When I started my iPad-only journey in 2012, I was stuck in a hospital bed and couldn’t use my Mac. It’s a story I’ve told many times before: I had to figure out a way to get work done without a Mac, and I realized the iPad – despite its limited ecosystem of apps and lackluster OS at the time – granted me the computing freedom I sought. At a time when I couldn’t use a desk or connect to a Wi-Fi network, a tablet I could hold in my hands and use to comunicate with remote colleagues over a cellular connection was all I needed. Over time, however, that state of necessity became a choice: for a few years now, I’ve preferred working on my iPad Pro and iPadOS (née iOS) in lieu of my Mac mini, even when I’m home and have access to my desk and macOS workstation.
The more I think about it, the more I come to this conclusion: the iPad, unlike other computers running a “traditional” desktop OS, possesses the unique quality of being multiple things at once. Hold an iPad in your hands, and you can use it as a classic tablet; pair it with a keyboard cover, and it takes on a laptop form; place it on a desk and connect it to a variety of external accessories, and you’ve got a desktop workstation revolving around a single slab of glass. This multiplicity of states isn’t an afterthought, nor is it the byproduct of happenstance: it was a deliberate design decision on Apple’s part based on the principle of modularity.
In looking back at the past decade of iPad and, more specifically, the past two years of the current iPad Pro line, I believe different factors contributed to making the iPad Pro Apple’s first modular computer – a device whose shape and function can optionally be determined by the extra hardware paired with it.
The original iPad Pro showed how Apple was willing to go beyond the old “just a tablet” connotation with the Apple Pencil and Smart Keyboard. Three years later, the company followed up on the iPad Pro’s original vision with a switch to USB-C which, as a result, opened the iPad to a wider ecosystem of external accessories and potential configurations. At the same time, even without considerable software enhancements by Apple, the creativity of third-party developers allowed iPad apps to embrace external displays and new file management functionalities. And lastly, just a few weeks ago, Apple unveiled iPadOS’ native cursor mode, finally putting an end to the debate about whether the iPad would ever support the desktop PC’s classic input method.
The intersection of these evolutionary paths is the modern iPad Pro, a device that fills many roles in my professional and personal life. Ever since I purchased the 2018 iPad Pro1, I’ve been regularly optimizing my setup at home and on the go to take advantage of the device’s versatility. I’ve tested dozens of different keyboards, purchased more USB-C hubs than I care to admit, and tried to minimize overhead by designing a system that lets me use the same external display and keyboard with two different computers – the Mac mini and iPad Pro.
At the end of this fun, eye-opening process, I’ve ended up with a computer that is greater than the sum of its parts. By virtue of its modular nature, I find my custom iPad Pro setup superior to a traditional laptop, and more flexible than a regular desktop workstation.
So how exactly did I transform the iPad Pro into this new kind of modular computer? Let’s dig in.
Table of Contents
Tablet Mode
At its core, the iPad Pro is still very much a tablet. And despite the number of desktop-oriented accessories I’m going to cover in this story, I still enjoy the simple act of unplugging everything from my iPad Pro – including its Smart Keyboard Folio cover – and sitting on the couch to read longform articles and books, watch videos, or take care of MacStories admin tasks with the Apple Pencil.
It may be a trite statement a decade into the iPad’s existence, but no traditional portable computer, from Apple or other companies, beats the iPad’s inherent simplicity when it comes to holding a large screen in your hands and controlling it with multitouch. In spite of such obviousness, I feel like I should reiterate this sentiment as, somewhere along the conversation surrounding post-PC hybrids and “what’s a computer” rhetoric, we may have lost track of the tablet’s basic appeal.
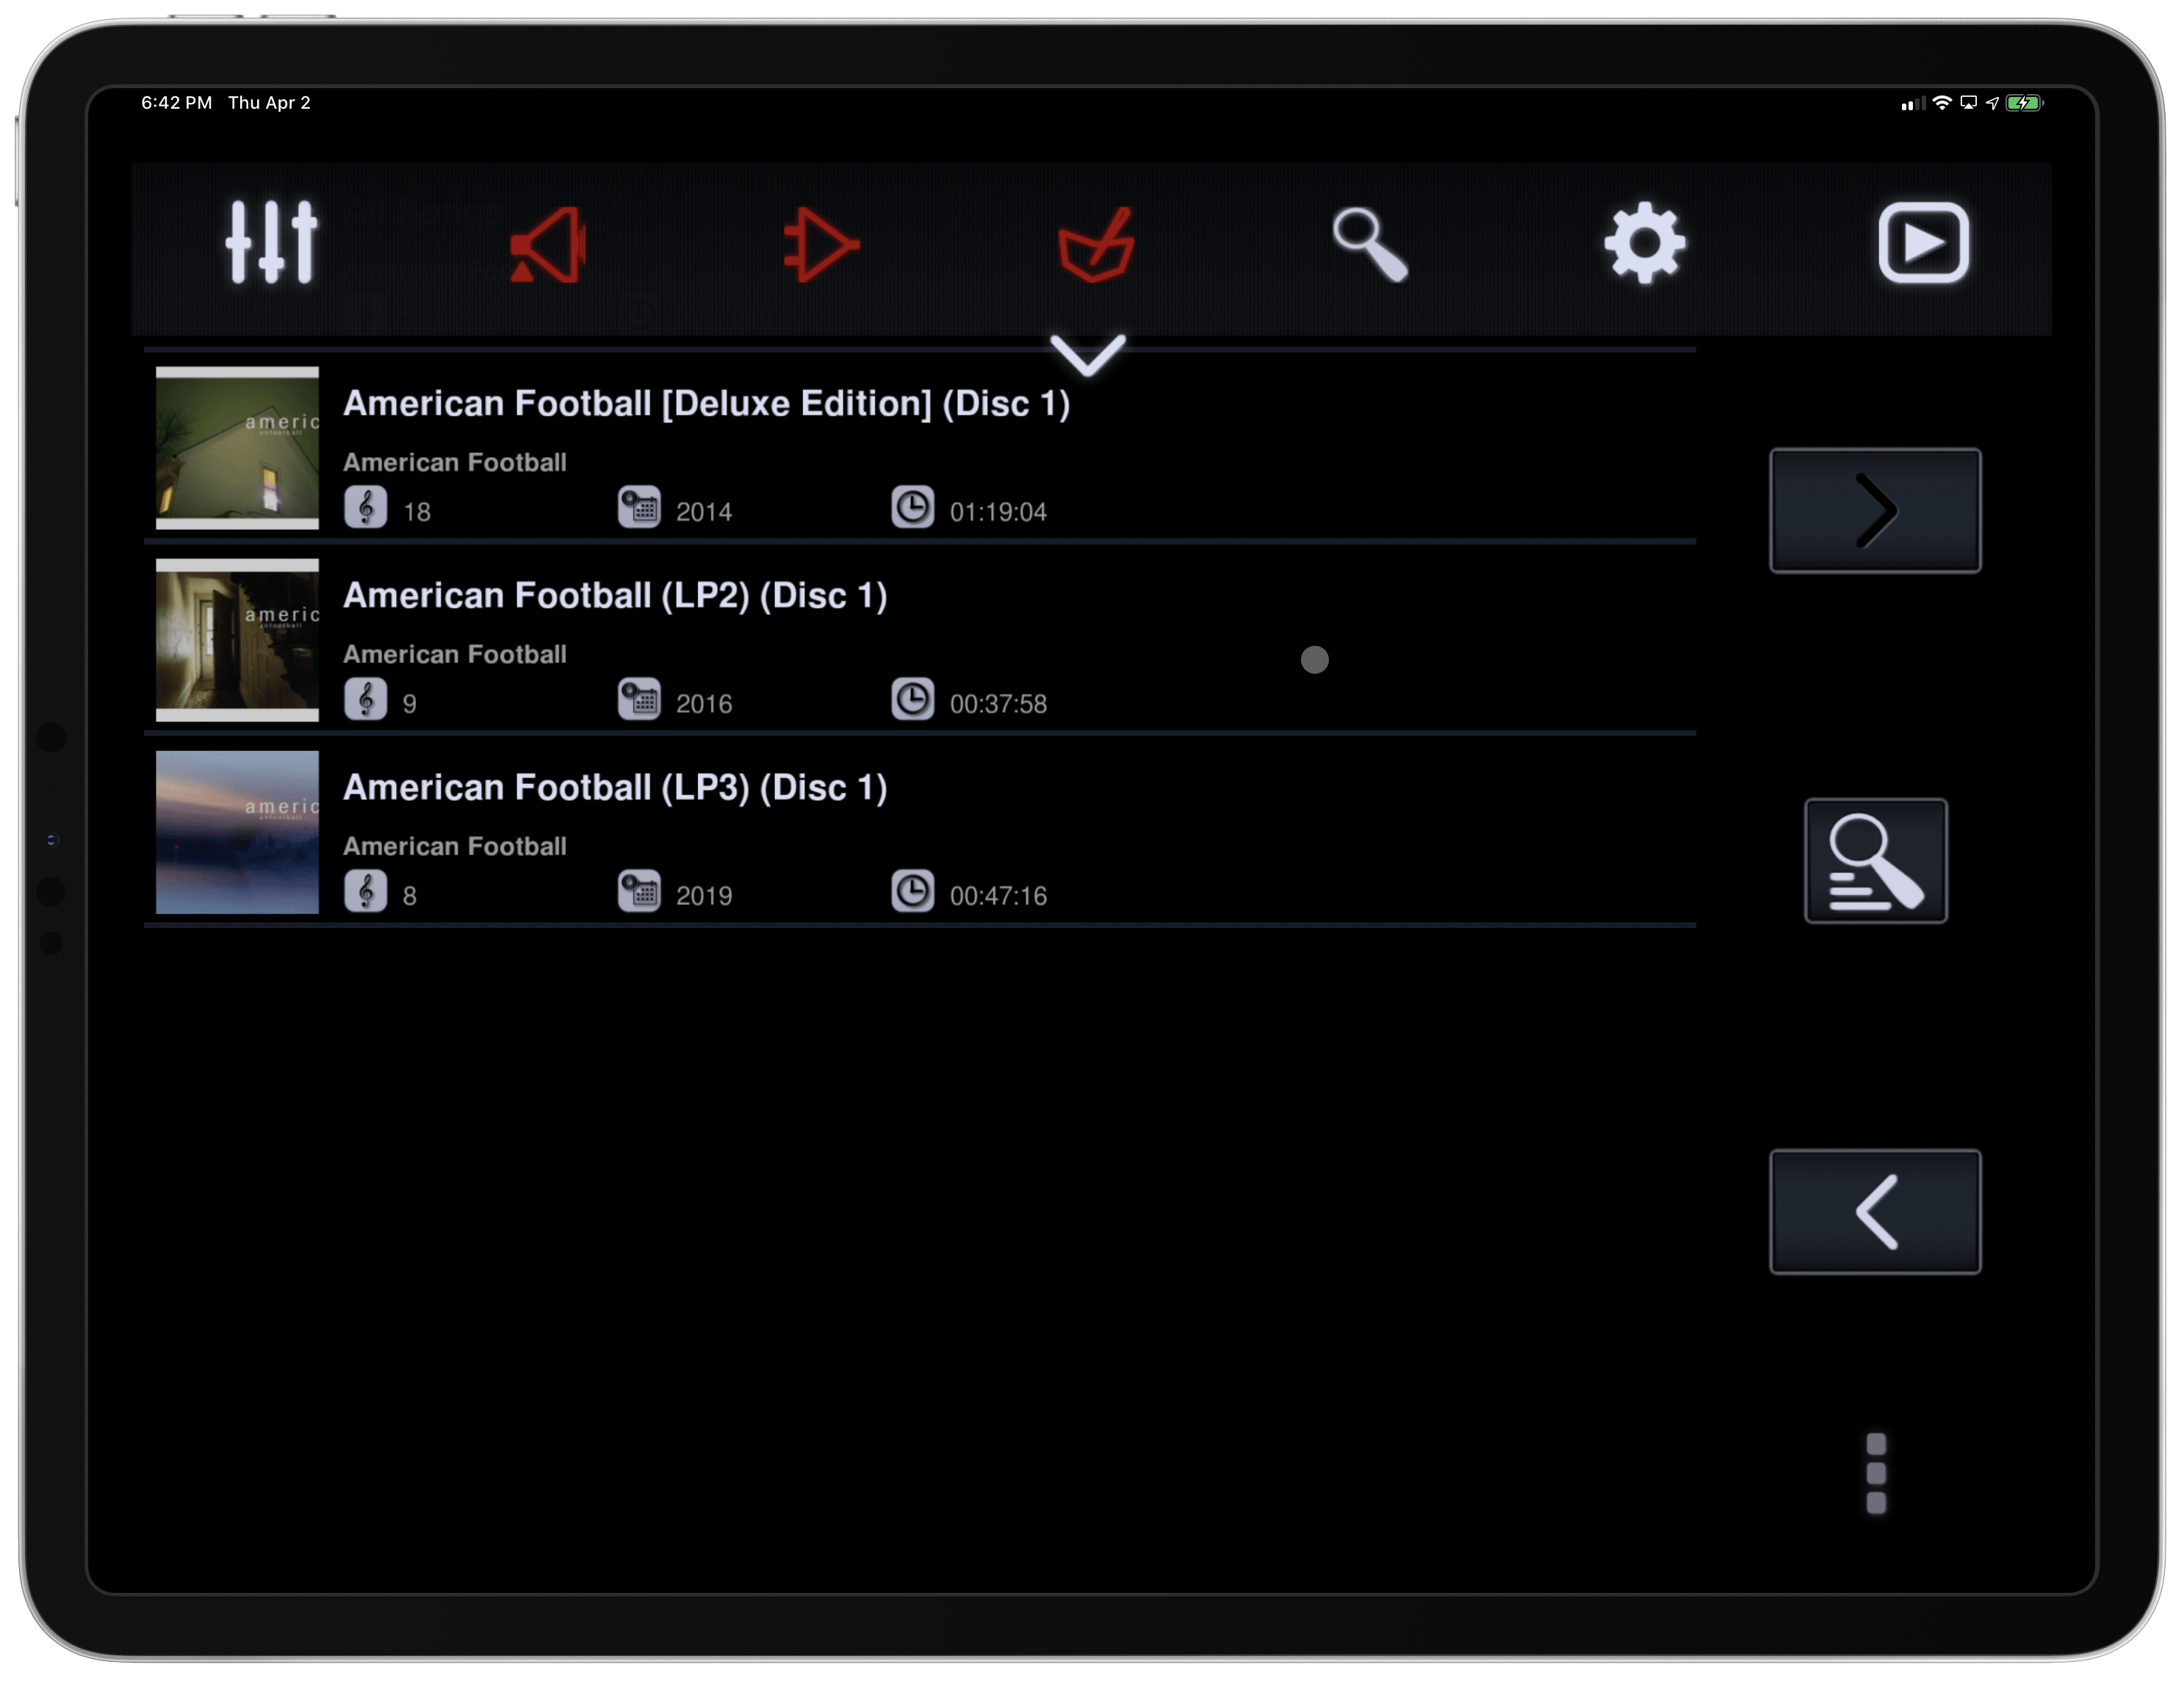
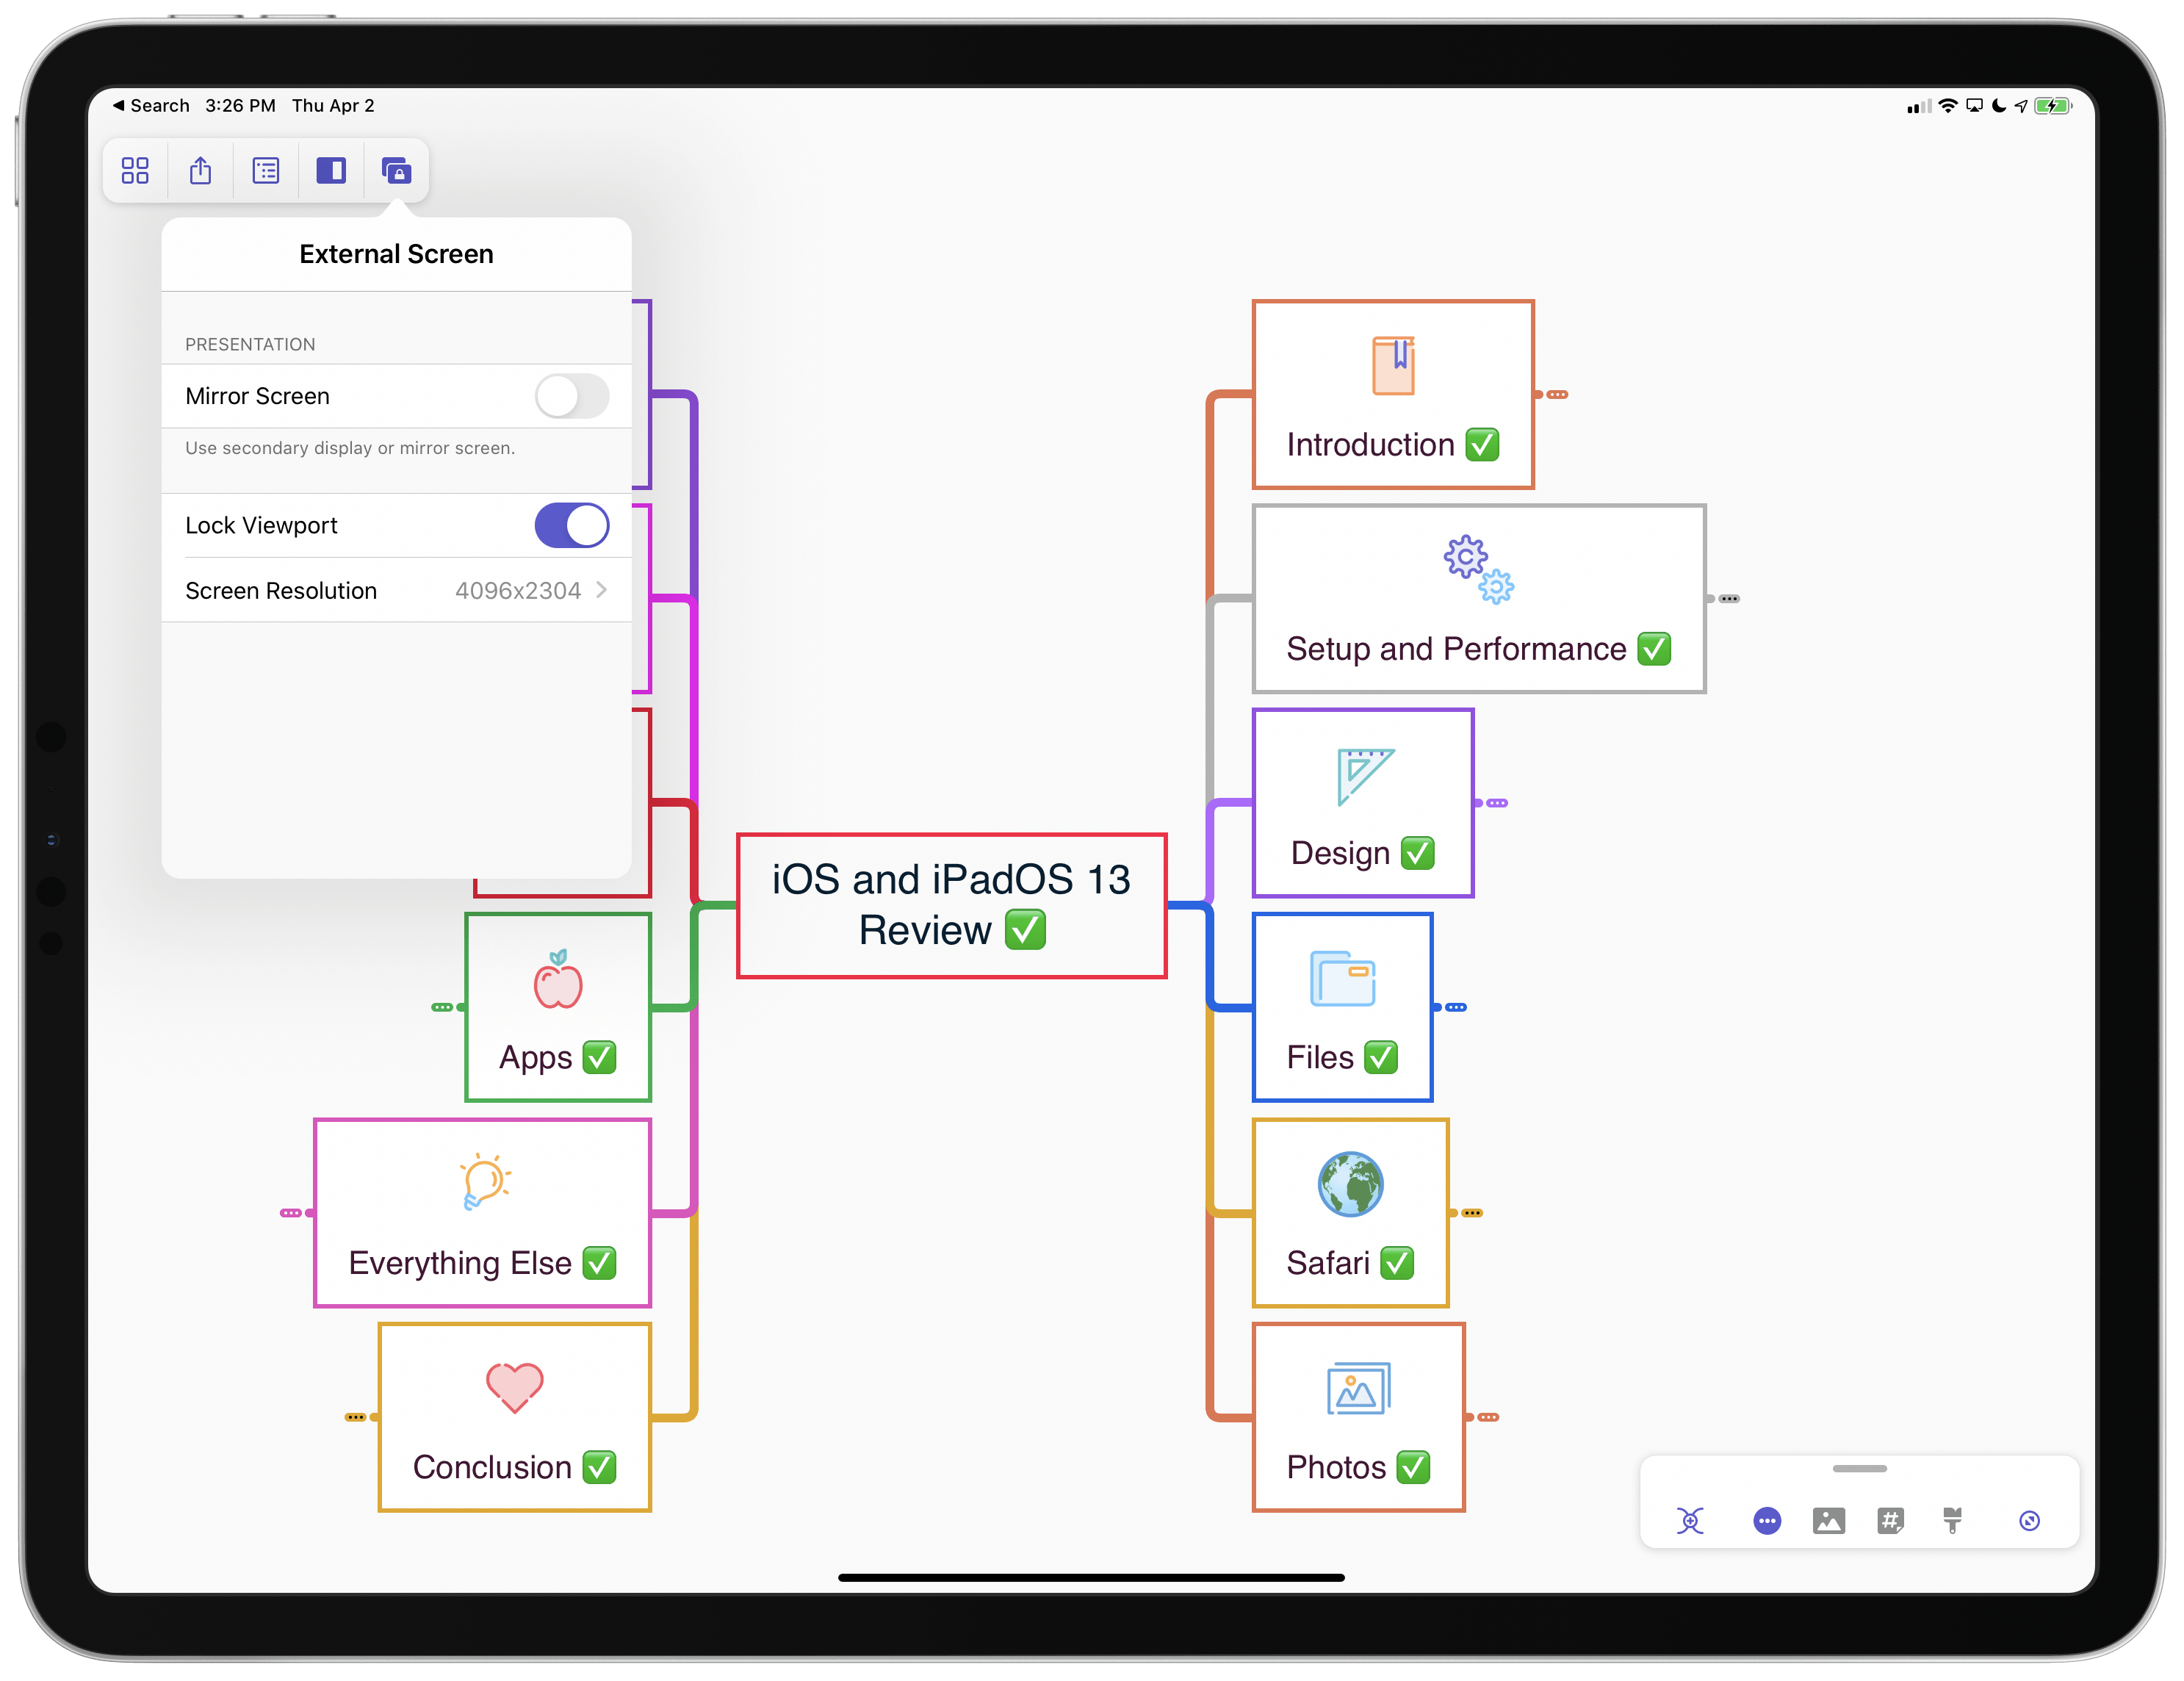
The 12.9” iPad Pro is not a lightweight tablet: its footprint makes it impossible to operate with one hand, and when you compare it to the sheer portability of an iPad mini or Kindle, you’d be hard-pressed not to consider it an unwieldy affair. At the same time though, the big iPad Pro makes for an amazing “couch tablet” experience: watching YouTube videos2 and reading manga are fantastic activities to perform on a 12.9” display resting on your lap; whenever I need to edit an article that’s going to be published on MacStories, I like to put the iPad Pro in portrait mode on my lap (so I see more text onscreen), load up our team’s GitHub repository as an external location in iA Writer (more details here), and use a custom MacStories preview template to edit and read the piece as it would look on our website. The illusion of holding an article in my hands is reinforced by the iPad Pro’s near edge-to-edge design, a unique trait that I don’t appreciate as much when I use the device as a “computer” on a desk, paired with an external keyboard.
To make the iPad Pro’s tablet experience more enjoyable and flexible, a few months ago I installed an anti-glare screen protector. Initially, I tested version 2 of the popular Paperlike matte screen protector, but didn’t like its somewhat complex installation procedure and rough texture.3 Then, at the recommendation of some MacStories readers, I started testing the Moshi iVisor screen protector and fell in love with it. This screen protector is a thin film that can be applied to the iPad Pro’s display in 30 seconds; amazingly, it leaves no air bubbles, can be washed and reused, has a smooth texture that is much less aggressive than the Paperlike’s, and, more importantly, adds a matte layer on top of the iPad Pro’s display that nearly eliminates all reflections.
I started looking into matte screen protectors for a couple reasons. First, I’ve always found it annoying I couldn’t read with my iPad Pro while sitting outside on our large balcony without seeing all kinds of reflections on the tablet’s screen; additionally, looking ahead at summer 2020 and iOS/iPadOS review season, I didn’t want to be in the same situation as last year – trying to desperately find some shade under a beach umbrella in a vain attempt to edit my annual review on the iPad Pro’s reflective screen. If Apple allowed a more expensive, build-to-order matte display for the iPad Pro, I would absolutely go for it because I like working outside in the spring and summer here in Italy. In the absence of an official option, I had to find a third-party alternative.
I’ve been using my iPad Pro with the Moshi iVisor matte screen protector for about three months now; not only has this modification vastly improved my experience with using the iPad under direct sunlight or other light sources, but when I look at an iPad without a matte screen protector, I don’t know why I didn’t try this approach years ago. Unlike the Paperlike 2, the iVisor can be installed in seconds and easily re-applied without creating air bubbles, and I can still swipe with my fingers across the display without feeling too much friction. Color fidelity and image crispness is somewhat impacted by the addition of a screen protector, but, again, I’ve found the iVisor to perform better than the Paperlike in this regard too.

Even though it’s not advertised for those who seek a paper-like experience when handwriting or sketching on iPad Pro, I’ve found the iVisor to add just the right amount of friction for the Apple Pencil too. I’ve never been a heavy user of the Apple Pencil myself (John has far more creative use cases for it when it comes to brainstorming and mind-mapping), but it’s my go-to accessory whenever I have to review and sign PDF documents from my accountant. When I have to do that, I like to grab my iPad Pro and Apple Pencil, relax on the couch (if you have to read boring legal documents, you might as well do it from the comfort of a sofa), and annotate in PDF Viewer. I could do this with my Mac mini, or with a MacBook, but nothing beats the simple act of holding a document and signing it with an Apple Pencil.
Throughout the rest of this story, you’re going to see and read about various pieces of additional hardware I’ve used to unlock different modes for my iPad Pro. I felt it was equally important, however, to emphasize that one of those many modes still is, perhaps surprisingly to some, to use the iPad Pro as a tablet. No keyboard, no trackpad, no external display: just a screen I can hold in my hands – the only way it used to be years ago, and something I don’t ever want the iPad to lose.
Laptop Mode: Custom Smart Keyboard Folio
My relationship with Apple’s Smart Keyboard Folio was off to a rocky start in November 2018, but, as I wrote last year, with time I’ve grown to appreciate the simplicity and reliability of Apple’s slim keyboard cover. Unlike Bluetooth keyboards, the Smart Keyboard feels like an integral component of the iPad Pro: by eschewing Bluetooth pairing and battery life concerns, the Smart Keyboard is always ready to type as soon as you open it; like the second-generation Apple Pencil, the act of letting the Smart Keyboard make contact with the iPad Pro means the two can work together. The Smart Keyboard has its limits4, but I’ve enjoyed using it for what it is: a full-size keyboard that requires no pairing and adds minimal bulk to my iPad Pro while also offering essential protection for its display. In my mind, no other keyboard accessory ticks all these boxes.
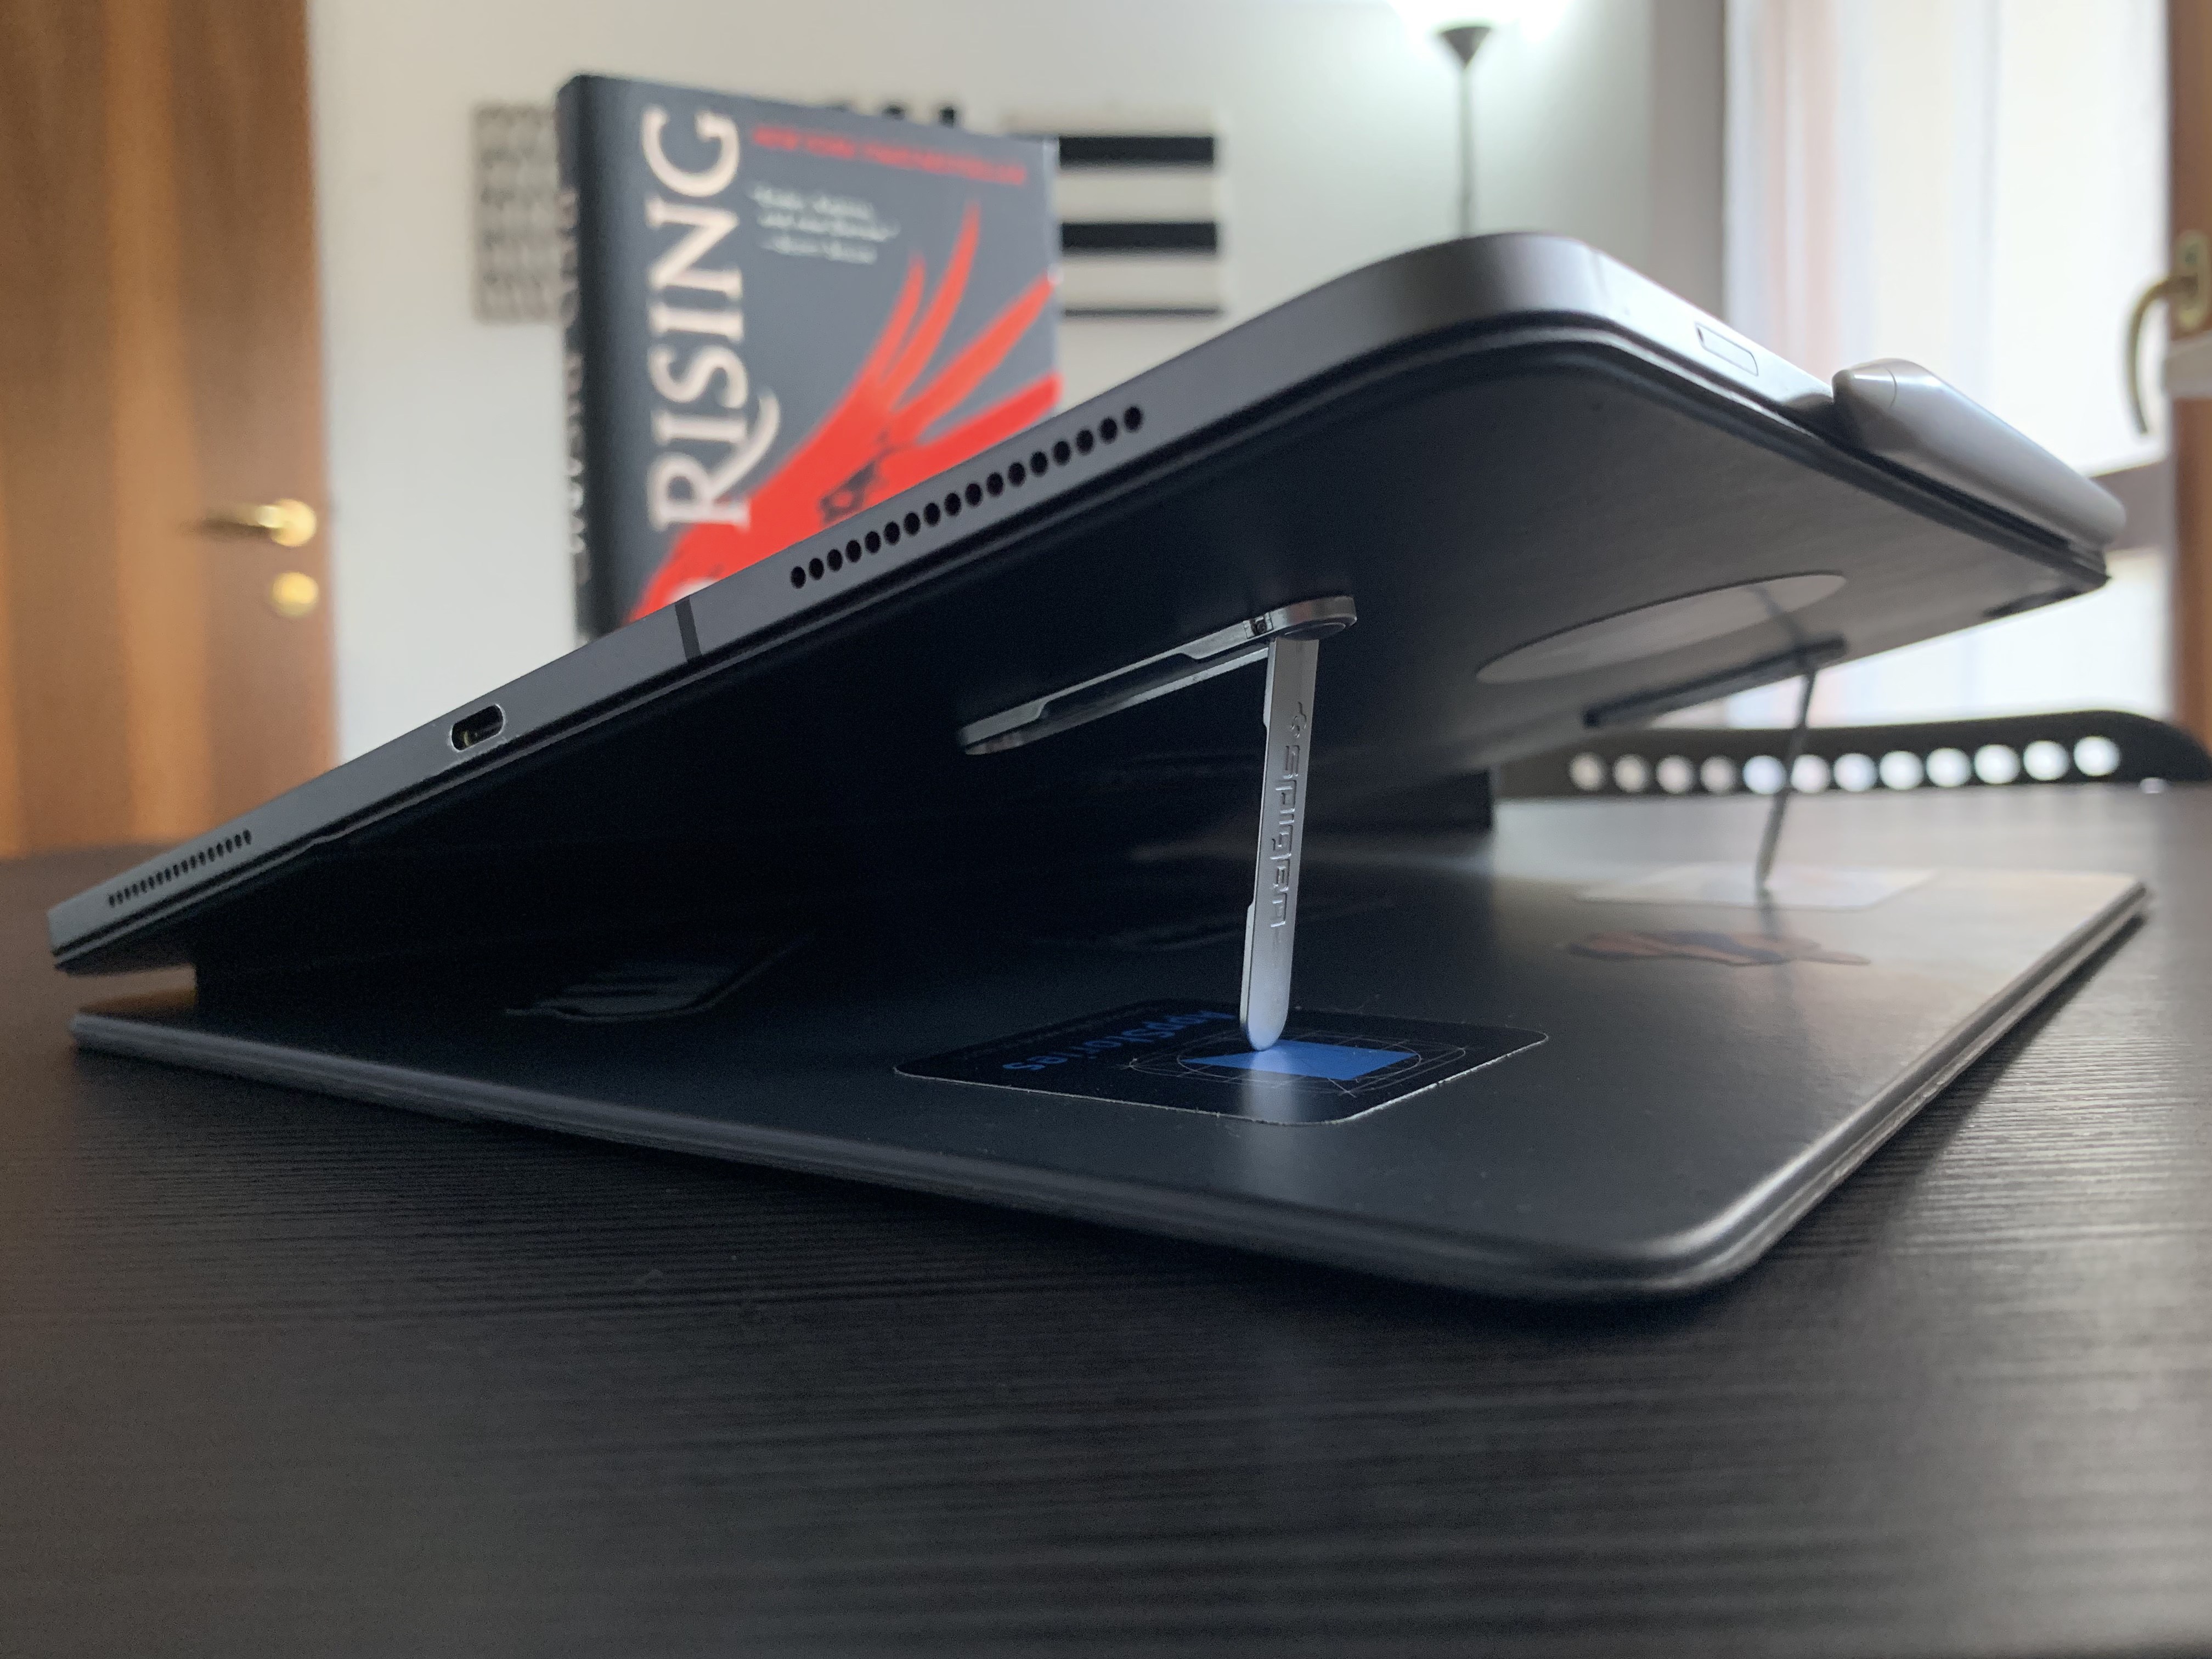
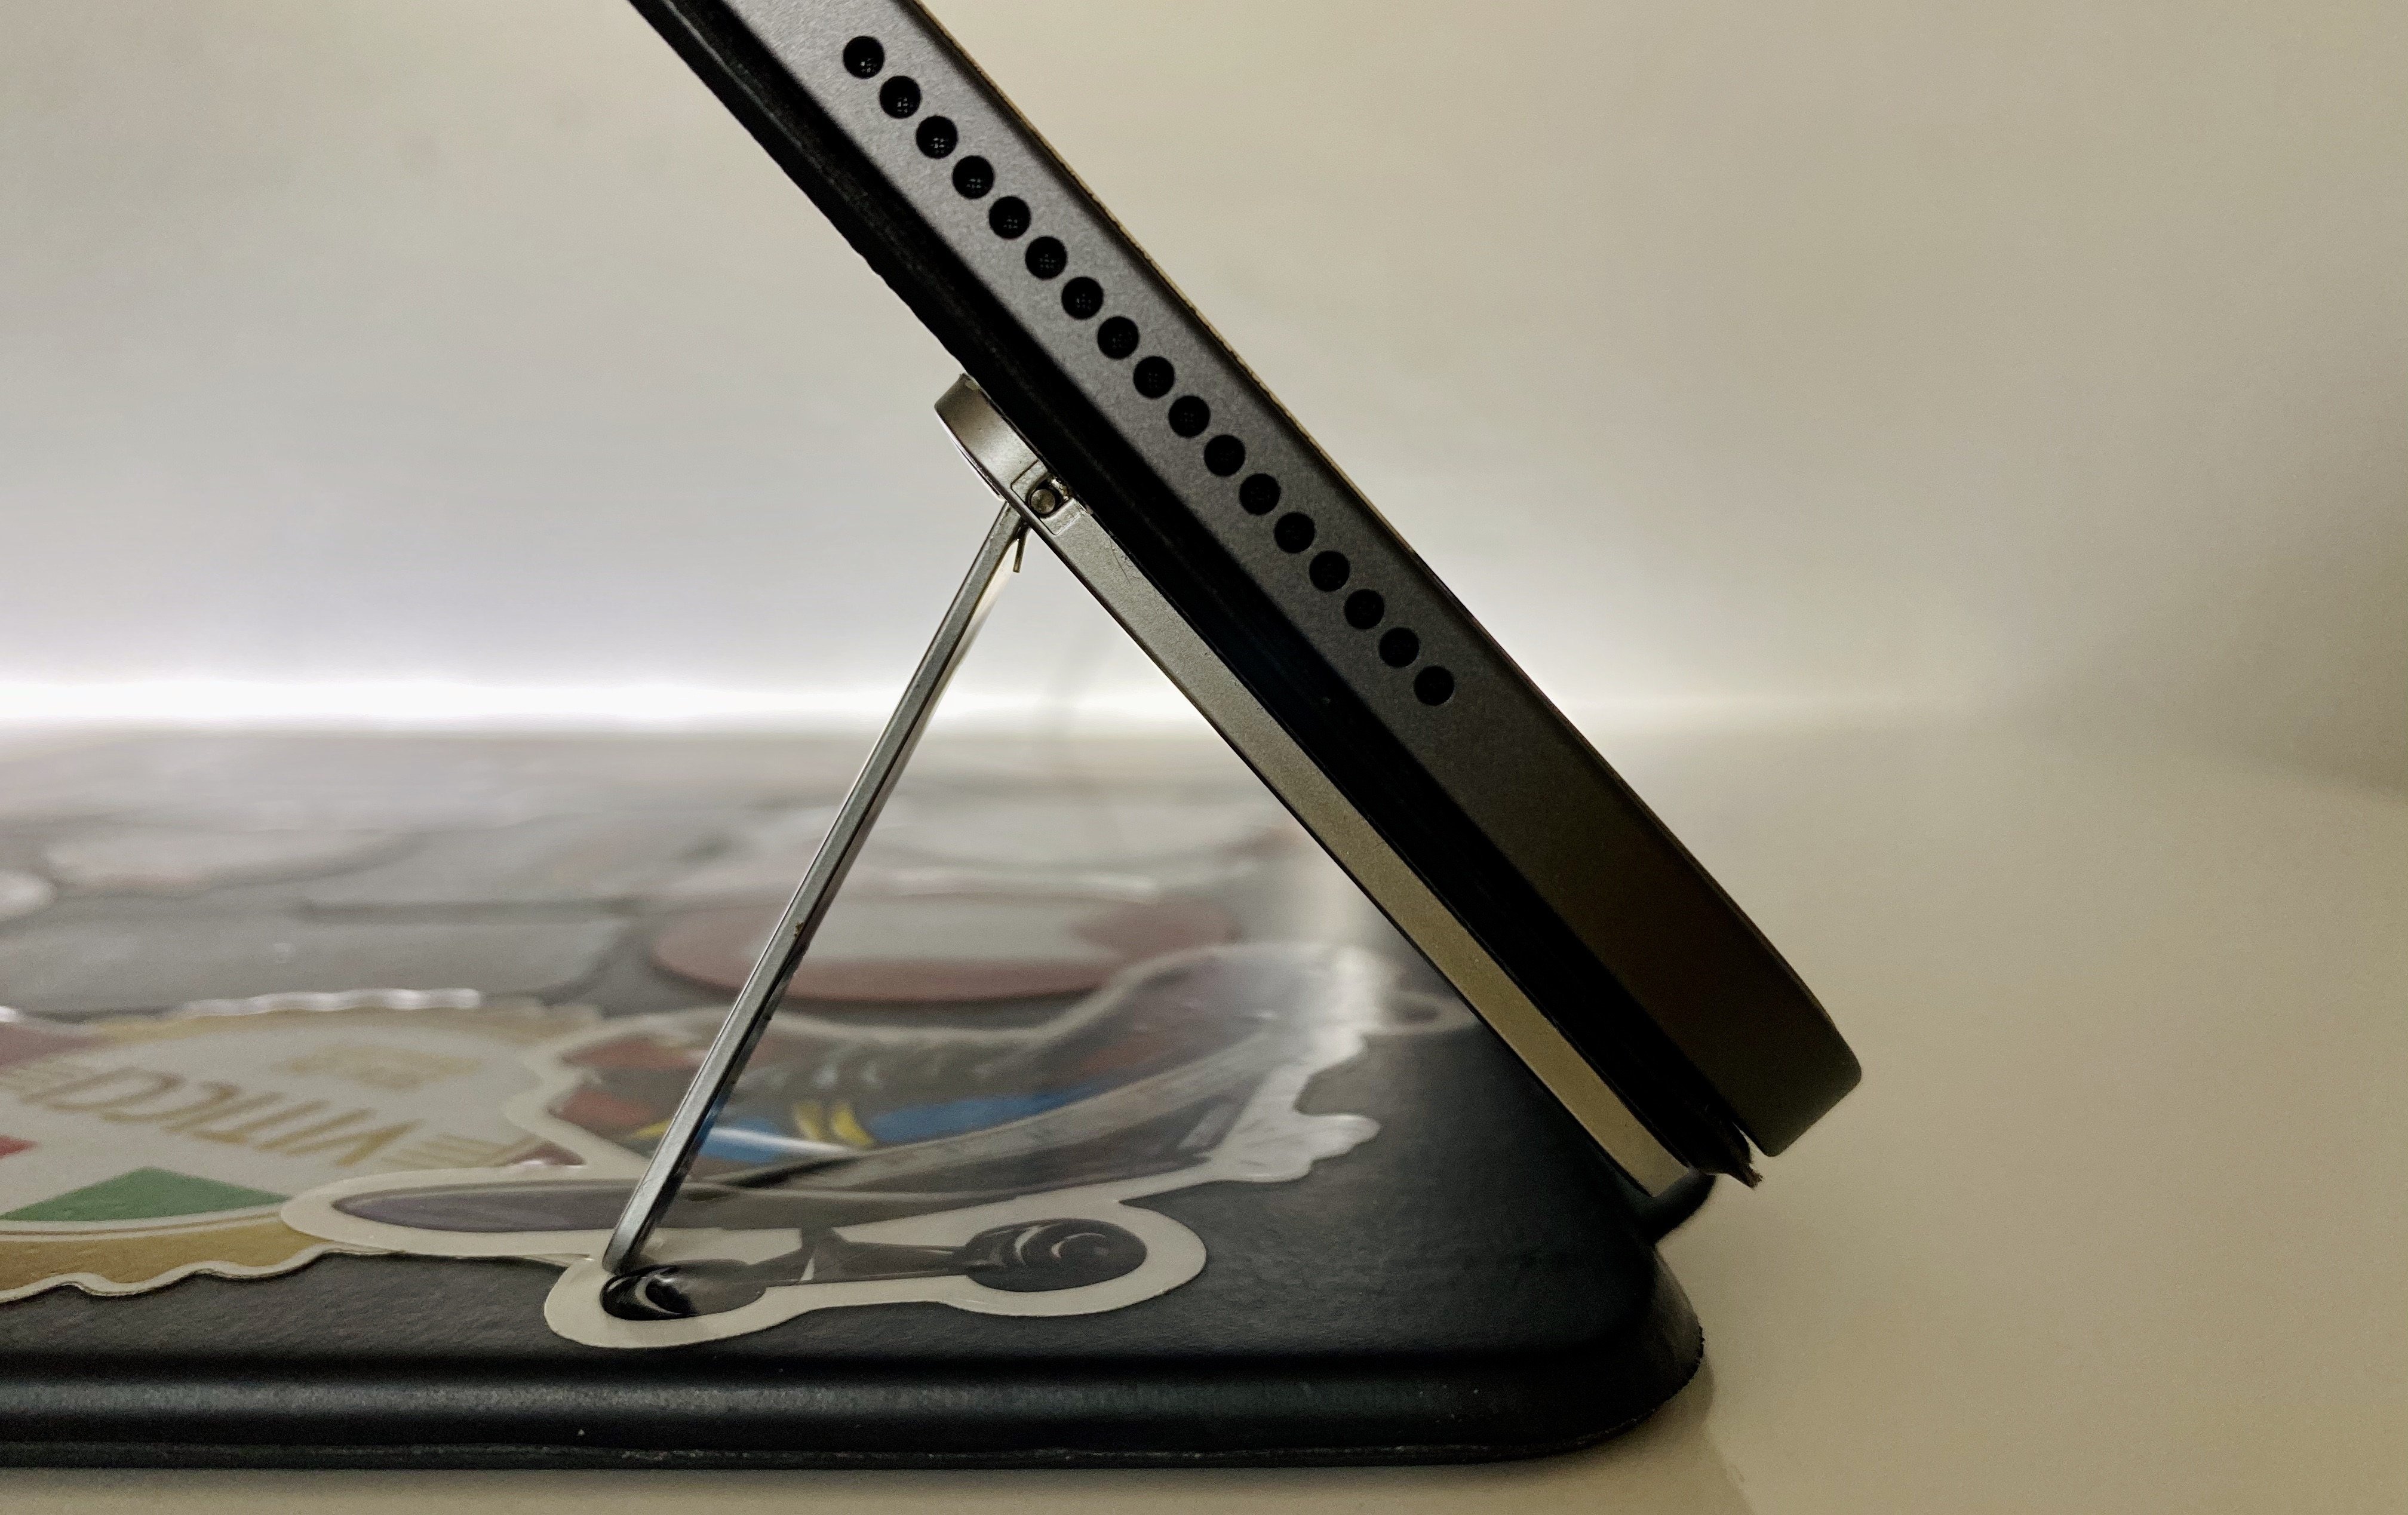
That’s not to say I was just willing to accept the Smart Keyboard Folio’s design limitations. As I also detailed last year, I employed the so-called Kickstand Method5 to mod the Smart Keyboard Folio with two small metal kickstands, which allowed me to use the iPad in software keyboard mode (propped up at a slight angle) without removing the Smart Keyboard Folio.
For context:
Following a tip from a MacStories reader a few months ago, I came across these metal kickstands by Spigen, which are available for around $10 each on Amazon. These kickstands are designed for smartphones: you attach the base of the kickstand via its built-in adhesive tape to the back of your phone’s case; then, when you need to watch a video or have a video call and would like to keep the screen propped up on a desk, you can just flip open the kickstand – which is sturdy and reliable – and set your phone down. It’s a simple, unobtrusive, robust design that is perhaps a bit more utilitarian than a PopSocket.
But back to the idea I received on Twitter a while back: what if instead of using a kickstand with an iPhone, I attached two kickstands in parallel to the back of the Smart Keyboard Folio so that, with the cover folded on itself, they would prop up the iPad at an angle, thus creating the “touch mode” Apple didn’t support out of the box?
And here’s what the result looked like at the time:
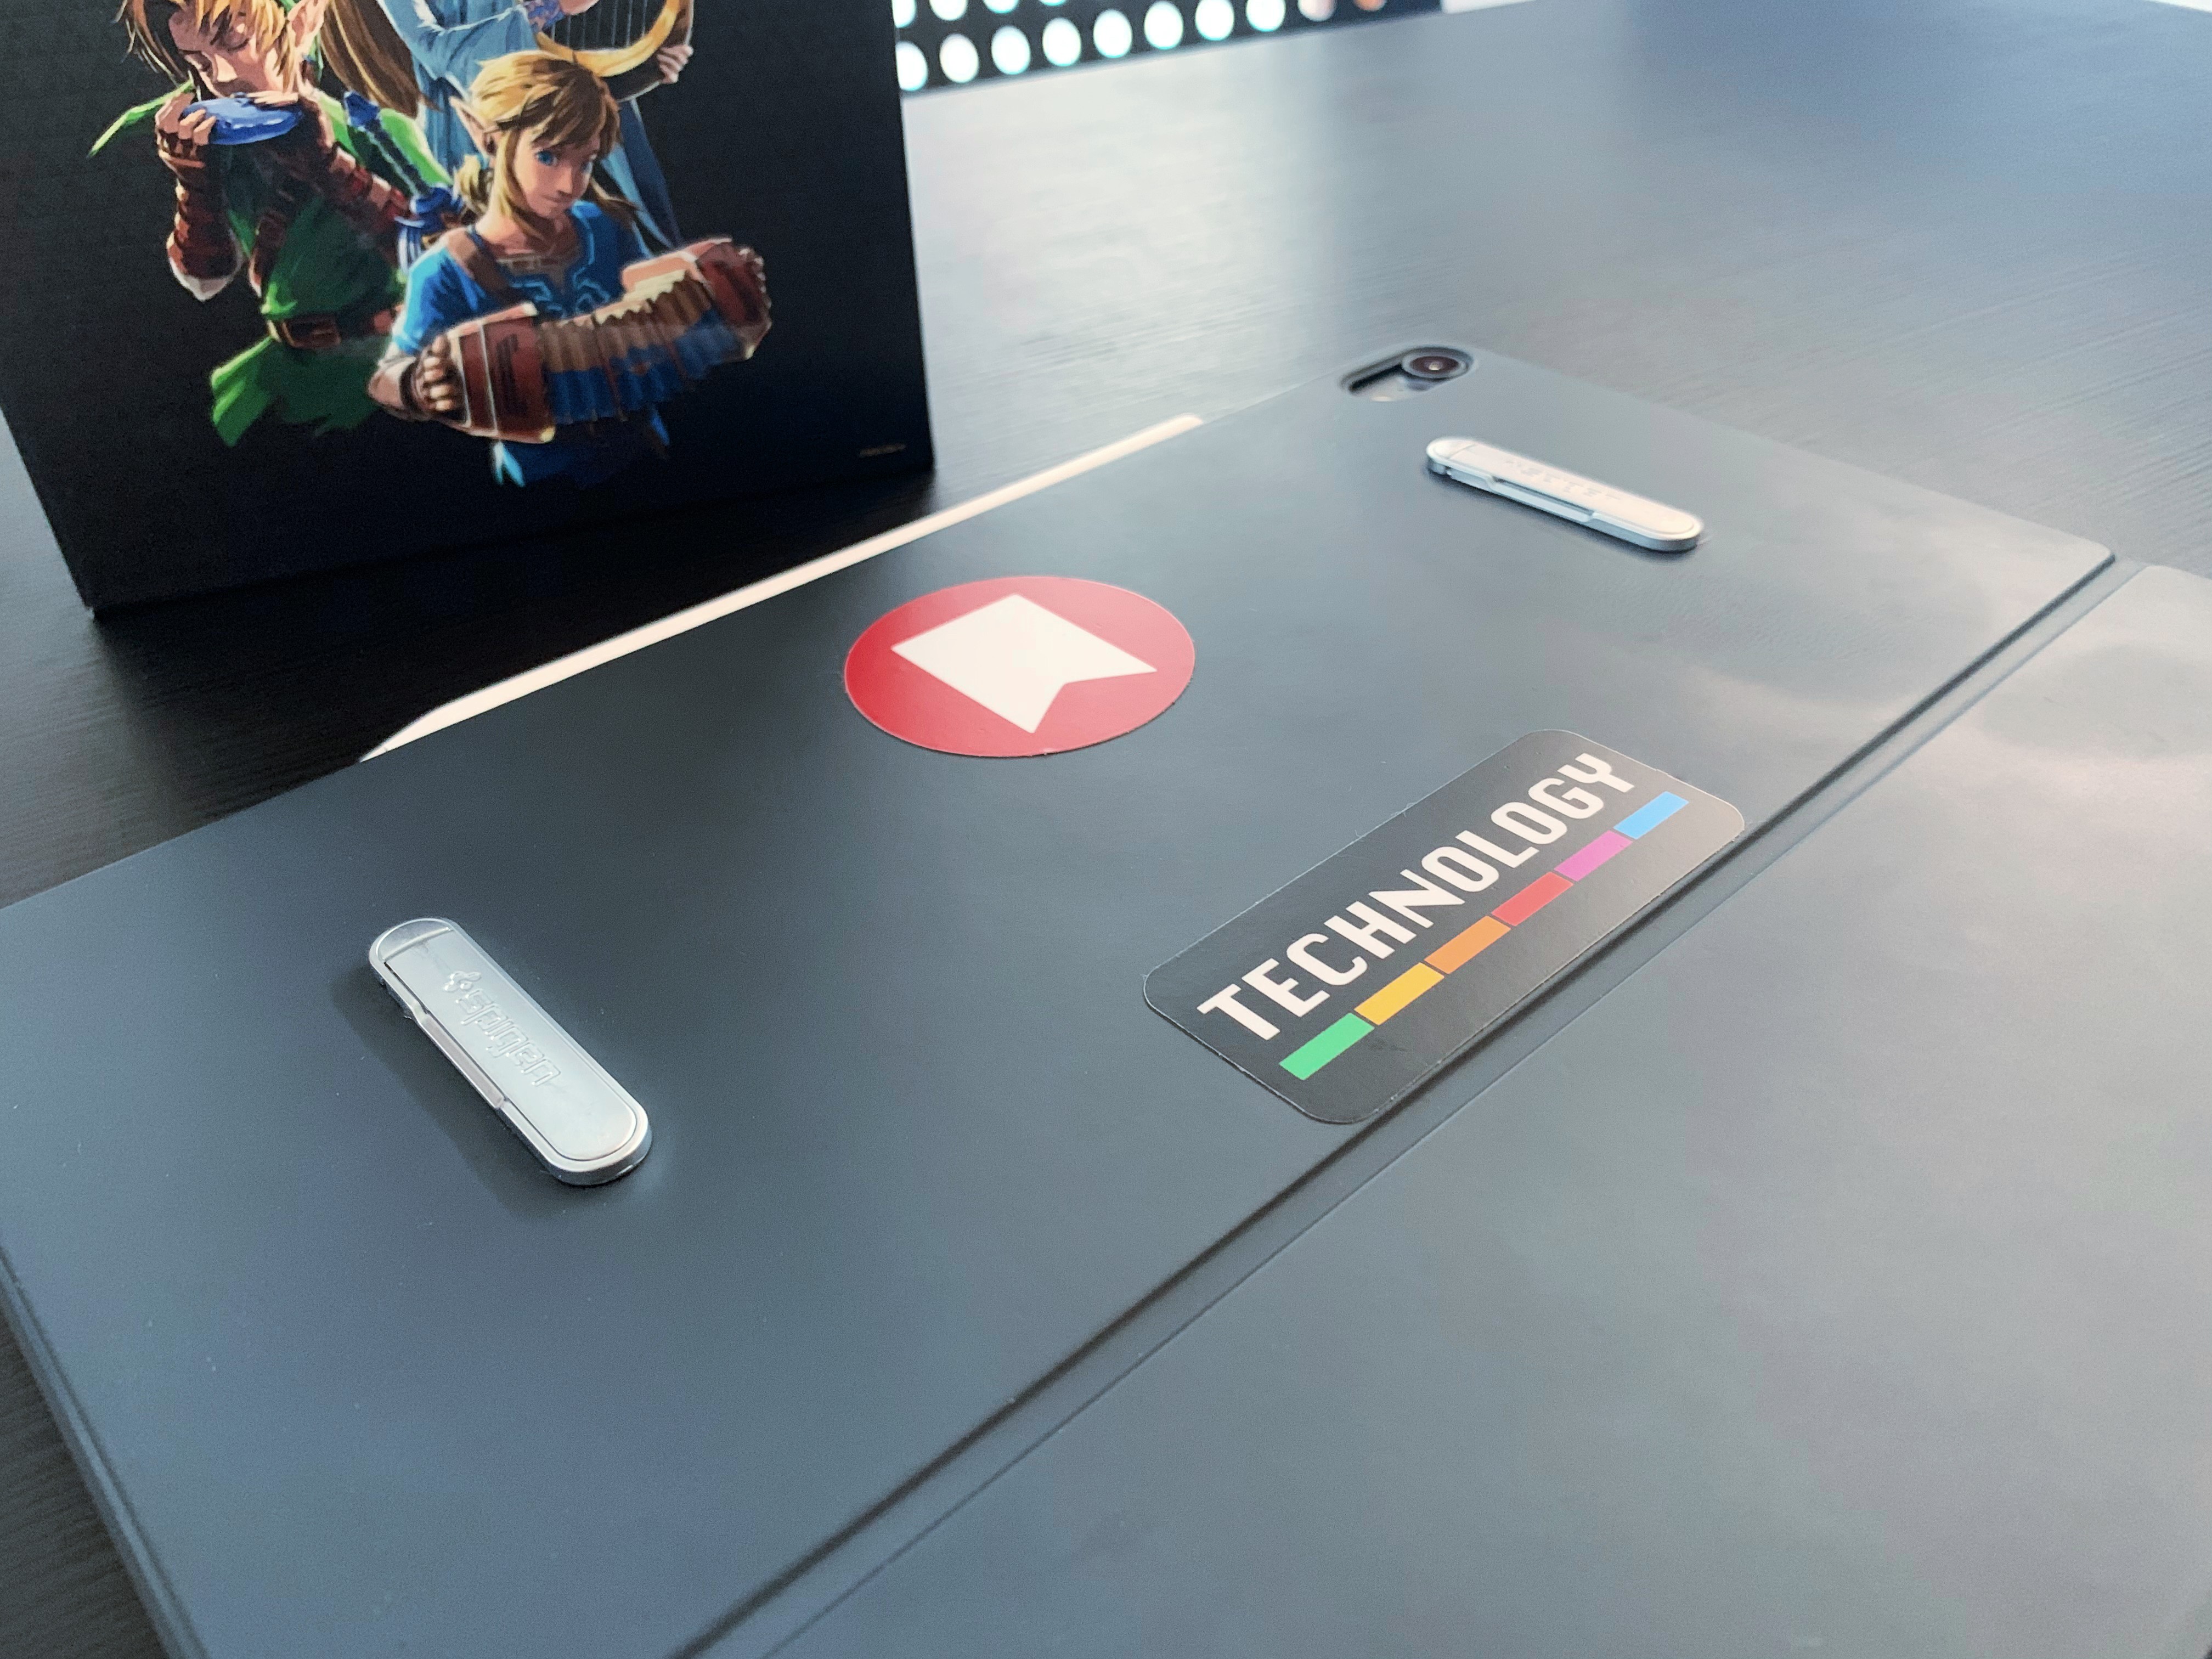
Now, some of you may have thought that was just an experiment that wouldn’t last long. And I wouldn’t blame you – it is my job, after all, to try multiple accessories and apps, most of which don’t stick around for long. But the Kickstand Method is different: not only have I been using the original set of kickstands to prop up my iPad whenever I want to type with the software keyboard, sign documents with the Apple Pencil, or just change input methods for a while, but I liked the results so much, a few months ago I added a second set of kickstands to the back of the Smart Keyboard Folio. To help you visualize everything, here’s what my Smart Keyboard Folio looks like now:
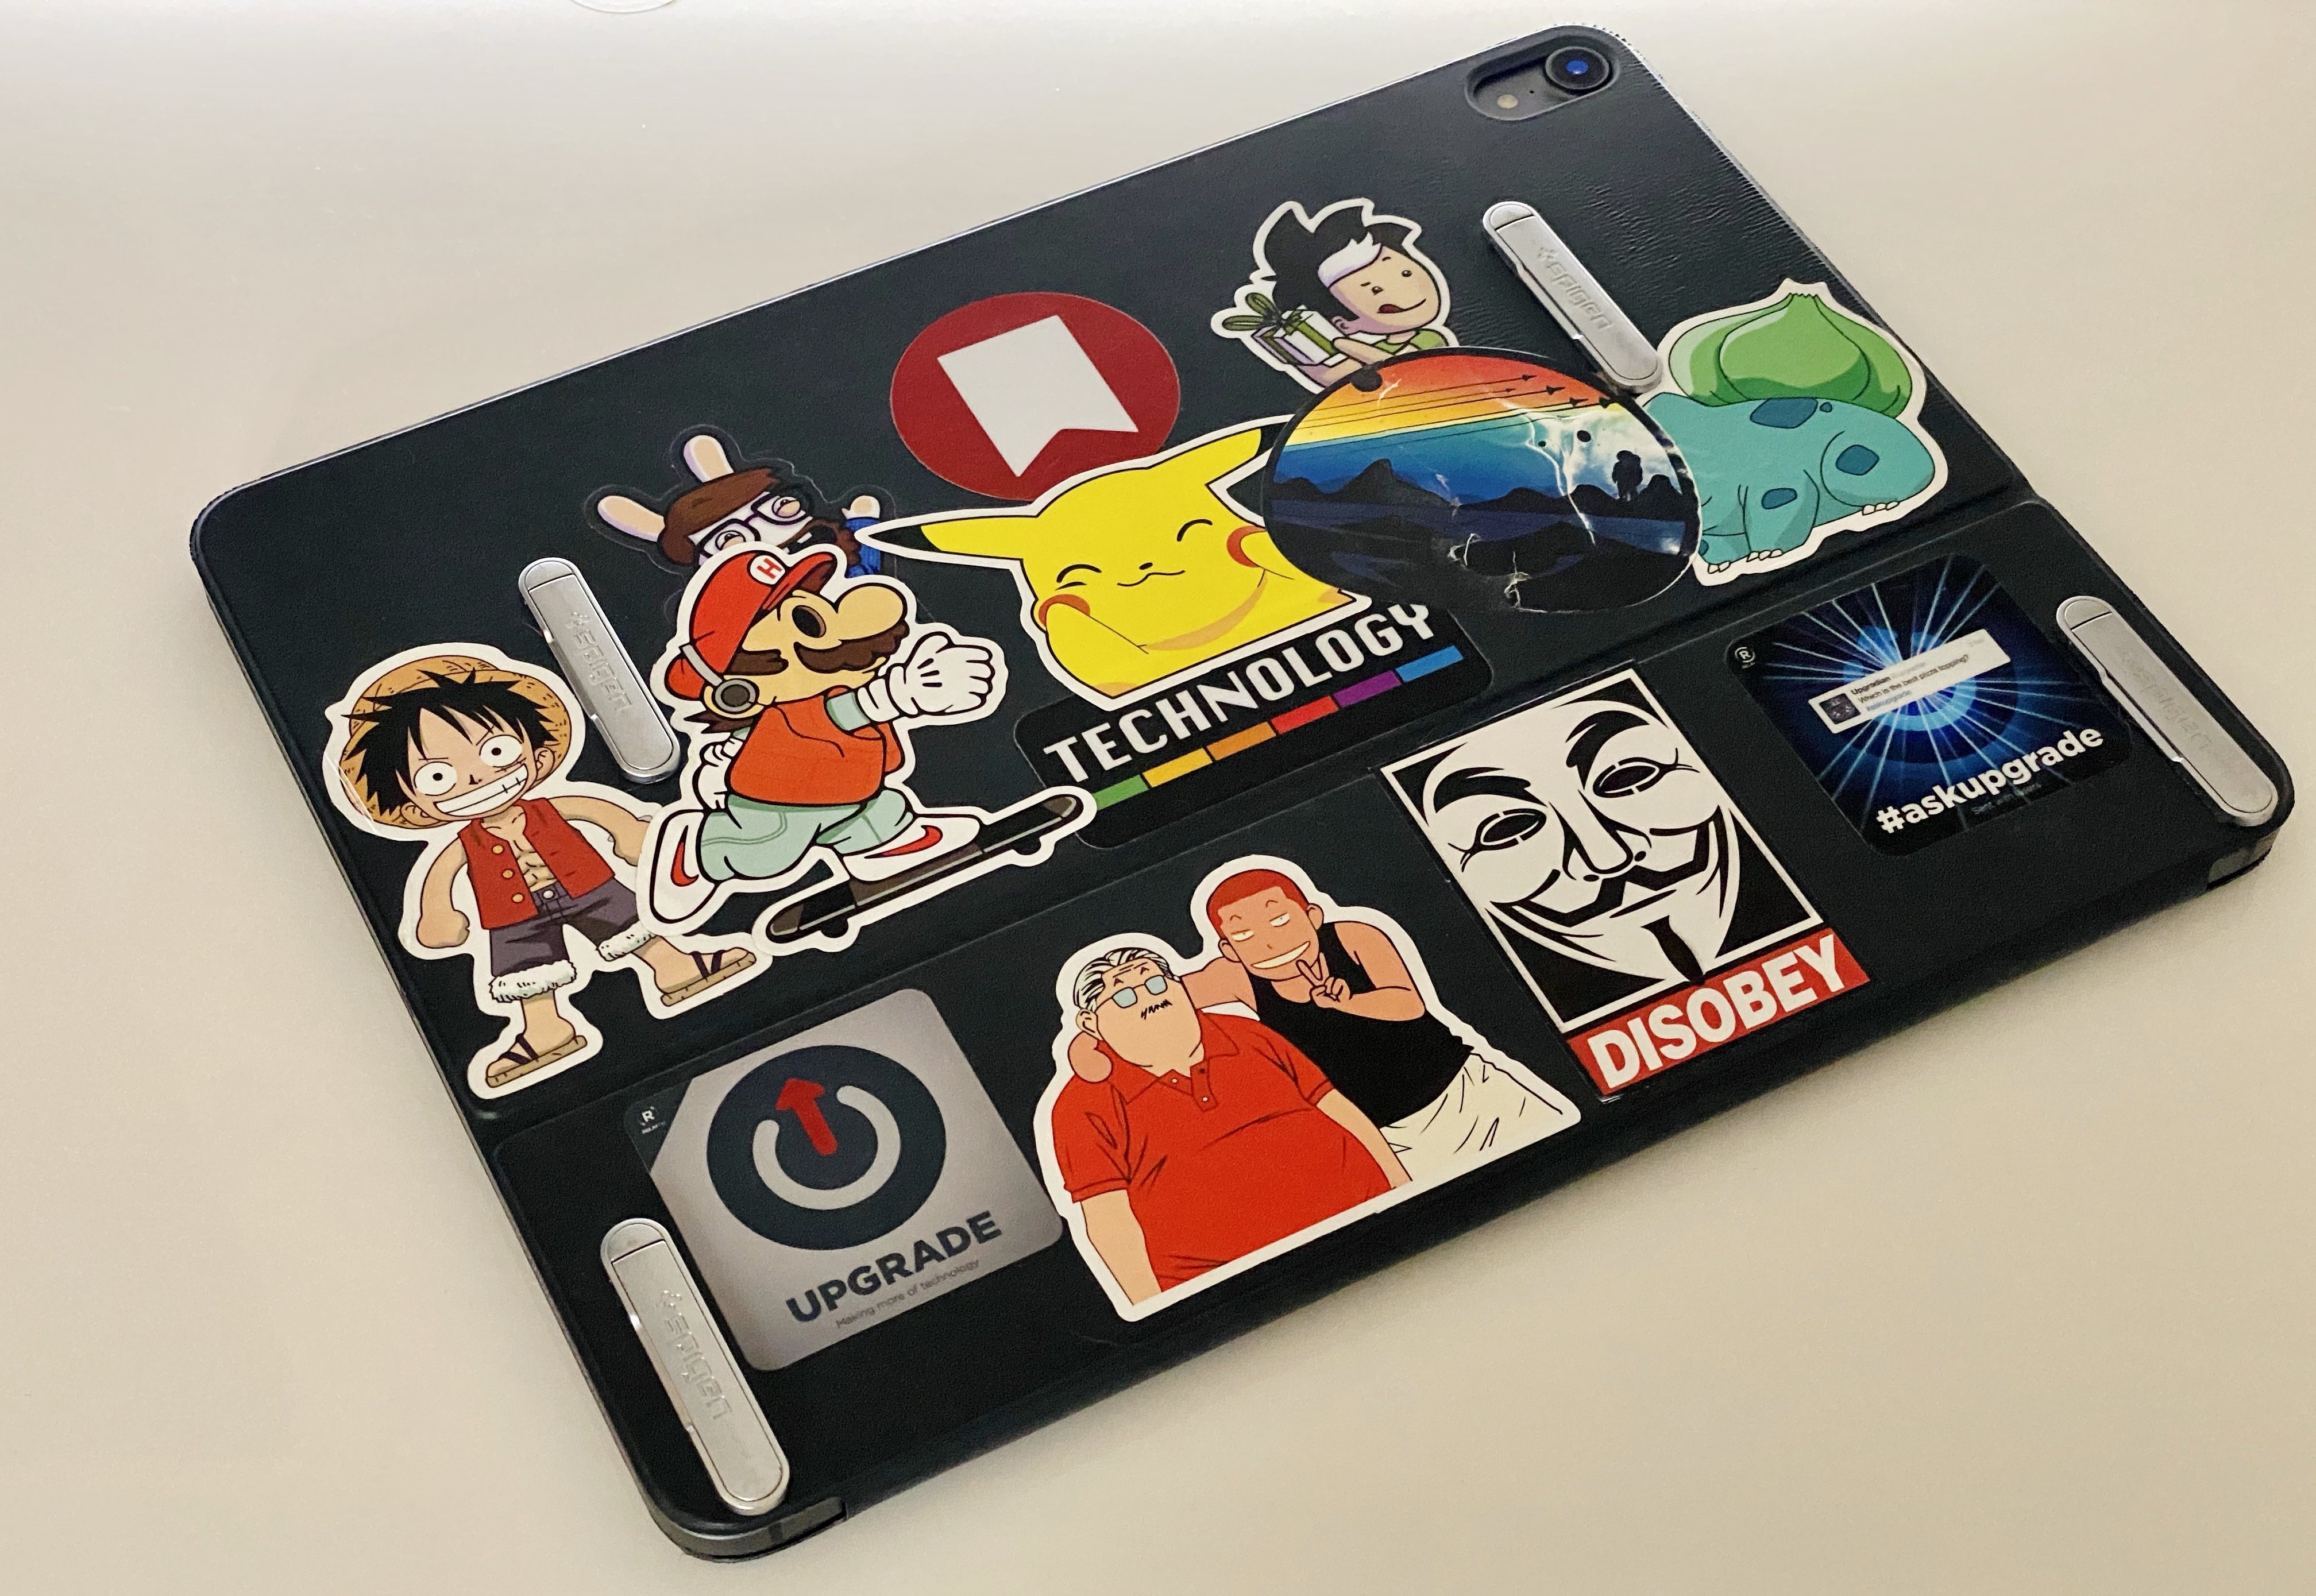
The new stickers are the result of WWDC 2019 plus an order of hundreds of assorted stickers from Amazon.
As you can see, the new kickstands – also placed parallel to each other – sit lower than the original set. With the two additional kickstands, I can now prop up the iPad Pro in “movie mode”: the base of the Smart Keyboard Folio folds on itself so it lays flat on the back of the device; the kickstands rest on the back of the cover, creating a 50-degree angle that is ideal for watching videos, playing games, or FaceTiming with the iPad Pro’s large display.
Together with adding a memory foam layer to the AirPods Pro silicone tips, these kickstands are my favorite mod I’ve ever applied to a tech accessory. As I explained last year, these kickstands have added practically no weight to my iPad Pro and haven’t dented the Smart Keyboard Folio’s back cover at all. In return, they’ve allowed me to get more out of the Smart Keyboard Folio since I can use it in more contexts that wouldn’t otherwise be supported without the additional viewing angles created by the kickstands. Furthermore, these kickstands are also behind my favorite setup (which I’ll describe later): the iPad Pro laying almost flat on my desk next to the UltraFine 4K display.
My newfound appreciation for the Smart Keyboard Folio notwithstanding, I, like other iPad users, am ready to say goodbye and switch to the upcoming Magic Keyboard, which will feature a freely adjustable viewing angle, built-in trackpad, and backlit keys. But I also have questions.
Will the Magic Keyboard be moddable enough to support folding it on itself and using the Kickstand Method again? (I don’t think it will.) Will it be too heavy to carry around? (I think it’ll be heavier than the Smart Keyboard Folio, but not incredibly so.) Will it be stable enough to use on my lap? (I believe Apple has figured this out.) I don’t have definite answers to any of these questions yet, but I’m keen to find out next month.
Until that happens, I wanted to reiterate how much I’ve enjoyed working with my modded Smart Keyboard Folio for the past year. I typed my entire iOS and iPadOS 13 review on it, and I’ve carried it around with me to WWDC, the beach, and countless car trips.6 Two years ago I never thought I’d say this, but the Smart Keyboard Folio has been the best iPad keyboard experience I’ve had to date.
USB DAC Mode
This particular configuration of my iPad Pro is an extremely niche one, and I believe the majority of MacStories readers will not be interested in it, but I wanted to mention it because it’s fun, geeky, and, in a way, oddly fascinating.
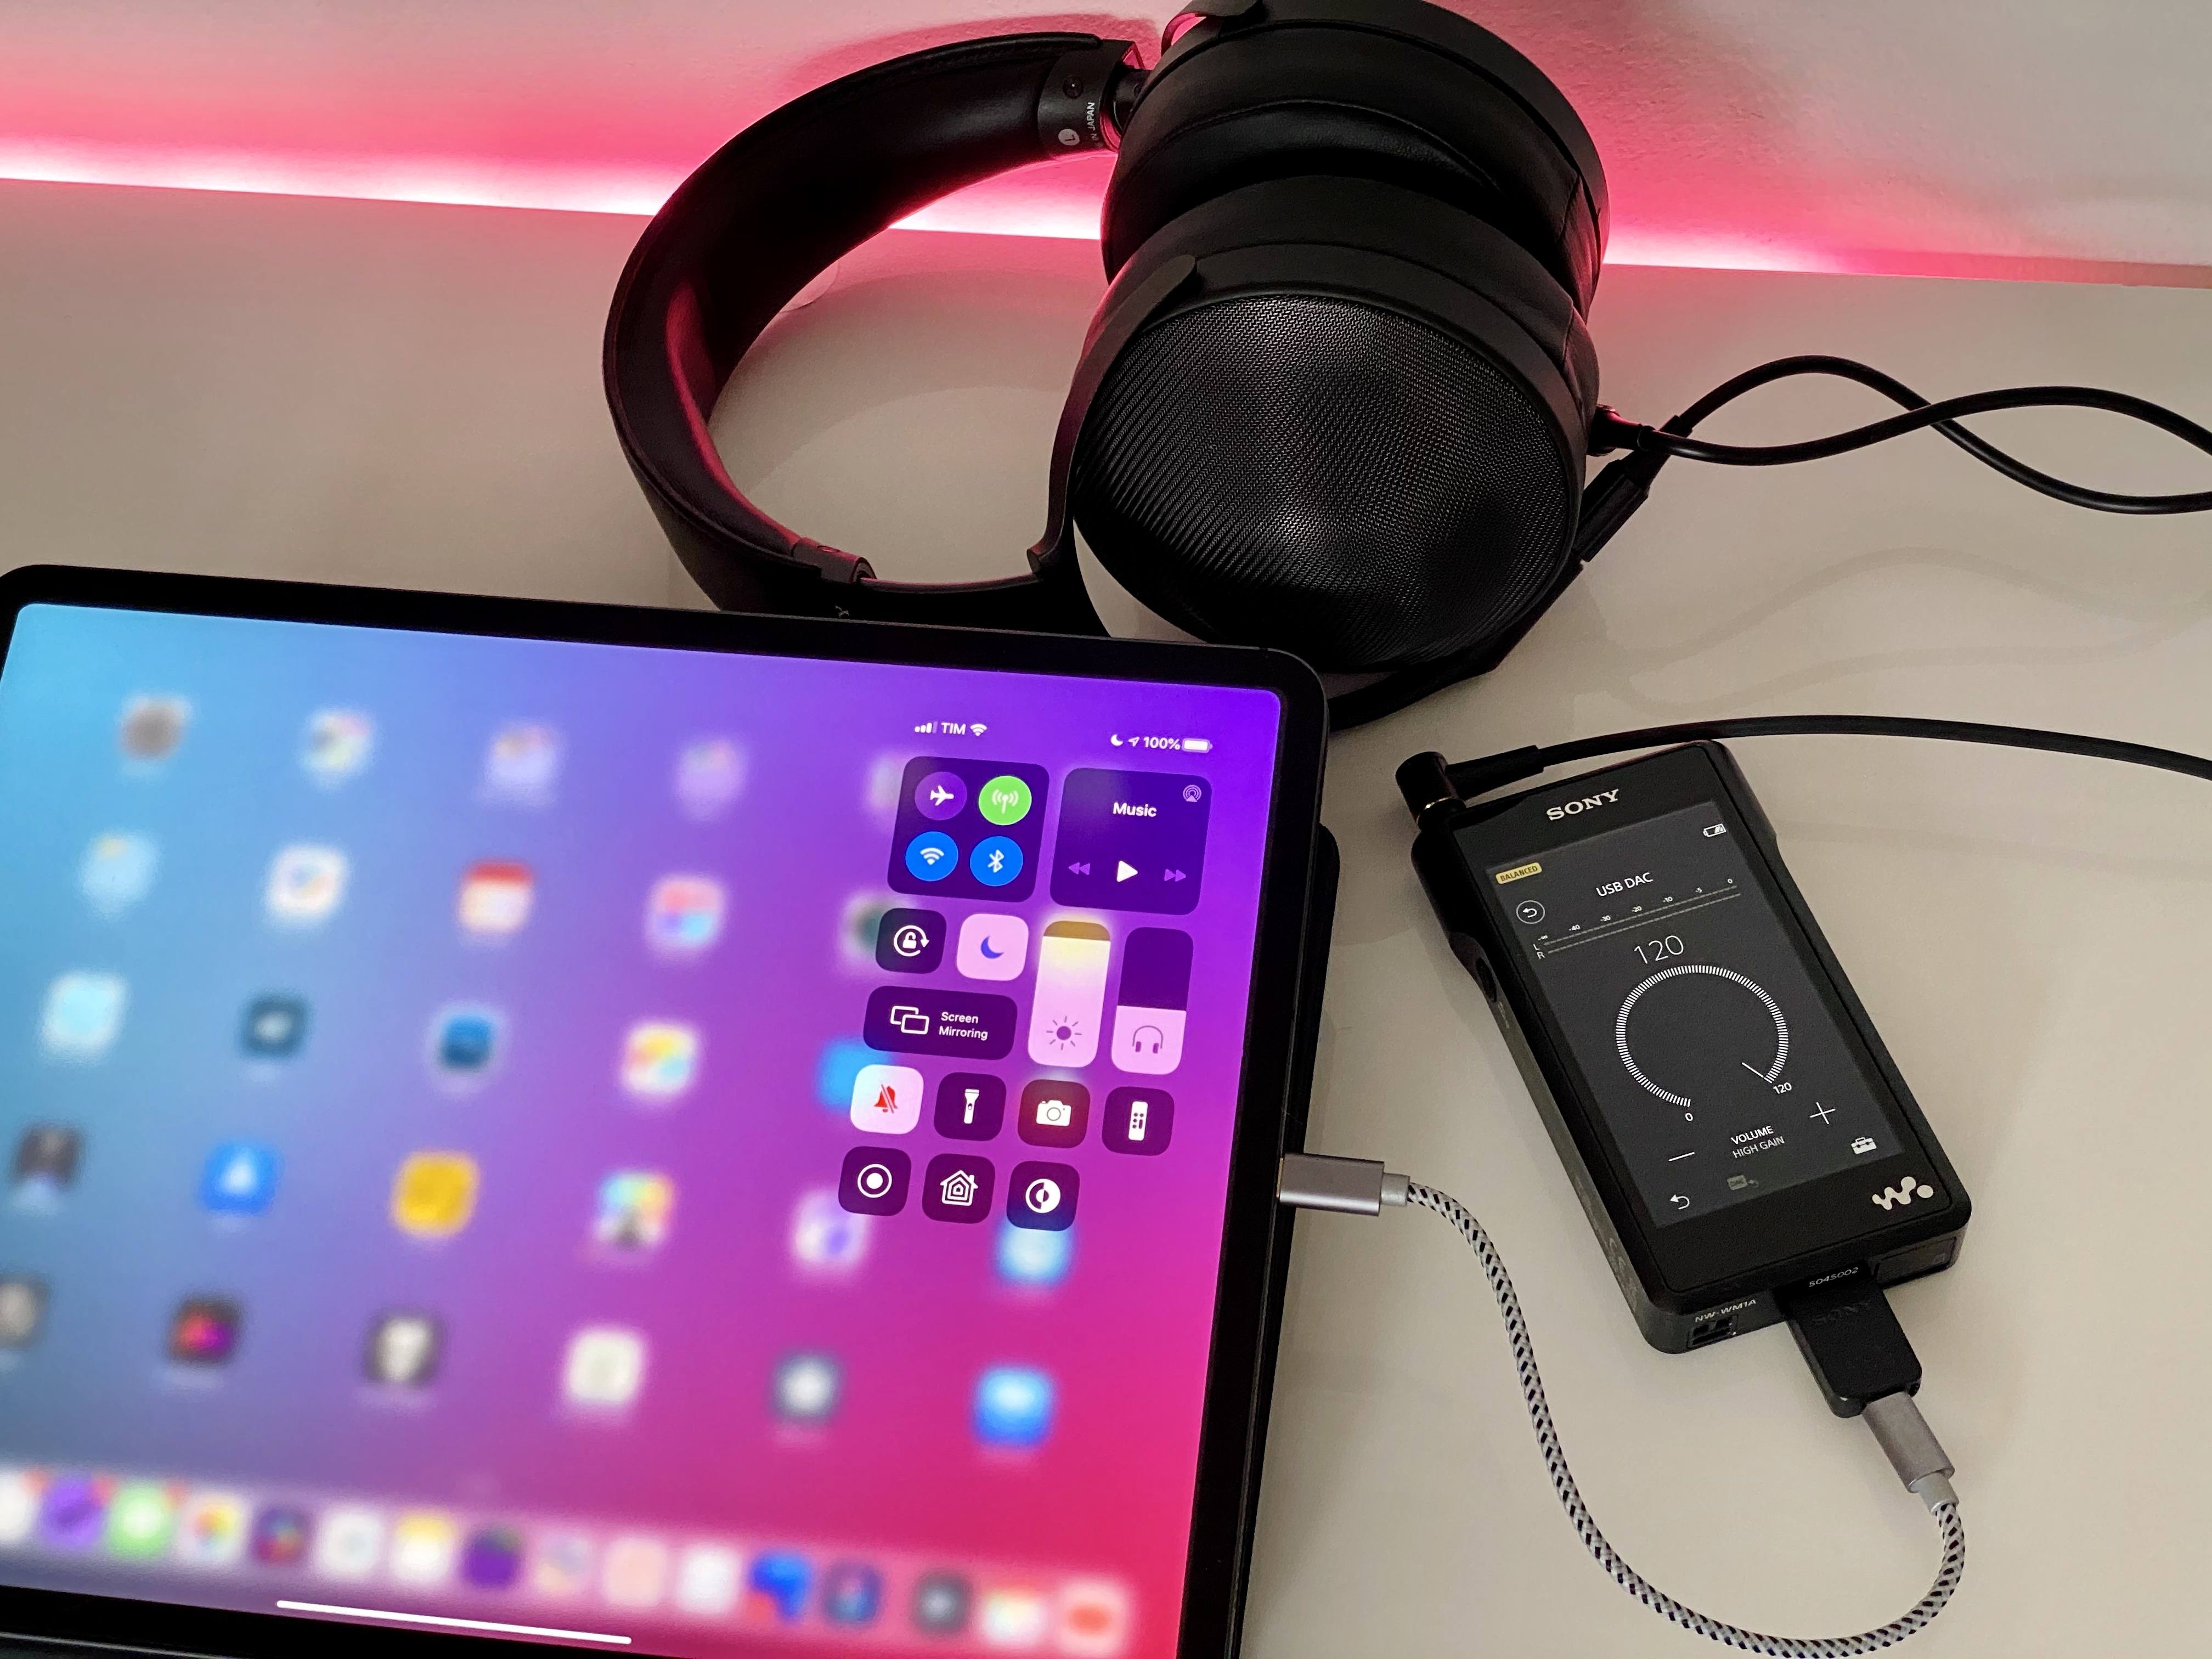
As I explained in my recent coverage of Meta for Mac, for the past year I’ve been building a personal music collection by purchasing my favorite albums in the lossless FLAC format. To enjoy these albums, I have a high-resolution Sony Walkman music player which I pair with my absolute favorite over-ear headphones – the Sony MDR-Z1R – via a balanced cable. If you’re curious about all the details behind my setup, I covered everything in the December 2019 episode of the MacStories Unplugged podcast for Club MacStories members; in short, I’ve been discovering sonic details of my favorite songs I never knew existed, and it’s nice to disconnect from the Internet every once in a while and simply enjoy listening to music without the distractions of Twitter or the endless catalog of a music streaming service. It’s pure audio bliss, it’s nice, and we could all use more nice things these days.
Sometimes, however, I want to listen to music with my good Sony headphones and continue working on my iPad Pro at the same time. So after some research (and thanks to the help of Connected listeners), I realized it was possible to use the Sony Walkman as an external DAC (a digital-to-analog converter) that can drive my headphones with high-res music coming from the iPad Pro’s USB-C port.
My music library is stored on a Samsung T5 SSD that is connected to my Mac mini server, which is always running in the background and shared on our local network. This means I can access the contents of the T5 drive via SFTP and SMB, allowing me to connect to it from the iPad’s Files app and other iPad file managers as well. To listen to my music library in its original format with my Sony headphones, I can’t use the iPad alone: the MDR-Z1R come with a 4.4mm balanced audio cable, which needs to be plugged into the Walkman. Here’s where things get interesting: the Walkman supports a USB DAC mode, which lets the device connect to a computer and act as an audio passthrough for the headphones connected to it. And as it turns out, the iPad Pro’s USB-C port supports all of this – provided you use the right apps to start music playback.
Here’s what I did to listen to high-resolution music (both FLAC files in 16/24-bit at 44.1/48/96 kHZ and DSD) from the iPad Pro:
- First, I purchased Sony’s micro USB adapter for the Walkman’s proprietary port;
- I bought a cheap and short USB-C to micro USB cable from Amazon;
- I experimented with different audio players for iPad, and eventually settled on Neutron.
When I want to listen to an album in high-resolution and work on the iPad at the same time, all I have to do is enable DAC mode on the Walkman and connect it via USB to the iPad Pro; the iPad will see the Walkman as an external audio device and set it as default output. Then, I can open Neutron, browse my external music library, and start playback. Audio will be passed in its original lossless format from the iPad to the Walkman to my headphones, so I can continue working while retaining the ability to control playback from my keyboard’s media keys.
Unfortunately, Neutron is – how can I say this – not the prettiest app around. The app’s UI is…confusing at best, and it doesn’t scale well to the iPad’s large display. But, from an audio engine perspective, Neutron is incredible: the app is powered by a 32/64-bit audio rendering engine that delivers high-resolution audio via Lightning or USB-C without frequency resampling and with all DSP effects applied – even if the audio stream is coming wirelessly from a server.
Neutron is not a good-looking app. However, I always leave the app running in the background, so that doesn’t bother me much.

Neutron is the only app I’ve found that can source audio files from network locations such as SMB or FTP, and it even offers native DSD and gapless playback. If you’re an audiophile, you know what all this means and, like me, you’d be willing to forgive the app’s poor UI in exchange for its astounding functionality. Just take a look at the list of features on Neutron’s website to see what I mean.
Using the iPad Pro with an external DAC for high-resolution audio is, quite possibly, the definition of a niche use case. Regardless, this continues to prove my point: it’s also thanks to USB-C that the iPad Pro now supports a variety of accessories, which in turn has allowed the device to fit into new and different setups.
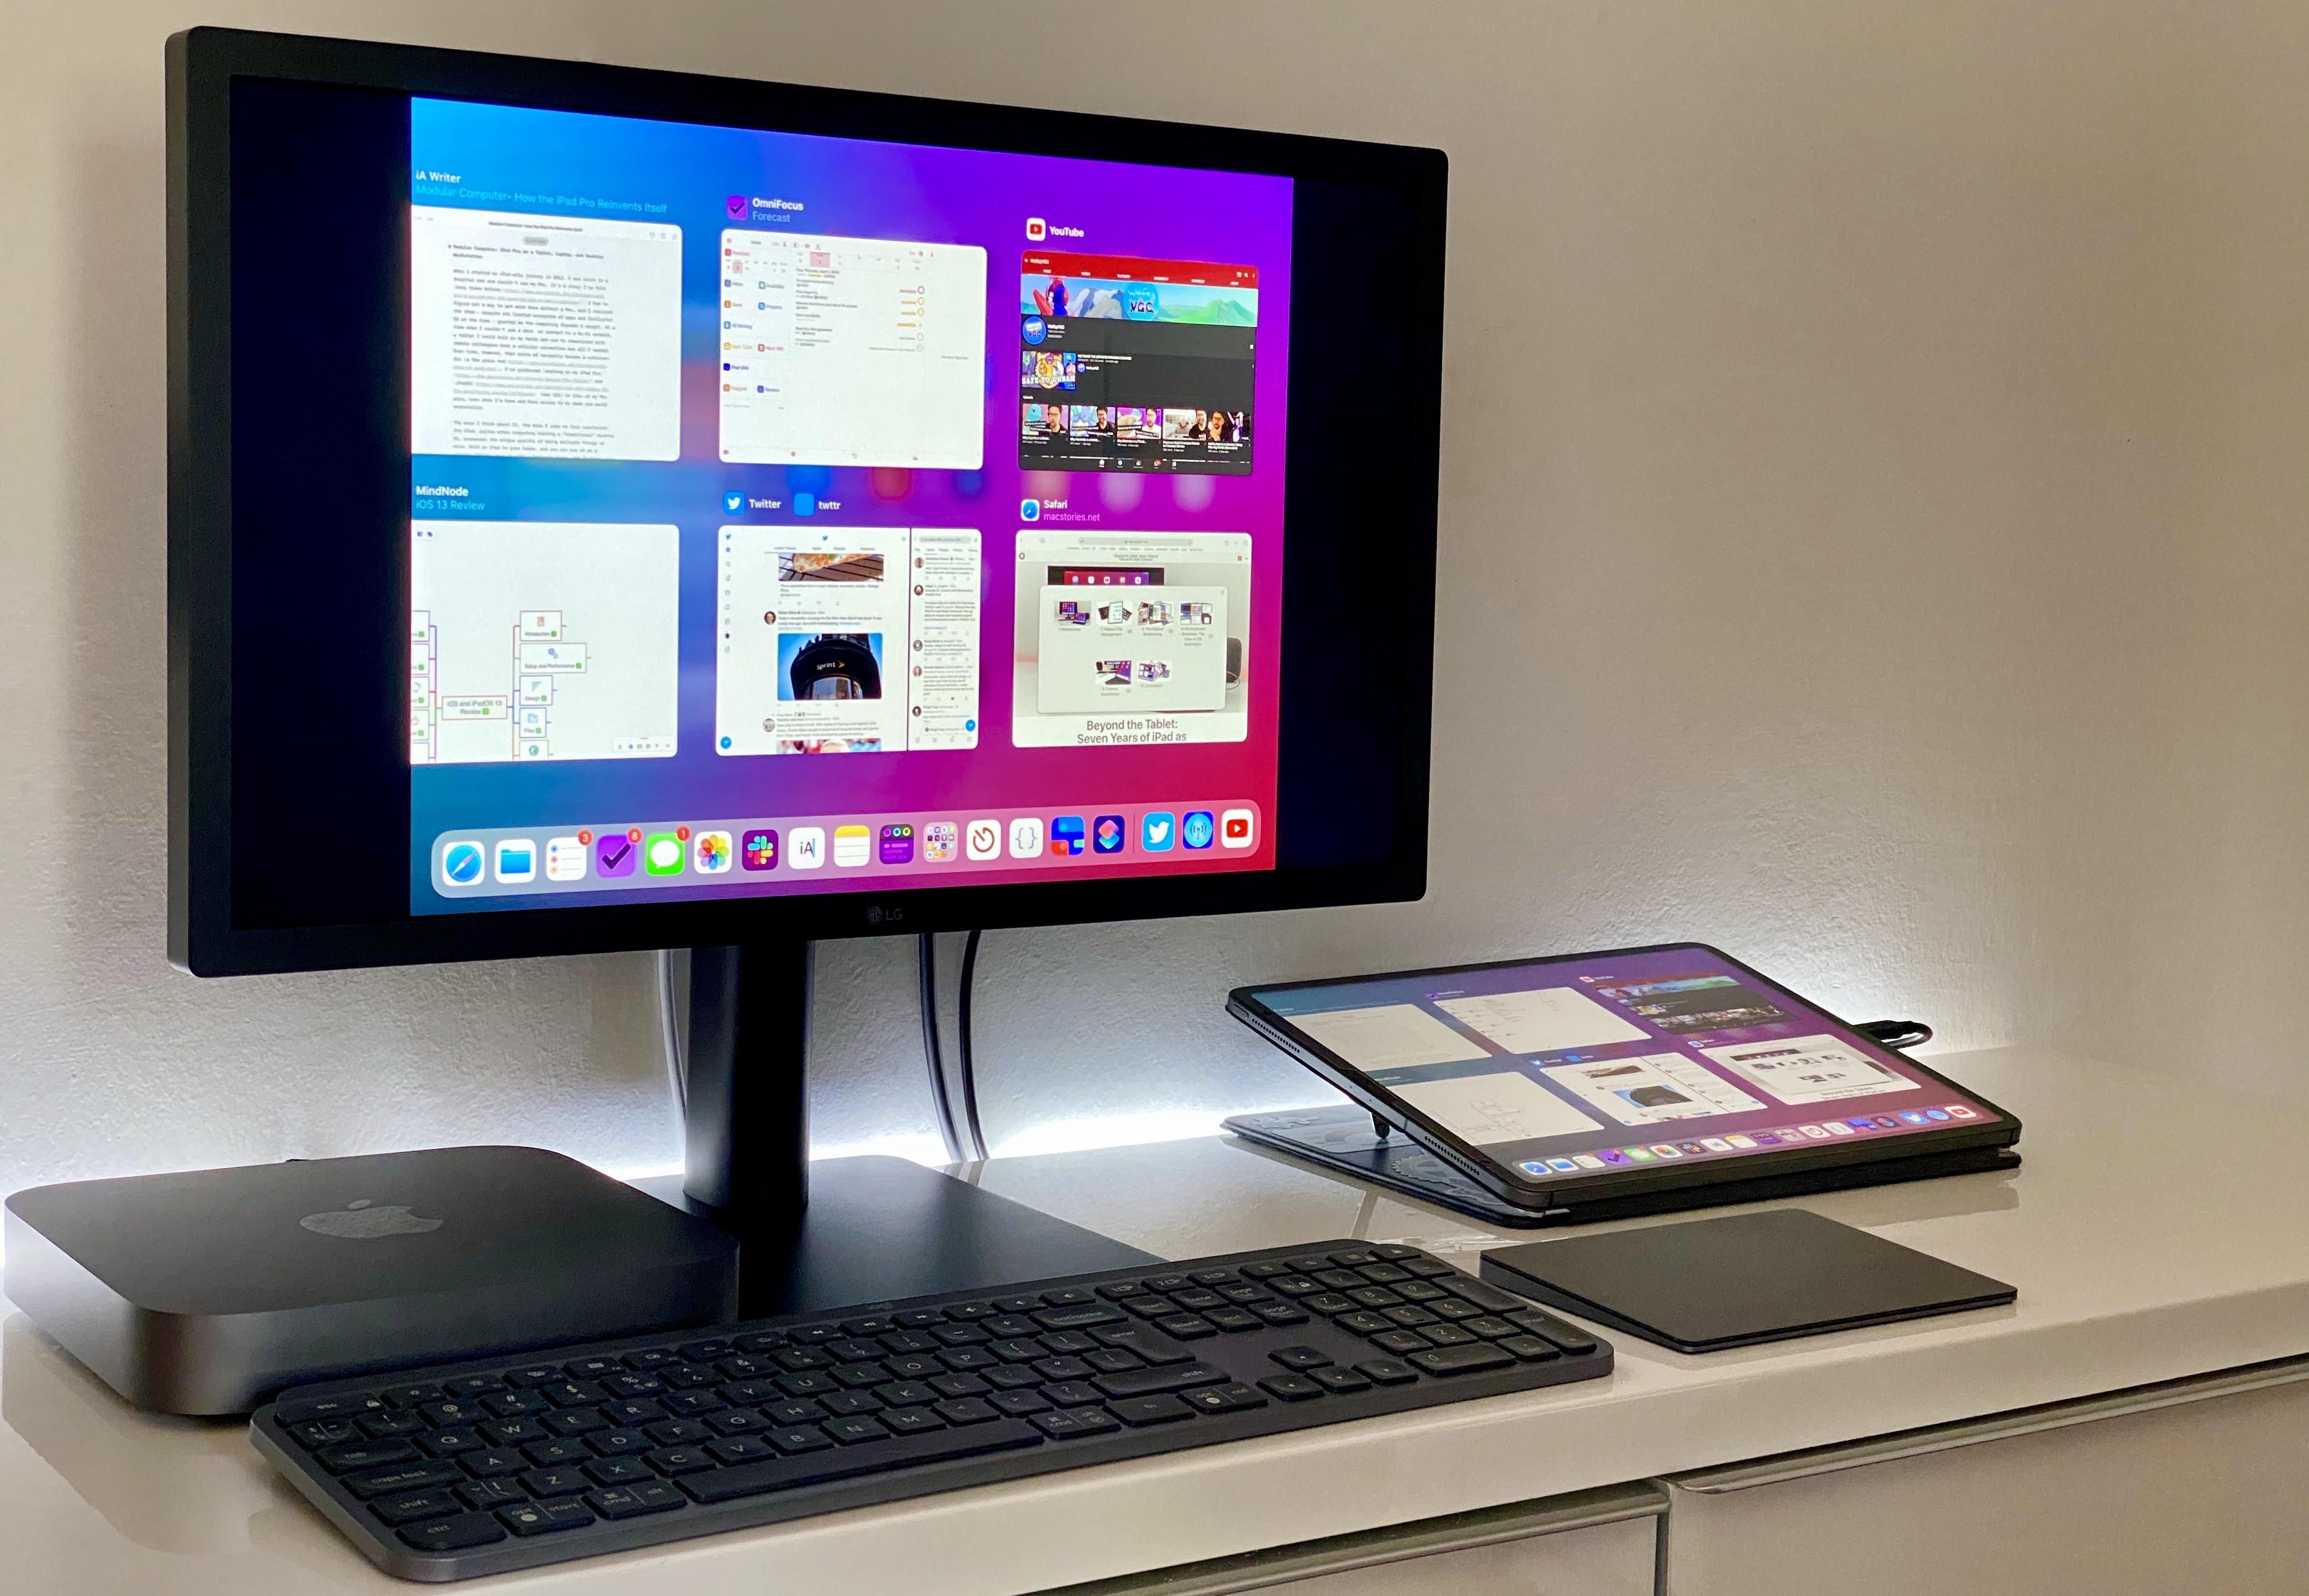
Desk Mode
Ever since I upgraded my home office with a new desk, Mac mini, and UltraFine 4K monitor in November 2018, I’ve been working toward a single goal: building a setup that would allow me to use the same external display and keyboard with two different computers and OSes – the Mac mini and iPad Pro. Same desk, two vastly different experiences. It took me a while, but thanks to the improvements in iPadOS 13.4 (and a late realization on my part), I’m happy to say I finally have the “desktop iPad Pro” setup I’ve long desired.
First, an explanation is in order for those who may land on this section without being familiar with my tastes and needs. Most days, I only turn on my Mac mini to let it run homebridge and Plex in the background, and I primarily get work done on my iPad Pro. A couple times a week, I also record podcasts on my Mac mini; I could do this from my iPad Pro, but because it’s a more involved setup, I only use my iPad Pro to record podcasts when I do not have access to my desk. The Mac is still essential to an important part of my work, but it’s actively used for less than six hours each week.
In case it wasn’t clear, I enjoy working7 on my iPad Pro more than the Mac mini. Or more specifically, I prefer the design, interactions, and app ecosystem of iPadOS to macOS. For this reason, when I was rethinking my home office two years ago, I had an idea:
What if I could create a – you guessed it – modular setup that supported both macOS and iPadOS with minimal adjustments necessary?
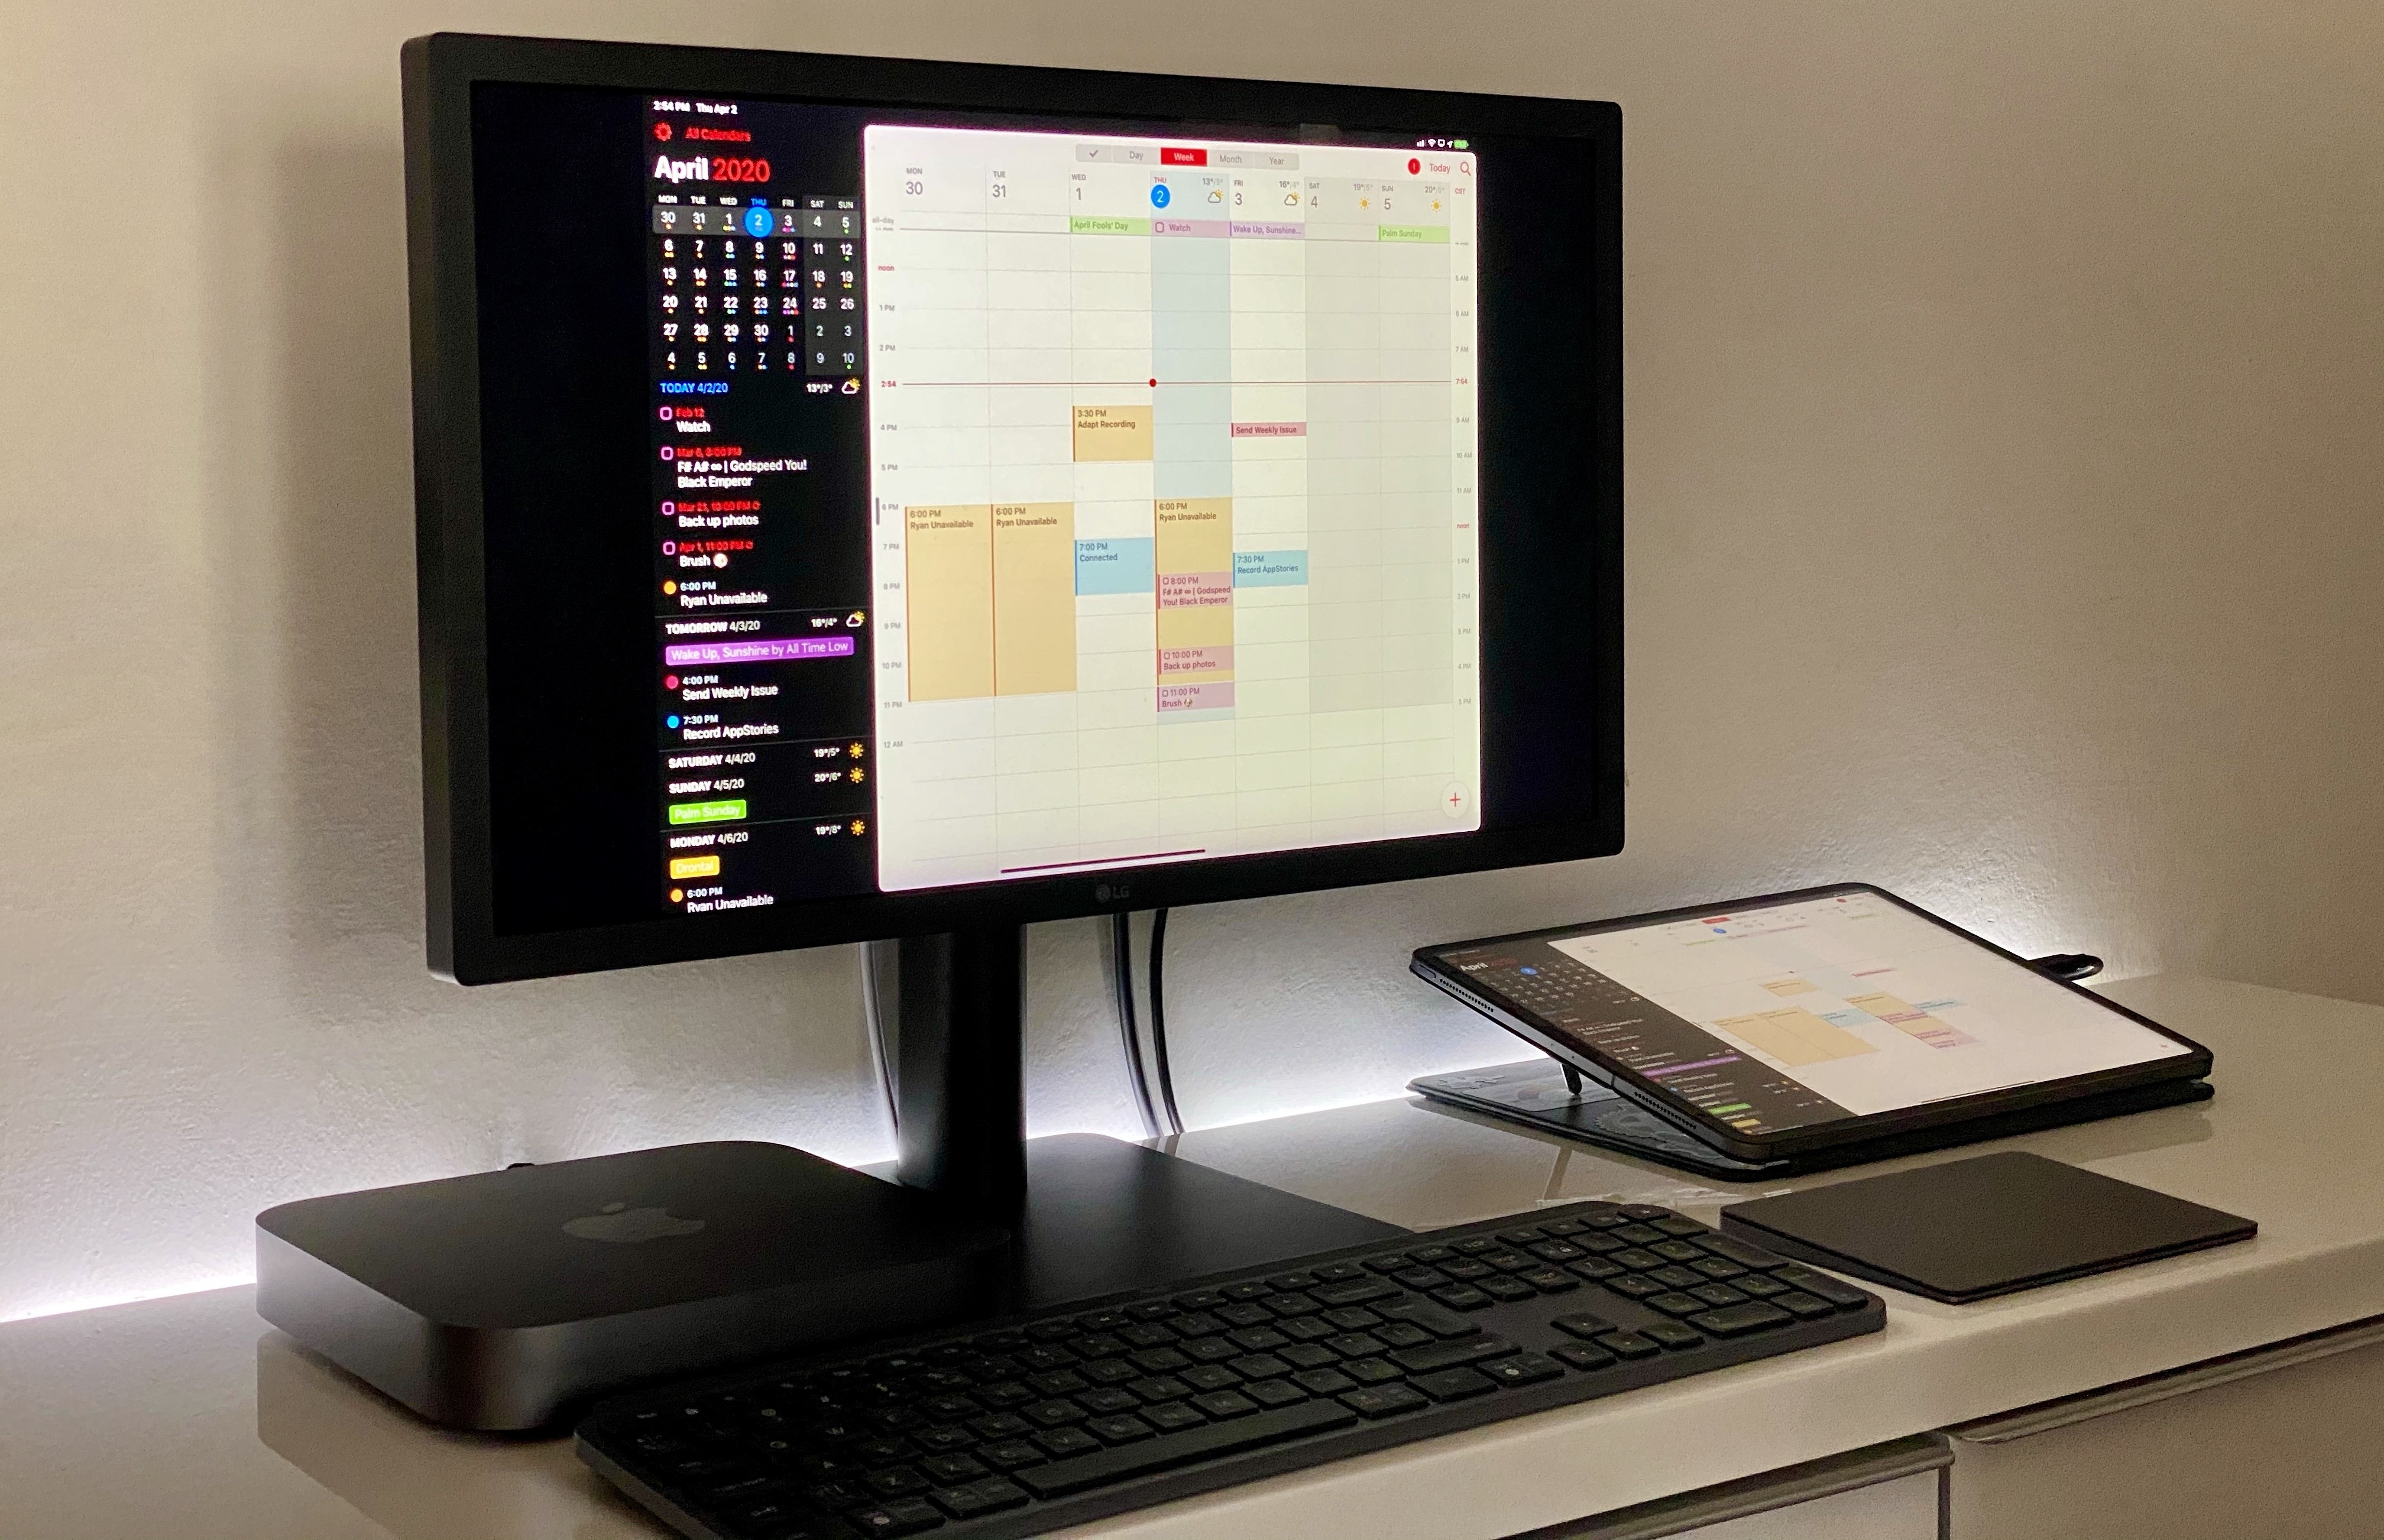
Enter the UltraFine 4K display, which, thanks to a single USB-C cable, can work as an external monitor both for my Mac mini and 2018 iPad Pro. I’ve written about this display and my penchant for using an iPad Pro with an external monitor (and all its limitations) several times before, most notably here and here. Here’s a key section from last year:
With a single USB-C cable (compatible with USB 3.1 Gen. 2 speeds), the iPad Pro can mirror its UI to an external 4K monitor, support second-screen experiences for apps that integrate with that API, and be charged at the same time. In the case of the UltraFine 4K display, the monitor can also act as a USB hub for the iPad Pro thanks to its four USB-C ports in the back; as I mentioned last year, this allows me to plug the Magic Keyboard (which I normally use via Bluetooth with the Mac mini) into the UltraFine and use it to type on the iPad Pro. To the best of my knowledge, there are no portable USB-C hubs that support 4K@60 mirroring to an external display via USB-C’s DisplayPort alt mode.
Despite the fact that I can’t touch the UltraFine to control the iOS interface or use a trackpad to show a pointer on it, I’ve gotten used to working with iOS apps on the big screen while the iPad sits next to the keyboard, effectively acting as a giant trackpad with a screen. For instance, when I want to concentrate on writing while avoiding neck strain or eye fatigue, I just plug the iPad Pro into the UltraFine, connect the Magic Keyboard in the back, and type in iA Writer on a larger screen. No, pillarboxing is not ideal, but the bigger fonts and UI elements are great for my eyesight, and I still get to work on iOS, which is the operating system I prefer for my writing tasks.
Keep in mind the second quoted paragraph, as it’s going to be relevant in a bit.
Now, the reason I want to use my iPad Pro with an external display is simple enough: even with pillarboxing, it’s bigger and doesn’t cause neck strain if I have to type for several consecutive hours. I get to enjoy the benefits of iPadOS and all my favorite apps while using a large display that sits at eye level and is more comfortable than hunching down at a desk to look at my iPad’s smaller display.
When I last wrote about using the iPad Pro with an external display last year, I had the one-cable-to-rule-them-all ordeal pretty much figured out (yay USB-C!), but the external keyboard was a problem: I didn’t want to manually unpair the Magic Keyboard from the Mac mini every time I wanted to use it with the iPad Pro. Additionally, the iPad didn’t support mice and trackpads – via AssistiveTouch or otherwise. Suffice to say, a lot has changed over the past few months.
The first aspect I was able to fix8 is the keyboard. I’ve stopped using the Magic Keyboard and I now use the Logitech MX Keys, a Bluetooth keyboard that supports switching between multiple devices with the press of a button. There’s plenty to like about the MX Keys besides its multi-device pairing: it’s backlit, its build quality is terrific, it charges via USB-C, and keys have a bit more travel than the Magic Keyboard. The only downside, at least for me, is that the MX Keys cannot be purchased in a compact layout that omits the number pad on the right side of the keyboard, which I never use.
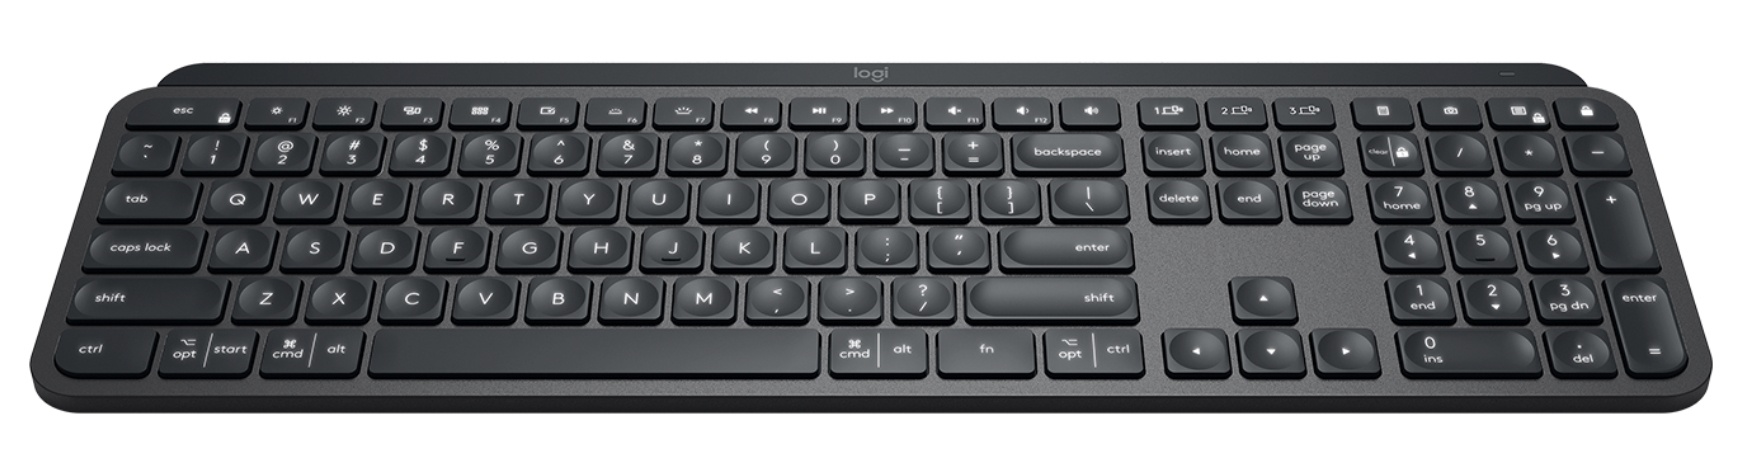
Unlike the Magic Keyboard, the MX Keys comes with media keys to activate specific functions such as volume control and media playback. Source: Logitech.
The most important feature of the MX Keys, as I mentioned above, is the ability to quickly switch between multiple paired devices – in my case, the Mac mini and iPad Pro. When I want to work with the iPad Pro at my desk, I press the ‘1’ switch button, and the iPad instantly connects to the MX Keys; when it’s time to use the Mac mini, I press ‘2’ and the keyboard pairs with the Mac again. It’s that simple, and I wish Apple’s own extended Magic Keyboard offered a similar function, perhaps based on the company’s proprietary wireless chips.
Which brings me to pointer support in iPadOS 13.4 and controlling content mirrored from an iPad onto an external display.
The New Pointer
In my Beyond the Tablet story last year, which was published before the debut of iPadOS and its support for USB/Bluetooth mice via Accessibility, I described why I enjoyed connecting my iPad Pro to the UltraFine 4K to focus on one task at a time, particularly writing. If I was spending the majority of my time typing in iA Writer, then not having a way to control the iPad’s UI shown on the monitor without touching the iPad’s screen was not an issue – I could just keep typing with the keyboard. I also noted how I could keep the iPad propped up at an angle next to the UltraFine thanks to its custom kickstands and use my right hand or the Apple Pencil for the occasional touch interaction with the display.
Besides the placement of my iPad Pro, all of this has changed with the release of iPadOS 13.4 and its native integration with mice and, more importantly, the Magic Trackpad 2. I don’t mean to speak ill of last year’s AssistiveTouch-powered mouse integration – a feature designed for the Accessibility community that also garnered mainstream attention – but it never quite clicked for me (no pun intended) since it didn’t allow for full, system-wide control of the iPadOS interface. The new native pointer does, and it’s a game-changer for anyone seeking to turn their iPad Pro into a desktop workstation.
The most important difference from last year’s Accessibility feature is the pointer: it is deeply embedded within the system’s UI, which has been updated to recognize the pointer and adapt certain UI elements to it. When you control an iPad with a mouse by using it as a pointing device with AssistiveTouch, the indicator displayed onscreen is, effectively, a virtual replica of your finger; the iPadOS UI has no idea that a pointer is moving onscreen because that Accessibility pointer only supports tap events, which prevents it from having access to features such as scrolling inertia, hover state, and multitouch. By contrast, the pointer in iPadOS 13.4 is entirely integrated with UIKit and dynamically adapts to different UI elements and areas by employing a mix of shapes, visual effects, and magnetic snaps.
By default, iPadOS’ new pointer is a tiny floating dot that moves across the screen and intelligently changes its hue depending on the color of content underneath (a simple touch, but a clever one). The difference between the AssistiveTouch pointer and iPadOS 13.4’s flavor is immediately clear as soon as you start moving it around: all elements of the iPad’s UI can be interacted with using the pointer, from the small separator between apps in Split View and the clock in the status bar to the dock and apps on the Home screen. This is true system-wide integration between the interface and an external input mechanism – a first for Apple’s touch OS. And it’s not just that the pointer can click on any item it hovers over; unlike traditional desktop pointers, there’s a symbiotic relationship between the iPadOS UI and the pointer: interface elements visually react to the pointer, which often changes shape, momentum, color, and behavior based on the target underneath.
Developers can create custom pointer effects and features (and I’ll cover some examples later in this section), but I want to highlight a couple default behaviors that made me realize how Apple’s iPadOS pointer is the perfect blend of utility and whimsy.
As soon as the pointer flies over a text field, it quickly squishes – Knight Bus-style – to transform itself into an insertion point. This type of pointer makes it easy to perform fine-grained text selections by clicking and dragging a text selection onscreen; if you pay close attention to it, you’ll notice that the insertion point even “snaps” to individual lines in a block of text, almost as if magnetically attracted to them. The animation is fun, and selecting text becomes much easier and faster than doing so via touch – especially since Apple (bafflingly enough) got rid of the magnification loupe for text selection in iOS and iPadOS 13.
Selecting text with the system pointer.Replay
The aforementioned snapping behavior is what Apple has officially labeled pointer magnetism, and it highlights another difference from traditional desktop pointers: an increased visual affordance when navigating the iPadOS UI. Whenever the pointer arrives in the proximity of a UI element that has been updated for this new interaction method, the pointer’s blob transforms again, accelerates toward the element, and snaps to it, usually highlighting it with a translucent, rounded rectangle. There are a variety of visual effects developers can employ for buttons and other elements that react to the pointer, including parallax and color changes. Try hovering with the pointer over the toolbars of Notes and Mail, or perhaps over the multitasking controls in Split View, and you’ll see how it dynamically changes its appearance, all while selected elements bounce, wiggle, and react to the pointer to visually communicate that, yes, they’re selected and waiting for interaction. Once again, whimsical and useful context at the same time.
Various types of pointer effects.Replay
In using the new system pointer since the release of iPadOS 13.4, I’ve realized that, unlike others, I appreciate its constant state of transformation because it works well with the underlying aesthetic of the iPadOS UI. Differently from macOS, most buttons in UIKit have no visible shape or contour – they’re just glyphs.9 Arguably, those “buttons” are easier to interact with when you’re not using a mouse or trackpad because you can simply reach out with your finger and touch them to see what happens. But the pointer introduces a layer of abstraction between the interface and user: suddenly you’re not manipulating the screen anymore – you’re controlling a virtual pointer that translates a movement of your finger into an action onscreen. This separation between UI and user is what has stumped novice PC users for decades and why modern smartphones and tablets are generally considered more user-friendly than traditional computers.
And here lies the core of Apple’s idea with pointer support in iPadOS 13.4, and why I ultimately believe they’ve done an excellent job with it: rather than merely mimicking the macOS pointer, Apple sought to find a middle ground between the inherent usability of a touch UI and the abstraction of a pointer. The result is an adaptive pointer that communicates context and the addition of a new layer between the device’s UI and the user – the visual effects that show you what’s being selected and what may happen if you scroll or perform a click. It may seem obvious in hindsight – the best innovations often do – but I believe this was a massive, multi-year undertaking for the UIKit team at Apple; it’s no surprise the system is mature enough to support a variety of integrations for developers and that the company’s explanation is thoughtful and thorough. They must have spent years getting all these pieces in place.
In practice, the net result of Apple’s pointer efforts is a comprehensive system that lets me fully control the iPadOS UI mirrored on my UltraFine 4K monitor without ever touching the iPad Pro. This has fundamentally altered the ergonomics of my setup and improved how quickly I can get work done with multiple apps in this configuration.
With a native pointer, I can finally select text with higher precision than multitouch without taking my hands off the keyboard and trackpad in front of me. iA Writer, my favorite text editor, supported text selection with the pointer without an app update required; obviously, both Mail and Notes (two apps I also use on a daily basis) worked with the pointer right away as soon as I updated to iPadOS 13.4. Even once it transforms into an insertion point, the pointer can perform other functions: if I hold down on the trackpad to left-click then drag, I can drag a text selection somewhere else; if I right-click instead (a two-finger click on the Magic Trackpad 2), the native copy and paste menu comes up. And that’s not all: again without requiring an update, buttons in the enhanced copy and paste menu of iA Writer support the pointer too, so I can hover over them and see which one I selected at a glance.
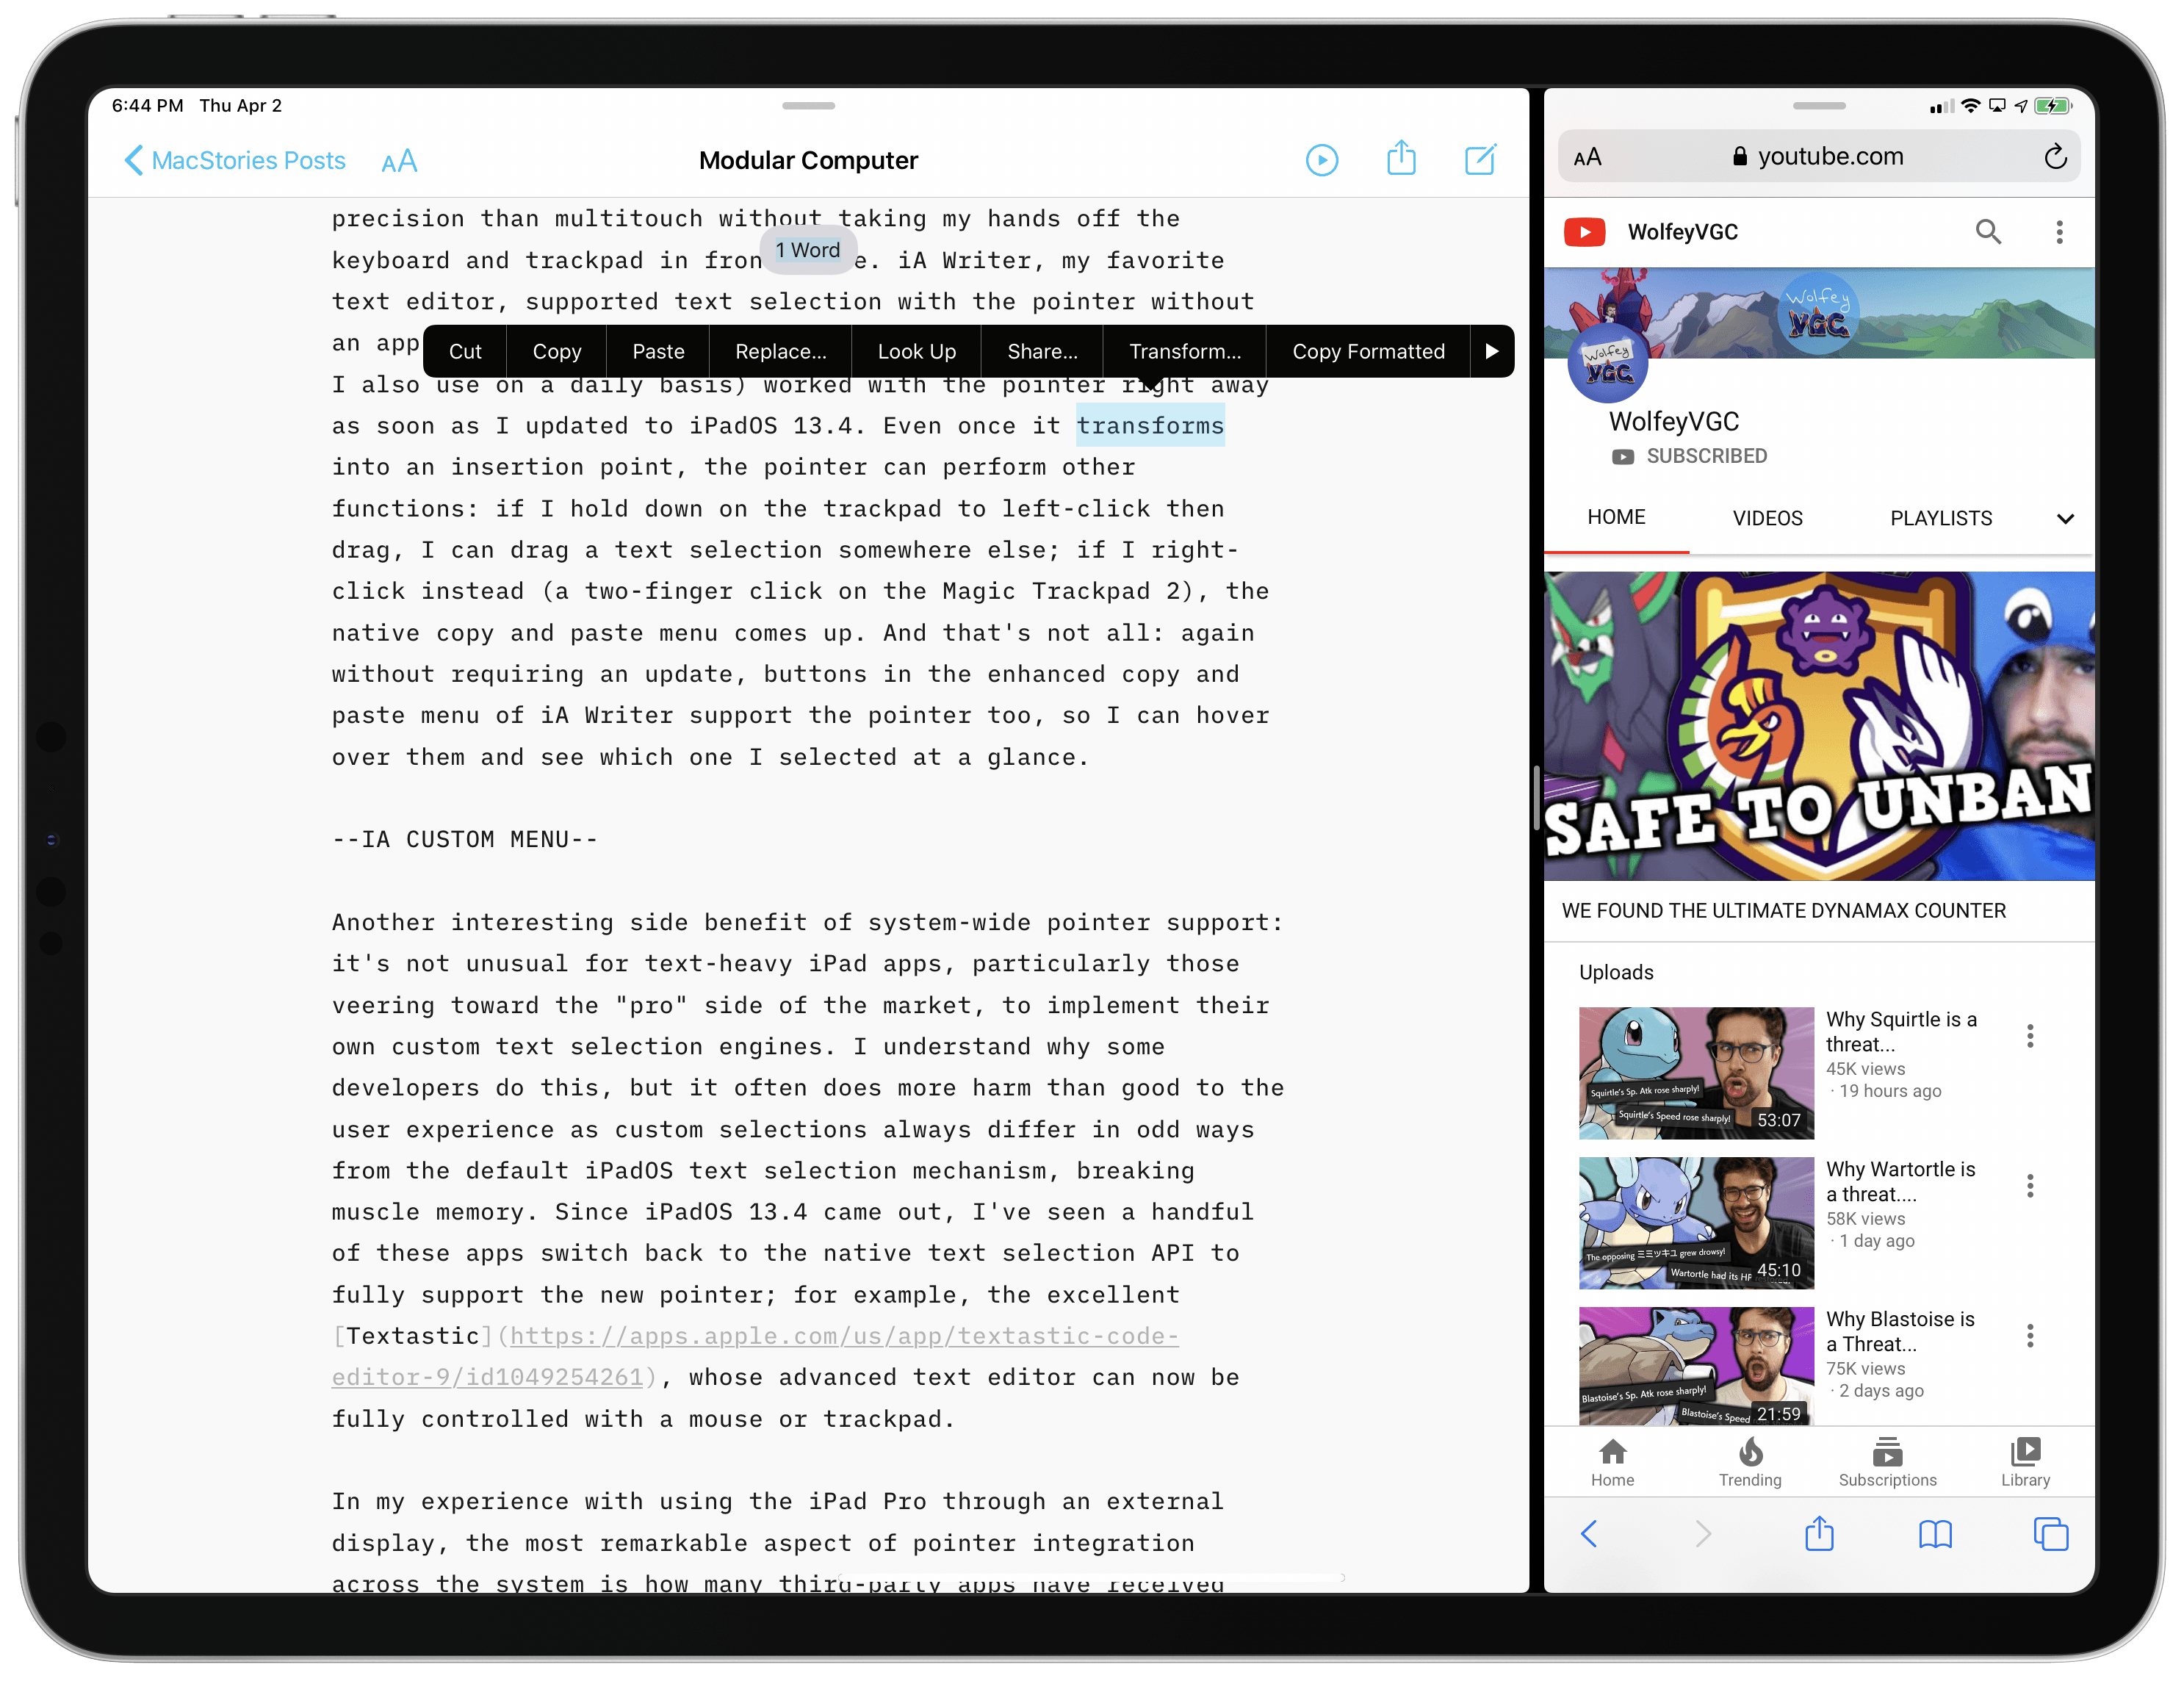
iA Writer’s enhanced copy and paste menu works with the pointer out of the box, just like other standard UIKit elements in the app.
Another interesting side benefit of system-wide pointer support: it’s not unusual for text-heavy iPad apps, particularly those veering toward the “pro” side of the market, to implement their own custom text selection engines. I understand why some developers do this, but it often does more harm than good to the user experience as custom selections always differ in odd ways from the default iPadOS text selection mechanism, breaking muscle memory. Since iPadOS 13.4 came out, I’ve seen a handful of these apps switch back to the native text selection API to fully support the new pointer; for example, the excellent Textastic, whose advanced text editor can now be fully controlled with a mouse or trackpad.
In my experience with using the iPad Pro through an external display, the most remarkable aspect of pointer integration across the system is how many third-party apps have received support “for free”, without requiring an update, simply by virtue of supporting native frameworks and APIs. This creates a virtuous cycle that encourages developers to adopt modern APIs as soon as possible, thus making the ecosystem stronger and allowing Apple to introduce new functionalities that already work with existing components.
NetNewsWire, which I’ve been testing as my go-to RSS reader lately, supported the pointer as soon as 13.4 launched: in the app, I can select and click toolbar items, swipe with two fingers on the trackpad to show actions for individual articles, and even right-click to show the context menu. Similarly, in Twitter for iPad I can click on tweets, switch between views in the sidebar, and even right-click on tweets to bring up the native context menu.10 Developers of apps with custom UI elements may want to look into the new pointer API for further customizations; overall, I’ve been impressed by how many third-party apps mostly worked out of the box with the pointer in iPadOS 13.4.

Speaking of context menus, I like what Apple has done to adapt them to the pointer. Before iPadOS 13.4, if I wanted to invoke a context menu with my Logitech mouse, I had to assign a long-press gesture to a button, click it, wait for the “fake” gesture to perform, then interact with the menu. The native pointer has brought a much better activation method: by default, right-clicking opens a context menu (or copy and paste menu if in a text field); the menu comes up immediately without waiting (there’s no fake long-press to wait for), and it doesn’t carry the context menu’s preview panel, thus replicating the look of a desktop contextual menu. I love how fast invoking these menus is now, and I appreciate that I can hover over each button in the menu before making a choice. The clunkiness involved with showing context menus was one of the pain points of the old mouse integration based on AssistiveTouch; in iPadOS 13.4, right-clicking in an iPad app to show a context menu feels just as natural as its Mac counterpart.
When activated via the pointer, context menus come up immediately and don’t embed a preview of the selected item.
Multitouch and Updated Apps
What is going to bring the desktop iPad experience even closer to a traditional desktop computer, however, is iPadOS 13.4’s support for multitouch gestures and developers building deeper pointer integrations in their apps.
As I mentioned above, for the past couple weeks I’ve been using Apple’s Magic Trackpad 2 to control my iPad Pro whenever it’s connected to the UltraFine 4K display. I also own a Logitech MX Master 3 mouse with configurable buttons that can be paired with the iPad Pro; after testing both peripherals, I soon realized the multitouch trackpad was going to help me navigate the system and switch between apps more quickly – something I was discouraged from doing with the old setup last year.
In addition to the ability to control UI elements in apps with an adaptive pointer, Apple built full support for navigation across the system through a combination of multitouch gestures and swipe gestures toward specific areas of the screen. The three most common actions when working with multiple apps on iPad – opening the app switcher, moving between apps, and going back to the Home screen – can be performed with three-finger swipes:
- A three-finger vertical swipe goes back to the Home screen;
- A three-finger vertical swipe and hold shows the app switcher;
- A three-finger horizontal swipe switches between apps.
I find these gestures intuitive, reliable, and consistent with their touch counterparts when I’m using the iPad without a trackpad. Swiping up with three fingers and pausing to show the app switcher, then scrolling horizontally with two fingers to pick different apps instantly clicked for me – almost as if support for multitouch trackpads had always been part of iPadOS. After having used these gestures, I don’t think I could ever go back to a trackpad without support for three-finger swipes.11
Other gestures Apple baked into iPadOS 13.4 may need some additional fine-tuning. These are the gestures that require you to quickly “slide” with the pointer into a specific area of the screen: the Home indicator to show the dock; the upper right corner to show Control Center; the right edge of the screen to open Slide Over; the upper left corner to view notifications. In my experience, showing the dock is fine, but Control Center, Slide Over, and notifications often fail to activate on the first slide into the associated corner. To overcome this, I’ve started sliding the pointer into the corner twice – first to place the pointer, then to activate the specific function – which seems to trigger the gesture more consistently. I wonder if Apple could tweak the momentum required to activate these features so they always appear immediately.
Despite these initial struggles with sliding the pointer into such “hot corners” (different from Hot Corners, an actual feature of macOS and iPadOS’ Accessibility), I also want to call out how nice it is to interact with Slide Over via the Magic Trackpad. Once Slide Over is open, I can use the same three-finger swipe gestures mentioned above to cycle between apps and close individual apps in the Slide Over stack; alternatively, I can hover with the pointer over the pulling indicator at the top of a Slide Over app, let the pointer attach to it, then drag the app to the other side of the screen or drop it into Split View. These interactions are consistent with the iPad’s existing gesture vocabulary, but they can be performed from a trackpad without touching the screen at all – another reason why I can’t imagine using non-multitouch-enabled trackpads with iPadOS.
Interacting with Slide Over using the pointer.Replay
Pointer and trackpad integration dramatically improves interactions with apps in the context of an iPad Pro used at a desk. Based on what I’ve seen and tested so far, third-party developers have already begun taking advantage of the pointer and two-finger gestures in useful ways.
In an upcoming version of iA Writer, my favorite text editor, you’ll be able to swipe horizontally with two fingers anywhere in the text editor to show and hide the document library. This may not seem like a big deal until you realize how much faster it is to do so from a trackpad instead of having to select the ‘Back’ button in the upper left corner of the app to show the library. Furthermore, iA is also adding support for renaming files by clicking on their title in the title bar, which becomes a highlighted element on hover – a great approach I’d love to see in more apps in the future.
The upcoming version of iA Writer for iPad will let you click the document’s name in the title bar to rename it. I want this pointer interaction in every app now.
I’ve also been impressed by the deep pointer integration in the latest version of Fantastical for iPad. No matter which view you’re using, you can now hover over events/tasks and they’ll respond to the pointer with a subtle bounce effect that makes the UI feel alive even without touching the screen. But there’s more: you can also select buttons in the upper toolbar and segmented control and – my favorite detail – hover with the pointer over individual days in the sidebar’s mini calendar. As you do that, selected days will be highlighted with a square indicator; do it quickly enough, and you’ll get the result shown in the video below.
Fantastical’s excellent support for the iPadOS 13.4 pointer.Replay
Pointer support has added a new dimension to Fantastical on iPad, which allows me to use it on my UltraFine 4K monitor without compromises. Fantastical is a perfect example of the kind of deep integration with custom effects I’d like to see more iPad developers consider going forward.
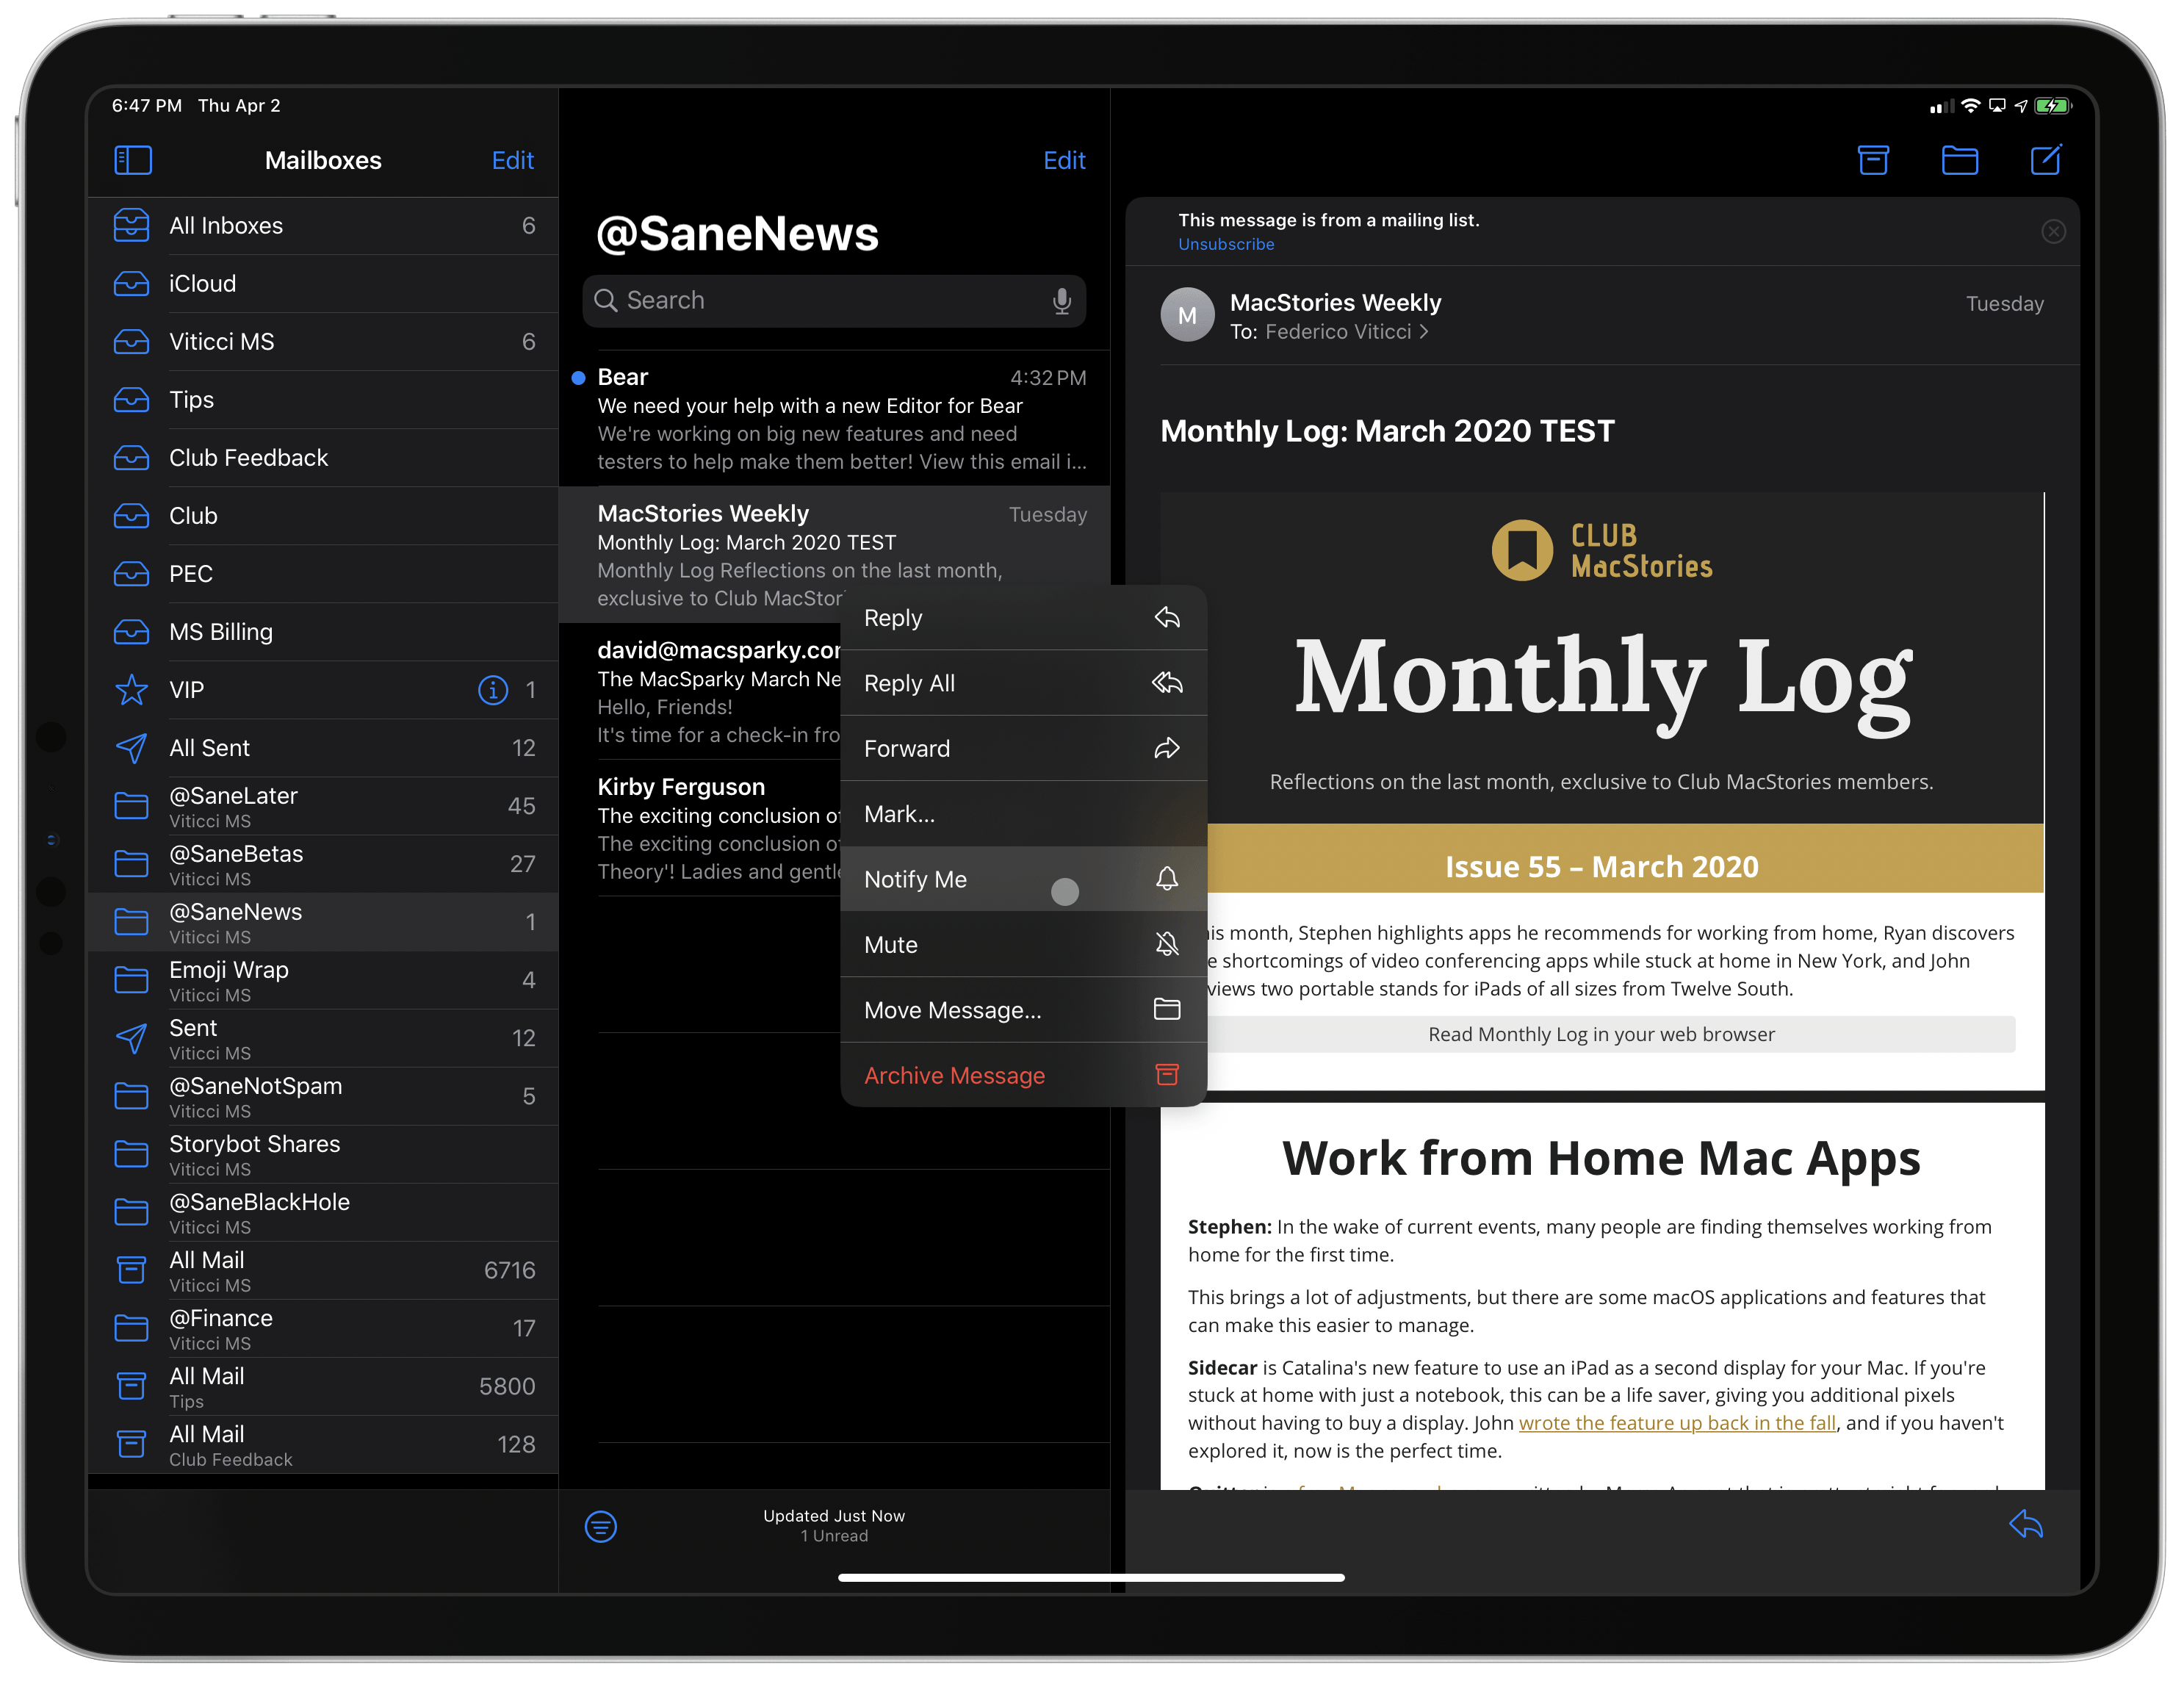
Another excellent example is Broadcasts, Steve Troughton-Smith’s new Internet radio app. Broadcasts features both default pointer effects (for instance, when hovering over toolbar buttons to highlight them) as well as custom ones such as the lift animation that occurs when hovering over radio stations in the main grid. Additionally, Troughton-Smith was even able to bring tooltips – a classic Mac feature – to iPadOS when the pointer has snapped and paused on top of a button.
Broadcasts features rich pointer integration, keyboard shortcuts, and Mac-like context menus.Replay
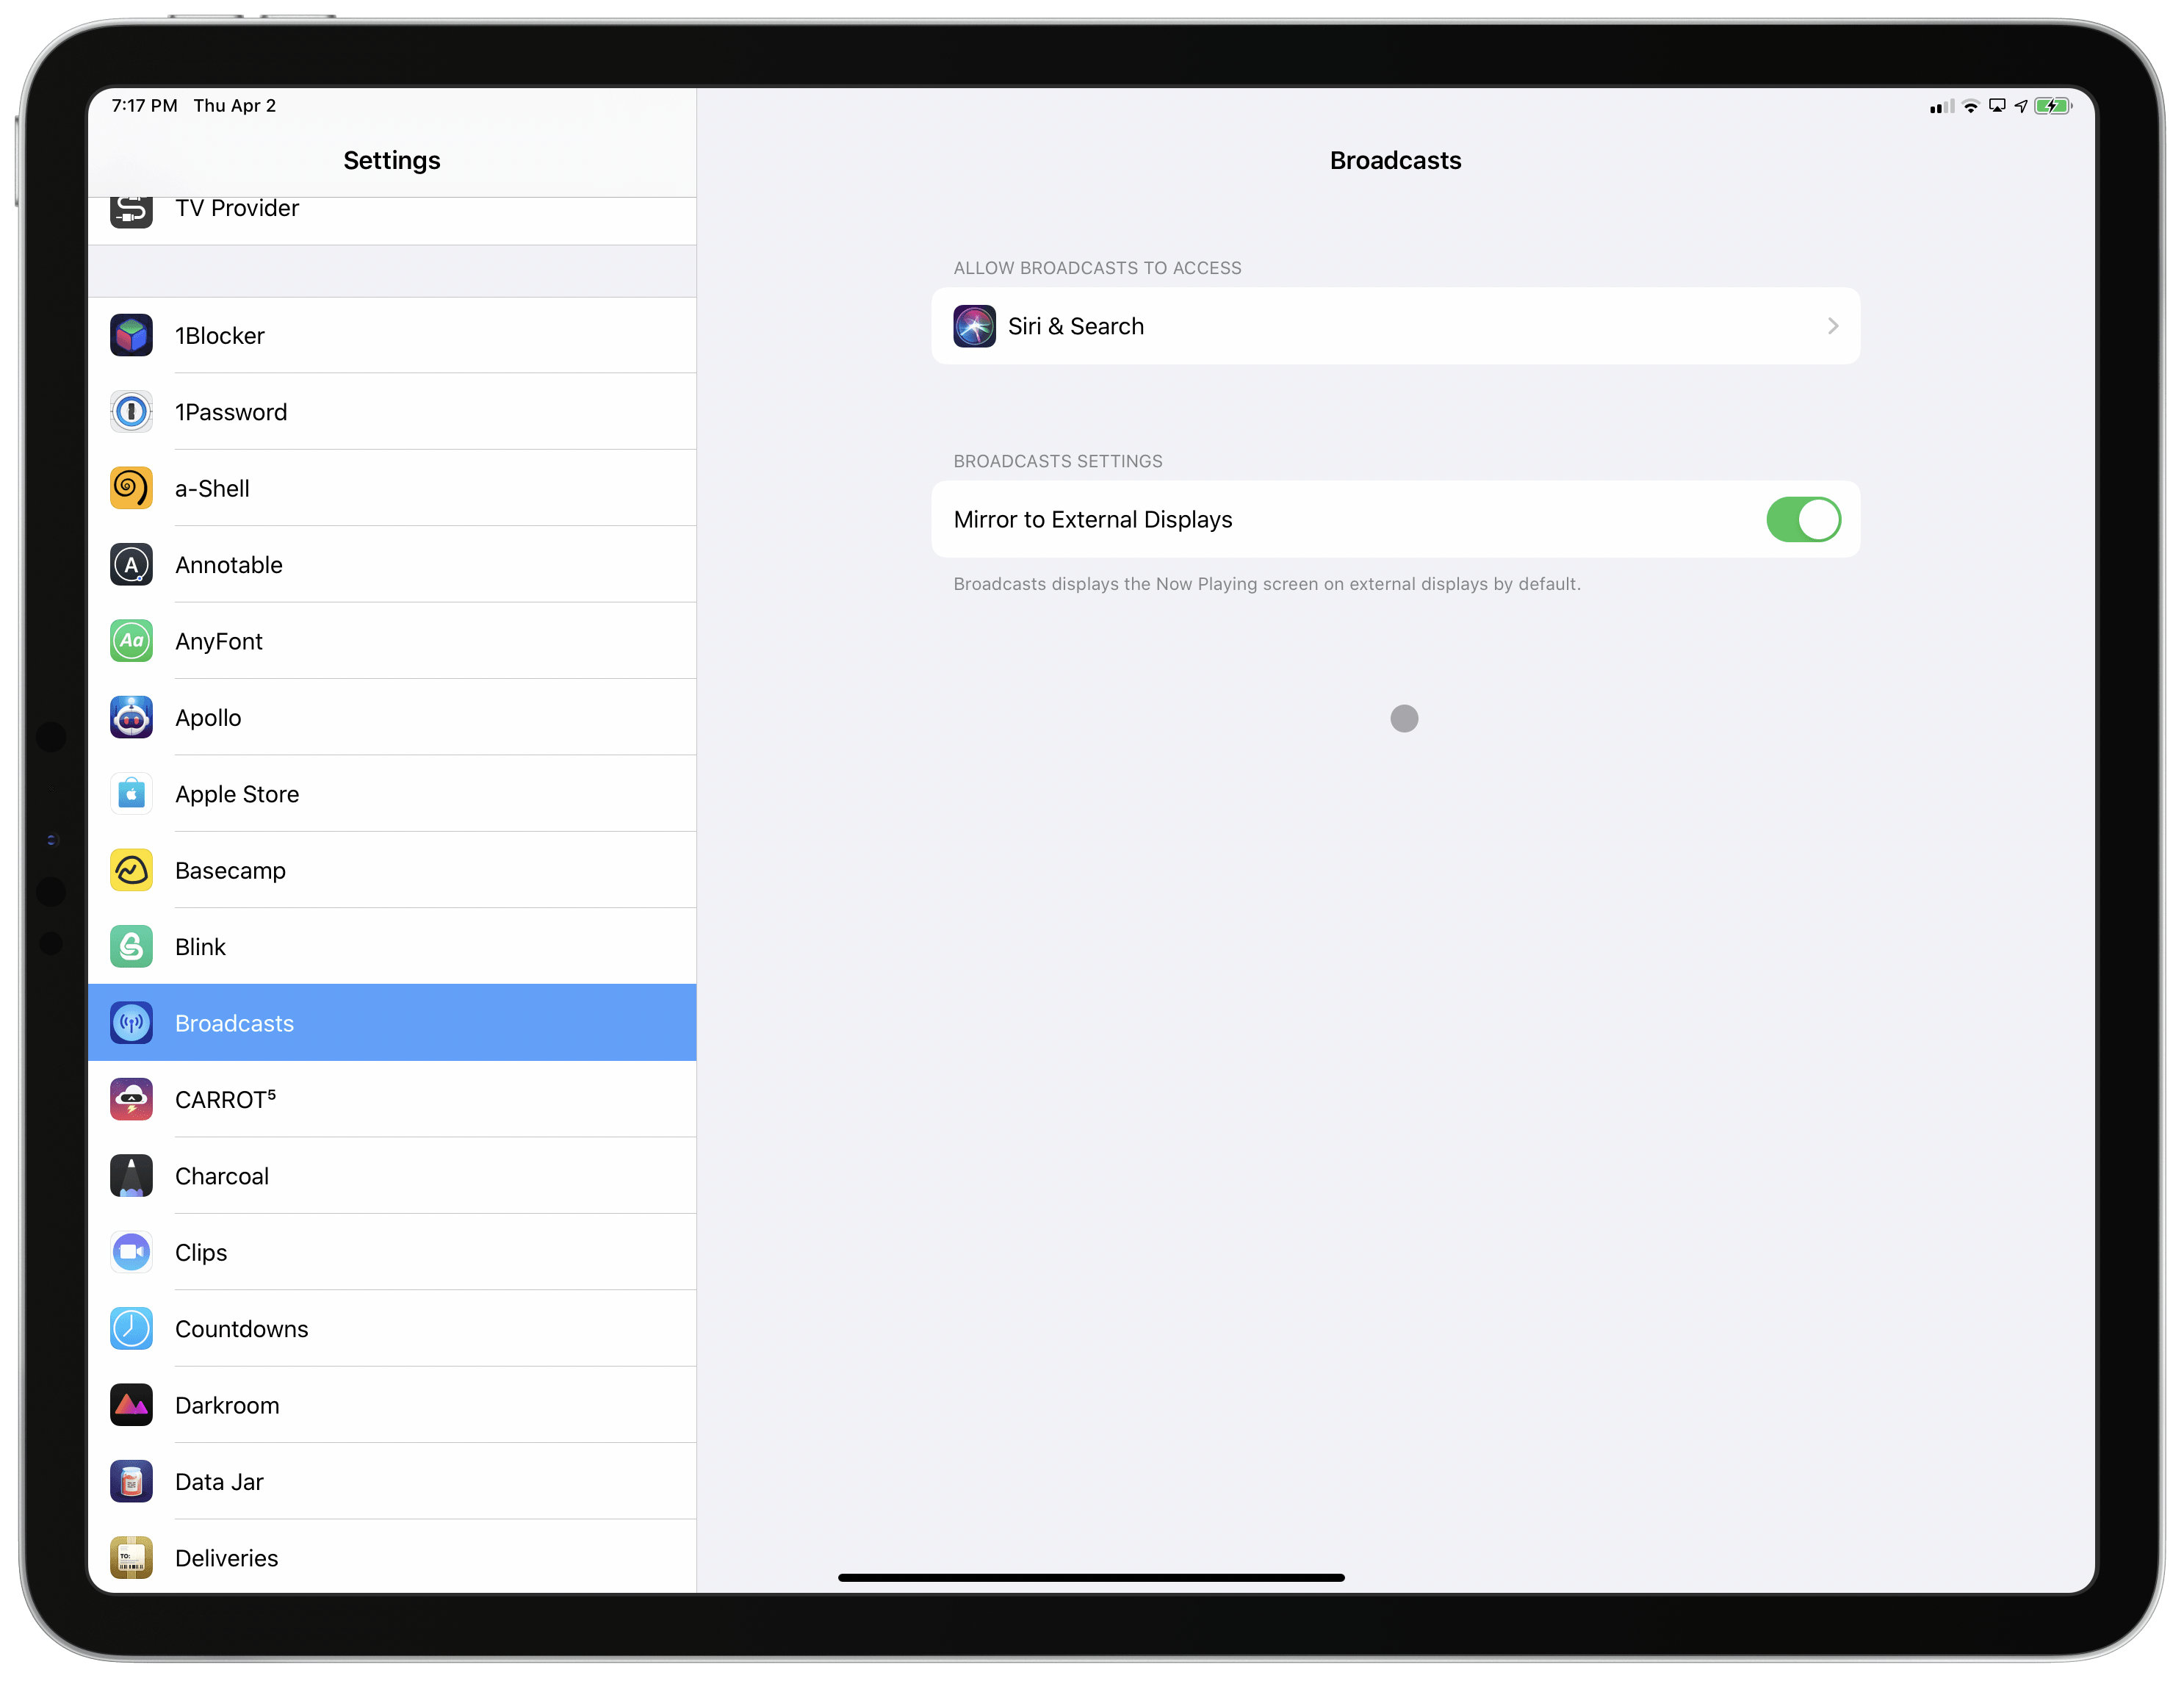
Broadcasts also offers a setting screen to choose whether the app should be mirrored on an external display or output full-screen content. More apps should offer a similar option.
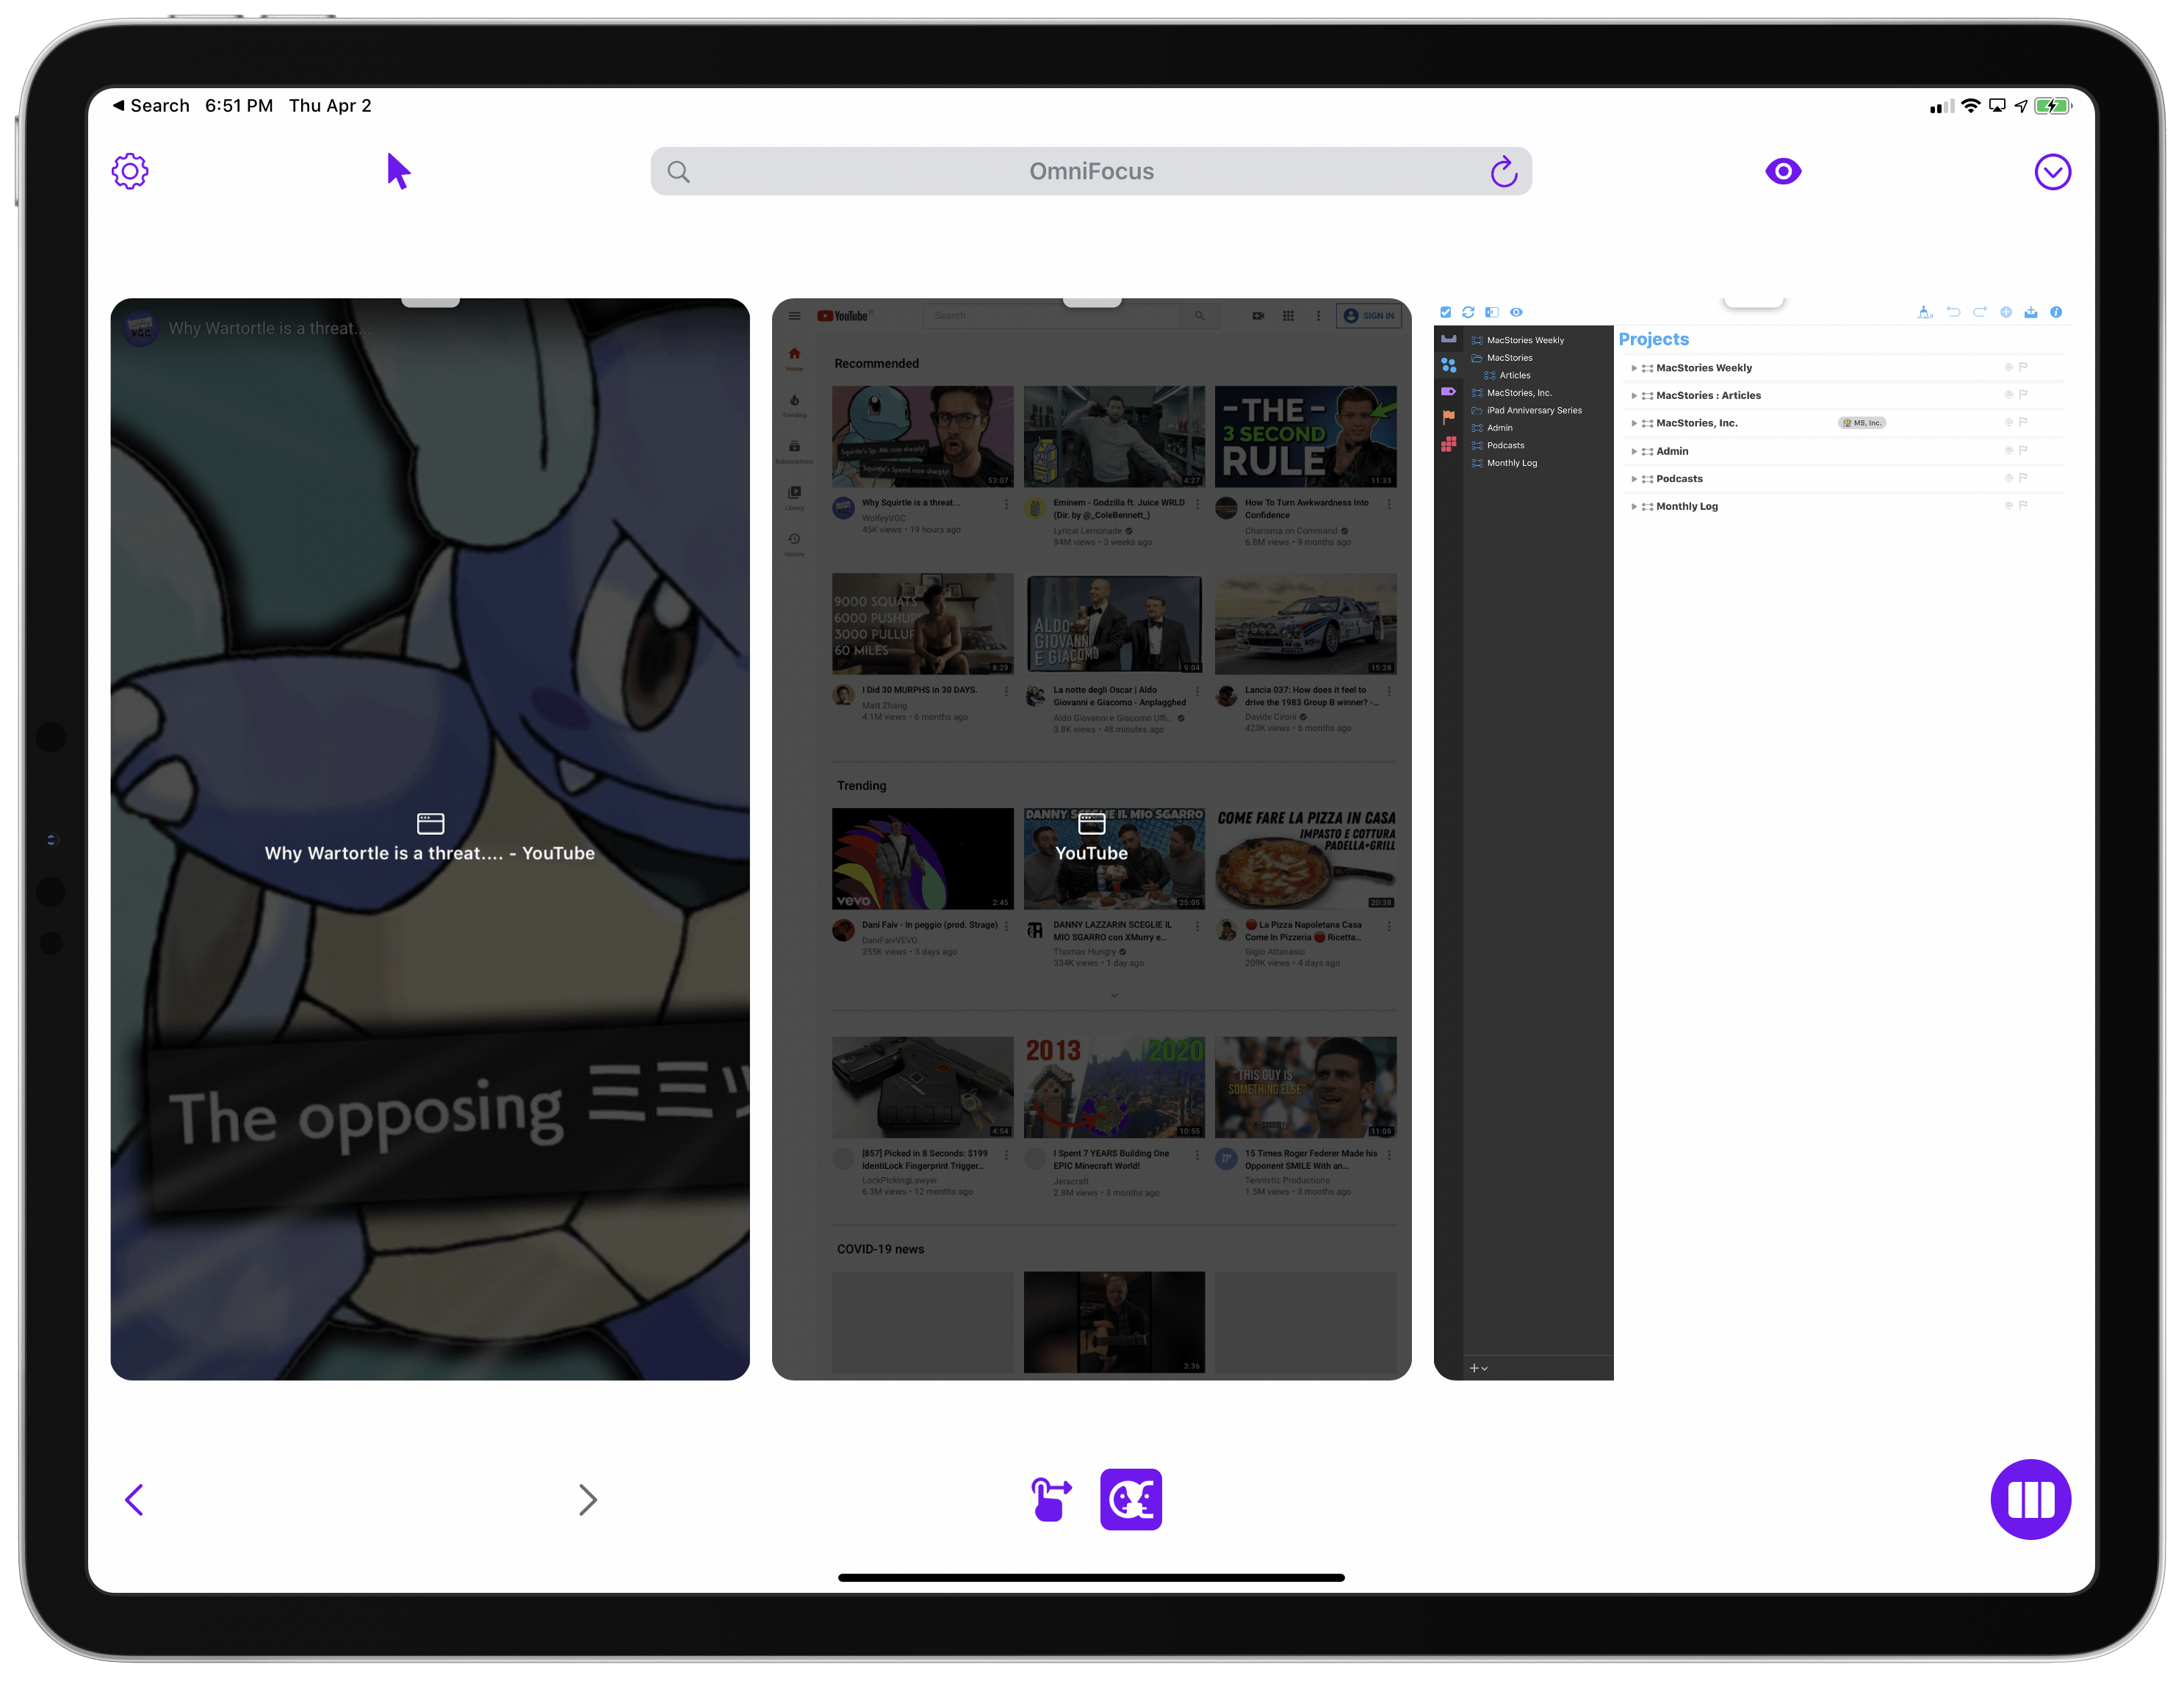
Indeed, besides enabling iPad apps to be fully controlled without touching the device, pointer integration also means developers can easily replicate features from macOS. Nowhere is this more apparent than Screens, Edovia’s popular VNC client that lets you control a Mac/PC from your iPad. Screens has already been updated with pointer integration, and this is where things get kind of amazing in terms of iPadOS and external displays.
When I work with the iPad Pro at my desk, I may have to occasionally check on my Mac mini to monitor its Plex server or transfer FLAC files to my Walkman. I could unplug the iPad Pro’s USB-C cable from the UltraFine display and plug the Mac mini’s cable in again to do this, but there’s a more elegant way to handle it.
With my Mac mini running in the background, I can open Screens on the iPad Pro, which instantly logs me into macOS with my credentials. Here’s why this setup is incredible: Screens for iPad supports full-screen output on external displays (more in the next section), which means I can interact with a full-screen macOS UI on the UltraFine display that is actually being transmitted from an iPad app over USB-C. In the latest version of Screens for iPad, I can use the Magic Trackpad to click-and-drag macOS windows, right-click to open contextual menus, and otherwise use the native macOS pointer from my iPad without even seeing the iPadOS pointer on my external display. It’s a mind-bending setup, but it works beautifully – you’d be forgiven if you looked at the photo below and thought I was using macOS and the iPad Pro next to each other. In reality, that’s just my iPad Pro running Screens in external display mode along with a Magic Trackpad 2.
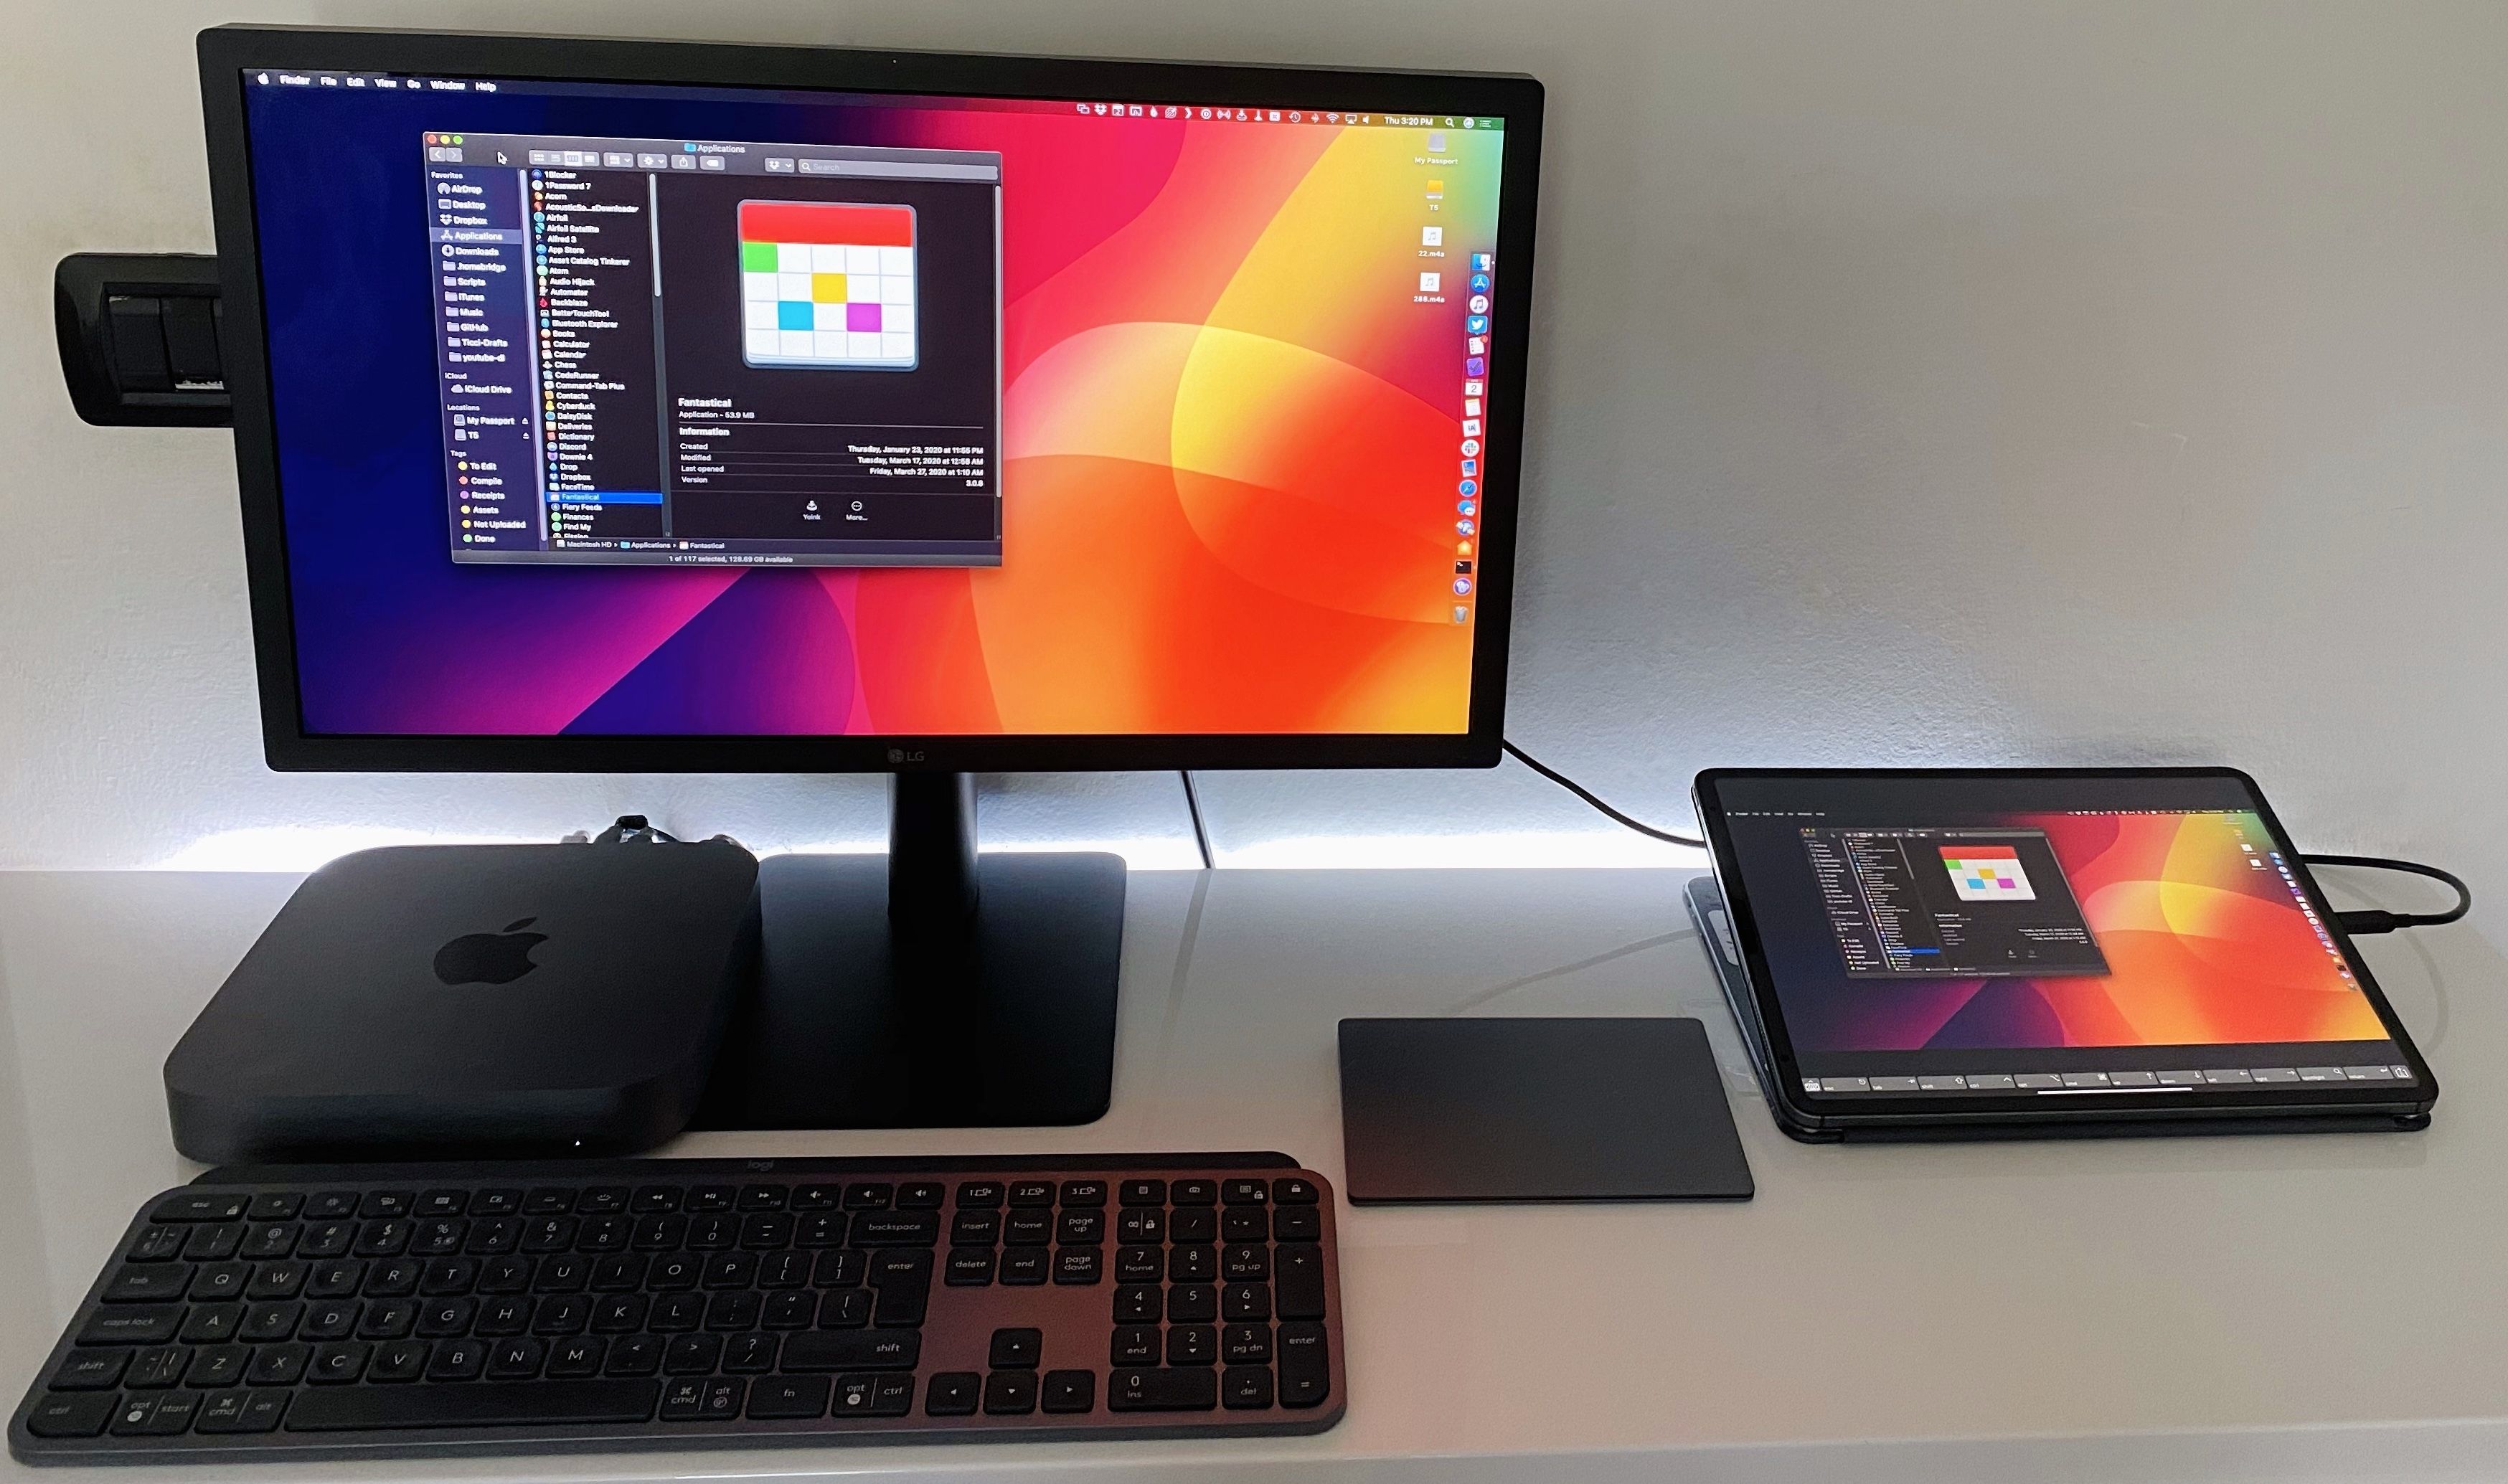
Effectively, this is macOS as an app. Thanks to the pointer API in iPadOS 13.4, the folks at Edovia have been able to emulate classic macOS interactions from a trackpad connected to the iPad. In my experience, the approximation is close enough: were it not for the loss of image quality due to the VNC protocol, you’d be fooled into thinking you’re using macOS from a Mac physically plugged into the UltraFine display. Still, because performance and image quality are good enough, as a result of this Screens update I’ve only plugged the Mac mini into the external display twice this week to record AppStories and Connected.
Full-Screen Apps
In future versions of iPadOS, I would love the ability to get rid of pillarboxing when the iPad is connected to an external display. As I described last year, I’ve grown used to the black bars that appear at the sides of my UltraFine 4K display, and the benefits of this setup, at least for me, outweigh the issue; still, I’d welcome the ability to output full-screen app UIs to the external display and control them with a trackpad.
While we wait for iPadOS to properly support external displays, however, it is possible to get an idea of what such a system might look like by using apps that take advantage of an existing API to output full-screen content on external displays. I don’t use this particular mode every day, but it has its niche, and a handful of developers have devised some pretty clever implementations for it.
Originally launched several years ago and primarily designed for gaming purposes, Apple’s second screen API (based on UIScreen) allows iPhone and iPad games to output full-screen content on a display connected via AirPlay or a cable. The idea, as we explored in an old MacStories article, was to let iPhone and iPad users play games on a big screen by using their touch devices as controllers. The API was never really improved by Apple, but that didn’t stop developers of certain productivity apps from exploiting it for potentially unforeseen use cases.
The iPad apps that integrate with this API are few, and because this technology hasn’t been integrated with the iPadOS pointer yet, it is not possible to “navigate” with the pointer from the iPad’s screen to the external monitor, as you would when using a Mac connected to an additional display. In addition to the aforementioned implementation in Screens, however, I also have a couple other examples I’d like to highlight.
MindNode, my favorite mind-mapping app (which I use every year to outline my iOS reviews) added support for displaying full-screen map content on a connected monitor last year. If MindNode detects an external monitor, you can choose between two modes: you can mirror the entire app to the external display (with pillarboxing), or output a full-screen map to it. If you pick the latter, you can also decide whether the full-screen map should follow the zoom and scroll levels of the iPad (keeping both versions of the map in lockstep) or if you want to lock the viewport on the external display.

With the ability to control the viewport, I can lock the external display to a specific branch of the map, which lets me focus on the details of an individual section, while the iPad shows me the entire map, and vice versa. Even though I cannot move the pointer to the external display and directly control the map there, I’ve found this feature beneficial for those times when I want to keep a section of a map as reference in front of me, so I can stay in my text editor on the iPad.
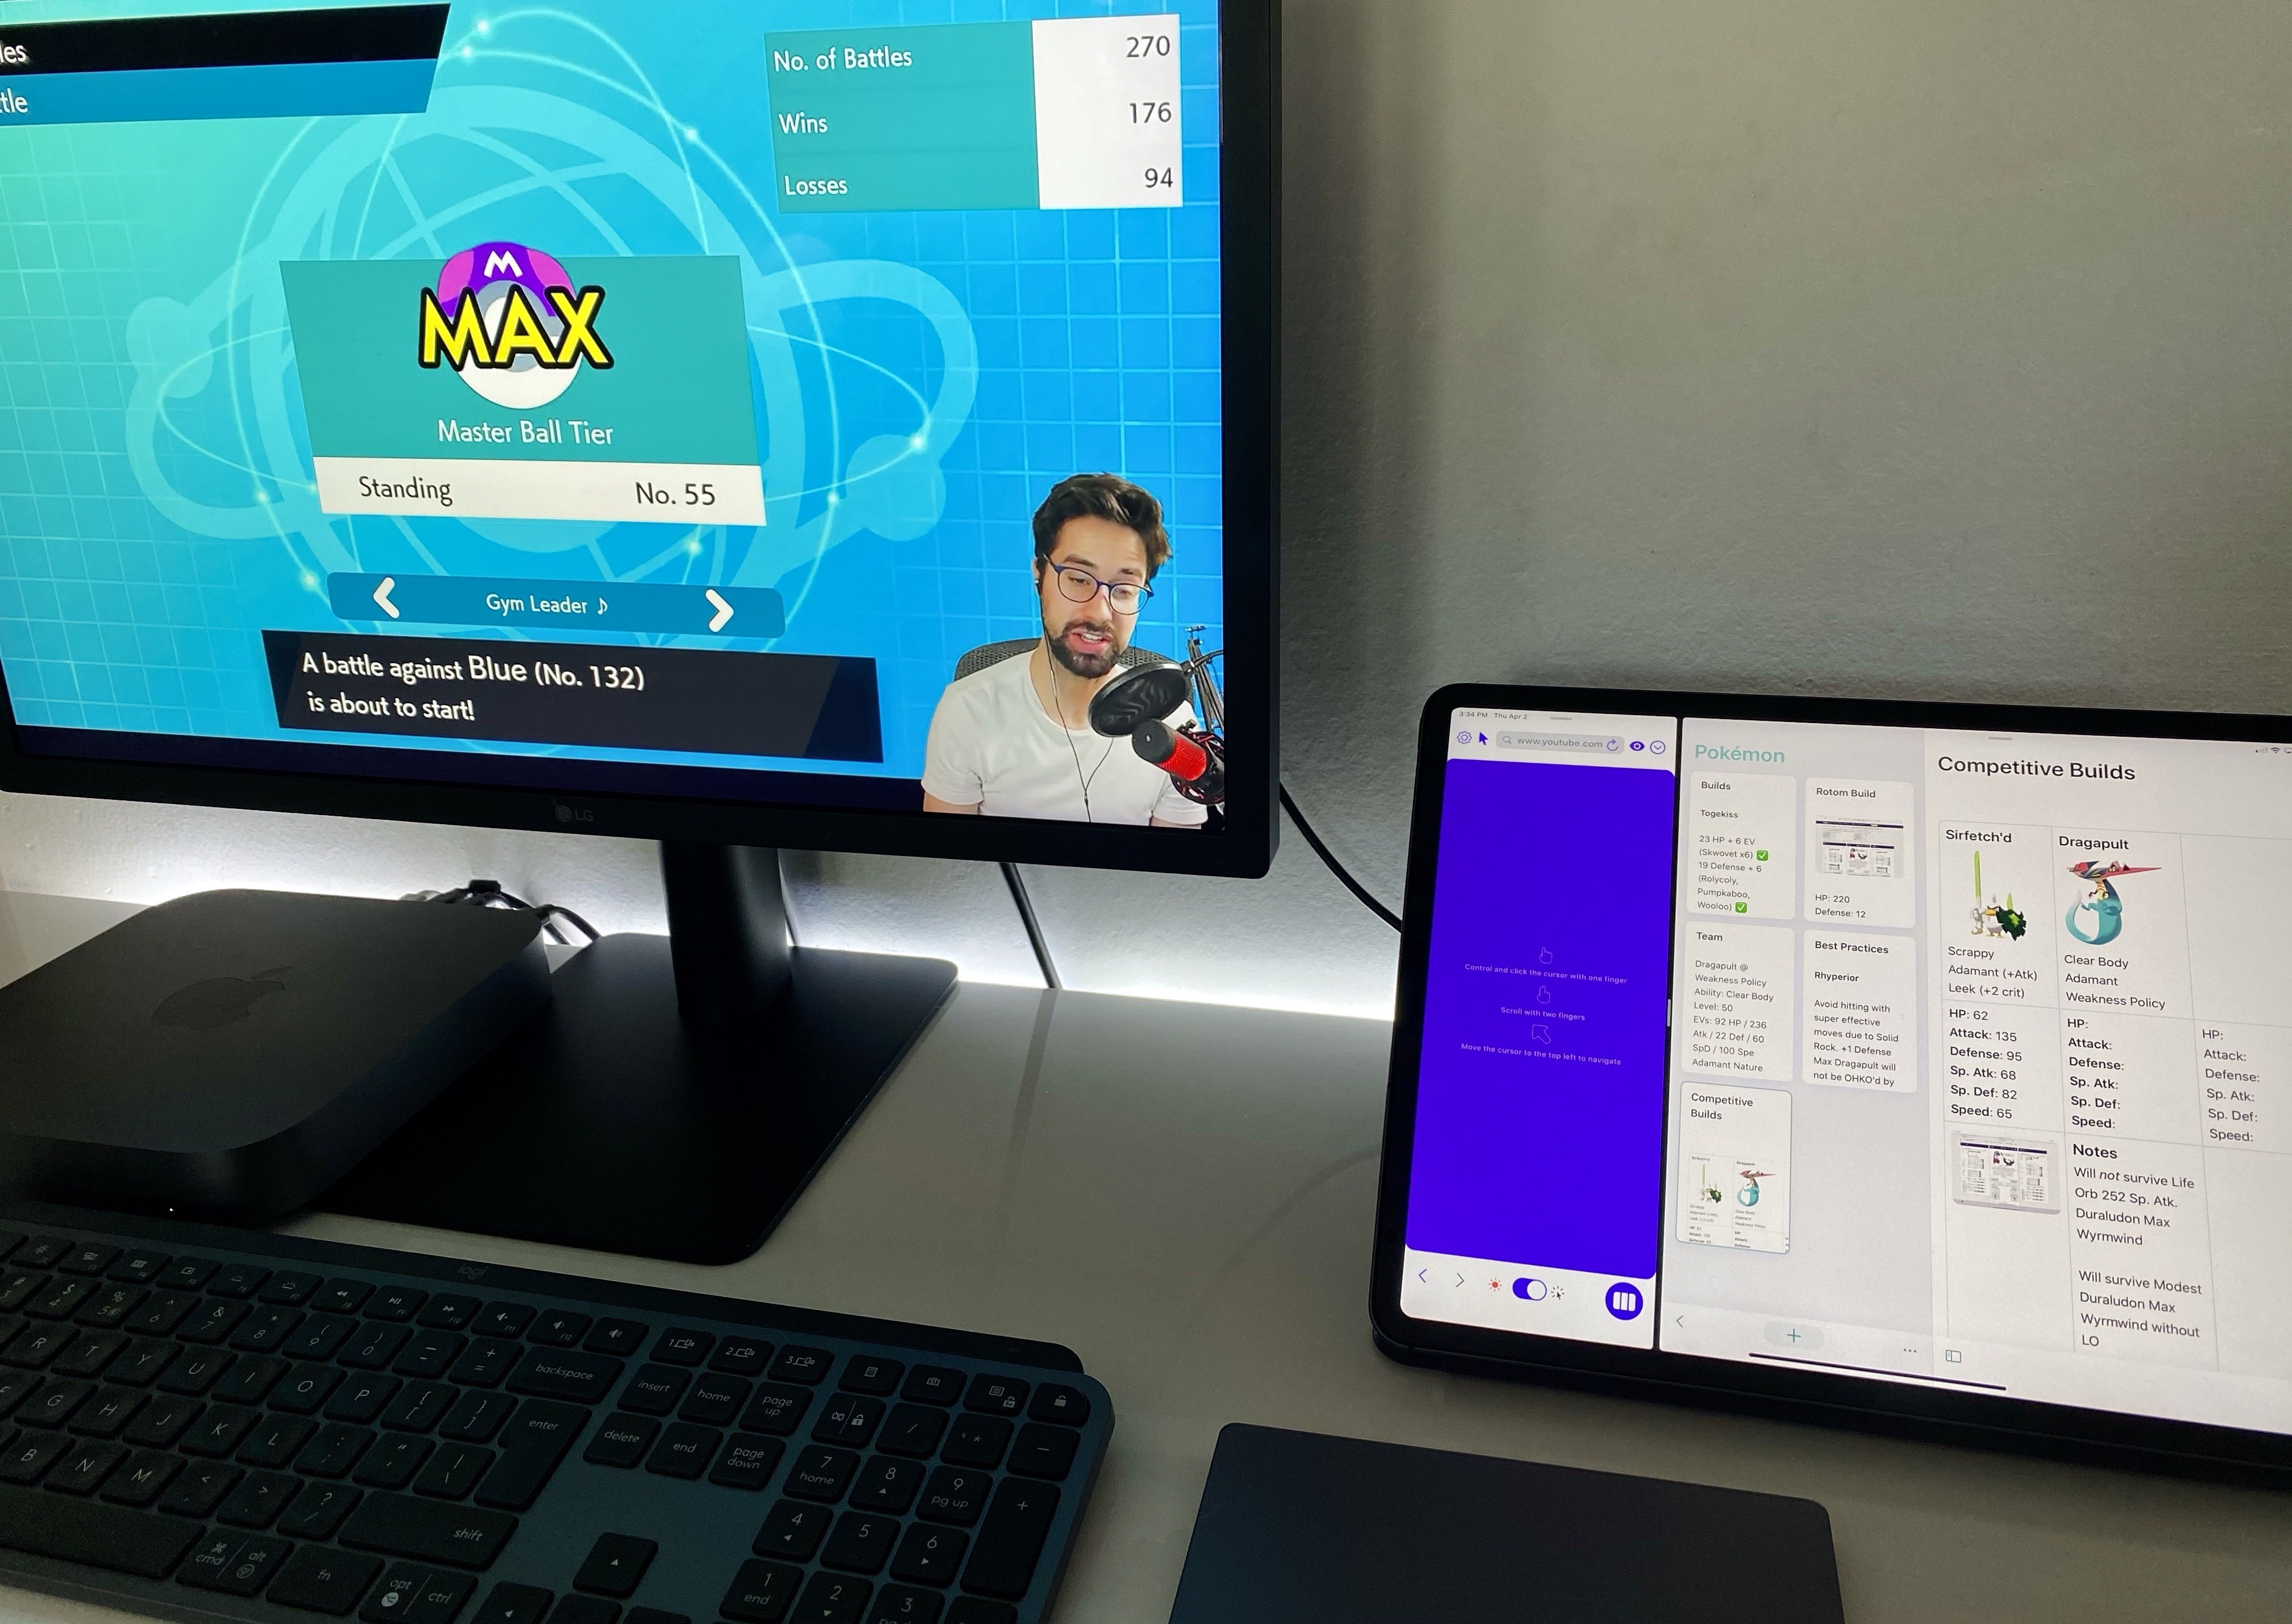
The most impressive implementation of the second screen API, however, is the one in Shiftscreen, a new utility by indie developer Yannik Schrade that’s been entirely built around this technology. Shiftscreen is an iPad app that lets you open webpages and documents – it’s a custom browser and document preview tool. That’s not exciting at all, but here’s the twist: Shiftscreen lets you open these webpages and documents as multiple windows on external monitors, where they’ll be displayed in full-screen, without pillarboxing. On the iPad, you manage these open windows and select different zoom levels to make webpages bigger or smaller; on the external monitor, you see your open webpages and documents (any document that can be previewed with Quick Look is supported by the app) in full-screen.
At a glance, Shiftscreen may seem like a utility designed for teachers or people who often do presentations and may want to output a webpage or PDF document onto an external display in full-screen. The app’s developer has considered that use case, which is why Shiftscreen, in addition to a virtual touchpad to control content on the connected monitor, also has a laserpoint feature. But the use cases for Shiftscreen go far beyond lectures and presentations, and I’ve been taking advantage of the app in a bunch of interesting ways.
First, due to a legacy aspect of the iPad’s multitasking system, it is possible to use two apps in Split View and let one of them output full-screen content on an external monitor; however, that app has to be placed on the left side of the Split View.12 With this in mind, I can open iA Writer or Notes on my iPad, create a Split View with Shiftscreen on the left, and take notes while looking at a big, full-screen webpage on my UltraFine 4K display. Shiftscreen doesn’t have native integration with the iPadOS pointer yet (although it should be coming soon), but clicking and dragging on its virtual touchpad is good enough for now.
The full-screen webpage is more comfortable than a tiny Safari window in Split View on my iPad, and I find this an excellent way to get research done on a particular topic. Similarly, because Shiftscreen can also open documents in full-screen, I can open a version of a PDF document in full-screen on the UltraFine and edit a copy of it on my iPad Pro.
What if my research requires me to watch a video though? Thanks to the most recent update to the app, I can navigate with the Shiftscreen browser to the YouTube website, click on a video, and play it back in full-screen on the external monitor while continuing to work on my iPad Pro. This is nothing revolutionary for Mac users, but it’s never been possible on the iPad before, and developer Yannik Schrade found an ingenious solution to the problem by working around an old API designed for games.
My favorite use of Shiftscreen involves Markdown and a combination of apps. Stay with me, because this is a wild one.
As I detailed last year, I use Working Copy to save articles from iA Writer and share my drafts with the MacStories team. Working Copy comes with a Preview feature that lets you preview Markdown documents as HTML; in the Preview menu, you can also enable an External URL option that allows Working Copy to create a local web server where the preview will be displayed. This local web server runs at a specific address (something like 192.168.1.1), and you can copy its URL to paste it in Safari and see the preview generated by Working Copy. In the latest version of the app, there’s also the option to let this local web server run in the background, which I’ve unlocked so Working Copy can always keep its local web server active.
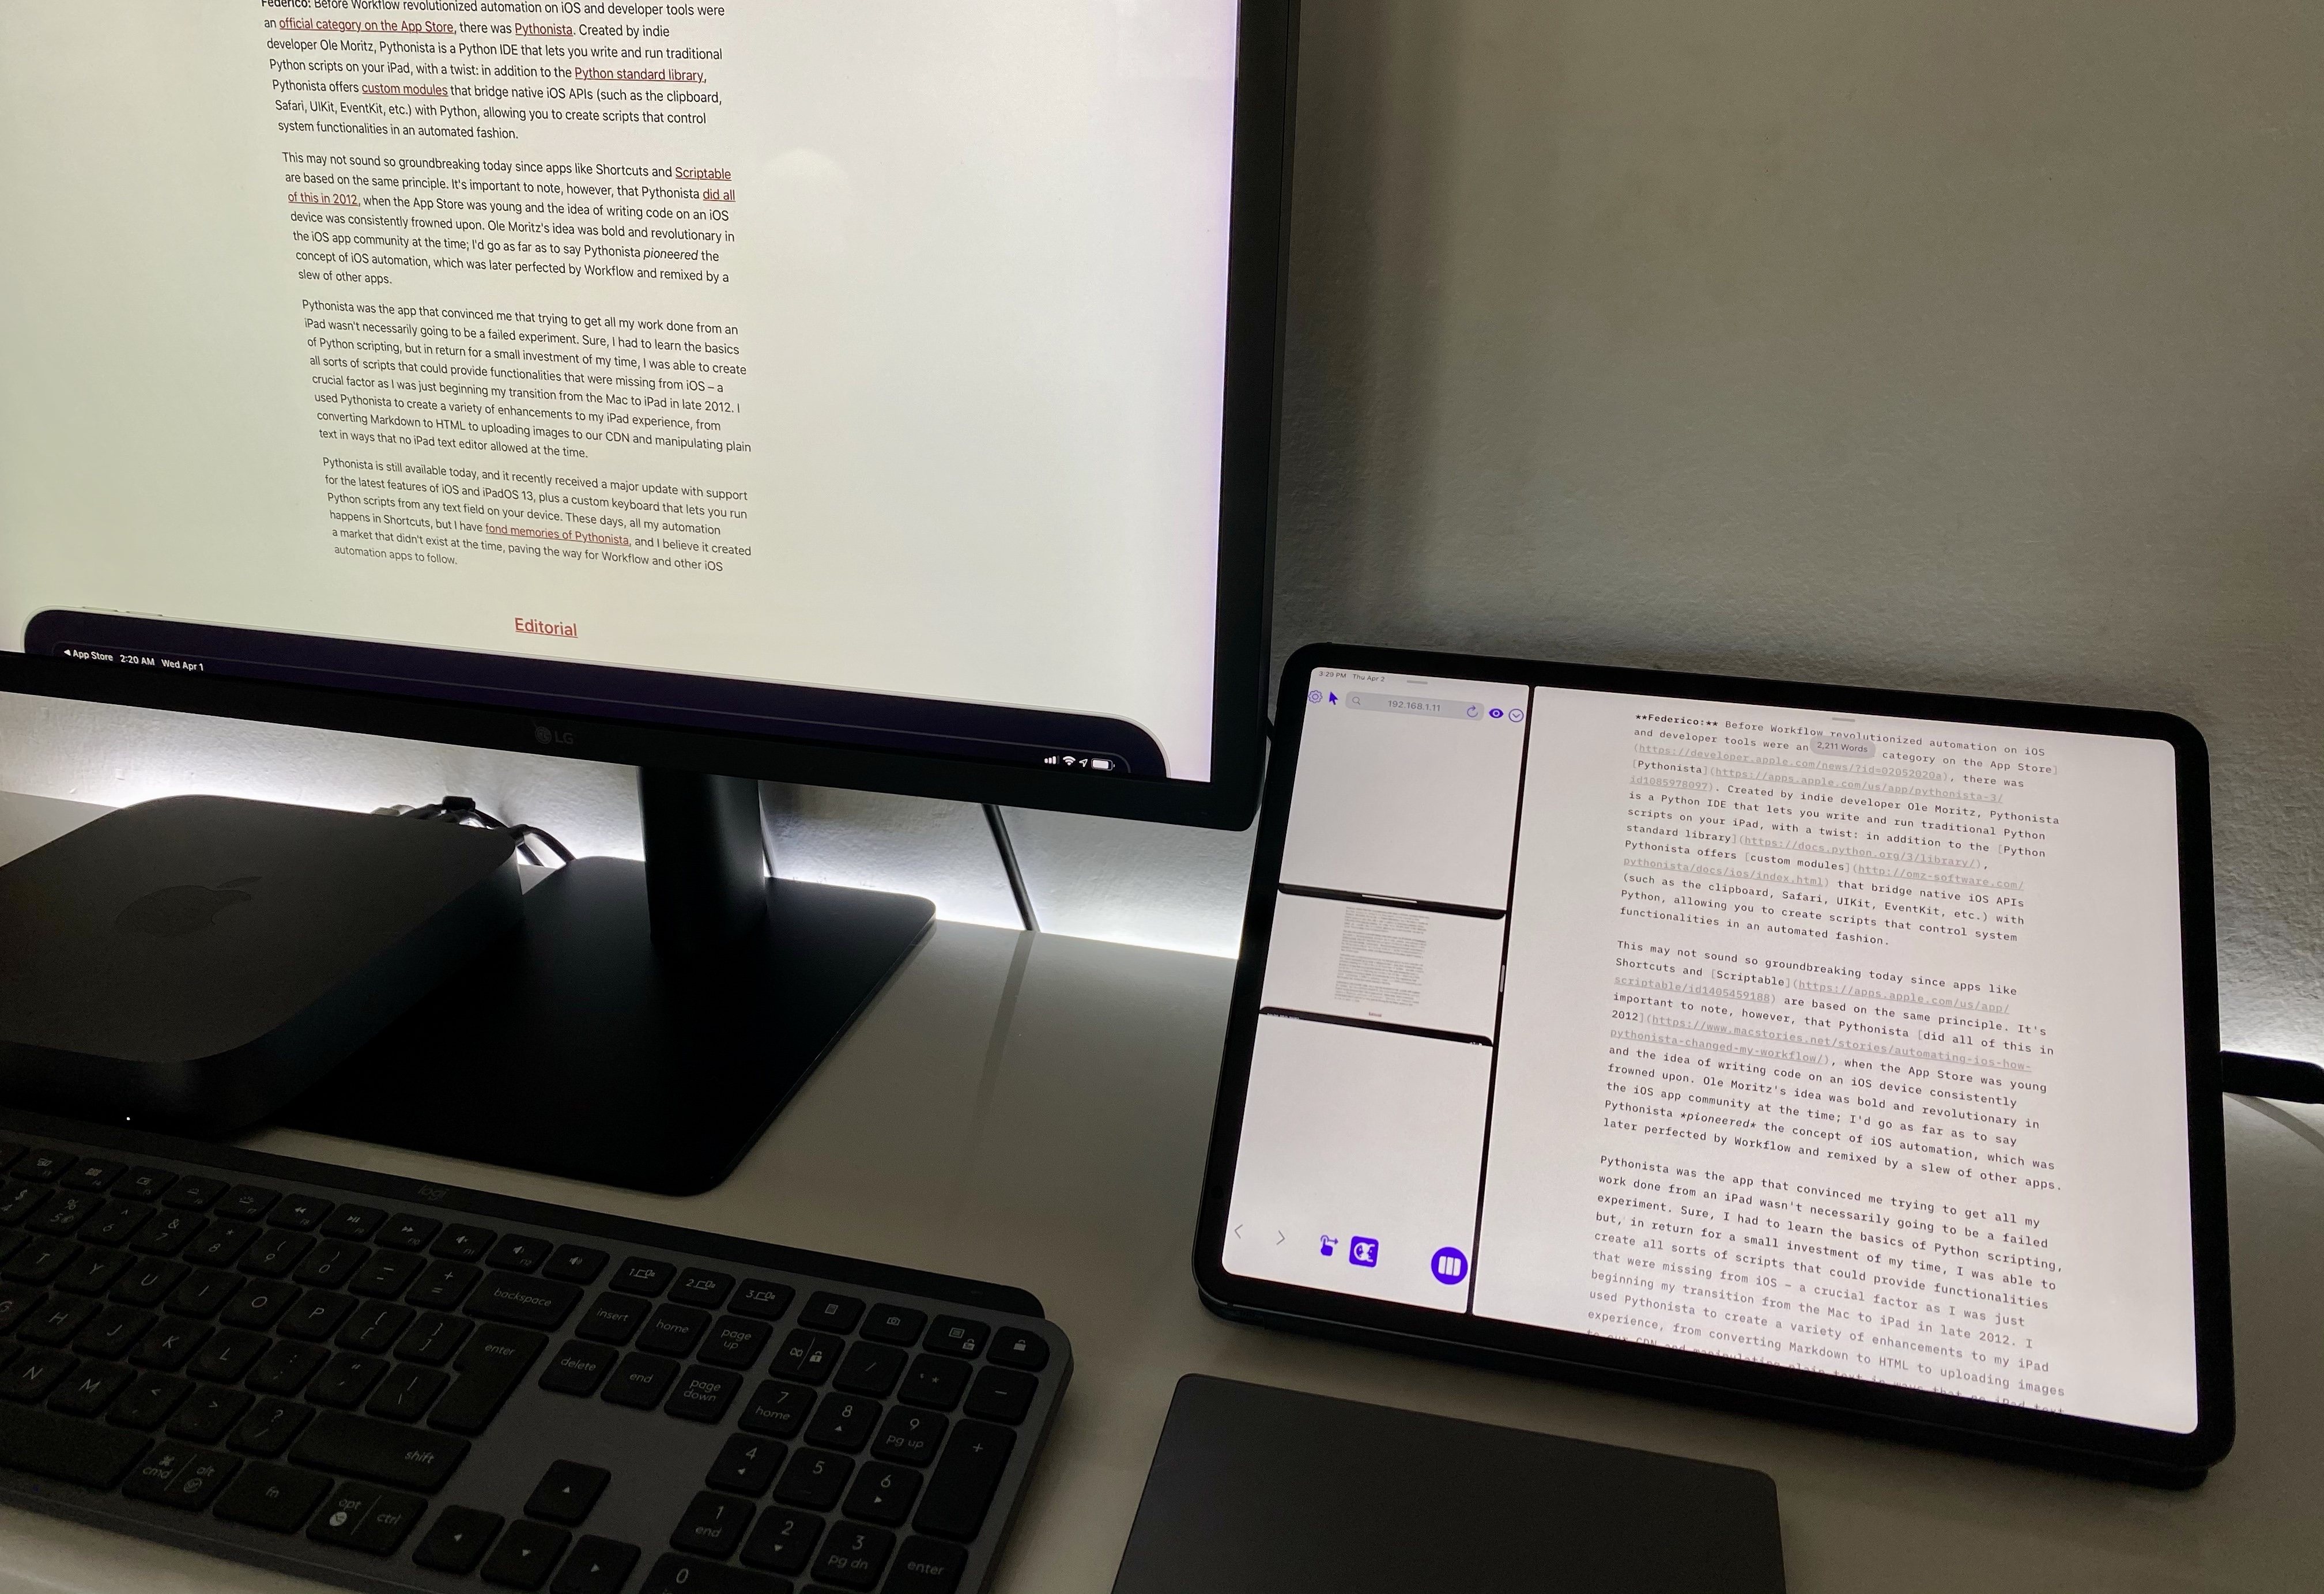
I can use Shiftscreen to open a remote preview generated from Working Copy as a full-screen webpage on an external monitor.
I think you know where this is going. After copying the local web server URL for a document’s preview in Working Copy, I can put Working Copy in Slide Over and dismiss it. Then, I can put iA Writer and Shiftscreen in Split View, with Shiftscreen on the left so it outputs full-screen content on the external monitor. Because Working Copy is keeping the preview server running in the background, I can paste the preview’s external URL in Shiftscreen, which will open a webpage in full-screen on the external display. This way, I can edit a document in iA Writer and simultaneously look at a styled, full-screen preview13 of it on my UltraFine 4K monitor, which I can scroll with Shiftscreen. I can do all of this with my iPad Pro, a single USB-C cable, and a combination of apps in Slide Over and Split View.
At this point in the evolution of the iPad and its operating system, I believe Apple is aware of the fact that certain users like to pair their iPads with external displays to get work done. As I noted above, the default UI mirroring system is limited by pillarboxing; at the same time, the API to present full-screen content on external monitors is old, poorly documented, and not integrated with the new reality of iPadOS multiwindow and pointer support. I may have found some ways to take advantage of apps that use the existing full-screen content API, but I look forward to Apple releasing a new, more powerful, fully multitasking- and pointer-enabled version of it in the future.
In the making of this story, the iPad Pro has been sitting (propped up at a slight angle) on the right side of my desk, connected to the UltraFine 4K display with a single USB-C cable. All my interactions with iPadOS took place from the MX Keys keyboard in front of me and the Magic Trackpad 2 in between the keyboard and the iPad. The only time I had to physically touch the iPad was to confirm a purchase from the App Store by double-clicking the iPad’s side button – that’s how comprehensive the new pointer system is in iPadOS 13.4.
For someone with a setup similar to mine – an iPad Pro, a keyboard, and an external monitor – the Magic Trackpad 2 is, right now, the single best accessory that can be paired with iPadOS. The combination of the trackpad, pointer system designed by Apple, and support from third-party developers makes working with the iPad Pro at a desk not only feasible, but fun even – with a level of precision and nimble interactions that were previously inconceivable for iPadOS.
Modular Future
Looking ahead at the next decade of iPad, I believe Apple will continue to evolve the iPad Pro line with a focus on modularity. A modular computer enables a new kind of fluid, versatile user interaction – one that can scale across different contexts, input systems, and form factors. Take a look at the existing iPad Pro and its support for USB-C, keyboards, displays, and trackpads – as I did in this story – and you can already see this strategy at play today, right now.
For this ideal modular future to come to fruition, however, the iPadOS platform will need to grow in some key areas. As I explained above, the iPad’s support for external monitors needs proper integration with the pointer and multiple windows, allowing users to freely move windows across displays and interact with apps on an external display using a pointing device. The fact that Apple added a full-featured system-wide pointer this year makes me think this will happen sooner rather than later. On a similar note, while extensive, iPadOS’ trackpad options could learn a few things from macOS, where all trackpad settings are exposed in one preference panel with clear instructions; the Mac also supports Hot Corners, a feature that is not integrated with iPadOS’ native pointer yet, and which could further simplify iPad multitasking.
More broadly speaking, I expect Apple to continue opening up the iPad’s USB-C port to more types of devices. Whether it’s a scanner, printer, MIDI interface, game controller, or multitrack audio interface, iPad users should be able to plug any USB accessory into the iPad Pro and have it work just like on macOS. Apple has an opportunity to rethink how the necessary drivers for these accessories should be installed (could they be extensions delivered via the App Store?). Regardless of the company’s approach, it should happen; when it comes to USB-C, I don’t see why the iPad Pro shouldn’t be as flexible as the Mac.
If my journey with the iPad over the last eight years – and more specifically with the 2018 iPad Pro – has taught me anything, it’s this: I love working with a modular computer that can be a tablet, laptop, and desktop workstation at the appropriate time. The freedom to choose how I want to hold, touch, or type on my iPad Pro is unparalleled. No other computer lends itself to being used at the beach, at a desk, on the couch, or in my hands as seamlessly and elegantly as the iPad Pro does.
At its core, the iPad Pro is still a tablet; with the right additions, however, it’s also become the modular computer I didn’t know I needed – and now I can’t imagine using anything else. I can’t wait to see where this approach takes me over the next 10 years.
You can also follow all of our iPad at 10 coverage through our iPad at 10 hub, or subscribe to the dedicated iPad at 10 RSS feed.
- I bought the 1 TB model because it offered two extra GBs of RAM. In hindsight, that was a good call. ↩
- For those times when I don’t want to take control of the living room TV because someone else is watching it. ↩
- The Paperlike is, well, supposed to feel like real paper for users who write and sketch with the Apple Pencil a lot, but I’m not one of those people. ↩
- Two of them, backlight illumination and adjustable viewing angles, will be fixed by the upcoming Magic Keyboard. ↩
- Isn’t it fun when you can just make up a nickname for something and slap the so-called qualifier on it? ↩
- Remember when we could freely go out and drive around? Good times. ↩
- Where by work I also mean “business tasks” that are typically involved with running a company that go beyond “just typing in a text editor”. Some people seem to think that running MacStories only involves “being a blogger”; I wish they were right. ↩
- Until a few weeks ago, I couldn’t get any third-party Bluetooth keyboards to be recognized by macOS’ login screen after a system shutdown. As it turns out, many third-party keyboards don’t work after a Mac has been shut down if you have FileVault enabled since the startup disk is encrypted and doesn’t have access to the necessary Bluetooth drivers to recognize a third-party keyboard. After disabling FileVault on my Mac mini, I can now type my password with the MX Keys at startup just fine. ↩
- Yes, there is an Accessibility setting to enable button shapes, but that’s optional. ↩
- Note how, because of Mac Catalyst, the Twitter team achieved feature parity across its iPad and Mac apps for features such as context menus and keyboard shortcuts. ↩
- Which is why, unfortunately, I can’t recommend the new Brydge Pro+ keyboard for now – its trackpad is limited to two-finger swipes. ↩
- Back in the days of iOS 9, the app on the left was considered the “primary” one. ↩
-
In Working Copy, you can put a file called
md-styles.cssin a repo, and all Markdown documents in that repo will use it as a default stylesheet when previewed. ↩
