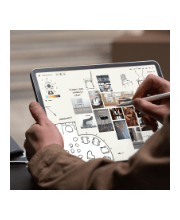
It all started because I wanted a better keyboard for my Vision Pro. I had no idea that, in looking for one, I’d accidentally create the hybrid Apple computer of my dreams.
As I quickly discovered after working on the Vision Pro daily, you can get by without an external trackpad, but a keyboard is necessary if you want to type something longer than a passcode. That’s where my journey began: if I wanted to write and edit articles on the Vision Pro, what would the best keyboard-trackpad setup be?
Over the past few weeks, I’ve tested all the options at my disposal. I started with an Apple Magic Trackpad and Keyboard, which I then placed inside a Twelve South MagicBridge (it was too uncomfortable to put on my lap for longer stretches of time). Next, I tried using different types of “trays” for these two accessories that offered a laptop-like layout (comfort was better, but lack of palm rejection was an issue). I even attempted to revive an old Brydge keyboard and use it with the Vision Pro, but, alas, third-party trackpads aren’t supported on visionOS at the moment.
Eventually, I settled on the solution that I should have known was coming for me all along: the best keyboard and trackpad combo for a Vision Pro is a Mac laptop. So I started using my MacBook Air every day, taking advantage of Mac Virtual Display and Universal Control to get work done with the Vision Pro in a mix of classic desktop apps and new visionOS experiences. I’ll write more about this soon, but, so far, it’s felt powerful and flexible in a way that iPadOS hasn’t made me feel in a while.
But something kept nagging me.
Why wasn’t Apple making that kind of combined accessory for the Vision Pro? More importantly for my use case: I had a screen physically attached to my MacBook Air, but I rarely looked at it. If I’m using my MacBook Air with Mac Virtual Display or, when I’m at my desk, in clamshell mode with my Studio Display, do I even need a screen to be permanently attached to a computer that I primarily use as a keyboard and trackpad for other displays?
Just as I was pondering these thoughts, Luke Miani’s video appeared like a sign from the universe. The concept behind the video was fascinating: if a Vision Pro can provide you with a virtual display for your Mac, can you physically remove the display from a MacBook and continue using it in “headless” mode with a Vision Pro or other external monitors? The answer is yes.
That video planted an idea in my brain that I couldn’t get rid of. I could see myself working with that type of accessory; removing the screen from my MacBook Air would make it even lighter to carry around and put on my lap; it would also mean I could get rid of the standalone Magic Keyboard and Trackpad on my desk and just use the remaining part of the MacBook Air for input with my Studio Display.
I was tempted, but the more I thought about it, the more I realized there was an obvious missing piece. What about those times when you do want to have a screen attached to your MacBook Air because you can’t or don’t want to wear a Vision Pro?
And that was the turning point, and why I needed you to follow along with this introduction, so you can understand – I hope – how my brain operates.
You see, I’d been thinking about creating a headless MacBook Air and relying on Universal Control, but I was only considering one side of the story – the Mac-to-Vision Pro side. It was only when I remembered that Mac-to-iPad Universal Control and Sidecar also existed that everything clicked:
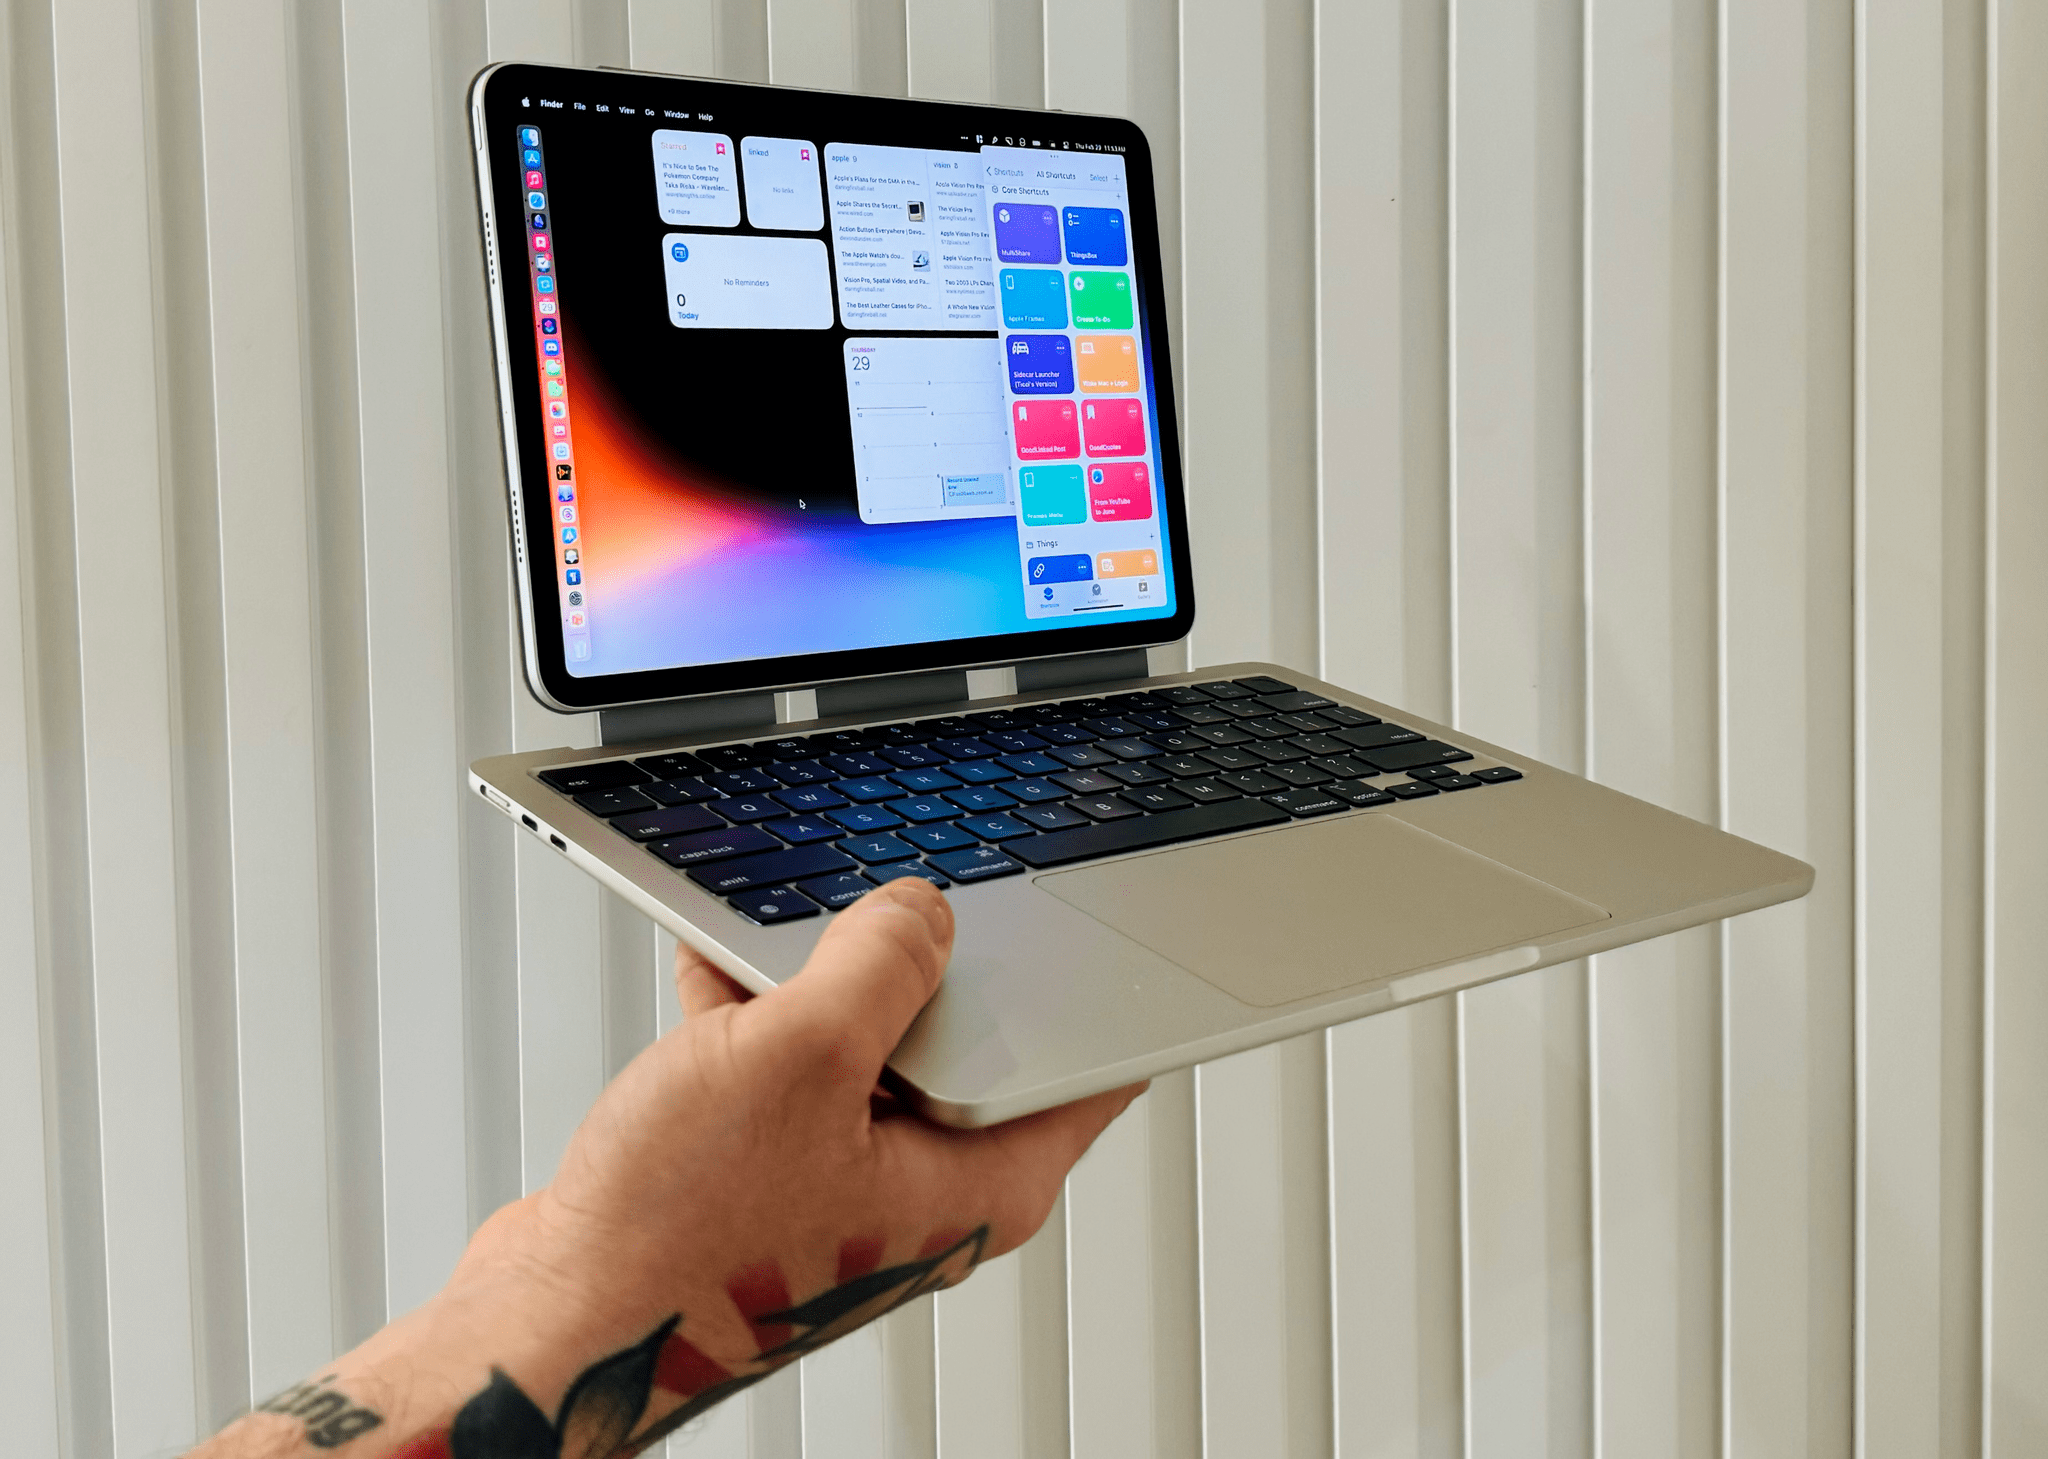
I didn’t just want to make a headless MacBook anymore. I had to figure out how to combine the MacBook Air and iPad Pro into a single machine.
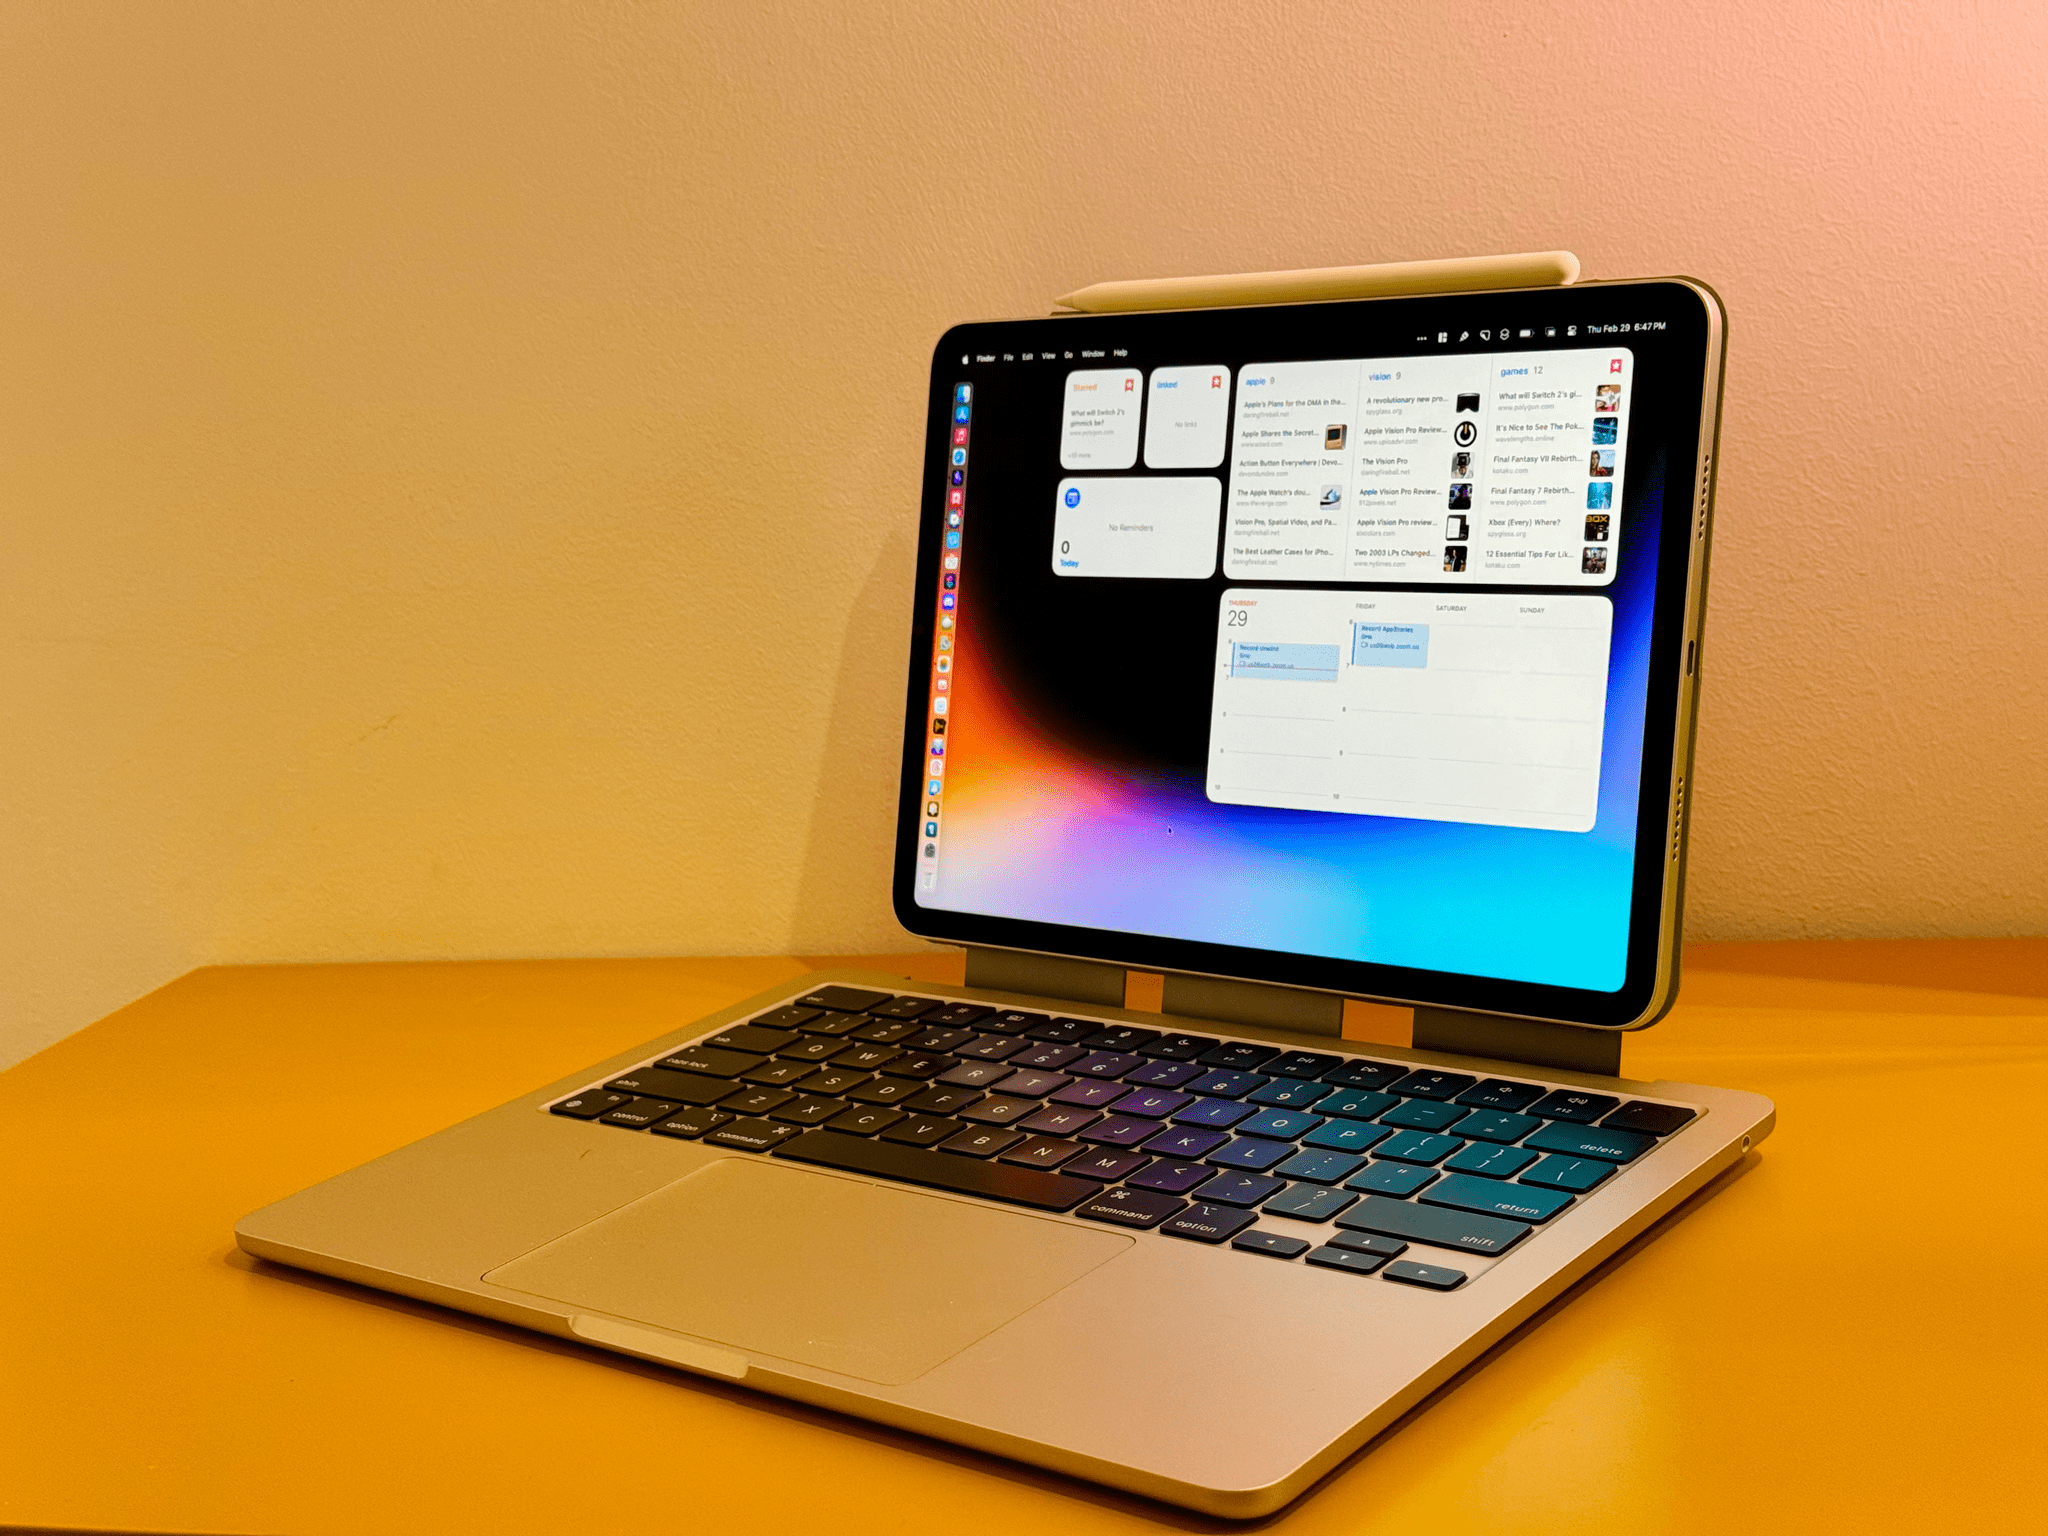
For the past three weeks, I’ve been using something I call a “MacPad” as my new laptop. The MacPad is a hybrid device that serves multiple purposes:
- It’s a keyboard and trackpad for my Vision Pro;
- It’s a Mac with a detachable display;
- It’s an iPad Pro with an external keyboard and trackpad.
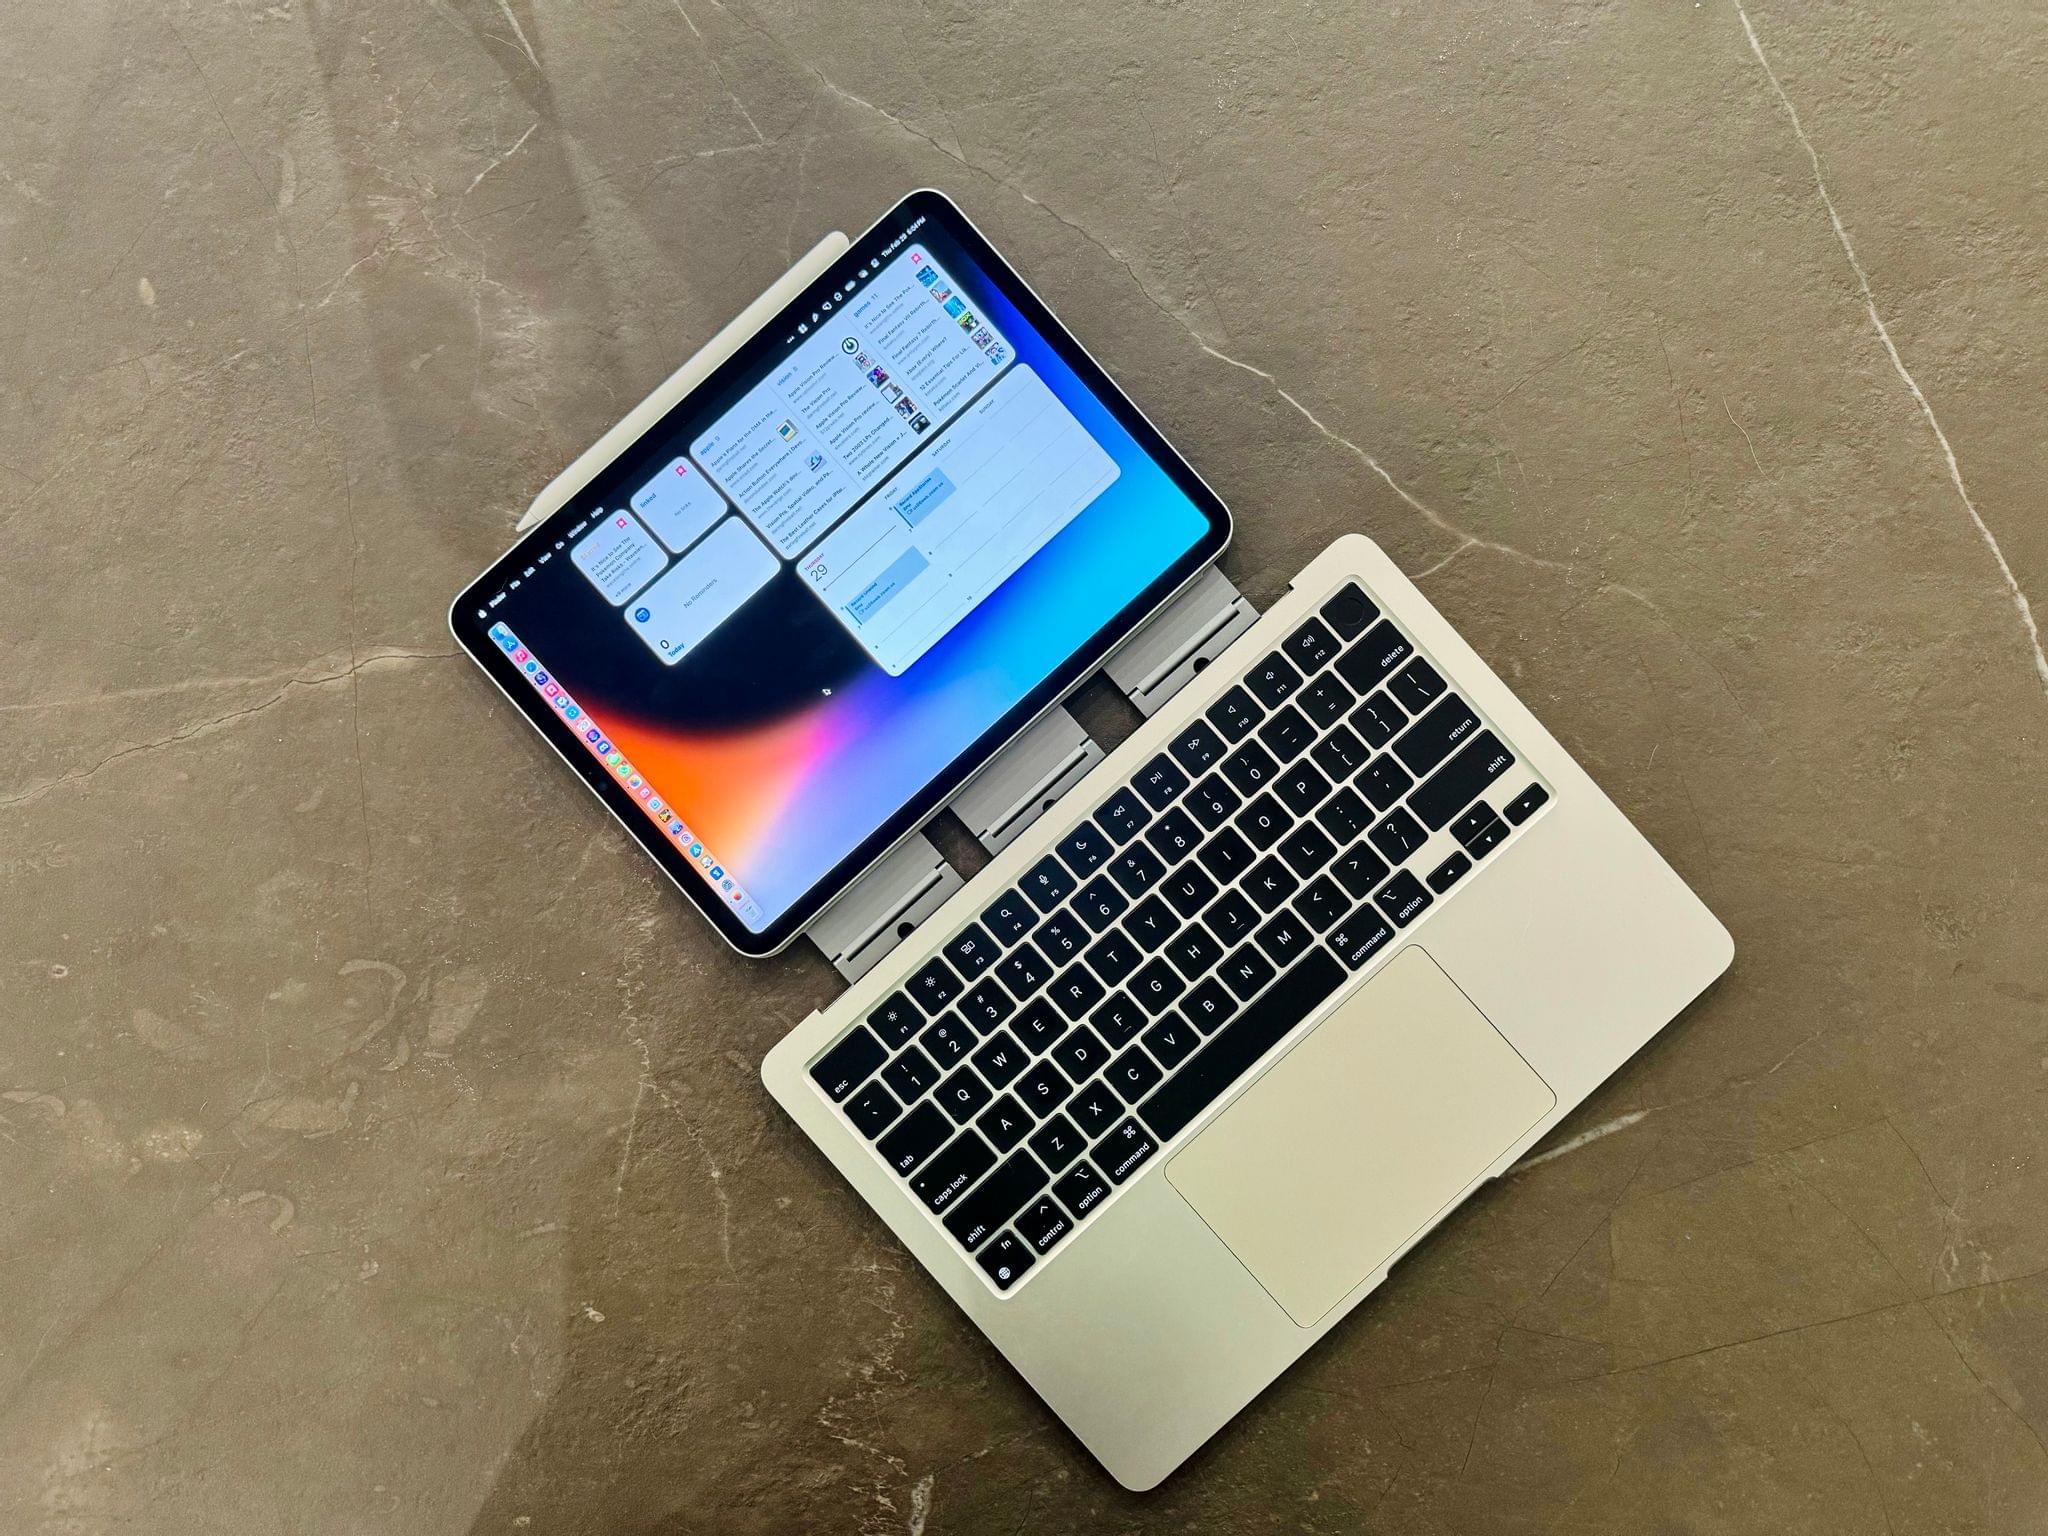
You know where this is going. These aren’t three separate devices: it’s one computer made of, well, two computers working together thanks to the magic of Apple’s ecosystem. It’s a Mac with an iPad display that I can detach and use as a tablet whenever I want; it’s an iPad that transforms into a Mac when docked. And, it’s the ideal keyboard and trackpad accessory for the Vision Pro.
In researching keyboard options for the Vision Pro, I ended up building the convertible Apple laptop-tablet that I so desperately want the company to make.
Let me explain how.
Table of Contents
- Setting Up a Headless Mac
- Attaching the iPad Pro to the MacBook Air
- Using Sidecar to Turn an iPad into a Mac Display
- Questions, Tidbits, and Other Setups
- My Future Is a MacPad
Setting Up a Headless Mac
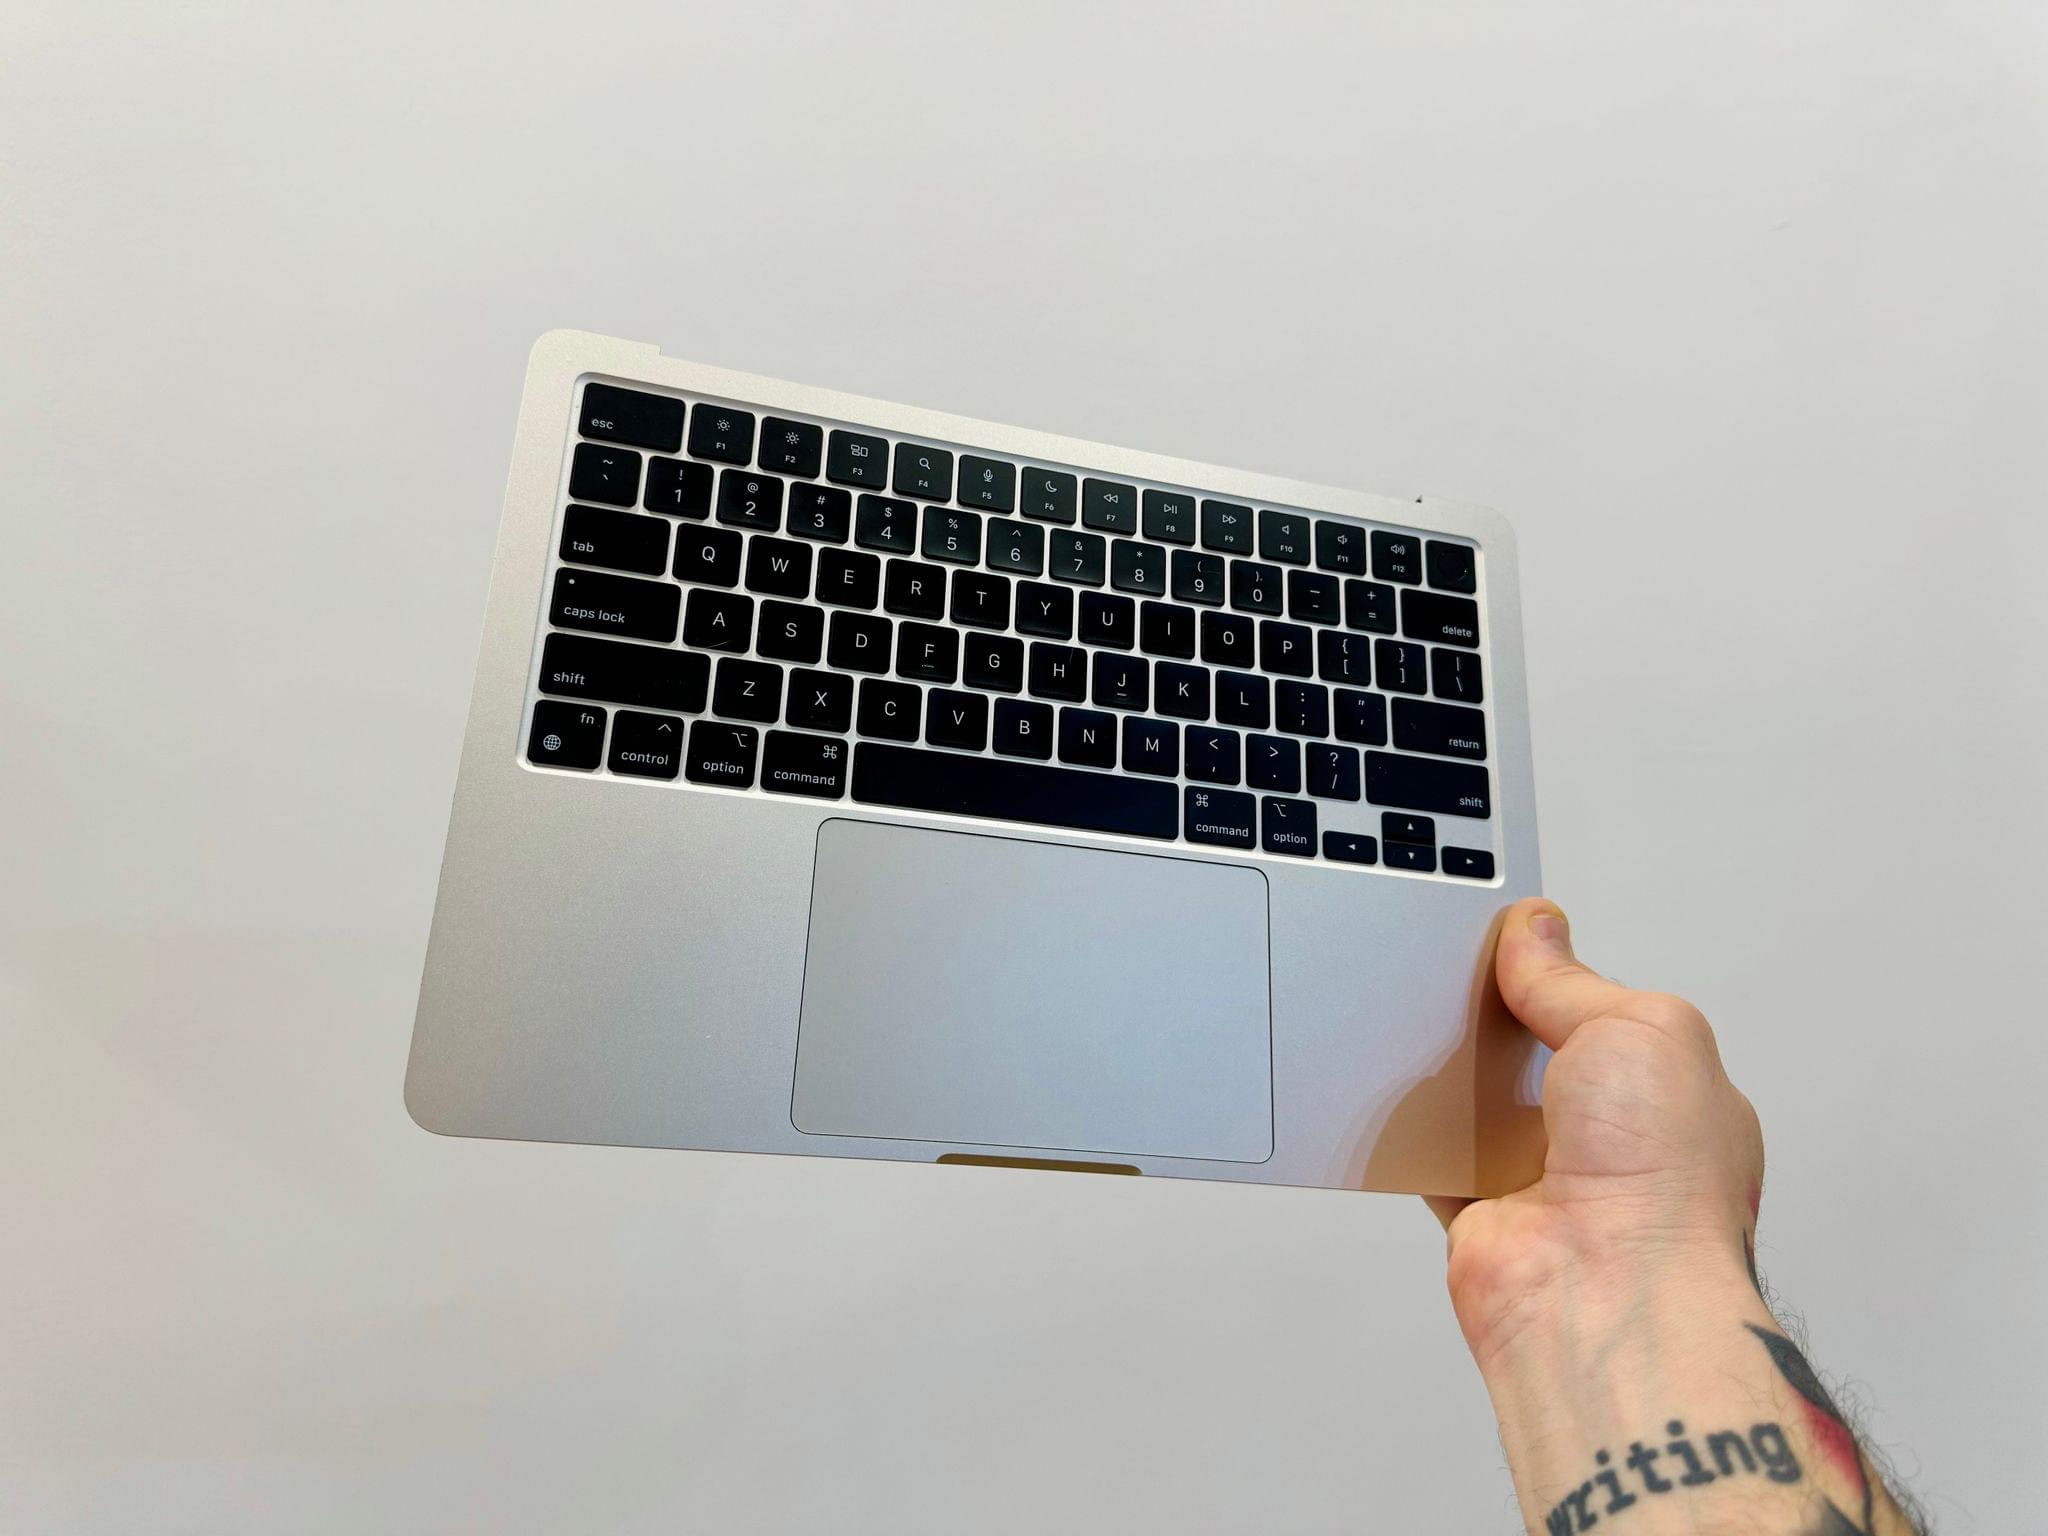
Alright, so obviously the first step of the process is to physically remove the screen from a MacBook, right? Well, not quite. Let me share some advice first.
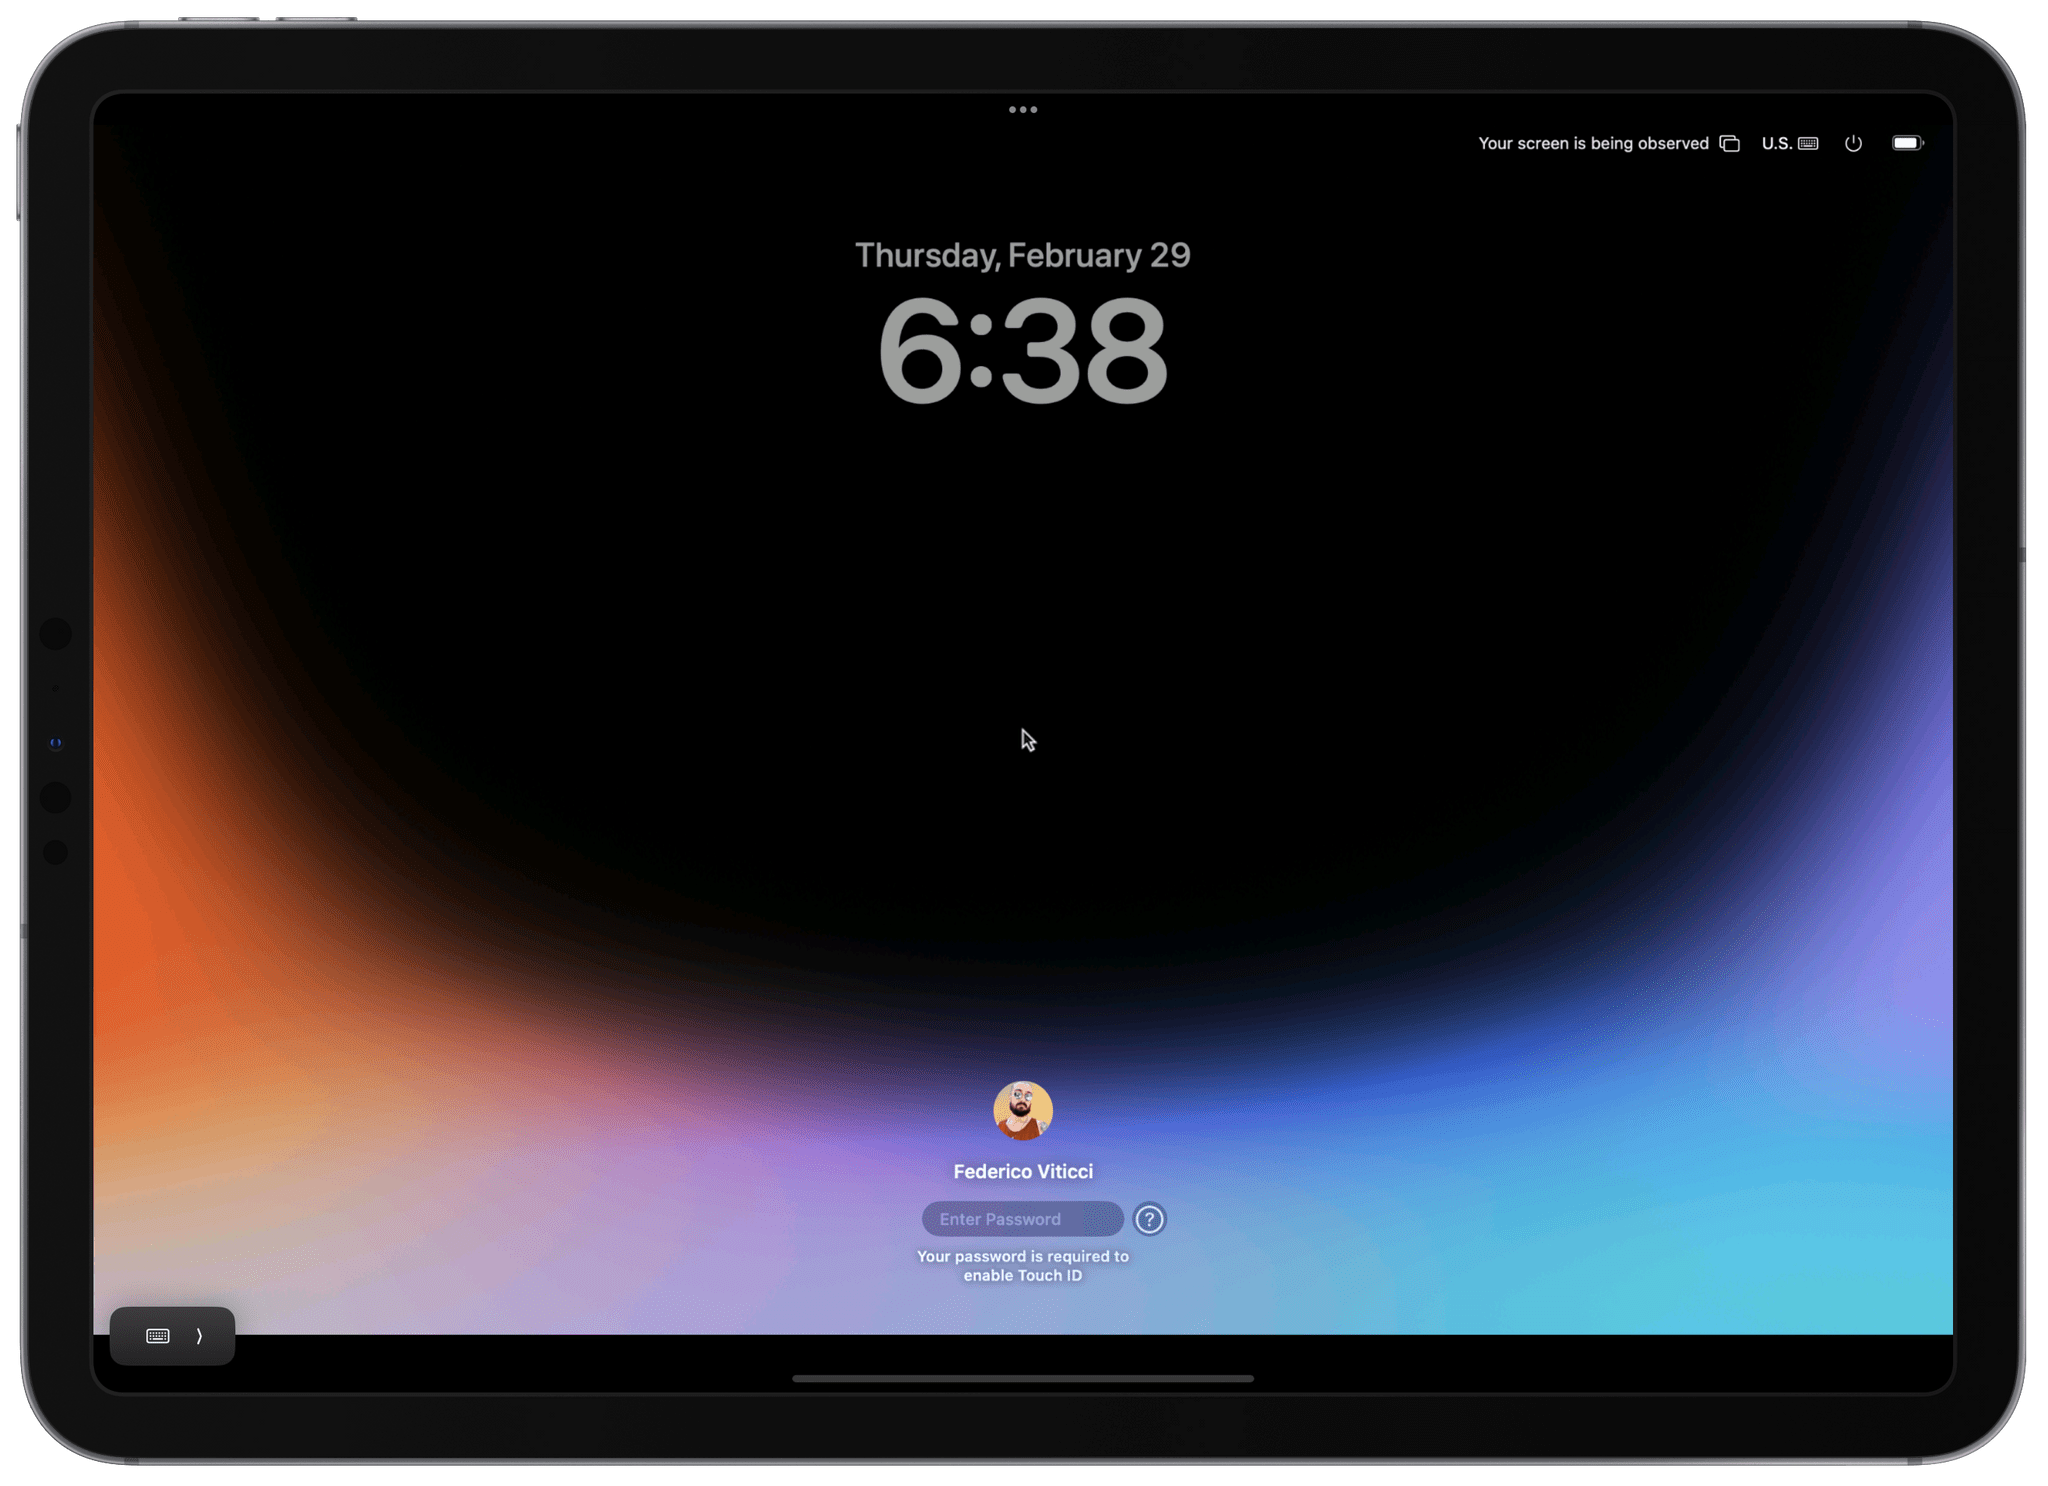
As I was considering this procedure for my own MacBook Air, I started wondering what would happen if my headless Mac shut down or had to reboot and I didn’t have a monitor to see the login screen and type my password. Sidecar, which is the Apple software that turns an iPad into a Mac display, can only be activated from an unlocked Mac; Apple Watch unlock for macOS only works after you’ve logged in with a password at least once after a macOS restart.
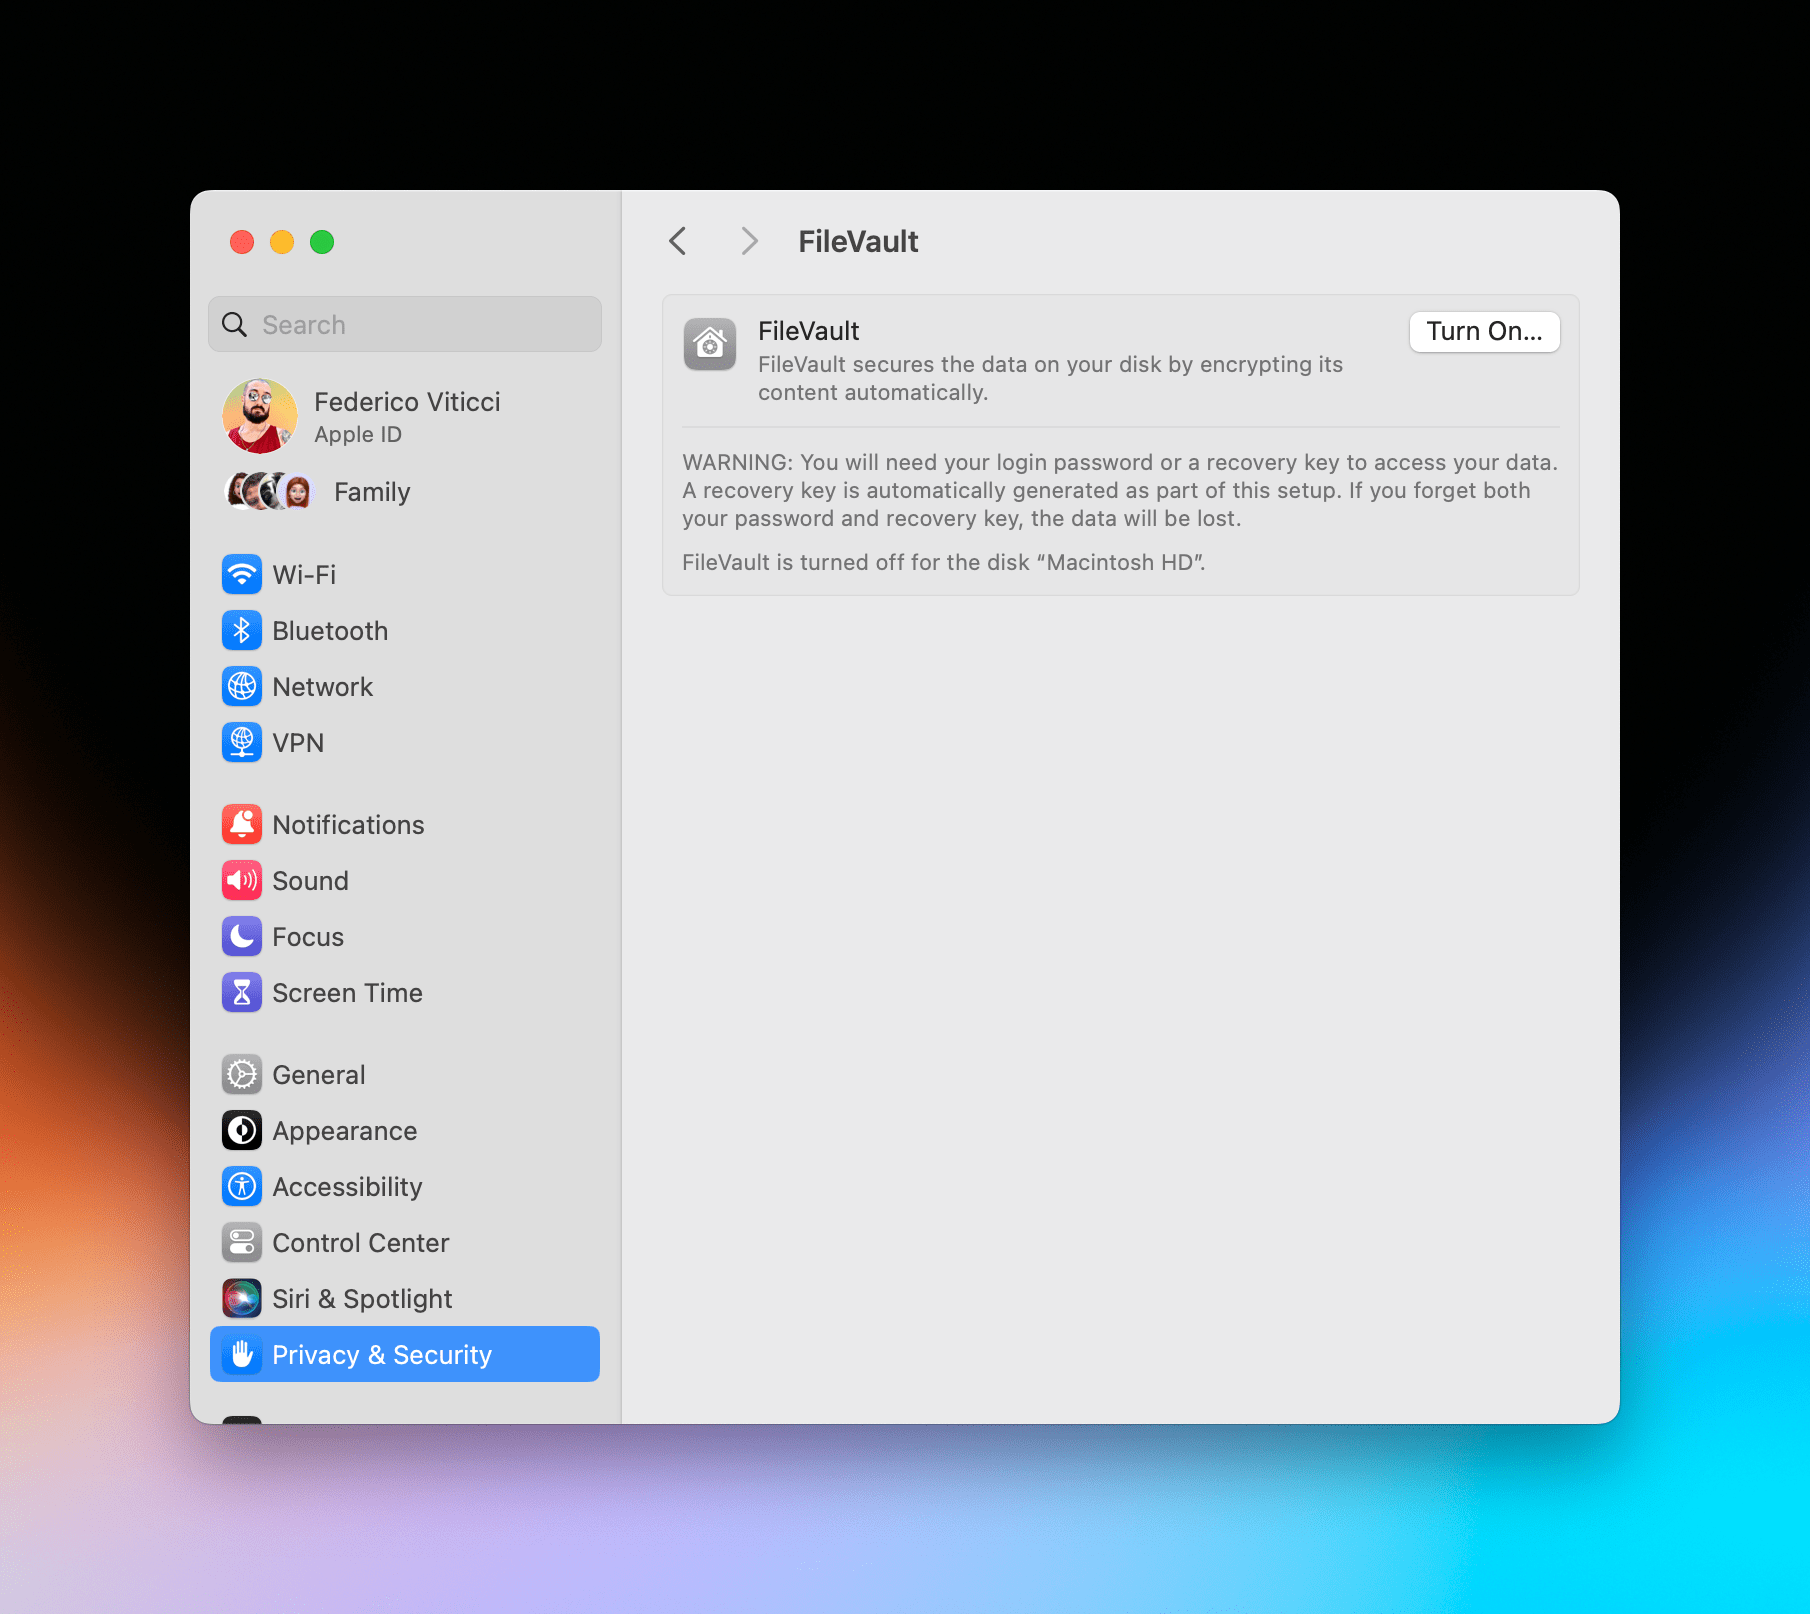
This may be a dealbreaker to some, but to overcome this issue, I created a stronger password for my Mac and disabled FileVault encryption so that I could use VNC access at the macOS login screen, even after a reboot.1
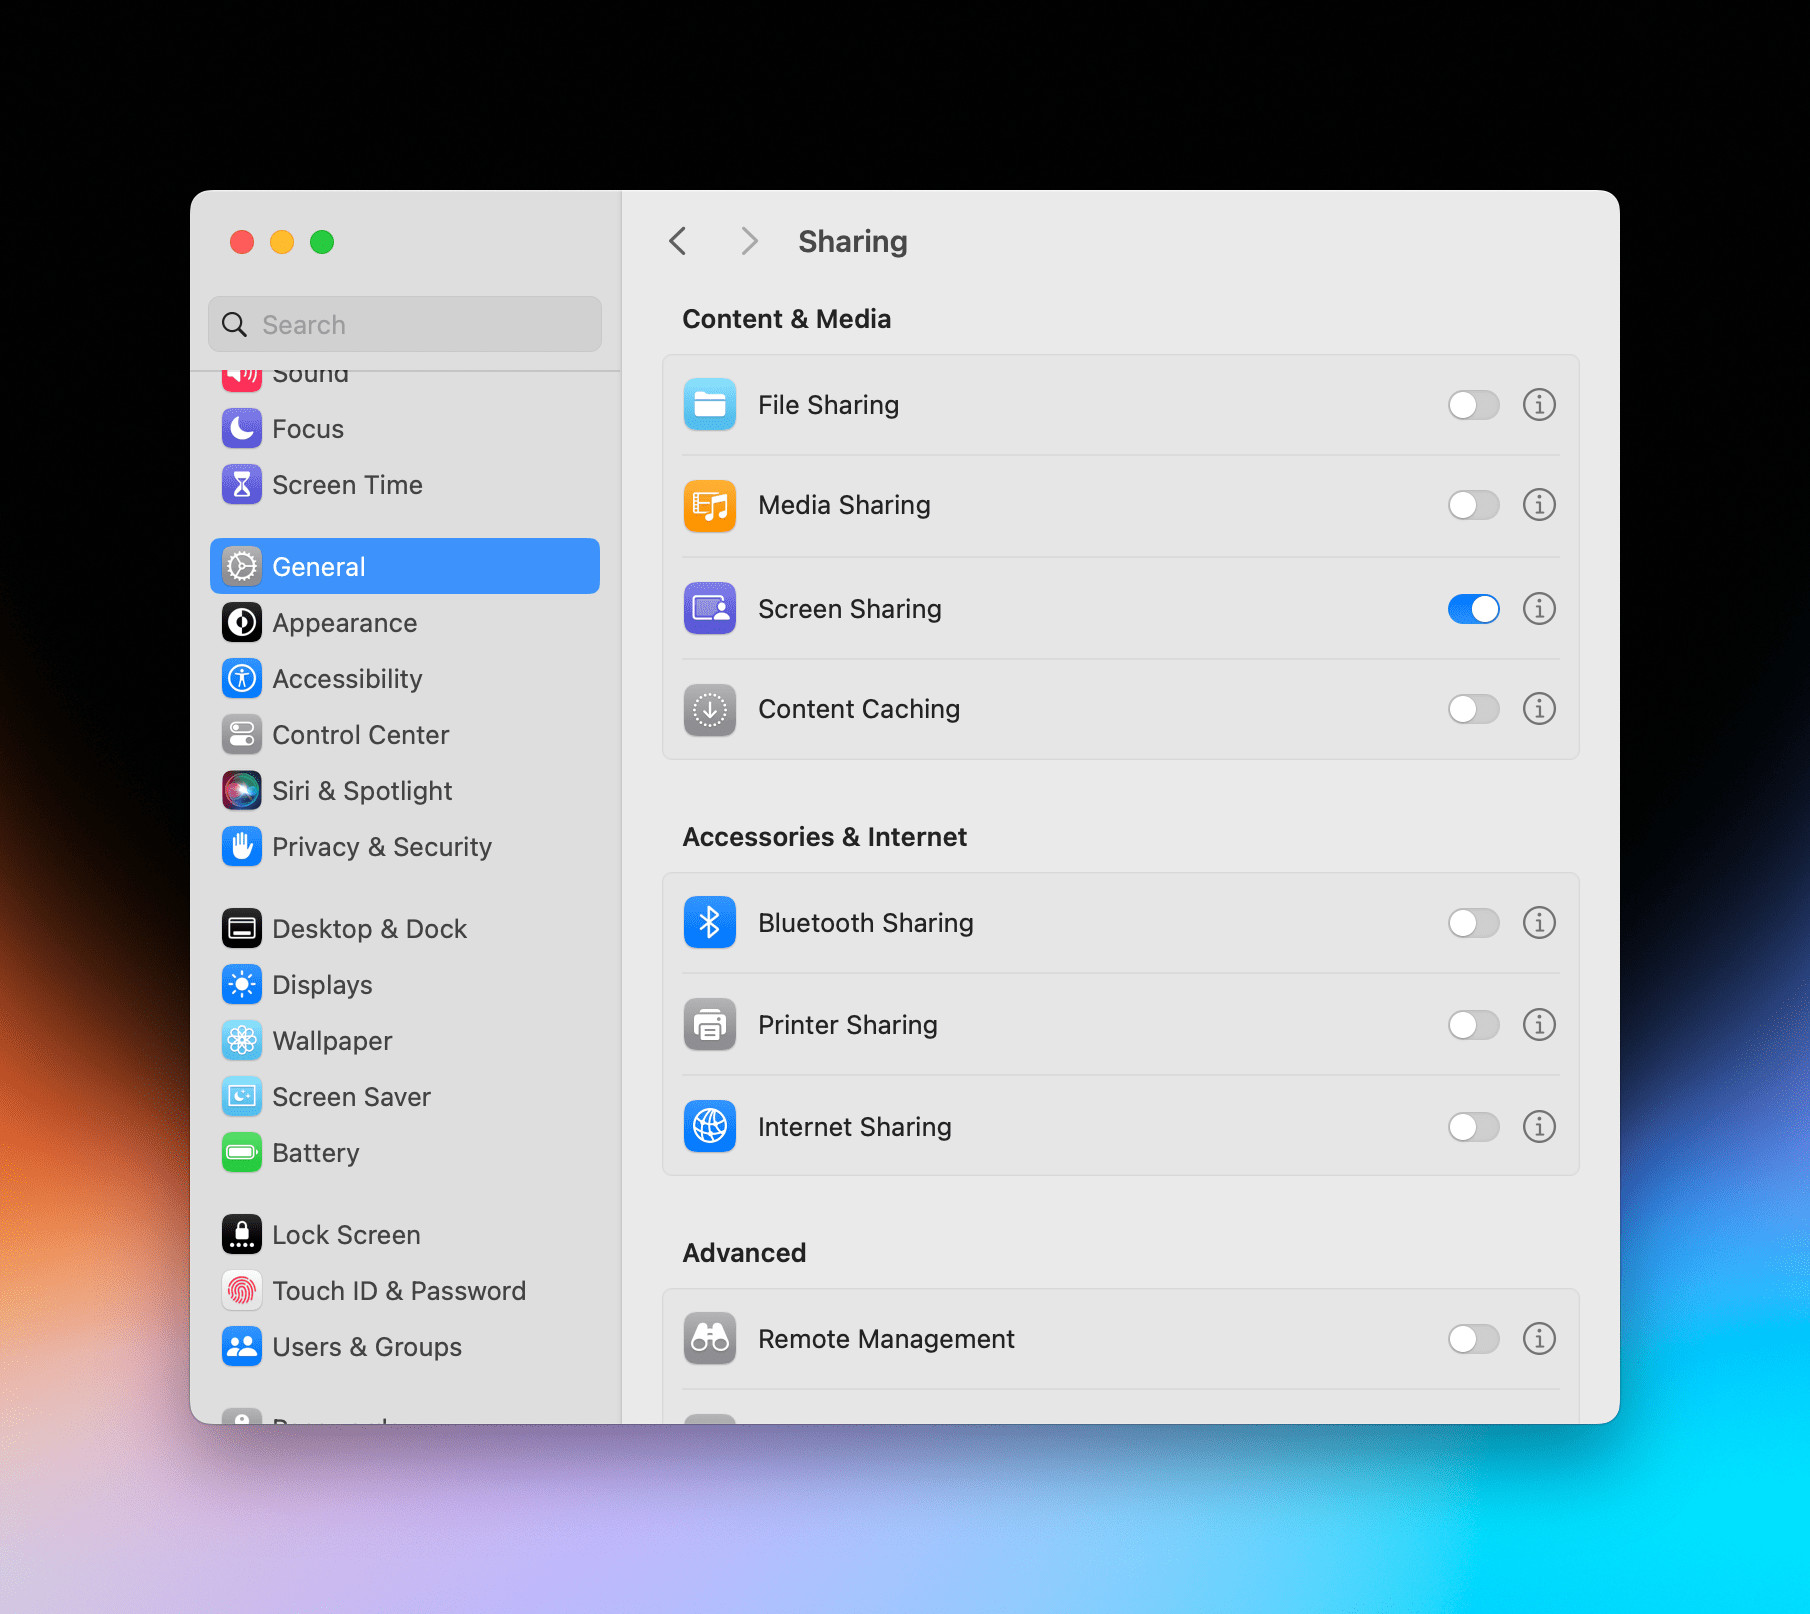
I disabled FileVault in System Settings ⇾ Privacy & Security ⇾ FileVault, made sure that screen sharing was enabled under System Settings ⇾ General ⇾ Sharing, and shut down my MacBook Air before removing the display, as a test.
I then powered on the MacBook Air again, selected the computer I previously configured in Edovia’s Screens VNC client and the app successfully showed me the macOS login screen even after my Mac had just rebooted:
That was the first issue I wanted to figure out upfront, and my theory worked. As long as you have FileVault disabled and both a headless Mac and VNC client (which, in my case, is running on an iPad) are connected to the same network, screen sharing is going to work at the login screen to type in your password. For subsequent unlocks, of course, you can rely on Touch ID, Apple Watch unlock, or the Shortcuts app with SSH scripts, as we’ll see below.2
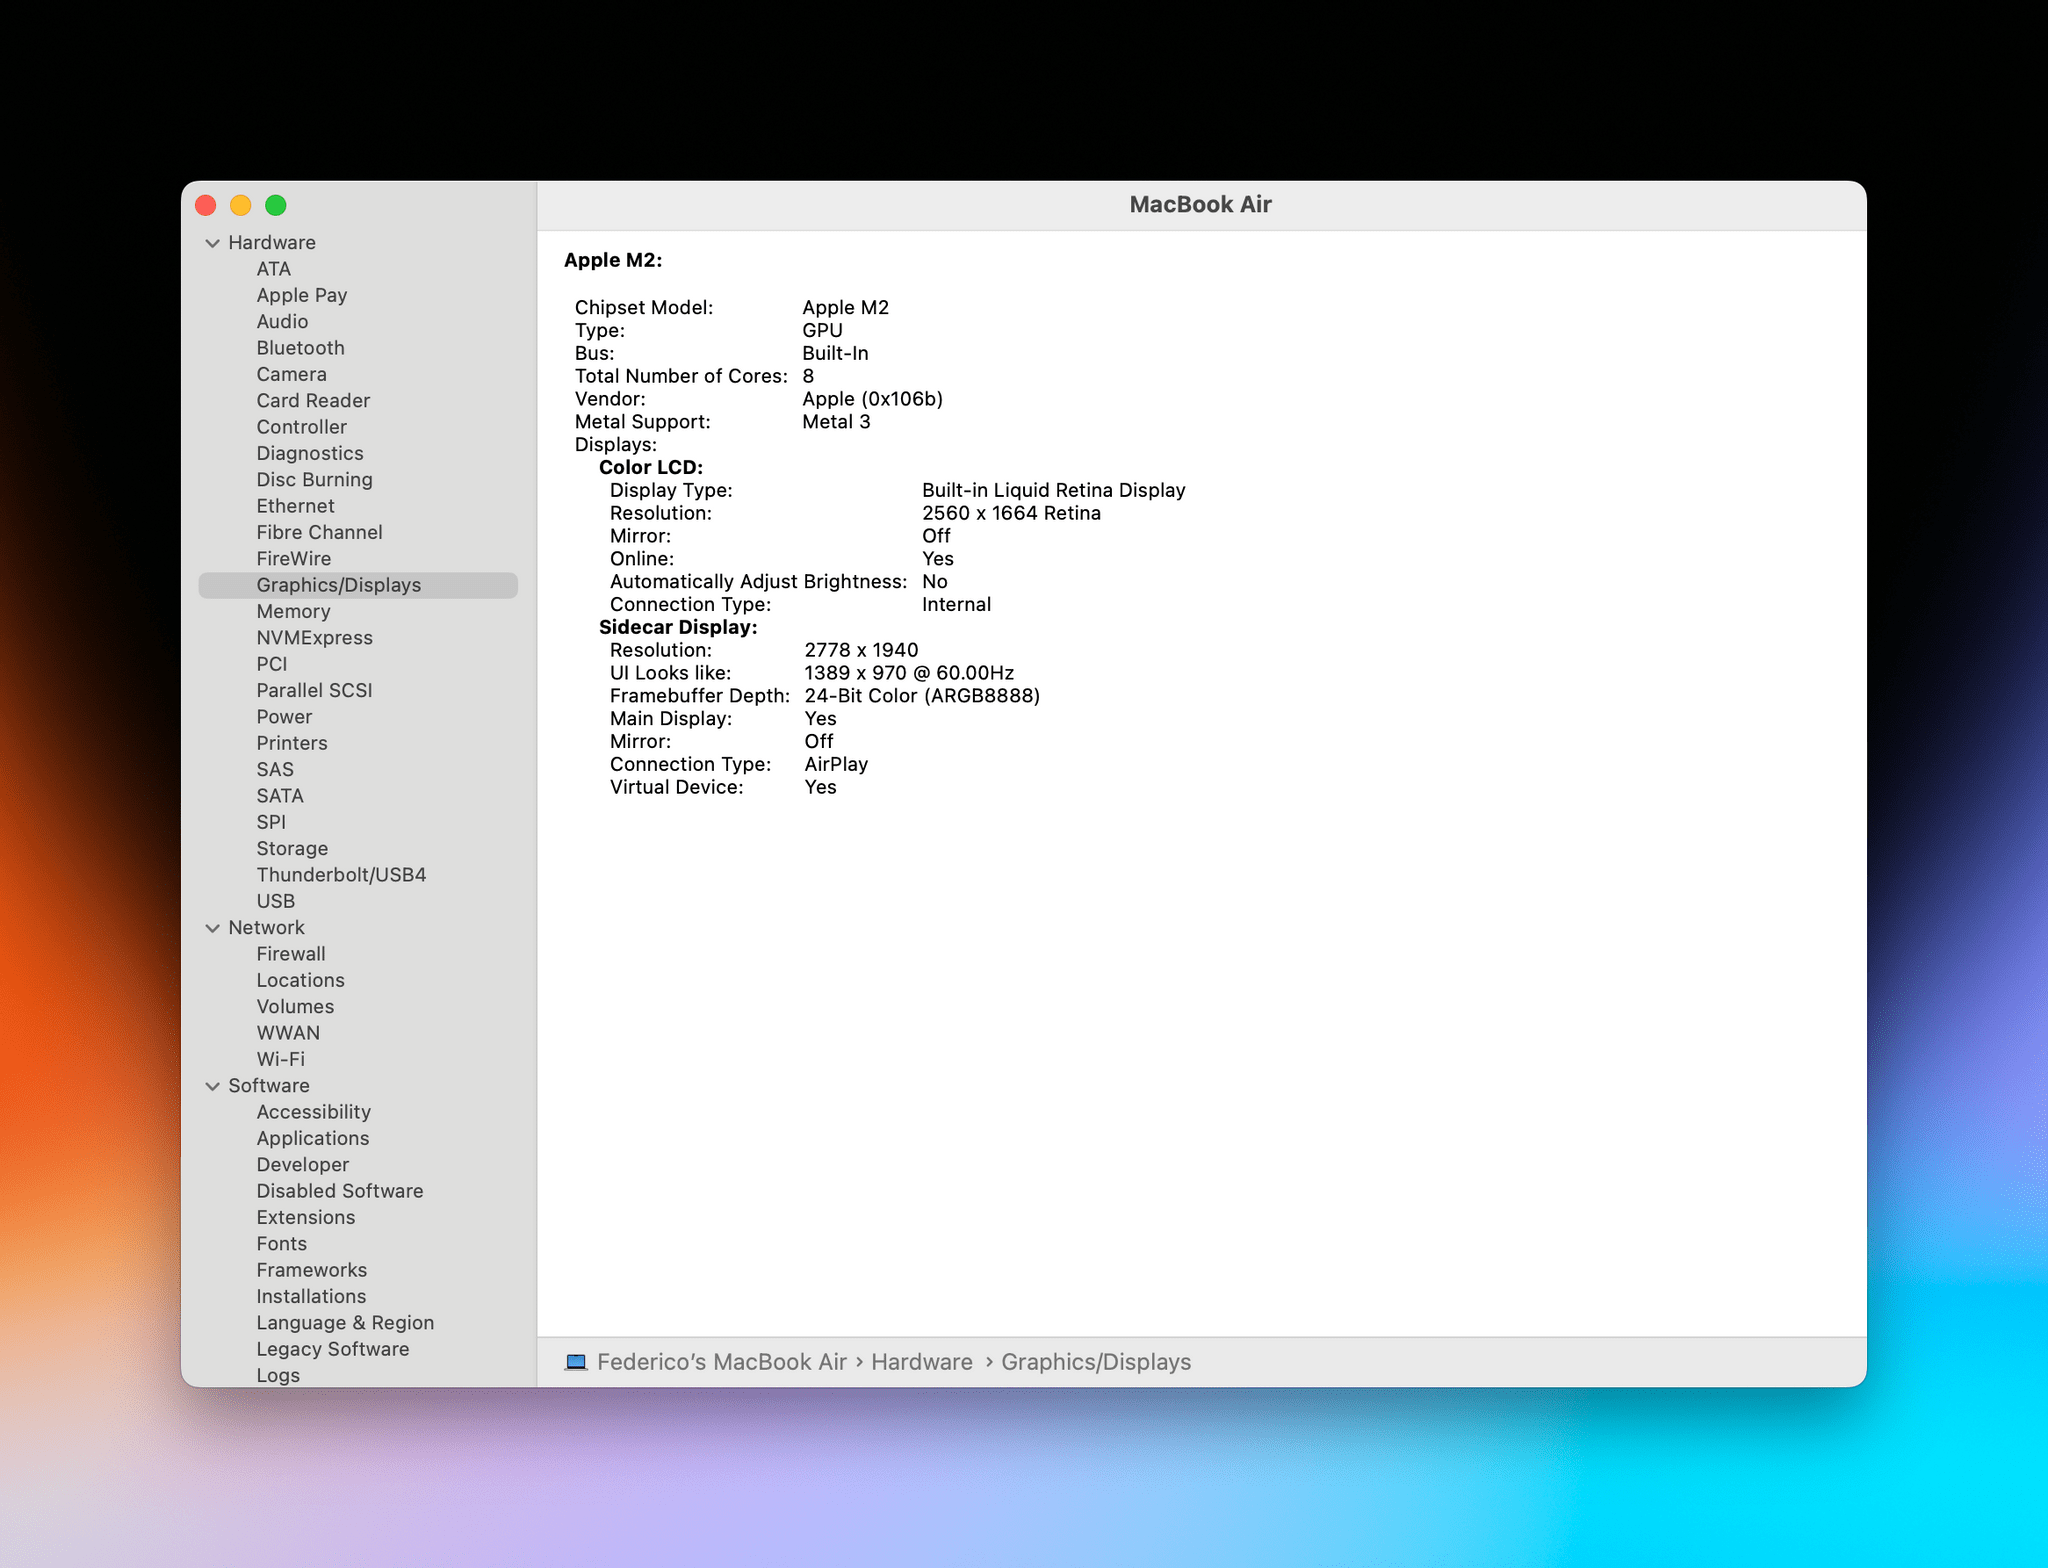
Next, you may have heard that to use Sidecar as an external monitor for a headless Mac, you also have to buy a “dummy” HDMI adapter to make macOS believe it still has a main display connected to it. This is only partially true. If you want to use Sidecar with a headless Mac mini that is not connected to an actual monitor, then yes: you have to buy a dummy HDMI plug. But with the method I followed to remove the display from my MacBook Air, it’s not necessary: macOS will continue to think there is a built-in display attached to the computer, even after it’s been physically disconnected from the display connector inside the chassis. If you plan on doing this with a Mac laptop, you won’t need an extra video-out adapter.
And now for the main event: to make my 13-inch M2 MacBook Air a headless computer, I followed – word for word – Luke Miani’s walkthrough on YouTube, which you can watch below:
My advice: before you do this, watch the video twice and make a note of all the equipment you’re going to need. I recommend the iFixit toolkit and a separate set of Torx screwdrivers with all the sizes mentioned in the video. It’s not a hard procedure, but you’ll have to be careful, particularly when removing the shield from the battery connector and unplugging it. If you’re brave enough to do this, make sure you’re working on a clean surface where you can keep track of all the shields and screws you’re removing from the computer; don’t rush the job and watch every step multiple times, even if you think you know what you’re doing.
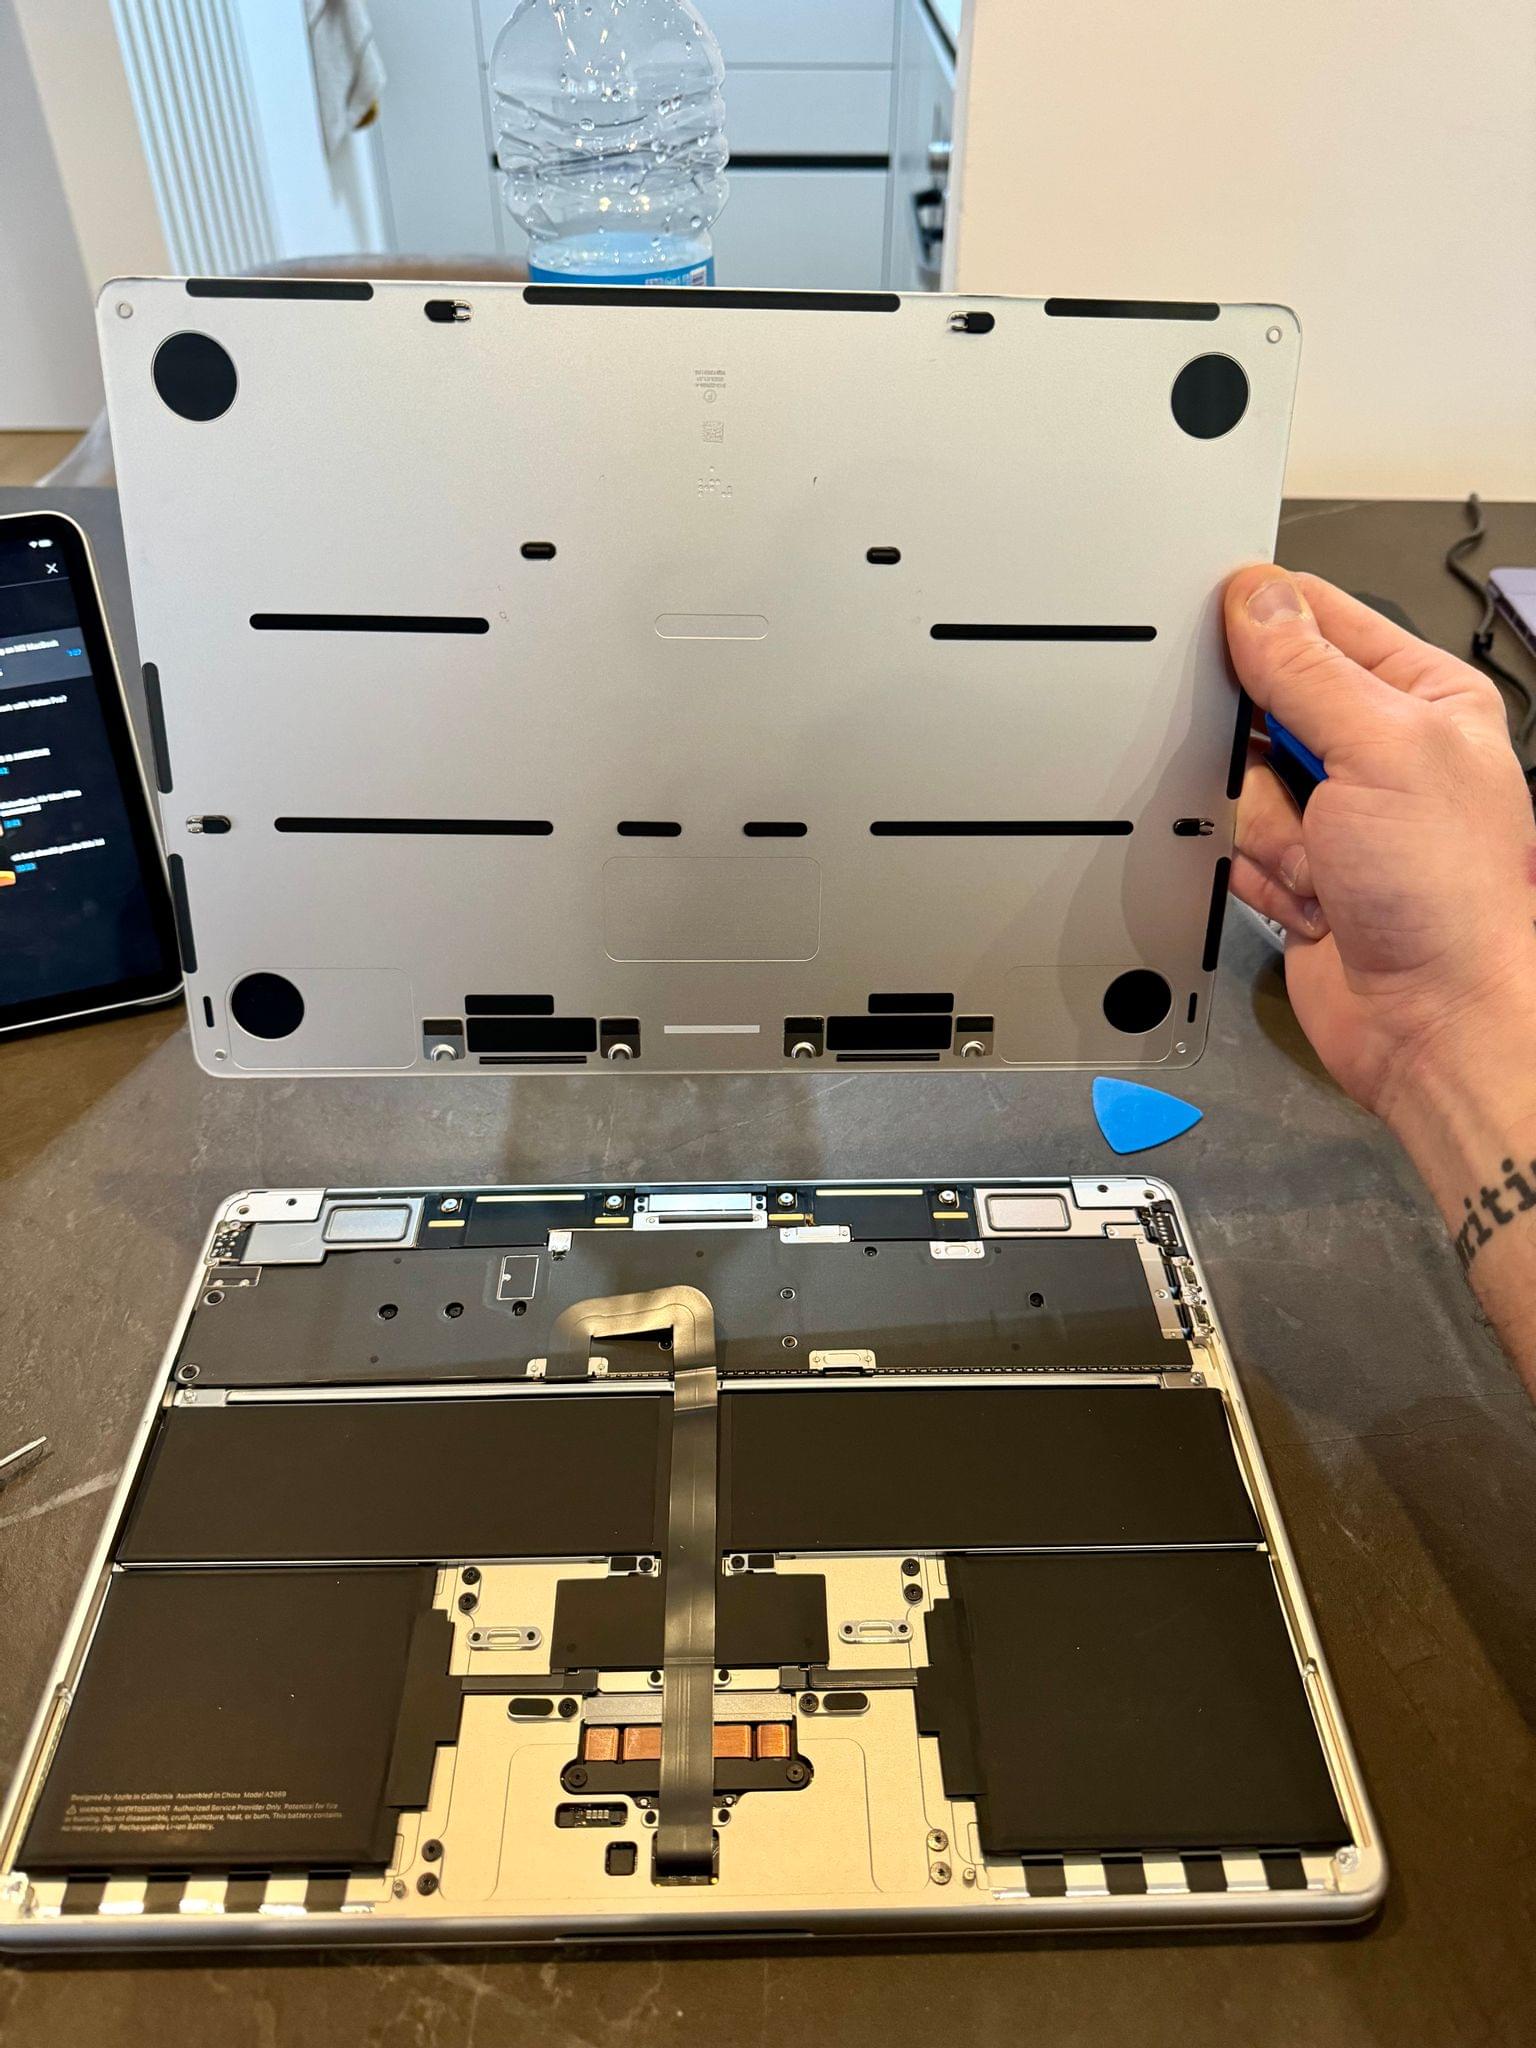
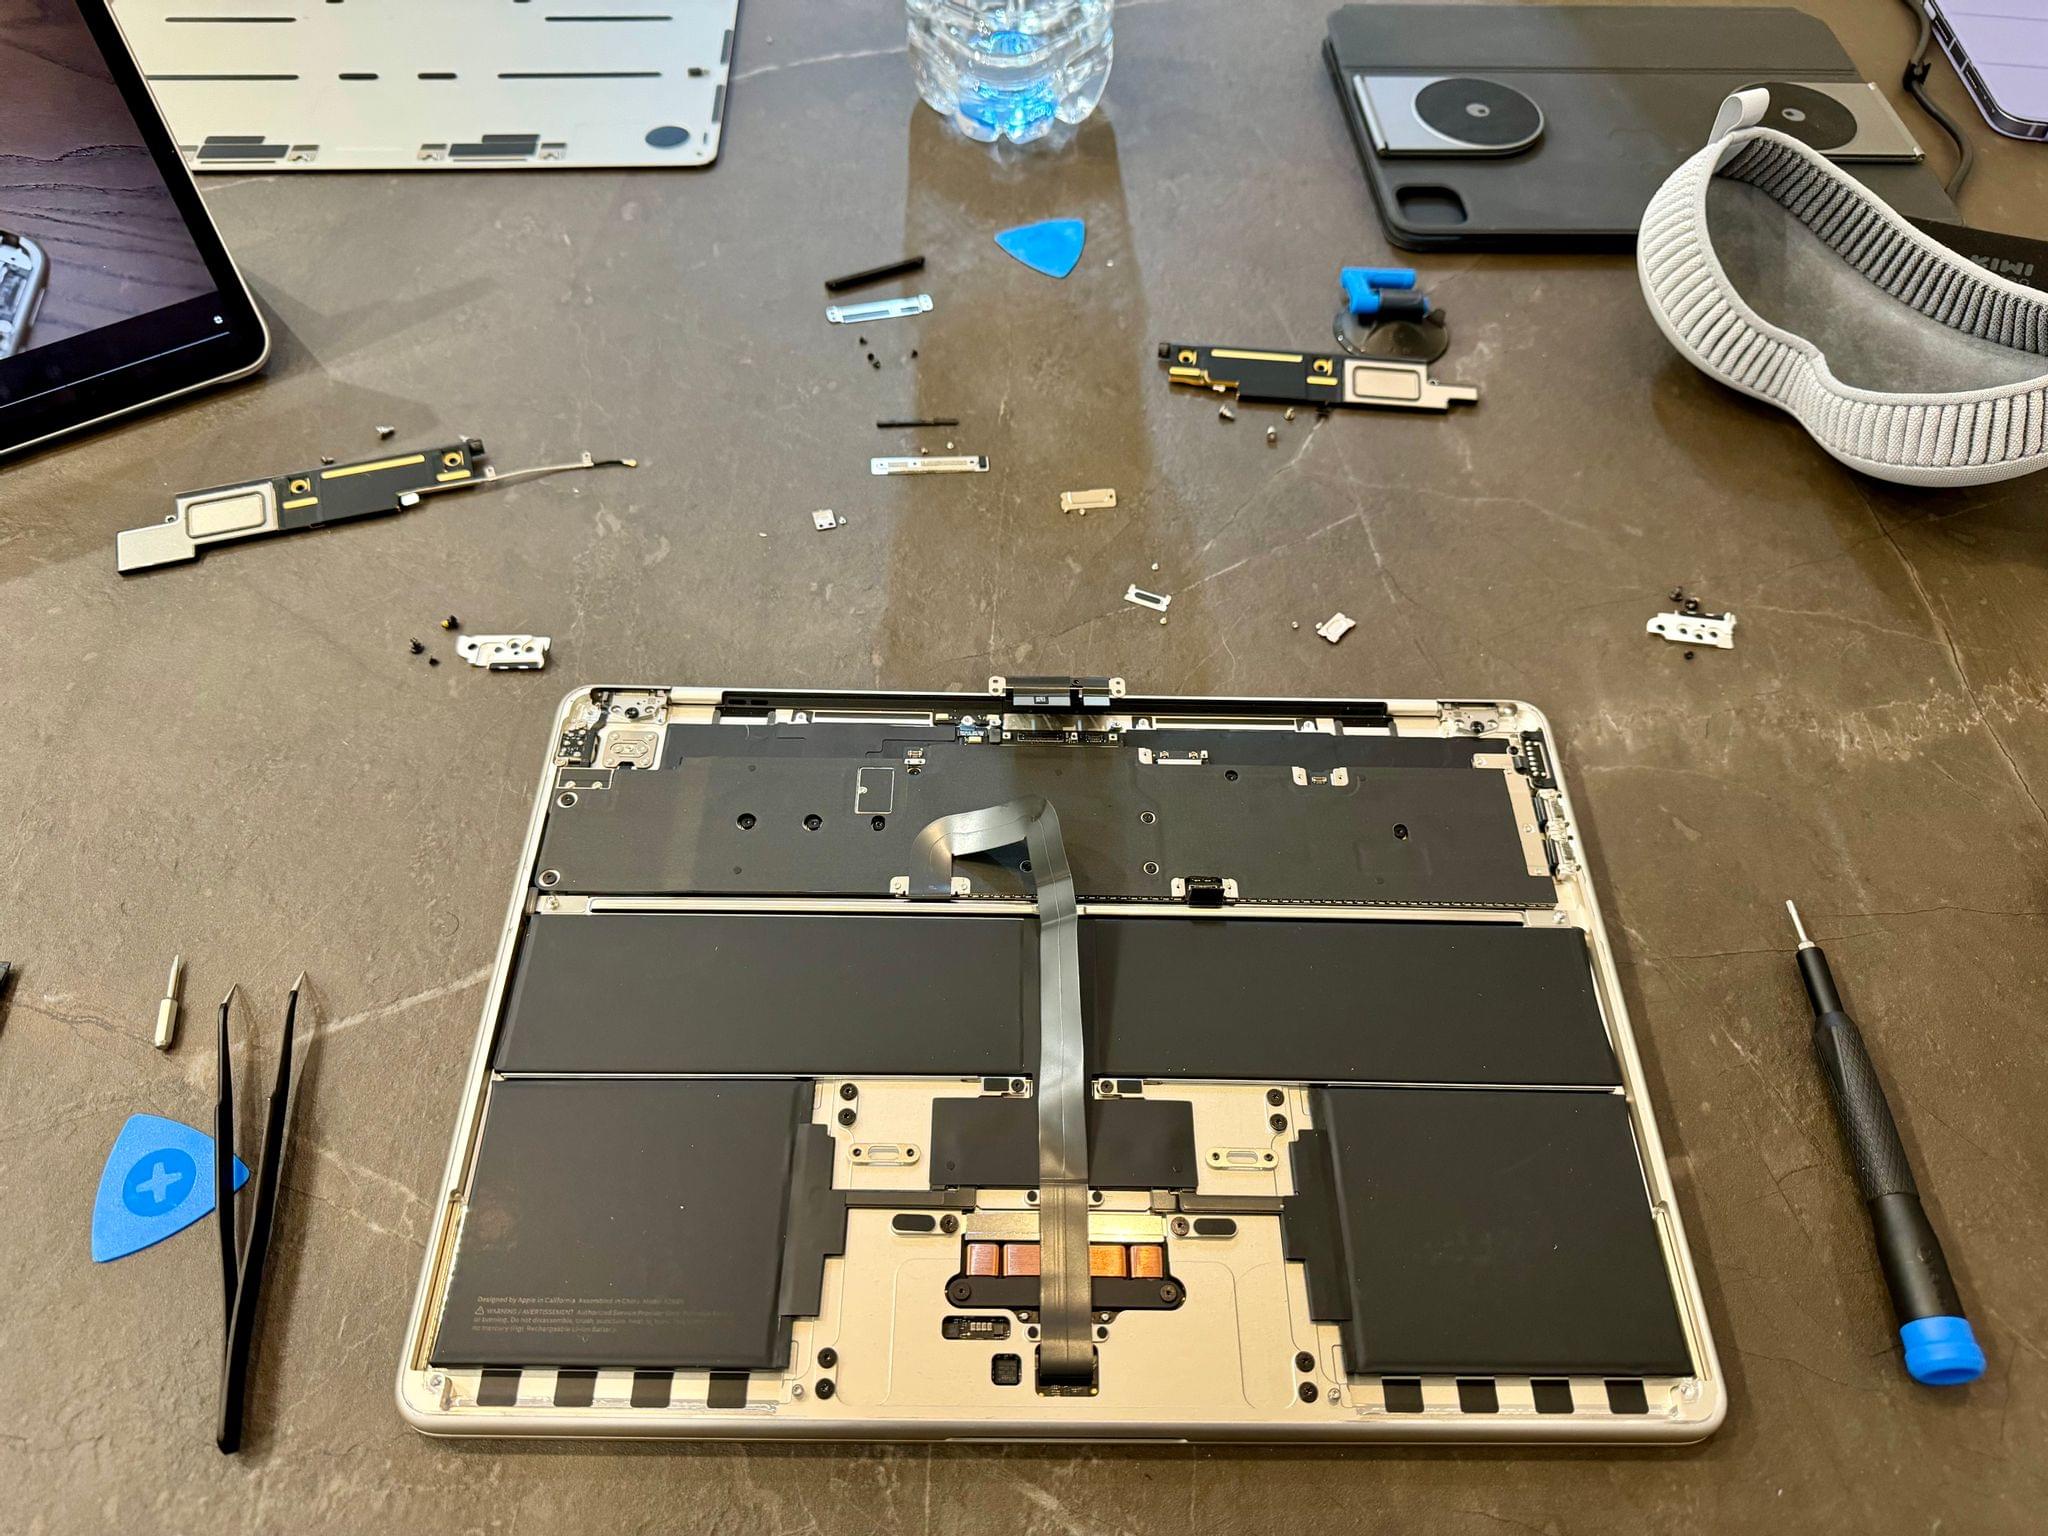
Once I successfully removed the display, I then put back some of the shields that were covering all the connectors and hinges inside the Air’s chassis, but – like Miani – I eventually ran out of patience and sealed everything again without re-applying all the shields. (It’s been fine so far.)
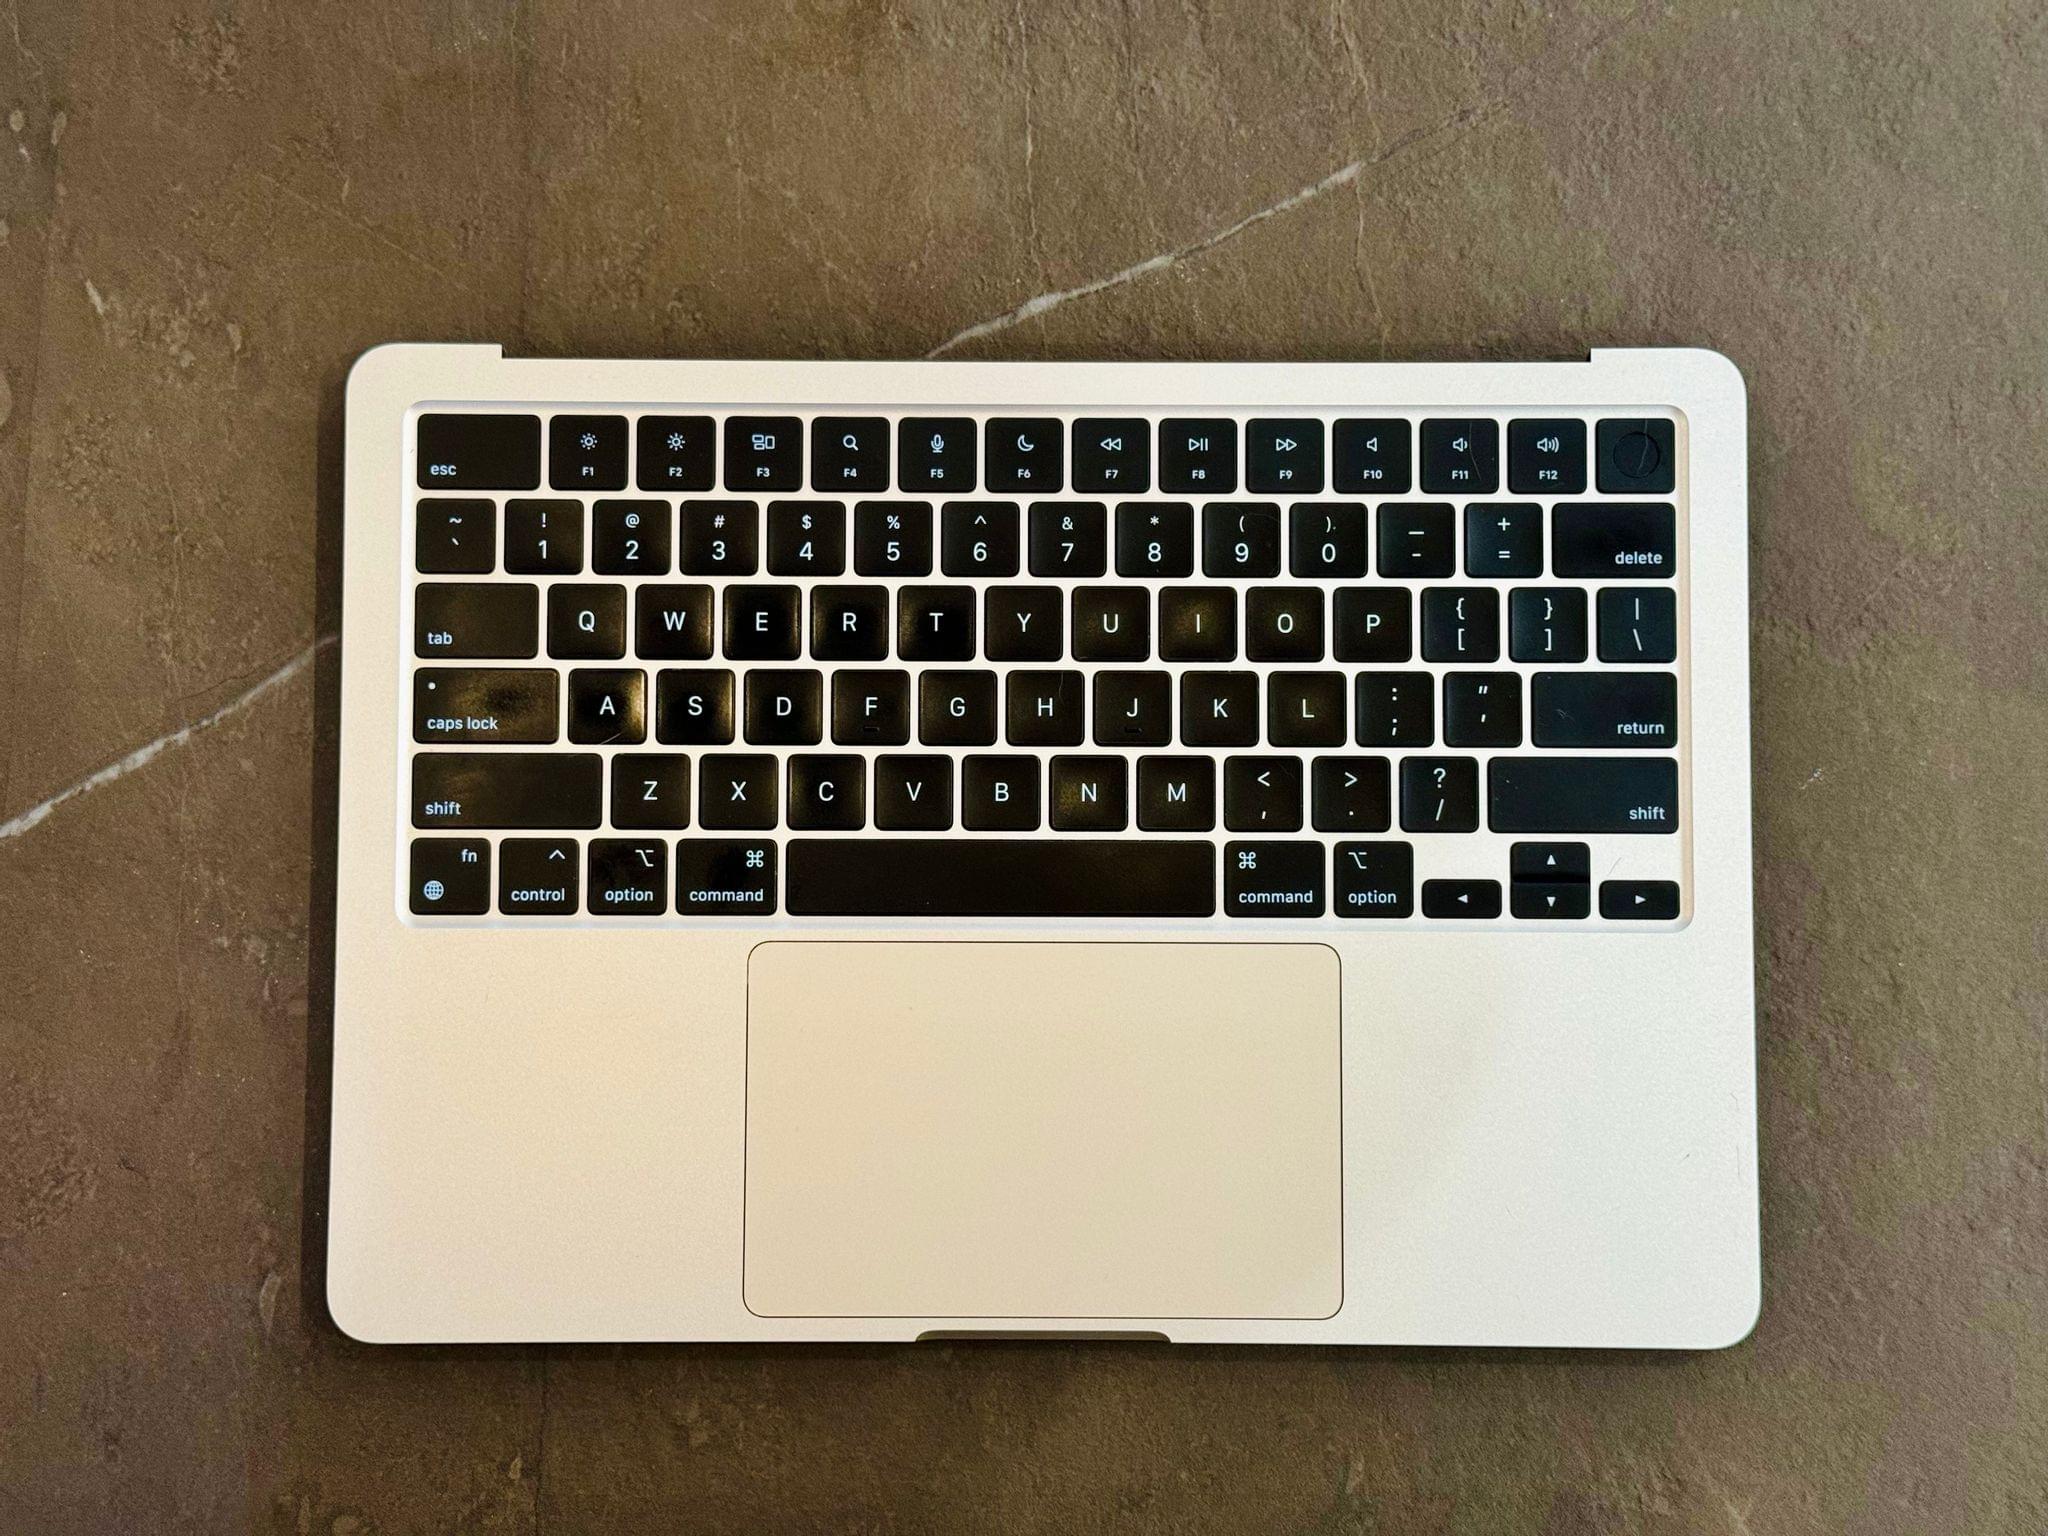
It was finally the moment of truth: I had to turn on my Mac, wait a few seconds, and see if I could log in the first time using VNC on my iPad. I have to be honest: it was a very stressful 30 seconds after I pressed the power button and the Air’s trackpad wasn’t clicking. But then the keyboard lit up, the Air showed up in the list of nearby devices in Screens, and I knew I’d done it:
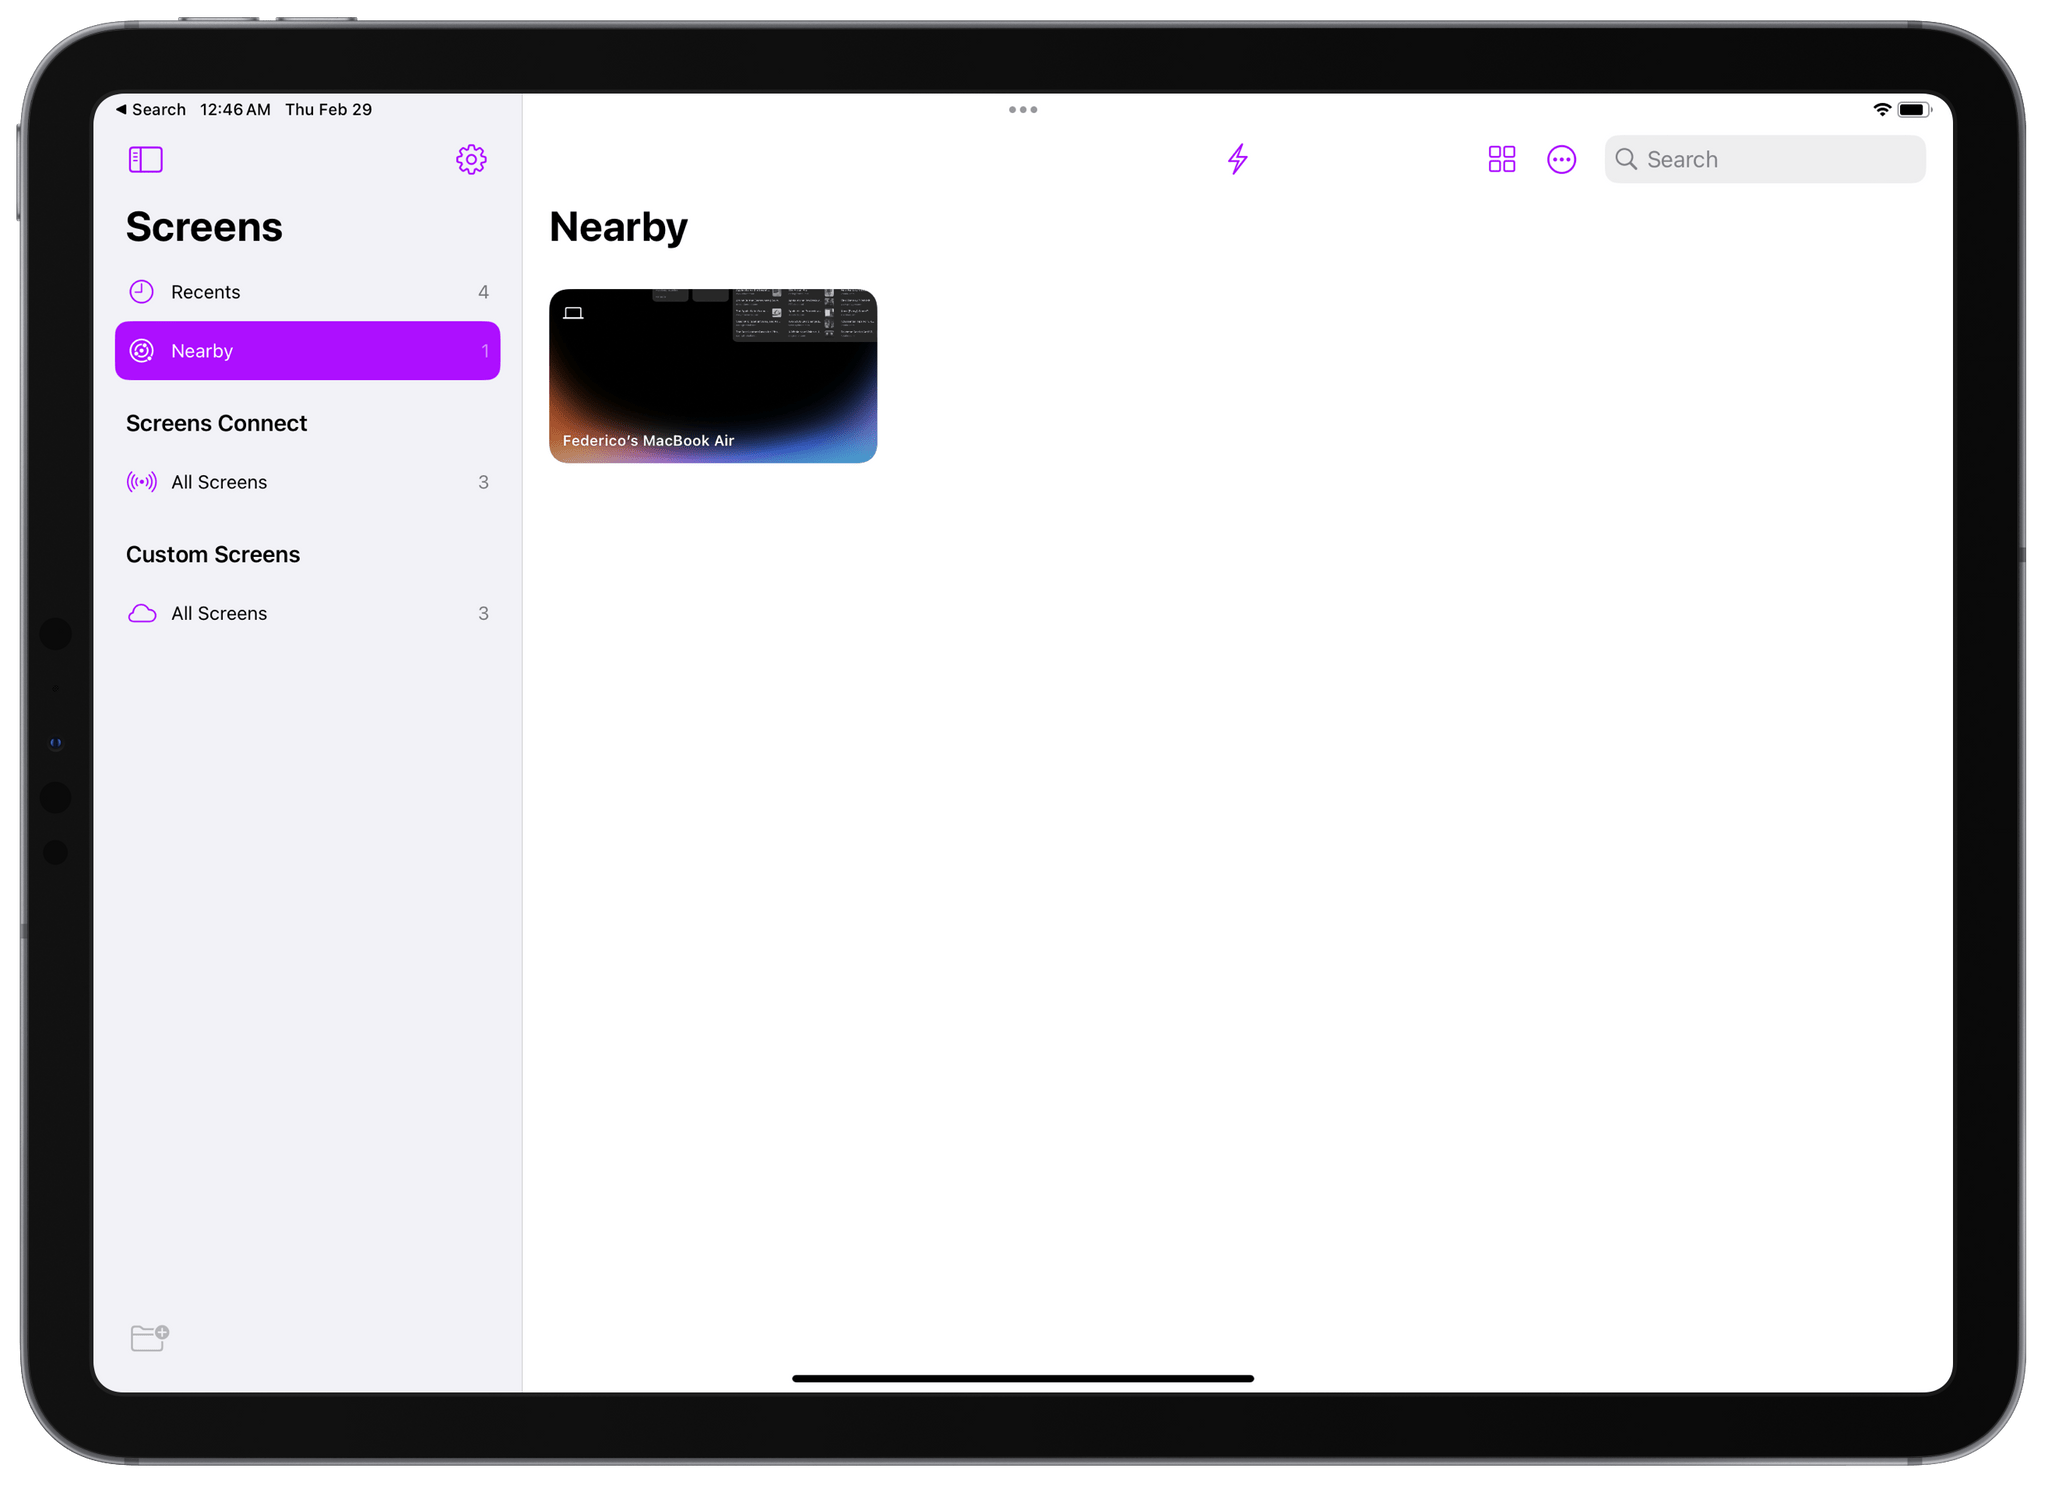
I was “remotely” logged into my headless MacBook Air from my iPad, but, of course, using it as an actual display meant I had to set up Sidecar. And not only that, but I also had to find out if I could initiate a Sidecar connection from the iPad itself rather than do it from macOS every time.
I’ll get to that in a minute. First, I had to create an adjustable display mount for my new iPad display.
Attaching the iPad Pro to the MacBook Air
If I wanted the hybrid laptop-tablet of my dreams that Apple won’t make, I’d need a system to tear my MacBook’s display away, so I could use it as a tablet. That’s the computer I want Apple to make; for now, I’d have to create my own version by relying on some old friends:
Magnets.
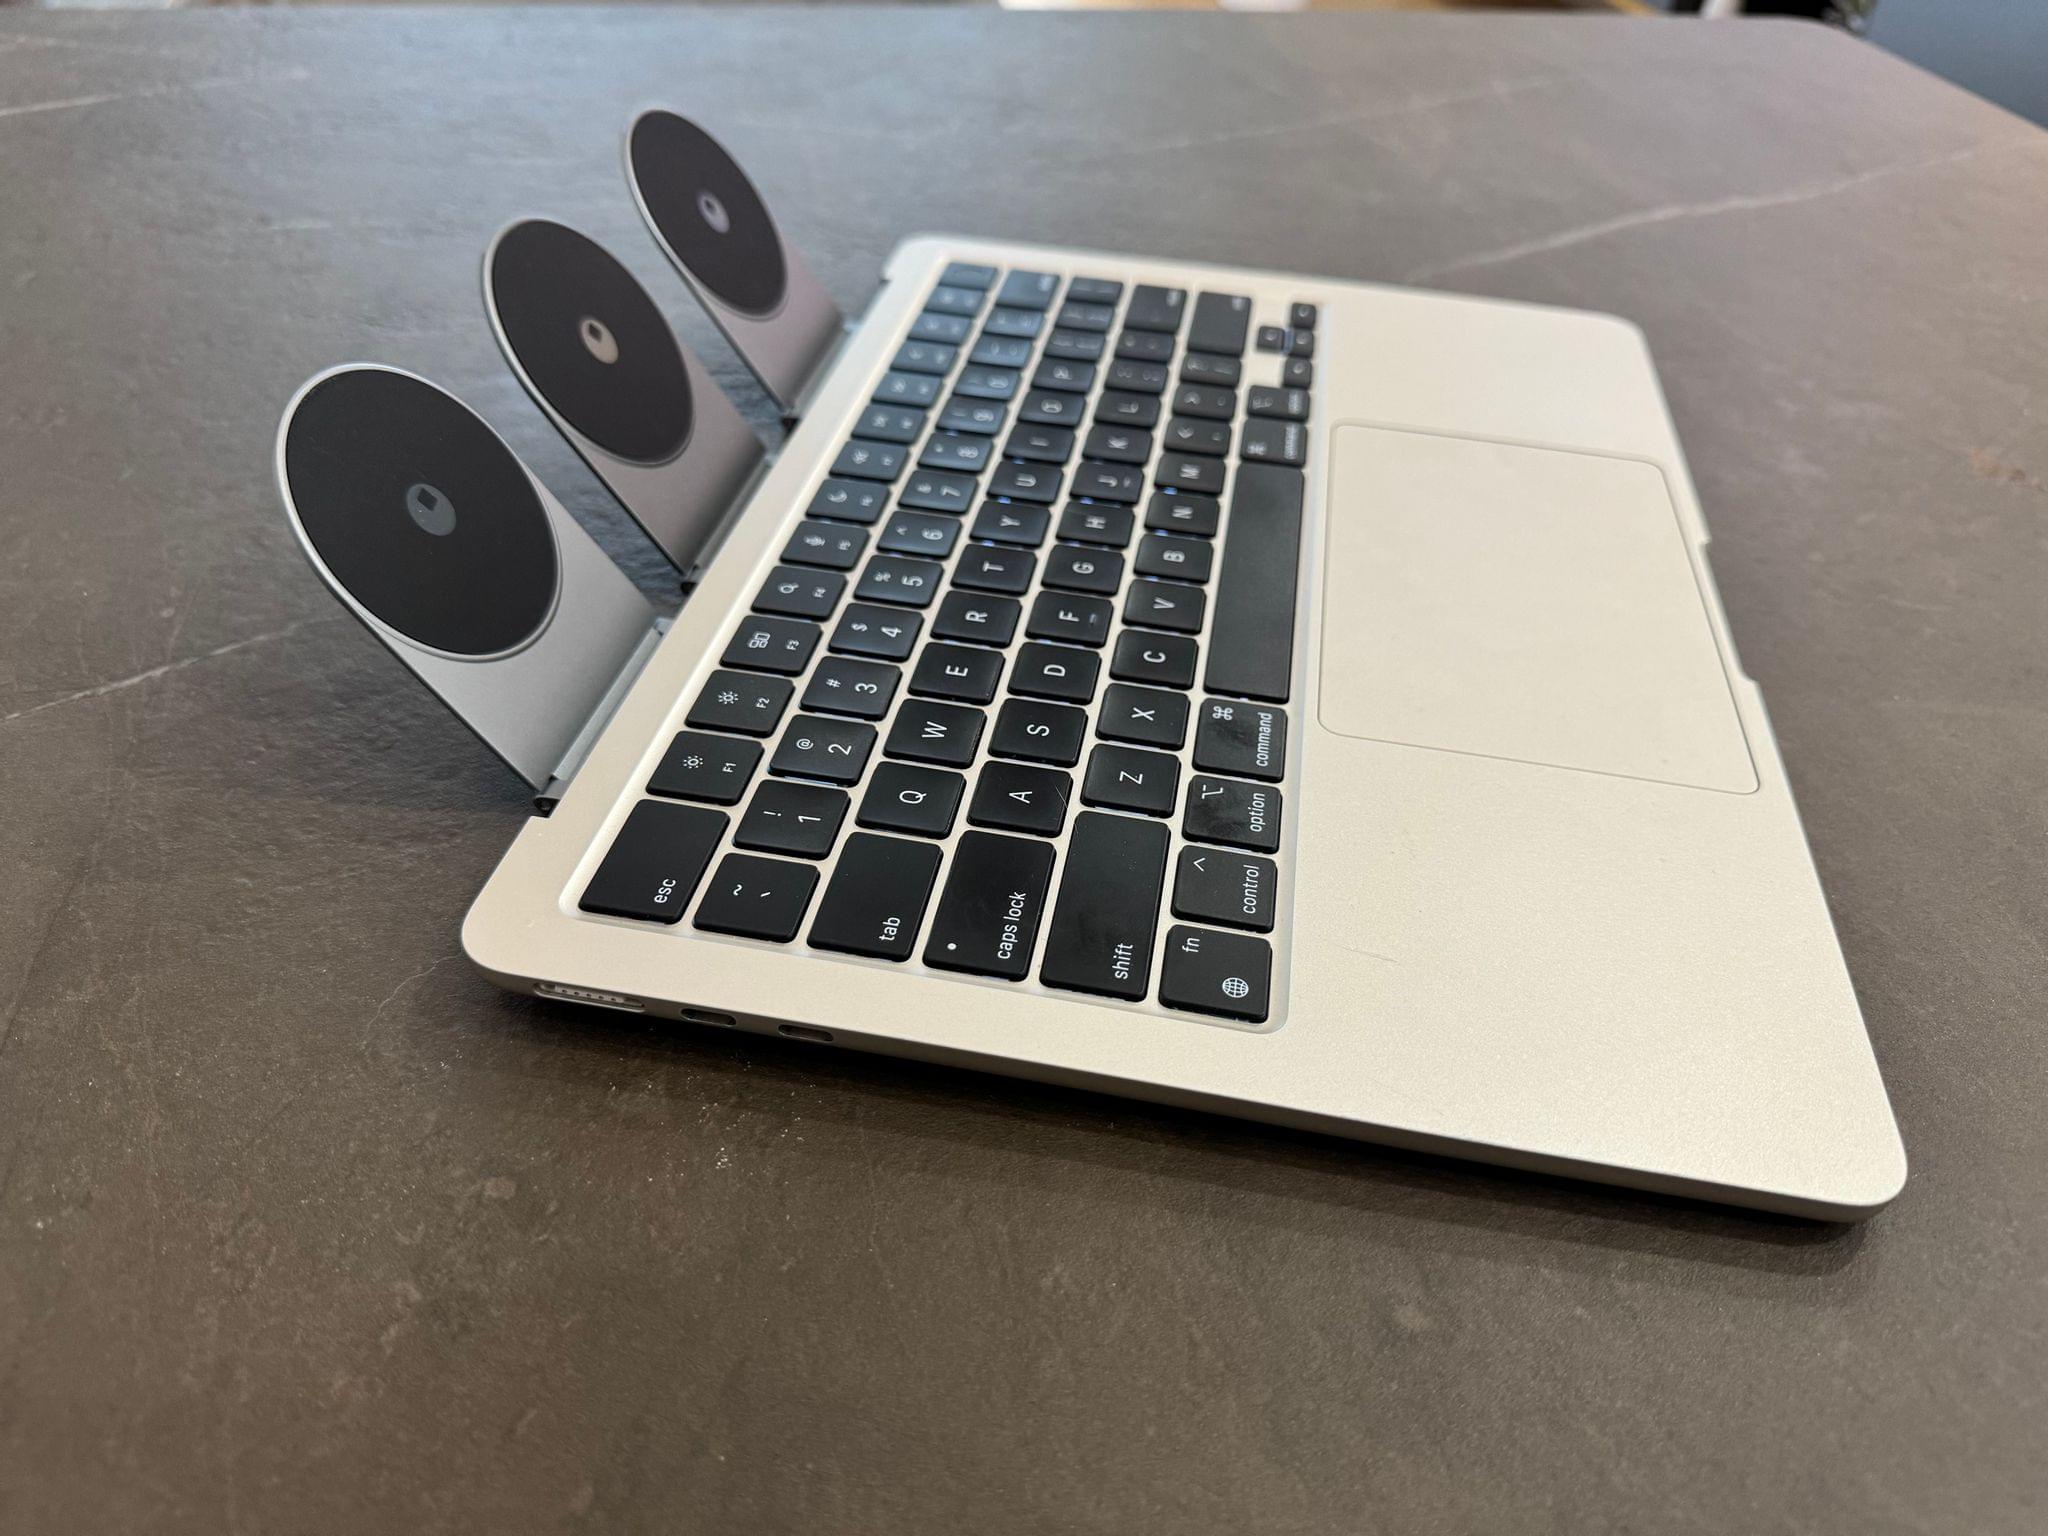
The idea came naturally as soon as I pictured the iPad Pro as a Sidecar display floating above the MacBook Air’s keyboard: to mimic a laptop configuration, I could rely on adjustable magnetic mounts to provide a sturdy, yet flexible mounting option for the iPad Pro. Even better, if I used enough magnets and positioned them just right, I could even support a wider viewing angle than the MacBook Air typically allows for.
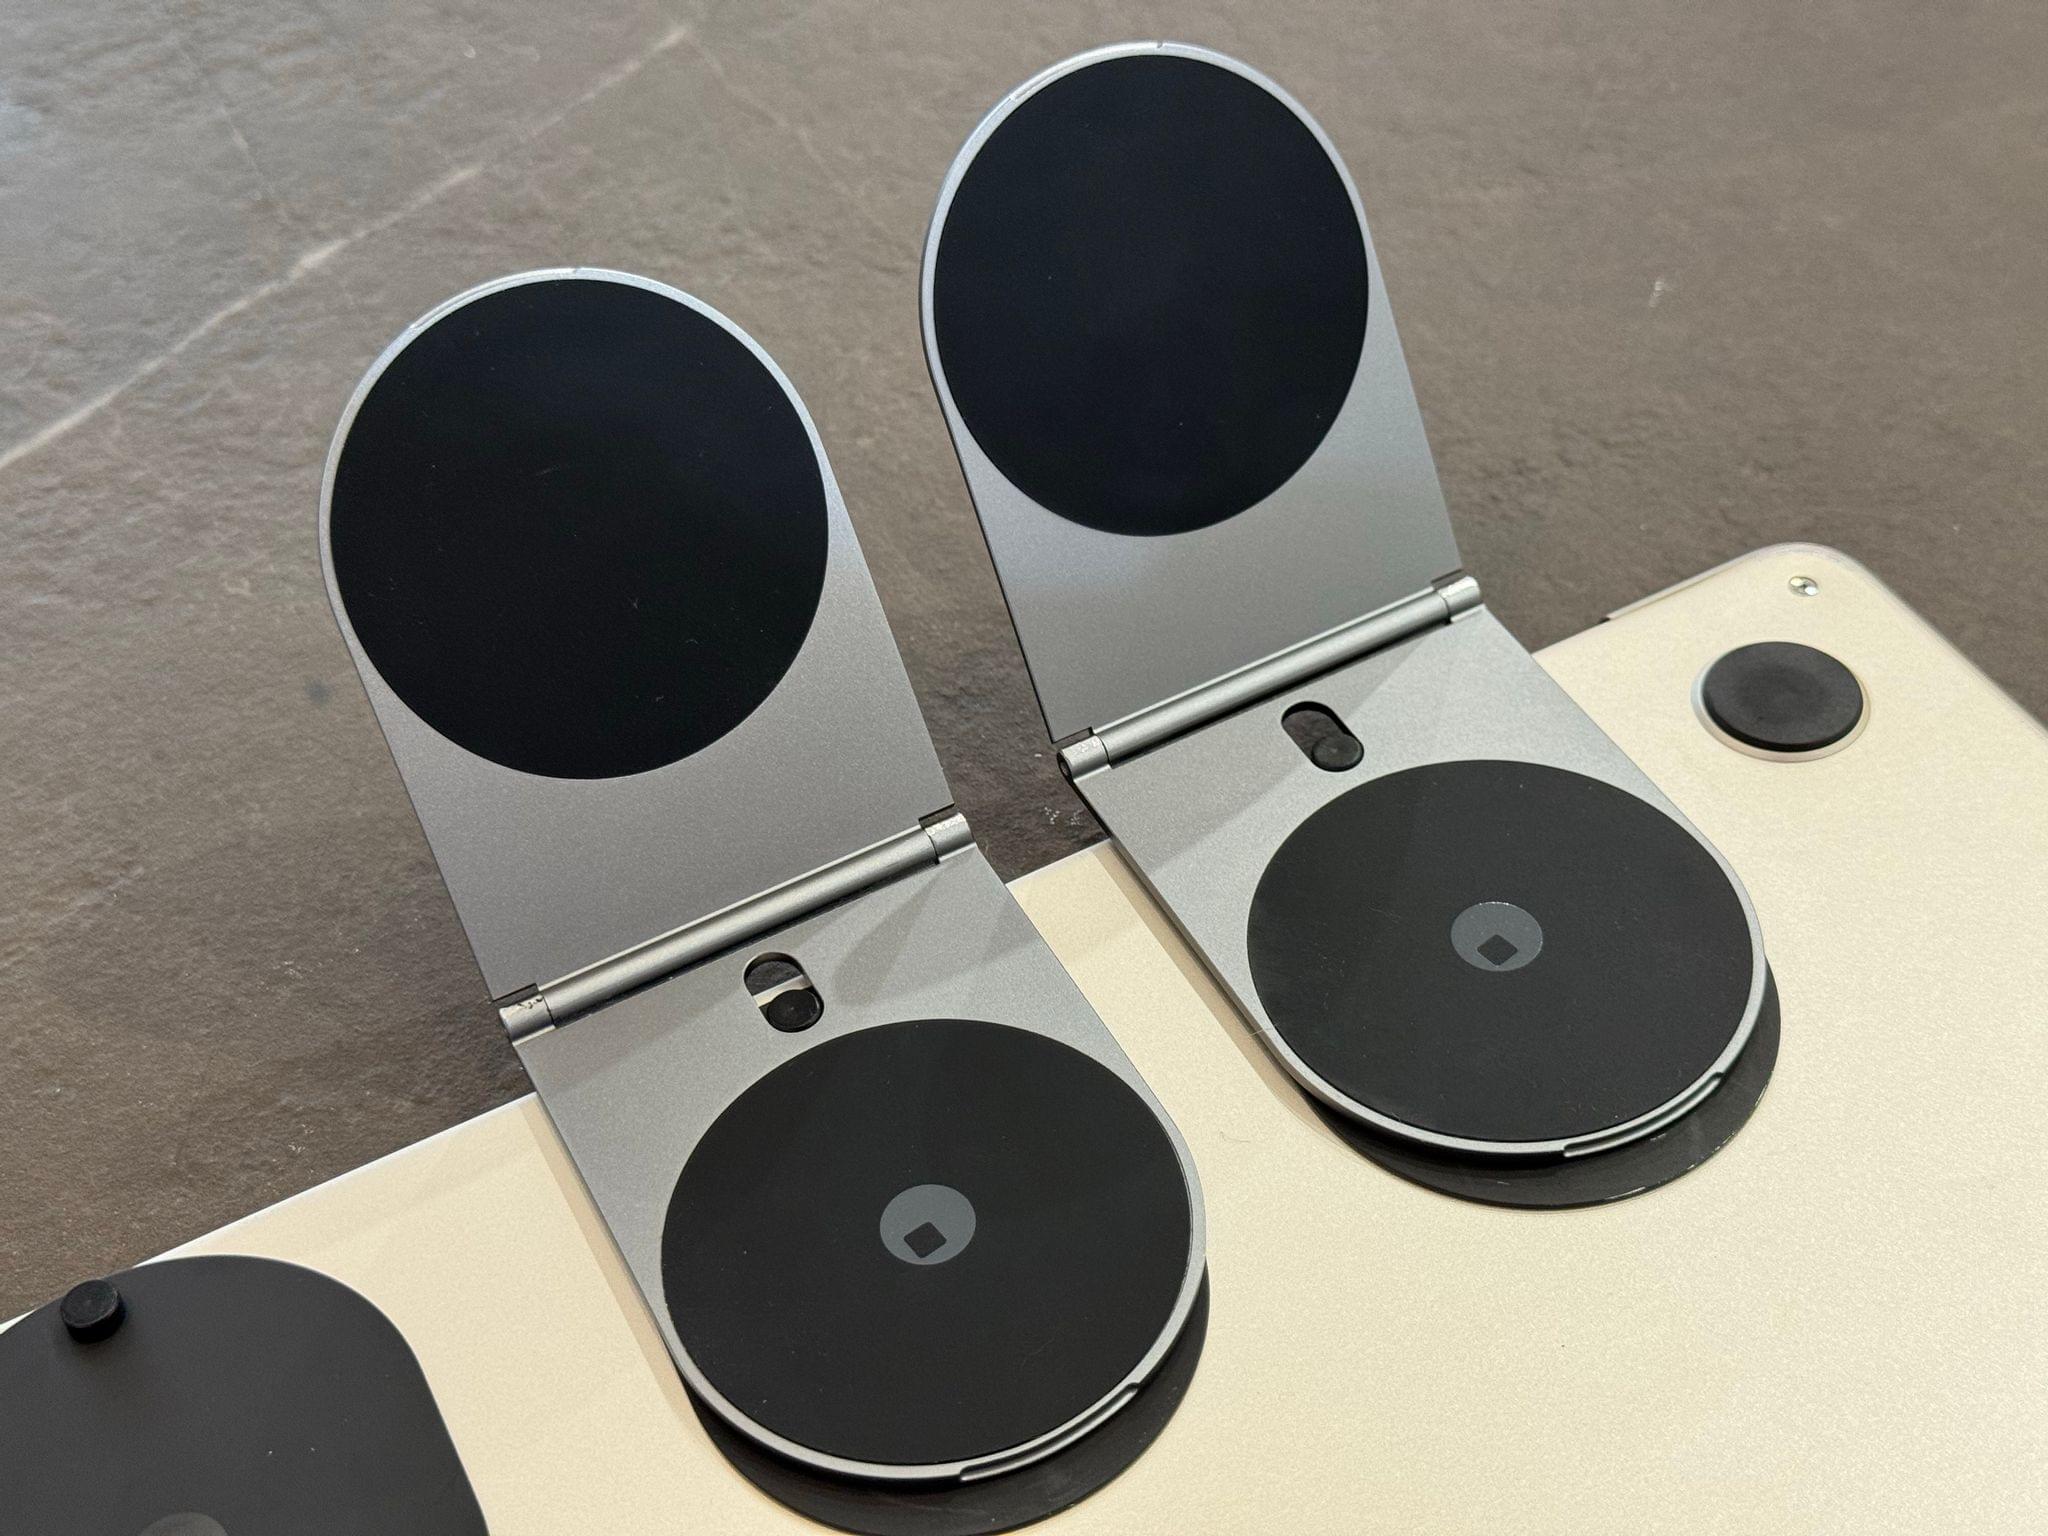
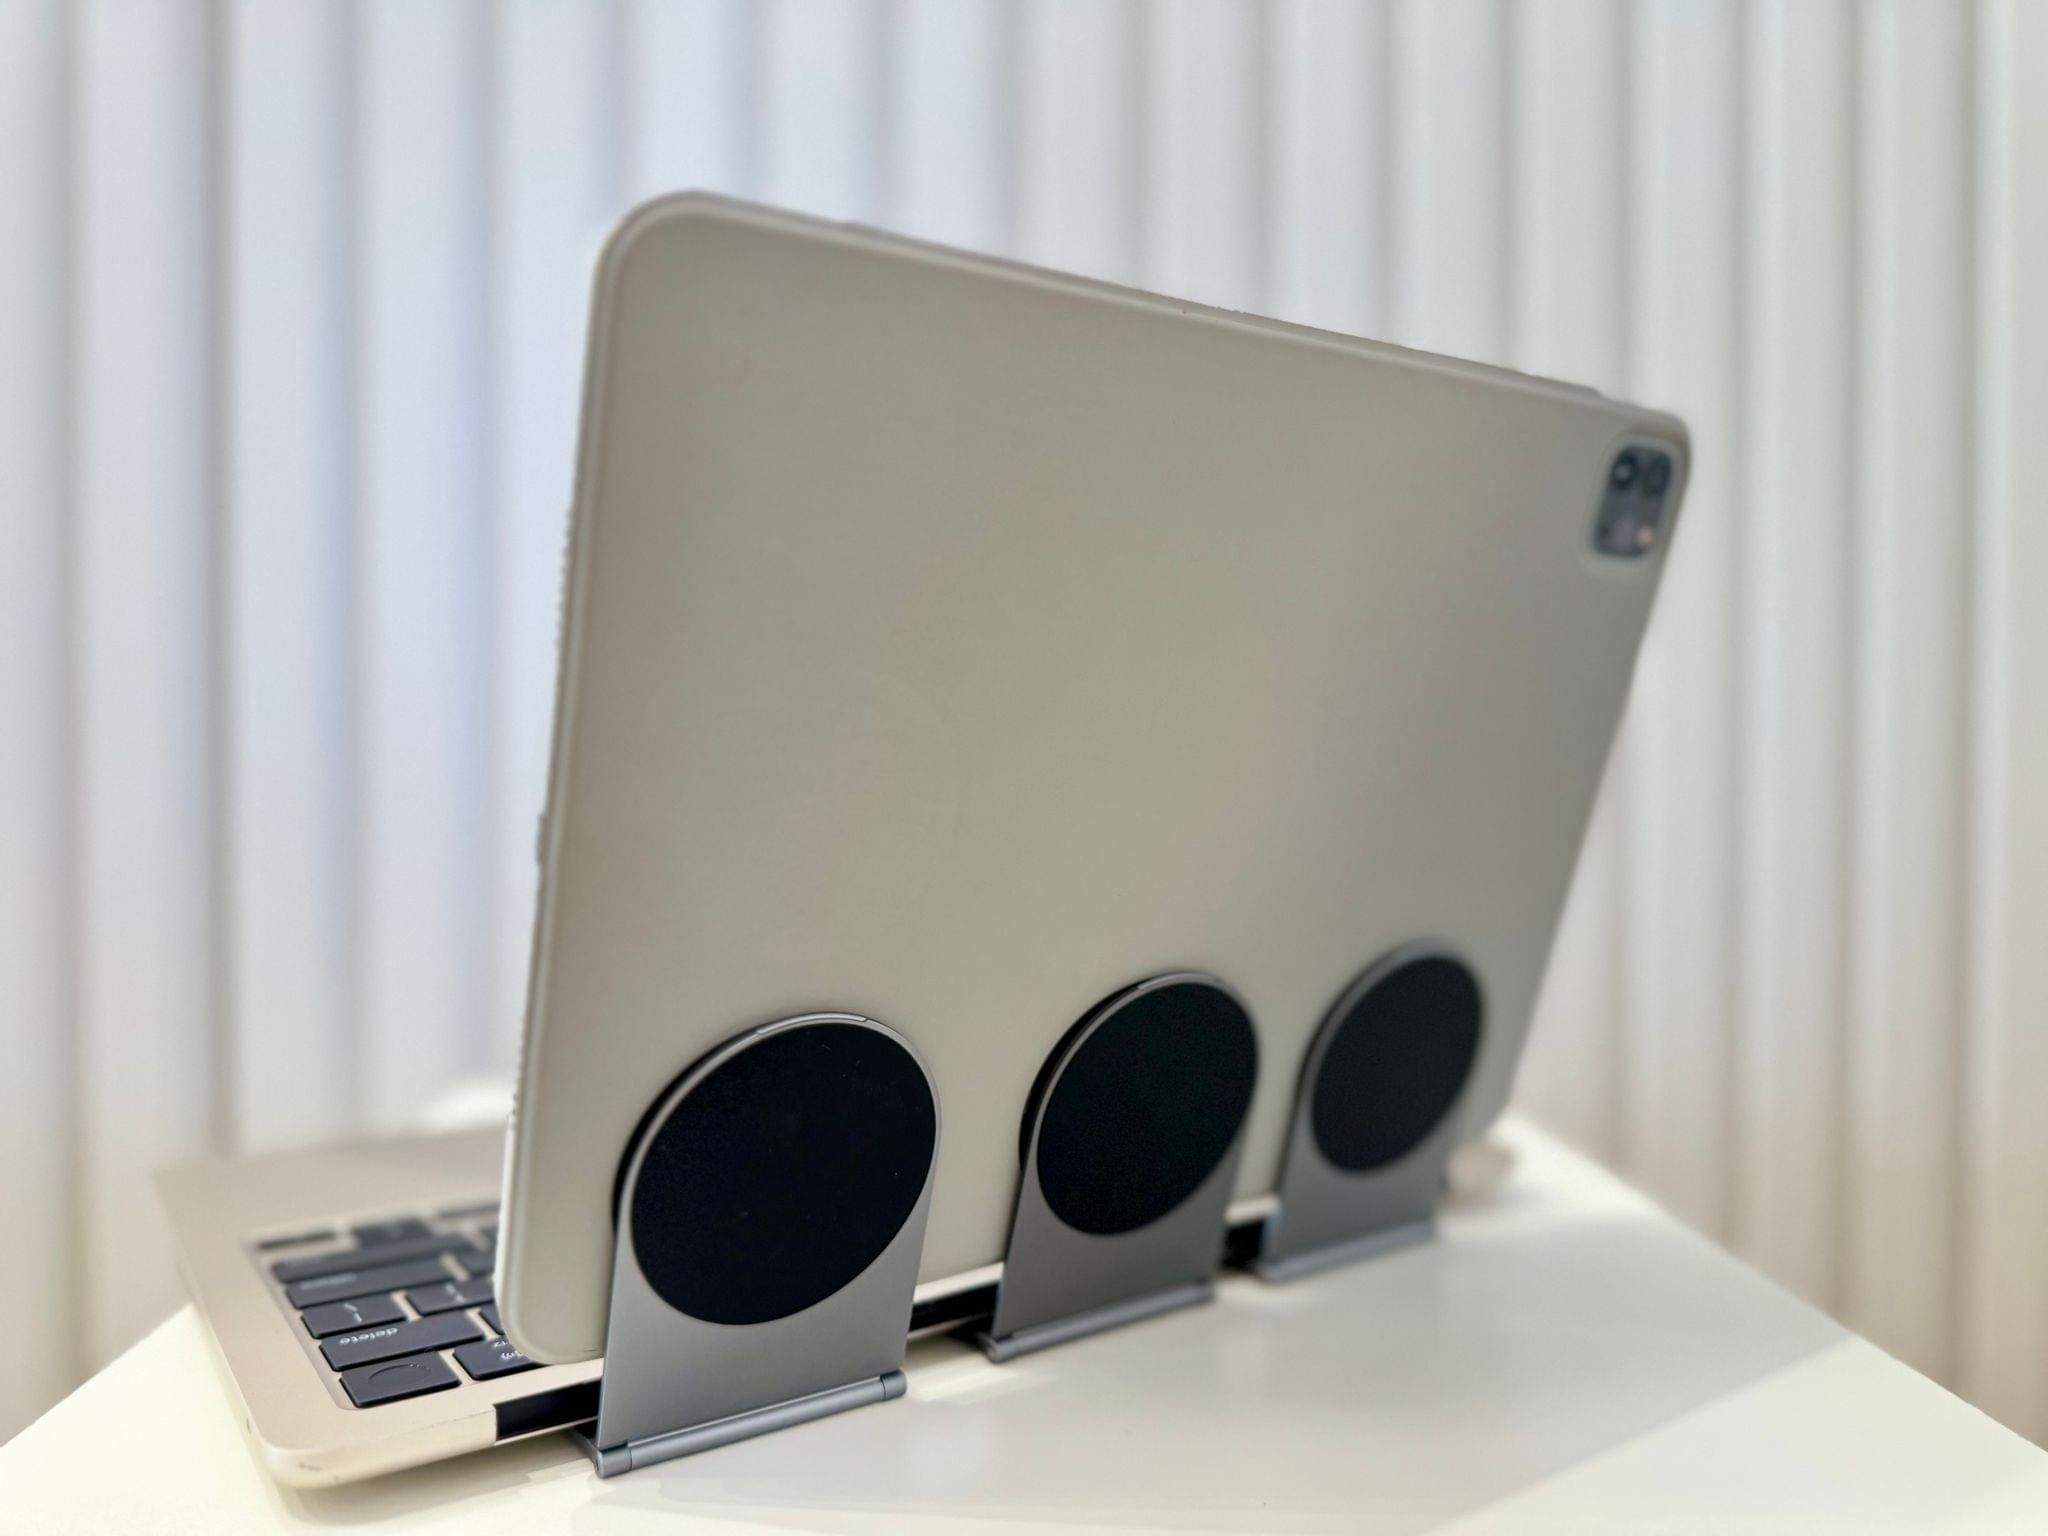
Once again, I used the Rolling Square Edge Pro Core mounts, which you may remember from my story about attaching an iPhone and puck-style speakers to my iPad Pro. First, I attached three adhesive magnetic bases to the bottom of my MacBook Air, like so:
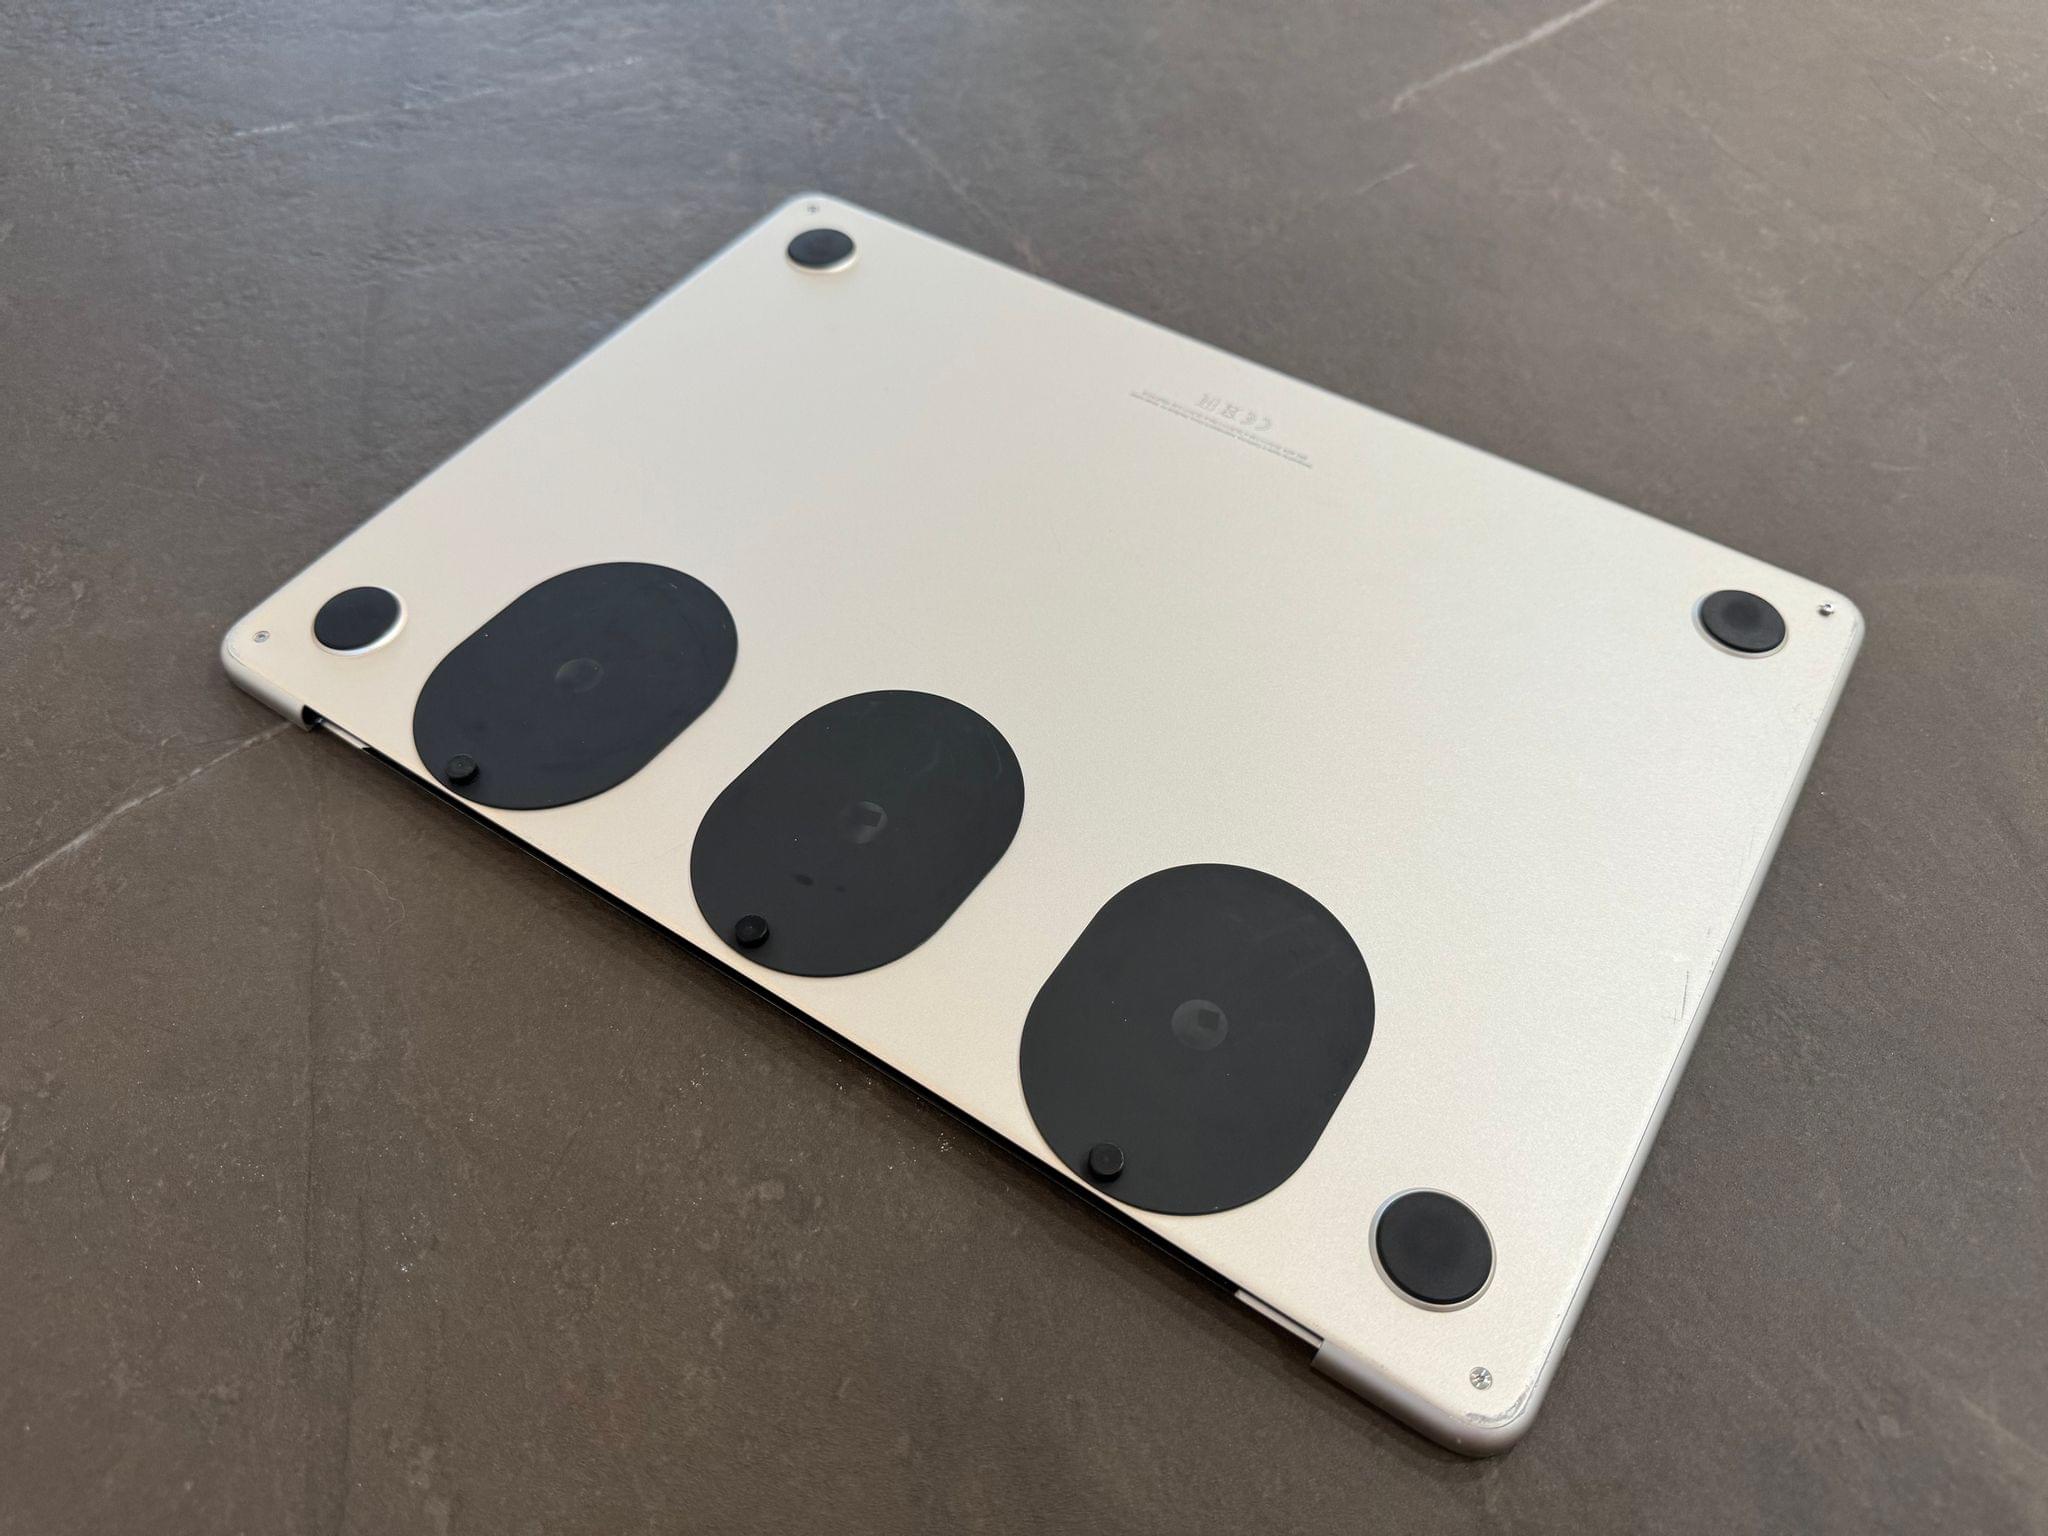
As you can see, I attached the bases as close to the chassis’ edge as I could. I did that so that the adjustable mounting clips could extend as far as possible both toward the Air’s keyboard and away from it. By doing this, thanks to the Edge Pro Core’s widely adjustable angle, I can even lay the display flat on a table if I want to:
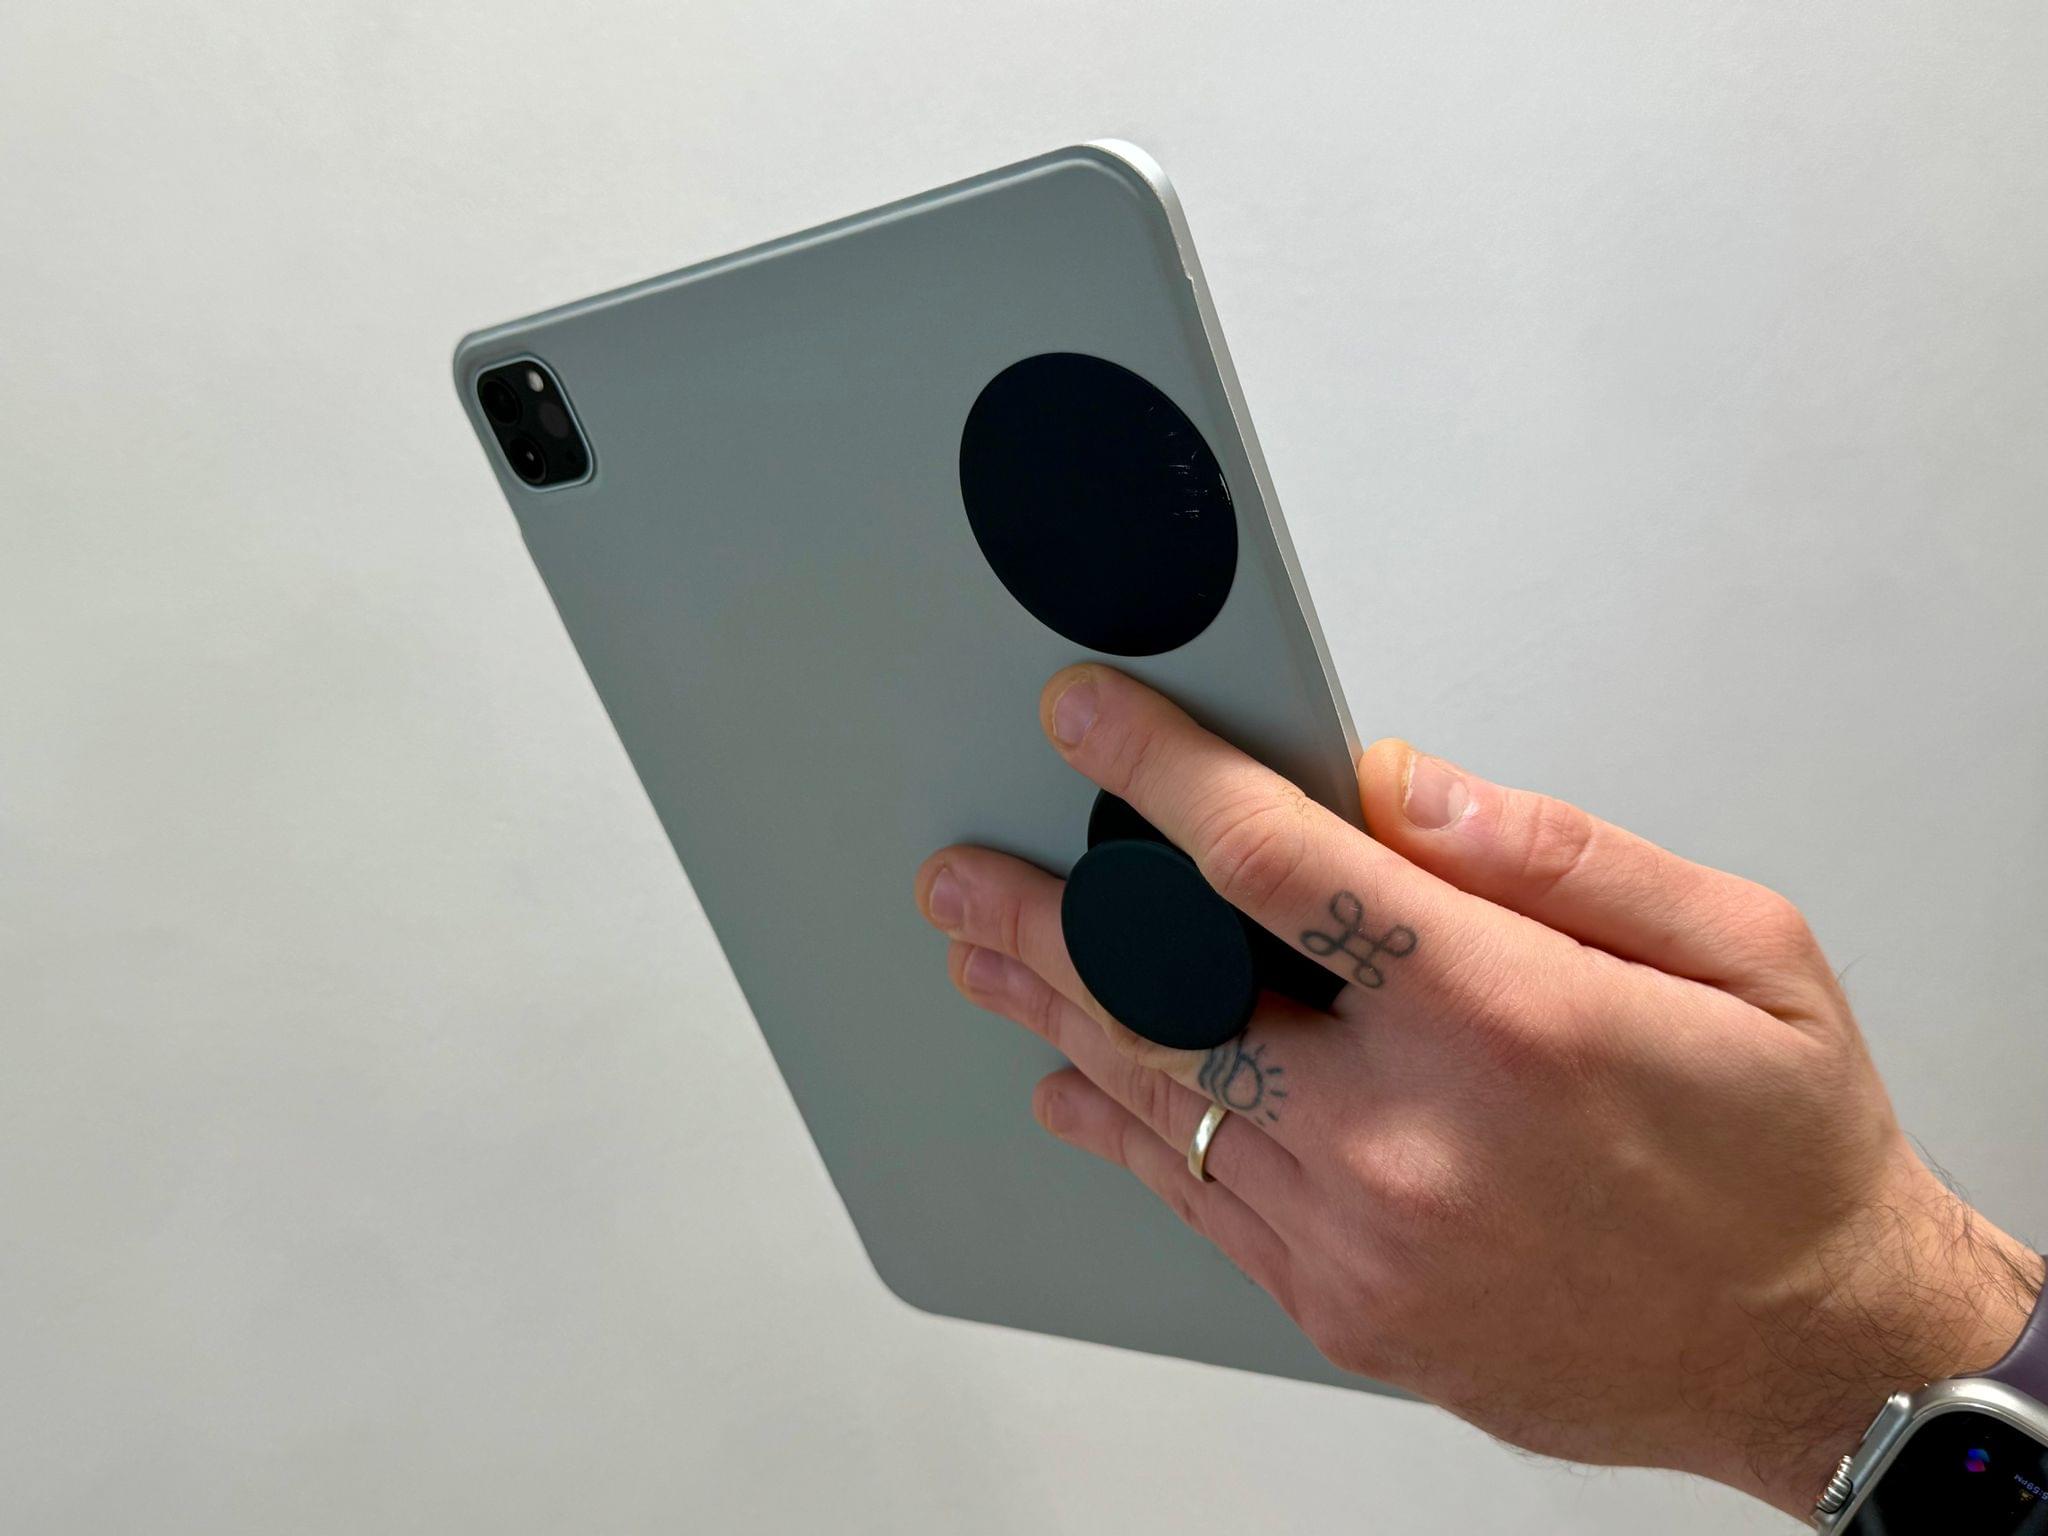
Then came my next idea: crafting a custom magnetic cover for the iPad Pro that would also attach to the Rolling Square magnets on the MacBook Air.
While I stuck three magnetic bases to the bottom of the MacBook Air – which is something I never see or touch – I didn’t want to attach three magnets to the back of my iPad Pro. Here’s what I did instead: I took an ESR smart cover for the iPad Pro (a cheaper alternative to Apple’s Smart Folio that I’ve been using for years now) and used a knife to separate the back cover from the front. I also cut out the Apple Pencil flap since I wasn’t going to use it. Then, I lined up three magnets with the Rolling Square clips, attached them to the smart cover, and voila: I created a lightweight mounting system that would allow me to easily and quickly tear away the MacBook’s display and use it as an iPad.
When I say “tear away the display”, I mean it. Here’s how simple it is to go from MacBook mode to iPad mode when I’m done working with macOS:
Switching from macOS to iPadOS mode.Replay
I can also choose to detach the iPad without its cover:
Keeping the back cover attached to the MacPad.Replay
I’ve been working with this magnetic attachment system for the past couple of weeks, and it’s been terrific. The more adjustable viewing angles have allowed me to use this computer while lying on the couch or in bed and tilt the display back further than a typical MacBook Air. Three magnets provide a connection strong enough to walk around the house with this computer without the fear of the iPad detaching from the Air’s chassis. The final product, as I’ll explain later, is heavier than a MacBook Air – but it also carries the benefits of two OSes in the same machine.
Is there a more elegant and practical solution that doesn’t involve sticking magnets to a MacBook Air or cutting a smart cover by hand? I’m sure there is. Perhaps someone with a 3D printer and more skills than yours truly could design a custom mounting system that integrates nicely with the Air’s display hinges and chassis. However, given my lack of expertise and resources, I think the modular system I designed is pretty good, and it does the job well.
Using Sidecar to Turn an iPad into a Mac Display
Enough about hardware. It’s time to get to the meaty part of this story: Sidecar.
We’ve been able to use an iPad as an extended display for macOS for the past five years – since macOS Catalina and iPadOS 13, to be exact. Sidecar has barely changed over the years, so what John covered in his original story still applies today: Sidecar was conceived to use an iPad as a secondary display for a Mac; you can drag windows from the Mac’s main display to the iPad’s, or you can send individual windows from one monitor to another. There are some additional options you can configure (there’s even a virtual Touch Bar, still!), which you can also read about in Apple’s support document here.
There’s only one problem, though: even after five years, you can only initiate a Sidecar connection from a Mac first. Suffice to say, that was a bit of a problem for someone who no longer had a display attached to his MacBook Air. How could I interact with the macOS UI to start Sidecar without a display? Was my only solution to VNC into my Mac first and then manually start Sidecar from there every time?
See, my dream was more ambitious. I wanted to sit down with my MacPad, press a button on iPadOS, and enter macOS mode; then once I was done, I wanted to be able to press another button on the Mac, and return to iPadOS mode. Essentially, I wanted a seamless transition between macOS and iPadOS, designed around Sidecar but faster than what Apple normally allows for.
And, dear readers, I figured it out.
During my research, I came across a lot of Reddit and forum threads from people who were wondering if there was a way to use Shortcuts and automation to start a Sidecar connection directly from iPadOS. I tried some of the methods mentioned online, including one that involved the often-unreliable GUI automation, and none of them worked as quickly or reliably as I hoped. Then I came across Sidecar Launcher, an open-source project by developer Jovany Ocasio that provided exactly the solution I was looking for.
Unlike other tools to start a Sidecar connection you may find on the Internet, Sidecar Launcher is not based on AppleScript. Instead, Sidecar Launcher is a little executable program that uses private APIs based on Apple’s ‘SidecarCore’ framework to return a list of all available Sidecar-enabled devices, start a specific Sidecar connection without interacting with macOS at all, or disconnect Sidecar. You can inspect the Sidecar Launcher code here and, if you want, download the Xcode project and build the executable file yourself.
To use Sidecar Launcher, you just need to download the executable script, place it somewhere in Finder, and then download a companion shortcut on your iPad. The shortcut created by Jovany Ocasio requires you to enter your Mac’s IP address/hostname, username, and password, as well as the path where you placed the Sidecar Launcher script. That’s all the configuration you need to do and you won’t have to touch Sidecar Launcher at all in the future.3 When you run the shortcut on your iPad, it’ll take care of waking up your Mac, logging in, and enabling the Sidecar connection for you. Run the shortcut on your iPad, wait 10 seconds or so, and the iPad’s screen will turn into a macOS extended display – no further interaction necessary.
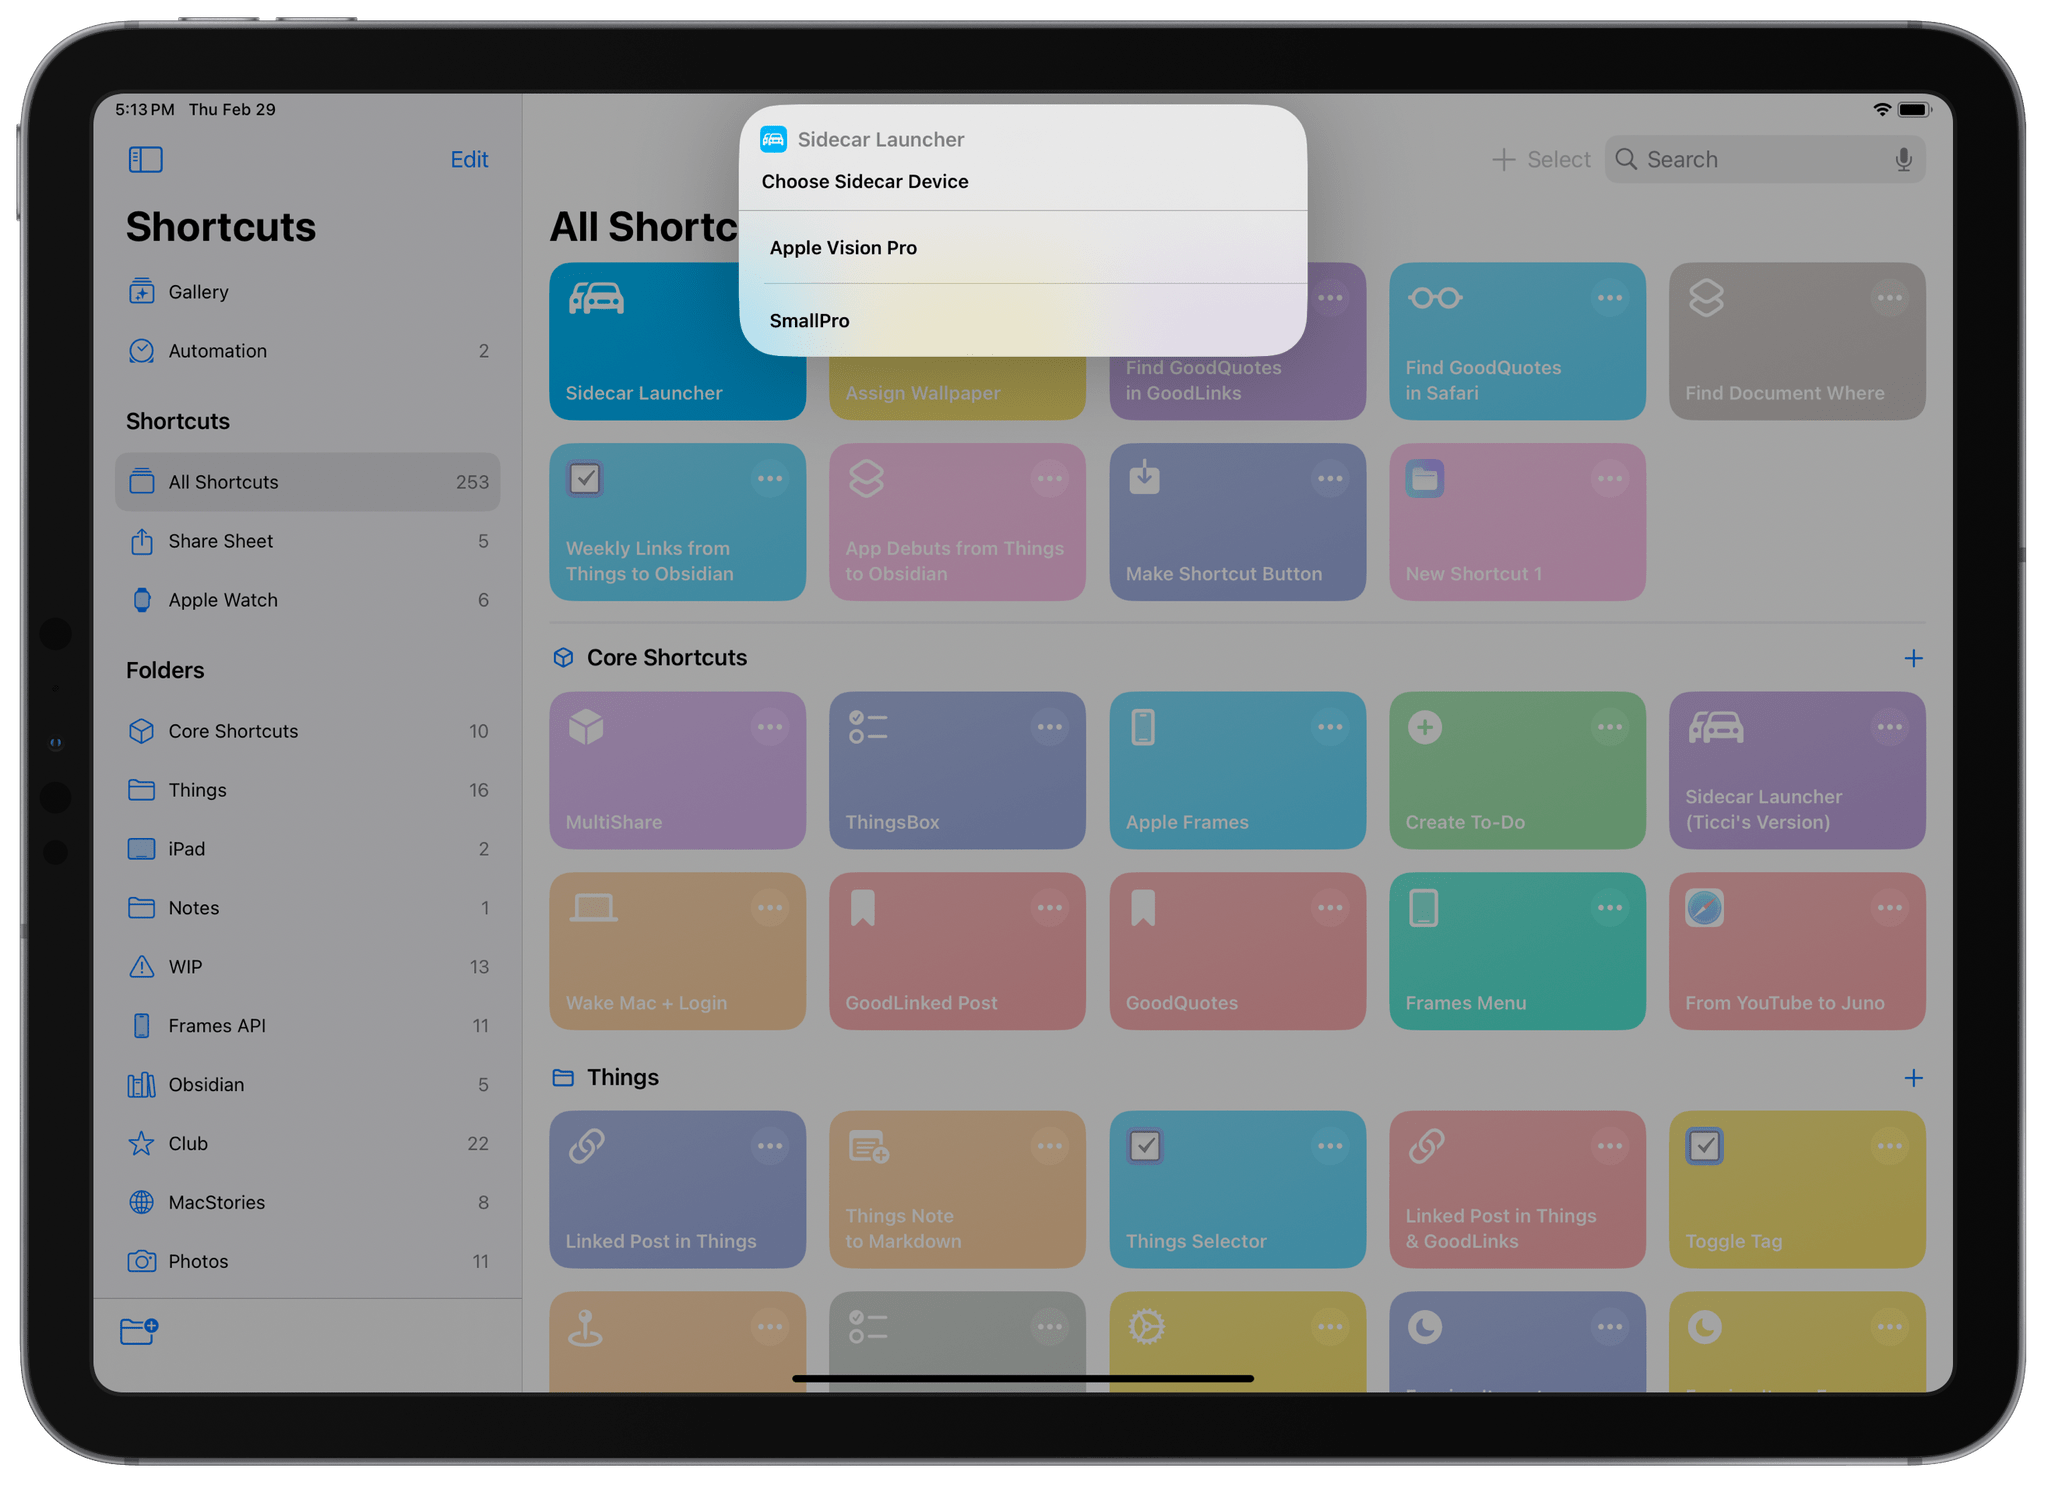
The first time I tried Sidecar Launcher, I knew it was precisely what I needed, but I still wanted to make it faster and easier to use. Take a look at how Jovany Ocasio’s shortcut works by default:
The original Sidecar Launcher shortcut.Replay
And here’s Sidecar Launcher (Ticci’s Version), which connects to macOS and enables Sidecar in two seconds:
My simplified version of Sidecar Launcher.Replay
I modified the original Sidecar Launcher shortcut in a couple of ways. For starters, I privately got in touch with Jovany Ocasio, who was kind enough to listen to my feedback and implemented a disconnect command that terminates an existing Sidecar session. That allowed me to put together a version of a shortcut that acts as a toggle:
- When run from the iPad, the shortcut instantly connects to the Mac;
- When run from the Mac, the same shortcut disconnects Sidecar.
In my version of the shortcut, I removed all the code that dealt with waking a Mac and authenticating the user: I can just unlock my headless MacBook Air with Touch ID and know that the computer is ready to go when I run the shortcut in my iPad’s dock.4 Furthermore, I removed the need to manually choose an iPad from a list of supported Sidecar devices nearby and instead used a ‘Text’ action that gives macOS the name of the iPad it needs to connect to.
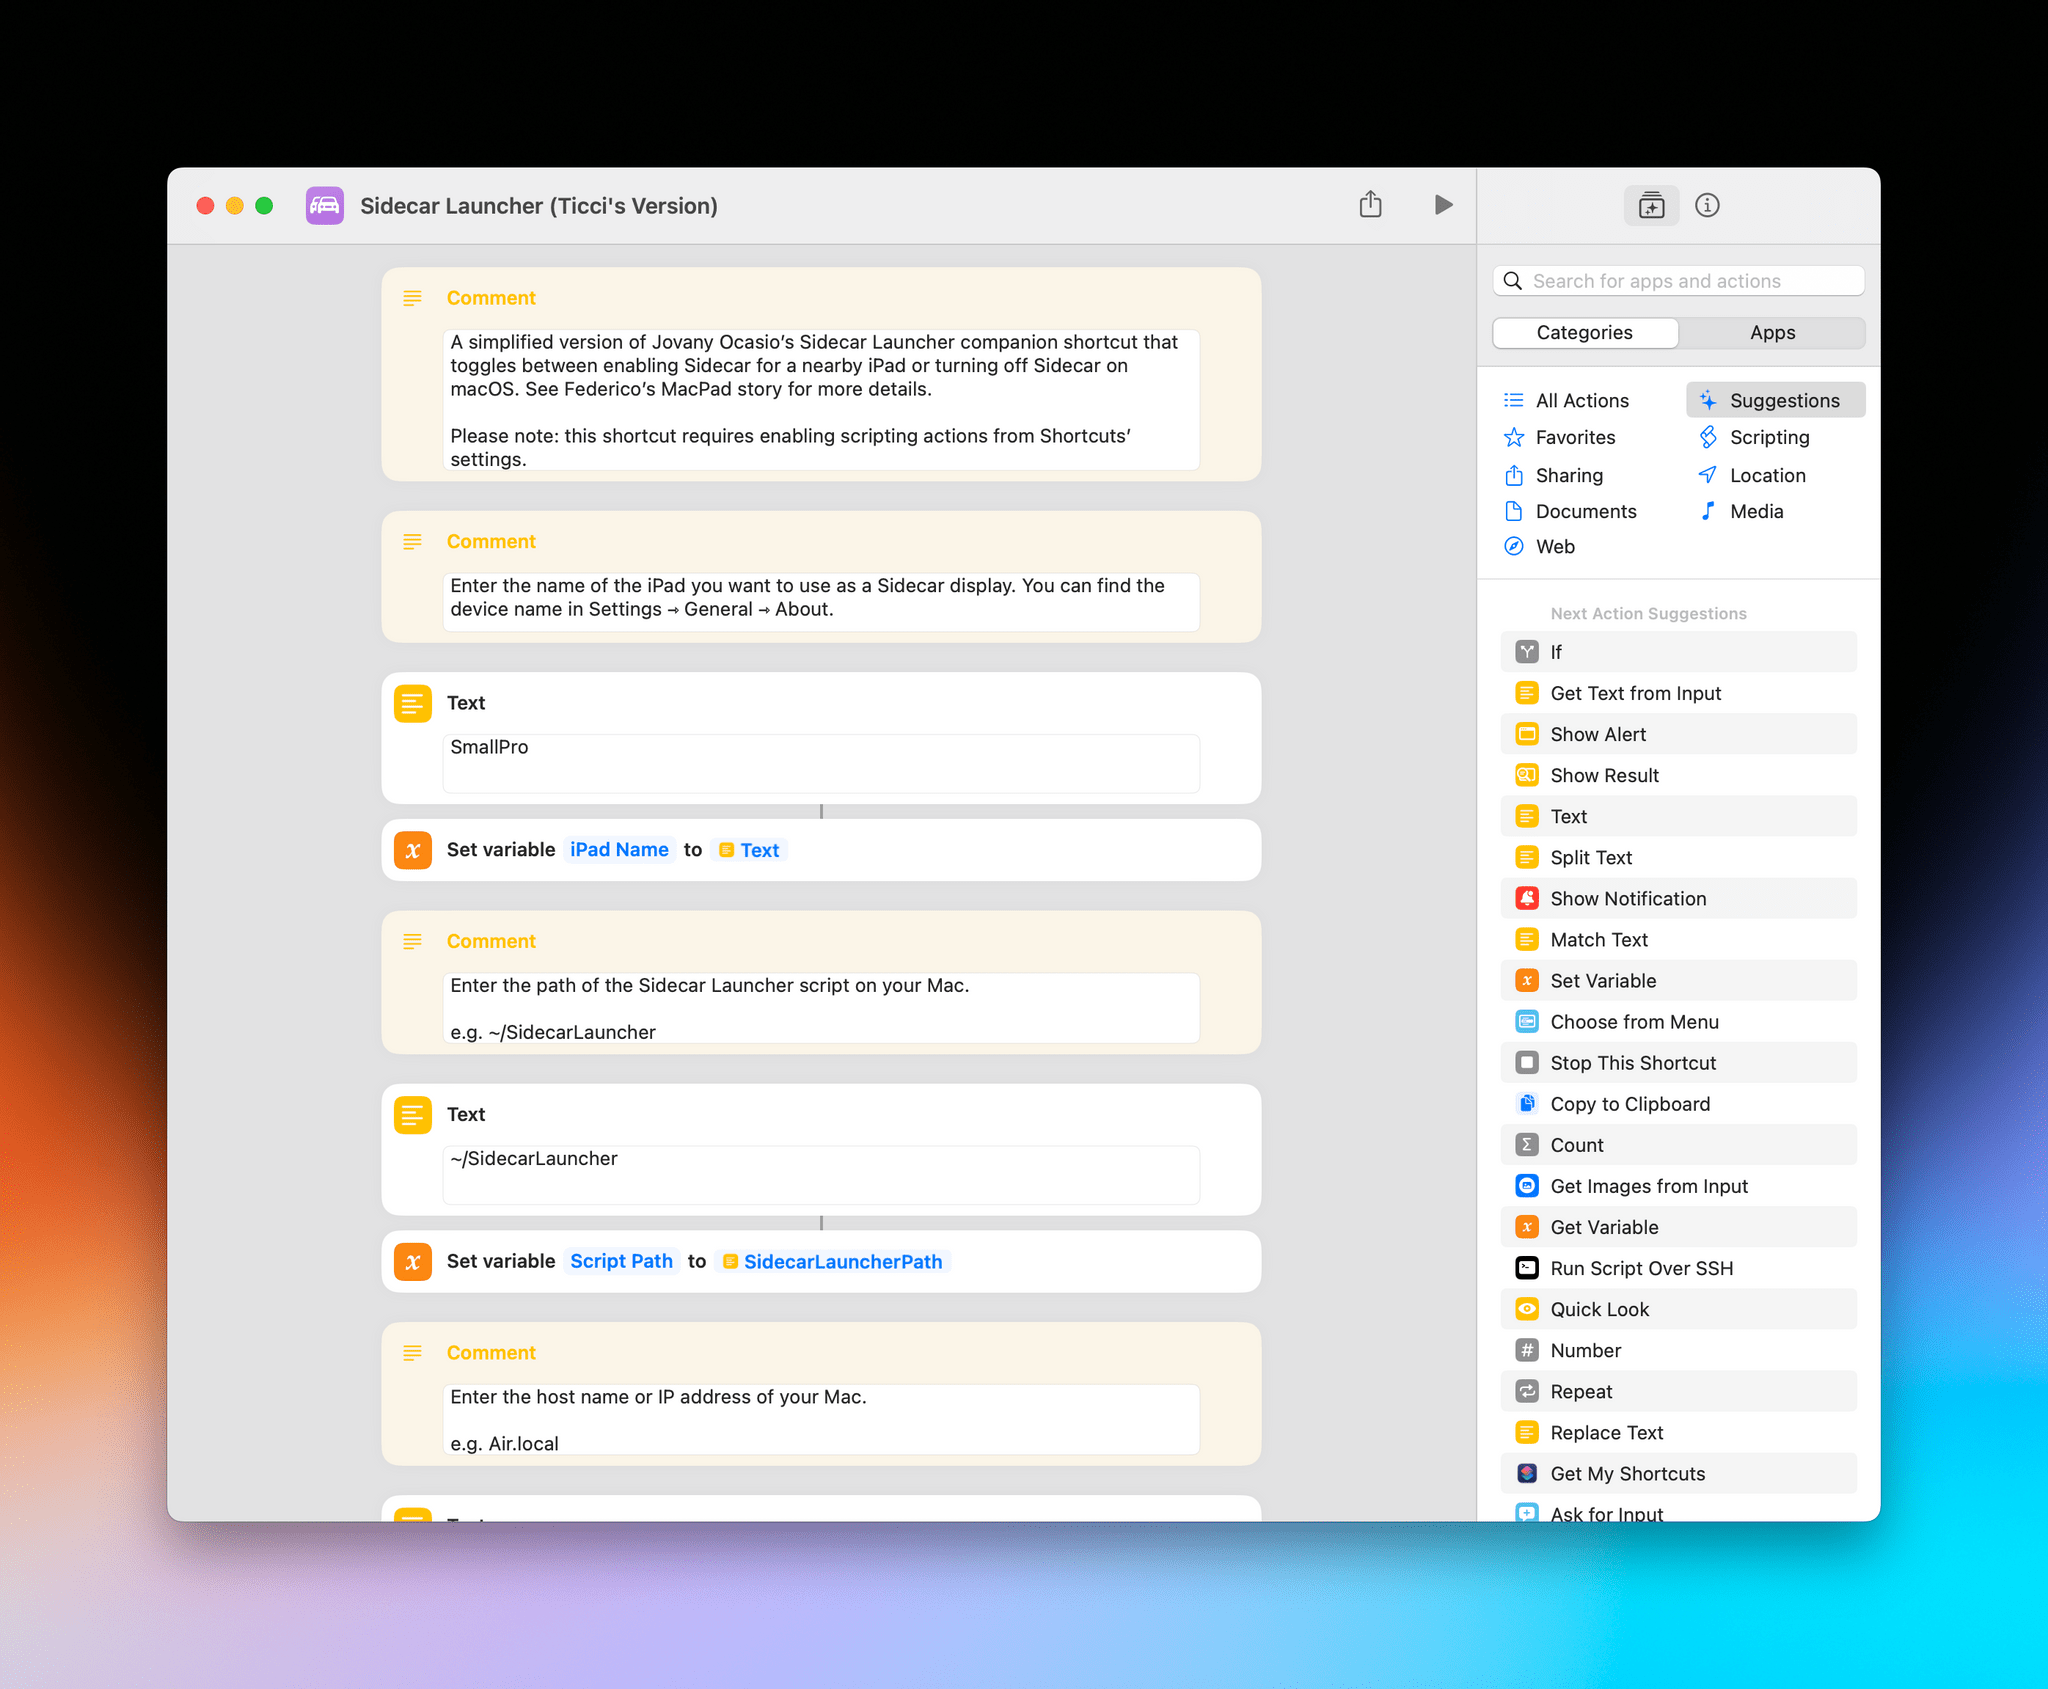
Thanks to these changes, as long as both the Mac and iPad are already unlocked, nearby, and on the same Wi-Fi network, the Sidecar Launcher shortcut in the iPad dock will initiate a Sidecar connection immediately. When I’m done working with macOS, running the same shortcut from the Mac’s menu bar will quit Sidecar instead. Props to Jovany Ocasio for reverse-engineering how Sidecar works and finding the private APIs that make these direct connections possible. You can download Sidecar Launcher (Ticci’s Version) below and find it in the MacStories Shortcuts Archive:
Sidecar Launcher (Ticci’s Version)
A simplified version of Jovany Ocasio’s Sidecar Launcher companion shortcut that toggles between enabling Sidecar for a nearby iPad or turning off Sidecar on macOS.
Please note: this shortcut requires enabling scripting actions from Shortcuts’ settings.
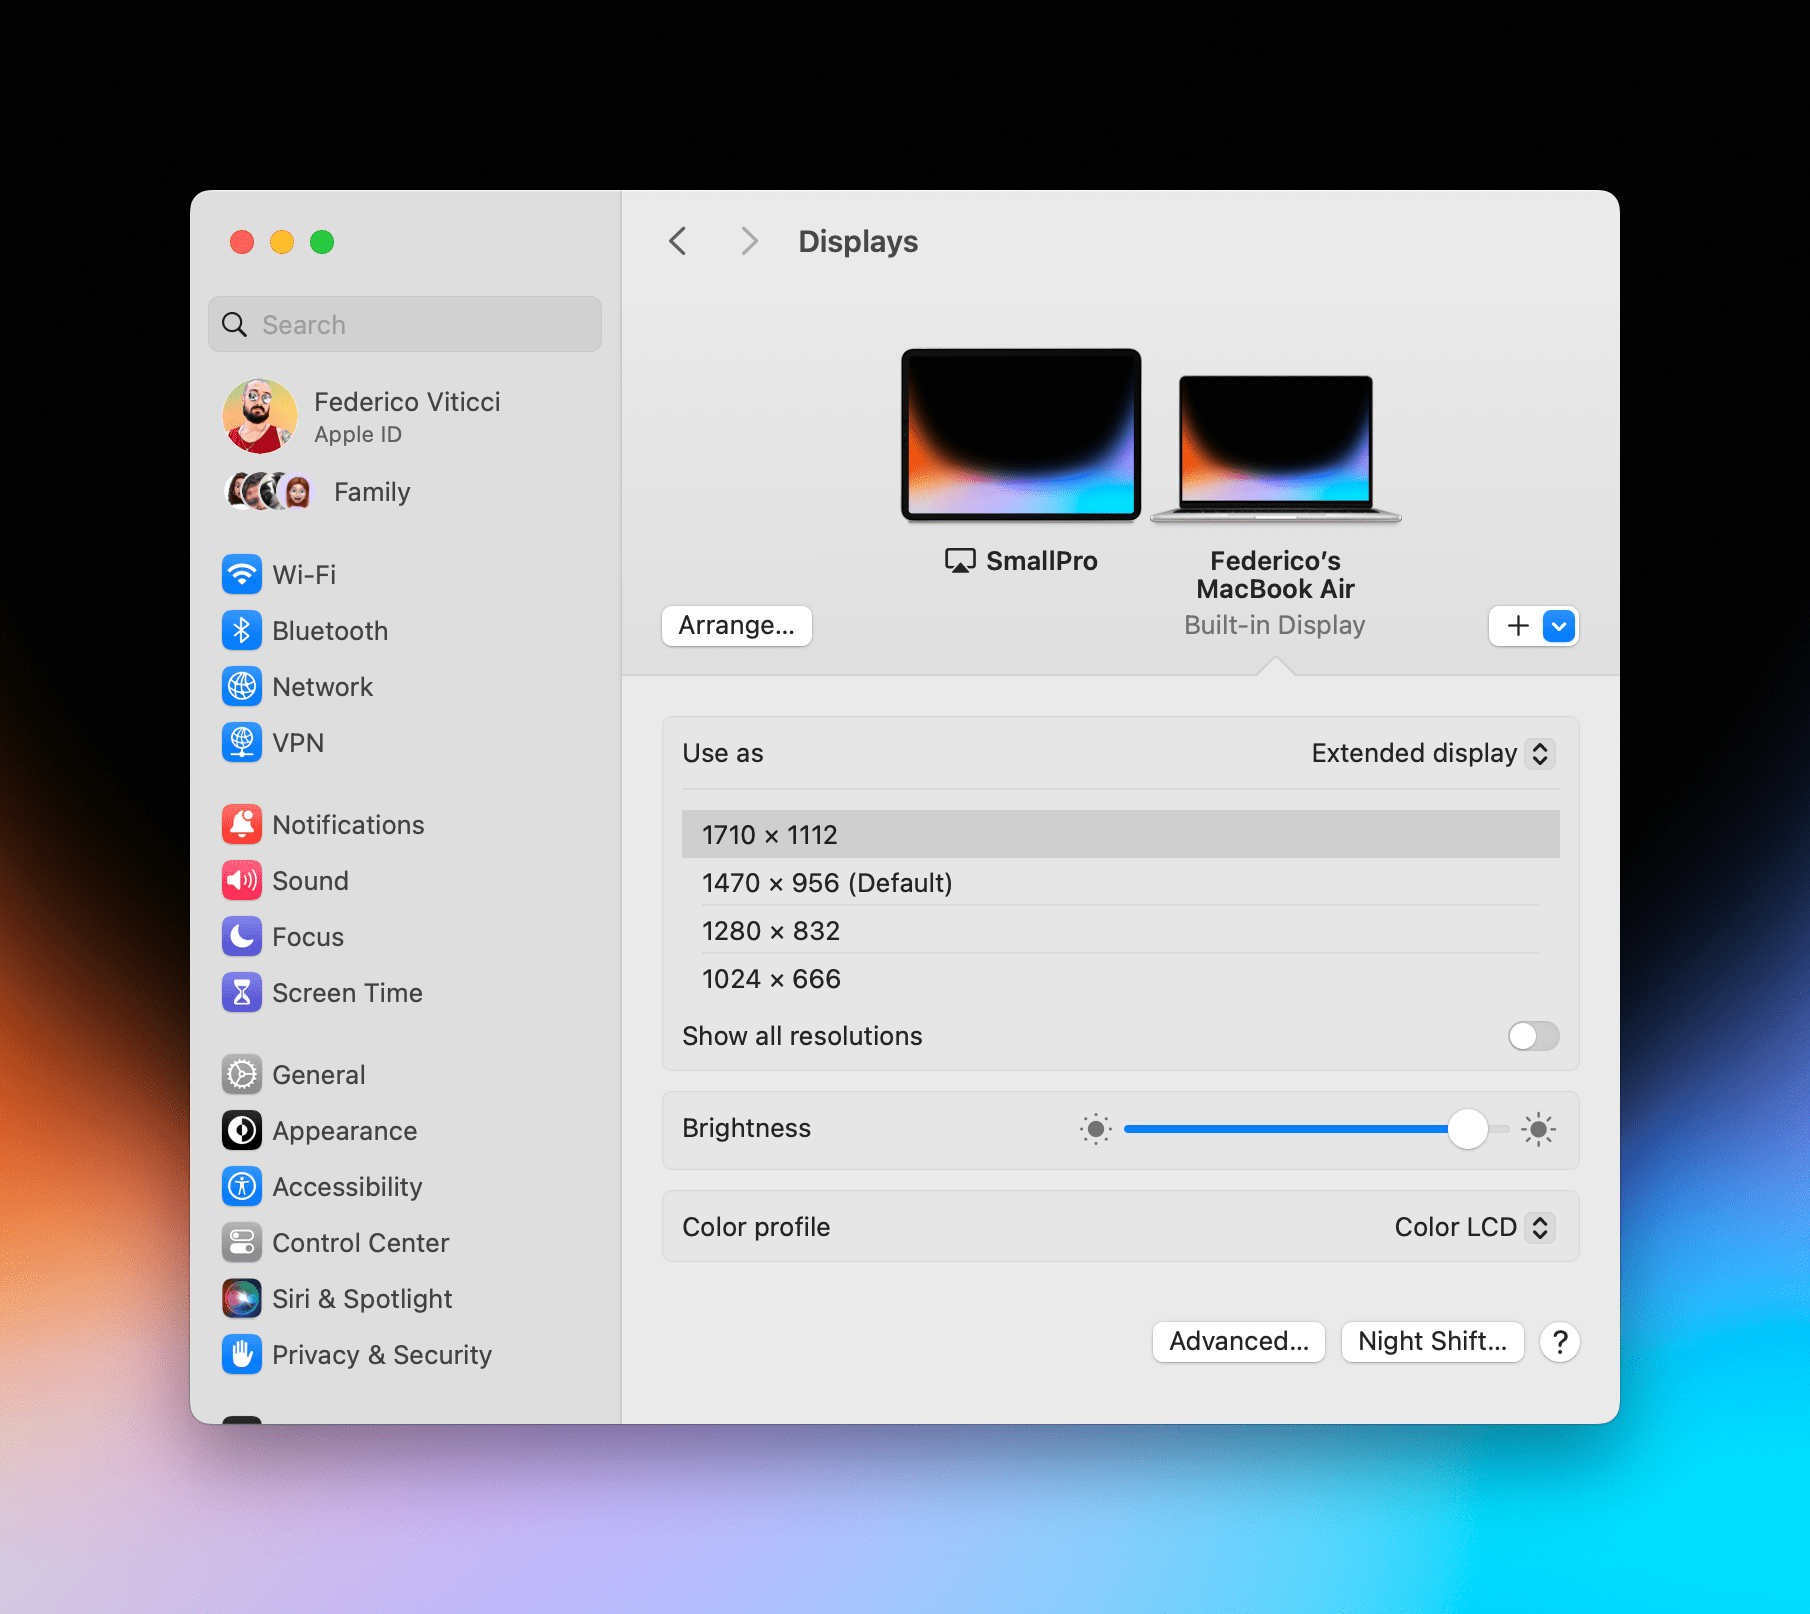
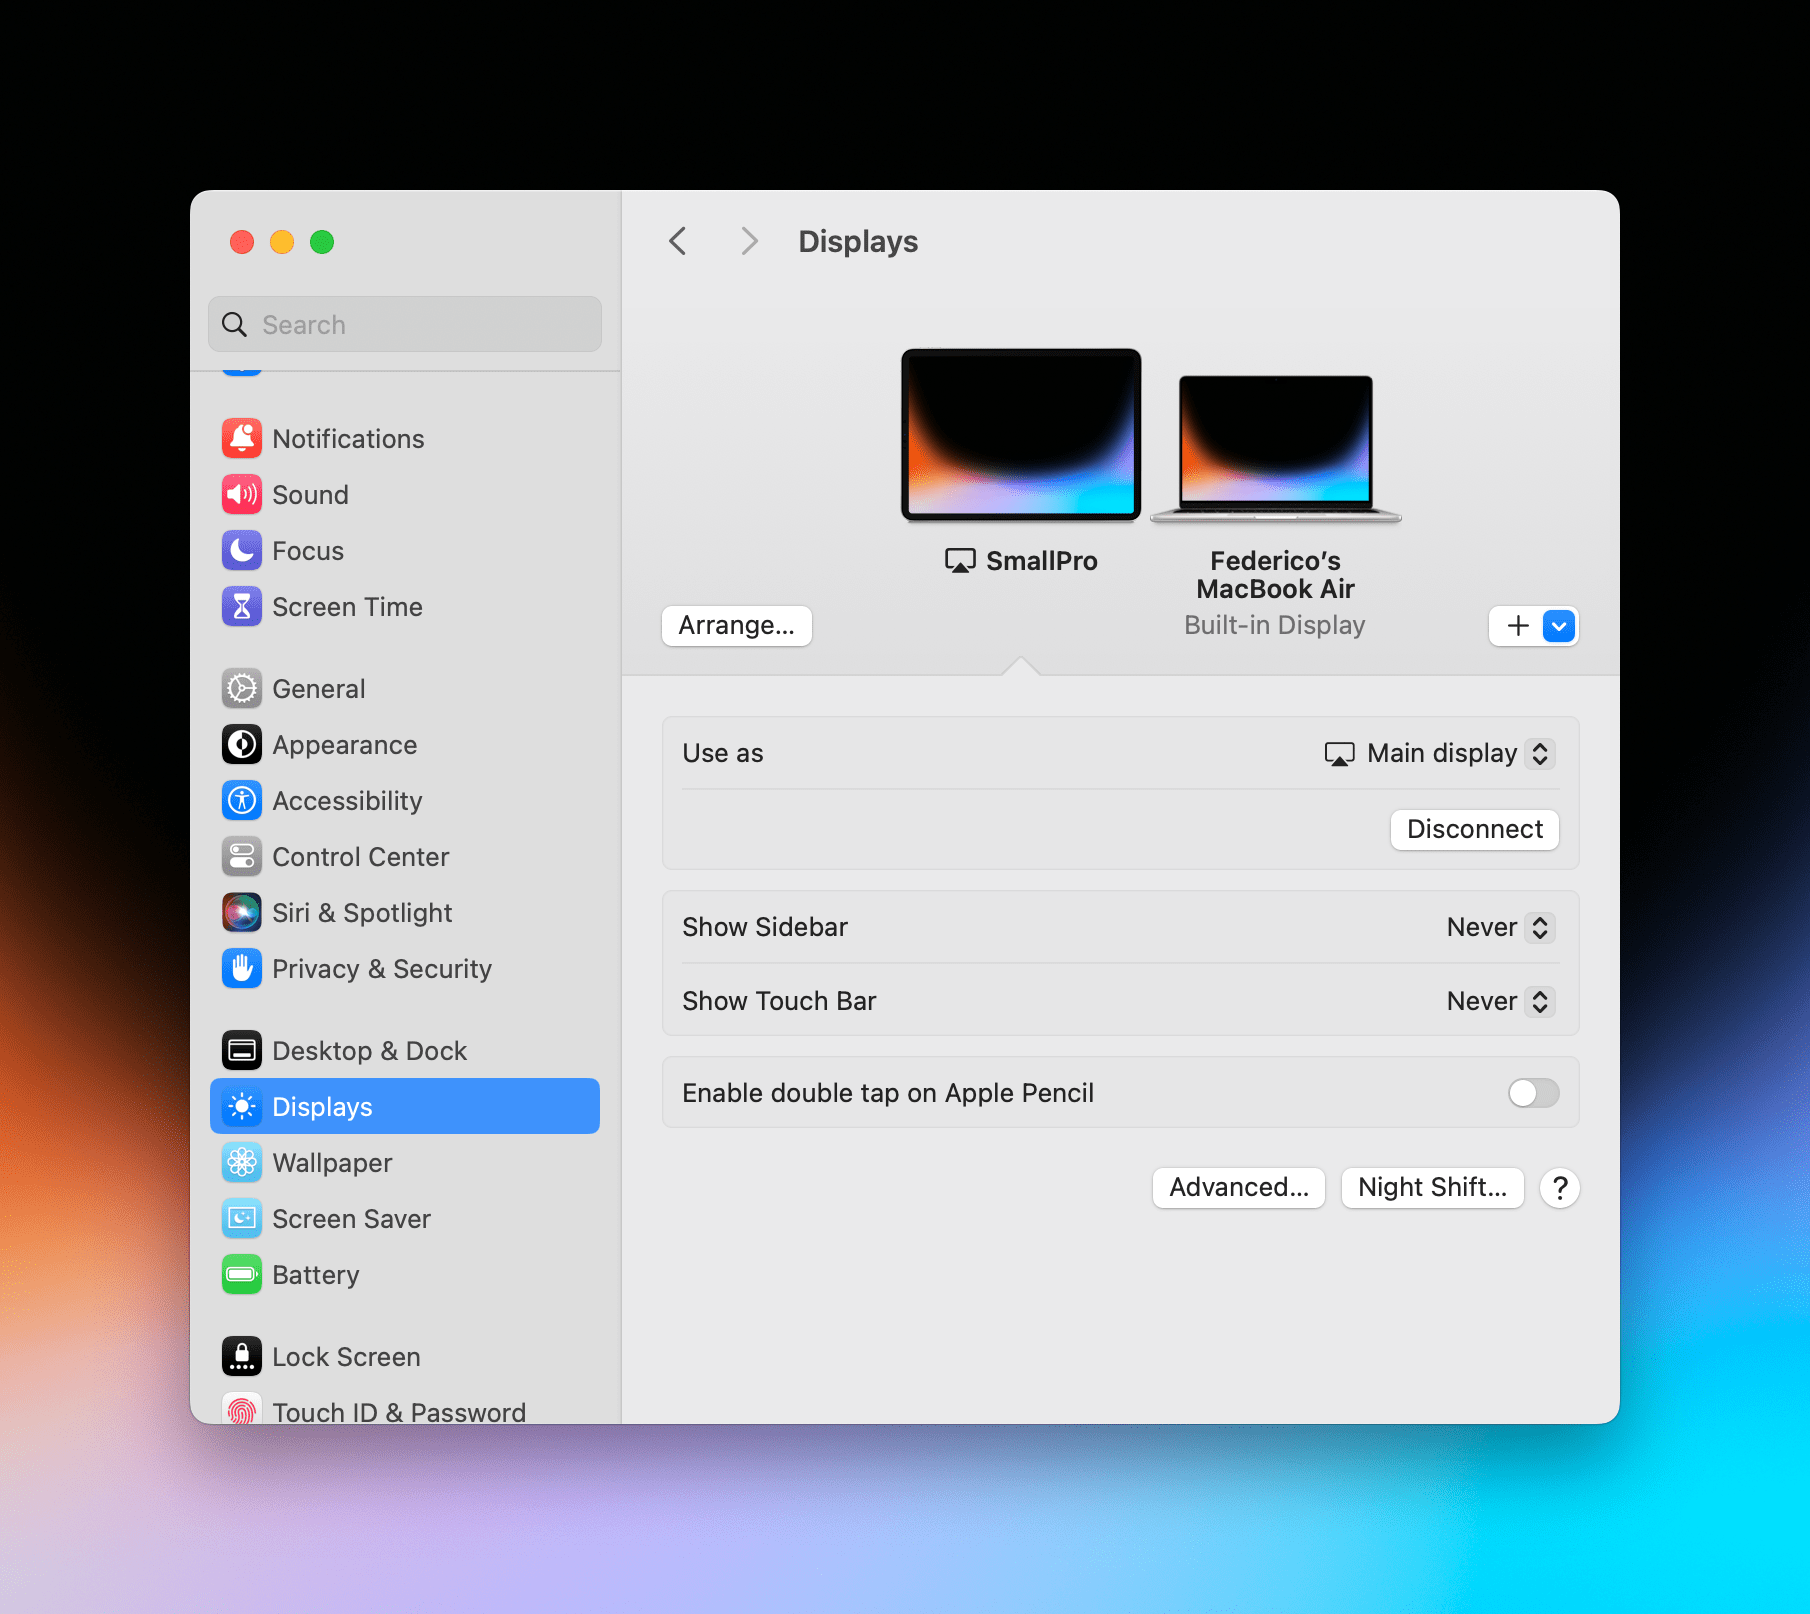
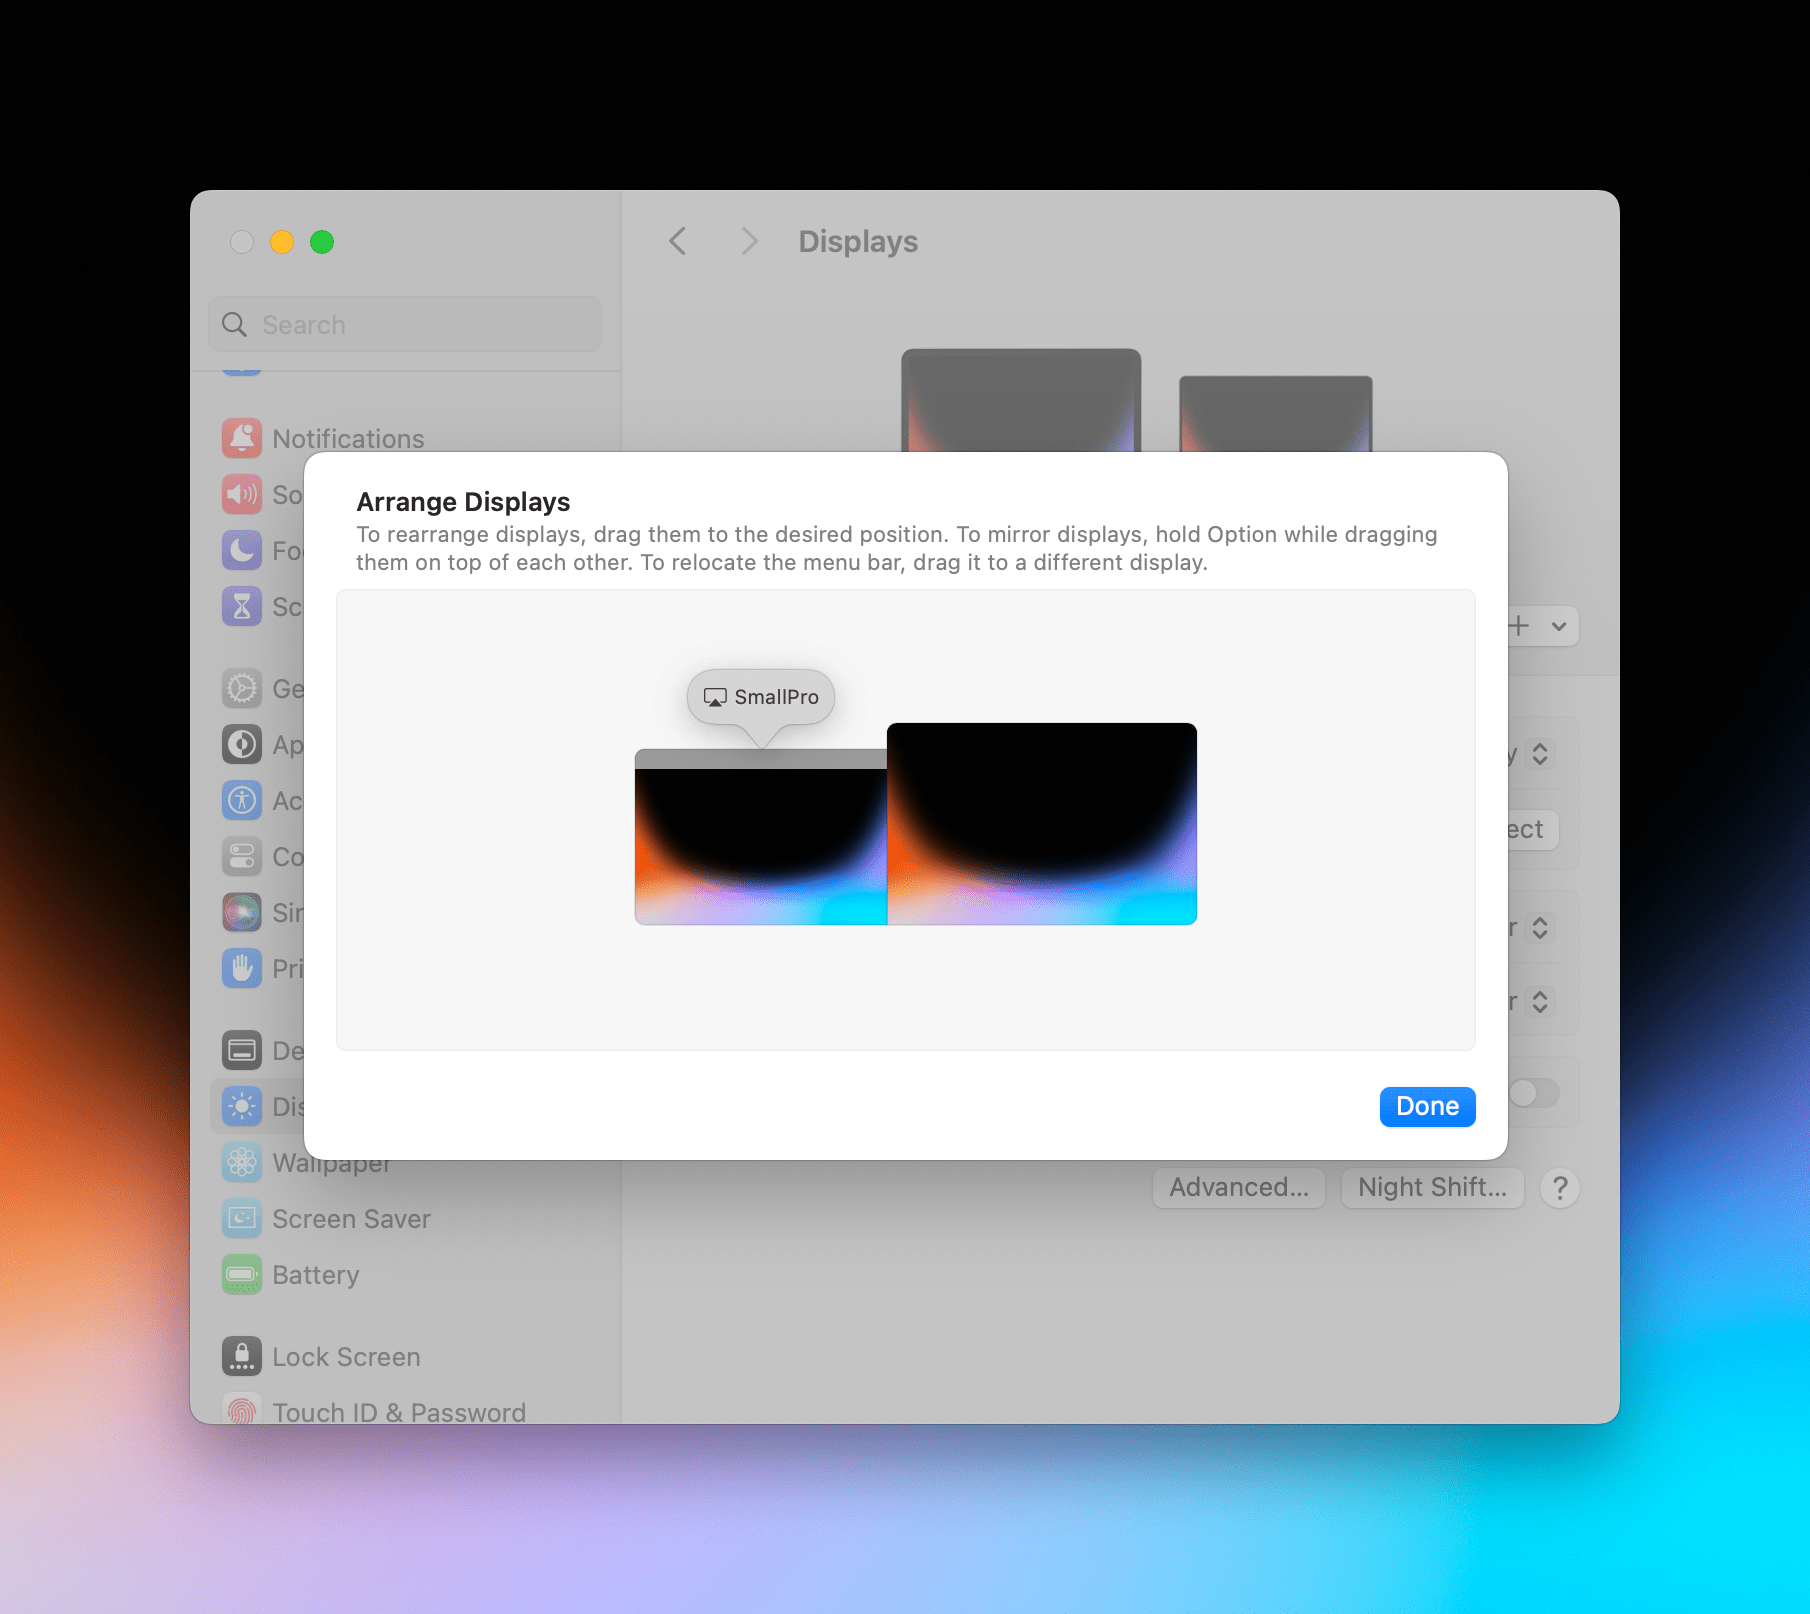
As we saw previously, macOS still thinks there’s a built-in display attached to my computer. And since Sidecar can turn an iPad into an extended display, it’s also possible to make it the main display of the computer – which is a setting that will stick over time, thus defaulting to the Sidecar-enabled iPad as the MacBook’s main display the next time you connect. To do this, you just need to visit System Settings ⇾ Displays, drag the menu bar onto the iPad display, and choose to make it the main one.
With those setup-related details out of the way, allow me to dig into how I’ve been working with my MacPad for the past three weeks.
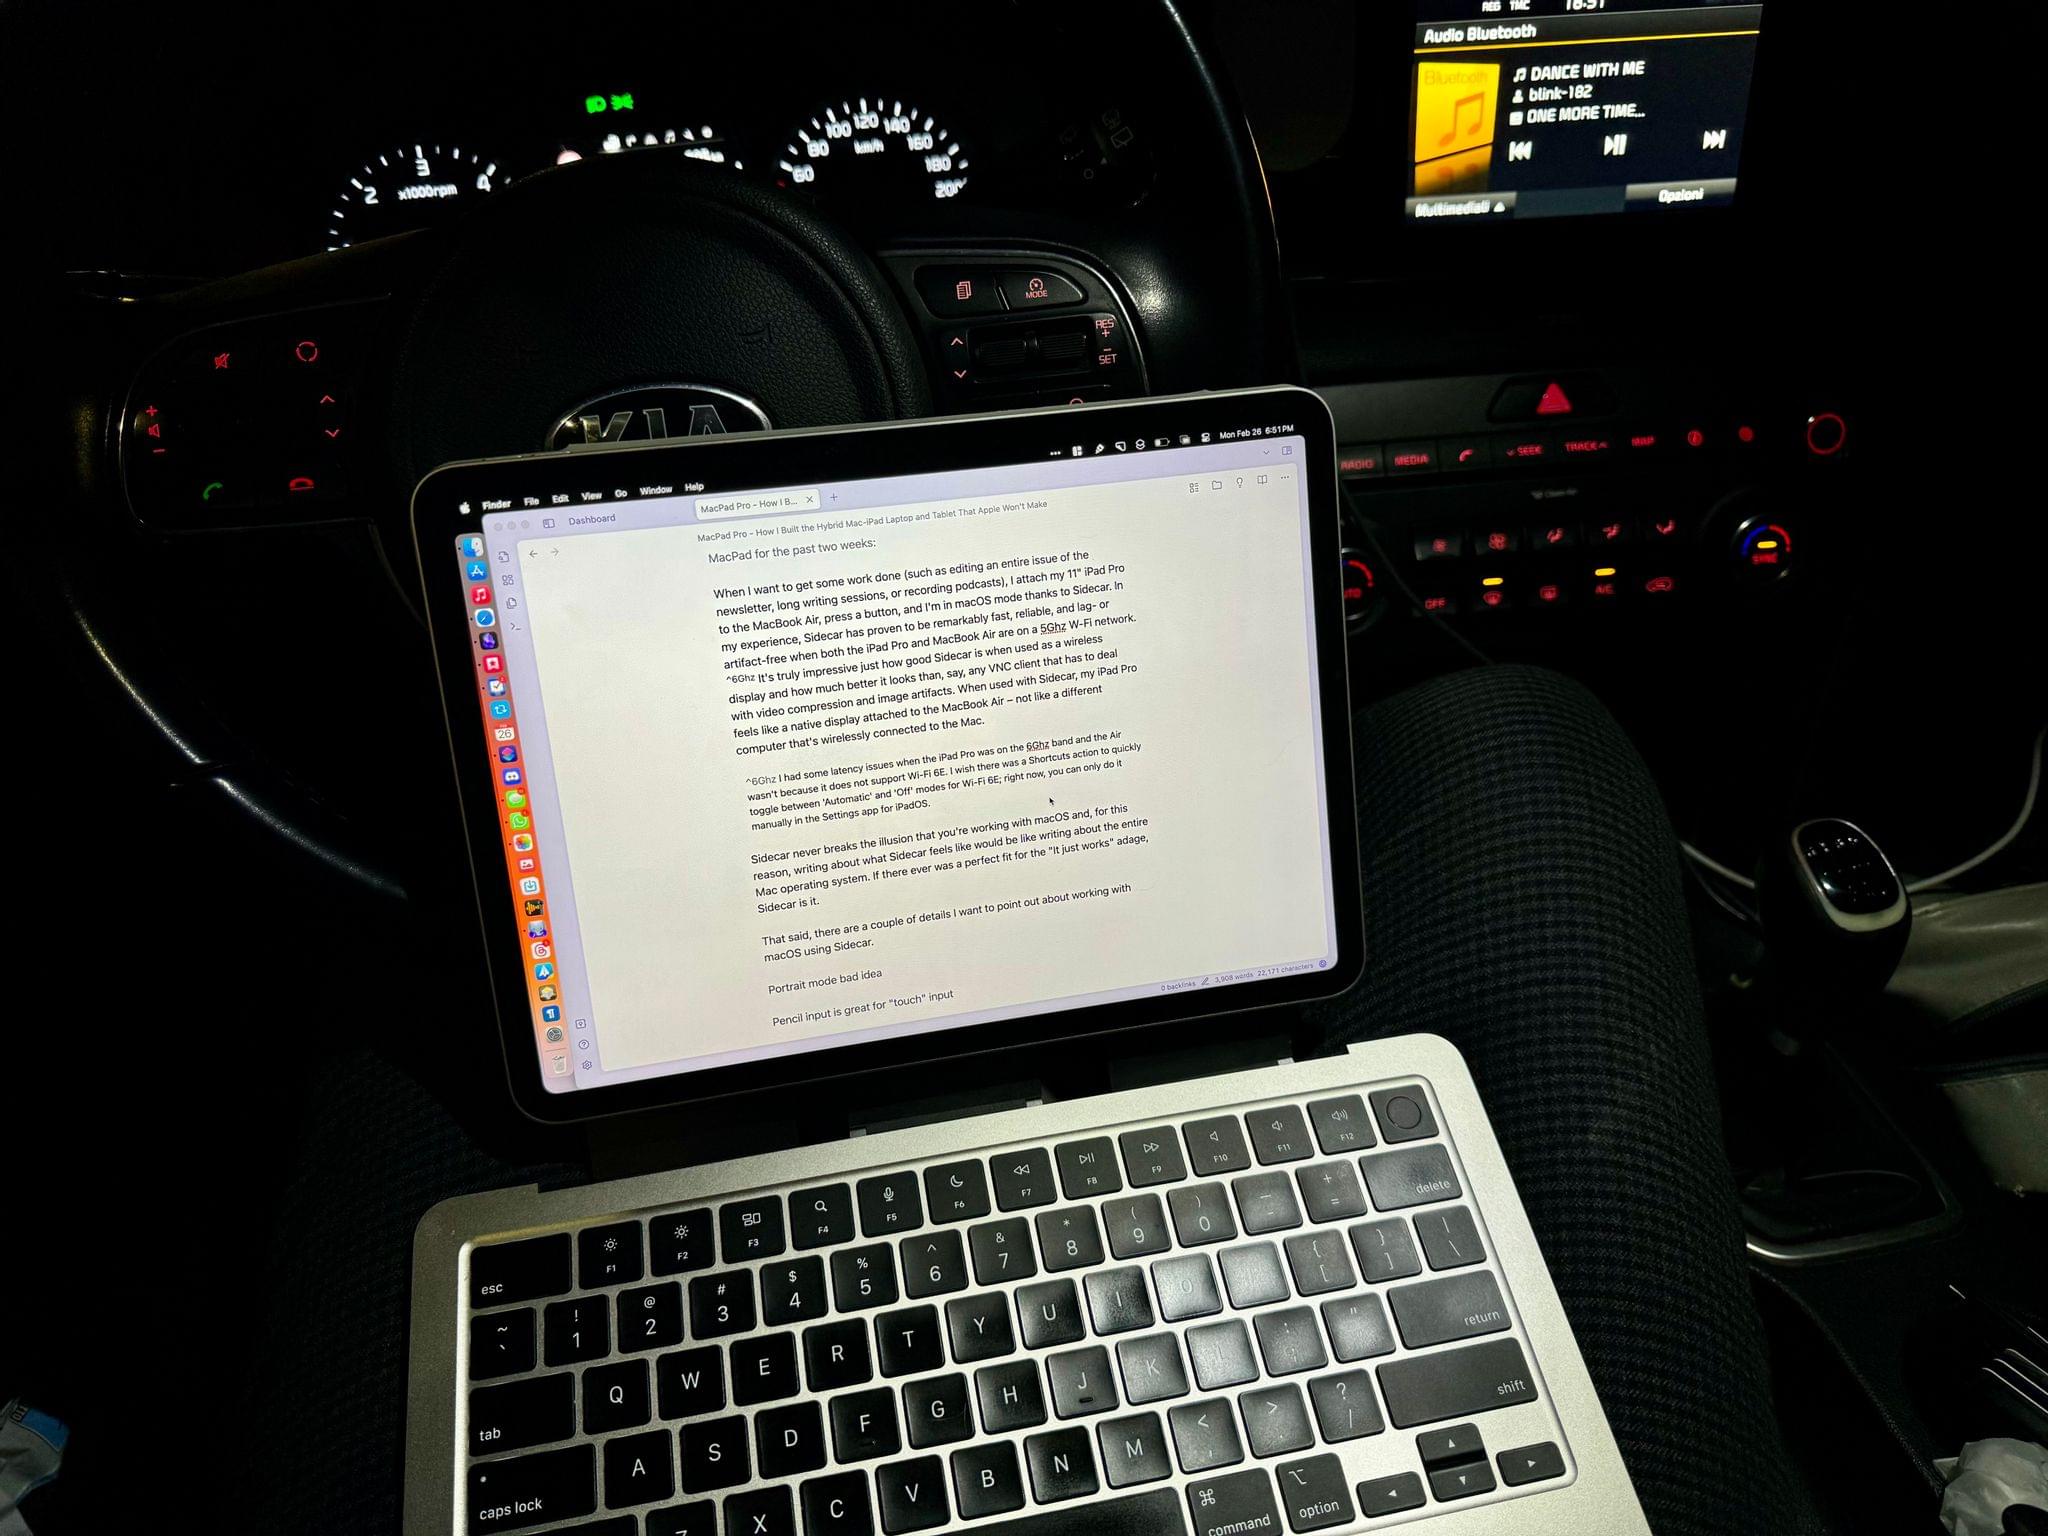
When I want to get some work done (such as editing an entire issue of the newsletter, long writing sessions, or recording podcasts), I attach my 11” iPad Pro to the MacBook Air, press a button, and I’m in macOS mode thanks to Sidecar. In my experience, Sidecar has proven to be remarkably fast, reliable, and lag- or artifact-free when both the iPad Pro and MacBook Air are on a 5 GHz W-Fi network.5 It’s truly impressive just how good Sidecar is when used as a wireless display and how much better it looks than, say, any VNC client that has to deal with video compression. Thanks to Sidecar, my iPad Pro feels like a native display attached to the MacBook Air – not like a different computer that’s wirelessly connected to the Mac.
Sidecar never breaks the illusion that you’re working with macOS and, for this reason, writing about how Sidecar works would be like writing about the entire Mac operating system. When I connect to Sidecar, my iPad simply becomes a Mac display, capable of doing all the things any regular Mac can. If there ever was a perfect fit for the “It just works” mantra, Sidecar is it.
That said, there are a couple of details I want to point out about working with macOS using Sidecar.
I tried setting up Sidecar in portrait mode using BetterDisplay with my 11” iPad Pro, and it was a bad idea. At the default resolution scaling option provided by Sidecar, everything displayed on-screen was too tiny to be comfortable; plus, the portrait orientation was just weird to me. I know some folks out there like their vertical monitors for coding and other tasks, but it wasn’t for me. If you want to try, you can follow this guide.
When you’re using Sidecar, some touch input options are still available on the iPad’s display. You can swipe from the edge of the display to invoke Slide Over apps (a lot more on this in the next section) and swipe up with four fingers to enter the iPadOS app switcher, where you’ll notice that Sidecar is shown as a special ‘Continuity’ app that cannot be seen anywhere else in the system:

You can also scroll any macOS window with two fingers, pinch to zoom, or use the Apple Pencil to click any UI element. This is where we enter the wild hybrid territory of this project that I love, and which I will expand upon in the next section of the story.
At any point when I’m using macOS on the iPad’s display, I can simply reach out with my fingers and pinch on, say, a specific part of a photo I want to zoom in on. It’s a natural gesture that brings the direct manipulation we’ve gotten used to appreciating on touch-enabled devices to the Mac. I’m not saying that I’d like to control the macOS UI with touch all the time – some UI elements are too small to be tapped comfortably; I’m saying that for the occasional interaction, it’s nice to be able to touch a screen like we do hundreds of times each day for other devices in our lives.
Another nice use case for occasional touch interactions? Ripping the “display” apart from the MacBook and using the Apple Pencil to navigate and click around macOS.
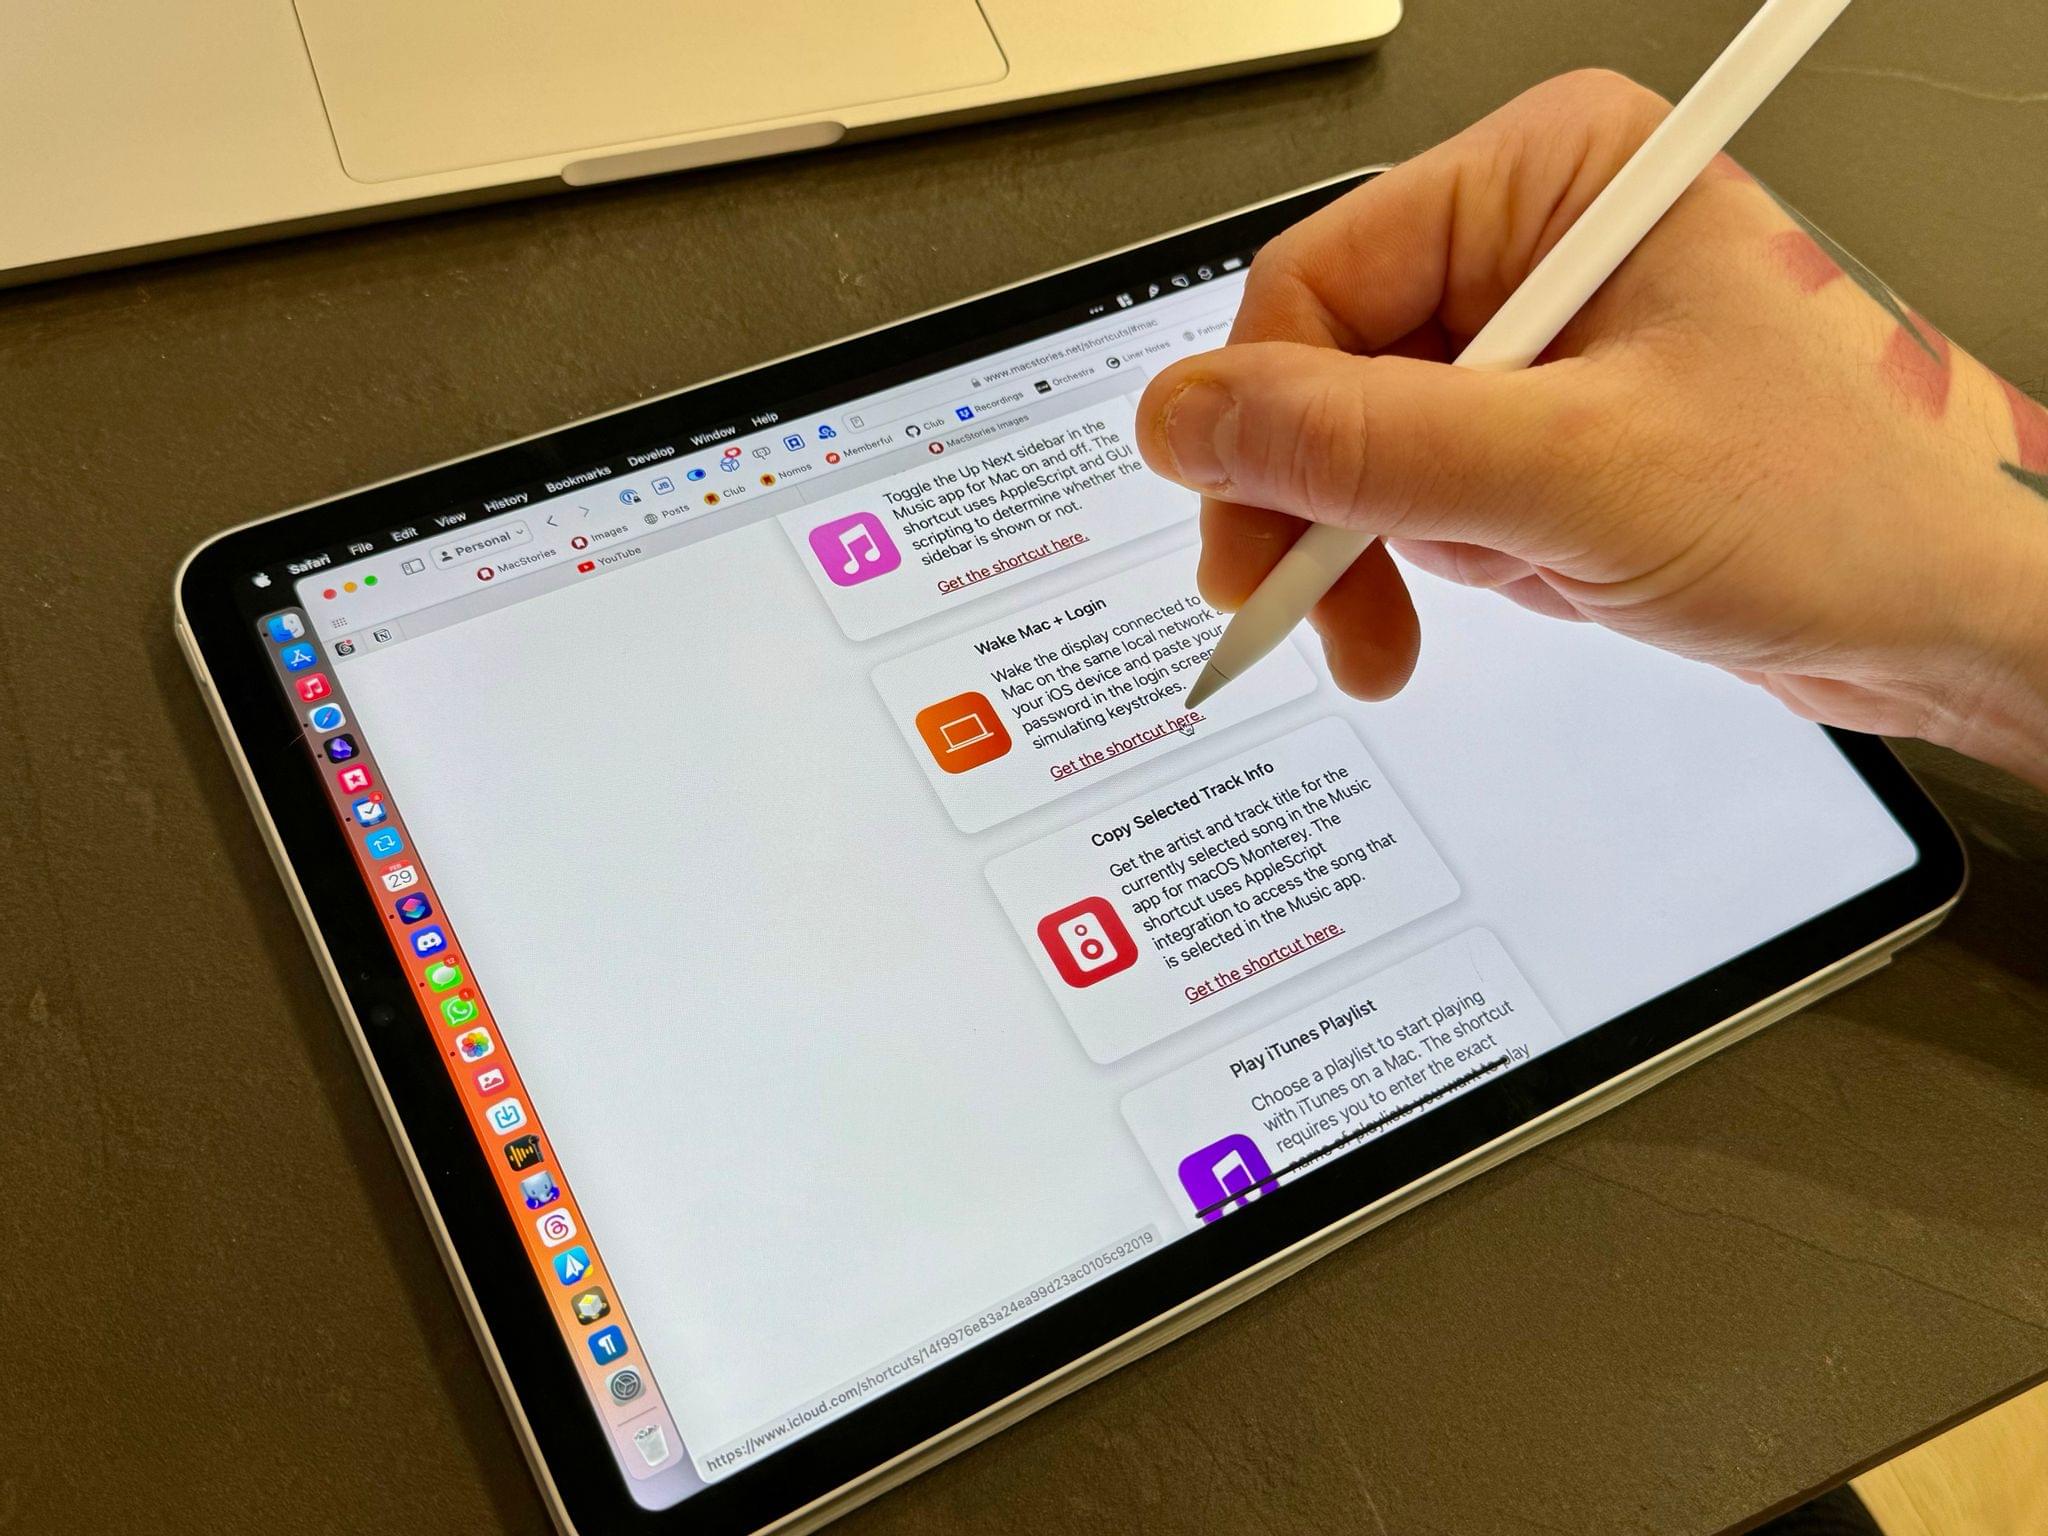
The Apple Pencil can be used to click around the macOS UI and hover over links and other interface elements.
Every once in a while, I’m doing something with my MacPad that requires reading for a while, such as editing an article for MacStories. A tablet – which lets you cozy up on a nice chair, put the screen on your lap or in front of your face as you’re lying down – is great for reading in a comfortable position for prolonged periods. A regular MacBook doesn’t let you do this. With my MacPad, I can detach the screen, and – if I want to continue using macOS for the task (the choice is always mine) – keep working with the Mac and use two fingers to scroll and the Pencil to click. Sidecar works just fine within a 10-meter distance when used wirelessly, and I can’t tell you how nice it is to have this kind of freedom for those times when you need it.
I also want to mention two Mac apps that have helped in this transition from a vanilla MacBook Air to the MacPad. Beyond the usual suspects (Raycast, Audio Hijack, and Bartender), these apps have considerably sped up my MacPad workflow:
Magnet. There are dozens of tile-based window managers for macOS that aim to replicate the multitasking flow of Windows 11, but after trying a lot of them, I like Magnet for two specific reasons. First, it comes with easy-to-remember hotkeys for tiling windows to the left or right sides of the screen, which is an effective way to create split views without using macOS’ actual Split View mode:
More importantly, Magnet has a keyboard shortcut for cycling the window of the frontmost app between displays. On the off-chance that a window doesn’t open on my Sidecar display but is instead spawned on the non-existent built-in MacBook Air display, Magnet’s ⌃⌥⌘←/→ hotkeys let me instantly cycle that window across connected monitors, thus bringing it back to the iPad’s display.
Screens. It doesn’t get any better than Edovia’s Screens app when it comes to connecting via VNC to computers on your local network or available remotely. Screens is fundamental to my new MacPad workflow because it’s how I can type in my login password after a macOS reboot, but it’s also what I use to connect to my gaming PC to start streaming games to macOS or visionOS using Moonlight.
macOS and iPadOS, Together
We need to go deeper now.
What if I told you that, with my MacPad, I can use both macOS and iPadOS together, as in literally at the same time? This is where things get a bit wild, in a way that I wasn’t expecting when this experiment began.
A few weeks ago when I started using Sidecar, I noticed that – as long as my iPad had successfully authenticated on the Lock Screen with Face ID – I could toggle back and forth between macOS and iPadOS by swiping up on the Home indicator. As I noted above, Sidecar shows up as a special Continuity app in the iPad app switcher; you can use other iPad apps and then return to Sidecar, or you can quit the Sidecar app on the iPad to terminate the connection.
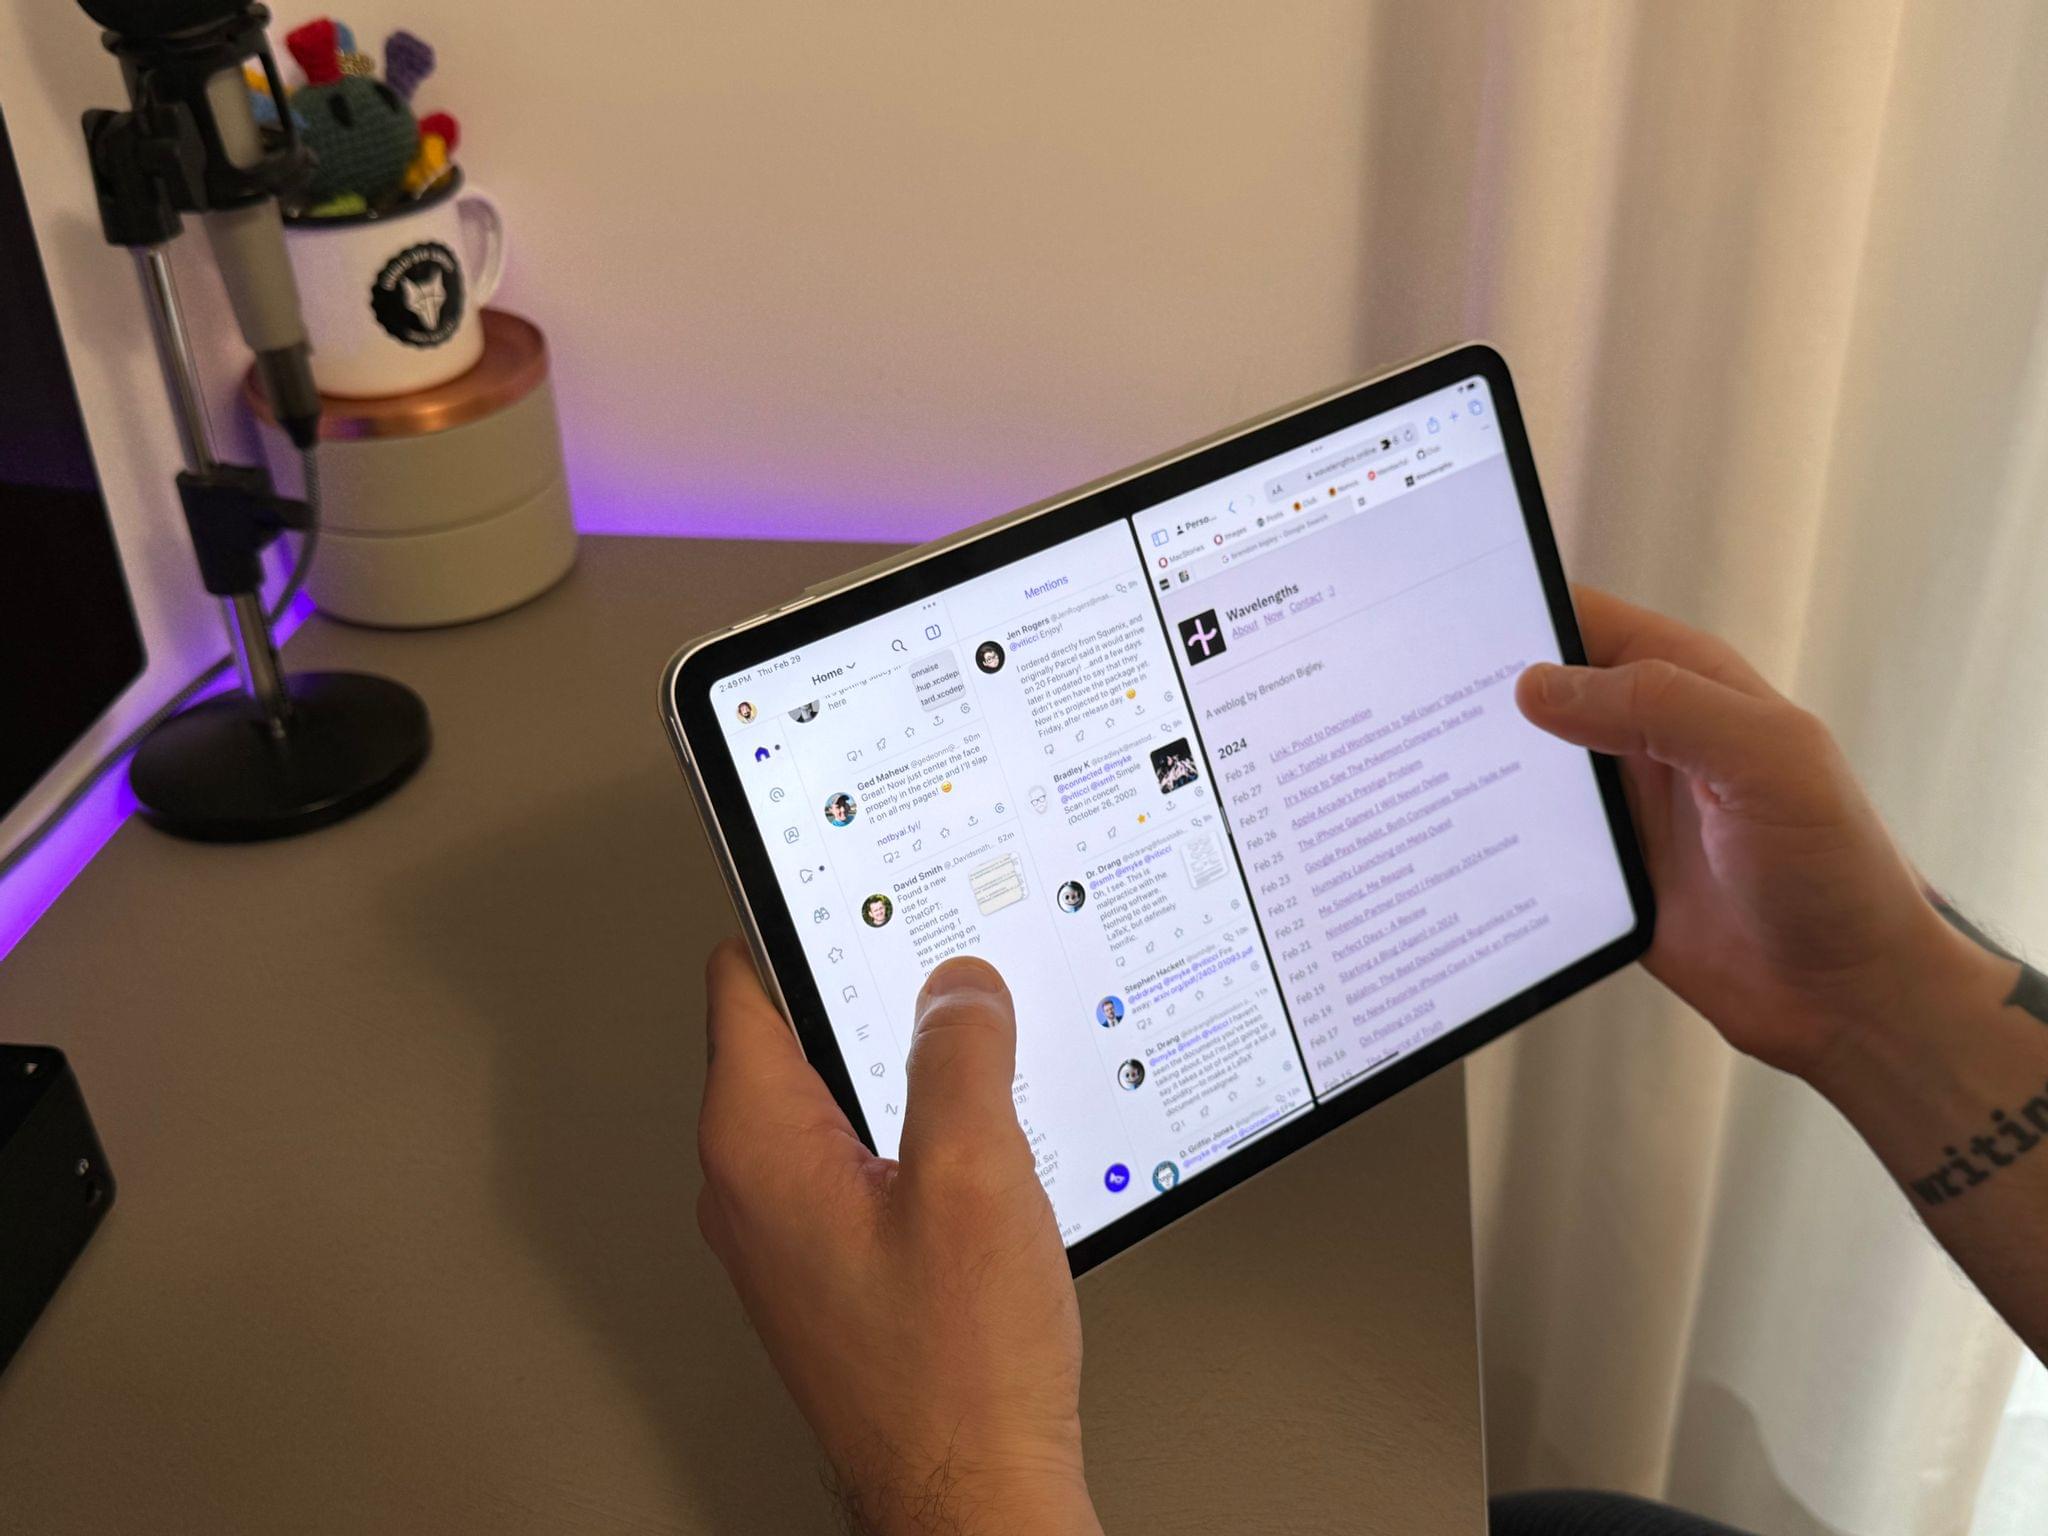
It was only when I disabled Stage Manager on my iPad Pro that I realized Sidecar would let me use macOS and iPadOS apps on the same display at once. Our good old friend Slide Over is one of the iPadOS UI elements to be allowed inside Sidecar’s display while macOS is active. Just swipe from the right edge of the display, bring in Slide Over, and you can use an iPad app while macOS is shown underneath.
The ability to use macOS and iPad apps in tandem has been a game-changer for me. There are some apps – like Music, Home, or Messages – that I prefer on the iPad as they lend themselves well to quick interactions that only require glancing at them briefly. (For instance, if I want to turn on a light in my office or respond with a Tapback to a message.) Instead of cluttering my Mac workspace with more windows, I can touch the screen, swipe for Slide Over, do what I have to do in an iPad app for a few seconds, and dismiss it.
I’m not constrained to a single iPad app either: Slide Over has supported multiple apps for a few years now; when invoked from inside Sidecar, Slide Over lets me cycle between multiple app windows and, if I realize I’m going to need more time with one of them, make it full-screen and leave macOS.
Another iPadOS UI element6 that is allowed to coexist with macOS while in Sidecar is the Picture in Picture player for videos (or, as we’ve seen on MacStories, other apps that use the same technology):
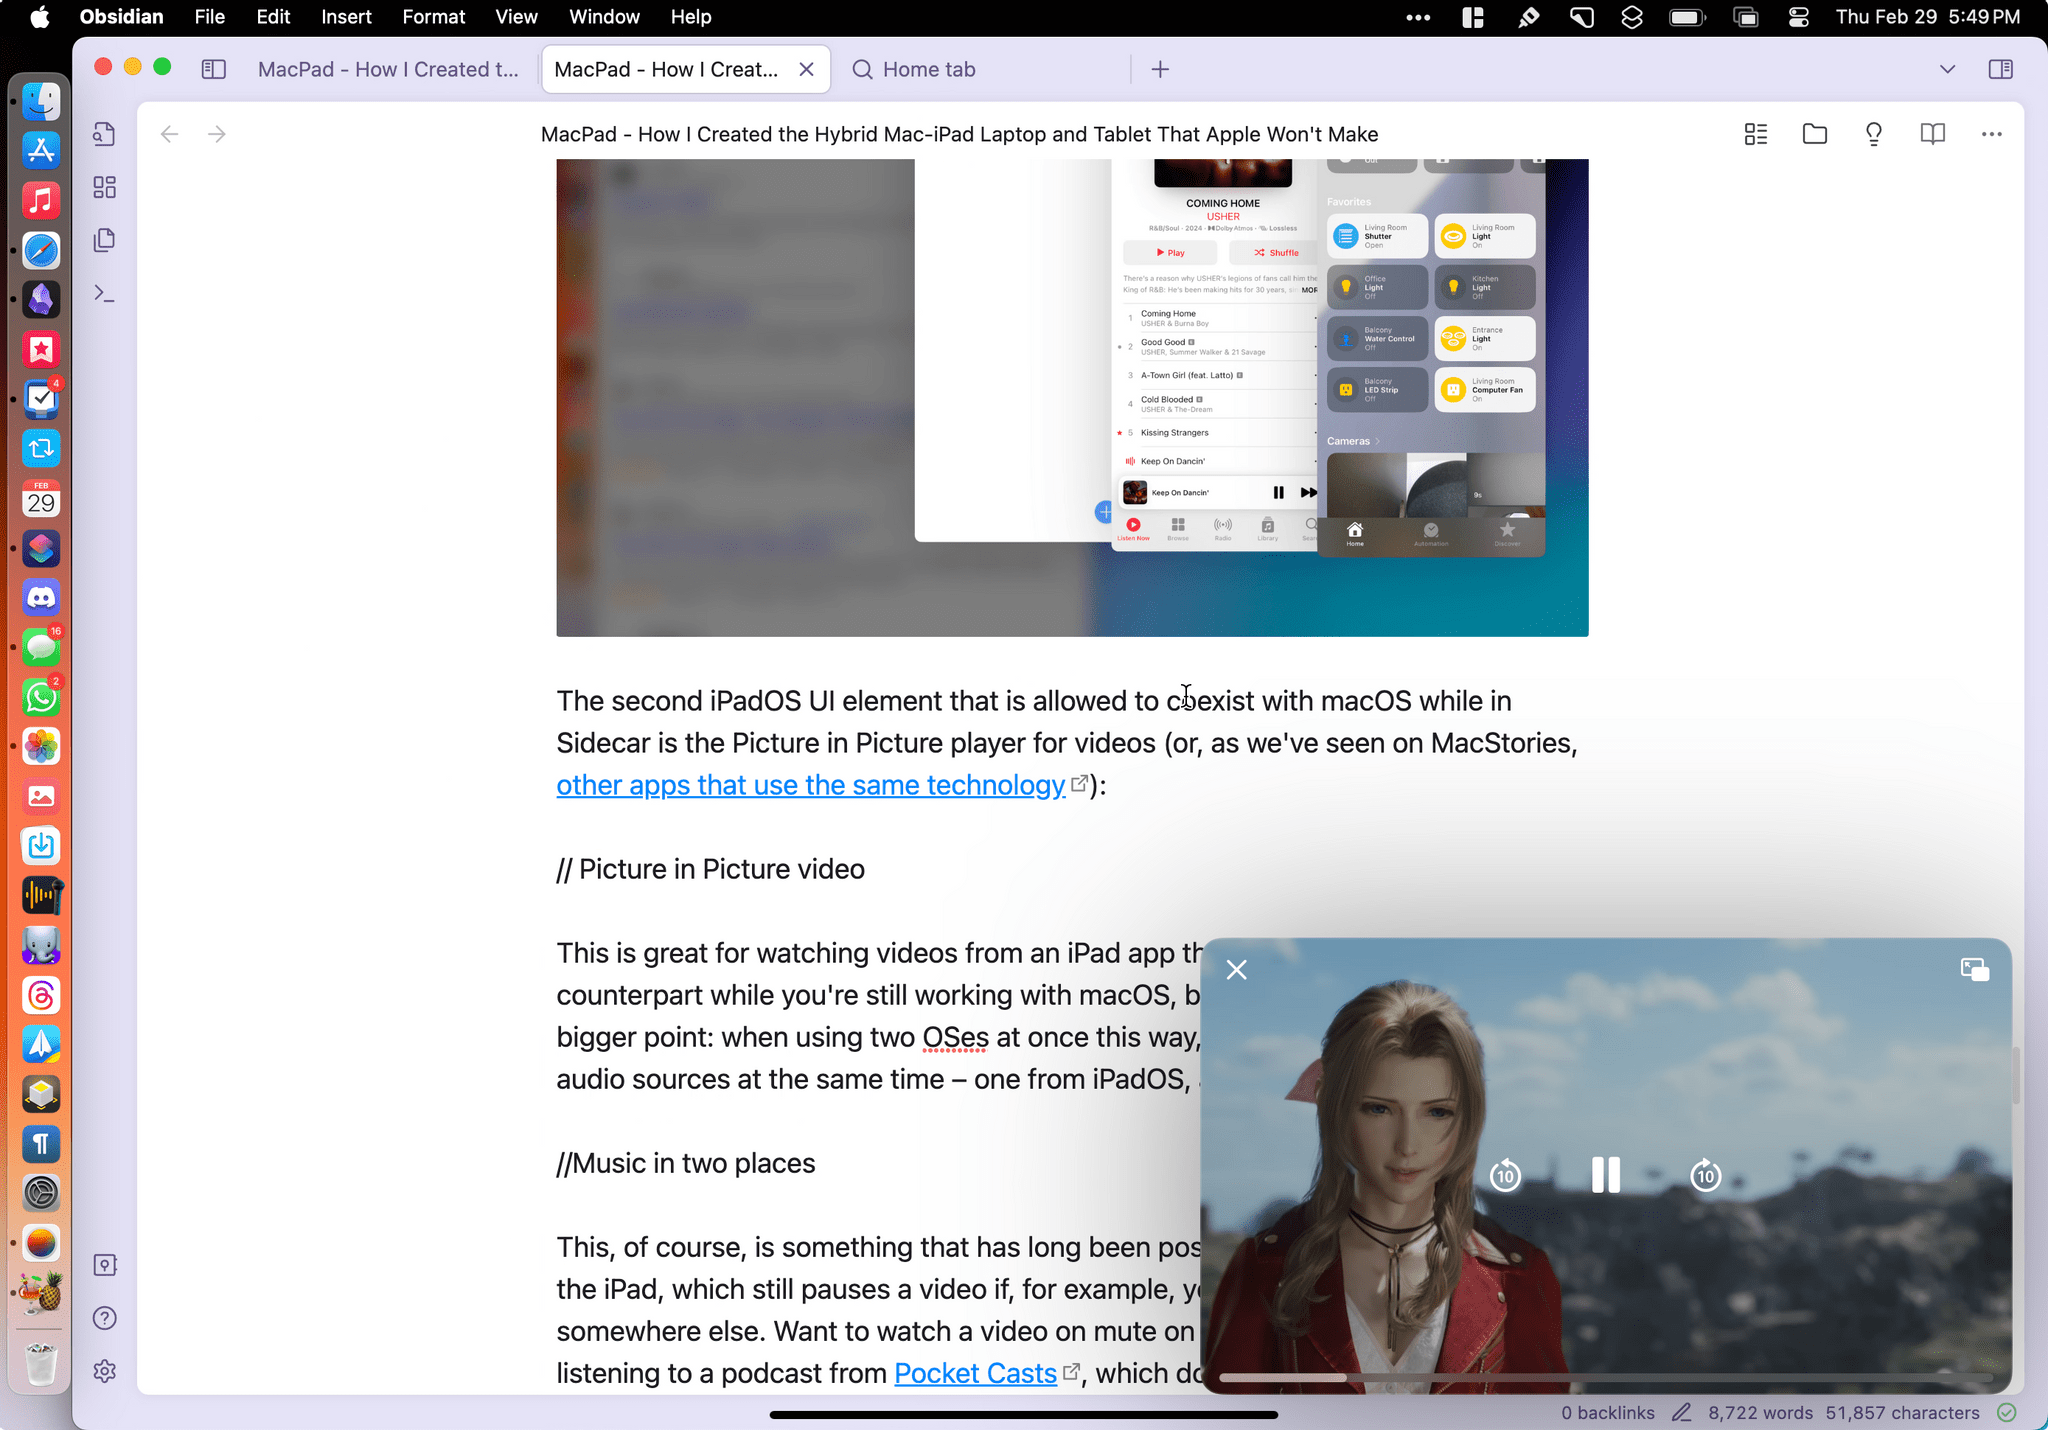
This is great for watching videos from an iPad app that doesn’t have a Mac counterpart while you’re still working with macOS, but it also brings me to another, bigger point: when using two OSes at once this way, you can listen to multiple audio sources at the same time – one from iPadOS, another from macOS.
This, of course, is something that has long been possible on the Mac, but never on the iPad, which still pauses a video if, for example, you start music playback somewhere else. Want to watch a video on mute on the Mac while you’re still listening to a podcast from Pocket Casts, which doesn’t have a native Mac app? Just put Pocket Casts in Slide Over, play the video on the Mac, and both media streams can live together. This has always been the case for Sidecar, but it takes on a new meaning when the iPad itself becomes the primary display for a headless Mac laptop.
The advantages of Sidecar and Apple’s tightly integrated ecosystem don’t stop at media, however. When I’m using my MacPad, I can start a screen recording on iPadOS, switch over to macOS, and the recording will continue without interruptions. Here, let me show you with a video that I recorded from my MacPad:
From iPadOS to macOS and back.Replay
Another integration that Apple built years ago and that also works beautifully with the MacPad is Universal Clipboard. Whether it’s some text I copied from the Mac or, say, an image I copied from the iPad’s Photos app, the clipboard will be instantly shared between platforms when Sidecar is active, allowing me to easily copy and paste between different apps and environments as if I was using one device.
The best part of using macOS and iPadOS together with my MacPad has been the realization that doing this doesn’t feel weird at all. Quite the opposite: thanks to Apple’s consistent design language and the common denominator of SwiftUI across modern apps, there are platform-specific differences between apps and OSes, but they are holistically consistent in a way that facilitates hopping between two distinct environments.
This, I believe, would be Apple’s greatest advantage against its competitors if only they invested in making the MacPad a real product: they already have a vibrant, deep ecosystem of apps based on a shared UI language that is equally optimized for each platform but consistent and familiar at the same time.
I say this as someone who worked with a Surface Pro 9 last year for six months and recently spent time exploring Android foldables: no other tech company on Earth currently has the same ecosystem strength, developer tooling, design foundation, and user-friendly approach as Apple here. The combination of iPadOS and macOS is, right now, already leagues above what Microsoft is doing with the Surface line; the only problem is that I had to build this hybrid device myself to prove it.
Not only is Apple well positioned to release a convertible laptop in the future, but their existing OSes and cross-device integrations already make for a fantastic experience with something like a MacPad today.
Questions, Tidbits, and Other Setups
Below, I’ve compiled a list of some questions I had to figure out during the MacPad’s creation as well as examples of other setups for the MacPad’s modular system.
What About Sidecar without Wi-Fi?
In case you’re not familiar with Sidecar, you can use this feature with both an iPad and Mac signed into the same Apple ID on a Wi-Fi network, or by connecting the two with a USB cable.
In my experience, aside from the occasional glitch that forced me to quit Sidecar and restart it, the USB connection hasn’t been necessary, which enabled me to keep the iPad charged while I was using macOS with it. My theory is that the issues I encountered were due to the iPad switching to the 6 GHz band of my Wi-Fi 6E router; the 5 GHz band has been more stable on a daily basis. As I wrote above, when using Sidecar over Wi-Fi, I didn’t notice any discernible latency or image artifacts.
But what about those times when I want to use the MacPad and don’t have a known Wi-Fi network to connect to – like, say, when I’m in my car? I solved that problem with an accessory John first brought to my attention: a portable Wi-Fi router called GL-iNet Beryl AX3000.
This small gadget, which is powered via USB-C, can create a Wi-Fi 6, 5 GHz network by tethering over USB to my iPhone’s cellular plan. When I need to get work done with my MacPad in the car, I can just fire up the AX3000, wait for its Wi-Fi network to come back online, and wait for the iPad and Mac to connect to it automatically (it takes a few seconds). Then, wireless Sidecar will work just fine. I tested this in my car over the past few weeks, and it’s worked out perfectly.
What About Unlocking the Mac?
Since my MacBook Air no longer has a display lid, the computer’s built-in sensor that determines whether the computer is closed or not doesn’t work anymore. This is not a huge deal – I can always manually log out with ⌃⌘Q or wait for my computer to go to sleep on its own – but it’s caused a specific issue I had to solve.
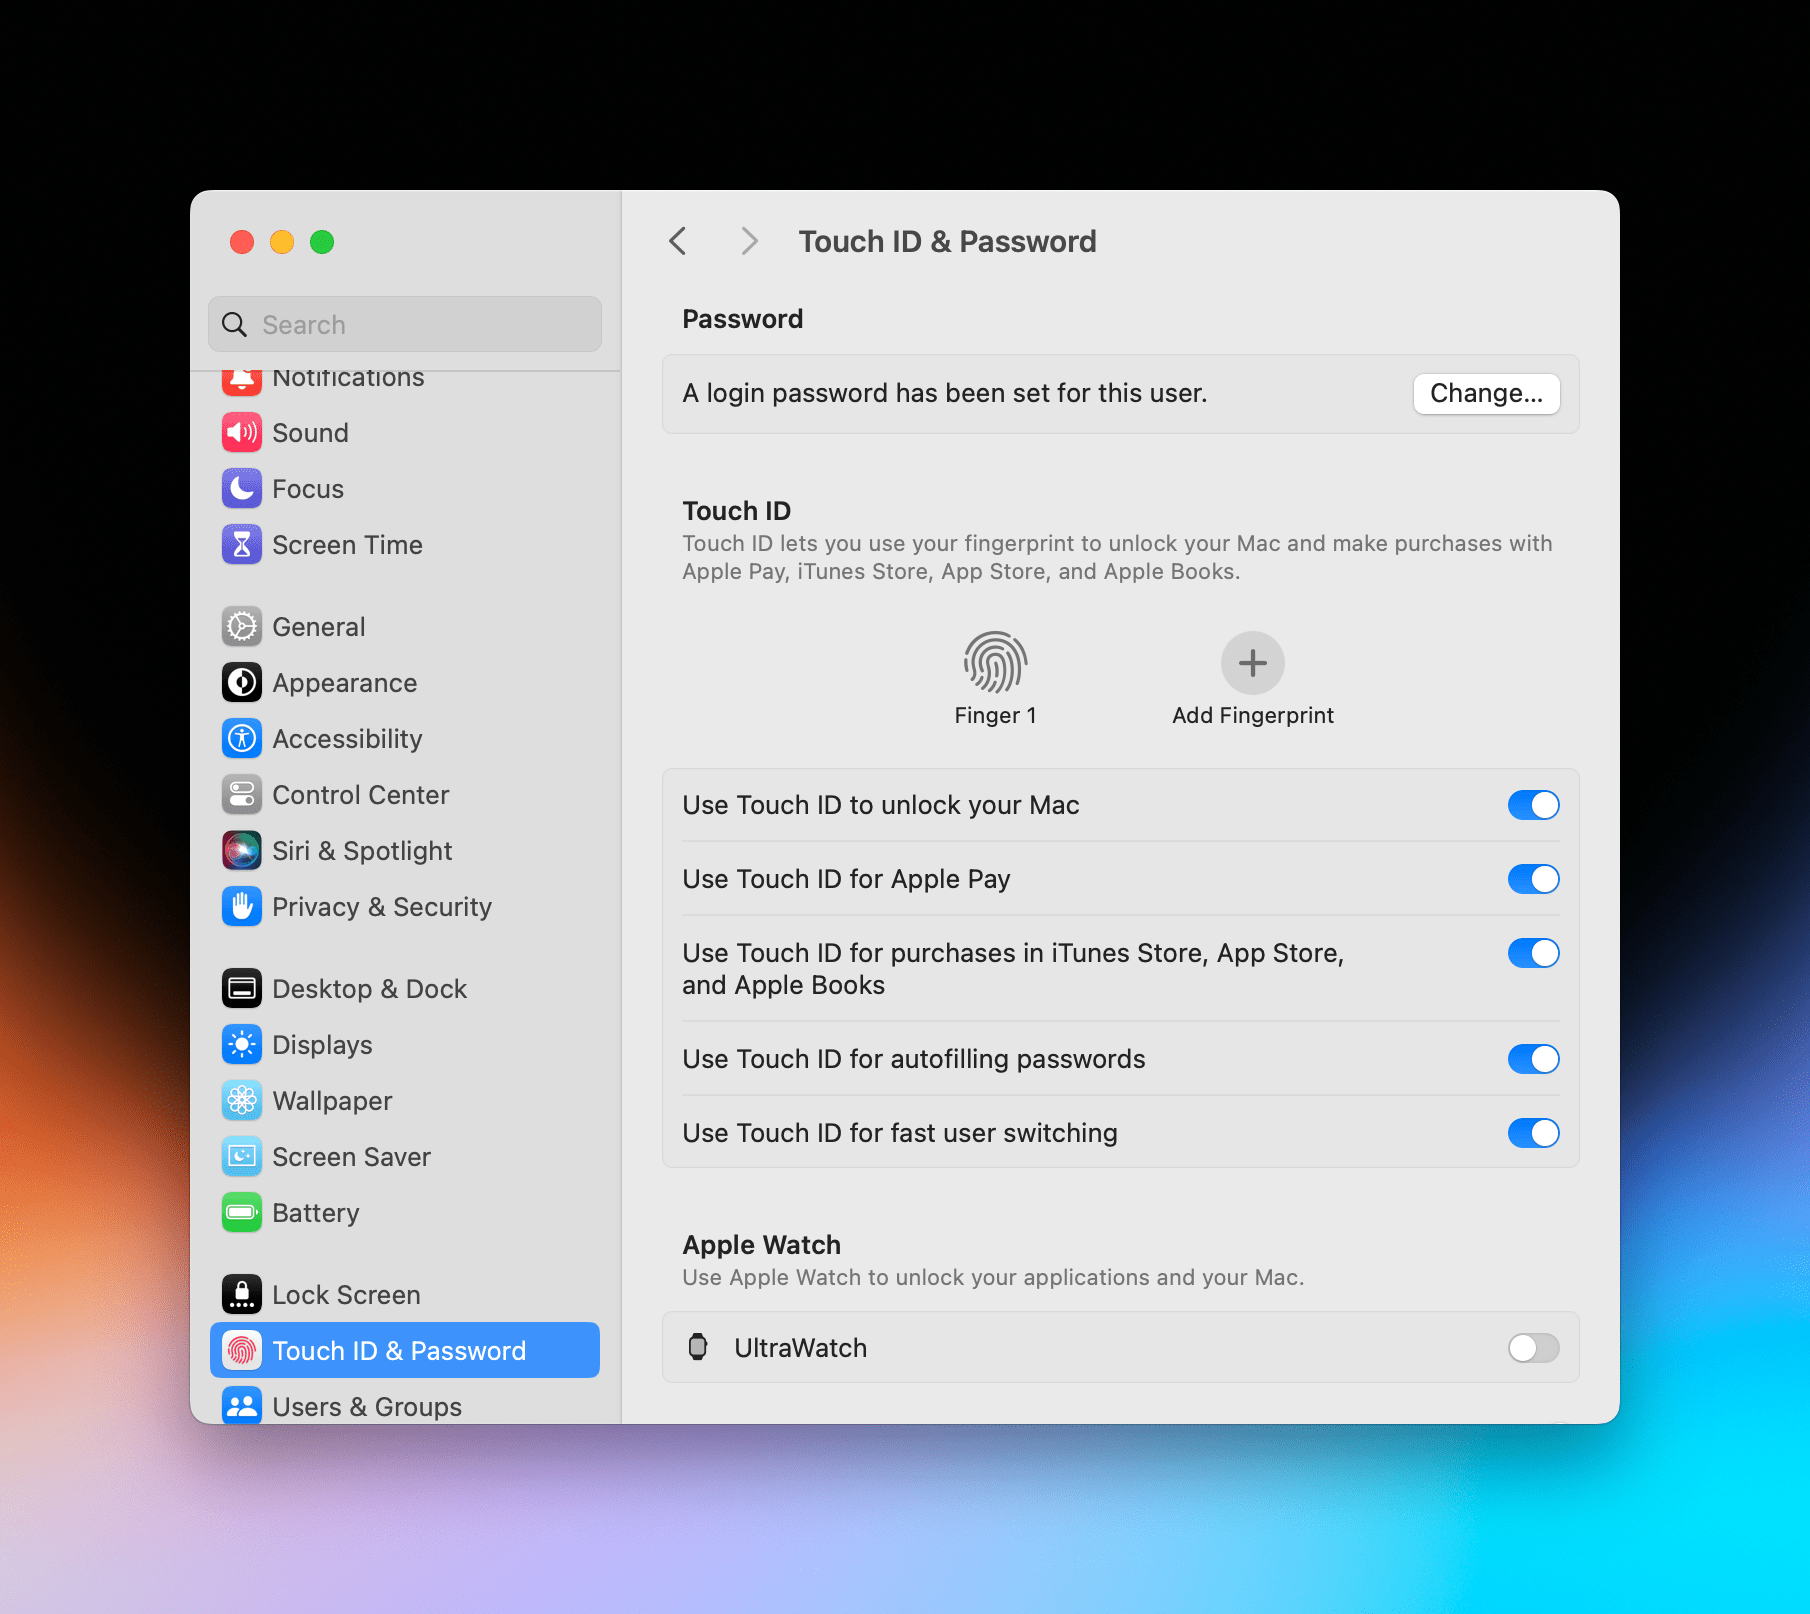
With this kind of headless laptop setup, my recommendation is to disable automatic Apple Watch unlock and only rely on Touch ID for login instead. Without a lid always closed on top of it, my Apple Watch would continuously unlock the MacBook, even when it was stored in a bag while I was driving. (I use this sleeve to hold both parts of the MacPad.) That made me nervous, so I decided to disable Apple Watch authentication, and I haven’t had any accidental logins since.
iPadOS Mode with Universal Control
For those times when I want to work with the more focused environment of iPadOS, I can rely on Universal Control to move the pointer and type on my iPad Pro. All I have to do is place my finger on the Mac’s Touch ID sensor to log in, then move the trackpad to the left, and the pointer lands on iPadOS.
As we’ve known for a while, this feature is glorious. But I will also add that, as of today, the best iPad Pro keyboard is a headless MacBook’s keyboard. Ironic, I know. But hear me out: the keyboard is quiet, the keys have nice travel but not too much, they’re backlit, and…there’s a function row. The same keys that control media playback or keys for Spotlight and Do Not Disturb work the same way on iPadOS while in Universal Control mode without having to remap anything. The trackpad is much more comfortable than the iPad’s Magic Keyboard one, and all the gestures for multitasking work too. It feels like using a more pro-level Magic Keyboard (which Apple may announce soon), except it’s actually a Mac.
The only downside here is that Sidecar needs to be turned off for Mac-to-iPad Universal Control to work. In the future, I hope Apple can find a way to let us use Universal Control when the Sidecar/Continuity “app” is running, but not in the foreground.
iPad as a Tablet
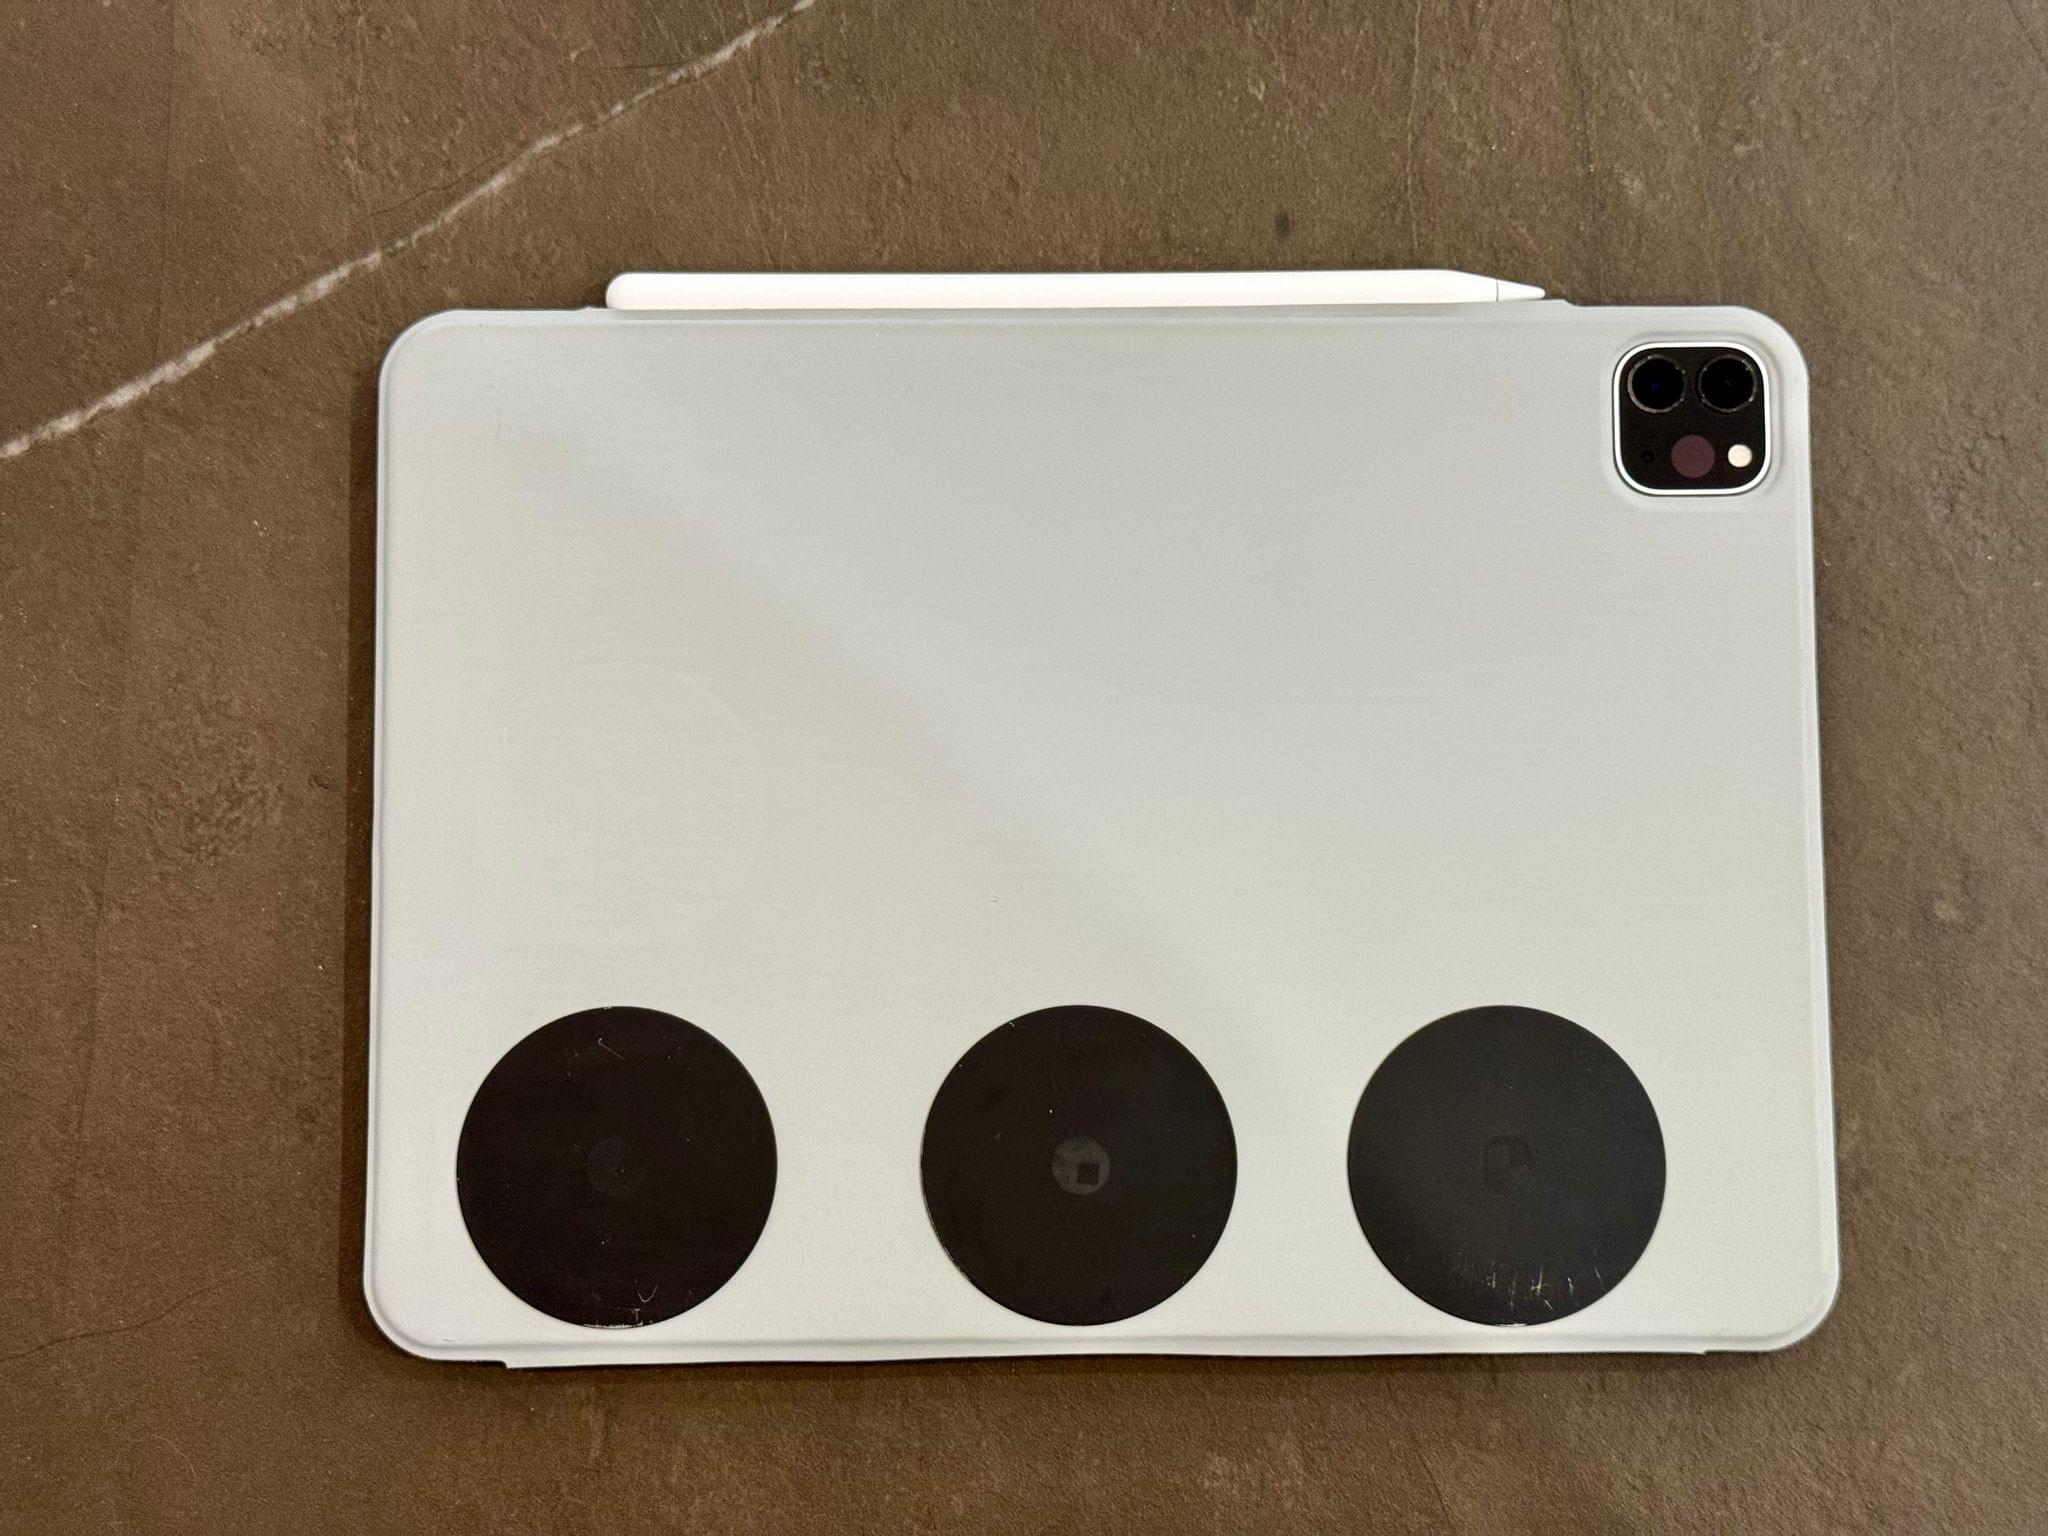
As for those times when I want to use the iPad as a tablet, well…I can just detach it from the MacPad’s magnetic structure, and it’s an iPad. Since I attached three magnets to the back of the smart cover I modded, I figured they could be useful when I’m using the iPad as a tablet as well. Sure enough, the magnets were a perfect fit for a magnetic PopSocket, which I can attach to the back of the iPad when I want to read an article or book for longer sessions:
I should also say that I tried both the 12.9” and 11” iPad Pro for my MacPad, and I prefer the smaller iPad Pro. For a while, I’ve been feeling like I was mostly using the 12.9” iPad Pro in laptop mode (with the Magic Keyboard) because the device was too big and heavy to be enjoyed as a tablet. The MacPad further cemented this idea and pushed me to stop using the 12.9” iPad Pro altogether.
For starters, while the 12.9” iPad Pro display is better and makes for a more visually balanced MacPad, the whole thing gets too heavy at 1900 grams – that’s 350 grams more than a 14” MacBook Pro. With an 11” iPad Pro, the MacPad weighs around 1650 grams, which is only 100 grams more than a MacBook Pro. The big iPad Pro flavor of the MacPad looked great with the larger screen and XDR display, but it was unwieldy, and I was constantly afraid the magnets wouldn’t hold.
More importantly, however, the 11” iPad Pro strikes a much better balance between large enough as a Mac display and small enough to be held as a tablet in my hands. Since I have real multitasking on the Mac, I disabled Stage Manager on the iPad Pro, and it reminded me of just how much nicer old-school Split View and Slide Over are on an iPad when you want to do less-intensive iPad things.
I can hold the 11” iPad Pro with both hands in landscape and type with the software keyboard using my thumbs; in portrait, I see more text than an iPad mini on a single page, and holding the device is not as awkward as doing the same with a 12.9” iPad. Plus, as I showed in the Monthly Log for Club MacStories members, the 11” iPad Pro also works great as a fake PlayStation Portal, which I created by modding the Galileo G8 game controller.
The MacPad made me an 11” iPad Pro believer. I can’t wait for this iPad model to carry an OLED display.
Headless Mac at a Desk with a Studio Display
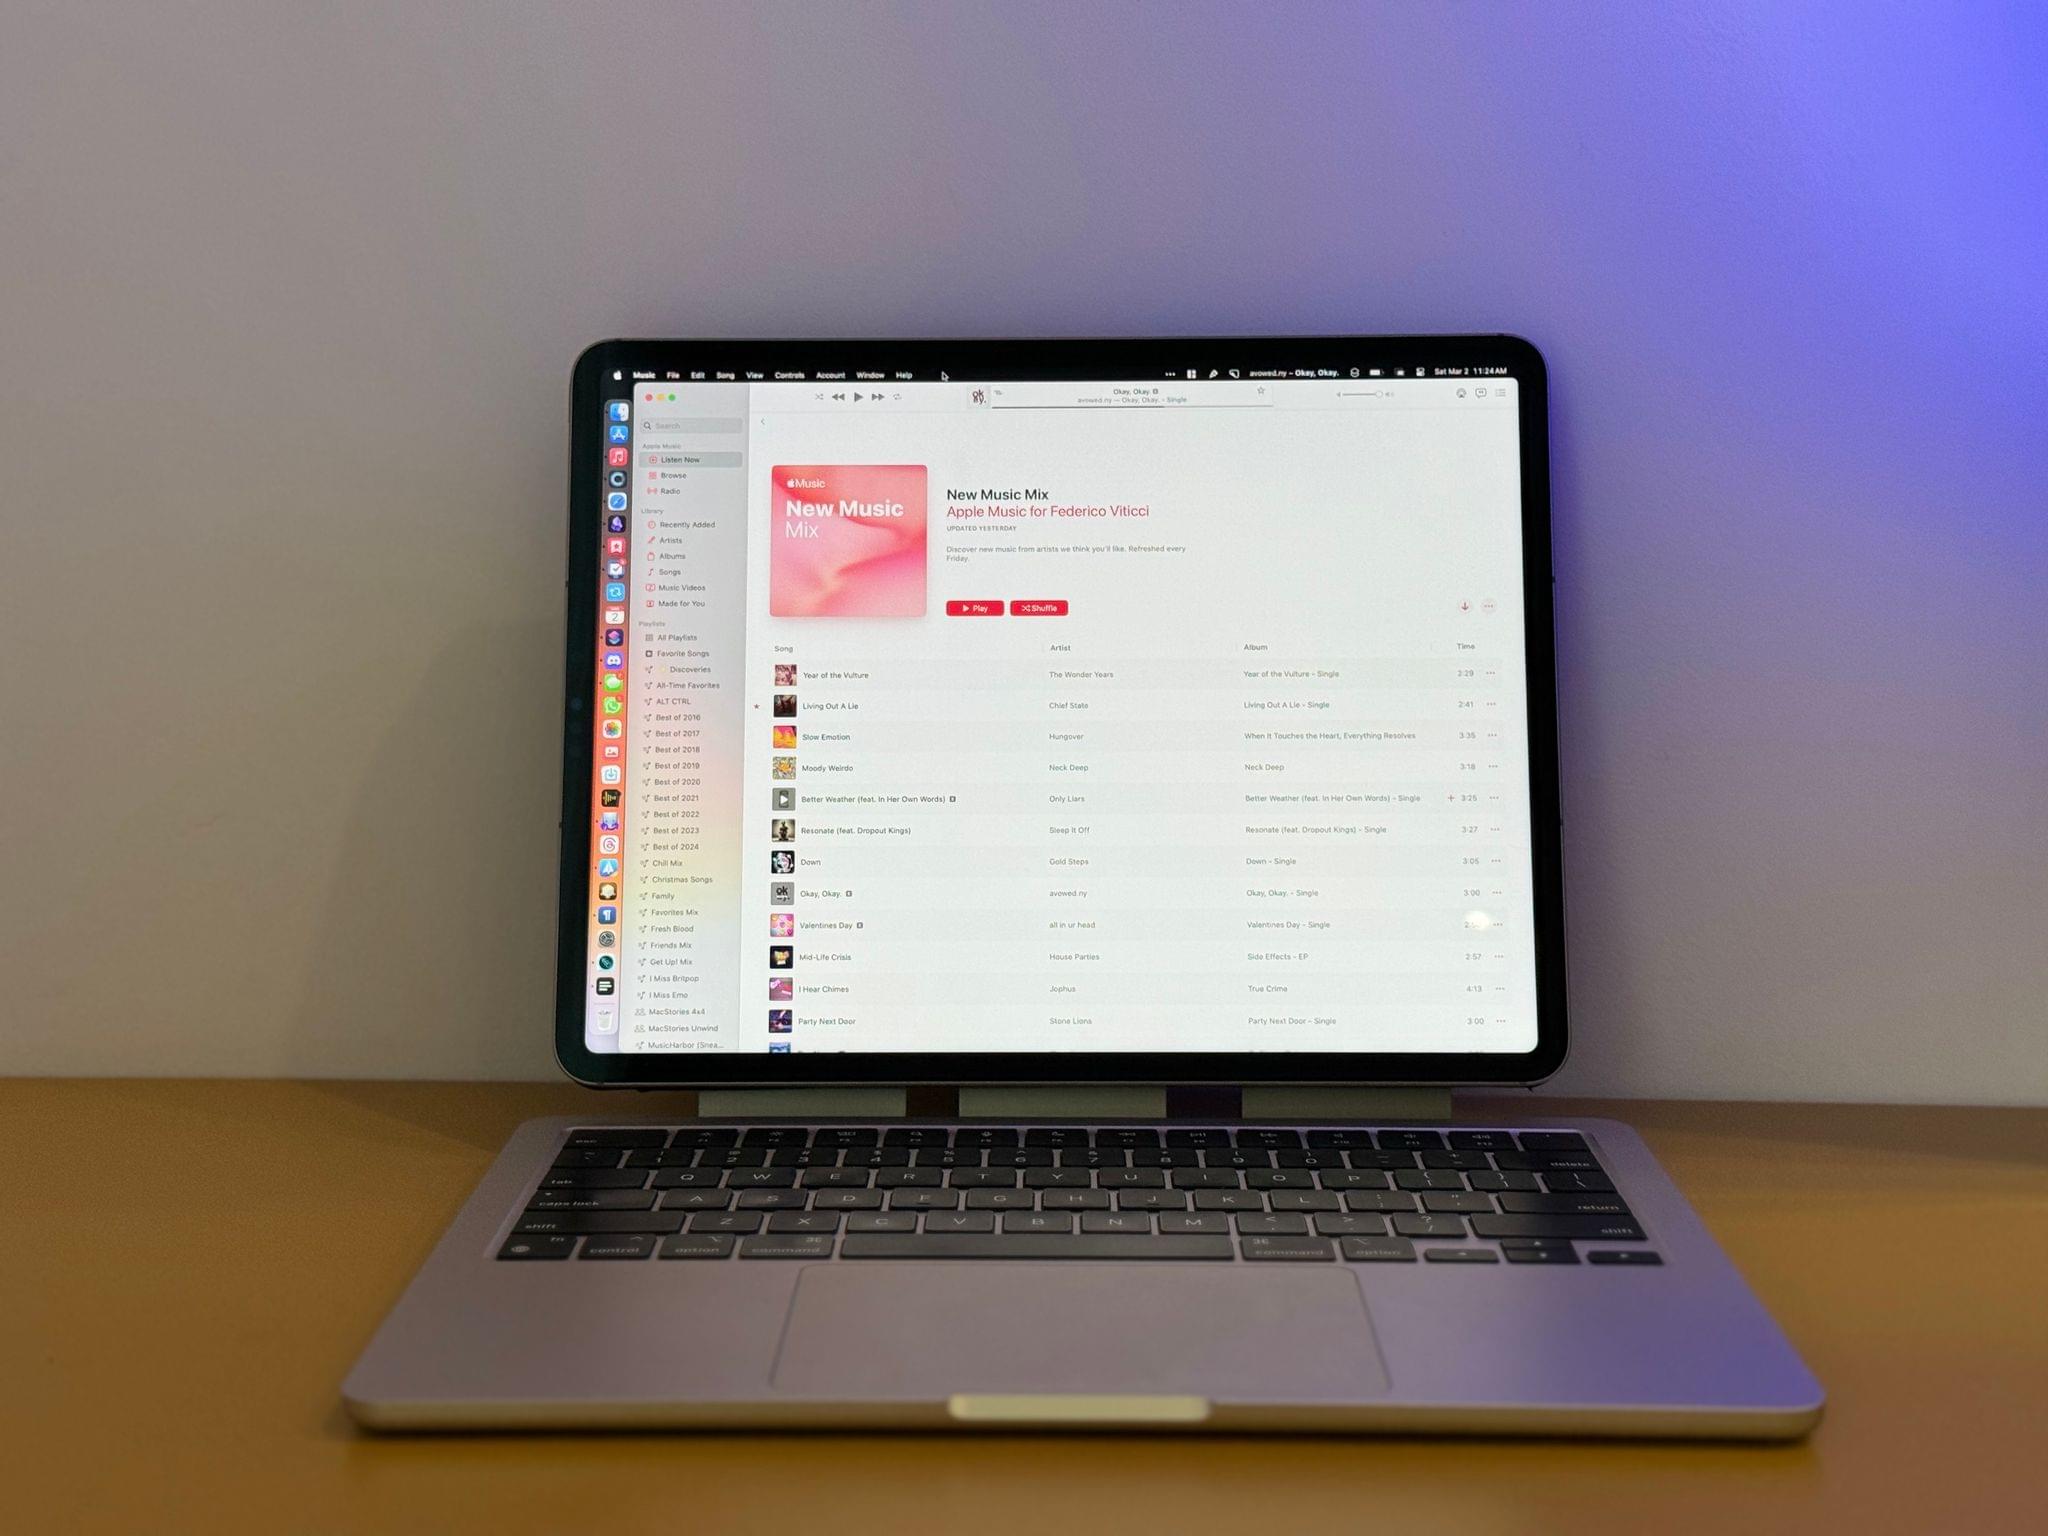
By making a headless MacBook Air, I was also able to simplify the setup at my desk with my Studio Display, which is where I record all my podcasts. Since my computer is now comprised of a keyboard and trackpad, I no longer need separate input accessories on my desk: I just need a single Thunderbolt cable, which connects the MacBook Air to Ethernet and the Studio Display via the CalDigit TS4 dock.
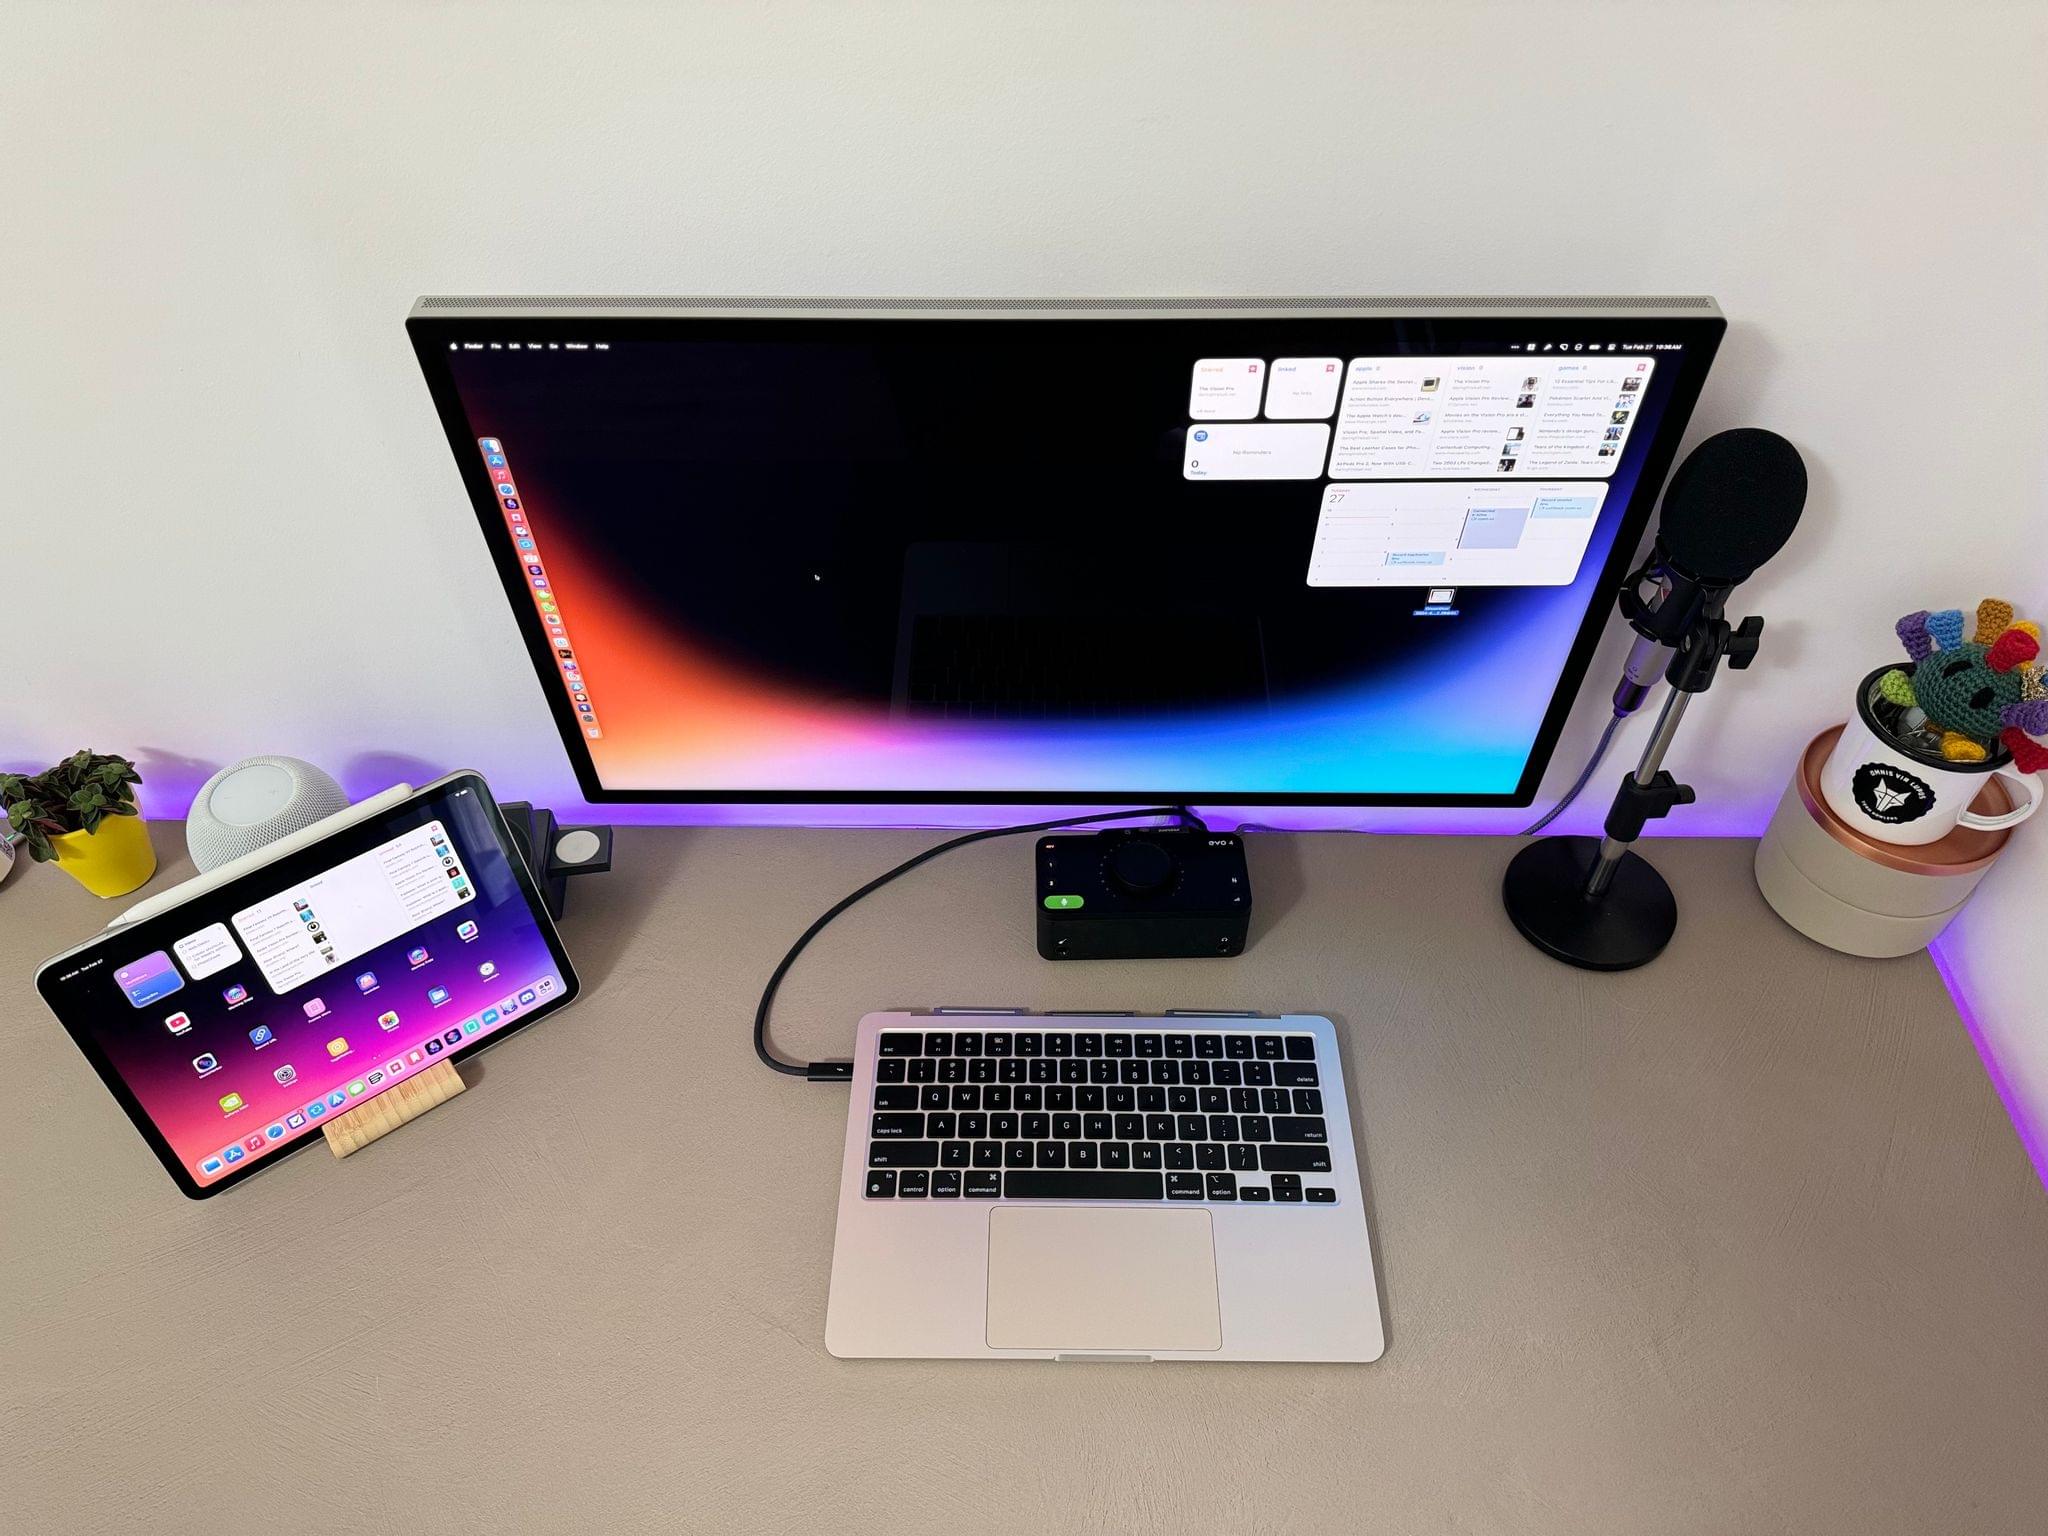
Those who have been following me for a while know how much I disliked having a keyboard and trackpad always on my desk only for those times when I needed to record. Now, when I’m not in the office, the desk is empty; and when I’m working, I only have to connect one cable to my “keyboard computer” to extend macOS to the Studio Display and use that as my primary monitor. I even switched to an angled USB-C connector to create a straight connection between the cable and the computer:

Because my desk is now tidied up and clutter-free, I can use the space when I’m not working to put my Z13 gaming PC, which I use to stream games to macOS, iPadOS, or visionOS using Sunshine and Moonlight.
Headless Mac as Keyboard and Trackpad Input for the Vision Pro
I saved the idea that started this whole journey for last.
As I suspected when I originally linked to Luke Miani’s YouTube video, a headless MacBook Air makes for the ultimate Vision Pro accessory: in a very compact, quiet, and powerful package, you have a Mac that you can use as a virtual display on the Vision Pro and as an input system that supports excellent typing with palm rejection features for its trackpad.
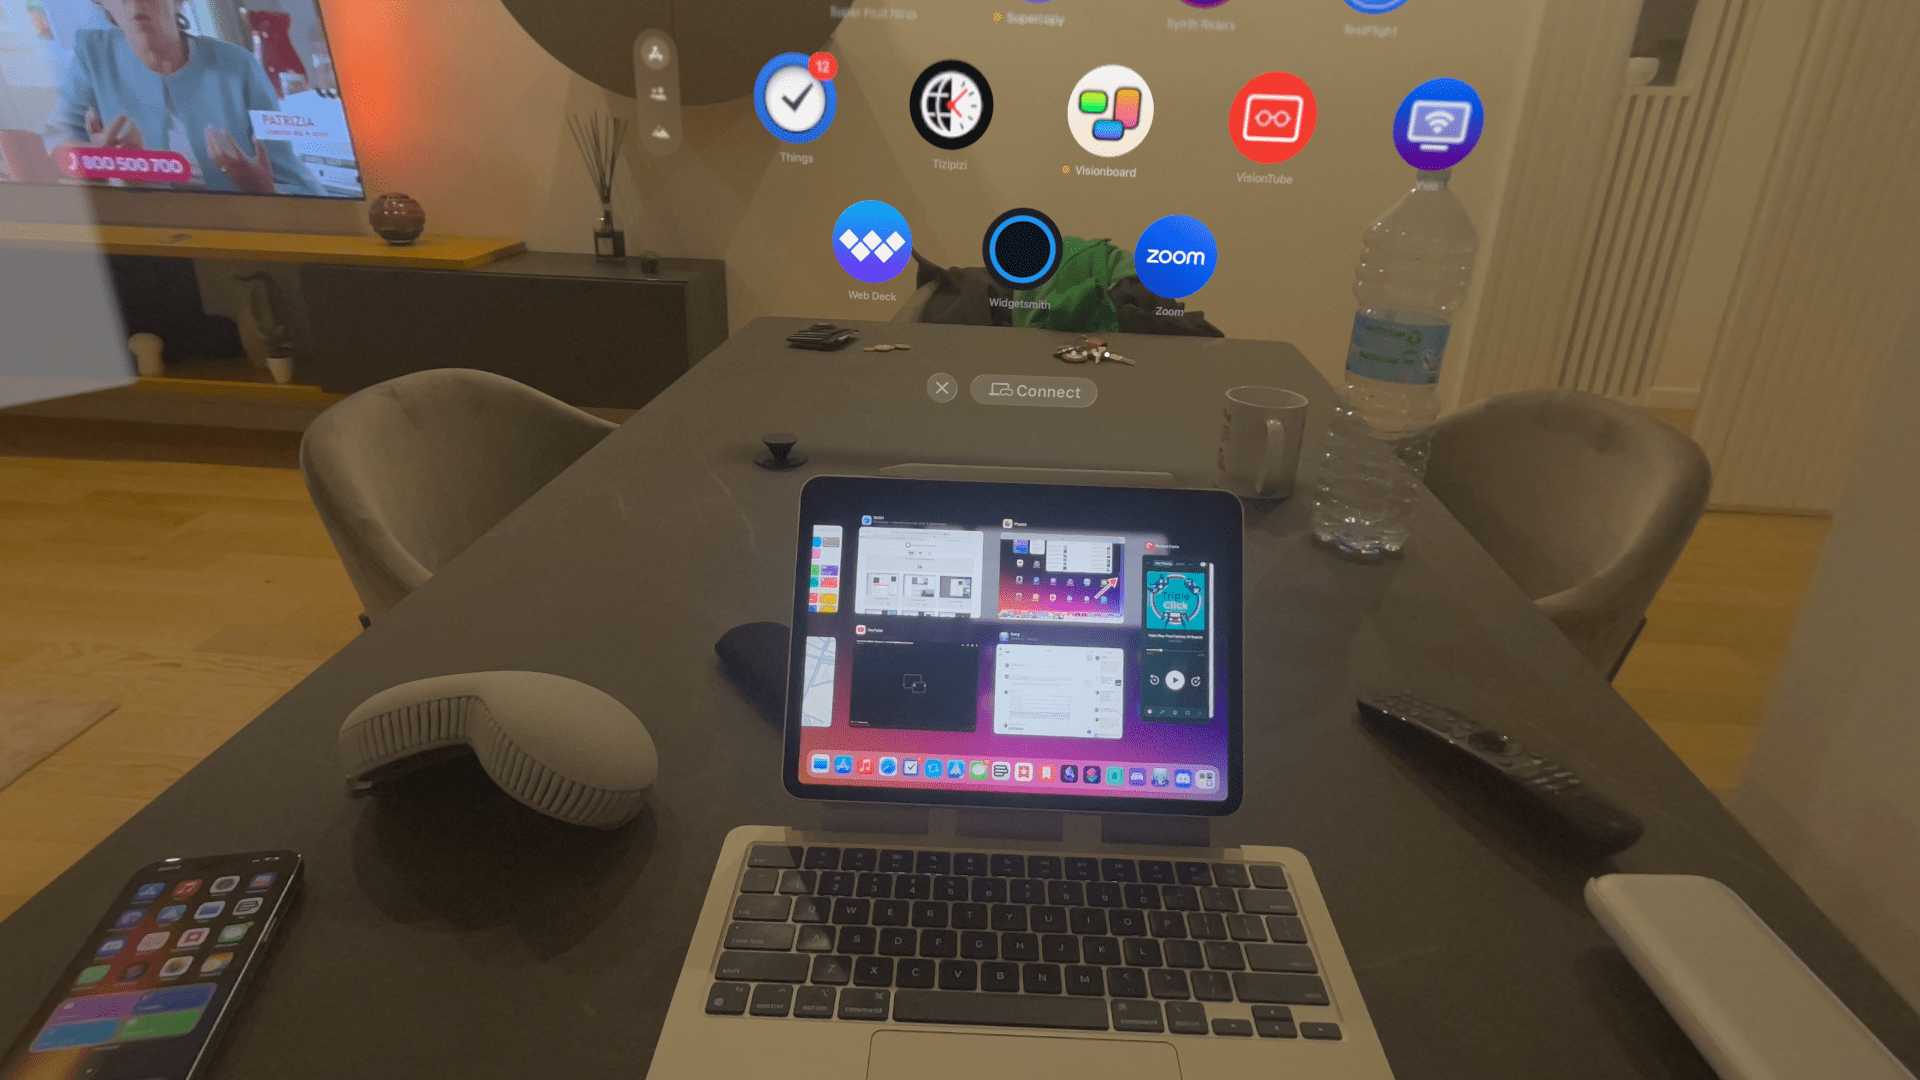
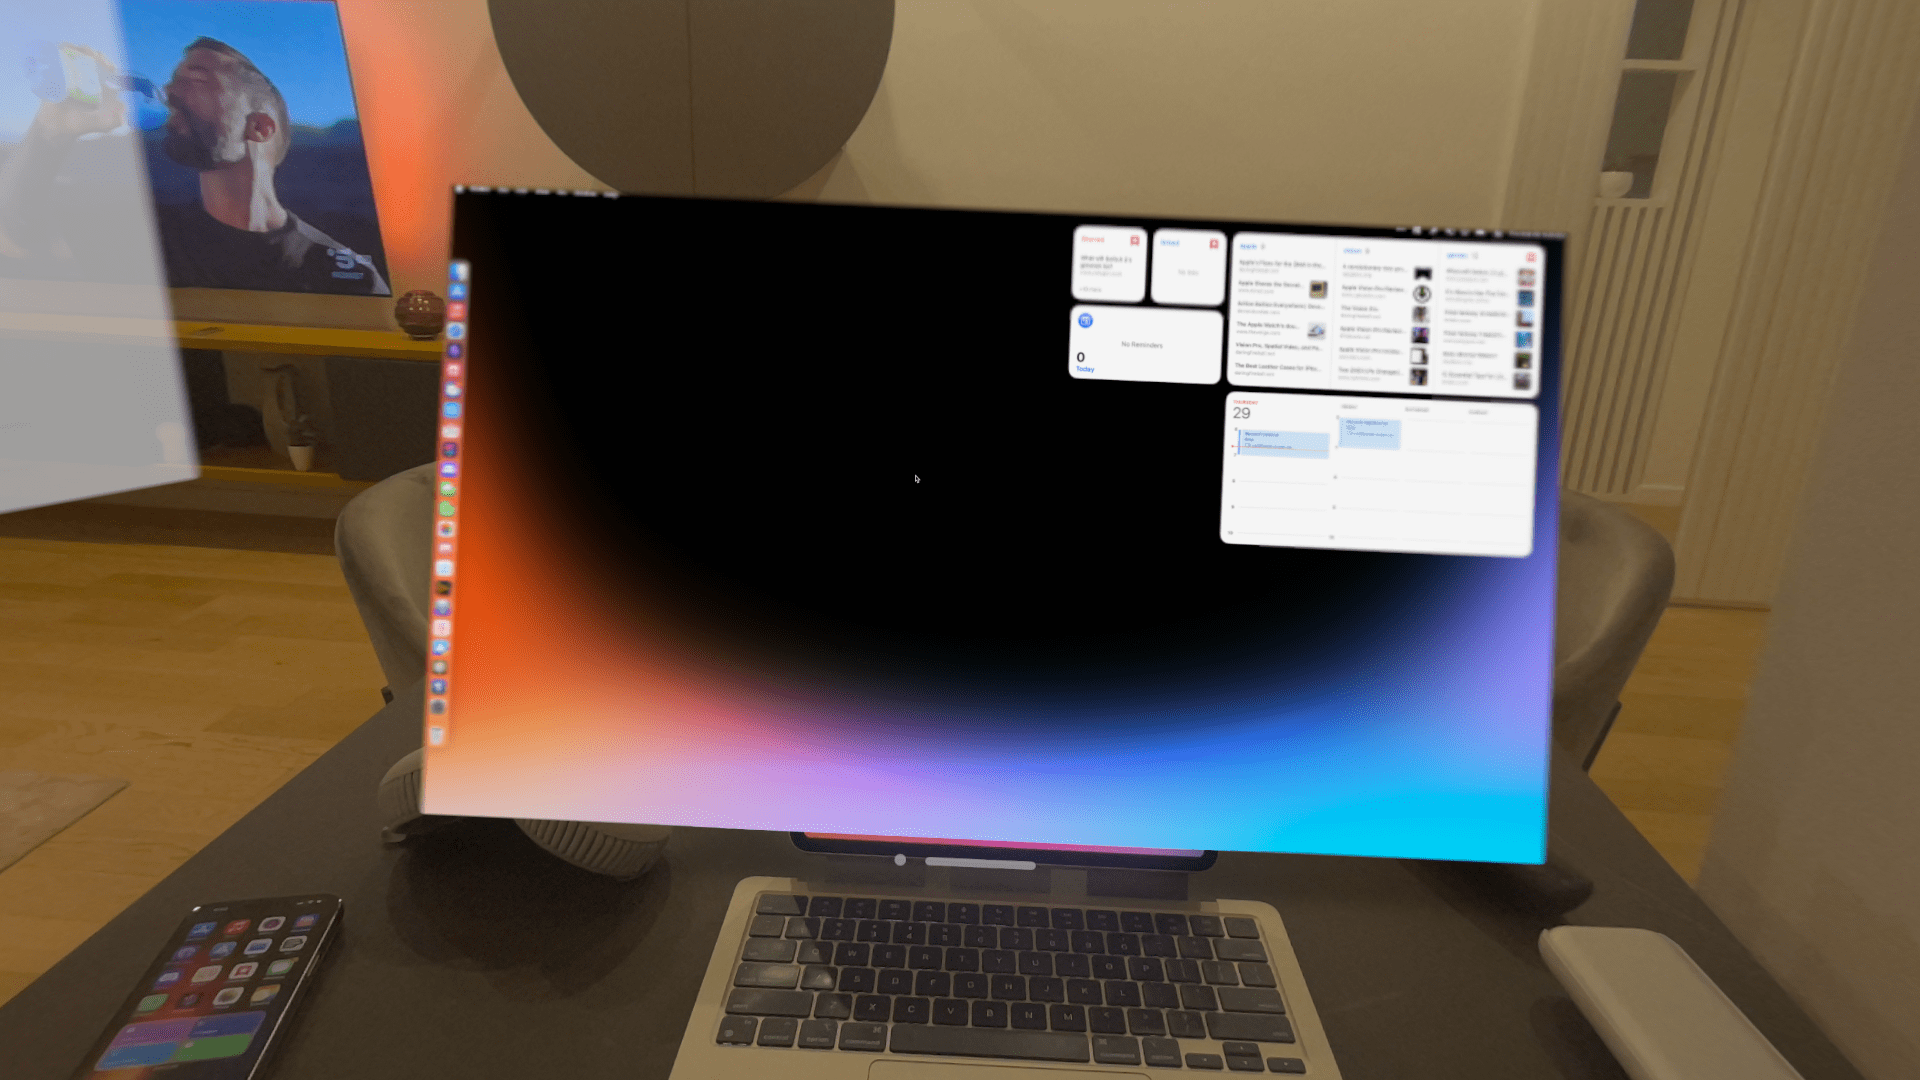
When I’m not using the MacPad, I use Mac Virtual Display. I love the feature so much, I’m thinking about selling my Studio Display, which is just taking up space on a wall at this point. Sure, the resolution of Mac Virtual Display isn’t as good as a physical Studio Display; however, a Studio Display can’t become a giant monitor in front of my eyes that can coexist with other large visionOS windows. In many ways, I believe that, for my use case, the Vision Pro is the most impressive Mac monitor I own: the trade-off in image quality is balanced by its portability and freedom to use a large Mac interface anywhere I am.
As is the case with Universal Control on the iPad, you can’t use Sidecar and Mac Virtual Display at the same time. While in pure headless mode, the Vision Pro still recognizes the MacBook Air in front of me and displays a ‘Connect’ button where the physical display used to be. When it doesn’t do that, I can just connect to the Mac from visionOS’ Control Center.
More Questions
Here are answers to some common questions I received from friends who read the story in advance:
Can the MacPad use the iPad’s webcam while in Sidecar? Sadly, no. Continuity Camera is another feature that is unavailable while Sidecar is active. If I need to be on a video call while using the MacPad in macOS mode, I can plug in my Opal Tadpole portable webcam and attach it to the iPad Pro’s bezel; otherwise, I can just switch to iPadOS mode with Universal Control and use the iPad’s front-facing camera (which I hope moves to the landscape side in the next iPad Pros).
What are the full weight comparisons between the 12.9” and 11” iPad Pro versions? Here are the numbers:
- MacPad with 11” iPad Pro (ESR back cover): 1650 grams (3.63 lbs)
- MacPad with 12.9” iPad Pro (Nomad leather back cover): 1900 grams (4.18 lbs)
- MacBook Air 13”: 1240 grams (2.73 lbs)
- MacBook Pro 14” (M3): 1550 grams (3.41 lbs)
Essentially, for 100 grams more than a MacBook Pro, I get two computers instead of one with my 11” MacPad.
If you have more questions, feel free to ask them in the Club MacStories Discord, and I’ll try my best to answer them tomorrow in the live Q&A we’re doing with members.
How do you charge both devices? I can plug in a USB-C cable in each device using my Anker GaN Prime charger when I’m home, or via the Anker Prime battery when I’m out and about. I should note, however, that by not having a built-in display anymore, the MacBook Air’s battery lasts forever now, which is a nice perk of this project.
My Future Is a MacPad
It’s funny: the MacPad, a product that doesn’t exist and that I created by modding a MacBook Air, is a testament to the incredible strength of Apple’s ecosystem.
Apple doesn’t offer a MacPad (yet), but they’ve been developing the technologies that could make it possible for a long time. It’s only because of the integration between hardware and software in the Apple ecosystem that I was able to turn two computers into one and use it with basically zero issues.
There are several lessons to be learned from this story. For starters, you shouldn’t have to do this yourself if all you’re looking for is a better input accessory for the Vision Pro: Apple should make that device, and it’s silly that they haven’t updated their standalone keyboard and trackpad in years. I’m fully aware that what I’ve done is absurd, even if it worked out well in the end.
Second, Sidecar is surprisingly resilient: I’ve gotten so used to working with my MacPad now, I sometimes forget I’m using a wireless display that’s actually an iPad running a different operating system. The teams at Apple working on Sidecar, Universal Control, and Mac Virtual Display are responsible for truly remarkable engineering feats that are fast, secure, powerful, and intuitive. These features are quintessential Apple, and I’m so happy whenever I use them. The fact that I’m now using macOS almost entirely with virtual screens says a lot about the quality of these functionalities.
Additionally, the setup I created will immediately scale to new iPad Pros as soon as they’re released: I’ll just need to buy another smart cover I can mod. And thanks to the MacPad, I’ll have an OLED MacBook months (years?) before those products are released. OLED is going to be a glorious addition to my MacPad setup.
Most importantly, however, making the MacPad has shown me that it’s so liberating to use a convertible Apple computer that can be both a laptop and tablet at the same time.
At a moment’s notice, I can go from working with a laptop to holding a tablet in my hands, and the user experience doesn’t suffer because of the transition. Likewise, by blending macOS and iPadOS apps on the same display, I can have the best of both worlds: the power and versatility of the Mac, and the nimble nature and richer app ecosystem of the iPad.
It all started because I wanted a better keyboard for my Vision Pro, and I ended up accidentally creating the Apple computer of my dreams: a Mac-iPad hybrid with two form factors I love, and none of the constraints of either of them. After using my MacPad for the past weeks, there’s one key takeaway:
An official Apple one can’t come soon enough.
- My understanding is that, with FileVault turned off, various daemons and processes, such as Wi-Fi and screen sharing, can start in the background even if your computer just restarted. ↩
- If you don’t want to disable FileVault on your Mac and are okay with adding more hardware to the mix, you could always use your iPad as an external monitor via a USB-C to HDMI cable (like this one), a capture card, and Orion. ↩
- Before running Sidecar Launcher for the first time, you’ll have to right-click the script in Finder and select ‘Open’, otherwise macOS’ security won’t let Shortcuts run the script. Additionally, make sure that Shortcuts’ scripting actions are enabled in the app’s settings and, if possible, use a static hostname for your Mac instead of an IP address that may change over time. ↩
- I’m guessing that Jovany Ocasio designed the companion shortcut this way to optimize it for headless Mac minis without a Touch ID keyboard nearby, which makes sense. ↩
- I had some latency issues when the iPad Pro was on the 6 GHz band and the Air wasn’t because it does not support Wi-Fi 6E. I wish there was a Shortcuts action to quickly toggle between ‘Automatic’ and ‘Off’ modes for Wi-Fi 6E; right now, you can only do it manually in the Settings app for iPadOS. ↩
- Other iPadOS UIs that can be used while in Sidecar are Quick Note, the screenshot markup tool, notifications, volume control, and Siri. ↩