
A couple of weeks ago, the MacStories team shared our favorite indoor HomeKit devices. The HomeKit accessory universe is more limited outdoors, but with spring easing into summer in the Northern Hemisphere, we thought we’d share the devices that we use outside, too.
Table of Contents
Federico
Logi Circle 2 Camera
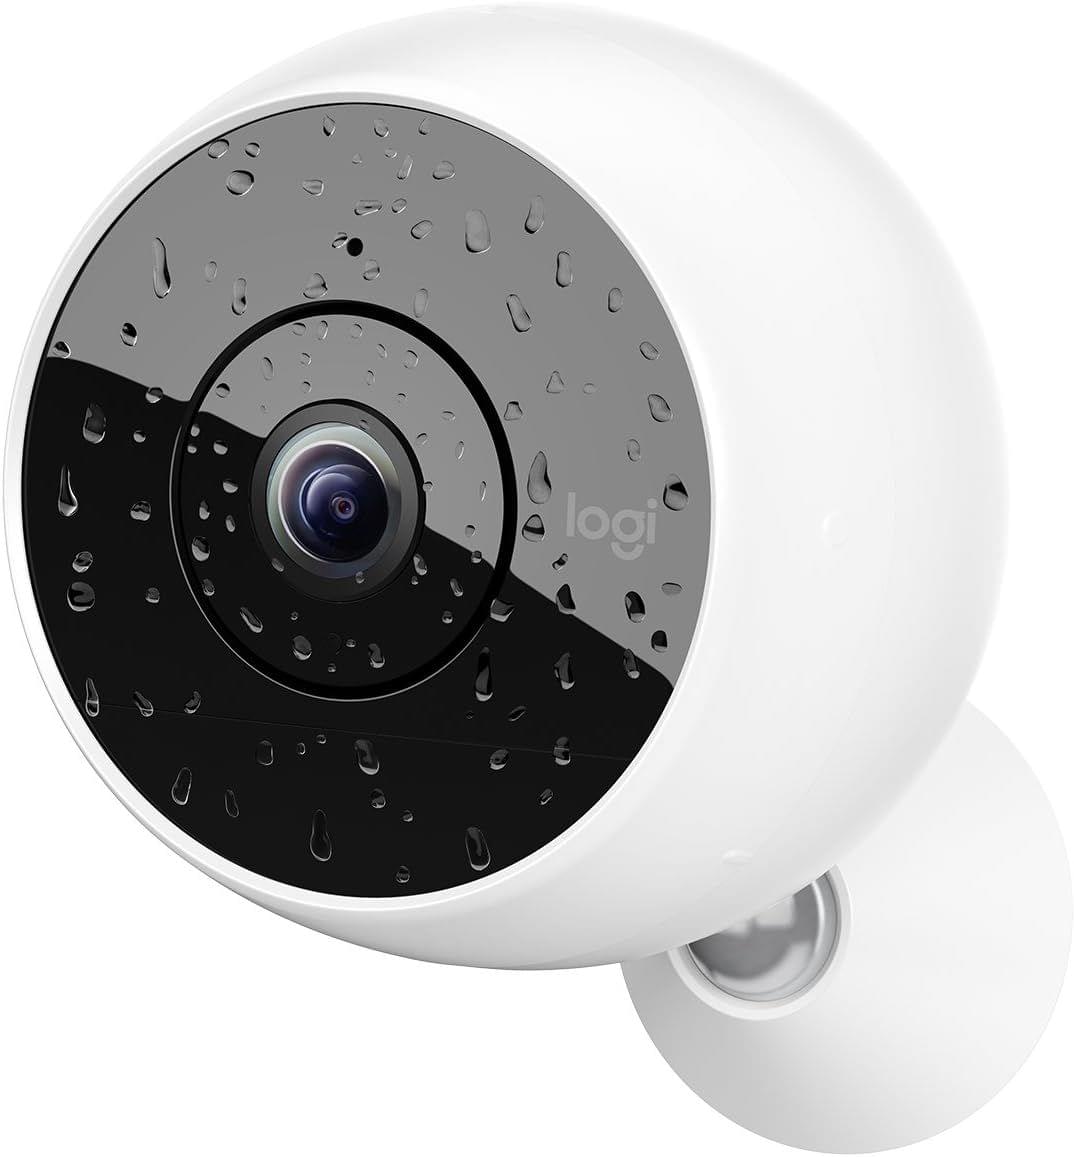
Even though we have upgraded to Aqara cameras indoors, we decided to keep one of our old Logi Circle 2 cameras (the one that was not having any disconnection issues) outside to monitor the balcony. The placement we chose is relatively close to the router we have in the living room (there’s only one window and wall between them), so Wi-Fi reception is good enough, and the camera stays connected all the time.
Eventually, I should probably upgrade to a more modern outdoor camera that also supports pan and tilt controls. As long as this one works, though, I’m going to leave it be.
Philips Hue Iris Table Lamp
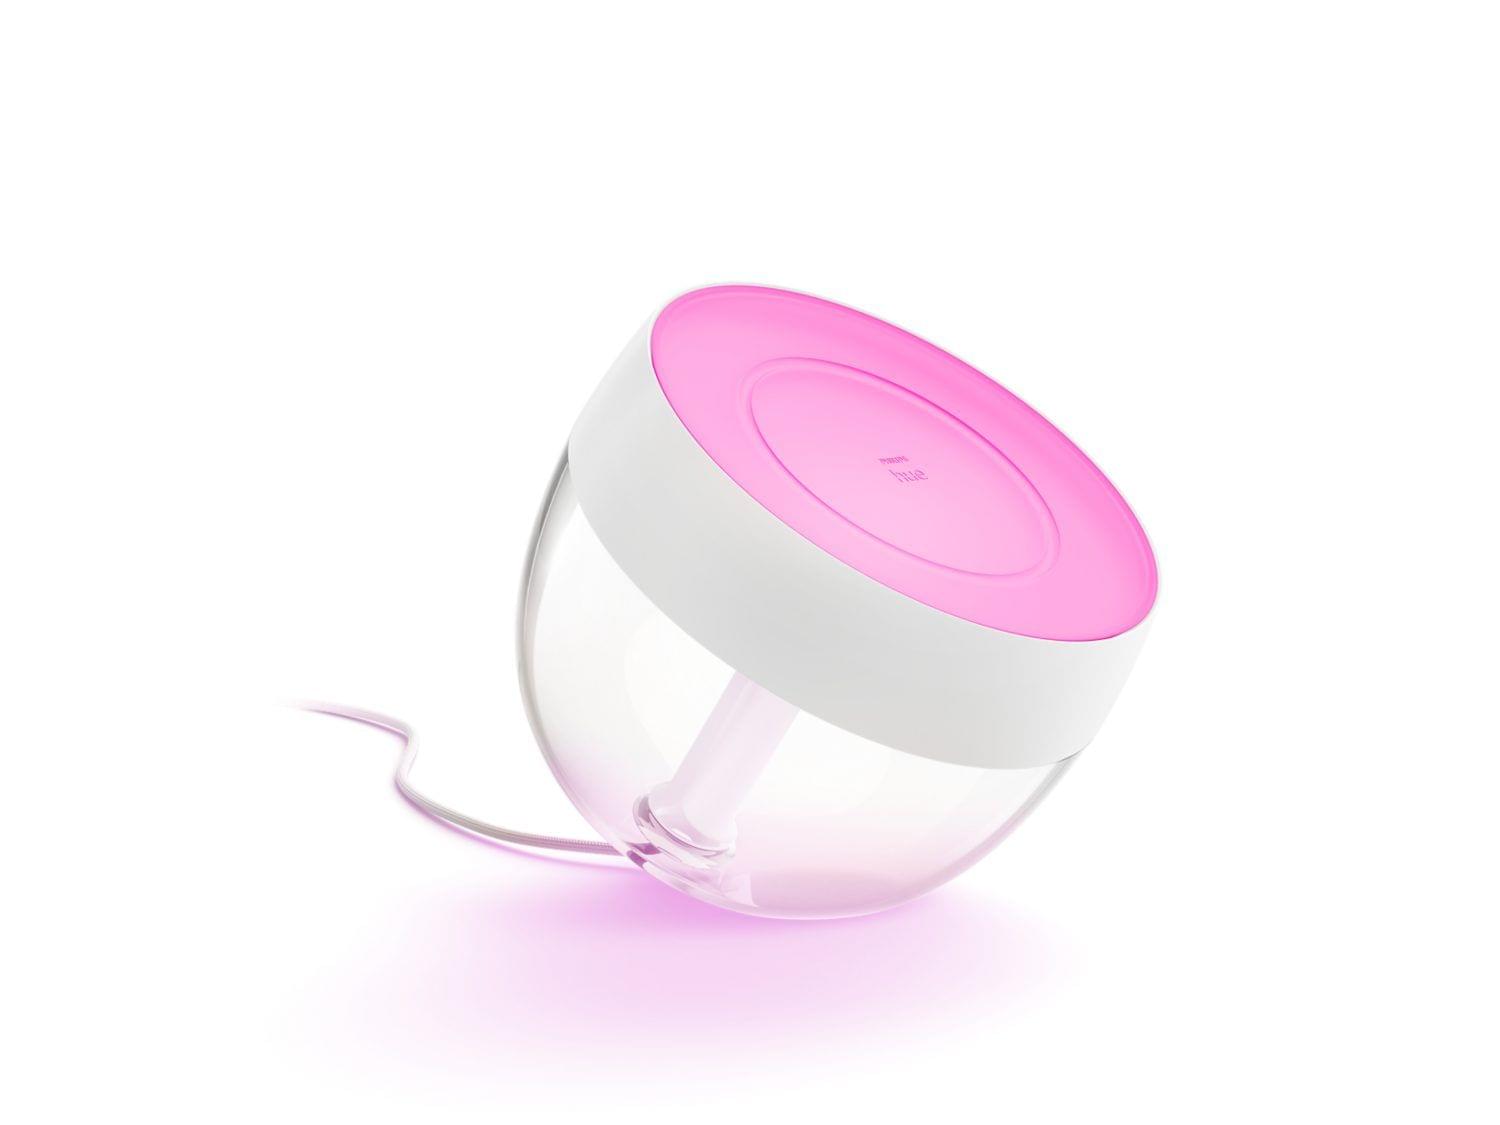
This lamp used to be in our hallway at the old apartment, and it recently graduated from storage to the top of an IKEA cabinet we have on the balcony. Technically, this semi-spheric table lamp is not an outdoor one, but since it’s not exposed to rain and it’s never too cold in Rome, it’s fine.
This lamp connects to my Hue setup and provides some nice accent colors for the “chill” area of the balcony, where we like to turn off the main lights and relax with diffused colored LEDs at night. It gets the job done and looks good. Plus, its base is transparent acrylic plastic, and we all know that I’d use any tech product made of that material.
Gardena Smart Water Control Set

This is my crown jewel, a product that I researched for months before I bought it, and I couldn’t be happier with it.
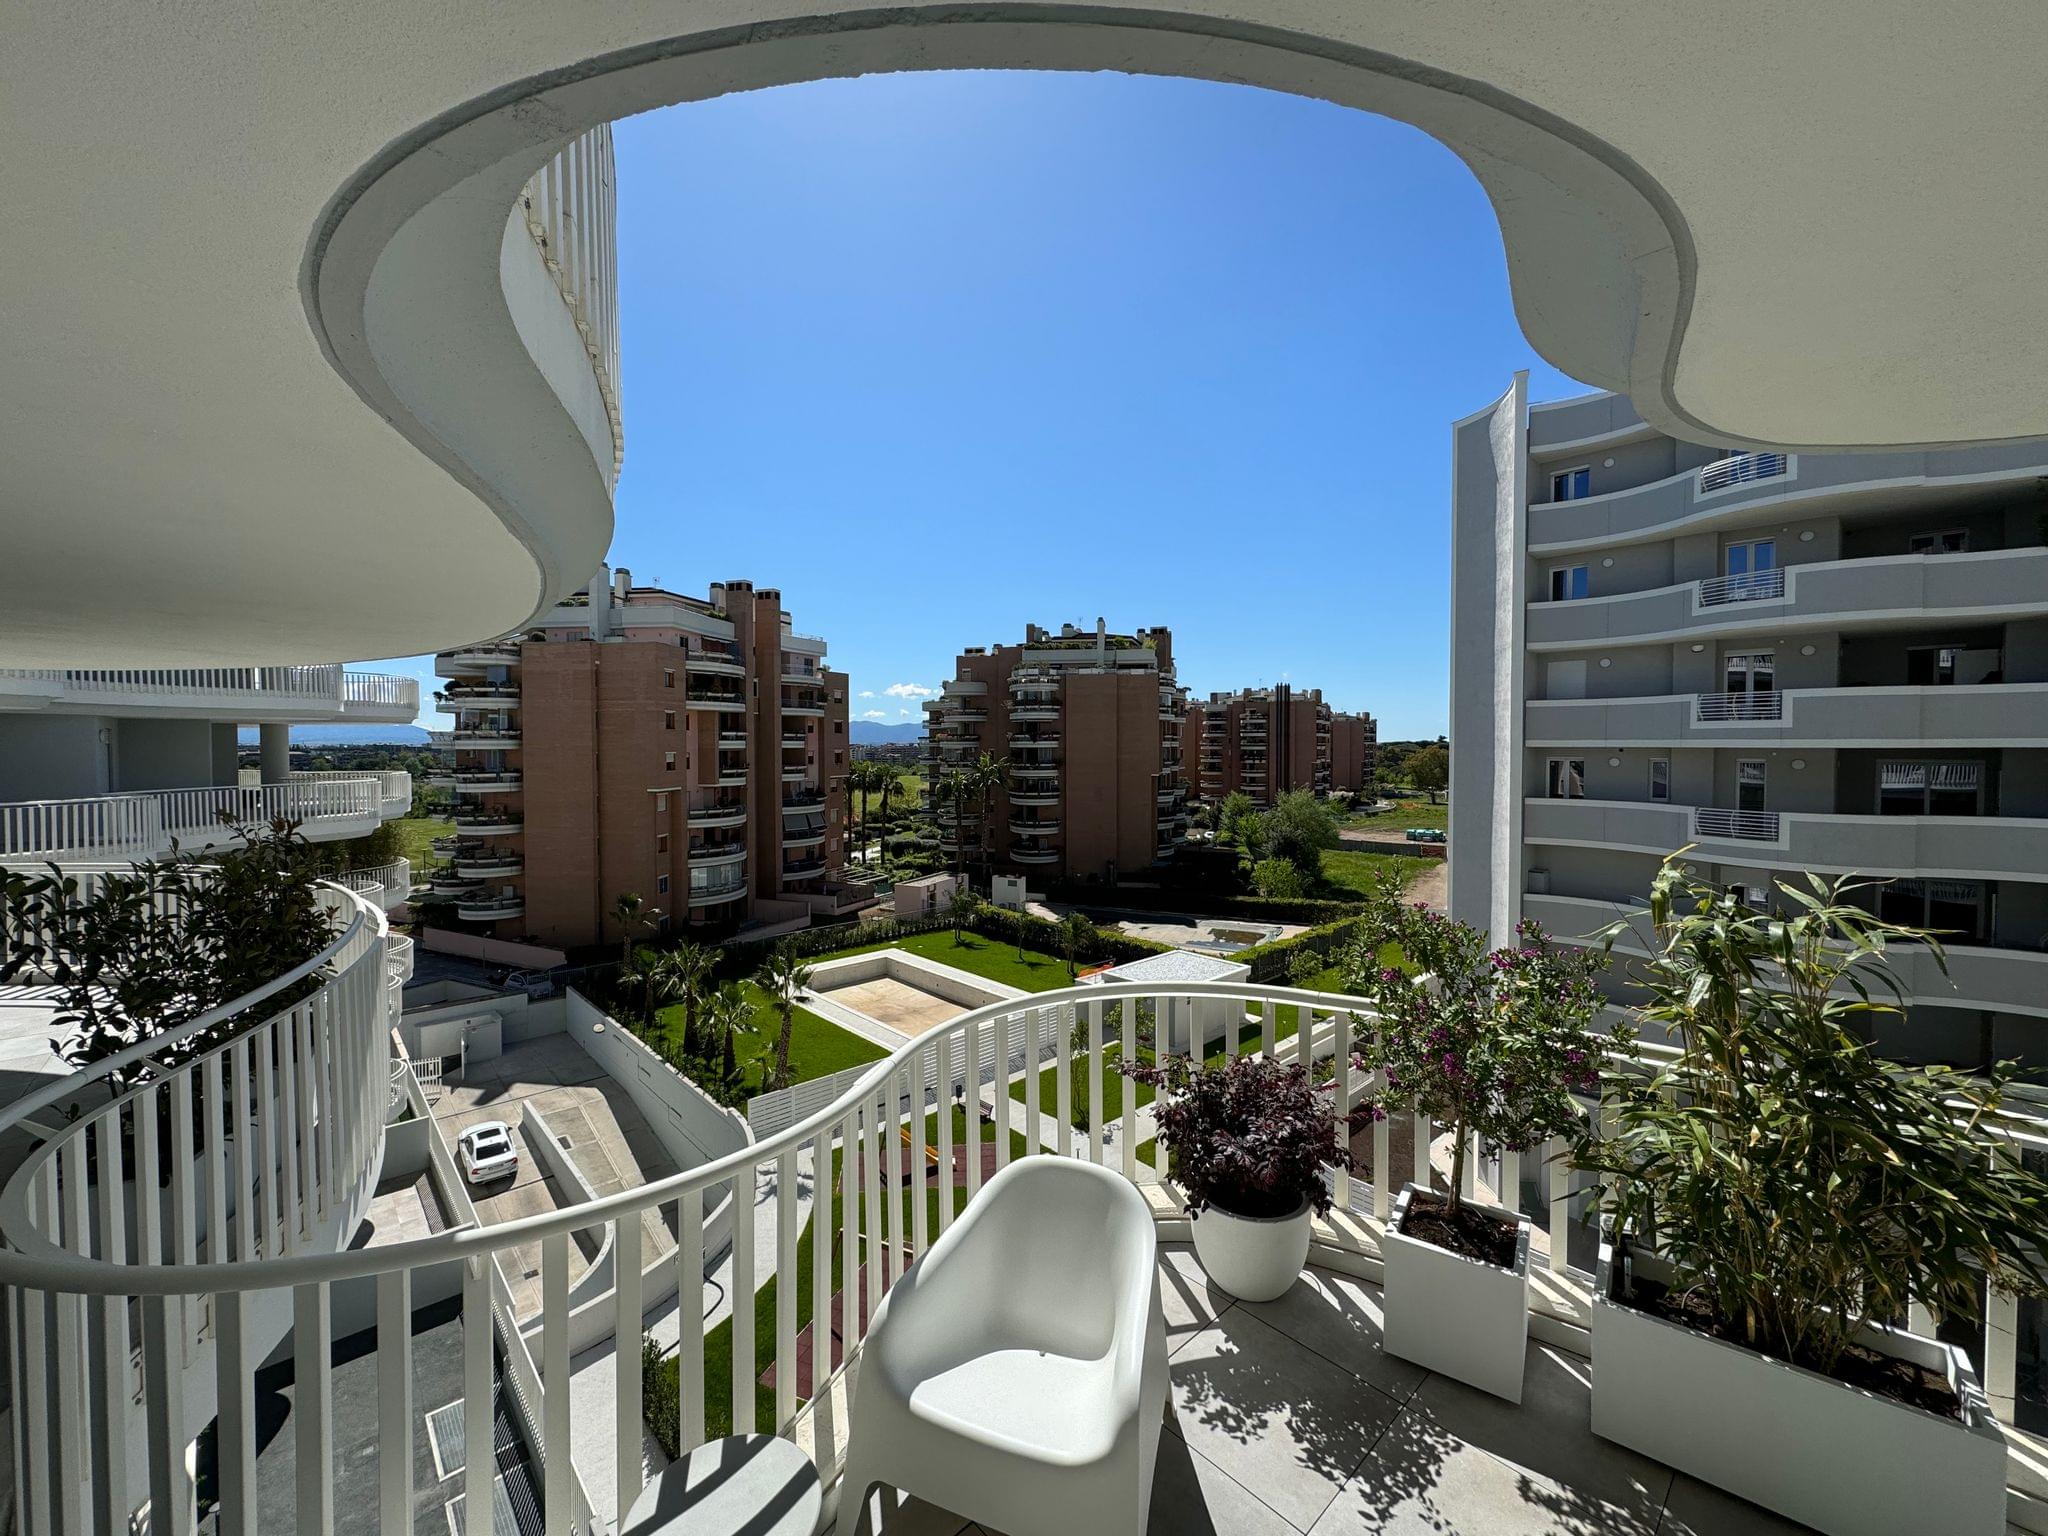
Last summer, Silvia and I decided we wanted to add a lot of plants and flowers to our balcony, which is an area of about 70 square meters (~750 square feet). We went with a series of planters with a mix of bamboo plants, photinias, laurels, loropetalum, small lemon trees, bougainvillea, and more. Obviously, all these plants would have to be watered on a regular basis, and I didn’t want to add the responsibility of doing that manually to my life. I needed to set up an automated irrigation system that supported a schedule I could customize and remotely control.
The last part was a key requirement for me: there are plenty of Bluetooth-enabled irrigation hubs that you can manage locally – inside your house – with a smartphone, but what if I’m not home? What if I’m on vacation, check the weather, realize that it’s a hotter day in Rome than previously anticipated, and decide to give some extra water to my plants in the evening so they don’t suffer the heat too much? I couldn’t do that with a Bluetooth-only irrigation system. I needed something that would provide me with remote access capabilities. And, ideally, it would be part of the technology I was already using to manage remote access to my home: Apple’s HomeKit. So I set out to find an irrigation system that would make water control appear in the Home app.
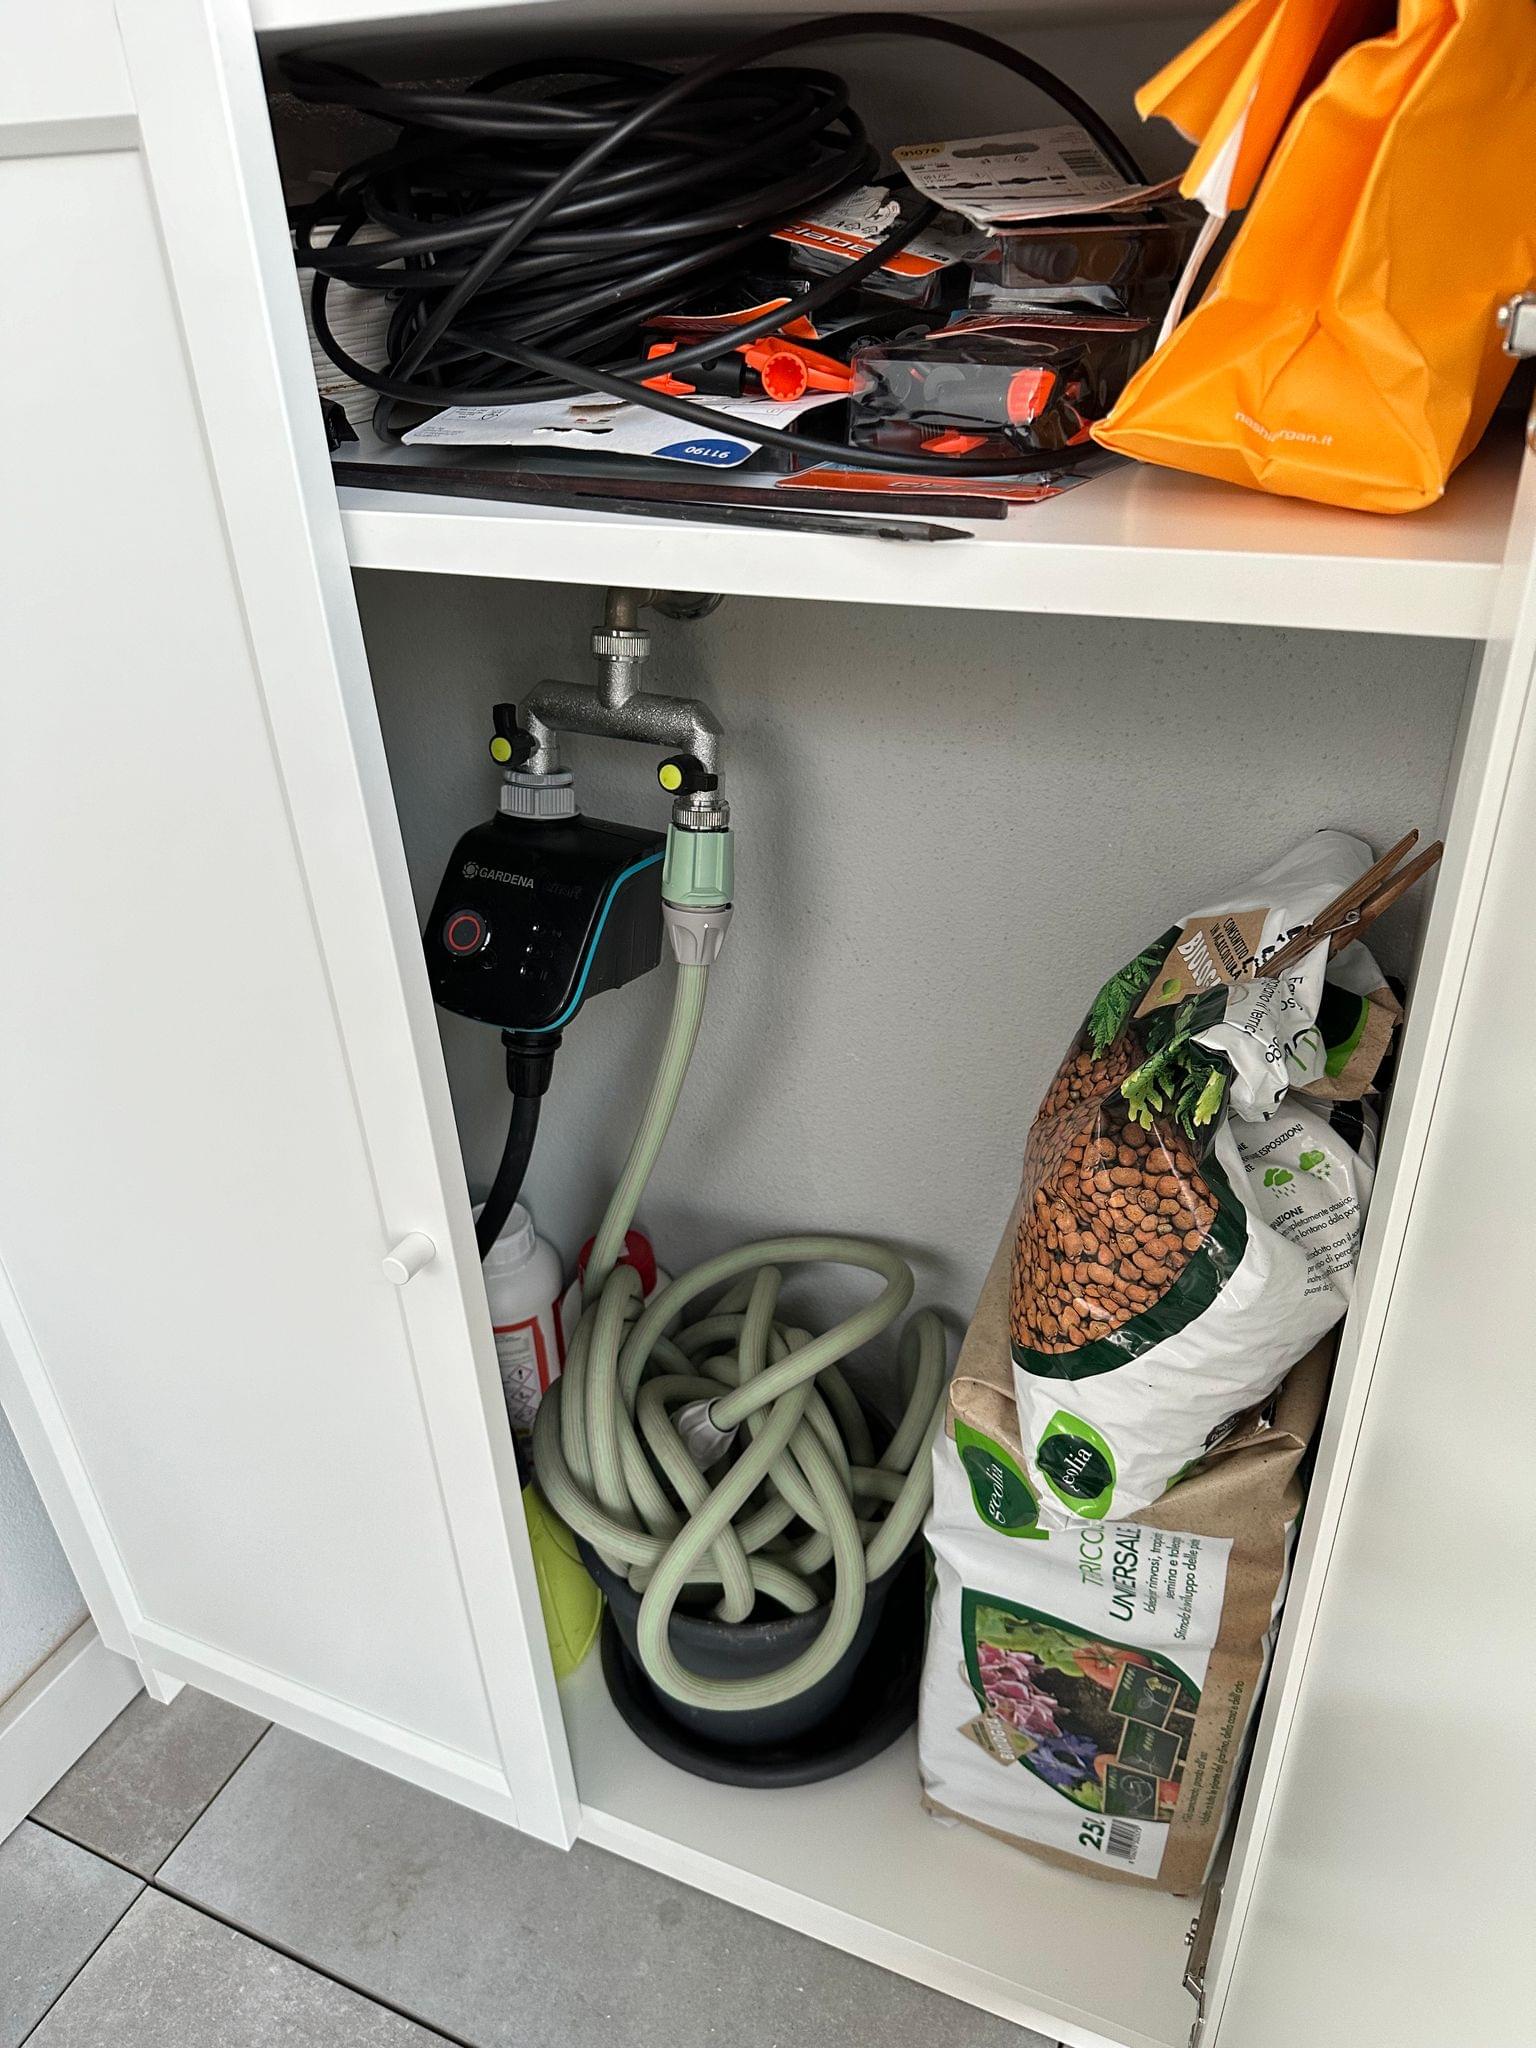
My solution, which we’ve been using for nearly a year now, was Gardena’s smart water control set. This kit is comprised of a main unit that needs to be connected to a water faucet, plus a gateway that needs to be placed inside the house and connected to your network. The idea is simple enough: you leave the faucet always “open”, and the central unit physically controls when water can flow or not. Commands to open or shut off the water valve are issued by the gateway, which communicates locally with the irrigation device, but is also capable of connecting to HomeKit and the open web thanks to Gardena’s API.
This system has been working exceptionally well for us, even though it required a lot of work upfront.
I decided to build my own irrigation system without any help from a professional, which meant I had to buy several meters worth of different types of flexible pipes, adapters, and sprinklers. I installed the central line under the floor of our balcony (we have a raised floor that allows me to hide pipes and wires underneath), connected each planter to a micro-pipe and sprinklers, and tested everything over the course of a few months. I also had to turn the one faucet I had outside (it’s inside an IKEA cabinet we customized) into two faucets using an adaptor.
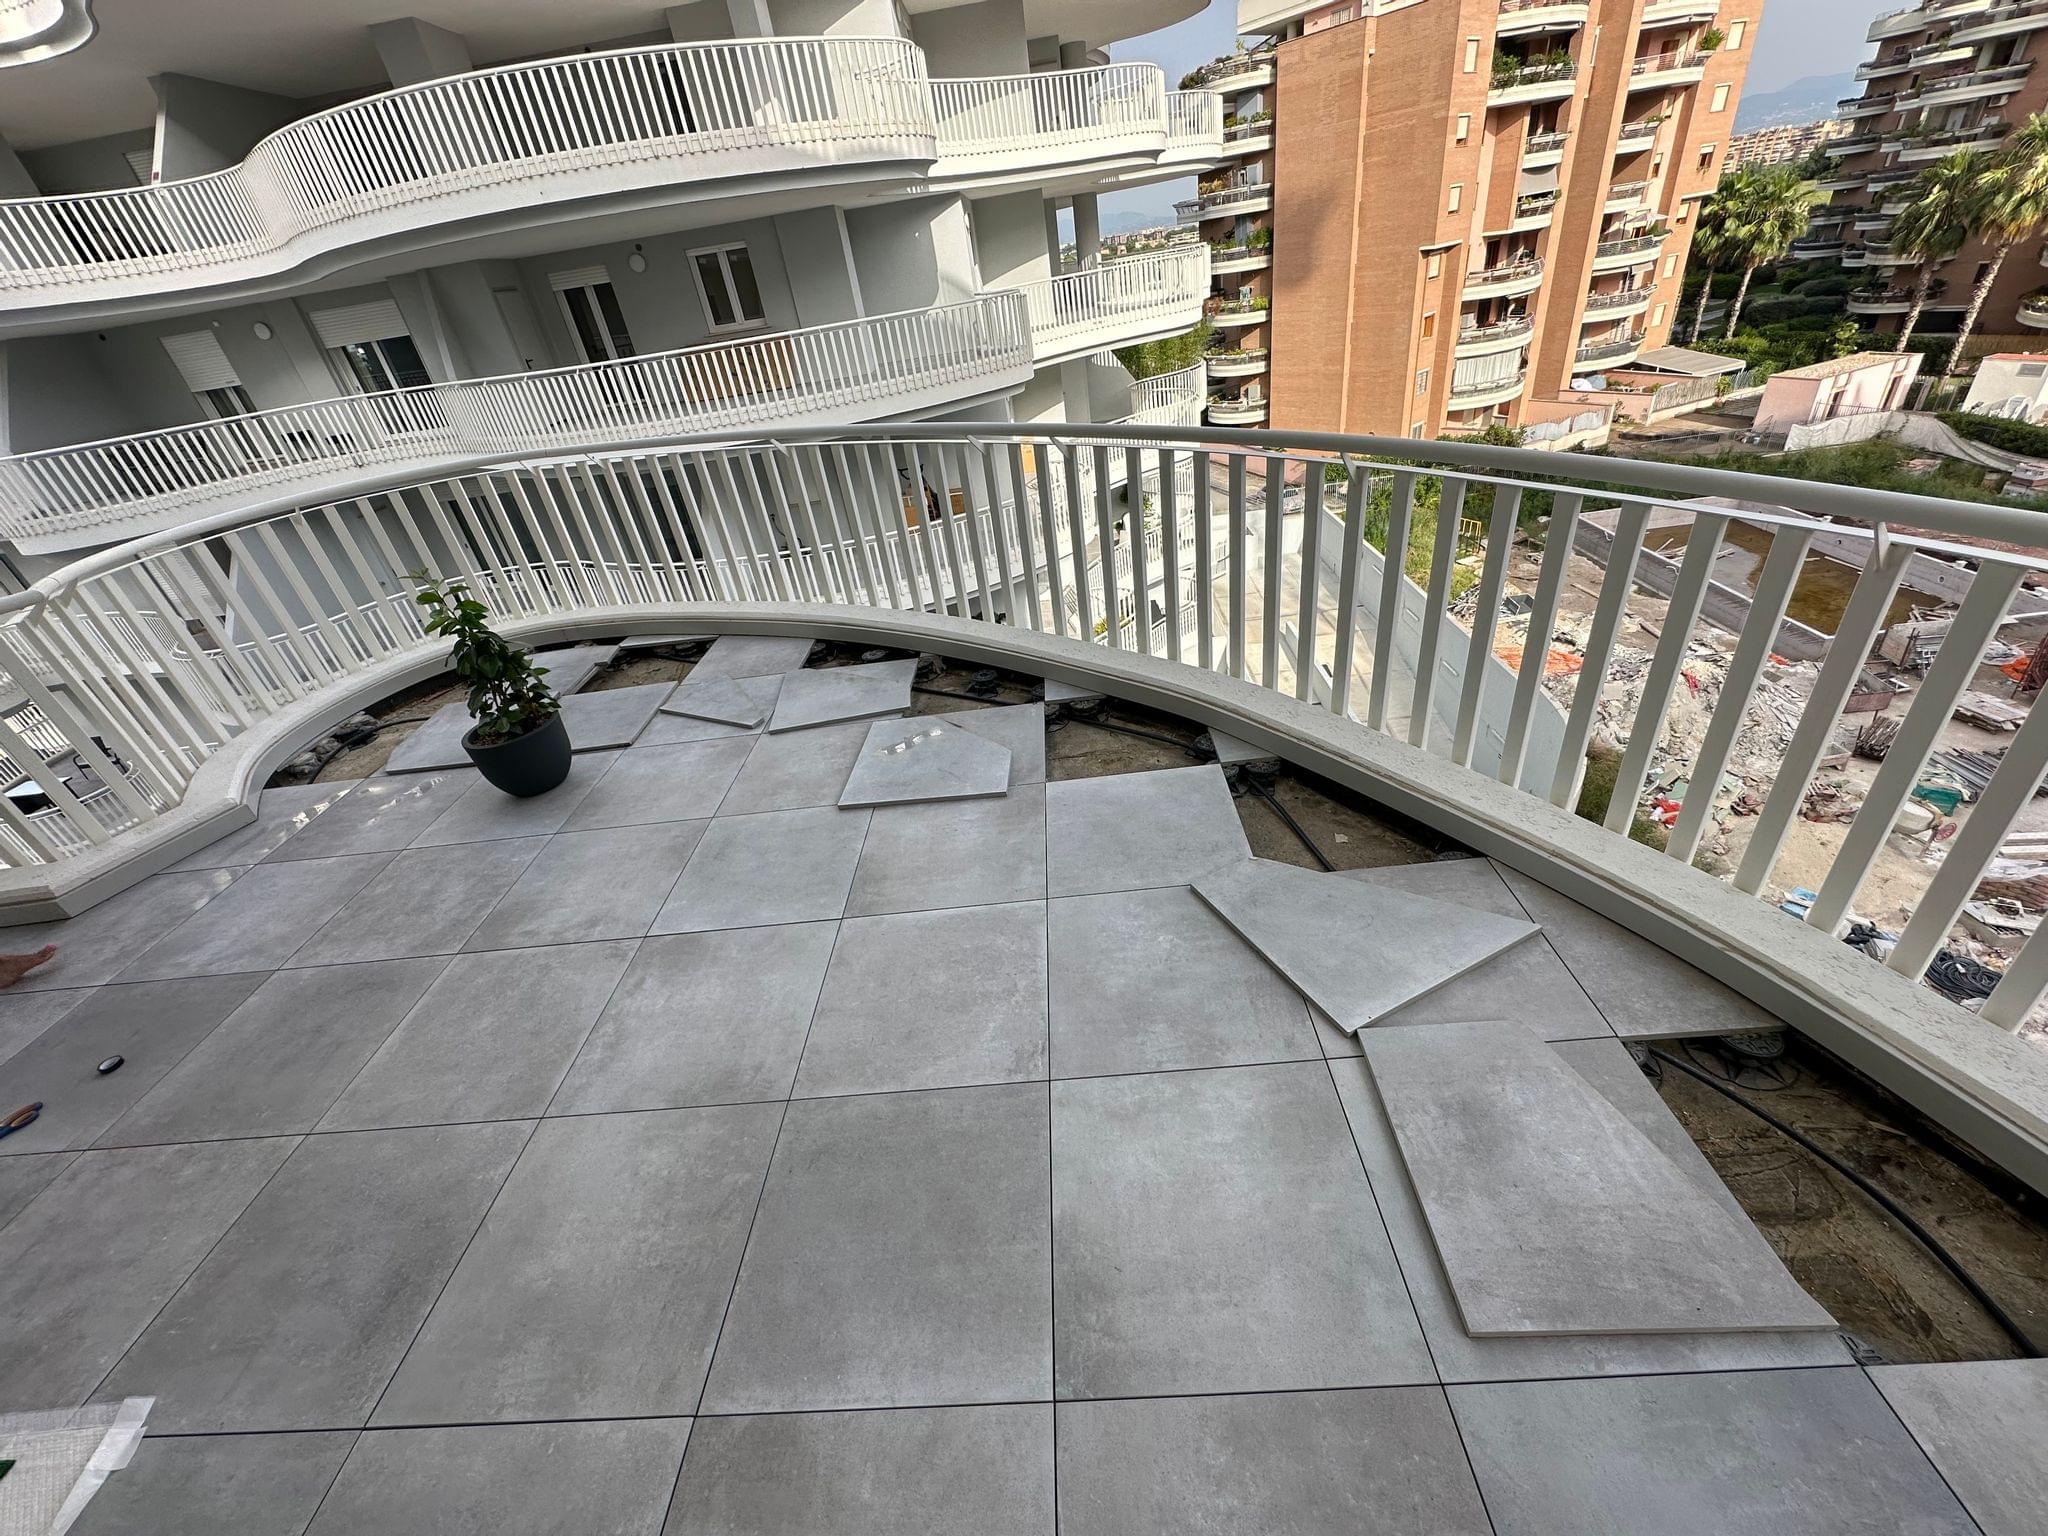
I took this when I was working on the irrigation system last year. The small black pipe is the central line.
By the end, we had a beautiful balcony featuring a mix of 10+ species of plants in a total of (roughly) 30 planters that are all hooked up to my irrigation system and are now living their best lives under my supervision.
Some of our plants. The irrigation system runs under the floor and is then connected to each planter.
The Gardena device shows up in HomeKit as a ‘water control’ accessory that allows me to turn it on whenever I want with a single tap. The accessory is connected to the Gardena smart gateway, which shows up as a ‘bridge’ in HomeKit. I’m very proud of how this entire setup went.
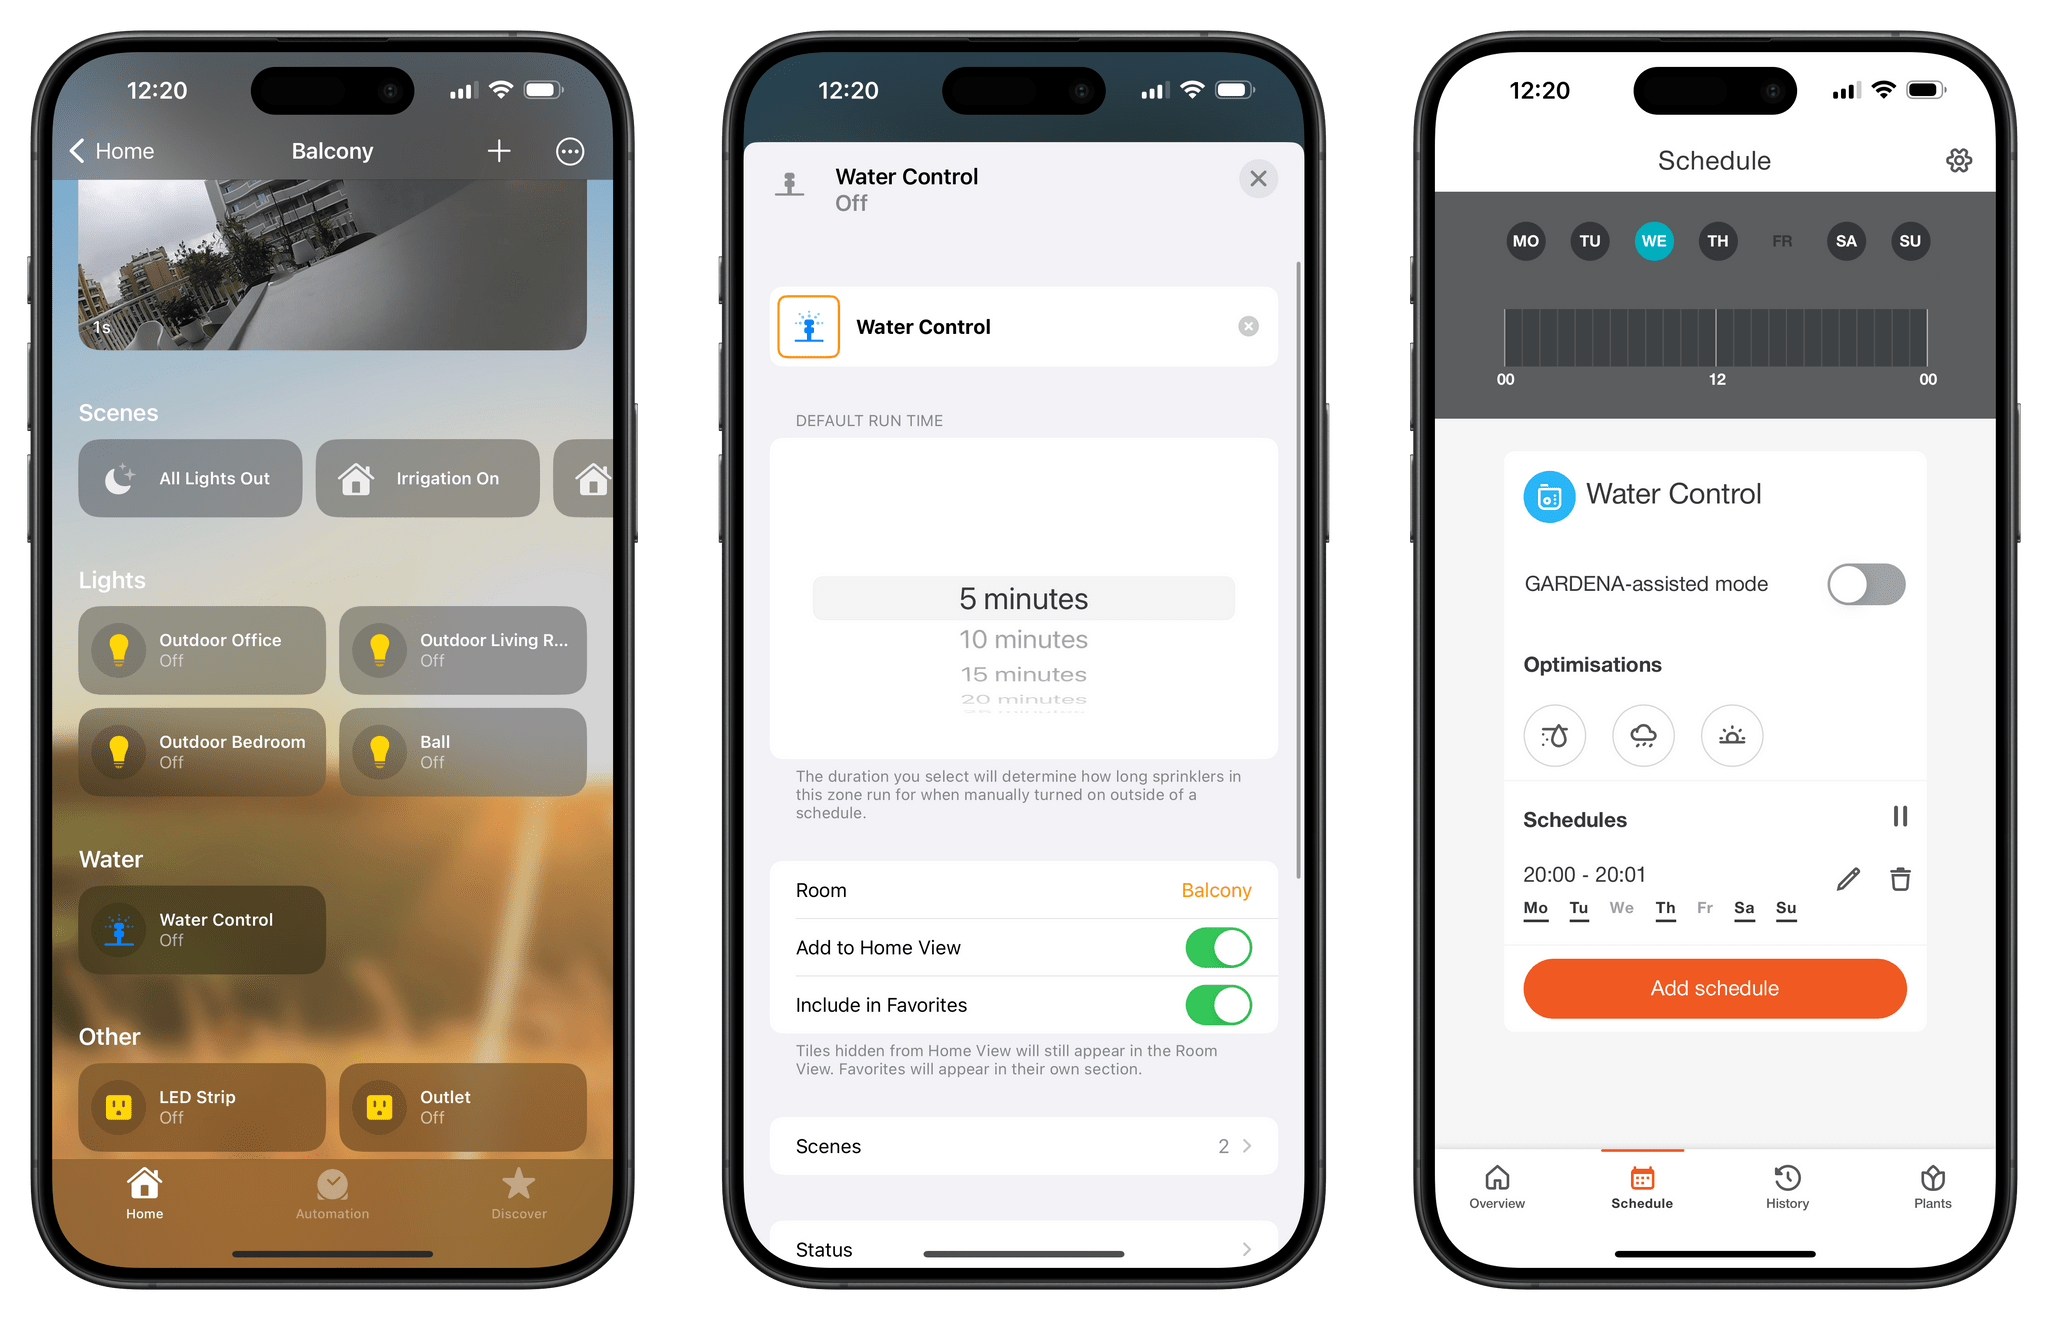
That said, there are a couple of caveats worth addressing. The most important one is that, for whatever reason, the Home app doesn’t let you set a default run time for water control of 1 minute. The minimum threshold is 5 minutes, which is too much water for my plants. I have no idea why this limitation exists, nor why water control cannot be part of native HomeKit automations. For these reasons, I had to create a schedule using Gardena’s smart app, which is only available in the European App Store for… reasons. That app lets me set a schedule for 1 minute of irrigation every day, which is what I wanted. With this hybrid approach, I can have my daily schedule set in the Gardena app; when I want to give the plants more water, I can use Siri or Control Center, which I find easier and faster to use than the Gardena app.
That’s a lot of words to describe watering some plants but, hey, you know me. I had to go down this rabbit hole because I wanted the optimal solution for me. Despite some limitations, I like this system a lot, and I recommend it.
Aqara Leak Sensor
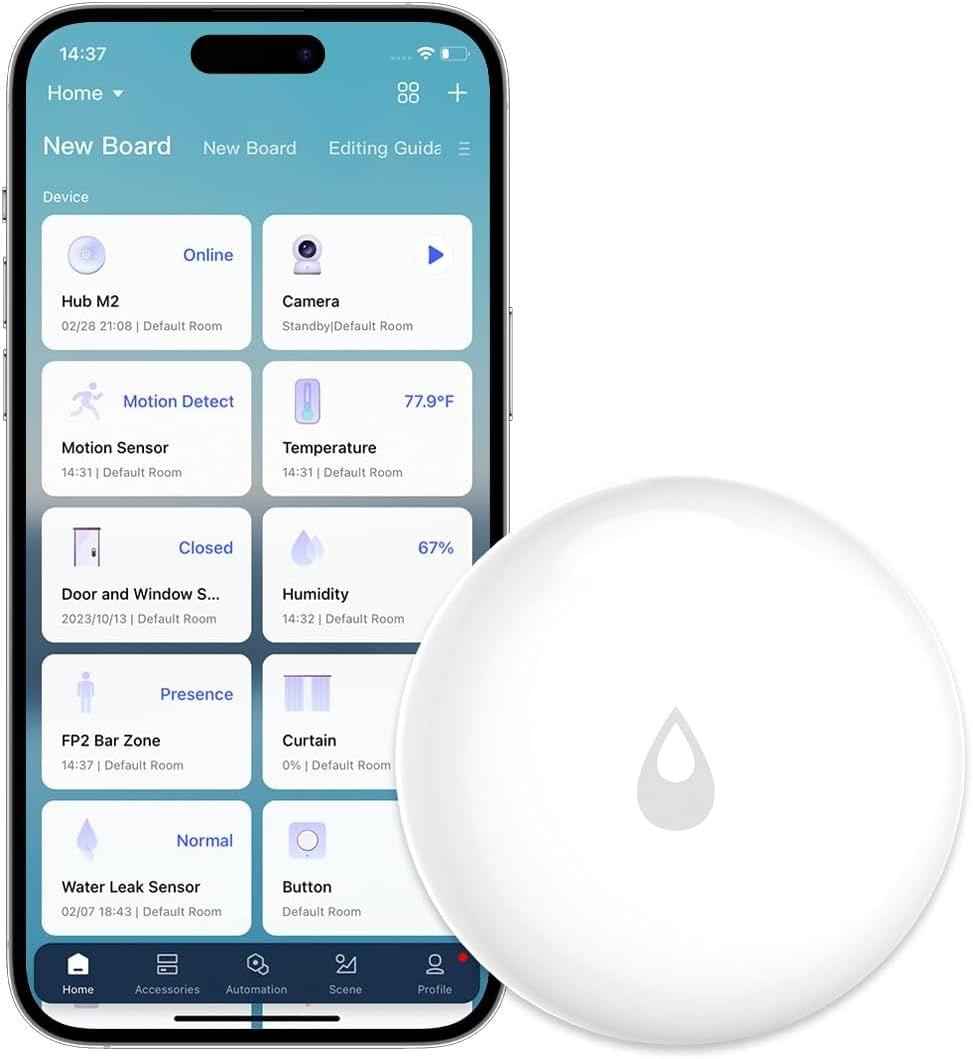
After we set up the dual faucet and irrigation control system, I had to figure out a way to be alerted if anything went wrong outside with a water leak from the Gardena unit. I fixed this with an Aqara leak sensor, which is a little puck-style device that detects if water hits it and sends you a notification.
I confirmed that the sensor was working last summer by intentionally splashing water on it, and again for the screenshots in the story. Fortunately, I’ve never received a “real” notification from the device because an actual water leak hasn’t occurred in real life so far. However, if you’re curious, you should know that this device can send critical notifications via HomeKit, which will always make a sound (regardless of your Focus settings) and stay pinned until you dismiss them.
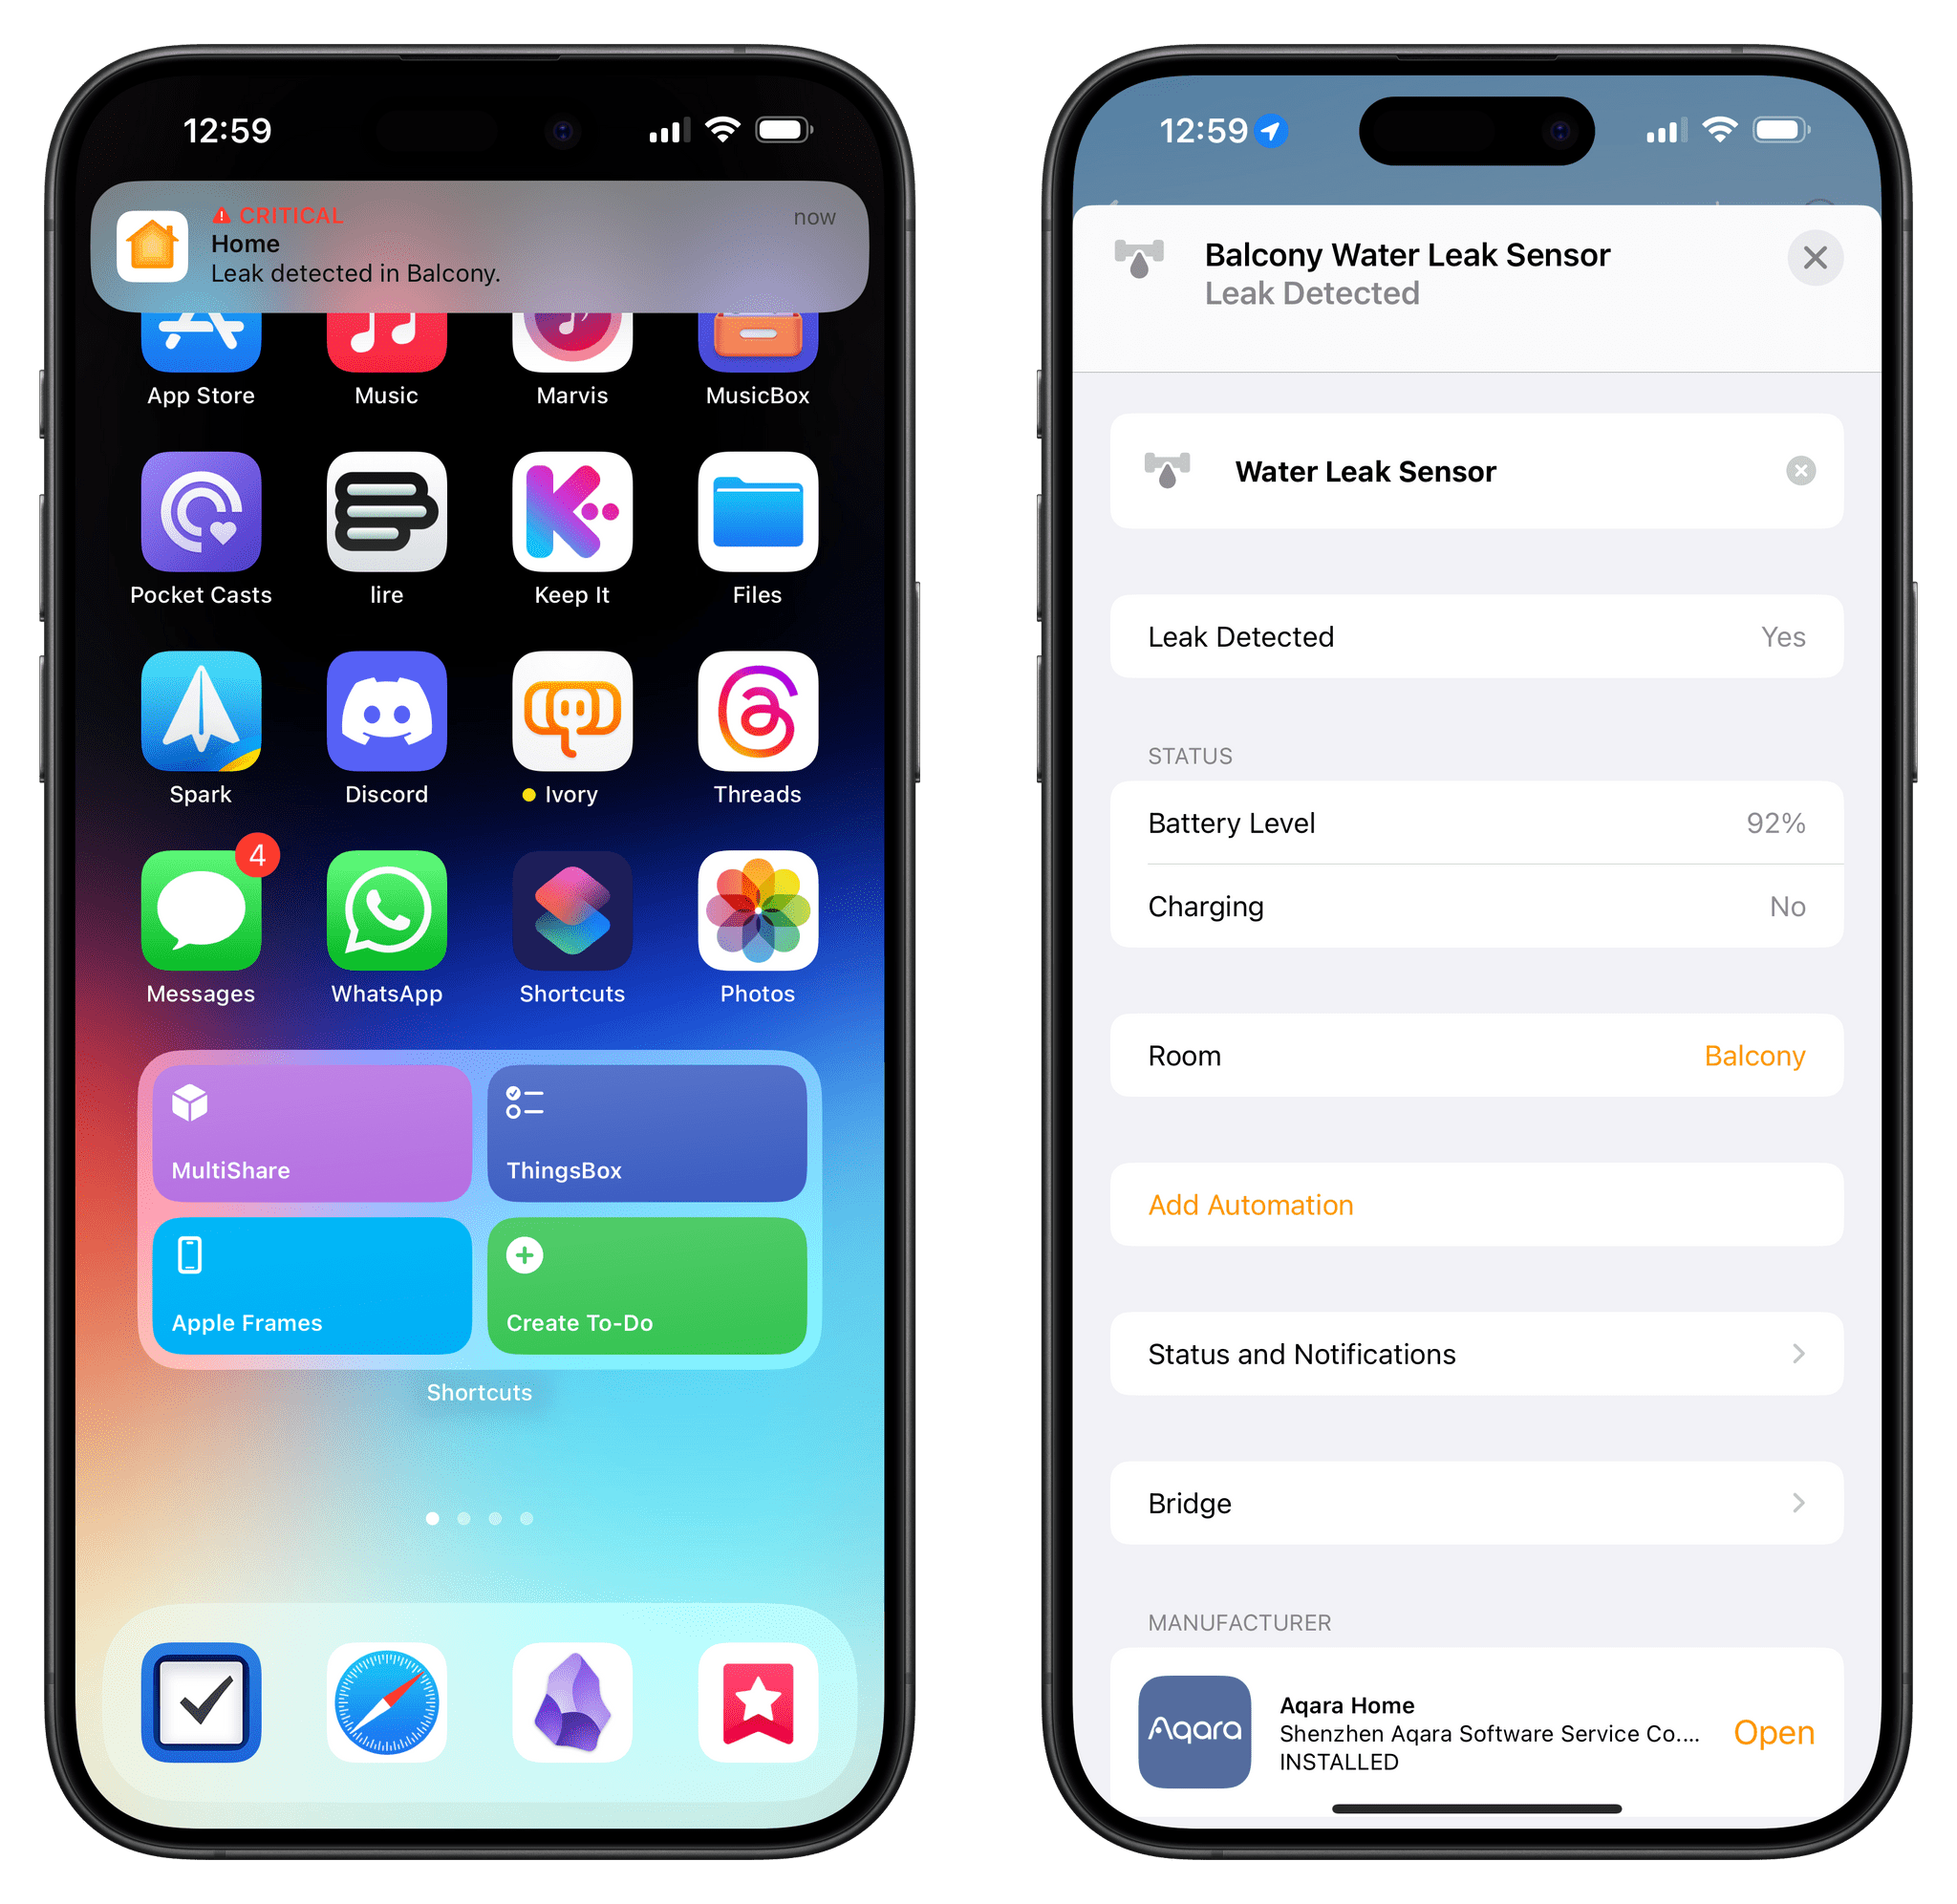
The leak sensor also shows up in the Aqara app, which can tell you additional information such as the strength of the Zigbee signal from the nearest Aqara hub (in my case, that’s the G3 indoor camera) and the firmware version. Battery in these things also lasts forever: I set up the sensor eight months ago, and the battery is still at 92%.
Meross Waterproof Plug
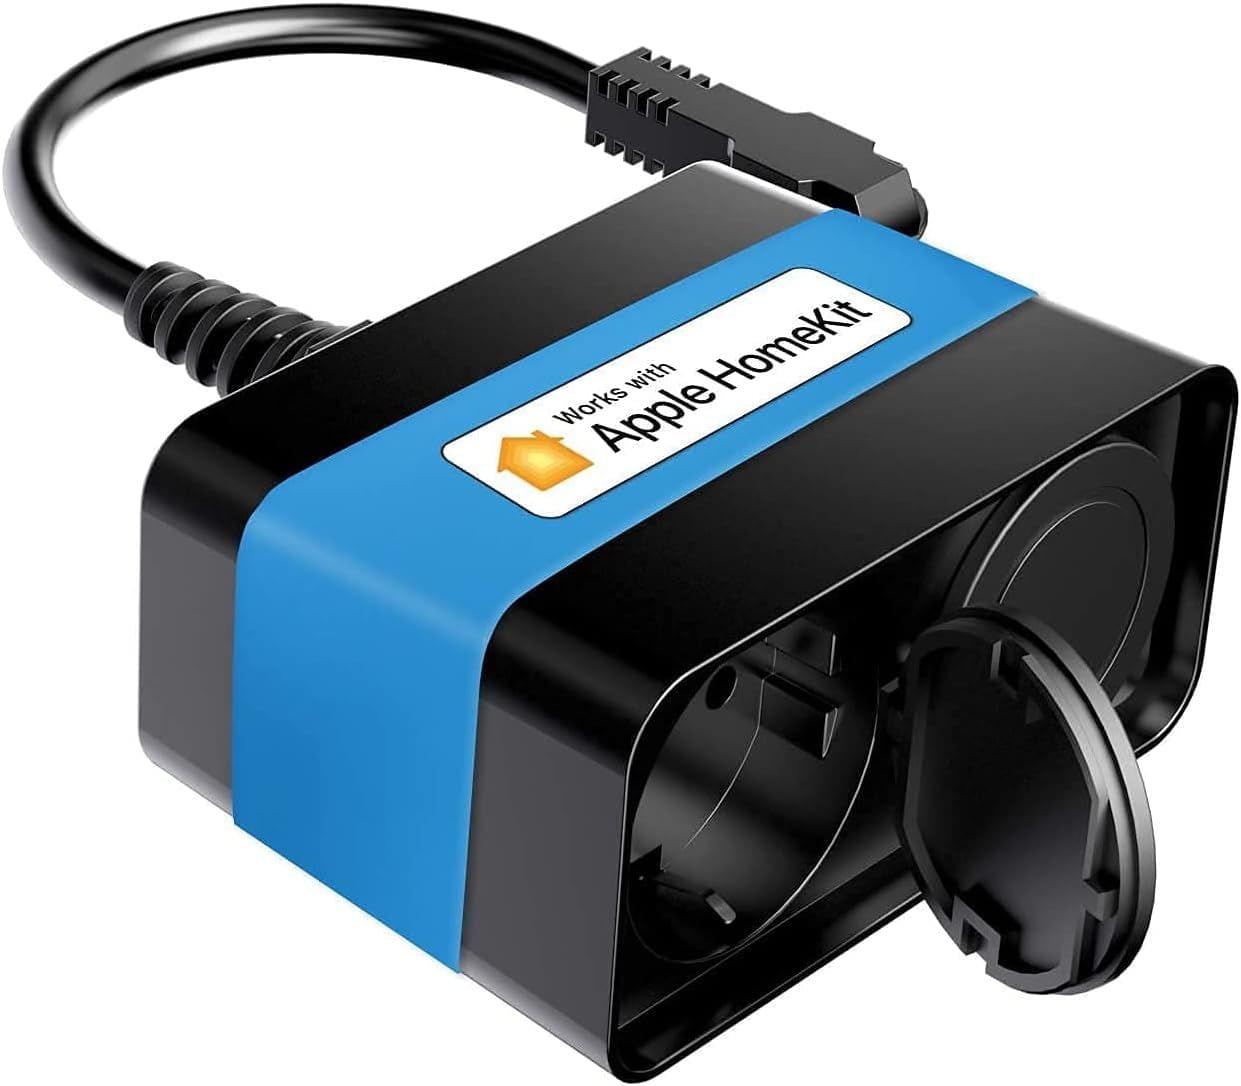
After my good experience with Meross plugs in our bedroom and office, I knew I wanted to look for another accessory by the same company to control the gadgets we have outside. Specifically, we have a non-HomeKit, 30-meter LED strip running across the entire perimeter of the balcony that I wanted to make “smart” with a HomeKit plug, and I also wanted to provide power to the aforementioned Logi camera. The only problem: the power outlet was inside the same IKEA cabinet we customized around the water faucet, and I felt a little uncomfortable about that placement near a water source.
Thankfully, the folks at Meross thought about this kind of scenario as well with their line of outdoor and waterproof smart plugs. The one I got is a two-plug system with two sockets that are individually controllable from the Home app. The plug is certified for IP44 water resistance, which means that it’s “splashproof” – a good enough rating for the ease of mind I was looking for. This way, even if the occasional water droplet lands on the plug’s housing, I feel safe knowing that nothing nefarious is going to happen.
We’ve been using this outdoor plug since last August, and I have zero complaints. I set it up months ago and never touched it again.
John
Ecobee Smart Doorbell Camera
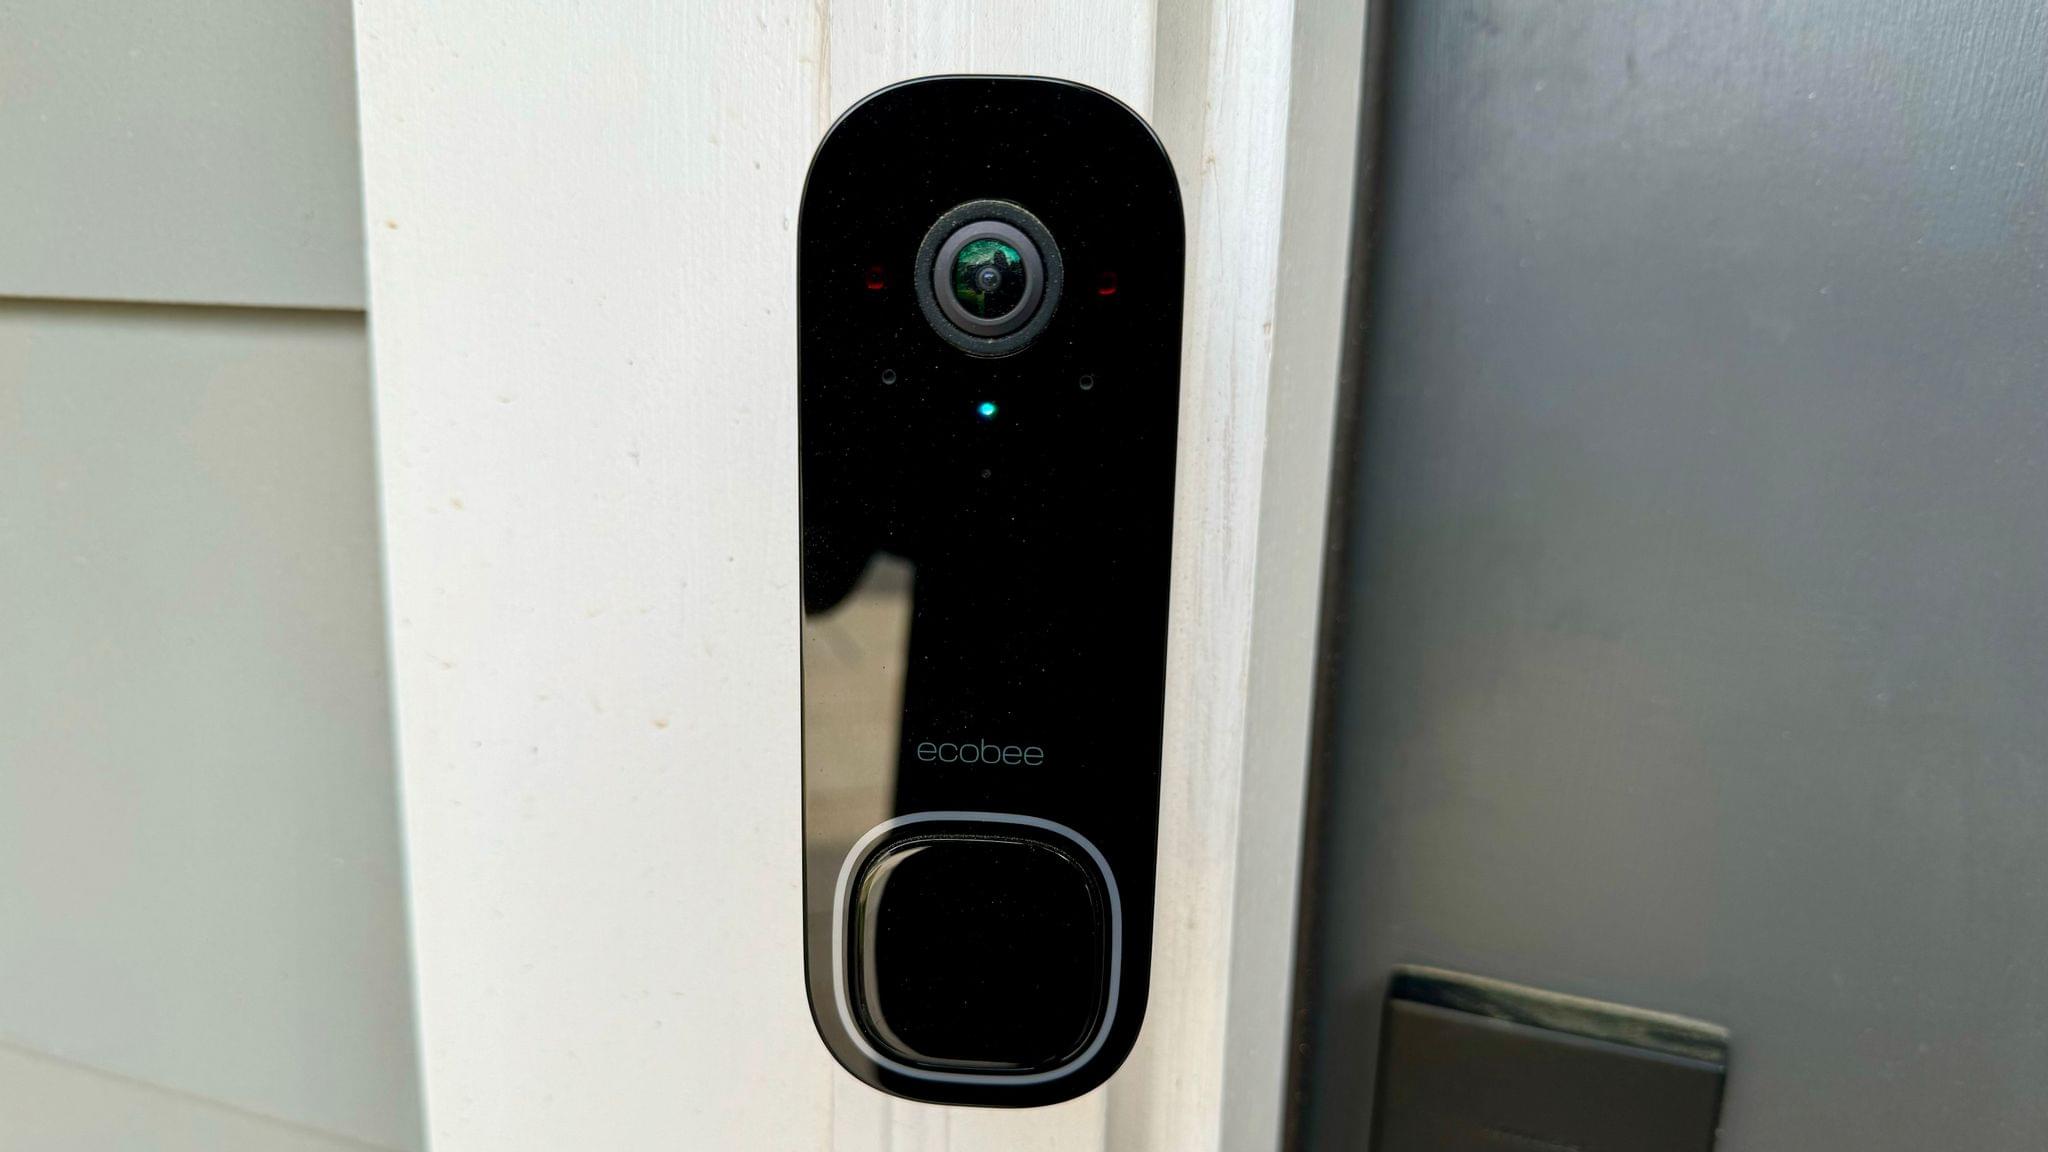
I cheated a little and included this device as part of our indoor gadget roundup because the ecobee’s Smart Doorbell Camera is an integral part of my security system that consists mostly of indoor devices. However, it’s worth mentioning again because it’s an excellent standalone outdoor HomeKit accessory, too.
When I lived in Illinois, I had a Logitech Circle View doorbell. Well, technically, I had two. The first one I owned overheated and died, which, based on my research a couple of years ago, seemed to be a common problem. That issue may or may not have been addressed since then, but I didn’t want to take any chances with my new setup in North Carolina because it gets hot here, and my front door is in the sun all day long.
I’ve always been impressed with the quality of ecobee’s thermostats, and when I moved into my new place, it was rumored that the company was working on a smart doorbell. So, I did something uncharacteristic: I waited semi-patiently.

My patience paid off because last fall, a year after my move, ecobee’s Smart Doorbell Camera debuted to good reviews. I bought one and installed it myself one Saturday, and it’s been working without a hitch ever since.
The camera integrates with the Home app, and when someone rings the bell, it rings both a chime that comes with the doorbell and my HomePods. The doorbell does not, however, integrate with HomeKit Secure Video. Instead, ecobee offers a separate security subscription that I covered in our other HomeKit roundup. I’ve been happy with the service, but I would prefer if HomeKit Secure Video were an option, too. The subscription also adds package detection, while person detection is a standard feature that doesn’t require a subscription.
Overall, I’ve been very happy with ecobee’s doorbell. My door is close to a sidewalk, and the ecobee app’s ability to create detection exclusion zones has spared me from constant notifications when neighbors walk by. Package detection works well, too. And, despite direct sunlight and high temperatures, even late last fall and this spring, the doorbell has not overheated.
Hue Festavia String Lights
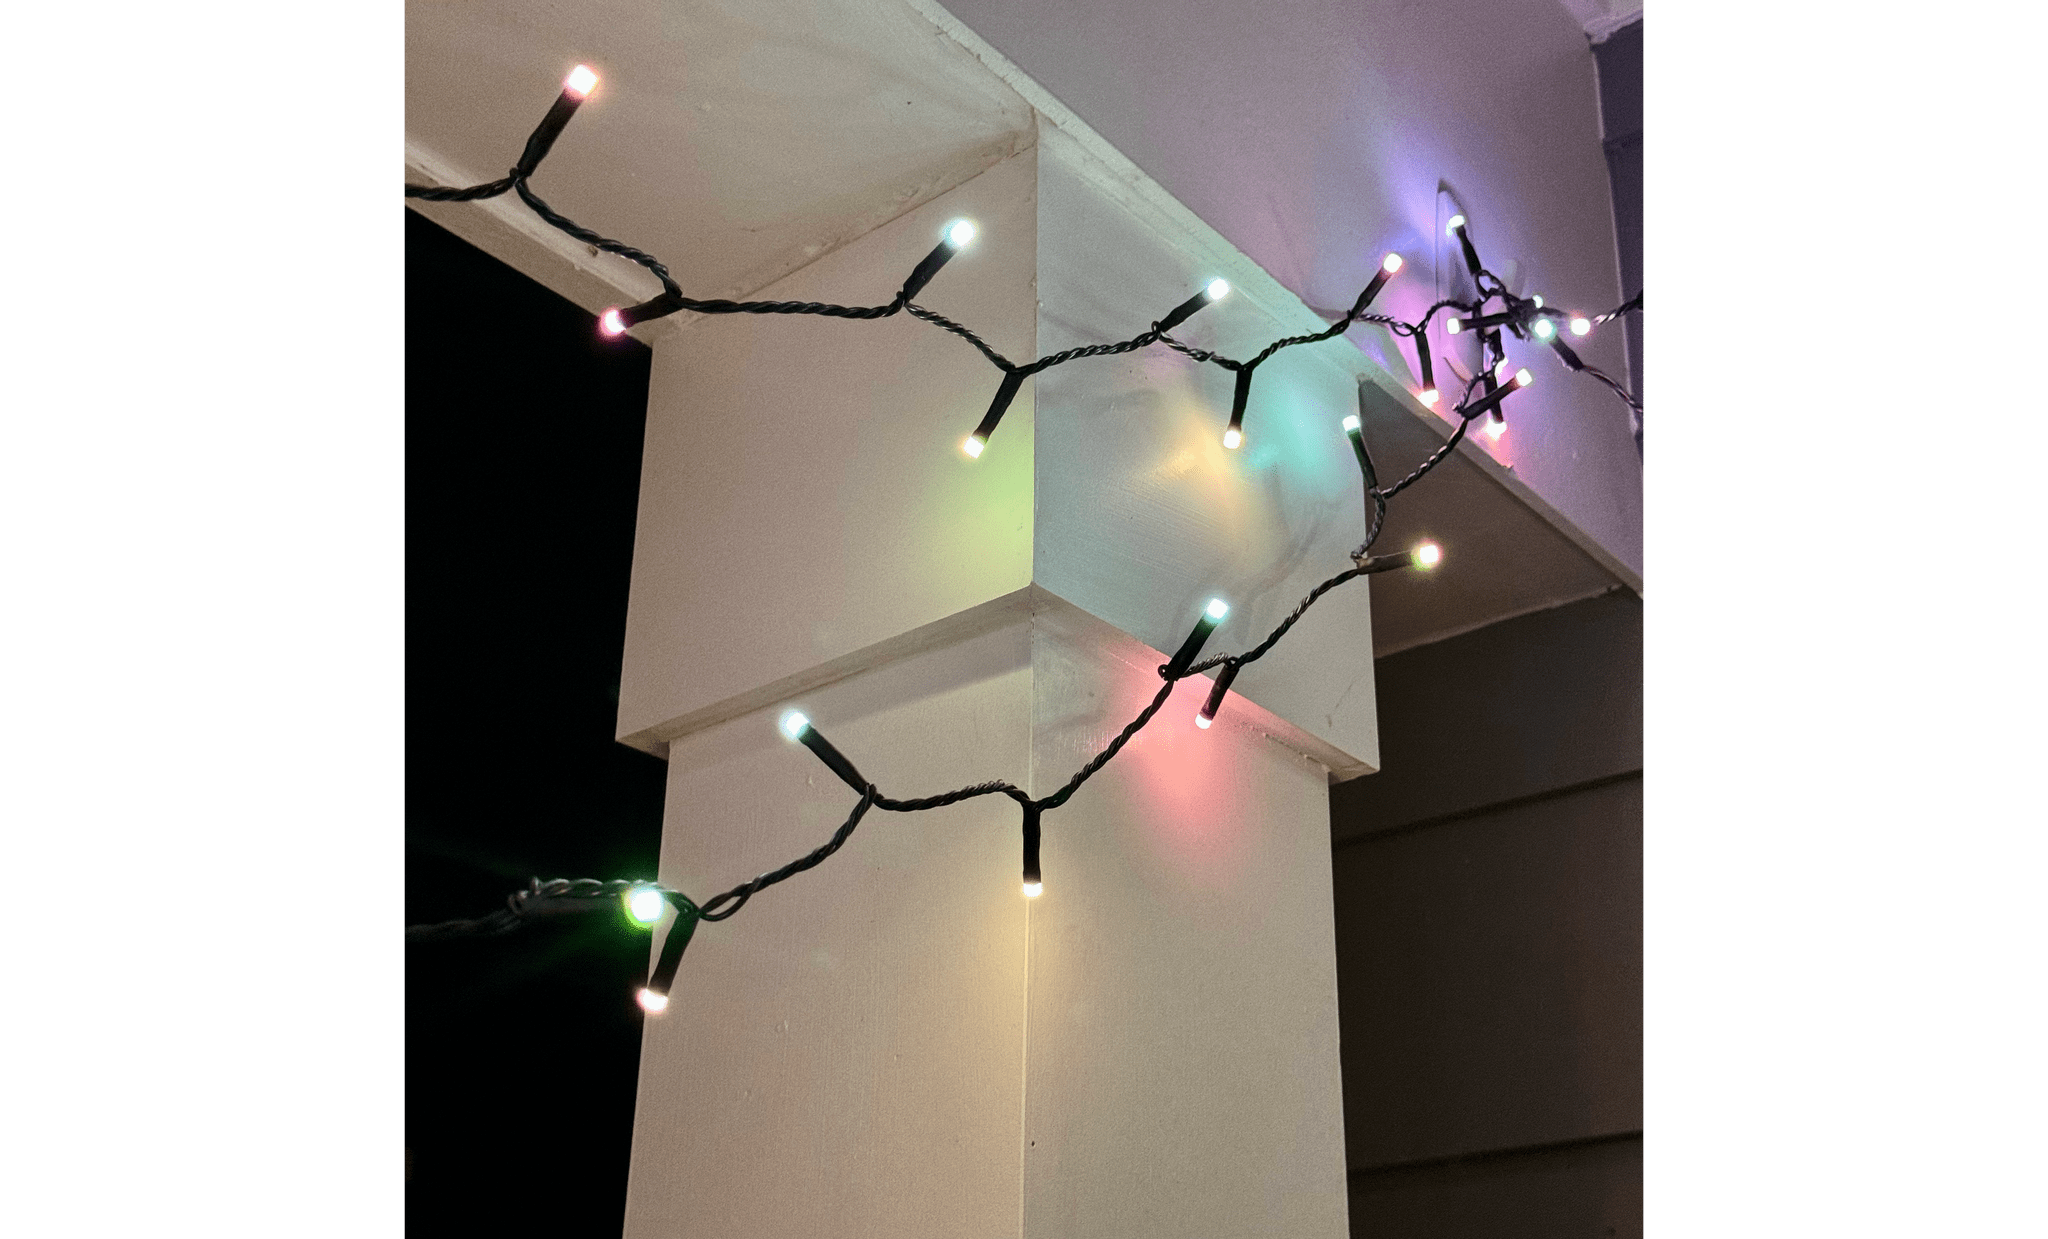
We have a big balcony that extends off the back of the second floor of our home. When we moved in, I bought a string of big outdoor decorative bulbs and paired it with an outdoor smart plug from iHome that is no longer made. The setup allowed me to turn the lights on and off on a schedule or with Siri, which I liked, but since last fall, I switched to a set of Hue Festavia string lights that I like even more.

The Hue Festavia string lights, which I reviewed last year, are expensive, but they’ve been a big upgrade because they’re colorful and integrate with the Hue app. The lights come in 250- and 500-light versions. I have the longer version, which is 131.2 feet (40 meters) long, more than enough to drape them around the edge of my balcony twice.
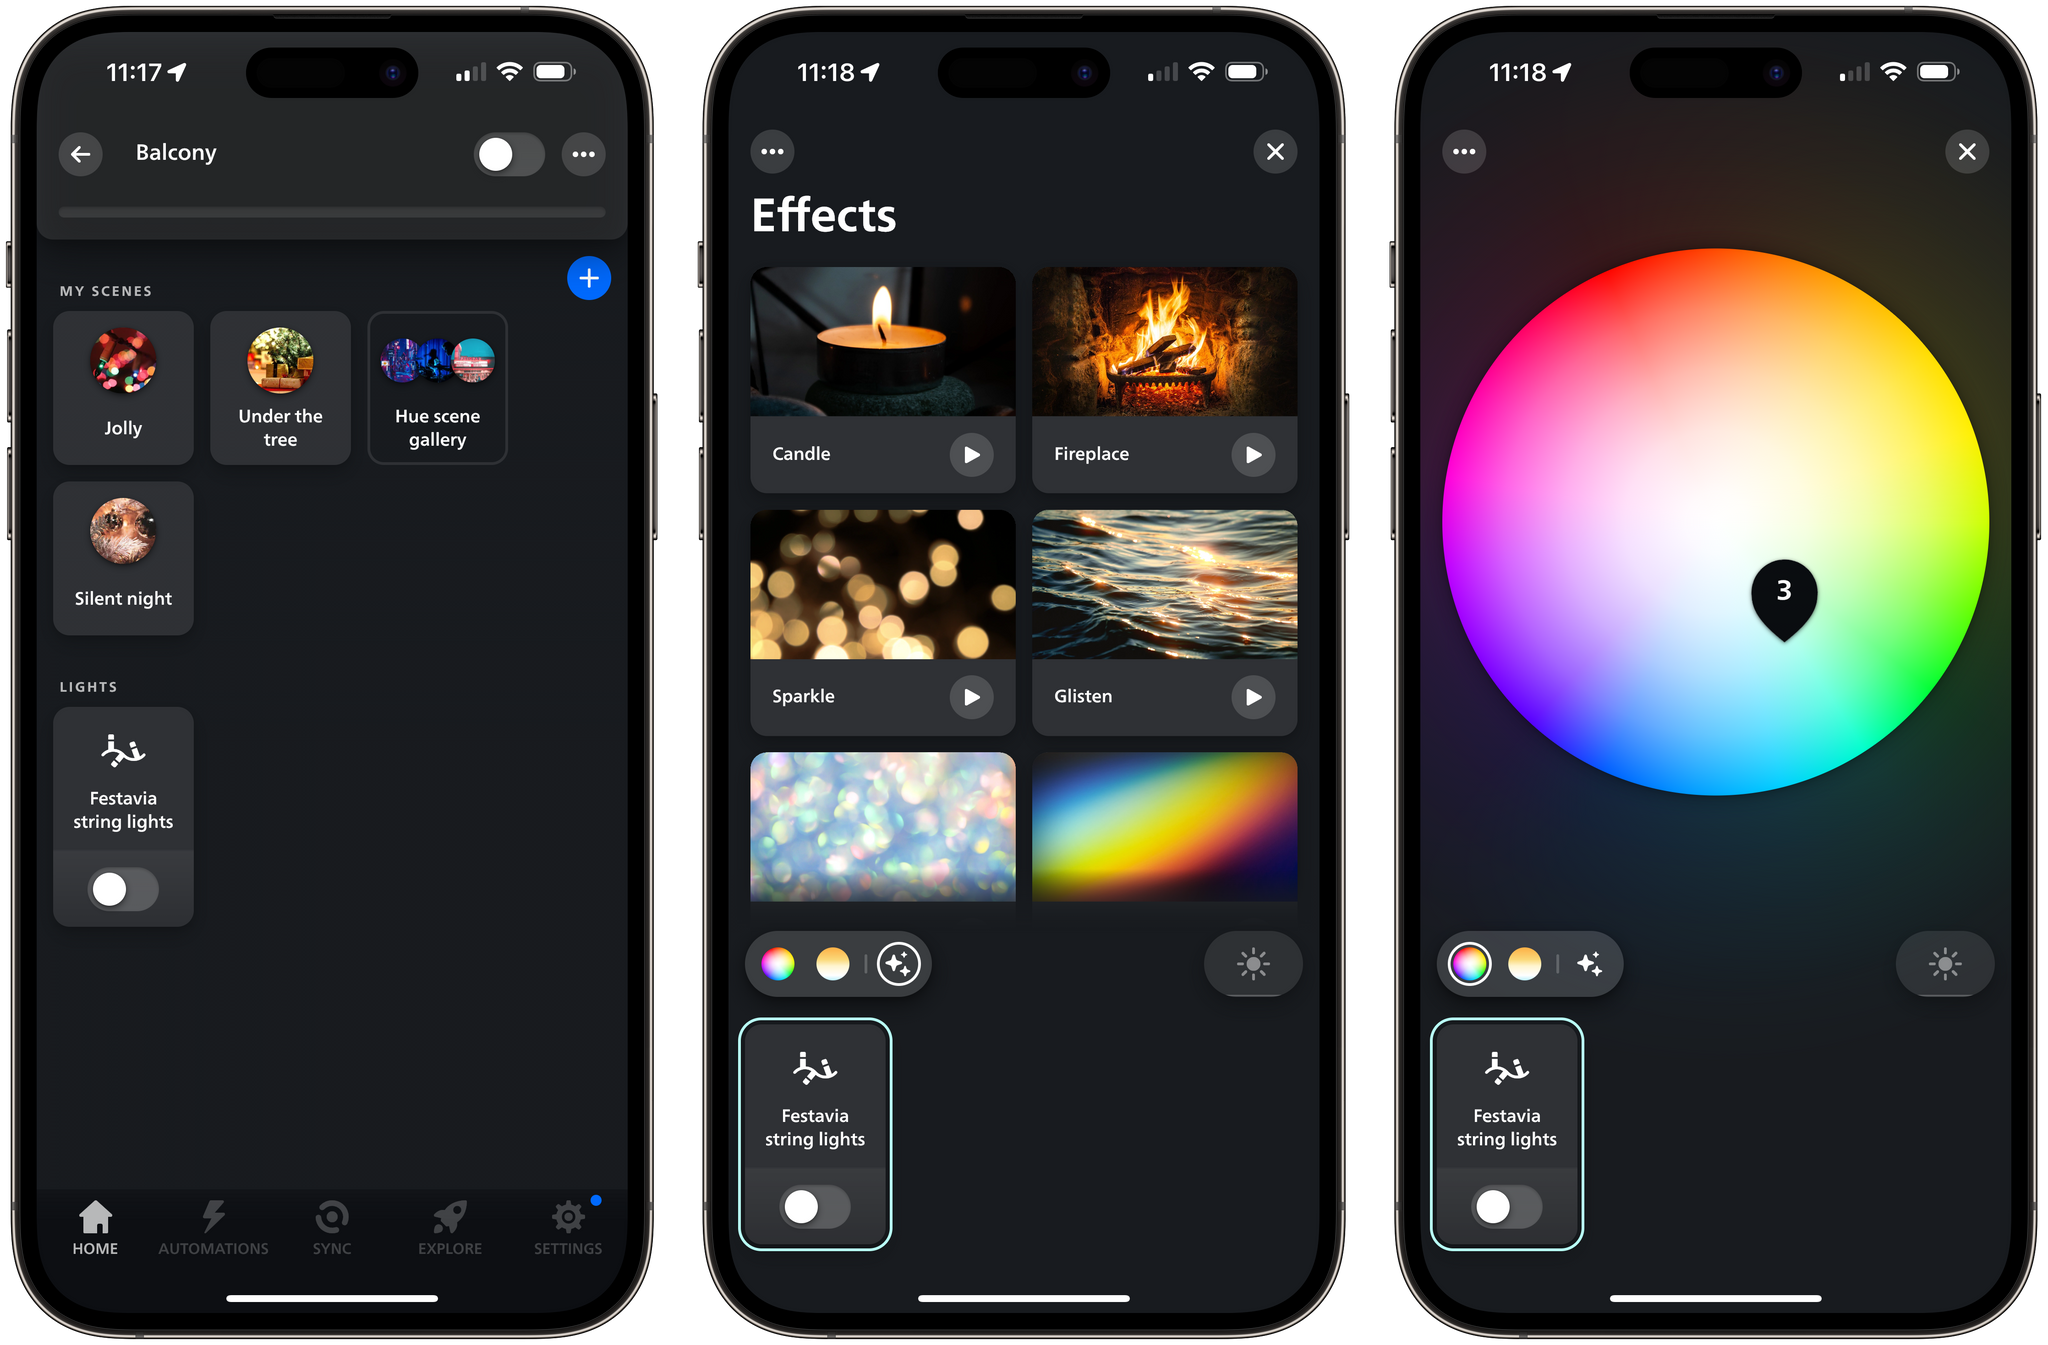
Like other Hue lighting, the Festavia lights require a Hue Bridge and can be controlled from the Hue or Home apps. That allowed me to create a simple automation in the Home app to turn our lights on at sundown and then turn them off automatically a few hours later. The Home app is also how I operate the Festavia lights manually. However, when I want to add a little color or animation, I turn to the Hue app for scenes like Candle and Sparkle, which cause the lights to flicker and twinkle through the windows that look out on the porch. Then, when I’m sitting outside on a warm evening, I can pick something more dramatic and festive, taking advantage of the lights’ wide color palette.
I’ve had the Festavia lights outside for about six months through all sorts of weather, and they’ve held up well. They add a little fun to our balcony that plain bulbs controlled by a smart plug didn’t, but that’s a great option, too, especially if you aren’t interested in colored lights or animation, in which case I’d recommend pairing something like a Meross smart plug with a sturdy set of outdoor string lights.
Hue Smart White Lightbulbs
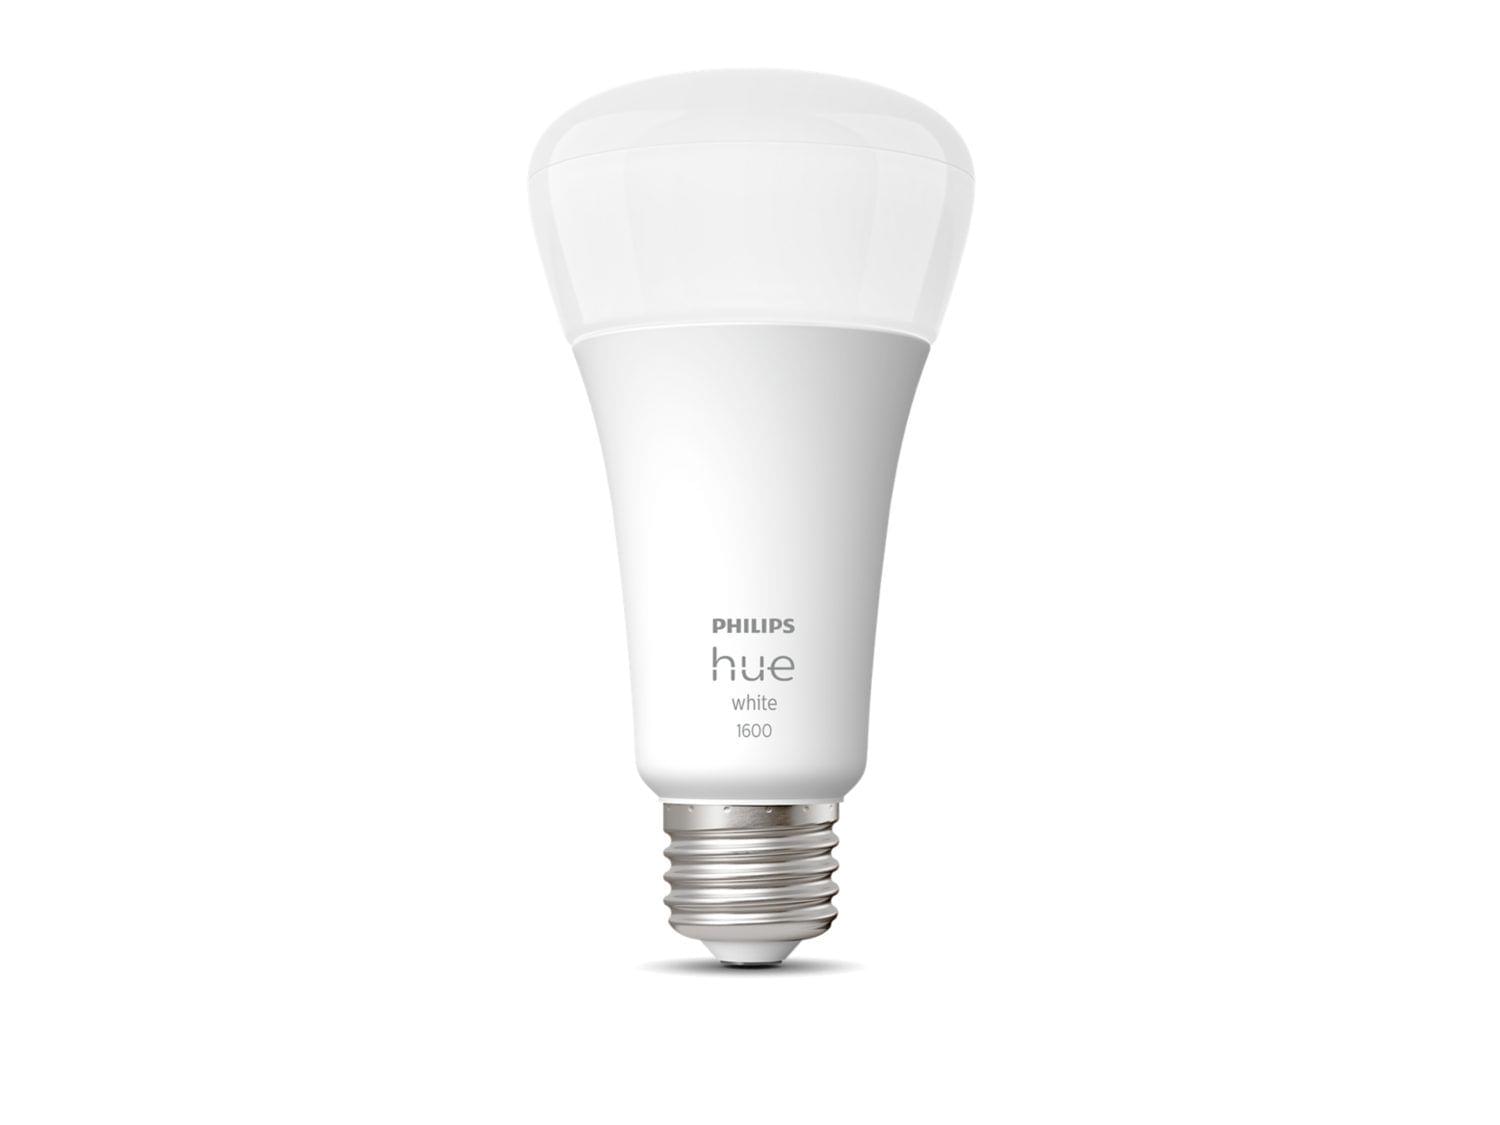
I have light fixtures outside my front door and next to my garage, which I’ve equipped with simple Hue Smart White lightbulbs. The bulbs are advertised for indoor use, but I’ve used them in sheltered outdoor light fixtures for years, and both still work. Since they’re outside, though, I went with the least expensive, non-dimmable bulbs that Hue makes. My Wi-Fi network is strong enough, and the bulbs are close enough to my other Hue devices, that connectivity between them and the Hue Bridge has been solid, too. It’s a small thing, but not having to remember to turn on our outdoor lights at dusk or turn them off in the morning is a nice convenience.
Jonathan
Eve Aqua
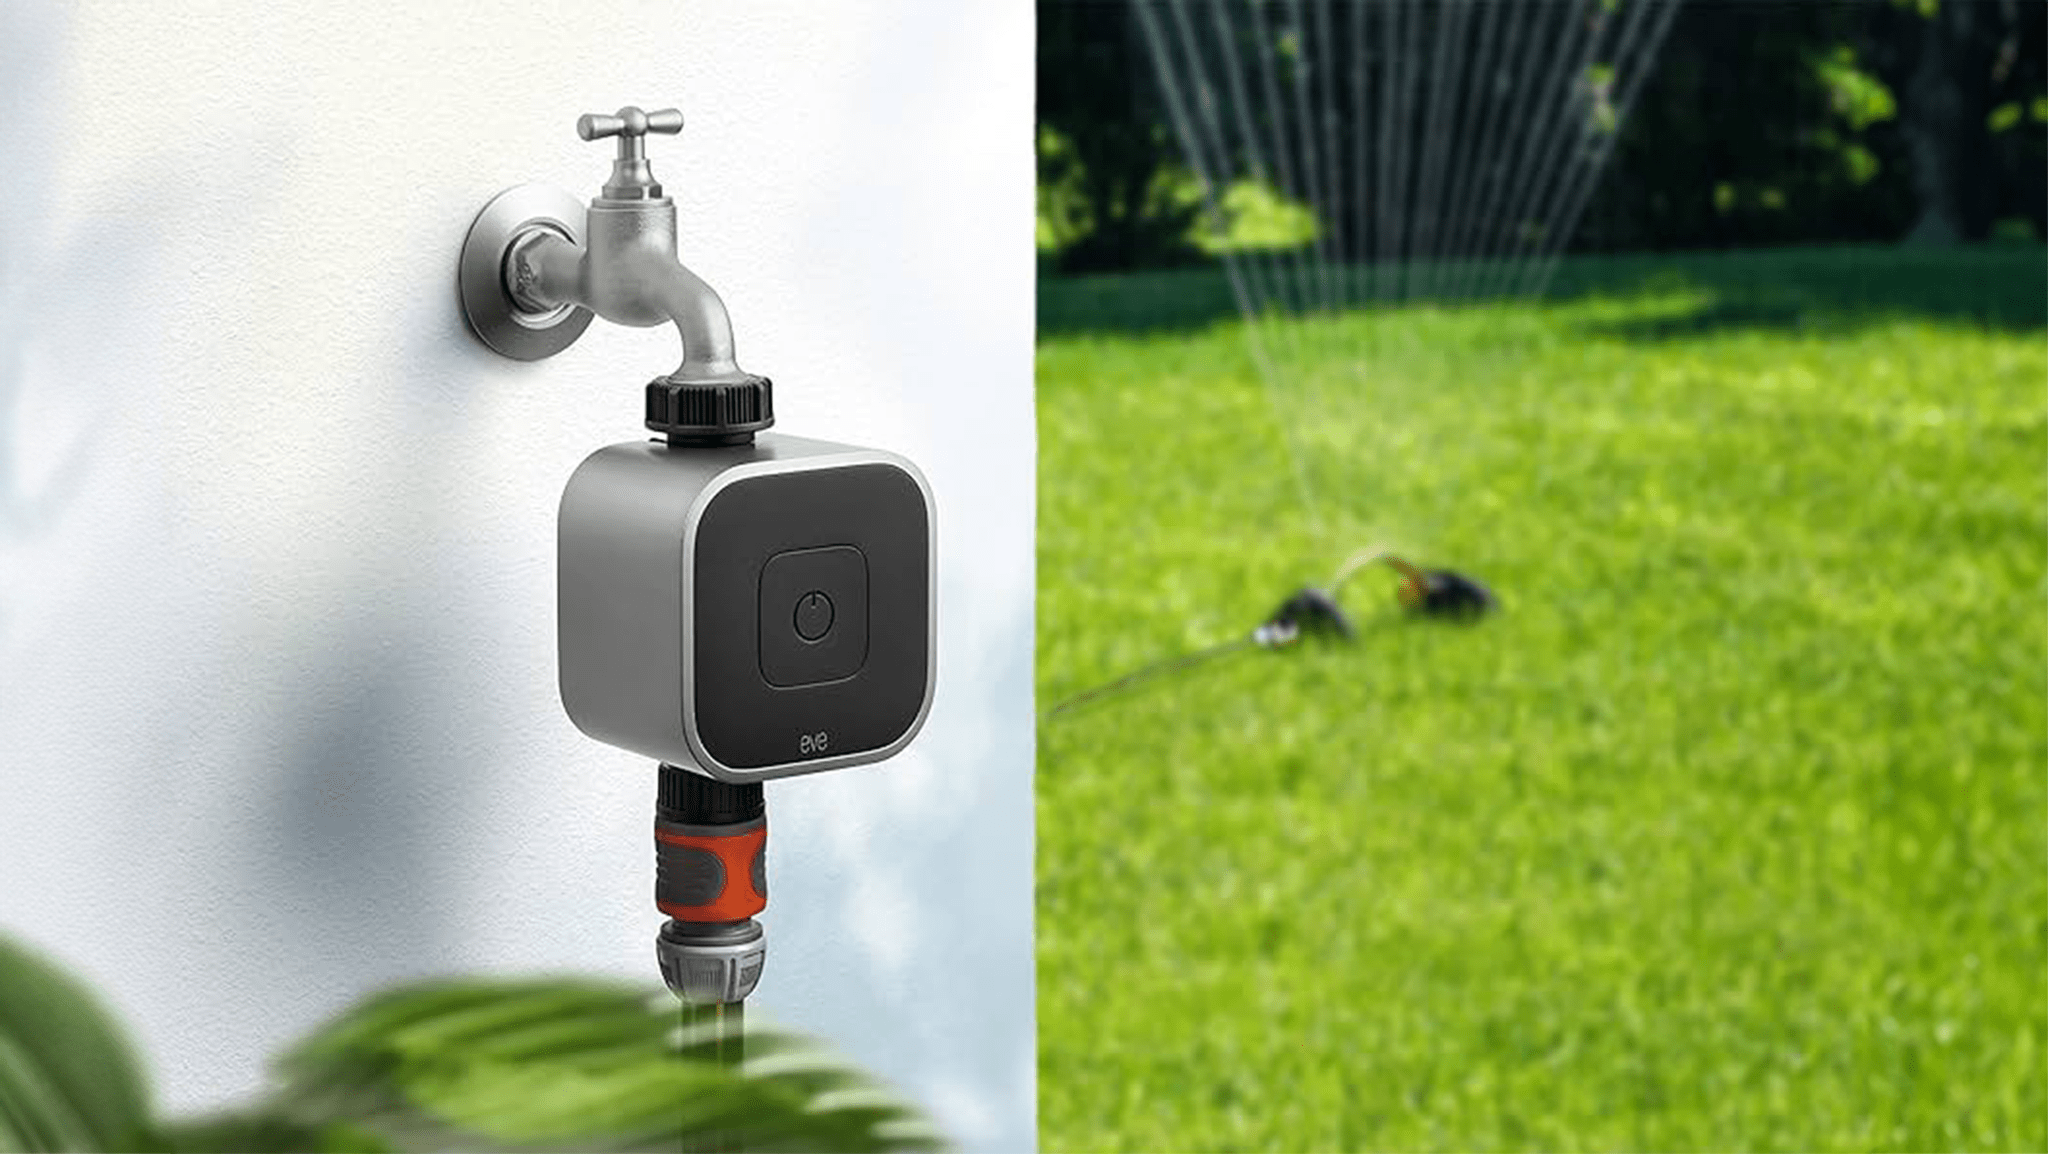
The recent uptake in Thread support has enabled excellent reliability and response times for many devices. Eve has been at the forefront of implementing this new technology, and one of their devices in particular is a perfect example of the benefits of Thread. The Eve Aqua is a simple (and chunky) add-on to your outdoor tap that enables you to turn the water supply to a hose or other garden attachment on or off from your Home app.
It has been very handy to control my garden hose without having to go all the way to the tap, but the thing I’ve noticed most about the Eve Aqua is its incredible speed in carrying out a request from the Home app. It connects directly to a HomePod mini, which also supports Thread, and I imagine this direct connection is the reason for the speed. Even so, the split-second responses are always impressive. I love the Eve Aqua for what it does, and it’s a great example of the benefits of a Thread-supported home accessory.
Netatmo Smart Video Doorbell and Smart Outdoor Camera with Siren
Video doorbells are the perfect example of smart technology making your home better by adding a new feature to it. The ability to see who’s at the door when you’re away or in the garden is a much better experience than missing deliveries or racing through the house to answer the door before the caller leaves.
While there are many video doorbells on the market, very few work with HomeKit, and even fewer support HomeKit Secure Video. It would be pretty easy to get a Ring doorbell and set it up outside our front door, but previous scandals surrounding some models led me to ensure that the doorbell I got was both secure and private, in addition to working well with HomeKit.
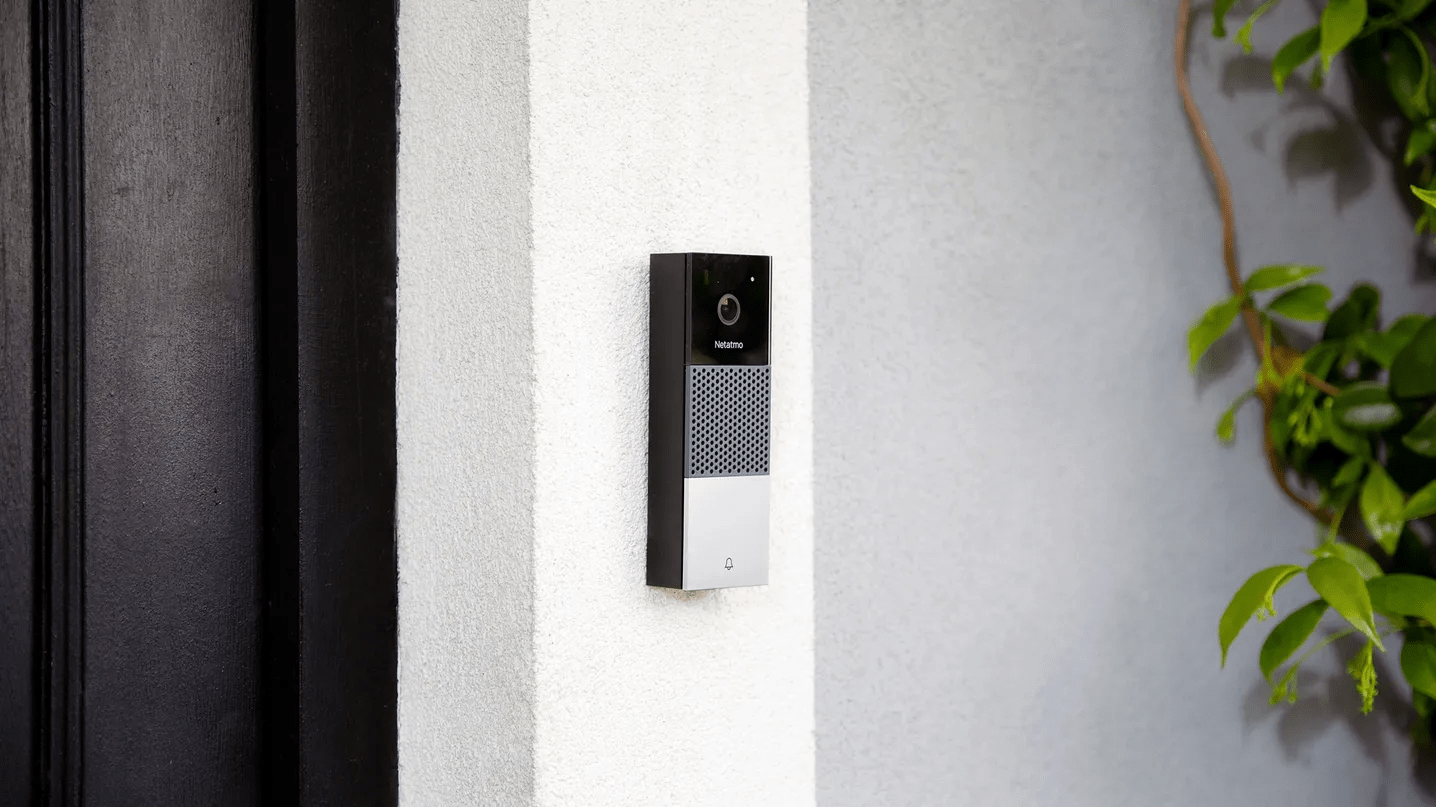
There are mixed results for picture quality across the video doorbells available, so after some research, I settled on the Netatmo Smart Video Doorbell, which has excellent night vision. I got it over two years ago, so there are solid alternatives that have come out since then, but the Netatmo Smart Video Doorbell has stayed strong and is still reliable.
One thing it doesn’t have is HomeKit Secure Video Support, which, while disappointing, isn’t a deal breaker. This is because all recordings are stored locally (and securely) on a memory card within the doorbell – no cloud service required. In fact, the ease of scrolling through past events in Netatmo’s app with its nice, big previews is superior to Apple’s Home app, which can often be very fiddly. Despite the lack of HomeKit Secure Video, this video doorbell has all the usual features like people detection and alert zones, where you can tell the camera to ignore certain parts of the area it’s pointed at.
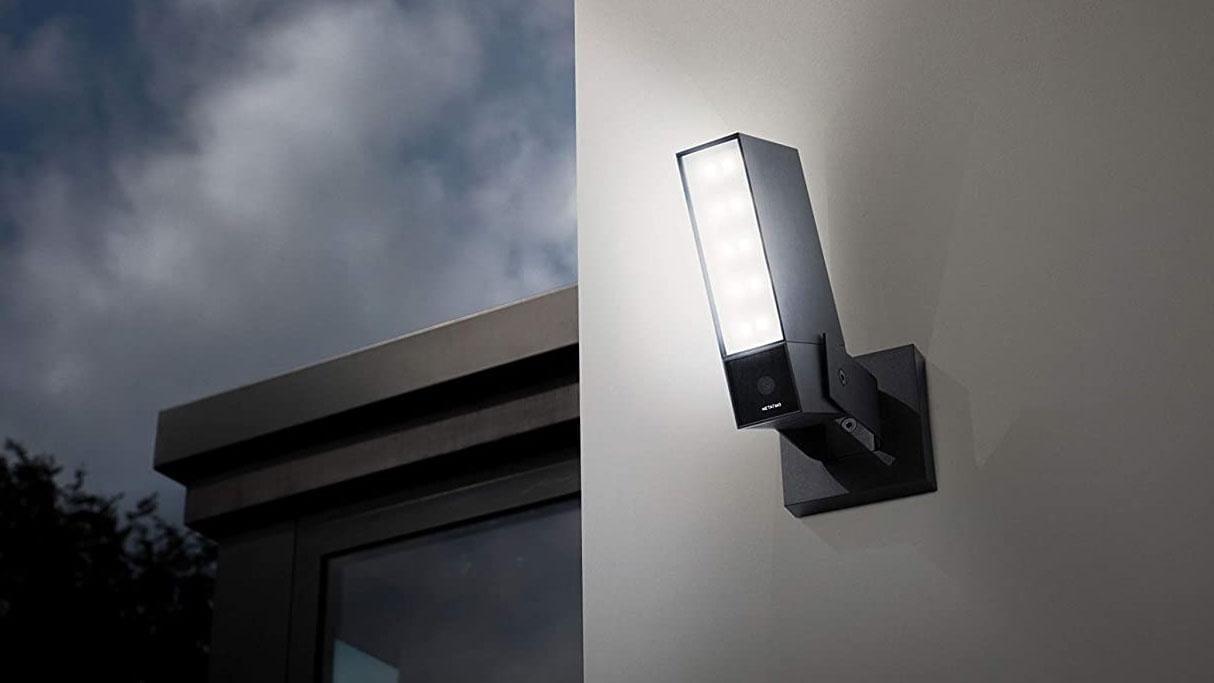
My experience with their video doorbell led me to purchase another product from Netatmo: the Smart Outdoor Camera with Siren. This chunky boy has a really powerful outdoor light on board, a 1080p camera, and a loud siren (which I’ve never had to use, thankfully).
I hardwired the camera into my home mains through the outer wall, and from there, the setup is simple: it points at an area outside (in my case, our back yard) and alerts you when it detects a person, while also turning the light on. From there, you can trigger the alarm to scare off the intruder (or play a prank on your family member) from within the app. You can customize the triggers for animals and vehicles, too, though I have those turned off as our yard can sometimes be the scene of the neighborhood cat tailgate. As with their video doorbell, this camera is easily accessible within HomeKit.
One fun additional feature is the ability to turn all the video that the camera captures during a certain amount of time into a timelapse video. I’m not sure of the practical use for this, but it sure was fun watching us zip around cleaning the backyard in a 20-second highlight real.
Niléane
Eve Weather
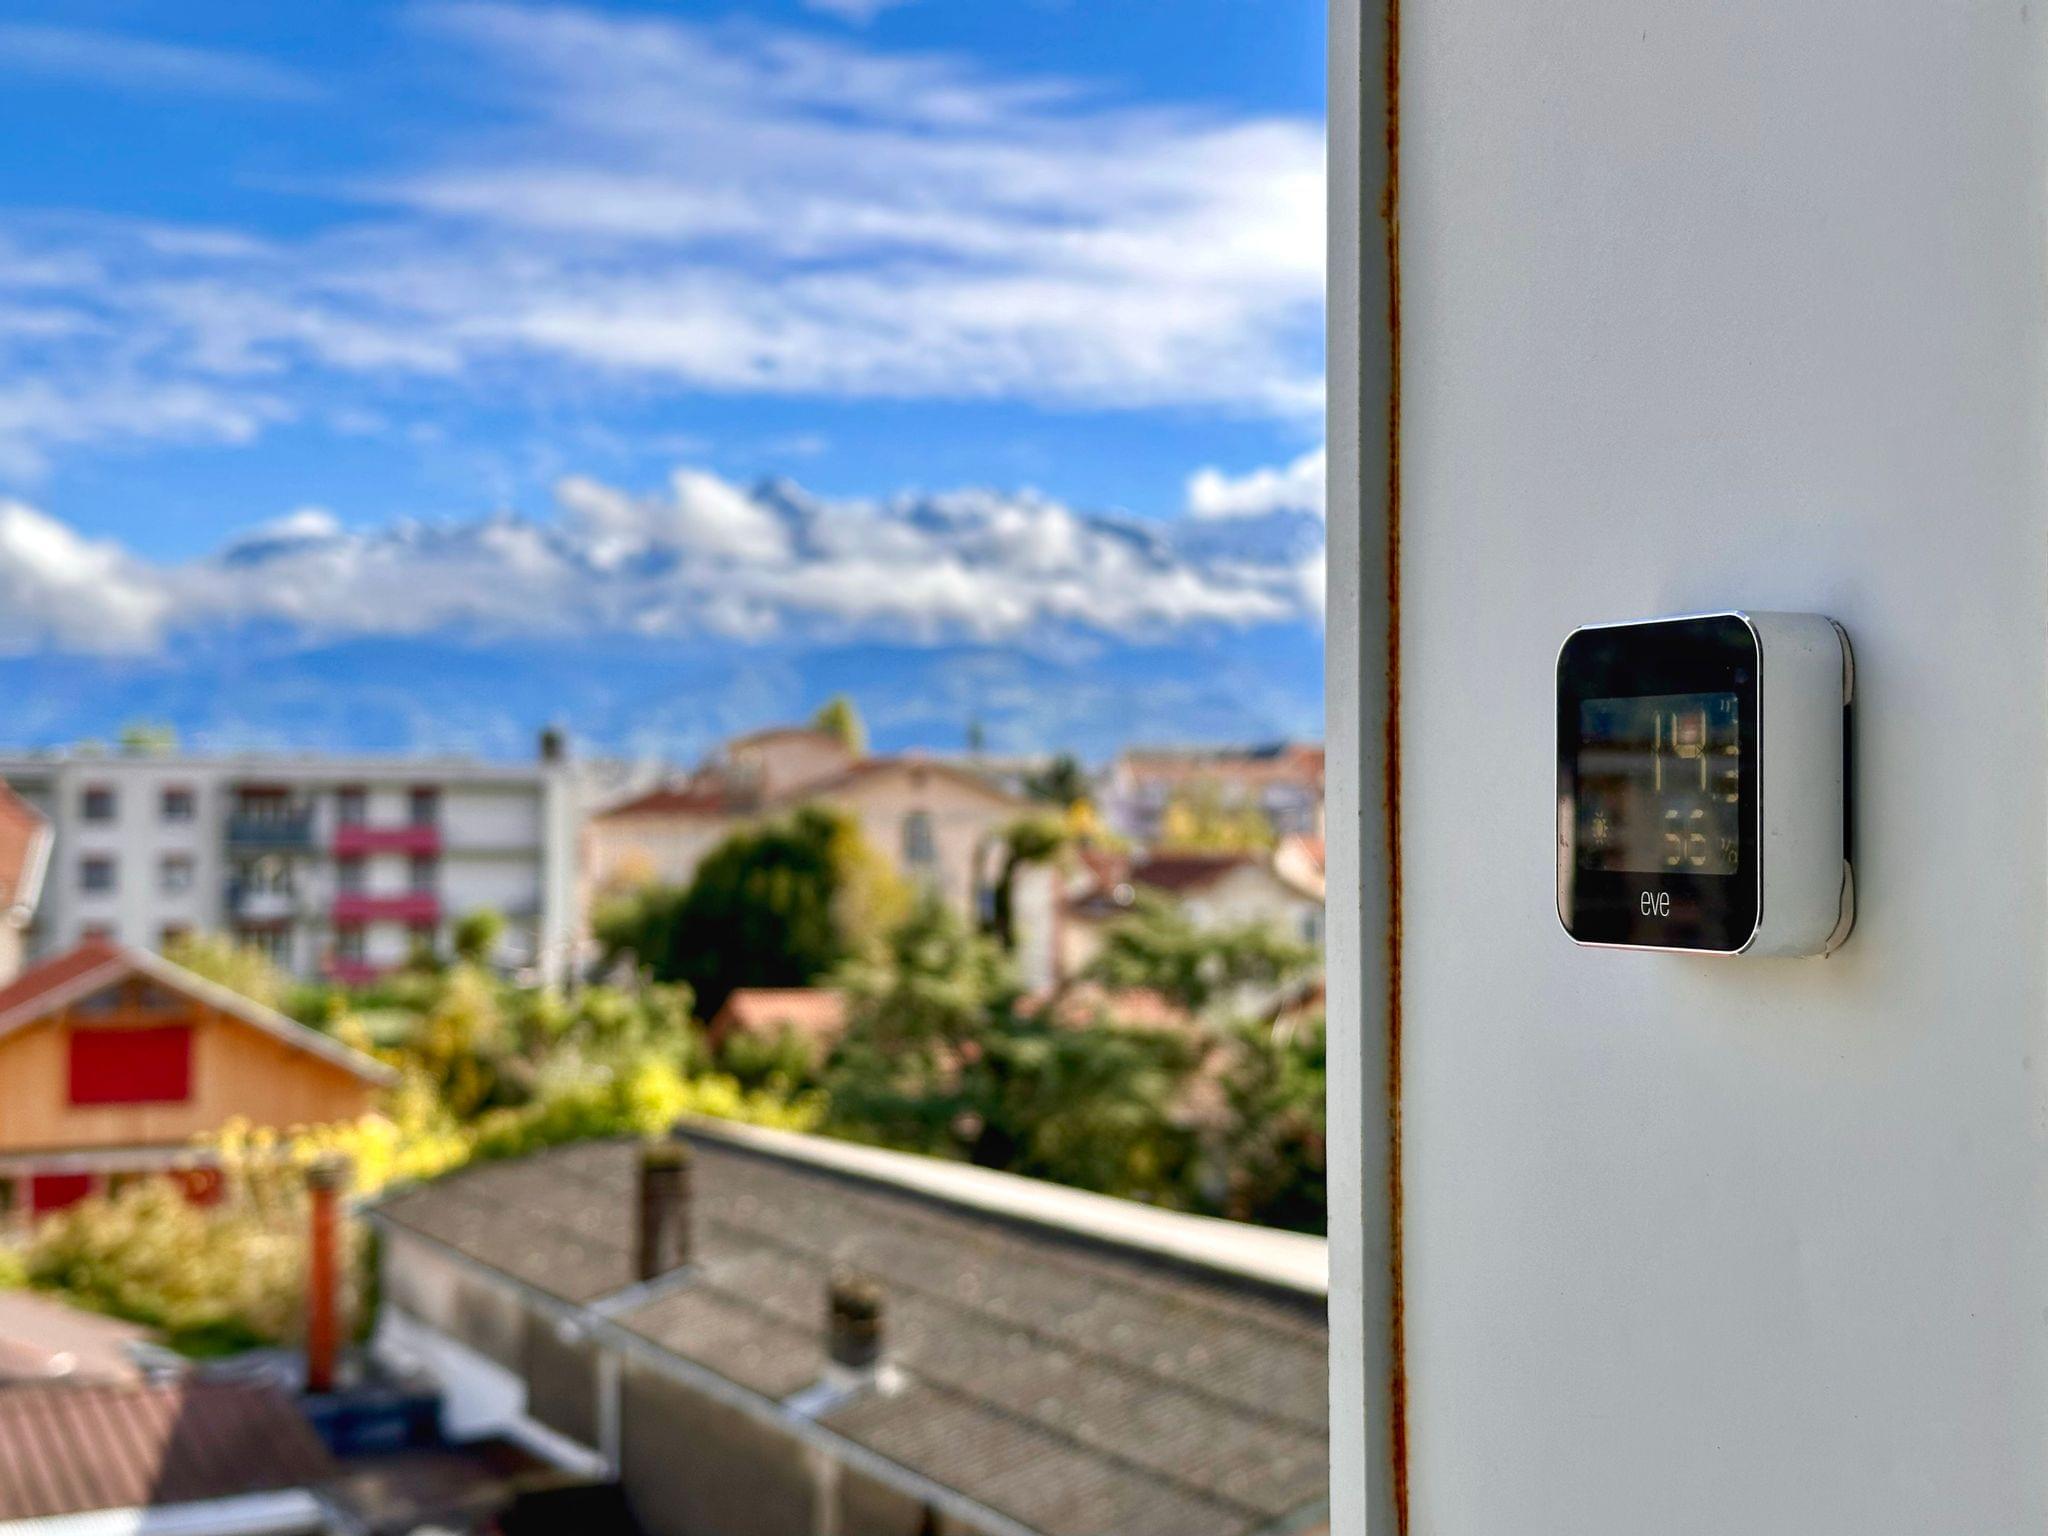
Last summer, after a succession of severe heat waves, l realized how inaccurate Apple Weather and other online weather sources could sometimes be. They were particularly unhelpful when I wanted to check in the evening if the temperature had finally dropped enough so we could open the windows and let in some fresh air for the night. So I started looking for an outdoor weather station that could give me an accurate, real-time temperature reading at home at all times. I had two criteria for it: since we live in a small apartment, it had to be small and compact, and it had to be easy to set up with HomeKit.
Having already owned and used several HomeKit gadgets from Eve, I immediately went with the Eve Weather, and I was incredibly satisfied with how easy it was to set up and how reliable it’s been since. After scanning the QR code from Apple’s Home app, I only had to stick it on the wall right outside our bedroom window, and it’s been sitting there doing its thing for close to nine months now. The device’s metal build was able to withstand several heat waves, rain showers, snow, and even hail, and so far it’s still working perfectly.
While I wish the Eve Weather’s display was as readable as its e-ink indoor counterpart, the Eve Room, the temperature is still easily visible in daylight. On the display, you can also see the current air humidity reading, as well as an atmospheric pressure trend in the form of a pictogram.
Since the Eve Weather is compatible with HomeKit, its temperature and humidity readings are surfaced in the Home app, where you can use them as automation triggers for other devices in your home. This means that, in theory, you can ask Siri to tell you the current temperature. However, in practice, if you simply ask it something like, “What is the current outdoor temperature?” Siri will often just reply with data from Apple Weather instead of the Eve Weather. To work around this, I found that placing the Eve Weather in its own room in the Home app and naming that room ‘Outdoor’ makes it so Siri will consistently respond with the Eve Weather’s temperature reading when you ask it using that term. Although, since we’re talking about Siri’s notorious quirkiness here, I should say that your mileage may vary with this trick.
Siri workarounds aside, HomeKit support also means that you can fetch the current temperature and humidity using the ‘Get the state of my Home’ shortcut action. I’ve actually been leveraging this action with a shortcut on my Mac to display the data coming directly from the Eve Weather in the menu bar.
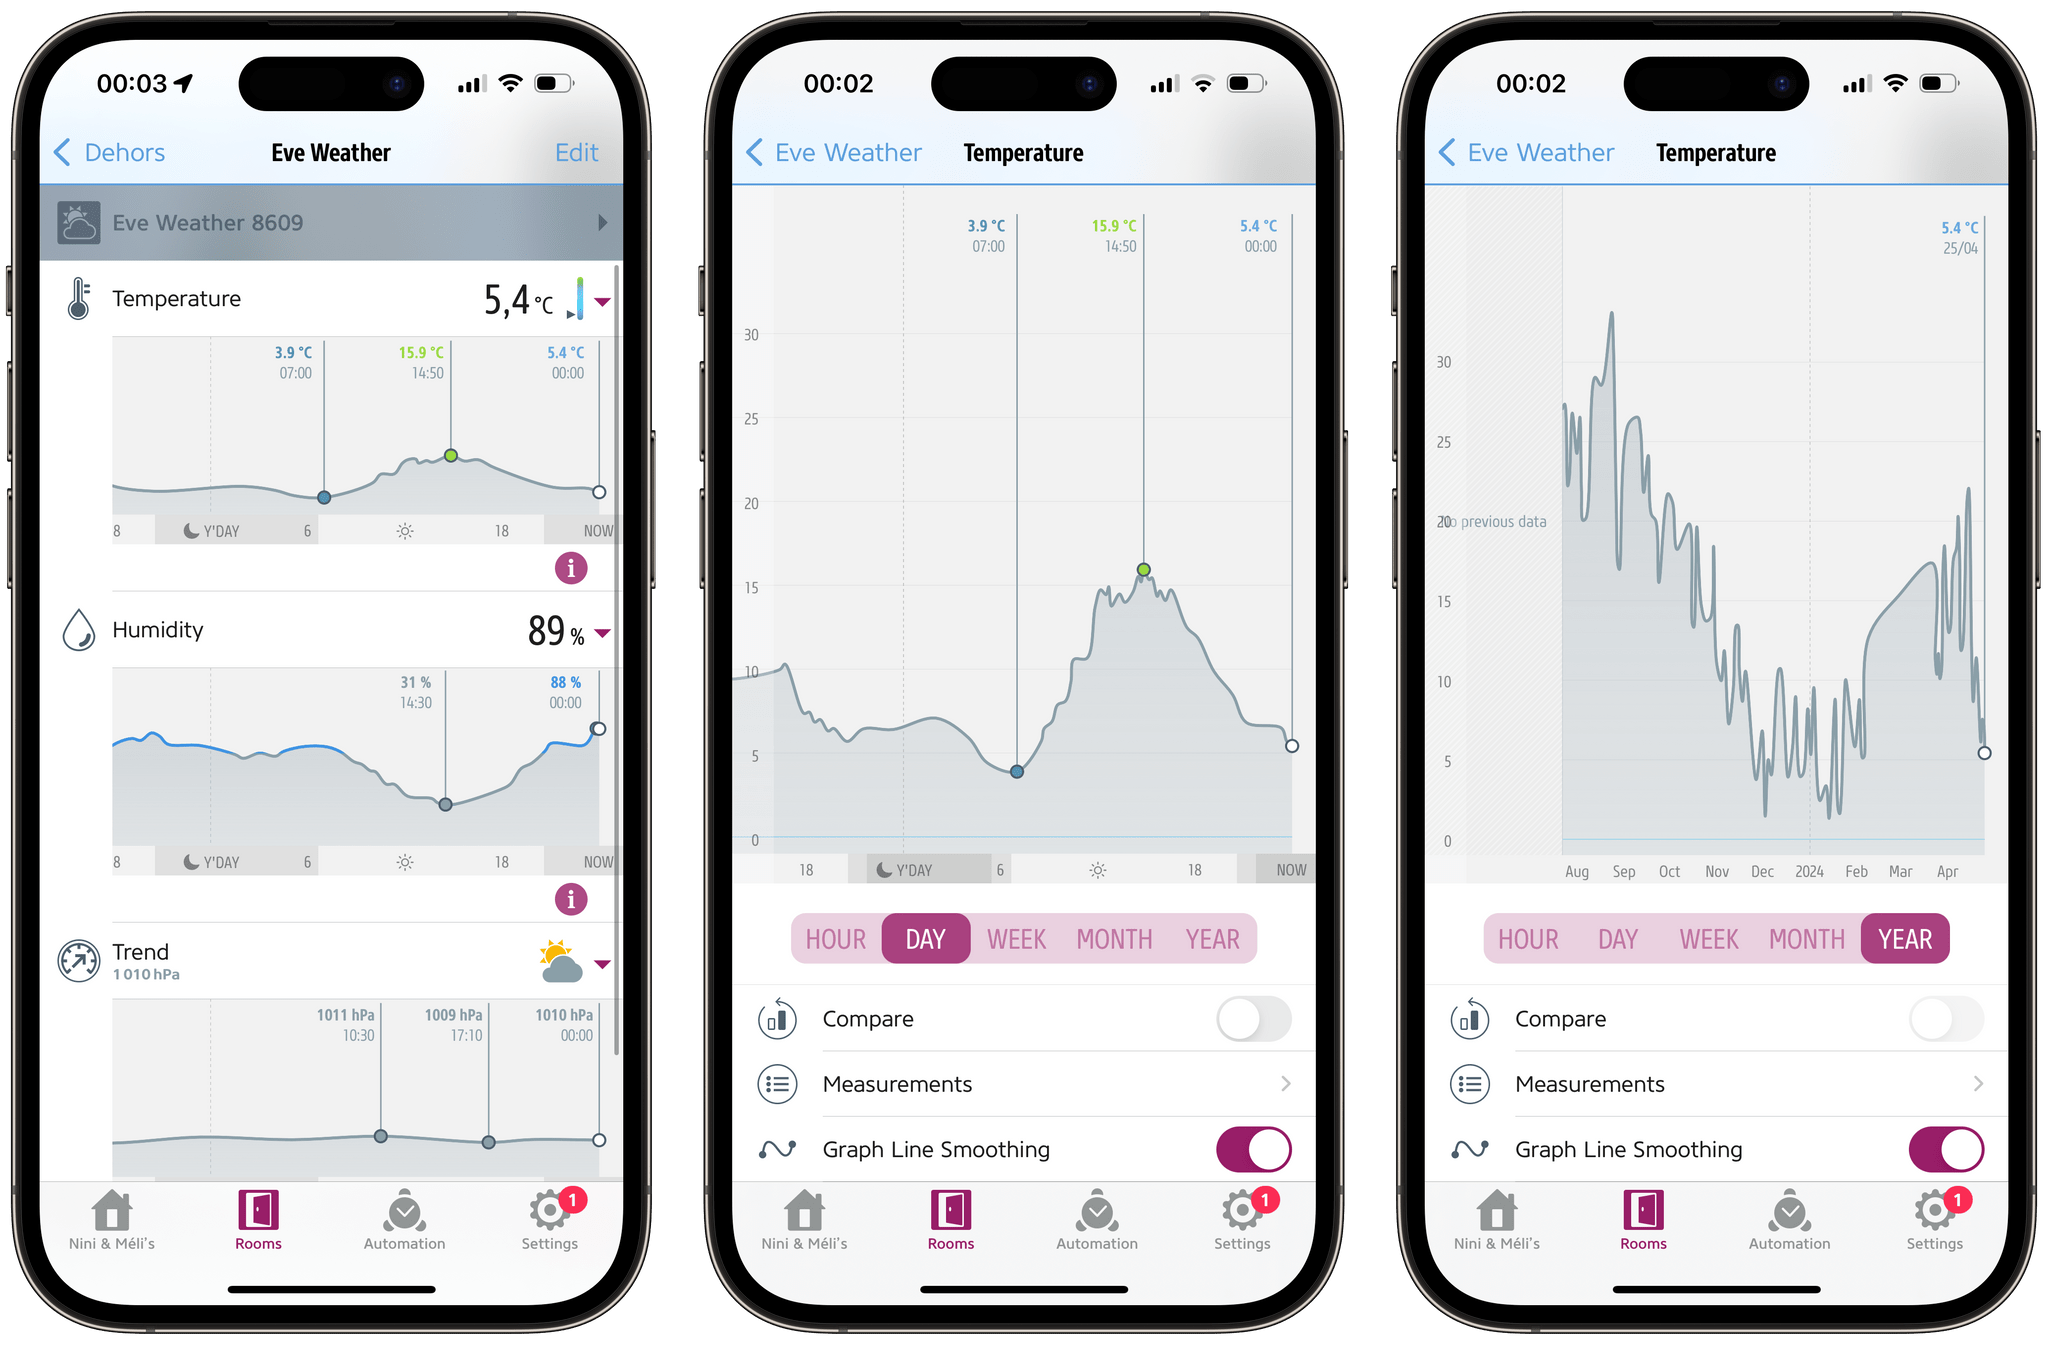
If you don’t want to deal with Shortcuts, Siri, or the Home app, you can also access the Eve Weather’s data from the Eve app, which features a full data history for each of the station’s sensors. The temperature, humidity, and atmospheric pressure can each be viewed on a graph spanning hours, days, weeks, months, or a full year. The app is also where you can export the data in a CSV file if you want to go wild and create your own visualizations in your software of choice.
I absolutely love spending time in Eve app’s views, especially now that we’ve accumulated months of data. It is oddly fascinating to be able to generate a hyperlocal climate overview of where you live like this. If you’ve been looking for a simple, compact, HomeKit weather station, and if you can spare a small spot in the shade on your balcony or outside a window, I definitely recommend giving the Eve Weather a go.