The Four Stages of Drag and Drop
Drag and drop is comprised of four phases that we can summarize as:
- Lift
- Drag
- Drop
- Data transfer
Each stage provides the necessary information and conditions for the subsequent step; together, these elements collaborate in a seamless workflow that goes where the clipboard and share sheet never could.
Lift
One key aspect makes iOS 11’s drag and drop secure and private by design: a drag is not an immediate transfer of content; a drag is a promise.
When you hold down on content, iOS 11 creates what is called a “drag item”. No data is transferred or even prepared for transfer and thus exposed to the destination app at this point. A drag item makes a promise of something that will be delivered at the end by describing its general attributes – namely, what type of items the user is dragging. Even though it might look like you’re dragging an item across apps, you’re actually dragging a representation of it that tells the destination which items it’ll receive if the drag is accepted.
At the beginning of the process, drag and drop is a contract between two apps; only at the very end does it result in a transfer of data from the source to the destination. It’s kind of like calling your partner after you went grocery shopping to tell them what you’re bringing home. A drag by itself is a promise of something that will be delivered eventually.
Before the abstraction of the item is created by the source app, you have to long-press content and see if it can be lifted. The gesture is simple enough: if an item lifts up (usually gaining a drop shadow and growing slightly bigger), then you can start moving your finger away to begin the drag. This phase can be canceled: if you let go of the long press, or if you keep holding the item long enough without dragging it away, the session will end. The lift will be canceled, and the selected item will recede to where it came from.
Hold until the lift is canceled.Replay
This behavior is consistent among all apps that support drag and drop, but, sometimes, an intermediate step lets you access actions that used to be tied to the long-press gesture before iOS 11. For example, if you’re holding a link in Safari, you can let go after the item has lifted (or keep holding for longer) and the old contextual menu with share options will appear before the lift is dismissed.

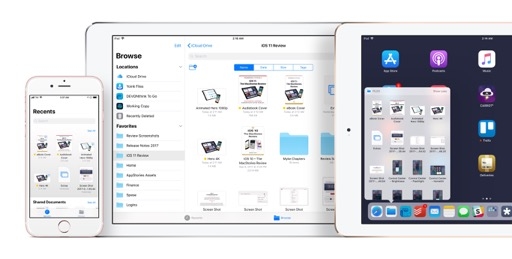
Similarly, in Files, the action menu pops up during the lift stage to give you options that wouldn’t otherwise be available if you begin a drag.

This mid-step is a compromise to maintain compatibility with the old gesture, and it’s an effective one: the same long press has been split into two parts so that developers don’t have to add extra contextual buttons. On iOS 11, if you can’t find the action menu you’re looking for, lift an item and wait a few seconds to see what happens.
Drag
When you start moving the finger holding a lifted item, the source app gives iOS 11 a set of instructions to generate its representation. In crude terms, a drag item is a preview image and a payload of promises dispatched by the source app. This is where it gets fun.
Developers retain full control over the data promised in the drag item as well as its visual presentation. They can choose the badges, lifting animation, and preview styles used for the drag item. The preview can be updated in-flight as soon as the user starts dragging, or it can retain the original appearance of the item from the lift stage. Developers can even restrict drag access to just the source app, apps by the same team, or disable drag and drop altogether if they don’t want any item to be dragged away from their app. It’s entirely up to them.
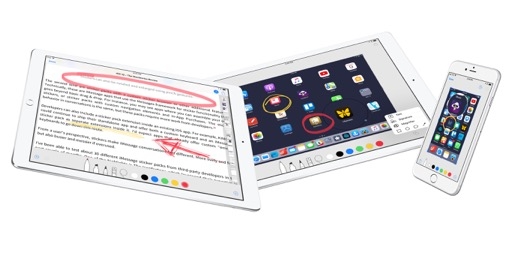
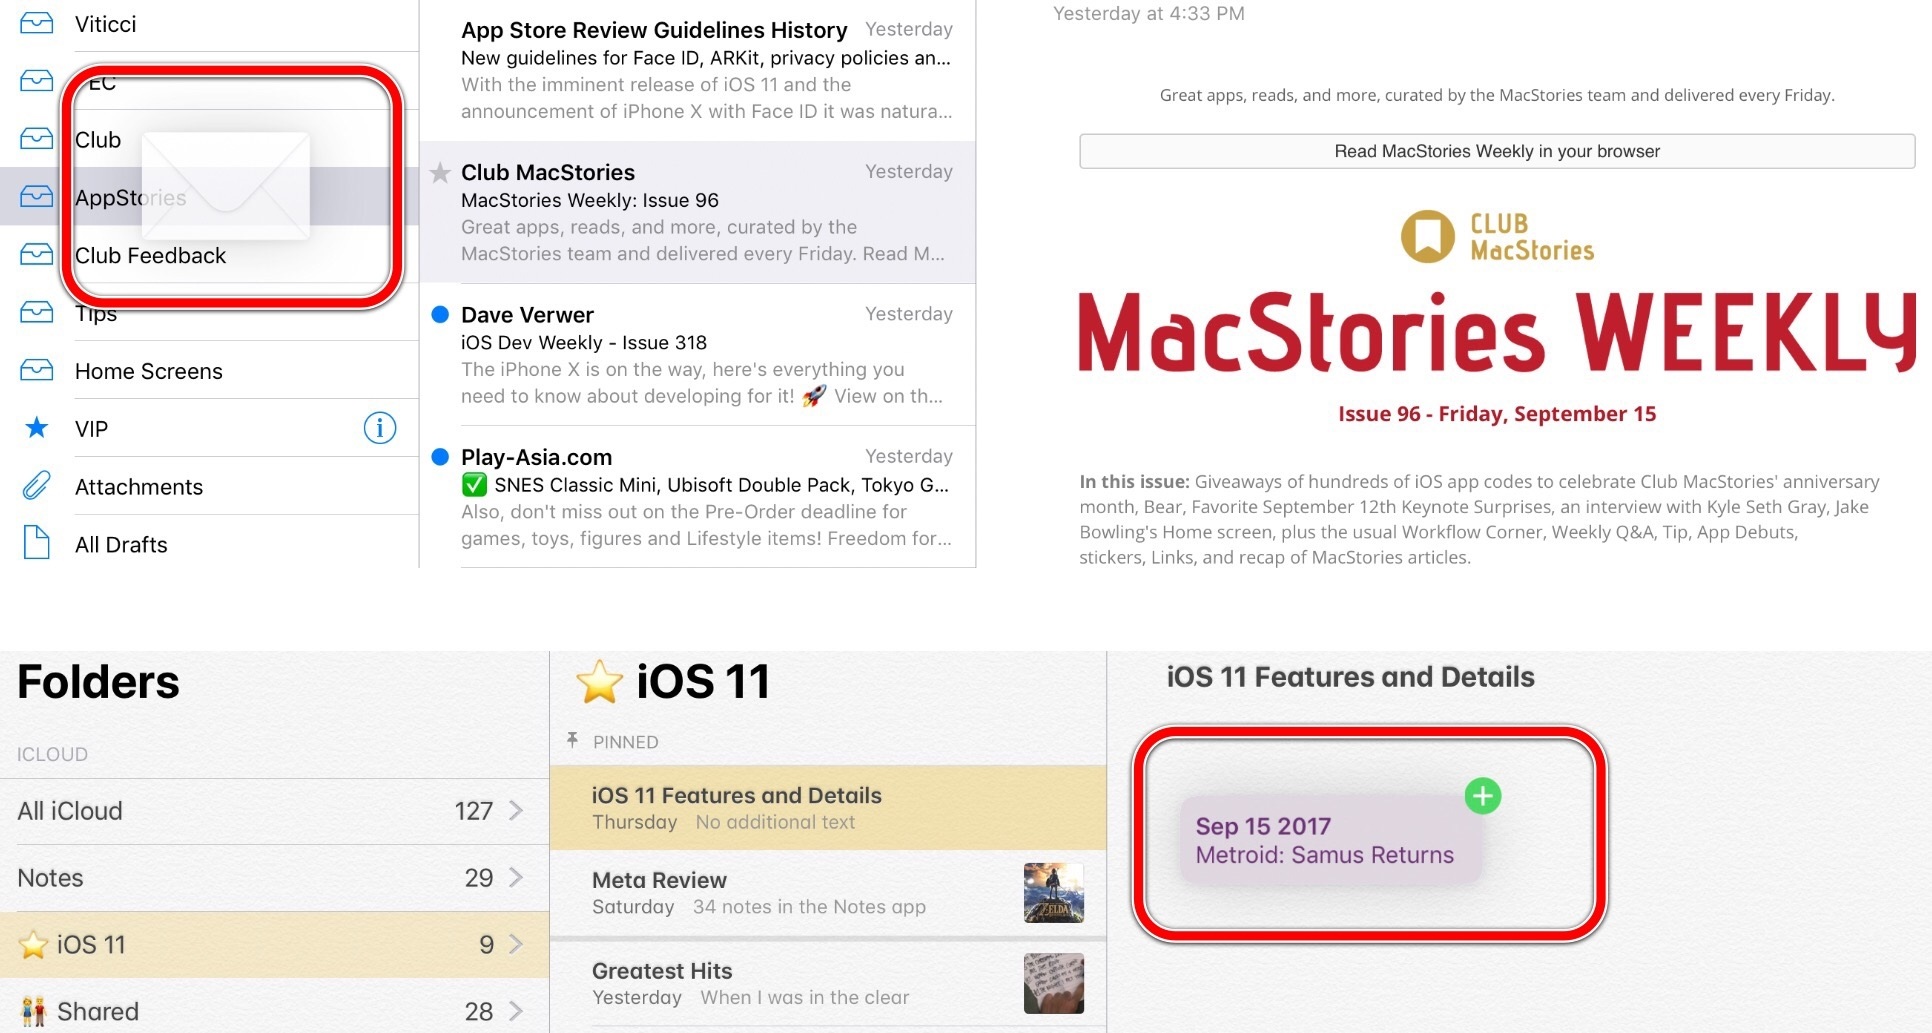
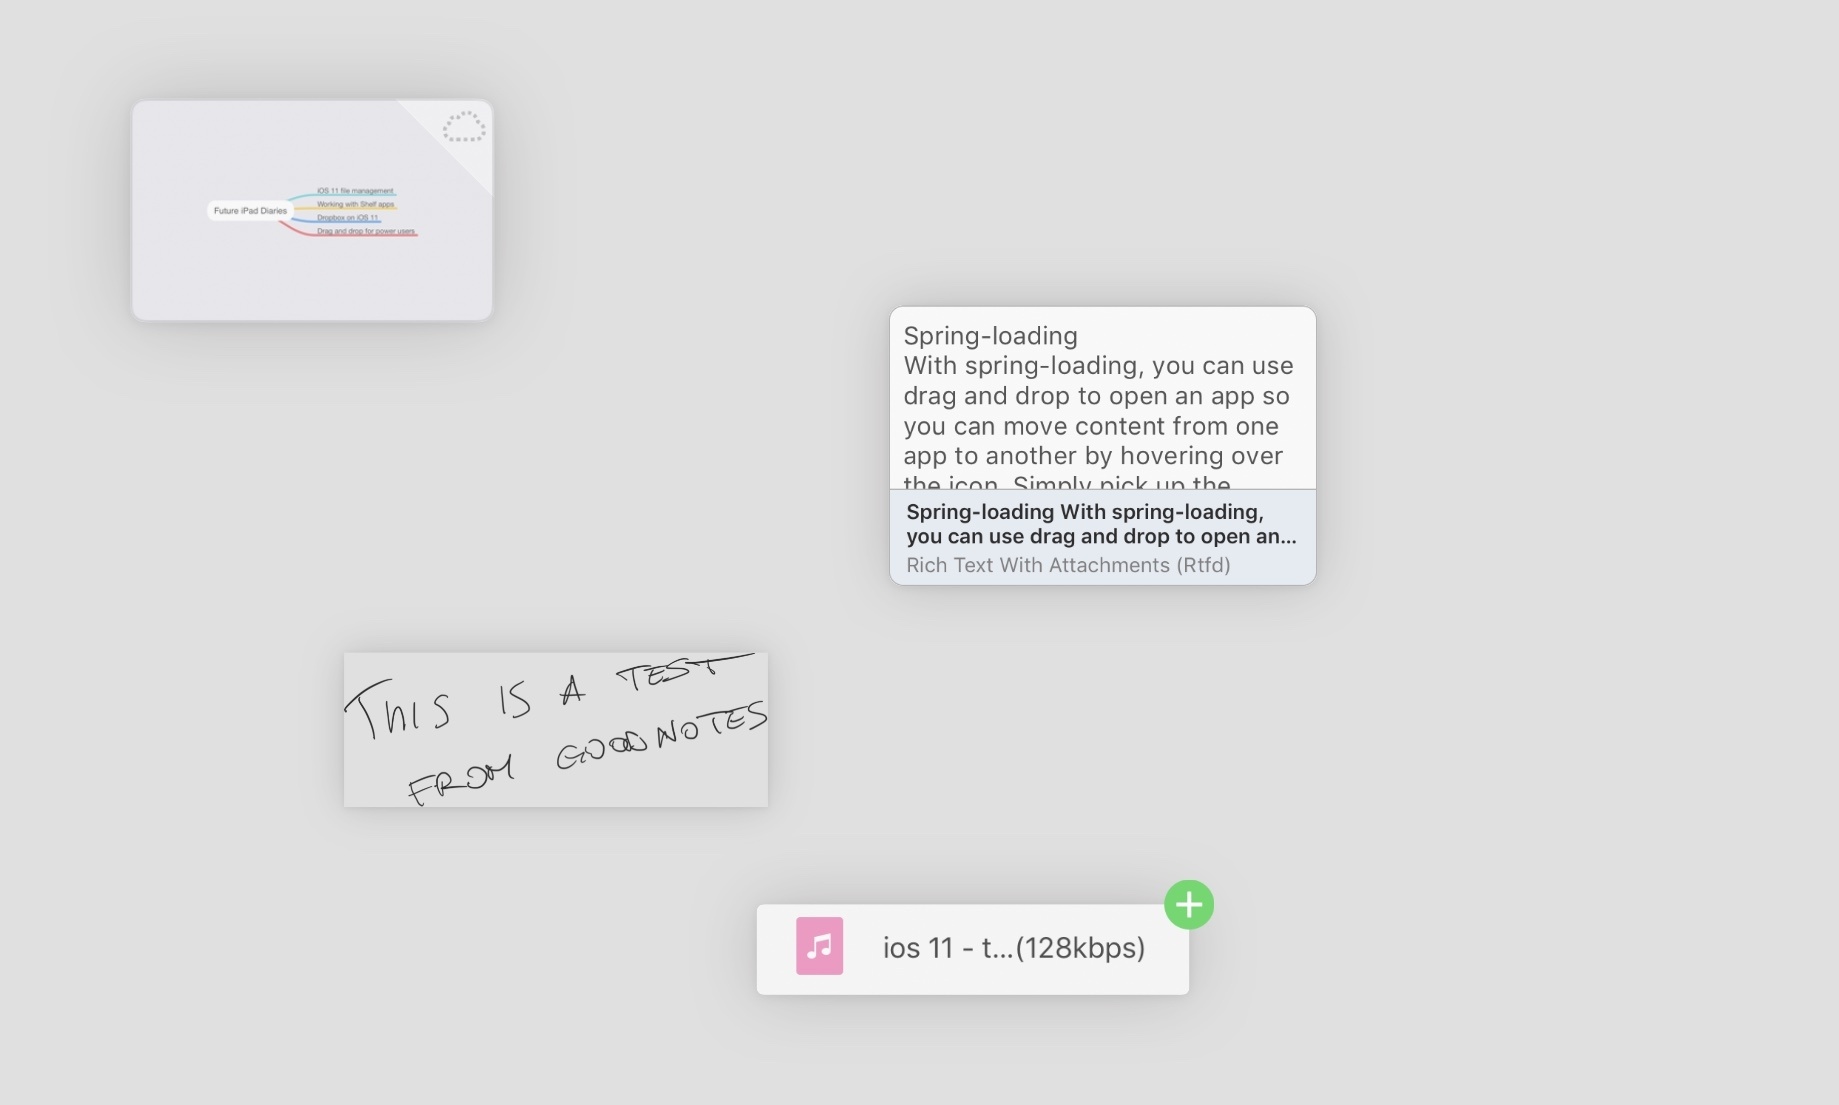
There are some terrific examples of drag item previews in Apple’s built-in apps and frameworks. Selected text is transformed into a floating snippet that keeps rich formatting displayed inline. Images and videos become draggable thumbnails. Mail messages are lifted and dragged directly from the inbox, but once you hover over mailboxes, they transform into tiny envelopes.
Maps and Calendar feature my favorite implementations of drag item previews. In the Maps app, a place lifted from the sidebar remains a cell until you start dragging; then, it turns into a MapKit-powered tile with a preview image of the location on a map, plus its name and address. Similarly, calendar events maintain their standard appearance as long as you’re in the Calendar app; drag them over another app, and they’re updated mid-flight as tiny rectangles with the title and time of the event.
Custom drag item previews offer useful context when dragging, and I’m curious to see how third-party developers will adopt them.
A distinguishing trait of the drag behavior in iOS 11 is that it doesn’t block interaction with the user interface. Instead, it leverages multitouch to enable full navigation across the system while a drag is in progress. As you’re holding and dragging an item with one finger, you can scroll, tap around apps, click the Home button, even use multitouch gestures to navigate apps and the system. You can do anything.
Apple wanted to build a touch-native version of drag and drop that could use multitouch to its full extent. They perfectly accomplished their goal with a framework that runs alongside the iOS interaction layer without blocking it.61 It’s a remarkable blend of two core iOS features.
At first, I thought the ability to drag and interact with the UI was impressive on paper, but nothing more than a cute demo. In everyday usage, I’ve come to realize that I wouldn’t want drag and drop to behave any other way.
I’ve grown used to new kinds of workflows such as dragging text from Notes with my right index finger, revealing the dock with a swipe of the thumb to tap an icon, then opening the composer in Mail to drop text in a new message. It may sound convoluted, but after a few days it becomes second nature and it never stops feeling like magic. It’s a fun and efficient way to use all the touch input methods we were born with to augment interactions between apps. Everything is faster, more obvious, and more rewarding than copying to the clipboard or activating extensions.
This is surprisingly easy to do after a few days on iOS 11.Replay
There are countless scenarios where you can appreciate the effort that went into making drag and drop and UIKit close friends. You can select multiple links from Safari’s Reading List to create a stack, open Notes, select a note, and drop them in. No more appending with the Notes extension for every link. Need to send a long email with attachments in Mail? Write the message, hold the Files icon in the dock, grab a file from the Recents menu, then switch back and drop it. After three months of iOS 11, it takes longer to describe these interactions than to actually perform them. The fact that a drag session isn’t a one-way street towards a destination app is perhaps the best decision Apple has made for the sake of pro users and the iPad’s large screen. The entire implementation is, frankly, outstanding.
Occasionally, you may want to cancel an in-progress drag because you’ve changed your mind. This isn’t a problem if the drag item is still gliding across the source app: just lift your finger anywhere in the source view and the item will return to its original place. In some cases, such as text selection, you may have to reposition the item over the original lift point in the source app, otherwise it could be moved to a slightly different position. But what happens if you’re still dragging and you’re already in a different app?
Apple hasn’t built a safe cancel area shared throughout iOS, which can be an issue during the more breath-holding procedures when you’re moving a bunch of items with multiple fingers and don’t see a clear exit path to cancel the drag. Apple recommends developers implement ways to opt out with sheets that appear before the content is dropped and that offer a Cancel button62, but that isn’t a system-wide safety net.
In my experience, I’ve found that dragging items towards the status bar and the upper edge of the display always stops drag sessions without consequences. While I’d like to see an easier, visual way to cancel an in-progress drag from anywhere on iOS, the status bar trick works for now.
Drop
To understand the actions that occur in the drop phase, we have to go back to the moment just before the drop, while the user is still dragging and the touch point physically enters a potential destination. This step defines how drag and drop works between different iPad apps, and it’s entirely built on the idea of how a source app represents a drag item.
When you start dragging an item on iOS 11, the source app creates a representation that doesn’t hold the item’s actual contents. Rather, the representation is populated with registered type identifiers (UTIs) that provide an overview of the item’s contents. These are plain text strings that, in English, would sound something like this: “This item can deliver a PNG image or a JPEG version.” UTIs have been in use on Apple’s systems for years; they’re widely documented, and they can describe data and file formats in a way that is understood by humans and computers.
After you start dragging but before you drop, this is all the destination app can see: a list of types that broadly describe the drag item. They can’t read the contents of the actual item, or even access metadata like file name and creation date, until you let go of the item and commit the drop.
There are a few reasons to prefer Apple’s approach in this regard. First is performance. When you lift an item to begin a drag, the source app doesn’t have to dynamically create multiple versions of the content (such as different formats for the same image) and let the OS cache them as you drag, just in case the destination app might want one of them. By making a promise, the source app can simply provide an accurate summary of the content it’ll transfer later on.
Second is compatibility. Not every app works with the same file formats or content types. Notes supports rich text (as RTFD), but Ulysses deals with plain text; Photos stores HEIF images in iOS 11, but Tweetbot requires JPEGs or PNGs to share a photo. The same piece of data can always be interpreted in different ways because computers deal with formats and encodings rather than concepts like “some text” or “a photo” as we do.
Therefore, inter-app communication based on drag and drop needs a system that can speak multiple languages and find common ground between two apps. This is why a source app can promise multiple representations of a drag item: to maximize compatibility with other apps. Had Apple not built iOS drag and drop this way, we’d be using a crippled feature where apps fail to accept each other’s items or perform lossy transfers of content. A single representation of an item doesn’t scale.
Third, and perhaps most importantly, is privacy. One of Apple’s goals with drag and drop was to make it inherently more secure than the pasteboard and prevent apps from reading content without the user’s explicit consent. Consider this: if a drag item contained the actual data from its source app – like a JPEG photo – the destination app would be able to see the JPEG, read it, and do something with it, even if you hovered over the destination area without dropping the item. That’s not a secure design. The intention of dropping something doesn’t equal committing to a drop. With a system based on promises and item representations, destination apps can only see an abstraction of the dragged content until you, the user, lift your finger and drop.
The construction of the drag item is managed by developers. The flavor (UTI) of the item with the highest fidelity – the one that best represents the original content – is the one that should be prioritized in the item’s hierarchy and advertised first. For instance, a vector drawing from an illustration app should offer its native format first; then, in descending order of fidelity, other formats to increase app compatibility. In that case, the custom format could be followed by a PDF representation (an open format that maintains vector scalability), followed by PNG and JPEG.
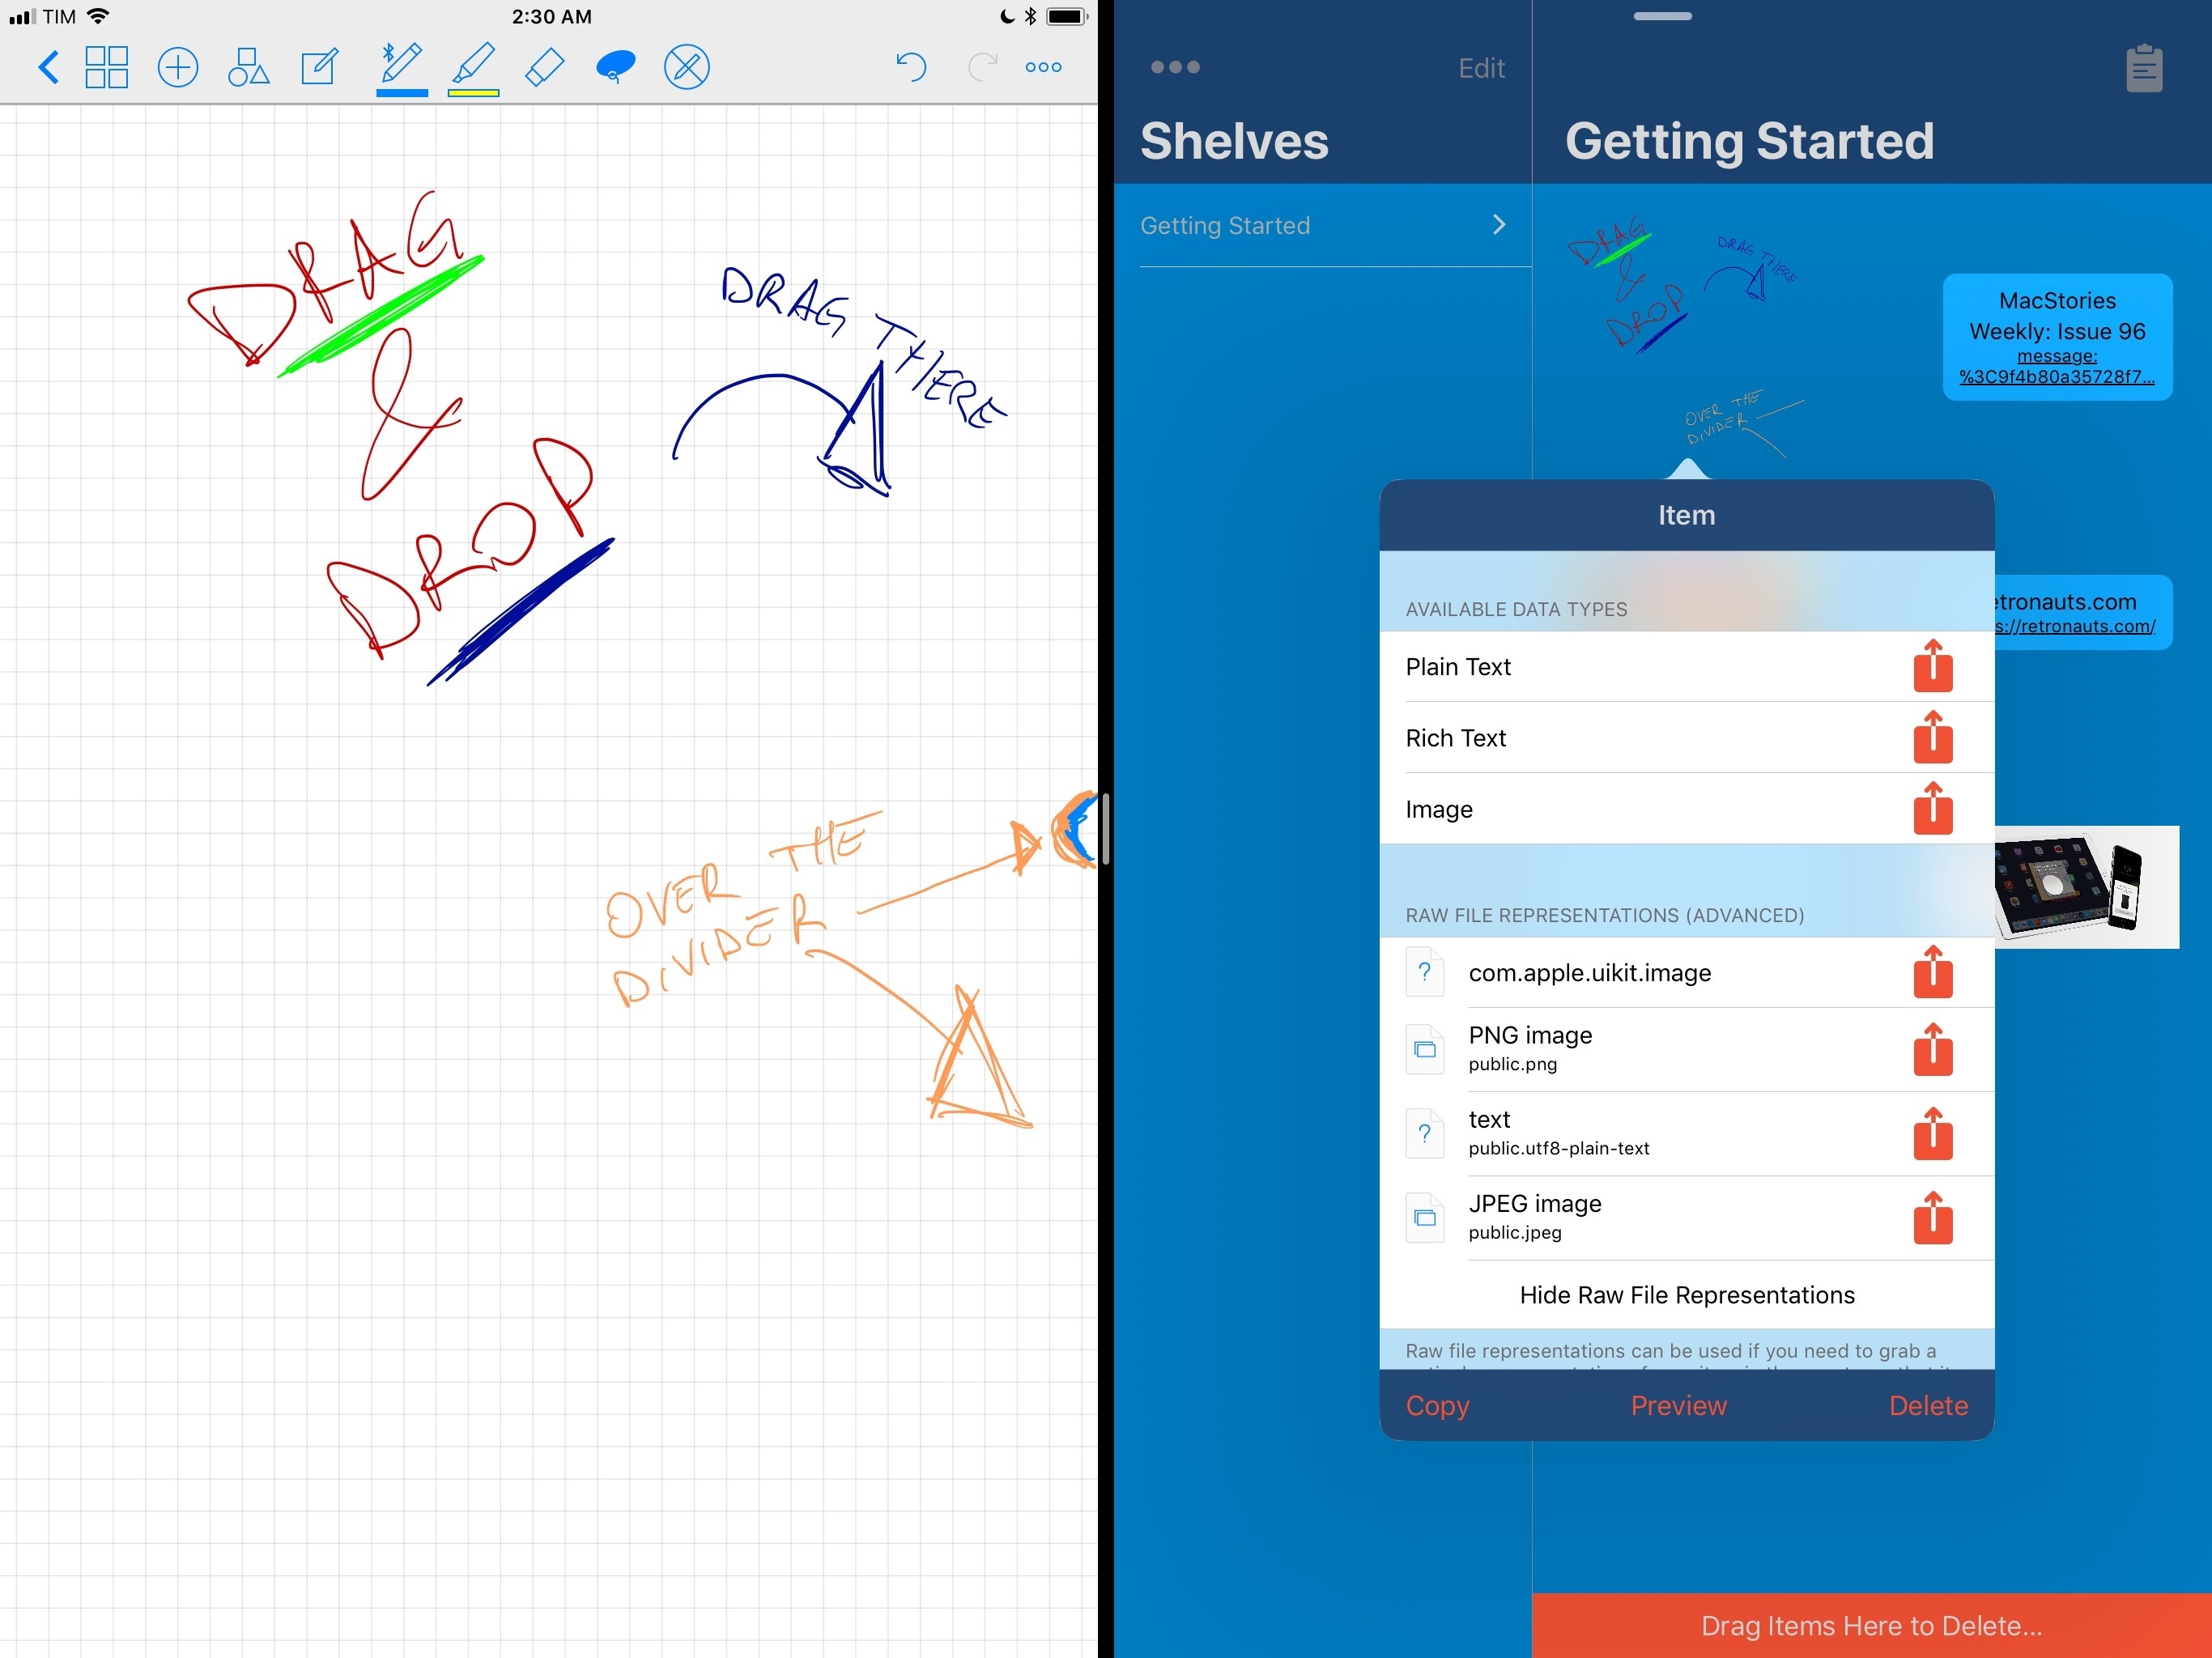
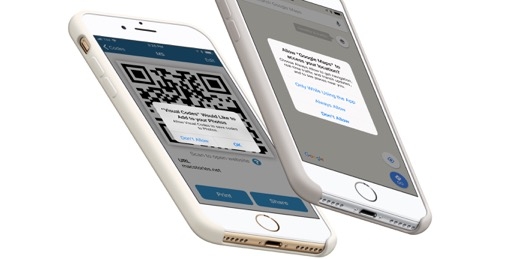
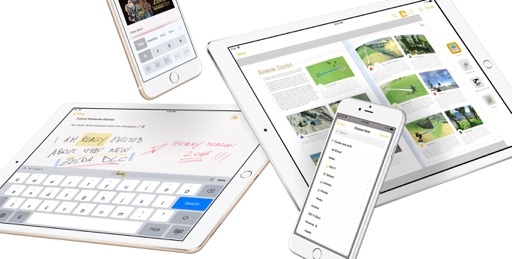
UTIs at play: a sketch from GoodNotes is first advertised as an image (in multiple formats), but, thanks to the app’s OCR, it can also be dropped as text.
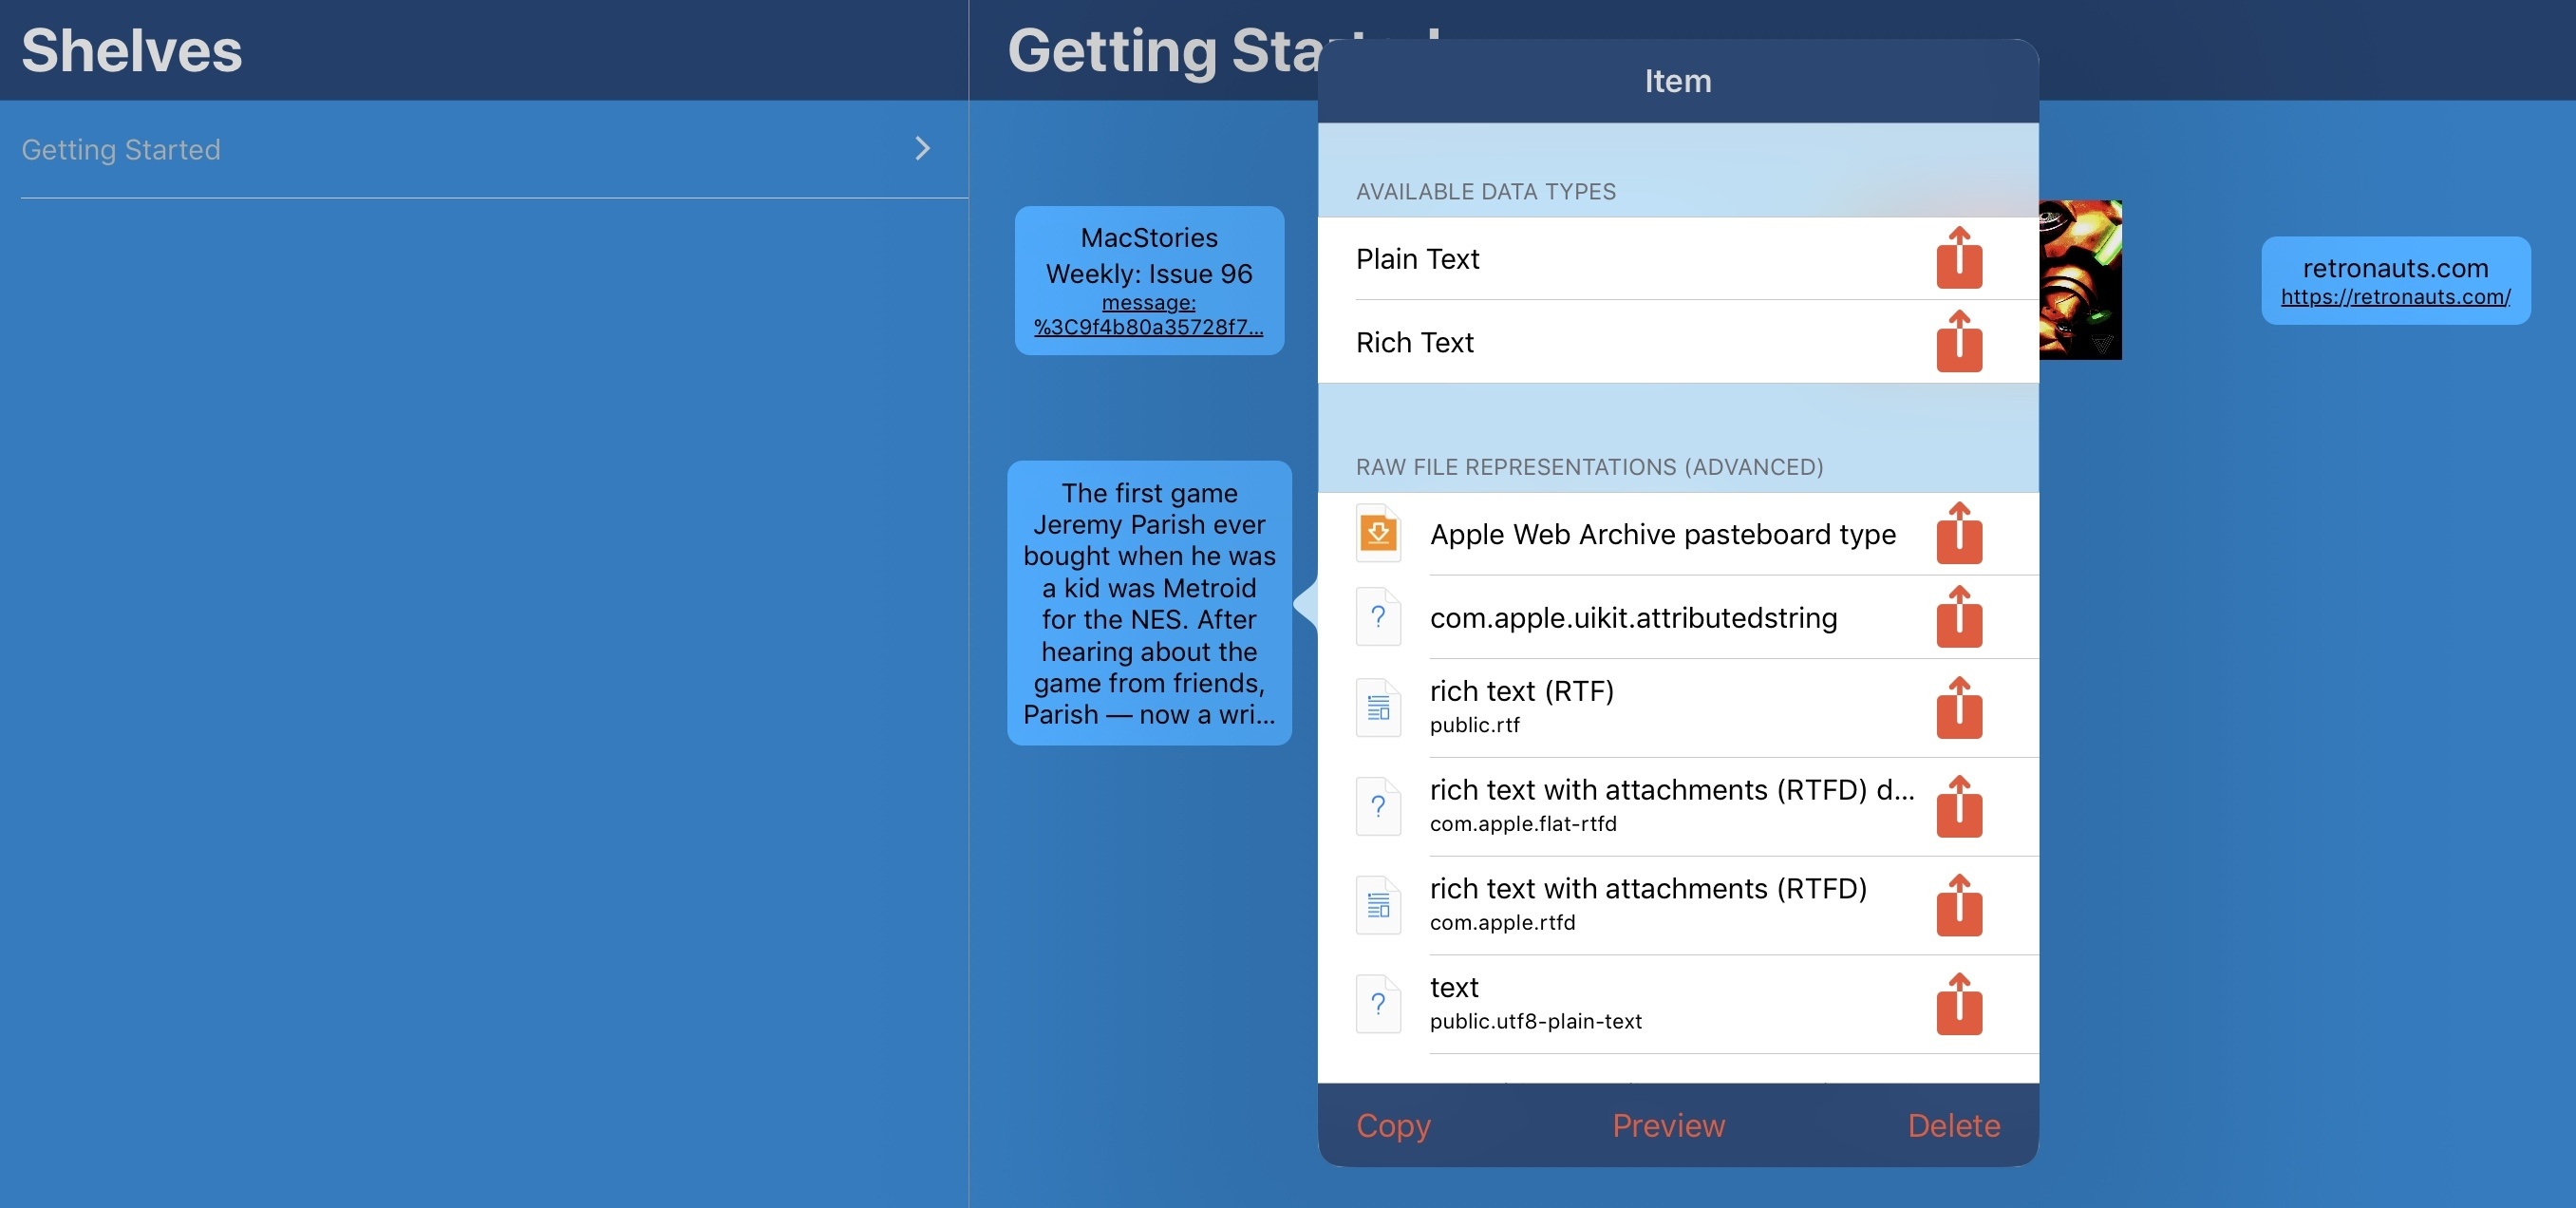
Apple’s apps offer some great examples of this API applied to common drag and drop workflows. Notes promises a proprietary format first (useful for other Apple apps) along with attributed string, RTFD, and UTF-8 plain text. An address from Maps is represented with a MapKit object followed by a vCard that can become a rich place card when dropped into Contacts. A text selection from a Safari webpage is first represented with a web archive but plain text and RTF are options as well. And so forth.
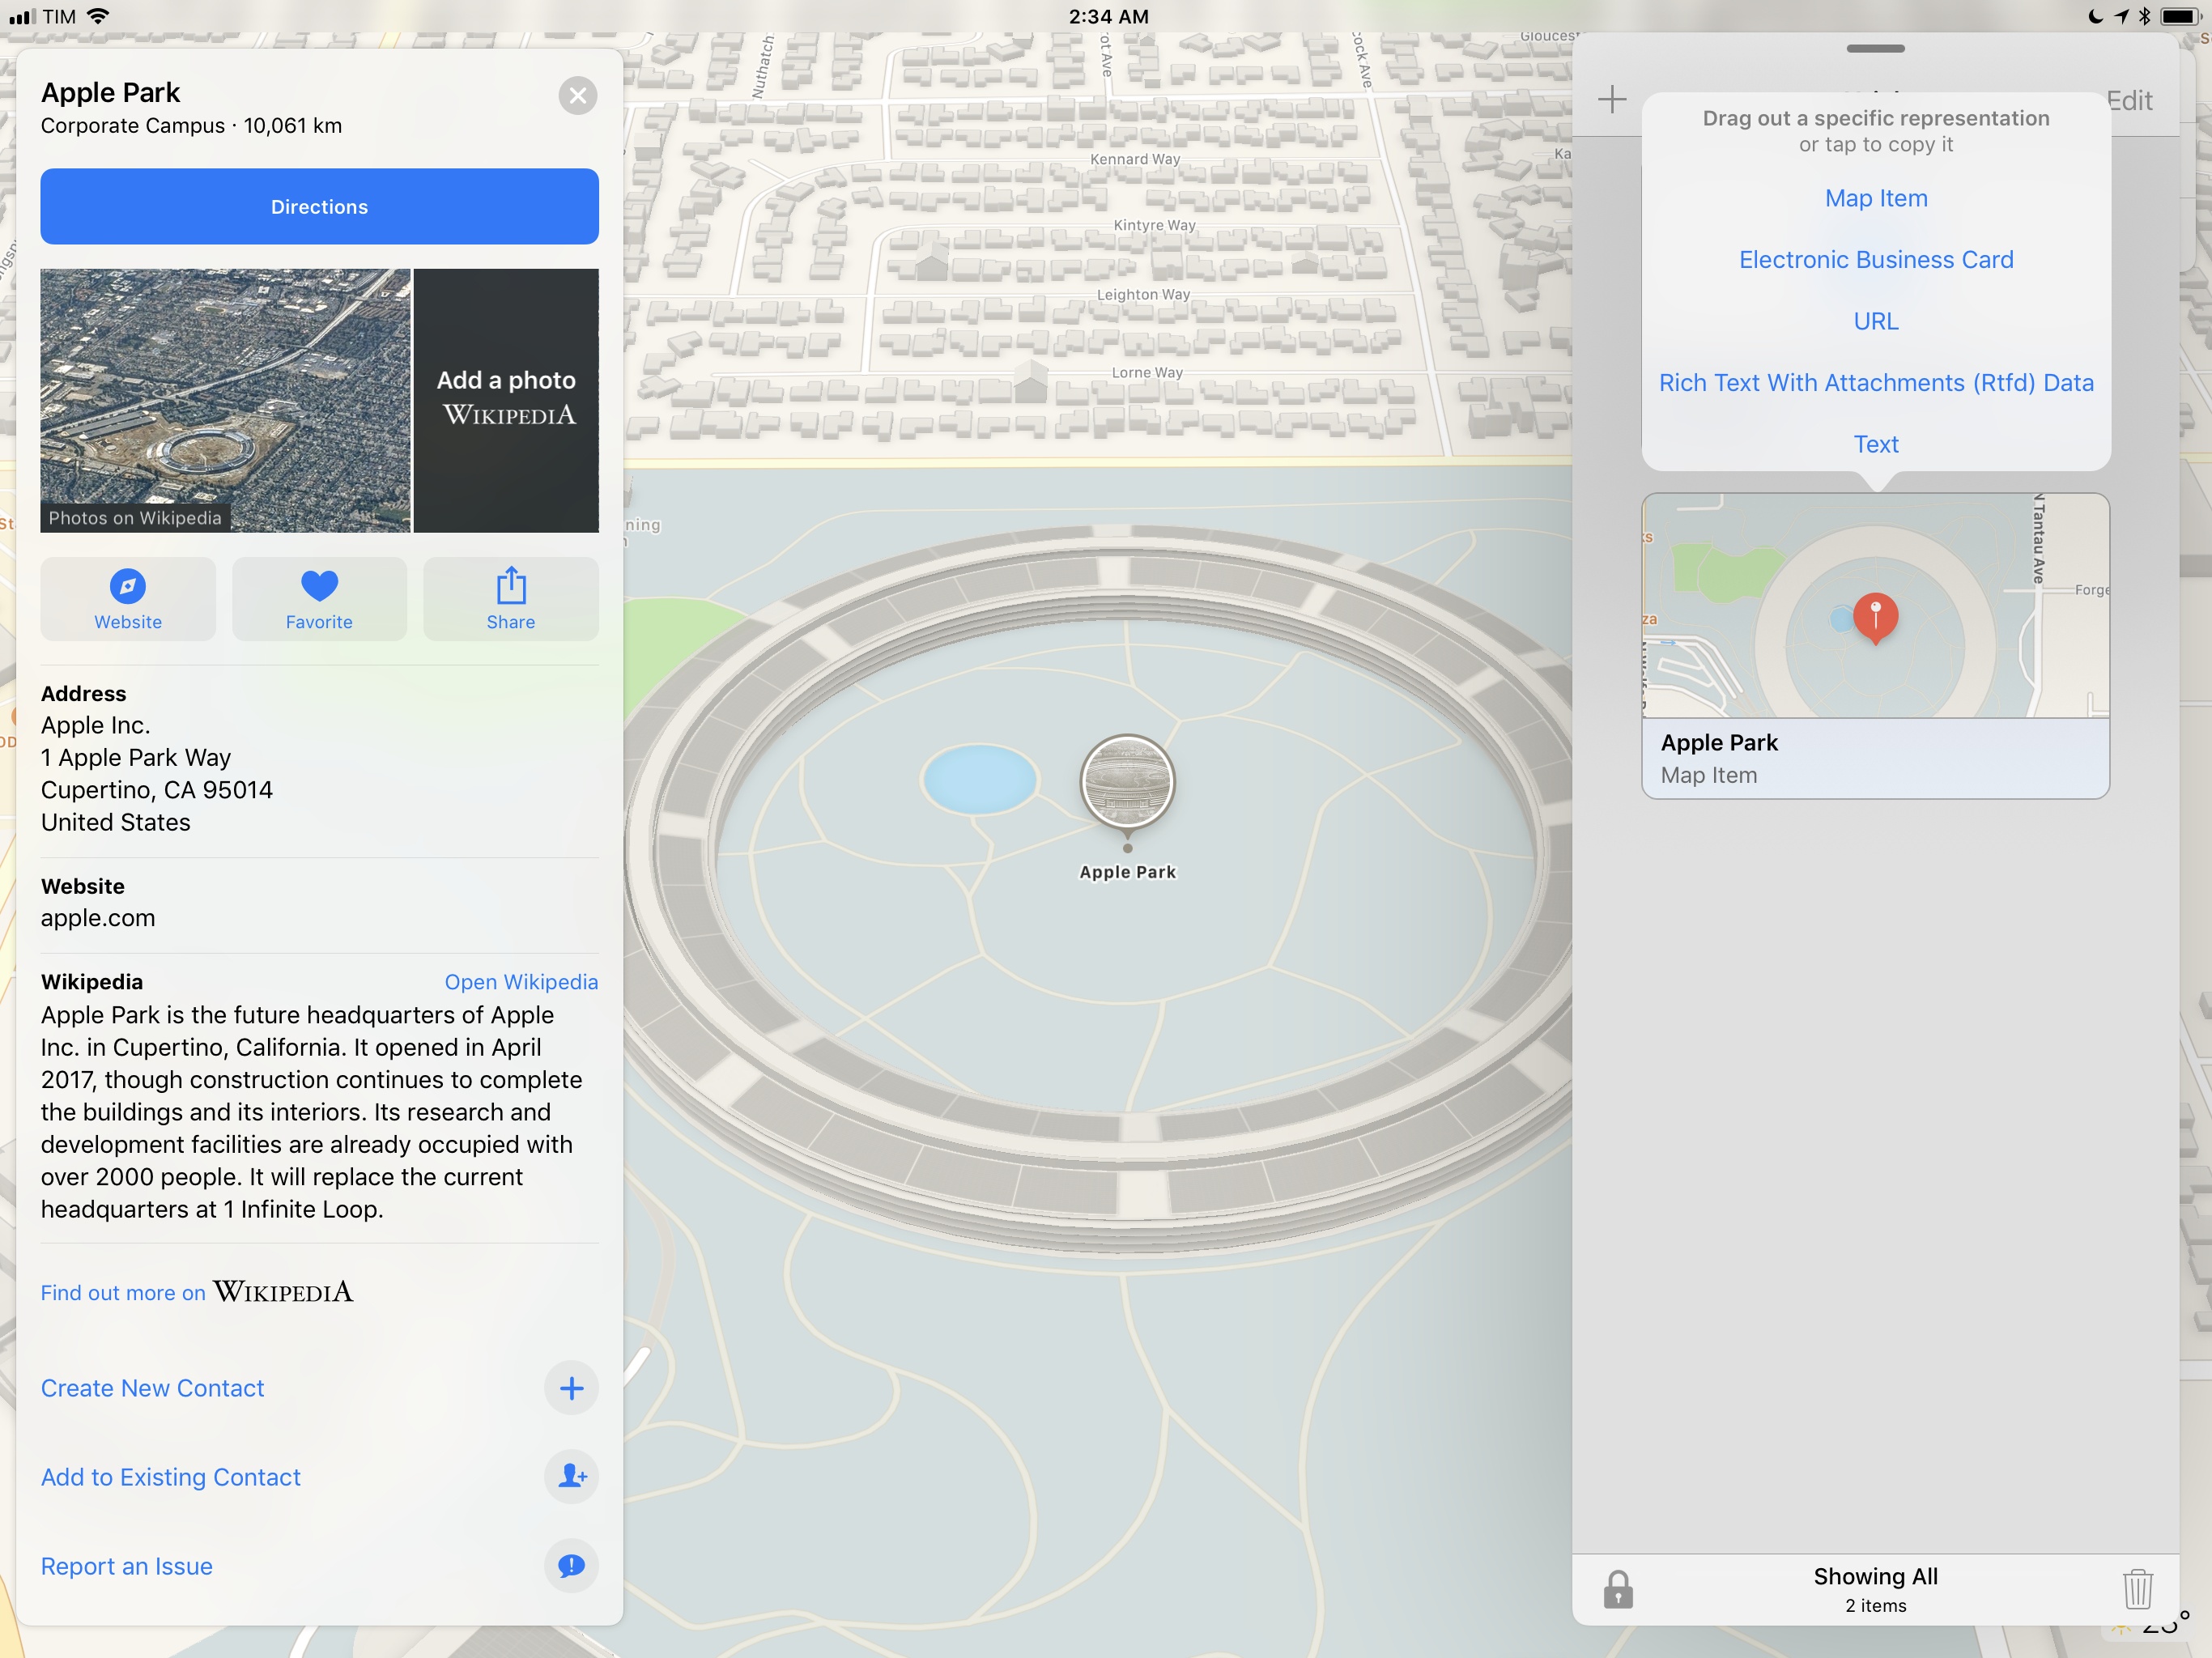
A place from Maps can be passed to another app as a map item, a contact card, or even a URL.
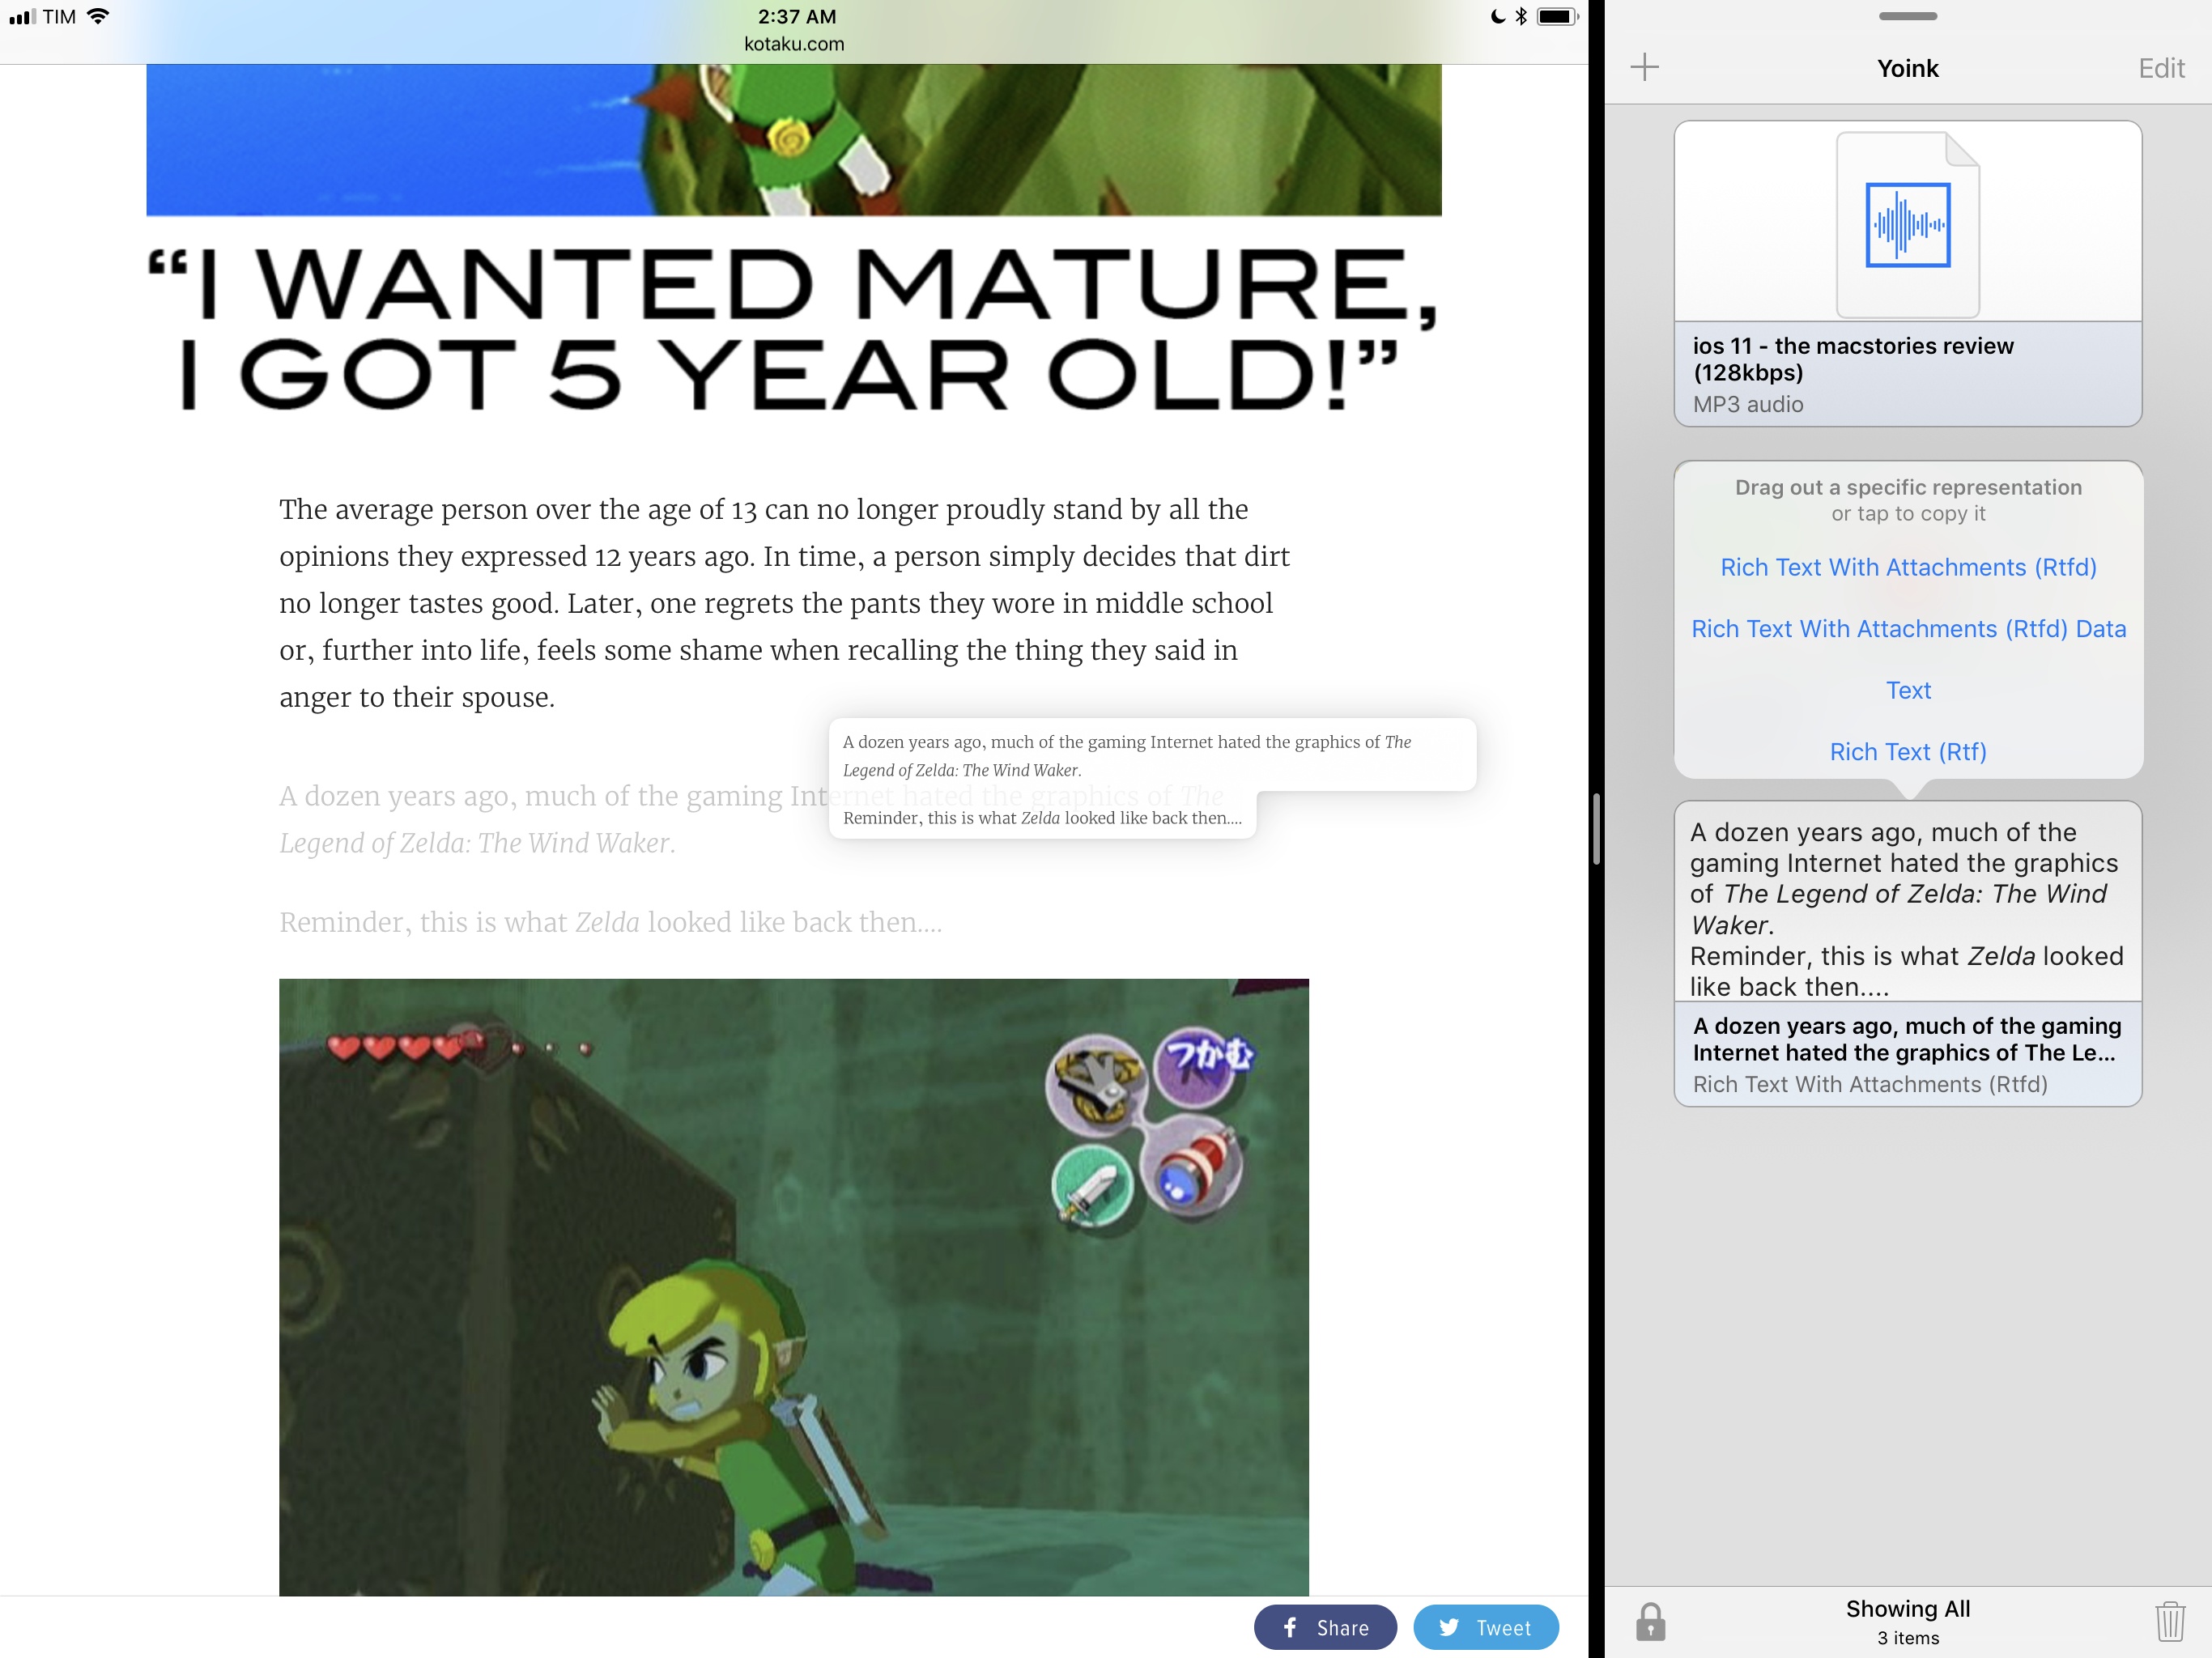
A text selection from Safari can be dropped as rich or plain text.
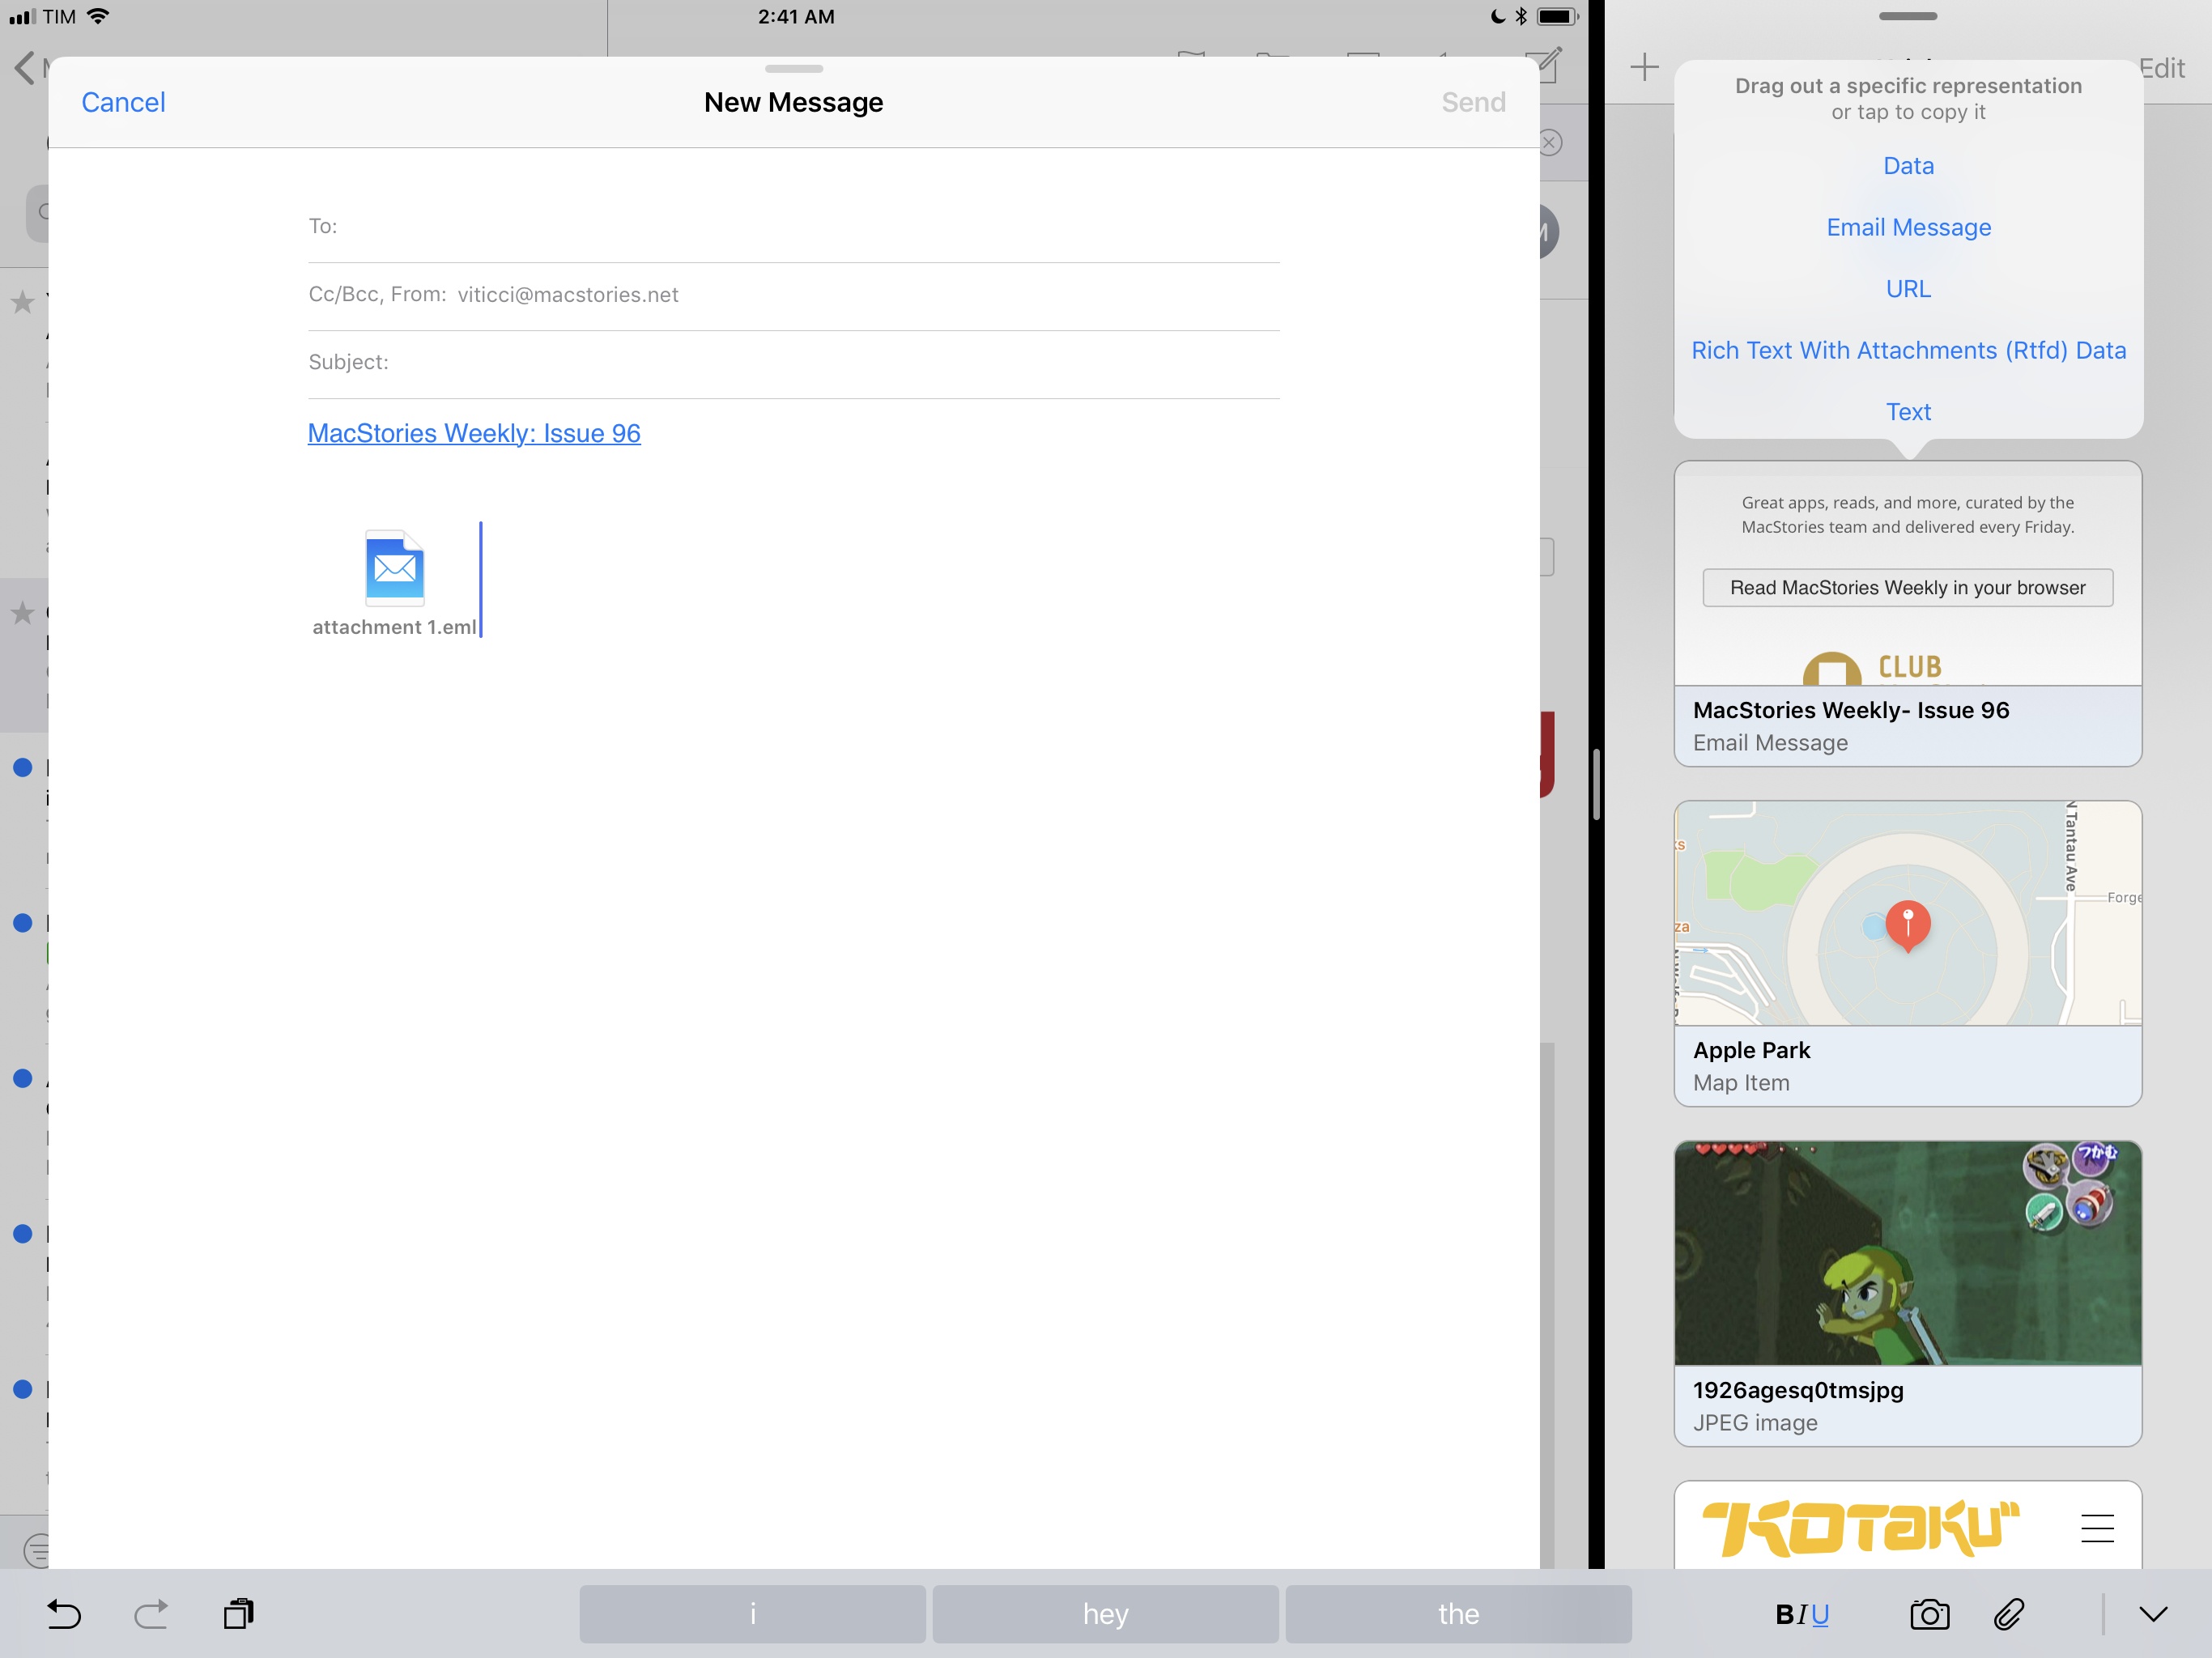
Messages can be exported from Mail as rich text subject links, URLs, or .eml files.
The job of the drag and drop framework is to match what the source is promising with content that the destination expects and is capable of handling. This conversation takes place before an item is dropped, and it can either lead to an agreement between two apps or a rejection of the item while the drag is still occurring.
Developers have been granted some flexibility here: in addition to inspecting the representations of the item and deciding if the conditions for a drop are being met, apps can also preemptively reach out to the drag item and explain the types of content they’re capable of handling. In terms of user experience, this is why you can see badges added to the drag item or custom animations in the destination app before you drop: the destination app has confirmed to the source app whether or not there’s a match between them, so iOS 11 can visualize the outcome beforehand. It’s like reverse Tinder for apps.
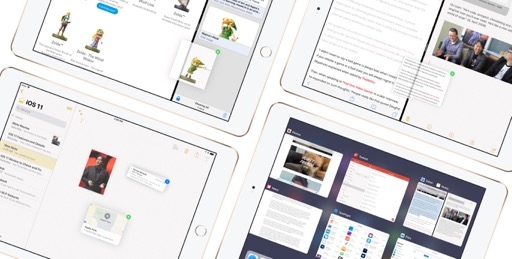
Examples of apps that feature custom animations for drag and drop.Replay
The best part of this process is that it happens automatically, behind the scenes, in a fraction of a second. It’s completely invisible and abstracted from users, who shouldn’t have to know about the complexities involved. It helps, however, to have a minimal understanding of it all, particularly for pro users who will find themselves dragging content between different iPad apps and ending up with the occasional dropped copy that is not in the format they imagined.
The feeling of surprise that comes with drag and drop stems from this bottleneck: how accurately can destination apps ingest dropped items while matching user expectations? Should developers of pro apps give users preferences to fine-tune the dynamic conversion of items once they’re dropped? Or should they always assume what is best for the user and prioritize compatibility with apps over everything else? It’s too early to tell. For the most part, the promise-based system “just works”, but there will be edge cases.
There’s nothing fancy about the drop stage itself – it’s more about what happens right before it. The drop alone mostly consists of animations and a lead-up to the final step.
Data Transfer
As soon as an item is dropped, iOS 11 begins the process of transferring data. In the spirit of never blocking interaction with the UI, drag and drop uses lazy delivery, transitioning from exposing representations of items to asynchronously copying data to a new location.
In the majority of cases, the result of a drop will be instantaneous: you let go of an item, the destination animates, and the item is transferred. Asynchronous transfer can only be appreciated when you’re dropping items that have to be downloaded from a server or that require additional processing from the source app before they’re delivered. For example, an app could display a placeholder with a loading spinner when the user drops photos that are stored in iCloud Photo Library and that have to be downloaded first; while the images are being fetched, you could interact with the app to do something else. Developers have control over this aspect of drag and drop too, and can optimize their apps accordingly.
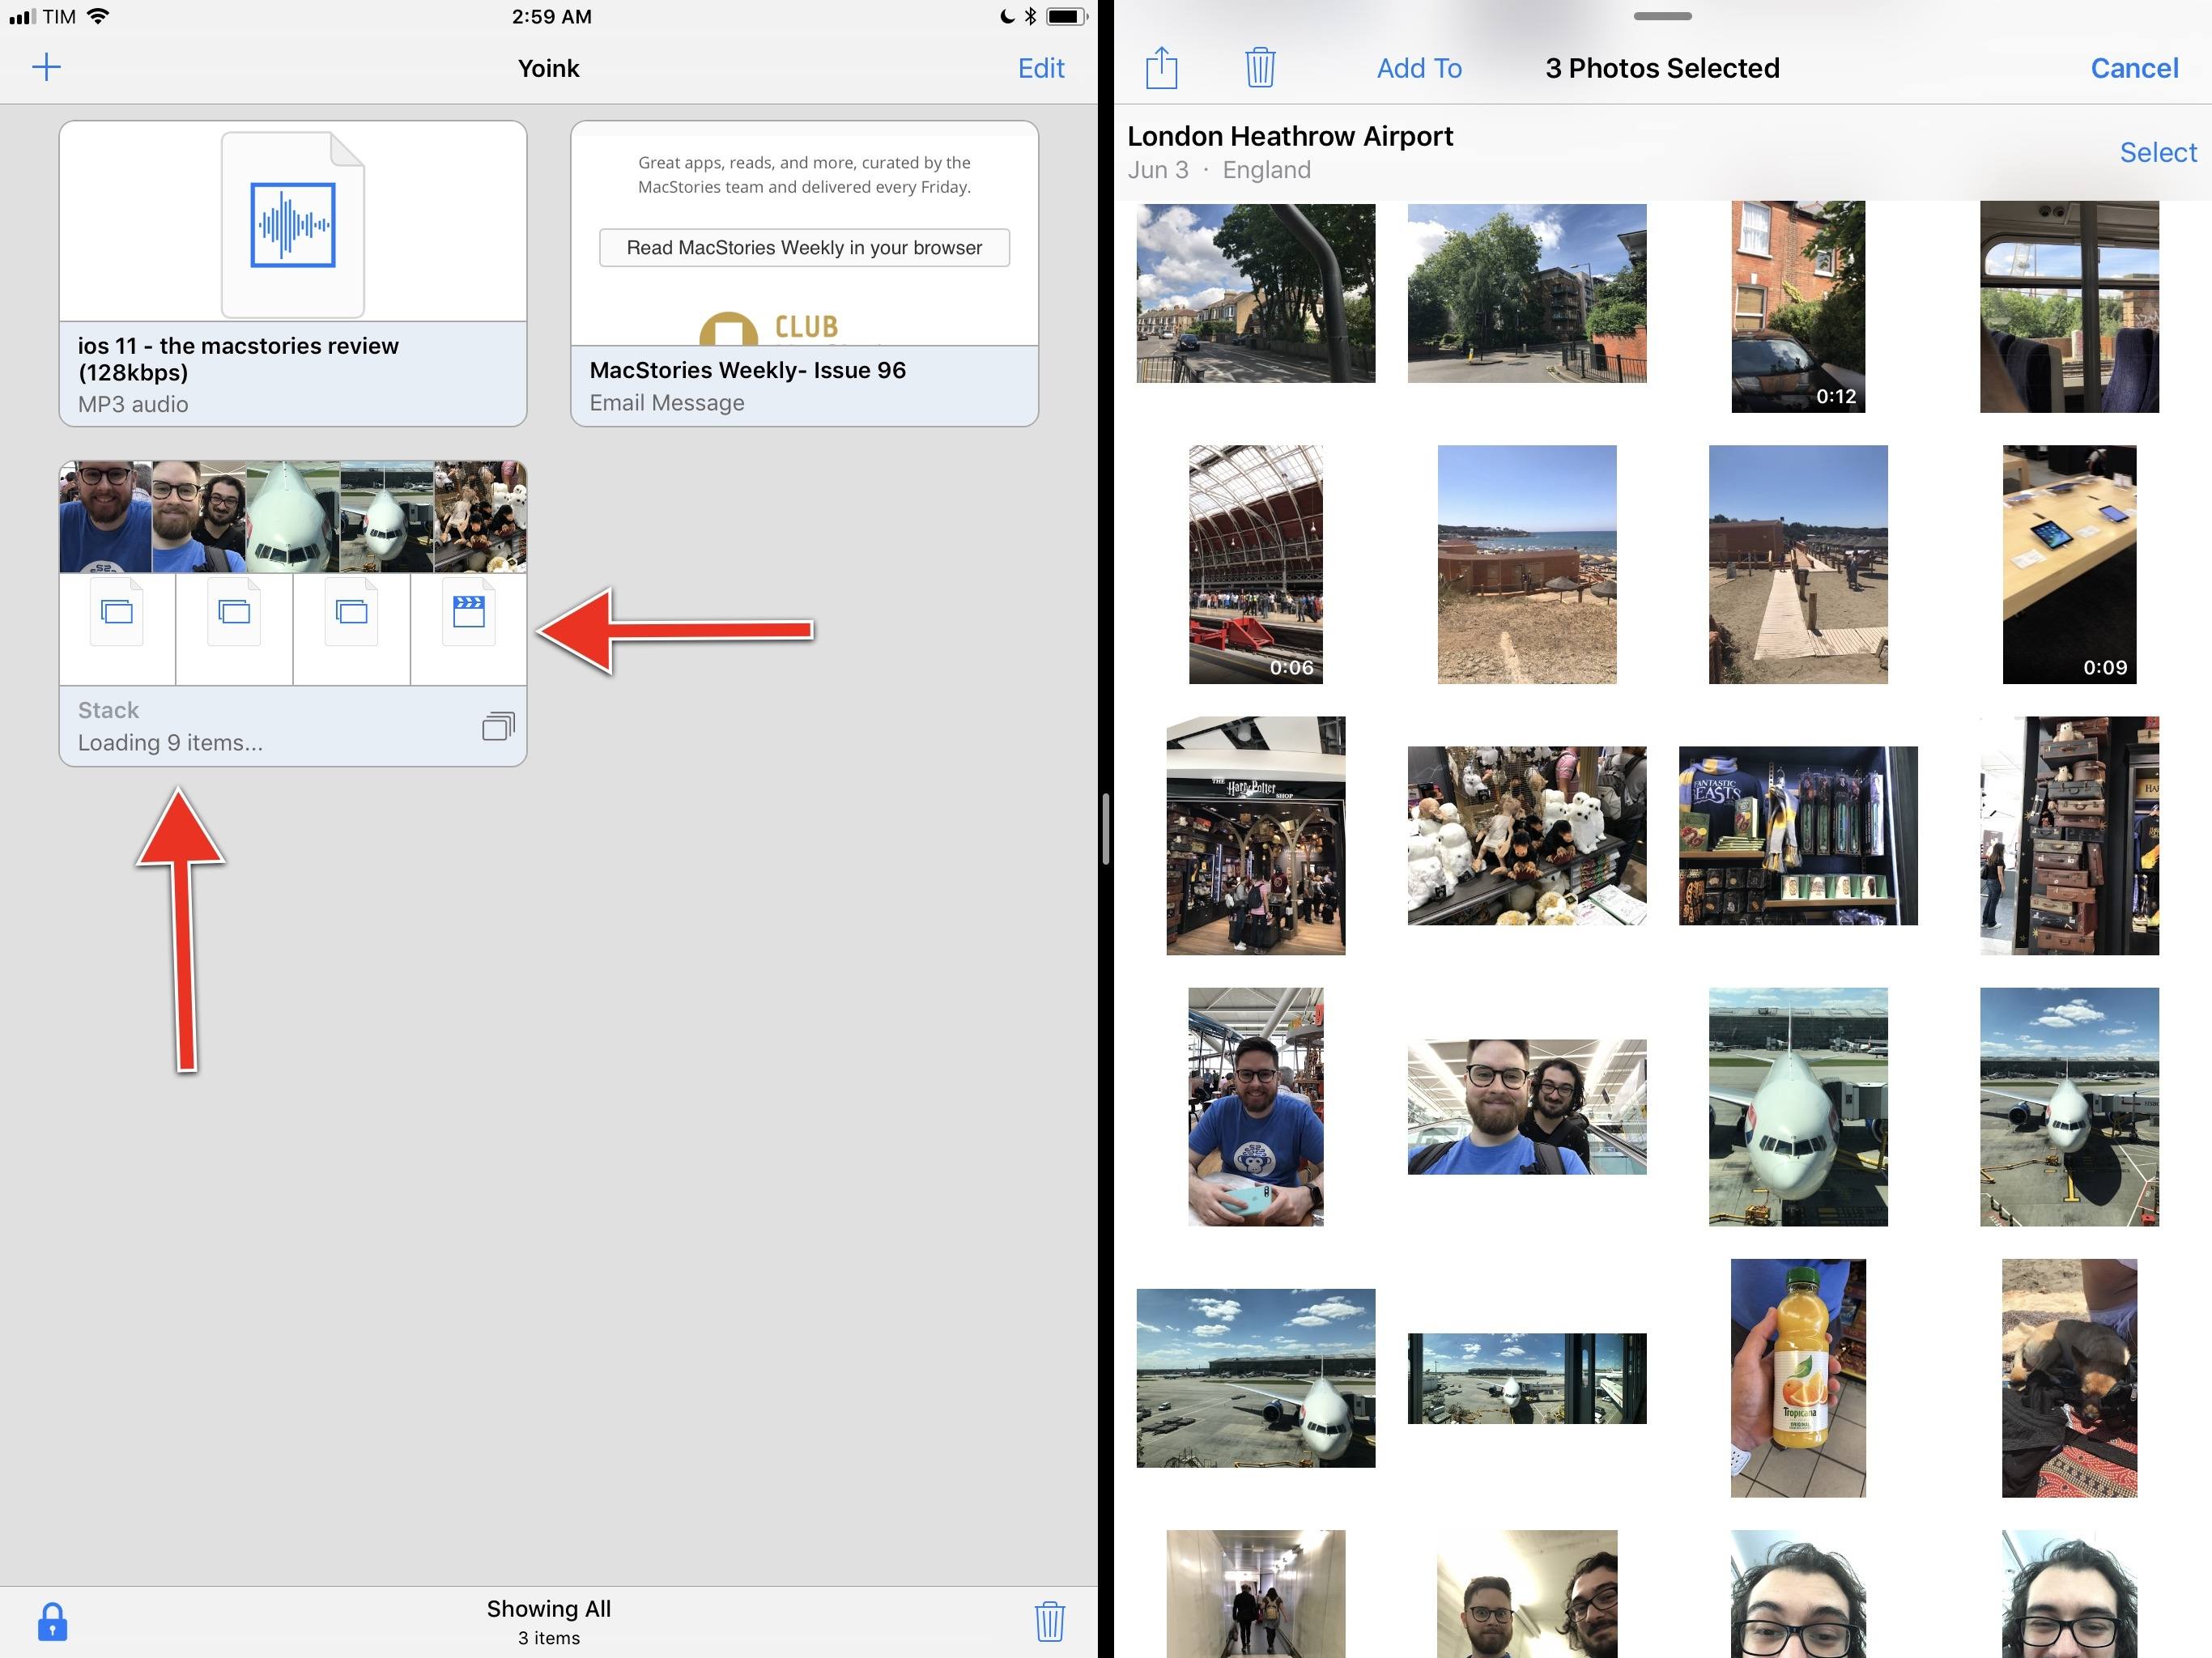
Yoink asynchronously loads items after they’ve been dropped, so you can continue interacting with the app.
Apps can also decide to copy items as data, copy them as files or folders, or open them in place rather than copying them at all. File copies are powered by APFS63, which, thanks to its cloning abilities, can create constant copies of files without duplicating them, thus saving disk space.64
And that’s it for the lifecycle of drag and drop. The technicalities of the framework reveal a complex, well thought-out system built on a cornucopia of principles: great touch performance, ease of use, privacy, compatibility with apps, and flexibility for developers. On paper, it’s quite the accomplishment. But as always, the App Store and widespread adoption by apps will be the definitive litmus test for drag and drop.