Update: I have turned this review into an interactive book with additional & exclusive content. You can find it on iTunes, on sale for a limited time. More information is available here.
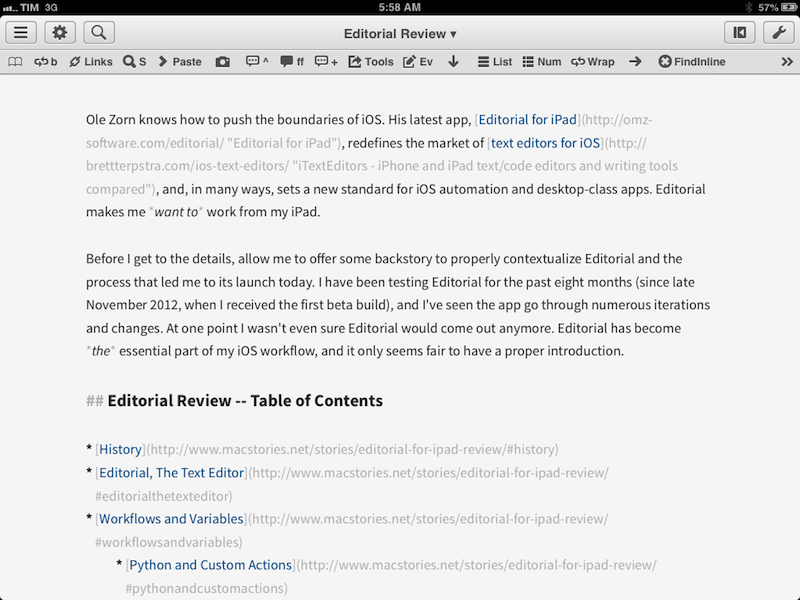
Ole Zorn knows how to push the boundaries of iOS. His latest app, Editorial for iPad, redefines the market of text editors for iOS, and, in many ways, sets a new standard for iOS automation and desktop-class apps. Editorial makes me want to work from my iPad.
Before I get to the details, allow me to offer some backstory to properly contextualize Editorial and the process that led me to its launch today. I have been testing Editorial for the past eight months (since late November 2012, when I received the first beta build), and I’ve seen the app go through numerous iterations and changes. At one point I wasn’t even sure Editorial would come out anymore. Editorial has become the essential part of my iOS workflow, and it only seems fair to have a proper introduction.
Editorial Review – Table of Contents
- History
- Editorial, The Text Editor
- Workflows and Variables
- Workflow Sharing
- The URL Scheme
- Snippets
- Best Practices and Tips
- Basic Workflows
- Advanced Workflows
- A New iOS
History
In the summer of 2012, I decided to re-evaluate my iOS workflow and reassess the way I was using third-party apps and services to get my work done on a daily basis. My main goal was to find cohesiveness and coherence in how I could work from iOS – and especially my iPad – without ending up producing subpar content because of limitations in my workflow. I wanted to get rid of the notion that I needed a Mac for certain tasks, and (quite possibly to also prove this to myself, my colleagues, and my readers) I wanted to demonstrate that it wasn’t so absurd to think I could work from an iPad without compromises.
I had my reasons for deciding to embark on such a journey. I’ve shared more details on other occasions, but, to summarize, being forced to work efficiently only if I had my MacBook was becoming a problem for me, as MacBooks – even the Airs – just aren’t as portable as iPhones and iPads. And even if you could argue that the 11-inch Air is the king of Mac portability, I challenge you to work from that device for 8 hours straight while stuck in a hospital bed.
The idea of being able to get the same amount of work – with the same degree of quality and speed – done exclusively from an iPad seemed untenable, but I knew that it was what I needed to accomplish.
Longtime MacStories readers may be familiar with the process that I’ve gone through, as it’s been regularly documented on the site and my Twitter account. At first, I thought that centralizing key tasks and documents in Dropbox as plain text files would be the solution; arguably, I managed to set up a beautiful workflow that revolved around .txt files and a single Dropbox folder for organizing my todo list, my notes, my articles, my research material, and, sometimes, even my memories and ideas.
The problem is – workflows aren’t meant to be beautiful. They should be flexible, streamlined, and efficient. Working with a variety of different bits of content on the same level of plain text was a beautiful, liberal idea – but it wasn’t efficient.
I came to the conclusion that, in spite of the inner beauty of plain text, some things were better off as rich text or contained inside an app’s database. By saving links to interesting webpages as plain text URLs, I was losing the ability to easily tap on them and open them in a browser; by organizing tasks in a plain text list, I started feeling like a GTD hippie, presumptuously denying the higher appeal of tools like OmniFocus and Reminders. Plain text is great…until it’s not. It’s silly to deny the fact that, in today’s modern Web, we’re dealing with all kinds of rich content, which gets lost in the transition to plain text or hierarchical file structures (such as Dropbox); managing tasks in a text list is an elegant, old-fashioned concept that I’m sure Don Draper would have appreciated 50 years ago, but that, today, I wouldn’t choose over smart features like alarms, notifications, and location data in my todo app. I didn’t drop plain text altogether: I chose plain text for some tasks, and started using other apps for different purposes.
Around October 2012, the workflow I had settled with largely resembled the one I’m still relying upon today:
- My articles for MacStories are stored as plain text files in a single folder in Dropbox; once they’re published, they’re archived in a sub-folder. On the Mac, my editor of choice is Sublime Text 2, which uses Marked for Markdown previews and HTML generation.
- My tasks are organized in Reminders. It used to be Due, then OmniFocus, but I’ve been liking Reminders’ simplicity and fast sync across platforms and devices. On the Mac, I run my own “quick entry” tool based on AppleScript, and I like how Fantastical gives me a list of all reminders in the menubar. On iOS, I’m a fan of Agenda’s Reminders integration.
- I process my mail with Mail.app on the Mac; on iOS, I use a combination of Triage and Dispatch for processing and writing, and Gmail for push notifications.
- My personal memories are stored in Day One.
- Bookmarks (for sites that I want to archive for future reference with a full copy of the original webpage) are saved in Pinboard (a service that I also use every day for discovery).
- Everything else goes into Evernote, where I keep a few notebooks and tags and use saved searches a lot. My paperless system is based on Evernote; my article ideas and things I want to check out are available as notes; I keep annotated screenshots in it with Skitch; I use it to gather reference material for interviews and other projects I’m working on, collect show topics for The Prompt, and more. Evernote’s smart organization tools and cross-platform availability have outclassed Dropbox’s folder-based structure for me, and I don’t think that Mavericks’ Tags will be enough to win me back into the Finder.
Instead of forcing everything to fit the plain text model, I’m using different services and multiple apps that tend go beyond “just text” and that sync with other devices. Some may argue that this is convoluted; I think that I’m using the best for me.
As I was getting comfortable with my new way of working with iOS and OS X, I started noticing that, in spite of the system being solid, I still couldn’t complete key work-related tasks on my iPad. I was slow: screenshots took forever to be composited on iOS, as opposed to my two-second generation on the Mac with Keyboard Maestro; starting a new post from a link in my RSS reader took me minutes; when my colleagues pinged me about news items I should quickly check out, I would often reply “Sorry, I’m on the iPad right now”. And that was unacceptable.
I lacked a system that would allow me to automate tedious and common tasks to save time. I didn’t fully appreciate the importance of tools like Alfred and Keyboard Maestro until I lost them. Because of iOS’s sandboxed nature and Apple’s unwillingness to create power-user automation tools for it, I ended up with a nice set of apps and services…that didn’t take me anywhere. I was back to square one.
Until I stumbled upon Pythonista, developed by Ole Zorn, thanks to Gabe’s recommendation. Earlier in 2012, I started learning my way around AppleScript, which, somewhat surprisingly, is still alive and supported by Apple and third-party developers. I’m not a programmer by trade, and AppleScript was easy enough to pick up and tinker with to create little programs that would help me save time. AppleScript is often regarded as the programming language that “normal people”[1] can understand and use; I never thought I would ever approach something more complex and “serious” like Python. I did, eventually, because Gabe made a terrific argument in favor of iOS automation through Python scripting. Which sounded completely crazy at the time.
Pythonista is a Python interpreter for iOS: it can run Python programs as long as modules from the Python library have been added by the developer. What’s amazing about Pythonista, though, isn’t the polished design or custom keyboard – it’s the fact that it leverages native iOS functionalities and UI elements to integrate them with Python scripts. For instance, you can load native iOS alert dialogs or banner notifications with Pythonista and make them display or launch custom text and actions; you can open URLs in Safari and build URL schemes to make multiple apps communicate with each other; you can access the system clipboard, fetch photos from and save them to the iOS Camera Roll, and even use secure password storage – all while working in a Python environment.
From my original review of Pythonista, aptly titled “Automating iOS”:
I don’t think iOS automation will ever be exactly like OS X automation. Pythonista has a series of limitations that, in comparison, running Python on OS X or any other desktop operating system doesn’t have. Hardcore Python users may not like this. At the same time, though, I also find working in Pythonista more intuitive, safer, and, ultimately, easier. Why shouldn’t I “compromise” if the end result is the same but I actually get more joy out of the experience?
Pythonista became the glue that was missing from my iOS workflow. By leveraging the strengths of Python scripting and mixing them with access to native iOS areas, Pythonista allowed me to create workflows to automate screenshot generation, Markdown conversion to HTML, publishing articles to WordPress, saving bookmarks to Pinboard (before Pinbook and Pushpin came around) add new tasks to my todo app, downloading files in iCab, and more.
Pythonista clearly wasn’t for everyone, but it singlehandedly revolutionized my workflow by letting me use multiple apps without wasting time with repeating boring tasks. Pythonista changed my perspective on how it was possible to get work done on iOS, even if I understood that mine was an extremely particular use case that didn’t necessarily reflect the general state of advancement of the iOS platform. Despite that “niche factor”, though, I felt that Pythonista did, in a way, raise awareness in regard to the kind of software that Apple was accepting on the iOS App Store, paving the way for a future “movement” of users and developers interested in exploring the potential of treating iOS devices as serious work machines. I don’t think it’s a coincidence that, after Pythonista, interest in URL schemes and iOS productivity software has seen the launch of powerful new apps, increased adoption of callbacks for inter-app communication (even by Google), and lots of interesting workflows being explored by independent writers and developers.
Shortly after my review of Pythonista was published, developer Ole Zorn told me that he had been working on a “spin-off” of the app that was a text editor powered by the same Python engine but that also used a GUI for Automator-like actions and workflows. Coming from the massive change that Pythonista had been for me and as a fan of Sublime Text on OS X, I was immediately intrigued by the idea. It sounded exactly like the kind of follow-up to Pythonista that Gabe and I were imagining when we talked about “a Sublime Text for iOS”. On November 29, 2012, I received the first beta of Editorial.
Fast-forward 8 months, Editorial is available on the App Store today. I have been testing every beta, built hundreds of workflows for it, and spent hours testing its workflow system, URL scheme, and integration with other iOS apps. I believe I have a good understanding of how Editorial works and the choices behind its interface and actions. In the past 8 months, Editorial has turned my iPad into a device that I want to use more than my Mac, because it combines the power of automation with the fun and low-friction nature of iOS. I wanted to share with my readers and followers the reasons why I was going iPad-only for a month, but I couldn’t. Today, I can.
Editorial, The Text Editor
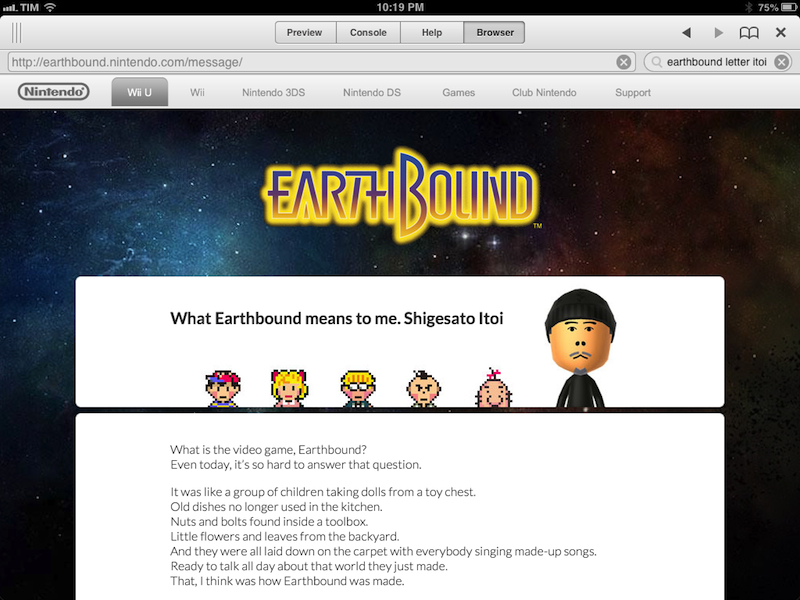
Editorial is a text editor that supports Markdown, syncs with Dropbox, and comes with “accessory panels” to access a preview of documents (converted from Markdown to HTML), a Python console and scratchpad, a documentation viewer, and a web browser for quick research.
Editorial supports Dropbox versions, TextExpander snippets as well as its own abbreviation system, it comes with a powerful URL scheme, and – the core aspect of the app – it lets you automate text editing and communication with other apps through a workflow systems that is reminiscent of Automator and combines built-in actions with the possibility of running Python scripts. Editorial can be used to “just take some notes”, but it truly shines when the browser and workflows are put to good use for research purposes and to automate writing and editing in Markdown.
Like Byword, Editorial can be synced with Dropbox or used with local storage; as you can imagine, I’m using the app with my Dropbox account, and, more specifically, with the /Apps/ folder where I keep all the .txt files of articles that I’m working on.
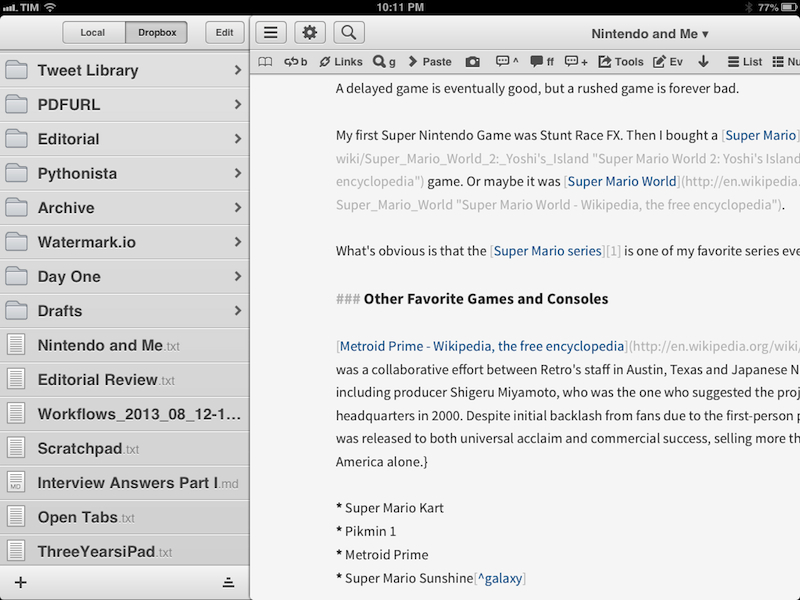
Editorial’s interface design is clean: a sidebar on the left lists all your text files and folders, while accessory panels are available on the right side of the text editor as a series of tabs at the top. Both the sidebar and panels can be accessed by swiping horizontally on screen, with Editorial making it extremely clear (either through drag handles or the use of shadows) that the text editor is the main content area of the app; alternatively, the omnipresent hamburger button and a panel button in the title bar allow you to open their respective views without having to swipe.
Dropbox sync can be configured from the Settings (available through the cog icon next to the hamburger button). Editorial is capable of accessing your entire Dropbox, meaning that you’ll be able to point the app to the Dropbox folder that you’re already using to store text files through the “Sync Folder” option; in my tests, Editorial fetched hundreds of files in about a minute, and it didn’t return any error upon first sync.
The Settings also show the first aspects of user customization available in Editorial. Notably, the app comes with a light and dark color scheme: the former is reminiscent of Zorn’s work on Pythonista, and the latter is suited for late night writing sessions or, in general, people who like dark color schemes (I prefer the light one on my iPad mini).
Line spacing can be tweaked, as well as text width and the default browser that the app will use to open links in workflow actions. The first version of Editorial supports Safari, Chrome, and iCab in the Settings, and perhaps it would have been nice to see more options in this initial release, such as 1Password or other popular third-party iOS browsers; however, this is mitigated by the fact that, because “Open URL” actions (more in a bit) can open any URL scheme, Editorial users can set up workflows to open URLs in any app they want.
Editorial supports TextExpander snippets but it also allows you to set up snippets created with its proprietary syntax and tokens. In the “Snippets & Abbreviations” screen of the Settings, you’ll see options to ignore case when typing snippets, enable or disable TextExpander integration, and suggest TextExpander snippets. Similar to Pythonista’s code completion, Editorial can display small “bubbles” above the keyboard that suggest a matching snippet showing the abbreviation (with letters you’ve already typed highlighted in blue) and a preview of the full snippet.
This can be handy for choosing between snippets that share the same first letters in the abbrevation, and Editorial has an option to choose whether you’d prefer the suggestion bubble to come up after the first letter is typed, or after two letters (the default option). While the “first letter” option may sound incovenient, it’s actually a good way to enable users who have abbreviations starting with characters like semicolons to type less and still see their suggested snippets.
Alongside the usual controls for spellcheck, auto-correction, and auto-capitalization, Editorial offers separate settings for Markdown and plain text editing. For Markdown users, Editorial can show an inline preview for things like bold and italic text, links, footnotes, headers, blockquotes and code blocks. If the inline preview is active in the settings, you’ll get control over heading fonts, code fonts, and advanced options; otherwise, you’ll only be able to tweak the main text font, which defaults to Source Sans Pro and 9 other fonts (font size can be tweaked, too). Editorial is very deliberate in that it doesn’t give the user access to hundreds of personalization options for colors and fonts, but instead limits the tweaking to two color schemes, 10 fonts, sizes, and line spacing. Under the Advanced screen, you’ll see options to change the opacity of the formatting character for the Markdown inline preview, and fields to manage supported file extensions and set a default one (mine is txt).
Editorial’s file sidebar has a few nice touches worth mentioning. At the bottom, a sorting button lets you sort files and folders (both are supported in the app) by name and modification date; folders are always displayed at the top, but their sorting behavior matches the one of files below. To create a new file manually (it’s also possible to do so programmatically with workflows), you can hit the + button on the left. Editorial can navigate inside subfolders, where files will be downloaded[2] and made available for viewing; files can be deleted by swiping over them, and there is an Edit button to delete multiple files, move them, or create a new folder.[3]
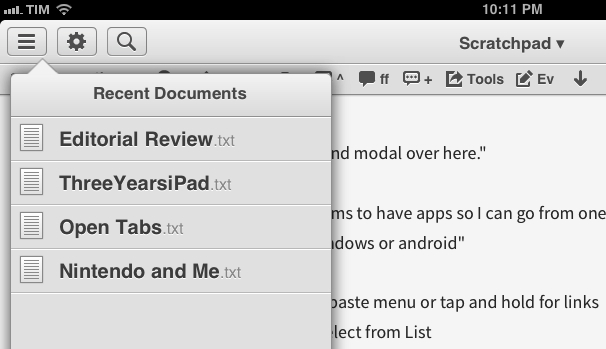
There are two other little features that I like about the sidebar. The first is the fact that it supports pull-to-refresh, which I’ve come to expect from any app that uses lists and gets data from the Internet, even if it’s not a timeline of messages[4]; the second is how you can tap & hold the sidebar button to bring up a switcher for recent documents that persists across sessions (if you quit and relaunch Editorial), which is a nice way to multitask between multiple documents.
Editorial’s text editor looks simple, but it’s packed with functionalities. The writing area elevates content with a handy Markdown preview that ensures you can get a quick visual understanding of your place in a document by seeing larger, bold fonts for headers and blue inline links. Many apps have live inline Markdown syntax highlighting these days, and Editorial’s one supports most special Markdown formatting such as the aforementioned headers and links, but also bold, italic, lists, footnotes, blockquotes, and more. I find it useful, and it looks good (especially with the default font).
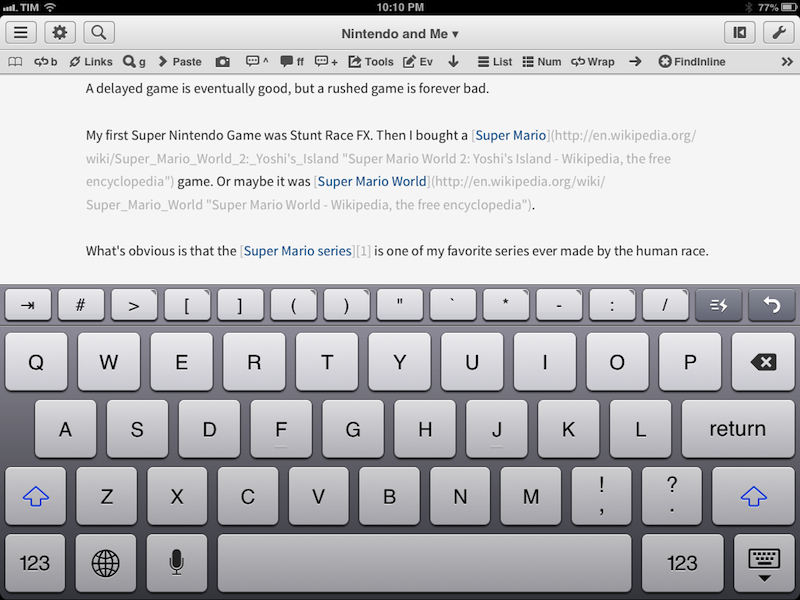
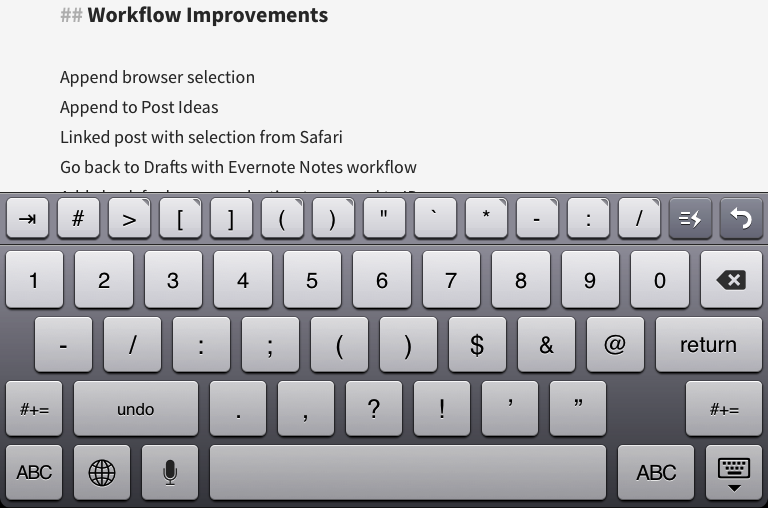
The keyboard takes up where Pythonista left off and offers an extra row and character auto-pairing for parentheses, brackets, and quotes; as I also mentioned in my Pythonista review, automatic character pairing can be confusing for some users, but, for me, it is a great addition to the writing experience as, combined with the extra keyboard row, it lets me quickly hit the parenthesis character once without having to remember to close it later. Like Pythonista, the keyboard row also doubles as a swiping area to replicate the popular Hooper selection concept: swipe your finger across the keyboard row, and you’ll be able to move the cursor in the editor. I’m quite fond of this feature in both Pythonista and Editorial, and I like that the gesture rarely results in characters being accidentally typed on screen.
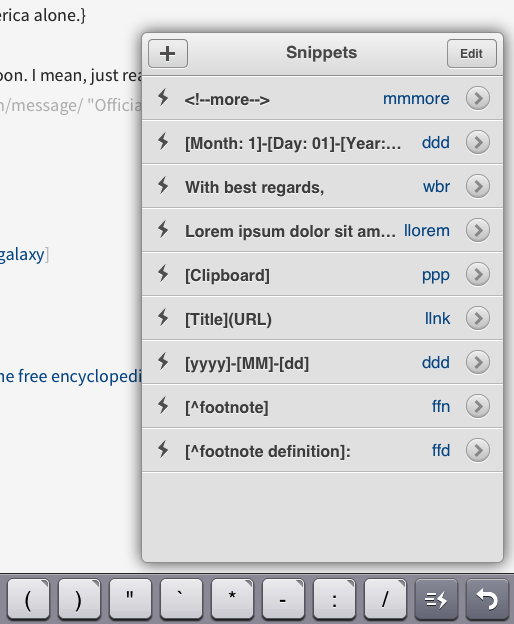
And last (again, like Pythonista), characters in the extra row that have a “dog ear” in their upper right corner can present a set of alternative characters (such as curly brackets for parentheses) upon tapping & holding[5], whereas (unlike Zorn’s Python app) the rightmost corner of the row has been reserved to an Undo button (for unlimited Undo actions, which also shows a “Redo” option with tap & hold) and a special Snippets popover.
At the top of the editor, Editorial shows the bookmarks and title bars. The bookmarks bar is a key area of the app and the one that starts revealing the differences between Editorial and most iPad text editors: similar to the one you’d see in a web browser, this bar lets you bookmark and launch workflows, URLs, and documents.
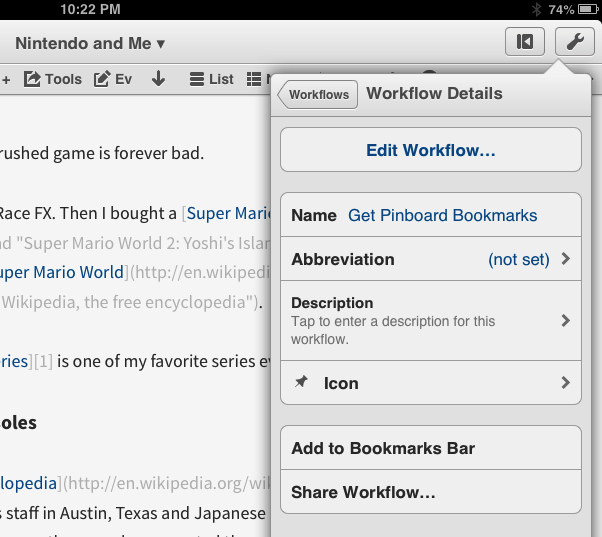
Workflows (more in the next section) can be bookmarked from the Workflow Details popover (accessible by tapping the wrench button in the upper right corner), but they can also be added from the Bookmarks popover, which can be opened by tapping the familiar book-shaped icon on the left of the bookmarks bar.
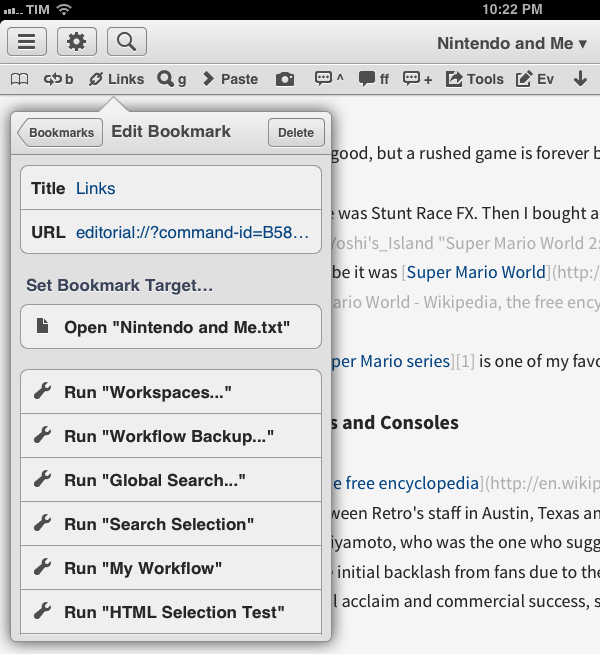
If you want to create a new bookmark from scratch (that is, without bookmarking an existing workflow), you can tap the + button in the Bookmarks popover to open the Edit Bookmark view, from where you’ll gain access to several options that include entering a title for a new bookmark, choosing whether you want to launch a URL in the web browser, set the bookmark target to the current document (so you’ll be able to quickly reopen it from another document), or run an existing workflow from your library. Alternatively, you can create bookmarks with fixed or flexible space: these are namesakes of options that OS X users have grown accustomed to seeing in the “Customize Toolbar” screen of modern Mac apps, and they enable icons to be better organized and grouped with separators.
One of the best design choices of Editorial is, in fact, the possibility to assign custom icons to workflows. Available from Workflow Details > Icon, Editorial comes with 90 monochromatic icons you can freely assign to any workflow, and that you’ll see in the editor and browser’s bookmark bar and popover.
But there’s more. In Editorial, bookmarks don’t have to use the same name of a workflow in your library. Say, for instance, that you have a workflow called “Append To Evernote”, but that you realize the name is too long for the bookmarks bar: once bookmarked, you can tap & hold the item, edit its name to make it shorter, and Editorial will still launch the workflow you originally bookmarked. This is a wise implementation, as it lets you keep workflows with descriptive titles but use shorter names for the bookmarks bar, where you’ll likely want to save as much space as possible.[6] Under the hood, this is made possible by Editorial’s way of assigning a unique “command ID” to each workflow, which I’ll elaborate upon later in this review.
Editorial’s bookmarks bar is flexible in how it combines custom names and icons with the ability to bookmark workflows, websites, and even documents and launch them directly from the editor with one tap. Instead of cramming shortcuts to selected features in another extra keyboard row, Editorial elegantly takes cue from web browsers and puts bookmarks away from the keyboard (which is already crowded with just one additional row).
You can also bookmark an amount of items that exceed the length of the bookmarks bar, and they will be shown in a popover available from the » button on the right side of the bookmarks bar. This popover contains a button to hide the bookmarks bar entirely if you never want to see it.[7]
In my Editorial setup, every workflow bookmark that I have has been given a custom icon and a shorter name for the bookmarks bar. I don’t use separators; I have some workflows that have been bookmarked without a name (they have just an icon) and I don’t keep bookmarks for documents or websites in the editor. I keep the bookmarks bar visible, as I tend to add inline links or formatting while I’m writing and because I run workflows that go beyond simply acting on the text that I’m currently seeing. I use the bookmarks bar all the time, and I believe it’s one of Editorial’s best implemented features that differentiates it from text editors I’ve tried over the years.[8]
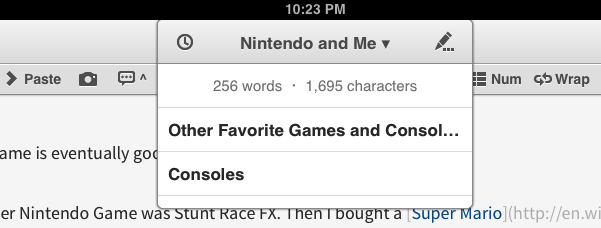
The document’s name in the title bar can be tapped to reveal a popup menu with buttons to access Dropbox versions, edit the filename[9], see word and character count, and navigate to sections of a document containing Markdown-style headers (which is particularly handy for long documents with several sections – like this review).
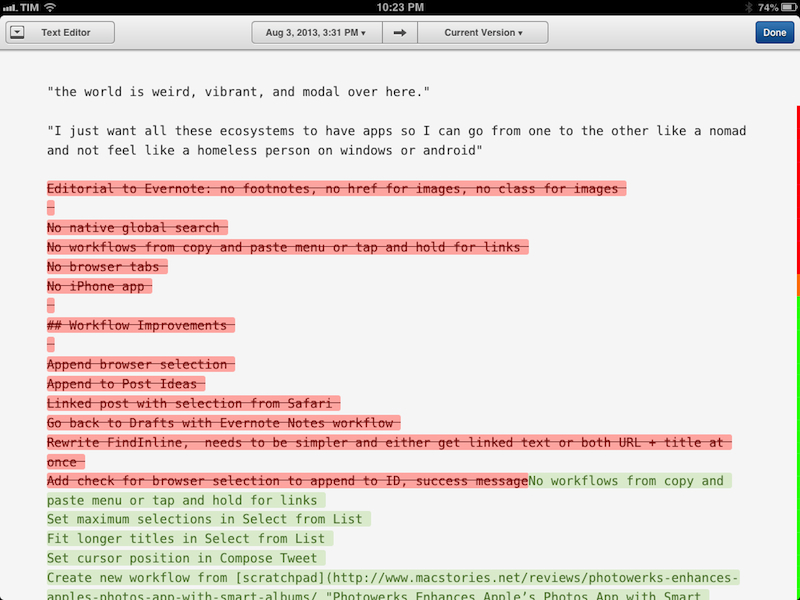
Versions work by fetching revisions of a document stored in Dropbox and loading them in a version browser interface that, by default, displays the latest (current) version as two tabs at the top of the screen. The version browser can be minimized by tapping the Text Editor button in the top toolbar (a feature that is shared across other functionalities in Editorial); when the version browser is minimized and docked at the bottom of the editor, you can write and edit your document without limitations.
The version browser primarily acts as a diff tool, comparing two versions of the same file and displaying additions as green highlights and deletions in red (text that is unchanged won’t be highlighted); at the top, you can choose to compare an older version with the current one, or two old versions against each other.
When comparing an old version with the current one available in Editorial (and synced to Dropbox), you’ll have two options for restore: you can “restore this version” (through the arrow icon at the top) to quickly take an entire version and restore it (replacing the current one), or you can manually select a deletion and choose “Restore Selection” from the copy & paste menu. In both cases, the version browser will be minimized, selecting the document’s text (with a gray selection) and showing an Undo button at the bottom to cancel the restore process. If you don’t want to see deletions inline, you can “collapse deletions”, and they will be displayed as ellipses in the version preview screen. I don’t use versions much – it’s one of those features that you’ll be glad to have when you’ll need it; it has certainly saved me in those couple of occasions where I had deleted something that I wanted back.[10]
The “gray selection” that I mentioned above is Editorial’s way of keeping the selection active when the iPad’s keyboard is dismissed.
In most iPad apps, selecting text when the keyboard is shown and then dismissing the keyboard results in losing the selection; Editorial has a custom selection engine that allows you to select text as you normally would when the keyboard is shown, but also to dismiss the keyboard, keep the selection, and tap the dimmed selection again to bring up the keyboard without losing the selection at all. When the selection is dimmed, you can do anything that you can typically do with a non-custom selection, such as extend it and copy text. This is a minor detail – but one that shows the level of care that went into making sure Editorial could enhance even the smallest, most obvious aspects of editing text on an iPad. After months of testing, I believe this implementation is superior to Apple’s text selection – it doesn’t solve all the problems of editing text on iOS, but it’s a solid addition.
Editorial’s selection engine is best demonstrated by the in-document search available in the top toolbar: when searching for an occurrence of a word in the current document, Editorial will highlight results in yellow and select the first occurrence with a gray selection. You can move between multiple occurrences with the arrow buttons next to the search field, or tap the selection to make it active and start typing with the keyboard to delete/replace a selected occurrence.
Last year, I took a look at the best MultiMarkdown previews in iOS text editors, and I concluded that Byword had the best preview tool. Editorial follows Byword’s example and provides an excellent Preview panel that supports inline images (both as MMD or HTML code), code blocks and blockquotes, footnotes, links, headers, and more. You can tap & hold links to open them[11] or add them to Safari’s Reading List, and, overall, the preview just looks great. One thing I don’t like is that there is no shortcut for generating and copying HTML text in the Preview panel, as Editorial forces you to build a workflow for that. While this is a common scenario in Editorial as Zorn preferred showcasing the power of workflows over adding native features to the interface, I think that adding a “Copy HTML” button in the Preview would be a smart move that wouldn’t clutter the UI too much.[12]
Even without using workflows, Editorial’s text editor is versatile enough to guarantee a pleasant writing experience thanks to syntax highlighting, the extra keyboard row with character auto-pairing, swipe gestures and custom selection, versions, search, and the rich Preview panel. Editorial can be used as a text editor that doesn’t rely on workflows, but that would be short-sighted: Editorial’s real power lies in the workflow system, which is unlike anything you’ve seen on iOS before.
Workflows and Variables
Workflows are at the heart of Editorial: they define the app’s nature, its automation and inter-app communication capabilities, and its unique proposition for iPad users. Workflows are deeply intertwined with Editorial’s feature set and they’re completely open to user customization.
A workflow is a set of actions run sequentially from top to bottom – from the first action to the last one. Workflows generally handle text, as they are based on an input/output mechanism that receives and produces text to pass to other actions. Workflows can interact with text from the main editor, but they don’t have to. Moreover, because of the variety of available actions, workflows don’t have to exclusively handle text: you can augment them with Python scripting to create and upload images, add interactivity to them with actions that play sounds or present alert dialogs, open URLs, and move the position of the cursor in Editorial’s text editor. Workflows, reminiscent (in terms of UI and overall concept) of Automator for OS X, are primarily aimed at enhancing Editorial’s writing and editing process, but, with enough time and imagination, they can be turned into powerful solutions to automate several aspects of iOS.
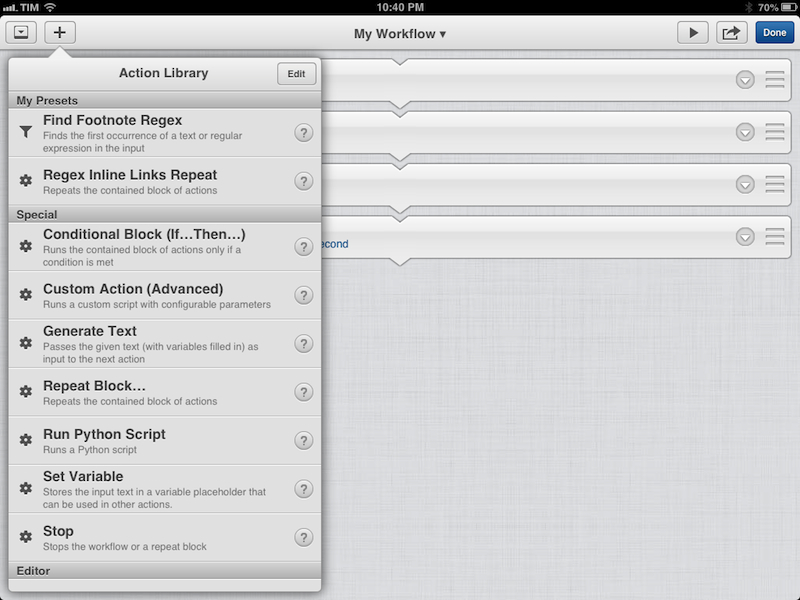
A workflow is made of actions, and actions are available in the Action Library. Editorial comes with 50 built-in actions that range from working with text to presenting custom UI elements or converting Markdown, and they are organized in categories:
Special
- Conditional Block (If… Then…)
- Custom Action
- Generate Text
- Repeat Block
- Run Python Script
- Set Variable
- Stop
Editor
- Extend Selection
- Get Bookmark URL
- Get Document Name
- Get Document Text
- Get File Contents
- Get Selected Text
- Move Caret
- Open Document
- Replace Selected Text
- Select Closest Word
- Select Range
- Set File Contents
Interaction
- Compose Email
- Compose Text Message
- Compose Tweet
- Console Output
- Request Text Input
- Select from List
- Show Alert
- Show Dictionary Definition
- Show HTML
- Show HUD Alert
Text Filters
- Change Case
- Convert Markdown to HTML
- Count
- Escape for Regular Expression
- Expand Snippet
- Extract Range
- Extract URLs
- Filter Lines
- Find
- Find / Replace
- Prefix / Suffix Lines
- Remove Duplicate Lines
- Remove Whitespace
- Sort Lines
- URL Escape
Utilities
- Math
- Play Sound Effect
- Set Clipboard
Web Browser
- Evaluate JavaScript
- Open URL
- Search Web
Many of these action names are rather self-explanatory, and, for a detailed summary of each action’s capabilities, you can open Editorial’s documentation and read through the Workflow Actions Reference. In this article, I’ll demonstrate Editorial’s workflow system by example, describing an action’s role in a workflow when necessary and providing an overview of the workflows that I use in Editorial.
Workflows can be accessed by tapping the wrench button in the upper right corner of the text editor; from the popover, you can swipe down to reveal a search bar to filter your workflows, hit the + button to create a new one, or tap Edit to navigate into Workflow Details. A workflow can have a name, abbreviation, description, icon, and, as mentioned above, it can also be added to the bookmarks bar; when searching for a workflow, Editorial can look both into the name and description fields – useful if you, like me, will end up with dozens of workflows and remembering names won’t suffice.
When you create a new workflow, you start with a blank canvas and a top toolbar that contains the name of your workflow (you can tap to edit it), a play button to run the workflow, a sharing icon, a Done button to go back to the editor, a + button to add new actions, and a button to minimize the workflow editor. Minimizing a workflow, like versions, allows you to keep the editor open while also seeing what’s happening in the current document – useful for debugging workflows that manipulate document text.
To add actions to a workflow, you can tap on them in the Action Library; each action that you’ll add will be inserted at the bottom of the workflow. Besides a name, actions have a brief description and a “?” button that you can tap to view the piece of documentation for an action inline within the Action Library popover. To rearrange actions in a workflow, you just drag & drop them.
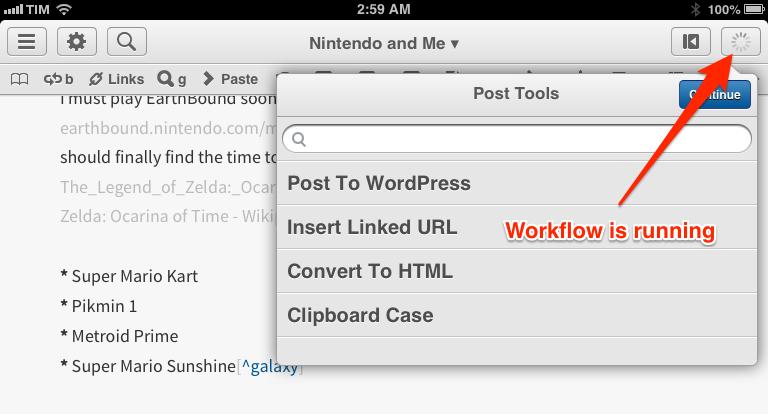
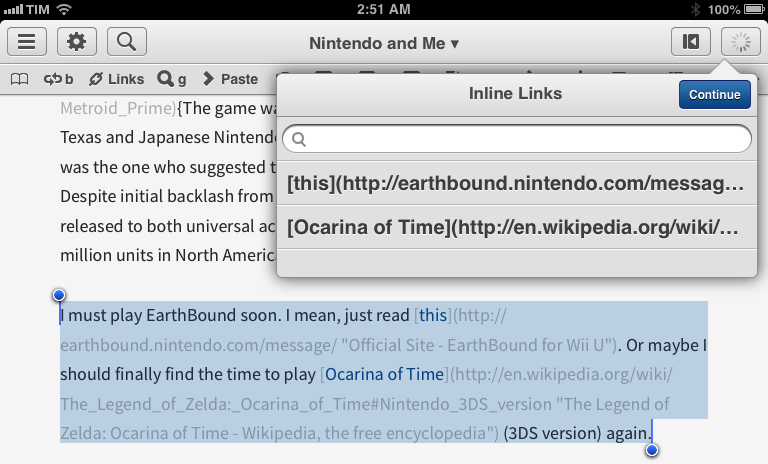
When you run a workflow, the wrench icon turns into a spinning indicator:
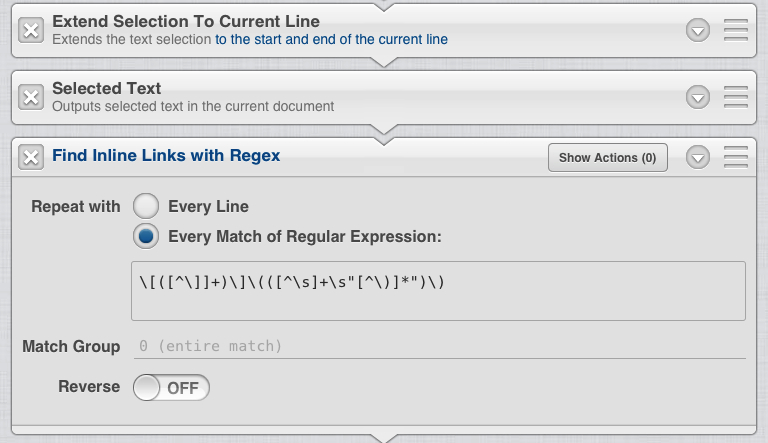
To better explain the process of creating workflows in Editorial, I’m going to demonstrate how you can build a workflow to insert an inline Markdown link in the editor.
Editorial is aware of things like the currently selected text or the webpage you have opened in the built-in web browser; to insert an inline link in a document you’re editing, we can take advantage of these aspects to avoid manual typing and copying of URLs.
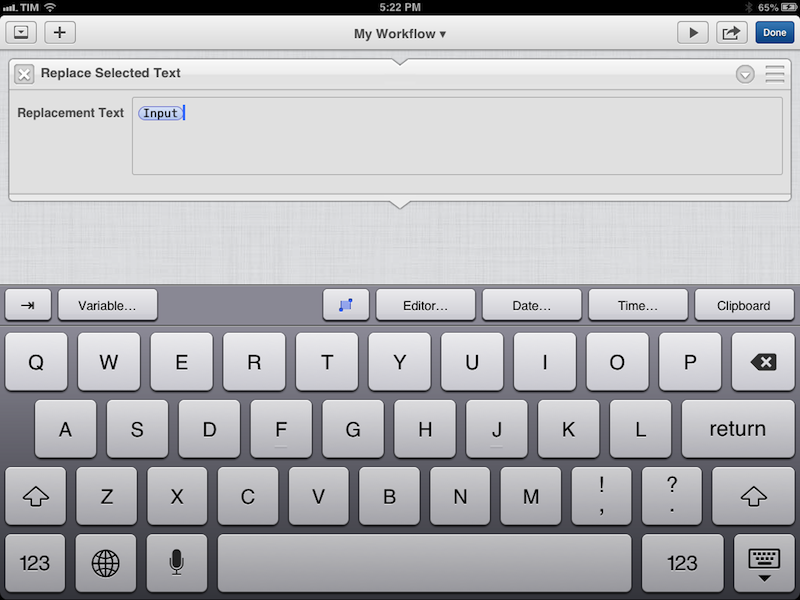
The easiest way to insert a link would be to use a single Replace Selected Text action, which replaces the selected text with a replacement text you can specify in the workflow; tapping on the action to add it to the workflow reveals the better part of Editorial’s workflow system:
There are several things to look at here for first-time users, and understanding the basic mechanism behind this simple action will be key to building more complex workflows.
Actions can be configured with parameters; in most cases, parameters can modify the input text that an action receives or the output that it produces, but they can also take on more advanced tasks such as setting the name of a button in an alert dialog or running regular expressions. In the case of Replace Selected Text, the default variable shown in the Replacement Text parameter is Input.
Variables are a key aspect of Editorial’s workflow system and you’ll have to learn how to use them and combine them with arbitrary text and other variables in order to chain multiple actions together. Variables are text tokens that can be stored in a workflow and re-used in other actions without having to follow a one-way input -> output pattern; every time a variable is used in a parameter, it is expanded and used by the workflow with its full text contents. An example of this may be a variable containing a placeholder for the current date and time that is generated at the beginning of the workflow but only used in the last action (when it’s not the direct input anymore); or, a variable containing a URL that was fetched from the browser in the first action, and used after a series of actions that worked with other bits of data. Variables are a handy way to store text that you’ll want to use in a workflow at a later time without having to constantly leverage the input/output mechanism, or, worse, the system clipboard.
For the Replace Selected Text action, the blue, OS X token-like bubble called Input is actually a variable that, as the name suggests, will be expanded to the text passed by the previous action. Because, however, we have a single action in the workflow, there is no “input” and the replacement text will end up being empty – unless we use other variables.
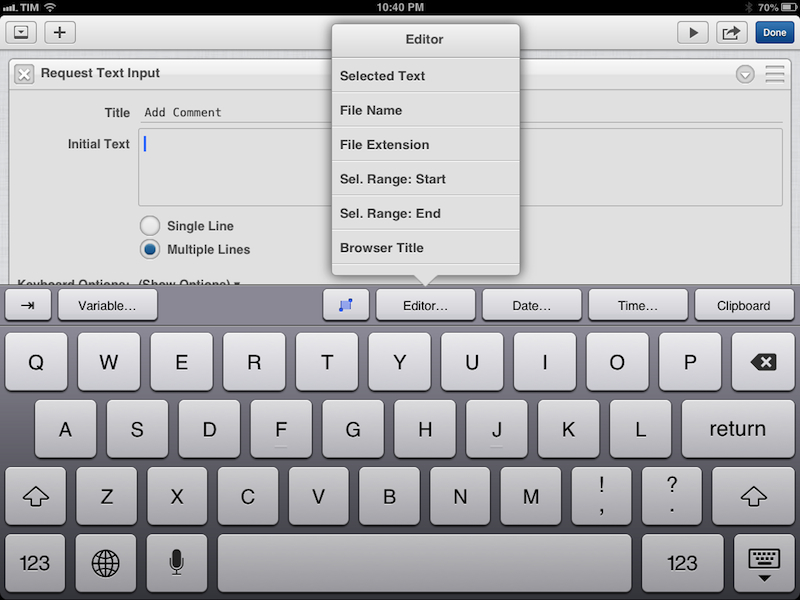
In the workflow editor, Editorial’s Markdown-oriented extra keyboard row turns into a series of buttons to quickly insert default variables into actions. The variables that Editorial ships with are:
- The current input
- Text that is currently selected
- File name and extension
- Browser title, URL, and selection
- The start/end (as range) of the current selection in the editor
- Date variables (for year, month, day)
- Time variables (for hour, minute, second, AM/PM)
- The contents of the system clipboard
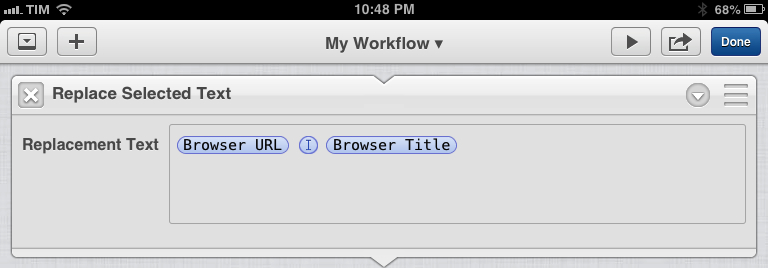
Additionally, in the same keyboard row, you’ll also see a tab key to insert a tab between characters, and, in some actions, a blue selection button to set the cursor position in a text string. The latter is similar to TextExpander’s cursor macro: if, for instance, you want to paste the browser URL and title in the editor and end up with the cursor between them, you can use the variables as shown below:
Variables can be inserted into actions by tapping on them in the extra keyboard row; variables that depend upon data that may or may not be available (such as a browser URL or a selection) will be returned as empty if they can’t be expanded (e.g. if Editorial doesn’t have any URL open in the built-in browser, there is no “Browser URL” variable to expand). In multi-line parameters, such as Replacement Text, you can have a mix of variables and plain text you’ve entered manually (e.g. “Browser URL” variable + “This is a cool link” text string); in single-line parameters (such as “Title” in the Show Alert action), only variables manually set by the user can be inserted using a “Variable” button in the copy & paste menu (a limitation of Editorial 1.0 – you can’t have both plain text and variables in single-line parameters).
Aside from built-in variables, users can set their own variables through the aptly-named Set Variable action. Setting a variable requires two parameters, Variable Name and Value; variables set through the “Set Variable” action will be available in the (also aptly-named) “Variable…” popover of the extra keyboard row.
The Replace Selected Text action we’ve added to our test workflow reveals, upon closer inspection, more features besides variables. An “x” button next to the action name allows you to delete an action from a workflow, while a drag handle to the far right lets you rearrange an action’s position in a workflow. Unfortunately, Editorial 1.0 doesn’t come with an “insert action at this point” command, so drag handles will soon turn into your best (and only, because you have no other choice) friends for long workflows that will require lots of drag & drop (new actions are always inserted at the bottom of a workflow).
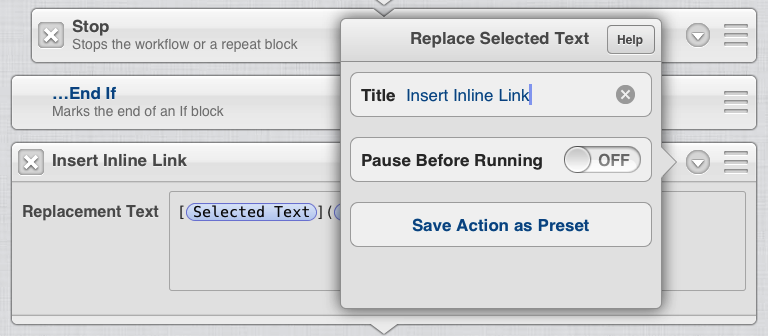
Actions can be renamed, paused, and saved as presets. By hitting the down-pointing triangle button next to the drag handle, you’ll open a popover showing a custom title field, a button to save an action in your preset library (for future reuse), and a “Pause Before Running switch that, if activated, reveals a second ”…Show Parameters” option. Title and presets are useful if you want to make actions more illustrative and easier to access in other workflows, whereas pausing allows you to debug a workflow and understand what parameters are being used, or, more simply, pause while something else needs to finish loading.
A paused action will show a slightly different triangle button and, when run, will open a rectangle-shaped indicator on the left side of the screen, which contains a blue “Continue” button and an edit button to show the parameters that are being used, plus a Stop button. The pause indicator can be dragged up and down on screen; if the “Show Parameters” option is set to On, the popover with parameters will come up by default.
Pausing actions can come in handy when debugging workflows and having to inspect parameters that are passed from one action to another; on the other hand, though, don’t underestimate the potential of pausing as a way to make other actions complete and return a correct set of data – such as moving between different documents or launching another app and then coming back to Editorial.
With an increased knowledge of Editorial’s workflow system, we can go back to our Replace Selected Text and use a mix of plain text and default variables to turn a text selection into a Markdown inline link. As it turns out, we can accomplish this by building a workflow that contains a single action and that uses three variables and plain text characters to use Markdown’s inline link syntax:
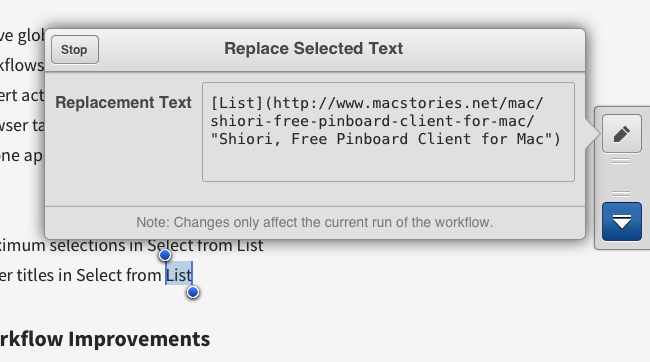
If you pause the action before running it, you can see the parameters that Editorial is going to use: the current selection in the editor, and URL + title from the built-in web browser. When run, the action will simply replace the selection with the new data inline, putting the cursor at the end of the Markdown link.
This workflow is simple and it gets the job done, but it could be improved in several ways: it doesn’t have any way to check for available conditions; it doesn’t know how to handle errors; and, it could use a “success message” to let the user know that the workflow was completed without issues. All of this can be accomplished in Editorial by adding more actions to the workflow.
The first thing I would add is a conditional block to check whether a URL is actually open in the browser. A conditional block (or “If block”) contains a group of actions that are run only if certain conditions are met; actions inside a conditional block are nested in the workflow editor, and you can have up to three nested levels of conditions inside a conditional block, a feature that opens up to a great deal of condition-checking and workflow accuracy.
There are five conditions that can be checked for any text string supported by Editorial (input, variables, plain text, etc):
- Run if…is Equal to
- Run if…is Not Equal to
- Run if…Contains
- Run if…Doesn’t Contain
- Run if…Matches Regular Expression
Combining these five conditions with variables and nested blocks unlocks a deeper layer of flexibility – if you want to build state-of-the-art workflows that can adapt to varying situations and scenarios, you’re going to have to use conditional blocks profusely.
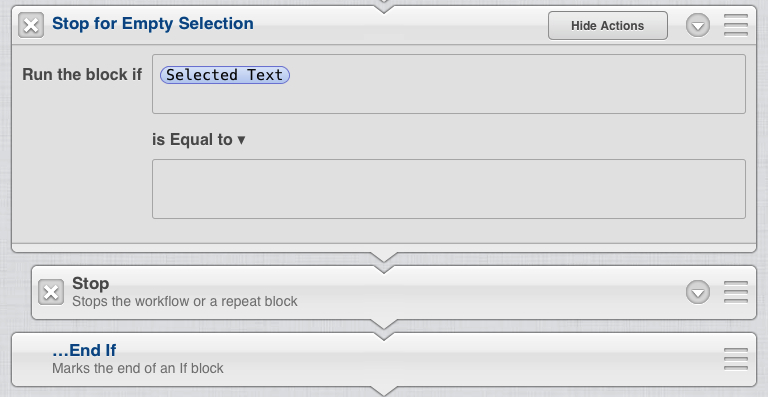
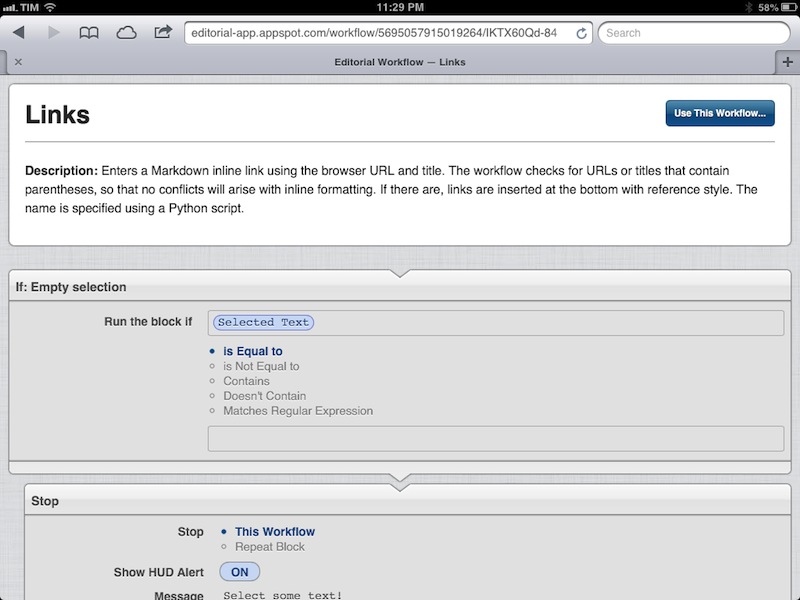
For our workflow, the first condition we want to check is whether there is an active selection in the editor, and, if there’s not, stop the workflow and tell the user why. Therefore, we can add a conditional block that, in case of an empty Selected Text variable, will stop the workflow and show a HUD message to communicate the error. To check for an empty variable, you can leave the “is Equal to” multi-line parameter empty.
The Stop action can be used to stop a workflow or a Repeat Block (more on this later); additionally, it can show a native HUD alert containing a text message. In our case, we’ll write “Select some text first!” to inform the user that the workflow to replace the currently selected text was stopped for lacking a text selection in the first place.
Still, even with a selection, Editorial may not have a webpage open in the built-in browser, and we’re relying on Browser URL and Browser Title for our replacement text. Because Markdown will generate an inline link even without a Browser Title, we’ll add a second conditional block similar to the first one, but this time checking for an empty Browser URL. Like the first block, the workflow will be stopped if the condition is met.
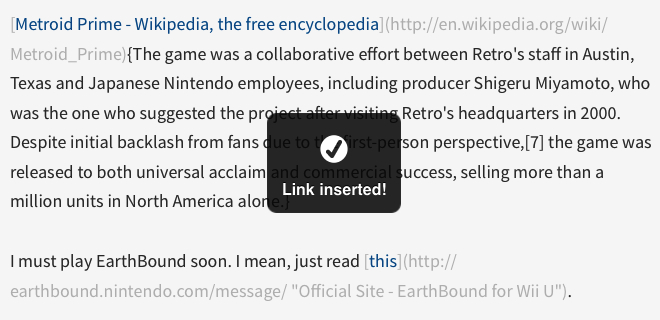
Once we’ve ensured that Editorial has an active selection in the editor and that a URL is open in the browser, we can go ahead and run the Replace Selected Text action that we built at the beginning, this time renaming it as “Insert Inline Link” to make it nicer and more explanatory. To communicate the correct and complete execution of the workflow, we can insert a Show HUD action that will show a HUD alert similar to the Stop action’s one, but with a checkmark; in the Show HUD action, you can specify a text message and duration (1, 2, or 3 seconds) of the translucent overlay (which doesn’t block touches on screen, unlike alert dialogs).
At this point, we’ve ended up with a solid workflow that does what intended, using conditional blocks to make sure actions aren’t run when data isn’t available, and built-in variables to grab text from the browser and editor. I like inline Markdown links, as I prefer seeing what I’m linking to directly from the sentence that I’m currently editing, without having to scroll to another position in the document. And yet, there are times when I need to use reference links – either for syntax compatibility or readability purposes.
How hard would it be to tweak our workflow to make it ask us whether we want to use an inline or reference link, and if we choose reference ensure that it’ll correctly create a link for us? Not too hard – but the solution I’m going to show you will use Editorial’s most advanced features: Python scripts and Custom Actions.
Python and Custom Actions
Like Pythonista, Editorial comes with a built-in Python interpreter and a scriptable editor. The differences between the two apps, however, go beyond the assumption that they share the same Python engine for the same tasks: Editorial’s Python scripts can do the same things they could in Pythonista – in fact, you should be able to port your scripts over without major changes (if any) – but they’ve been enhanced to directly plug into the text editor and workflows as well. This is epitomized by the fact that “Run Python Script” is actually a workflow action in Editorial.
I don’t need to explain the potential and limitations of Zorn’s Python interpreter on iOS: for that, my initial Pythonista review and subsequent coverage of the app updates should be enough to give you an idea of the scope of native iOS integrations that Pythonista achieved. Editorial follows the same path, and adds a new workflow module with functions to get and set variables, receive input and parameters, set output, and stop a workflow. If, when building a workflow, you’ll come up with an idea that can’t be realized with built-in actions, you can resort to Python scripting for a more advanced solution that unlocks the power of Python’s Standard Library and Zorn’s custom modules for iOS (all of them ported from Pythonista).
For instance, sets of actions that deal with list creation and appending text may be easier to put together in Python (if you know your way around the basics of the language) rather than multiple actions and variables in a workflow. With Editorial’s “Run Python Script” action, getting the value (i.e. the expanded text) of a variable is as fast as workflow.get_variable('Name'), where Name is, unsurprisingly, the name of a variable you’ve previously set in a workflow; the opposite is true for workflow.set_variable(), where you assign a string of text to a variable’s value. And, as you can guess, when running workflow.set_output() in Python, the output will be fetched by Editorial’s built-in Input variable in a following action.
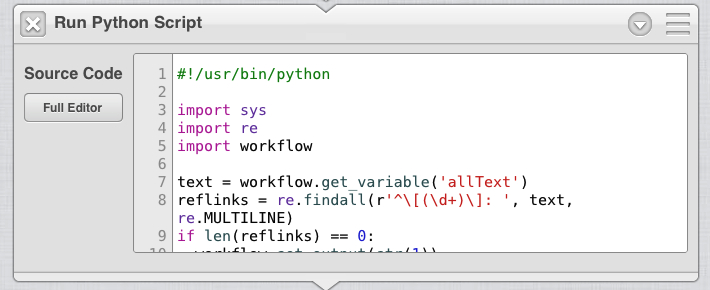
The “Run Python Script” action comes with two types of editor: the inline, “mini” source code editor and the full editor.
The first one is shown inline within a workflow, and it comes with Pythonista’s syntax highlighting and line numbers but no automatic character pairing or auto-completion. This is meant for short scripts and people who know Python well.
For longer scripts and to have access to the “real” editor, you can tap the Full Editor button and you’ll be brought to a screen that resembles Pythonista, only with Editorial’s minimize button and support for swipe gestures to open the sidebar or accessory panels. For everything else, it’s really “just” Pythonista’s editor and interpreter (plus documentation) with direct integration with Editorial’s workflow system.
Which is an insanely powerful addition. “Run Python Script” is a great action, but if you’re going to reuse your Python programs several times and want a more visual way of understanding how they work in tandem with other actions in a workflow, you’ll want to use a Custom Action.
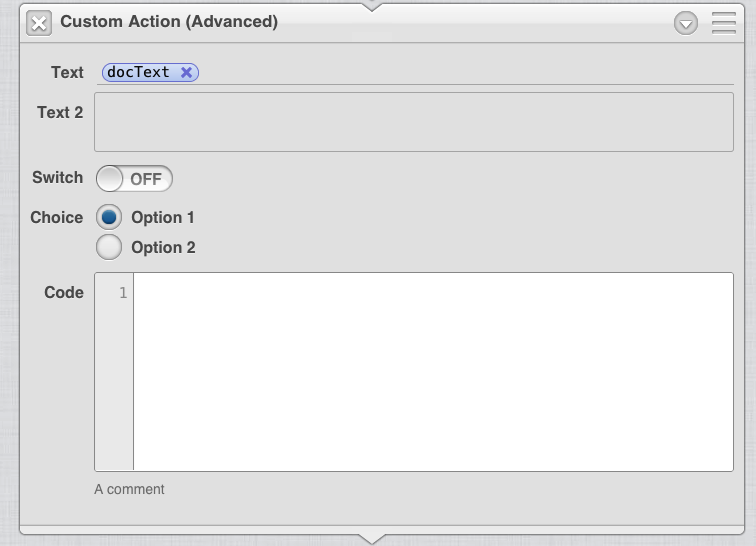
Custom actions run Python scripts with configurable parameters. In the workflow editor, you’ll get a script-powered action that doesn’t show the Python editor inline, but that instead lets you display a series of parameters, choosing from six types:
- Single-line text
- Multi-line text
- Switch
- Single Choice
- Code
- Comment
The purpose of custom actions with “visual” parameters shown in the editor is to allow users to create advanced Python scripts that can be easily shared and re-used without having to manually edit the source code. By properly taking advantage of custom actions, you can write a script that accounts for every possible scenario (is the switch On or Off? Did the user choose Option 1 or Option 2? And so forth) and that behaves as expected for different users or even for various implementations of the same script in multiple actions, while customization is entirely done through the (easier to understand) parameters. With custom actions, parameters act as a visual front-end for data that you’ll feed to a script, and they can save you a lot of time if you find yourself using the same scripts, in slightly altered implementations, over and over.
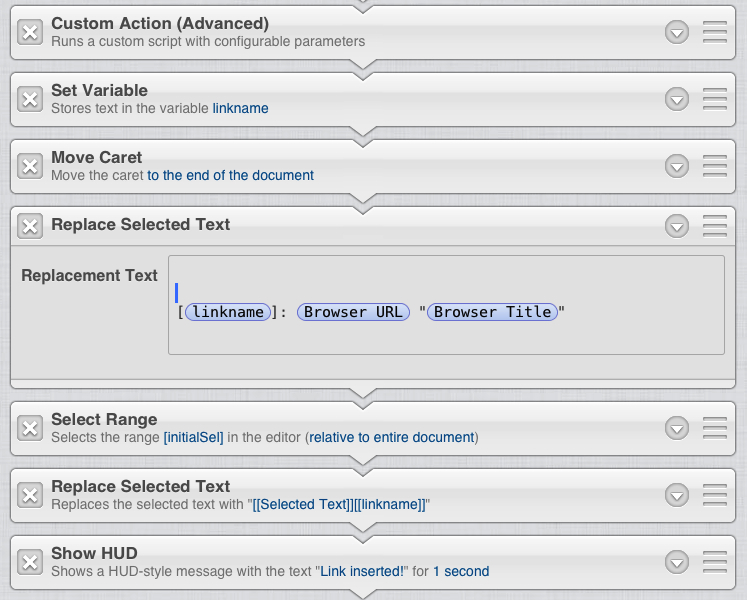
So let’s go back to our workflow to insert Markdown links. We have to choose whether we want to use an inline link or a reference-style one. The first addition we can make to the workflow is to make sure the document’s text is saved in a variable, as we’ll use it later in a Python script to automatically generate reference link numbers.
Then, we can save the current cursor position through the Selection Range variables. In Editorial, a range is expressed as two numbers in a from:to format that indicate an absolute position in the entire document or the current selection. In a document where nothing is selected, 0:3 would set the range to the first three characters and 3: to everything except for the first three characters; if you try to get a range for an active selection, the first character in the selection would get index 0:, independently from its position in the entire document. Once you understand ranges (start at 0, each character counts as 1), they become a powerful tool to manipulate the cursor position in Editorial.
To save the initial selection in a variable, use the built-in Sel. Range: Start and Sel. Range: End variables, placing a colon between them to respect Editorial’s range format. The initial selection represents the text that we want to turn into a link – it’s the same selection that we’re checking against in the “Empty Selection” If block we added above. Once turned into a link, this text will be highlighted in blue by Editorial.
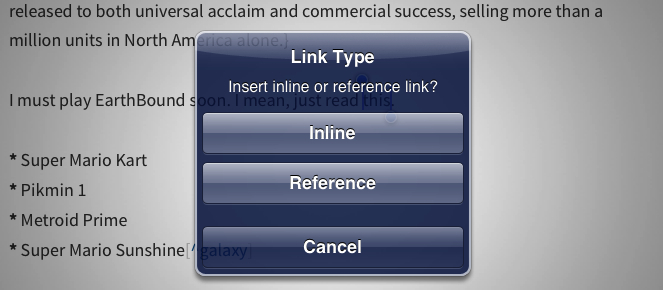
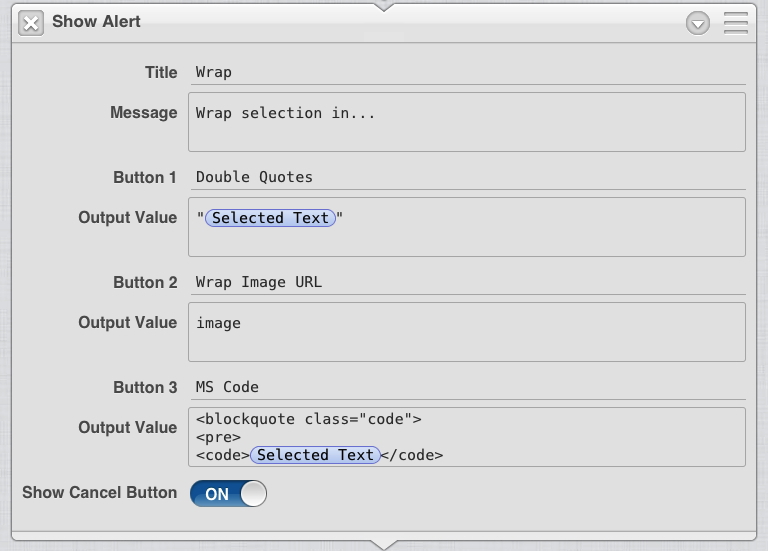
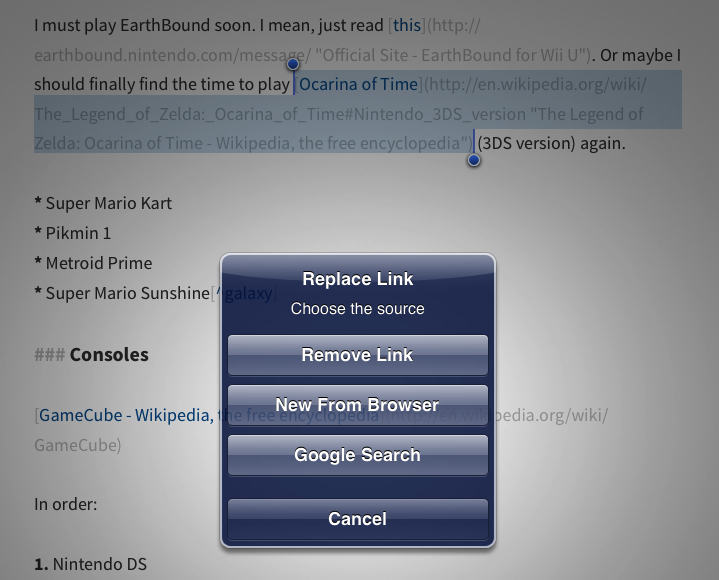
The next step is to build a nice UI for choosing the kind of link we want to use, because, frankly, presenting a choice by printing it in the Python console isn’t exactly attractive. Fortunately, Editorial comes with a Show Alert action that pops up the native iOS message alert – only with button names and text that we can set:
Show Alert is entirely customizable (within iOS’ limitations for alerts): it can show a custom title, message, up to three buttons with a custom name, and a Cancel button. The cool thing about buttons is that they can output a text value when pressed, which is exactly what we’ll do to check on the user’s decision: the “Inline” button will output “inline”, and the Reference button will output “reference”.
I think you know where this is going. After presenting a choice and setting the output to two separate values, we can take the Replace Selected Text + Show HUD combo that we were using in the first version of the workflow and put it inside an If block that runs only if the input is equal to “inline” (without quotes).
Next, we need to insert a Markdown reference link if the choice on the alert dialog was “reference”. Now, this is open to personal interpretation and taste, but the way I generally like to go about this is to trust Dr. Drang. Last year, he posted a short and elegant Python script to automatically generate numbers for reference-style links by looking into a document text, checking whether there were any reference link numbers, and incrementing the largest by one. In this way, if the script finds 0 reference links, the new one gets the 1 reference; if there are, say, 4 already, the new one gets 5 – and you don’t have to type any of that. But how?
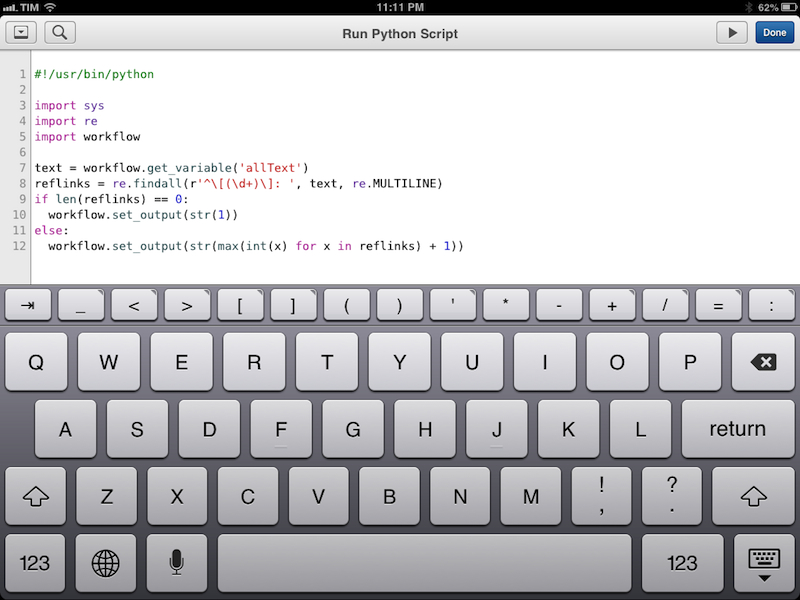
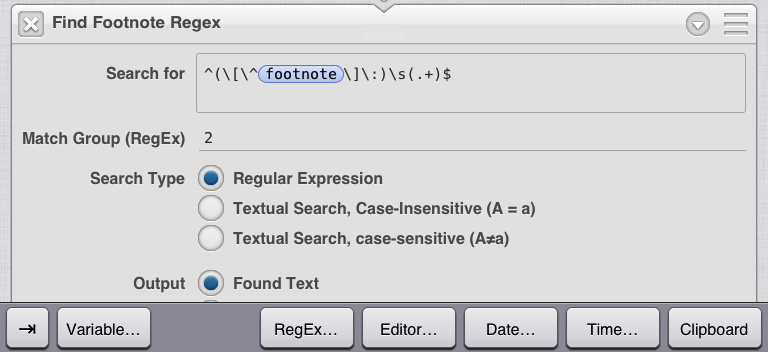
Drang used a regular expression to check for a match at the beginning of a line (where a reference link typically is) containing a digit inside square brackets, followed by a colon and a space. That’s the format for reference links that I want to use, and the script works in Editorial out of the box with minimal tweaking: instead of reading input from stdin, we can use the workflow module and the document text variable that we saved at the beginning of the script.
I set up my script as a custom action, so the document’s text is passed as a variable to a parameter, which lets me avoid changing the variable’s name in the source code. To fetch the parameter’s value, I use the get_parameters() function of the workflow module.
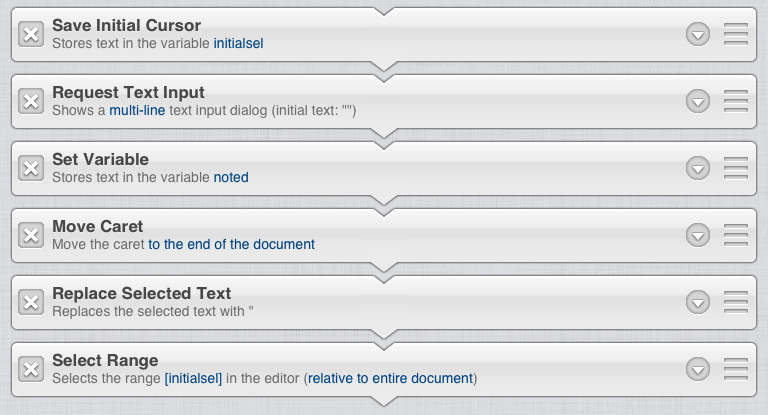
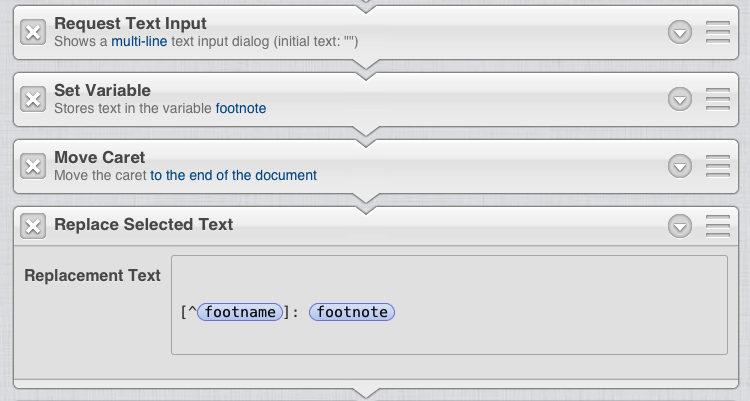
With the output set to the number we need to use in the reference link, we can move to the last part of the workflow, which takes care of inserting the link at the bottom of the document and returning to the original cursor position. First, the link number is saved in a variable; then, using the Move Caret action, we move the cursor to the end of the document (using “Forward” as direction), and, through Replace Selected Text, we insert a reference link mixing variables and plain text:
The trick here is to add a blank line to Replace Selected Text so that the reference link will always be separated from the document and/or previous reference links; it’s also important to understand that, when no text is selected, “replacing” selecting text simply means inserting text at cursor position. And because the cursor is at the botton, that’s where text will be inserted.
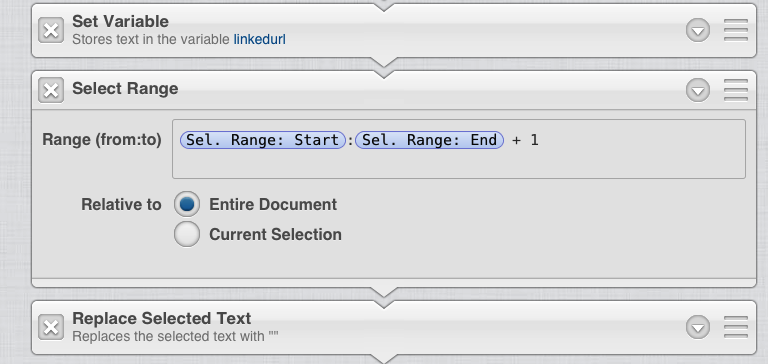
For the last three actions, we need to turn the original selection into a link. That’s why we saved the initial selection as a variable: using the Select Range action, we can select initialSel (which will be expanded to the from:to value by Editorial) relative to the entire document, replace selected text with the necessary Markdown formatting, and show a success HUD. The workflow is done.
A note on the initial selection and turning it into a Markdown link. I could have run the Python script to generate a reference link number before going to the end of the document, but that would have made the process of re-selecting the original selection at the end of the workflow more complex (but not impossible). If I had decided to insert the Markdown link beforehand, returning to the initial range (because I want to end up with my cursor where I started) would have required me to calculate the additional characters I added to my selection – the square brackets and link numbers. It’s not impossible to do inline math calculations in Editorial – as I’ll explain later, it’s something I need to do sometimes – but, in this case, it’s just an extra step that adds clutter to the workflow.
Here’s a demo video of the test workflow we made for this review.
You can download the workflow here.
Workflow Sharing
You may be wondering what’s the Editorial URL I just used to share a workflow. Unlike Pythonista, Editorial has a sharing feature that allows you to generate a web-based, shareable preview of a workflow that you can send to other people. When opening the workflow web view in a browser, you’ll see a static HTML rendition of your workflow alongside a title, description (fetched from a workflow’s description upon sharing), and a button to add the workflow to Editorial. Tap the button and Editorial will open, adding the workflow to the library.
A nice touch is that, upon creating a public link Editorial will put the resulting URL into the clipboard and offer you to open it in the browser you set as default in the Settings.
Another one is that Editorial’s web app will recognize workflows containing Python scripts and display a security notice telling users to import the workflow only if they “trust the person who shared this with you, and if you know exactly what it does”.[13]
Eventually, I’d like to see a directory that highlights popular workflows shared by Editorial users and have the ability to update a previously-shared workflow using the same URL over and over (right now, a new URL is generated every time you create a public link). For now, I’m happy with the current sharing feature, as it’s undoubtedly better than having to share plain text or URL schemes.
The URL Scheme
Speaking of URL schemes, Editorial has one and it’s extremely flexible. The editorial:// URL scheme is based on and fully compliant with Greg Pierce’s x-callback-url, including support for x-success and x-cancel, but also x-error. It’s one of the most powerful URL schemes I’ve seen to date.
Raising an error in a URL scheme isn’t something you see every day, and Editorial uses this parameter when a workflow generates an error; a message isn’t shown, but the URL specified in x-error is opened, appending errorMessage and errorCode parameters to it. I never use x-error personally, but I like the idea.
I find the [[output]] placeholder for x-success much more interesting. Normally, a URL is provided to the x-success parameter, specifying the app/web address that you want to open if an action is completed successfully. This is the basic idea of Tweetbot callbacks in Google Chrome, for example. In Editorial, you can add an [[output]] tag to the URL, which will be expanded to the URL-escaped output of the last action of a workflow.
So let’s say you built a URL scheme that starts from Drafts, opens Editorial to run a workflow, and wants to open Tweetbot at the end. Using x-success=tweetbot://post?text=[[output]] will automatically launch Tweetbot’s compose screen, using a workflow’s output as text. I don’t use the [[output]] placeholder much in my workflows, but I’m sure that ideas for chaining workflows (and checking on “Input contains/is equal to”) and opening other apps will crop out soon.
Besides x-callback-url, Editorial’s URL scheme lets you open files, create new ones, run workflows, specify an input, and set a selection. This will open a file named “Test.txt” and select the first 50 characters in the editor through the URL scheme:
editorial://open/Test.txt?root=dropbox&selection=0-50
Of note, the fact that root can be Dropbox or local and the selection parameter, which is based, like the workflow action, on ranges. In the URL scheme, the from-to values are separated by a dash and not a colon, but, like the respective action, they have the advantage of working as a “set cursor” mechanism if only one value (the from one) is provided or no selection is available within that range. A nice trick is to be able to scroll to the end of the document by setting a very large selection value, like 500000.
But the key factor is that the URL scheme can also call and run specific workflows in your library. Let’s say you want to run a workflow called “Append”:
editorial://open/Test.txt?root=dropbox&selection=500000&command=Append
The URL scheme above would open Test.txt, scroll to the bottom of the document (assuming there aren’t 500,000 characters in it), and run the “Append” workflow from the library. Handy, but we can do more.
There’s an input parameter that we can use to pass text to the URL scheme. And if we can also open a specific document, run a workflow, and return to other apps with x-callback-url, it means that we can do this:
javascript:window.location='editorial://open/Scratchpad.txt?root=dropbox&command=AppendPad&selection=500000&input='+encodeURIComponent(document.title+'\n'+document.location.href)+'&x-error=editorial://&x-success=googlechrome://';
This is a bookmarklet that uses the URL scheme to send the webpage you’re viewing in Google Chrome to Editorial, append it at the end of a document by running a workflow, and return to Google Chrome within 2 seconds. If Editorial is already running and you like to use a separate browser for research purposes (or multiple tabs), you’ll barely see Editorial running the workflow that’s called by the URL scheme. You’ll end up with something like this appended to a document:
On the bookmarklet’s side, things are pretty straightforward: the “AppendPad” workflow is launched for the “Scratchpad” file I keep in Dropbox, setting the cursor position to a very high value that will be capped and will make Editorial scroll to the bottom; the webpage’s name, a new line, and the webpage’s URL are sent as input through JavaScript; in case of error, the workflow remains in Editorial, and, in case of success, the app returns to Google Chrome.
The workflow in Editorial is equally simple: it is stopped if the input is empty; if there is an input, it is saved to a variable (not required; I just like the elegancy of it), and it is inserted using “Replace Selected Text”. The timestamp is generated by Editorial’s built-in variables for date and time, mixed with plain text. You can download the workflow here.
As you’ll keep building workflows and coming up with ideas for speeding up tedious iOS tasks using Editorial’s automation tools chained to other apps, the URL scheme will turn out to be a powerful companion. The fact that the URL scheme can execute a workflow and open or create documents is especially valuable, as it’ll save you further taps and navigation across menus in Editorial.
The Accessory Panels
Editorial’s panels contain the HTML preview, Python console, the app’s documentation, and the built-in browser. I’d like to point out a few things I like about the browser and a feature of the console – the Python Scratchpad.
The Scratchpad is a full-featured Python editor that you can use to try out scripts that you don’t want to incorporate in workflows just yet. Think of it as a mini Pythonista, separate from the workflow system, with full access to Python shortcuts and documentation, for one script at a time. Before Zorn implemented the Scratchpad in the Editorial beta, whenever I wanted to try a new script I would create a new workflow, add a “Run Python Script” action to it, test the script, and then either delete or continue working on the workflow. The Scratchpad is persistent – the script you’re working on is preserved when you quit and relaunch Editorial – and it’s a clever way to play around with Python independently from the workflow system.[14] I would love to have a shortcut to “create a new workflow with this script” in the Scratchpad.
Editorial’s Browser doesn’t have multiple tabs, and that’s one of my few complaints about the app. I would have liked the possibility to keep more than a URL in the browser, even if that required the app to load them again due to memory constraints (especially noticeable on the iPad mini, which has always aggressively closed tabs in other browsers for me).
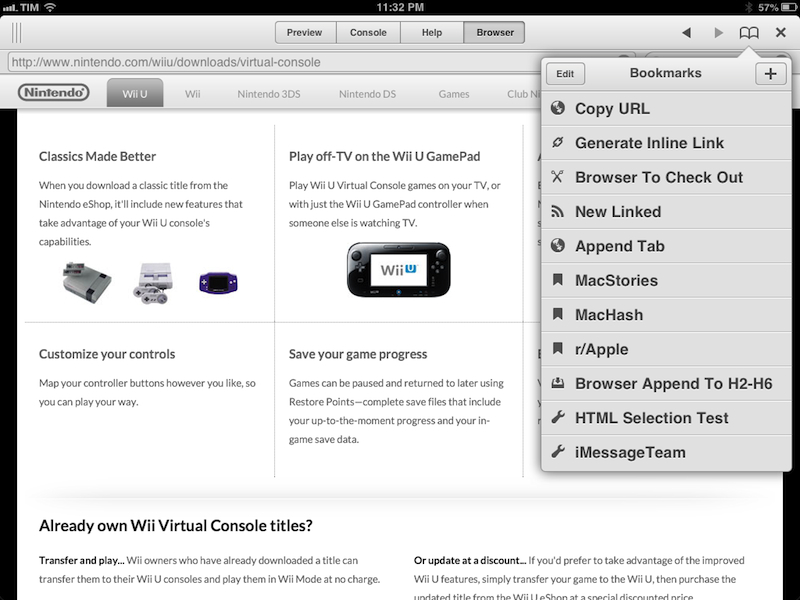
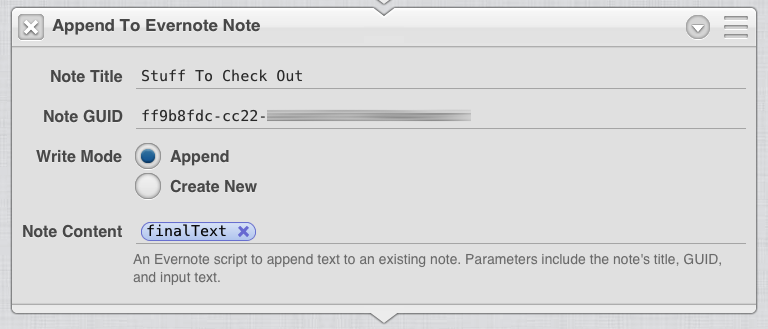
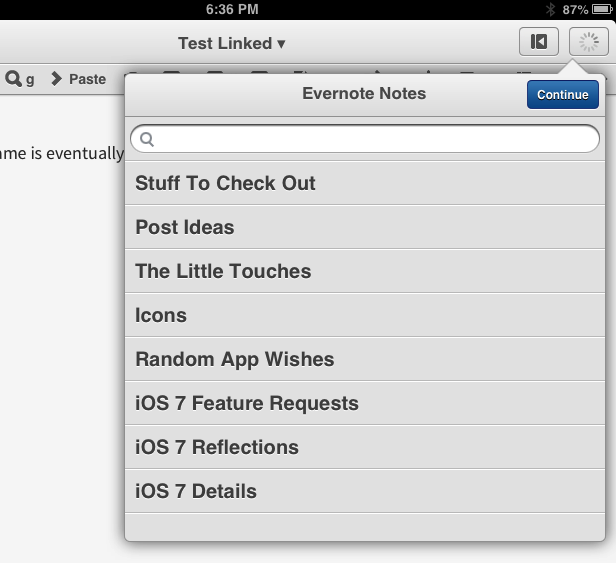
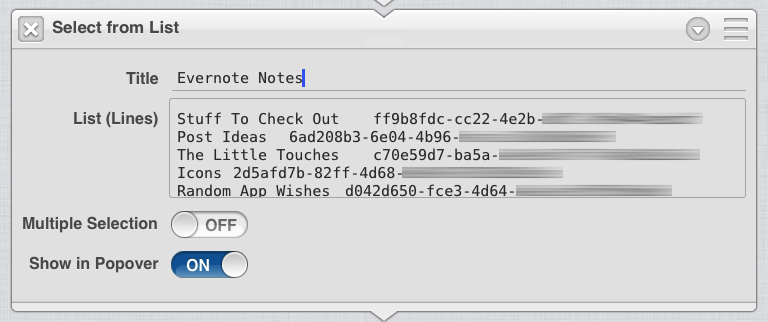
The best part about the browser is that it comes with a Bookmarks menu that can contain shortcuts to workflows or websites, which means that you can tweak a workflow such as my “Append to Scratchpad” one to be launched directly from the browser – simply use the built-in variables for Browser Title and URL to send the current webpage to a document. Thanks to Editorial’s support for selection in webpages, the browser can be used for research purposes: when I’m researching a particular topic, I have a workflow that sends a webpage’s URL, title, and selection to an Evernote note with a Python script, directly from Editorial’s browser.
The browser’s address bar doesn’t come with any sort of auto-completion, but there is a search field for Google searches (without suggestions). In the Bookmarks popover, websites you have bookmarked don’t show a favicon, but a monochromatic “ribbon” icon which distinguishes them from regular workflow bookmarks.
Editorial’s eschewal of native features in favor of user-made workflows continues in the browser with the lack of a simple “Copy URL” button: almost every third-party browser on iOS (and even Safari itself) comes with sharing options to copy the URL of the current page or send a link to friends on Facebook and Twitter. Editorial’s browser doesn’t come with any of these, preferring users to build their own commands instead.
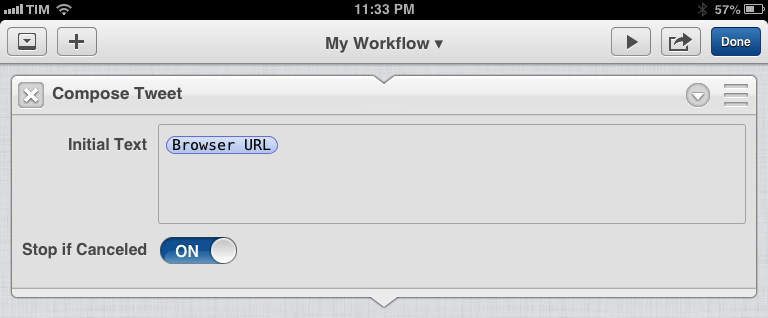
For instance, tweeting from the built-in browser (with native iOS Twitter integration) would require bookmarking a workflow that uses a single “Compose Tweet” action using the Browser URL variable as initial text:
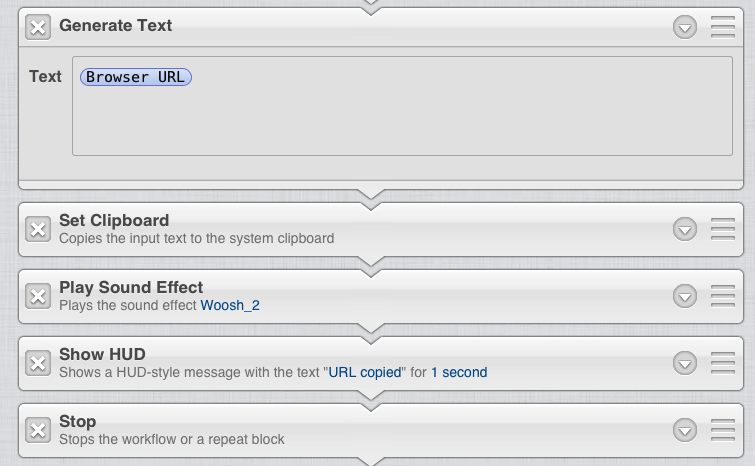
To copy a URL, you’d use a workflow to set the Browser URL variable to the clipboard and display a HUD message for confirmation, perhaps also playing a sound effect:
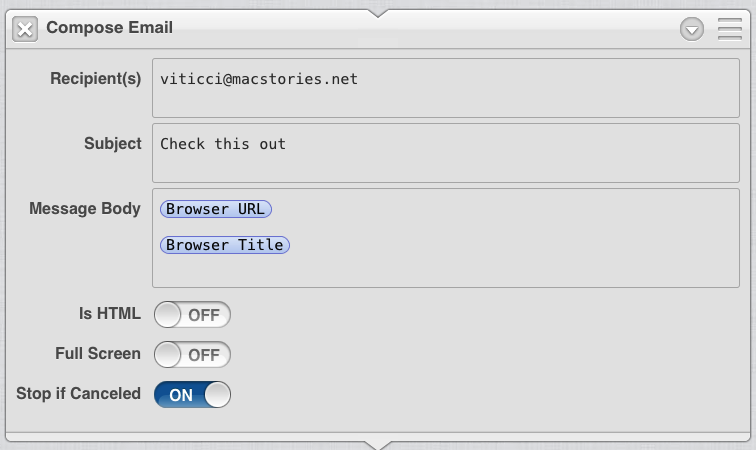
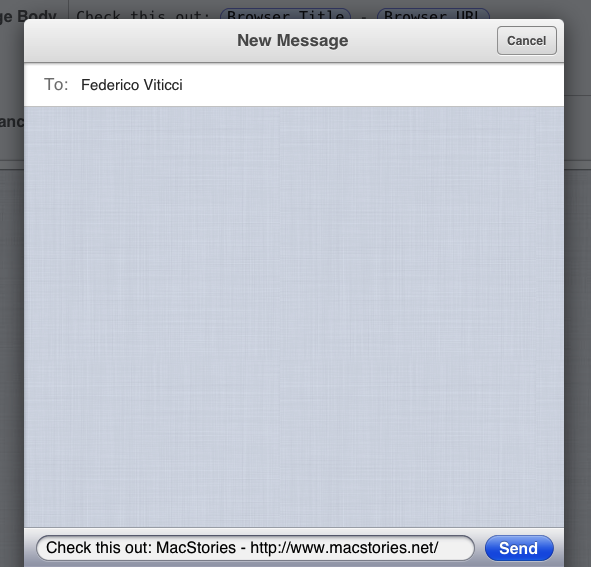
Similarly, to share a webpage via email, you can build a workflow that triggers the Compose Email action, which can bring up the native iOS Mail sharing UI while letting you set default recipients, subjects, a message body, and even decide whether you want to send HTML content or display the Mail panel in full-screen:
How about creating your own Messages sharing action that is always sent to a pre-defined recipient? No problem. Use the Compose Text Message action, plain text, and the browser variables to show a native Messages popup every time you want to send a link to a friend over iMessage:
I understand that some users may be put off by the browser’s complete lack of sharing features – there is no support for the native AirPrint or Reading List, for example.[15] However, because Editorial doesn’t want to be a browser but a text editor with a browser research tool, I think the choice of focusing on flexibility and customizable workflows is a good call in that it enables users to decide which actions they want, and how to activate them.
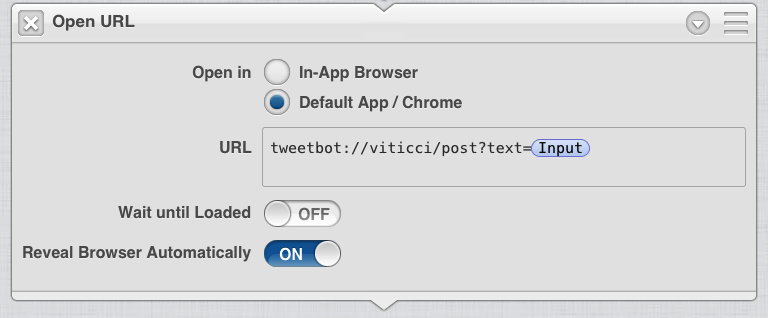
As further evidence, take the “Open URL” action. Normally, you’d use this to open a URL in the built-in browser or the browser you chose in the Settings. However, because you can enter anything you want in the URL parameter – either URLs or placeholders like variables – you can use Open URLs to launch other third-party apps through URL schemes.
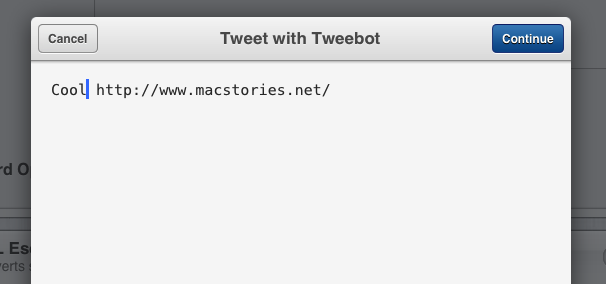
This is one of the actions that I’m constantly using to make Editorial communicate with other apps I rely upon on a daily basis. Want to tweet the current webpage URL plus a comment in Tweetbot? It’s three actions.
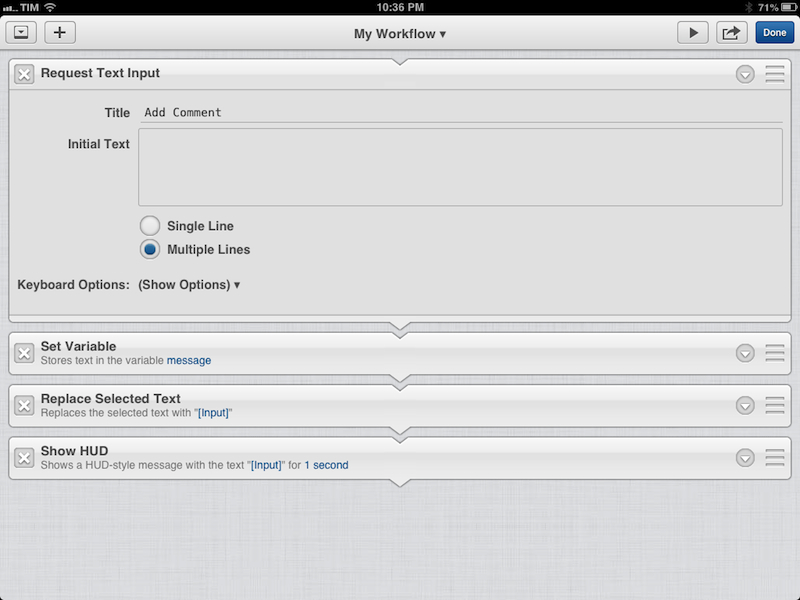
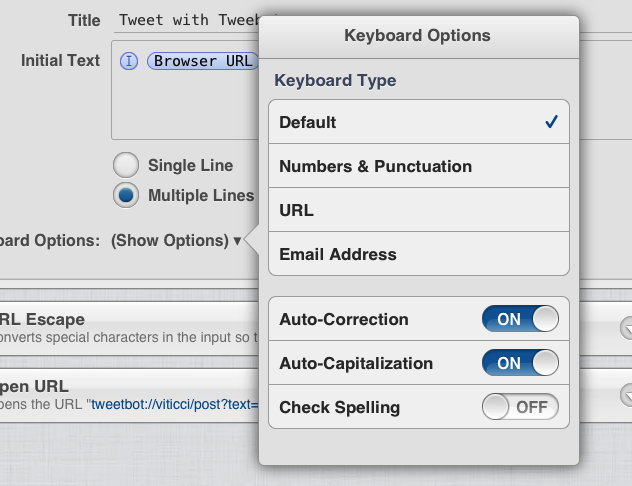
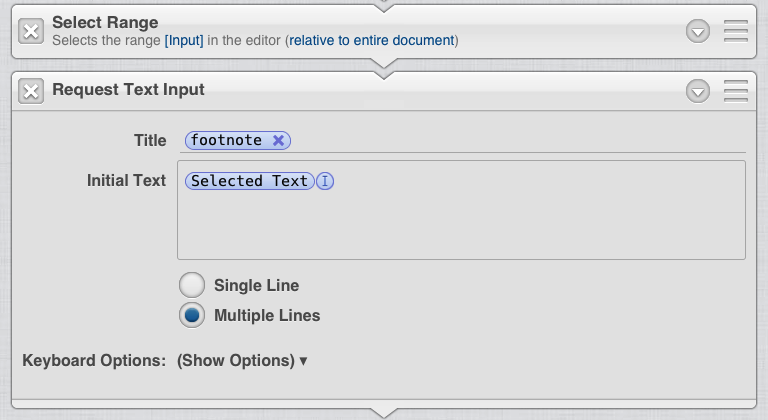
Request Text Input will pop up a modal text view where you can type your comment. You can set the view to come up with some initial text already displayed, so you can pre-fill the field with a cursor placeholder and the browser URL; this will let you start typing before the URL. Also nice about Request Text Input: it comes with Keyboard Options to select the Keyboard Type (Default; Numbers & Punctuation; URL; Email Address) and activate auto-correction, auto-capitalization, and spellcheck. I love this action.
Encode what you just typed with URL Escape. You’ll be launching Tweetbot, and Tweetbot wants percent-encoded text.
Launch Tweetbot with Open URL using the Tweetbot URL scheme and a simple Input variable as the text you want to post.
You can apply this concept to basically any app that supports a URL scheme and incoming text. You can send text to Drafts to trigger actions; you can select an address in the browser and send it to Google Maps; you can open links in Google Chrome, iCab, or perhaps bookmark a link Pushpin and come back to Editorial automatically. Just keep in mind the URL Escape + Open URL combination, and you’ll be fine.
Also worth mentioning is the fact that Editorial’s browser has an “Evaluate JavaScript” action that lets you run JavaScript in the browser and pass output to another action in a workflow. In simple terms, this means that you can take your existing bookmarklets (see our collection on MacStories) and bring them over to Editorial, saving them as bookmarked workflows in the browser. In my tests, I noticed that things like opening links in 1Password, Google Chrome, or Tweetbot worked fine as JavaScript bookmarklets, whereas more advanced implementations such as alerts or grabbing an HTML selection required more changes or just didn’t work in Editorial. I wouldn’t recommend relying on JavaScript to get data in and out of the browser, but if you just want to port your existing bookmarklets, the action is there.
Here’s a video showing Evaluate JavaScript in action with a workflow to send rich text to Evernote from Editorial’s browser.
Editorial’s browser isn’t as full-featured (in terms of native additions to the interface) as Writing Kit’s one. But the two apps share different underlying philosophies, and it wouldn’t be fair to compare them. I would appreciate having multiple tabs in the browser, as well as a way to choose whether you want to place a shortcut to a workflow in the Copy & Paste menu, which feels more natural to me when I’m dealing with a text selection I want to act on. Editorial’s browser and URL-launching system are deeply integrated with workflows, and they are a fundamental part of my writing and publishing process with the app.
Snippets
Editorial has both its own snippet system and support for TextExpander snippets on iOS 6. Snippets are bits of text that can be inserted in the editor (or in a workflow action) by typing an abbrevation: instead of typing your full email address every time, you can set up an eee abbreviation that will automatically insert text for you, for example.
Snippets are created and managed in the Snippets popover, accessible from a button in the extra keyboard row of the text editor.
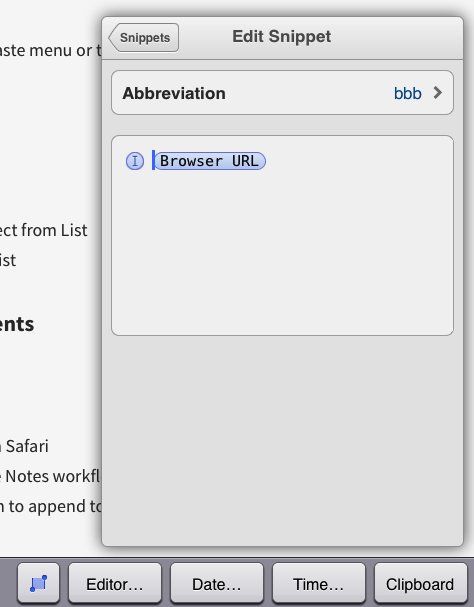
Editorial’s snippet system supports the same built-in variables of workflows: in the text field for editing a snippet, you can enter plain text but also insert variables for the clipboard, browser URL and title, cursor position, and more.
When assigning a new abbreviation to a snippet, Editorial will show conflicts with existing abbreviations in red, also pulling in abbreviations from TextExpander and prefixing them with “[TE]”. In the editor, you can start typing an abbreviation and either complete it or tap on the suggestion bubble to insert the snippet (the abbreviation will be deleted and replaced by the expanded text, just like in TextExpander).
Being able to trigger a workflow using the keyboard is a practical approach to letting users speed up Editorial without having to tap on bookmark buttons or menus; it can be particularly handy when you’re focused on writing, you’ve hidden the bookmarks bar in the editor, and you still want a quick way to activate a workflow (not to mention the convenience of not having to touch the iPad’s screen when typing with an external keyboard). Something that I use a lot when writing is an abbreviation to open websites I frequently visit in the browser, which benefits from the option of not automatically revealing the built-in browser; in this way, I can open a website in the background, finish a sentence, and then swipe to view the browser. The regular plain text functionality of “normal” snippets is useful, but somewhat expected in iOS text editors at this point.
TextExpander Syntax
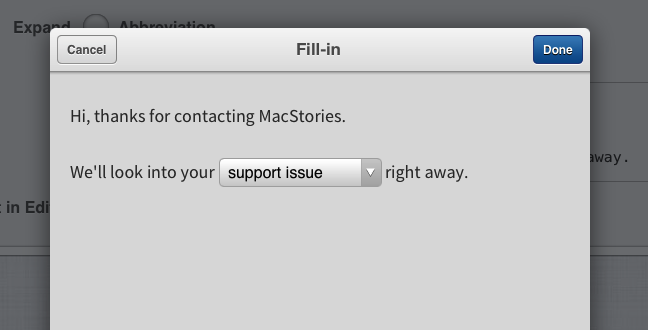
Editorial’s integration with TextExpander touch’s fill-ins is also interesting. In the editor, you can type the abbreviation for a fill-in, and Editorial won’t launch TextExpander like Drafts does – instead, it’ll bring up a custom rendition of TextExpander’s fill-in UI. In order to avoid yanking users out of Editorial to expand fill-in snippets, Zorn basically wrote a standalone interpreter of TextExpander’s fill-in syntax, which allows Editorial to a) recognize TextExpander snippets but also b) mimic their appearance and bring them up inside the app.
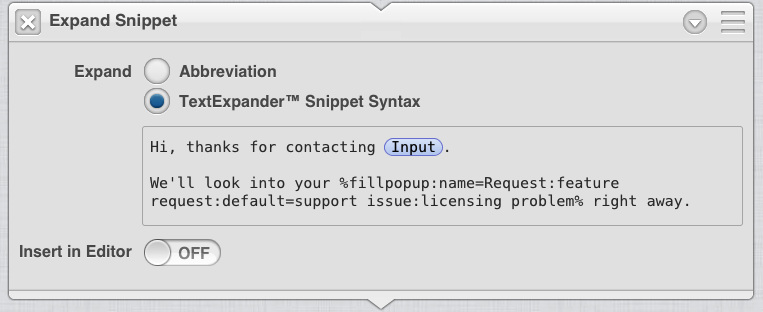
A good way to understand how this works is to use the Expand Snippet action, which lets you generate expanded text from an existing snippet in a workflow. Expand Snippet’s primary functionality is to expand an Editorial abbreviation into the full snippet, passing it to another action or also choosing to insert it into the editor. This can be useful if you have snippets for things like timestamps or boilerplate text that you want to integrate with workflows without turning them into separate actions or rewriting them from scratch.
Expand Snippet has a “TextExpander Snippet Syntax” parameter too, which has a text field where you can paste TextExpander’s macro syntax to bring up a fill-in snippet during a workflow. TextExpander doesn’t have to be installed for this to work; and because Editorial is using its parser to generate a fill-in off TextExpander’s syntax, you can intermix workflow variables within a fill-in – something that wouldn’t be possible with TextExpander alone. Still, my recommendation is to keep TextExpander on your iPad, because you can’t seriously pretend you’re going to type out the fill-in syntax by hand; create fill-ins in TextExpander, copy them, paste them into Editorial, and integrate variables with the fill-in syntax.
An obvious implementation of variables mixed with TextExpander fill-ins is to create a workflow that lets you compose an email template using both Editorial UI elements and a fill-in’s interface for multiple choices and optional sections.
In the test workflow I created, I can choose between various company names from a “Select from List” action; the output is inserted in the fill-in, which provides a better UI for seeing both plain text and popup menus at the same time. In the fill-in, I can select the kind of email I received from my imaginary customer, and thank him/her for contacting my company. Then, I can pipe all this piece of text into a Compose Email action.
Editorial’s snippet system, like workflows and the browser, is customizable and integrated with the app’s text editor. Snippets can help you save precious seconds when writing, but they are also powerful tools for automating visual workflows with TextExpander fill-ins, which, in some cases, are preferrable to Editorial’s actions (if only for the fact that you probably already have fill-in snippets you can reuse).
Best Practices and Tips
After having described the main ideas behind Editorial but before delving deeper into my workflows and explaining how I’ve been using them, I thought it would be appropriate to share some general “tips and tricks” to get the most out of the app.
Set variables first. When you know the workflow you want to build and you have an idea of the variables you’ll have to use, set them immediately at the beginning of the workflow. If you know you’ll need to work with a document’s name or text, don’t wait until you’re in the middle of the editing process – set the variables first, and then start thinking about other actions.
Set variables, change them later. In building workflows, you’ll eventually face the scenario of wanting to set two (or more) different values for the same variable name. An example may be a workflow where you want an appendThis variable to include the browser selection if there is one, but just the URL if there is no selection. To do this, use If blocks and remember that the same variable can be set and reset multiple times in a workflow. So if there is a browser selection, set the variable inside an If block, and do the same if there is no selection. This is a good practice for Python scripts or custom actions: you don’t want to clutter them with indented If blocks to fetch multiple variable names. Use one variable name, change its value depending on the condition you need to be true or false.
Stop workflows. If you have multiple If blocks in a workflow, I’d recommend putting a Stop Workflow action at the end of a block if you know the workflow doesn’t need to continue. You may have added a condition afterwards, thinking that the workflow shouldn’t be able to continue anyway, but I always prefer to manually stop a workflow just to make sure.
Check and nest conditions. If blocks are a powerful tool and you shouldn’t underestimate them. Don’t make multiple separate workflows to account for different conditions (e.g. Does my clipboard contain a URL or a bunch of text?): instead, use If blocks – and nest them! – to add proper condition-checking to a single, intelligent workflow.
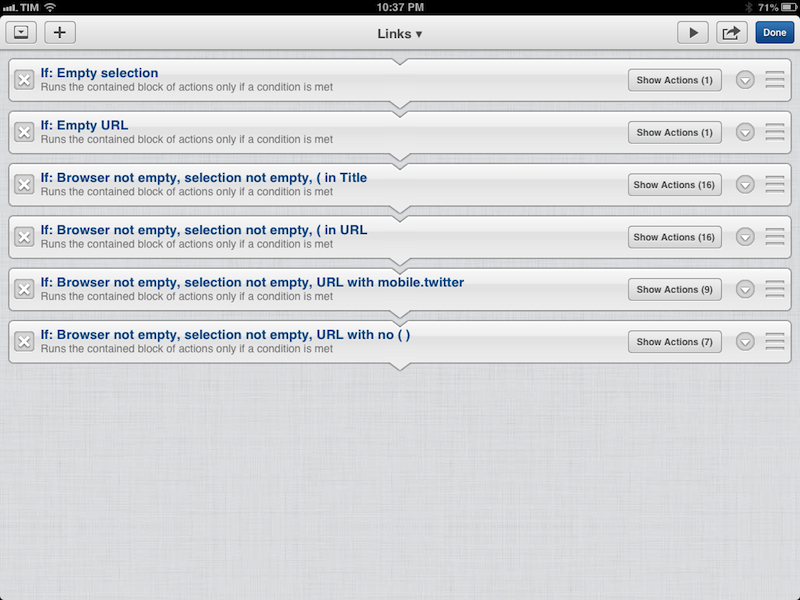
Save presets and blocks. If there are actions or conditional blocks that you find yourself using over and over (such as the “If browser URL is not empty & If Browser selection is not empty” combo), make them presets and re-add them with one tap to new workflows.
Percent-encode strings. MacStories readers know that I always say to properly percent-encode strings of text that will be used in URL schemes. Seriously, do it. Editorial makes this easy – no Python required – with a URL Escape action that does exactly what you think.
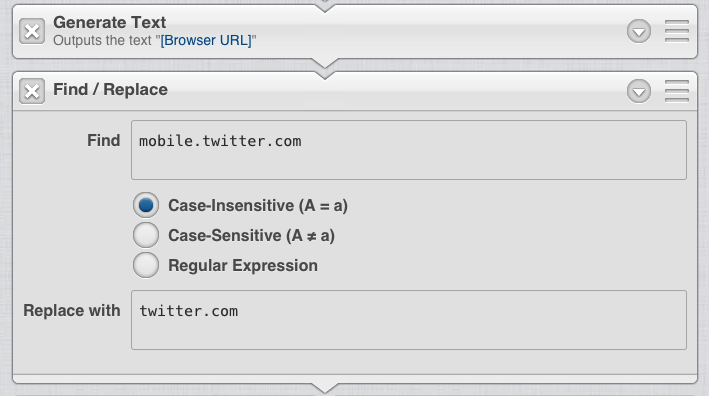
Generate text for input. You saved a variable at the beginning of a workflow, now you need to do something with it, but the action you want to use doesn’t have a text field to specify the variable. How do you tell Editorial to use a variable again as input? Use the “Generate Text” action, which passes any given text to the next action.
Save cursor position. You’re building a complex workflow, but you know that, at the end, you’d like the app’s cursor to return to its original position. Use ranges: save Sel. Range: End in a variable, and, when the workflow is done, use the “Select Range” action with that variable to place the cursor back at its original position.
Recalculate cursor position. The problem with saving selection ranges at the beginning of a workflow is that you may add text before your initial position, which will require you to recalculate it: if the cursor was at “range 5” in the editor but then you added a single square bracket before it, the original position would now be 5+1=6.
And fortunately, you can do just this kind of simple math operation with Select Range: provided you have the initial range and you know the number of characters you’ve added before it, do the math inline (as shown above), and Editorial will take care of the rest.
Check for URLs. Editorial doesn’t have a “If input contains URL” condition. There are two ways to achieve a similar functionality: one is using a URL-matching regex, and the simpler one is a basic workaround. You have some text, and you want to execute different actions depending on whether there’s a URL in it or not. Given some input text, use the “Extract URL” action[16], and if the input is empty (e.g. no URL could be extracted), run your If block.
Make a list with names but output tabbed values. “Select from List” may be my favorite Editorial action: you provide a list of lines, and you get that list inside a popover (or a modal popup) that also has a search bar and a title (which can be a variable). You can use the search bar to filter items in the list, and check the “multiple selection” option to output multiple lines to the next action.
The great thing about Select from List, though, is that you can display a set of lines in the list, but output a different set of data. To do so, separate names and values with a tab character:
- Federico
- Viticci
- MacStories
When fed to Select from List, these will output Federico, Viticci, and MacStories, respectively.
- Federico
tabVP of Special Business - Viticci
tabticci - MacStories
tabmacstories.net
This list will display Federico, Viticci, and MacStories but output VP of Special Business, ticci, and macstories.net to the next action. This is a fantastic way to deal with list-making and data that may have pretty short names but ugly long strings as output. As an example, I have a list that shows an article’s name in the popover, but outputs the URL when tapped.
Add interactivity to your workflows. Maybe you’ve built a workflow that works with data from the web, or one that takes a few seconds to complete an action in the editor. Either way, my suggestion is to add graphical elements that show interactivity and progress in the workflow: HUD alerts and sounds are a good way to communicate errors and successfull operations, and if you’re using Python you can also show a “spinner” in the menubar alongside an optional “in progress” HUD alert through console.show_activity. Sound Effects are available in the Play Sound Effect action, and they are playable inline if you want to try them out before running a workflow. The play_effect function of the sound module in Python has a couple of extra arguments to set a volume and custom pitch. A well-built workflow doesn’t simply execute actions – it also properly communicates what’s going on, and why.
Add descriptions and comments. This is going to happen to you: you will create the most advanced, elegantly handcrafted workflow, and, after two weeks, you’ll forget what it does or why you used certain actions instead of others. Unless you follow my tip: conspicuously comment and document the actions you’ve added to a workflow, give them custom titles, and use the Description field to explain your future self why you’re doing inline math for Select Range instead of just using a variable.
Move caret instead of Set Contents to keep Undo. Suppose you’re building a workflow that appends text to the bottom of the current document you’re editing. You’re looking around in the Action Library, and you realize that you don’t need to do all the fancy Move Caret-set range-select range thingamajig – you can just use Set File Contents and update the document to have new text! And you’d be correct, with a big “but”. The problem with Set File Contents is that it won’t allow you to undo changes using the Undo button in the editor – you’ll have to use the version browser. So, you can use Set File Contents for the current document, but, as the Editorial documentation also suggests, it’s better if you use it for documents that you’re not currently editing.
Backup your workflows and snippets. Editorial 1.0 doesn’t have a native Backup functionality to save a copy of your entire workflow library. You can use apps like iExplorer or DiskAid to find the Editorial app folder, then navigate to Library > Application Support > Commands (or Snippets) and back everything up to your Mac.
There is, unsurprisingly, a Backup & Restore workflow made by Ole Zorn that uses Python to create a backup of your workflow library as a .zip file in Dropbox. The backup is saved with a timestamp in the file name, and it can be restored at any time from the same “meta-workflow”. There’s also a workflow to backup your bookmarks and save them as “workspaces” that you can restore later; as Zorn told me, “the idea is that you might want to use different sets of commands when editing different types of documents (e.g. todo lists vs. blog posts)”. This is a great example of the kind of customization that you can apply to Editorial itself thanks to Python and the workflow system.
Basic Workflows
I work in Editorial all the time, every day. Over the past eight months, I have created workflows that go from basic and useful to slightly more complex and essential for the way I take notes, research topics, and write articles in Editorial.
Below, you’ll find my favorite workflows, starting from the simple ones and going all the way up to the advanced stuff. I will provide a description for each workflow, and shareable links for web previews and quick installation.
Make List
With an active selection in the editor, this workflow turns a list of lines into an unordered list in Markdown. Editorial has automatic list continuation, but I often forget to prefix the first line with an asterisk when I’m quickly jotting down lines. With this workflow, I can select a bunch of lines when I’m editing, and turn them into a properly formatted list.
The workflow checks for an active selection, then uses Remove Whitespace to remove empty lines from the selection, and Prefix / Suffix Lines to add an asterisk before each line of the input. Using Replace Selected Text, the list is inserted into the editor.
Download the workflow here.
Make Numbered List
Same concept as the one above, only to turn lines into a numbered list. This was the first workflow I made to use a Repeat block in Editorial.
I haven’t mentioned them so far, but Repeat blocks are another advanced feature of Editorial that you’ll learn to master over time. A Repeat block repeats a part of a workflow multiple times for every line of the input or every match of a regular expression. The iteration goes from top to bottom in lines or matches of a regex, but there is a Reverse option to make the iteration go backwards. Like If blocks, actions inside Repeat blocks will be indented and there’s a button to Hide actions if you want to drag around an entire block.
To make a numbered list, the workflow needs to increment numbers by one for every line. The first part of the workflow is similar to the one for normal lists – it takes selected text, removes empty lines, but then a Repeat block comes in and starts counting. For every line passed to it, the Repeat block is told to evaluate a mathematical expression through the Math action. It sounds complicated, but it’s actually a very simple implementation.[17] Math can do complex operations, but, in this case, it just needs to store the result in a variable and count against the variable itself. Take a look:
This is quite a nice trick, so let me explain. The action receives multiple lines from the Repeat block; the first time Math is triggered, it adds “1” to a variable that doesn’t exist yet – because we told Math to store its result in the variable. So after it adds 1 to 0, 1 becomes the actual “counter” variable, and the second time the Repeat block runs Math for the second line of the input, 1 will be added to 1, and so forth. Before ending the Repeat block we can generate text with the counter variable, a dot, and the input lines, and what we end up with when we Replace Selected Text is a nice numbered list that automatically prefixed lines with numbers starting from 0, automatically incrementing every line by 1.
Download the workflow here.
Change Clipboard Case
I often need to transform lower case text into Title Case Text for MacStories. Handily, Editorial has a Change Case action that supports text transformation to lower case (for when you’re in a normal mood), to Title Case (For When You Want To Be Fancy and Professional), and to UPPER CASE (FOR WHEN YOU NEED TO MAKE A POINT). I prefer to fetch text from the clipboard, because I usually copy titles that need to be turned into Title Case.
The workflow is straightforward and short. The clipboard is passed to Change Case through Generate Text, and the results are stored in a variable. Then, an alert asks if the text should be copied to the clipboard or inserted as replacement text into the editor. Two If blocks run separate actions depending on what was chosen in the Show Alert action.
Download the workflow here.
Open URL
Sometimes I just need to send a URL from the browser I’m using to Editorial. Therefore, I’ve created a workflow that opens a URL given in the input text. The workflow has been aptly named “SimpleURL”, and it’s launched by this bookmarklet in Google Chrome, iCab, or any other browser:
javascript:window.location='editorial://?command=SimpleURL&input='+encodeURIComponent(document.location.href);
However, the workflow also checks if the input text (sent from the URL scheme) contains a URL. If it does not, it assumes that a URL may be in the clipboard, and it checks for a URL there using an If block; if a URL isn’t found in the clipboard either, another If block displays an error message that says “No URL in clipboard”.
Download the workflow here.
Google Search
This is a workflow to Google the current selection (which I do quite often to create an inline link for selected text in the editor); if there’s no selection, a Request Text Input action lets me write my search query manually (with options for auto-correction and auto-capitalization). In both cases, Editorial uses the Search Web action to start a search in the built-in browser.
Download the workflow here.
Note At The End
When I’m writing an article, I tend to come up with an idea for a paragraph or a point I want to make later in the piece, and, to make sure I don’t forget about it, I quickly append it at the bottom of the document. On the Mac, this forced me to come up with a script to make Sublime Text behave like I wanted; in Editorial, it’s five actions:
The current cursor position is saved in a variable, and I enter text in a multi-line view generated by Request Text Input. The caret goes to the bottom of the document, inserts the text I typed, and goes back to the initial position using Select Range. No scripting required.
Download the workflow here.
Tools Palette
The Editorial URL scheme comes with an additional “command-id” parameter that contains a unique identifier for each workflow. This special URL can be viewed when you bookmark a workflow and going into the Edit Bookmark popover.
As I kept using Editorial every day, I noticed that there were certain workflows that I always ran when I was done writing an article. So, to better group these workflows, I created a “Tools” workflow that presents a list of workflows in a popover; this list provides easy access to workflows like “Convert to HTML” or “Post To WordPress”, which I use regularly. It’s a workflow to launch workflows through the URL scheme. Yes, I know.
This workflow is also a nice way to implement Select from List’s tabbed output values: in the list, I enter the workflow names, a tab, and the URL for each workflow; Editorial will display a list with the names, but output the URLs on selection. Then, with a Open URL action, I can go from the Tools palette to the workflow I want to run. This idea of getting a workflow’s unique ID and launching it with Open URL can be applied to a variety of situations and you should consider it to chain multiple workflows together.
Convert To HTML
Editorial has a Convert Markdown to HTML action that does exactly what it says on the tin. For when I need to copy a document’s HTML code to the clipboard – perhaps to update an already-published article’s source code in WordPress – this workflow gets the document’s text, converts it to HTML, puts it in the clipboard, and displays a HUD message. This can be integrated with other actions, such as writing in Markdown and then sending an email from Editorial as HTML.
Download the workflow here.
Wrap Inside
When I need to wrap selected text inside double quotes or MacStories-specific HTML code for images and code blocks, I run a workflow that asks me what kind of wrapping I want to perform through a Show Alert action.
After checking for selected text, Show Alert lets me choose whether I want to output selected text surrounded by quotes, HTML code for images, or formatted inside a code block. The Double Quotes and MS Code buttons don’t require additional tweaking – they can simply surround the Selected Text variable with plain text, and pass that to the next action. However, when I need to insert HTML code for images, besides the selected text (which is the actual image URL), I also need a title parameter, which I have to type manually.
Therefore, after Show Alert, the workflow replaces selected text if the output isn’t “image”; if the output is “image”, a Request Text Input asks me for an image title, which is then mixed with plain text for HTML code and Selected Text + Input variables to generate the full code for images I need on MacStories.
Download the workflow here.
Find and Replace
This isn’t too uncommon: I’ve finished writing an article, and then I realize I’ve gotten a developer’s name wrong in every instance of it. This workflow lets me replace every occurrence of a search query with new text using Editorial’s Find / Replace action.
First, the file name and the document text are fetched and saved to two separate variables. Then, two Request Text Input actions ask me a) what I want to find and b) what I want to replace it with; both actions use single-line text fields, as my queries aren’t usually so long to require a multi-line field. Their results are saved to separate variables as well.
The document’s text is generated as input again, and Find / Replace runs a case-sentitive search + replace. The last action uses the input from Find / Replace to set the file contents of the current’s document to the new text.
Download the workflow here.
iMessage
When I’m browsing the web with Editiorial, I may find a link that I want to send to someone via iMessage. Now, I could just copy the URL, switch from Editorial to Messages, and come back after I’ve sent the message, but where’s the fun in that?
The workflow uses the Compose Text Message action and is activated either from the built-in web browser or through a URL scheme. If I’m in Editorial, the workflow sees that the input is empty when I trigger the workflow, and sets a variable called link to the current browser URL; the last action of the workflow takes email addresses as recipients, and composes a new message with the URL as pre-filled text.
If I’m launching the workflow from Google Chrome, there are some extra checks at the top. Starting from this bookmarklet:
javascript:window.location='editorial://?command=iMessageTeam&x-source=Editorial&x-success=googlechrome://&x-cancel=googlechrome://&input='+encodeURIComponent(document.location.href);
…Editorial will see that the input is not empty, and it’ll set the link variable to the document.location.href, which is JavaScript’s way of calling the current URL.
There is an additional check, though, nested inside the “If input is not empty” block. If there’s one thing that I find annoying, is when I’m on my iPad or iPhone and Twitter links don’t launch Tweetbot but open the mobile Twitter website. Because the people I send messages to use Tweetbot as their main client on every device, I feel comfortable converting Twitter links to Tweetbot URLs that will open the same tweet detail view, only in Tweetbot instead of the Twitter website, thanks to the URL scheme. I’ve covered this on MacStories before, and there are several ways to do text substitutions with Python, but for this workflow I adapted the script by our Don Southard to work with Editorial. If “twitter.com” is contained in the link variable, the script gets its value (line 13), substitutes the necessary elements to become Tweetbot parameters (line 10), and sets the variable to the new value (line 15), which is then fed to the Compose Text Message action at the end.
Download the workflow here.
Tweet With Tweetbot
Speaking of Tweetbot, I have created a workflow to compose a tweet in Editorial, tweet it with Tweetbot, and come back to the app after the tweet has been sent. I know that tweeting could be done more easily with the Compose Tweet action, but that wouldn’t allow me to upload images to Droplr before tweeting and, in general, I just like Tweetbot.
The workflow requests text input (how nice would it be to have a 140-character counter in there?), saves it to a variable, and then runs a custom action. The action has two parameters: “Account” for the name of the account you want to use in Tweetbot, and “Tweet” for the text you want to use in your tweet. You can change these two parameters to whatever you want, and the Python script that powers the app will keep working. This is the advantage of using custom actions if you need to share them or reuse them as presets.
The script (which Zorn once sent me as part of a “Custom Actions Pack” download), is pretty self-explanatory: parameters are fetched on lines 8–9, and lines 12–16 construct the Tweetbot URL scheme, percent-encoding the parts that need to be encoded (tweet text and callback URL). Line 17 launches Tweetbot with the webbrowser module.
Download the workflow here.
Here’s a video showing a collection of various workflows mentioned so far.
Advanced Workflows
Below, you’ll find more advanced workflows that rely heavily on multiple If and Repeat blocks, Python scripts, URL schemes, and custom actions. These are the workflows that allowed to save several minutes every day when working from my iPad.
Inline Links
Taking a look at a screenshot of this workflow, you’d think it’s just a nice and good-looking series of six If blocks:
And it is, indeed, nice and good-looking, but there’s a lot going on with the actions inside the blocks that may scare you initially, so allow me to explain.
This is the workflow I use to insert inline Markdown links in my articles. It uses the built-in browser for fetching links and titles, and it’s organized in six blocks to check for different conditions:
- If no URL is open
- If no text is selected
- If the browser URL is not empty, selected text is not empty, but there’s a parenthesis in the browser Title
- If the browser URL is not empty, selected text is not empty, but there’s a parenthesis in the browser URL
- If the browser URL is not empty, selected text is not empty, but browser URL contains mobile.twitter.com
- If the browser URL is not empty, selected text is not empty, and browser URL doesn’t contain a parenthesis
Let’s go through the blocks one by one. The first two are obvious choices: if there is no URL open or the selection in the text editor is empty, stop the workflow, because a link requires a selection and a URL.
The next two blocks switch the link format from inline to reference to avoid formatting issues with Markdown and parentheses: if there’s a parenthesis in the title or URL of an inline link, chances are Markdown won’t properly escape those characters, resulting in an extra parenthesis in the final HTML, which I don’t want. So, if a parenthesis is contained in the URL or Title, I run the same actions I demonstrated in our test workflow earlier in this review: based on Dr. Drang’s script, the workflow generates a reference link number, the link is inserted at the bottom of the document, and the cursor returns to the original position.
The fifth block transforms a mobile.twitter.com URL into a regular twitter.com URL by removing the “mobile.”“ part from it. Given the browser URL as input text, a Find / Replace action finds ”mobile.twitter.com” in the string and replaces it (with a case-insensitive search) with twitter.com. Then, a Replace Selected Text action inserts a Markdown inline link with a normal Twitter link instead of the mobile one (which I don’t want MacStories readers to open).
The last If block is the “easiest” one: given browser URL and title that don’t meet the conditions above, it just inserts an inline link replacing the selected text.
I use this workflow every day, and I prefer it to what I do on the Mac with Sublime Text and Keyboard Maestro, because it’s so quick, accurate, and fast.
Download the workflow here.
Find Inline Links
After I’ve added links to an article, there’s the chance I may need to remove or change some of them. To speed up this process and avoid having to manually select and edit inline links, I have set up a workflow that finds an inline link, splits it up in parts, and allows me to do stuff with it.
The workflow starts by saving the current cursor position and extending the selection to the current line; this action can run in both directions, so even if I’m in the middle of a paragraph, I can run the workflow to select an entire line. Then, selected text is passed to the next action, which is a Repeat block that runs my regular expression to find inline links.
The regex I’ve made finds inline links properly formatted as [text](link "title"), with two groups capturing the linked text (group 1) and URL + title inside the parentheses (group 2). If no link is found, the workflow is stopped, and the original cursor position is restored.
If at least one link is found, a Select from List action is triggered, setting the output to the link (including square brackets and linked text) I’ve chosen from the popover. The document’s text is fetched again, and a case-sensitive textual search for the input is run, setting the output to the range of text of the result; because my link names and URLs are always unique – I never link the same piece of text to the same URL – I can rest assured that the Find action will always find one result for the output of the popover.
With the result found, the range is selected, and an alert comes up, asking me if I want to remove the link, change it to the one open in the browser, or replace it with something else. The three actions are nested inside three If blocks.
Removing a link requires to run the regex again, but this time for the selected text (the entire Markdown link) and for match group 1. This will scan the Markdown link and select the linked text only (the one inside square brackets), saving it to a variable.[18] Last, the workflow finds the original Markdown link again, selects it, and Replace Selected Text “cleans it up” by replacing it with the previously-linked text, now un-linked.
If, on the other hand, I want to keep a bit of text linked to a URL but change the destination URL and title, the workflow runs the Find action on the selection, but for match group 2 – which is the URL and title. With that part of the Markdown link selected, I can simply Replace Selected Text using the built-in browser URL and Title variables.
If I want to replace a link with something else from the built-in browser but I don’t know what that something is yet, the third option the workflow has is to select the URL + title and then bring up a text input to search Google. The workflow uses the Search Web action, which runs a basic Google search in the built-in browser. To give me time to find what I need for a link and to make sure that the last action has time to store and use the updated variables, there is a paused Show HUD action between Search Web and Replace Selected Text; in this way, I can look for something while the workflow is paused, then press Continue when I’m ready to replace an existing inline link with a new one.
Download the workflow here.
New Keychain Item
I have several workflows that deal with authentication to web services in Python, and I don’t want my passwords to show up as plain text in my scripts. Fortunately, like Pythonista, Editorial comes with a keychain module that allows for secure password storage and easy retrieval in scripts.
My workflow to save new passwords in the keychain is made of four actions and a custom action. First, two single-line text input fields ask me for the names of the service and user I want to save a password for, saving them in two variables; then, the custom action gets those two variables as parameters, and launches a Python script.
The script gets the parameters (line 7) and the current contents of the clipboard (line 8), as it assumes you may have already copied the password (I do this in 1Password). A sound effect is loaded on line 10; line 15 brings up an input_alert showing the password in the clipboard as pre-filled text. You can clear the text field and type your password manually if you don’t want to use the clipboard’s contents.
Lines 17–22 save the password in the keychain, display a success message, and play the already-loaded sound effect; if a service’s name hasn’t been specified, the workflow is stopped.
Download the workflow here.
Post To WordPress
This is the workflow that allowed me to stop using Poster to publish articles to WordPress. I have built it in a way that I can use it to publish both regular and linked posts for the site, also automatically tweeting an article for me using our custom bit.ly short URLs. It is, essentially, my all-in-one publishing solution for MacStories, available right inside Editorial.
The workflow starts by creating two empty variables that I’ll later use for categories and tags. The third action is a Request Text Input one that comes up pre-filled with the current document title, and I gave it the custom name “Double Check Title” because I don’t always name my text files with the title they will get as articles on MacStories. Once renamed for the site, the title is saved to a variable.
The document text is fetched, saved to a variable as Markdown, converted to HTML, and saved to another variable. At this point, the workflow asks me if I want to publish a normal post or a linked one: if I choose normal, the workflow goes ahead and uses the HTML content I just generated; if I need to publish a linked post, there are some extra steps.
MacStories’ linked posts use a custom field to set the source URL of the webpage we’re linking to. When I’m creating a linked post in Editorial, I always set the destination URL as the first line of the document without an empty line before the actual text of the linked post. It looks like this:
http://blog.instapaper.com/post/57817543037The new Instapaper web beta just launched.
The URL is the value of the custom field and the text below is my comment. Upon choosing “Linked” from the Show Alert action, Editorial will pass the variable for the Markdown version of the document as input again, and an Extract URLs action will find all links contained in that variable; the source URL will be the first one of the list. Because a list can also output a range, the URL is then selected and set to a variable (as selected text). At this point, I do the following to delete the source URL from the document’s text (because I don’t need that URL in the post, but only in a custom field):
Why the +1? Easy: I want to delete the URL from the document without leaving a blank line after the removal. Adding 1 to the end of the selected range will move the selection forward by one character to the beginning of the next line, which is exactly how I want the post to start – without an empty line. The workflow removes the URL using a Replace Selected Text action with an empty parameter, then generates the document’s text as input again, converts it to Markdown, and overwrites the value of the content variable with new HTML code, free of the extra URL I had at the top. Conveniently, content is also the name of the variable I was using for HTML of normal posts.
Now this is when things start getting serious. To communicate with a self-hosted WordPress installation, I adapted this script by Silouane Gerin by splitting it up into multiple parts that use Editorial’s native UI elements instead of Python’s console and raw input. Full credit goes to Silouane, who figured out how to use xmlrpclib to fetch data from WordPress and create new posts in it.
First off, the workflow needs to fetch categories from WordPress, and present them in a list that uses Editorial’s popovers instead of plain text in the console. Line 6 gets the (empty) value of the categories variable I set at the beginning of the workflow; line 8 has the URL of the xmlrpc file for WordPress; line 9 a username; line 10 gets the WordPress password securely from the Python keychain. Before opening a connection with the server, line 13 shows a status bar spinner with an “in progress” HUD message.
Line 15 opens a server connection, and line 17 fetches categories from WordPress. Lines 19–23 get the names of categories and append them to the categories variable, separating categories and their number in the list with a tab character. The categories variable is then set to this new list of lines.
The categories variable is generated as input text, empty lines are removed from the list, and a Select from List action displays a popover with categories from WordPress; only one category can be chosen. Because there was a tab character between each category’s name and its associated number, the number is the output of the popover; it is saved into a catID variable.
The next four actions do the same thing for tags, with the difference that in the popover multiple tags can be selected. Tags will be saved as a list into a tagID variable.
The last Python script takes all the data and variables that have been generated by the workflow so far, and assembles the post that will be published to WordPress. Line 19 gets the variable for the post title, and line 20 gets the content variable for the HTML code; line 25 gets the category’s ID, and line 26 does the same for tags.
Multiple tags, however, were likely chosen in the list (I always tend to assign at least two tags per post), so line 28 splits the tag IDs and lines 30–32 create a new list of tags by appending tag names to it. Line 34 creates a list for the chosen category as well.
Line 36 gets the value of the variable for a linked URL, and lines 38–41 create the post’s final data: if the linked URL wasn’t empty, the externalLink custom field (you can change this name for your website’s custom fields) is assigned the linked URL to use on the site; if the linked URL variable was empty, the custom field isn’t used. Lines 45–47 publish the post to WordPress, and return the post’s information. Lines 51–52 (commented out in my version of the script) print the post’s public link and set it to the clipboard. Lines 54–55 show a success message and line 55 sets the workflow’s output to “Success”.
The last action of the workflow is “Open URL”, contained inside an If block. If the output of the previous action is “Success”, another workflow is launched: the one to shorten the URL of the new post and tweet it.
Download the workflow here.
Publish with Poster
Before coming up with a workflow to directly publish to WordPress from Editorial, I used a workflow to send an article to Poster. The app’s demise eventually led me to build my own workflow that I could control and that couldn’t be acquired and shut down by anyone, but, because Poster still works on iOS 6, I thought I could still share my old system here.
The workflow largely mirrors the WordPress one, with the exception that there’s a lot of URL escaping going on for the Poster URL scheme. The title is double checked, encoded, and saved to a variable; Markdown text is converted to HTML, encoded, and saved; the workflow asks me if I want to publish a normal post or a linked one, and if the result is linked, the linked URL is extracted and used for Poster’s customfield parameter.
The workflow isn’t too complex – just keep in mind to always use URL Escape for text that you’ll send to Poster through the URL scheme, and you’ll be fine. In the Open URL actions (the ones inside the two If blocks for the output of the Show Alert), you’ll see that I’m using an externalLink custom field and opening macstories.net in Google Chrome after a post has been published; these values are set by variables in the workflow, and you should change them to your needs if you’ll end up using this workflow over the native WordPress integration.
Download the workflow here.
Shorten and Tweet
This workflow fetches the most recent post from WordPress, shortens its URL using bit.ly credentials, and tweets it. It’s usually run after the workflow to publish a new article to WordPress.
Two empty variables are created – one for the post’s title, and one for the URL. The next step is a Python script: the first part of the script has the same functionality of the one above (authenticating with WordPress and opening a connection), but uses the getRecentPosts method to get data for the most recent post from WordPress – if everything went correctly, the one that was just published.
The last two lines set the values of the title and link variables again, getting the respective data from WordPress’ title and permalink fields.
Next up, a custom action to shorten URLs with bit.ly; this one was sent to me by Zorn, so credit goes to him. There’s a parameter that you must change in this custom action: the bit.ly access token. You can get yours here. The Python script itself is fairly simple: it uses urllib.urlopen to open the bit.ly API URL, json to load the response sent by bit.ly, and workfow.set_output to read the shortened URL from the response.
With the shortened URL saved to a variable, the workflow puts together the post’s title and URL and saves a new tweet variable. Before tweeting, though, the built-in browser tries to open the shortened URL and pauses the Tweet action, just to make sure that everything has been processed correctly. Last, the Tweet action can be unpaused to tweet with your account of choice, and Open URL will launch Tweetbot – because, usually, I want to tweet or retweet a MacStories link myself (possibly manually adding a comment), and I want to do that from Tweetbot.
Download the workflow here.
Append To Evernote
I use Evernote on a daily basis to collect research material, share notebooks with my teammates for projects we’re working on, and organize screenshots of apps and websites. It only made sense to come up with an Editorial workflow to quickly append a webpage from the built-in browser to an existing note in Evernote, so I could revisit it on my Mac or the Evernote app on iOS.
Editorial supports the Evernote Python SDK, which allows you to authenticate with the service, create notes, access notebooks, control share settings, and more. My workflow takes the current browser URL and title, a selection if there’s one, and appends everything to my “Stuff To Check Out” note – the same that I already use with Drafts. While I could have made a workflow to send this data to Drafts, fire up an Evernote action, and come back to Editorial, I wanted to have fun with the Evernote SDK and see whether I could avoid jumping between apps. As it turns out, my workflow takes a few seconds to complete and it works right inside Editorial.
The first two actions expand the snippet I use for timestamps and save it to a variable. The third action sets a browser variable to the browser title, URL, and selection (as three separate lines), but then an If blocks checks if there’s an empty selection in the browser, and if that’s true, the browser variable is reset to just the title and URL.
The timestamp and browser variables are unified in a single variable, which is then converted from Markdown to HTML, and saved into a new variable. Last, a custom action is triggered to append text to a pre-defined Evernote note.
The custom action has four parameters: Note Title, Note GUID, Write Mode, and Note Content. Only two are actually used: Note GUID and Note Content. I’ve put in the other two for presentation purposes, and because someone may want to tweak the script to create a new note instead of appending text. The action itself is a version of this script by Justin Rascoe.
Line 11 imports the Evernote API token (required for using the Python SDK) stored in the keychain; line 13 gets the Note Content parameter and line 14 makes sure to encode it in UTF–8. Line 16 brings up a HUD message, and lines 18–20 mostly deal with importing the Evernote SDK.
At this point, you need to make sure you have the correct GUID for an existing note you want to append text to. A GUID is a unique identifier for a note, and the easiest way to find out what it is for a specific note is to use the “Copy Note Link” feature in Evernote for Mac. You’ll get some code like this:
evernote:///view/1799176/s15/fd9e11fe-387d-48b4-adcc-4709c140fbbf/fd9e11fe-387d-48b4-adcc-4709c140fbbf/
Where fd9e11fe-387d-48b4-adcc-4709c140fbbf is the GUID. More details from Evernote’s documentation here.
With the GUID placed in the Note GUID parameter (as shown in the blurred screenshot above), lines 25–47 will execute the script’s appendNote function, which will append the text you provided to the note. At the end of the script, a success message will be displayed, and you’ll end up with newly appended text in your Evernote note – all done natively in Editorial.
Download the workflow here.
Select Evernote Notes
This workflow is a simple variation of the one above that enhances it with the ability to receive text from Drafts and, more importantly, choose an Evernote note to append text to from a list of multiple notes.
The workflow starts by checking the input: if Drafts sent some text via URL scheme, the input is not empty, and therefore the received text is converted to HTML and saved to a draftsMD variable. This allows me to append text to Evernote without creating multiple actions in Drafts, relying on a single Editorial workflow that handles everything with an If block and a script.
After the If block, a Select from List action displays the titles of notes that I frequently append text to; as you can imagine, the list presents titles but outputs GUIDs (separated by a tab character) and which the script will require.
The GUID is saved to a variable, and then another If block checks again for initial input coming for Drafts, and if not empty it runs my custom action (which I saved in Editorial as a preset) with GUID and draftsMD variables in the parameters.
If I didn’t send text from Drafts, but still wanted to select which note to append text to, after the list a Request Text Input will come up to let me type some text, which will then be converted to HTML, saved to a variable, and appended to Evernote through the custom action.
Download the workflow here. You can install the Drafts action using this link.
Append Link To H2-H6 Header
When I’m putting together a longer article for the site, such as this review, I typically outline the sections and sub-sections I’ll cover with Markdown headers. By using H2-H6 headers, I can also tap on Editorial’s file name to see a recap of my sections and quickly jump to a specific one by tapping it. But what about appending bits of research such as links or browser selections to a header? I have a workflow for that.
This workflow allows me to append the browser title, URL, and possible selection to an H2-H6 header of my choice. When I’m doing research, this is useful to look up a section’s main topic in advance, and save relevant links and quotes as “article todos” right underneath the header.
The workflow starts by setting an append variable with this format:
[Browser Title](Browser URL){Browser Selection}
This format allows me to make the Browser Title a Markdown link, while keeping the selection (between curly brackets) as a sort of “comment” to an inline link. I have regular expressions for this link format that I’ll share in the future.
With the variable set, the workflow gets the document’s text and uses the Filter Lines action to output lines that match the regular expression. Filter Lines is a great action: it can output lines (or lines + ranges) that contain or don’t contain specific text (with case-sensitive search), or, for more advanced implementations, output lines that match a regex. In my case, I built a regex to find headers (from H2 to H6) at the beginning of a line (as they should be):
If the input is not empty (i.e. at least a match was found), a list of headers comes up; the output (a selected header) is saved to a variable. Then, if the browser URL is not empty, the range of the chosen header is selected, and text is appended by replacing text with selection, new line, and append variable. A HUD message is displayed, and the workflow is stopped.
If the browser selection is empty, an additional If block changes the append format to a simple Markdown link that doesn’t have a comment contained inside curly brackets. Here’s a video of the workflow.
Download the workflow here.
New Footnote
I like footnotes[19], and this workflow makes it easy to add a new one and automatically go back to the original cursor position.
First, the current range is saved to a variable along with the document’s text. Then, a single-line Request Text Input action asks me to add a name for the footnote, because I don’t like to name my footnotes with numbers (something I learned from Gabe a few months ago). While I tend to give each new footnote a unique name, I wanted to make sure that a footnote’s name isn’t repeated twice (or more) in the same document; hence, I added an If block that checks whether the document’s text (saved into a variable) contains a footnote’s name. If a footnote with the same name is found, the workflow is stopped with an error message.
The actual text of the footnote is typed into a multi-line text input with active auto-correction and auto-capitalization, so it feels like writing in the text editor. Text is saved into a variable, the caret goes to the bottom of the document, inserts the footnote’s contents, the initial range is selected again, and a footnote marker is inserted.
I just added a new footnote in seconds, without ever scrolling the document manually; this is a fantastic timesaver for longer documents.
Download the workflow here.
Find Footnote
You’ve added a footnote, a few days pass, you go back to editing your long document again, you see a footnote marker…and you don’t remember what the footnote is about anymore. Normally, you’d have to scroll all the way down, squint to find your footnote, and read the text again.
In Editorial, this can be automated: the workflow I’ve created uses a regular expression, native alerts, and the Select Closest Word action to find the text assigned to a footnote marker.
At the beginning of the workflow, the current cursor position is saved, and the Select Closest Word action outputs the word that is closest to the cursor. In the way I run this workflow, I typically tap with my finger next to the footnote marker[20], and even if the cursor isn’t inside the square brackets, Editorial’s text engine will still find the closest word, which is the unique ID I gave to the footnote, escape it for a regular expression, and save it to a variable.
Then, the workflow outputs the document text, and a Find action starts looking for a match for a regular expression. Find, one of Editorial’s search-related actions, lets you run simple textual searches with case-sensitive or case-insensitive options, as well as regular expressions with optional match groups. A group is a part of a regular expression that we want to capture in a found match. For the output, Find can give us the found text, or the range of text.
Here’s my regular expression:
As you can see, it uses a mix of regex syntax and an Editorial variable to look for a line that starts with [^footnotename]:, then has a whitespace character, then any character (one or more times), and then the end of a line. The footnote marker and the footnote text are organized in two groups, delimited by parentheses; this allows me to capture the groups separately, with group 2 being the footnote text, which is exactly what I want to extract.
You’ll notice that, for actions that support regular expressions, Editorial has an additional RegEx button in the extra keyboard row that opens a RegEx Cheat Sheet popover with common regex characters.
This popover is useful in that characters are organized by category, they have a brief description of their role, and they can be tapped to be inserted in the regex field of an action. Even if you don’t know regular expressions that well, this makes it easy to put together a simple regex in minutes.
If the input is empty (i.e. no match is found), the workflow returns to the original cursor position and stops, saying that no footnote was found; if there is a match, an alert dialog will show the text, and then restore the original cursor position.
My regex may not be state-of-the-art, but it gets the job done. It saves me taps and seconds I’d otherwise spend scrolling a document looking for a footnote, which isn’t a wise investment of our time on this planet.
Download the workflow here.
Add To Footnote
There are other times when I’m editing an article, I see a footnote, I read its text again, and I want to add something to it. Thus, I’ve made a workflow to automate the process.
The first half of the worflow is the same of the one to find a footnote, except that, when finding the footnote with a regex, I set the output to “range of text” instead of “found text”, because I want to scroll down to the footnote itself this time. To check for an empty range instead of empty text, I tweaked the following If block to have “Input is equal to 0:0”; in that case, the workflow is stopped.
If the found input isn’t an empty range, the workflow selects the footnote’s text and brings up a multi-line text field pre-filled with the selected text and the cursor ready to type after it.
This helps communicating the fact that I’m adding text to an existing footnote. Once I’m done adding text, the original footnote is replaced with the extended one, and the original cursor position is restored.
Download the workflow here.
Insert Image
I also use Editorial to upload and insert images when I’m done writing an article. The workflow I have, called CDN, uses Python, this script by our Don Southard, and the photos module to upload images to a bucket on our Rackspace account.
Given a Rackspace account (authenticated via secure keychain) and a destination bucket, an image is fetched from either the clipboard or the Album Picker, uploaded to Rackspace, and returned as a public URL to the next action, which saves it to a variable.
With an image URL available, Editorial asks if I want to copy the URL to the clipboard, copy it and open the image in the built-in browser, or insert the image in the editor – wrapping it inside HTML code for MacStories. The third option is the one I use the most: it’s not super-fast as it requires using the cloudfiles module (which I have imported into Editorial; it’s not as fast as pyrax), but it gets the job done and it lets me upload screenshots without having to rely on a Mac.
Download the workflow here.
Insert Affiliate Link
I tweaked Dr. Drang’s Python script to generate iTunes affiliate links (which I use on MacStories) to work with Editorial.
The whole workflow is inside an If block that first checks if “https://itunes.apple.com” is contained in the clipboard; if it is, empty lines are removed from it, and a variable is set. I do this because, in order to generate an affiliate link, I first open the App Store and use the “Copy Link” menu; for some reason, the iOS 6 App Store appends an empty line at the end of the URL, and I need to remove that.
With the selected text also set to a variable, Drang’s Python script is run with some minor modifications to use workflow.get_variable for the iTunes URL and workflow.set_output to save a new variable with the affiliate link. At the end, I manually type the name of the app I’m linking to, and a Replace Selected Text action inserts a Markdown link. Short and sweet.
Download the workflow here.
Get Pinboard RSS Feeds
I love Pinboard. I use the service on a daily basis to bookmark (and archive) links to interesting stuff I find online, but I also enjoy Pinboard’s (not widely promoted) basic social aspect that lets me view other people’s feeds as standalone streams or coalesced in a “Network” page. Because I use Editorial to create and publish linked posts on MacStories, it made sense to integrate the links discovery process in it as well.
This workflow uses Pinboard’s excellent support for RSS feeds to present a list of links in a popover. The workflow uses Python to parse RSS feeds, and it can fetch either Network bookmarks or a specific user’s stream, optionally filtering it by tag.
The workflow starts by asking if I want to view Network or user bookmarks; this choice will generate two If blocks that set the feed URL variable that will be parsed later on.
If I choose user, a list of Pinboard users I like comes up, allowing one selection that is saved to a variable. A Request Text Input action then asks me to type a tag I may filter a user’s feed with. If I type a tag and continue, the workflow will set a feed variable to a Pinboard feed URL formatted for the user and tag (note how I’m using the count argument to fetch 100 items from the RSS feed); if I don’t type a tag, the same variable is set to only get the latest 100 bookmarks from a user’s feed.
If I choose Network, an If block fills a new variable called authors with some arbitrary text and sets the feed variable to my specific secret URL for the Network RSS feed. You can get this URL by visiting your Pinboard’s Network area (you have to subscribe to other users first) and clicking the orange RSS link in the top right corner.
At this point, a custom action needs to parse the Pinboard RSS URL, which is available as a parameter.
Lines 4–6 fetch parameters and the authors variable that was set earlier; lines 8–16 use the feedparser module to get the RSS feed, parse it, get its entries, and start the creation of a list. Lines 17–23 look for the authors variable, and, if not empty, append each bookmark’s user, title, and URL to the list; otherwise, only titles and URLs are appended. The purpose of the authors variable is to ensure that, in case of Network bookmarks, the list of links I’ll get will also show usernames, allowing me to understand who bookmarked what. As you can guess, titles and URLs are separated by a tab character.
Lines 24–26 hide the HUD message that was being displayed by the script, and join each line of the list in the output that is passed to the next action.
Finally, the workflow knows whether it received a list of entries or an empty list. If the list is empty, the workflow is stopped with a message that says “No bookmarks found”; if the list has entries in it, Select from List displays the bookmarks’ titles, setting the output to their URLs thanks to the tab character that we used. Last, an Open URL action opens the URL in the built-in browser.
I like the idea of being able to integrate my link discovery, writing, and publishing processes within the same app.[21] Pinboard’s social features may not be the service’s most popular facet, and yet they have a been a great resource for me when it comes to finding new cool stuff from people whose judgement I trust.
Download the workflow here.
New Linked Post
The last piece of my Editorial workflow is a way to quickly create new documents that will become linked posts for MacStories. I typically discover links to post through Mr. Reader, an iOS browser, or Editorial’s built-in browser, and the workflow I have for this task is flexible in that it can work for all three different scenarios.
The workflow starts by checking if there is an empty input; if there is, it means the workflow wasn’t triggered by an external app through the URL scheme, and it assumes I want to create a new document starting from the built-in browser.
The documents I create for linked posts always have a source URL at the top and may or may not have a blockquote pulled from the browser selection below that; they also usually have the same name of the webpage I’m linking to. I want to automate the process of creating files with these criteria.
If there is a browser selection when the workflow is triggered from Editorial, the variable content is saved with the browser URL and browser selection (formatted in Markdown); if there’s no selection, content is just a URL. The workflow then gets the browser title, turns it into Title Case, and saves it to a variable formatted with Input.txt. The extension is necessary for the next action, which sets the file contents of a file in Dropbox using the content variable for New Text; Set File Contents can create a new file if one with the same name doesn’t already exist, which is what my workflow does.
I also want to open the newly created document, so the title variable is generated again, it’s URL-escaped, and I open the document using the Editorial URL scheme. I could have used the standalone Open Document action, but it only works for documents that have already been downloaded, whereas forcing Editorial to open a document with the URL scheme will always open it. Last, the caret is moved to the end of the document, and the workflow is stopped. My document is ready to be tweaked to become a linked post for MacStories (and then published with the WordPress workflow).
I have two other ways to create new linked posts in Editorial: from Safari and from the RSS app Mr. Reader. From Safari, I can use the following bookmarklet:
javascript:window.location='editorial://new/'+encodeURIComponent(document.title)+'.txt?root=dropbox&command=New%20Linked&input='+encodeURIComponent(document.location.href+'\n\n')+'%3E%20'+encodeURIComponent(window.getSelection());
This will launch Editorial, create a new document with the name of the webpage I’m viewing, put a URL, an empty line, and a blockquote for the browser selection in the document, and trigger the “New Linked” workflow (this one). Note the %3E%20 in there, which is the encoded version of Markdown’s > character (plus a space) for blockquotes.
Same idea for Mr. Reader’s Services menu: whenever I select some text in Mr. Reader, I can trigger the “Editorial Link Selection” action, and the app will create a new document in Editorial, just like Safari. With a handy addition: thanks to Mr. Reader’s [AUTHOR] placeholder, I can also put the name of the author of a blog post (followed by a colon) before the blockquote, which will save me further time when editing in Editorial. You can download this Mr. Reader action (and a simpler one that doesn’t use selected text) here.
After receiving text from other apps via URL scheme, Editorial will see that the input is not empty and it’ll jump directly to the second If block, setting the content variable to the input text. Because I want to open the source URL in the app’s browser, Editorial will scan the input text for a link, and open it using Open URL. However, to avoid errors in case multiple URLs are present in the input text, the workflow will first count the lines of extracted URLs, and if it finds more than 1 it’ll ask me (through a list) to specify which URL is the one that needs to be opened.
With the URL open and the caret at the end of the document, Editorial can now insert the content variable and stop the workflow.
Here’s a final video, showing how all my workflows come together in Editorial for the creation of a new post on MacStories.
Download the workflow here.
A New iOS
As a Markdown text editor, Editorial is solid: the app has a clean look, fast and reliable Dropbox sync, a version browser, snippets, a beautiful preview pane, and a powerful editor with syntax highlighting. At $4.99, these features alone make Editorial a better text editor than the majority of Markdown apps on the App Store.
As a text editor with automation features for power users, Editorial is incredible. It has, admittedly, an initial learning curve[22], but that’s quickly overcome thanks to the app’s intuitive drag & drop interface and Automator-like UI that is well-designed and easy to use. Even without any knowledge of Python or regular expressions, iPad users moderately interested in text automation will find great utility in Editorial’s workflow actions; as I demonstrated above, Editorial provides tools to create workflows that can speed up common tasks related to text, list-making and management, web research, and sharing. While creating complex workflows isn’t necessary, it’s fun to become more comfortable with the workflow system and the URL scheme to explore the possibilities of chaining apps and web services together with text. And eventually, that fun will surprise you by producing workflows that can help you save time every day, like they did for me.
Editorial raises the bar for iOS automation by building on the solid foundation of Pythonista and going one step further than Drafts and Mr. Reader. While I’d argue that Drafts is still better suited for quick text entry and sharing – and that’s why many of my workflows integrate with Pierce’s app – Editorial tries a bolder approach for power users with automation features that encompass the iOS user interface, text, URL schemes, scripts, and snippets in a single environment. Even taken individually, Editorial’s automation tools are more powerful and flexible than current alternatives on iOS.
This is something that’s never been done on iOS before, and it shows how Editorial isn’t afraid of treating the iPad more like the Mac. I would go as far as saying that there’s no third-party text editor for OS X that can do what Editorial is capable of as easily and clearly. Editorial is beyond the scripting required by apps like BBEdit and Sublime Text (both primarily aimed at programmers, but also regarded as the non plus ultra of OS X text automation by writers); the best way I can describe Editorial is as a mix of Pythonista, Keyboard Maestro, Automator, and Sublime Text that results in a unique piece of software with no equal on iOS or OS X. BBEdit and Sublime Text may have more scriptable engines, but Editorial can allow more people to automate text thanks to visual actions. Editorial lacks some of Sublime’s features like multiple cursors and selections, but it also makes it ridiculously easy to build workflows that, in Sublime, would require dozens of lines of code. On iOS, Nebulous Notes offered an idea of what could be possible with text automation, but it was too limited. And that’s why I believe that, for writers who like plain text and automation, there’s no app like Editorial on iOS or OS X.
I have to wonder about an alternate universe where iOS had more inter-app communication features and Editorial wasn’t limited to URL schemes to talk to other apps. I imagine that, somewhere in the multiverse, there’s a version of Editorial that knows how to bring up Drafts without a URL, or how to reference an Evernote note without using Python. In our universe, in spite of Zorn’s best efforts, there are areas of iOS that Editorial just can’t access, and that will remind you how there’s still lots of work to be done to make iOS an ideal platform for power users.
There are some aspects of Editorial that could still be improved. For one, an iPhone version, which is not available at this point. The app could use a richer selection of example workflows, tabs and in-page search in the built-in browser, more options in Select from List (such as “maximum selections allowed”), and an easier way to insert and rearrange actions in the workflow editor. Looking ahead, it’ll be interesting to see how and when Editorial will be ready for iOS 7: the app will certainly benefit from new APIs that Apple will provide to developers, such as background refresh and TextKit. I also wouldn’t mind seeing workflow actions for Dropbox file and folder management that don’t require Python scripts.[23]
Editorial changed how I use my iPad: I can now work from my mini without worrying about the apps and features I’d miss from my Mac. I want to work from my iPad, because Editorial is a better, faster, more efficient writing and editing environment than Sublime Text 2 on OS X, even considering all the Markdown-related scripts and macros I have in Keyboard Maestro. As a hub that connects apps and text with workflows and native UI elements, Editorial has reinvented the way I use iOS and third-party apps for writing, researching, taking notes, discovering links, and sharing them with other people. For me, Editorial is more than just a text editor.
The iPad was launched three years ago, and Editorial proves that desktop-class apps uniquely built for iOS can, today more than ever, be a reality.
In November 2012, here’s how I concluded my review of Pythonista:
I believe that, going forward, Pythonista and other similar apps will show a new kind of “scripting” and task automation built around the core strengths of iOS.
This is it. Editorial sets a new standard for third-party iOS automation, and, for me, there’s no going back. I can work smarter, faster, and more fluently with Editorial than any other app, on any platform. I wish iOS had a workflow system like Editorial.
I remember one day, back in February, I was going back home from the hospital, and my mom was driving. I found a piece of news that I needed to post, and I quickly did so with Editorial. When I was done and the news-induced adrenaline rush was over, I realized that I wrote, edited, and published an article in a few minutes from my car using an iPad, and I thought that was pretty amazing.
For the past 8 months, I have been writing for MacStories primarily from my iPad with Editorial. I’ve enjoyed it more than my Mac.
- What is a “normal person”, anyway? ↩︎
- Editorial only downloads the latest version of files for the main Dropbox folder that you choose upon first launch. ↩︎
- Also, subfolders share the same sorting options of the main folder. ↩︎
- I know it’s probably wrong to like pull-to-refresh for a list view that isn’t displaying tweets or mail messages. But what can I say? I like to live my life dangerously on the fast lane. ↩︎
- It’s also possible to swipe up on keys with a dog ear to automatically insert the first alternative character they contain. This is quite useful to, say, create a footnote (tap the
[key, then swipe up on the same key, and you’ll see). You can also swipe up the Undo button to quickly Redo changes; tap in the editor with two fingers to select a paragraph; and, you can swipe on the*key to enclose the selection in two asterisks instead of one on each side (to make bold text in Markdown). ↩︎ - Similarly, the order of workflows doesn’t reflect the order of bookmarked workflows. You can rearrange and delete bookmarks from the Bookmarks popover. ↩︎
- I guess that some people will like the idea of hiding the bookmarks bar when they’re writing(to achieve a more distraction-free experience), and show it only when they’re editing. To get the bookmarks bar back, you can tap the triangle below the sidebar button on the left (symmetrical to the position of the Bookmarks button). ↩︎
- Pro tip: don’t forget you can also use Unicode characters as names for bookmarks. Uniconsole is a fine app to quickly find characters suitable for the job on iOS. Alas, there’s no way to not give an icon to a workflow/bookmark, and you can’t load your own custom library of icons into Editorial (a feature that I’d love to have in a future update). ↩︎
- Also available by tapping & holding the document’s name. ↩︎
- As far as I can remember, WriteUp is the only iOS text editor to support Dropbox versions. Brett Terpstra agrees with me, too. Dropbox versions are particularly useful with the Packrat add-on, which extends revision history beyond 30 days. ↩︎
- You can also tap Markdown links in the editor when the keyboard isn’t shown. If the keyboard is active, you can select the linked text (the one between square brackets, highlighted in blue) and an Open Link option will appear in the Copy & Paste menu. ↩︎
- I would also like a way to select a portion of text in the Preview, and generate HTML text for the selection using a button in the copy & paste popup menu. ↩︎
- If you’re curious: right now, workflows are based on JSON under the hood, but that may change in the future according to Zorn. ↩︎
- I use this a lot when I’m putting together scripts to work with web APIs and other services that don’t require me to have access to workflow functions. ↩︎
- Do people still print out webpages? I guess that some do. Editorial does actually have access to the Reading List – but only if you tap & hold on a link in the browser, and then choose “Add to Reading List”. It’d be nice to have that as a workflow action. ↩︎
- Which uses Apple’s NSDataDetector to find and match URLs in a text string. ↩︎
- And, believe me, if I managed to put this together, you can, too. I failed my math classes every year for the last three years of high school. I still graduated with a 95 out of 100 (our school system doesn’t use letters, but numerical grades), though, because I liked all the other classes. Math (as the class is called in Italy), just isn’t for me. Nope. But I’m excused, because in choosing Liceo Classico, I thought I wouldn’t have to deal with math that much. I was wrong. My mom is still mad at me for lacking those last 5 points out of 100. But such is life: decisions that may disappoint other people. ↩︎
- When using the Find action for selected text and then selecting the range that came from the Find action, use the “Relative to: Current Selection” parameter. ↩︎
- I really do. ↩︎
- Tapping a footnote marker when the keyboard is dismissed will make Editorial scroll down to a footnote’s text. ↩︎
- That’s business. ↩︎
- The app’s reliance on workflows instead of native additions to the UI may be hard to comprehend for some early adopters. This is epitomized by the app’s Global Search feature – available as a workflow instead of a separate screen. I believe that for some functionalities such as the aforementioned Global Search or simple actions like “Copy URL” or “Open In”, Zorn should consider making them native to the app. ↩︎
- As for crazier ideas, I only have one: a “Workflow SDK” that could allow other apps to provide actions and parameters without requiring users to learn and configure URL schemes. Although I guess that kind of functionality would make sense for another app, separate from Editorial. ↩︎


