This Week's Sponsor:

Notify

Monitor Websites & RSS Feeds. Private. Simple. No Servers Required.


Posts tagged with "automation"

Change Text Case With AppleScript

Last night, I was looking for a quick way to change a string of text from lowercase to Title Case, which is the format I use for headlines here at MacStories. Normally, I would recommend installing WordService by DEVONtechnologies, but that’s a system Service, and I don’t seem to be able to install those without logging out and back in (I didn’t want to log out).

As I’ve come to learn lately, when you’re looking for ways to automate your Mac, the solution has likely already been posted on MacScripter. Among all the possible combinations of AppleScript to change text to a particular case format, I like this one by forum member “kai”. Essentially, the script takes the someText property and transforms its text items through changeCase to four possible options: upper, lower, title, and sentence.

To customize the script to my needs, I set someText to get the contents of my clipboard, change the case, then turn the result over to the clipboard again. In this way, I can select any text, copy it (so the original version is available in ClipMenu’s history), change the case, and paste back. To run AppleScripts with a keyboard shortcut, I use either Keyboard Maestro or Alfred.

Check out the AppleScript here.


Send Favorite Tweets To OmniFocus’ Inbox

In my daily “social networking workflow”, I use the “favorite” feature of Twitter as a todo list of sorts. I couldn’t find a way to add favorites to OmniFocus without leveraging email as a bridge, so I built a solution myself.

Using IFTTT, a single line of bash, Hazel, and AppleScript, I created a simple way to turn a favorite tweet into an OmniFocus task in the application’s inbox, ready for future processing. As an extra, I have also created a more “advanced” version that adds Automator to the mix to only extract URLs from favorite tweets. Read more


Turn URLs and Webpages Into PDFs In Your Dropbox

I stumble across a lot of interesting webpages on a daily basis. Sometimes it’s a video I want to watch later; sometimes it’s an article I don’t have time to read right away. Other times, I find a webpage that I want to keep around for future reference. For me, there’s a difference between articles to read later and reference material: whereas a new item added to Instapaper has a short life span in terms of attention (read, share, archive), a webpage I want to keep around forever needs to be turned into a document I can read anywhere, highlight, annotate, and carry around between platforms and devices. For that, I like PDFs.

I keep a “PDFs” folder in my Dropbox that contains all the documents I check upon regularly for work and personal purposes. They can be eBooks, tutorials, or guidelines from Apple that are essential to my writing online. Thanks to the increasing support for cloud services in apps like PDF Expert, GoodReader, and iAnnotate, I can keep a single copy of a PDF in my Dropbox, use the app I want to annotate the document with, and forget about duplicates thanks to sync. Furthermore, I’m fairly sure that, due to their popularity, PDFs will still be readable and supported 20 years from now, so I don’t have to worry about data preservation and file formats.

Lately, I have become obsessed with turning longer articles I find on the Internet also into PDFs for long-term archival. For as much as I like Instapaper, I can’t be sure that the service will be around in the next decades, and I don’t want my archive of longform and quality content to be lost in the cloud. So I have come up with a way to combine Instapaper with the benefit of PDFs, Dropbox, and automation to generate documents off any link or webpage, from any device, within seconds.

(Disclaimer: what follows is an explanation of a hack I created for personal use. It uses publicly available tools and apps to fill a personal need. You shouldn’t create PDFs off websites and redistribute them – you should support the sites you read instead).

In short, I use the Instapaper Text bookmarklet to fetch a webpage’s text and images (while preserving hyperlinks and great typography) and I convert the resulting page to PDF using wkpdf. Created by Christian Plessl, wkpdf is a command line tool that uses WebKit and RubyCocoa for rendering HTML content to PDF. Since wkpdf uses WebKit’s HTML rendering, it can generate good-looking PDFs that maintain most CSS2 and CSS3 stylings and properties. I have tried another command line tool for file conversion, Pandoc, but I like wkpdf better for straight HTML to PDF conversion. Read more


Plain Text, Macros, Markdown, and Nebulous Notes

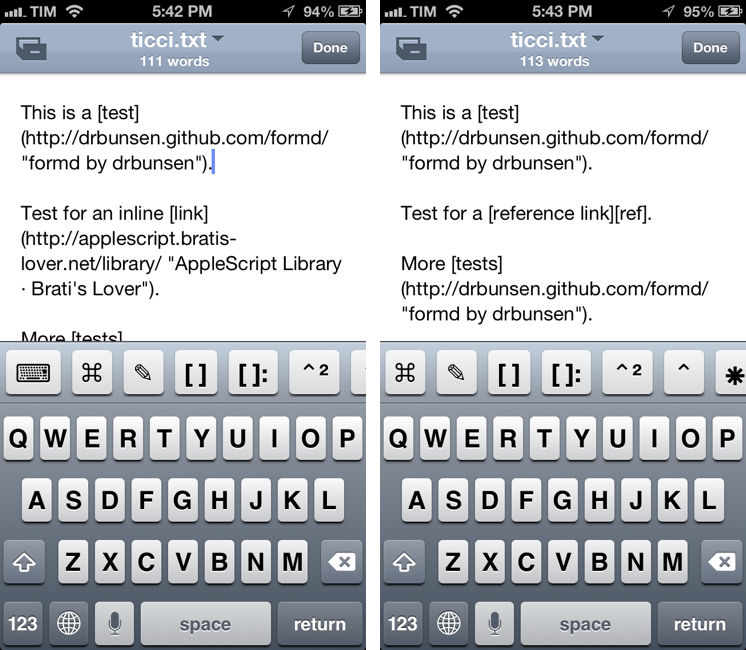
Nebulous Notes

Nebulous Notes

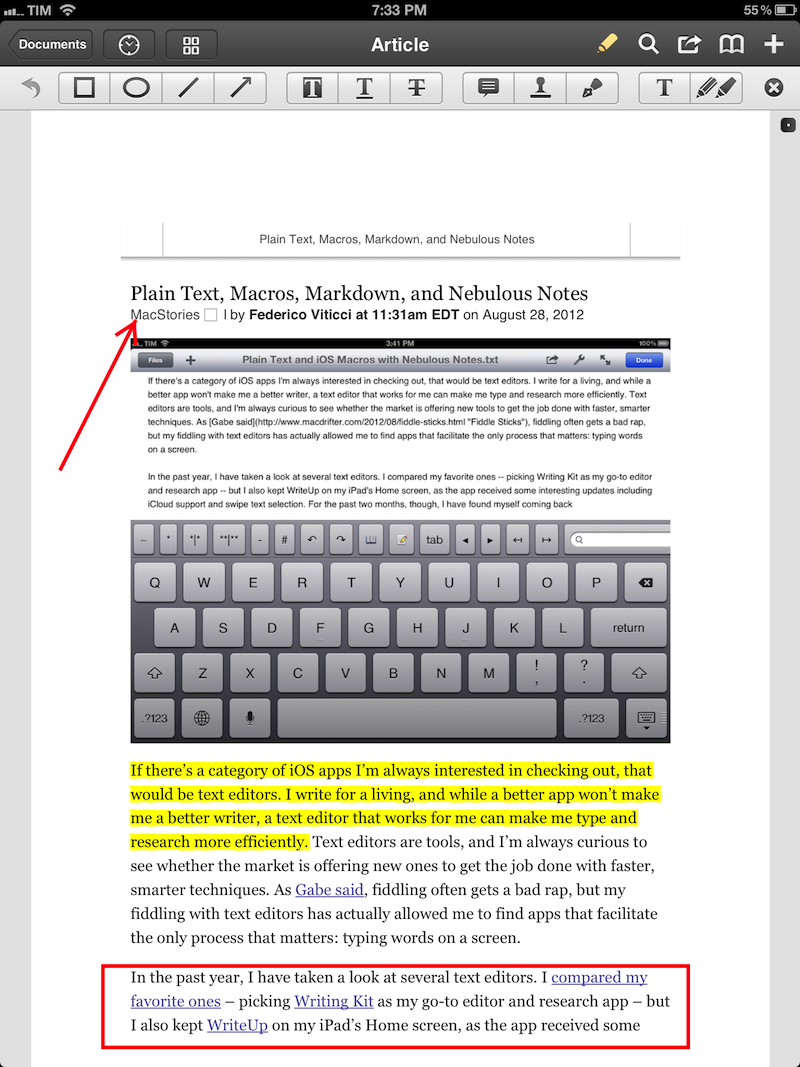
If there’s a category of iOS apps I’m always interested in checking out, that would be text editors. I write for a living, and while a better app won’t make me a better writer, a text editor that works for me can make me type and research more efficiently. Text editors are tools, and I’m always curious to see whether the market is offering new ones to get the job done with faster, smarter techniques. As Gabe said, fiddling often gets a bad rap, but my fiddling with text editors has actually allowed me to find apps that facilitate the only process that matters: typing words on a screen.

In the past year, I have taken a look at several text editors. I compared my favorite ones – picking Writing Kit as my go-to editor and research app – but I also kept WriteUp on my iPad’s Home screen, as the app received some interesting updates including iCloud support and swipe text selection. For the past two months, though, I have found myself coming back to another text editor that I had been previously recommended by various Internet pals: Nebulous Notes. And in spite of my publicly stated praise for Writing Kit, I have been getting lots of writing done with it – so much that I haven’t used any other app for my posts and notes. Read more


Launch Center Pro and OmniFocus

 Launch Center Pro and OmniFocus

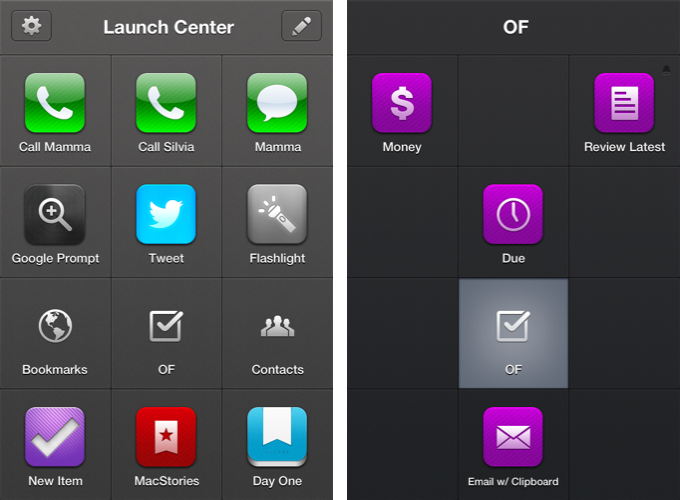
Michael Schechter has created a series of Launch Center Pro templates to speed up the creation process of repetitive tasks in OmniFocus for iPhone, inspired by David Sparks’ snippets for TextExpander and OmniFocus for Mac. With actions to easily attach the contents of the clipboard to a new task or setting up a reminder to follow up on something with a colleague, Michael’s snippets can be huge timesavers if you’ve been looking for a way to automate certain aspects of OmniFocus on the iPhone.

All I’ve done here is create a new group in Launch Center Pro called OF Actions. This allows me to have 11 rapid-fire actions for my most commonly created tasks. Rather than 11 unique actions, I’ve actually created duplicates for most that include whatever I have on the clipboard. This way I have a version that duplicates the Quick Entry field and another that emulates some aspects of the Clipper.

Based on OmniFocus’ new URL scheme and Launch Center Pro’s support for prompts (more details in our review of the app), these snippets won’t offer the same degree of customization found in desktop solutions like the aforementioned TextExpander or Keyboard Maestro, but they surely are the best way to automate OmniFocus on the iPhone for now. Because of the nature of iOS, you won’t be able to set up scripts that, for instance, let OmniFocus communicate with other apps automatically, but at least you’ll be saving some typing and navigation inside the app.

Inspired by Michael’s work, I have set up actions to access my most used perspectives and a new one called “Review Latest” that makes up for the lack of an Inbox perspective on iOS (as it’s project based rather than context based) and displays the latest tasks I may have added without a context or due date using Captio. Furthermore, I have assigned a scheduled reminder to the action, so that every day after dinner I’ll be reminded by Launch Center Pro to process my newest tasks created throughout the day.

The Omni Group’s Ken Case also chimed in on Twitter explaining how OmniFocus URLs work, and Justin Lancy collected the tweets in a Storify bundle. Nick Winja took a look at how it’s possible to access contexts via URL, as well.

You can see the full text for Michael’s Launch Center Pro snippets here.

Permalink

Hazel 3.0 Adds Nested Rules, UI Improvements, and New Actions

I spend a lot of time refining my workflows with the naive intention of heightening my productivity, but it always has an adverse effect. I know this is not a new problem, and a lot of my Mac nerd friends also fall victim to the “tweak now and it will help me later” facade. What I have come to realize is – productivity is about having tools that you can trust and rely on to provide stability in times of hectic disarray. For my own personal workflow I have relied on Hazel for quite some time now (our own Federico Viticci previously wrote about it here). Hazel has become the backbone that provides stability to my trusted system: I have so many automated processes ranging from managing my monthly utility bills to just doing general cleanup that I could not easily accomplish without it.

Today Noodlesoft has released Hazel 3.0, and with it come some much needed interface improvements, a heap of new features, and under-the-hood changes for a completely redesigned engine for detecting file changes. Let’s take a closer look at some of the highlights added to this release.

The first thing I noticed when I launched Hazel 3.0 is that it looks a lot like the previous version. That is not a bad thing, but the changes were not completely obvious at first. Then I noticed the new little eyeball icon in the section to add folders. When clicked, this icon displays a quick dropdown preview of what files match the rules for the folder you have selected. So, at this point I am about three seconds into using the new version of Hazel, and I’m already in love with just one of the many new features. Those using the previous version of Hazel would probably agree that the old method of previewing rules felt buried in sub-menus, and it is great to see that moved to the forefront of the UI.

There have been some other general interface improvements you just do not notice until you start using the program. For example, when editing an embedded script you can now adjust the size of the editor window. This alone is a huge help for long scripts that previously would have been easier to write in an external text editor. Speaking of script editing, perhaps my favorite visual improvement is the new popover design for script editors and option windows when creating new rules. This solves one of my biggest peeves with the previous version: when too many options had been expanded, the old slide-down windows would extend right past the bottom of the screen. It was probably only an issue on smaller laptop-size screens, but it was frustrating nonetheless. The new popovers are a great solution, and they really make Hazel feel at home on Mac OS X Lion.

The list really does goes on and on with tweaks to improve usability. In fact, so much of what makes Hazel 3.0 great is how it gracefully solves quirks I experienced in previous versions of the app. For instance, another frustration (now solved) was the inability to reorder conditions for matching rules. It is hard to explain why you would need to do this until your start creating and editing rules, but just know that version 3.0 does this superbly. In fact, I worry that new users will not be able to fully appreciate the effort that went in to improving the new release – they will simply have to live in blissful ignorance I suppose.

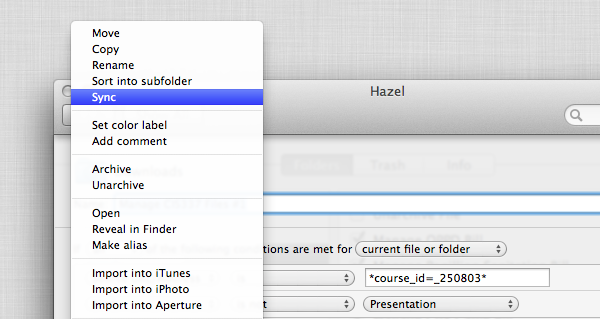
More interesting than the visual upgrades are the new features added to Hazel’s rules section. New features are always the cornerstone of any great software upgrade and Noodlesoft did not disappoint. Newly added actions include Import into Aperture and Sync. I don’t personally use Aperture but I am definitely excited to see the sync option. Unfortunately it is only a one-way sync action so it really only saves me the time of writing a script to run rsync. In fact, rsync is packaged into Hazel and that is how it accomplishes its own sync feature. Regardless, this is definitely a win for the average user.

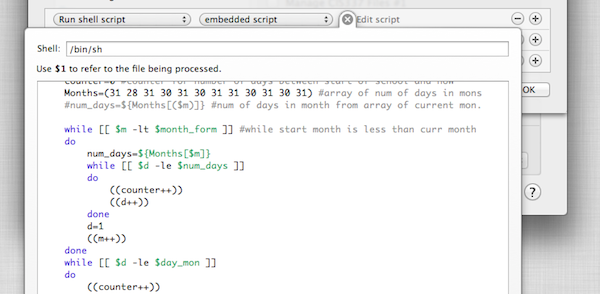
Another feature I was pleasantly surprised to see was the option to specify custom conditions via scripts. This basically allows you to write a shell script or AppleScript and test the file in anyway you want, then just return the value 0 to indicate the file is a match. This is so neat because it really brings an entirely new level of flexibility to how people can use Hazel. The structured rules Hazel ships with are great for most situations but now I have the ability to write my own. A simple example: I can write a shell script to grep the contents of a file and look for some specific information with regular expressions or in a way more powerful than Hazel’s stock “contents contains” action. I can not wait to really sink my teeth into that feature.

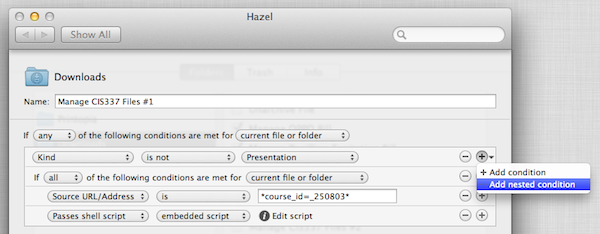
Hazel 3.0 doesn’t stop there, as rules can now be nested and/or grouped in any combination you see fit. This was probably the most requested feature and Noodlesoft did a fantastic job with the implementation. To add a nested rule you simply hold the Alt/Option key while clicking the (+) to add a rule condition; you can also simply click and hold down on the (+) to find the new add a nested rule option. Obviously, the potential uses for more complex conditions are limitless and I am sure many people will upgrade just for this addition.

One more thing worth highlighting is the new engine for detecting changes. Users should notice a decrease in time it takes Hazel to pick up on file changes, because, according to the developer, Hazel no longer needs to poll the disk as it relies on its new prediction engine to only wake when needed. This should result in less resources used and possibly even longer battery life for laptop users.

There are probably a hundred more changes I have not mentioned (i.e. scheduling rules) but you will have to download Hazel yourself to experience all it has to offer. Hazel 3.0 is an excellent upgrade and it is available as a single license for $25 or a family license for $45 directly from Noodlesoft’s website, and it is also available as a $10 upgrade fee for previously licensed users.


Sidekick Automates Your Mac’s Settings Based On Your Location

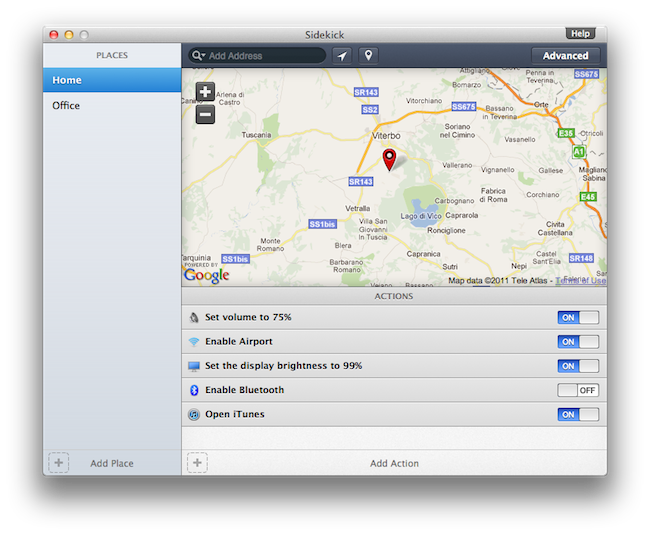
Last week, I ordered a new MacBook Air from Apple’s website. My MacBook Pro was getting old, so I decided it was time for an upgrade – and the new MacBook Airs looked like a worthy upgrade. As with the Apple online store’s tradition, the computer showed up at my doorstep in roughly three days. As soon as I got it, I opened it up, set up my personal information, and connected it to the Internet to start downloading my first apps. I was at my office, and in less than two hours I had my new MacBook Air up and running with my favorite applications, Dropbox, work documents, and so forth. A few hours later, when it was time to go home for dinner, I took my MacBook Air, got home, and placed it on the desk in my room. Thirty minutes later, I opened the MacBook’s lid again, fired up Spotify and Google Chrome, launched MacStories’ internal chat URL, and opened iTunes to check for app updates. Sure, the computer was new, but the pattern of actions that followed the opening of the lid wasn’t uncommon: this is what I do every day after dinner. I fire up some music, talk to my co-workers overseas, and browse iTunes. My laptop may be changing location travelling from my office to my house and everything in between (usually a coffee shop downtown), but the workflow is the same.

Sidekick, a new app by Oomph, aims at automating the tedious process of changing your Mac’s settings basing on the location of your computer. Read more


Company Promises To Automate Your Home Using iPads

How great would it be to control everything in our homes using only iOS devices? I’ve always dreamed to fire up my Espresso machine remotely using an iPhone app, or being able to close all my windows from an iPad with live webcam feeds. I know, crazy futuristic stuff that current home automation techniques haven’t fully addressed yet, especially when it comes to security concerns and reliability. But ask Solstice Multimedia about it: the Denver-based company with a decade-long experience in telecommunications and residential services thinks that turning your house into a full-featured iPad-controlled system is totally possible. They even promote a 3,400-square- foot model home with two iPads built-in at $718,000. Okay.

Price of the model home itself aside, the iOS-based system relies on a dual-iPad setup that will cost you roughly $5,000. Optional audio, video and security equipment will take the cost to $60,000 – that’s a whole lot of equipment, right? I assume so. Apparently the system’s “brain” is built into the home’s “mechanical room” with WiFi connection to the 2 iPads, but a third device can be used to control everything without having to touch a screen on your wall. So, basically, the iPad is the engine, and mechanical parts take care of lights, motorized blinds, cameras, and other stuff. The Denver Post reports:

A model home in the Overlook neighborhood in Lone Tree’s Heritage Hills is equipped with two built- in iPads that can control all of the electronic systems in the home, including lights, motorized shades, music and television systems, baby monitors and closed-circuit cameras.

“The iPad has brought the entry-level price point down significantly, because an 8-inch in-wall touch screen before cost upwards of $3,000 or more,” Deatherage said. “Now we can get a $500 iPad and still provide most of the functionality that an in-wall touch panel can give.

I’m pretty sure Apple won’t release an iHome anytime soon, so if you’re willing to automate your living room using iPhones and iPads this might be your best chance yet. Go take a look on Solstice Multimedia’s website. [via Cult of Mac]


AppleScriptObjC Explored by Shane Stanley

AppleScriptObjC Explored by Shane Stanley

AppleScriptObjC Explored by Shane Stanley is the most advanced, thorough, and in-depth documentation for the creation of AppleScript Objective-C applications. Utilizing a hands-on approach, the book guides you step-by-step through the process of integrating the power of Cocoa into your AppleScript applets and applications, demonstrating each concept and technique in fully editable and annotated example projects.

Recommended. [via DF]

Permalink