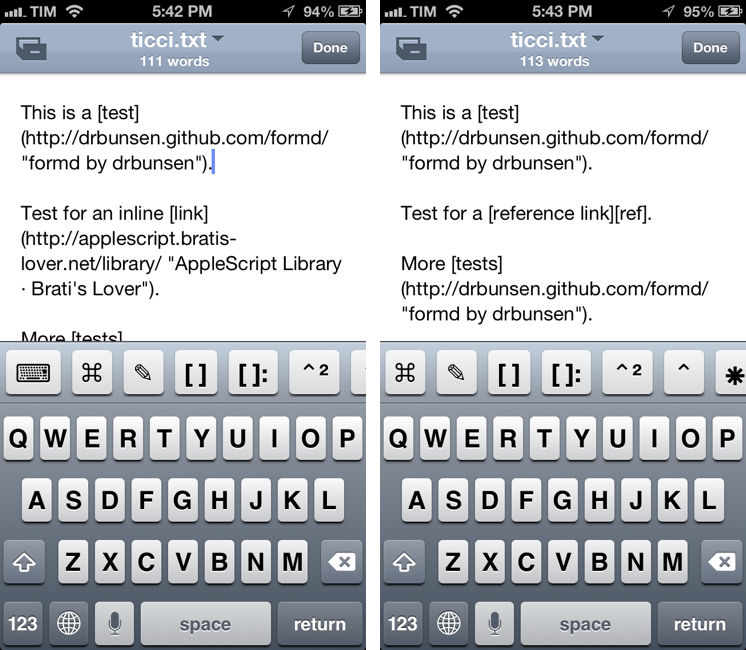
I have written about Nebulous Notes before. Back in August, I posted an overview of my workflow with the app, plain text, and Markdown:
Combining Nebulous’ support for text substitution and cursor position macros has enabled me to achieve a powerful workflow when it comes to writing in Markdown. For instance, I can select words I want to turn into inline links, and have the app automatically wrap them between square brackets, and paste the contents of my clipboard (the link) to the right. To copy Markdown-ready links, I use my own bookmarklet. Or if I want to create a list, I can hit a button that inserts an asterisk and a space. Or again, if I need to create a text file with a format that OmniOutliner recognizes correctly, I can indent items with Nebulous’ $tab and $cursor macros.
Since then, a major 6.0 update to the app has been released, which, in my opinion, deserves another look. For the occasion, I’ve put together a few videos showing how I use the macros I have created for easier and quicker Markdown (more specifically, MultiMarkdown) formatting. The videos were recorded on a Mac using QuickTime capturing an AirPlay Mirroring session through Reflection. I have embedded them here using the video tag supported by most modern browsers (video files are encoded in MPEG-4). For Firefox users, there’s a fallback to Theora .ogv files (converted using ffmpeg2theora). I will also make my macros available for download at the end of this post.
Nebulous 6.0 is a solid update. In terms of interface design, it makes the app more pleasant to look at with a new color scheme and it brings support for the iPhone 5 (more on this in a bit). You can now generate Dropbox public links for any file you’re editing, and you can save files to Evernote if you want to get them out of Dropbox. There is now a live word and character count, possibility to set margins on the iPad (I use “small”), and one-click access to toolbar icons for Markdown preview and “close file”.
Unfortunately, Nebulous is still based on a “device” and “cloud” file organization that forces you to “cache” (download) files before editing them. Fortunately, every change you’ll make will be auto-synced after that. Search is, according to the developer, improved in this version, but I still can’t search inside files stored in Dropbox (ie. not previously downloaded on the device). I am looking forward to the day when Nebulous will be more like Notesy from a sync standpoint.
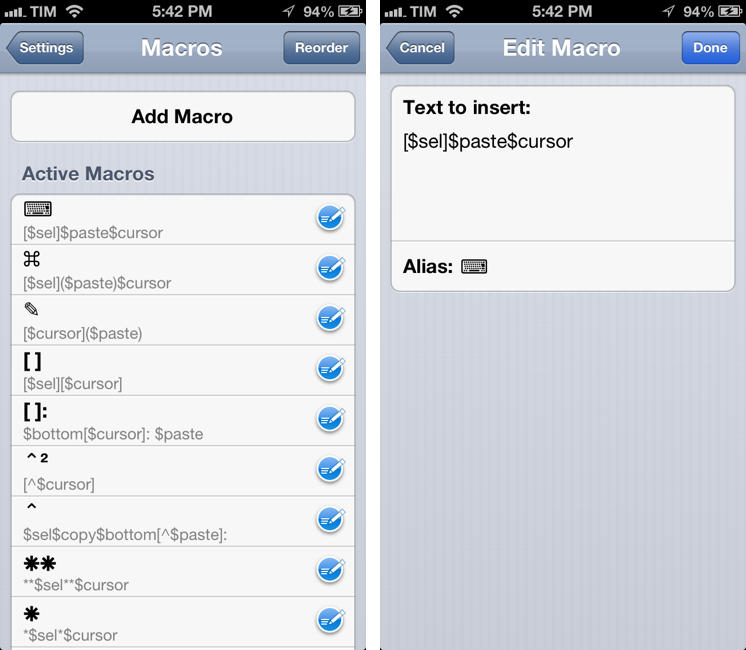
For me, the biggest change in version 6.0 is related to macros. I’ve always thought Nebulous should be able to “chain” macros together: the app won’t ever be a Keyboard Maestro for iOS (not unless Apple makes some major changes to the underlying iOS technology), but I wondered if it’d be possible to combine multiple app macros together in the same chain of commands. While you still can’t, say, manage multiple clipboards or do complex text selections, the developer has made serious progress in allowing commands like $top and $bottom to be chained with things like $paste or $sel. I’ve been told by the developer that, in a future update, the $selectcommand will also support chaining.
Eventually, I’d like to be able to assign selected strings to a named clipboard inside the app or do stuff like dialog prompts for variables similar to Keyboard Maestro; for now, I’m fine with the macros I’ve been able to put together.
Inserting links
My macros for inserting Markdown links in Keyboard Maestro are largely based on bookmarklets for grabbing webpage URLs and titles in Safari (or any other browser). The output of the bookmarklets is properly formatted for inline links or reference-style links; I generally prefer inline links because they allow me to edit text quickly, but for longer pieces I prefer the tidier organization of reference links at the bottom of a document.
Inline links
For inline links, my most-used macro is the one that grabs the current selection, wraps it between square brackets, and inserts the inline link generated by my bookmarklet. I also have macros for inserting “simple links” (just the URL, no title) and for inserting the link first, then typing the linked words between square brackets.
Reference links
For reference links, the main problem you have to account for is that you can’t automatically calculate the number you’ll assign to your reference (if only Python scripts could be executed inside Nebulous Notes…). You have to type in the reference manually.
I had to split the macros in two parts: the first macro wraps the selection between square brackets and puts the cursor at the point of insertion for the reference; the second macro goes at the bottom of the document, inserts a link you have in your clipboard after the colon, and places the cursor between square brackets so you can type in the reference again. If Nebulous supported multiple clipboards, I could put the reference number in a named clipboard to avoid typing it again. Instead, I have to leave the link copied from Safari in the clipboard, and type the reference manually twice.
Overall, these are a lot of words for a process that, even with its limitations, takes seconds.
Pro tip: Because the reference macro goes to paste the link at the bottom of your document, I always create some blank lines first, as you can see in the video.
Bold and Italics
These are simple. Take the current selection and wrap it between asterisks.
Footnotes
I don’t use use footnotes much, but when I do, I want to make sure I have a system that allows me to create them quickly. On the Mac, I’ve been using this Keyboard Macro by Jeff Hunsberger.
For Nebulous Notes, because of the aforementioned bug that prevents $selectfrom chaining and due to the lack of multiple clipboards, I have split the process in two macros. The first macro creates the proper footnote reference in the body text; the second one, after manually copying the footnote’s reference, goes at the bottom of the document and pastes the reference. Personally, I let this macro create an additional blank space at the bottom for the reasons mentioned above, but you can easily edit it to place the cursor right after the reference so you can type your actual footnote immediately.
Preview
When I’m done writing and editing, I preview my document using apps that support MultiMarkdown such as Textastic or Byword.
Not Nebulous At All
Nebulous Notes 6.0 allows me to write faster Markdown. Because of iOS’ own limitations, Nebulous can’t become a full-on mobile Keyboard Maestro or TextExpander, but the app is getting closer to every Markdown writer’s dream of an iOS app with automation features and scripting support. And I know the developer is planning more great features for the future.
With the taller screen of the iPhone 5, I can have an extra row of macros to make typing even faster without sacrificing the screen space I was used to having on my iPhone 4S. On the iPad, the larger screen in landscape mode makes for an even speedier experience with macros.
There’s a lot more you can do with Nebulous Notes if you check out the documentation: there are several macros I’m not using, and support for TextExpander snippets ensures you’ll also have an extra option for doing text expansions. If you combine the app with Launch Center Pro, you can set one-tap actions to append or prepend text to a specific file in Nebulous Notes. And because Launch Center’s actions are URL-encoded, you can add things like new lines or quotes to your template (unfortunately, adding TextExpander snippets to the custom URLs won’t make them expand once they reach Nebulous Notes).
Nebulous Notes works for me, and I hope these macros will help speed up your workflow as well. Check out Nebulous Notes on the App Store.
Download the macros
You can download my macros as a .txt file that you can import in Nebulous Notes. Make sure to have a backup of your macros, as the app’s “Import” feature will override existing ones.


