Iconography
The icons in Big Sur’s Dock echo the shape of those found on the iPhone and iPad, but wouldn’t be mistaken for them. Every icon is backed by the familiar super-ellipse used for iOS and iPadOS app icons, but the Mac’s icons reflect greater depth and detail. There’s a more pronounced use of drop-shadows to set glyphs apart from their background and, in some instances, finer image details like the return address on the Mail icon and the hammer in the Xcode icon, both of which are highlighted below. Another clue that you’re not looking at iPhone and iPad icons is that elements of some icons, like Xcode’s hammer and TextEdit’s mechanical pencil, extend beyond the bounds of the backing shape, a touch that macOS 11 shares with earlier versions of the OS.

Big Sur’s icons retain the fine detail of past versions of macOS, and, in some cases, glyphs extend beyond the bounds of the icon’s background.
By and large, I like the new icons, though broader public reactions have been mixed. The new shape adds orderliness to the Dock that I appreciate, and it leans into a trend I’d noticed among some developers coming from iPhone and iPad who were already using iOS and iPadOS-style icons for their Mac apps. The change also makes sense in light of the introduction of iPhone and iPad apps on Apple M1 Macs. Regardless of whether you like the new icons or not, though, the previous-generation icons feel out of place in Big Sur, so I expect the transition to the new format to happen relatively quickly.
The Big Sur icons that have a counterpart on iPadOS are often similar, but with greater use of shadows to convey depth.
Initially, the hardest icons to get used to during the beta were the ones with the simplest glyphs where the drop-shadow was the most pronounced, like Messages and FaceTime. In the final release of Big Sur, though, the originally heavy drop-shadow treatment was dialed back, as I expected it would be, so, for example, Messages’ icon looks less like King Boo now. The final result is a playfulness and level of detail that distinguishes Big Sur’s icons from their siblings on iOS and iPadOS and gives them a personality and style of their own.
Although I like most of the new system icons, there are some that I think could use a little more attention, like these.
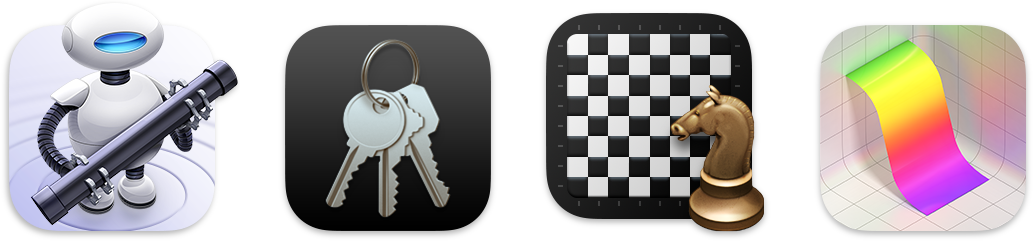
Not all of the new icons are created equal, though. I’m not a fan of the Automator and Keychain icons, for example. However, my approach to the icons I don’t like is more practical than principled. The icons I don’t like aren’t things that sit in my Dock, so although I’d prefer all of the Mac’s icons be perfect and beautiful, having these out of sight means they’re largely out of mind too.
The Menu Bar: Translucency and Whitespace
.jpg)
The merits of the use of translucency in macOS have been debated for years now. It’s not to everyone’s tastes, but it doesn’t appear to be going anywhere, having survived for years on macOS 10 and made the transition to Big Sur. This year, transparency was one of the central design concepts championed by Apple at WWDC for its role in creating a layered hierarchy of UI elements.
Although translucency is found throughout Big Sur’s UI, it’s front and center in the menu bar. The Dock shares the menu bar’s translucency, but the fine detail and depth of the icons sitting on it make the translucency of the Dock less obvious. The purpose of the translucency is the same for both the Dock and menu bar, though. Translucency causes the chrome of the Dock and menu bar to recede into the background, focusing the user’s attention on the icons and desktop space.
Apple has taken care to render menu bar text and icons in a way that minimizes readability issues caused by the desktop picture behind it, but it can still make text and icons somewhat harder to read at times. Whether this bothers you will depend on the degree to which you use the menu bar. I don’t use the menu bar much, having previously used a Mac with the menu bar hidden for years. As a result, I rather like that it fades into the background.

In addition to translucency, the menu bar’s pull-down menus and icons are slightly more spread out horizontally. Menu items are more spaced out vertically too. It’s tempting to interpret the spacing as a sign that touch is coming to the Mac, but I don’t think that’s happening anytime soon. I’m not suggesting that touch will never come to the Mac, but I’m inclined to accept at face value Apple’s stated design goal of reducing information density.
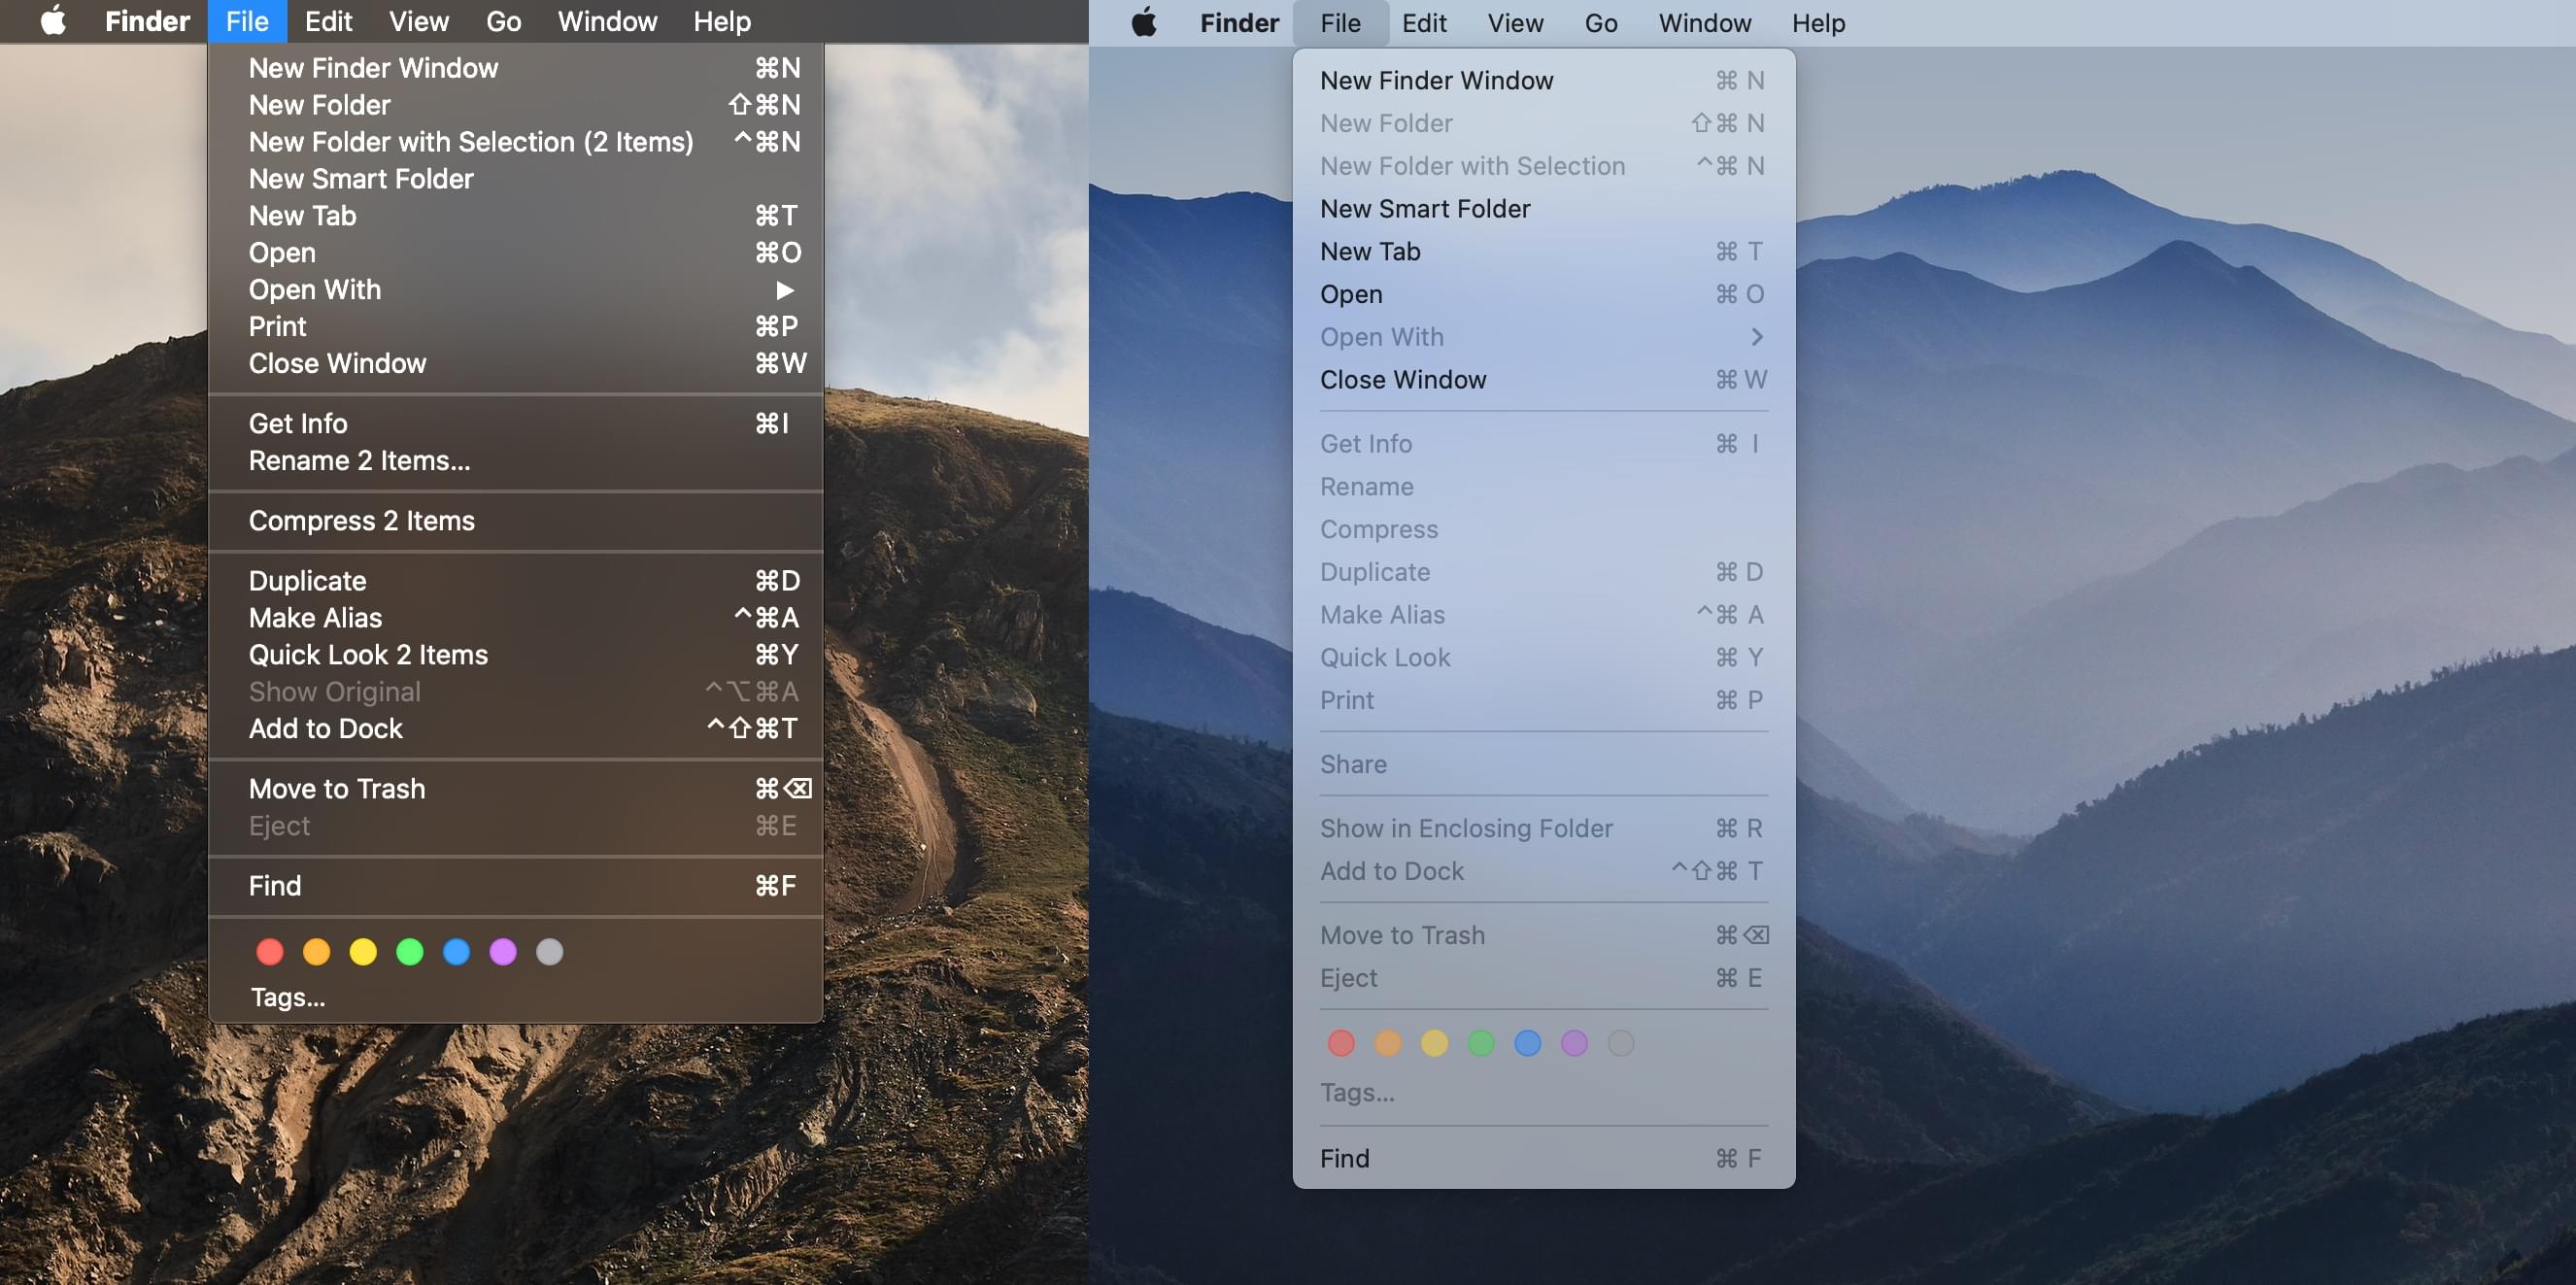
Also, although the increased spacing between UI elements can be found throughout Big Sur, it’s predominantly a change that’s limited to lists of text. For example, stoplight buttons in the top left corner of windows remain tightly spaced, and toolbar icons seem as compact in Big Sur as before. Also, with the inherent complexity of moving the Mac to Apple-designed SoCs, it’s hard to imagine Apple simultaneously making a fundamental change to the Mac interaction model.
Control Center, Notification Center, and Widgets
The menu bar’s changes don’t end with the menu bar itself. Apple has brought Control Center over from iOS and iPadOS and redesigned how notifications and widgets are handled too.
Control Center

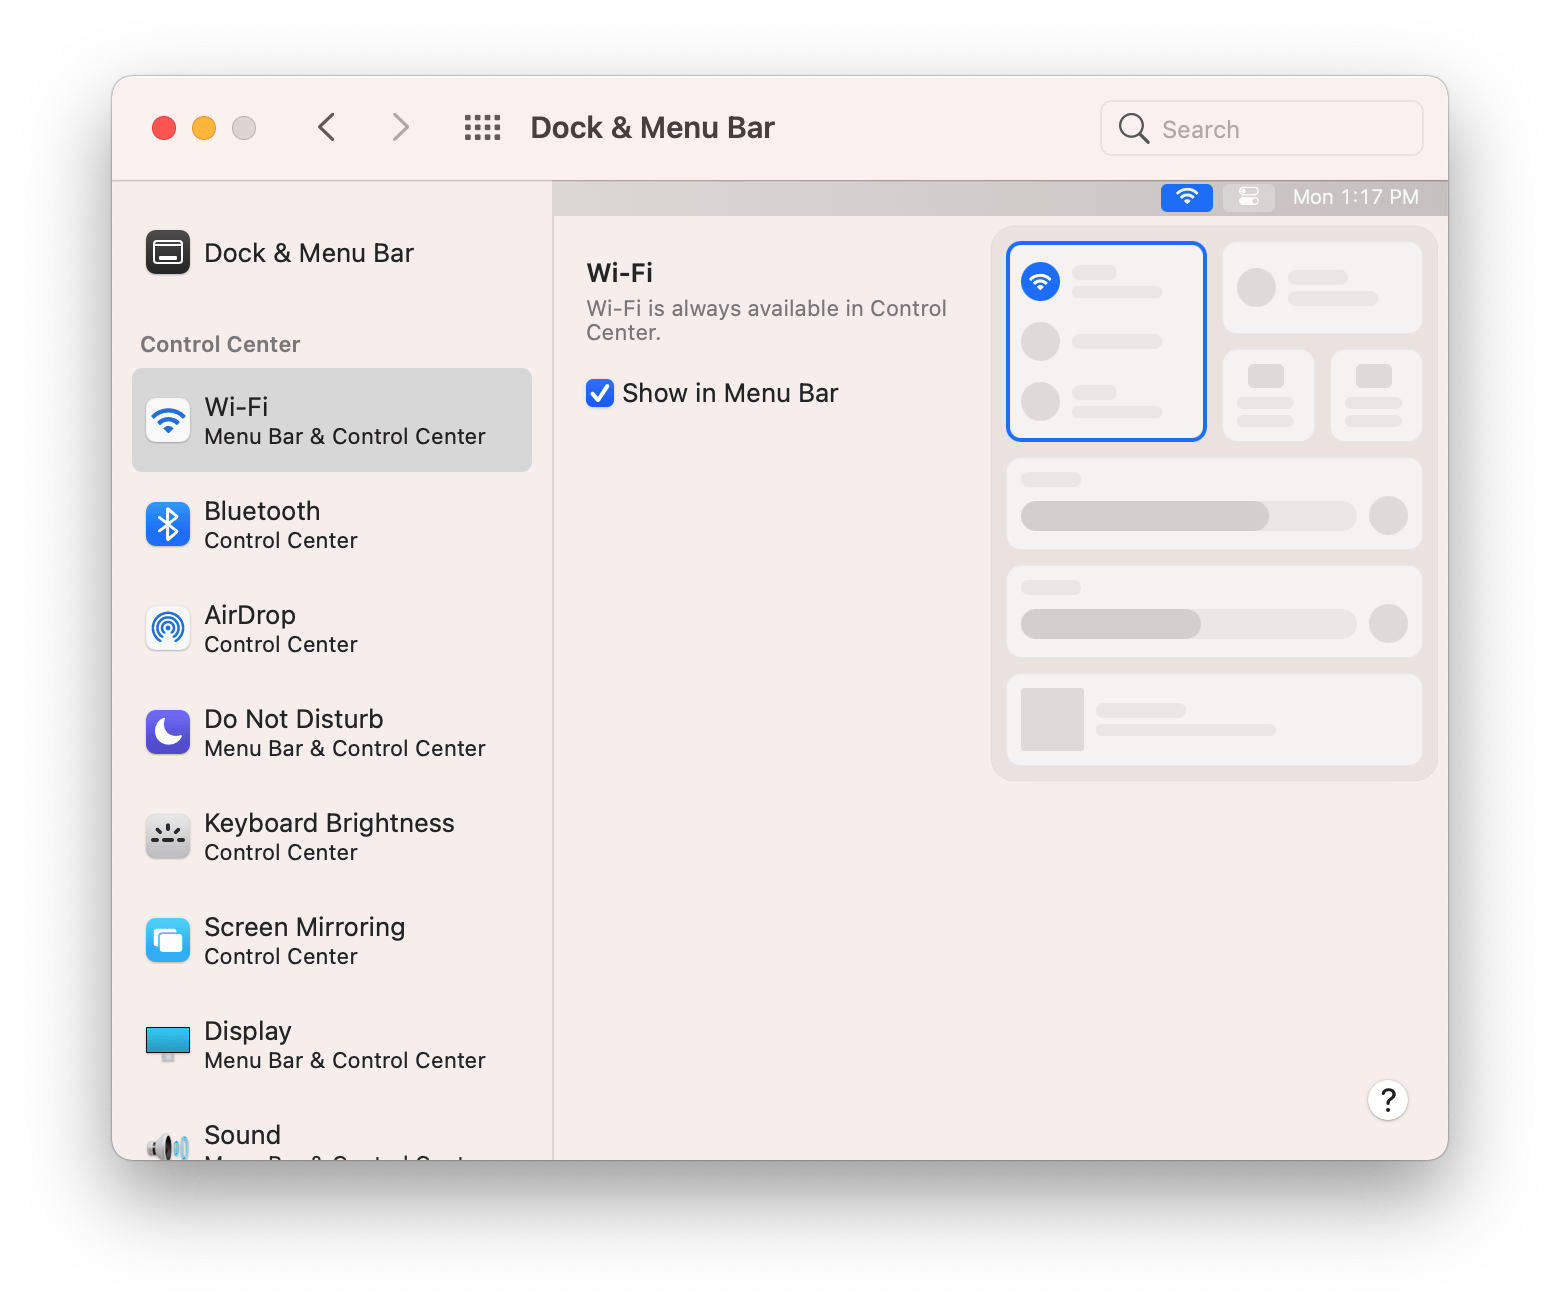
Control Center is accessed from the menu bar using the same icon found in the Settings app on the iPhone and iPad, but it works a little differently than on those devices. Control Center integrates with the other menu bar apps on your Mac, which makes it more flexible in some respects and, in other ways, substantially more limited than its iOS and iPadOS counterparts.
In its default configuration, there are nine modules in Control Center, with three more available via System Preferences. Each Control Center module provides quick access to settings that can also serve as standalone menu bar items or be accessed from the Mac’s System Preferences app.
The default modules can be interacted with from the pane that appears when you click on the Control Center menu bar icon, but they can’t be reorganized within the pane. However, users can drag any module out of the Control Center pane and deposit it on the menu bar where it behaves like the other standalone menu bar items. Control Center modules can also be added to the menu bar from the ‘Dock & Menu Bar’ section of System Preferences.
Control Center modules that are dragged to the menu bar are not, however, removed from Control Center. Instead, they exist in both locations, although some of the Control Center modules that are added to the menu bar can be set up to only appear when the feature is active from the ‘Dock & Menu Bar’ section of System Preferences.
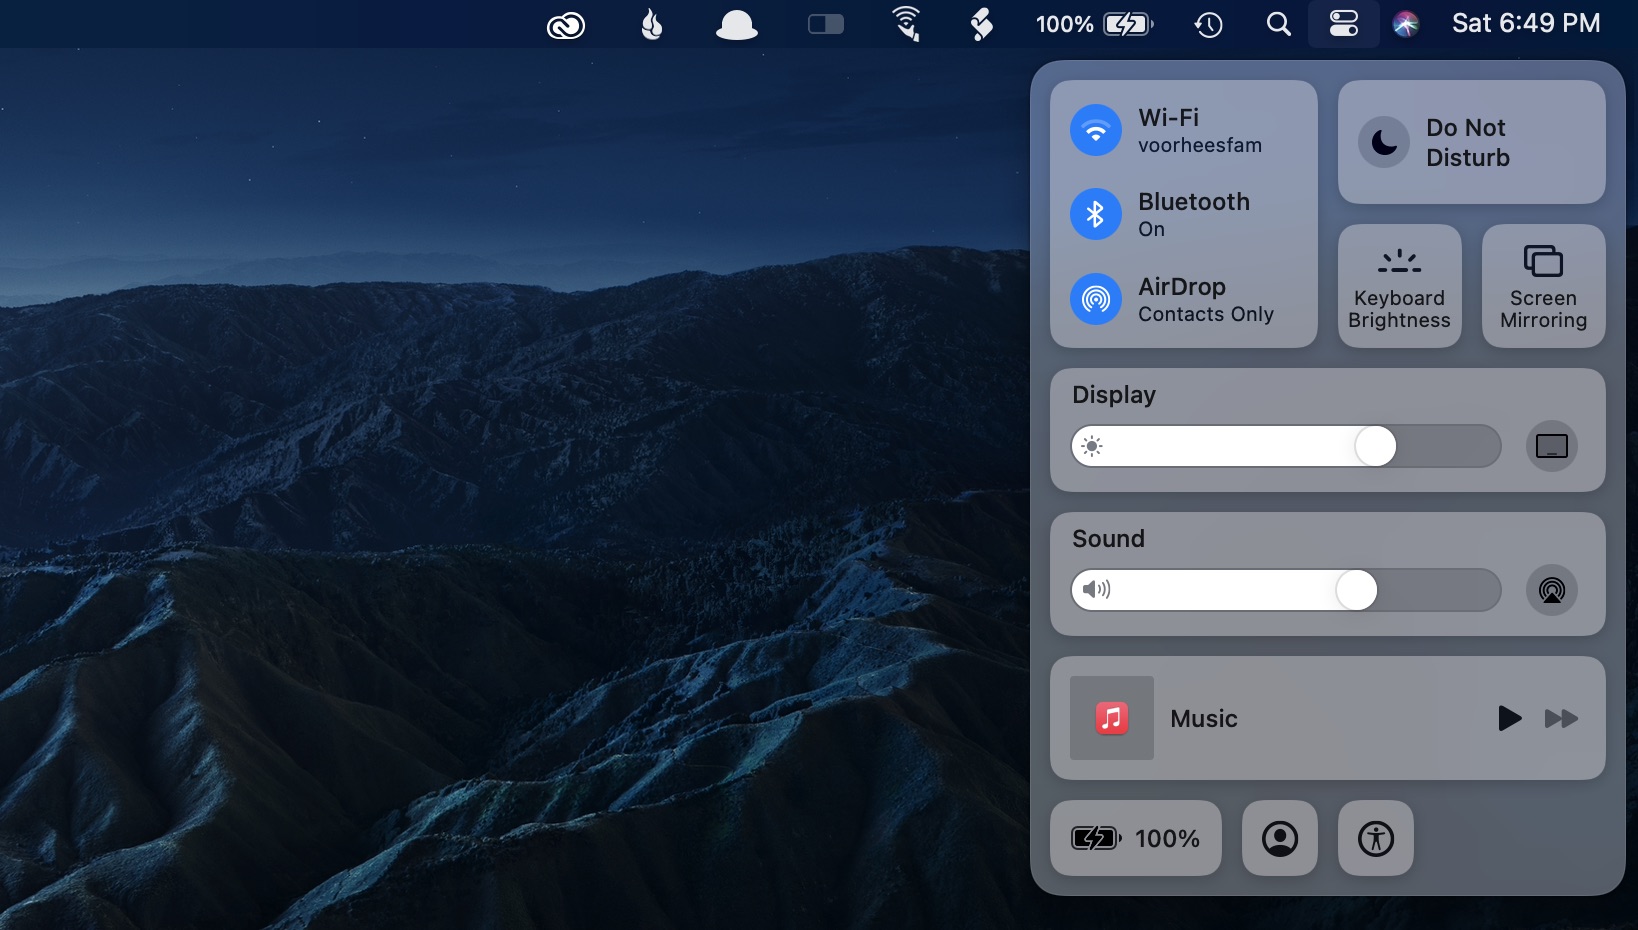
The default Control Center components are:
- Wi-Fi
- Bluetooth
- AirDrop
- Do Not Disturb
- Keyboard Brightness
- Screen Mirroring
- Display
- Sound
- Now Playing
Wi-Fi, Bluetooth, and AirDrop are grouped, which makes sense given their related functionality, and along with Do Not Disturb, their icons toggle from gray to bright blue when activated. To turn any of these four settings on or off, just click their icons. When you hover over each with the pointer, you’ll notice a caret glyph appears, indicating that you can click to access additional settings or jump to the related section of System Preferences too.
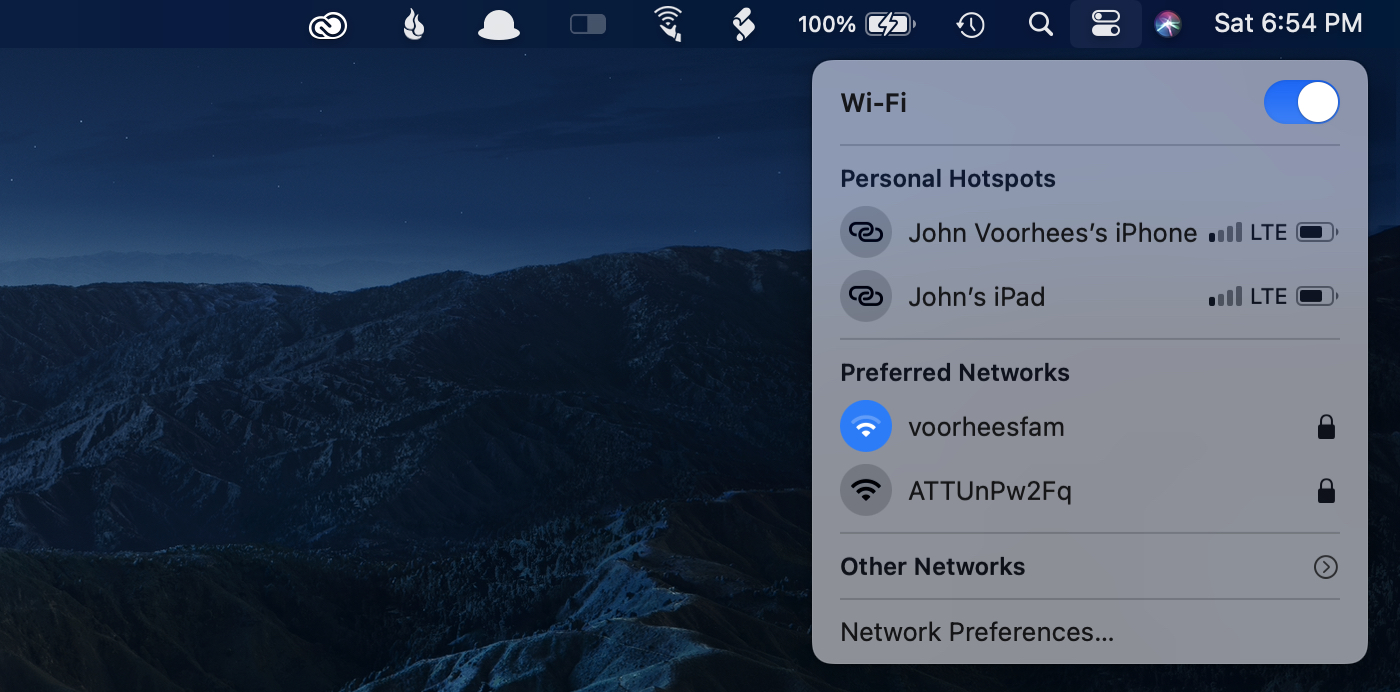
The additional Wi-Fi settings reveal options to connect to hotspots, preferred networks, and other networks. Clicking Bluetooth reveals all the devices you’ve paired with your Mac before. The detail view for AirDrop lets you switch between AirDropping to contacts only and everyone, and Do Not Disturb’s detail view lets you pick between turning the feature on for an hour, until the evening, until tomorrow, and always.
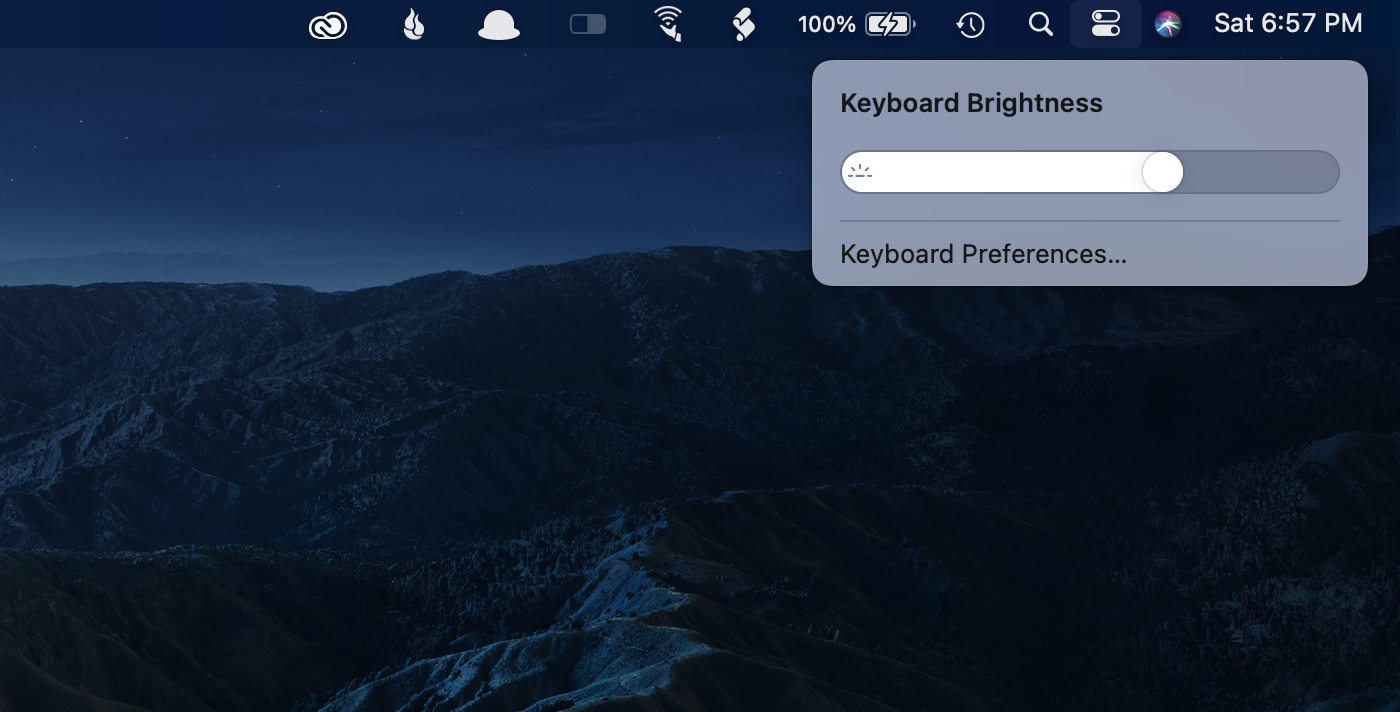
Keyboard Brightness and Screen Mirroring are a little different. Instead of rectangles like the other controls, they are squares. The difference helps balance the buttons in Control Center. Clicking Keyboard Brightness displays a slider for adjusting brightness, while Screen Mirroring lists the devices you can mirror to.
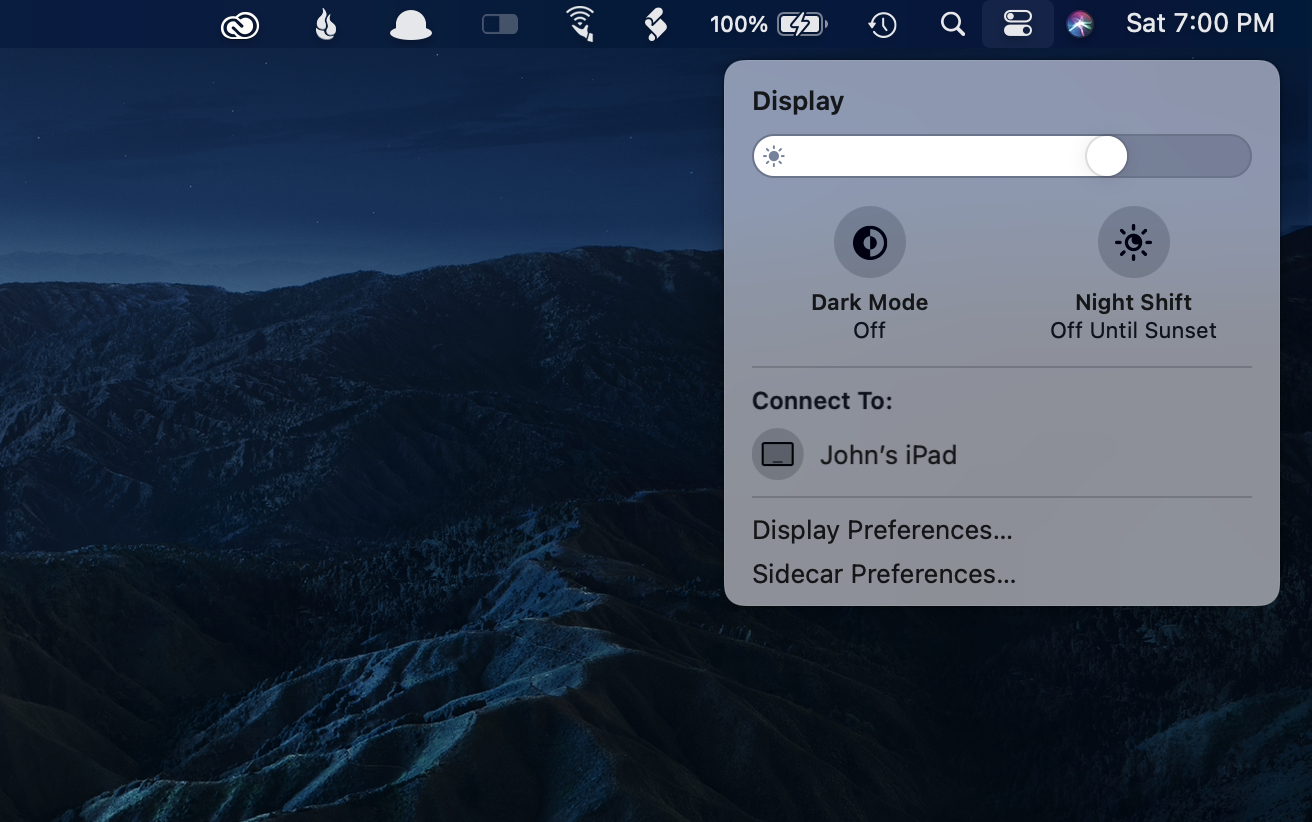
Display and Sound incorporate sliders for adjusting brightness and volume, respectively. Clicking Display also includes options for turning dark mode and Night Shift on and off and connecting to nearby iPads using Sidecar, while Sound displays devices to which you can output your Mac’s audio. Also, if you’ve got the Sound module in the menu bar, it dynamically updates to reflect the source, displaying an AirPods Pro icon when they are connected, for example.
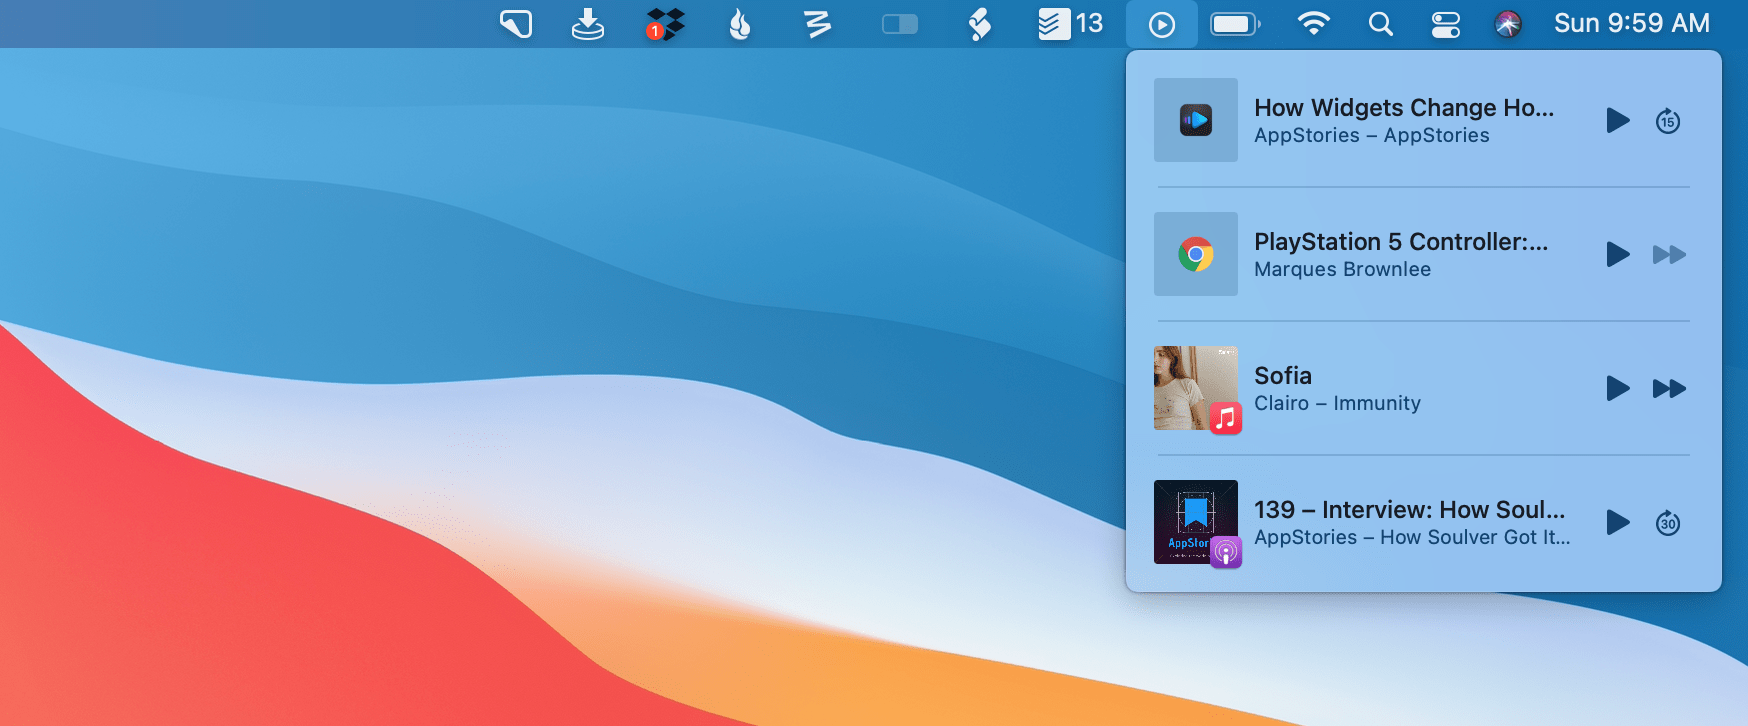
The Now Playing module shows information about the currently playing song, album, and artist along with a small album artwork thumbnail, a play/pause control, and a skip forward button. Clicking the Now Playing module expands it to reveal all open apps that can deliver audio, including third-party audio sources. For example, the expanded module might show playback controls for where you left off in a Music playlist and in a second one for a podcast episode in the Podcasts app. Click on one of the available sources and you get more player controls, including a button for skipping back song-by-song and an interactive scrubber for advancing to a particular point in a song. Unfortunately, AirPlay 2 isn’t supported. Also, it’s worth noting that the Music module was buggy in the late stages of Big Sur’s betas, occasionally showing an extra blank audio source. It has improved, but I’m still seeing the bug on one of my Macs.

The Accessibility module provides shortcuts to Vision, Physical and Motor, and other accessibility settings.
Accessibility Shortcuts, Battery, and Fast User Switching can be included in the menu bar, Control Center, or both. Clicking the Accessibility Shortcuts module provides quick access to the vision accessibility features, VoiceOver, Zoom, and Invert Colors, physical and motor accessibility features, Sticky Keys, Slow Keys, Mouse Keys, and the Accessibility Keyboard. The battery widget displays your battery’s charge status and can be set to display the percentage charge in System Preferences. Clicking on the battery icon displays the same information, plus alerts you if your battery needs to be serviced and indicates which of your apps is using the most energy.
I appreciate the flexibility of having the option to include settings in Control Center or as standalone menu bar items, but Control Center has a long way to go before it’s as useful as the feature is iOS and iPadOS. The iPhone alone supports over 30 different Control Center modules, while the Mac supports just a dozen, including the three that aren’t activated by default. When you add the inability to rearrange modules within Control Center, the differences between the Mac version of Control Center and what the iPhone and iPad offer are stark.
Control Center needs more modules on the Mac. Modules for input devices, peripherals like printers and scanners, and third-party menu bar apps would all be welcome. I’d also like to be able to modify the layout. Big Sur’s Control Center is a start, and it’s worth remembering that Control Center on the iPhone and iPad wasn’t always as customizable as it is today, but there’s ample room to make it more useful.
The Control Center settings in System Preferences could stand to be condensed because they dedicate an entire pane to one checkbox and in some cases a drop-down menu too.
Also, if there’s a keyboard shortcut for activating Control Center, I haven’t been able to find it. It’s a small wish, but sometimes, all I want to do is see what my current settings are without changing them. One solution is to use a little AppleScript and an app like BetterTouchTool to trigger Control Center, as is described in this Reddit post, but it should have a keyboard shortcut.
Still, despite its limitations, Big Sur’s Control Center will be one of many familiar touches added to the OS from the iPhone and iPad that will serve many users’ needs and declutter their menu bars. I expect power users will continue to use apps like Bartender to organize their menu bar apps, but even they will benefit from the consolidation and organization of the system menu bar items that Control Center provides.
Notification Center
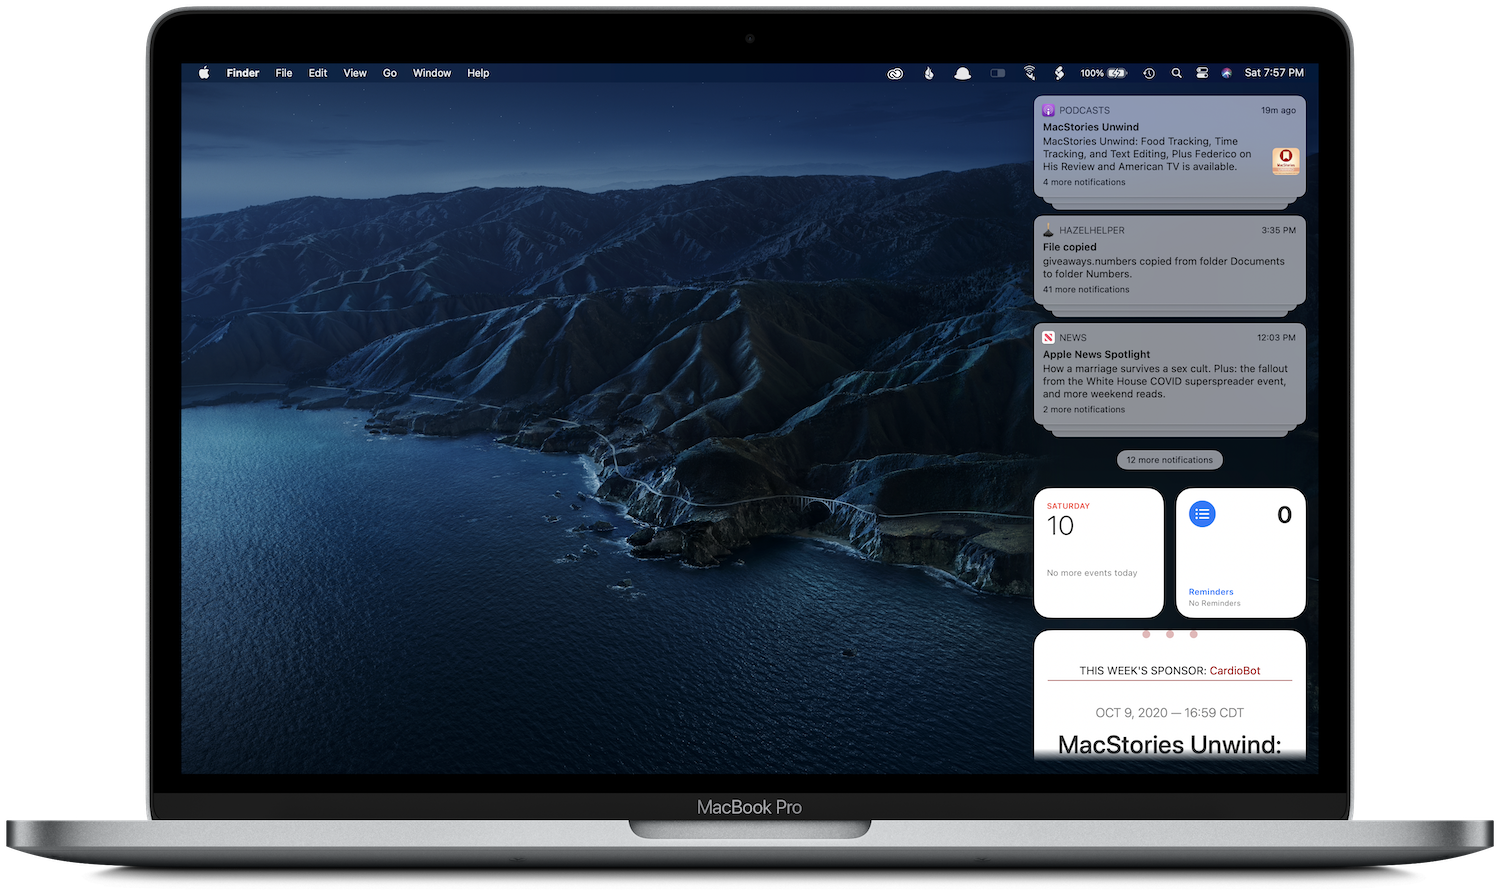
Notifications and widgets have been consolidated in Big Sur into a single panel that seemingly floats above the desktop. In prior versions of macOS, you clicked on a dedicated Notification Center menu bar app, which caused it to slide in from the right side of the screen. Once open, notifications and widgets occupied separate views that you could switch between by clicking on the segmented control at the top of the panel.

The new Notification Center (right) feels like it floats above the desktop compared to Catalina (left).
Now, however, notifications and widgets live in the same space, so there’s no need to switch between two views. What’s unusual, though, is that Notification Center is accessed by clicking on the day and time in the menu bar, which is highly undiscoverable. Although it’s reasonable to expect that something will happen when you click on the time in the menu bar, there’s certainly no affordance that would suggest that notifications and widgets are hidden behind there.
Also, when Notification Center had a dedicated icon in the menu bar, you could option-click on it to enable Do Not Disturb. That still works, but now, you option-click the time instead, enabling the feature’s always-on mode, further emphasizing the absurdity of hiding notifications behind the clock.
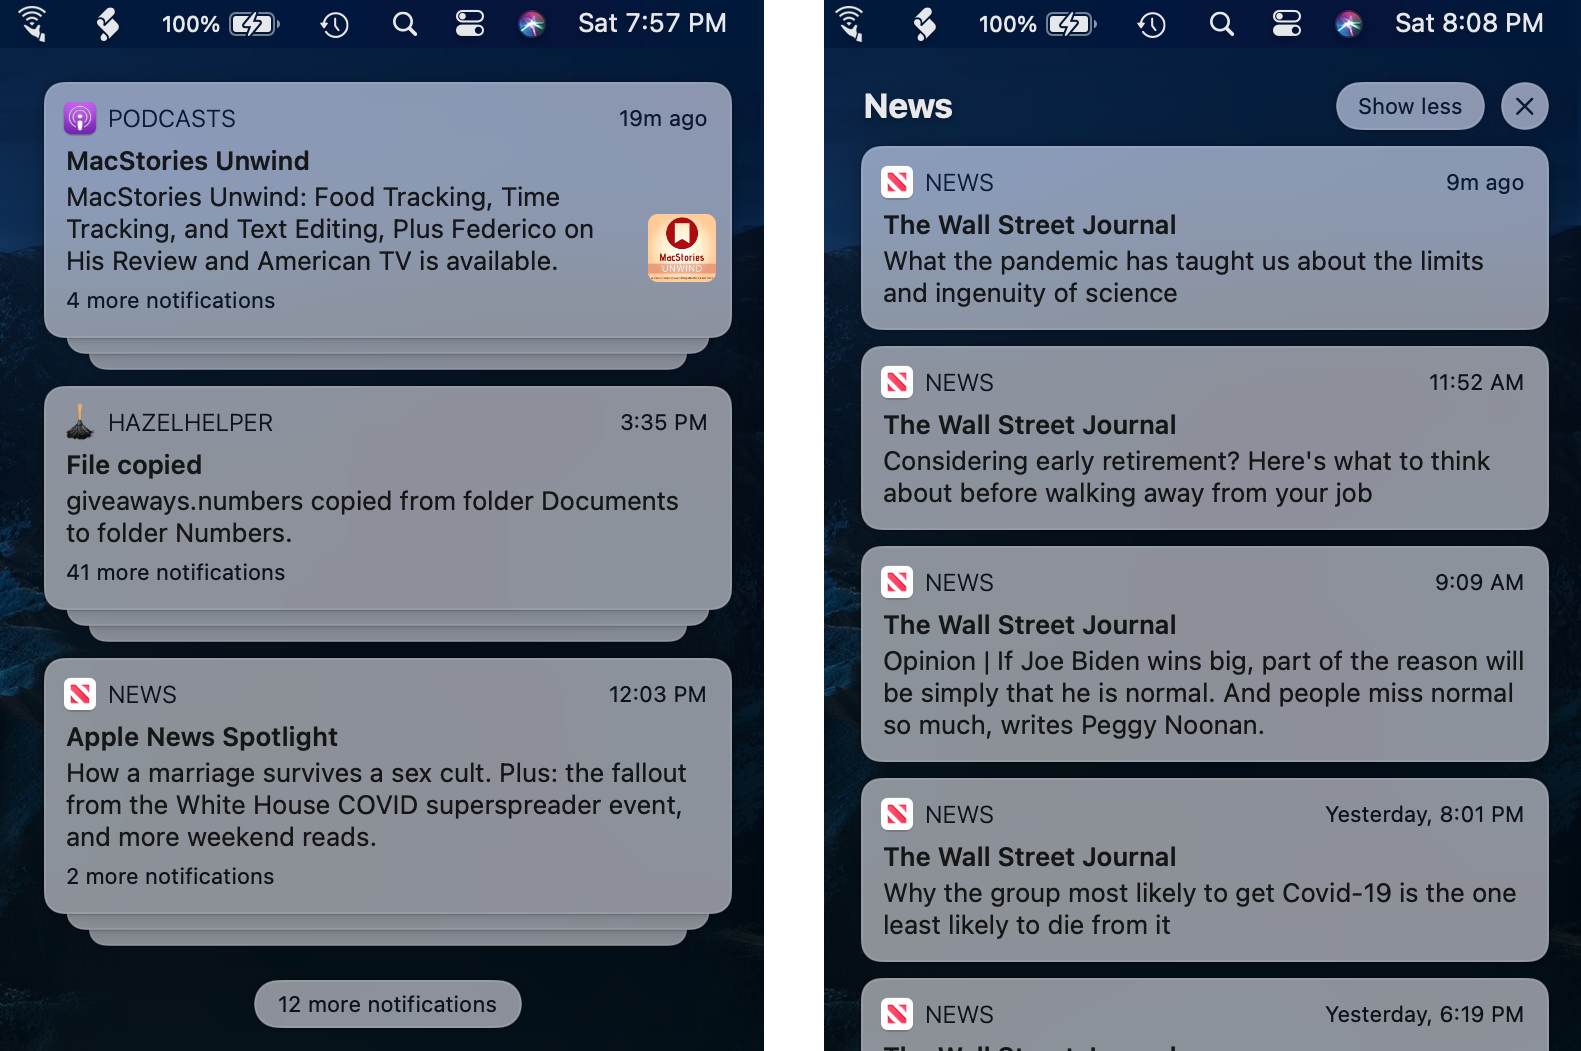
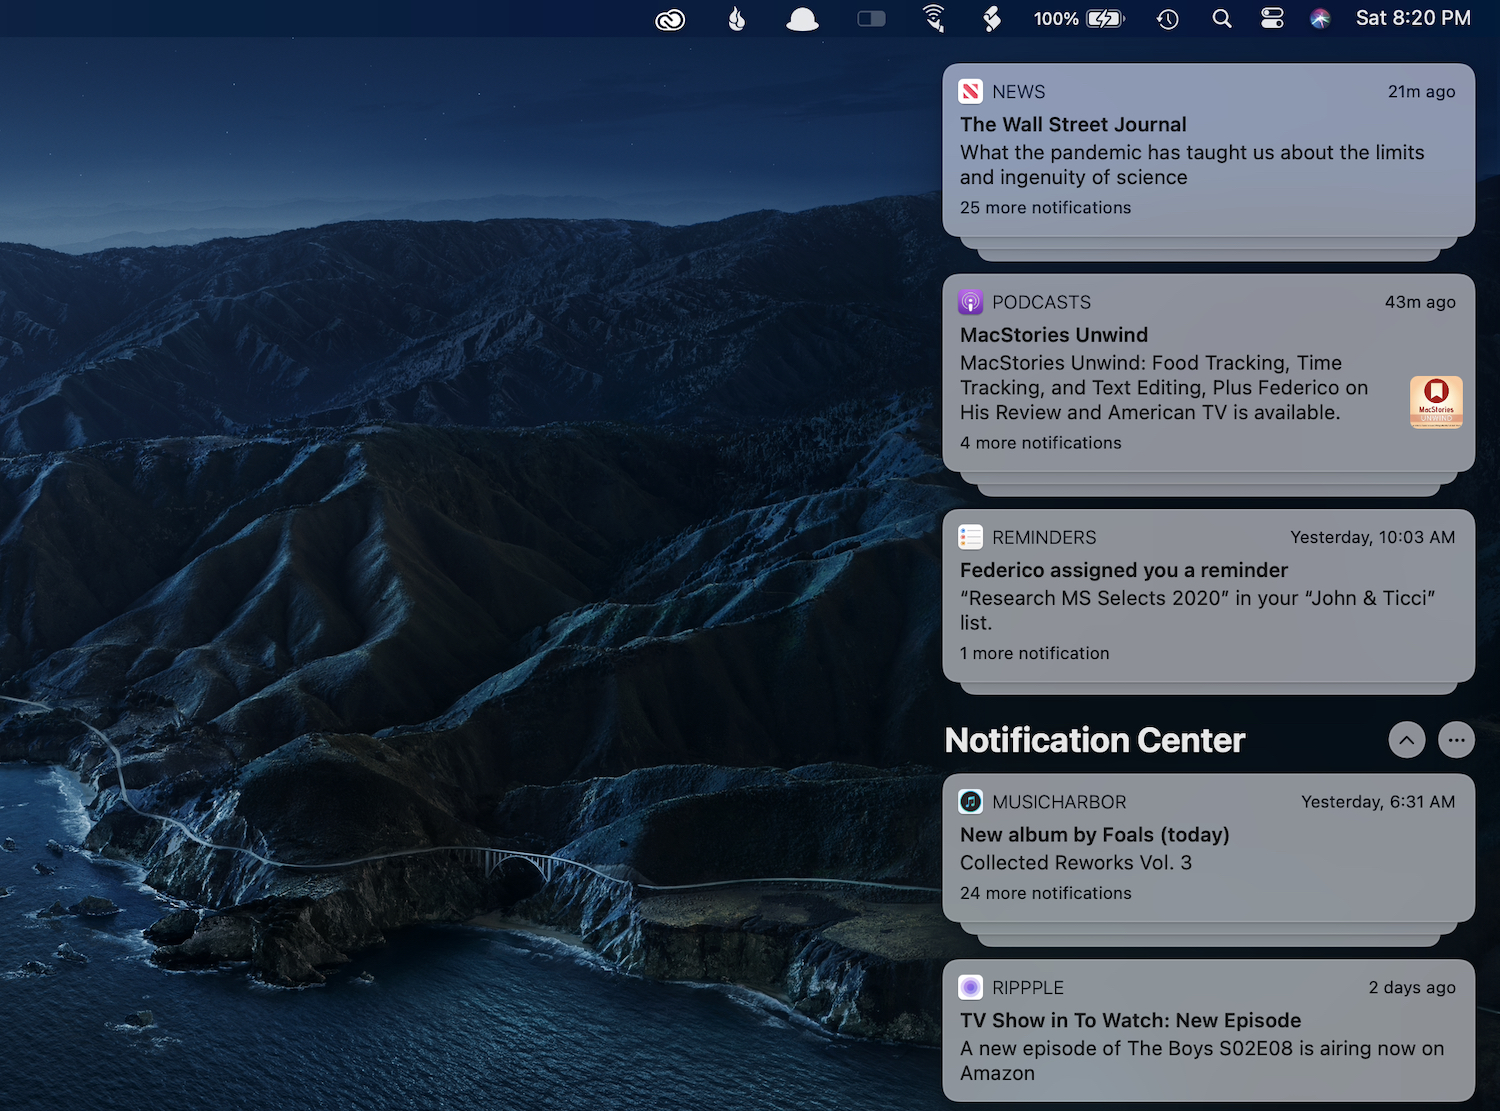
Still, once Notification Center is open, I greatly prefer its new organization. Notifications have been grouped by app into stacks, saving a ton of space. With a single click, stacks expand to reveal every notification. A second click on a ‘Show Less’ button that appears returns the notifications to their stack. Also, when you hover over the ‘x’ button at the top of an expanded stack, it turns into a ‘Clear All’ button that allows you to dismiss the entire stack.
With the click of a button, you can expand the Notification and Widget panel to show all your stacks of notifications.
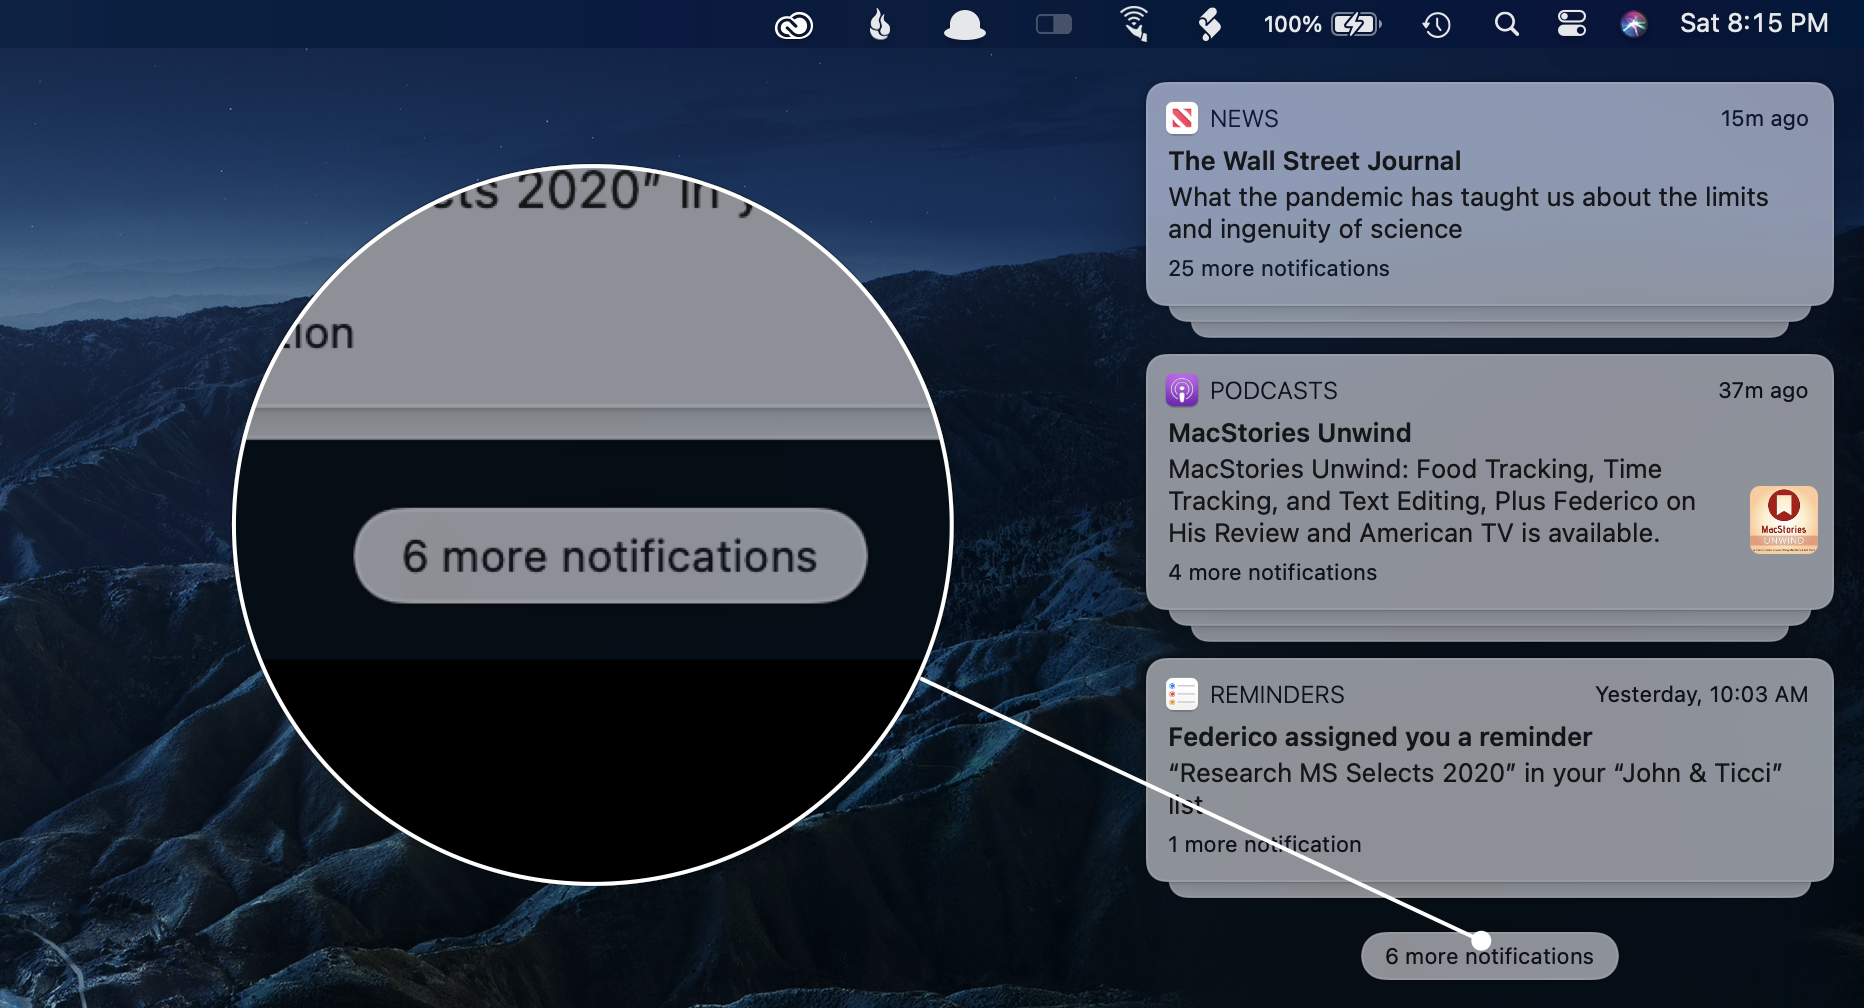
Even so, if you haven’t cleaned out your notifications in a while, the list of stacks can get long. To accommodate that, Apple has limited the notification section to a few stacks. After the last stack is a button indicating the number of remaining notifications that you can click to expand the column of stacked notifications, revealing them all. The section beneath the first set of stacks is labeled Notification Center and includes an upward-facing caret button to collapse the view again and an ellipse button for clearing all the notifications. From here, you can also open the Notifications section of System Preferences.
As in the past, the notifications you receive can be managed from the dedicated section in System Preferences. However, similar to iOS and iPadOS, if you right-click on a notification, you can now choose to deliver it quietly or turn off notifications for the associated app altogether. For more options, there’s also a right-click option to open the notifications section of System Preferences.
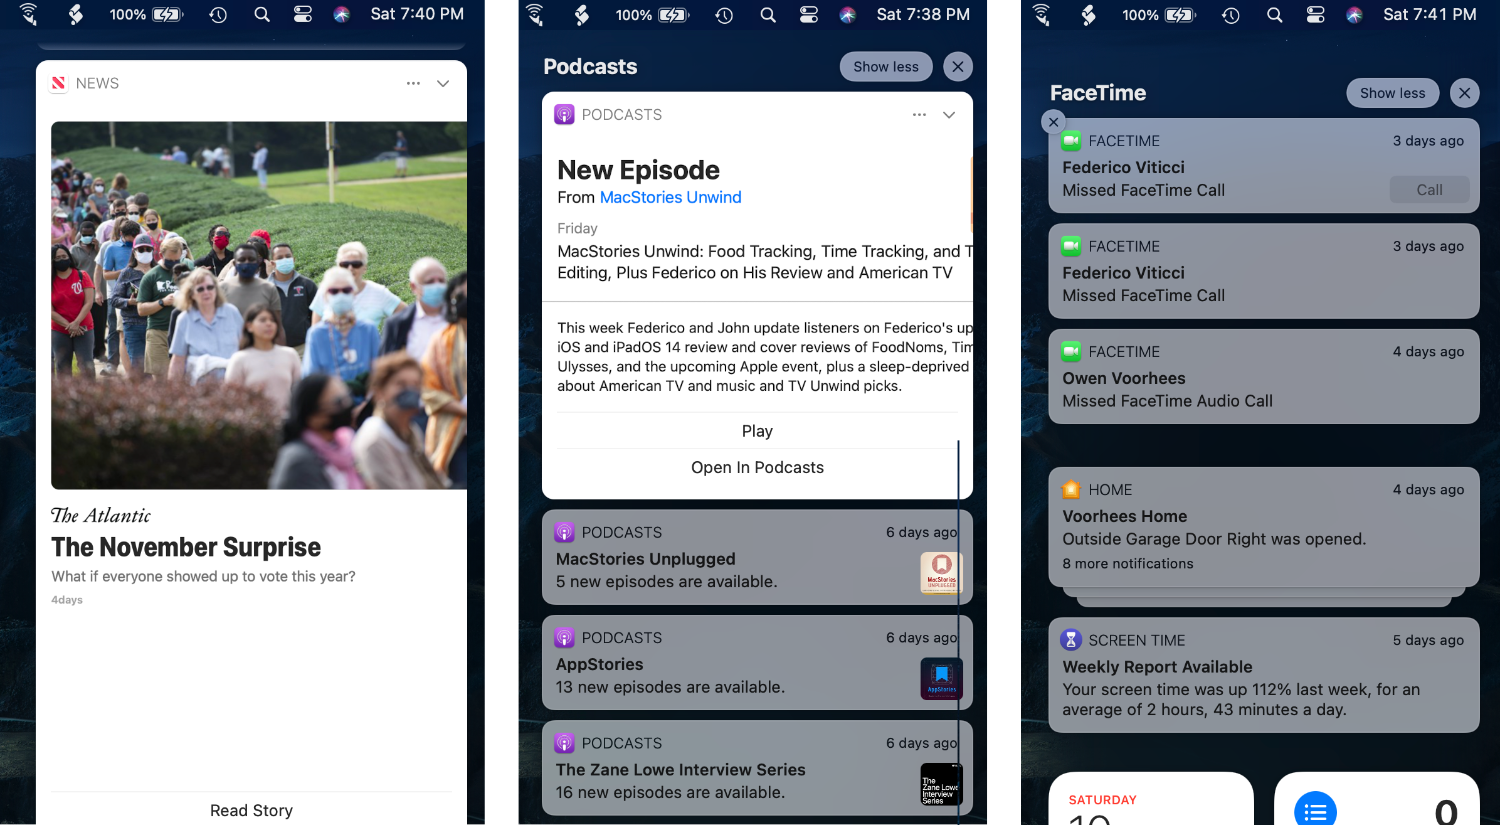
Some notifications like News and Podcasts can be expanded and include buttons for opening stories or playing an episode.
Apple has added richer content to notifications too. Hover over a News notification and a caret icon replaces the time in the top right corner of the notification. Click it, and a summary and image from the story are displayed. You can also view a photo from a Photos memory notification, respond to messages inline from Mail notifications, start playback of a new podcast episode, and accept an event invitation from a Calendar notification. Rich notifications are a terrific example of a Mac interpretation of a feature that has been available on iOS and iPadOS for a while via long-pressing a notification. I look forward to seeing what third-party developers do with this.
