iTunes Shortcuts
It may sound anachronistic in 2019, but one of the advantages of having a Mac mini always running and multiple HomePods around the house is iTunes. Yes, Apple’s music player/media manager gets a bad rap (and rightfully so; the app is a mess), but it’s got one thing going for it still: iTunes has extensive integration with AppleScript, including actions that can connect to AirPlay speakers and set their volume to play a specific song, album, or playlist. With iTunes, I can write AppleScripts that play Apple Music items from my library on specific HomePods/AirPlay 2 speakers; therefore, all these scripts can be triggered from Shortcuts on iOS and chained together in a multitude of interesting ways.
Play and Pause iTunes
This is an obvious one: I wanted a super-fast shortcut to instantly play or pause iTunes (which is usually sending audio to three HomePods at once) from either the Shortcuts widget on iOS or Siri. Thanks to osascript, this shortcut checks the player state of iTunes and either pauses it (if it’s already playing) or starts playing (if it’s paused).
Unlike Control Center on iOS, iTunes on the Mac always remembers the last AirPlay speakers it was connected to (even across restarts) as well as their individual volume levels. With this shortcut, I have a one-tap solution to resume iTunes’ playback on all the speakers it was previously connected to without having to manually select them each time. This is particularly nice when combined with the next shortcut.
Toggle iTunes
Toggle the player state of the iTunes app on a Mac on the same local network as your iOS device.
Play iTunes Playlist on Shuffle
Over the years, I’ve been curating a selection of playlists I like to listen to either by myself, with my girlfriend, or when we have friends over at our place. With AppleScript and iTunes, four lines of code are all it takes to start playing a specific playlist on shuffle:
tell application "iTunes"
    set shuffle enabled to true
    play playlist "Playlist Name"
end tell
In theory, I could have built a shortcut that played a specific playlists and duplicated it multiple times, changing the name of the playlist in each version. But that wouldn’t be a great use of what Shortcuts has to offer with its visual automation on iOS. Instead, my shortcut sends a Magic Variable to the AppleScript that runs on the Mac: a list of playlists is displayed by the ‘Choose from List’ action, and the chosen item is expanded as text upon running the AppleScript on macOS via the SSH action.
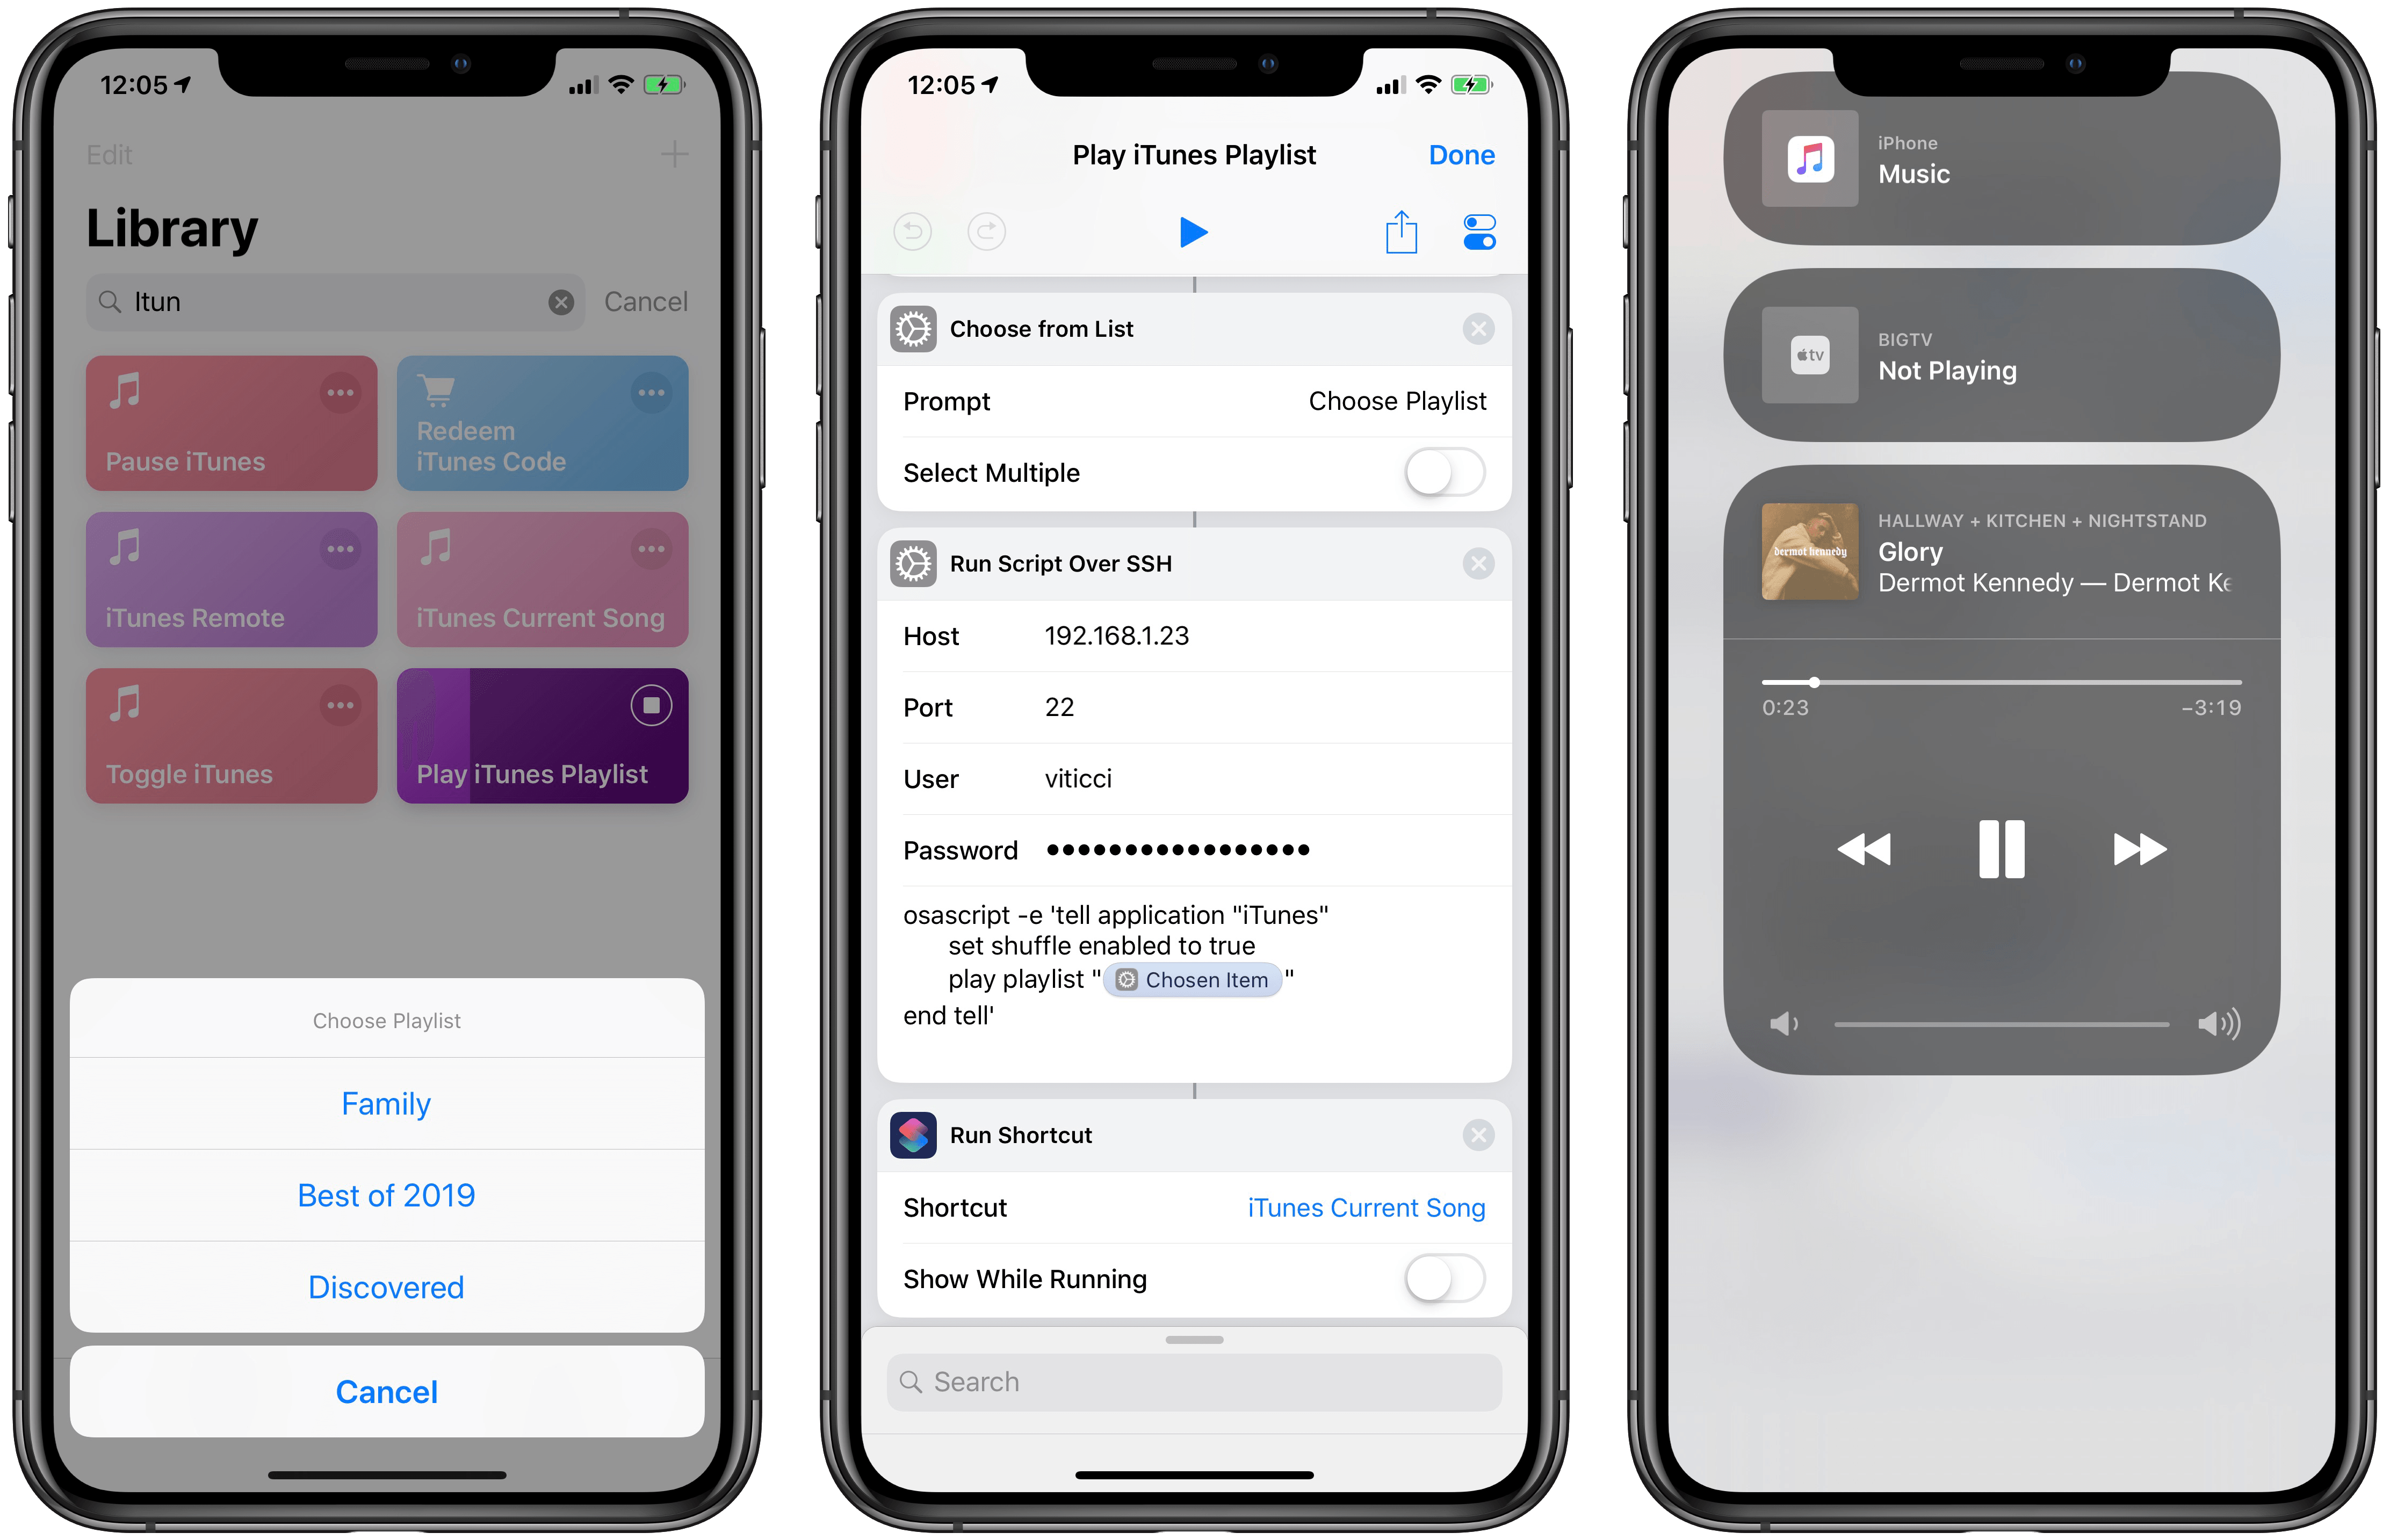
After picking a playlist from Shortcuts, you’ll be able to see the song playing on HomePod (via iTunes) from Control Center.
This approach allows me to have one shortcut in my library that lets me choose which playlists I want to shuffle with iTunes, which is going to resume playback with the last-selected speakers and volume levels – no need to pick them individually.
Play iTunes Playlist
Choose a playlist to start playing with iTunes on a Mac. The shortcut requires you to enter the exact name of playlists you want to play once, upon configuring the shortcut for the first time.
Once music starts playing on my HomePods, the last step of the shortcut is running another shortcut that returns details (including artwork) for the song that just started playing.
Current iTunes Song
The image part of this shortcut was adapted from Mac Maestro; the author of the shortcut figured out how to get raw data of the currently playing song’s artwork, which is returned as binary data to Shortcuts, which can feed it to ‘Get Images from Input’ to get the actual artwork from iTunes.
This shortcut lets you see the artwork of the song currently playing on iTunes on the Mac from the widget on iOS.
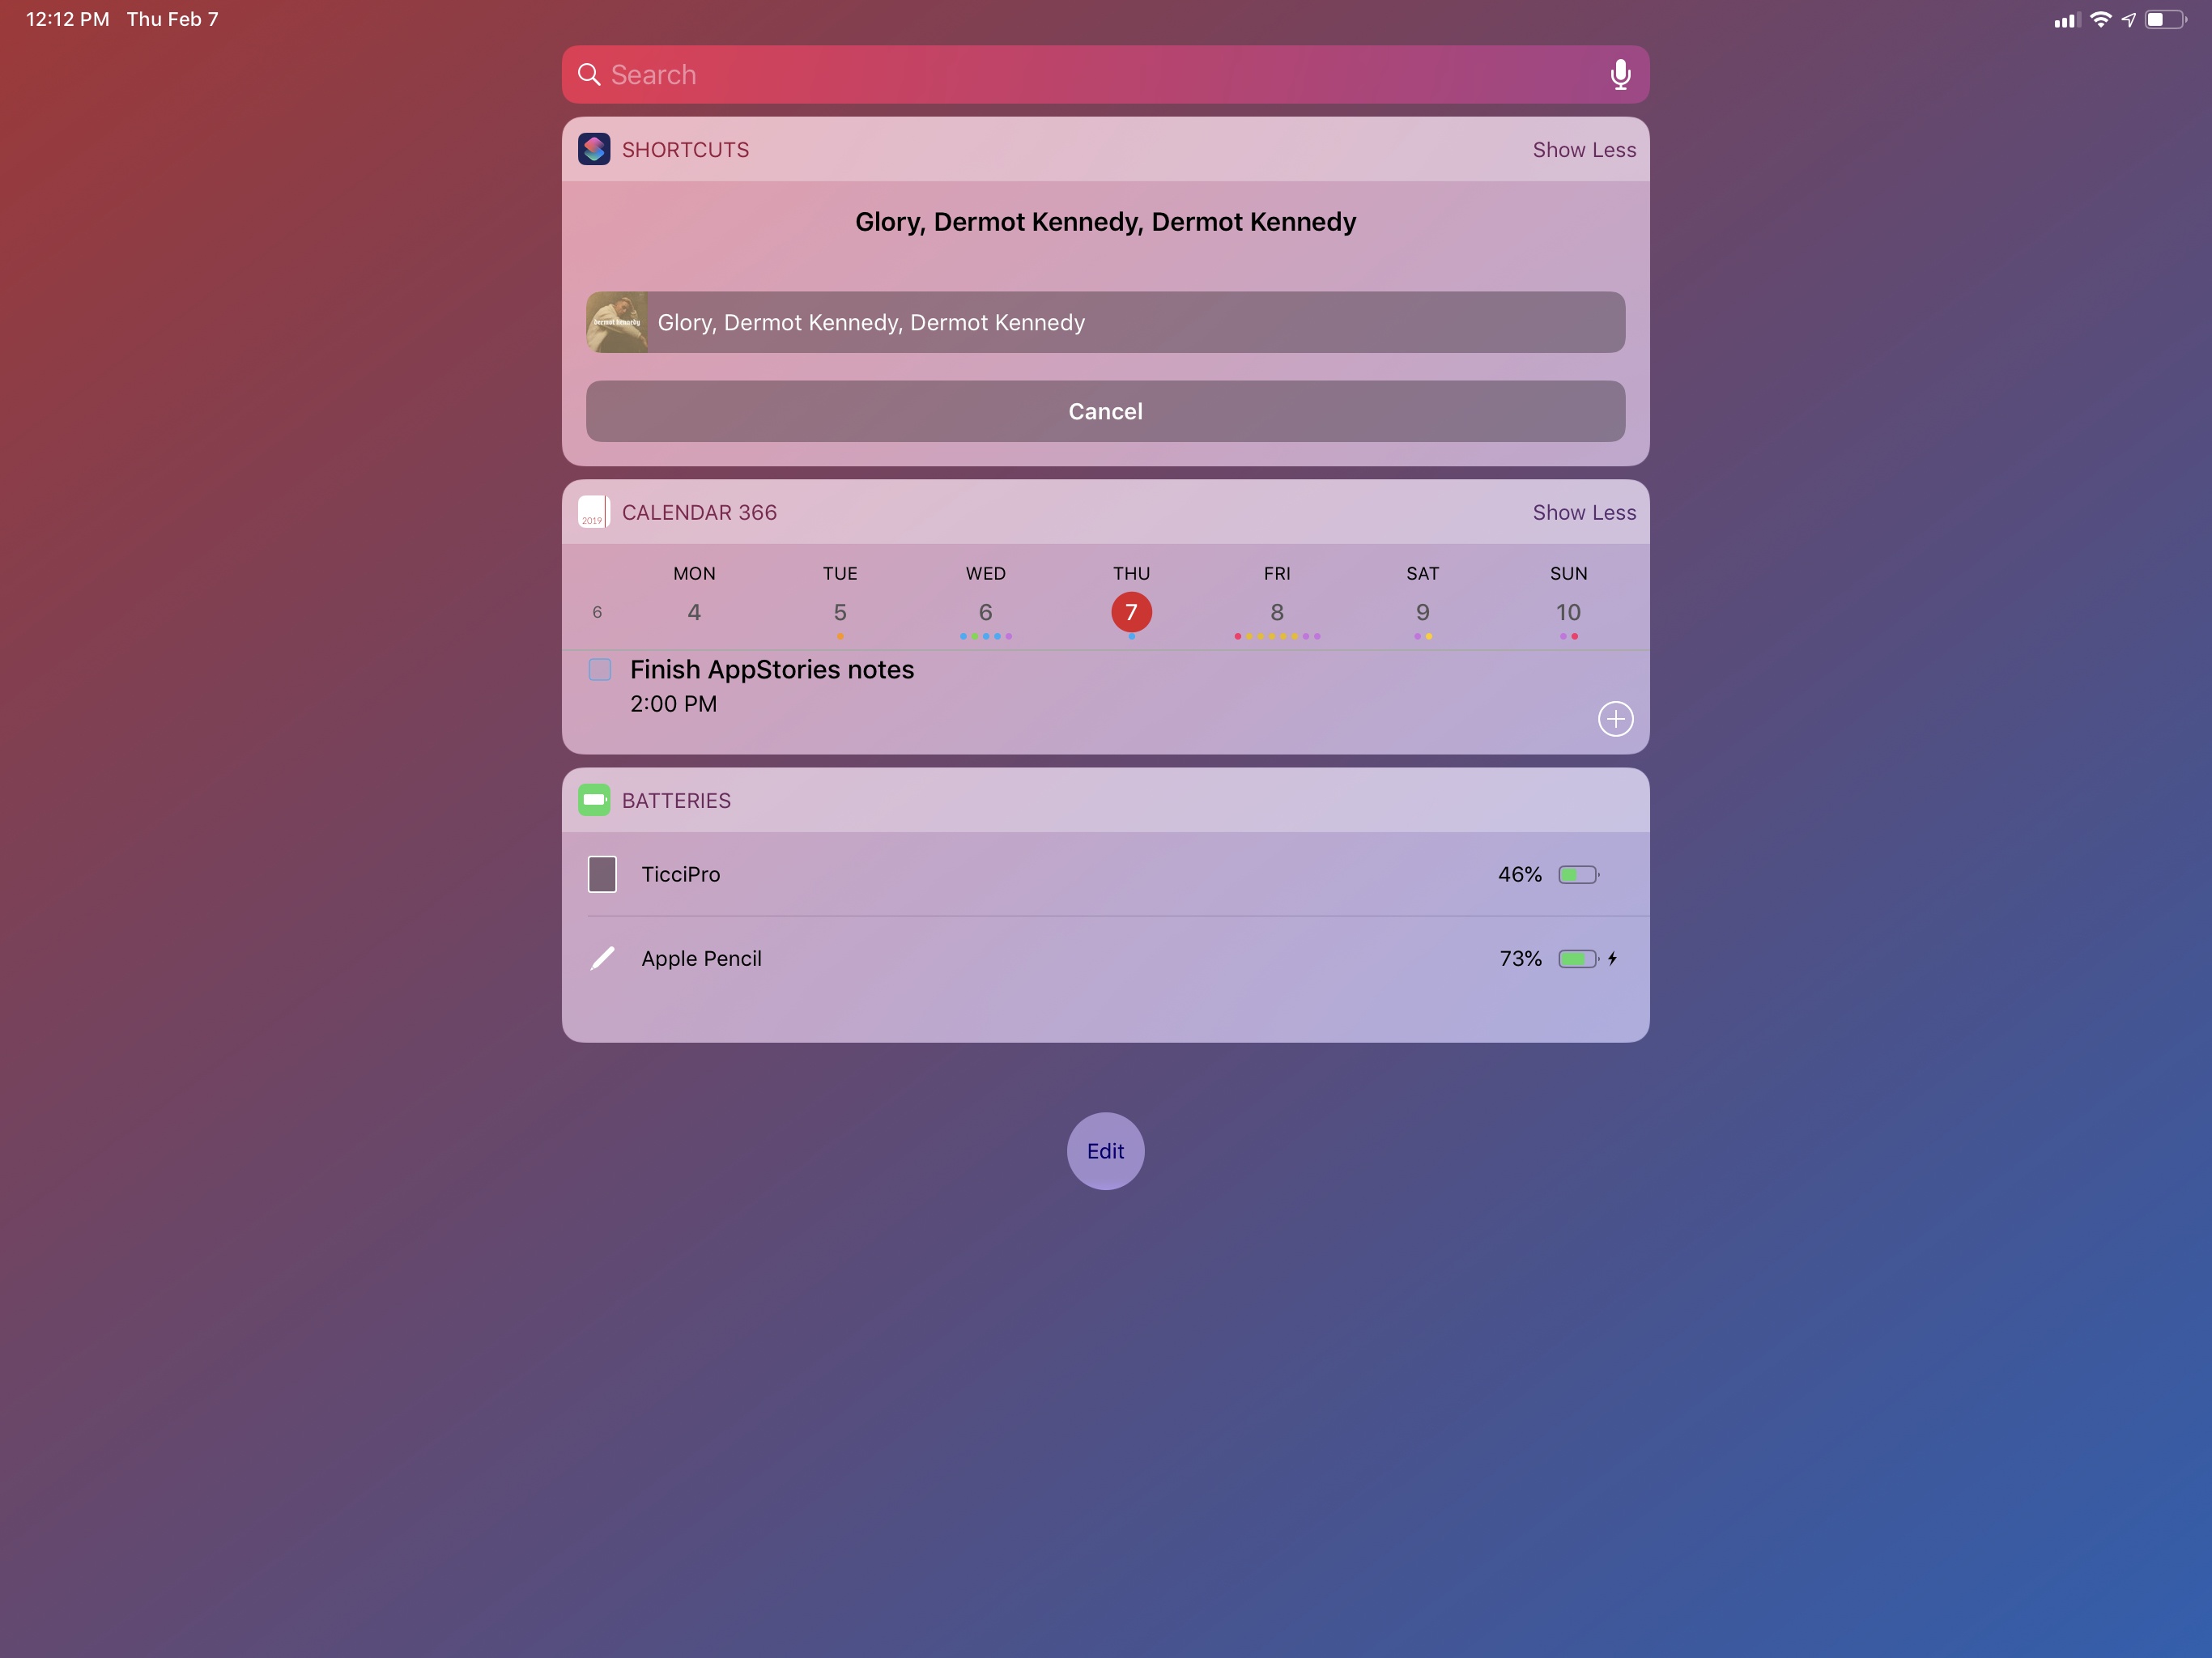
In addition to the artwork image, my shortcut returns the track name, artist, and album information from iTunes using a separate AppleScript. These bits of metadata are then set as the image’s title, which is presented in a ‘Choose from List’ action. This approach makes it possible to preview the artwork and track information both in the Shortcuts app and its widget, which is my preferred way of launching all these iTunes shortcuts.
iTunes Current Song
Get the album artwork of the song currently playing on iTunes on the Mac.
HomePod Speaker Volume
I love listening to music around the house with my three HomePods (one in the kitchen, one in the hallway, one in the bedroom), but I’ve often found myself wishing there was a quick way to change the global volume level without speaking to Siri. I mostly need to do this when my girlfriend and I listen to music at night before falling asleep. I don’t want to talk to Siri in the middle of the night and wake the dogs in the process.7 Similarly, when loud music is blasting through every room of the house during the day, I’d rather tweak the volume from the Shortcuts widget on my phone than have to a precise set of instructions to Siri. For me, tapping a widget is faster than saying “Hey Siri, set the volume to 45 in the kitchen and hallway”.
Ideally, Shortcuts should offer native AirPlay 2 actions to activate speakers and set their volume levels programmatically. In their absence, the solution once again lies in starting playback from iTunes on the Mac and using AppleScript.
How can something so trivial, so obvious in iTunes – by and large, the epitome of cruft in legacy software – be completely foreign to Shortcuts, the up-and-coming star of a new breed of automation? And yet here we are – while Shortcuts has no idea how to change the volume levels of connected AirPlay 2 devices, this AppleScript is all it takes iTunes to get it done in a second:
tell application "iTunes"
    set sound volume of AirPlay device "Kitchen" to 10
    set sound volume of AirPlay device "Hallway" to 20
    set sound volume of AirPlay device "Nightstand" to 35
end tell
Sometimes cruft has its advantages.
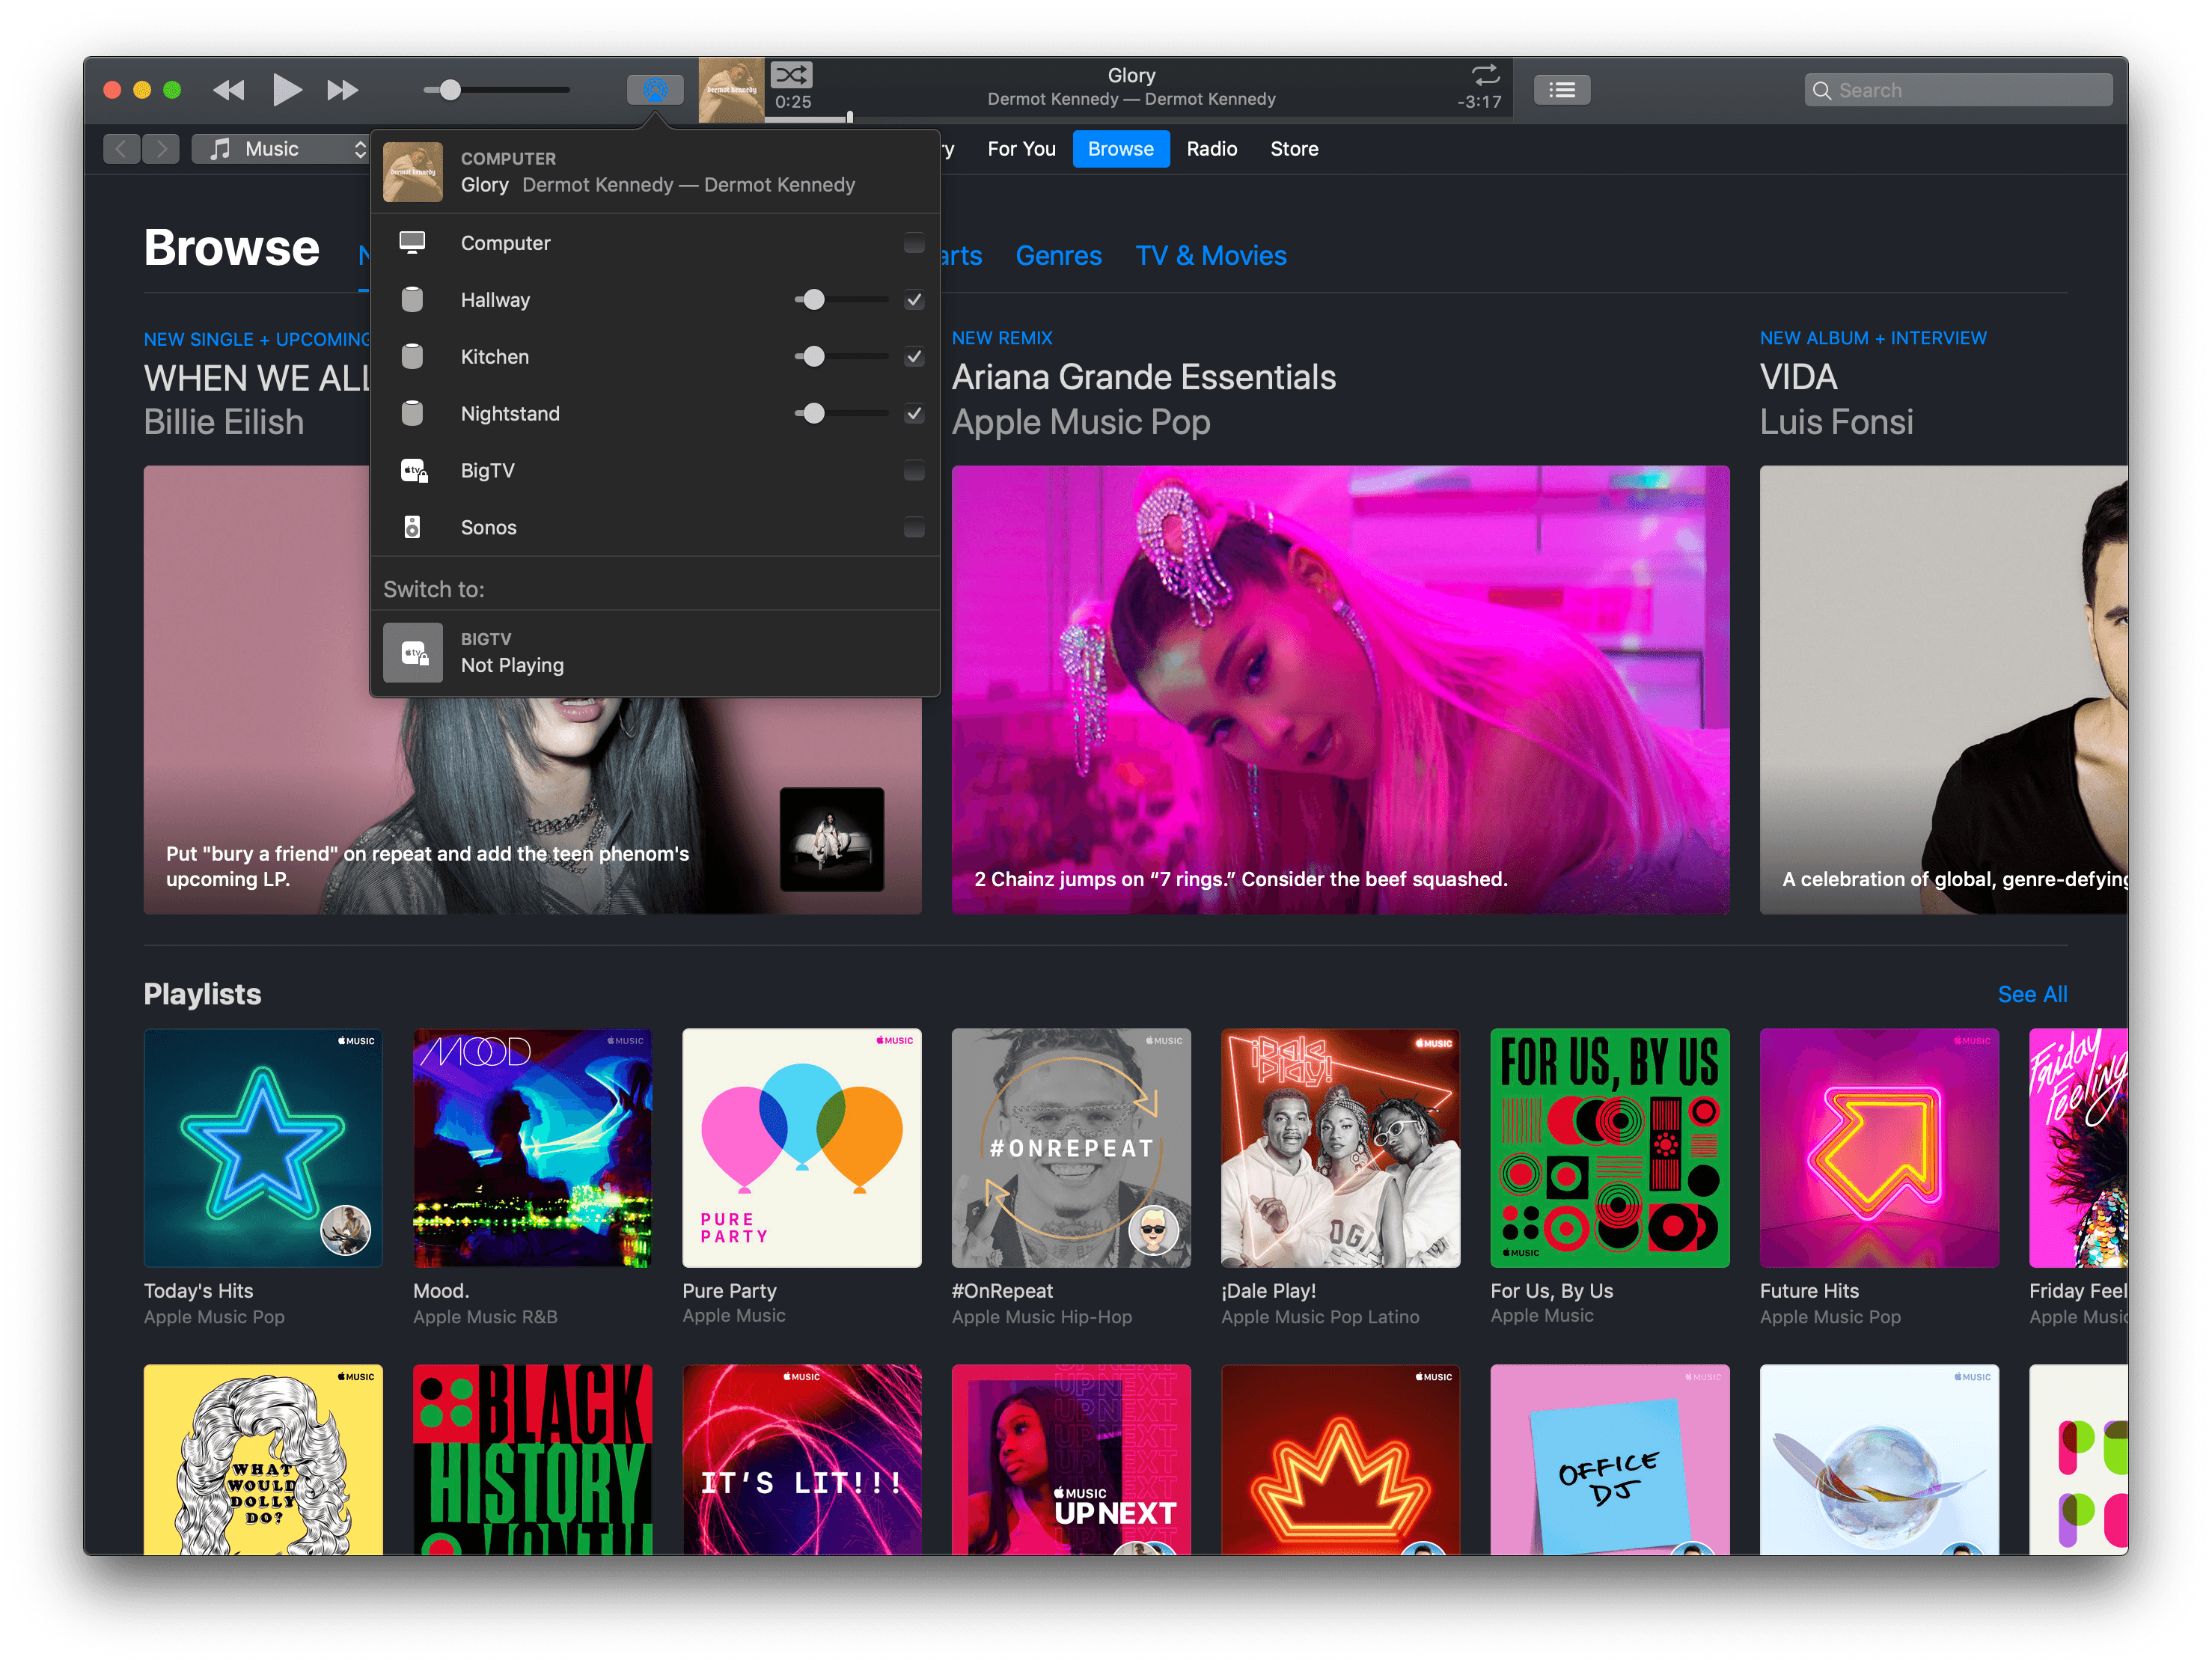
The syntax is easy to comprehend: it literally says to set the volume of an AirPlay device with a specific name to a number between 0 and 100. The name of the AirPlay device is the name of the HomePod you can change in the Home app, which is reflected in iTunes’ AirPlay connection popup as well.
In this type of shortcut, multiple volume levels are changed at once by repeating the same command for different AirPlay devices. The numeric volume level is provided by a menu that fills a ‘Number’ action at the beginning of the shortcut, so I can choose to set my HomePods at 10, 15, 20, 25, 30, 40, or 60 percent volume with just a couple of taps.
HomePod Speaker Volume
Change the volume of multiple HomePods (or AirPlay speakers) connected to iTunes at once. The list of preset volume levels is customizable. The shortcut can also be run from the iOS widget.
Set Active HomePod Speakers and Volume
Sometimes I seek more control over my HomePods than a shortcut designed to tweak the volume alone can give me. Sometimes I want to choose which HomePods are the active speakers in iTunes and type out their exact volume levels. For that, I employ a different shortcut.
The ‘Set Speakers and Volume’ shortcut is comprised of two separate, yet entwined parts. First, I can choose which AirPlay devices to set as active speakers by selecting them from a list. The list carries the names of individual AirPlay devices, which are all selected by default. After choosing which HomePods I want to stream iTunes music to, an ‘Ask for Input’ action lets me enter a number for the volume level I want to set on the speakers. None of this is currently possible with Shortcuts alone on iOS.
Then, a repeat block takes care of assembling AppleScript code using ‘Text’ actions and Magic Variables until it prepares code that, behind the scenes, looks like this:
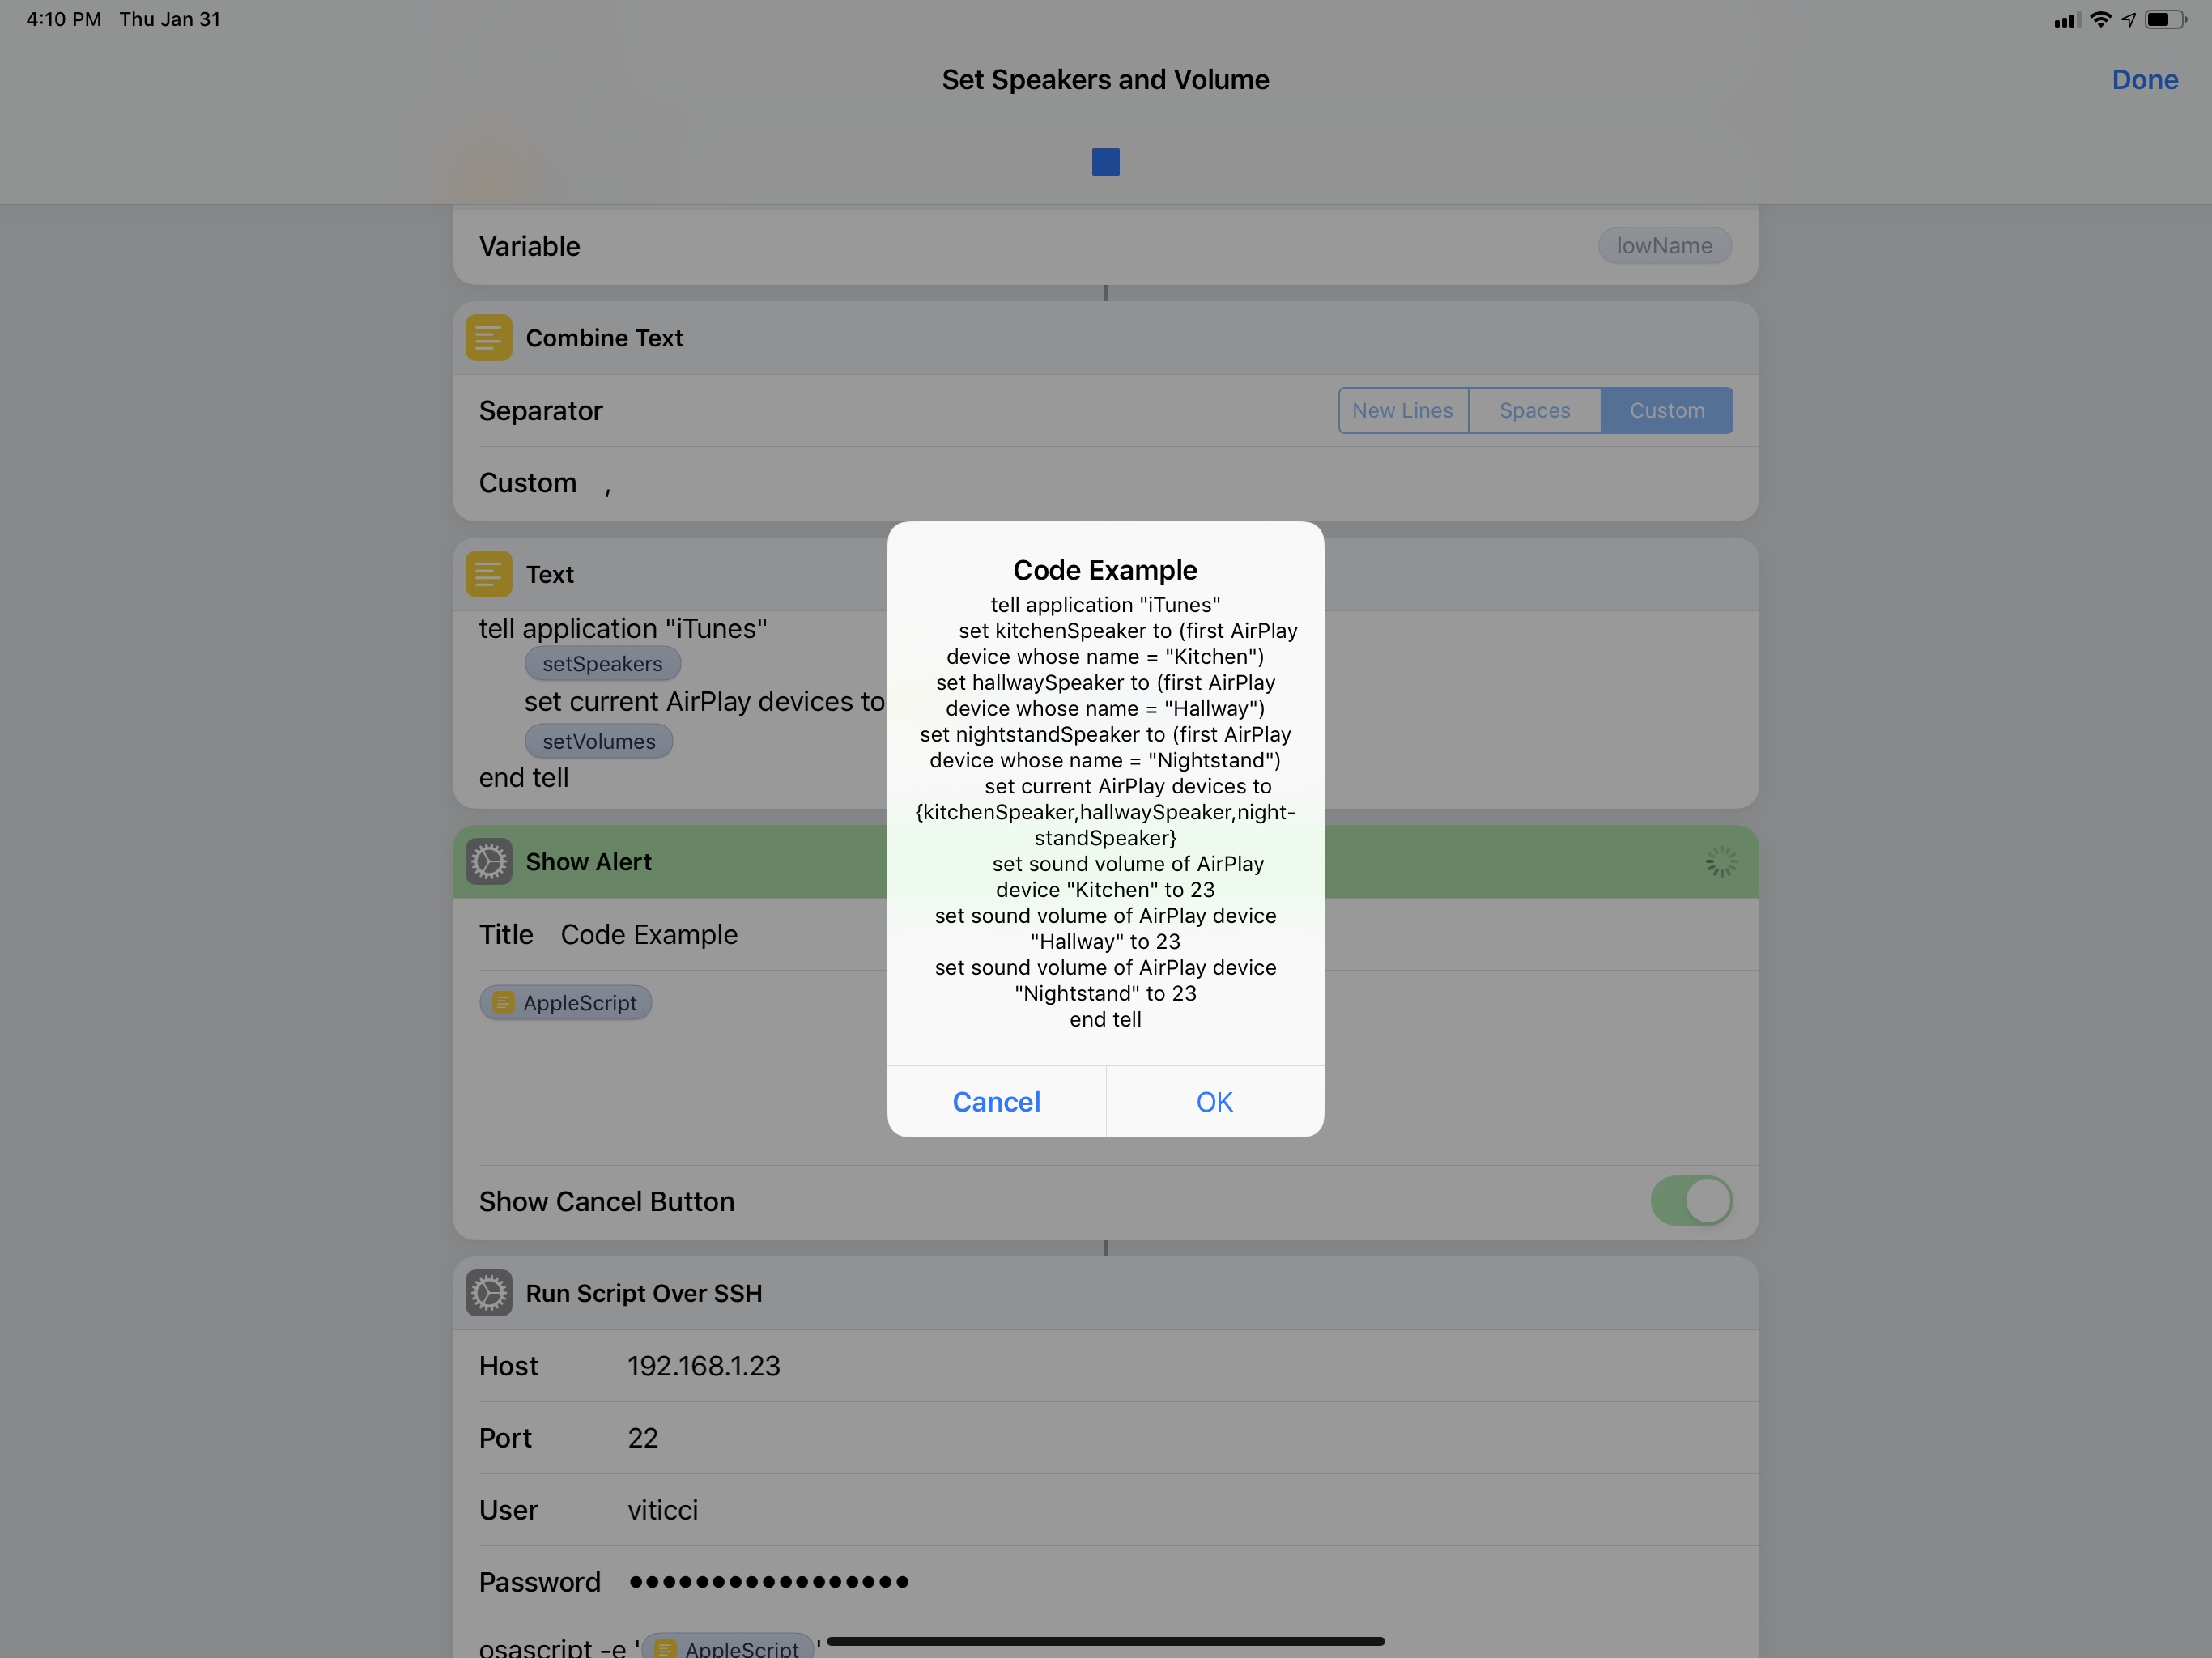
The script tells iTunes to change the speakers it’s currently connected to and, in the process, set their volume levels to a new percentage. Like the simpler volume shortcut above that inspired it, this one takes a second to run the command via SSH, but it’s got the added complexity of requiring user interaction to pick speakers and type numbers.
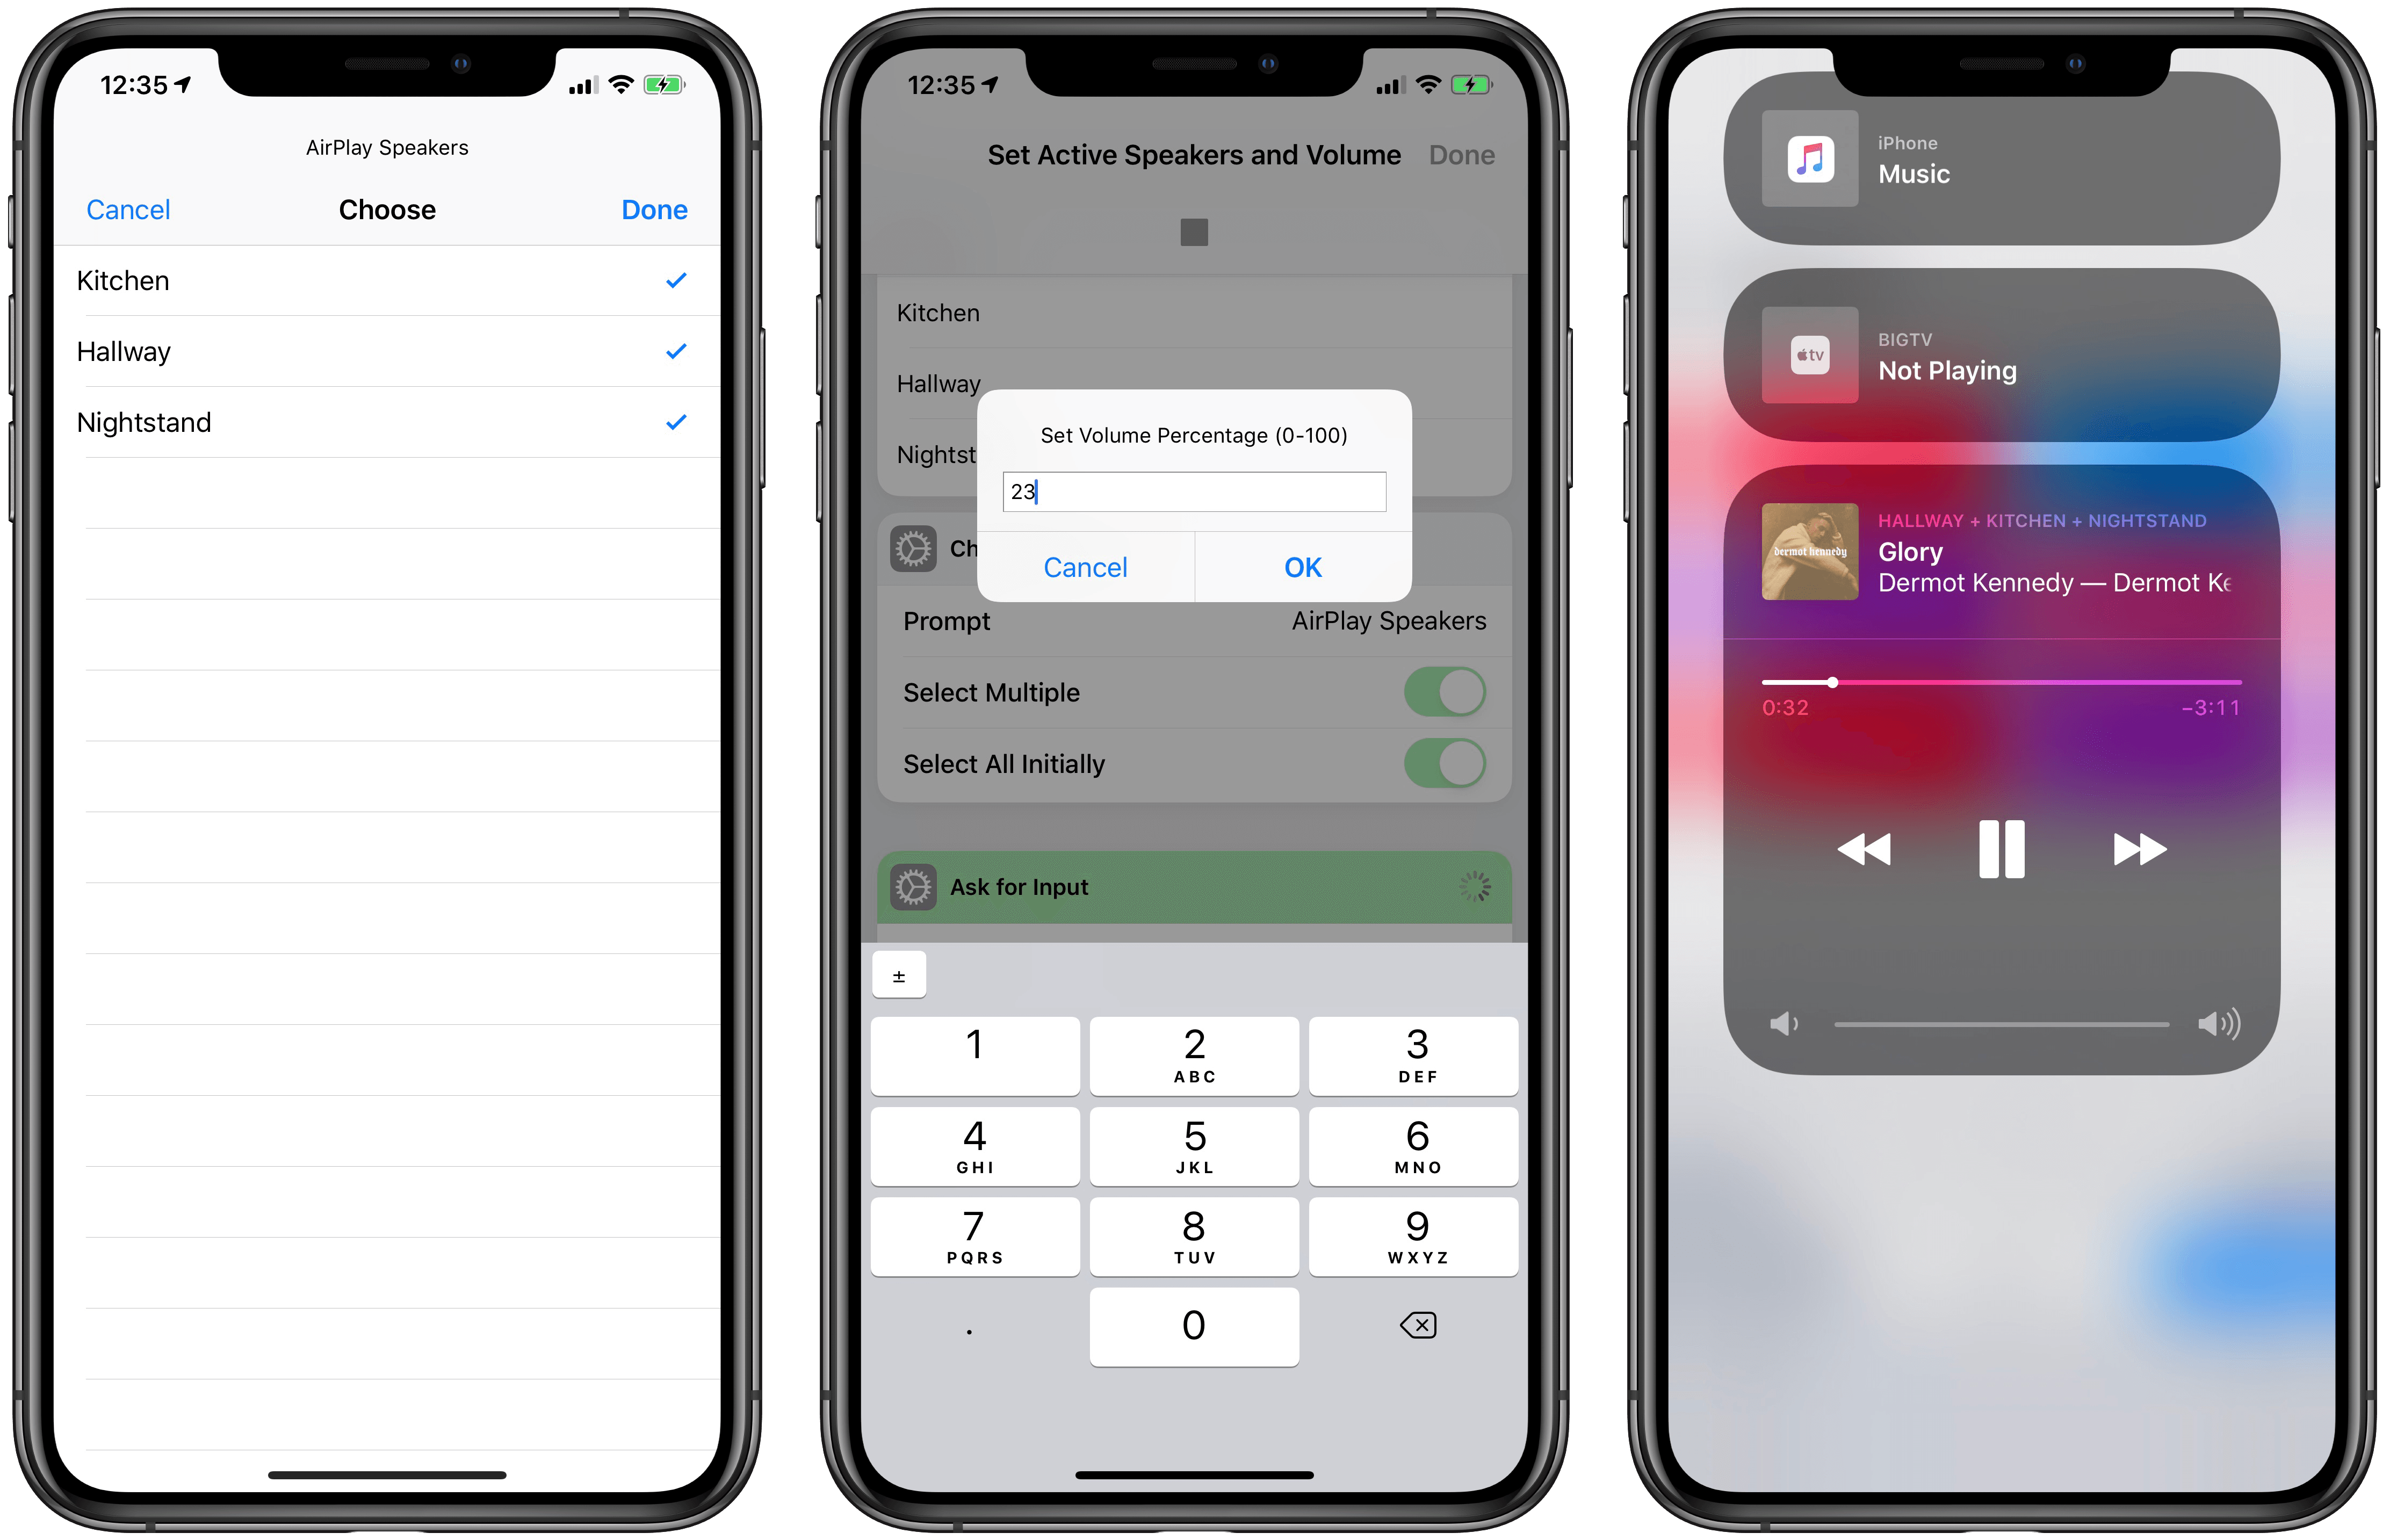
Selecting active iTunes speakers from Shortcuts is instantly reflected in Control Center’s AirPlay widget.
The shortcut works well and I wish this kind of control over AirPlay devices was supported in Shortcuts too. I’d love to be able to create shortcuts that play music on specific HomePods over AirPlay 2 with a specific volume and no manual interaction required whatsoever. As I wrote when Shortcuts launched in September, I continue to be astounded by its lack of AirPlay 2 actions.
Set Active Speakers and Volume
Change the volume of individual HomePods (or AirPlay speakers) connected to iTunes and choose which ones should be currently active. The shortcut lets you select one or multiple speakers as well as enter an exact volume level.
Preparing for Podcasts with Keyboard Maestro
For years, I sat down at my desk to record podcasts and went through the process of opening each app I needed for the recording, carefully arranging its windows, and typing URLs to open specific documents and webpages I needed in Safari. I checked audio inputs and manually started a new audio recording in QuickTime. I started my Toggl timer if I remembered to and changed the lights in the bedroom to a specific color, dimming them so I could focus on the show notes in front of me. I didn’t have multiple displays then. You see, I recognize that I’m a little particular when it comes to my podcasting setup: I like things my way even though I profoundly despise the act of resizing and moving windows on a Mac. Yet I need this to quell the part of my brain that laments an ever so imperfect setup should I record with a slightly off-center Safari window. It’s probably a silly problem to have, but it’s my problem.
As soon as I got a Mac mini, a larger monitor, and the iPad Pro running next to it thanks to Luna Display, I knew it was time to automate the entire thing. I knew it couldn’t be done with Shortcuts and AppleScript alone, so I turned my attention to two old friends of my former Mac OS X days – Keyboard Maestro and BetterTouchTool.
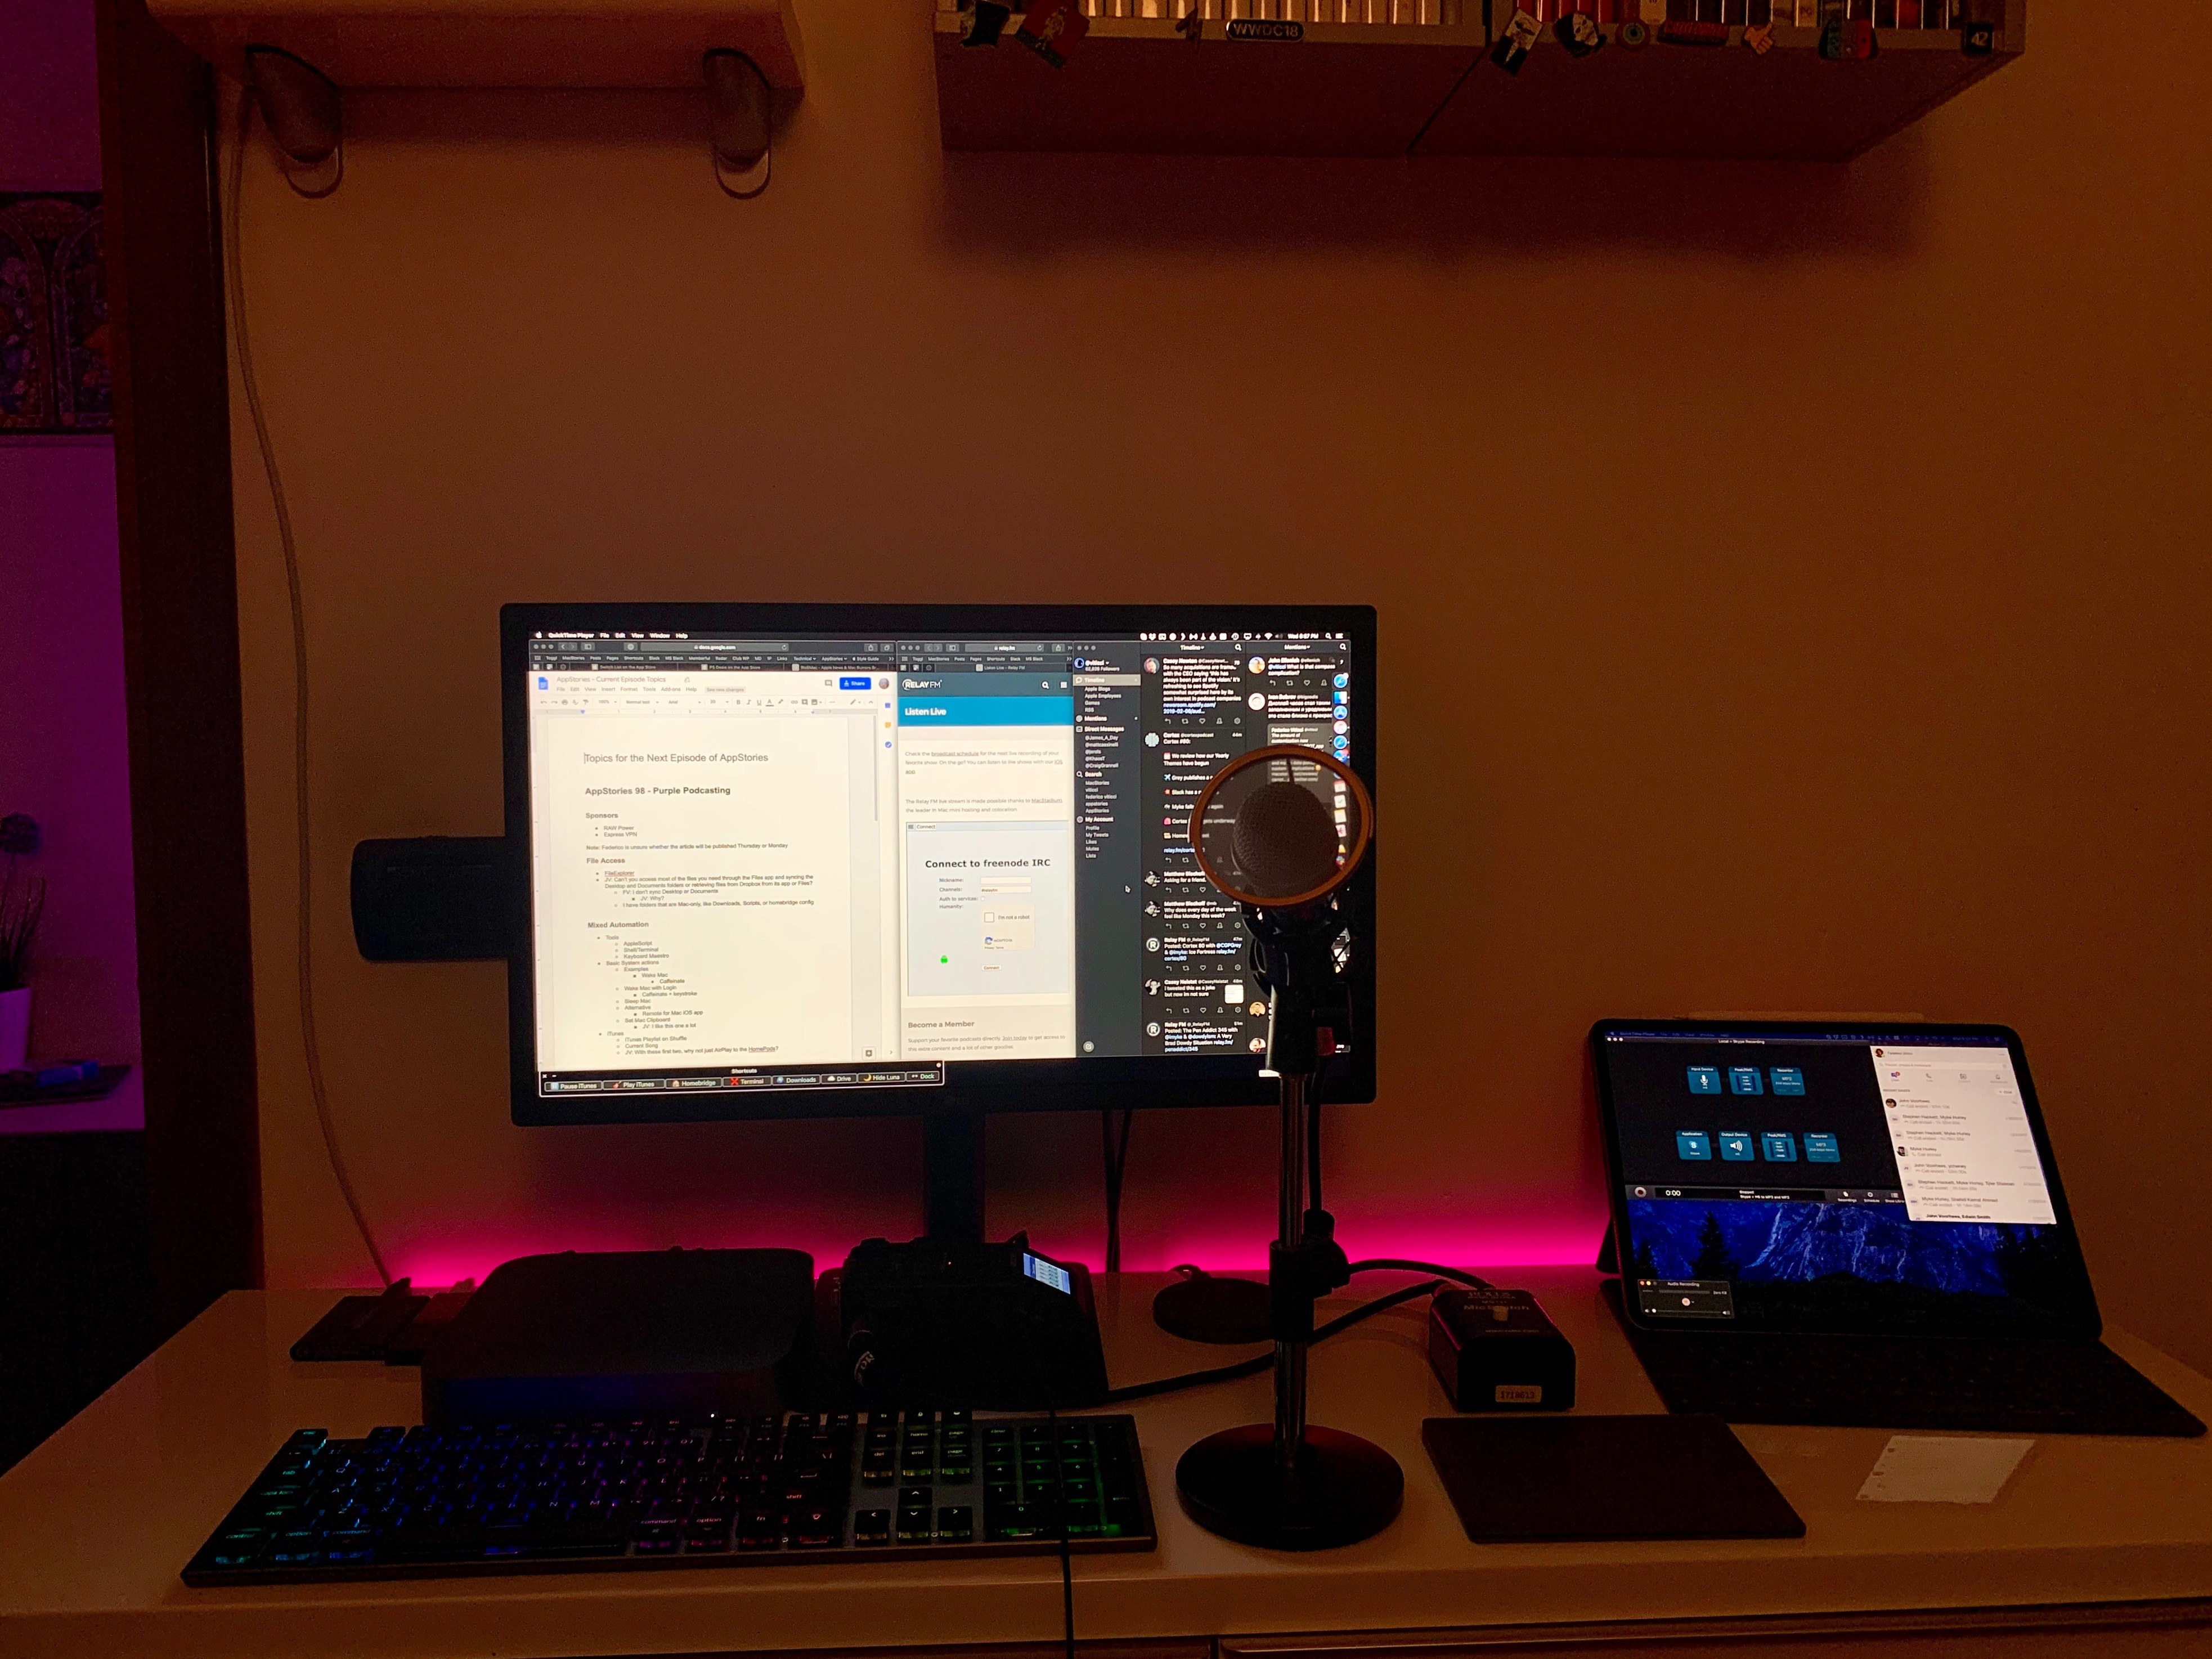
The result is this setup, ready for me to record a podcast, which only takes a single Siri phrase to spring to life:
And here’s a quick video version of it:
Setting up a Mac for podcasting via Shortcuts. (Tap volume icon for sound.)Replay
Of course, I still need to physically place the microphone on my desk. But you get the idea.
This automation involves different parts: on iOS, Siri activates a shortcut that triggers a Keyboard Maestro macro on the Mac; Keyboard Maestro opens URLs, creates windows and repositions them, and calls for BetterTouchTool to move them to the Luna Display monitor; then it’s back to iOS again, with Shortcuts starting a specific Toggl timer and setting the lights a certain shade of purple. It’s a beautiful intricacy of mixed automation, and I’ve been using it for the past month to great effect. Let me describe how it all works.
Before I sit down to record a podcast, I invoke a shortcut on my HomePod. The shortcut looks surprisingly sparse:
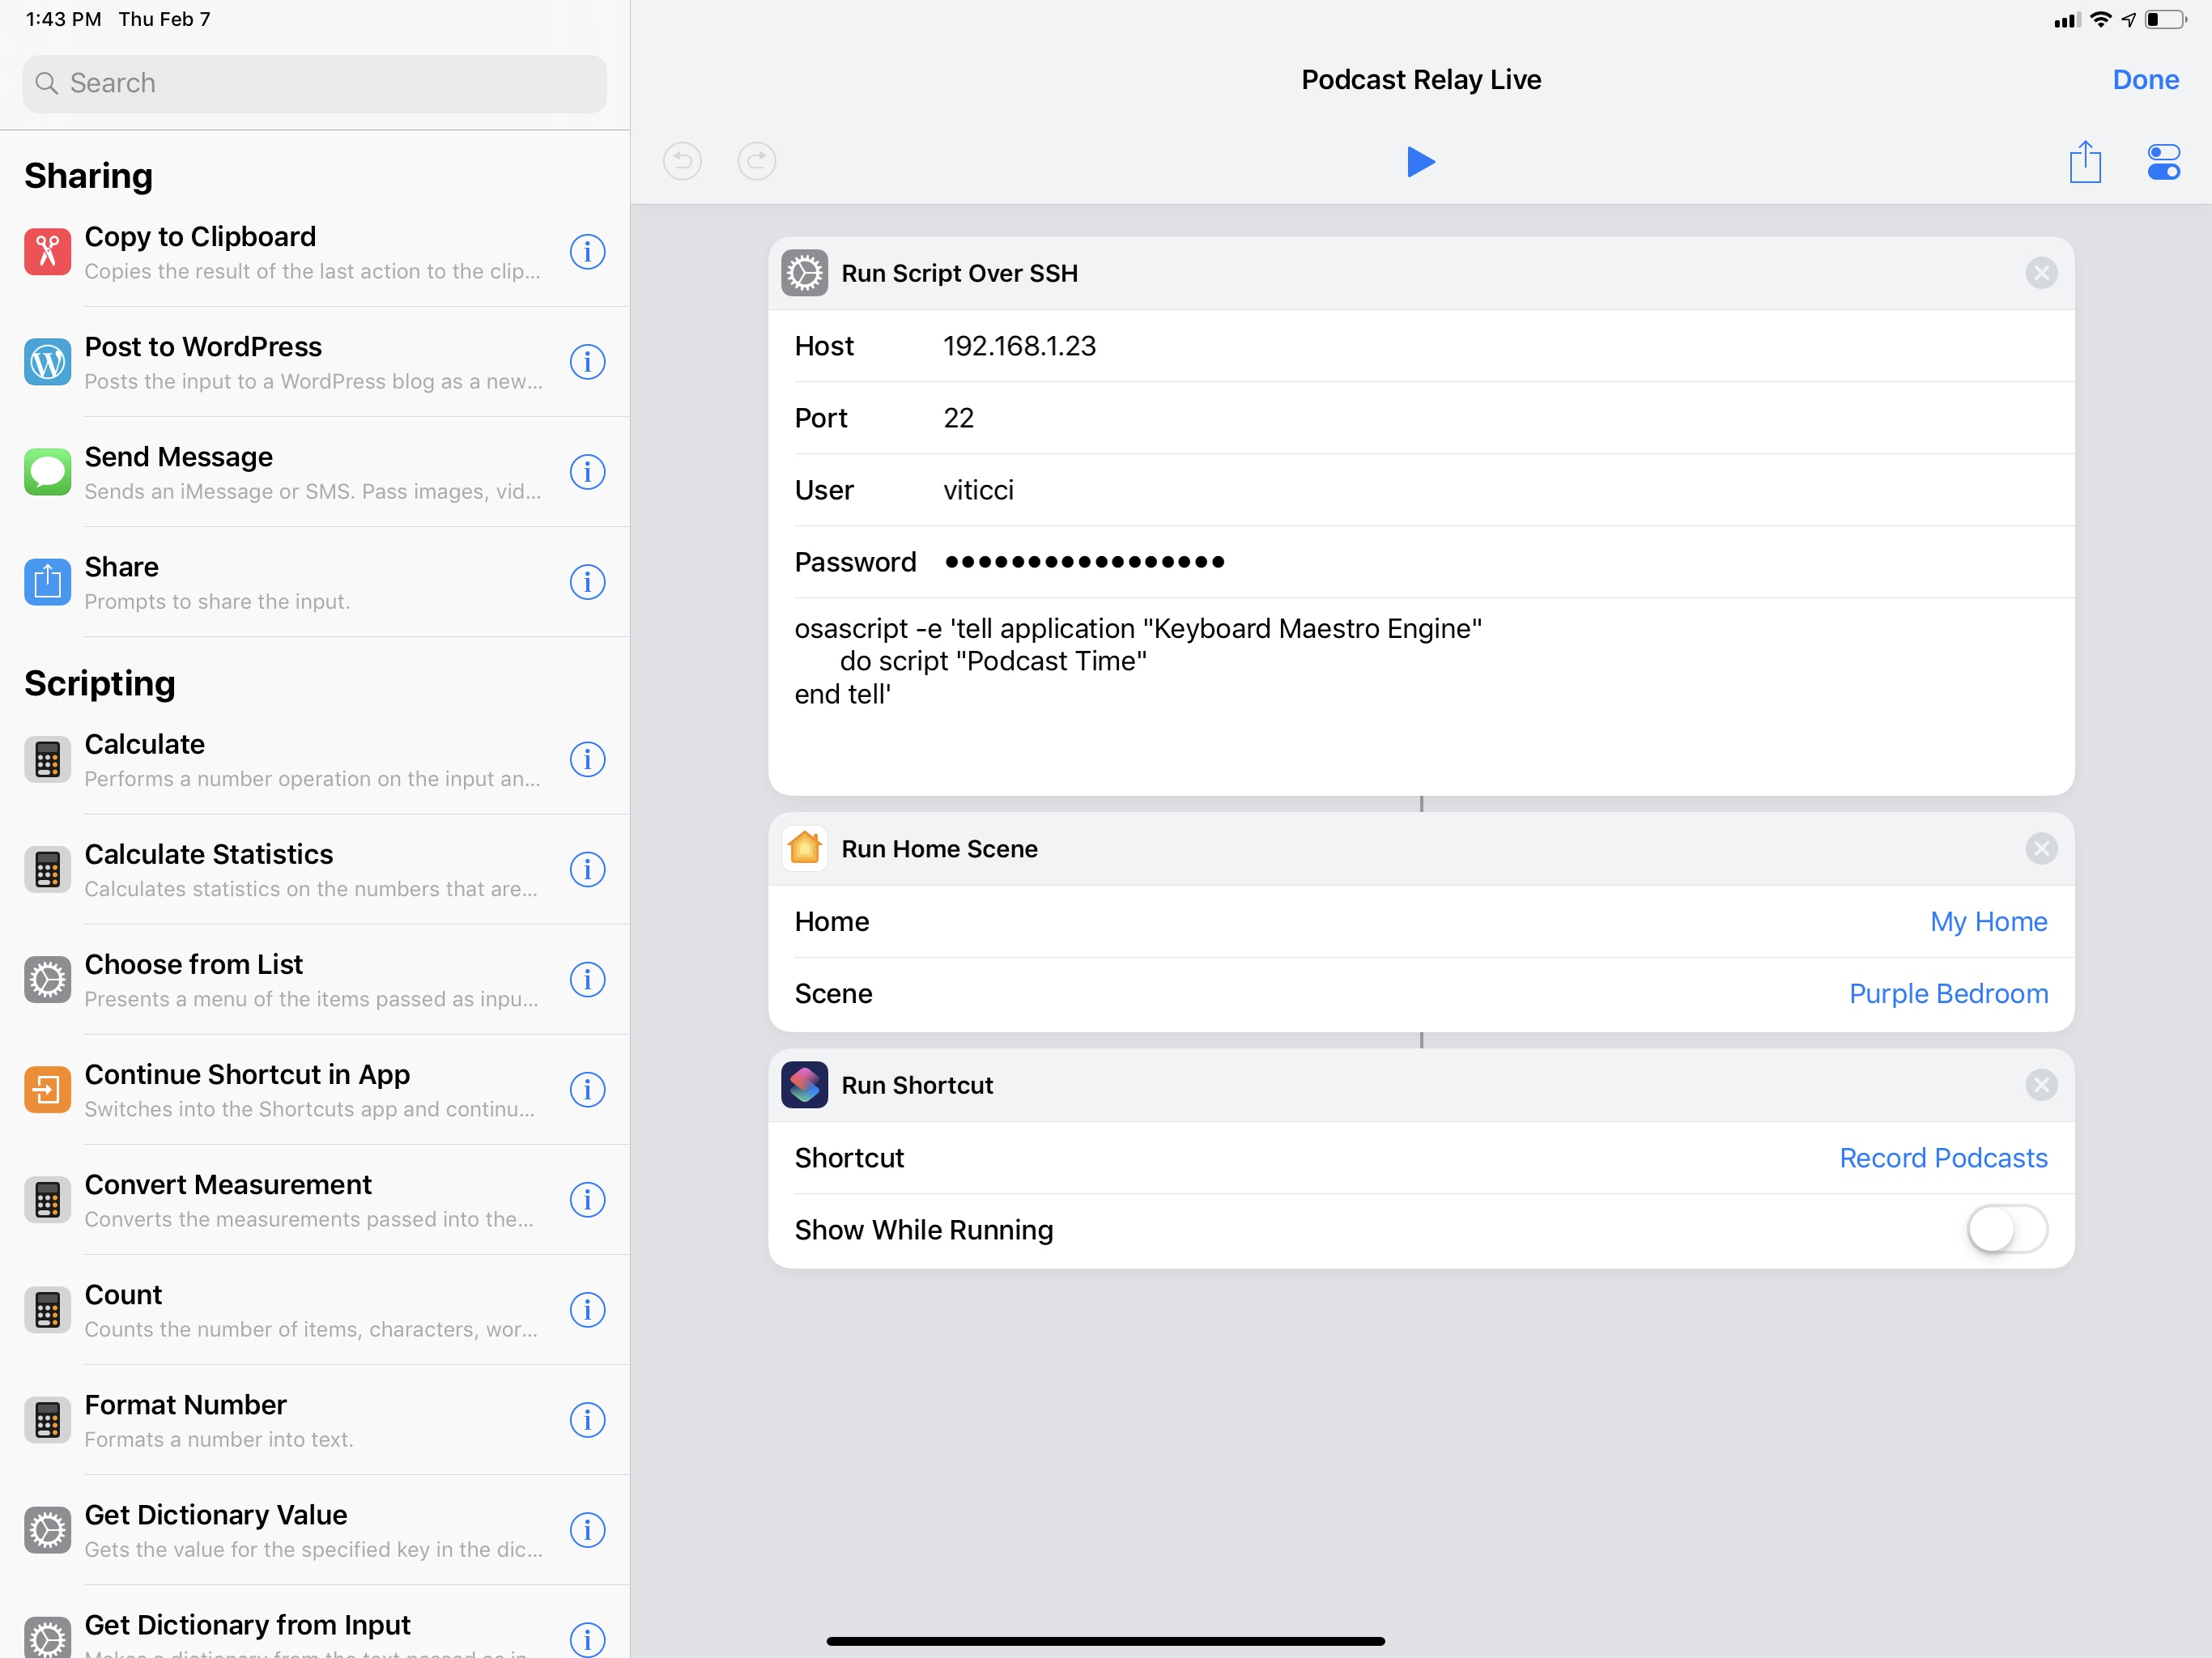
In reality, it’s anything but.
The first step of the shortcut is a ‘Run Script Over SSH’ action that tells my Mac to run a specific Keyboard Maestro macro aptly called “Podcast Time”. This is possible thanks to Keyboard Maestro’s AppleScript dictionary, which lets you control the app from other places on macOS and, in this case, iOS via osascript. Automations to run other automations – a common theme in what I’m about to describe.
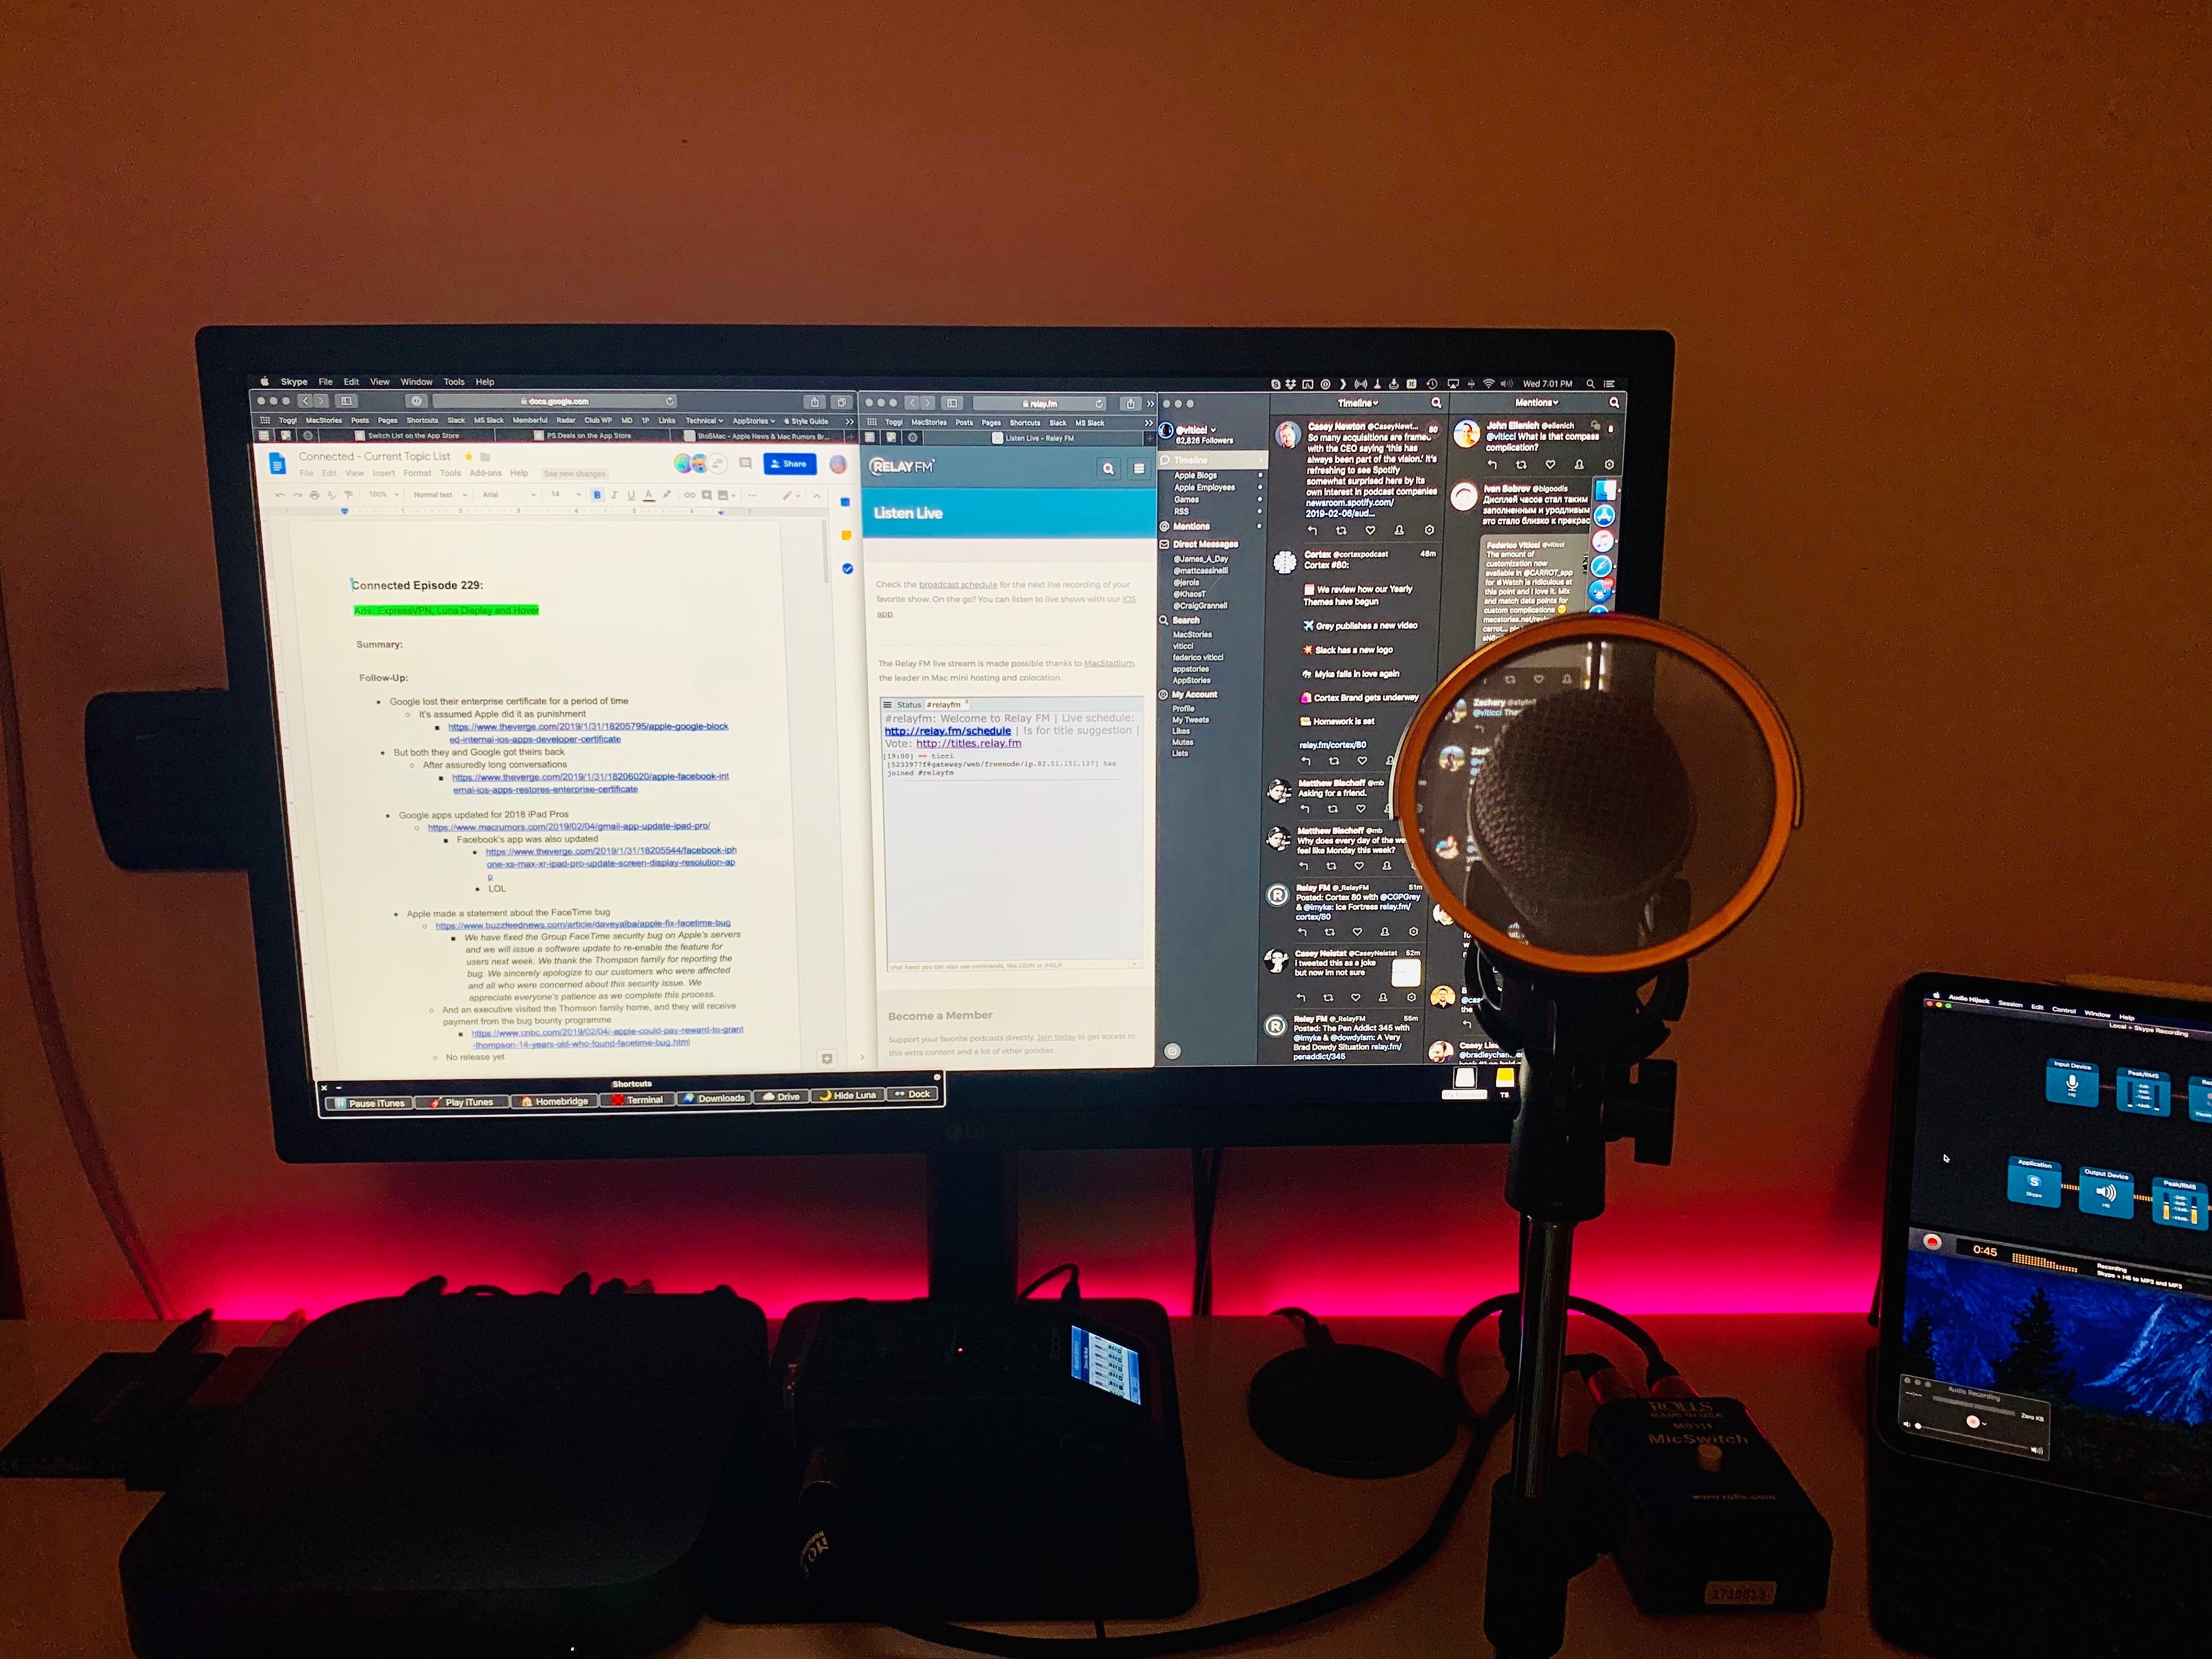
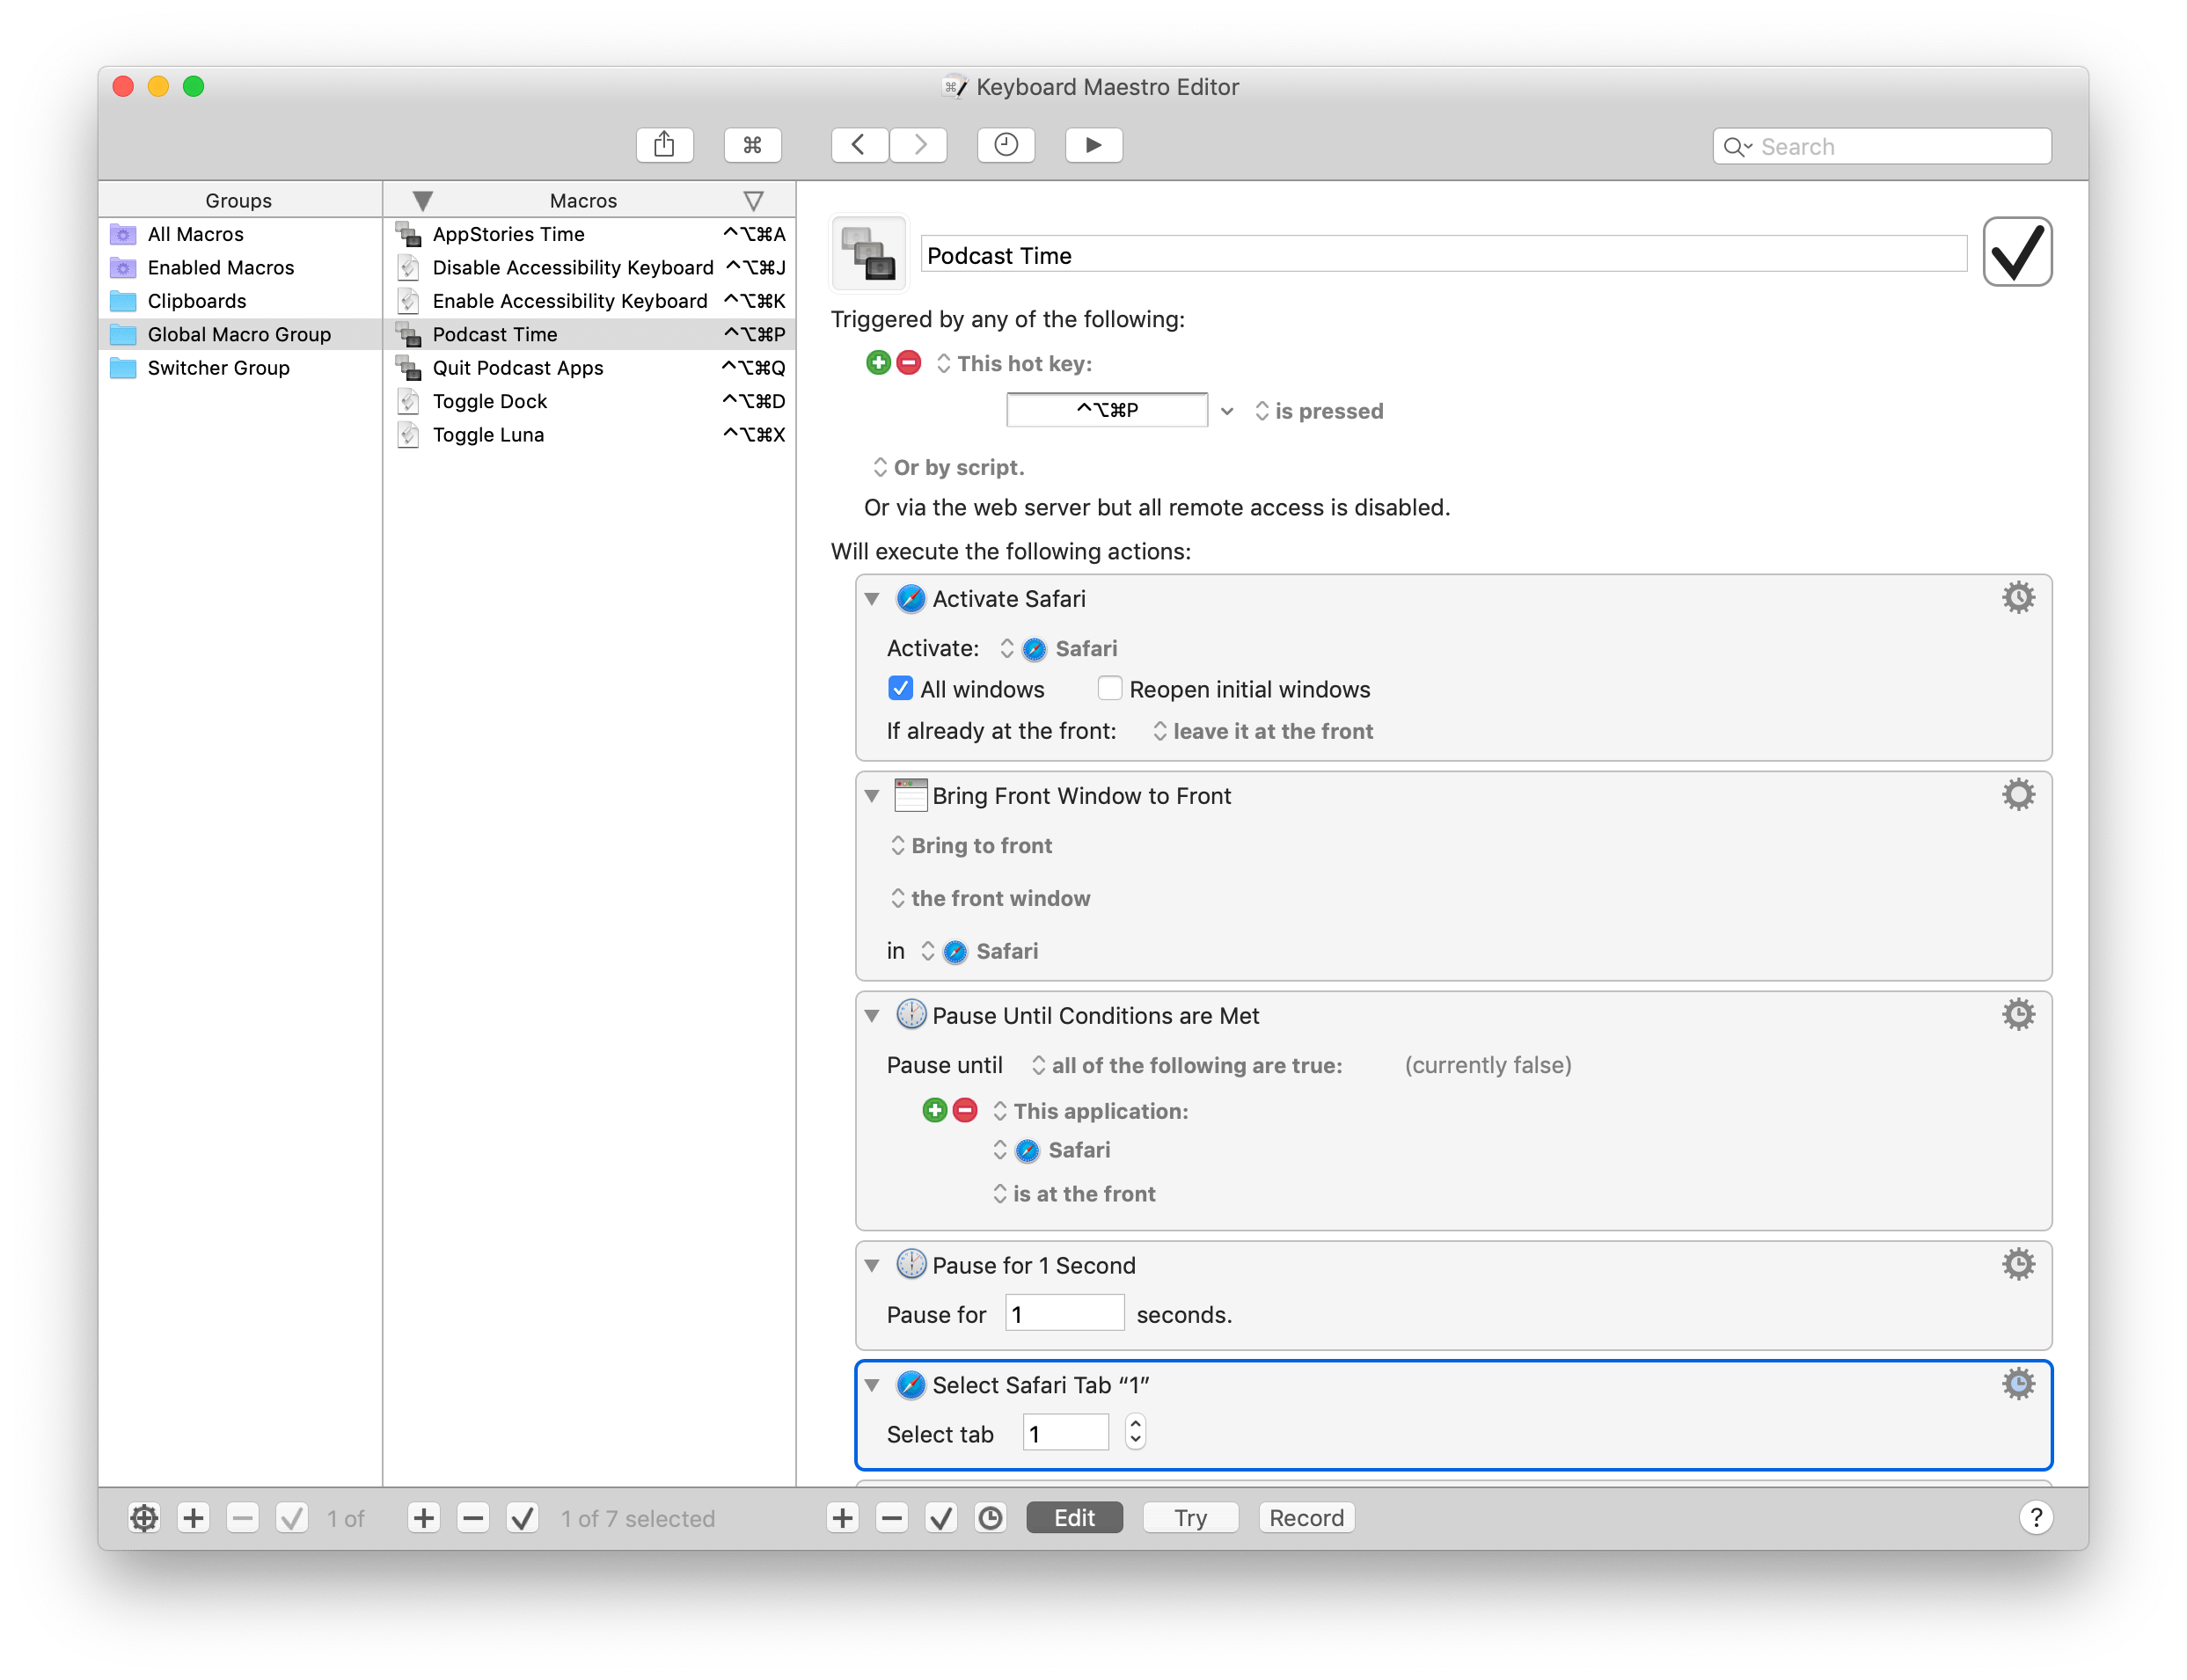
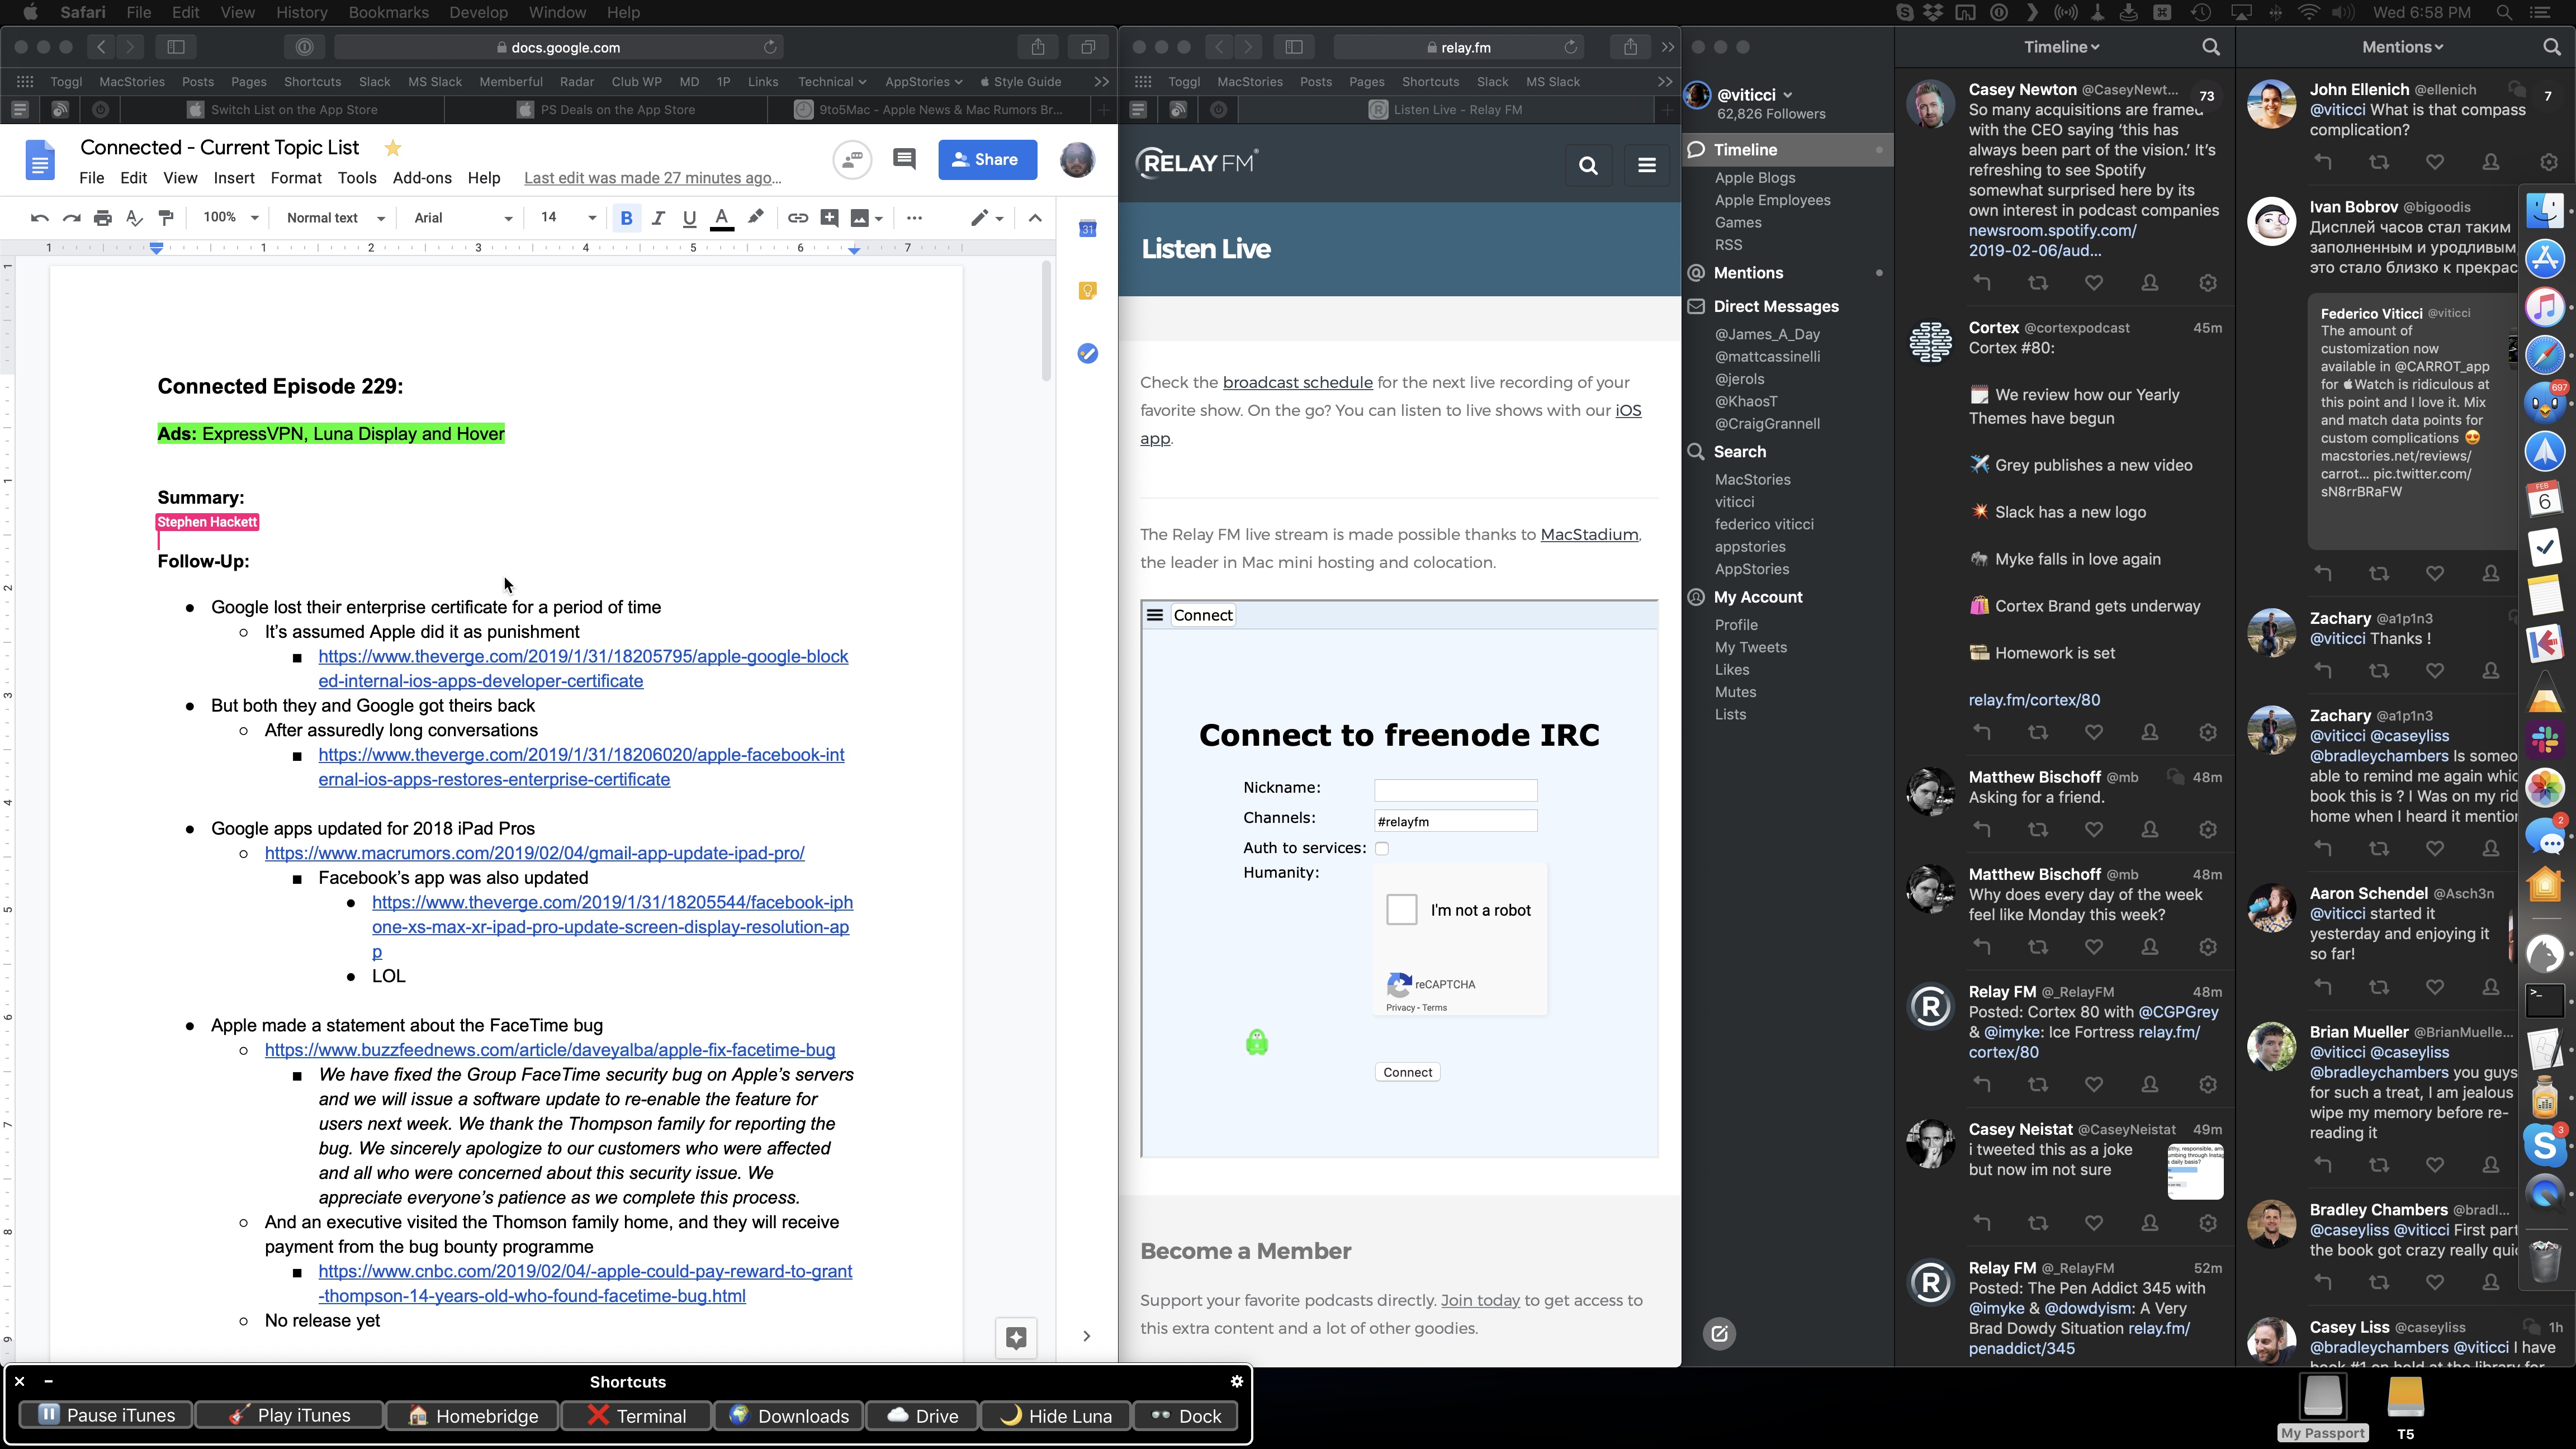
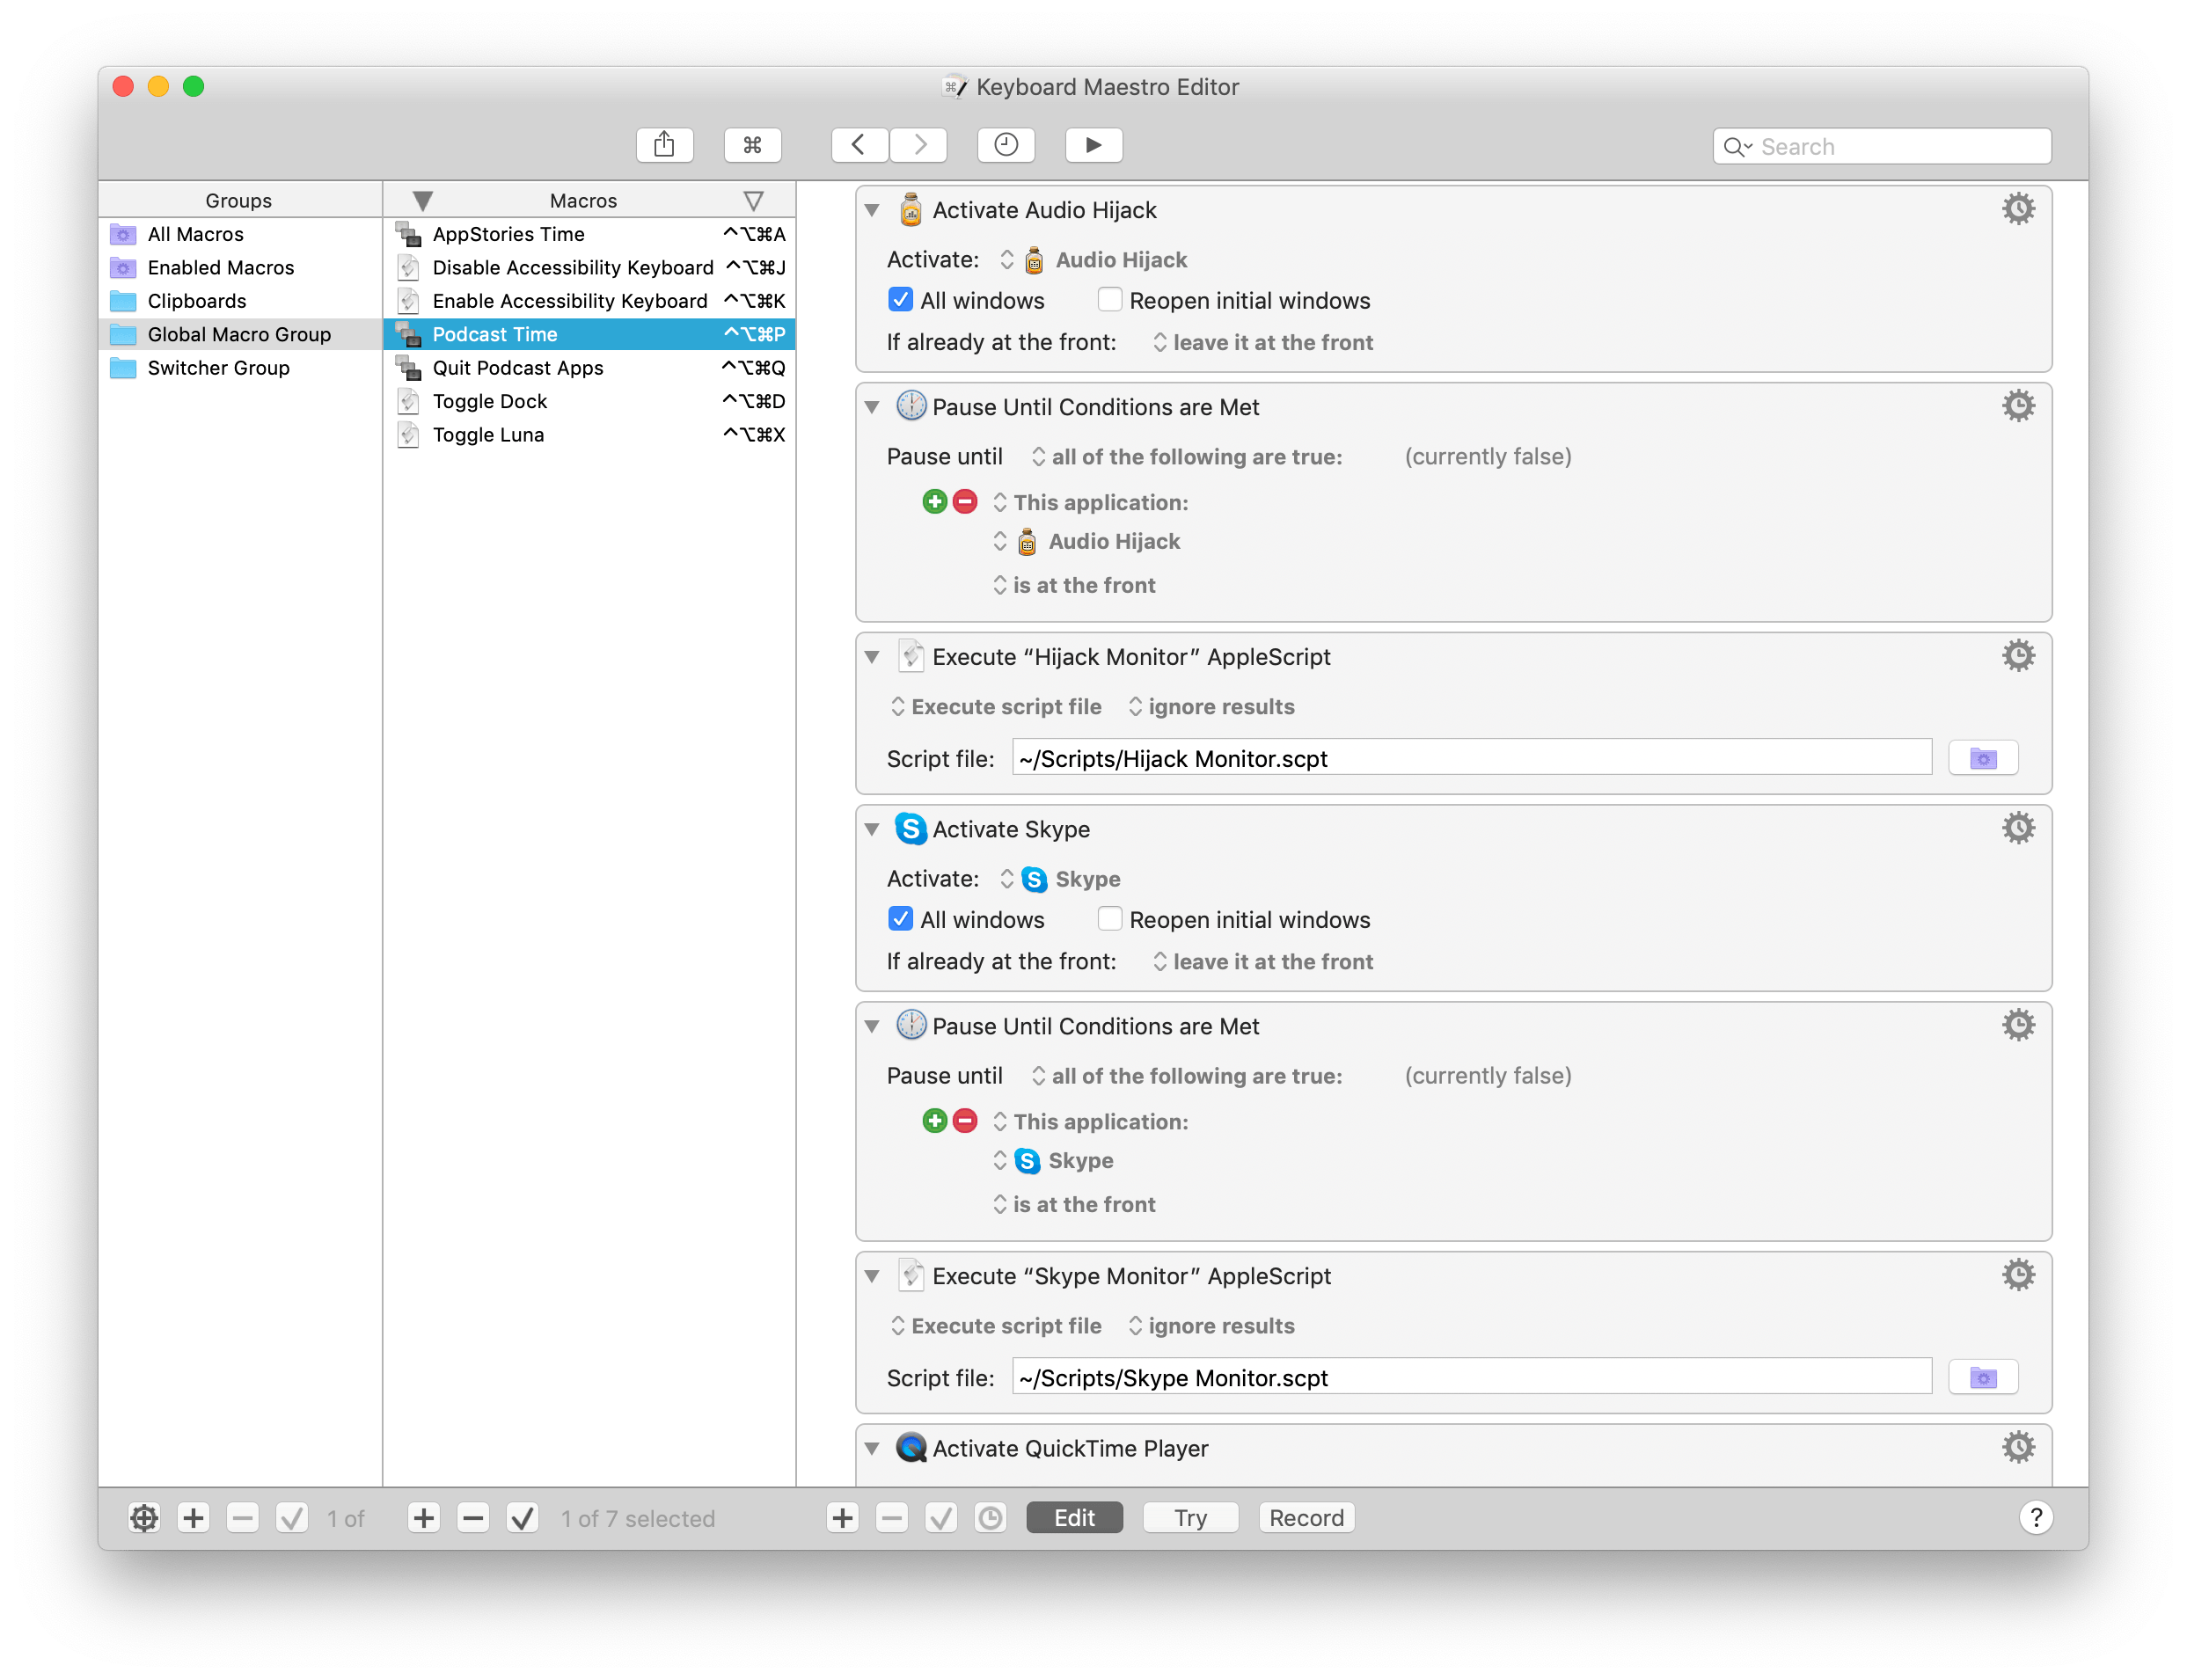
The Podcast Time macro is where most of the action takes place. A screenshot wouldn’t do it justice, so let me go through the broad strokes of this cornucopia of actions. The macro starts by launching Safari and resizing its frontmost window so that it occupies two thirds of my UltraFine display. Another action selects the first tab that I always keep pinned in Safari for Google Docs. This is where the document for the episode’s show notes will be open, allowing me to have plenty of room to look at the outline without much scrolling. Keyboard Maestro then opens a new Safari window and, if I’m recording a Relay show that involves a live chat, points it to relay.fm/live.8 The window is then resized to be a narrow rectangle that fills half of the remaining third of the display. I calculated these dimensions by testing several different combinations until I got the layout I wanted and the window width that worked best for me.

After opening and placing Safari windows on screen, the macro turns to other apps I typically keep open while recording podcasts. If the show is being streamed live on the Relay website, I open Tweetbot and put it on the rightmost side of the screen so I can keep an eye on additional real-time follow-up from listeners. Note how, throughout the macro, I dispersed an array of ‘Pause Until Conditions Are Met’ actions to make sure that apps can fully activate and come to the foreground before invoking actions that control them. It’s easy for Keyboard Maestro to get ahead of itself and attempt to, say, select a menu in an app that isn’t visible yet.
In five seconds, the main UltraFine display is filled with windows and I don’t have to lift a single finger. Apps are launched, tabs are selected, their windows resized and all I did was utter a command to Siri on a device that isn’t even a Mac. But the best part of the macro has just begun.
Now that the UltraFine is plastered with windows, I want other apps to launch and their windows to be automatically shuffled to the display next to the UltraFine – the iPad Pro running Luna Display. This is where BetterTouchTool comes in.
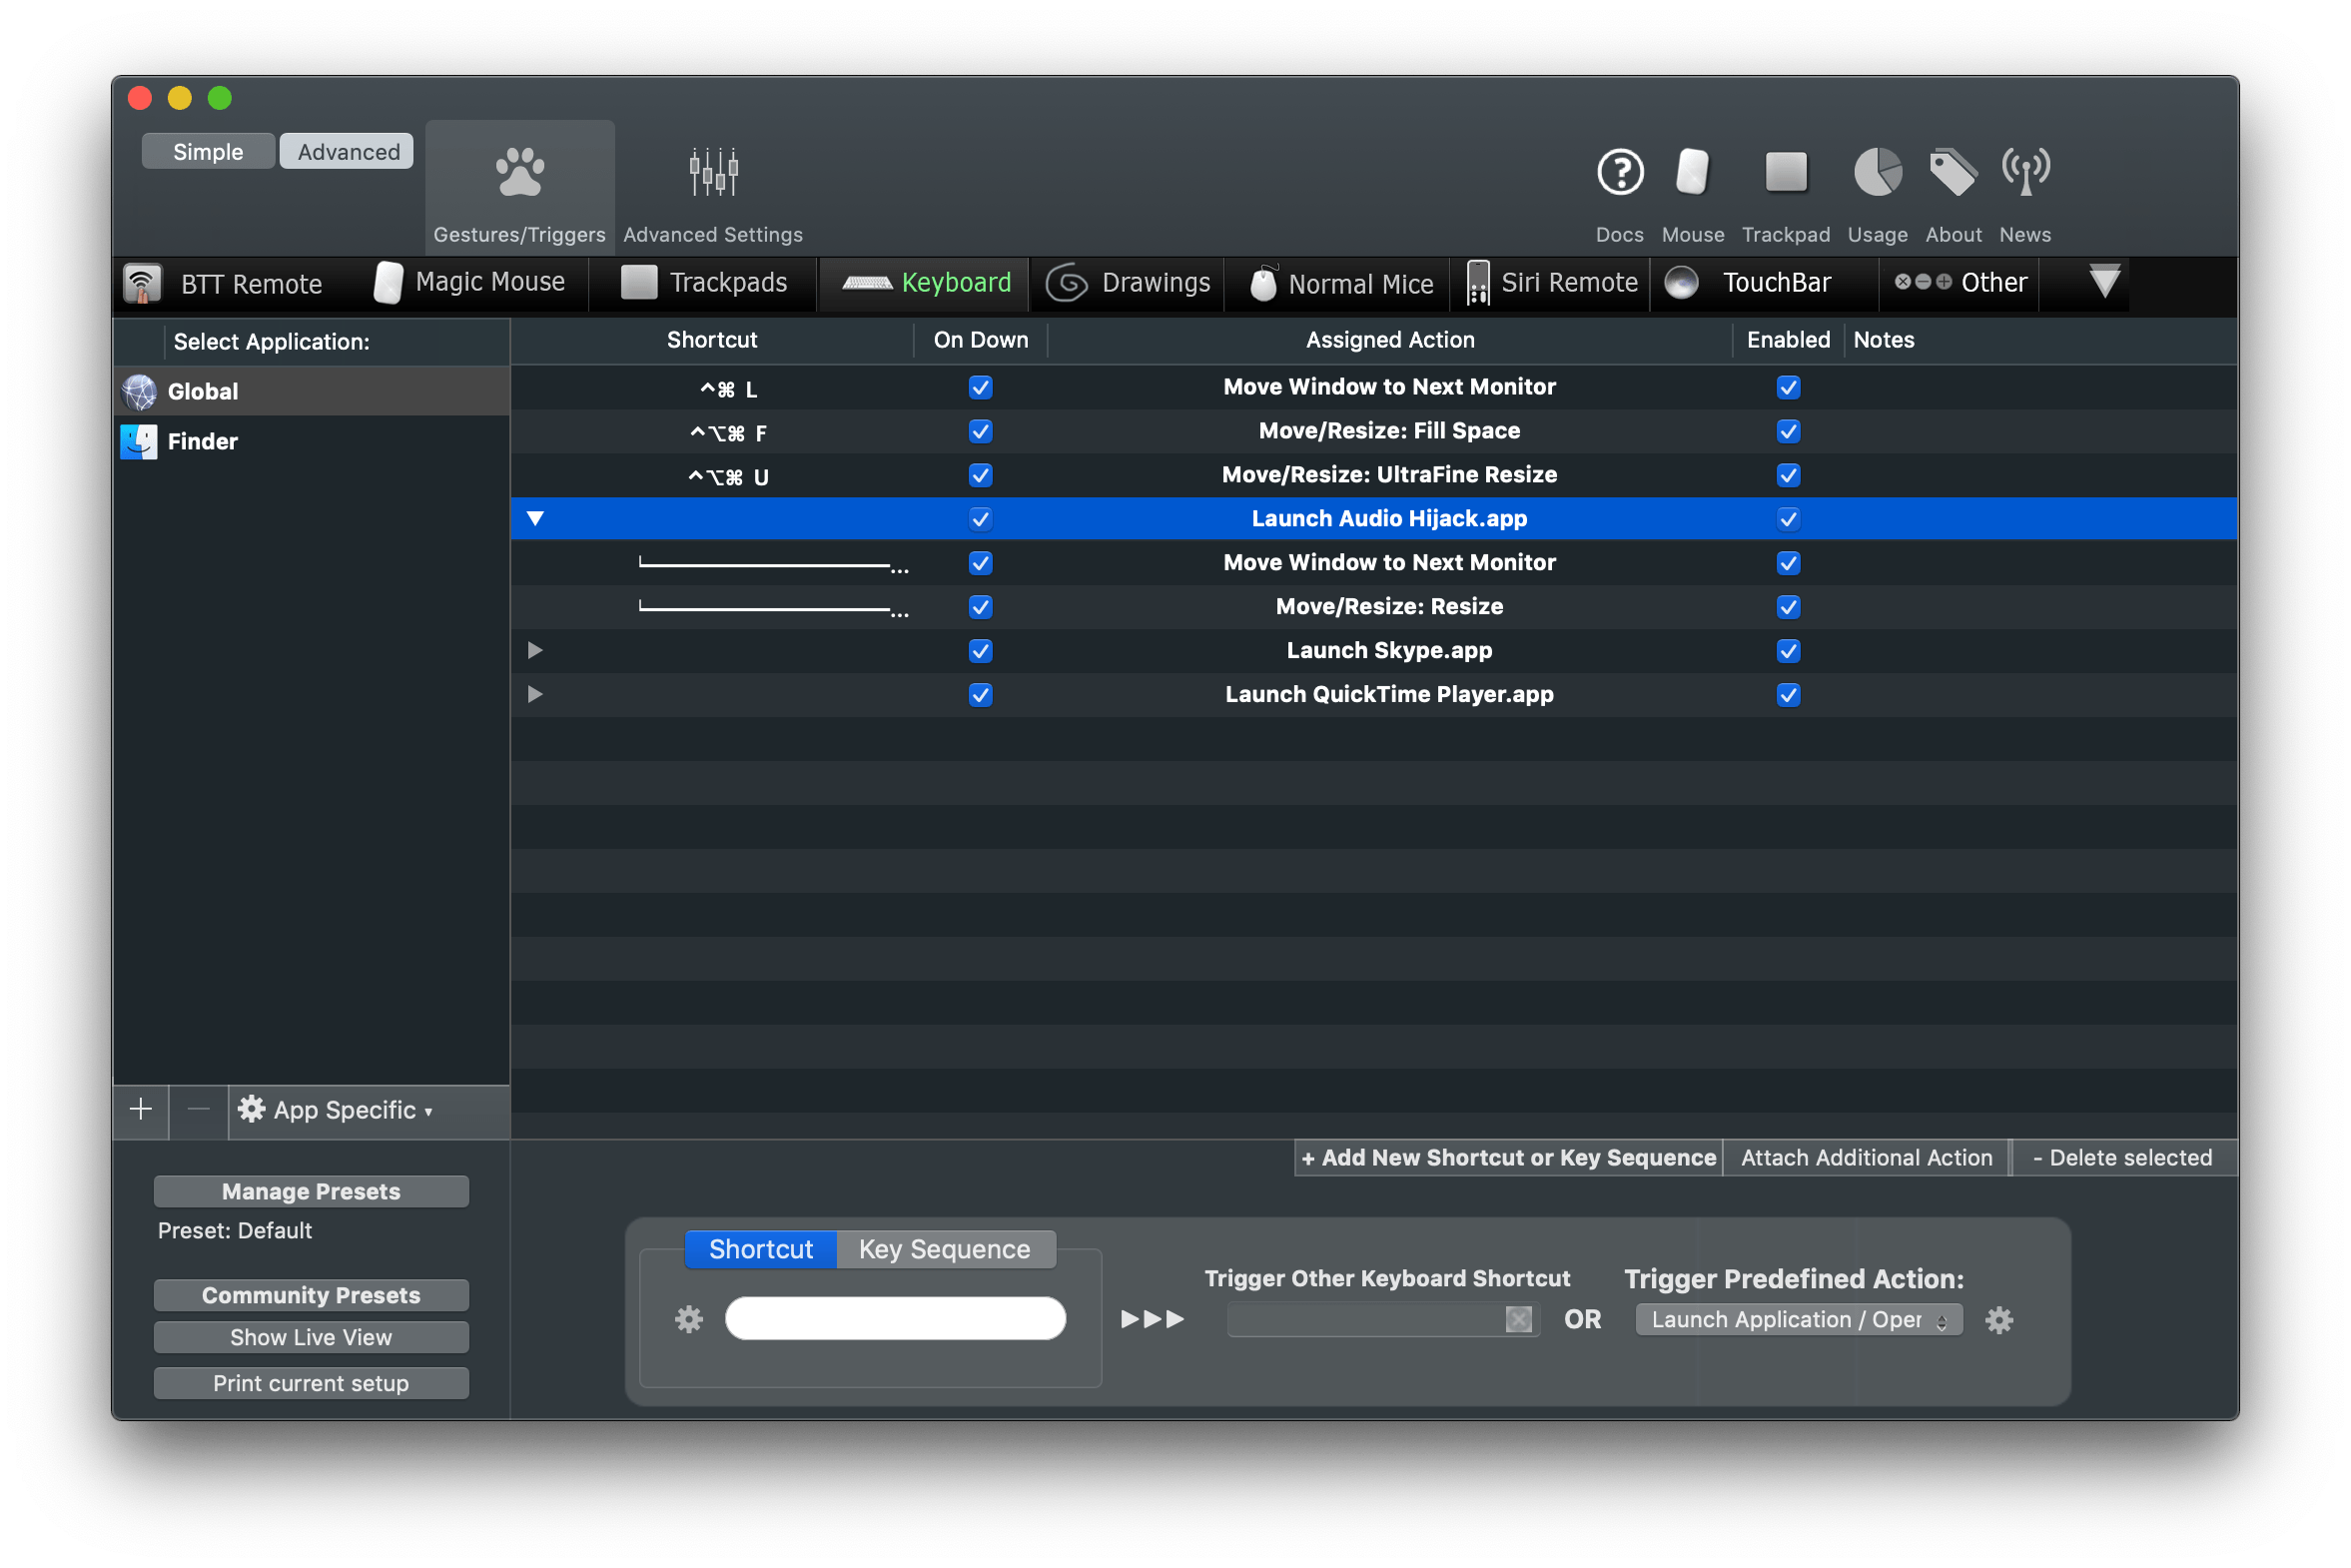
To the best of my knowledge, Keyboard Maestro doesn’t offer any actions to interact with connected monitors and the app windows displayed on them. BetterTouchTool (also known as BTT), with its myriad of options to rewrite the behavior of keyboard shortcuts, trackpad gestures, and more, does.9 So I decided to put together some BTT actions (grouped together) to launch, move, and resize windows that need to go on the iPad’s display.
Let’s use Audio Hijack as an example. First, BTT launches the app; then, thanks to the ‘Move Windows to Next Monitor’ action, the window is flung to whatever monitor is sitting next to the UltraFine (which is my primary display).
At this point, a third linked action in this group uses the ‘Move/Resize’ action of BTT with a series of custom parameters. Here’s what it looks like:
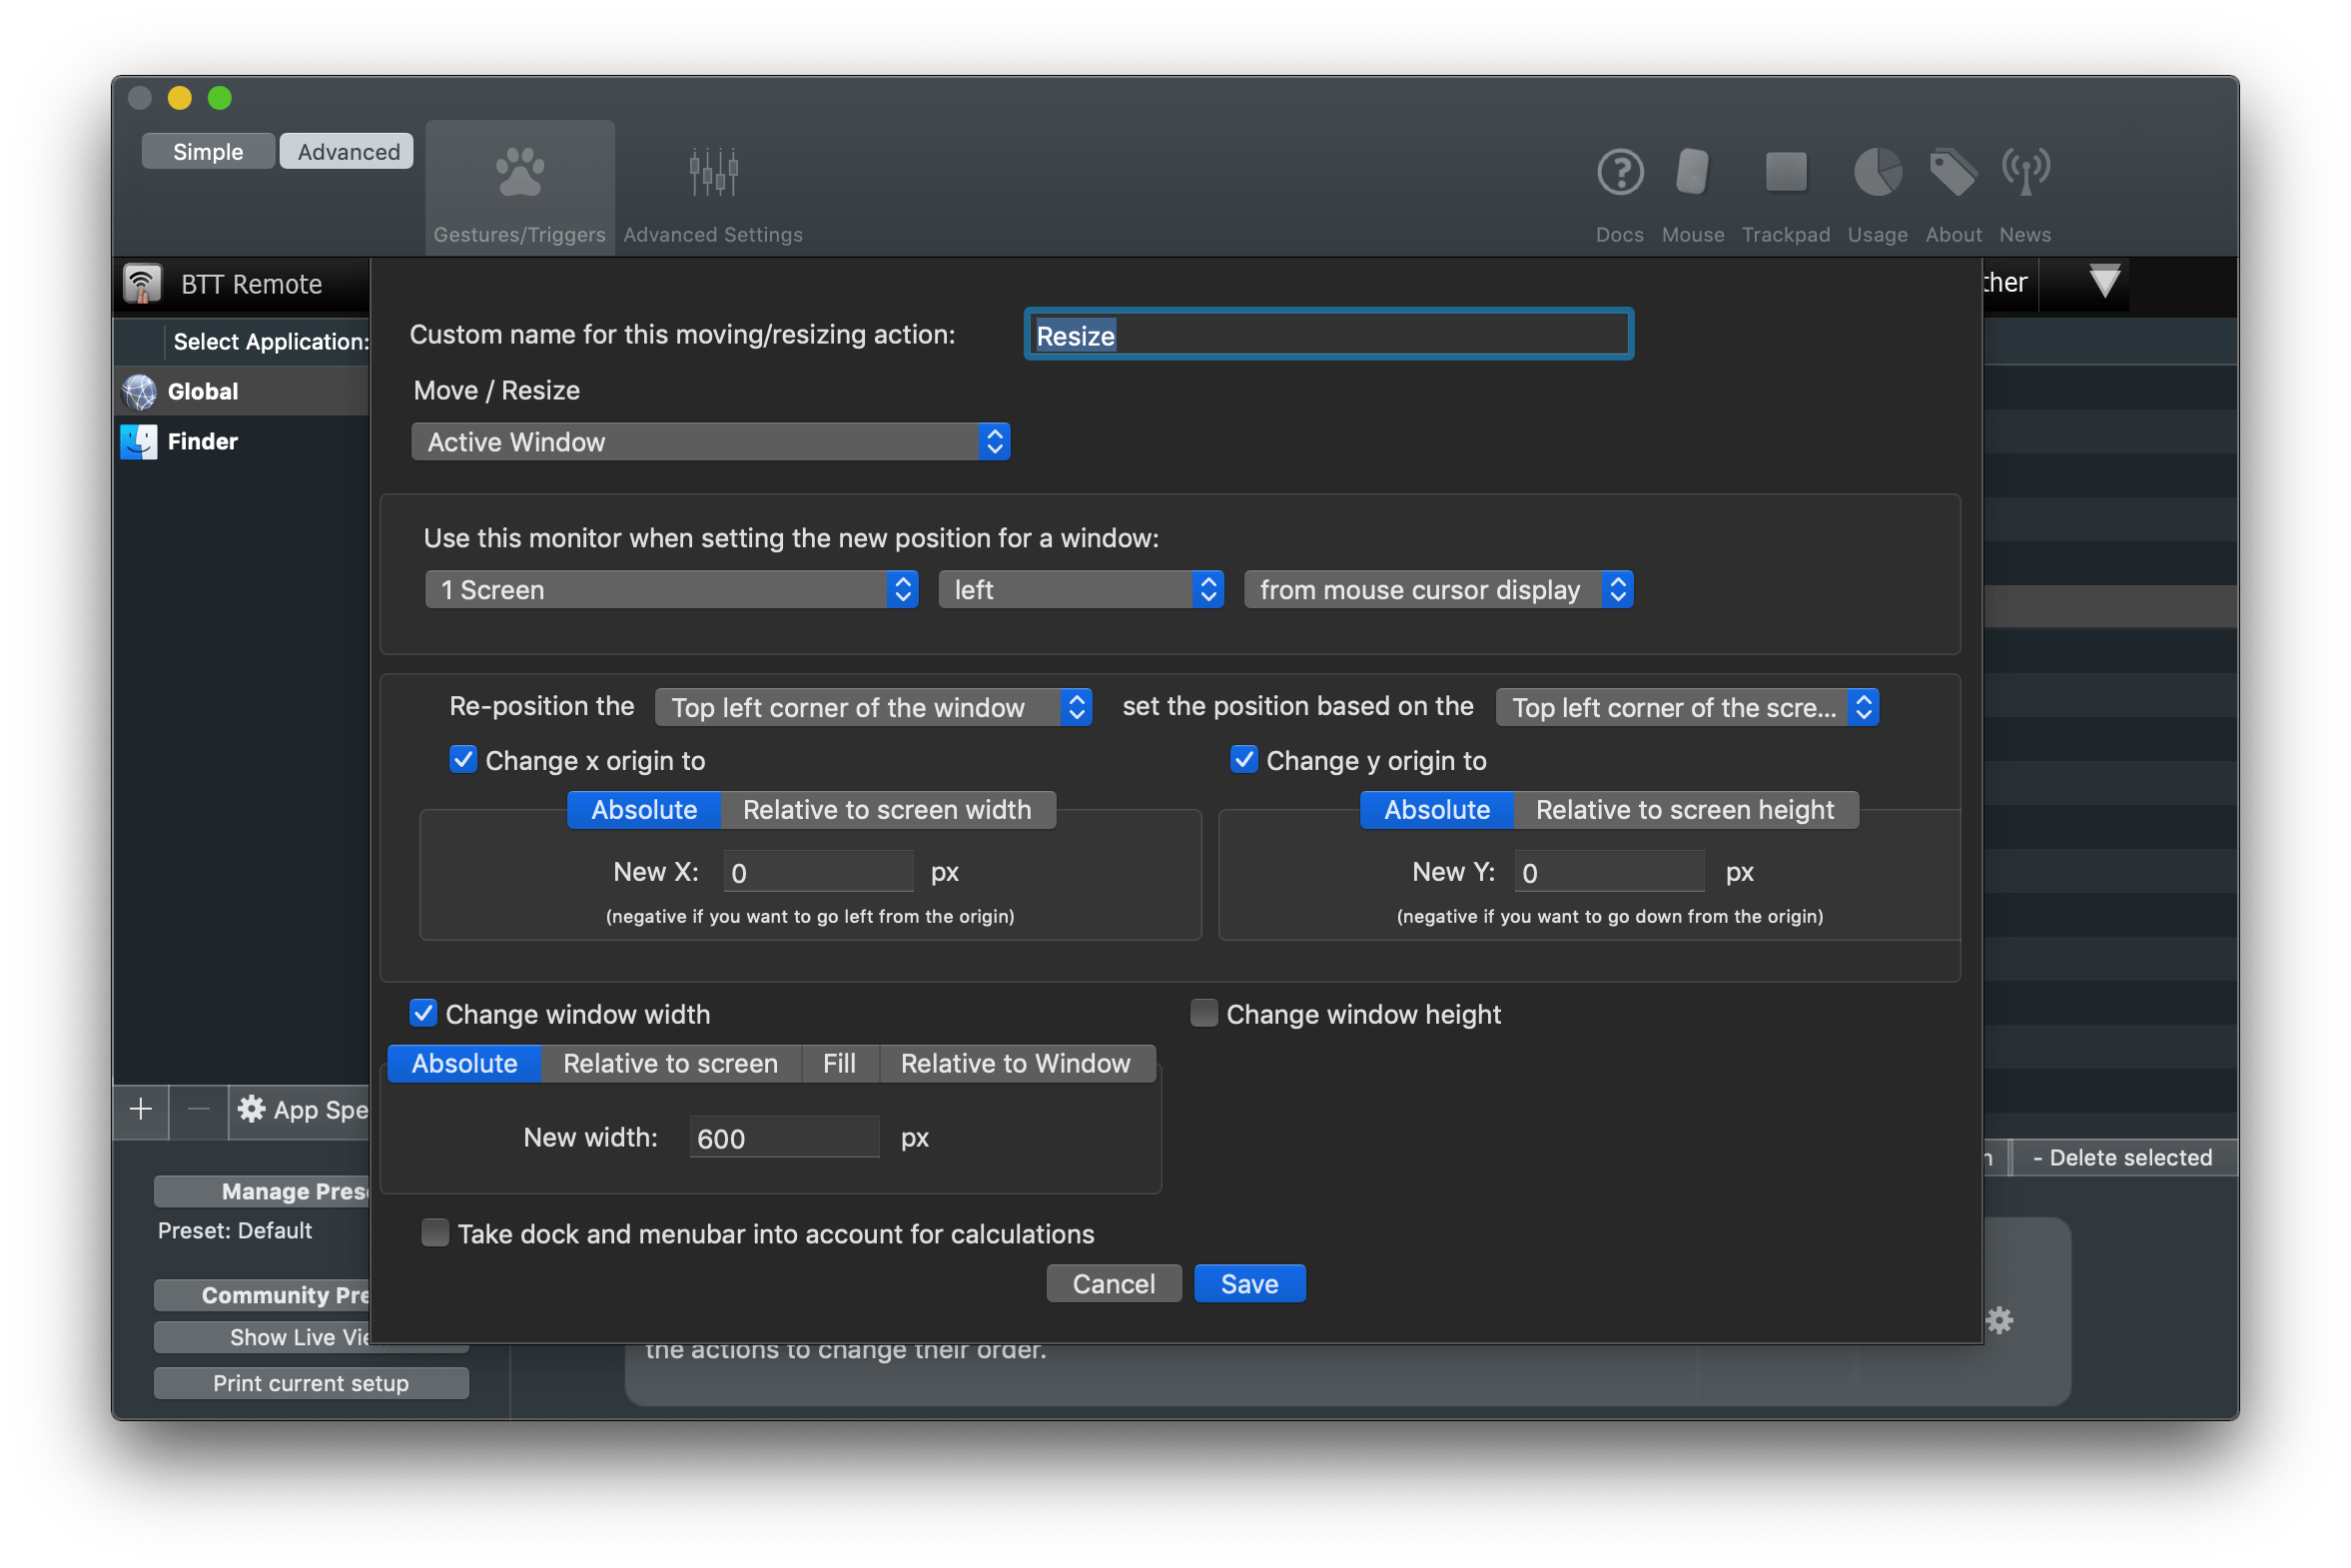
In plain English, this action takes the active window (Audio Hijack in this case) and resizes it to specific dimensions on the monitor that is sitting left from the display where the mouse cursor is. This is an additional check to make sure that the Audio Hijack window stays on the Luna Display and is resized there without being transported back to the UltraFine. The size and placement of the window was, once again, optimized by me through trial and error based on personal taste.
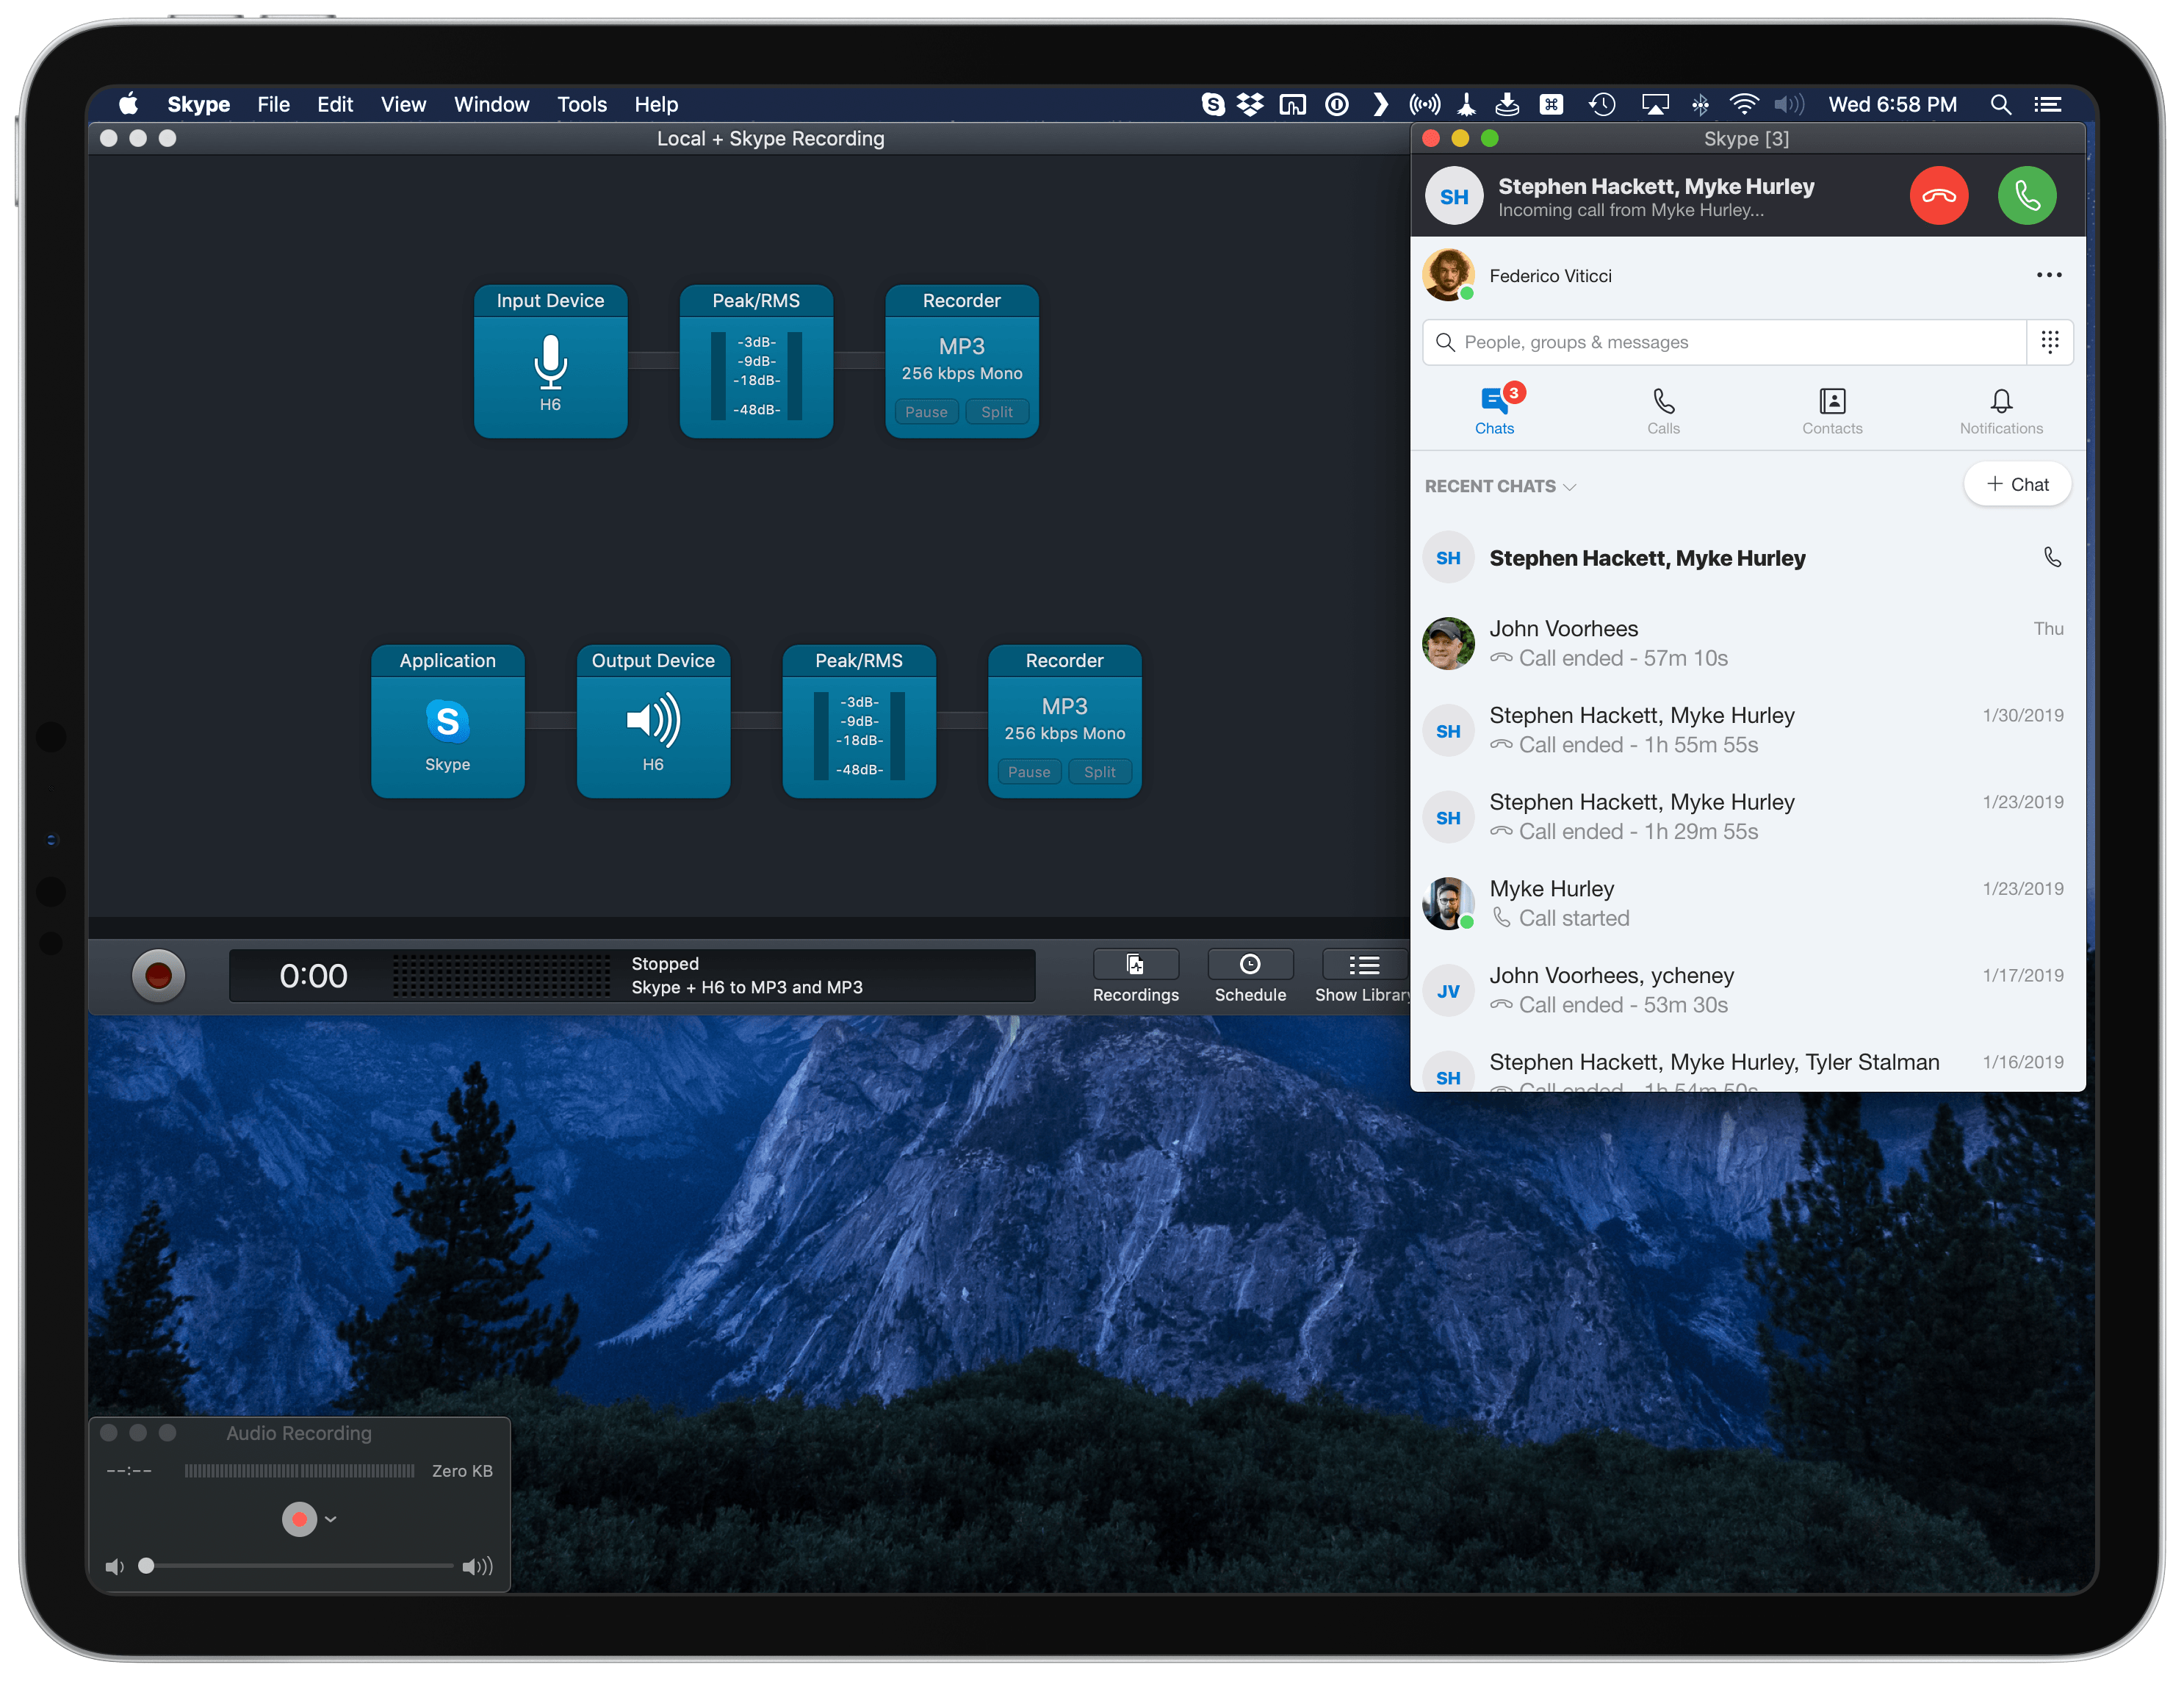
This cluster of actions linked together by BTT in a single flow – launch app, move it, resize it – is repeated for the three apps I use to converse and record audio: Skype, QuickTime, and Audio Hijack. The only difference between them are the values used to position their windows on the iPad’s display.
Once I had the actions to move and resize windows set up in BTT, I had to figure out a way to trigger them from the Keyboard Maestro macro. Thankfully, the developers of BTT thought about this possibility as well: BTT actions can be triggered from external apps in a variety of ways, one of them being an AppleScript that runs a specific action by calling its unique ID. The AppleScript looks like this:
tell application "BetterTouchTool"
    execute_assigned_actions_for_trigger "CFDA72F8-E2DD-4F0D-93B3-A424895R5BBD"
end tell
The UUID of a BTT action can be retrieved by right-clicking on an action and selecting the ‘Copy UUID’ option from the contextual menu. In an action group, running the first action from the top will automatically continue executing subsequent ones.
You can guess what I did next. I created three separate AppleScript files for the three aforementioned audio apps, saved them in the /Scripts folder of my Mac, and used the ‘Execute AppleScript’ action of Keyboard Maestro to run them from my macro.
Because BetterTouchTool expects each app to be already opened (how can you move windows if there are no windows to begin with?), I first had to make sure each app was opened and in the foreground before invoking the BTT scripts. Here’s what this looks like in Keyboard Maestro for Audio Hijack and Skype:
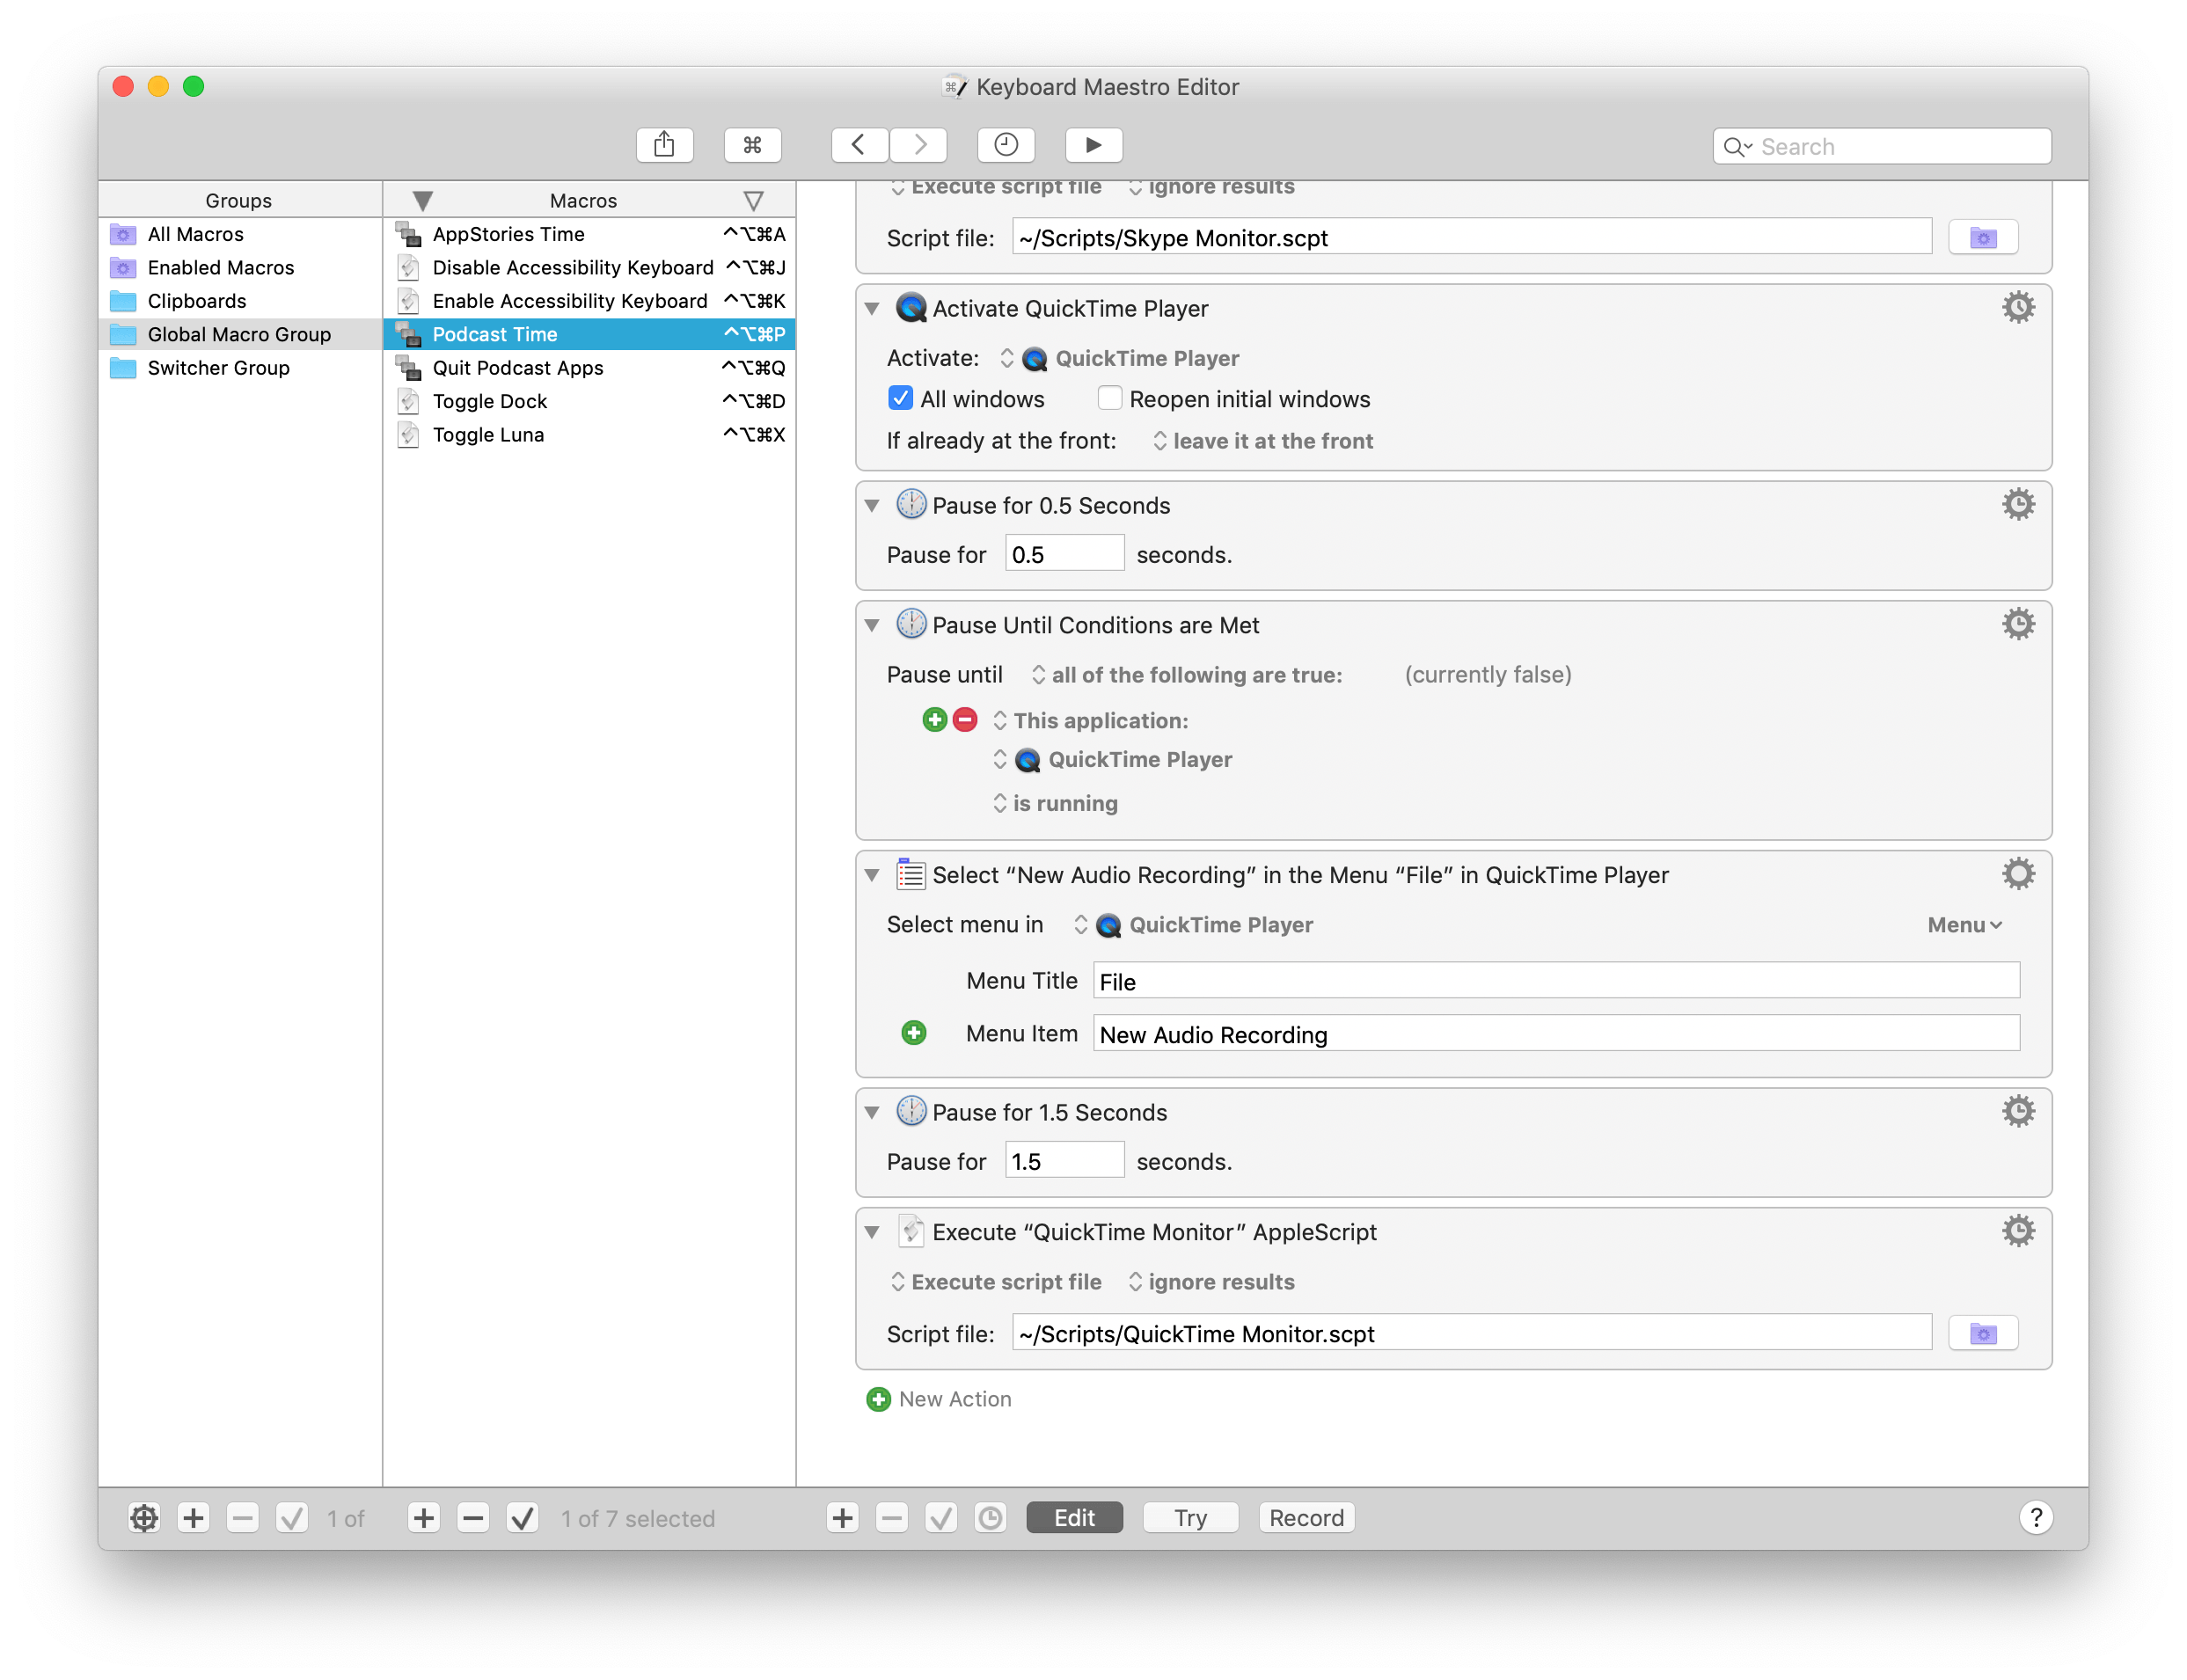
The only exception is QuickTime player, for which I also need to create a new audio recording by selecting File ⇾ New Audio Recording. But, of course, I don’t really need to select this menu item myself – Keyboard Maestro can do it for me with one of its inbuilt actions. So after launching QuickTime player but before running the AppleScript that tells BTT to move it across displays, this single step in Keyboard Maestro selects the menu item I need and prepares a window for a new audio recording:
Now, all the apps I need for recording a podcast have been launched, their windows resized and hurled through displays. Less than 15 seconds have passed since I asked Siri to prepare my Mac for podcasting, and the Keyboard Maestro macro is done. I might as well sit down and do the actual thing. Or at least you’d think so.
Back on iOS, there are two more steps the shortcut needs to finish running. First, I want my desk lights to be purple because I like that color when I’m talking to my friends on Skype. Don’t ask why. This is easily done with the ‘Run Home Scene’ action in Shortcuts, which runs my ‘Purple Bedroom’ scene that I set up months ago in the Home app.
Finally, the shortcut has to start a Toggl timer specific to the podcast I’m about to record. This is where the last step of all this, the ingeniously-named ‘Record Podcast’ shortcut, comes in to finish everything off.
This shortcut was built for my personal needs, but it’s easily adaptable to anyone who deals with recurring events and wants to start a timer when they’re about to start. The Record Podcast shortcut starts a Toggl timer if an event in my calendar matches one of the multiple podcast names I set up. If my Podcasts calendar has ‘Record Connected’ in it at 7 PM, the shortcut will start a ‘Recording Connected’ timer when I run it; if ‘Record AppStories with John’ is found, a Toggl timer for AppStories will start instead. And so forth. It’s a simple solution that I integrated with the automations I use to prepare my Mac for podcasts so that I never forget to track the time I spend recording them.
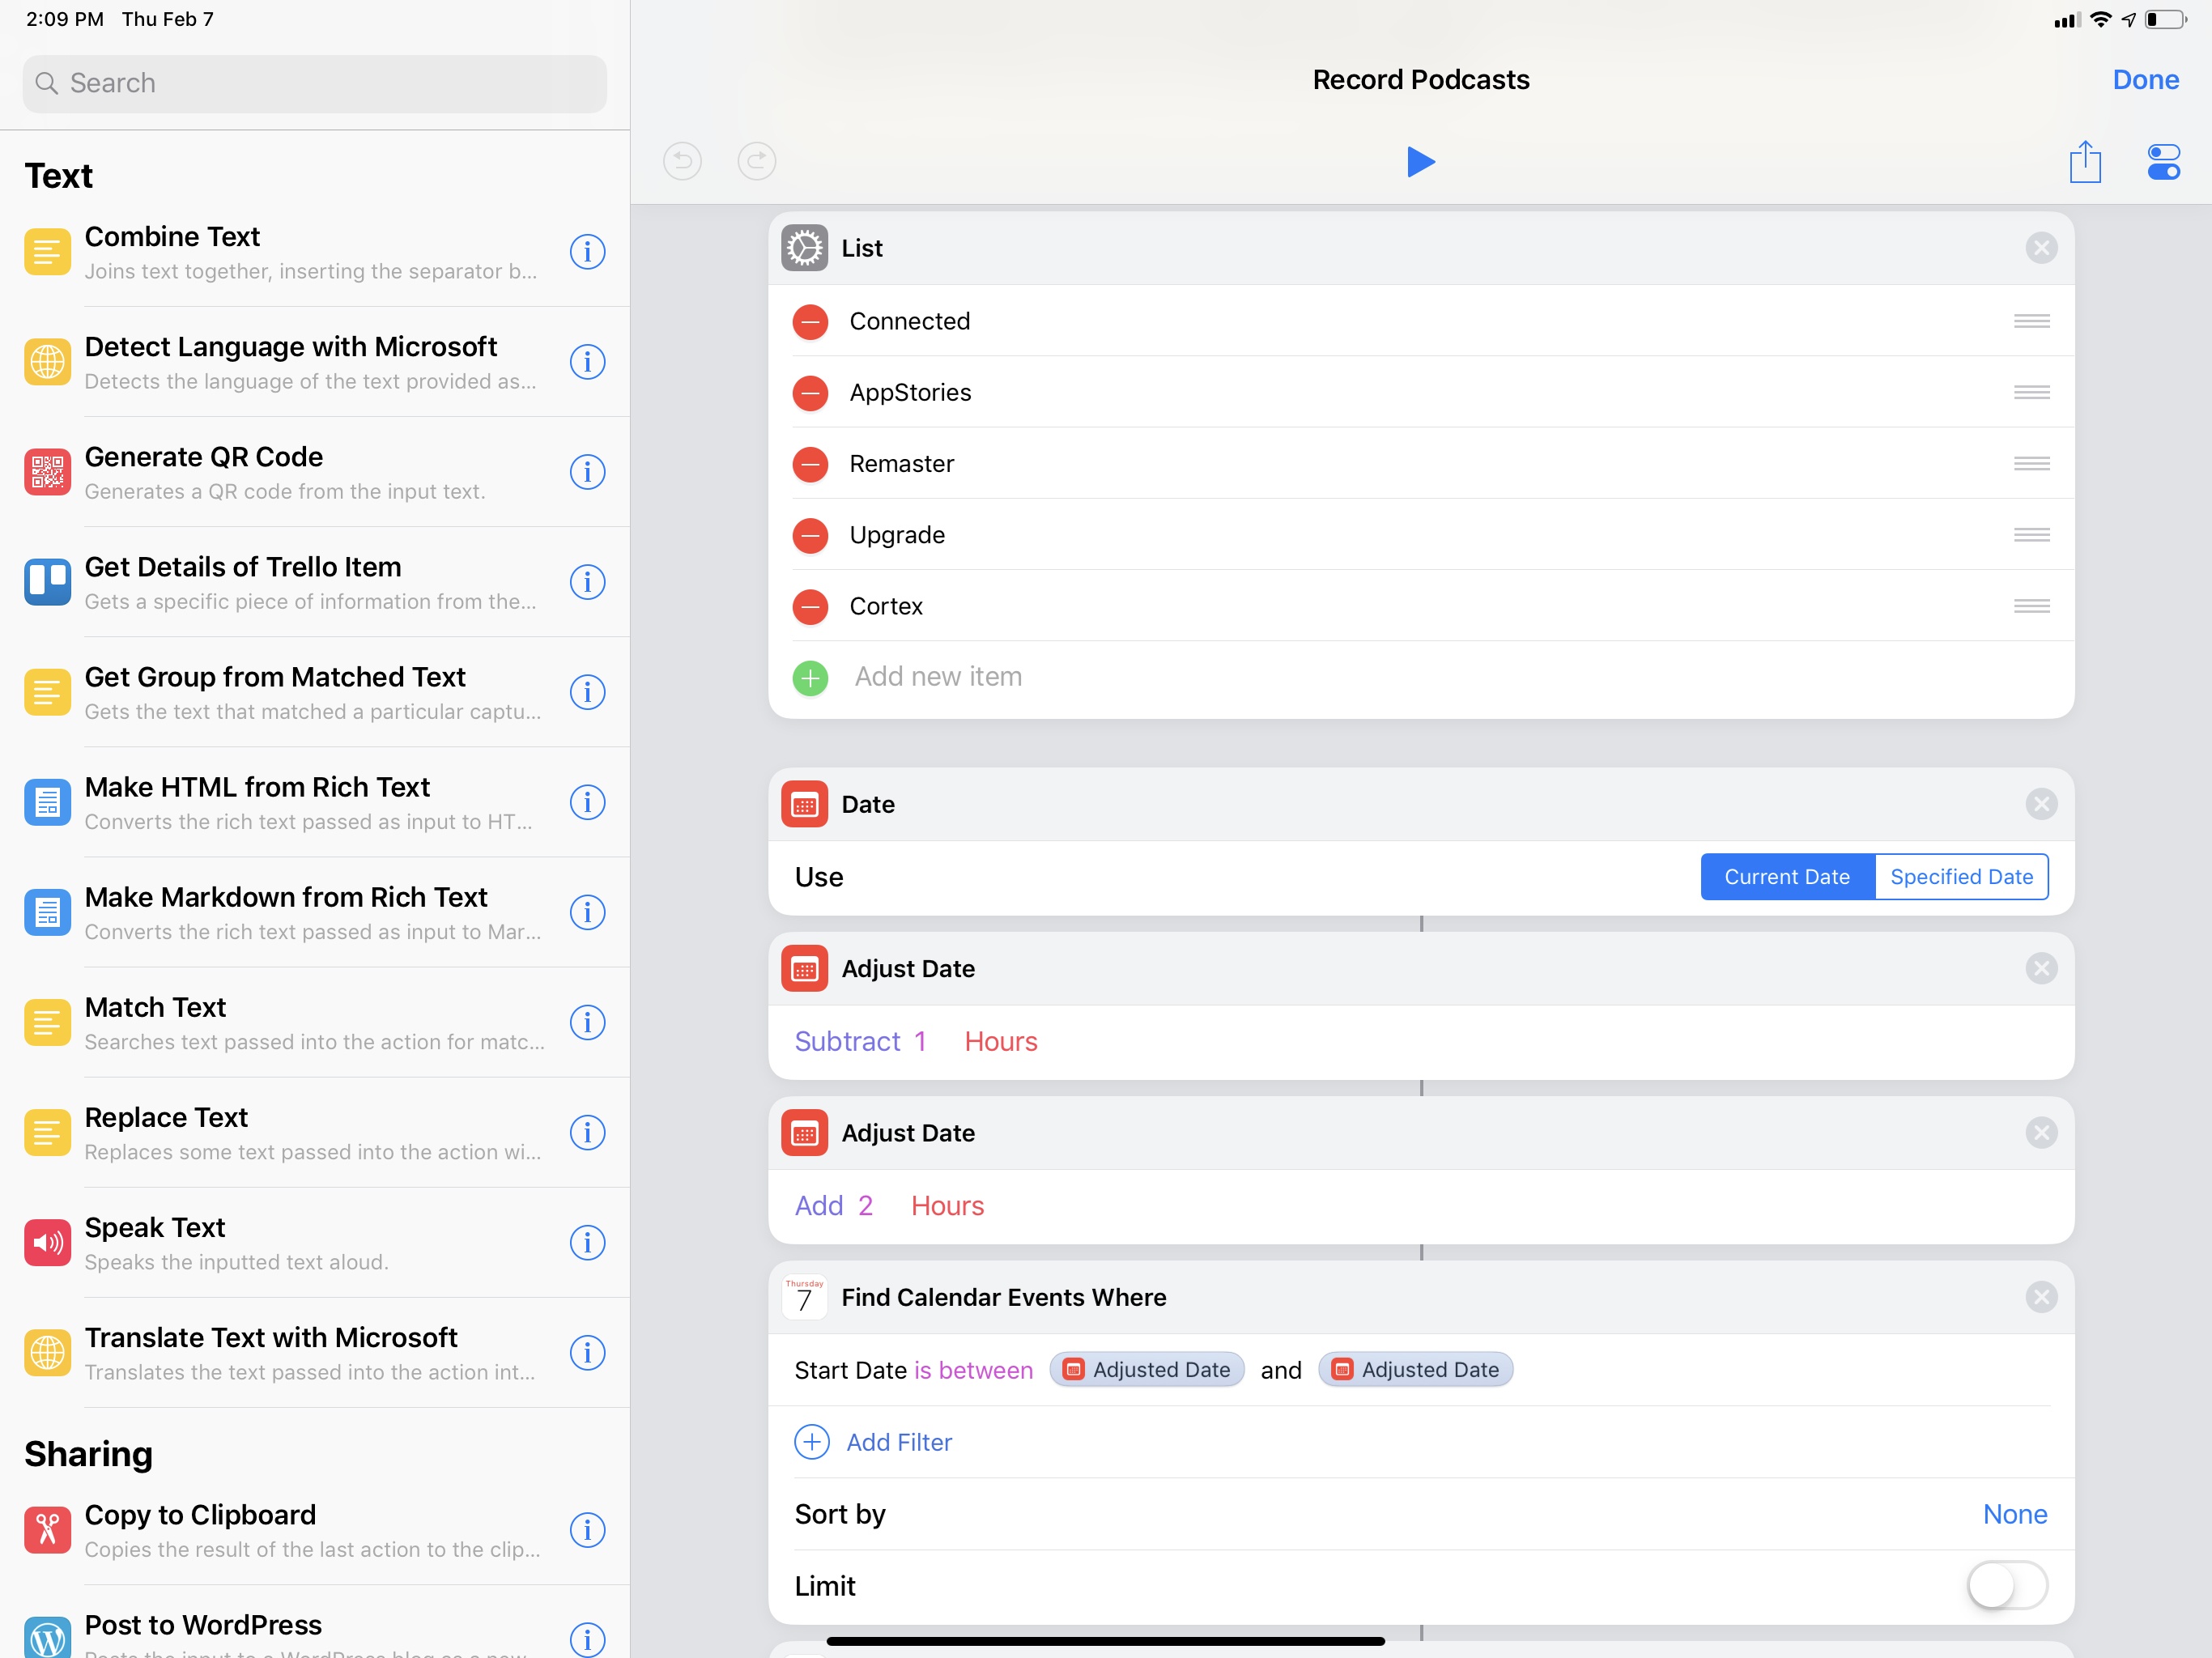
Given a list of event names (could be podcasts, could be meetings, could be soccer practice – anything that is recurring on your calendar works), the shortcut scans the iOS Calendar for events whose start date is between the past and next hour. This way, the shortcut will find events whether I run it before the event begins or if I’m late. Then, a regular expression matches the event found in the calendar (if any) against my list of podcast names; if there is a match, it means a podcast session is about to begin. A block of ‘If’ actions uses a different Siri shortcut to start a Toggl timer in the background depending on which podcast is found. The app I’m using to prepare these Toggl shortcuts is called Timery and is currently in beta (and I can’t wait to write about it), but you can replicate the same setup by using the Siri shortcuts donated by the official Toggl app for iOS.
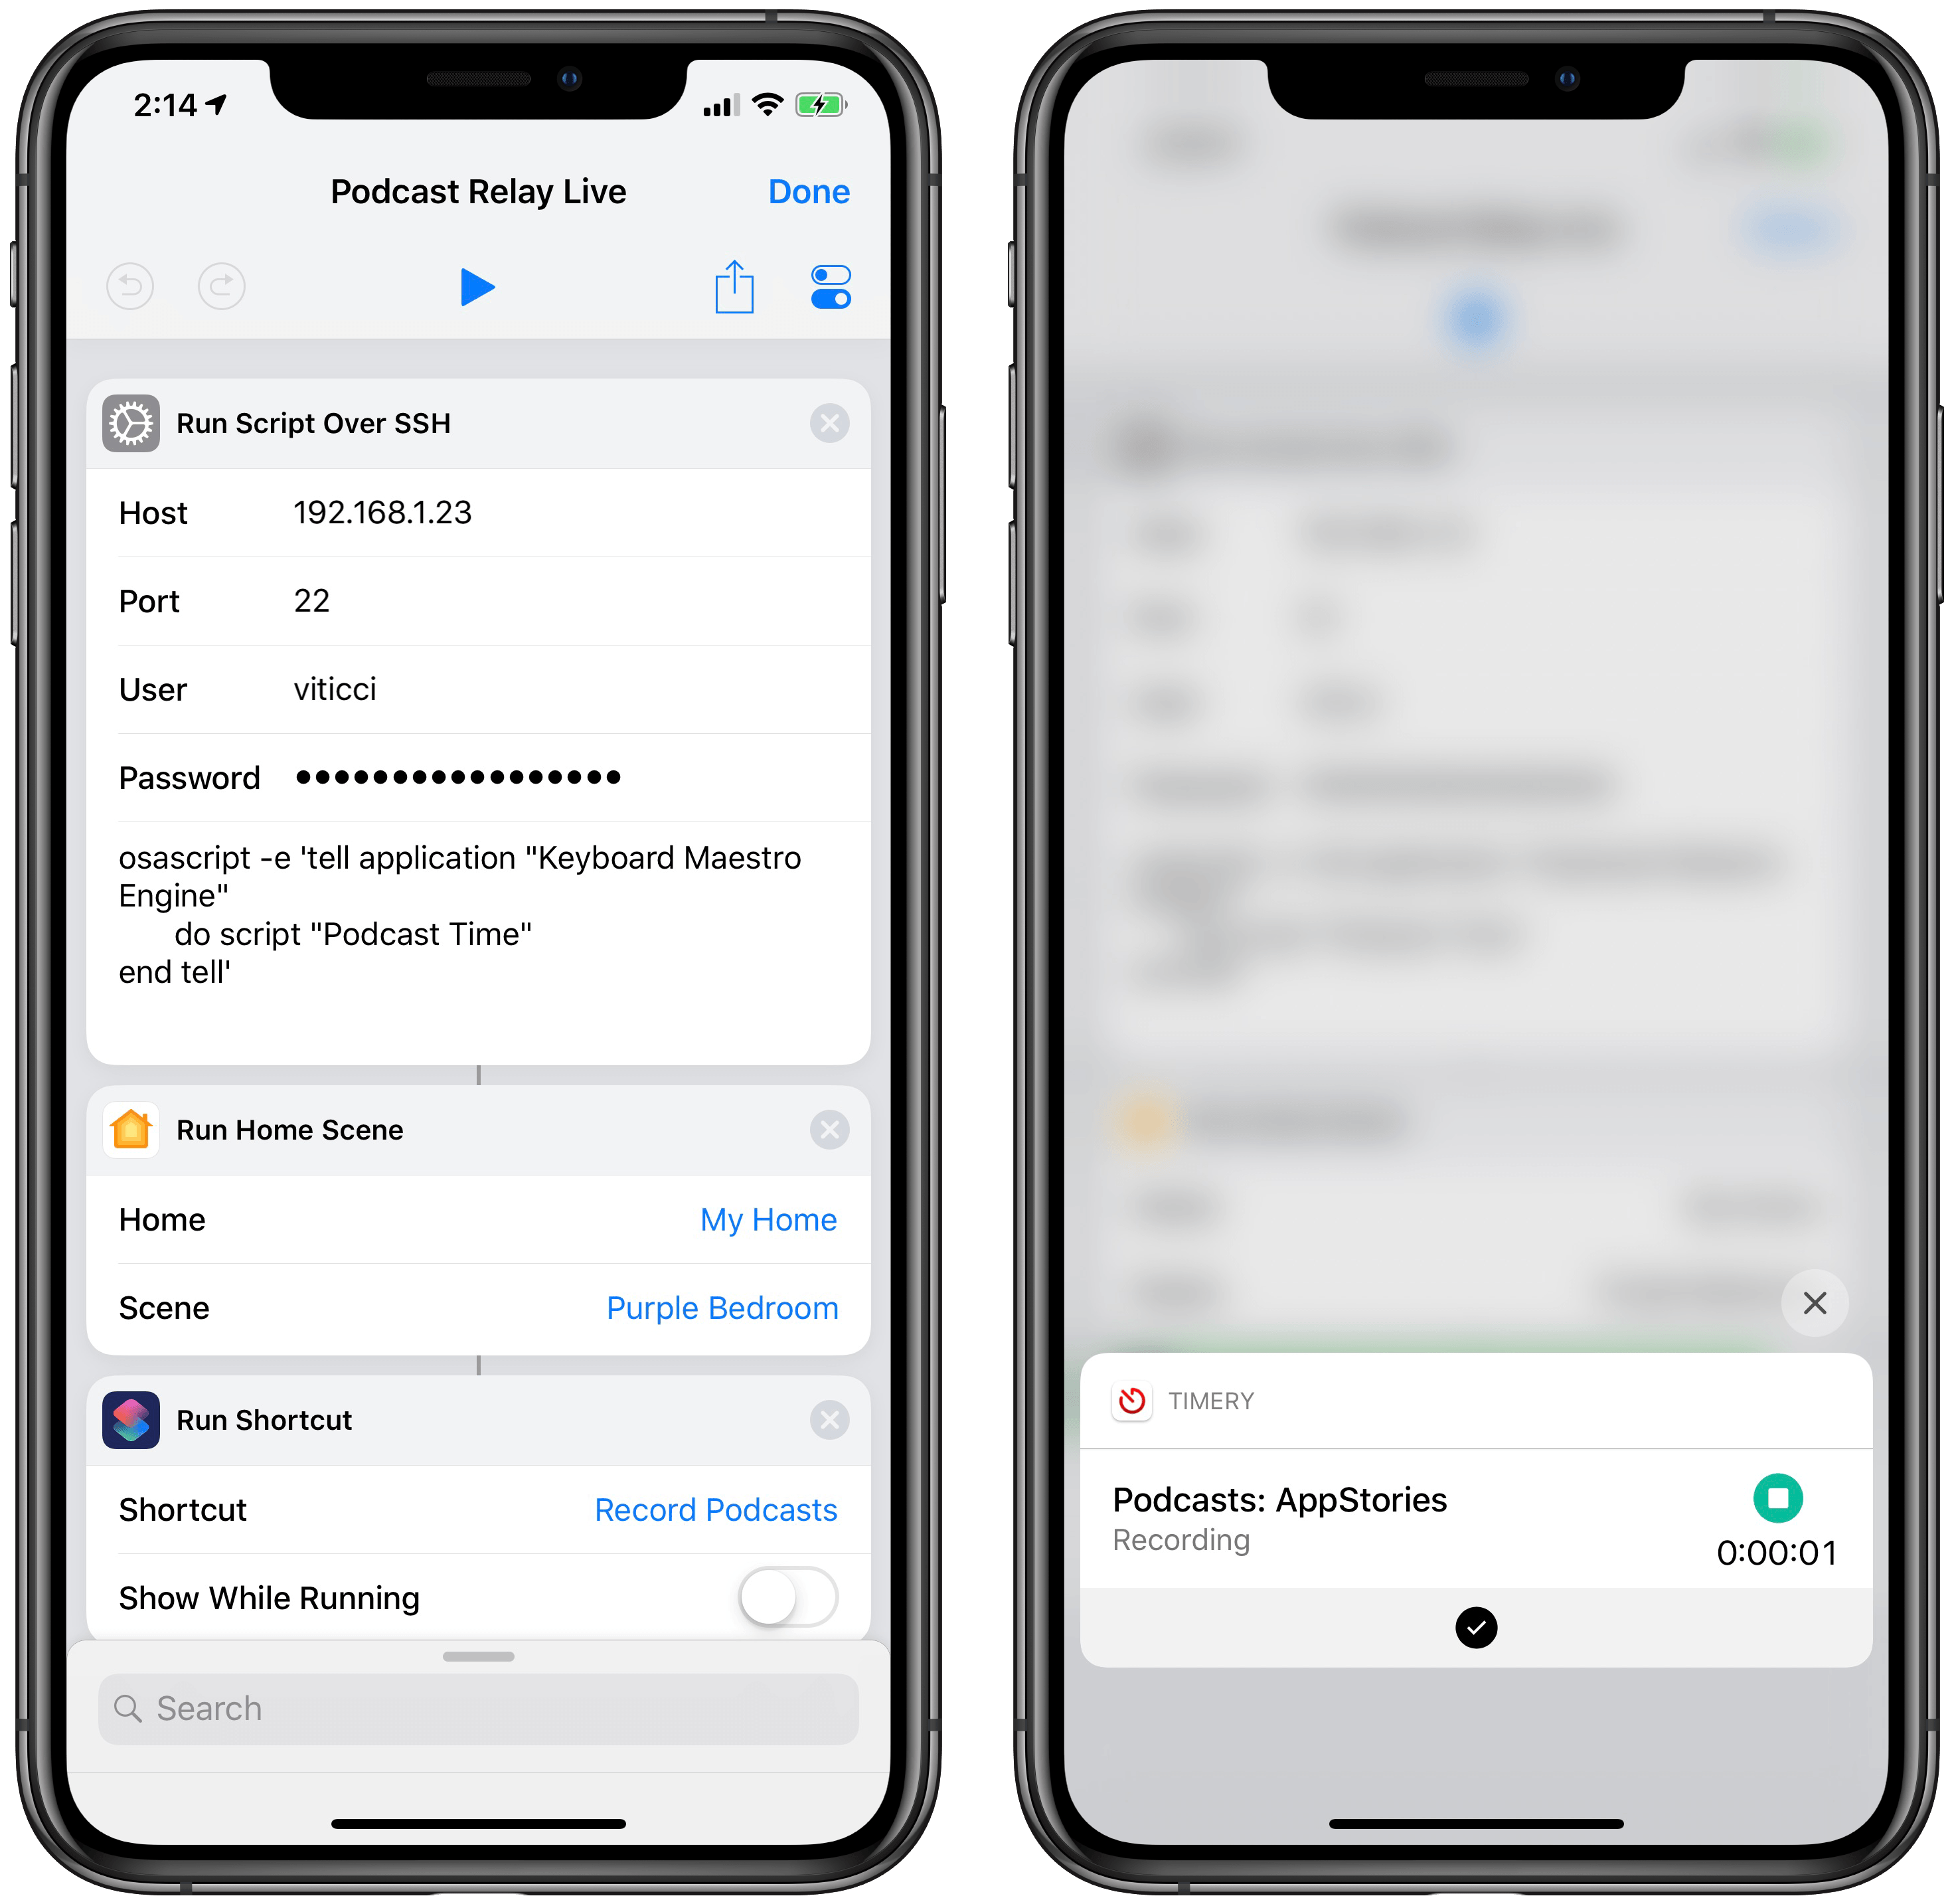
When I run the shortcut on my iPhone, nothing else is shown besides the Toggl shortcut started at the end.
Start Timer for Event
Start a Toggl timer (with the Timery app) based on an event name found in a specific calendar (or multiple calendars). You have to specify the event name in a list and replace the Siri shortcuts for Timery if you don’t have the app installed.
Dozens of actions, 20 seconds, and zero manual interactions after I told Siri that it’s “recording time”, the shortcut is complete at last. Mac apps are ready and waiting for me in their dual-screen setup; my lights are just the shade of purple I like; and a timer is ticking on Toggl. For years, I did all of this manually, and it took me several minutes to carefully position windows – when I had the patience to do so. Most of the time I just left a jungle of windows sprawling across the screen and forgot to track my time.
I love this new system I’ve put together. It has never failed me over the past couple of months – a testament to the Mac’s dependability as much as a validation of macOS’ greatest advantage compared to iOS: the absolute freedom to tinker, modify, and mold a computer to one’s needs. I prefer using the iPad Pro as my computer for everything else, but I still have to use a Mac and Mac software for podcasting. Who’s to say I can’t combine the best aspects of automation on both platforms to make the entire process better suited for me?
Coming Next…
There is much left to explore in this new approach to accessing and controlling a Mac from iOS, and I’m still figuring out new ways to take advantage of my Mac mini. In this article, I’ve only detailed how to access the Finder from Files, shared a handful of shortcuts, and described my advanced macro to prepare a Mac for podcast recording.
I’m not done yet. I have more BetterTouchTool and Luna Display tips to share. I need to explain my different uses of VNC and Luna Display from the iPad Pro. There are more shortcuts, more Keyboard Maestro macros to examine. As I promised, I’ll have to write about youtube-dl and homebridge, for which I’m glad I decided to abandon Mac laptops and get an always-on Mac mini server instead. And then I’ll have to explain how I built my own command panel with shortcuts that simplify using a Mac from an iPad Pro:

But that’s a story for another time. It’s going to be a fun ride.
- Zelda and Ginger can sleep through music, but they'll awaken instantly if I talk to Siri. Part of me wonders if they learned how to respond to "Hey Siri" more accurately than the HomePod itself does. ↩
- I have multiple versions of the same macro that account for Relay shows with and without live chats as well as AppStories. ↩
- This app can do so much more, it's beyond the scope of this story, but stay tuned for more BetterTouchTool coverage on MacStories in the future. ↩