Automation April is well underway: we’ve entered the second week of our month-long special event about automation on Apple platforms, and – in case you haven’t noticed – things are happening everywhere. We’ve published Shortcuts-focused articles on MacStories; interviewed developers of Shortcuts-compatible apps on AppStories; we’ve hosted a Town Hall Workshop on our Discord along with giveaways. And, of course, our panel of judges is now busy testing and evaluating shortcuts submitted by people for the Automation April Shortcuts Contest. If you haven’t yet, now would be a great time to start following @AutomationApril on Twitter to keep up with everything we’re doing.
Last week, I shared an initial batch of 10 shortcuts I prepared for Automation April here on MacStories. I’m back this week with another set of 10 shortcuts that encompass a variety of platforms, app integrations, and functionalities. In this week’s collection, you’ll find even more shortcuts to speed up macOS multitasking; a shortcut that makes it easy to create a calendar event starting from a date; there will be a couple of shortcuts for Markdown and Obsidian users too.
I’m having a lot of fun sharing these sets of shortcuts for Automation April. So once again, let’s dive in.
Split View Presets
This shortcut builds upon the Mac split-screen multitasking shortcut I shared last week, but with a twist: rather than picking apps from a list of currently open windows, this shortcut lets you recreate specific combinations of two apps side-by-side, filling two halves of the display. It is, effectively, a shortcut to create split-screen presets for your favorite app pairs.
I had to come up with some clever workarounds and techniques to make this shortcut work. For starters, as you can see in the image below, you’ll have to create your combinations of apps in the App Name+App Name format in a ‘List’ action at the beginning of the shortcut, as pictured below:
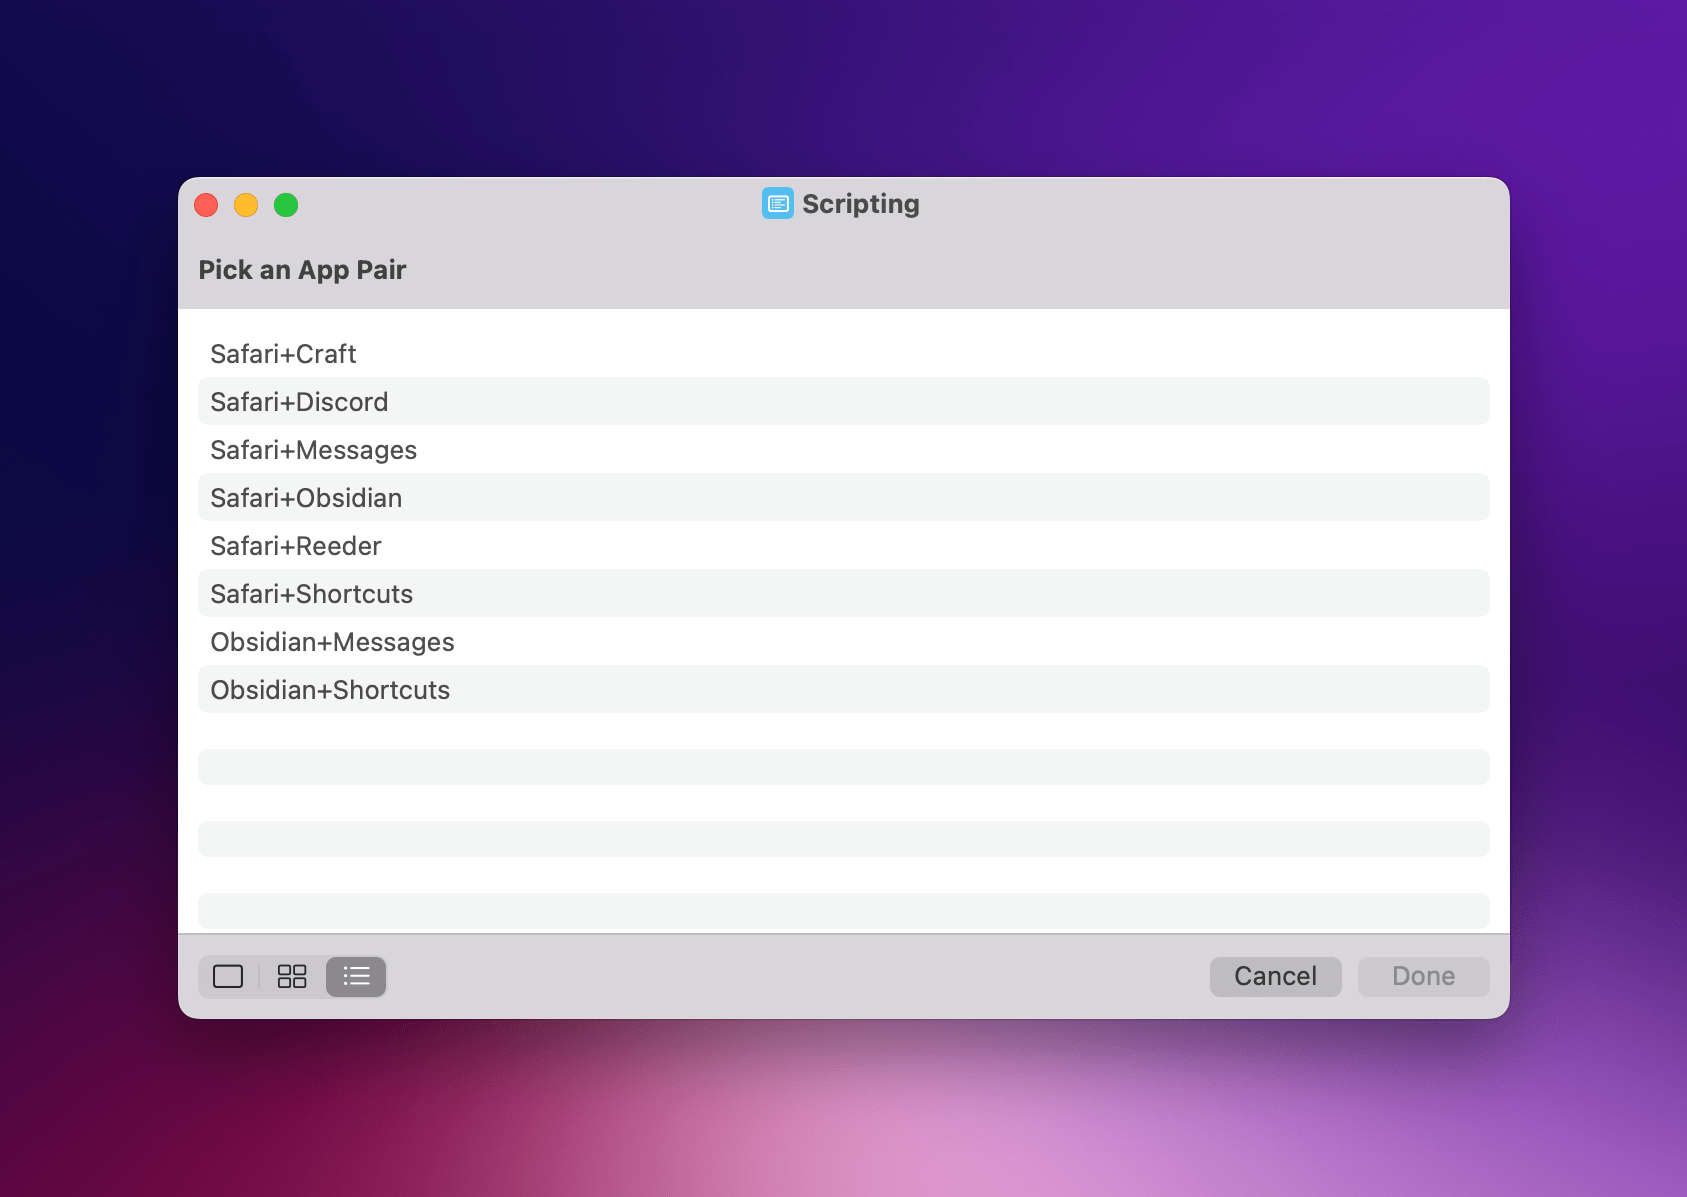
In my case, I added a few entries for common app pairs I find myself frequently using, such as:
- Safari+Obsidian
- Safari+Messages
- Obsidian+Shortcuts
…and so forth. The idea is that instead of picking apps manually from a list, the shortcut will let you choose one of the available split view presets and recreate the workspace by putting the first app on the left and the second on the right.
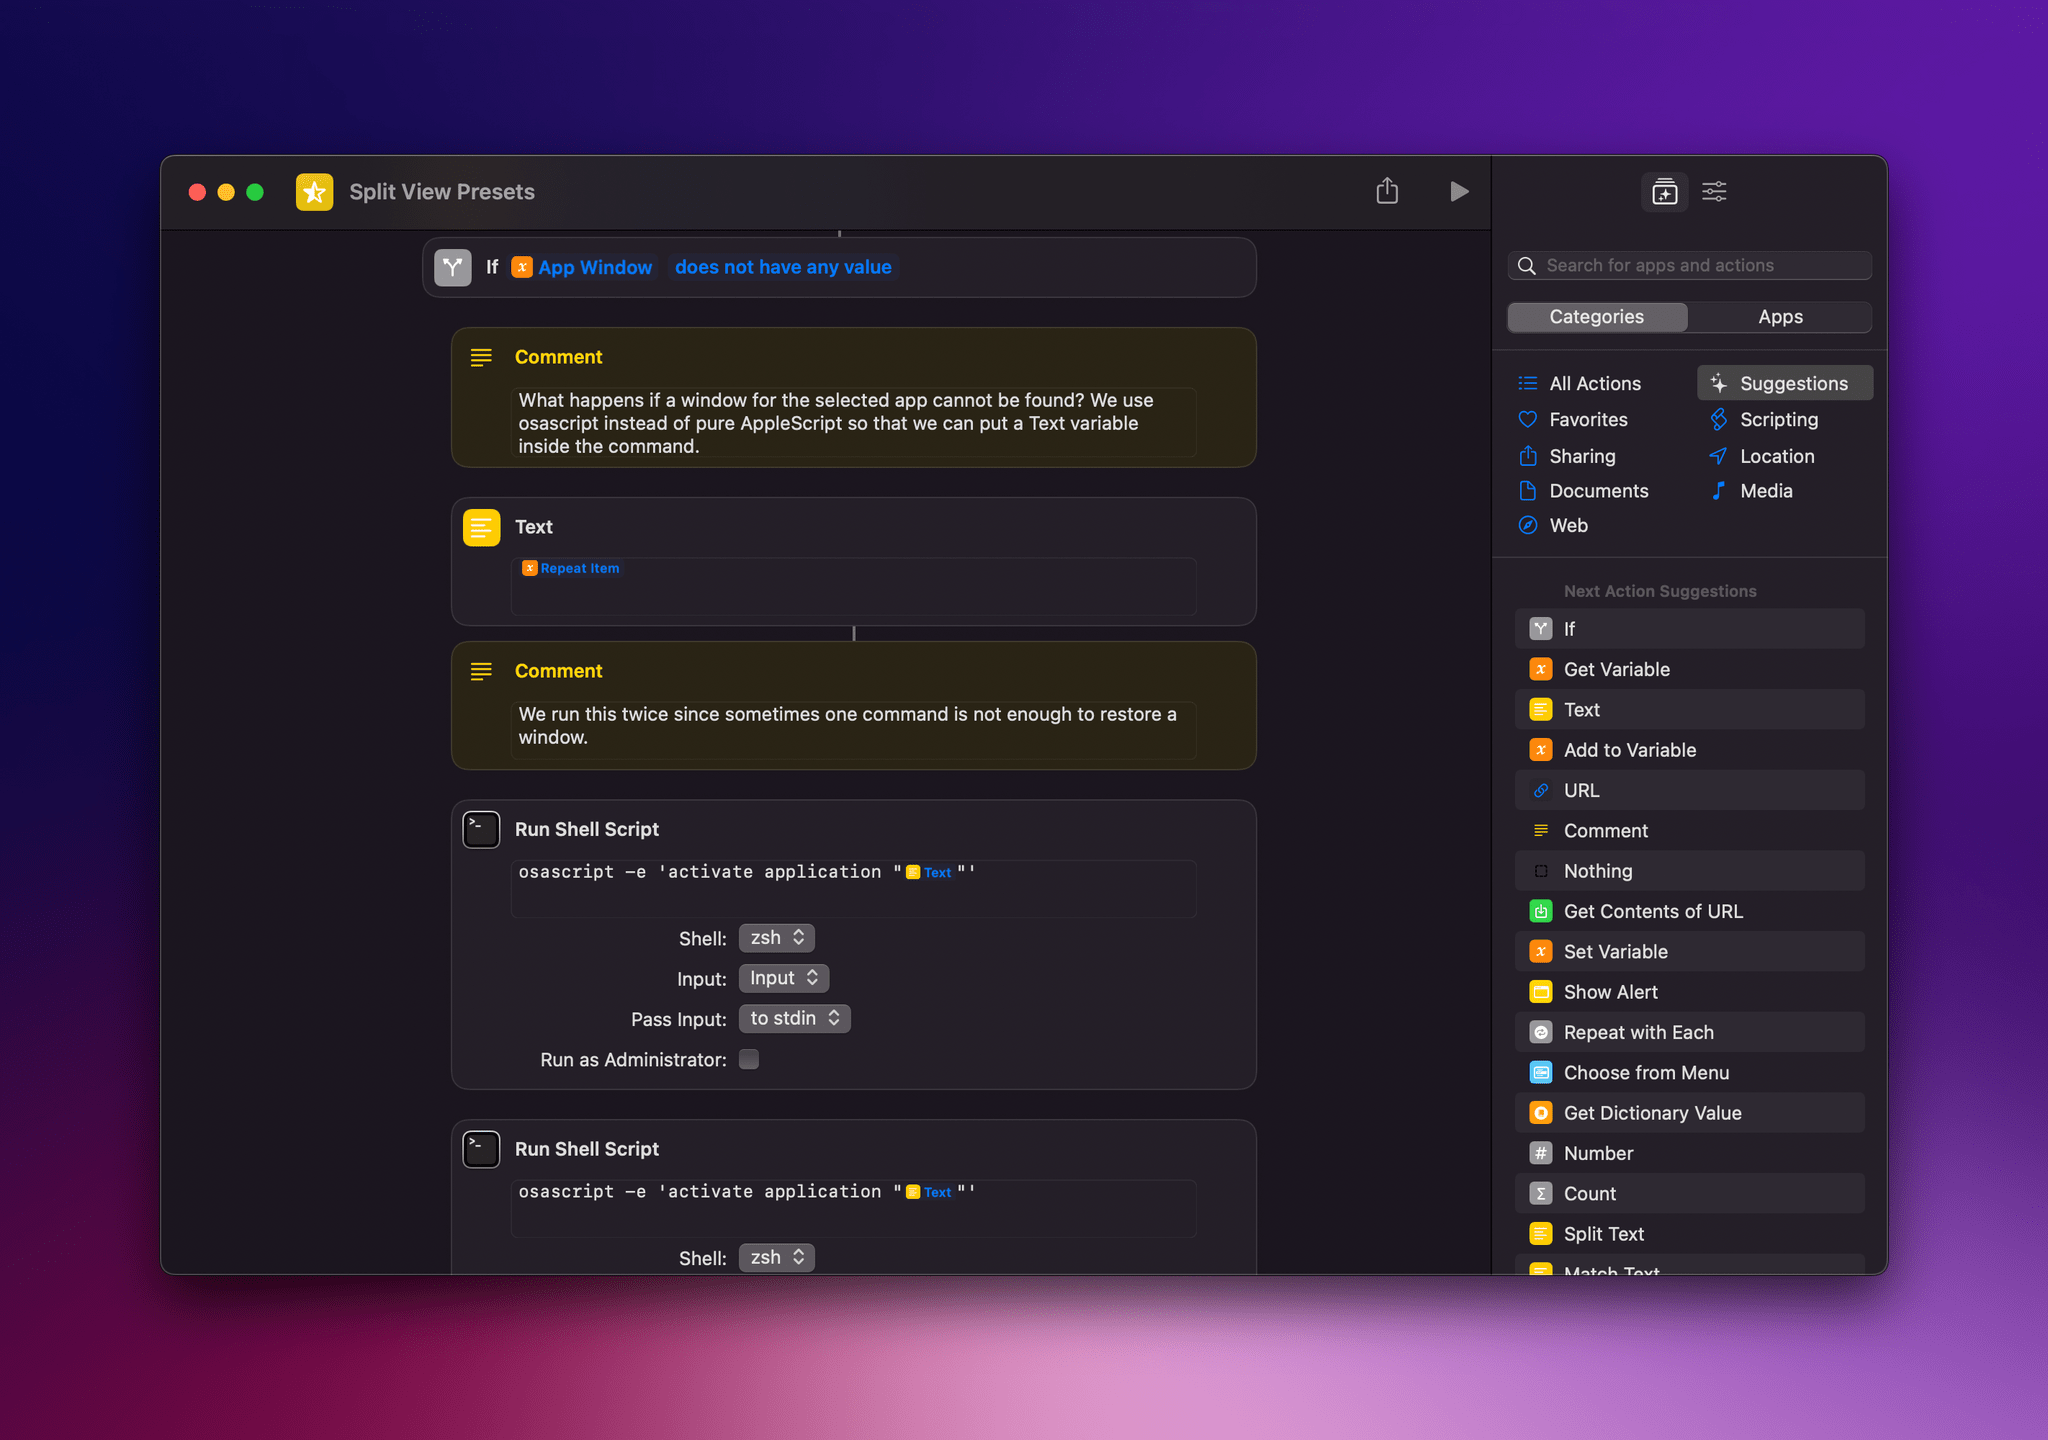
If the apps from the preset you’ve chosen are already running, the shortcut is pretty straightforward: it splits the preset name at the ‘+’ character, uses a Repeat loop to iterate over each app name, finds the window, and places it on the left or right side of the screen depending on whether this is the first or second app from the preset.
The issue was figuring out what to do if the ‘Find Windows’ action can’t find a window for an app from the preset, perhaps because the app you’ve chosen doesn’t have any windows or because it’s not running at all. To account for that scenario, I had to use the osascript command in a ‘Run Shell Script’ action1 and add a two-second delay to give Shortcuts time to activate the app and try again.
The Split View Presets shortcut has quickly become one of my most-used utilities on macOS. I hope that iPadOS will eventually gain the ability to create your favorite workspaces and activate them with Shortcuts; in the meantime, I have a solution that works on macOS, and I like it a lot.
Split View Presets
Create a split view with two apps by choosing from a list of app pairs saved as presets. You can create as many presets as you want and instantly recreate their workspaces with this shortcut.
Save Draft to Repo
I created this shortcut because I was missing the ability to easily share drafts of my articles from Obsidian to Working Copy, which is not available on macOS yet. When I write and edit articles on the iPad, committing the latest version of a file from Obsidian to our shared GitHub repo is easy: in the Obsidian app, I can press the hotkey to share notes with the share sheet, select the Working Copy extension, and commit the underlying .md file of the current note to my repo. Given the absence of a share sheet and Working Copy on the Mac, I had to take a different approach.
The shortcut I designed takes advantage of native Files/Finder actions and, more importantly, our very own Obsidian Shortcut Launcher (OSL) plugin. In case you missed the announcement months ago, this plugin lets you pass data from Obsidian to a shortcut in the Shortcuts app; in the shortcut, text passed from Obsidian will be accessible from the ‘Shortcut Input’ variable, and there are several types of inputs you can choose to send from Obsidian to Apple’s app. One of these types of inputs is the filename of the note you’re currently editing in Obsidian.
So, I created a simple OSL command that sends the name of the current document from Obsidian to my shortcut called ‘Save Draft to Repo’. Here’s what the command looks like:

In Obsidian, I can then press a hotkey associated with this command, which will trigger the shortcut in the background2. At this point, the shortcut kicks in. The shortcut is based on the ‘Get Contents of Folder’ action, which is set to perform a ‘Recursive’ search of your Obsidian vault – meaning it’ll find documents that match the given filename even if they’re stored inside sub-folders in your main vault’s folder.
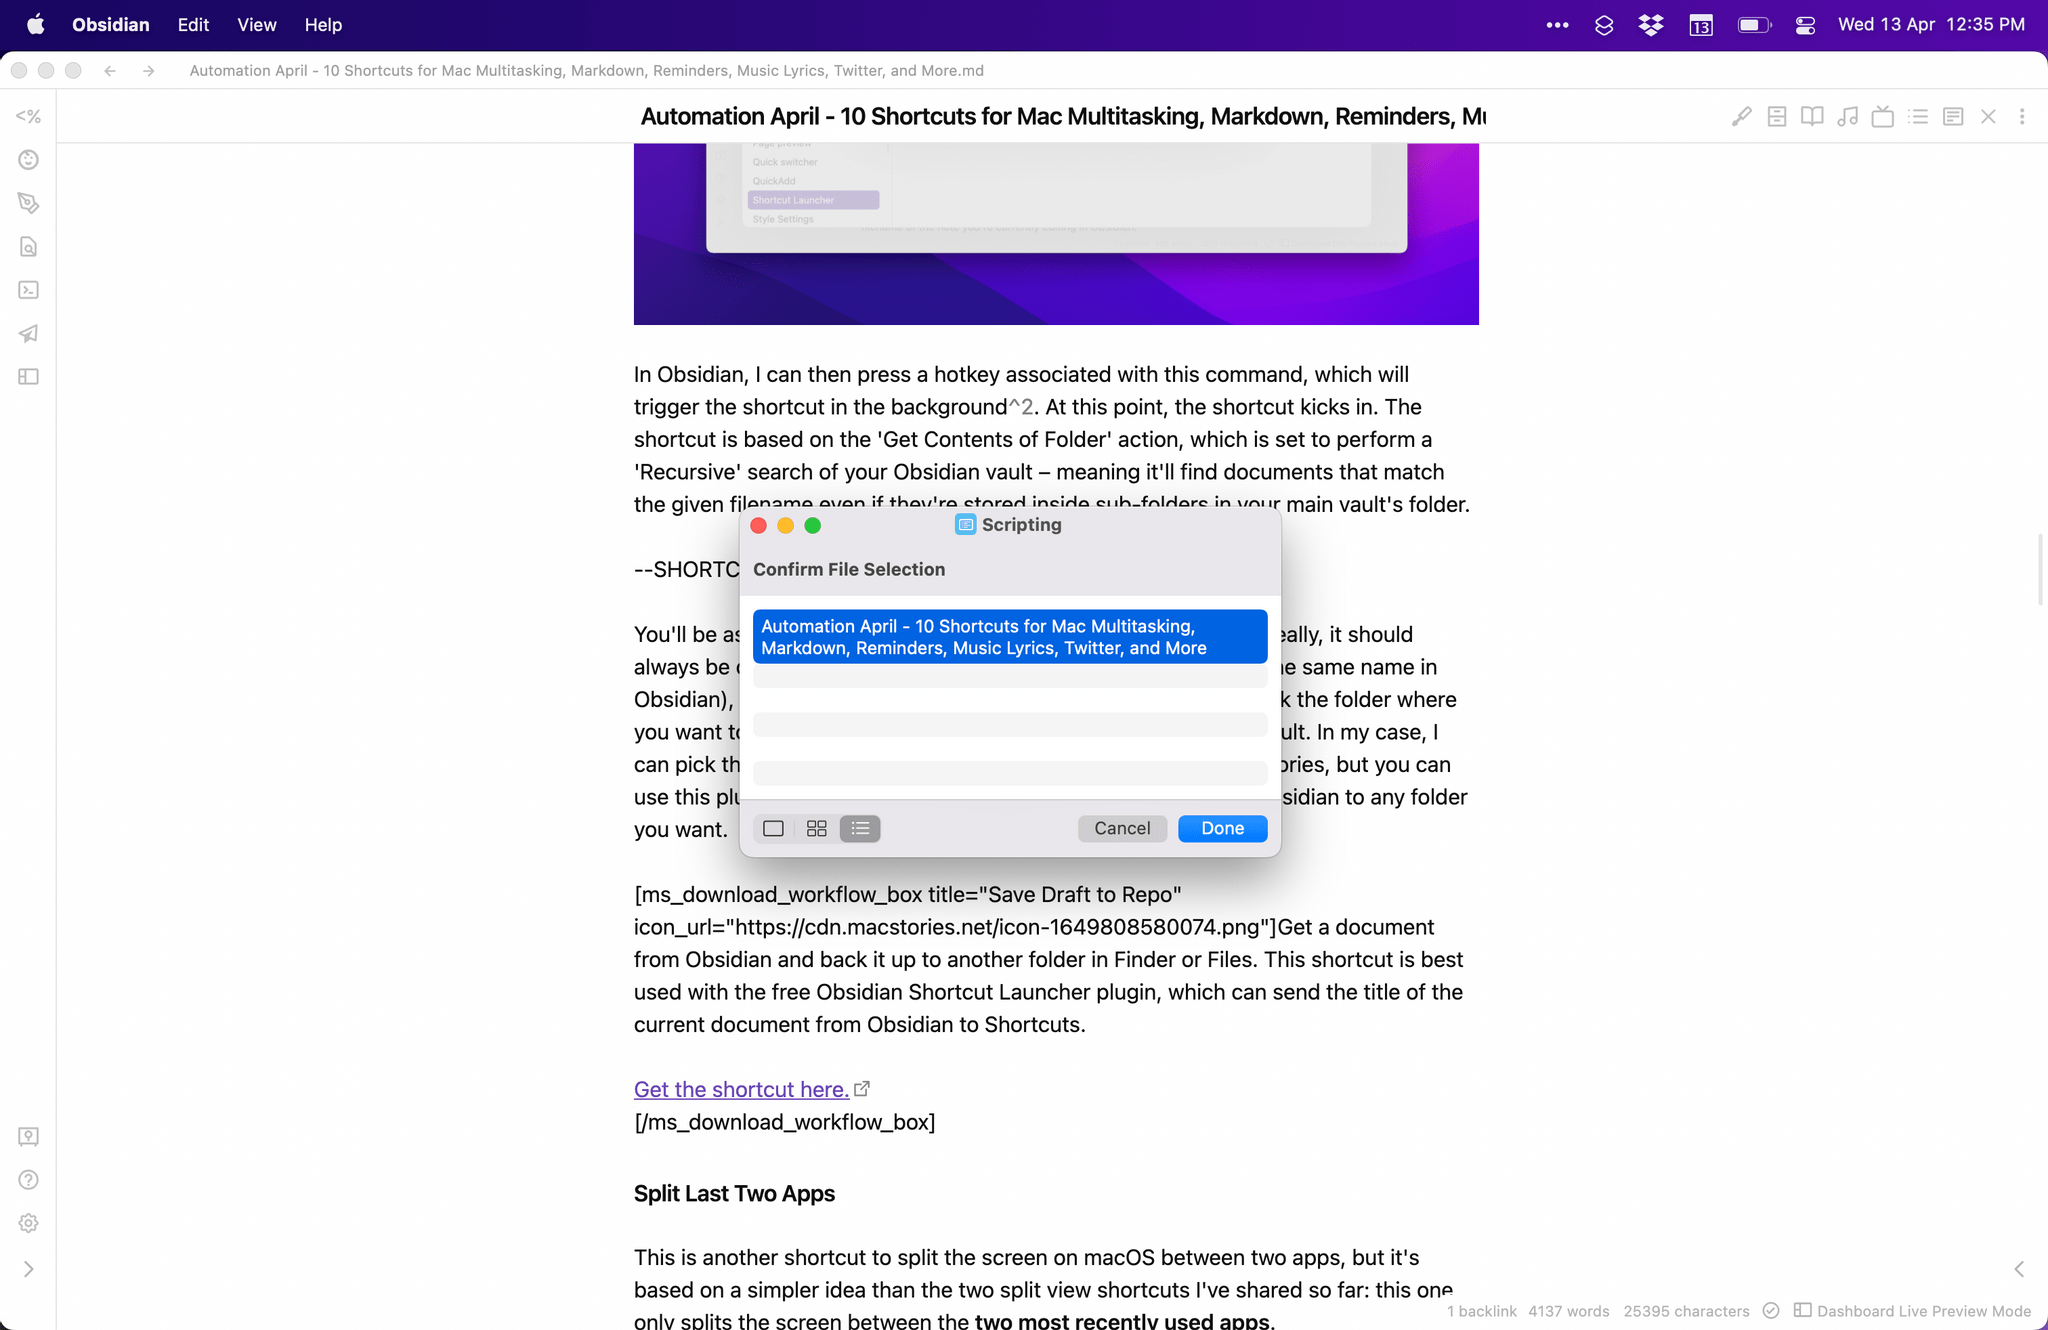
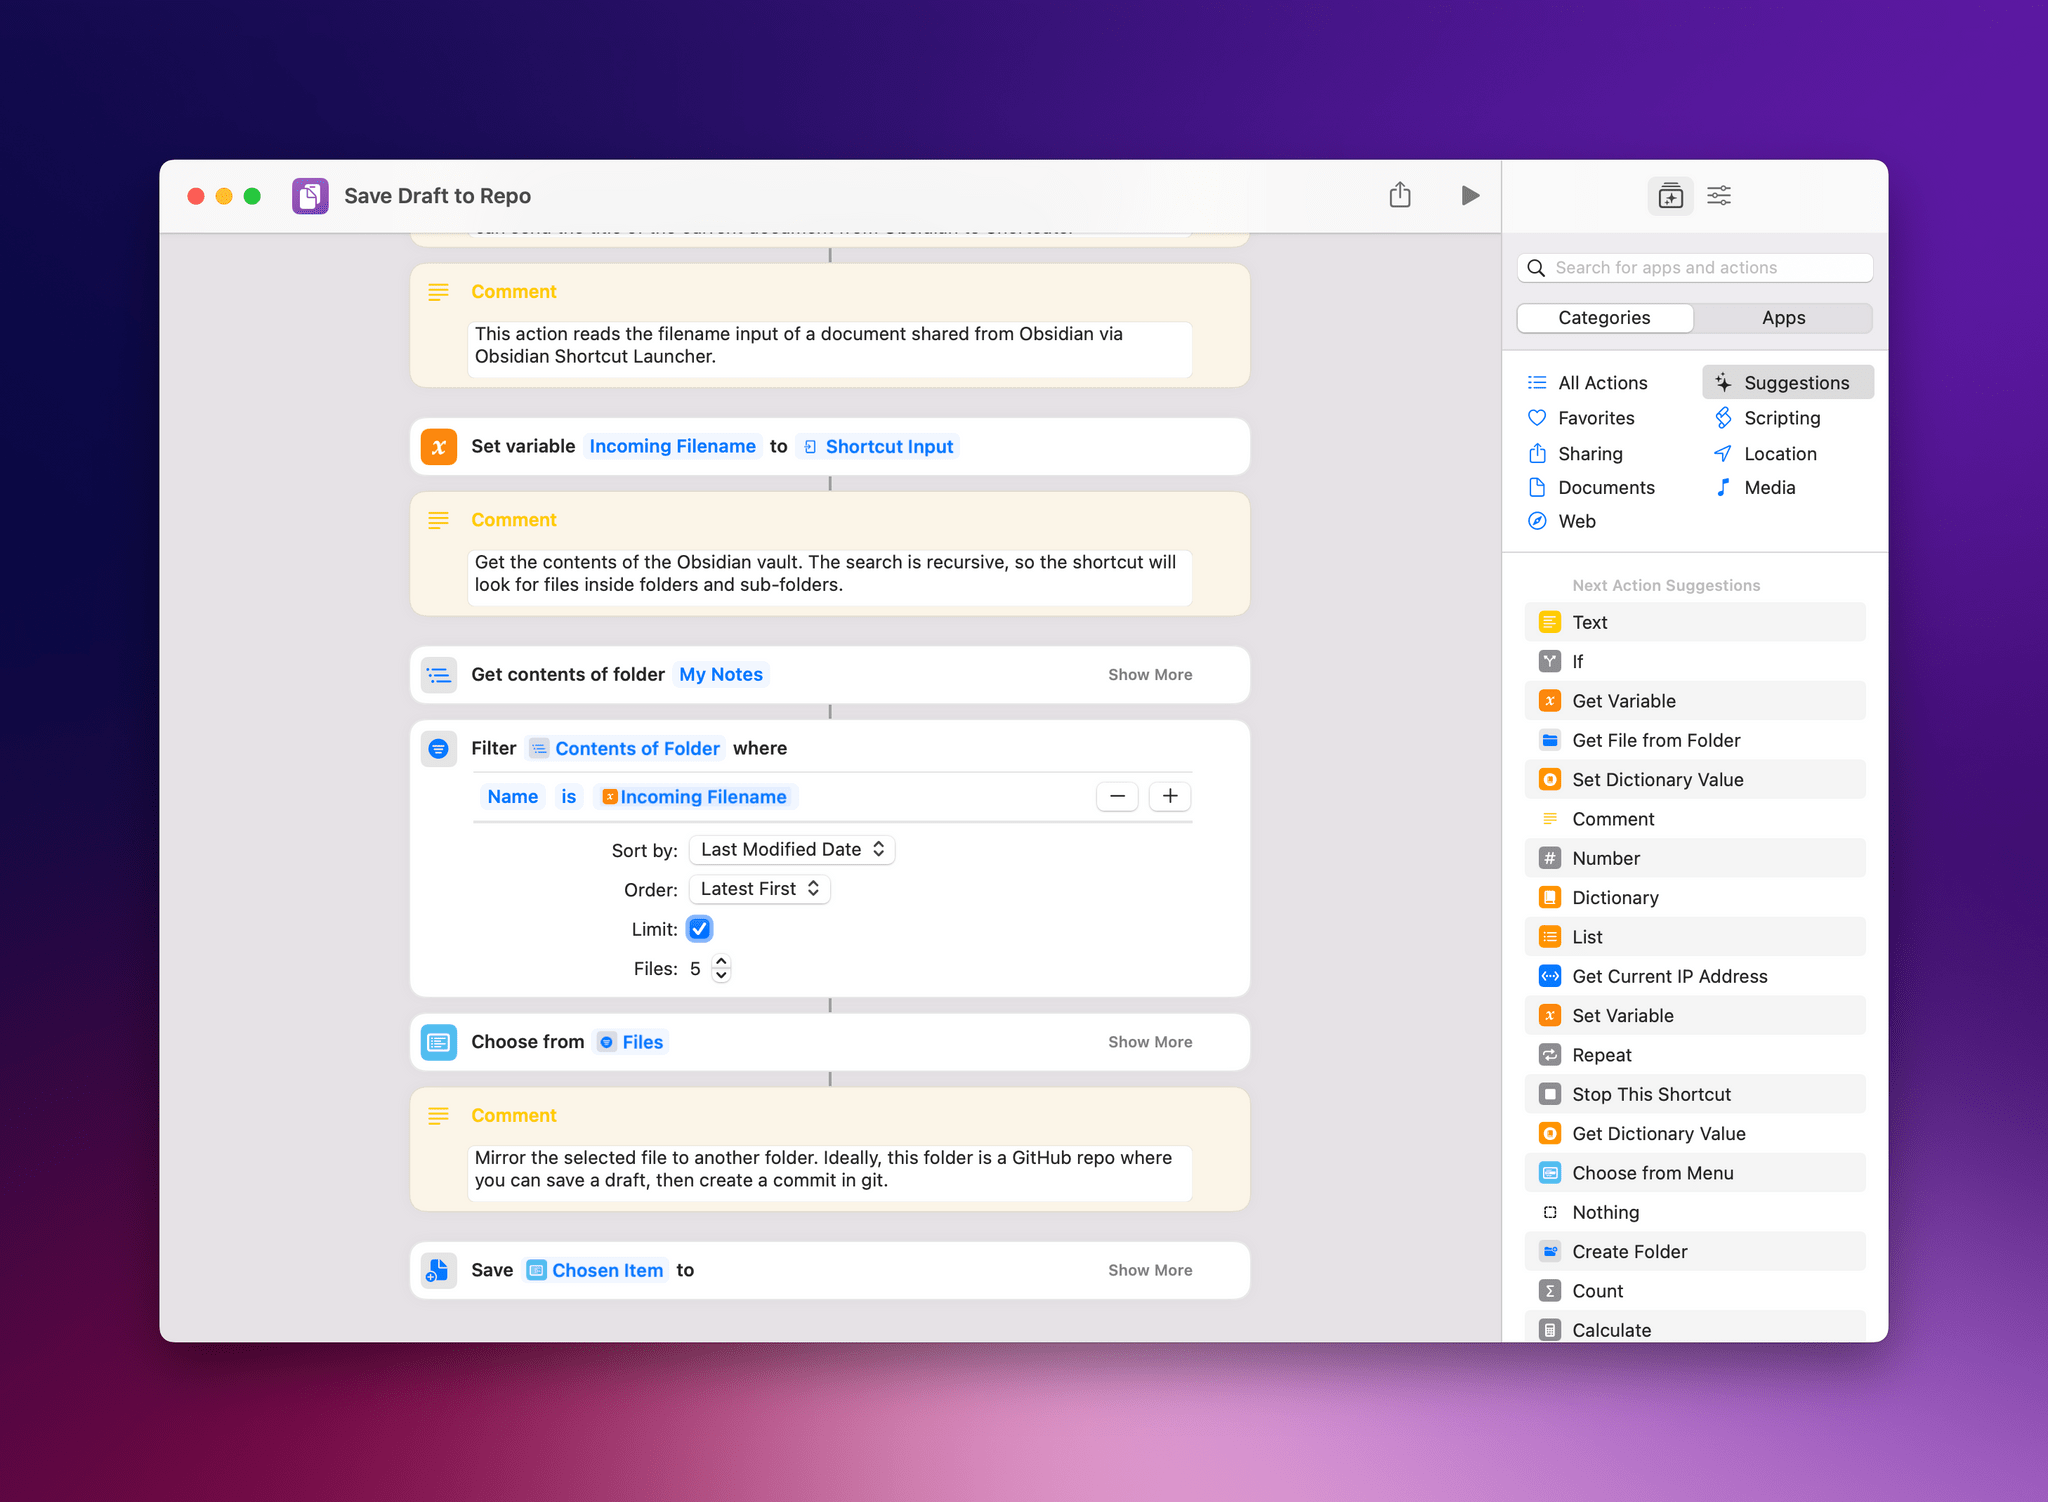
You’ll be asked to confirm the resulting file found by Shortcuts (ideally, it should always be one result – unless you have multiple documents with the same name in Obsidian), and, lastly, you’ll be presented with a Save dialog to pick the folder where you want to save a copy of the file retrieved from your Obsidian vault. In my case, I can pick the folder of one of the two repositories we use at MacStories, but you can use this plugin+shortcut hybrid technique to mirror drafts from Obsidian to any folder you want.
Save Draft to Repo
Get a document from Obsidian and back it up to another folder in Finder or Files. This shortcut is best used with the free Obsidian Shortcut Launcher plugin, which can send the title of the current document from Obsidian to Shortcuts.
Split Last Two Apps
This is another shortcut to split the screen on macOS between two apps, but it’s based on a simpler idea than the two split view shortcuts I’ve shared so far: this one only splits the screen between the two most recently used apps.
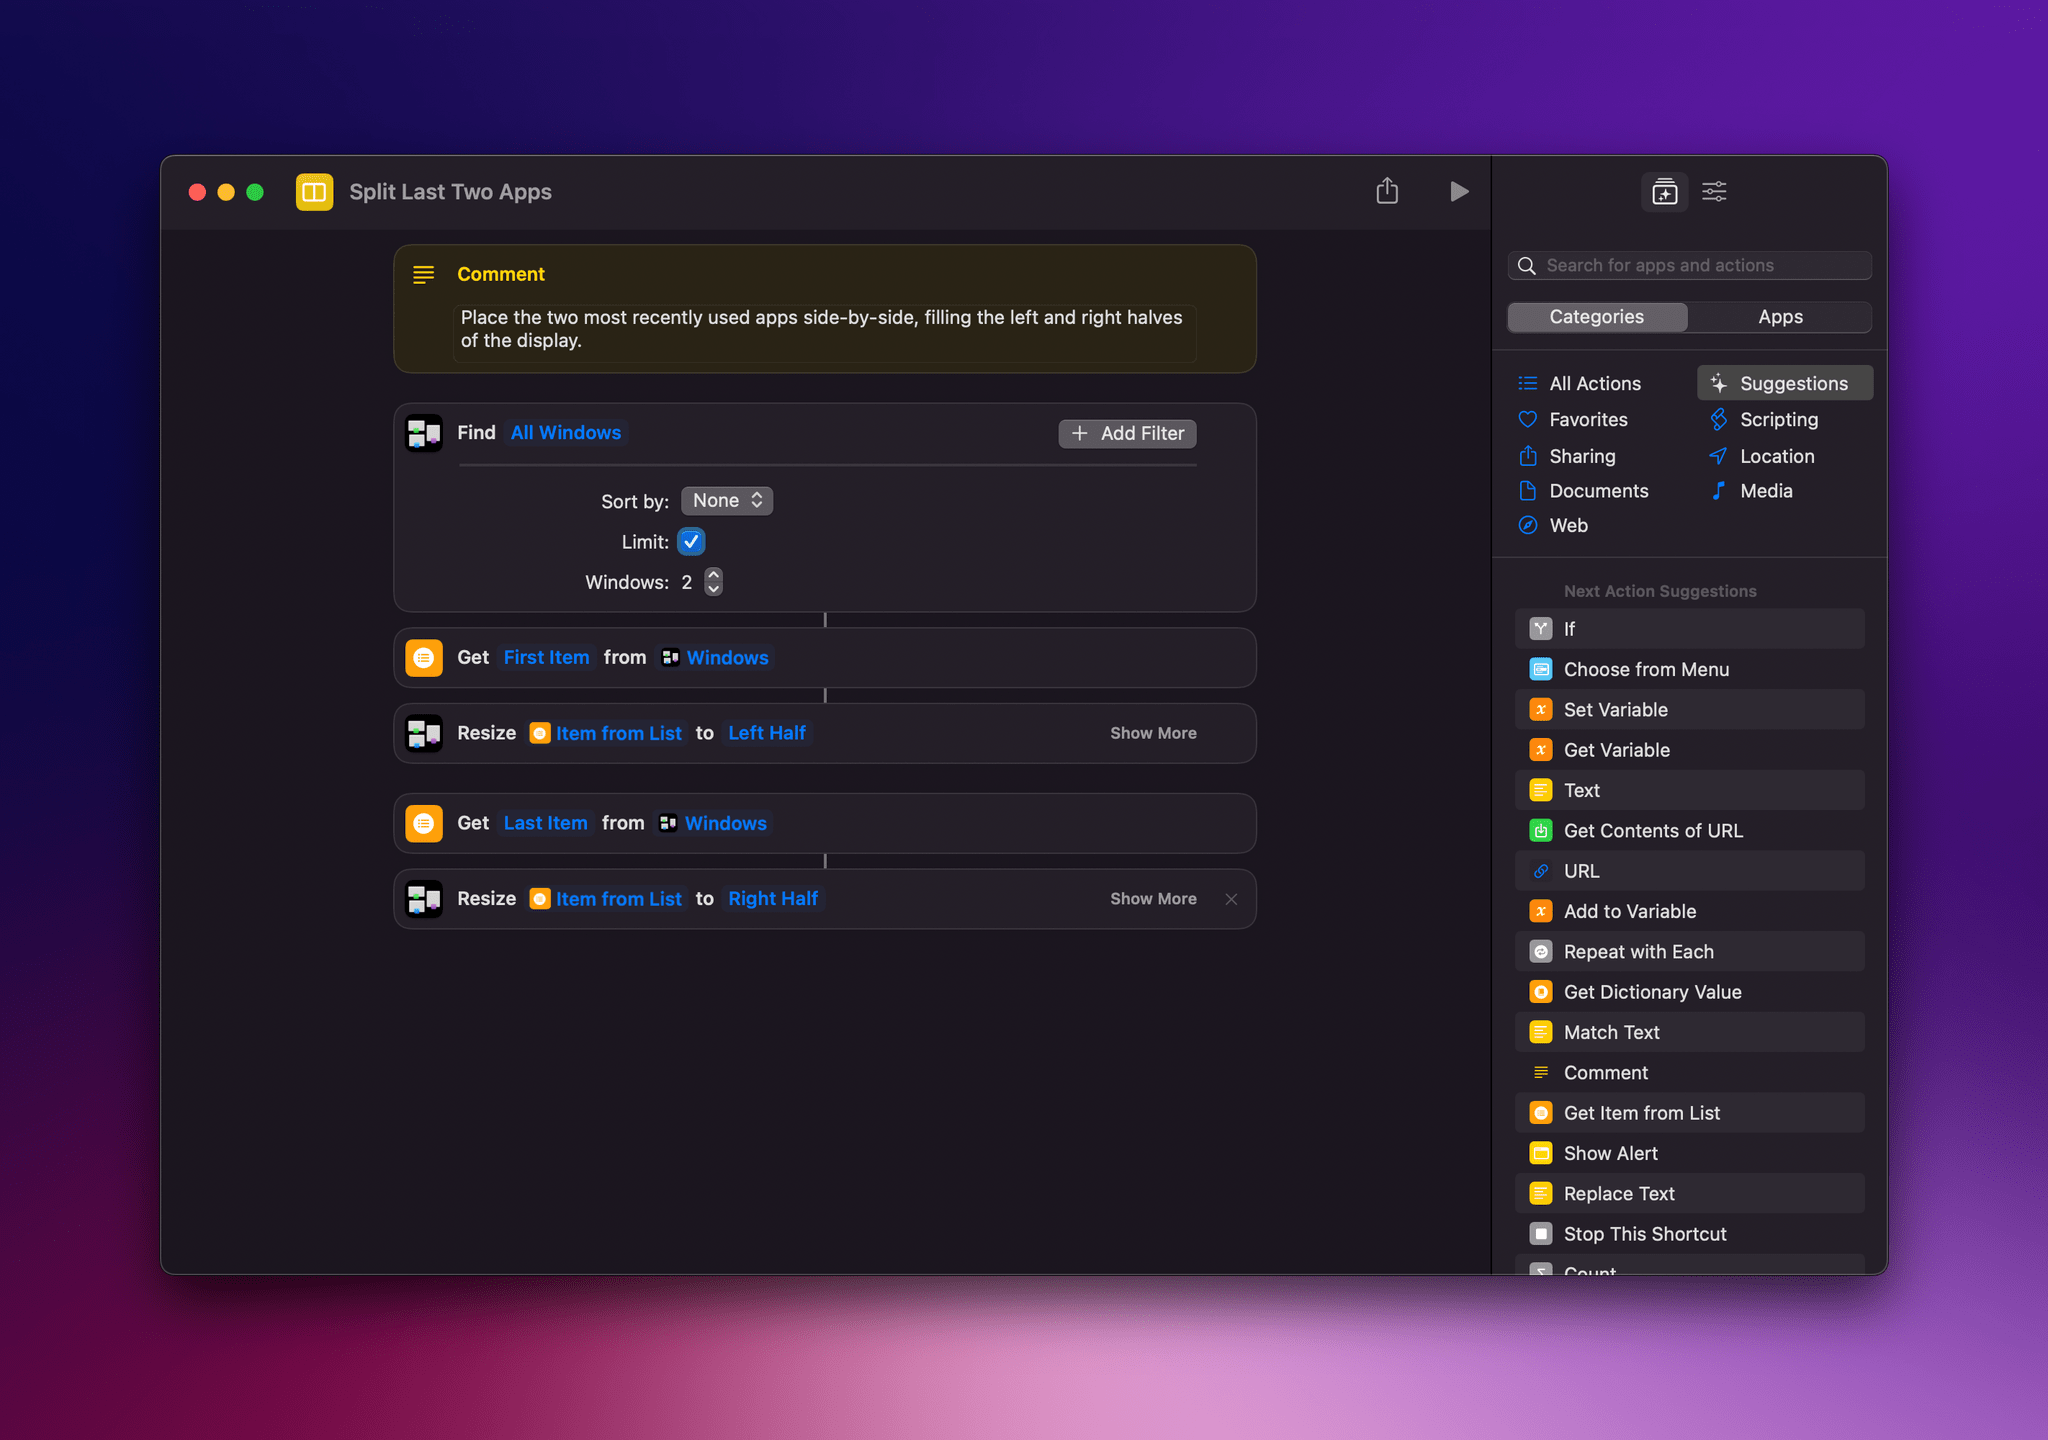
To build this shortcut, I used the ‘Find Windows’ action, but set it to only retrieve two windows; the action defaults to fetching recent windows (from latest to oldest), so there’s no need to configure additional sorting options. Once the shortcut has a list of the most recently used window and the window immediately after it, we can combine ‘Get Item from List’ and ‘Resize Window’ to place a specific window on a specific area of the screen. In my case, I want the most recent window to fill the left half of my desktop and the second one to fill the right half. The result is the kind of split view I like: two apps side by side, without having to use full-screen mode.
This shortcut is best used from the menu bar on macOS or as a system-wide hotkey. Another nice aspect of it: because of how it’s designed, you can keep invoking the shortcut to swap the same two apps between the left and right sides of the screen. I do this by repeatedly pressing the same hotkey, and I kind of wish iPadOS had a built-in keyboard shortcut to toggle between Split View sides too.
Split Last Two Apps
Place the two most recently used apps side-by-side, filling the left and right halves of the display.
Remove Time from Reminders
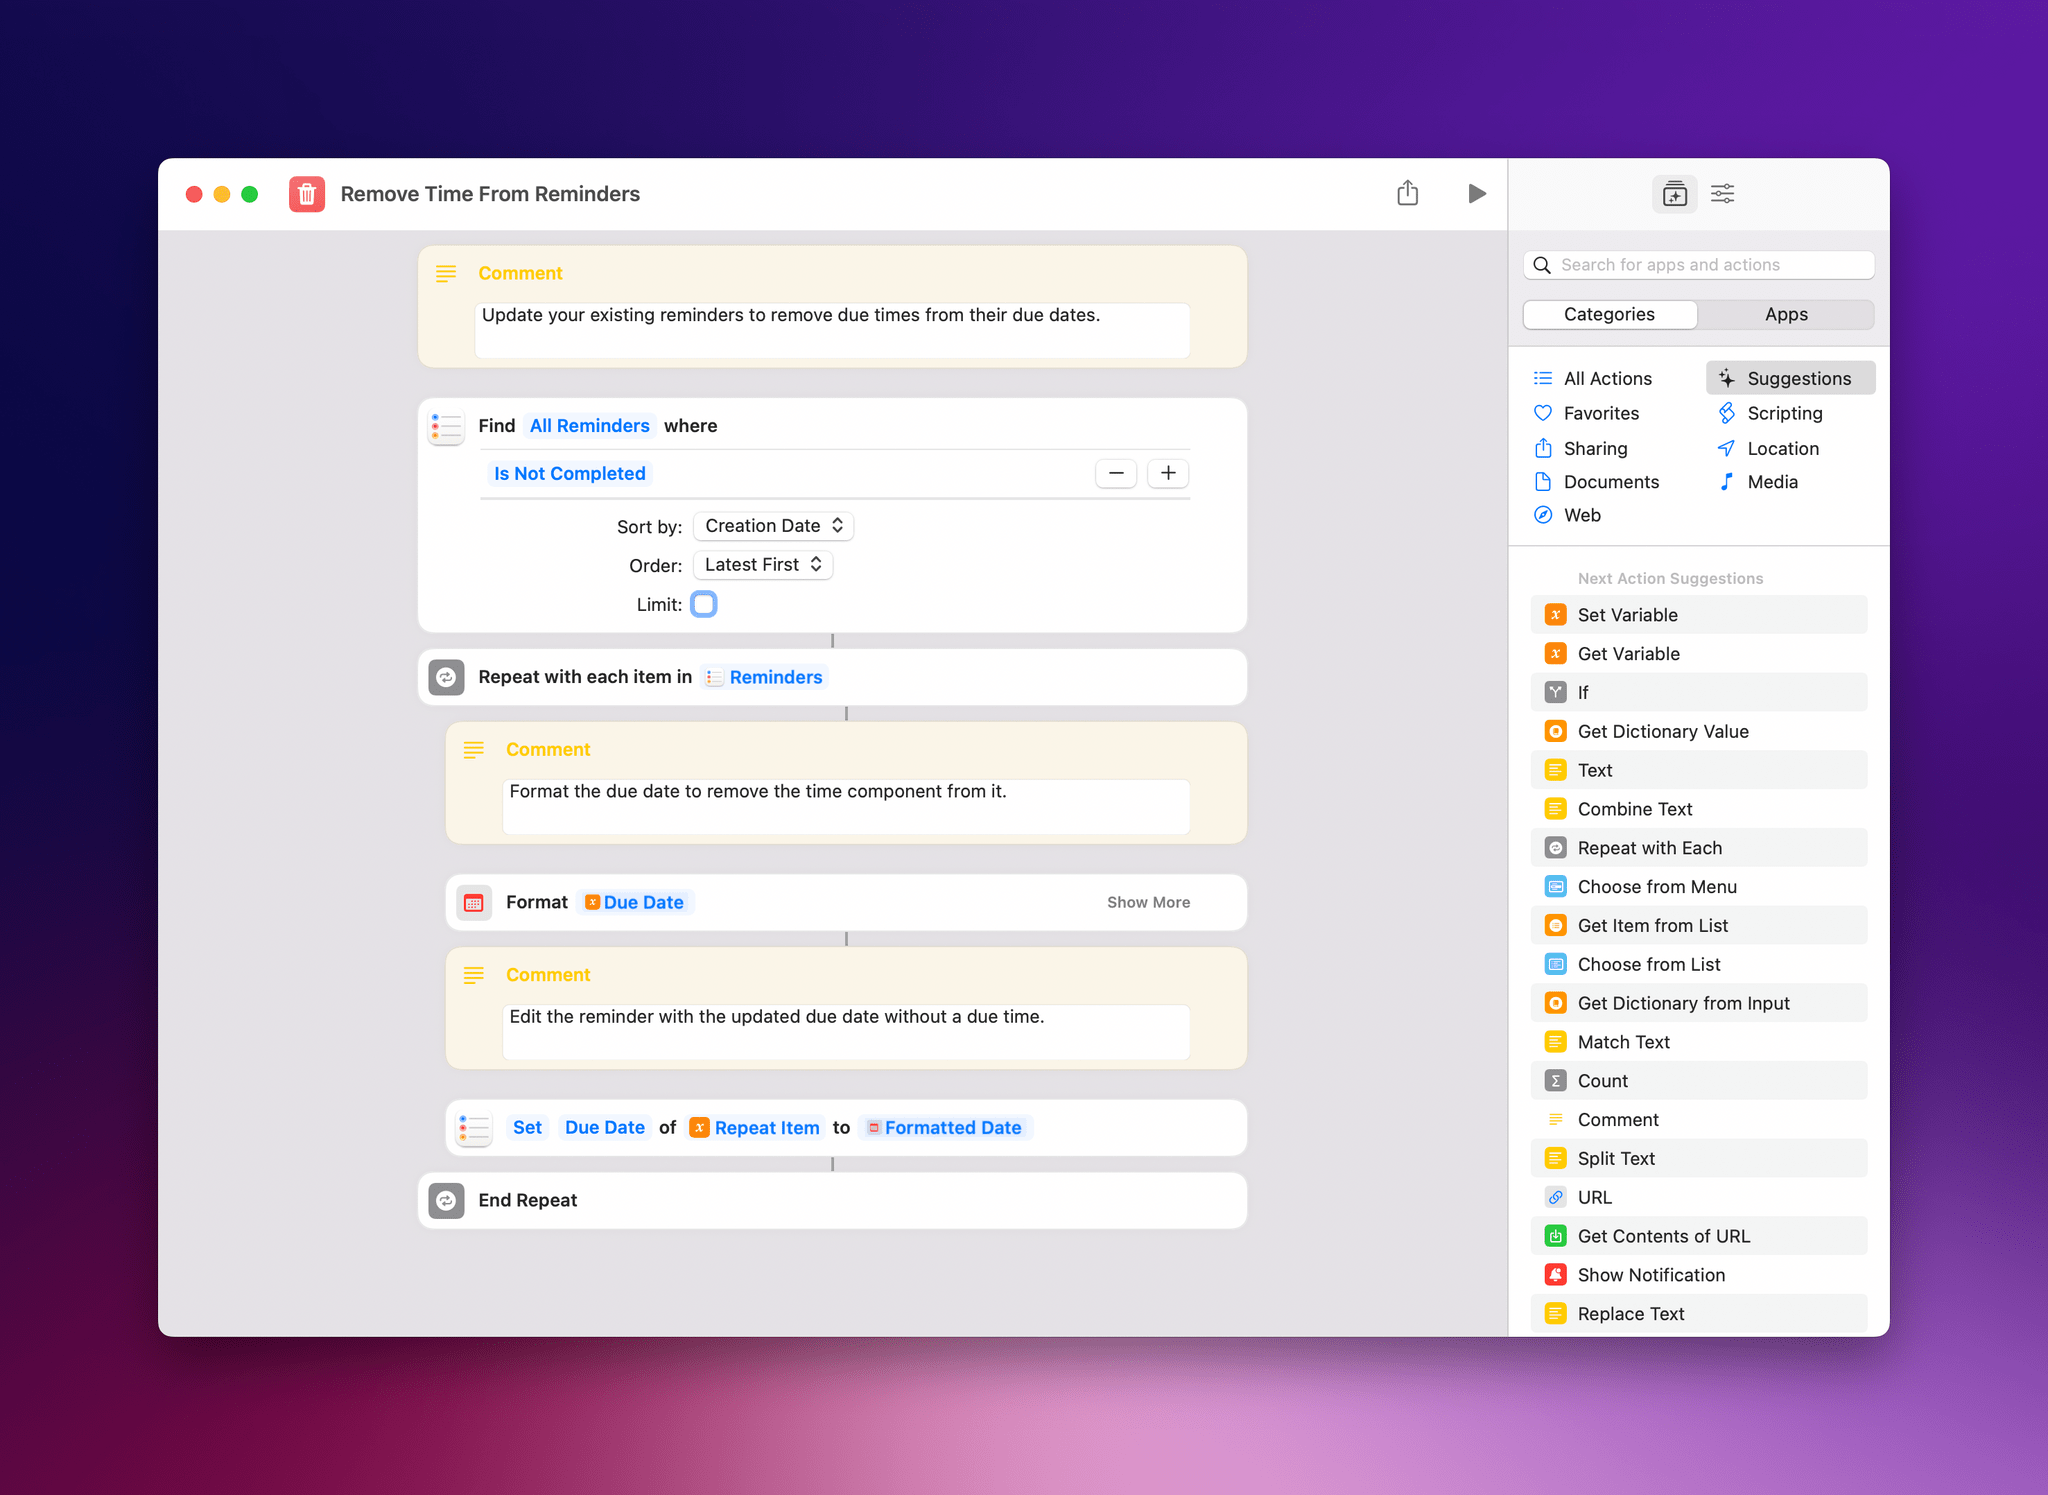
I created this shortcut to quickly convert my existing reminders into due-date-only tasks without due times when I changed how I track my tasks last month. It’s very easy: the shortcut takes all your non-completed reminders and iterates over each one of them. For each reminder, the shortcut reformats its due date and time to remove the time, and the reminder is updated with the new due date that no longer has a time component. That’s it. Here’s what it looks like in practice:
You can run this shortcut once and forget about it, or you can set it up as a personal automation if you use a third-party Reminders client that does not support creating reminders without a due time. In that case, you could limit the first action to, say, the last five reminders and run the shortcut as an automation every time you close your third-party client. That way, you’d make sure the system always removes times from newly created tasks, leaving just their due dates. Or you could just use the excellent Remind Me Faster to quickly create reminders without times.
Remove Time From Reminders
Update your existing reminders to remove due times from their due dates.
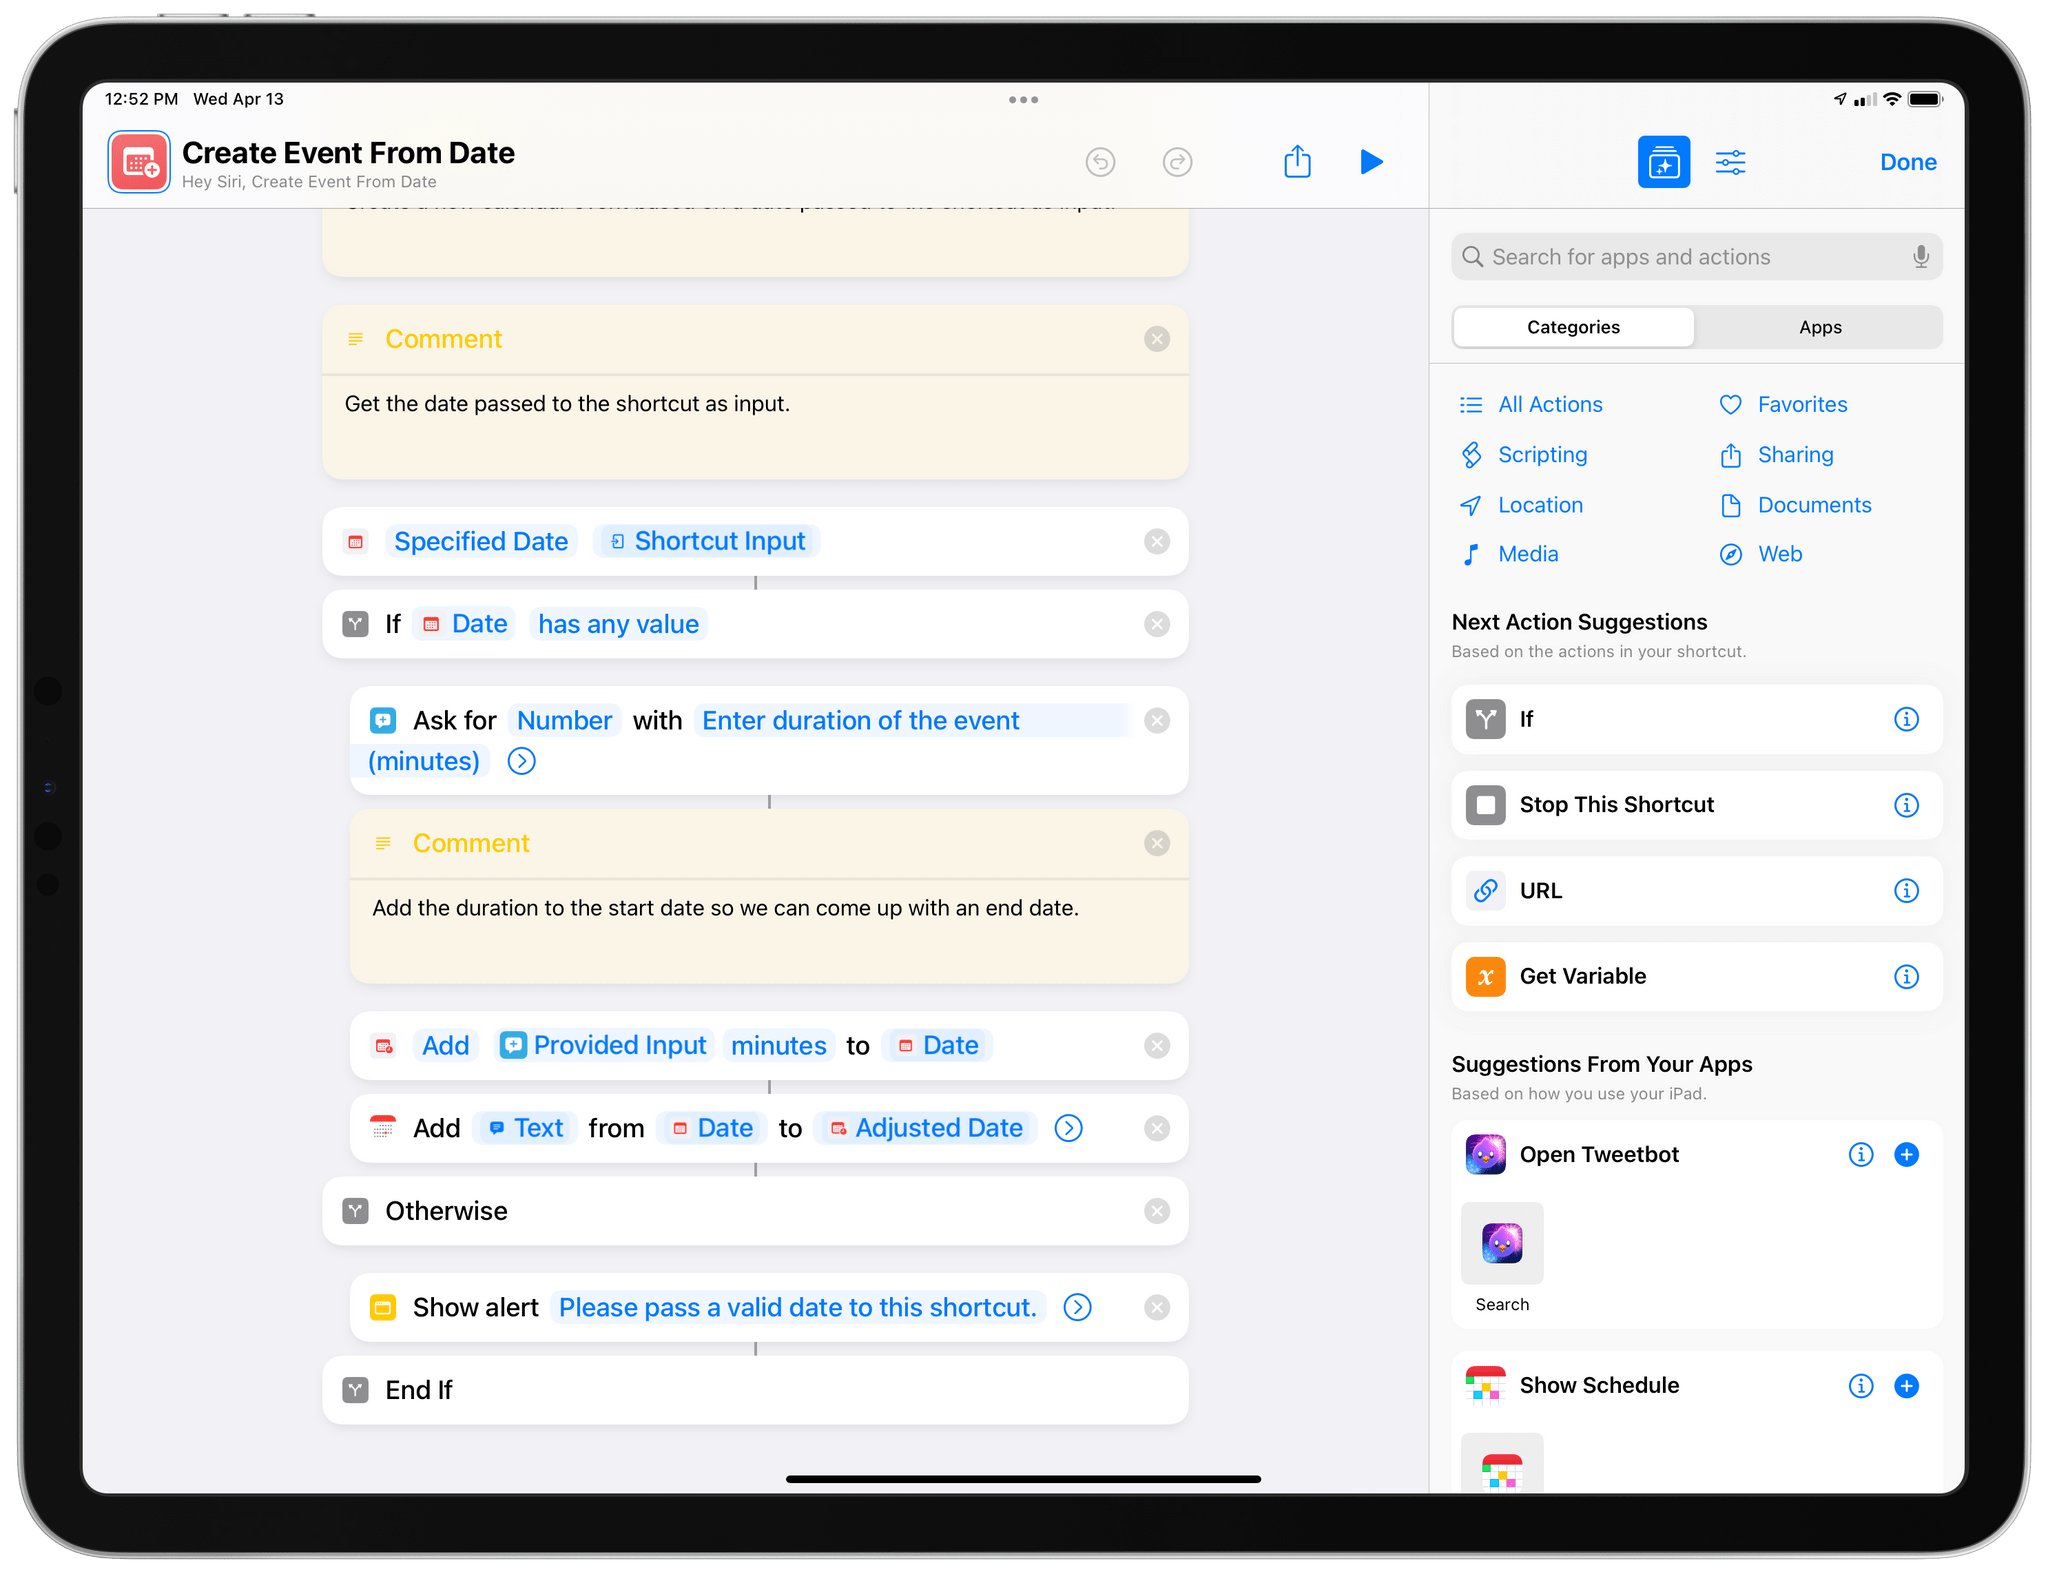
Create Event from Date
I’ve often found myself having to create a new calendar event starting from a date string received in an app that wasn’t properly highlighting it as a smart data detector. So, I created a shortcut that accepts a date string as input, asks me for a duration for the new event I want to create, and brings up a Calendar compose sheet where I just need to fill in details for event title and calendar.
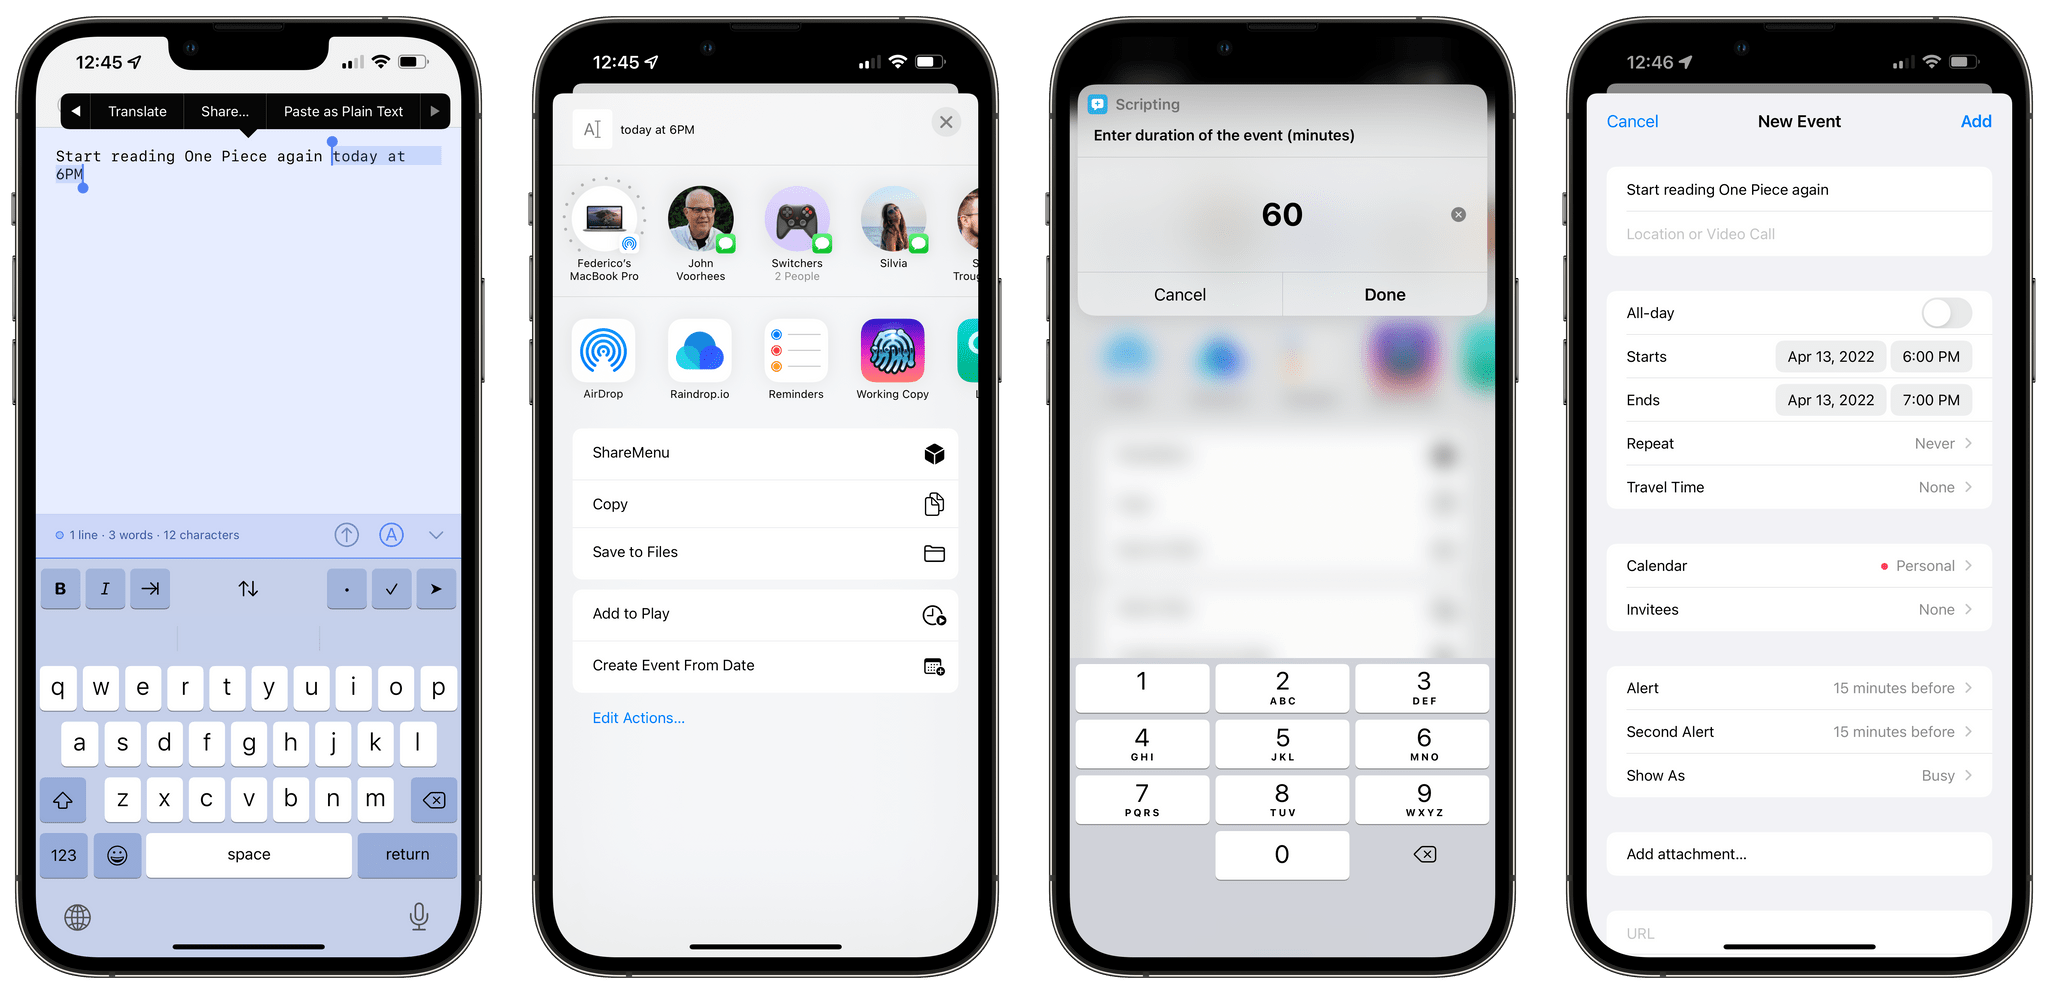
Thanks to the ‘Specified Date’ parameter of the ‘Date’ action, you can see how easy it is to accept and parse an input date in Shortcuts; the rest of the shortcut is just a matter of adding minutes to the start date (so we can come up with an end date for the event) and fill in the necessary fields in the ‘Add New Event’ action.
This shortcut is best when used from the share sheet (select some text that is a date, then hit ‘Share’ from the copy & paste menu and run the shortcut), or when plugged into other shortcuts that output dates via the ‘Run Shortcut’ action.
Create Event From Date
Create a new calendar event based on a date passed to the shortcut as input.
Toggle Lyrics
I don’t recall exactly when this happened but, at some point a few months ago, I wanted to create a shortcut that would toggle the lyrics sidebar in the Music app for Mac. I think I wanted this because a) I didn’t want to learn another keyboard shortcut for this command and b) I wanted to learn how to simulate key presses on menu bar items using AppleScript in Shortcuts.
You see, in the Music app for Mac, lyrics are displayed in a sidebar on the right side of the screen. You can make the sidebar appear by clicking View ⇾ Show Lyrics in the menu bar; if lyrics are already shown, the menu item becomes View ⇾ Hide Lyrics.
As it turns out, we don’t need third-party apps to accomplish this with Shortcuts since we can rely on native GUI scripting with AppleScript to perform clicks on menu items in the menu bar. To understand the underlying structure of the Music app and how its menu structure gets exposed to AppleScript, I turned to an old friend of mine: the amazing UI Browser.
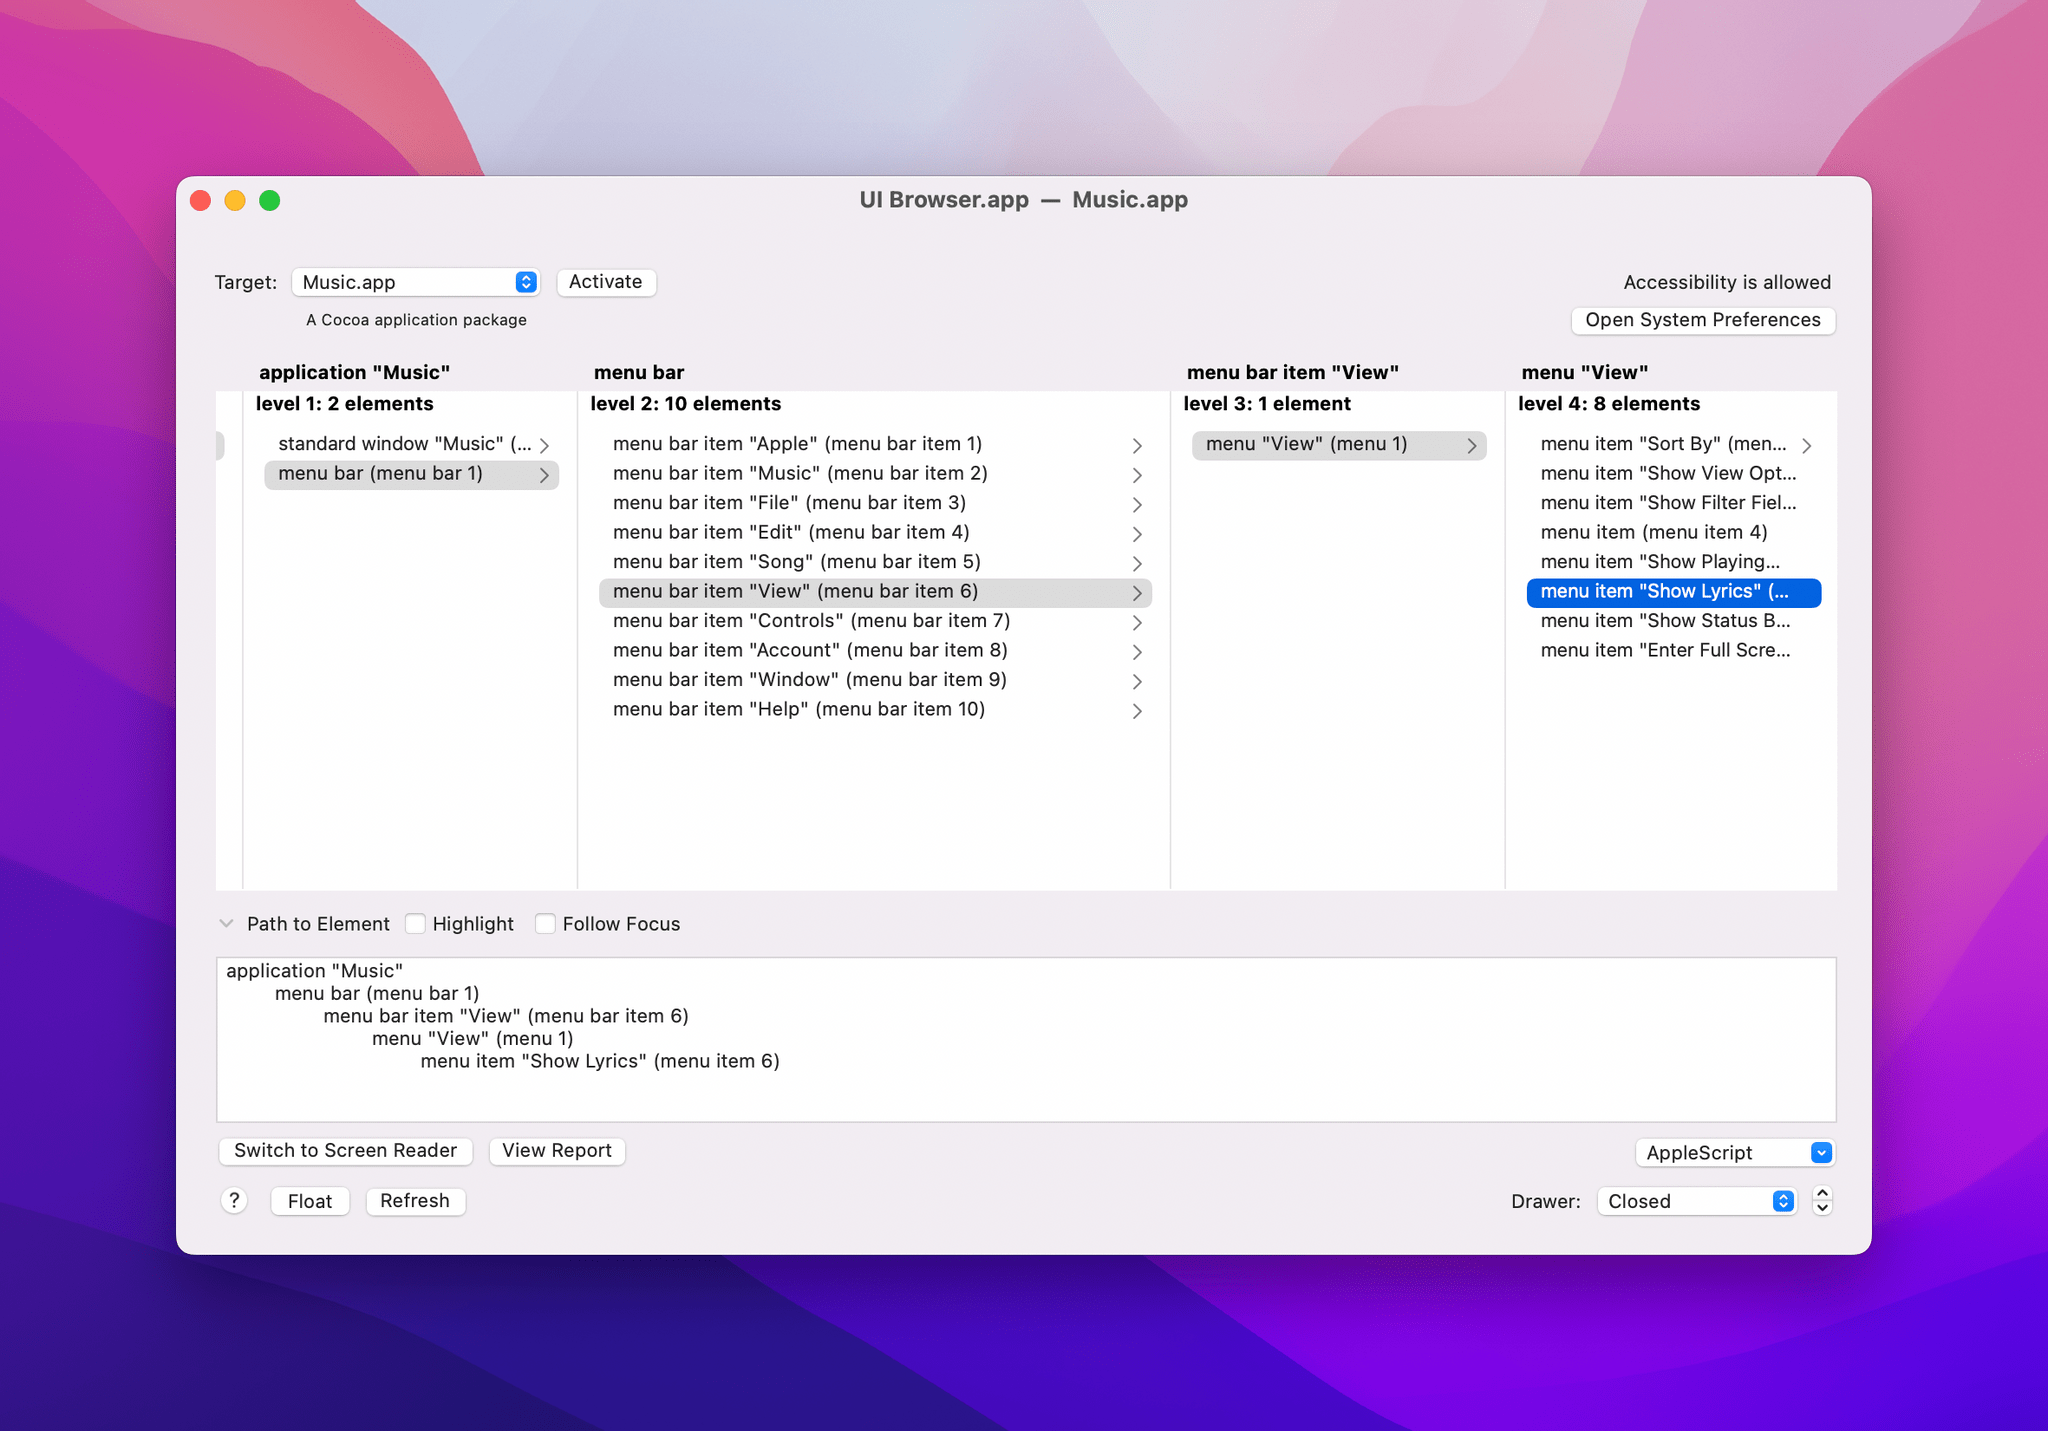
Thanks to this power-user utility, I was able to find out the proper terminology to access the ‘Show Lyrics’ menu item inside the ‘View’ menu, which I dropped into an AppleScript that invoked the Music and System Events apps. Then, it was just a matter of adding some extra code to check if the ‘View Lyrics’ menu item is available; if it isn’t, it means that ‘Hide Lyrics’ is shown instead since lyrics are already displayed onscreen.

With this single-action shortcut, I can now toggle the lyrics sidebar on or off in the Music app for Mac with the press of a button or a hotkey. Which isn’t really necessary since this menu item has its own hotkey already, but, hey, you can apply this approach to any other menu item of any Mac app now.
Toggle Lyrics
Toggle the lyrics sidebar in the Music app for Mac on and off. The shortcut uses AppleScript and GUI scripting to determine whether the lyrics sidebar is shown or not.
Linked Post ⇾ Obsidian
This is an updated version of an old shortcut of mine that I modernized for macOS Monterey and Obsidian. If you don’t use Obsidian, you can modify the final part of the shortcut to swap in whatever action you want to use for your favorite text editor and the final Markdown output of the shortcut won’t be affected.
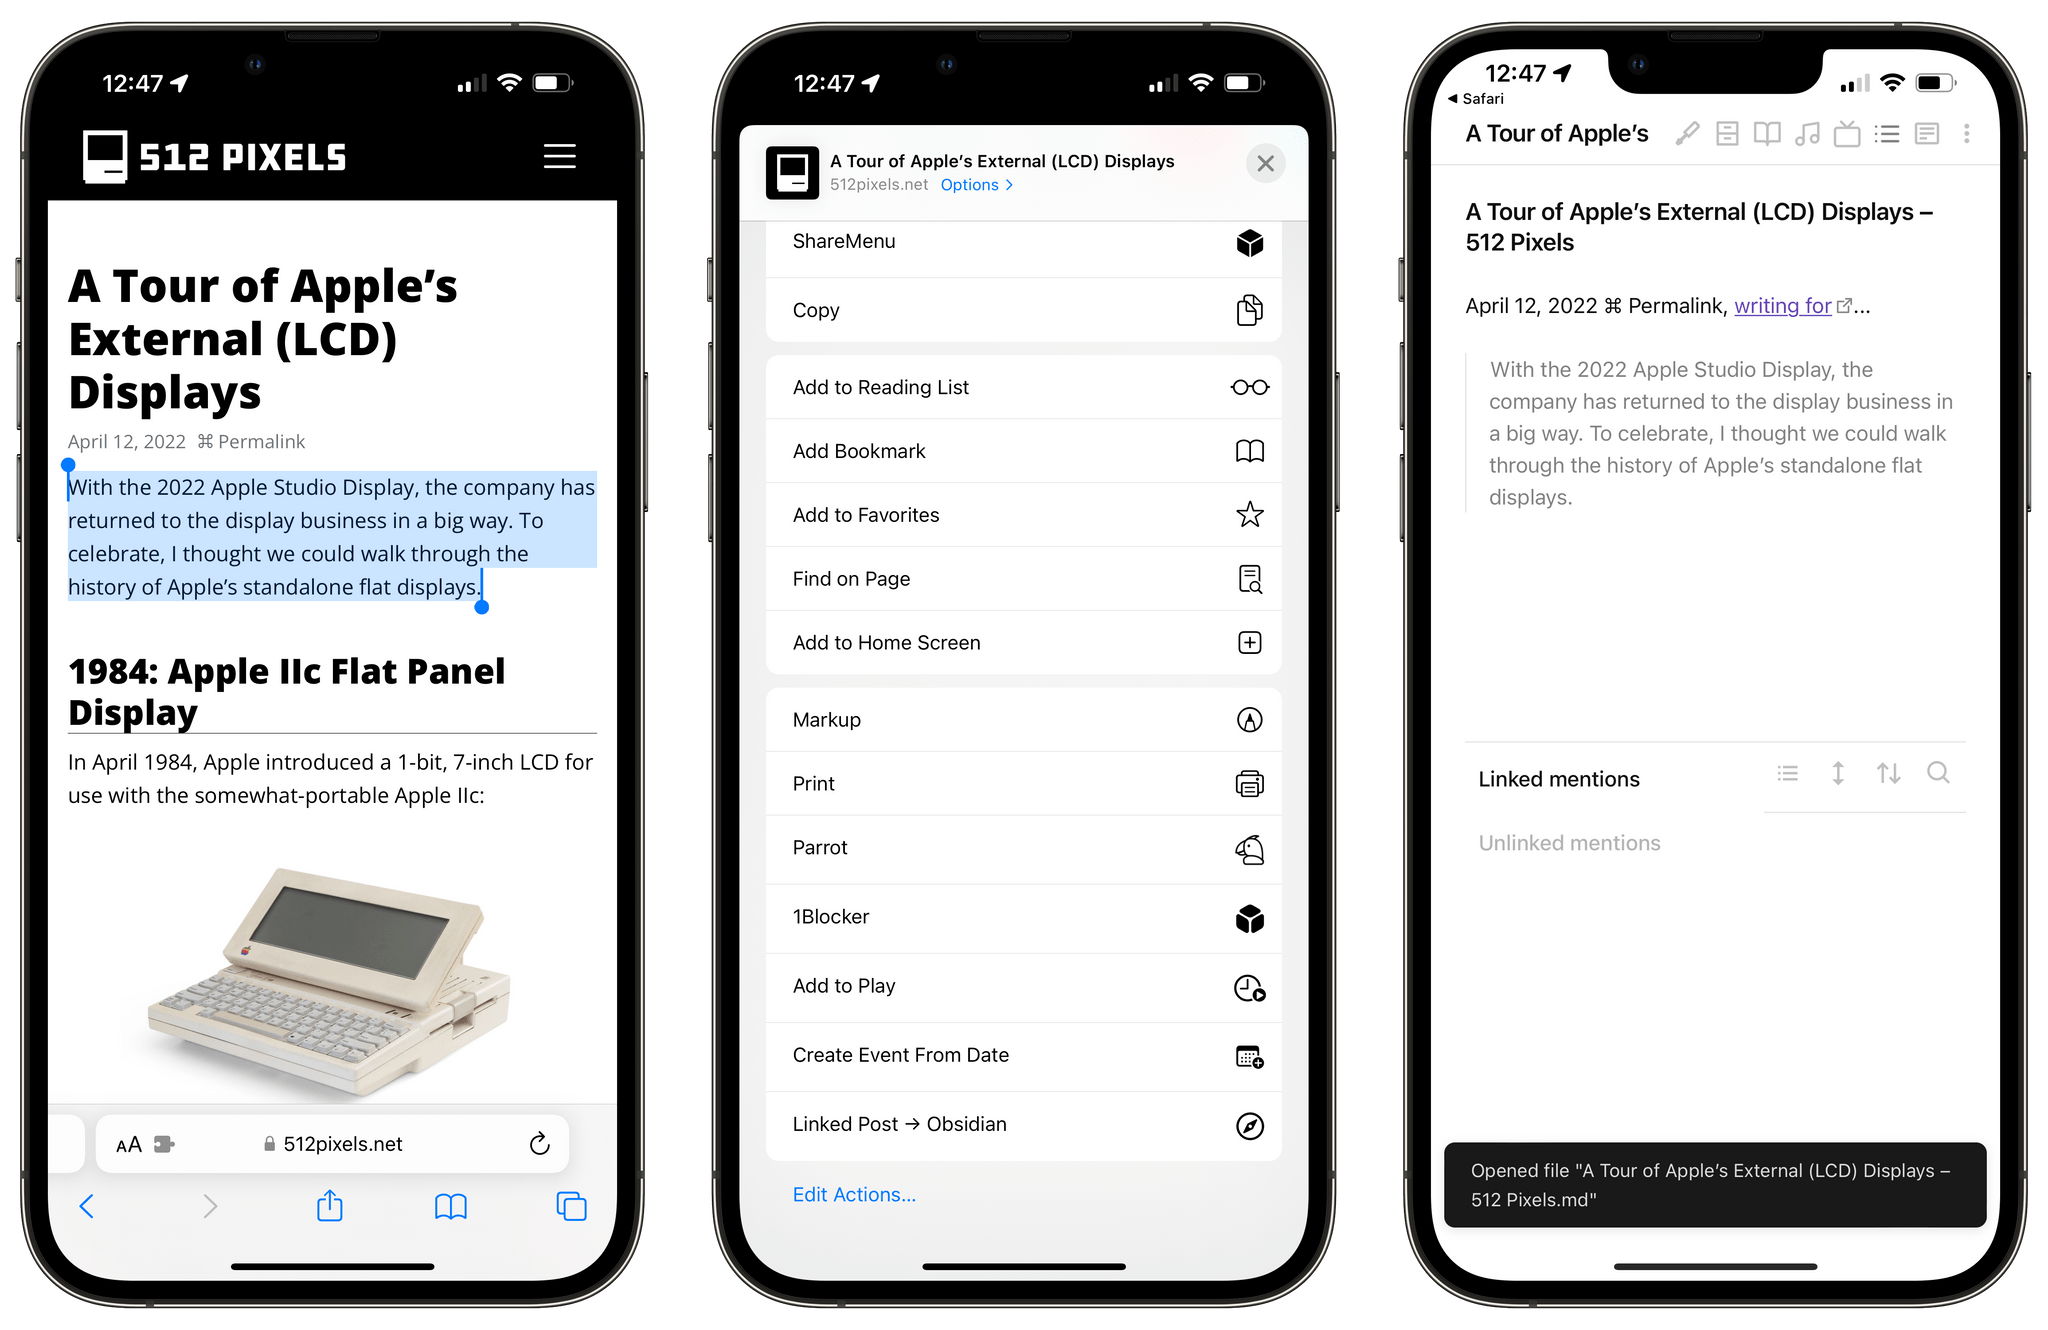
This shortcut lets you turn a Safari webpage into a Markdown template for a linked post on your blog. If you’ve seen how we like to do linked posts on MacStories, you know the kind of article I’m referring to. The shortcut extracts details from the current webpage such as title, link, author, and selection then prepares a Markdown template that is saved in Obsidian and ready for me to tweak before publishing it.
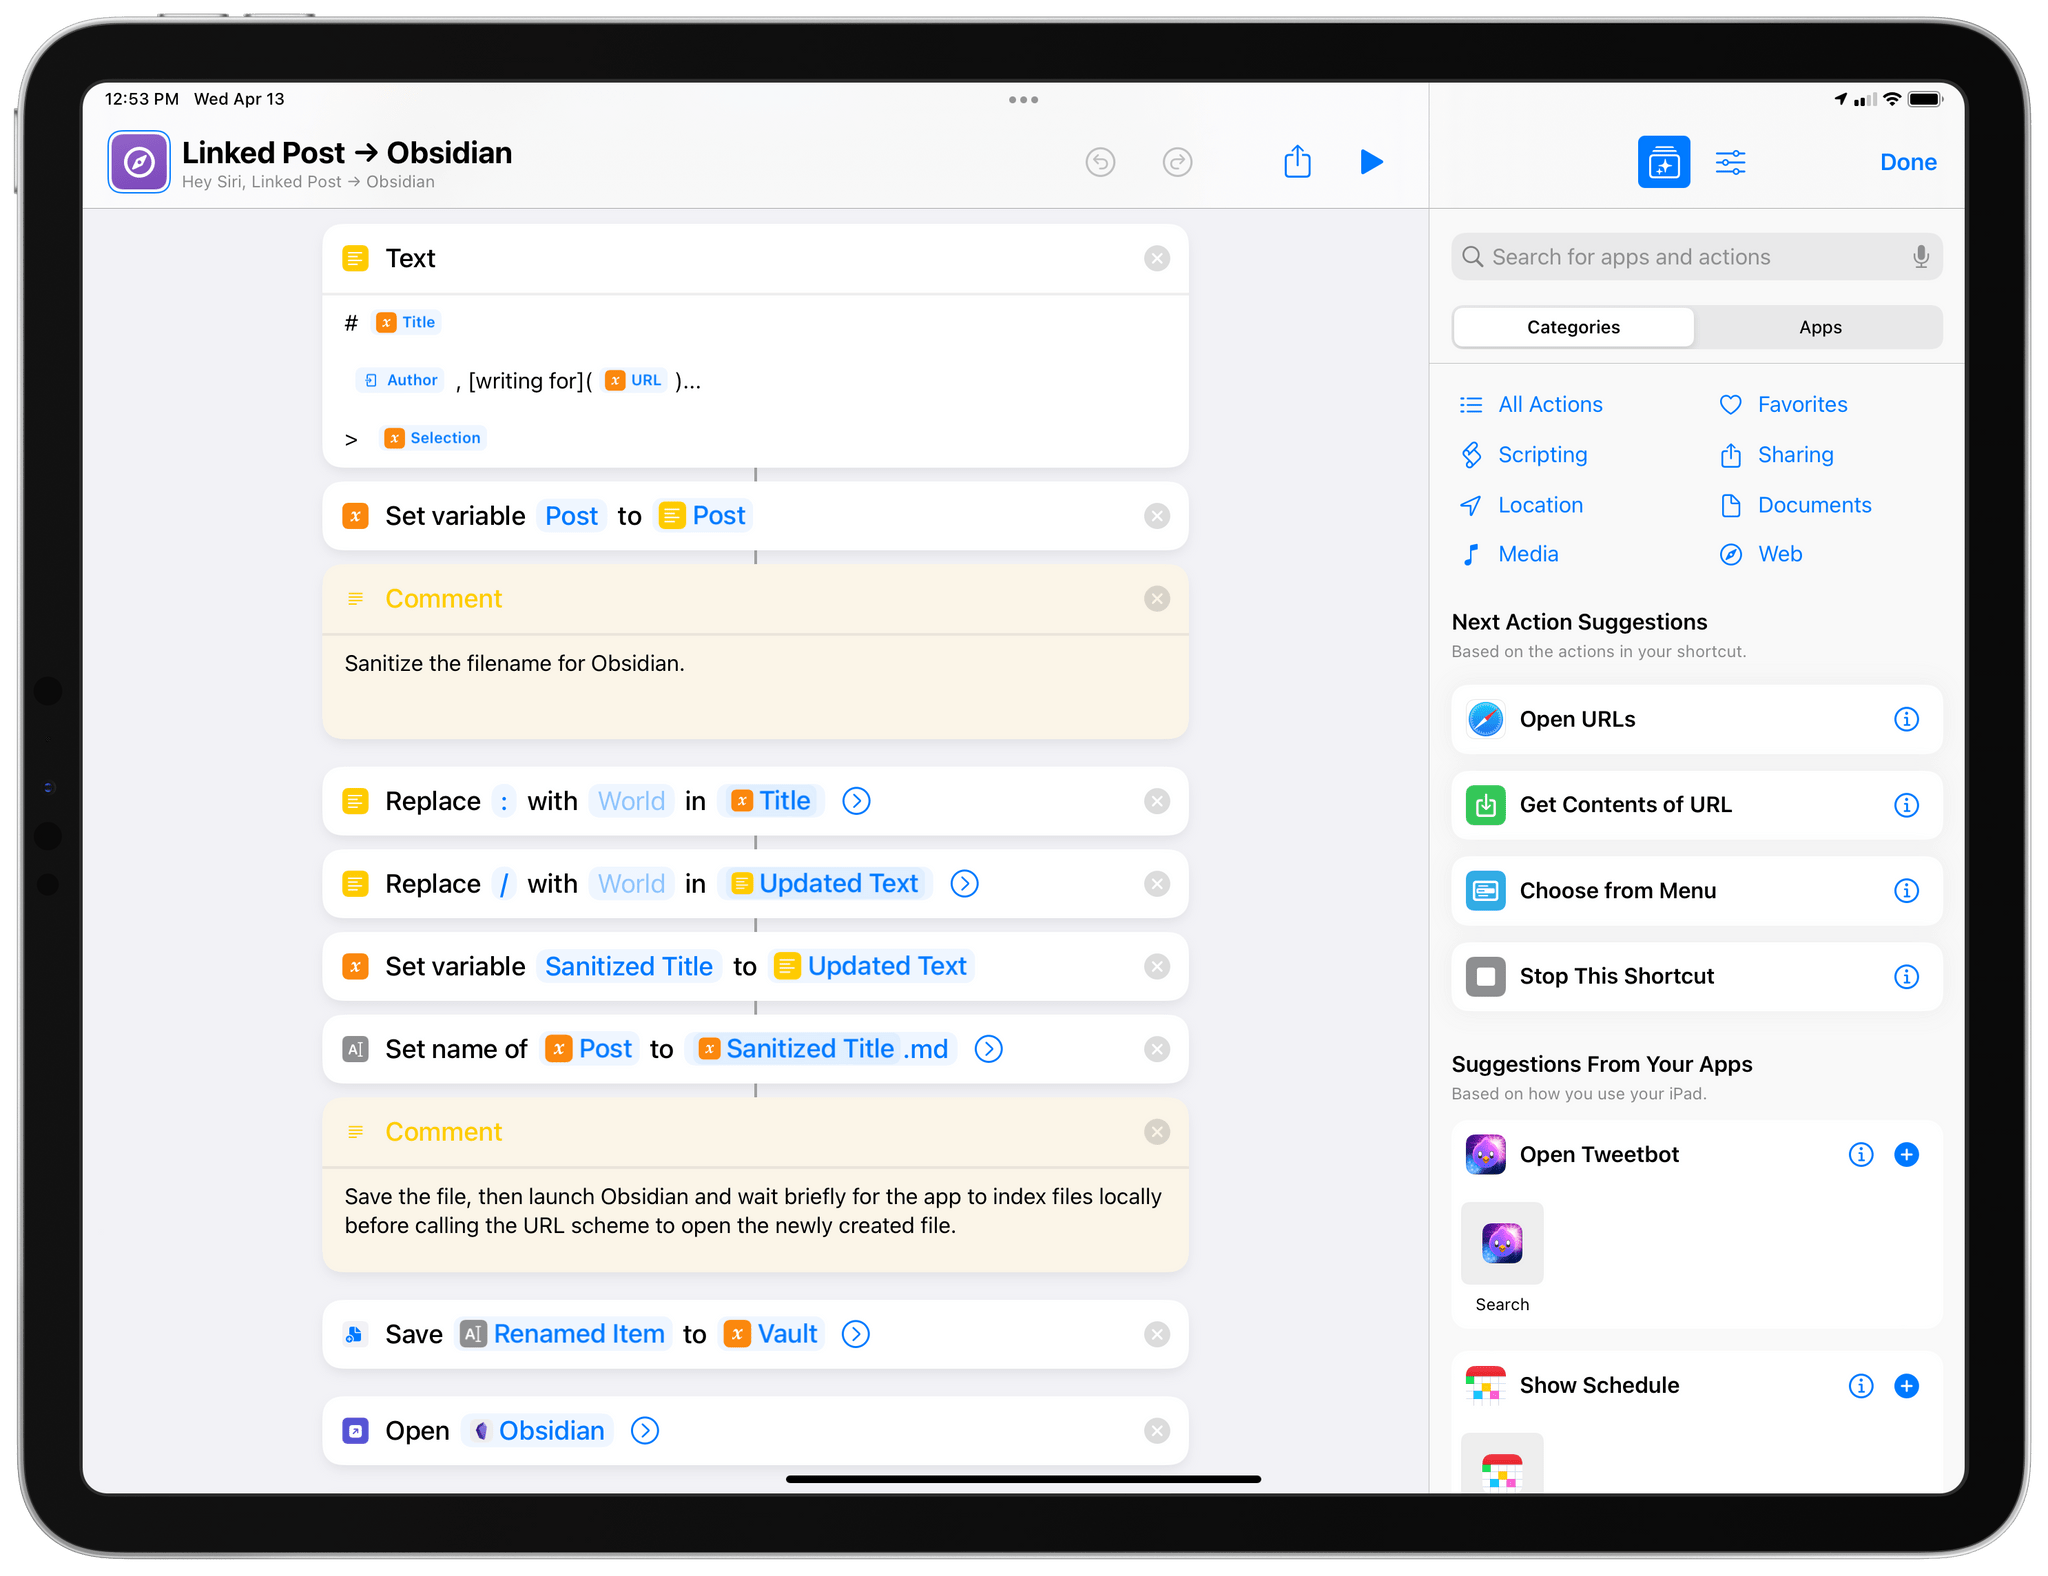
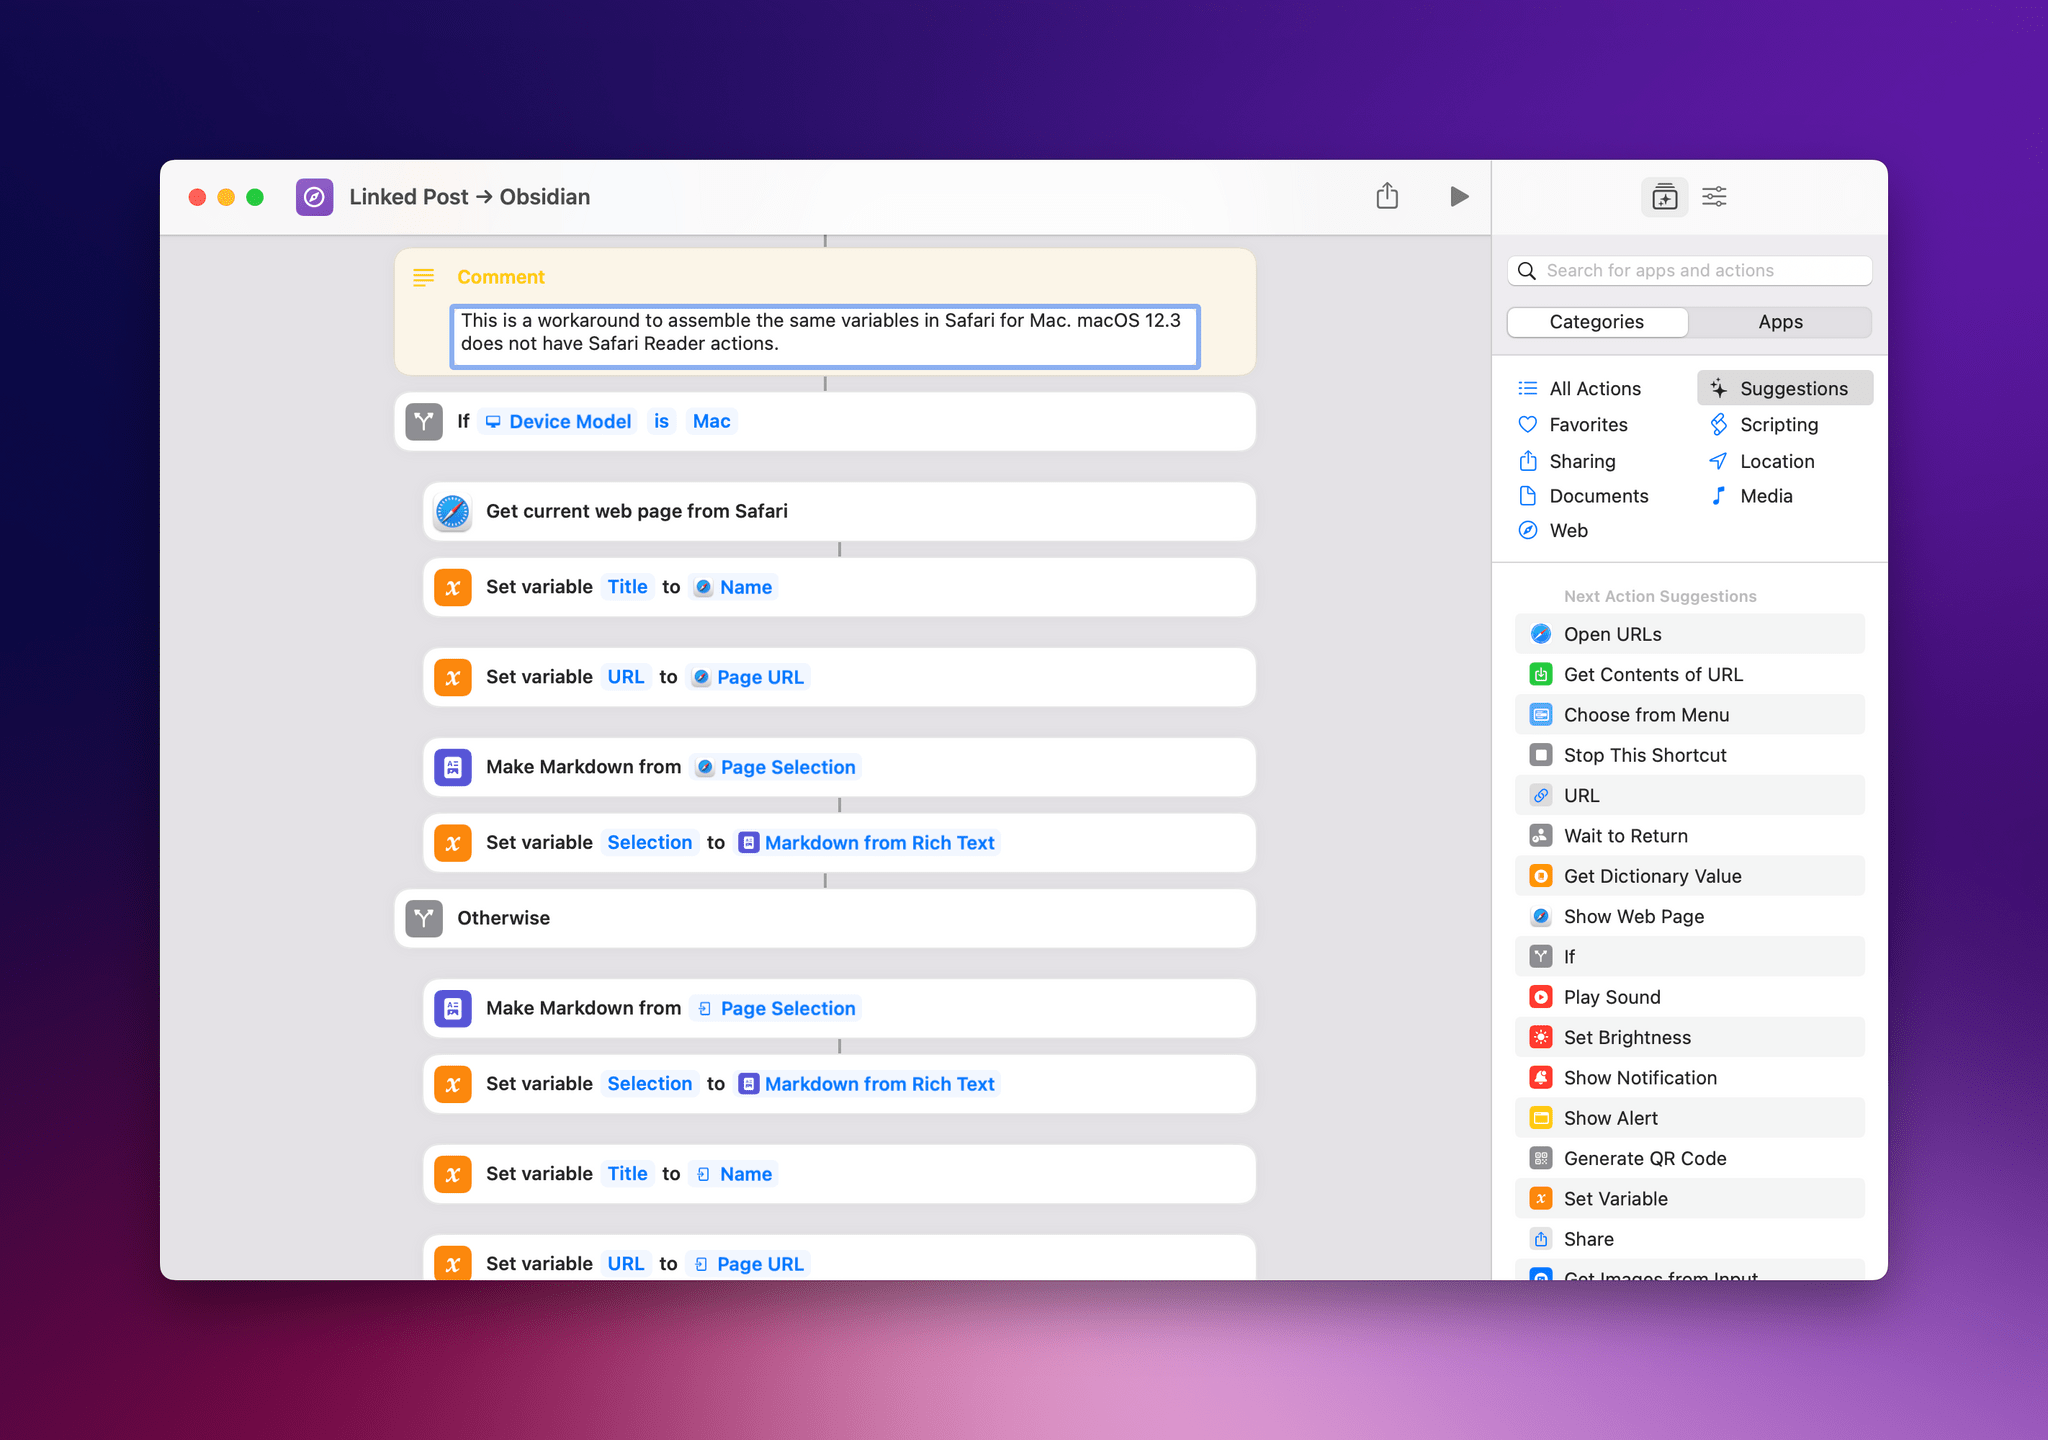
Unfortunately, I had to use a workaround to make the shortcut compatible with macOS Monterey because of the issues I’ve already covered regarding the lack of Safari Reader actions in Shortcuts for Mac. As you can see in the shortcut, I had to create a separate ‘If Model is Mac’ block that uses the macOS-specific ‘Get Current Web Page’ action to extract details for the title, link, and webpage selection (this property was added in macOS 12.3); alas, when the shortcut runs on a Mac, I can’t extract the author’s name because that is part of Safari Reader, and those actions are not supported on Monterey right now. Don’t ask me why.
Once the text is ready to go, the shortcut saves the Markdown document into your Obsidian vault and uses the Obsidian URL scheme to instantly open the newly created file in the app, ready for you to start editing.
You can run this shortcut from the share sheet on iPhone and iPad while looking at a webpage you want to link on your blog; on a Mac, you’ll have to invoke the shortcut with a hotkey or a launcher like Raycast, and Safari doesn’t have to be in the foreground.
Linked Post → Obsidian
Create a template for a linked post to an article in Obsidian. The text selection from a Safari webpage is used as a Markdown blockquote. The original title, author name, and URL of the webpage are also preserved in the sheet.
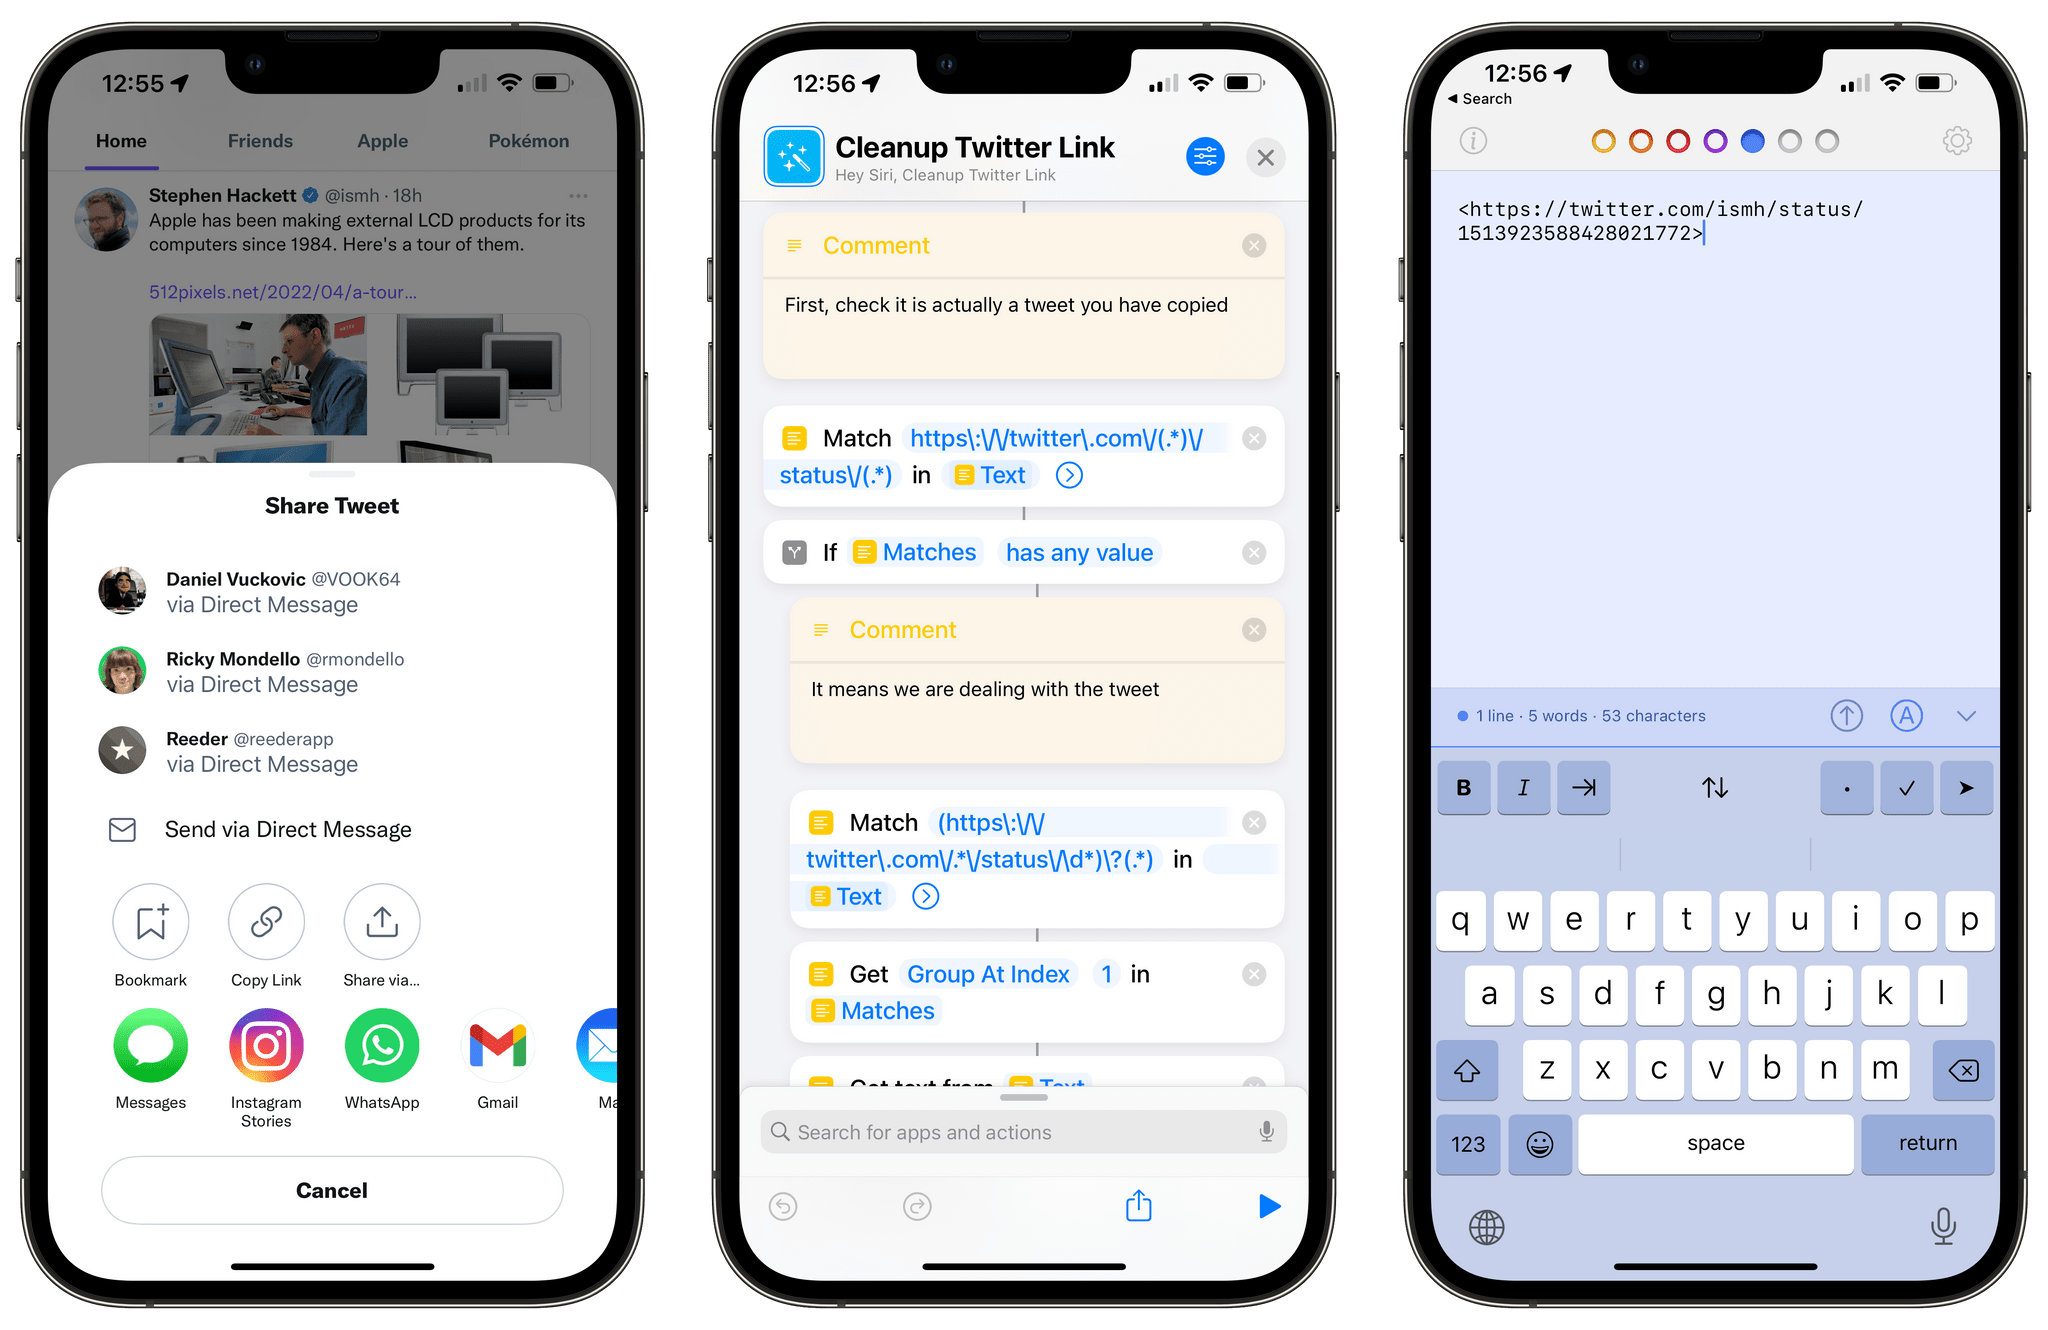
Cleanup Twitter Link
I’m taking the Twitter app for a spin again (I think the appeal of an editing feature is too strong for me to resist), but as part of the process, I have realized that the official client now appends new (and ugly) tracking parameters at the end of links for tweets copied to the clipboard. I’m talking about this kind of URL:
https://twitter.com/viticci/status/1513254453612318721?s=20&t=aSleT0QLA7YM8njyXITICQ
Where, actually, the canonical link to the tweet is just this part:
https://twitter.com/viticci/status/1513254453612318721
If you know me, you know that I can’t stand an ugly URL with tracking parameters I don’t need attached to it. So I came up with a shortcut and related personal automation that can clean up tweet links for me whenever I copy them to the clipboard.
The shortcut itself is pretty straightforward: given a tweet URL from the clipboard or passed to the shortcut via the share sheet (or other input methods), the shortcut uses regular expressions to first confirm we’re dealing with a tweet link (and not a link to a Twitter profile), then cuts the unnecessary bits from the URL, which is copied in its newly cleaned state back to the clipboard.
What I think is great about this shortcut is the system I’ve designed to make it run invisibly in the background and take care of cleaning links without my input. What I noticed is that I tend to copy links to tweets manually, close the Twitter app, then open Discord or Messages to paste them. In doing this, I realized that the one constant is me closing the Twitter app to open something else; this is a habit that can become a trigger for a personal automation in Shortcuts.
So I created an automation that mirrors my behavior: as soon as the Twitter app is closed, the automation runs my Cleanup Twitter Link shortcut; before I know it, the link has already been cleaned and I can paste it in Discord or Messages without worrying about tracking parameters. Even better, iOS’ default clipboard privacy banner tells me that Shortcuts accessed the clipboard in the background – so I know the system is working – but thanks to iOS 15.4, I don’t see the bigger automation alert every time this shortcut runs. It’s a win-win.
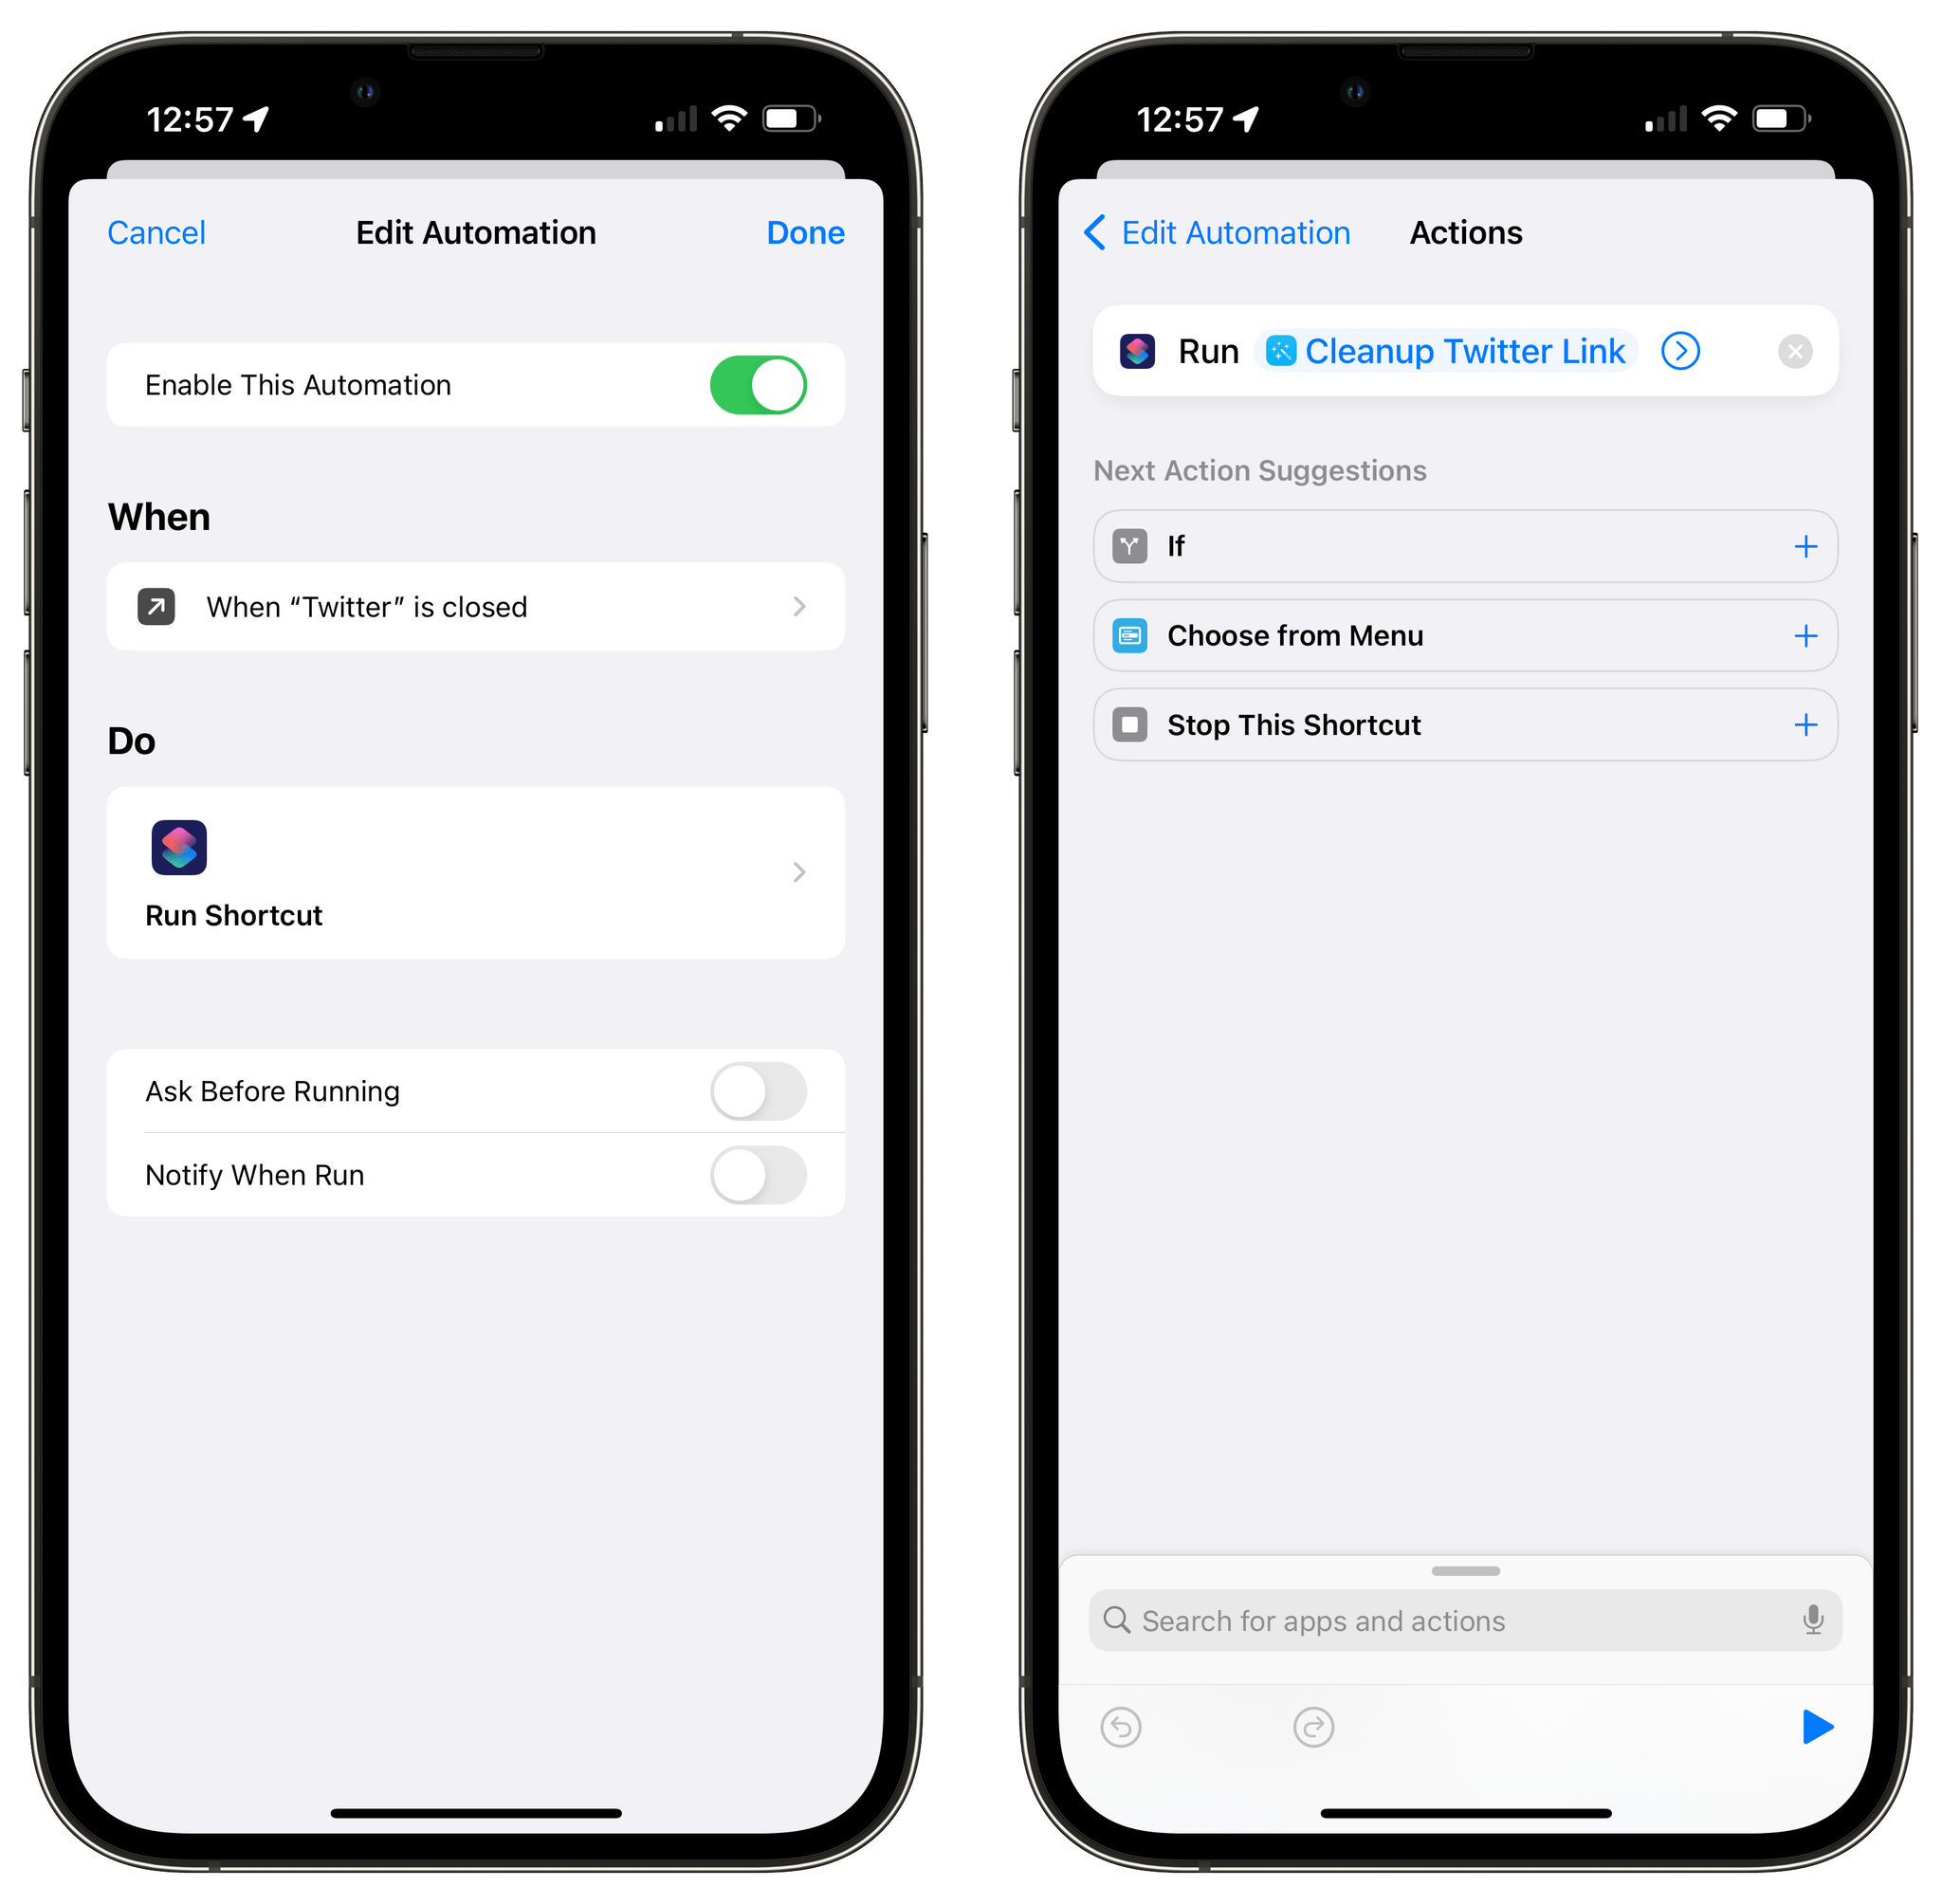
Since there are no personal automations for Shortcuts on the Mac, I’ve resorted to running this shortcut manually. I gave it a custom hotkey via Raycast, so whenever I copy a link from the Twitter website or app, I then press ⌃⌥⌘L to clean up the link. When the shortcut runs on macOS, it also displays a notification to confirm that it cleaned a link.
This shortcut is best experienced on an iPhone or iPad with the official Twitter app installed. Ideally, in the future, ‘When I copy a link in Twitter’ could be a third-party automation trigger for Shortcuts; for now, ‘When Twitter is closed’ should suffice as a way to automate the process.
Cleanup Twitter Link
Remove tracking parameters from tweet links. The shortcut is best used to clean up links to tweets copied from Twitter’s official apps and website.
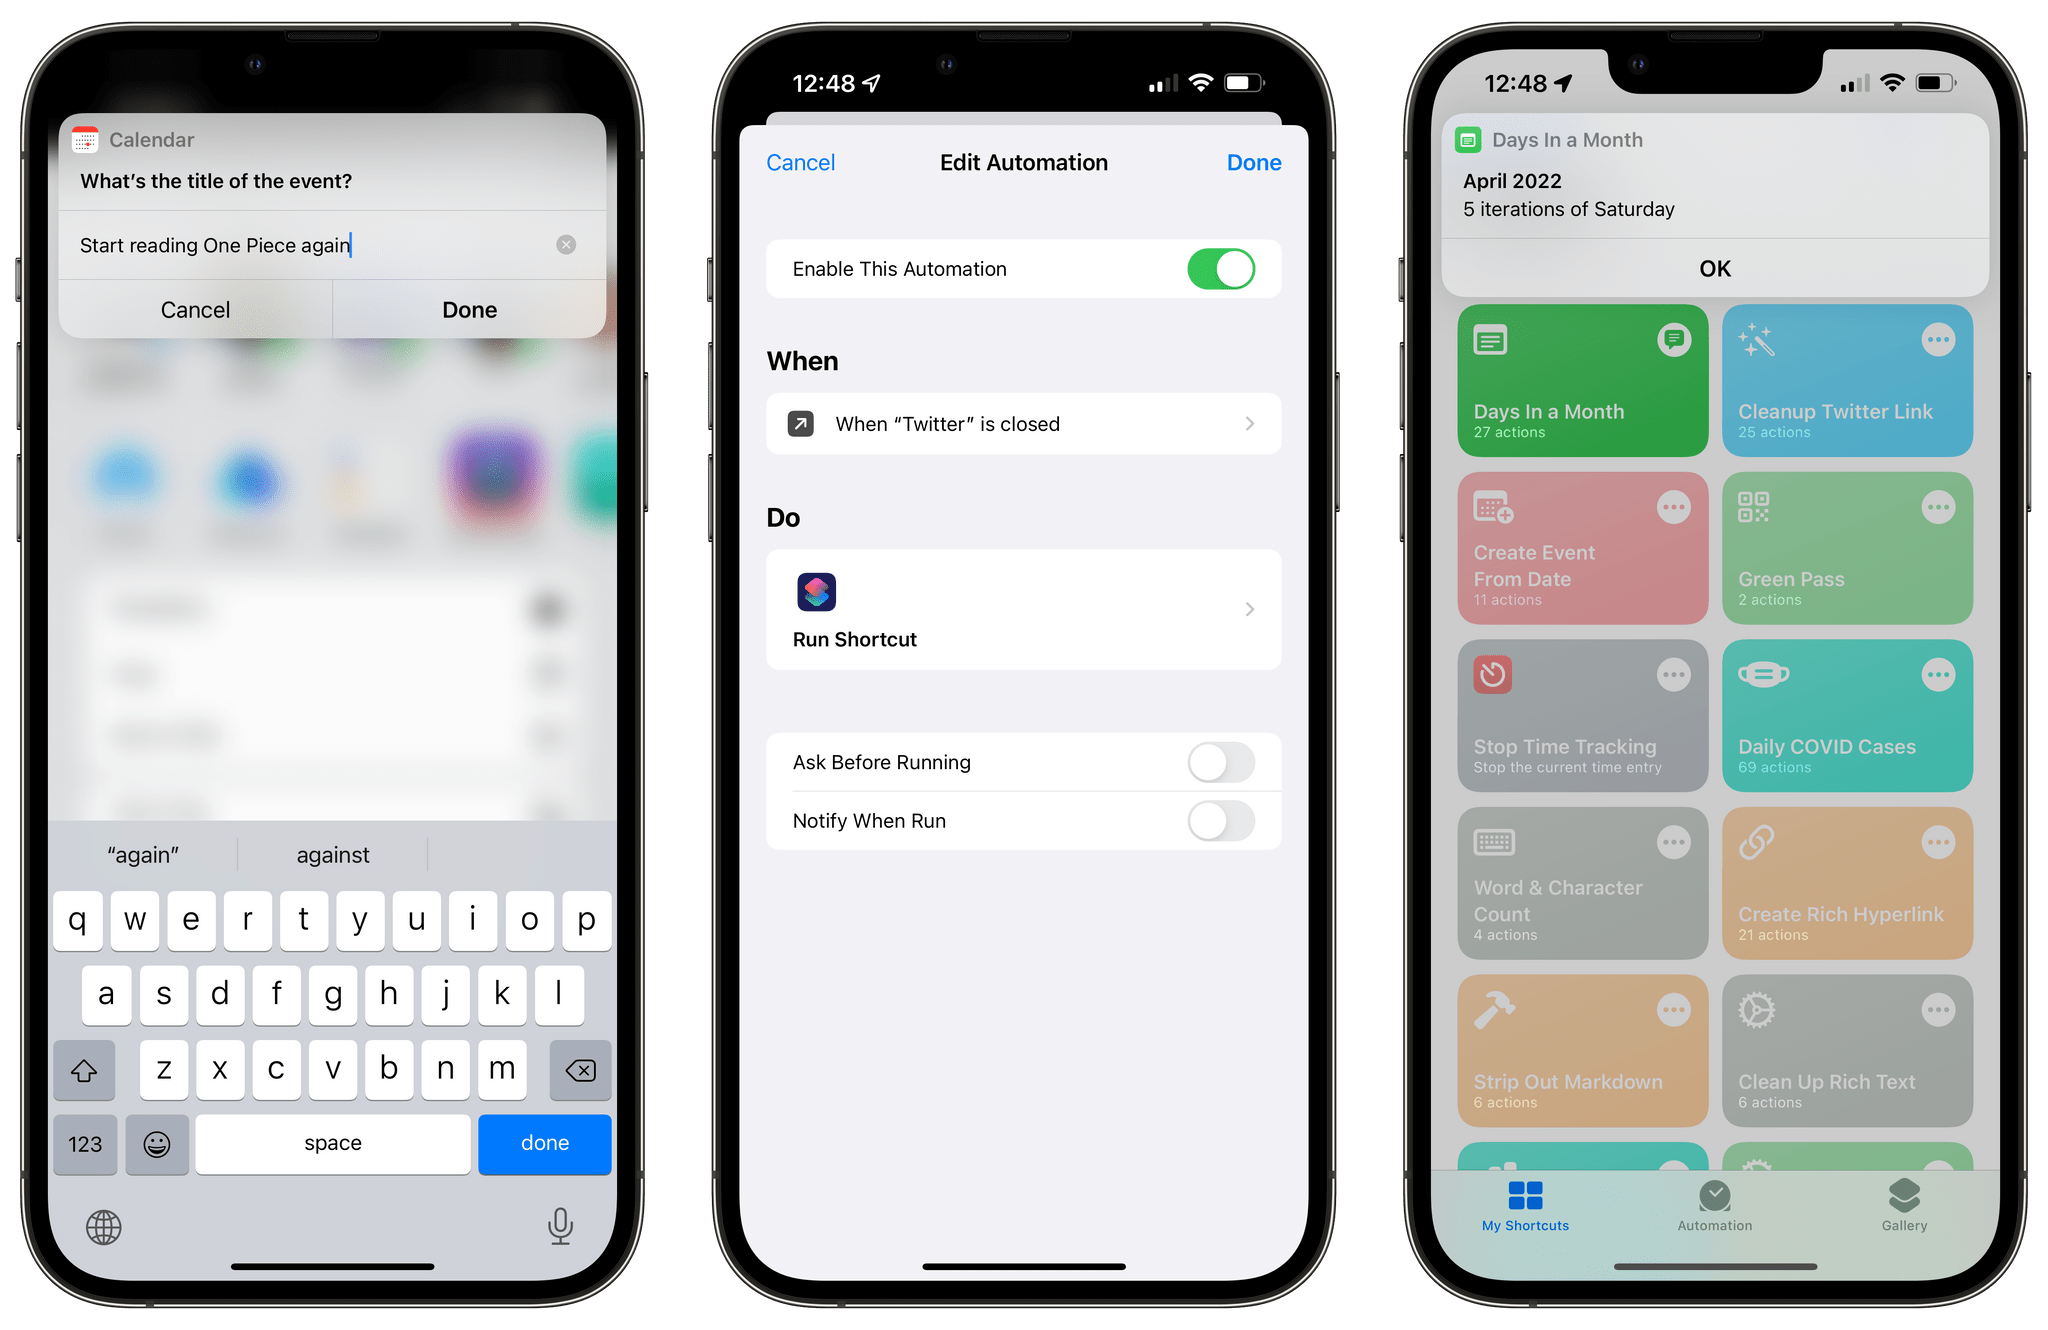
Days in a Month
A while back, a Club MacStories Discord member asked me if it was possible to count the instances of a specific day of the week in any given month. Their kid had soccer practice on Tuesdays and Thursdays, I think, and they wanted an easy way to count how many of those days were in a specific month. Challenge accepted.
The shortcut I’ve come up with, called Days in a Month, lets you choose the day of the week you want to find in any given month and responds with the total number of days for that month. When the shortcut runs, you’ll be asked to pick a month from a list, then pick a day of the week, and at the end you’ll get an alert telling you how many of those days are found in the selected month. For instance, there are five Saturdays in April 2022.
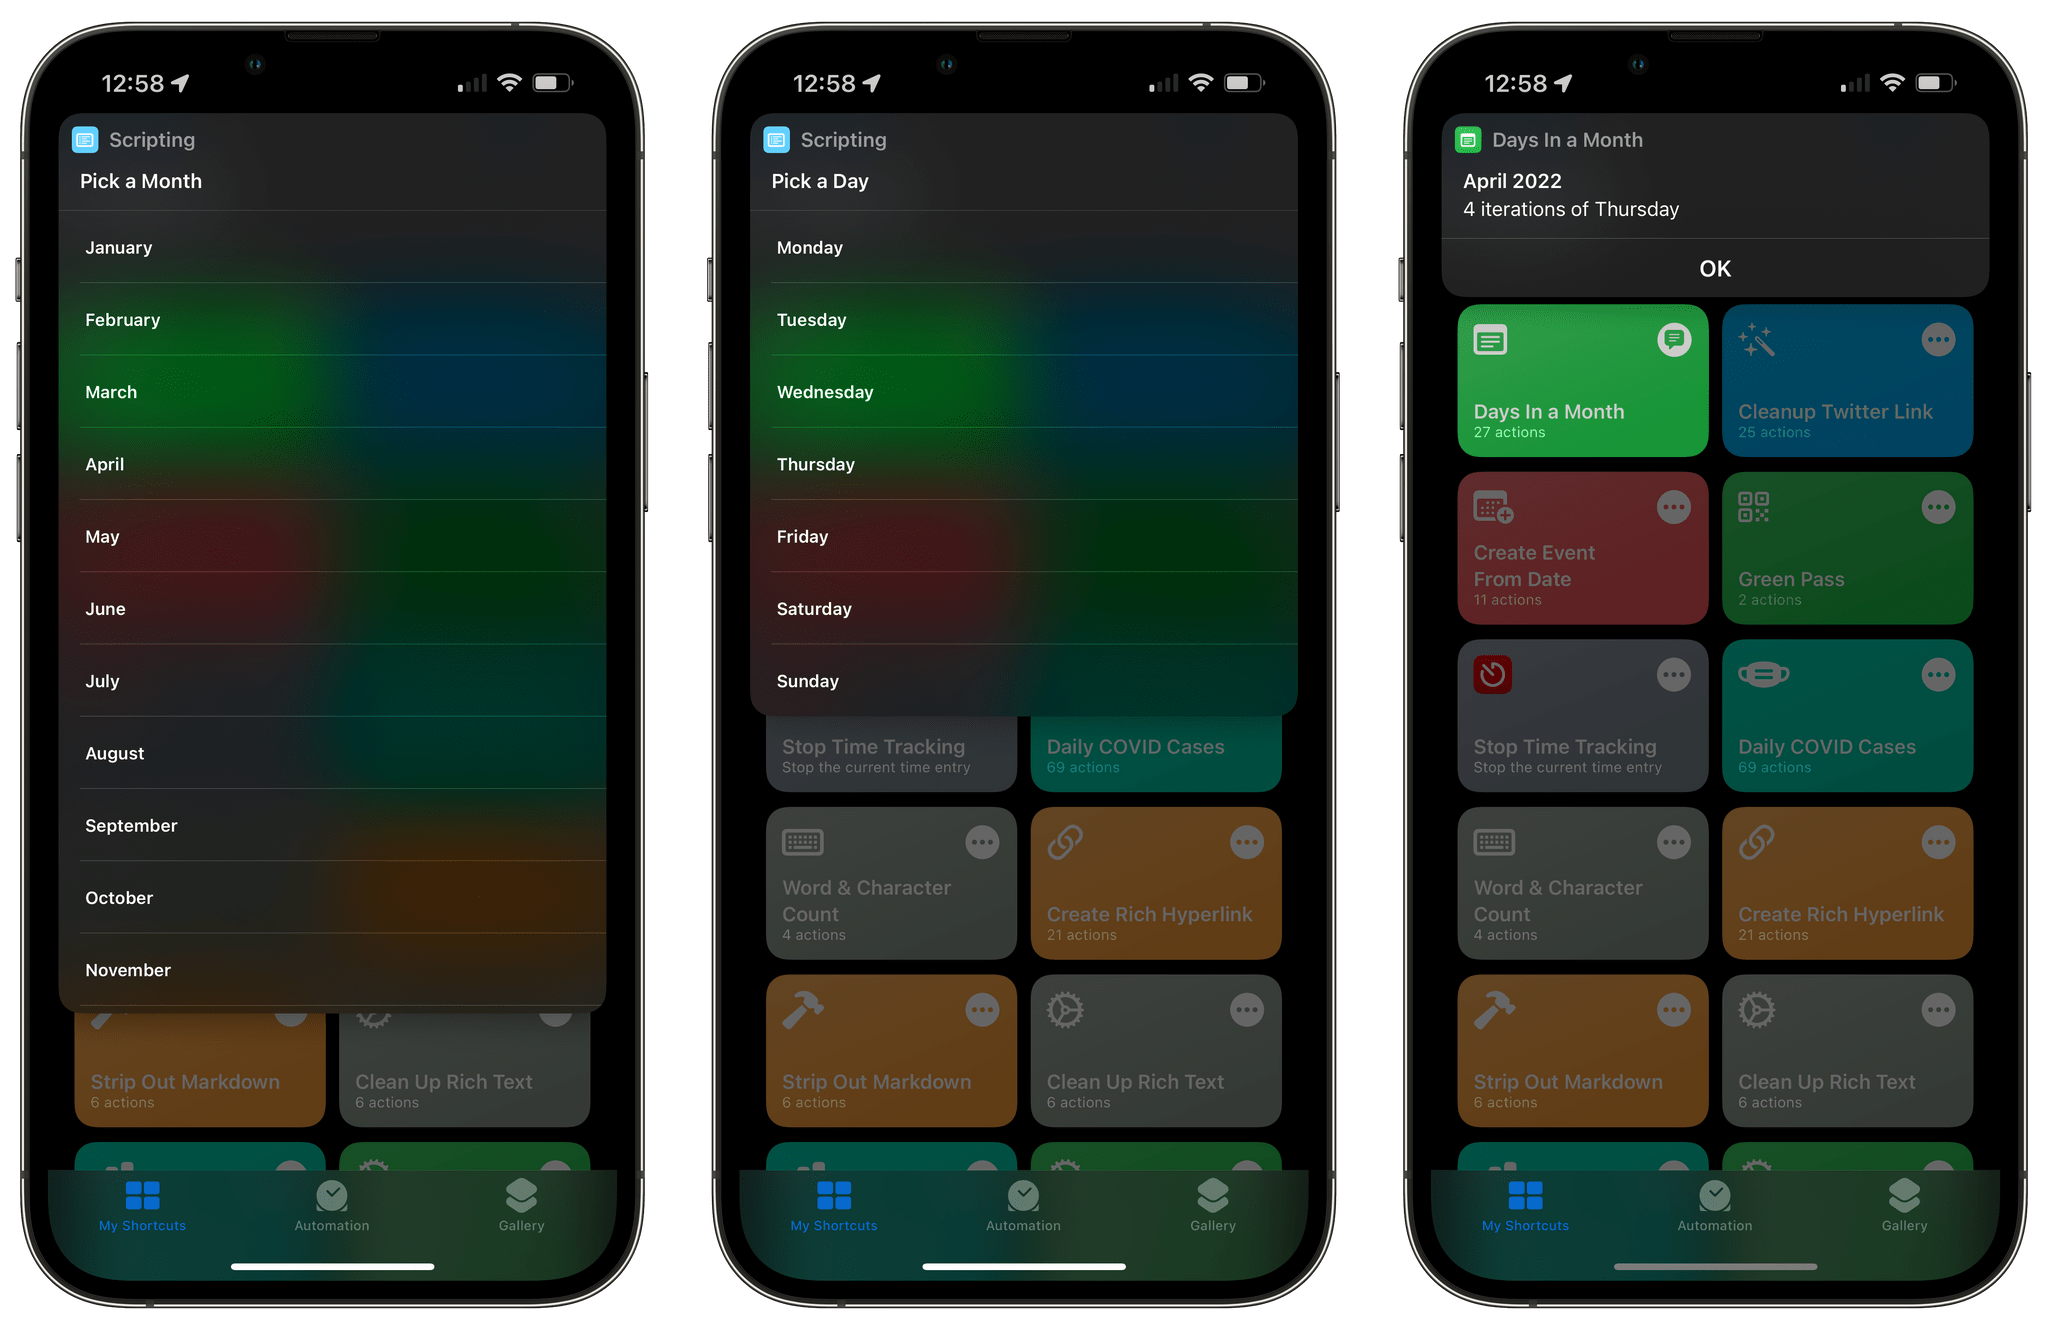
I like this shortcut because it showcases how easy it can be to perform complex date calculations in Shortcuts by just using visual actions that don’t involve a single line of code. The one limitation of the shortcut is that it doesn’t account for leap years; in that case, you’ll have to manually change the number of days for February from 28 to 29 in the Dictionary action at the beginning of the shortcut.
Days In a Month
Count how many instances of a specific day there are in any given month of the year.
Add or Remove Speaker
This simple shortcut was made possible by an addition to the ‘Change Playback Destination’ action in iOS/iPadOS 15.4 and macOS Monterey 12.3: the ability to add or remove AirPlay speakers/headphones to and from the current playback session. With this shortcut, you’ll be presented with a menu that lets you choose whether you want to add a speaker to your existing audio setup or if you want to remove one.
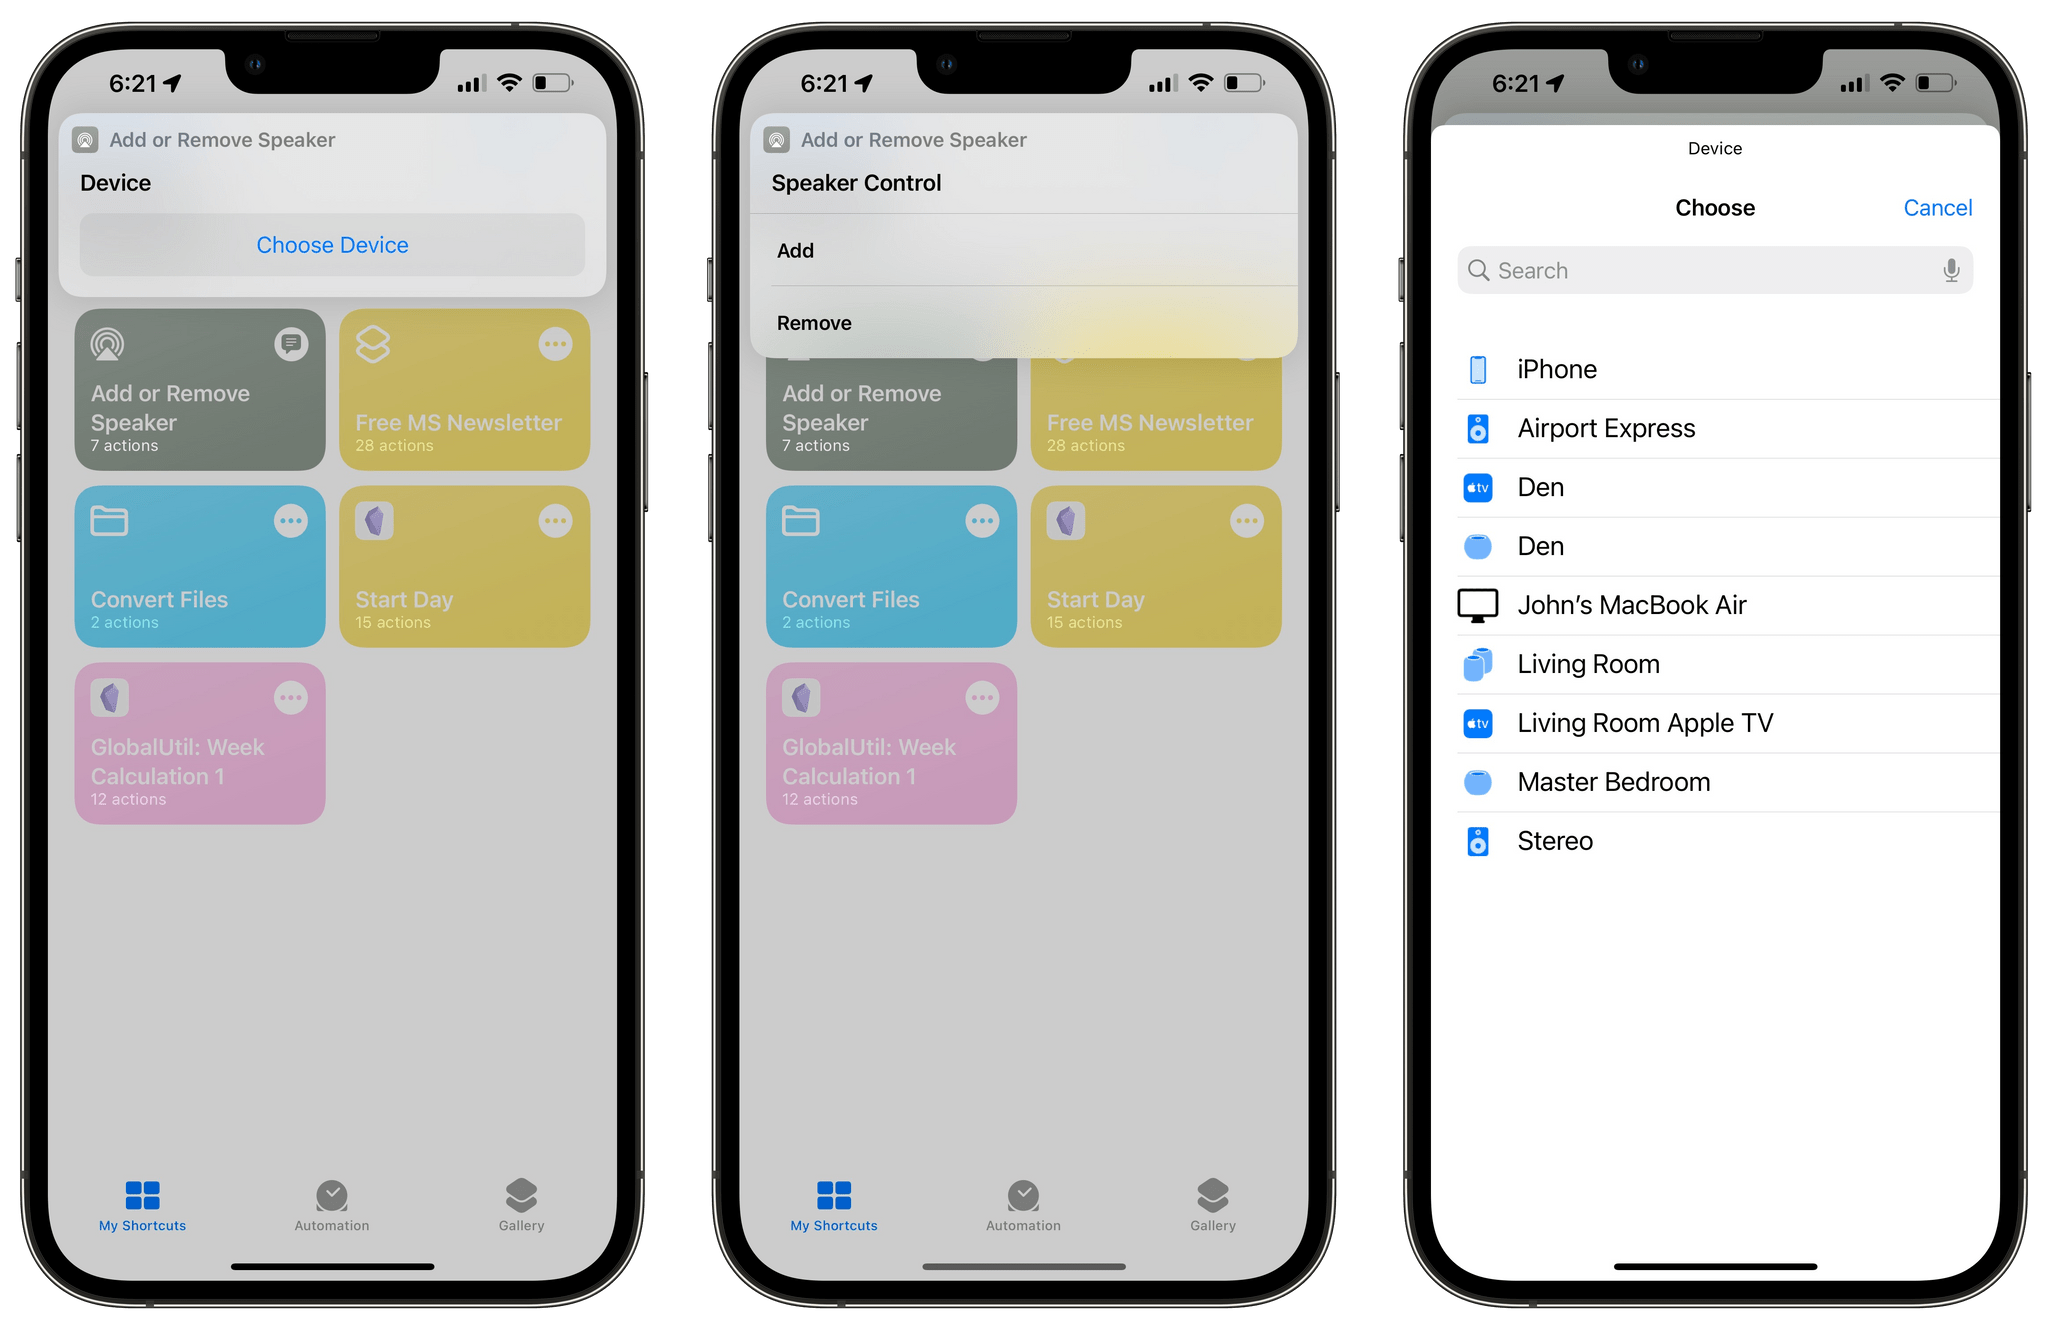
While this is all possible from Control Center manually (just select the checkboxes next to the AirPlay speakers you want to add/remove), I’m sharing this shortcut because it can serve as a template for people who want to create presets for their AirPlay setups. In the shortcut, you’ll see that I left ‘Ask Each Time’ values in the parameters for adding and removing speakers; you can modify these to your own liking to permanently include specific speakers to want to add or remove. For instance, if you want to create an automation that always disconnects your kitchen HomePod and adds the living room HomePod instead, you can modify this shortcut’s parameters to do exactly that.
Add or Remove Speaker
Add or remove speakers to and from your audio playback setup.
You can also follow MacStories’ Automation April coverage through our dedicated hub, or subscribe to its RSS feed.
- As I explained in this episode of the Automators podcast, I couldn’t use the standard ‘Run AppleScript’ action since it won’t let me put in variables inside the AppleScript code itself. The shell script action allows variables, so I can dynamically activate apps based on whatever preset I pick. ↩
- One of the benefits of the OSL plugin running on macOS is that it can execute shortcuts in the background via the shell. ↩