Last week, Nintendo rolled out a new feature that simplifies importing screenshots and videos taken on a Nintendo Switch on any smart device. As part of the console’s 11.0 firmware, you can now share up to 10 screenshots or a single video capture from the Nintendo Switch media gallery and, by scanning a series of QR codes with your phone or tablet, wirelessly connect your device to the console and save them via a web browser. Although Nintendo’s approach may not be as intuitive or modern as, say, Microsoft automatically saving all screenshots you take on an Xbox console and uploading them to your Xbox account, it is a clever, platform-agnostic solution that will keep working with any device that can scan a QR code and connect to the console’s Wi-Fi network.1
As someone who plays a lot of Nintendo Switch games2 and has always disliked having to share screenshots via Nintendo’s Twitter integration on the Switch, I’ve long wanted an easier way to send images and videos from the console to my iPhone and iPad. As soon as I tested Nintendo’s new feature, I had a feeling I could further speed up the process with Shortcuts and remove the (little) friction left in Nintendo’s system for sharing media between the console and smart devices.
The result is ShortSwitch, a shortcut that automatically recognizes media being shared by a Nintendo Switch over Wi-Fi and which gives you the option to save all items at once in Photos or Files, share them via the share sheet, or copy them to the clipboard. ShortSwitch does this by directly accessing the local web server created by the Nintendo Switch to share media; because it doesn’t need to connect to the Internet or use third-party apps, ShortSwitch runs instantly and allows you to save multiple items at once in just a couple seconds. Even better, you can configure ShortSwitch to run as a Personal Automation on your iPhone and iPad, which means the shortcut will run automatically as soon as you connect your iPhone or iPad to a Nintendo Switch.
You can download ShortSwitch at the end of this article and find it (alongside 220+ other free shortcuts) in the MacStories Shortcuts Archive. Now, allow me to explain how ShortSwitch works and how I put it together.
How the Nintendo Switch Shares Media
Nintendo documented the process for sharing screenshots and videos from a Nintendo Switch to smart devices here. Here’s how the feature works: after selecting media in the Album app on Nintendo Switch and choosing ‘Send to Smart Device’, the console creates an ad-hoc Wi-Fi network to create a local connection between itself and your smart device (which can be anything, from an iPhone or Android device to an iPad, desktop computer, or even an Apple TV). Once the Switch detects a device has successfully connected to its Wi-Fi network, it starts a local web server at the 192.168.0.1 address and makes media available on a webpage called index.html. When you visit this page with Safari, you’ll be presented with a grid of shared items, which you can tap and hold to save them to the Photos app or share them with other apps.
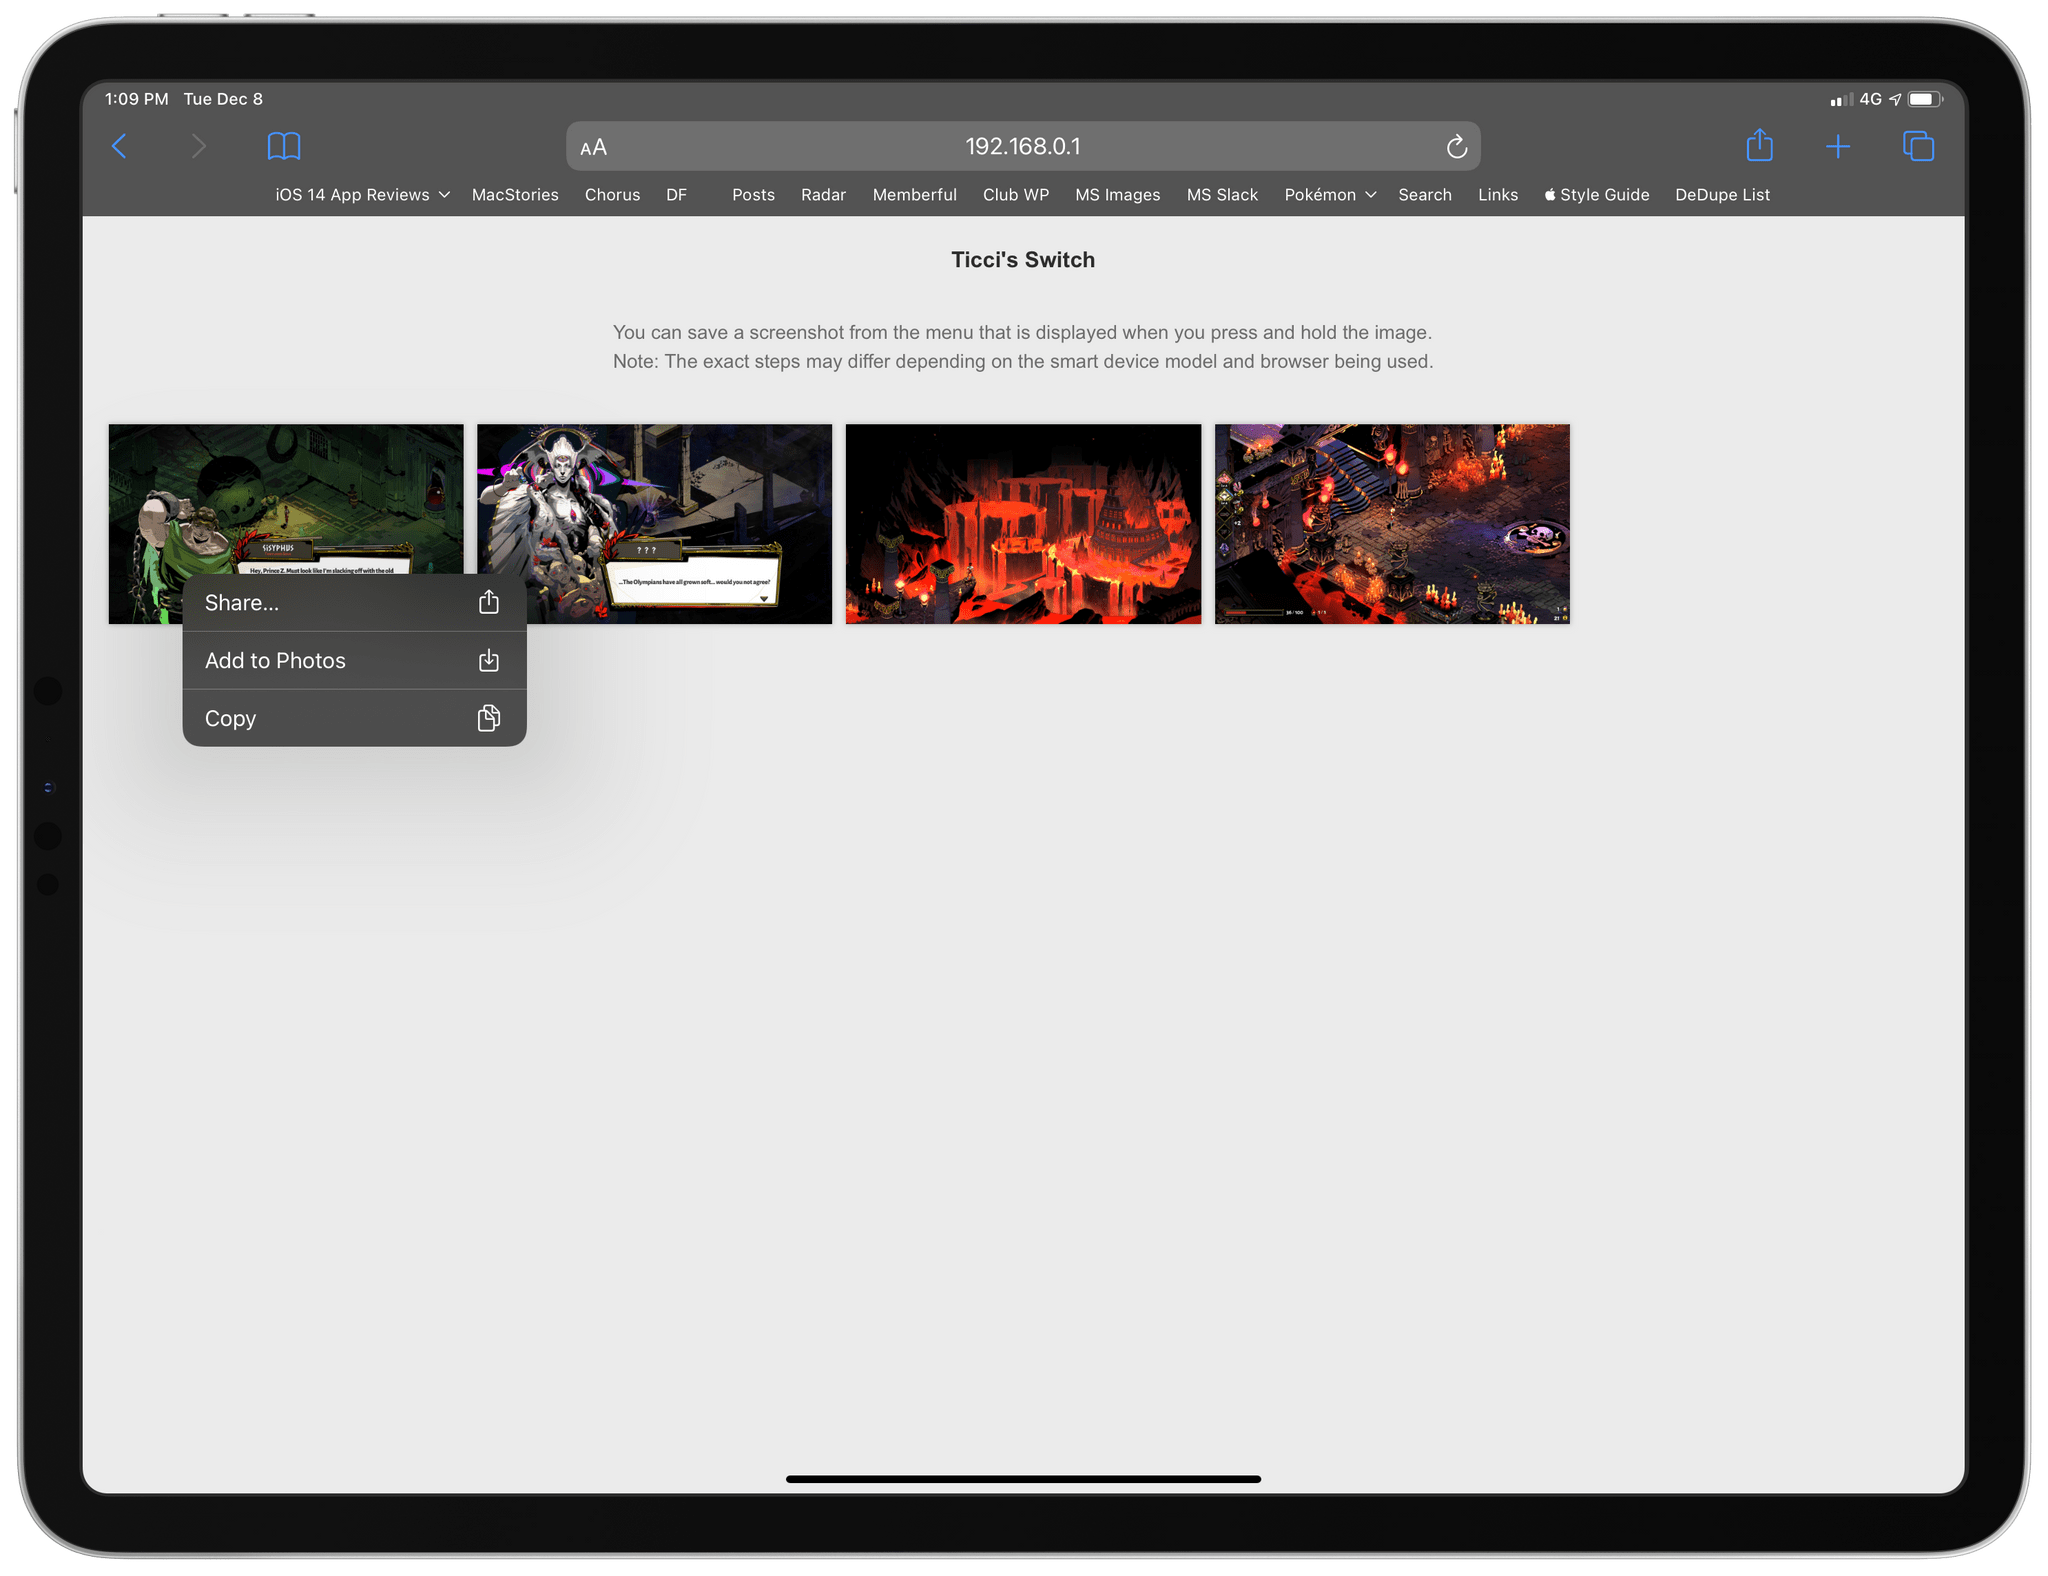
As you can see, this is a fairly primitive approach, but it works: any device with Wi-Fi and a web browser can connect to the Switch and open this page to save media. There’s no lock-in with a specific app or cloud service to access these screenshots and videos. The downside, of course, is that saving media requires your manual input: if you’re sharing 10 screenshots from your Nintendo Switch, you have to open the page and long-press each one to save everything to your device’s library.
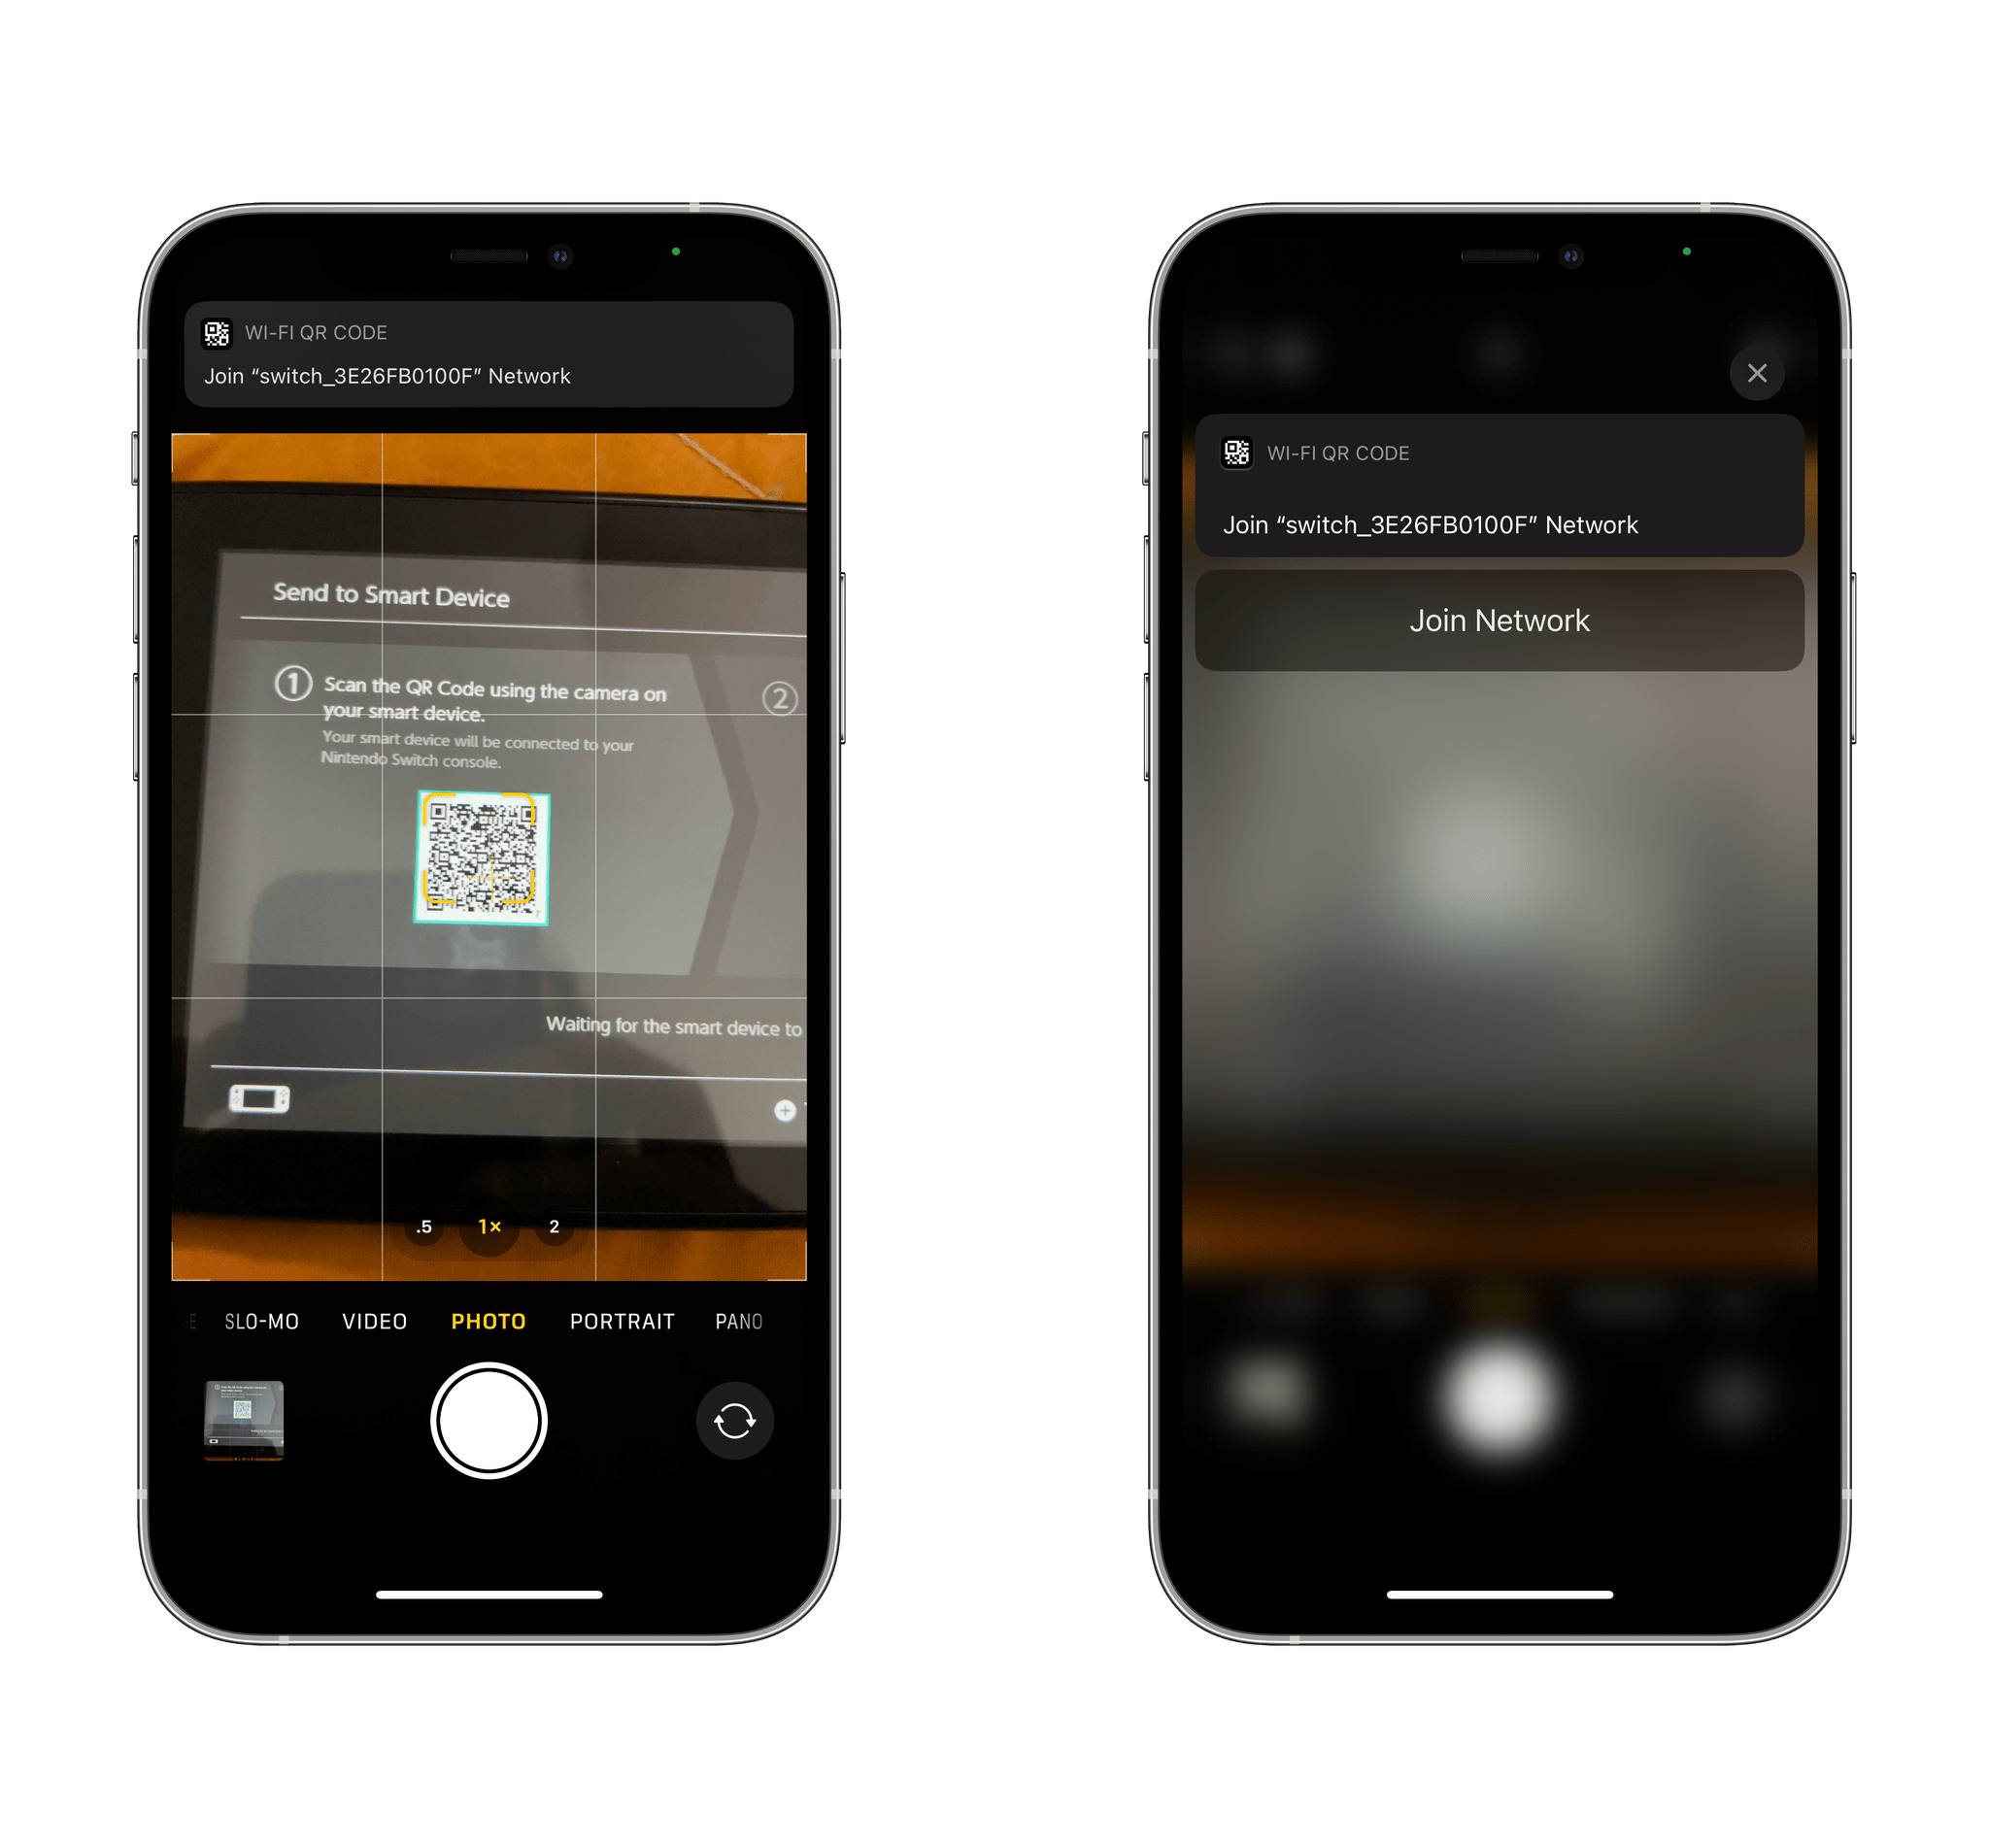
Nintendo did try to make the entire process as seamless as possible. When you start sharing media on the Switch, the console displays a QR code; scan this with your iPhone or iPad, and you’ll be connected to the console’s Wi-Fi network (which is usually labeled ‘switch_’ followed by a series of numbers and letters) without having to find it in the Settings app. Once you’re connected, the Switch displays a second QR code that takes you to 192.168.0.1/index.html in Safari, so you don’t have to type the address yourself. All this is convenient, and I appreciate how easy it is to connect to a different Wi-Fi network by scanning a QR code from Control Center; ultimately though, you still have to download each item manually from the webpage created by the Nintendo Switch. And that’s the part I wanted to automate.
How I Built ShortSwitch
When I understood how the Nintendo Switch was making media available over Wi-Fi, I started from the assumption that those items were available at a specific address and could be accessed directly without the need to use Safari and manually download them. My first idea was to use Charles Proxy to capture and inspect network requests when my iPhone was connected to the Nintendo Switch, so I could find where the images were coming from. However, my iPhone kept disconnecting from the Switch as soon as I enabled Charles Proxy’s local VPN, so I went for a simpler, yet effective alternative.
For the past few years, I’ve been using a fantastic utility called Inspect Browser to view webpage source code or access scripts and other assets that can’t be directly saved from webpages in Safari. For instance, Inspect Browser is how I always find the largest available version of Apple’s official iOS logos from their Developer portal. Any time I want to see which scripts are called when loading a webpage or find the source file of images that can’t be saved in Safari, I fire up Inspect Browser and I’m never disappointed.
Here’s what I did: I opened 192.168.0.1/index.html in Inspect Browser, navigated to More ⇾ Network to find the list of all requests started by the page, and, sure enough, I found a data.json file that was called every time the page loaded. So I opened 192.168.0.1/data.json in Safari, and there was my answer: whenever you share media from your Nintendo Switch, the console stores metadata such as your console’s name and individual filenames of images and videos you’re sharing in a dictionary available as a JSON file.
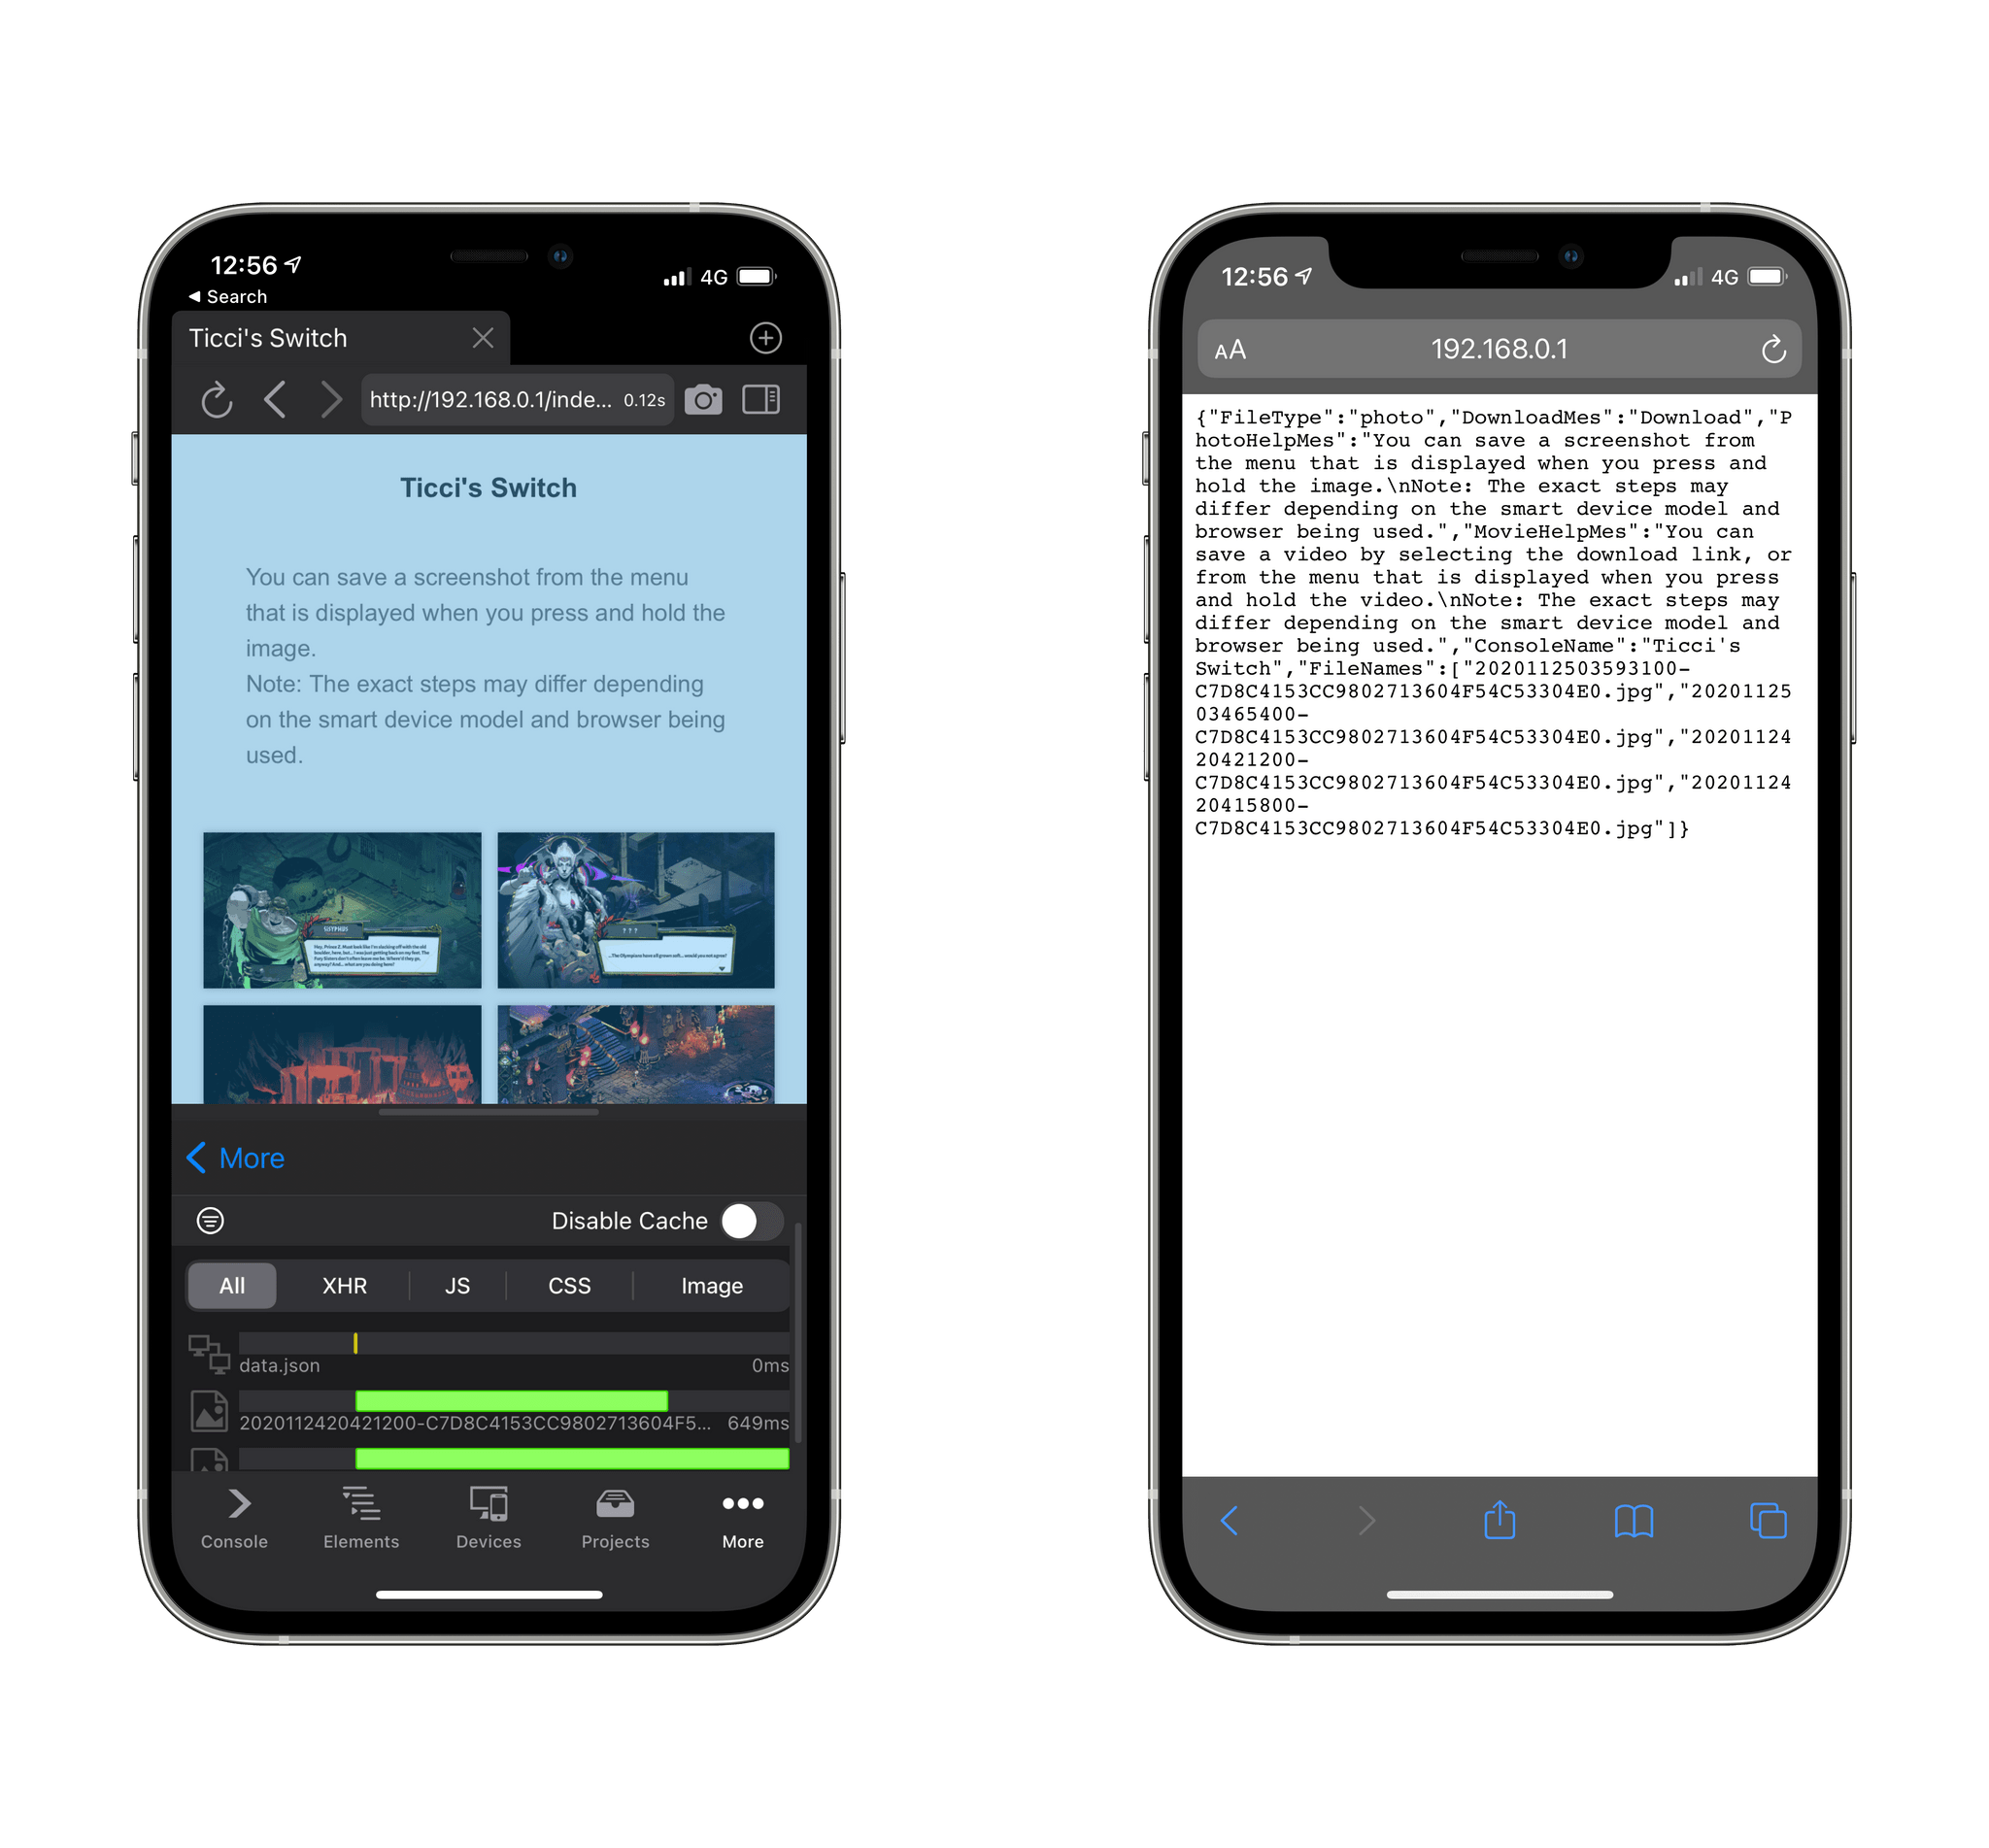
Once I had access to all the pieces of metadata I needed, and after confirming that media was stored in a sub-directory at 192.168.0.1/img/, it was all a matter of assembling a shortcut that would reliably and seamlessly fetch media from the Switch without any manual interactions, giving you different options for importing and sharing screenshots and videos taken on the Nintendo Switch.
Using ShortSwitch
To start using ShortSwitch, install the shortcut, then open the Album app on your Switch and select items you want to share. You can do so by pressing ‘A’ then ‘Send to Smart Device’ in the sidebar. If you’re sharing a screenshot, you have the option to select up to 10 images at once, otherwise you’re limited to one video recording per session. Confirm your items and the Switch will load a page containing a QR code on the left side of the screen. Using your device’s camera or special QR code reader in Control Center (either is fine), scan the code and tap the notification to automatically join the console’s Wi-Fi network.
At this point, your device is connected to the Switch and you don’t need to scan the second QR code displayed on the console.
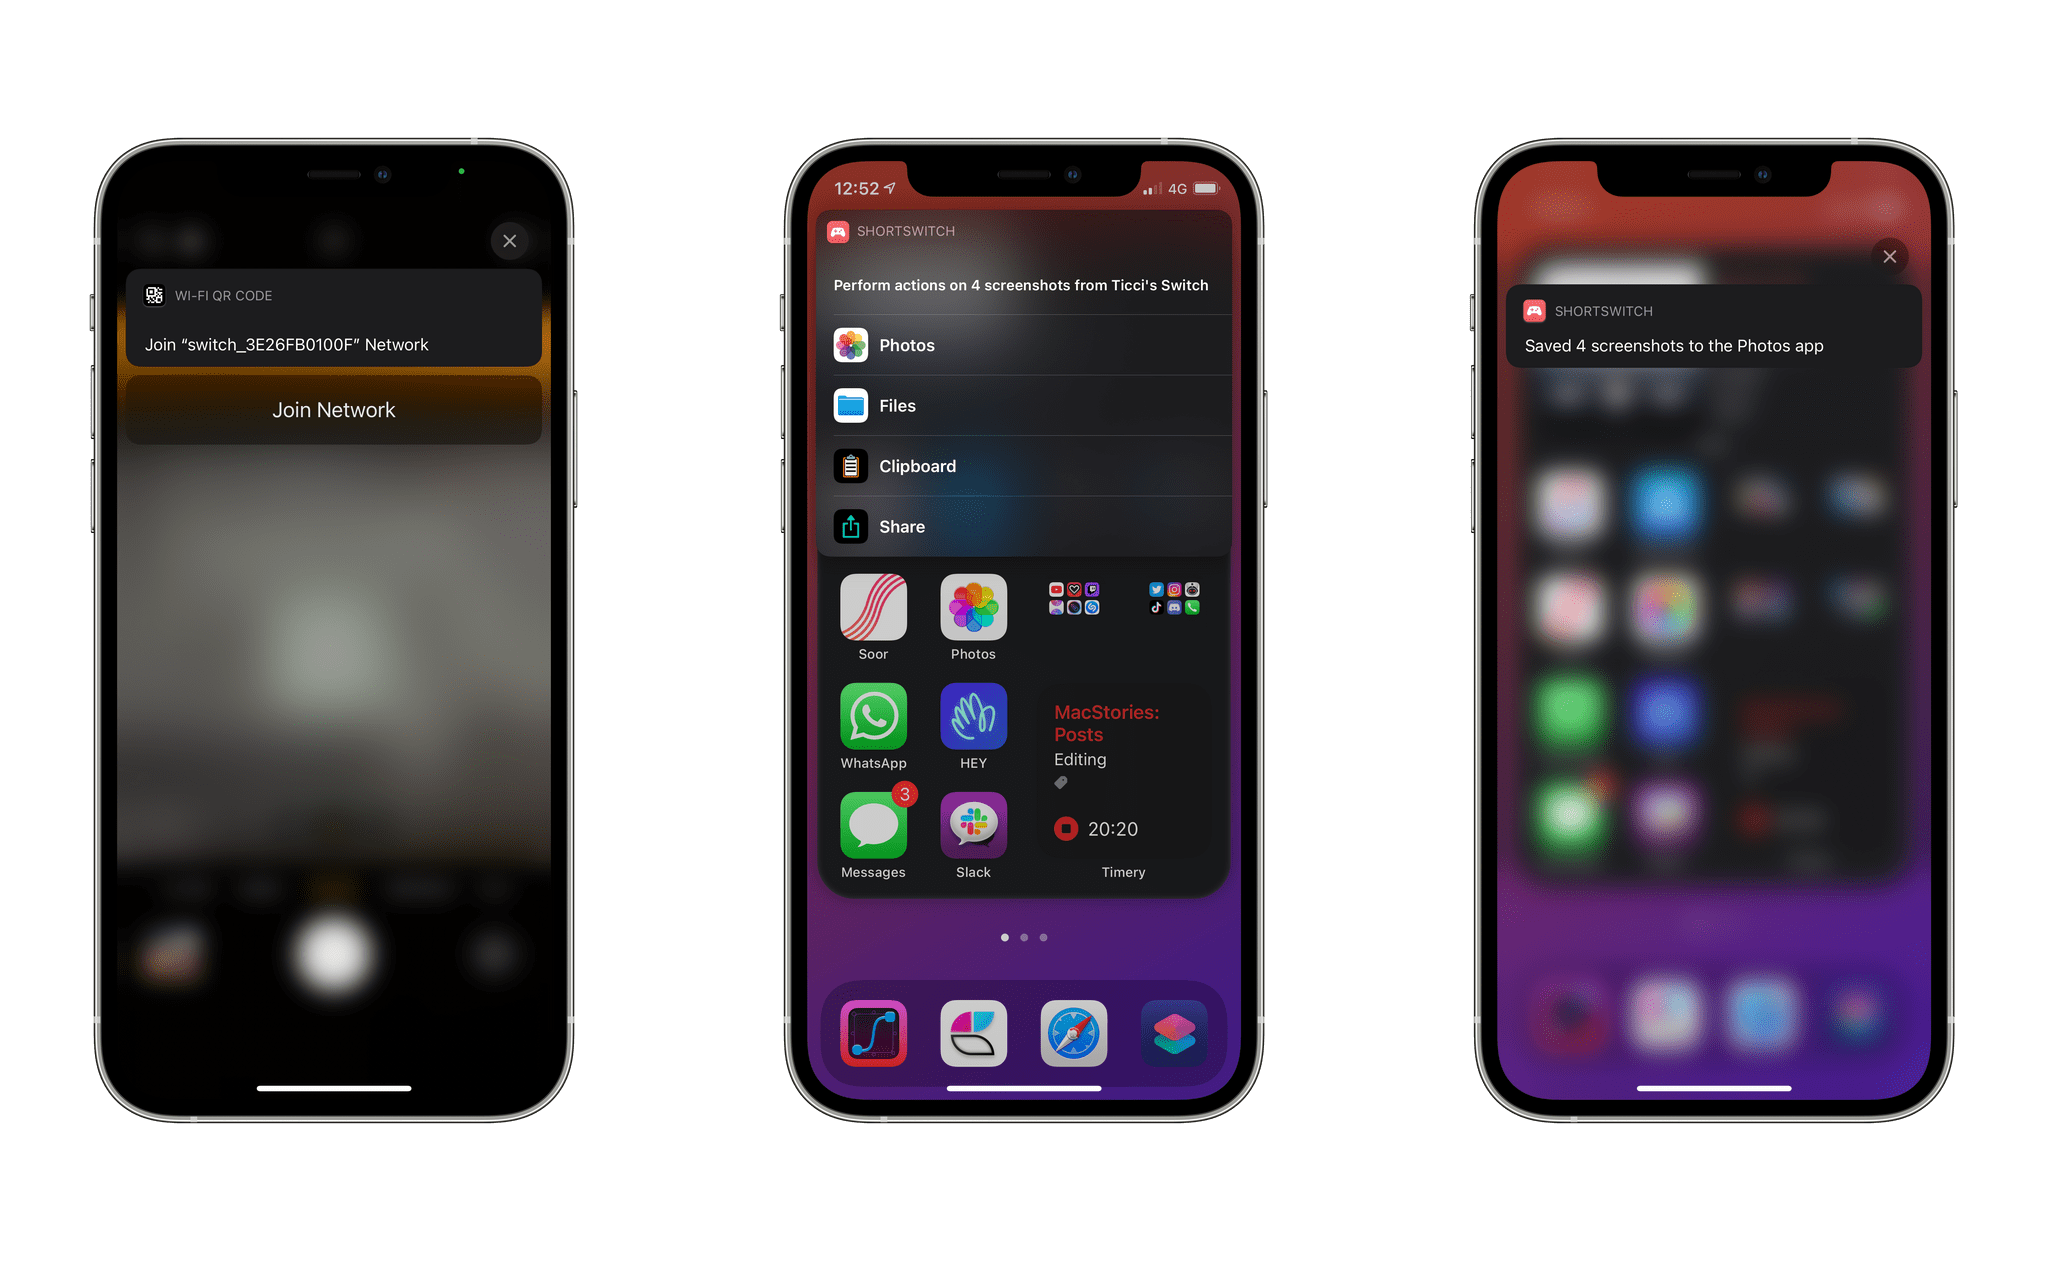
Run ShortSwitch in the Shortcuts app (or as a widget from the Home Screen), and you’ll be presented with a menu containing options to save media from the console in the Photos app or Files, copy items to the clipboard so you can paste them elsewhere, or share them via the share sheet and app extensions. Select the option you want and the items will be batch-transferred over Wi-Fi to the destination of your choice.
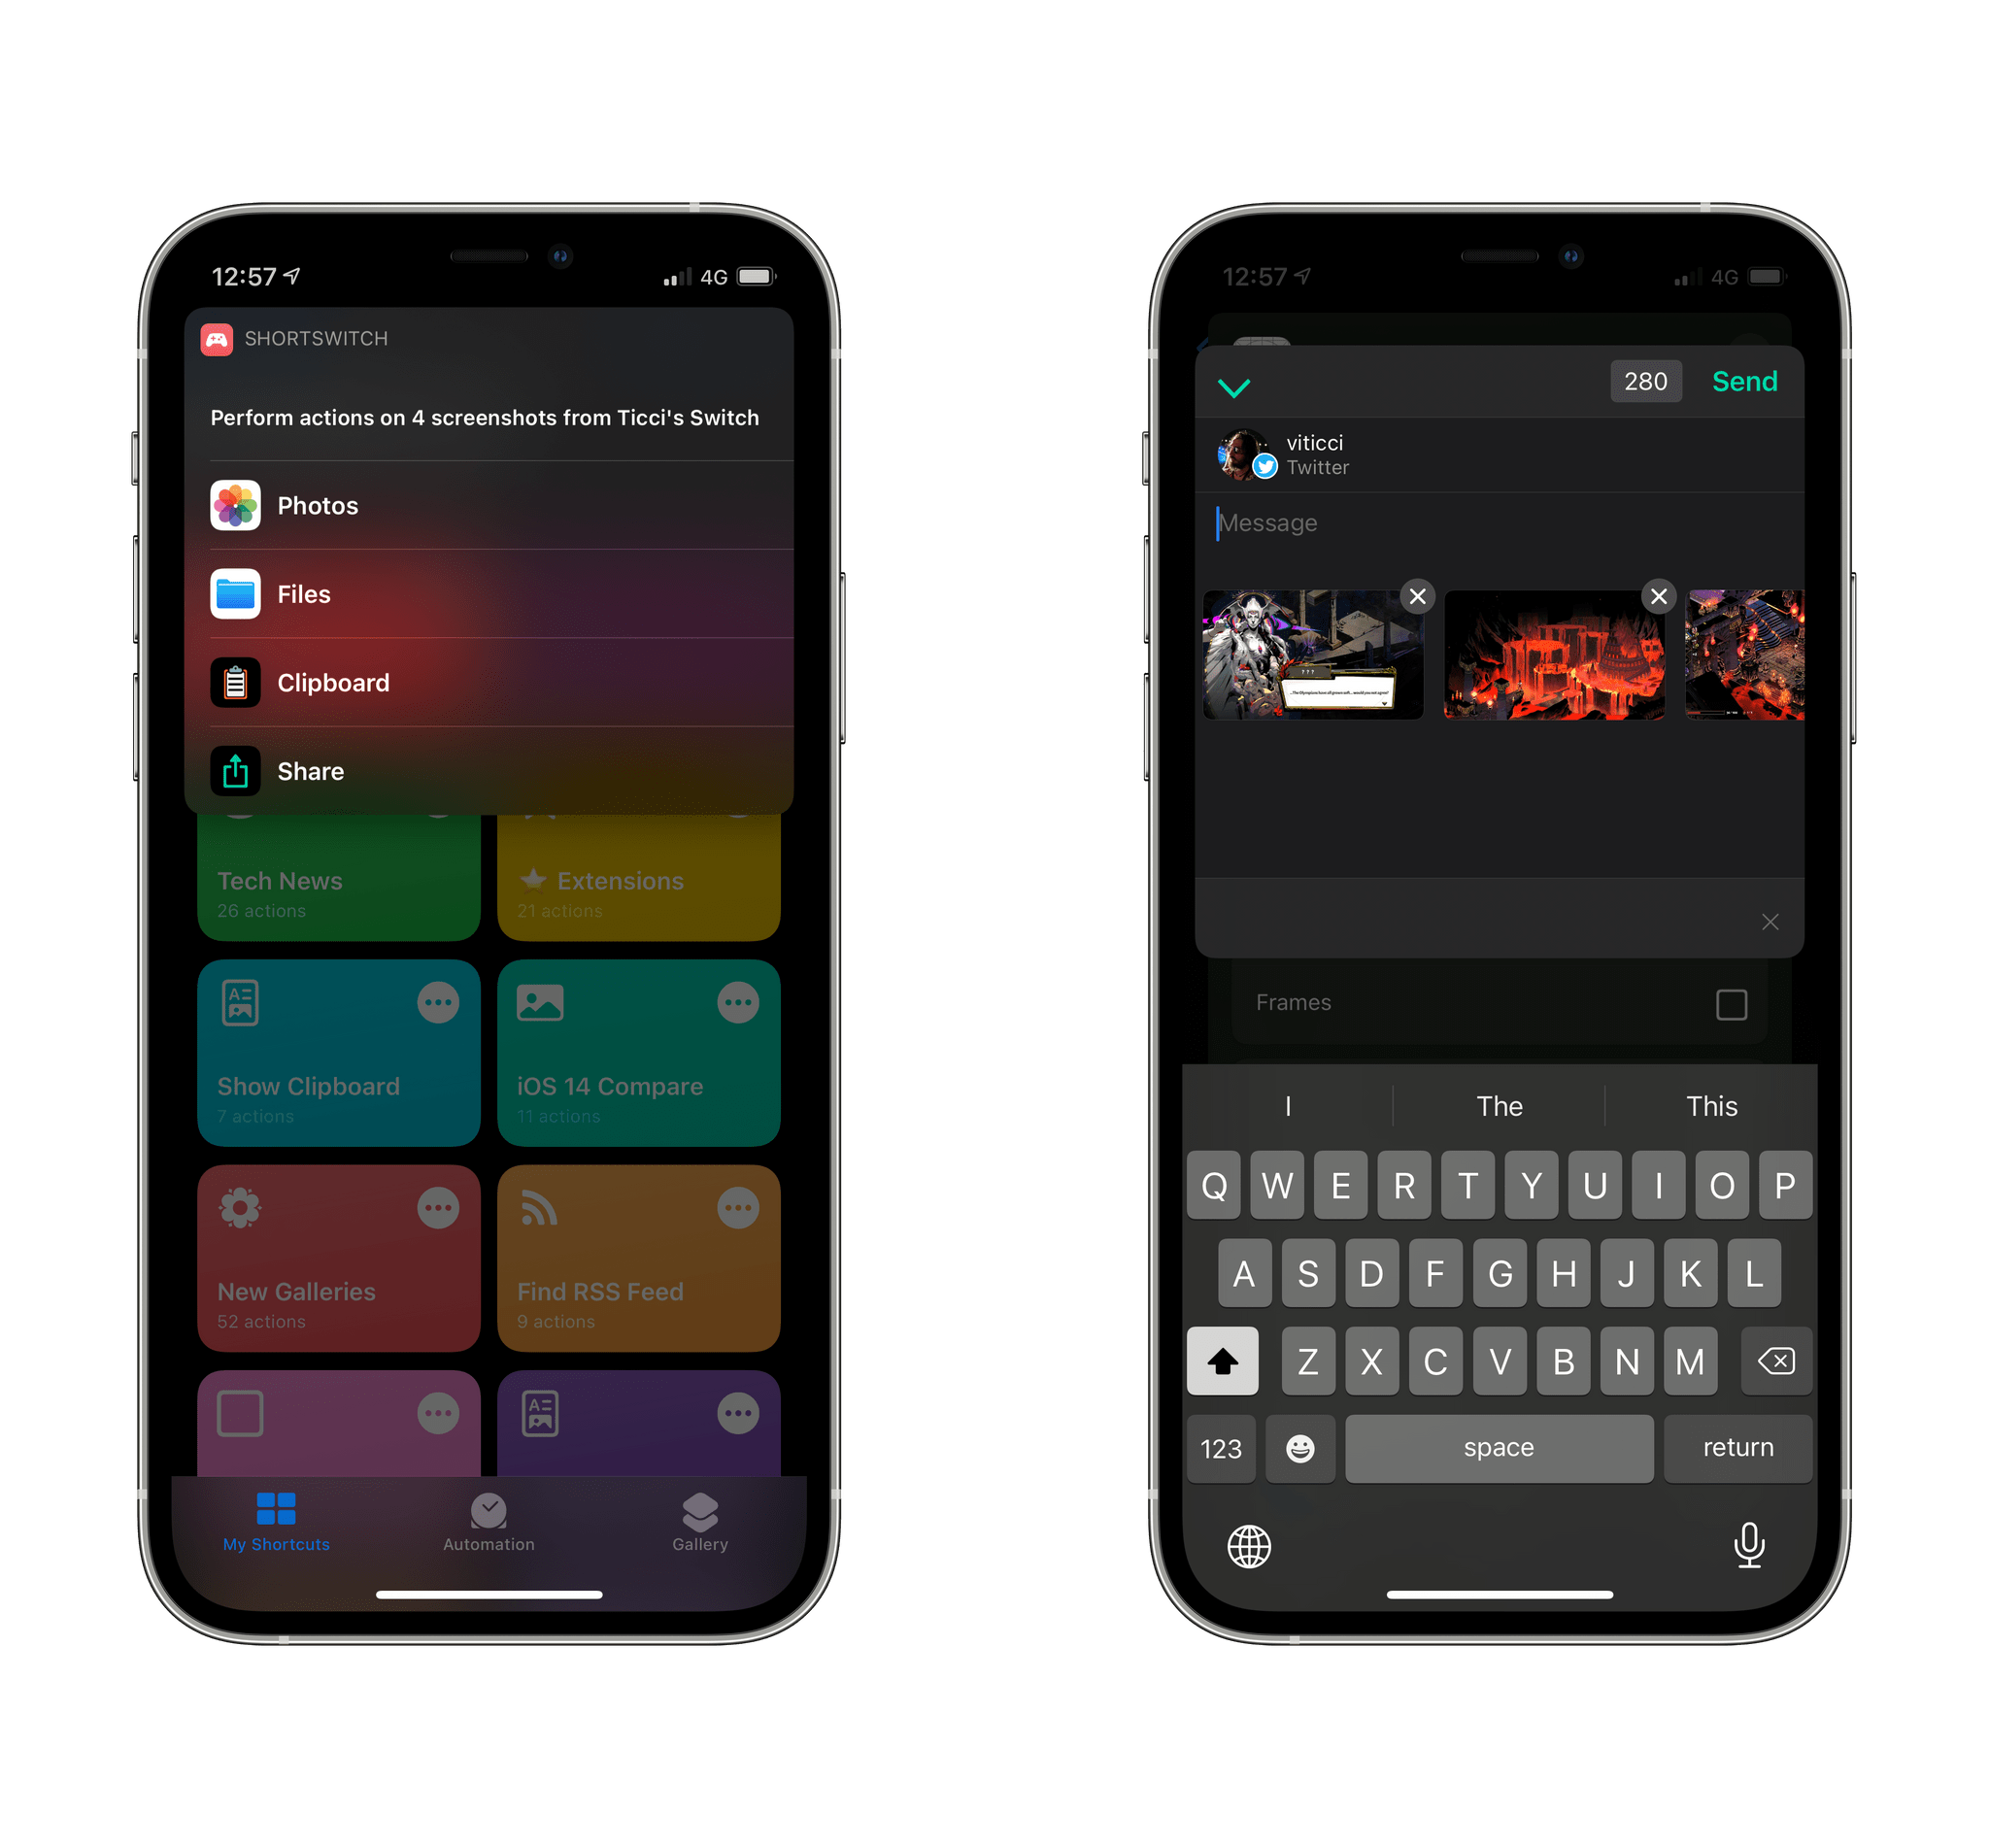
You can also use ShortSwitch to share multiple screenshots with app extensions. Pictured above: Linky.
And that’s it. No need to scan the second QR code, no need to save each item manually in Safari; just click ‘End’ on the Switch to close the Wi-Fi connection and go on about your day.
You can see how easy it is to use ShortSwitch in the video below:
Running ShortSwitch manually in the Shortcuts app. Replay
Using ShortSwitch as an Automation
We can take ShortSwitch to the next level and configure it as a Personal Automation in the Shortcuts app. This means ShortSwitch can run automatically as soon as your device detects it’s connected to the console’s Wi-Fi network, so you can avoid having to open the Shortcuts app or putting ShortSwitch on your Home Screen.
To configure ShortSwitch as an automation, follow these steps:
- Open the Automation page in the Shortcuts app
- Click the + button in the top right corner
- Select ‘Create Personal Automation’
- Scroll the page and choose the ‘Wi-Fi’ trigger
- Tap ‘Choose’ in the Network section and pick the Nintendo Switch network (this will show up if you’ve connected to the Switch at least once before) and tap ‘Done’
- Tap ‘Next’, then ‘Add Action’ and search for ‘Run Shortcut’
- Tap the empty ‘Shortcut’ field in the action and search for ShortSwitch in your list of installed shortcuts
- Tap ‘Done’ to save the automation
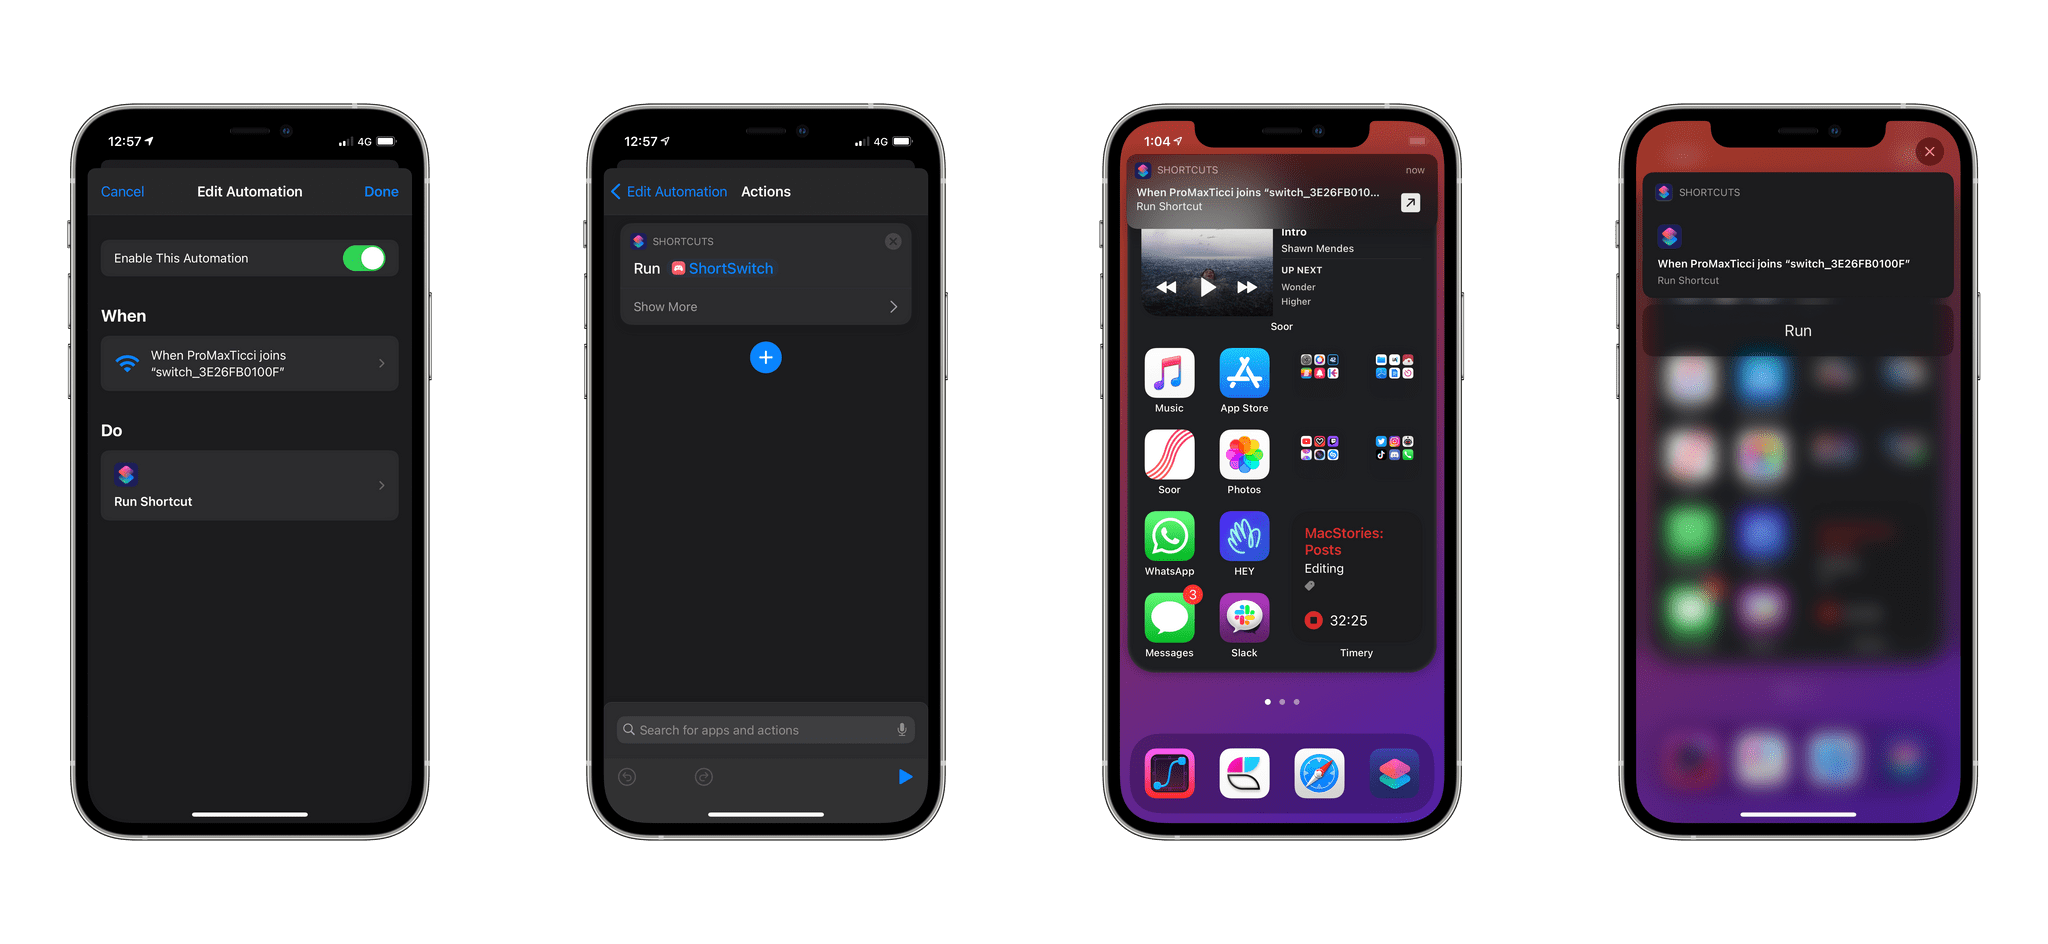
Now, whenever you connect to the Nintendo Switch Wi-Fi network with your iPhone or iPad, you’ll get a prompt asking you to confirm whether you want to run ShortSwitch. Press ‘Run’ in the alert and you’ll be able to save media from the Nintendo Switch from anywhere on your iOS or iPadOS device without opening the Shortcuts app.
You can check out ShortSwitch running as an automation in the video below:
Running ShortSwitch as an automation. Replay
Download ShortSwitch
I’ve been using ShortSwitch to copy Hades and Dragon Quest XI screenshots from my Nintendo Switch to my iPhone and iPad for the past few days, and it’s been a fantastic time-saver. I can finally tweet multiple screenshots at once from the Twitter app on my iPhone, and I’m no longer forced to transfer video recordings to my iPad using an SD card. Best of all, ShortSwitch does all this without requiring any additional tinkering on the user’s end: just install the shortcut, share media from your Switch, and you’re good to go.
You can find ShortSwitch below as well as in the MacStories Shortcuts Archive.
ShortSwitch
Wirelessly transfer screenshots or videos from a Nintendo Switch to an iPhone or iPad. After entering ‘sharing mode’ on a Switch console, the shortcut can connect to the Switch, fetch media, and enable you to save items to Photos or Files, copy them to the clipboard, share them via the share sheet, or frame them with the separate SwitchFrame shortcut.
- Which is basically anything these days. I’m pretty sure you can use a web browser on a smart fridge to navigate to the console’s webpage used to host screenshots and videos. ↩
- I’m currently jumping between the incredible Hades, Dragon Quest XI, and Super Mario 3D All-Stars – but I have so many more in my backlog. ↩