A couple of months ago, I decided to start learning Python.
I say “start” because, as a hobby to fit in between my personal schedule and work for the site, learning the language is still very much a work in progress. I hope I’ll get to an acceptable level of knowledge someday. Coming from AppleScript, another language I started researching and playing with earlier this year, the great thing about Python is that it’s surprisingly easy to pick up and understand. As someone whose job primarily consists of writing, I set out to find how Python could improve my workflow based on text and Markdown; I found out – and I’m still finding out – that Python allows for more flexible and intelligent string manipulation[1] and that some very smart folks have created excellent formatting tools for Markdown writers.
But this article isn’t strictly about Python. Soon after I took my decision to (slowly) learn my way around it, I asked my friend Gabe Weatherhead about possible options to write and execute Python scripts on iOS. Thanks to Gabe’s recommendation I installed Pythonista, and this app has completely changed my iOS workflow.
The iOS Workflow
A bit of backstory first.
The fact that I immediately wondered whether it’d be possible to “do Python” on iOS shouldn’t be a surprise. For the past 12 months, due to changes in my personal schedule, I’ve been forced to rethink my workflow entirely. With a focus on plain text and Markdown, I set out to find ways to ensure I would be able to get work done on iOS devices without limitations. I wanted to get the “I need a Mac for this” daily problem out of the equation; I wanted to be able to do the same work on all my devices. I wanted to automate tedious tasks I was doing every day; ultimately, I consolidated my workflow around devices and software I trust to get work done for me. I wanted the best for me.
I got a 3G iPad with Retina display, so I could put less strain on my eyesight and work from anywhere independently of availability of WiFi hotspots; I got a 32 GB model so I could comfortably cache music and podcast episodes on it. I upgraded my iPhone 4S to an iPhone 5, as I knew the improved cellular options and new antenna would let me get a signal in places – such as hospital corridors – where I knew I wouldn’t be able to work with “regular” 3G.[2]
I didn’t get the best options available for iOS devices: I bought the models that I knew wouldn’t let me down in case of necessity.
From a software standpoint, I got rid of apps that I wasn’t using regularly or that hadn’t been updated in a long time. If I were to reconstruct my workflow – and therefore, indirectly, my income – on a solid software foundation, I needed to do so with developers I could trust. I picked my weapons carefully: I realized plain text was my preferred way of writing and Dropbox my favorite cloud filesystem, so I combined them. It also helped that the Markdown/plain text community is fervent, passionate, and active. I chose iCloud to sync my personal information and settings for apps that support it, such as Downcast or Due. I understood that Evernote wasn’t meant to be a Markdown editor, so I started using it for what it’s really great at: collecting rich notes with images and other reference material. In trying new apps and services, I carefully selected the ones that came with native OS X and iOS apps, possibly with sync; those who follow me on Twitter know that I strive to find services that are ubiquitous and reliable, even when people tell me “you don’t need that on the iPad”.
I need my iOS devices (and especially my iPad) to allow me to get work done from anywhere.
Curating apps that enhance my workflow and finding software I can trust with my data isn’t simply my job as a “reviewer”: it’s an investment for the future of my business. The fact that I take pleasure out of writing about software is a different matter.
I was all set up: I had my plain text workflow with Dropbox, everything else in Evernote, my podcasts and music synced and cached. I had a few games, Twitter clients with sync, communication with my team happening through iMessage. I’m surprised I didn’t think of hooking up my car with the cloud, honestly. [3]
The experiment failed miserably. I started taking the iPad with me to write and publish posts for MacStories, but I was constantly reaching out to my MacBook Air in the other bag. So I stopped carrying the MacBook altogether: too bad one day I had to post a piece of news quickly, and got stuck on creating and uploading the image I needed for the article.
I spent entire weeks thinking about how to solve the issue. Eventually, I came to the realization that I didn’t need more apps, I needed a system to automate iOS. I was missing the little scripts and shortcuts and macros that, for power users, make OS X computers powerful machines to get work done quickly and efficiently. I was missing my automation setup: my Keyboard Maestro, my Alfred, my Hazel. Little things quickly add up: Markdown links take longer to put together[4] and screenshots don’t come out like I want them to. Losing all my scripts and macros in the transition to iOS meant I could only do some things, and not as fast as I would on a Mac. I needed to fix it.
I turned to my friend Gabe. Over at Macdrifter, Gabe writes about “Mac and iOS related material with a slant towards the technical”. Macdrifter is, by far, my favorite tech/indie blog of 2012: Gabe doesn’t write rumors or linkbait; he links to stuff he finds interesting and only reviews software he actually uses. Even better, he comes up with tips and workflows that are very specific (the so-called “niche”) but also incredibly useful.
Initially, Gabe introduced me to Nebulous Notes, a Markdown text editor that works with Dropbox and has support for macros. It has become my default text editor after a couple of weeks of experiments. This is the result of fine-tuning the app to my own needs.
Later, I pinged Gabe about my interest in Python, and he suggested I’d take a look at Pythonista, developed by Ole Zorn. I’m glad I did: Pythonista has profoundly changed the way I approach iOS devices when I know that work needs to be done. I’m not afraid to leave my MacBook at home; in fact, several of the posts published on MacStories in the past month have been produced entirely from an iPad.
Let me show you how I achieved iOS workflow nirvana.
Writing Workflow
I’ve previously written about my writing workflow; you can, however, find more recent additions here and here. As far as iOS is concerned, the biggest change was Nebulous Notes, which, like I said, altered my perception of iOS text editors thanks to macros. If I need to write a blog post on the iPad or iPhone, I can’t use any other app.
I have very specific needs when it comes to “work”. In an unordered list of importance:
- I need to publish blog posts to WordPress.
- I need to generate valid HTML for the Markdown I write my posts with.
- I want to visually preview the Markdown text to make sure the layout of the post is right.
- I need to upload images to our CDN.
- I need to convert images to another format and change their output quality.
- I need to upload images to Dropbox quickly.
- For articles that include iPhone screenshots, I want those screenshots to look like this.
- Once I have the link to an image, I need to generate the proper
imgHTML for MacStories. - Occasionally, I may have to download files.
- I generally create reminders for things I have to do in OmniFocus or Due.
- I bookmark links I find interesting with Pinboard.
On the Mac, these tasks are made simple by Sublime Text 2 and the Finder. As I’ve previously outlined, Sublime Text can be extended with some fantastic Markdown-related plugins; with the Finder, I can easily upload images from the Desktop to our CDN, I can access any Dropbox file thanks to the Dropbox app, and, when it comes to quick image modifications, I’ve come to trust Acorn and Keyboard Maestro to do the heavy work for me.
Pythonista
Pythonista is a Universal app for writing and executing Python scripts on iOS. There are some differences in terms of navigation and interface between the iPhone and iPad versions, but, overall, Pythonista is consistent across both platforms.
Like any respectable code editor, Pythonista comes with features like syntax highlighting and code auto-completion. For highlighting, there are six color themes to choose from in the Settings, including two Solarized options (dark and light); in the Settings, you can also change the editor font (Adobe’s new Source Code Pro is available), font size, line spacing, and tab width.[5]

Code completion is my favorite feature of Pythonista’s editor. For someone like me who’s just getting started with Python, the app offers an unobtrusive yet highly convenient way to auto-complete your code: suggestions appear directly above the keyboard and they’re colored according to your color scheme. When typing, you can tap on the “auto-complete bubble” to let Pythonista complete your code; code completion is also smart in that only functions/class names/etc related to a module you’ve imported will be suggested.
Code completion can be deactivated in the Settings alongside other options enabled by default. You can set Pythonista to highlight matching (), which is a nice feature to have as it provides a subtle hint to confirm you’ve matched parentheses in the right way. But what I really like is auto-pairing: characters like parentheses, square brackets, and single/double quotes will be matched with closing characters automatically. If you’re coming from nvALT or Sublime Text 2, you should be familiar with this option. For instance, if you beging typing ( a closing ) character will be immediately put on the right, with the cursor in the middle ready to type. Or, if you select text and hit ( the entire text will be wrapped inside ( ).
Character pairing can be confusing to some people, but I find it extremely handy. It speeds up my typing considerably.
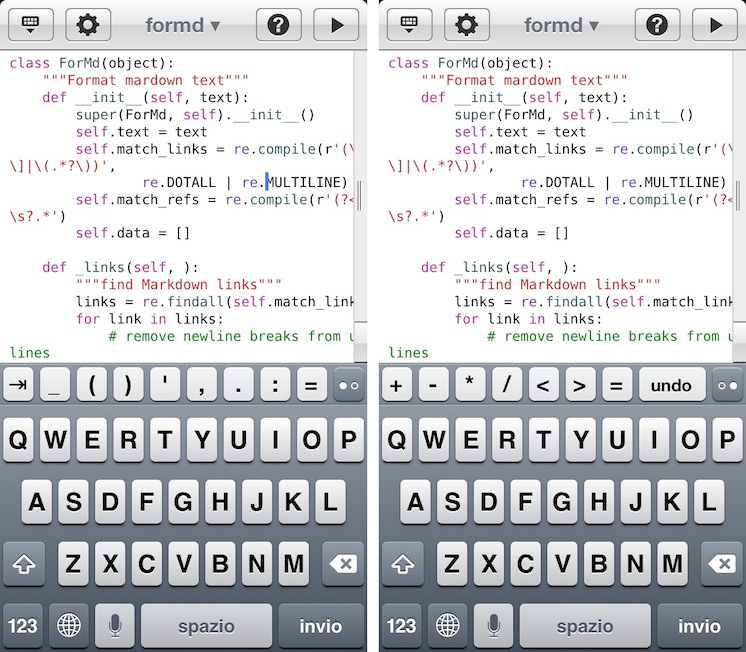
Typing in Pythonista, however, is also aided by the extra row available above the standard iOS keyboard. First introduced by iA Writer for iPad, Pythonista follows the trend of several Markdown editors and puts often-used characters directly above the main keyboard, so you won’t have to open the numeric or math keyboard when writing code. These characters include the usual suspects (quotes, parentheses, tab, etc), but with a spin: on the iPhone, due to the smaller screen, the extra row has been “split” in two modes that you can switch with a button on the right. The second mode is where you’ll find the app’s Undo function.
The extra keyboard row has two more tricks up its sleeves. First, most keys can be long-pressed to reveal additional keys in a popup: Undo becomes Undo/Redo and single quotes become single/double quotes and percent sign.
Additionally, Pythonista uses the extra row as a swipe area for the “Hooper Selection” made popular by a concept video earlier this year. Swipe selection only works with one finger (and you can’t move up/down through empty lines), but it’s still a nice touch to make editing quicker and more touch-oriented.
With a combination of code completion, character auto-pairing, extra keyboard row, and swipe selection, I find writing code in Pythonista intuitive and accessible. The fact that everything’s entirely touch-based gives the code editor a feeling of “manipulation” that I haven’t seen in desktop editors.[6]
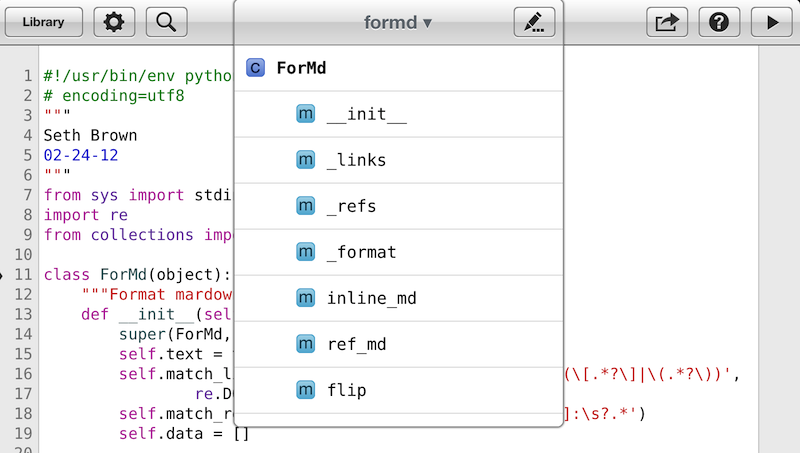
[Update]: There’s a search field in the code editor; you can also navigate your code’s structure from a document browser available in the top title bar.
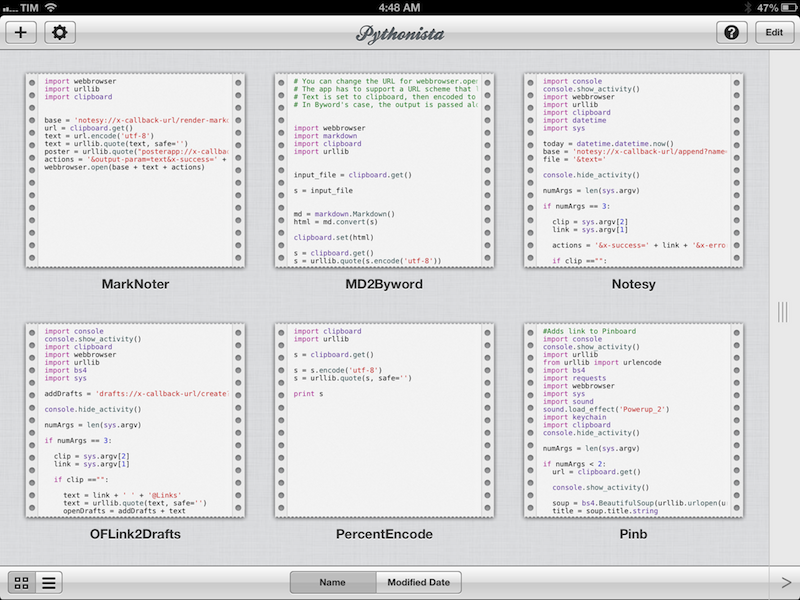
Pythonista lets you organize scripts in the Script Library. There are two views to choose from: a “snippet view”, which lets you see scripts as thumbnails with a preview of the first lines of code, and a more traditional list view. Both views can be sorted by name or modified date; you can add scripts with a + button at the top and delete existing ones by tapping on the Edit button.
A downside of Pythonista is that the Script Library doesn’t offer further organizational features to better sort your scripts. You can’t create folders, and it gets pretty confusing in snippet view; for the time being, I’m using list view, but it takes time to find scripts. I would definitely welcome an option to organize scripts by category or purpose.
Due to restrictions imposed by Apple, Pythonista can’t have a sync feature to import executable code from external sources like Dropbox. You can export, but you can’t import – not even from iTunes.[7]
There is, of course, a workaround. Developer Ole Zorn came up with a way to create new scripts off GitHub Gists: make sure you have a Gist URL in your clipboard, run the script, and you’ll have a new Python script in your Library. Alternatively, the Pythonista Community Forums are already filling up with ideas to simply click a bookmarklet to make the Gist importing process even easier. Overall, there’s no doubt Pythonista could use easier importing options, but unfortunately that is not allowed by Apple. Maybe someone will create a script to import a public .py file stored on Dropbox.
Personally, keeping scripts in sync between the two versions of Pythonista and my Mac (therefore Dropbox) is what makes me waste the most time in the app. There’s no way around the fact that you’ll need to organize files manually.
For someone who’s getting started with Python, Pythonista’s best feature is the in-app documentation. Available in a Help menu from the Script Library or code editor, it is based on the official Python 2.7 documentation and it has been reformatted for the iPad and Pythonista. The documentation browser has a Home button to go back to the initial screen, arrows to go back/forward, and a search box. There’s also a button to open a page’s Table of Contents and jump to a section directly, though this is only available on the iPad.
The documentation comes with a full Language Tutorial, Library Reference, Linguage Reference, Global Module Index, General Index, and Glossary. The Tutorial and Reference guides are fantastic tools to start learning Python right inside the app. Ole enhanced code snippets to include “Copy” and “Open in Editor” buttons that will let you easily copy code samples and play around with them in the editor.
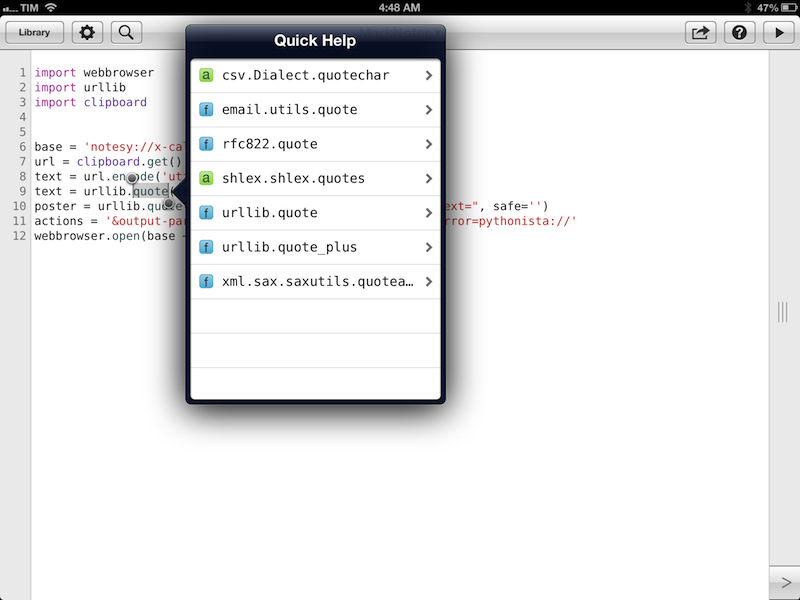
The documentation is directly integrated into the code editor. Simply select any class, module, or Python term, hit Help, and a popover (on the iPad) will show the relevant documentation entries in an inline Quick Help menu. Tap, and the Quick Help will jump to the result, highlighting it. On the iPhone, Quick Help is shown in a standard view overlaying the code editor; on the iPad, you can expand the Quick Help popover to a full window with one tap.
Don’t underestimate the convenience of readily-accessible inline documentation: especially on the iPad, and again, especially when you’re not a master of Python, it’s incredibly handy to be able to quickly check out proper module names and syntax.[8]

Pythonista’s console deserves a mention too. Available with a single swipe to the left from the editor (grab the handle on the right side and pull), the console is where ouput gets printed and results are displayed. There’s an interactive prompt (with command history) to try out Python scripts quickly, and the same text field is also used for raw_input when you need to enter text manually in the console.
Pythonista and iOS
Pythonista supports several modules of the standard Python library, but, due to limitations of iOS, it can’t support everything a desktop Python installation can. Aside from importing external modules and libraries – something anyone can do with Python on a computer – Ole had to come up with specific and clever ways to let Pythonista access data outside of its confined app sandbox.
For example, you won’t be able to programmatically read files from the filesystem on iOS: there’s no “Desktop” or “Documents” folder to read from on iOS. For the same reason, you won’t be able to “save” files to specified locations on your local filesystem, as Pythonista can’t break open the sandbox and, say, process a file for GoodReader.
However, not all hope is lost. If you think about it, there is one layer of data that is constantly shared across iOS apps: the system clipboard. Text and images we copy on iOS are stored in the clipboard (also known as “pasteboard”), and they are available at a system-wide level, albeit it’s up to the single developer to determine which kind of content can be pasted or copied – e.g. you can’t paste a photo into Tweetbot’s compose box.
Pythonista can read from and write to the system clipboard. The clipboard module, in fact, has single-handedly reinvented my usage of iOS in combination with Pythonista and third-party apps. I am not dramatizing this: as I’ll explain later in this article, the possibility to read and set text strings and photos through the iOS clipboard has proven to be a simple, yet fantastic way to automate several areas of my iOS workflow. As I’ll detail, x-callback-url has also played an important role.
To overcome the limitations of iOS, Ole Zorn has tried to access every area of the system he could configure with Pythonista. The aforementioned clipboard module can get and set text and images; there’s a canvas module to display vector graphics, and a scene module to draw 2D graphics and animations. There are actual, playable games developed with these modules in the built-in examples[9] and I’ve seen users already experimenting with their own takes on graphical representations of Pythonista’s library.
There are more Pythonista modules that I’ve used in my scripts. The console module, in particular, is one I use on a daily basis: aside from controlling text output (it can clear, set font, and set colors), console can be used directly in the editor as well. Coming from AppleScript, console.alert and console.input_alert are reminiscent of display dialog and display alert in that they use native iOS alerts with buttons or text fields to enter text manually. The console module also allows for secure input, login alerts, and, my favorite, a show_activity command to show the standard iOS network activity indicator in the status bar. I have employed this in a variety of scripts that fetch web data.
The keychain module is another powerful addition. It is secure password storage that lets you store passwords within Pythonista to reuse in other scripts. You can set passwords with keychain.set_password and retrieve them by importing keychain in a script and using get_password. This is my preferred way to save passwords internally within the app without writing them as strings in a script.
The sound module shouldn’t be underestimated: it allows scripts to play simple sound effects such as various version of “ding” or 8-bit inspired Arcade “jump” and “powerup”. I like how sound adds a new layer of presentation to scripts, which are otherwise primarily text based.[10]
There are some modules that aren’t part of the Python Standard Library that are included in Pythonista. I’m using some of them in my workflow.
- bs4 — BeautifulSoup 4
- Dropbox
- feedparser — Universal Feed Parser
- Markdown
- Python Imaging Library
- Requests – HTTP for Humans
Last, the editor module. I don’t use this in any of my scripts, but I believe it could pave the way for an evolution of the Pythonista engine into something different.
Here’s why: editor gives you access to the text of the script you’re currently editing. You can get the current selection, get selected text, replace it, or set a new selection. The syntax is simple and it allows, through a couple of lines, to do things like select & replace – with all the combined functionalities of other Python modules. If this doesn’t yet ring a bell to you, think about this: plugins for Sublime Text 2 are written with the Sublime API and are based on Python. As it stands now, editor is a great way to automate text selections and replacements in the code editor; I can’t wait to see if this will evolve in something bigger.
The Actions Menu
The potential of the editor module can be grasped by playing around with the Actions menu of Pythonista. Configurable in the Settings, Actions are shortcuts to scripts from Pythonista’s Library; instead of switching back and forth between the editor and the library for workflows that require multiple scripts, you can just bring up the Actions popover and run a script from there.
If you’ve created scripts that rely on the editor module for text manipulation, it makes sense to add them to the Actions menu for easier access; I, however, have found another advantage of showing my scripts in the Actions menu – the clipboard. To concatenate scripts together, I can just make sure they write their results (usually images or text) to the system clipboard; in this way, I’ll be able to start another script from the Actions menu, as I know it will get data from the clipboard I’ve just set. Ideally, I’d like to see a future version of Pythonista with support for “workflows” – sets of “rules” that determine how data (the clipboard) should be processed by groups of separate scripts, in which order.
The URL Scheme
For the joy of URL scheme aficionados, Pythonista comes with a URL scheme. You can launch the app itself with pythonista://, but the good stuff lies in the parameters you can pass along with the URL. Firstly, you can open a specific script using something like pythonista://MyScript – but even better, you can open and run a script by using pythonista://MyScript?action=run in the URL. To use this, a script with that exact name will have to be in your Library, and no other script will have to be running upon calling action=run.
The really good stuff is what you get by combining the URL scheme with command line arguments. As documented by Ole, you can pass one argument at a time by using &args= or multiple ones with &argv= in the URL. This is best explained with an example: because of the URL scheme, you can create JavaScript bookmarklets that launch Pythonista and pass command line arguments in the URL.
Let’s say I want to pass a webpage’s URL and title as two separate arguments to a Pythonista script. I can use the following line of JavaScript as a bookmarklet in Safari:
javascript:window.location='pythonista://Pinboard?action=run&argv='+encodeURIComponent(document.title)+'&argv='+encodeURIComponent(document.location.href);
The bookmarklet will launch my Pinboard script (more on this later) with argv[1] being the webpage title, and argv[2] as the URL.
Unfortunately, there’s no Launch Center Pro for iPad yet, but once you start thinking about the possible implementations of Pythonista’s URL scheme with web data from Safari, you’ll see how your workflow can benefit from this kind of automation.[11]
Home Screen Shortcuts
Unsurprisingly, Ole thought of his own way to let users enjoy the convenience of the URL scheme without waiting for a decent launch manager to arrive on the iPad.[12]
You can create Home screen bookmarks for Pythonista scripts. Simply head over this webpage created by the developer, enter your script’s name (it’s case-sensitive), hit Create Shortcut, then add the page to your Home screen using Safari’s Add Bookmark menu. The webclip will have a nice Pythonista-themed icon.
Upon tapping, a Pythonista Home screen bookmark will briefly open a blank page and then immediately redirect to the script you’ve configured in the Pythonista app. I’m fairly certain there’s no way to avoid showing a blank page for a second before redirecting to Pythonista; fortunately, it’s really just the fraction of a second, as the redirecting process is instantaneous both on my iPad 3 and iPhone 5.
I use bookmarklets for URLs I need to send to Pythonista from Safari (or iCab), but I prefer Home screen icons for data that’s been copied to the clipboard.
My Scripts
The Pythonista scripts I use on a daily basis are primarily oriented towards speeding up my Markdown workflow. Thanks to input and directions from Ole, I’ve put together a collection of scripts that allow me to get from raw Markdown text to final HTML (with images) ready for publishing in just a matter of seconds, rather than several minutes. I’ve also created scripts that rely on URL schemes to make the iOS apps I use communicate better, automatically.
Markdown to Poster
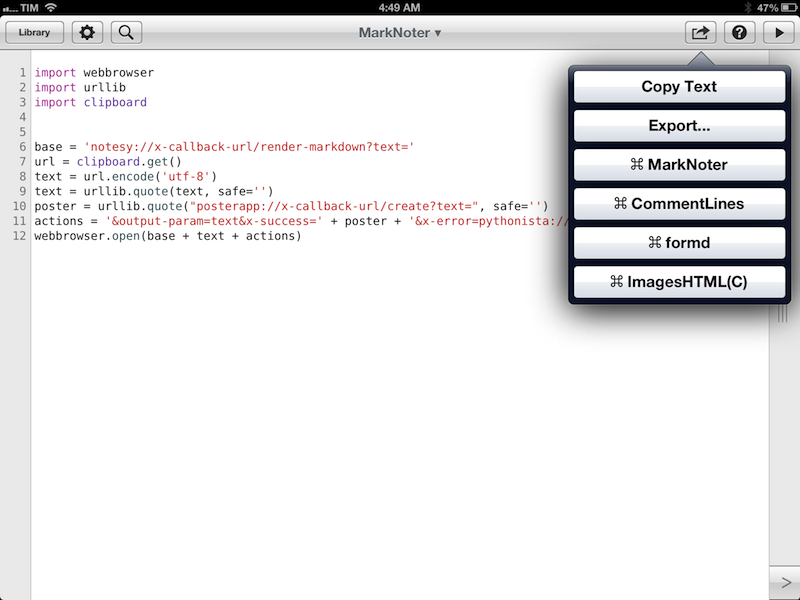
My most-used script is actually just a combination of simple Python and x-callback-url. It sends the contents of the clipboard to Notesy, which renders the Markdown and passes it to Poster – an app I use to publish posts on MacStories – as HTML. It takes less than 3 seconds to complete and return a new HTML post in Poster.
import webbrowser
import urllib
import clipboard


base = 'notesy://x-callback-url/render-markdown?text='
url = clipboard.get()
text = url.encode('utf-8')
text = urllib.quote(text, safe='')
poster = urllib.quote("posterapp://x-callback-url/create?text=", safe='')
actions = '&output-param=text&x-success=' + poster + '&x-error=pythonista://'
webbrowser.open(base + text + actions)
Not nearly as adopted as it should be, x-callback-url is a standardized protocol for iOS inter-app communication that enhances URL schemes with parameters apps can send/receive to trigger specific actions. In the words of Greg Pierce, its developer:
The goal of the x-callback-url specification is to provide a standardized means for iOS developers to expose and document the methods they make available to other apps. Using x-callback-url’s source apps can launch other apps passing data and context information, and also provide parameters instructing the target app to return data and control back to the source app after executing an action.
In the protocol’s draft specification, Greg details the structure of x-callback-url and how developers can easily take advantage of it by supporting parameters for source and target apps.
My script does indeed take advantage of the x-success parameter provided by x-callback-url. Most iOS apps that use URL schemes have implemented them in a one-way communication method: launch this URL to open this app. Developers who have spent time structuring their URL schemes often come up with richer actions: launch this URL to open this app in a specific view. Developers who rely on x-callback-url and respect the specification can get access to extra parameters such as source, success, error, and cancel. These enable powerful if/then clauses in URL schemes: if the action in the target app fails, go back to source app.
I write and edit in Nebulous, but I publish articles using Poster. As I was researching options to automate my workflow, I stumbled across the Notesy URL scheme. It seemed too good to be true: it supports x-callback-url and comes with an action to render Markdown and pass it to another app or the system clipboard. Essentially, given properly encoded text, Notesy can act as a “bridge” between apps to render Markdown to HTML – without forcing you to tap any buttons.
Why Notesy instead of the built-in Markdown module, though? First, Notesy uses the Sundown Markdown library, the same implemented by the best Markdown editors for iOS. More importantly, Notesy can run SmartyPants upon generating Markdown, which I find particularly useful for my frequent use of en dash on MacStories. Last, Notesy is really fast at rendering Markdown and I like to support an app that properly and cleverly utilizes x-callback-url.
The script itself is very straightforward: base is the Notesy URL scheme we’ll use to send text; url gets the text from the clipboard, encodes it in UTF–8 and replaces special characters using percent-encoding with urllib.quote.
The second part of the script prepares the URL that Notesy will open if it succeeds in rendering Markdown. We’re telling Notesy: if you successfully render Markdown, then open Poster with the HTML as article text. There are two things to keep in mind here: to pass along text with render-markdown in Notesy, use output-param. As you can see, I’m using text to encode text and send it as the result of Notesy’s rendering. Second, when an app launched via URL scheme (such as Notesy) has to open another URL scheme (in our case, Poster’s one), always percent-encode the second URL.
In the last line, the webbrowser module of Pythonista simply launches the complete URL and executes the set of actions described above. The nice thing about webbrowser is that it’ll open standard http:// links within Pythonista, but it can be used to launch other URL schemes without any confirmation dialog.
To show how, in practice, the script takes seconds to complete, I’ve made a video.
Convert Markdown
If, for some reason, I don’t want to convert Markdown using Notesy, I can rely on Python-Markdown to do the conversion for me. Available in Pythonista 1.2, Python-Markdown expects and returns Unicode input.
import markdown
import clipboard

input_file = clipboard.get()

s = input_file

md = markdown.Markdown()
html = md.convert(s)

print html
clipboard.set(html)
The script simply expects Markdown text to be in the clipboard, converts it to HTML using Python-Markdown, and sets the clipboard to the newly generated HTML. I find it useful for quick Markdown to HTML conversions.
Markdown to Byword
I’ve already explained why I believe Byword has the best MultiMarkdown previews on iOS. In spite of the lack of true MultiMarkdown converting in Pythonista, I’ve still put together a modified version of the script above to open the preview in Byword via the app’s URL scheme.
import webbrowser
import markdown
import clipboard
import urllib

input_file = clipboard.get()

s = input_file

md = markdown.Markdown()
html = md.convert(s)

clipboard.set(html)

s = clipboard.get()
s = urllib.quote(s.encode('utf-8'))

webbrowser.open('byword://new?text=' + s)
I hope Metaclassy will consider adding a more powerful URL scheme to Byword.
formd
Thanks to Ole, I’m using a simple adaptation of Seth Brown’s formd Markdown formatting tool to flip the style of Markdown links from inline to reference and viceversa. As Seth explains, “inline Markdown is difficult to read, but useful for writing and editing because the linked text and URLs are adjacent to the words you are writing”. I like to write with inline links, but I prefer to archive my articles as reference-style Markdown files.
#!/usr/bin/env python
# encoding=utf8
"""
Seth Brown
02-24-12
"""
from sys import stdin, stdout
import re
from collections import OrderedDict

class ForMd(object):
    """Format mardown text"""
    def __init__(self, text):
        super(ForMd, self).__init__()
        self.text = text
        self.match_links = re.compile(r'(\[[^^]*?\])\s?(\[.*?\]|\(.*?\))',
                re.DOTALL | re.MULTILINE)
        self.match_refs = re.compile(r'(?<=\n)\[[^^]*?\]:\s?.*')
        self.data = []

    def _links(self, ):
        """find Markdown links"""
        links = re.findall(self.match_links, self.text)
        for link in links:
            # remove newline breaks from urls spanning multi-lines
            parsed_link = [s.replace('\n','') for s in link]
            yield parsed_link

    def _refs(self):
        """find Markdown references"""
        refs = re.findall(self.match_refs, self.text)
        refs.sort()
        refs = OrderedDict(i.split(":", 1) for i in refs)
        return refs

    def _format(self):
        """process text"""
        links = (i for i in self._links())
        refs = self._refs()
        for n, link in enumerate(links):
            text, ref = link
            ref_num = ''.join(("[",str(n+1),"]: "))
            if ref in refs.keys():
                url = refs.get(ref).strip()
                formd_ref = ''.join((ref_num, url))
                formd_text = ''.join((text, ref_num))
                self.data.append([formd_text, formd_ref])
            elif text in refs.keys():
                url = refs.get(text).strip()
                formd_ref = ''.join((ref_num, url))
                formd_text = ''.join((text, ref_num))
                self.data.append([formd_text, formd_ref])
            elif ref not in refs.keys():
                parse_ref = ref.strip("()")
                formd_ref = ''.join((ref_num, parse_ref))
                formd_text = ''.join((text,ref_num))
                self.data.append([formd_text, formd_ref])

    def inline_md(self):
        """generate inline markdown """
        self._format()
        text_link = iter([''.join((_[0].split("][",1)[0],
            "](", _[1].split(":",1)[1].strip(), ")")) for _ in self.data])
        formd_text = self.match_links.sub(lambda _: next(text_link), md)
        formd_md = self.match_refs.sub('', formd_text).strip()
        yield formd_md

    def ref_md(self):
        """generate referenced markdown"""
        self._format()
        ref_nums = iter([_[0].rstrip(" :") for _ in self.data])
        formd_text = self.match_links.sub(lambda _: next(ref_nums), md)
        formd_refs = self.match_refs.sub('', formd_text).strip()
        references = (i[1] for i in self.data)
        formd_md = '\n'.join((formd_refs, '\n', '\n'.join(i for i in references)))
        yield formd_md

    def flip(self):
        """convert markdown to the opposite style of the first text link"""
        first_match = re.search(self.match_links, self.text).group(0)
        if '(' and ')' in first_match:
            formd_md = self.ref_md()
        else:
            formd_md = self.inline_md()
        return formd_md

if __name__ == '__main__':
    import clipboard
    import console
    md = clipboard.get()
    if md:
            console.clear()
            text = ForMd(md)
            [clipboard.set(t) for t in text.flip()]
            final = clipboard.get()
            print final
The text output is set back to the clipboard so I can pass it to another script or paste it in my editor of choice. In the future, I’d love to see Nebulous Notes being capable of launching URL schemes if only to trigger my Pythonista scripts directly from the app.
Screenshots
This is one of the Pythonista scripts I use the most: when I was beta-testing Pythonista 1.2 and Ole added support for images, I knew this would become the script that would allow me not to require a Mac for image processing anymore.
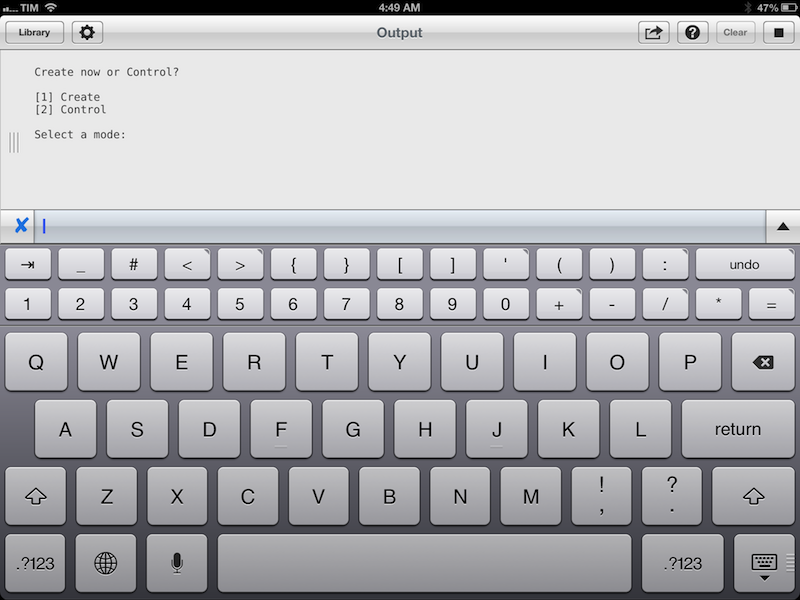
import clipboard
import Image
import console


im1 = clipboard.get_image(idx=0)
im2 = clipboard.get_image(idx=1)
background = Image.new('RGBA', (746,650), (255, 255, 255, 255))

def main():
        console.clear()
        print "Generating image..."
        console.show_activity()

        _1 = im1.resize((366,650),Image.ANTIALIAS)
        _2 = im2.resize((366,650),Image.ANTIALIAS)
        background.paste(_1,(0,0))
        background.paste(_2,(380,0))
        background.show()
        console.hide_activity()

        clipboard.set_image(background, format='jpeg', jpeg_quality=0.80)
        print "\n\n Image set to clipboard"


console.clear()
print "Create now or Control? \n"

print "[1] Create"

print "[2] Control \n"

set_mode = raw_input("Select a mode: ")

if set_mode == "x":

    print "Exited"

elif set_mode == "1":

        if __name__ == '__main__':
            main()

elif set_mode == "2":

        print "\n\n"

        print "Which image goes on the left? (in Photos.app order) \n"

        print "[1] The first image"

        print "[2] The second image \n"

        set_im = raw_input("Select an image: ")

        if set_im == "x":

                print "Exited"

        else:

                print "\n\n"

        if set_im == "1":

            if __name__ == '__main__':
                main()

        elif set_im == "2":
            console.clear()
            print "Generating image..."
            console.show_activity()

            _1 = im1.resize((366,650),Image.ANTIALIAS)
            _2 = im2.resize((366,650),Image.ANTIALIAS)

            background.paste(_1,(380,0))
            background.paste(_2,(0,0))
            background.show()
            console.hide_activity()

            clipboard.set_image((background), format='jpeg', jpeg_quality=0.80)

            print "\n\n Image set to clipboard"
Essentially, it is a Python version of my Keyboard Maestro macro for iPhone screenshots. Given two iPhone 5 screenshots, it creates a single composited image showing both screenshots side by side. Using text output in the console it enables me to control the placement of the screenshots: I can specify whether I want the first or second screenshot to be on the left side of the final image.
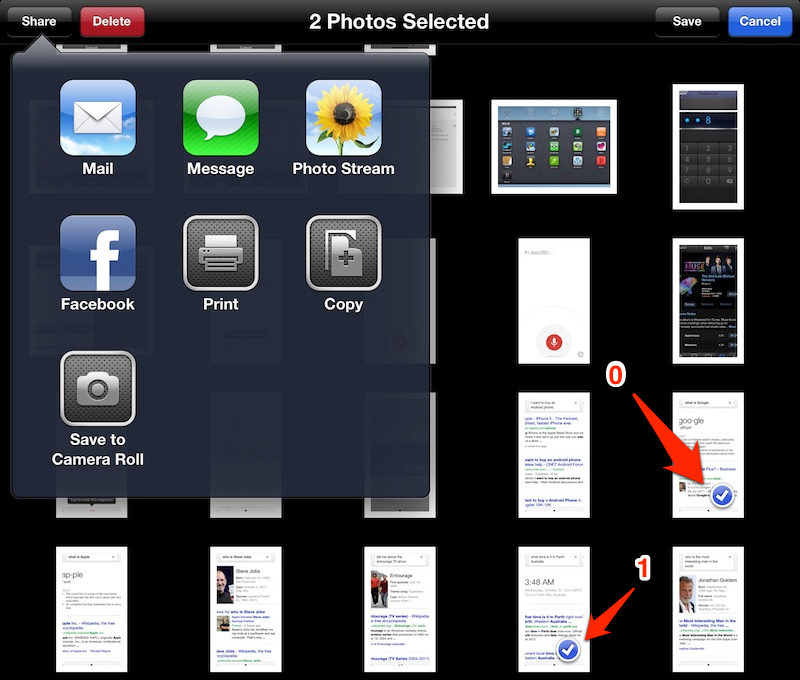
Line 6/7 grabs images from the iOS clipboard using clipboard.get_image. The get_image command is interesting for two reasons: first, as part of the clipboard module, it is able to read directly from the iOS clipboard – i.e. items you have copied using iOS’ standard “Copy” menu. Second, Ole structured it so that it returns a PIL image from an image in the clipboard. If you copy multiple images at once, you can use the idx parameter to get an image at a given index.
Here’s how idx works, and how I use it. To compose the screenshot, I need two images in the clipboard at once. To do so, I can copy multiple images from the Photos app: from either Camera Roll or Photo Stream, Edit > Select photos > Share > Copy, and you’ll have two images in the clipboard. The important thing to understand with idx and the Photos app is that Pythonista will grab images in “Photos app order” starting at 0.
So, for instance, here’s how idx would get the images shown below:
I don’t always need to, but there are times when I want to control how the screenshots are displayed on the final image – i.e. the second screenshot in Photos-order should actually be pasted first onto the image. I could have probably created something more elegant or simpler, but, in short, here’s how I did it: I defined a main function that pastes the first screenshot (idx=0) to the left side of the final image (coordinates 0,0). The function takes care of clearing the console, printing status messages, showing a spinner in the iOS status bar (it’s not network activity, but I like the visual hint), and doing the image processing; the final image is shown and also set to the clipboard. Through a series of text inputs, the script asks me if I want to create an image with default placement, or, if I want to control it myself. If I choose option 2 (control), it asks me if I want the first or second image to be on the left. In case I want the second image, it uses inverted coordinates for pasting.
Allow me to explain some parts more in detail. Once collected from the clipboard and turned over to PIL, screenshots need to be resized to fit inside the 746x650 image I want as final result. To do so, my main function uses resize (line 15/16) at 366x650 with ANTIALIAS, a high-quality downsampling filter provided by PIL. The process will be a little slower, but the image will be resized maintaining a higher quality.
Line 8 creates a 746x650 white background; the main function pastes the screenshots onto the background, offsetting the second one by 14 pixels so to leave a white strip in the middle. Line 19 shows the final image in Pythonista’s console.
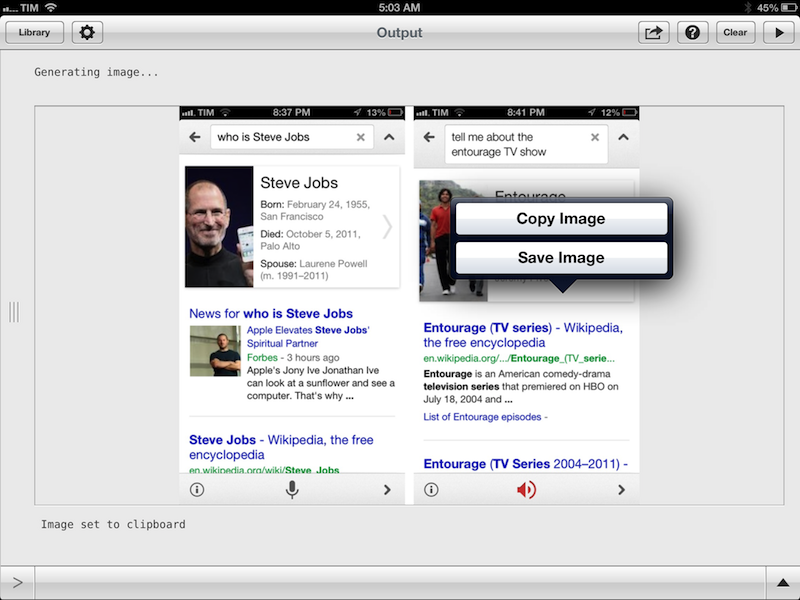
When you show() an image in the console, you can tap on it to Copy it or Save it, just like any other image on iOS. However, you can also set the image back to the clipboard automatically, so it’ll be ready for pasting in, say, a Mail message. Line 22 uses clipboard.set_image with format and jpeg_quality parameters to put the image as a JPEG saved at 80% of quality in the clipboard.
Once set up, you can create a Home screen shortcut for the script; select two iPhone screenshots from the clipboard, tap on the shortcut, and after a few seconds you’ll have a composited image ready in your clipboard.
This script has enabled me to a) save precious minutes, b) be faster and more efficient, and c) uninstall Photoshop Touch, which I was using solely to create this kind of screenshots. To manipulate iPhone screenshots on my iPad, I rely on Photo Stream for screenshots already in iCloud; when I’m on the go, I move screenshots between devices using Scotty.
iPad Screenshot to JPEG
I have an iPad 3. Whenever I take a screenshot, iOS saves a 2048x1536 .png file weighing at least 1 MB. I want that screenshot to become a lighter JPEG saved at 80% of the original quality.
import clipboard
import Image

image = clipboard.get_image()

background = Image.new('RGBA', (2048,1536), (255, 255, 255, 255))

background.paste(image,(0,0))

clipboard.set_image((background), format='jpeg', jpeg_quality=0.80)
Essentially, a simple adaptation of the screenshots script that could be done better (I’m not sure I even need to paste the image first), but still gets the job done.
Upload Screenshot and Read Text File from Dropbox
For MacStories image uploads, our Don Southard has set up a script that watches a Dropbox folder for images, and uploads every new image to our CDN. Every uploaded image returns a URL that is appended to a text file also in Dropbox. This allows every member of the team to simply drop images in Dropbox and get a CDN URL back after a few seconds; it is very convenient on the Mac thanks to the Dropbox app, but I wanted to automate the process on iOS as well. With input from Ole, I set up a script that uploads an image and waits 15 seconds before reading the last line of our .txt file from Dropbox.
First, create a Dropbox app and make sure to save a script that lets you log into Dropbox and prints your account info. I’m using this version provided on the Pythonista forums.
The script imports get_client and the account information from keychain.
from dropboxlogin import get_client
dropbox_client = get_client()
import clipboard
import keychain
import console
import time
import httplib
from io import BytesIO
import webbrowser

img = clipboard.get_image()
titles = console.input_alert('Image Upload', 'Enter your image name below')
buffer = BytesIO()
img.save(buffer, 'PNG')
buffer.seek(0)
response = dropbox_client.put_file('/LOLwat/Photos/upload-unedited/' + titles + '.png', buffer)

print "uploaded:", response

time.sleep(15) # delay for 15 seconds

console.clear()


def main():
    dropbox_client = get_client()
    f, meta = dropbox_client.get_file_and_metadata('/SecretLocation/Photos/upload-unedited/LeSecret.txt')
    content = f.read() # can use readlines here to get list of lines
    print 'file content:'
    print '=' * 40
    print content
    print '=' * 40
    print 'metadata:'
    print meta
    last = content.splitlines()[-1]
    clipboard.set(last)
    console.clear()
    print last
    webbrowser.open(last)

if __name__ == '__main__':
    main()
Line 11 gets an image from the clipboard, lets me enter a name with input_alert, and saves it as .png in a temporary buffer provided by BytesIO. Using the Dropbox command put_file, it uploads the file to a specific directory in my Dropbox.
Line 18 prints a response from Dropbox, then waits 15 seconds (my Mac mini usually takes 10 seconds to process an image) and the console is cleared. Last, dropbox_client reads a text file, and specifically the last line (the URL that was just appended) using splitlines[-1]. The URL is printed, set to the clipboard, and opened in Pythonista’s web browser for extra confirmation.
I’ve put this in my Actions menu and I use it after generating images with the scripts described above.
Images HTML
As I mentioned above, once I’ve written a post as Markdown and converted it to HTML, I need to insert images in the post. With Dropbox I can easily send an image from the clipboard to our CDN - but what about getting the proper HTML code inserted in the final post? Theoretically, I could use the built-in uploader of apps like Poster and Posts, paste an image’s URL, and adjust the way I want an image to be displayed. However, I like to have HTML for images inserted just right for MacStories, with more control over image alignment and title.

The script I use for this takes a URL in the clipboard and builds a series of HTML strings around it. I’ve embedded this script as image so its HTML tags wouldn’t create issues with this page.
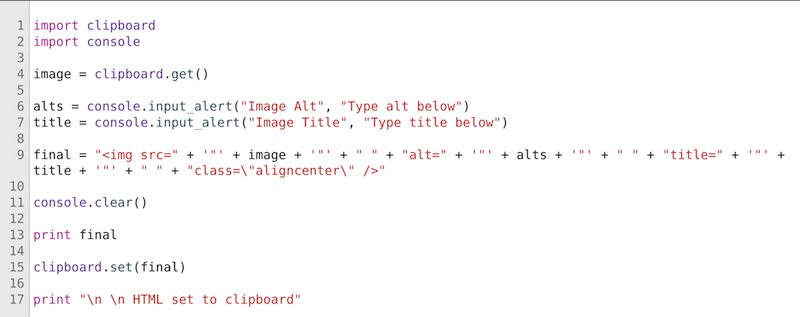
On line 9, the script asks for text to use for the image’s title and alt attributes in the final string. Said string, aptly named final, is simply a concatenation of various HTML tags and elements I have manually entered. Keep in mind double quotes need to be escaped with the \ character, as shown with aligncenter in the string.
Notably, the script uses console.input_alert to pop up native iOS alert boxes asking for user input.
Once constructed, the string is put back onto the clipboard, ready for pasting in a text editor.
Copy Webpage Title
I often need to grab a URL’s title when writing blog posts, saving bookmarks, or tweeting links. For those times when this kind of workflow isn’t implemented in another script (as you’ll see below), I have a standalone version that, given a URL in the clipboard, prints the title and URL so I can freely copy them from the console.
import urllib
import clipboard
import bs4
import console

link = clipboard.get()

console.show_activity()

soup = bs4.BeautifulSoup(urllib.urlopen(link))
pageTitle = soup.title.string +' '+ link

console.hide_activity()

console.clear()

print pageTitle
- Download
Download in iCab
iCab is a third-party iOS browser that comes with rich support for x-callback-url. The following script uses iCab’s download action to start downloading a link provided by the clipboard.
import webbrowser
import urllib
import clipboard

base = 'x-icabmobile://x-callback-url/download?url='
url = clipboard.get()
url = urllib.quote(url, safe='')
webbrowser.open(base + url)
This comes particularly in handy as a Home screen icon: copy link, tap the icon, start a download.
Bonus: Here’s a bookmarklet to send a URL to iCab, which will start downloading it.
javascript:window.location='x-icabmobile://x-callback-url/download?url='+encodeURIComponent(document.location.href);
Convert Twitter URLs
Previously detailed in this post, I’ve put together a script to turn Twitter.com URLs into Tweetbot-specific links that will open a tweet with Tweetbot’s detail view.
import clipboard
import console
import webbrowser

mytext = clipboard.get()
mytext = mytext.replace('https://twitter.com/', 'tweetbot://')
mytext = mytext.replace('statuses', 'status')
mytext = mytext.replace('http://twitter.com/', 'tweetbot://')
mytext = mytext.replace('http://mobile.twitter.com/', 'tweetbot://')
mytext = mytext.replace('https://mobile.twitter.com/', 'tweetbot://')

console.clear()
print mytext

clipboard.set(mytext)

webbrowser.open(mytext)
I use this to share links to tweets with my team, as we all use Tweetbot on our devices.
Percent Encode
This one percent-encodes text from the iOS clipboard.
import clipboard
import urllib

s = clipboard.get()

s = s.encode('utf-8')
s = urllib.quote(s, safe='')

print s
- Download
Post to Pinboard
When I’m not writing, I’m usually reading. And if I’m reading an interesting article I found on the Internet, there’s a high chance it’ll be bookmarked on Pinboard. Unfortunately, there aren’t fast and intuitive ways to save Pinboard bookmarks on iOS: there’s no iPad version of Pinbook yet, and using the bookmarklet works, but it’s not a great experience.
Annoyed by the cumbersome process of carefully tapping on text fields in a bookmarklet and the lack of simultaneous Instapaper & Pinboard saving in Tweetbot, I built a Python script that saves a URL to my Pinboard account in a few seconds. It works with a bookmarklet or the system clipboard.
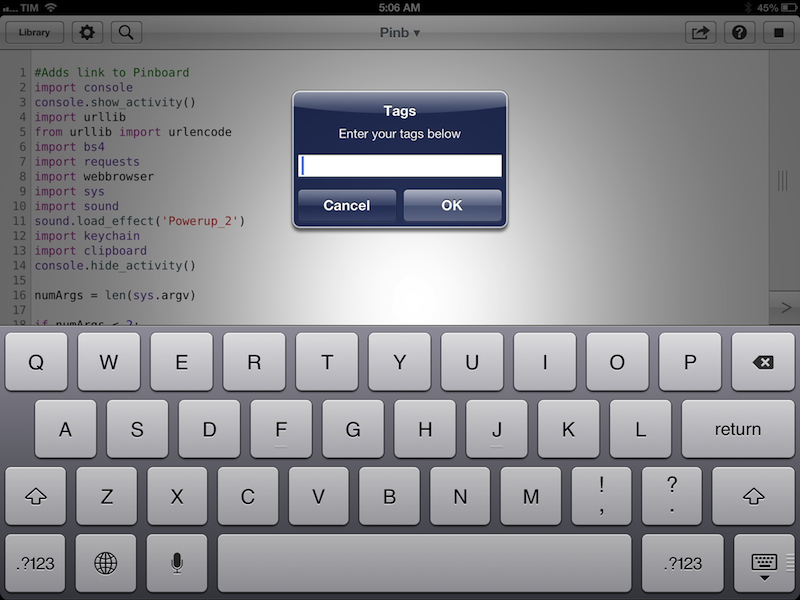
import console
console.show_activity()
import urllib
from urllib import urlencode
import bs4
import requests
import webbrowser
import sys
import sound
sound.load_effect('Powerup_2')
import keychain
import clipboard
console.hide_activity()

numArgs = len(sys.argv)

if numArgs < 2:
    url = clipboard.get()

    console.show_activity()

    soup = bs4.BeautifulSoup(urllib.urlopen(url))
    title = soup.title.string
        text = title.encode('utf-8')

    console.hide_activity()

else:

    text = sys.argv[1]
    url = sys.argv[2]

PASSWORD = keychain.get_password('pinboard','ticci')
USER = 'ticci'

tags = console.input_alert('Tags', 'Enter your tags below')

console.show_activity()

query = {'url': url,
         'description': text,
         'tags': tags}
query_string = urlencode(query)

pinboard_url = 'https://api.pinboard.in/v1/posts/add?' + query_string

r = requests.get(pinboard_url, auth=(USER, PASSWORD))

console.clear()

if r.status_code != 200:
    print 'Could not post:', r.text

elif r.status_code == 200:
    tags = tags.split(' ')
    tags = ','.join(tags)
    sound.play_effect('Powerup_2')
    print 'Link saved successfully'
    print text
    print "tags: " + tags
Bookmarklet:
javascript:window.location='pythonista://Pinb?action=run&argv='+encodeURIComponent(document.title)+'&argv='+encodeURIComponent(document.location.href);
With the bookmarklet, a webpage’s URL and title are sent to Pythonista via argv. If a link is in the clipboard, the webpage title is fetched using bs4. The script checks if less than two argv are sent, and in that case it proceeds to get URL and title from the clipboard.
The bookmarklet scenario is the more frequent one as I tend to browse on my iOS devices using Safari (because of its superior performance to third-party browsers); however, I find it convenient to also be able to copy a URL from any app and run the script.
The bookmarklet is fairly simple: it composes a Pythonista URL scheme string using two argv parameters – the title and the URL. The title portion is required as it’s what Pinboard will use for the name of a bookmark; in the Pinboard API, it’s called description to maintain compatibility with the legacy Delicious API.
The script begins by assigning sys.argv[1] and sys.argv[2] to title and URL, respectively. On line 10, it pre-loads a sound effect it’ll use at the end if a bookmark has been successfully added to Pinboard. Line 33/34 detemines the password and username to contact the Pinboard API with a GET request; the password has been previously saved to Pythonista’s secure keychain, so I don’t have to show it as string in the script. Line 36 brings up an alert to enter space-separated tags.
Line 40–43 creates the final query string by combining URL, description, and tags and by running urlencode on it. Following Ole’s suggestions, the Pinboard API is contacted using requests on line 47. A spinner is shown in the iOS status bar to indicate the script is working in line 2 (before importing the modules), line 20, and line 38.
The final portion of the script uses an if statement to print an error if the Pinboard response code is different than 200. If the GET request is completed without error, the script prints a message with the title of the bookmark and tags assigned to it (the sound is also played). Previously space-separated tags are split by individual words and joined using commas in a single string.
If you’re running the script with a URL in the clipboard, the only difference is how it uses clipboard.get() to grab a URL and runs bs4.BeautifulSoup(urllib.urlopen()) to get a webpage name as string (a spinner is shown in the status bar during this process).
Because of the check for argv on line 17, the same script works regardless of bookmarklet or clipboard usage; if you’ve copied a URL to the clipboard, I recommend adding this script to the Home screen.
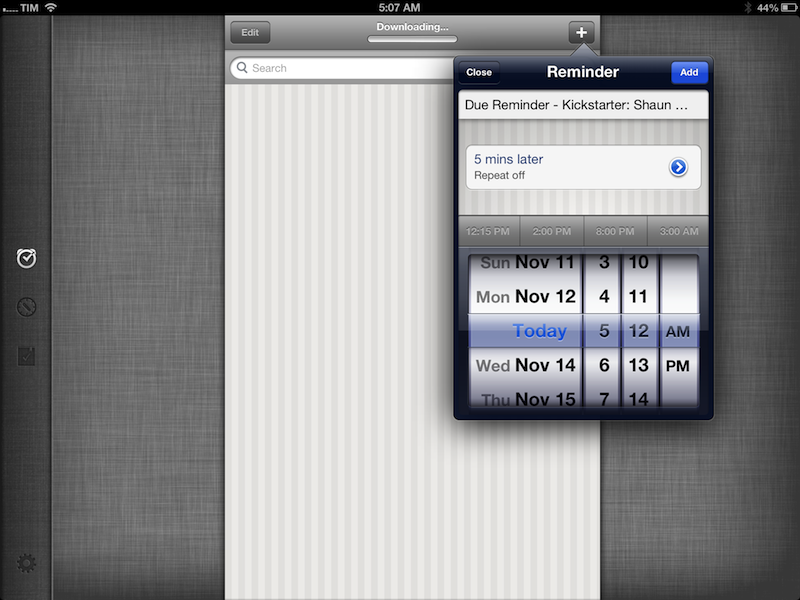
Link in Due
Due is a nice reminder app for iOS and OS X with support for iCloud and Dropbox sync, as well as x-callback-url for creating reminders from other apps. I like to save links as “quick reminders” to check out in a few minutes (or hours) in Due, which happens to have a feature to open URLs contained in a reminder upon hitting the “Done” button. Like the Pinboard one, this script works with a bookmarklet or the system clipboard. If you use the bookmarklet, it grabs a link’s URL and title from Safari ; if you’ve copied a link to the clipboard, it fetches the webpage’s title using bs4.
import console
console.show_activity()
import clipboard
import webbrowser
import urllib
from urllib import urlencode
import bs4
import sys

numArgs = len(sys.argv)

addnew = 'due://x-callback-url/add?title='

addtime = '&secslater='

console.hide_activity()

if numArgs < 2:

    console.show_activity()

    url = clipboard.get()

    soup = bs4.BeautifulSoup(urllib.urlopen(url))
    newlink = (soup.title.string + ' ' + url).encode('utf-8')

    console.hide_activity()

else:

    title = sys.argv[1]
    url = sys.argv[2]
    newlink = title + ' ' + url

newtask = console.input_alert('What is this?', 'Type your reminder below')

newtime = console.input_alert('When?', '3600 for 1 hour, 1800 for 30 minutes')

console.hide_activity()

text = newtask + ' - ' + newlink

encoded = urllib.quote(text, safe='')

err_handler = '&x-source=Source%20App&x-error=pythonista://&x-success=' + url

openDue = addnew + encoded + addtime + newtime + err_handler

console.clear()

webbrowser.open(openDue)
Bookmarklet:
javascript:window.location='pythonista://Due?action=run&argv='+encodeURIComponent(document.title)+'&argv='+encodeURIComponent(document.location.href);
Title and URL are represented by argv sent by the bookmarklet. The script revolves around the Due URL scheme, which is based on x-callback-url and is split up in multiple parts to allow me to enter a description and “due time” using console.input_alert in line 35 and 37.
Line 41 combines my description of the reminder with the title and URL using a dash as separator between the two; line 43 percent-encodes the reminder’s name as requested by Due. Last, line 45 specifies how to handle errors in Due: thanks to x-callback-url, Due can go back to another app if the user cancels the action of adding a reminder. Unfortunately, the friendly name for x-source isn’t dynamic – meaning, Due can’t display a different dialog depending on whether the user cancels the action or completes it. So, I chose to display a general “Return to Source App” dialog that returns to Pythonista in case of error (user canceled the reminder) or goes back to the link opened by the bookmarklet if the reminder is added.[13]
Line 47 composes the final URL to open in Due using all the pieces created and encoded in the script, and the last line uses webbrowser to launch Due.
I’ve been using Due to save quick reminders and I like the automation provided by this script, which I’ve added to my Home screen. In using it, I’ve noticed I’d like Pythonista to offer an option to open the iOS numeric keyboard when I need to enter numbers in input_alert.
Bonus: Here’s a bookmarklet to send a link (URL + title) to Due without Pythonista (you’ll have to enter any additional text and alarms manually). It also works on the Mac.
javascript:window.location='due://x-callback-url/add?title='%20+%20%20encodeURIComponent(document.title)+%20'%20'+%20encodeURIComponent(document.location.href)+'&x-source=Source%20App&x-error=due://x-callback-url/&x-success='+encodeURIComponent(document.location.href);
Sequential Task in Due
Inspired by Sean Korzdorfer, I’ve created a script that adds a reminder including an additional URL to create a sequential reminder in Due upon completing the first one.
import clipboard
import console
import urllib
import webbrowser

addnew = 'due://x-callback-url/add?title='

addtime = '&secslater='

newtask = console.input_alert('First Task', 'Type your reminder below')

newtime = console.input_alert('When?', '3600 for 1 hour, 1800 for 30 minutes, 300 for 5')

seqtask = console.input_alert('What next?', 'Type your reminder below')

seqtime = console.input_alert('Second Task?', '3600 for 1 hour, 1800 for 30 minutes, 300 for 5')

secondR = urllib.quote(seqtask, safe='')

newlink = 'due://x-callback-url/add?title=' + secondR + '&secslater=' + seqtime

encoded = newtask + ' ' + newlink

text = urllib.quote(encoded, safe='')

openDue = addnew + text + addtime + newtime

webbrowser.open(openDue)
Similar to first Due script, I’ve noticed spaces in the sequential reminder weren’t being encoded properly at the end; I’ve thus added an additional percent-encoding for seqtask that ensures spaces are preserved for the sequential reminder’s name.
This script can come in handy for reminders that need to be executed one after the other such as “do laundry” and “fold laundry”. When completing the first reminder, Due will ask you to launch the embedded Due URL scheme, which will create the second reminder without leaving the app.
Drafts
I use Agile Tortoise’s Drafts with a variety of scripts that, on my remote Mac mini, process text coming from email or text files and add it to other text files or OmniFocus. I also use Drafts to send text to other services such as Twitter and Evernote, and I’m a fan of the custom email actions added in the latest update to the app.
The script I use lets me send text to Drafts quickly. It grabs a webpage’s selection and URL if sent by a bookmarklet; if not, it pops up a console alert allowing me to enter text manually and send it to Drafts.
import sys
import webbrowser
import console
import urllib

numArgs = len(sys.argv)
base = 'drafts://x-callback-url/create?text='

if numArgs == 3:

    clip = sys.argv[2]
    link = sys.argv[1]

    if clip =="":

        text = link
        text = urllib.quote(text, safe='')

    else:

        text = clip + "\n" + "\n" + "From: " + link

        text = urllib.quote(text, safe='')

else:

    text = console.input_alert('Drafts', 'Enter your draft below')
    text = urllib.quote(text, safe='')

webbrowser.open(base + text)
Bookmarklet:
javascript:window.location='pythonista://Drafts?action=run&argv='+encodeURIComponent(location.href)+'&argv='+encodeURIComponent(window.getSelection());
On line 9, the script checks for the number of argv sent by the bookmarklet: if there are three and if the selection is empty, the text is prepared as a single string consisting of the URL. If there are three but the selection is not empty – meaning, the bookmarklet was sent with text selected in the browser – text is made of the selection, an empty line, and the URL. If there are no arguments (script wasn’t triggered by a bookmarklet), an input_alert lets me write a note manually. In all three cases urllib.quote encodes text for Drafts. The base Drafts x-callback-url is opened by webbrowser alongside text on line 30.
For me, this is the fastest way to send a URL or Safari’s selection and URL to Drafts, so I can forward them to other services configured with the app.
Append to Notesy
I keep a Scratchpad.txt file in my Dropbox where I append bits of text and information from my Mac and iOS devices. I’ll describe my workflow for this file in a future article. As an alternative to the Drafts script to append text “remotely”, I’ve set up a script based on Notesy’s local URL scheme that appends text like I want to: with a date string and the information copied from the clipboard directly below it.
Like the Pinboard, Due, and Drafts scripts, there’s an option to use this with a bookmarklet in Safari or your iOS browser of choice. The bookmarklet checks for text selected in the current tab and sends that selection to Pythonista to process it for Notesy. Due to the nature of iOS’ Safari, this only works on the iPad, where bookmarklets can be tapped in the browser’s toolbar so window.getSelection() can be preserved while tapping. With JavaScript, I can send the original page’s URL as argv to the script: this makes it possible to “round-trip” back to Safari after the text from a webpage has been clipped to Notesy. Unfortunately, due to a bug in the current version of Notesy, a “?” character is appended to a URL configured with x-success; the Notesy team is aware of the bug and working on a fix.
import console
console.show_activity()
import webbrowser
import urllib
import clipboard
import datetime
import sys

today = datetime.datetime.now()
base = 'notesy://x-callback-url/append?name=Scratchpad.txt'
file = '&text='

console.hide_activity()

numArgs = len(sys.argv)

if numArgs == 3:

    clip = sys.argv[2]
    link = sys.argv[1]

    actions = '&x-success=' + link + '&x-error=notesy://'

    if clip =="":

        text = "\n" + '_' + today.strftime("%Y-%m-%d") + '_' + "\n" + link
        text = urllib.quote(text, safe='')

    else:

        text = "\n" + '_' + today.strftime("%Y-%m-%d") + '_' + "\n" + clip + "\n" + "\n" + "From: " + link
        text = urllib.quote(text, safe='')

else:

    url = clipboard.get()
    clip = url.encode('utf-8')
    actions = '&x-success=notesy://&x-error=notesy://'
    text = "\n" + '_' + today.strftime("%Y-%m-%d") + '_' + "\n" + clip
    text = urllib.quote(text, safe='')

webbrowser.open(base + actions + file + text)
Bookmarklet:
javascript:window.location='pythonista://Notesy?action=run&argv='+encodeURIComponent(location.href)+'&argv='+encodeURIComponent(window.getSelection());
I’ve got to thank Gabe for suggesting the datetime module. Line 9 specifies what “today” is, and base creates the URL for appending text to a specific file in Notesy (using x-callback-url). When appending text, a new line is added with \n then the date is inserted using the format I prefer with strftime. Another new line is added, and a percent-encoded string is appended underneath the date. With x-callback-url, the script returns to Pythonista if it succeeds, or stays in Notesy in case of error. As usual, app URL schemes are launched from Pythonista using webbrowser.
Like Drafts, the script checks for an empty selection in Safari. If the clip argument is an empty string, only the URL is appended to Notesy’s text file.
This is yet another example of the powerful URL scheme provided by Notesy. I would like to see an x-callback-url parameter to make sure Notesy initiates a sync before and after appending the text and switching back to Pythonista, so I can make sure the text I appended is also synced to all my Dropbox clients (and to avoid conflicted copies).
OmniFocus Task for Drafts
My last script is another take on the bookmarklet/clipboard combination for Drafts that is formatted for OmniFocus task importing via email. It is primarily intended to quickly add web URLs to OmniFocus using Drafts’ email actions.
import console
console.show_activity()
import webbrowser
import urllib
import bs4
import sys

addDrafts = 'drafts://x-callback-url/create?text='

console.hide_activity()

numArgs = len(sys.argv)

if numArgs == 3:

    clip = sys.argv[2]
    link = sys.argv[1]

    if clip =="":

        text = link + ' ' + '@Links'
        text = urllib.quote(text, safe='')
        openDrafts = addDrafts + text

    else:

        text = link + ' ' + '@Links' + '\n' + clip
        text = urllib.quote(text, safe='')
        openDrafts = addDrafts + text

openDrafts = addDrafts + text

webbrowser.open(openDrafts)
Bookmarklet:
javascript:window.location='pythonista://OFLink2Drafts?action=run&argv='+encodeURIComponent(location.href)+'&argv='+encodeURIComponent(window.getSelection());
The script is essentially the same of the regular Drafts one, excepts it uses OmniFocus’ email syntax for contexts and notes; it works with the bookmarklet, and the browser selection is added after a new line so OmniFocus will see it as a note for a new task. Line 21/27 adds a “@Links” string that will identify the task as belonging to the “Links” context in OmniFocus.
iOS Automation
The scripts above are just an example of how my limited knowledge of Python allowed me to radically improve my iOS workflow thanks to the power of Pythonista.
I’ve been relying on these scripts for a few months now, and I’ve been able to get work done on iOS just like I do on my Mac. However, while the end result may be the same (articles get published and notes get saved), the setup is entirely different.
I don’t think iOS automation will ever be exactly like OS X automation. Pythonista has a series of limitations that, in comparison, running Python on OS X or any other desktop operating system doesn’t have. Hardcore Python users may not like this. At the same time, though, I also find working in Pythonista more intuitive, safer, and, ultimately, easier. Why shouldn’t I “compromise” if the end result is the same but I actually get more joy out of the experience?
I believe that, going forward, Pythonista and other similar apps will show a new kind of “scripting” and task automation built around the core strenghts of iOS. As we’ve seen, x-callback-url is a standard that leverages a part of iOS – URL schemes – to achieve simple, user-friendly and URL-based inter-app communication that can be used in a variety of ways. Looking ahead, there’s a chance rumored features such as XPC will bring more Mac-like functionalities to iOS, but developers will still find new ways to make iOS more powerful without giving up on positive aspects such as increased security and the simplicity of the app model.
We’re in the early stages of iOS automation, but Pythonista, Launch Center Pro, and x-callback-url are indicating the path other developers should follow.
Pythonista shows that it’s possible to be a power user on iOS while playing by Apple’s rules.
- Splitting text items at a specific delimiter takes two lines in Python. Don’t get me started on AppleScript Text Item Delimiters. ↩
- My town, Viterbo, is (surprisingly) testing DC-HSDPA wireless networking with TIM, the carrier I chose for all my devices. With the iPad 3 and iPhone 5, I usually get between 10–15 Mbits (download) and 3–6 Mbits (upload) here in Viterbo; it’s faster than my home connection with Fastweb. When not on DC-HSDPA, the iPhone 5 still manages to find good 3G signal (2–3 bars) in areas where previously the iPhone 4S went to “No Service”. ↩
- Actually, no, I did. ↩
- More about this here. In short, I care about having proper
titleattributes when converting Markdown links to HTML. ↩ - Font options are also available for the output of the interactive prompt. ↩
- If you want, you can pair an external keyboard with Pythonista via Bluetooth. Ole Zorn implemented some shortcuts for the code editor exclusively for external keyboards. As for touch, I love how iOS lets you select an entire line by tapping with two fingers. ↩
- The exporting options offered by Pythonista are very comprehensive. You can export Python scripts as Xcode Projects to build apps on the desktop, even selecting parameters like “Targeted Devices” and “Home Button” behavior beforehand, from Pythonista. I’ll cover this in a future post. To share scripts as scripts, you can send them via email, open in other apps (such as Textastic), or share on GitHub. Gists can be private or anonymous. ↩
- If you select a term that hasn’t got a “best match”, Pythonista’s Quick Help will display possible search results for your query. ↩
- If you delete the built-in examples (like I did), you can always restore them in the Settings. The fruit game is my favorite so far. Crazy to think it’s actually made in Python, on a phone. ↩
- Check out the documentation for an example on how to play specific notes with the Piano sound. ↩
- Not to mention using the URL scheme in combination with x-callback-url and multiple iOS apps that support the standard. ↩
- Yes, I have tried Launch+. ↩
- My reasoning for
x-successandx-erroris the following: go back to Pythonista if the user cancels or the reminder couldn’t be added; go back to the URL after adding the reminder so the user can close the tab (or re-confirm he wanted to really add that link). ↩