Banktivity: Achieve Your Financial Goals for 2019 [Sponsor]

Managing your finances doesn’t have to be difficult. With Banktivity, you can track expenses, know when to pay upcoming bills, gain valuable insights into the performance of your investments, and a whole lot more. Best of all, everything you need for financial peace-of-mind is available on your Mac and iOS devices.

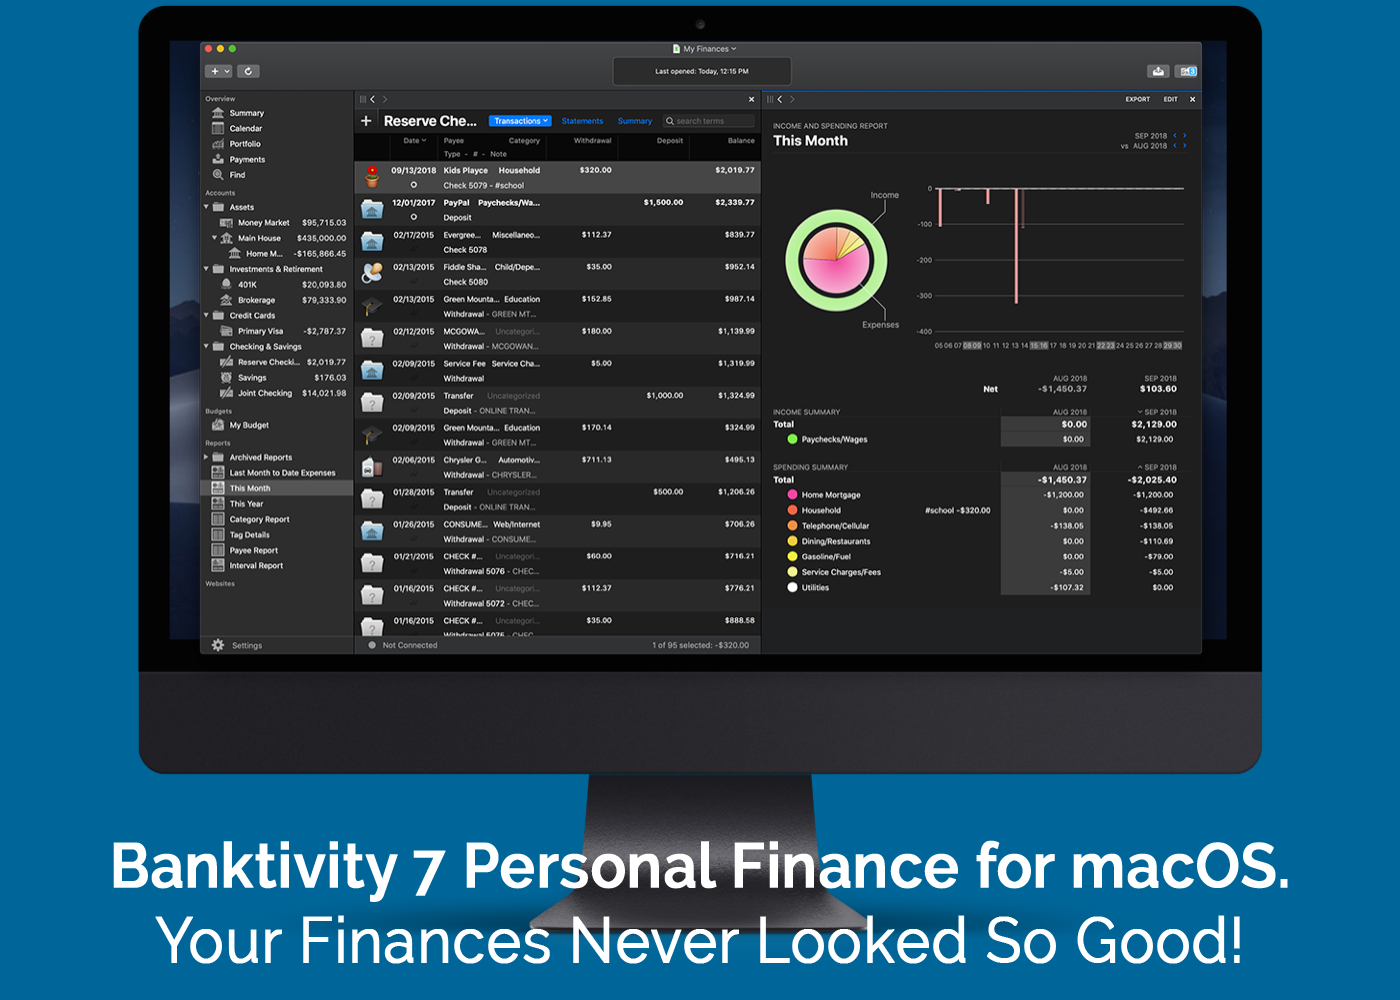
Banktivity empowers its users to manage all of their financial accounts in one place, includes real-time budgeting, and syncs with the free iPhone version of the app, so your finances are always right at your fingertips. With version 7 of the Mac app, Banktivity’s functionality adds all-new ways to track and analyze your finances.

Banktivity for the Mac has added a stunning new dark mode that looks great alongside other macOS Mojave apps. IGG Software, the makers of Banktivity, painstakingly examined and redesigned every corner of the app to take full advantage of dark mode.

The app also has a new ‘Calendar View’ that ensures you’ll never miss a bill again by letting you see past and upcoming bills and transactions. You can even customize which accounts are displayed and track their running balance over time.

Direct Access, which can be purchased separately, is faster than ever. Now, you can connect to over 14,000 banks and import your financial transactions quickly and seamlessly whether you’re on your Mac, iPhone, or iPad.

There’s an all-new real estate account type too, so you can track property you own and link it to related loans and mortgages. If you’re in the US, you can automatically follow your property’s estimated value with Zillow, and there’s a new view with details like your home’s available equity.

Say goodbye to financial stress and hello to Banktivity. Visit IGG Software’s website to learn more about Banktivity today. There’s a free 30-day trial available, so there’s nothing to lose. And when you’re ready to purchase, use the discount code MACSTORIES10 at checkout for 10% off.

Our thanks to Banktivity for sponsoring MacStories this week.


Hands On with iOS 12.2’s HomeKit Support for Smart TVs

As I noted yesterday, the launch of the developer beta of iOS 12.2 has brought the necessary underlying APIs for manufacturers of smart TVs seeking to integrate their television sets with HomeKit. Originally announced at CES 2019, the initiative encompasses both the HomeKit and AirPlay 2 technologies, which the likes of Samsung, LG, Vizio, and Sony will roll out (albeit to varying degrees) in their upcoming smart TVs over the course of 2019. Thanks to the HomeKit Accessory Protocol and the work of enterprising third-party developers, however, it is already possible to get an idea of what the HomeKit part of these integrations will be like by installing unofficial plugins that add HomeKit compatibility to existing TV sets via software.

Thanks to developer (and homebridge contributor) Khaos Tian, I’ve been able to test native HomeKit integration with my 2017 LG TV running webOS, which does not currently support HomeKit out of the box and which, according to LG, will not receive an official software update for HomeKit support in iOS and tvOS 12.2. In this post, I’m going to share my first impressions of HomeKit’s new TV features in the iOS 12.2 beta, describe how it all works in practice, and share some suggestions for changes I’d like Apple to implement by the final release of iOS 12.2.

Read more


Developer Demos HomeKit’s New Integration with Smart TVs

Benjamin Mayo, writing for 9to5Mac:

Developer Khaos Tian hacked the HomeKit protocol to simulate adding a smart TV accessory to the Home app. He shared some screenshots and videos of these features ‘in action’ …

By essentially faking the existence of a HomeKit-compatible Smart TV accessory on his network, he was able to add a television tile into his Home app.

This reveals new interfaces for controlling the TV. You can tap on the tile to turn it on or off and access the Details menu to change input.

Tian has posted a series of examples of this new HomeKit integration on his Twitter account, including one where he was able to control his LG TV running webOS from the iPhone’s Home app.

Interestingly, Tian has already contributed an update to homebridge – the third-party plugin to add all kinds of different accessories and platforms to HomeKit – with support for HomeKit’s new TV control APIs. Here’s where this gets really interesting for me: despite the launch of an online petition, LG has only confirmed that their latest 2019 TV sets will receive official HomeKit support. Thanks to homebridge, however, it should be possible to add native HomeKit integration to older LG televisions (such as my 2017 model) with plugins that bridge the webOS API to HomeKit’s new endpoints. This is precisely what Tian is doing for his demo.

Now, as someone who’s been running homebridge and the homebridge-webos-tv plugin for the past few months (and I promise I will write about this eventually), I’m excited about the idea of having a native interface for controlling my TV from the Home app (and, ideally, Siri too). As you can see, the plugin I’m currently using can only “fake” controls in the Home app by adding switches. It can get…confusing:

Configuring homebridge plugins (left) requires working with a JSON document.

Configuring homebridge plugins (left) requires working with a JSON document.

But it works. I’ve been running homebridge and this plugin without issues for months now, and I’ve gotten so used to asking Siri to change inputs on my TV, I can’t imagine not having these integrations anymore. A recent update to homebridge-webos-tv even added support for individual channel input and more remote control buttons. For this reason, assuming that the folks at LG don’t change their mind and ship a HomeKit software update for older TV sets, I think I’m going to experiment with a dual setup for webOS TV support in HomeKit: some controls based on the official HomeKit API, and others provided as custom switches – both based on homebridge plugins. But that’s a story for another time.

Permalink


Microsoft Office Debuts on the Mac App Store

Promised at WWDC last June, Microsoft Office 365 has arrived on the Mac App Store today. Office 365, which includes the company’s flagship Word, Excel, PowerPoint, and Outlook productivity apps are free to download but require a subscription available via an In-App Purchase to create and edit documents and to send and receive email messages. Before today, the Mac versions of the apps were only available as direct downloads from Microsoft.

At WWDC 2018, Apple announced a redesign of the Mac App Store. During the presentation, the company said the following apps would be coming to the Mac App Store:

  • Microsoft’s Office 365
  • Adobe’s Lightroom CC
  • Panic’s Transmit
  • Bare Bones’ BBEdit
  • Snap’s Live Studio
  • Houseparty

The addition of the apps announced has been slow. Houseparty debuted on the Mac App Store several months ago, but Transmit didn’t appear until last November. With today’s addition of Office 365, that leaves Lightroom, BBEdit, and Live Studio to go.

Office is a significant addition to the Mac App Store. The apps in the suite are used by millions of people worldwide, and the convenience of downloading them and updating the apps from the Mac App Store alongside other apps should be a welcome addition for many users. Hopefully, the remainder of apps promised aren’t far behind and will help reinvigorate the Store, which has not seen the same level of success as its iOS sibling.

Office 365 is available on the Mac App Store as a bundle. Word, Excel, PowerPoint, and Outlook can also be downloaded individually.


Connected, Episode 227: Caveats Ruin People

After Stephen ruins the intro, Federico finally gets around to talking about his second iPad Pro and Myke shares a secret.

On this week’s episode of Connected, I finally addressed why I bought a second (11”) iPad Pro last December. You can listen here.

Sponsored by:

  • TextExpander, from Smile: Multiply your team’s productivity.
  • Pingdom: Start monitoring your websites and servers today. Use offer code CONNECTED to get 30% off.
  • Luna Display: The only hardware solution that turns your iPad into a wireless display for your Mac. Use promo code CONNECTED at checkout for 10% off.
Permalink

AppStories, Episode 95 – Interview: Directing Animated Feature Films Using an iPad Pro with Yarrow Cheney

On this week’s episode of AppStories we interview Yarrow Cheney, whose animated feature film credits include directing The Grinch and The Secret Life of Pets and production design for the Despicable Me movies and The Lorax, about the role the iPad plays in his filmmaking process.

Sponsored by:

  • Toggl – Hassle-free time tracking, wherever you are.
  • Linode – High-performance SSD Linux servers for all of your infrastructure needs. Get a $20 credit.

AppStories+ Deeper into the world of apps

AppStories Episode 95 - Interview: Directing Animated Feature Films Using an iPad Pro with Yarrow Cheney

0:00
44:15

AppStories+ Deeper into the world of apps

Permalink

Apple Announces ‘Shot on iPhone’ Photography Challenge

For longer than I can remember now, Apple has plucked photos taken by iPhone users from the vast sea of images posted online and featured them on billboards, in print advertising, and online. Today, the company announced that through February 7th, it’s running a Shot on iPhone Challenge. Apple says that:

A panel of judges will review worldwide submissions and select 10 winning photos, to be announced in February. The winning photos will be featured on billboards in select cities, Apple retail stores and online.

Apple’s announcement also introduces the contest’s 11 judges, 6 of whom are from Apple and 5 of whom are outsiders with backgrounds in photography. The Apple team includes Phil Schiller, members of his marketing team, and others who work on Apple’s photo software. The rest of the judges include former White House photographer Pete Souza, travel photographer Austin Mann, who we recently interviewed for Club MacStories, Annet de Graaf, a travel photographer and author of iPhone photography books, Luisa Dörr who shot TIME magazine’s special Firsts issue entirely on an iPhone, and Chen Man, a visual artist and creator of photography-based social apps.

If you’d like to submit your iPhone photos, here’s what to do:

Post your best photo taken on iPhone to Instagram or Twitter with the #ShotOniPhone hashtag to participate in the the Shot on iPhone Challenge. Weibo users can participate as well using #ShotOniPhone#. In the image caption, note which model was used. Alternatively, you can also submit the photo in its highest resolution to [email protected] with the file format ‘firstname_lastname_iphonemodel.’ Photos can be straight from the camera, edited through Apple’s editing tools in the Photos app or with third-party software. Submissions for photos begins at 12:01 a.m. PST on January 22 and ends at 11:59 p.m. PST on February 7. You must be 18 years of age or older to participate, and this challenge is not open to Apple employees or their immediate families.

I’ve always enjoyed Apple’s Shot on iPhone ad campaigns. It will be fun to see which shots its judges pick from what I can only imagine will be a huge number of submissions.


Pixelmator Pro Updated with New Layers Features

Today the Pixelmator team released a layers-focused update to Pixelmator Pro, their Mac image editor.

The update allows users to add any of seven colored tags to a layer to help identify them. The feature also supports Adobe PSD color tags on import and export.

To make navigating projects with lots of layers easier, users can now filter layers based on several criteria including the new color tags, images, shapes, text, RAW, and groups. At the bottom of the layers sidebar, there is also a search field for locating layers by name.

Pixelmator Pro 1.3 supports clipping masks too. The feature allows users to apply the contents of one layer to the shape of another layer or group of layers. Clipping masks can be created from text, shapes, groups of layers, or nested shapes.

Finally, you can also adjust a layer’s opacity and blending mode using the controls at the bottom of the layers sidebar. Adjustments made are previewed live in the app’s main window.

Pixelmator Pro is available on the Mac App Store.