
We have many great deals for #MacStoriesDeals today. You can find us as @MacStoriesDeals on Twitter.
Posts in iPhone
#MacStoriesDeals - Wednesday
Required Reading On App Store Pricing For Developers→
Required Reading On App Store Pricing For Developers

The development of an app no doubt involves many tough decisions and trade-offs that you have to make, and one of the biggest will be at what price to sell your app for. To help clarify the important lessons and issues to consider when pricing an app, Michael Jurewitz has posted a five-part series based on his Çingleton and NSConference talks on ‘Understanding App Store Pricing’.
I’ve included below a brief summary of each article by Michael, but it’s really no substitution for reading the entire series yourself. It’s well written and although at times it covers some moderately complex microeconomic theories, it is broken down in easy to understand language with helpful diagrams and practical examples.
- Part 1: Michael delves into the common fear of “falling prices” and examines what the prices actually are for those in the Top Paid and Top Grossing lists. An important discovery is that those apps on the Mac App Store’s Top Grossing list are on average nearly 300% more expensive than those on the Top Paid list.
- Part 2: Michael further analyses the Top Grossing list to see if there are any characteristics to the make up of that list that distinguishes it from the Top Paid list.
- Part 3: Expanding upon the discoveries in part two, Michael gives an introductory explanation of demand elasticity and why it is incredibly important to understand when trying to maximise revenue.
- Part 4: Michael discusses some factors that can affect the elasticity of demand and warns those who want to develop a commodity app.
- Part 5: Applying all the lessons and discoveries made in the previous four parts, Michael goes on to discuss how Black Pixel priced Kaleidoscope 2 (our review) and then analysed how it performed in real life.
#MacStoriesDeals - Easter Deals!
We have many great Easter deals for #MacStoriesDeals today. You can find us as @MacStoriesDeals on Twitter.
#MacStoriesDeals - Wednesday
We have many great Easter deals for #MacStoriesDeals today. You can find us as @MacStoriesDeals on Twitter.
Twitterrific 5.2: Push Notification Rollout, Profile Banners, and Storify for Discussions

Redesigned from the ground up, Twitterrific launched last December with a fresh design that pleasantly surprised long time fans of the app. Breaking ground on the original iPhone, Twitterrific has relatively stayed the same for years, subtracting unnecessary features and focusing on delivering a robust core experience. Today, people expect more from their Twitter clients, such as the ability to mute hashtags and receive push notifications for follows and replies. The Iconfactory addressed the former through their last update with muffling, a simple way to shush users, hashtags, and domains on the timeline. Yesterday, The Iconfactory began addressing the latter by introducing push notifications in Twitterrific 5.2.
Podcasts 1.2: Thoughts on the New Now Playing View, My Stations, and More

Yesterday, Apple updated their podcast player by introducing some great new features as well as some visual changes to the Now Playing view. I’ve talked at length before about Podcasts and where it stands amongst other podcatchers on the App Store, but I’d like to revisit some of those notions as playlists take center stage in the form of stations.
How to Enable Two-Step Verification for Your Apple ID

Today, as originally reported by 9to5Mac, Apple has rolled out two-step verification for Apple IDs. Two-step verification makes it more difficult for someone to compromise your Apple ID by adding an additional layer of security. In this case, it’s an iOS device you own such as your iPhone (iPads and iPod touches also apply). As you make a purchase from iTunes on a new device or after you log into your account with your username and password, you’ll be asked to authenticate with a short code four-digit code. Currently, two-step verification is available for Apple customers living in the United States, the United Kingdom, Australia, Ireland, and New Zealand.
Using two-step verification is completely optional — you’re not required to use the extra security measure if you don’t want to. For those who opt-in, Apple gives fair warning that you’ll need your trusted device with you to access your account information. Apple does provide a printable Recovery Key in case you lose your iOS device or forget your password, but they won’t be able to help you if you lose it. I recommend storing the Recovery Key in 1Password for safe keeping. If you do lose the Recovery Key, you can generate and print a new key if you can log into your account.
If you won’t be enabling two-step verification, it might be a good idea to revisit your security questions. Instead of using likely answers, generate less guessable, complex words with 1Password instead for added security. Here’s a quick guide.

Setting up two-step verification starts by visiting appleid.apple.com. Upon logging in, click on the Password and Security tab. After entering a couple of answers to your security questions, you can find the option to turn two-step verification on at the top of the page. Simply click Get started… to begin setup.
FlightPath, TestFlight’s New Mobile Analytics Tool, Launches as a Private Beta

Today TestFlight is announcing FlightPath, a new mobile analytics tool that makes it easy for developers to gain insights on how their customers are using their apps in real-time.
Launching as a private beta, FlightPath shows what you care about on a single, easy-to-read living page. A simple chart provides a high-level overview of an app’s status and usage in real-time. Developers can click on various points to filter data into specific metrics, such as session length, that can be combined with other data points and saved off as preset segments for easier tracking. Preset segments, such as Loyal Users and Flight Risks, give developers a head start on gaining valuable insights. Developers already using the TestFlight SDK can easily take advantage of FlightPath by adding a single line of code.

FlightPath appears to be the Squarespace of analytics tools: it’s easy to get started, everything is a click away, and more nuanced data is available if developers want it. FlightPath aims to solve common frustrations with analytics tools by reducing complexity and by delivering up-to-date information now, not later.
Developers can sign up for the FlightPath beta by signing up at www.flightpathapp.com.
Quantifying The Australian “Apple Tax”
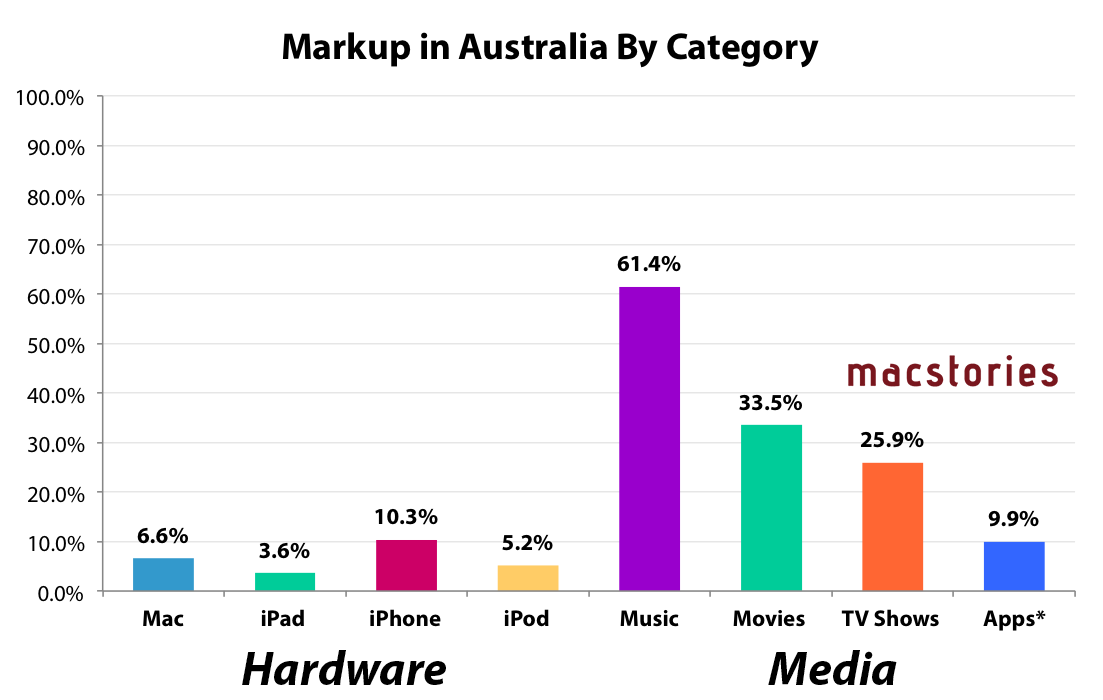
On Friday, Apple (along with Microsoft and Adobe) will front the Federal Australian Parliament’s inquiry into IT Pricing. You may recall that after failing to voluntarily appear, the committee in February of this year summonsed the three, effectively forcing them to appear. Given Apple’s appearance, I wanted to take a closer look to see what Apple actually charges for their products (both hardware and media from their iTunes and App Stores) and see how it compares to the US.
Methodology
Doing this kind of analysis can be fairly contentious given there are a few ways to do it, various assumptions you have to make, and different ways of presenting the information. To be clear, here is how I have constructed the data presented in the graphs in this article.
- I collected from Apple’s website, the Australian and US prices of all their key products and main models (but not built-to-order models).
- GST is removed from Australian price: The Australian price includes a 10% GST (goods and services tax), so I removed that from the Australian price because US prices do not include a sales tax, that is added at checkout based on which US state the customer is from (sales taxes varies across US states).
- Now that both prices don’t include sales taxes, I convert the Australian price from Australian dollars (AUD) to US dollars (USD). I use a 3 month average of the exchange rate. The 3 month average smoothes out any temporary peaks or troughs in the exchange rate and gives Apple a fairly lengthy period of time to alter prices if there was a significant change in the exchange rate.
- This now gives me the price of the Australian good in USD and without GST, a figure that can now be compared with the US price. So I calculate the percentage markup of the Australian price based on the original US price.
- NOTE: Methodology for the Media calculations do vary a bit, read the notes I include with them.
- I encourage you to scrutinise my calculations by taking a look at the Excel document I created, linked below.