My friend Amy is having her first experience with using Gmail, and, it, um, isn’t going as well as she’d like. The good news is that although Apple’s Mail.app and Gmail have had a rocky relationship in the past, Mail.app in Yosemite works pretty well with Gmail, but there are some things that you should understand before you proceed.
Gmail without an @Gmail address
Many businesses and schools use Google’s mail service for their email, even with their own domain names. This is commonly referred to as “Google Apps” (sometimes “Google Apps for Business” or “Google Apps for Work” or “Google Apps for Education” etc).
For the sake of clarity and brevity, I will just refer to “Gmail” for “Email which is provided by Google, regardless of whether it is provided by your school, company, organization, or Gmail.com or any of the other country-specific Gmail domains.”
You can log in to your Gmail account either by going to Gmail.com or by going to a special URL using your domain. For example, to check my MacStories email, I can go to https://mail.google.com/a/macstories.net. For the sake of simplicity I will refer to “Gmail.com” whenever I mean “the web interface for your Gmail account”.
Do you have to use Mail.app?
Ask any developer who has worked on an email app, and they will tell you that supporting Gmail is the bane of their existence, because Gmail uses its own protocol for email which is sort of like the standard email protocol (IMAP) yet very different in some important ways from standard email.
Although most Mac users are familiar with Mail.app, I think it is not the best way to use Gmail on the Mac. Most of Gmail’s features work best if you are using the web interface for Gmail, so I would encourage you to consider using that.
If you want a separate app for email but still want to use the Gmail web interface, look at Mailplane which offers that, plus the ability to use multiple Gmail accounts. If you need to be logged in to several Google accounts during the day for email, calendar, etc. then I think Mailplane is, by far, your best option. The other nice thing is that you can set Mailplane to be your default mail application, so it will respond to mailto links and email addresses from other applications.
(I consider MailMate to be a far-superior mail app than OS X’s built-in Mail.app. It has many more features and functionality than Mail.app and I consider it the top “pro” app for mail on OS X. There are instructions for setting up MailMate with Gmail here.)
However, some people may have to use Mail.app, or they may feel strongly enough about it that they want to use Mail.app and don’t want to change just because they have to use Gmail.
Gmail “Labels” are (mostly) like folders.
Email folders are perhaps one of the most basic parts of using email for most people, and yet already we are going to run into a way in which Gmail is different than other mail systems.
The primary difference between Gmail’s labels and other email system’s folders are that Gmail allows for one email to have more than one label. (You might think of this sort of like “tags” if you have used those in Finder, Evernote, or another program.)
Every email that you have ever received to your Gmail account is stored in a folder/label called (reasonably enough) “All Mail”. However, a problem can appear if you have filters in your Gmail account which apply labels to incoming messages. For example, I could have an email which comes to me from Federico Viticci which could end up in my “Inbox” as well as my “Important” label as well as another label called “Federico”. When I read that message through Gmail’s website, it will immediately be marked as “read” in the other labels as well. If I “delete” that message in one of the “Labels” the message is not really deleted unless I am in the “All Mail” label, in which case it will be deleted, after warning me that I will really delete the email if I continue.
However, if I am using Mail.app, it may see that message as 3 separate messages in 3 separate folders, and it may not necessarily sync the read or deleted state of the message. This can lead to a lot of duplication and confusion, obviously.
We have now arrived at my first suggestion for using Gmail in a mail application: “Use as few labels/folders as possible.”
There are several ways of managing this. You can create your own set of labels, of course, and you can sort your email, either using Mail.app’s “Rules” feature, or using Gmail’s “filters” feature, but my preferred way of managing this is to use SaneBox.
SaneBox
SaneBox is a web service which automatically categorizes your email based on smart filters that it creates and applies based on messages that you have sent and received. It is far easier and smarter than making your own Gmail filters or Mail.app rules. When you sign up for SaneBox, it will connect to your Gmail account and then it will look at your mailboxes, especially your Sent mailbox, to try to automatically determine who are the most important people you email.
(If you are squeamish about the idea of letting a company look at your email, SaneBox does this only by checking the headers of your email messages, not the contents and has a vested interest in protecting your privacy as a customer. They don’t have access to your Gmail password, and you can revoke their access to your account at any time.)
SaneBox creates at least one folder called “@SaneLater” where it will automatically put all of your “Less Important” emails. Your most important emails will stay in your Inbox. In my experience, SaneBox is extremely smart about this, but if it makes a mistake, all you have to do is save the email to the folder where it should have gone. For example, if an unimportant email ends up in your INBOX but it should have gone to “@SaneLater” just move it to “@SaneLater” and it will learn from this, and do that again in the future. If an important email ends up in “@SaneLater” simply save it to your INBOX and it will learn from that and do that again in the future.
The great thing about SaneBox is that you can use it in Mail.app, or Mail on your iOS or Android device, or the Gmail website, or anywhere else. You don’t have to install anything on your computer or your phone, because it all works server side.
(SaneBox also has other great features, like the ability to put messages in a “Black Hole” where any future messages from that person will automatically be deleted. It can also remind you of emails you have sent which have not been answered, and it can “hide” email until a later date if you want (i.e. if you see a message on Friday but can’t/won’t do anything about it until Monday, you can save it to a folder called “@SaneNextWeek” and it will automatically re-appear on Monday.)
SaneBox is one of those services that I happily pay for every month because it has completely changed the way that I manage my email.
Gmail Filters
If you can’t use SaneBox (due to company policy, etc) or prefer not to, then your next best option is to create Filters using Gmail.com. These filters will be applied to all of your email messages as soon as they arrive at Gmail, and therefore the messages will appear sorted in your mail application on your Mac as well as any other device that you might use.
Creating a Gmail filter is pretty simple. My preferred method is to select a message that I want to filter (usually based on who it was from). Select the dropdown menu next to “Reply” and choose “Filter messages like this.”
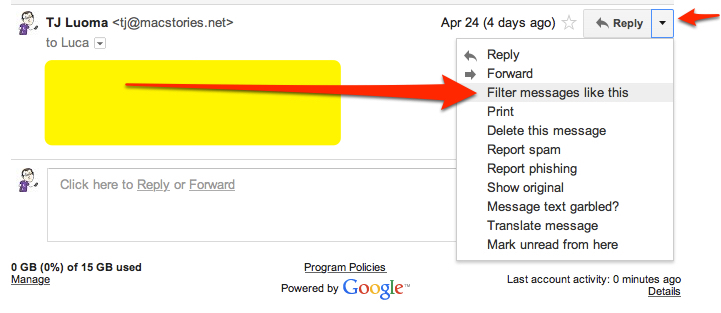
From there you can just follow the prompts. The great thing about Gmail is that it will automatically show you the results of the filter, as you put it in, so you can see that it is working as you want.
Mail.app Rules
Mail.app rules might be the easiest solution, since you can control them right on your Mac, but they are my least favorite, because they only work once your Mac has had a chance to sync your email, which means that your Mac must be on 24/7.
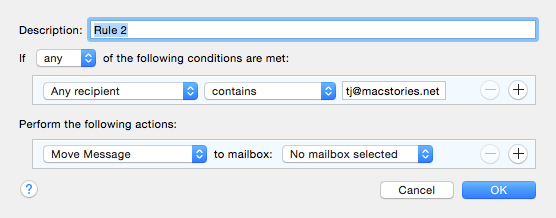
To create a Mail.app rule, go to Mail.app, then go to Preferences, click on the “Rules” tab, and then click “Add Rule”. From there it ought to be fairly self-explanatory.
Setting up Gmail on Yosemite
To add your Gmail account to Mail.app, first launch the app, and (if it does not prompt you to add an account), go to Preferences, click on “Accounts” and then click on the “+” at the bottom-left corner.
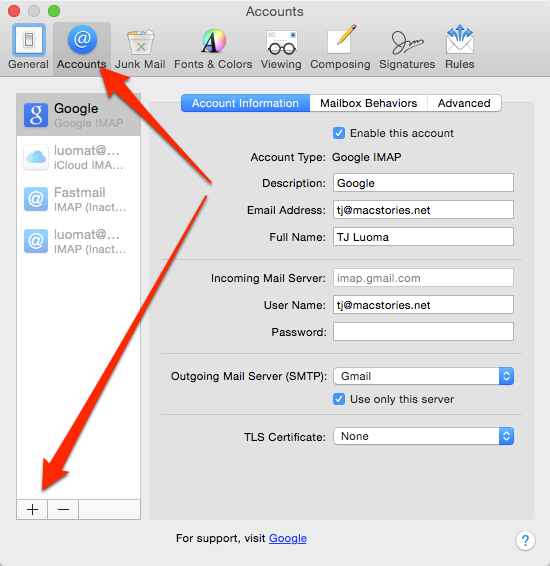
This image also shows you an example of what a completed account set up for Gmail looks like.
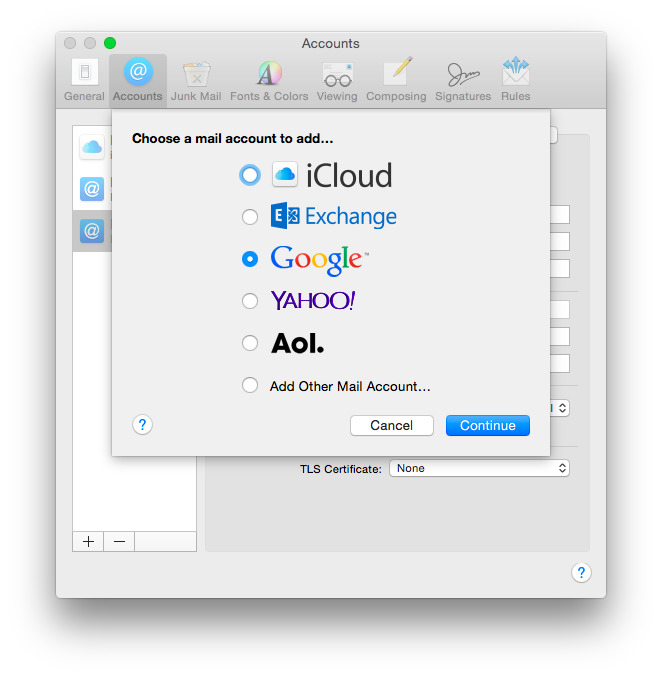
Mail.app will show you various options for different mail services. Choose “Google” from this list:
Click continue, and you will be asked to enter your Gmail username (email address) and password.
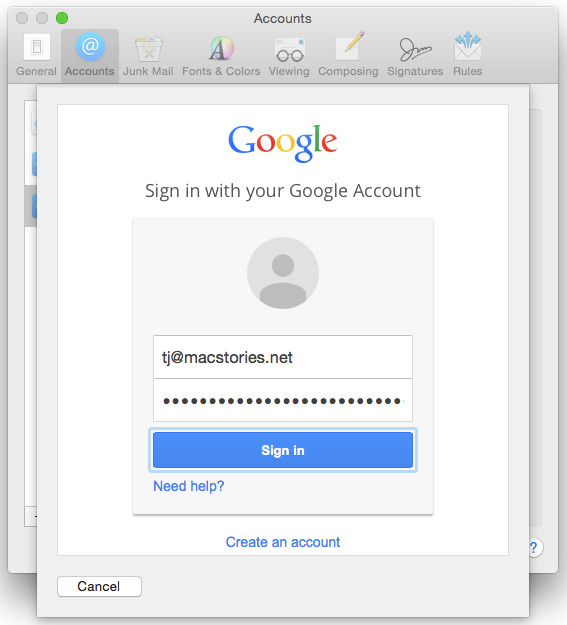
Click “Sign In”
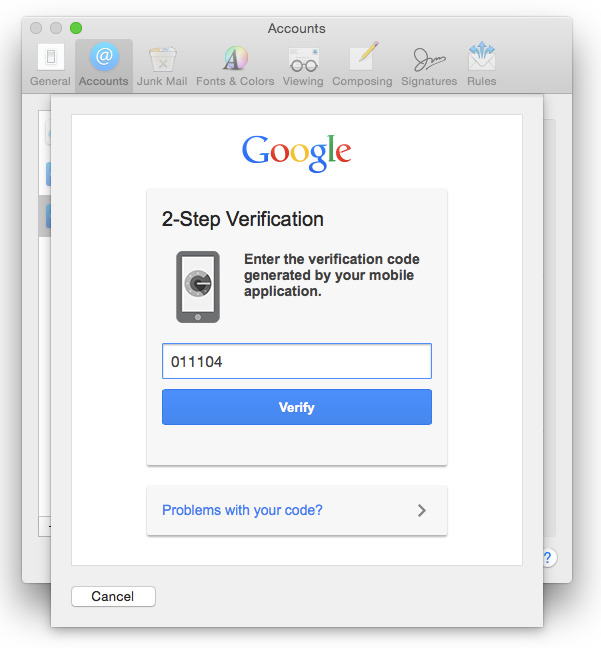
If you are using two-factor authentication, enter the appropriate code here. (You are using two-factor authentication, right? Because your email is one of your most valuable online accounts, and you should do everything you can to protect it.)
Next, Google will tell you what “OS X” wants to be allowed to do:
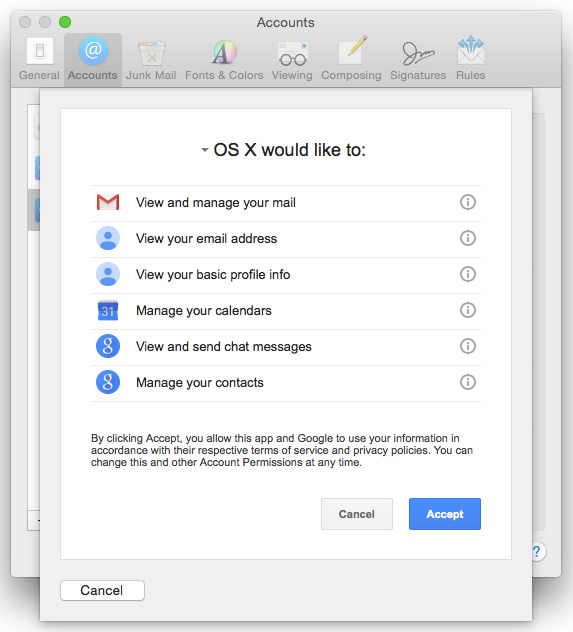
Click the “Accept” button (note: the button will be greyed out when the window first loads, but should become active after a few seconds).
Last but absolutely not least, select the “apps” that you want to use your Google account. If you will be using your Google Calendar, be sure to check that box as well.
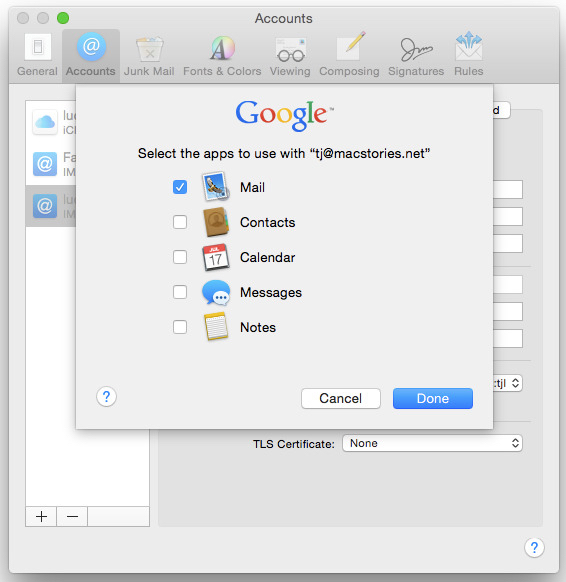
Once you’ve done those steps, Mail.app should be automatically configured to send and receive email from your Gmail account.
Gmail Pro-Tip: Limit IMAP folder sizes
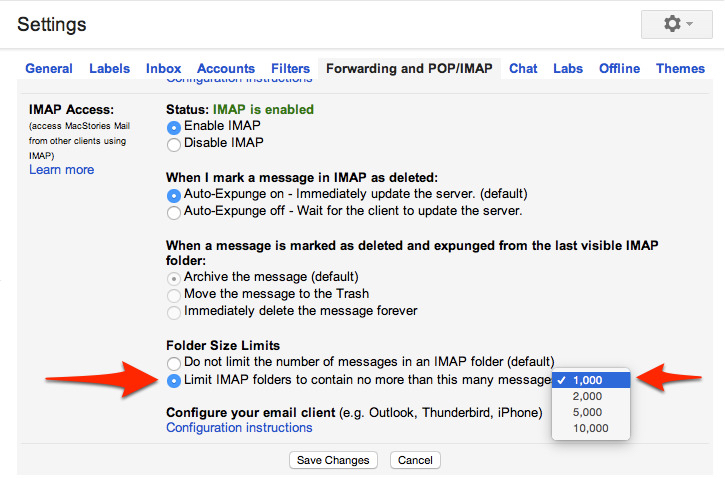
If you are in the habit of keeping a lot of email, you may find that Mail.app will eventually get very slow trying to keep up. This is especially true because of the “All Mail” folder. Gmail has a way to help with this, by allowing you to automatically limit the number of emails which will be shown in IMAP (that is, in your Mac or PC or iOS or Android mail client). You can limit it to the most recent 1,000, 2,000, 5,000, or 10,000 messages.
Older messages will not be deleted but will simply not show up in your regular mail app. To see them, you will have to go to Gmail.com and use the web interface.
Based on my previous experience, I would not recommend anything over 5,000 messages, and would suggest 1,000 or 2,000 at the most.
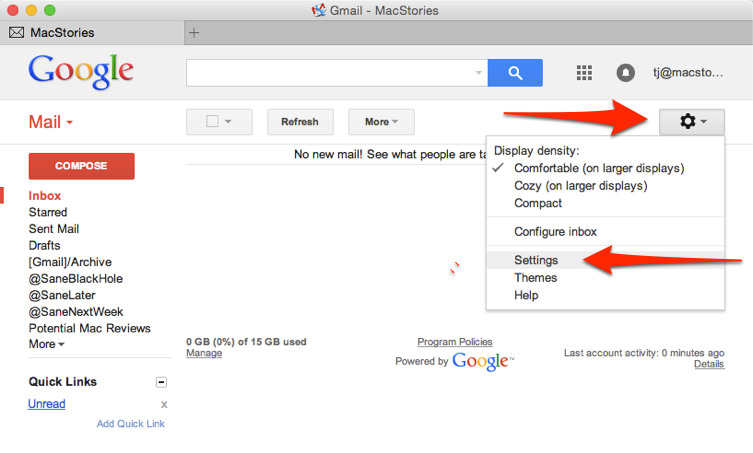
To find this setting, log into Gmail.com, click on the “Gear” icon, and then click on “Settings”:
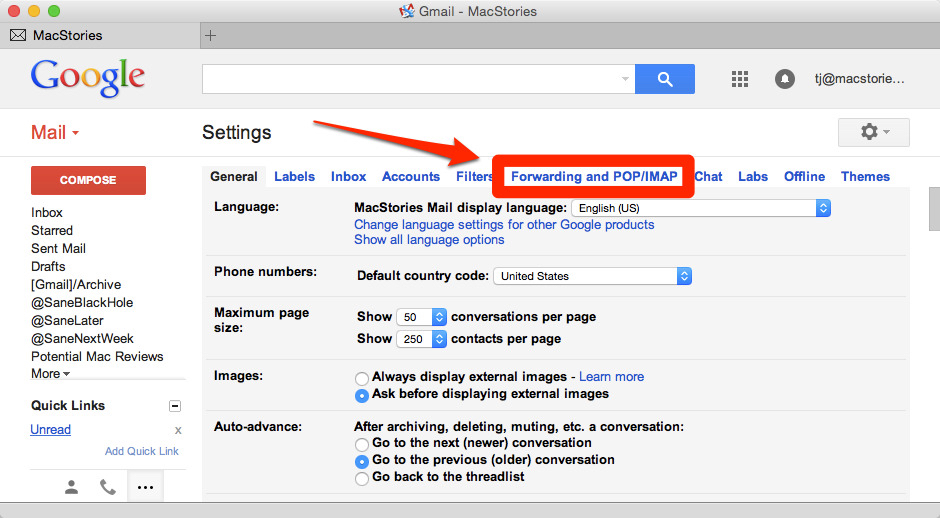
Next, select “Forwarding and IMAP” as shown here:
Then scroll down until you see the “Folder Size Limits” setting. It is Off by default, so you will have click the radio button next to “Limit” and then choose the number from the dropdown box, as shown:
“Delete or Archive?”
Setting up a Gmail account used to be somewhat confusing because when you would “Delete” an email, Gmail assumed that what you meant was that you wanted to keep it in the “All Mail” folder. That is no longer the case. Any message that you delete via Mail.app will be sent to the “Trash” folder/label in Gmail, where it will be automatically deleted after 30 days.
For best performance, I recommend moving read email out of your Inbox, either by deleting it or Archiving it. Mail.app has an “Archive” menu item:
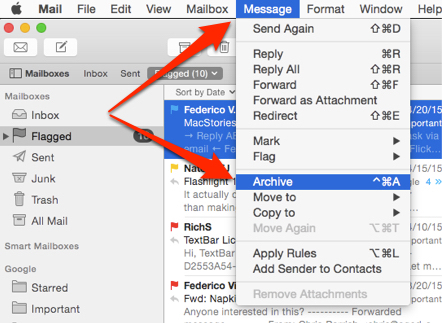
You can also trigger the “Archive” command using Command+Control+A which will help you get through your Inbox quickly.
Note: This article was written using OS X 10.10.3 (Yosemite). Mail.app in past or future versions of OS X may behave differently than what is described here. I recommend checking the Gmail website after you “Archive” and “Delete” messages, to make sure they are going where you expect them to go.