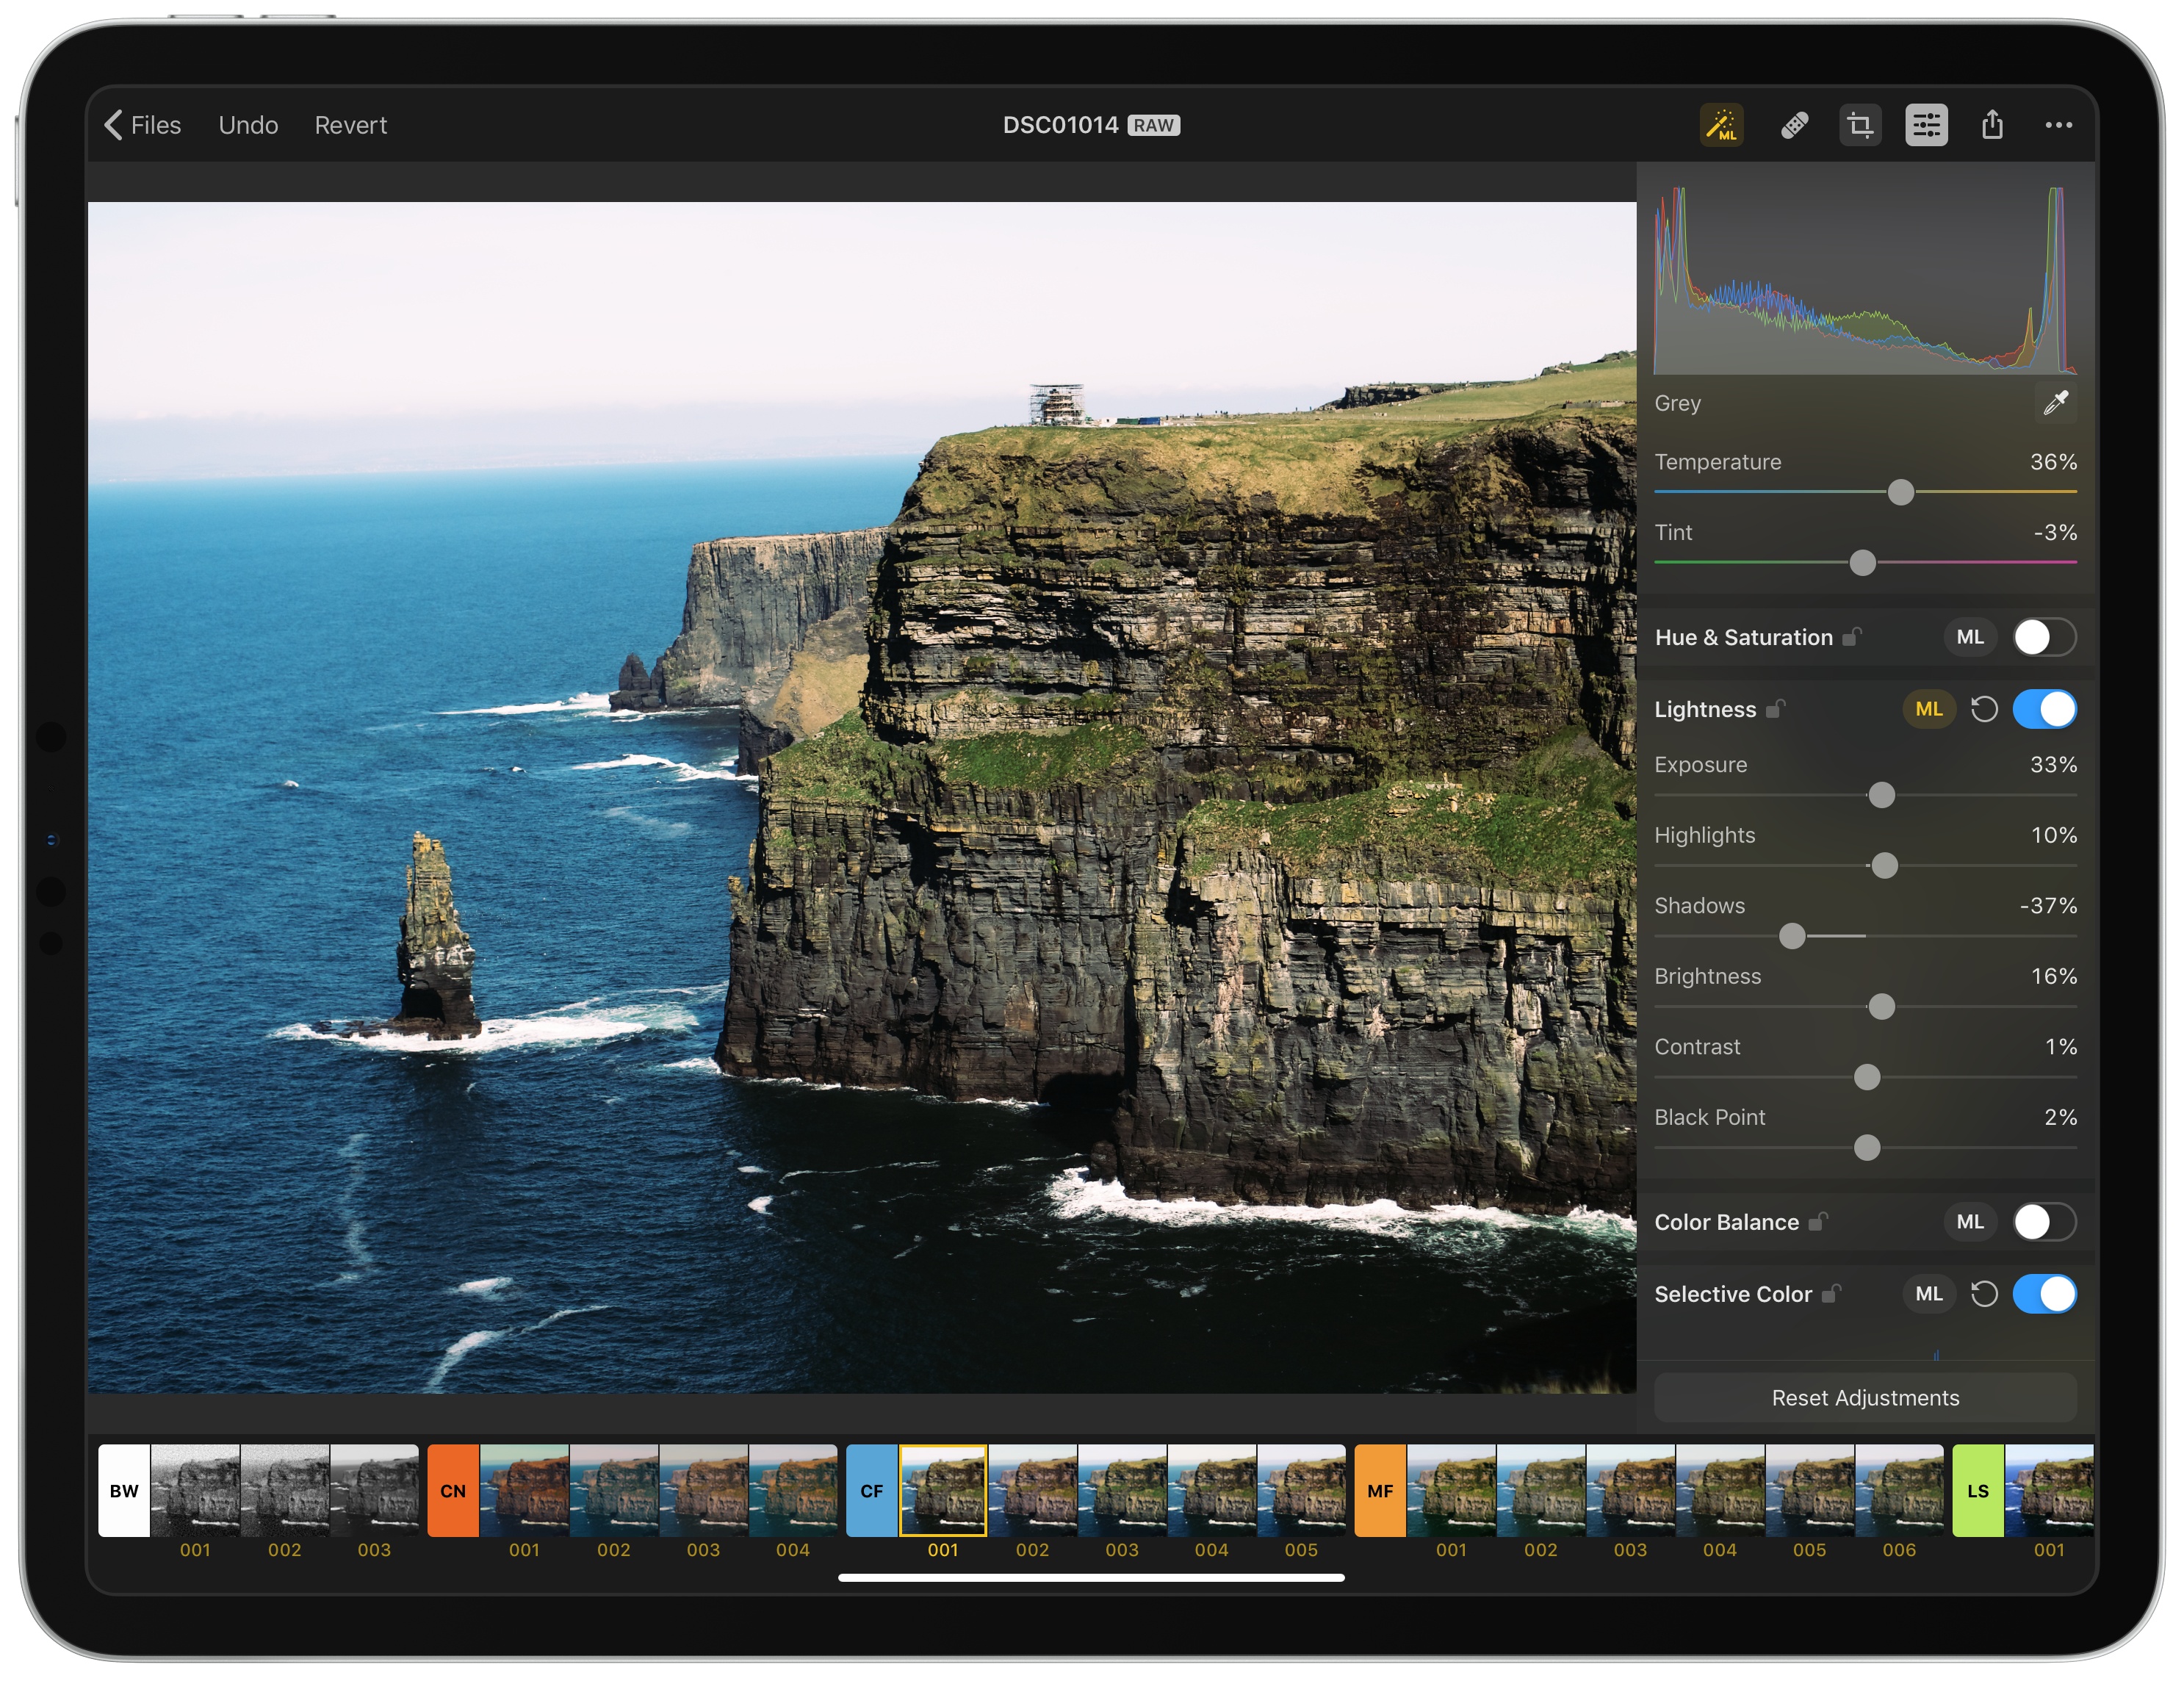
Luna Display as a Secondary Display: Keyboard Shortcuts
As a first order of business, I realized I needed to change some of the keyboard shortcuts that were in conflict between macOS and iOS.
Despite the fact that it creates the illusion that you’re using macOS on an iPad, it’s important to remember that Luna Display is still an iPad app, and as such it responds to default keyboard shortcuts that are shared system-wide across all apps on iOS. Specifically, when I started using Luna Display, the keyboard shortcuts to activate Spotlight search and the app switcher (⌘Space and ⌘Tab, respectively) kept triggering those functionalities on the iPad rather than being passed over to macOS. I had to replace them if I wanted to use the Mac’s search feature and app switcher from Luna Display on the iPad.
Disabling Spotlight was easy. To do this, go to System Preferences ⇾ Spotlight ⇾ Keyboard Shortcuts and disable ‘Show Spotlight Search’. If you want to keep using Spotlight but simply change its keyboard shortcut, click on it and record a new one from the keyboard. I’ve always preferred Alfred to Spotlight, so I turned off Spotlight’s keyboard shortcuts completely and started using ⌥Space to trigger Alfred’s search window, which does not conflict with iOS’ ⌘Space shortcut. It took a while to get used to opening search on the Mac with this new hotkey after years of ⌘Space, but the trade-off has been worth it. I can now use both iOS search and Alfred from Luna Display on the iPad – which is nice when I want to put an iOS app on top of Luna Display in Slide Over mode.
Replacing the ⌘Tab app switcher was trickier. As far as I know, there is no way to remap the default keyboard shortcut for the app switcher on macOS that doesn’t involve installing system modifications I’m not comfortable with. So I went in a different direction and settled on a third-party app switcher that mimics the default Apple one but extends it with some additional options, including customizations for its appearance and keyboard shortcut. The app is called Command-Tab Plus, and it looks like this after my customizations:
In terms of preferences, as you can see below, there are plenty of options you can configure to filter which apps are going to be shown in the custom switcher and what the palette looks like. I appreciate how I can hit numbers to quickly select specific apps and how I can cycle backwards in the list of apps by holding down the ⇧ key, just like with the Apple switcher.
Effectively, at this point I have two separate app switchers on my Mac mini – the default one and Command-Tab Plus. This way, when I access the Mac from Luna Display on the iPad I’m free to use either the iOS app switcher5 or the Mac one. Once again, it took me a few days to get accustomed to using ⌥Tab after years of muscle memory with a different keyboard shortcut, but I prefer the extra versatility granted by Command-Tab Plus now.
Controlling Windows with BetterTouchTool
To the best of my knowledge, by default macOS does not provide any keyboard shortcuts to cycle an app window through multiple displays, which, as I’ve noted in this article, is the most annoying limitation of using Luna Display as a secondary display for your Mac. To fix this problem, I’ve turned to BetterTouchTool.
It’s nearly impossible to sum up what BetterTouchTool can do in a single paragraph, but I’ll try: with BetterTouchTool, you can associate almost any action on your Mac with a custom keyboard shortcut, gesture, mouse click, or Touch Bar button. Whether you need to launch apps, trigger a specific menu item of an app, control windows, or run AppleScripts, BetterTouchTool can do it. It’s like Keyboard Maestro, but with a simplified interface that’s designed to let you quickly program your own shortcuts. If you’re interested in this kind of utility, take your time to read through the documentation and play around with a few examples; invest enough time into learning BetterTouchTool and what it can accomplish, and you’ll end up with a highly personalized macOS environment that can save you several minutes every day.
In my case, all I had to do to make it easier to fling app windows across displays was use BetterTouchTool’s ‘Move Window to Next Monitor’ action. As shown below, all it takes is creating a new shortcut in the ‘Keyboard’ category of the app, giving it a hotkey, and picking the action from a list of predefined steps:
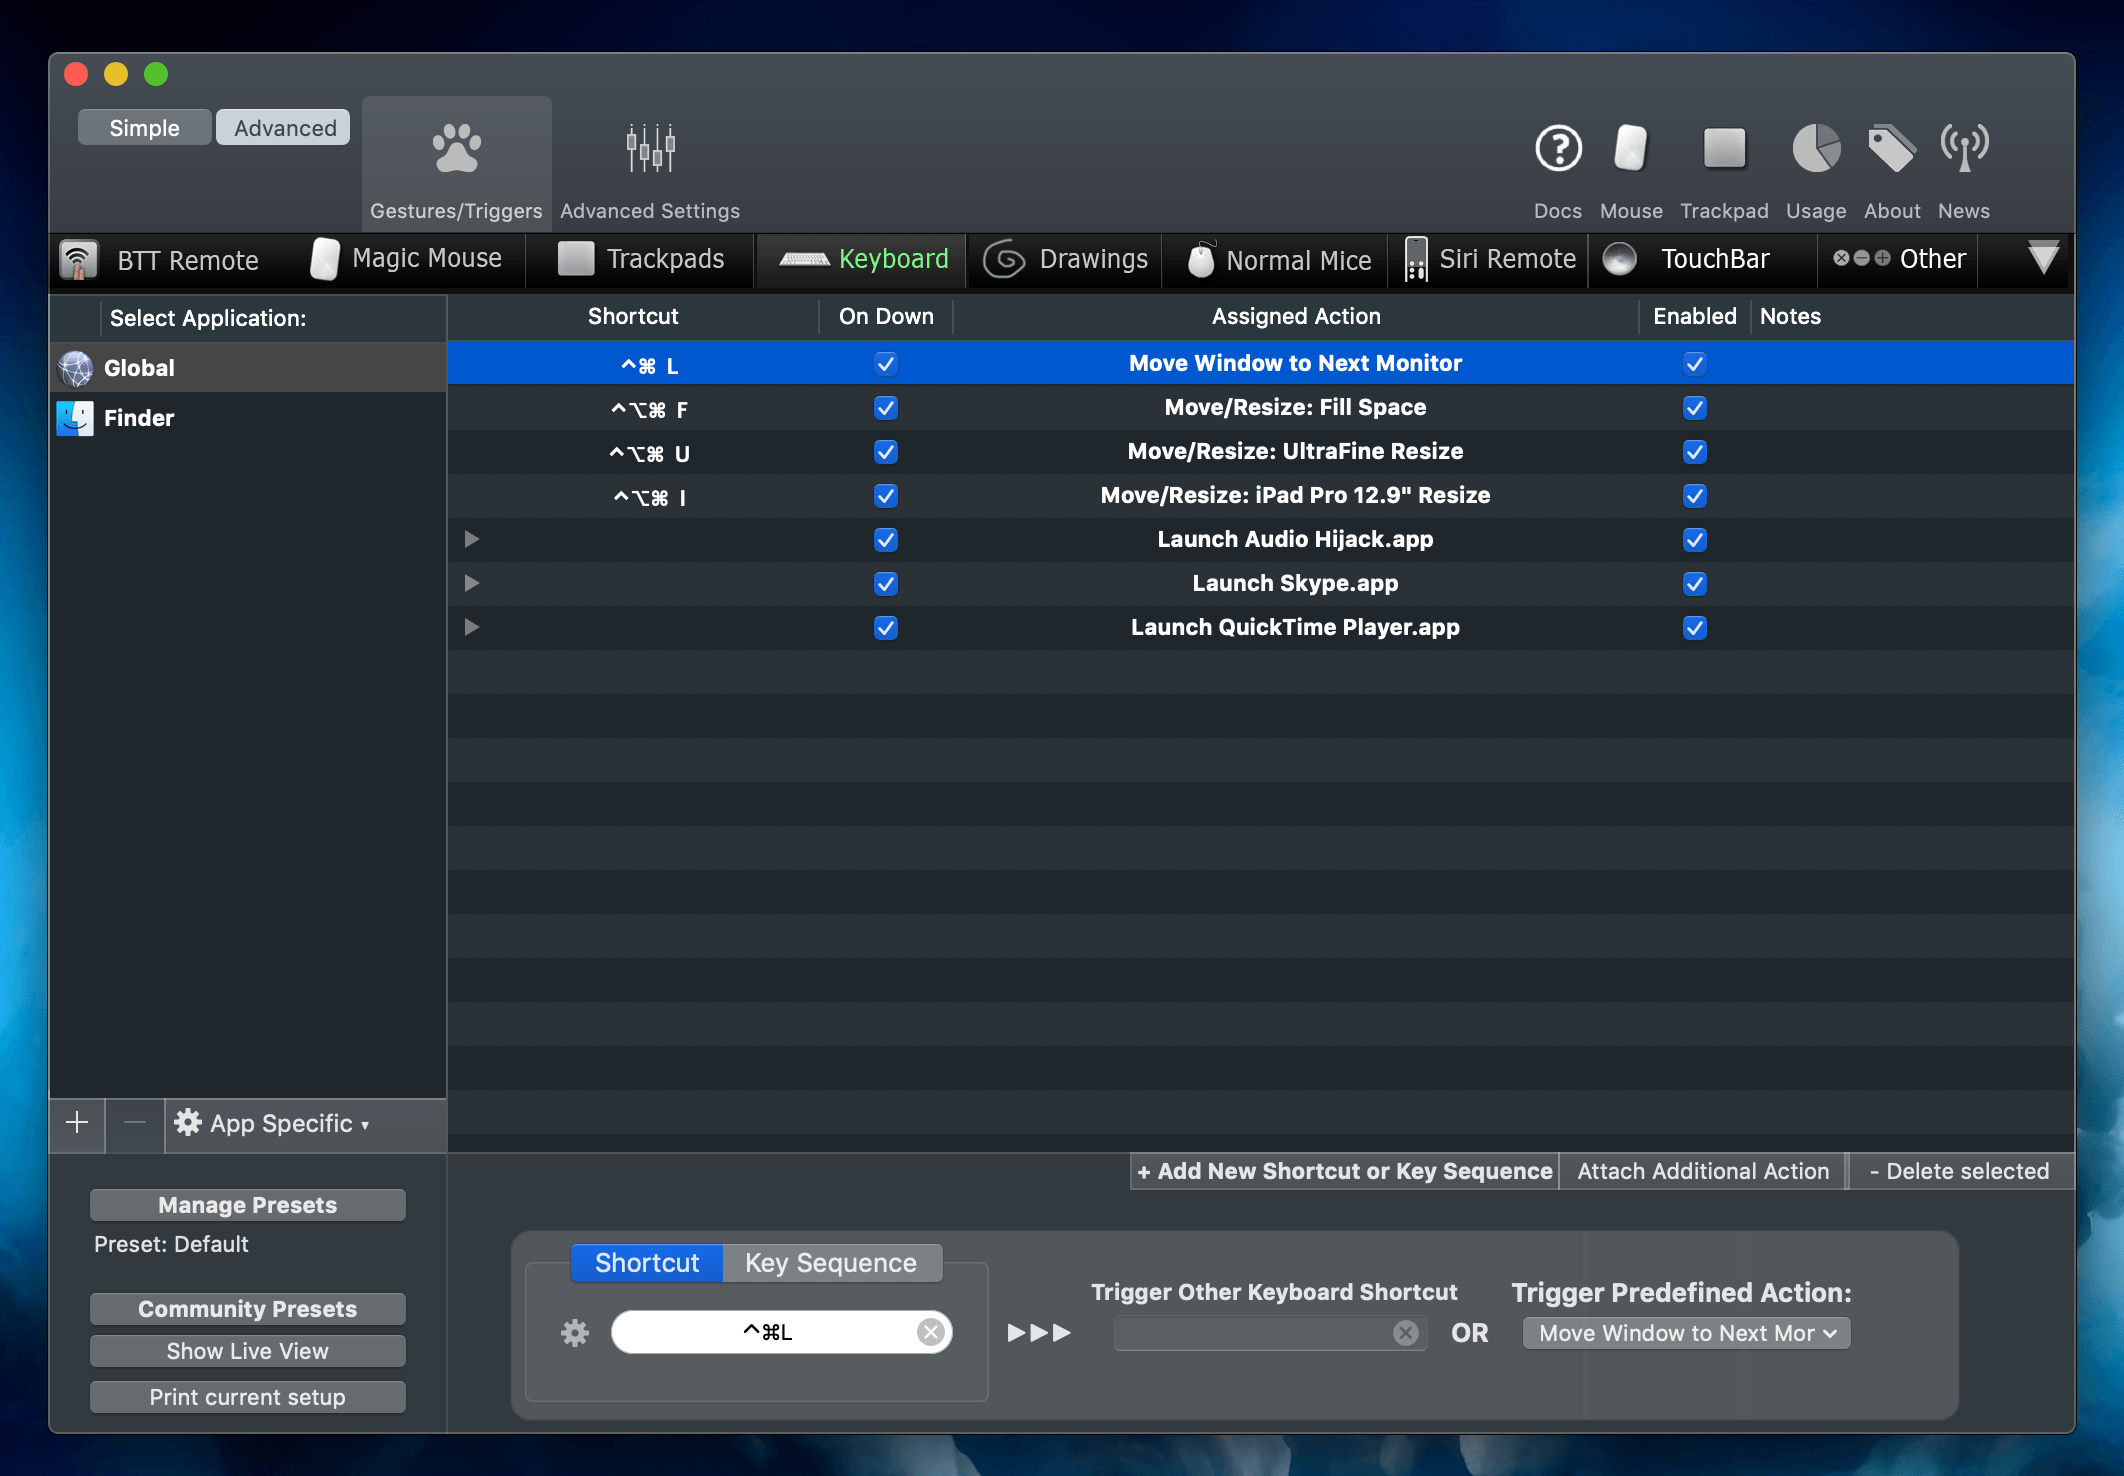
Now, whenever I want to move a window that has opened on the primary display (the UltraFine) to the Luna Display, I just need to press ⌃⌘L and the window will instantly move. But that’s not all: if I’m working with two displays at once (for instance, when I’m recording podcasts), I can hit the same shortcut to shuffle the current window back to the primary display because BetterTouchTool’s action is designed to move windows to the “next” monitor, so it’s not specific to the Luna Display one.
There are other BetterTouchTool actions I set up to improve the experience of using macOS from the iPad Pro. I was finding it difficult to maximize the size of app windows due to the small size of window resizing controls (because macOS is not optimized for touch interactions), so I assigned the ‘Doubleclick Window Titlebar’ trigger to ‘Maximize Window’.
Thanks to this gesture shortcut, when I’m using Luna Display and want to resize windows to fill the iPad Pro’s screen, all I need to do is double-tap their title bar and they’ll expand to all four corners of the display.
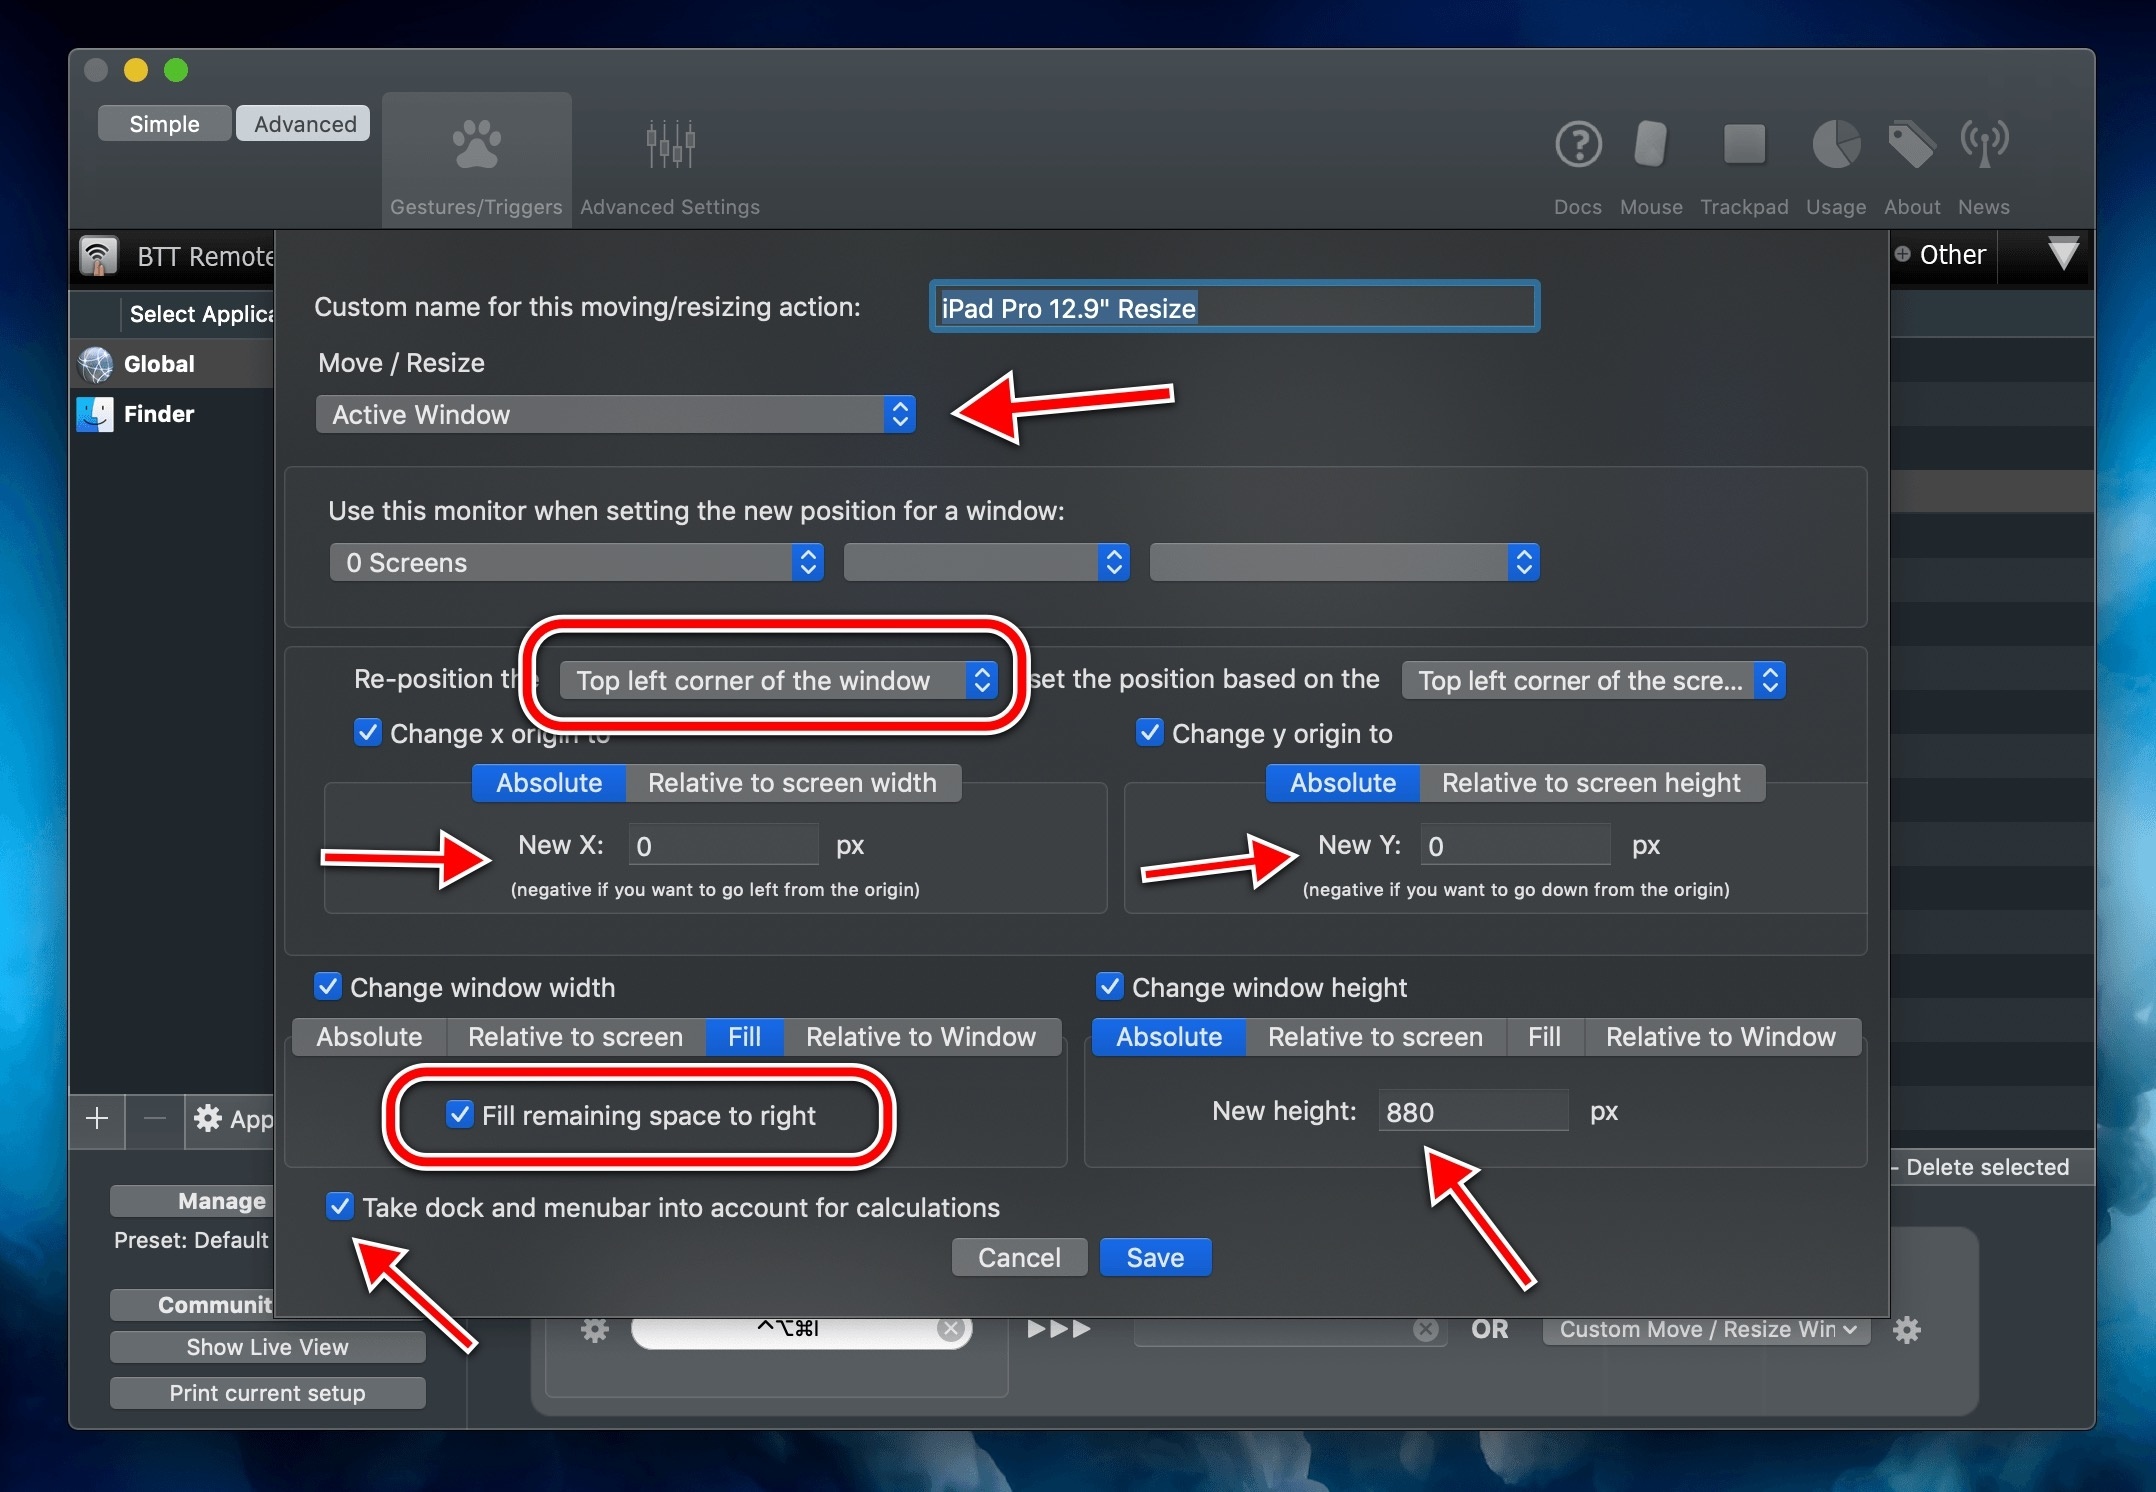
I also created a BetterTouchTool shortcut to resize windows so they can fill the screen until they reach the edge of the dock on the right side of the screen and the custom Accessibility panel at the bottom. To do this, I assigned a hotkey to ‘Custom Move/Resize Window’ and configured the action’s parameters as follows:
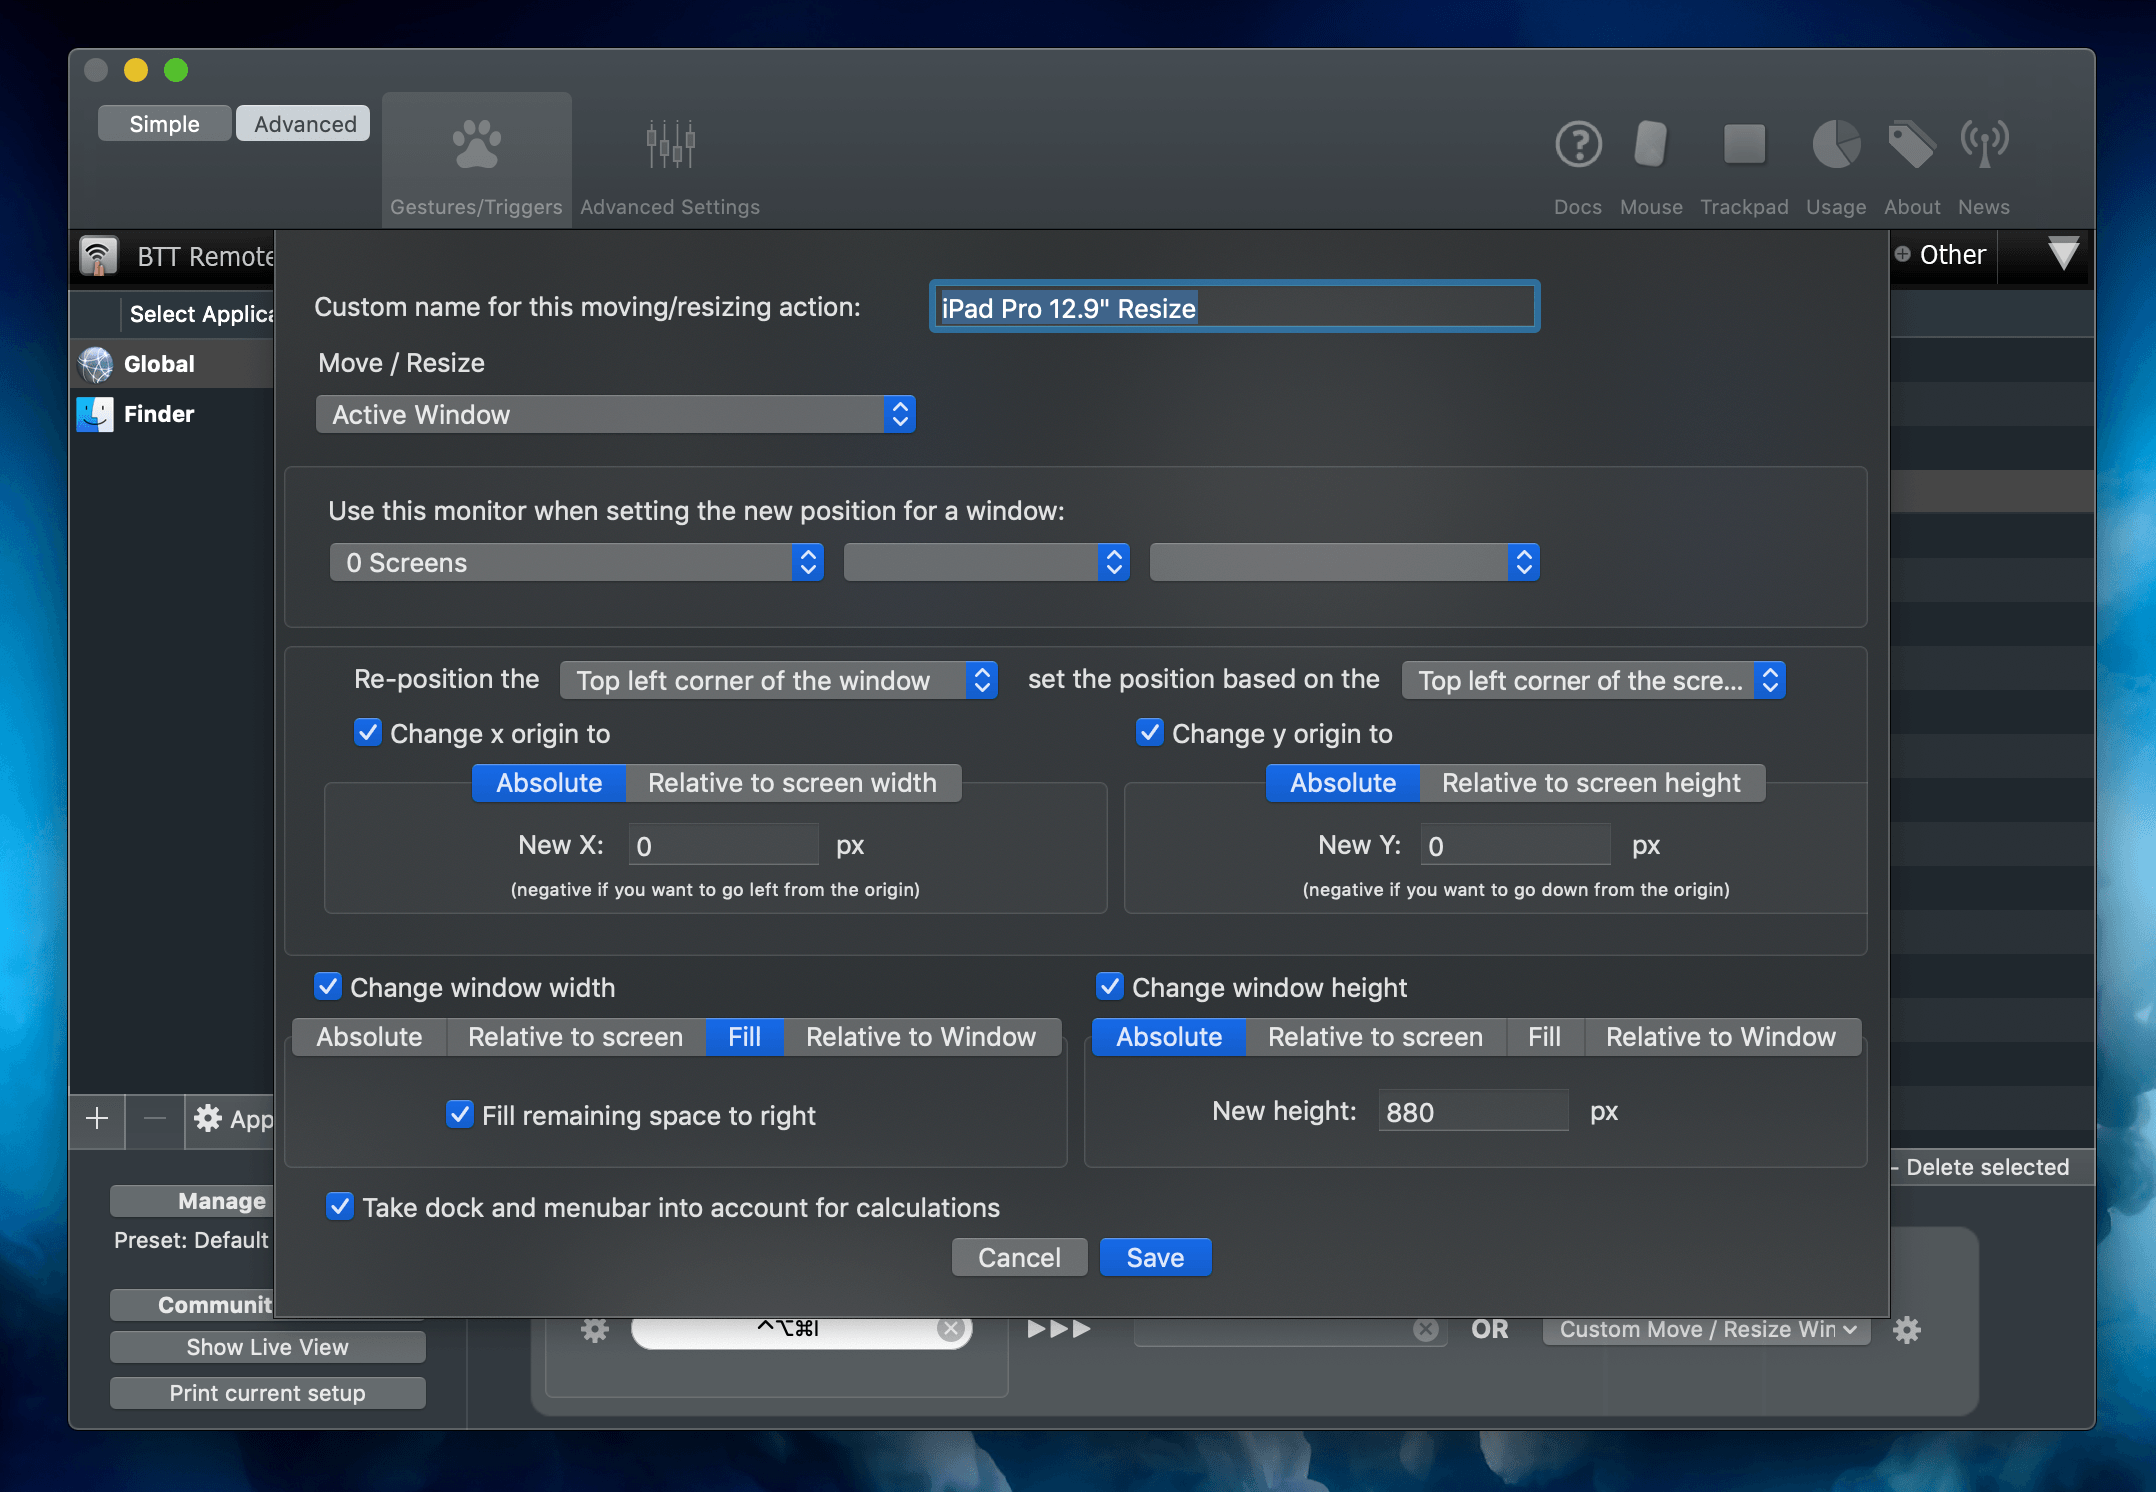
Essentially, this configuration tells BetterTouchTool to start resizing a window from the top-left corner of the display and fill the remaining space on the right by taking into consideration both the dock and menu bar. In terms of height, I set BetterTouchTool to give it an absolute value of 880px, which I manually calculated (with trial and error) to account for the presence of the Accessibility panel. Here’s an annotated version of the configuration screen that highlights the options I just mentioned:
I’ve barely scratched the surface of what BetterTouchTool can do, but I believe its support for multiple displays and window control actions is perfectly suited for Luna Display users who want a better way to deal with windows across multiple displays.
Custom Accessibility Keyboard Panel
Lastly, I want to explain how I’ve been taking advantage of macOS’ built-in Accessibility Keyboard feature and how I’ve turned it into a custom shortcut panel to trigger various features of macOS more comfortably both from the iPad Pro and when I’m working on my Mac mini.
Among the several Accessibility features supported by macOS, Apple offers a customizable Accessibility Keyboard that lets you use a Mac without a physical keyboard. For users with physical impairments, this is an essential functionality that allows them to type and use apps without having to interact with a physical keyboard. By default, the Accessibility Keyboard looks like a standard QWERTY onscreen keyboard; however, you can fully customize its appearance, as well as create new virtual keyboards from scratch, by using the built-in Panel Editor app available for free on macOS.
The Accessibility Keyboard is based on the idea of panels, and users can create multiple panels with buttons that perform specific actions such as launching apps, triggering system functions, or running AppleScripts. You can create as many panels as you want, and you have complete control over the appearance of buttons and their layout. In addition to the Apple documentation I linked above, I recommend checking out this article from AbilityNet about Panel Editor.
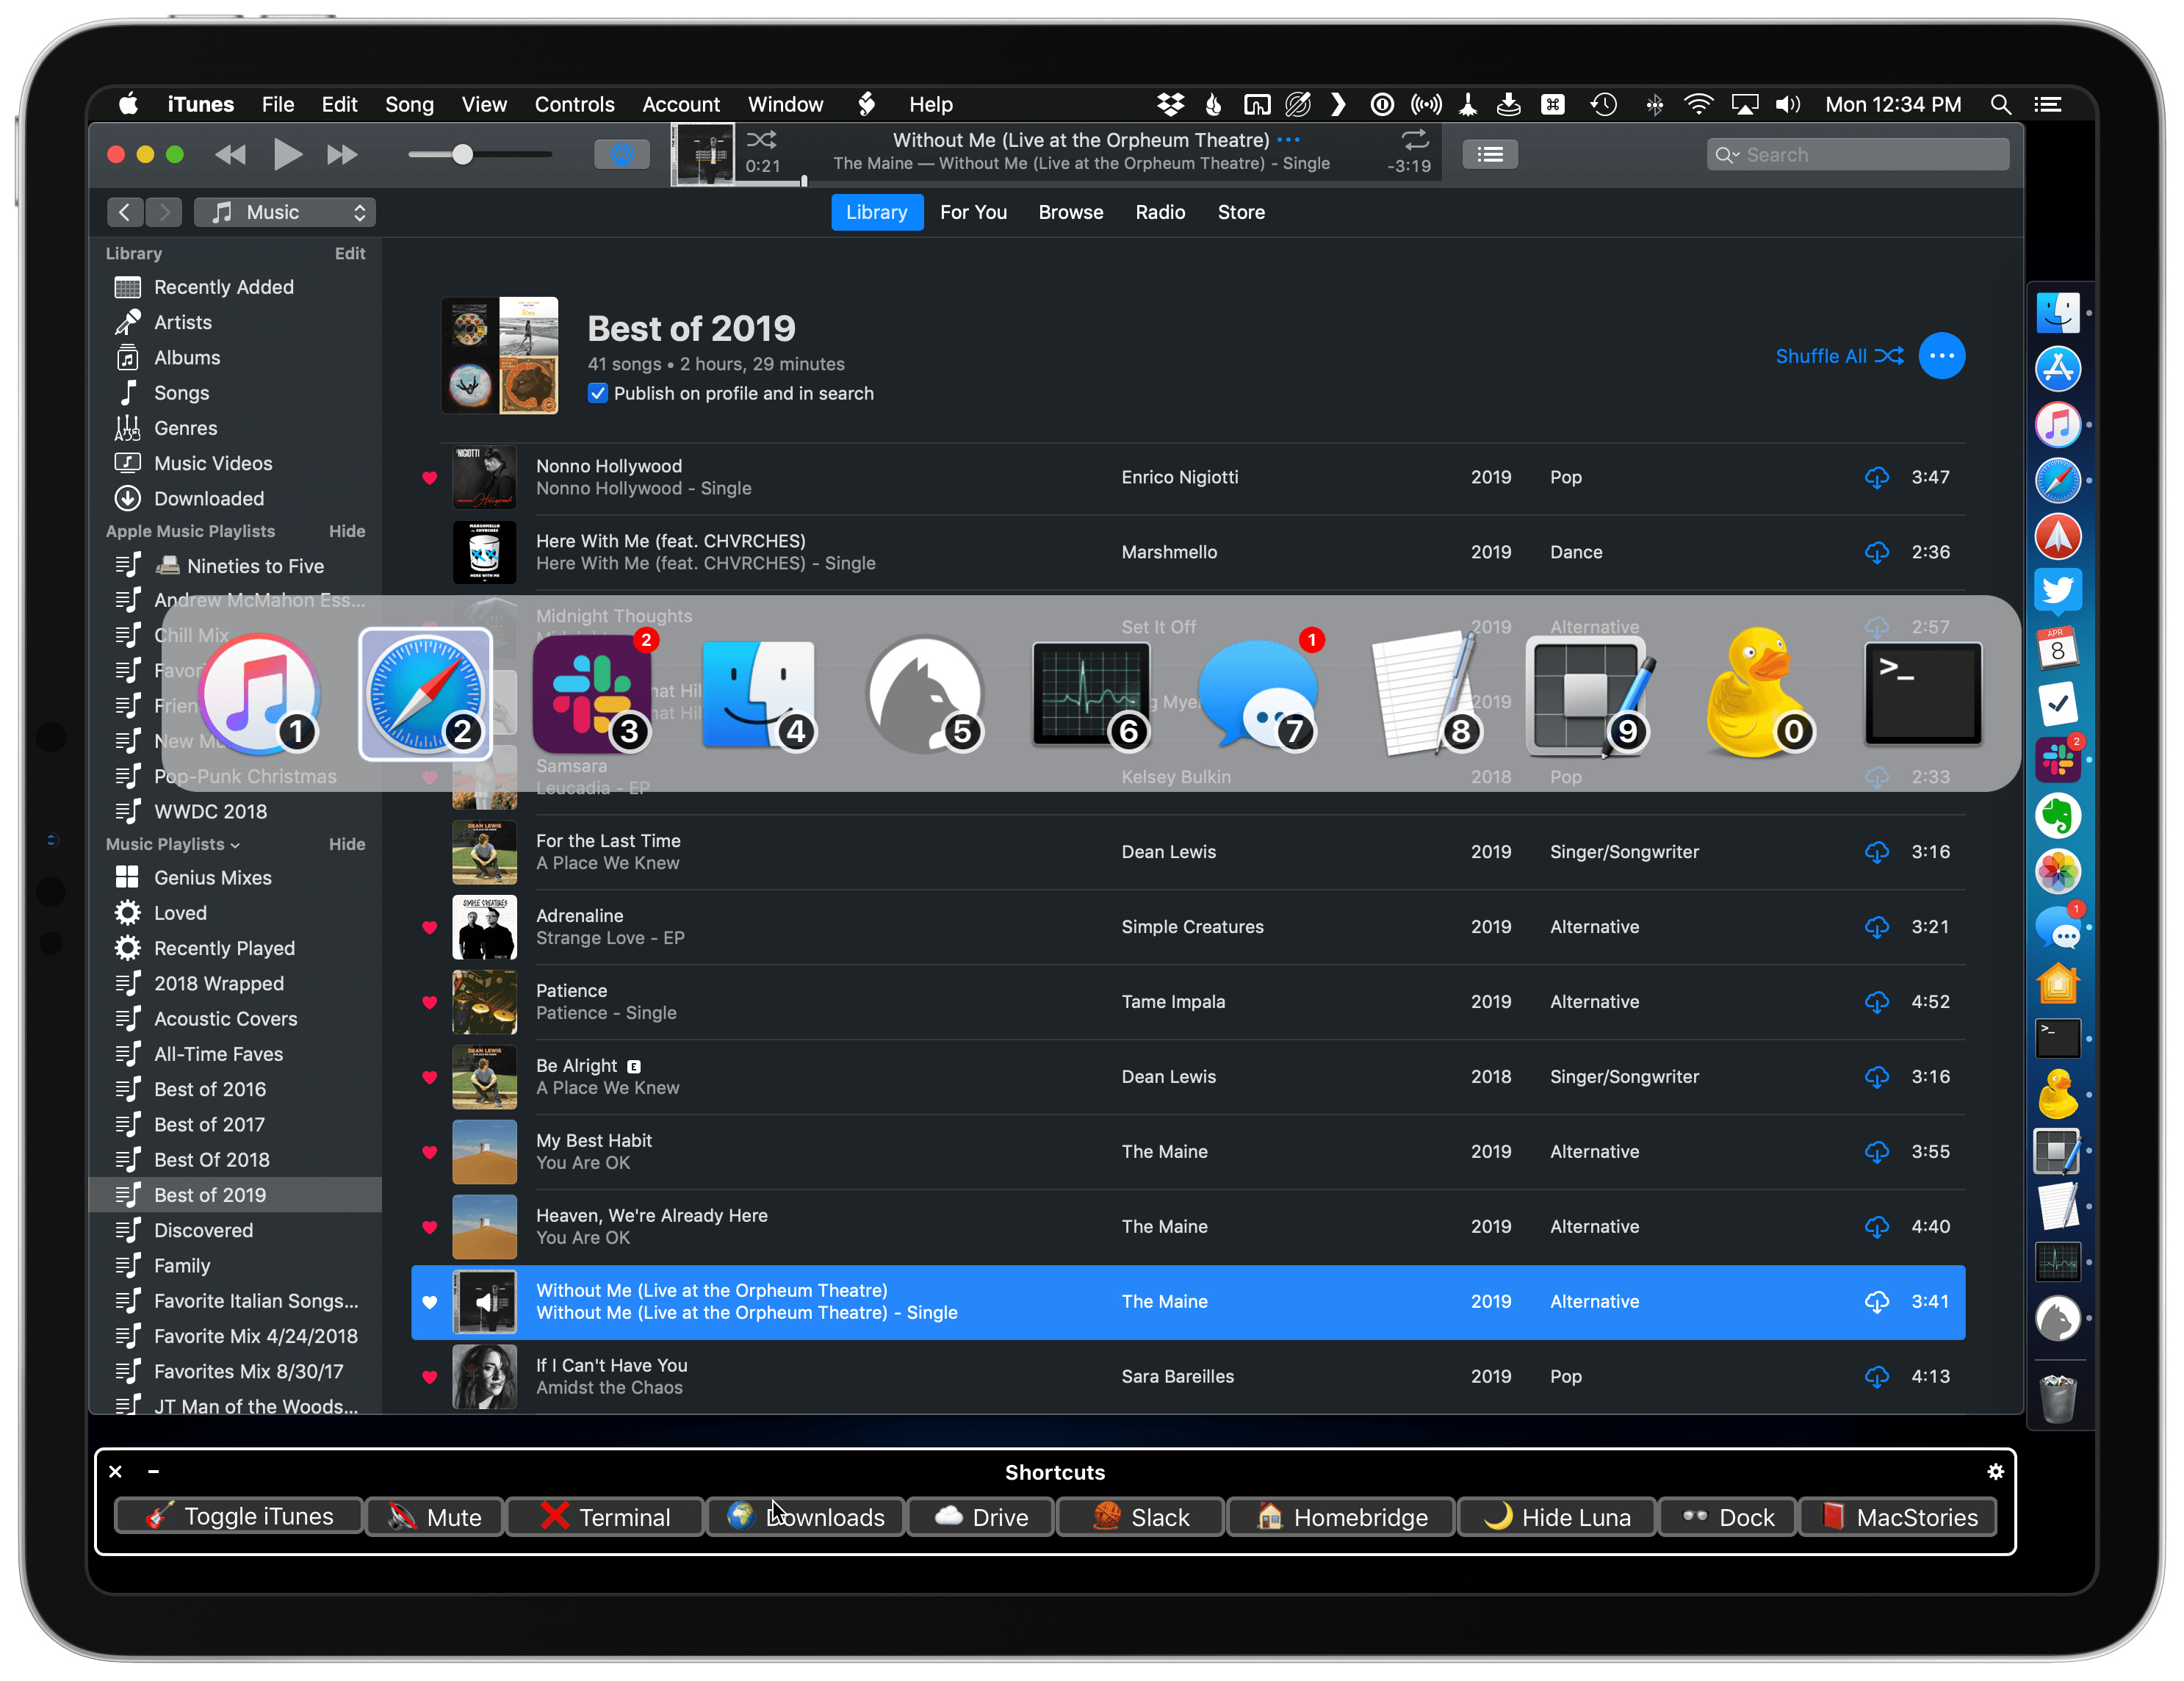
The Accessibility Keyboard and its custom panels are typically employed by visually or physically impaired users who want to have a more comfortable way of interacting with certain macOS features, which is a beautiful idea that confirms how Apple is at the forefront of Accessibility among all tech companies. But I had a different idea: what if I could use custom panels to create a “keyboard” that was actually a shortcut launcher for various apps and AppleScripts that I frequently invoke on my Mac?
I came up with this approach because I realized that, when using macOS via Luna Display on the iPad Pro, I wanted to have something that would allow me to visually launch specific commands in the fastest way possible. I’ve always been terrible at remembering long lists of keyboard shortcuts; instead, I wondered if I could have a “command palette”, sort of like Launch Center Pro but for the Mac, which would let me quickly execute actions with a single tap. Not only did I come up with a system that works well on the iPad because buttons are large enough to be tapped, but in the past few months I’ve also gotten used to this tool when I’m working at the Mac mini.
The final result looks like this:

And here is what it looks like when it’s being configured in Panel Editor:
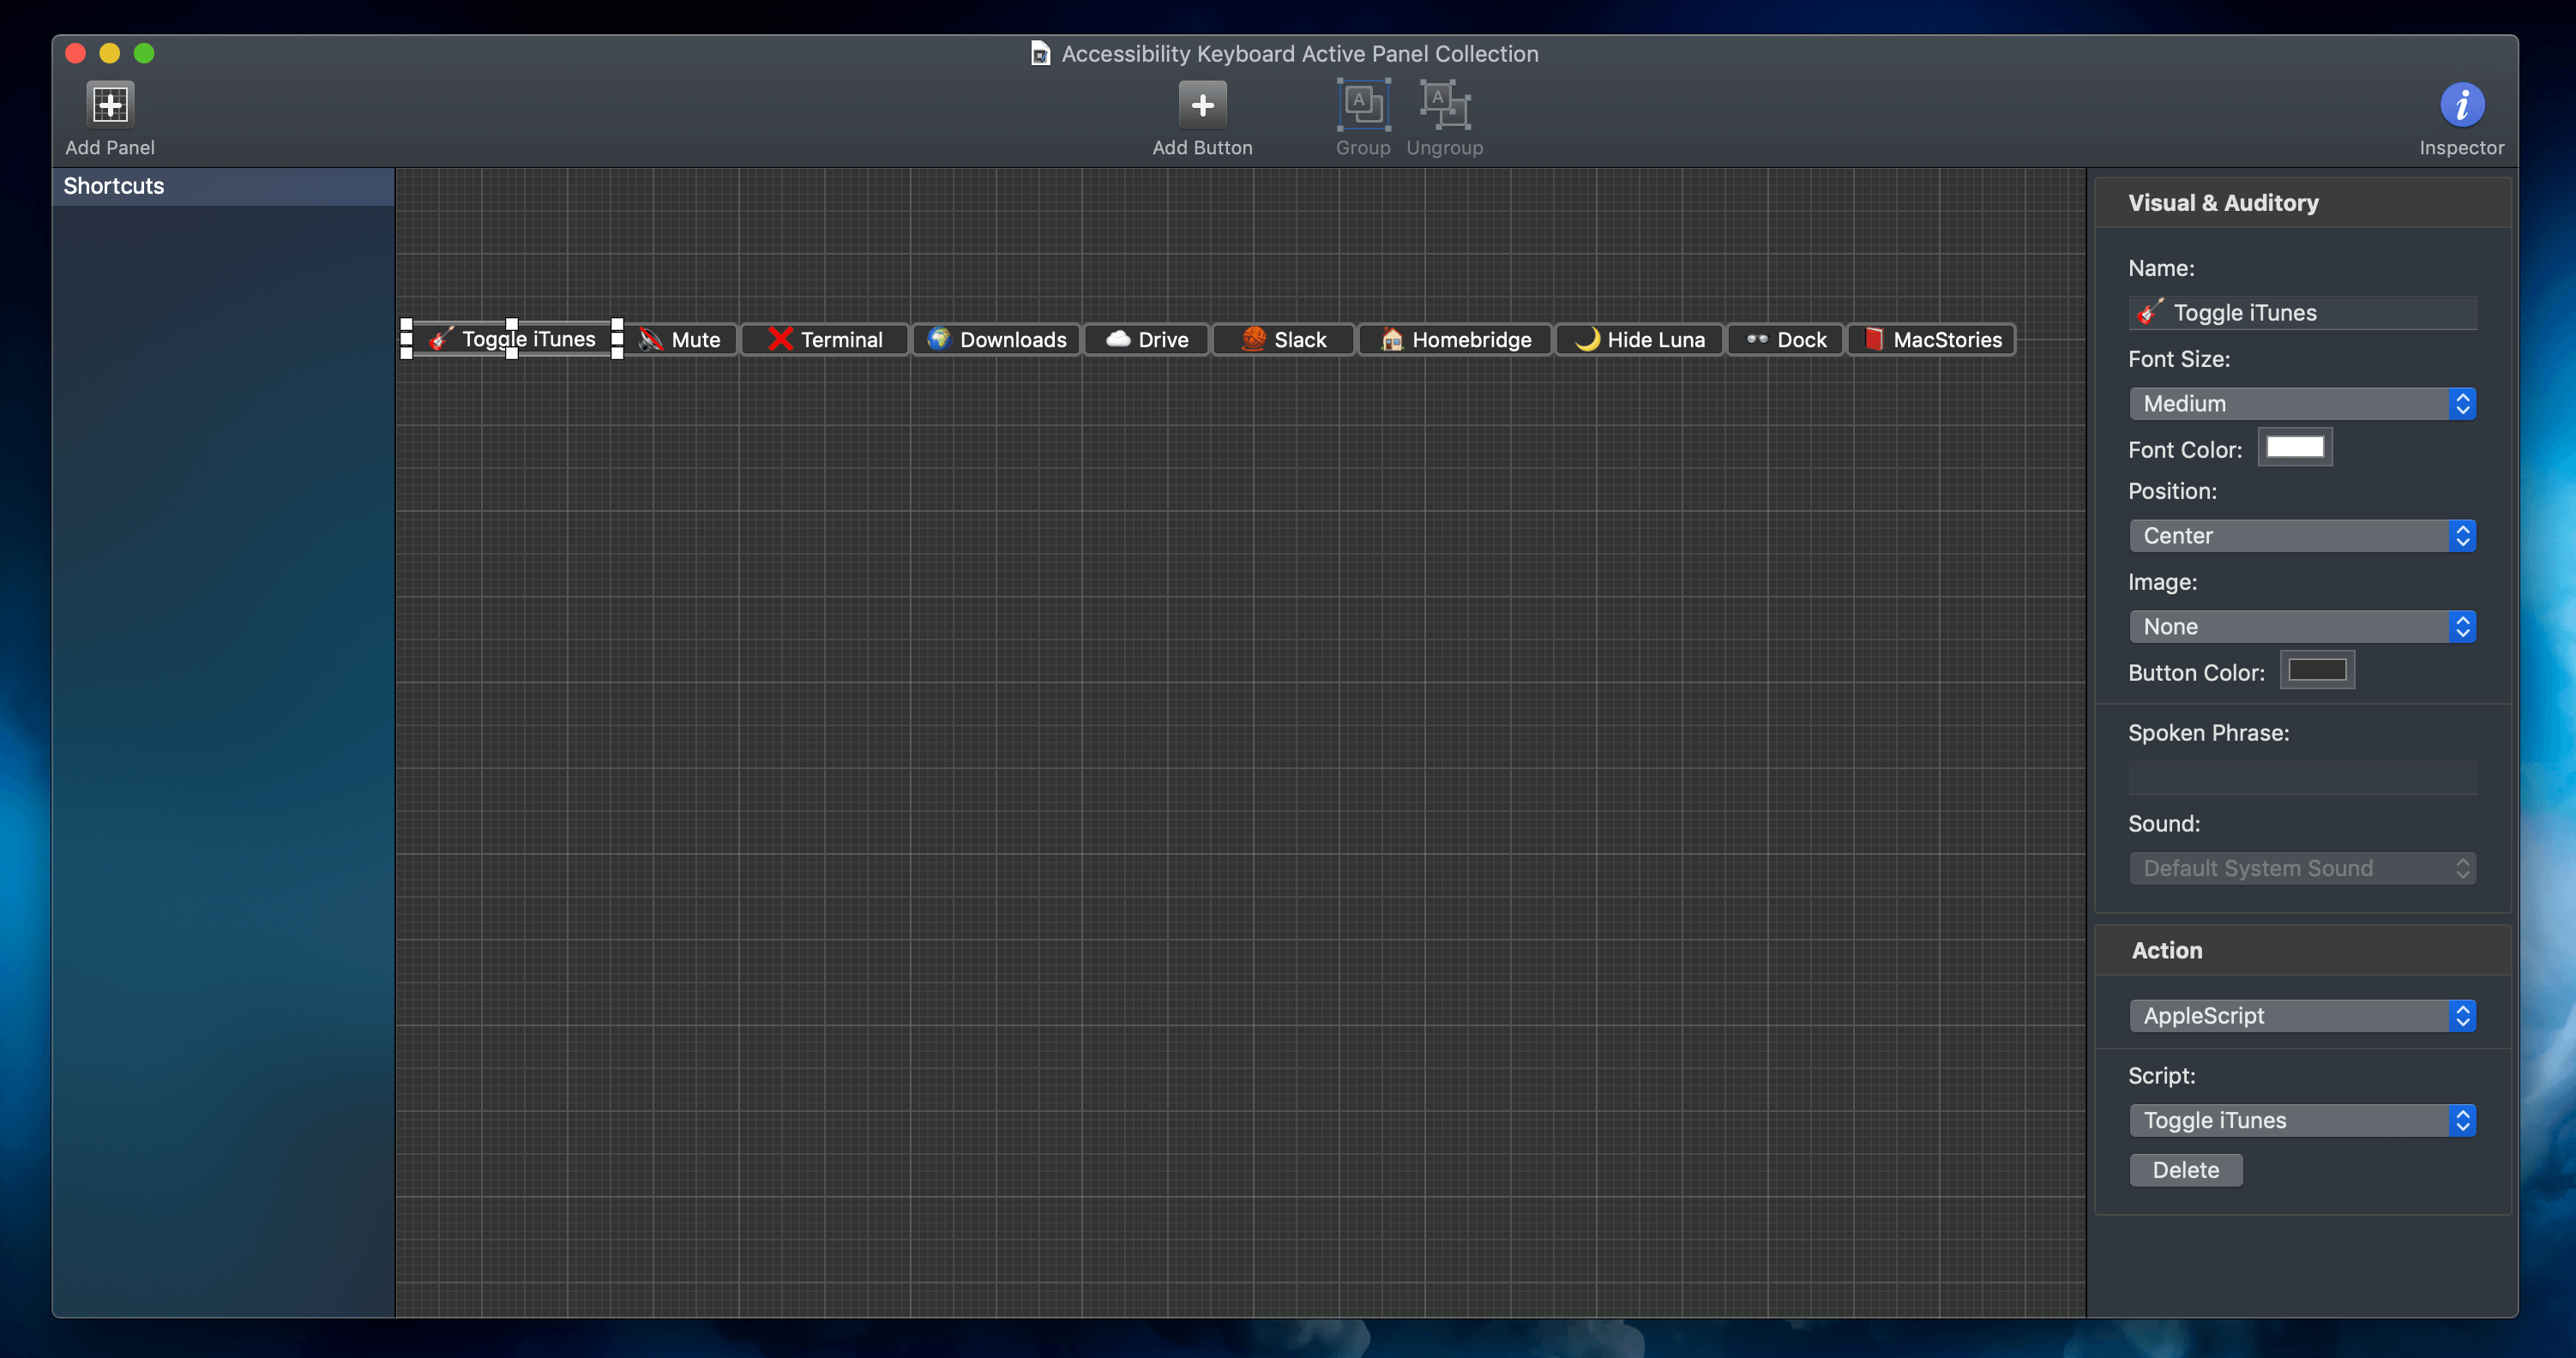
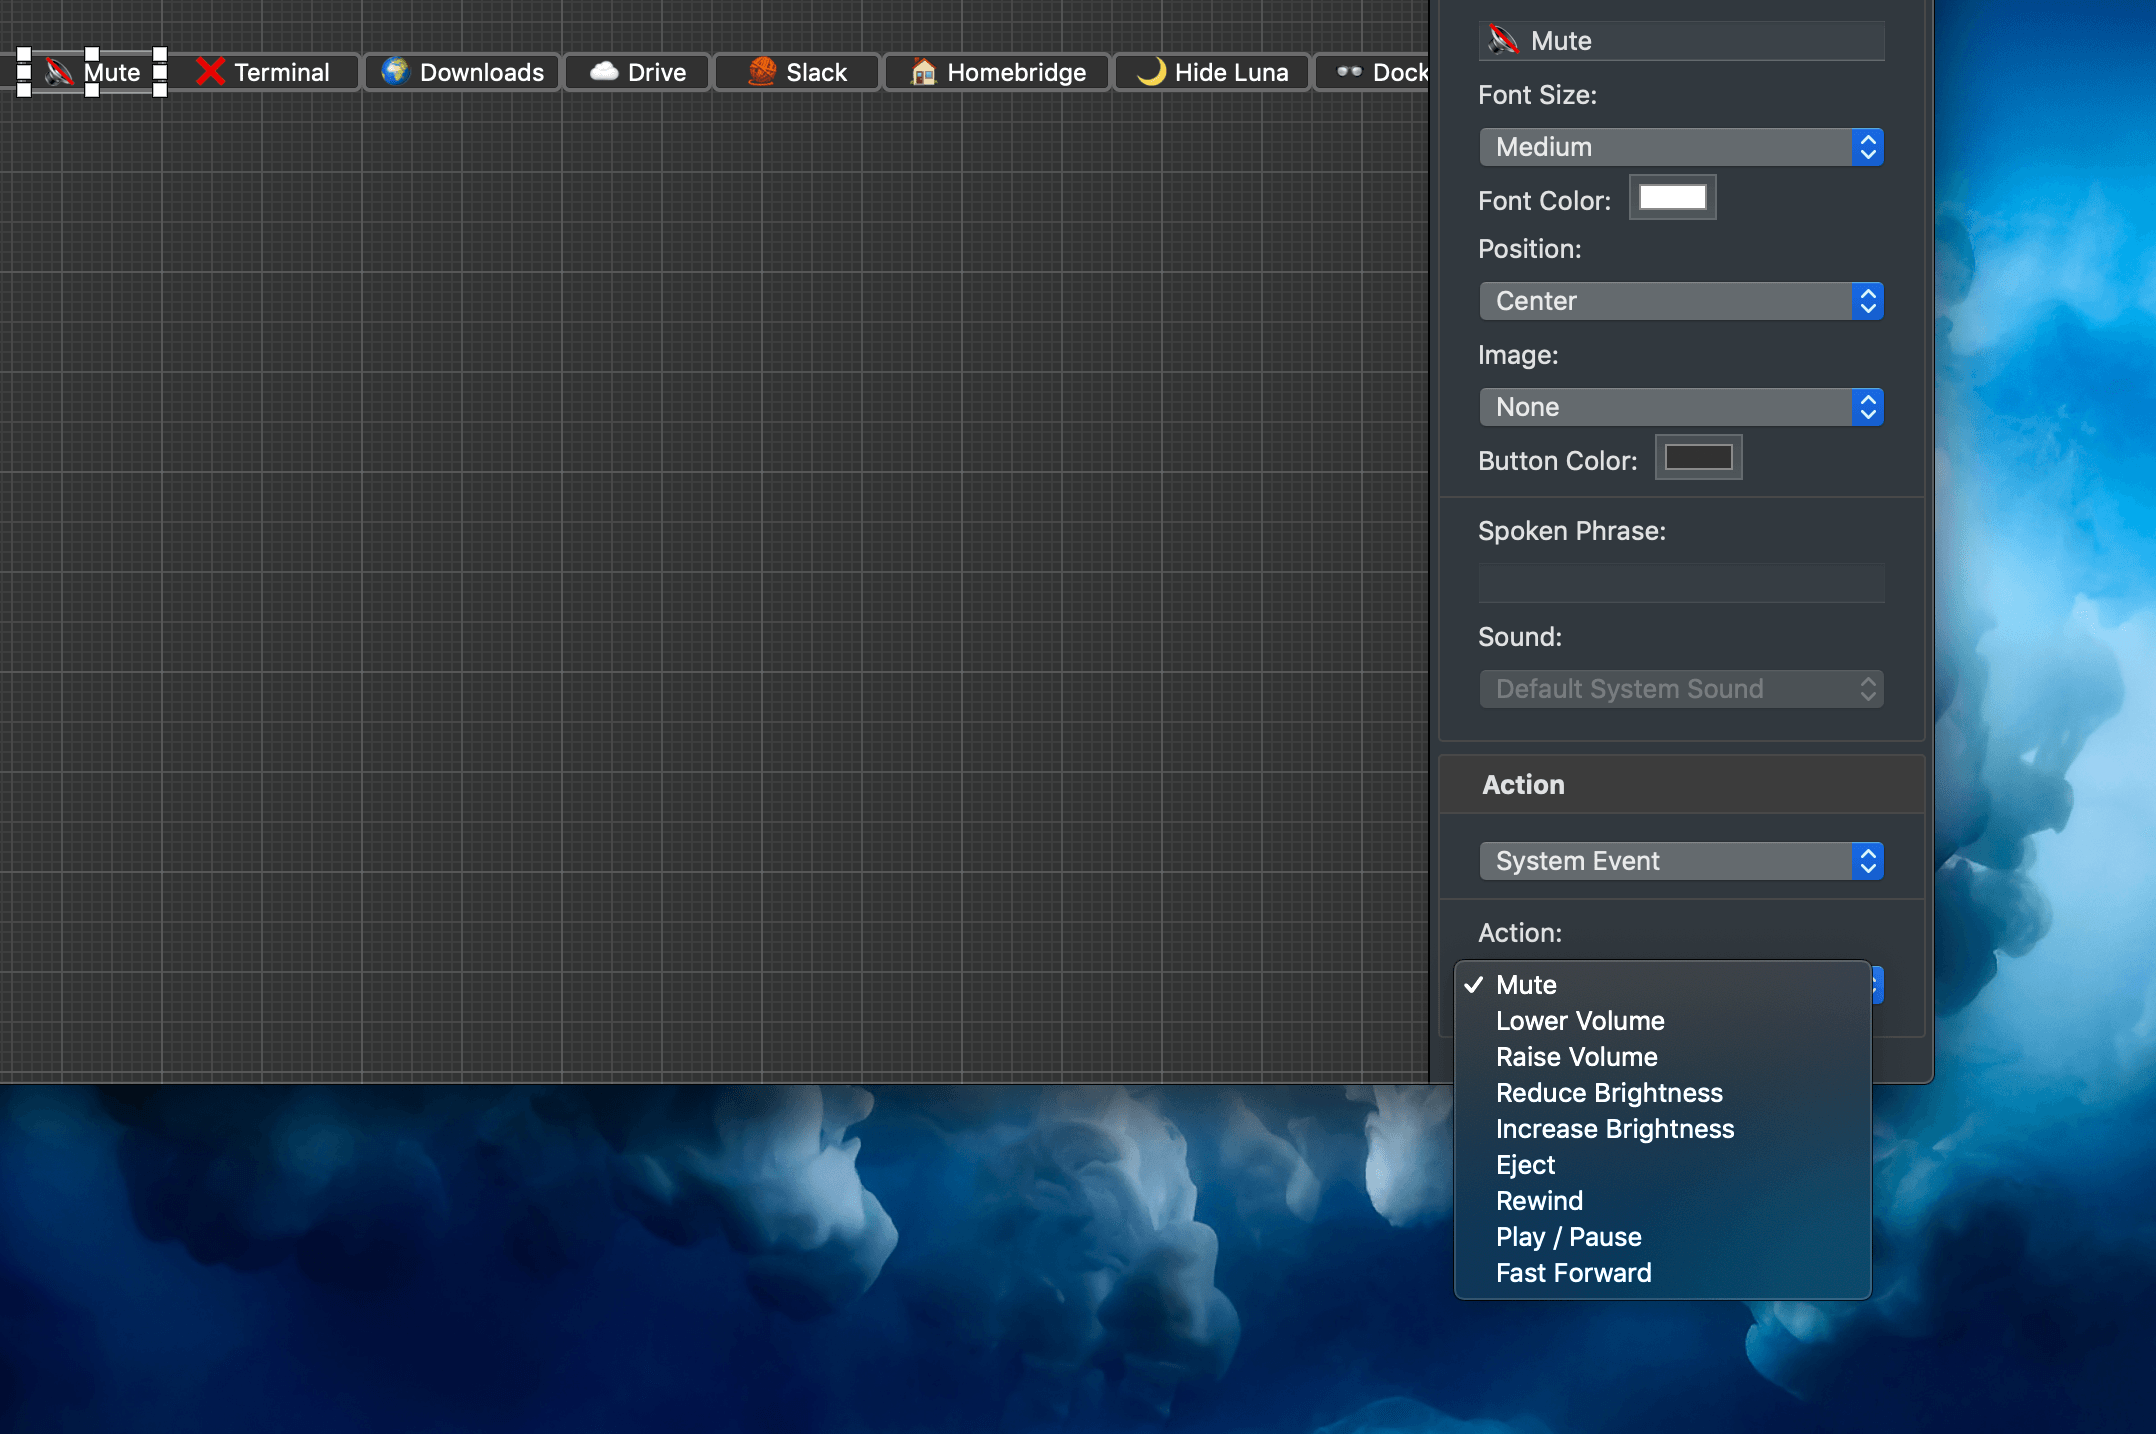
As you can see, each button (I used emoji to make it more visually pleasant) is associated with an action that I frequently perform on the Mac. To modify the appearance of a button and the action linked to it, there is an inspector on the right side of Panel Editor. Here, in addition to font size and color, you can choose the type of action a button should perform from a list of:
- Go Back
- Open Panel
- Show / Hide Toolbar
- Dwell
- AppleScript
- Enter Text
- Press Keys
- Open App
- System Event
- Typing Suggestions
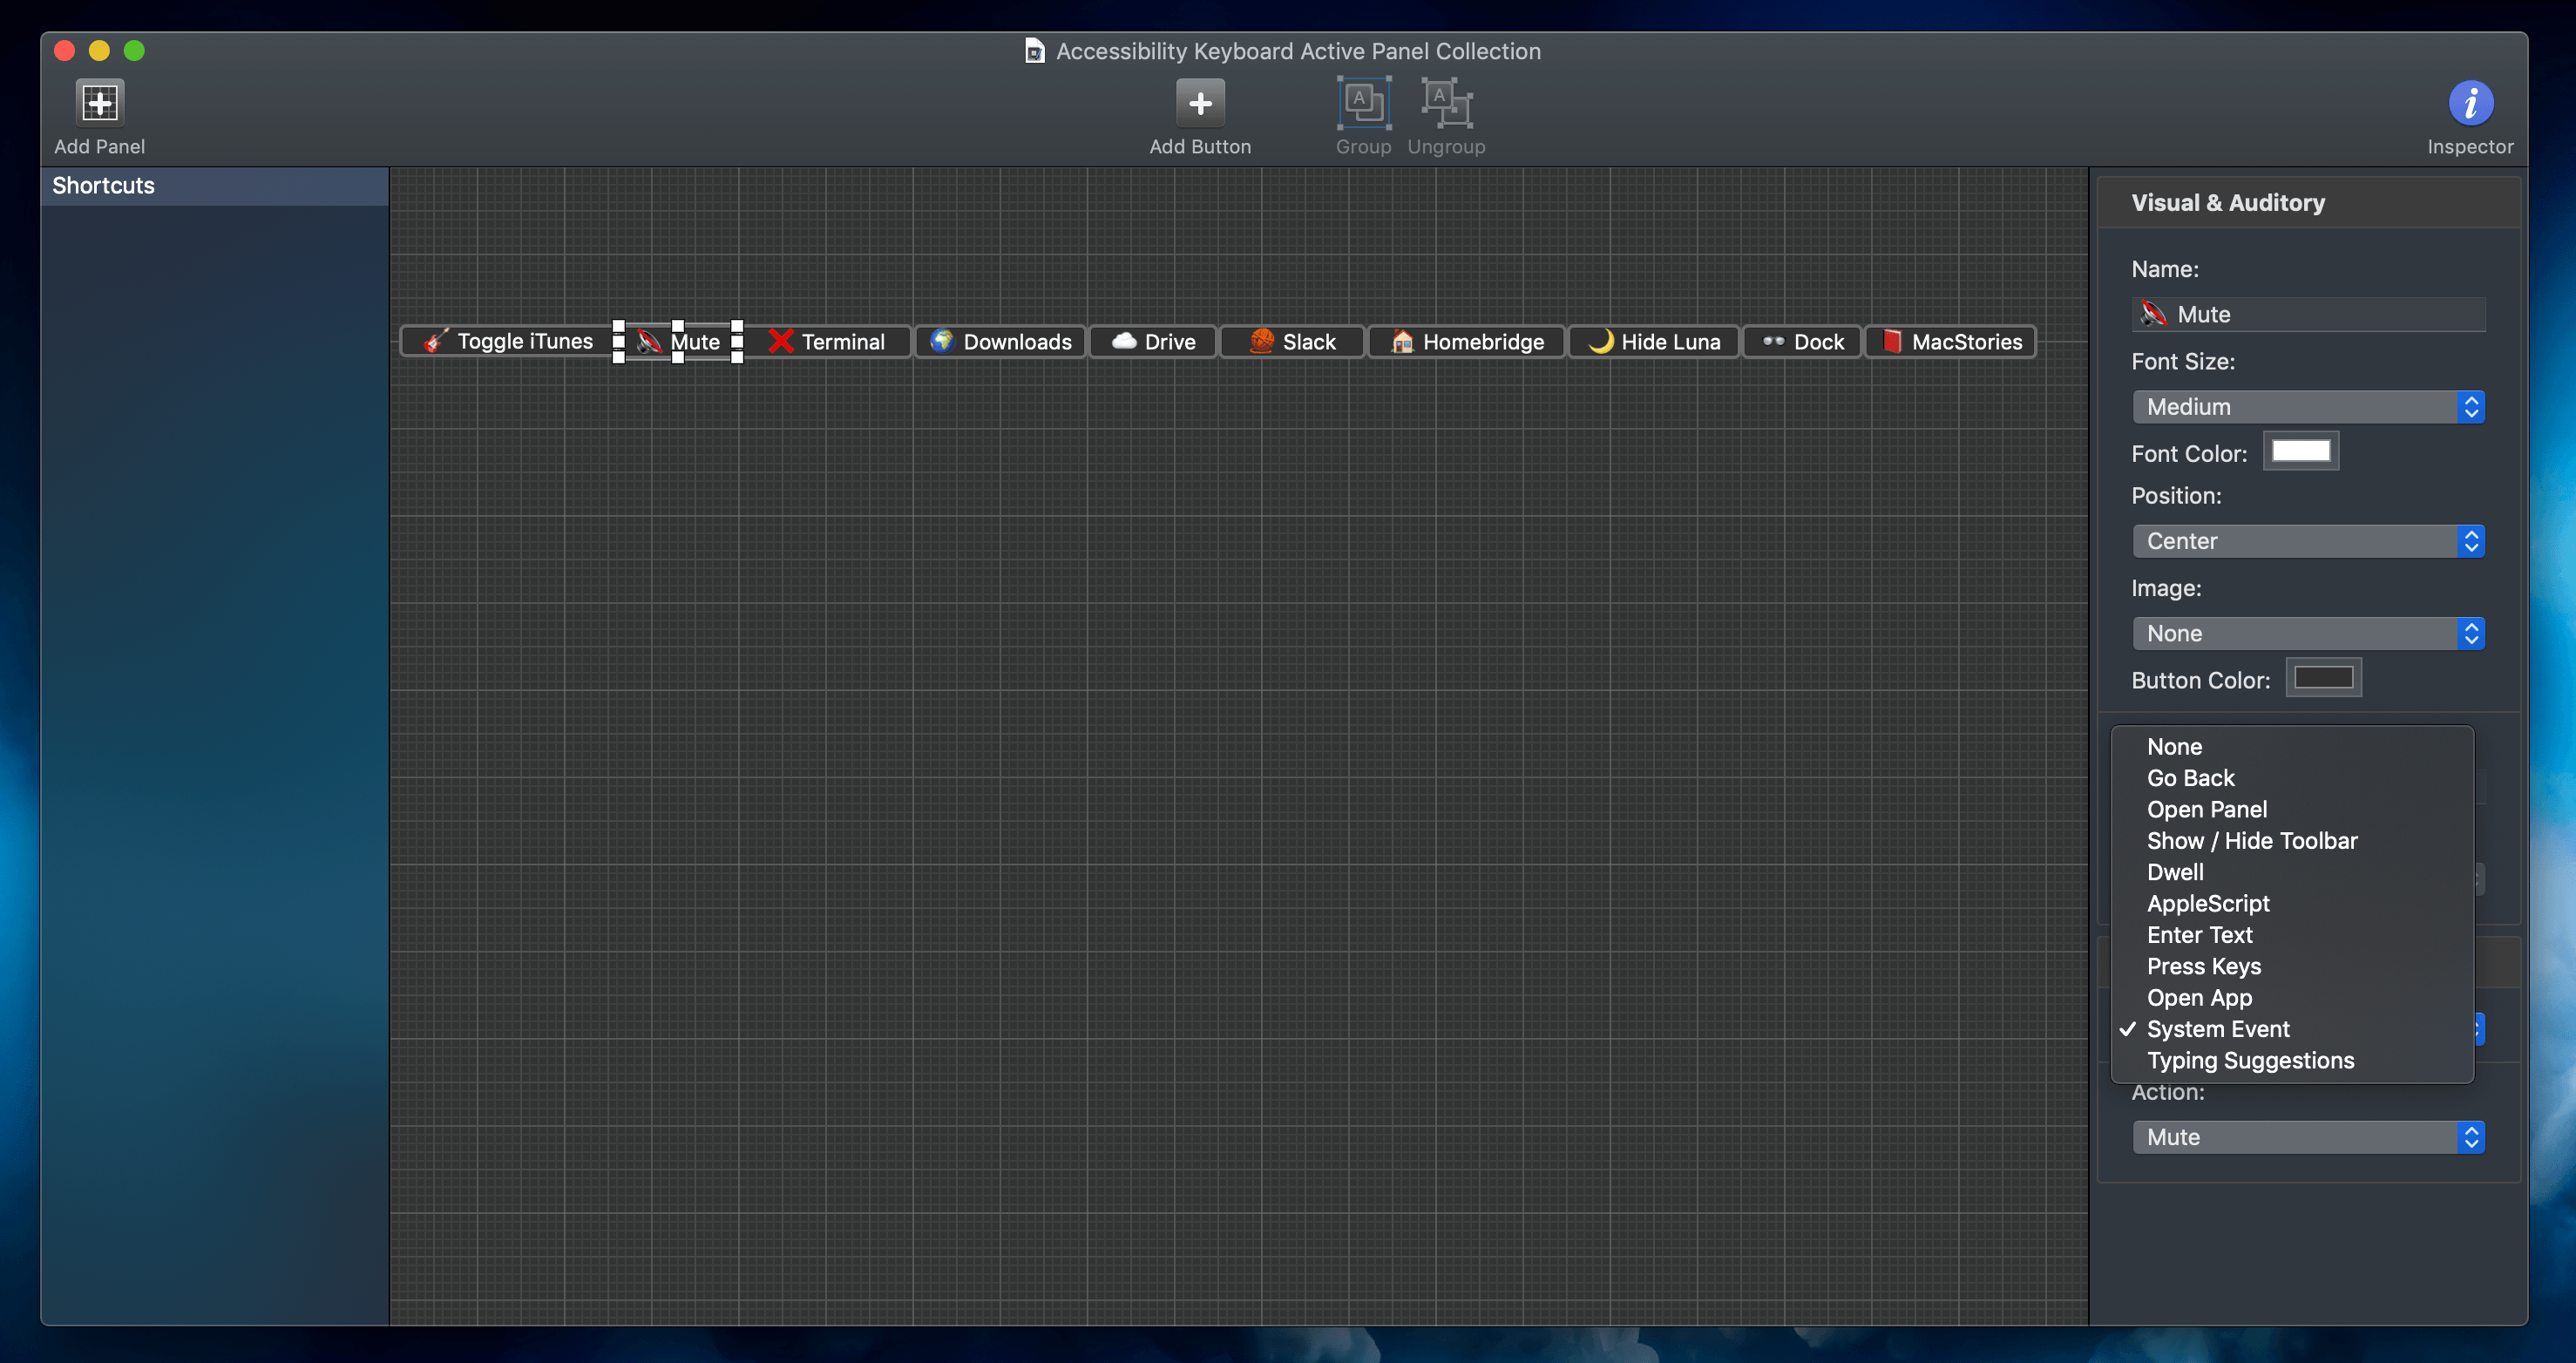
As I mentioned above, most of my buttons are based on the AppleScript action and scripts I’ve saved in the /Scripts folder of the Mac’s Finder. Of course, when a button triggers an AppleScript, the script runs in the background, so you never see any AppleScript code onscreen.
The ‘Toggle iTunes’ button, as the name suggests, toggles the playback state of iTunes. This is nice because, as I noted previously, iTunes is the only music app made by Apple that supports AirPlay automation for multiple HomePods. The button is based on the following script:
tell application "iTunes"
    if player state is paused then
        play
    else if player state is playing then
        pause
    else
        play
    end if
end tell
The ‘Mute’ button is another shortcut to quickly mute/unmute system audio on the Mac mini, and it is a built-in action of Panel Editor:
The ‘Downloads’ and ‘iCloud Drive’ buttons open those folders in a new Finder window with one tap6, so I don’t have to navigate the file system to get there:
tell application "Finder" to open "Macintosh HD:Users:viticci:Downloads"
set userLibraryFolder to path to library folder from user domain
tell application "Finder"
    reopen
    activate
    set iCloudDriveFolder to folder "iCloud Drive" of folder "Mobile Documents" of userLibraryFolder
    set target of Finder window 1 to iCloudDriveFolder
end tell
The ‘Slack’ button is based on the ‘Open App’ action and it, well, launches the Slack app.
With ‘Homebridge’, I came up with a simple way to restart my homebridge server whenever my Mac mini reboots or if I just want to start up the HomeKit server again. It’s also based on an AppleScript:
tell application "Terminal"
    activate
    delay 2
    set shell to do script "homebridge"
end tell
The ‘Hide Luna’ and ‘Dock’ buttons toggle the visibility of the Luna Display popup (seriously, it’s always in the way), and the macOS dock.
tell application "System Events"
    if visible of process "Luna Display" is false then
        tell application "Luna Display" to activate
    else if visible of process "Luna Display" is true then
        tell application "Finder" to set visible of process "Luna Display" to false
    end if
end tell
tell application "System Events"
    tell dock preferences to set autohide to not autohide
end tell
And finally, the ‘MacStories’ button launches the MacStories website in a new Safari tab.
tell application "Safari"
    tell window 1
        set current tab to (make new tab with properties {URL:"https://www.macstories.net"})
    end tell
end tell
I was pretty happy with this setup, but I knew I also wanted to come up with a way to enable and disable the Accessibility keyboard by pressing a single hotkey.7 Unfortunately, the macOS AppleScript dictionary does not have native support for activating the Accessibility Keyboard, so I had to turn to the inelegant, unreliable, but sometimes effective world of GUI scripting. This means I had to write AppleScripts that simulate clicking elements in the macOS UI without having to do it myself; effectively, I’m letting a script “interact” with the interface in a programmatic fashion to save a bit of time.
In practice, the final product looks like this:
These two hotkeys are based on AppleScripts that contain a bunch of ugly, flimsy GUI scripting code to open System Preferences, select the Accessibility tab, scroll down to the Keyboard section, and toggle the state of the Accessibility Keyboard setting so I don’t have to do all this myself manually every time. Here’s the code8 to enable the Accessibility Keyboard:
tell application "System Preferences"
    reveal pane id "com.apple.preference.universalaccess"
    delay 1
    tell application "System Events"
        tell window 1 of application process "System Preferences"
            select table 1 of scroll area 1
            delay 0.1
            select row 16 of table 1 of scroll area 1
            delay 0.1
        end tell
        tell tab group 1 of group 1 of window 1 of application process "System Preferences"
            click radio button 2
            delay 0.1
            click checkbox 1
            delay 0.2
        end tell
    end tell
    quit
end tell
And here’s the AppleScript to disable it:
tell application "System Preferences"
    activate
    reveal pane id "com.apple.preference.universalaccess"
    delay 1
    tell application "System Events"
        tell window 1 of application process "System Preferences"
            select table 1 of scroll area 1
            delay 0.1
            select row 16 of table 1 of scroll area 1
            delay 0.1
        end tell
        tell tab group 1 of group 1 of window 1 of application process "System Preferences"
            click radio button 2
            delay 0.1
            click checkbox 1
            delay 1
        end tell
        tell window 1 of application process "System Preferences"
            click button 1 of sheet 1
        end tell
    end tell
    quit
end tell
I’m not happy with the GUI scripting approach, of course: unlike native AppleScript, it’s tied to the interface, therefore if Apple changes even a subtle element of a window or menu in a macOS update, these scripts are going to break. However, both scripts get the job done and are reasonably fast. Even better, researching all this led me to discover UI Browser for Mac, an amazing utility that lets you inspect any visual element of the Aqua GUI, browse the hierarchy of windows and menus, and see what their AppleScript representation should be written like.

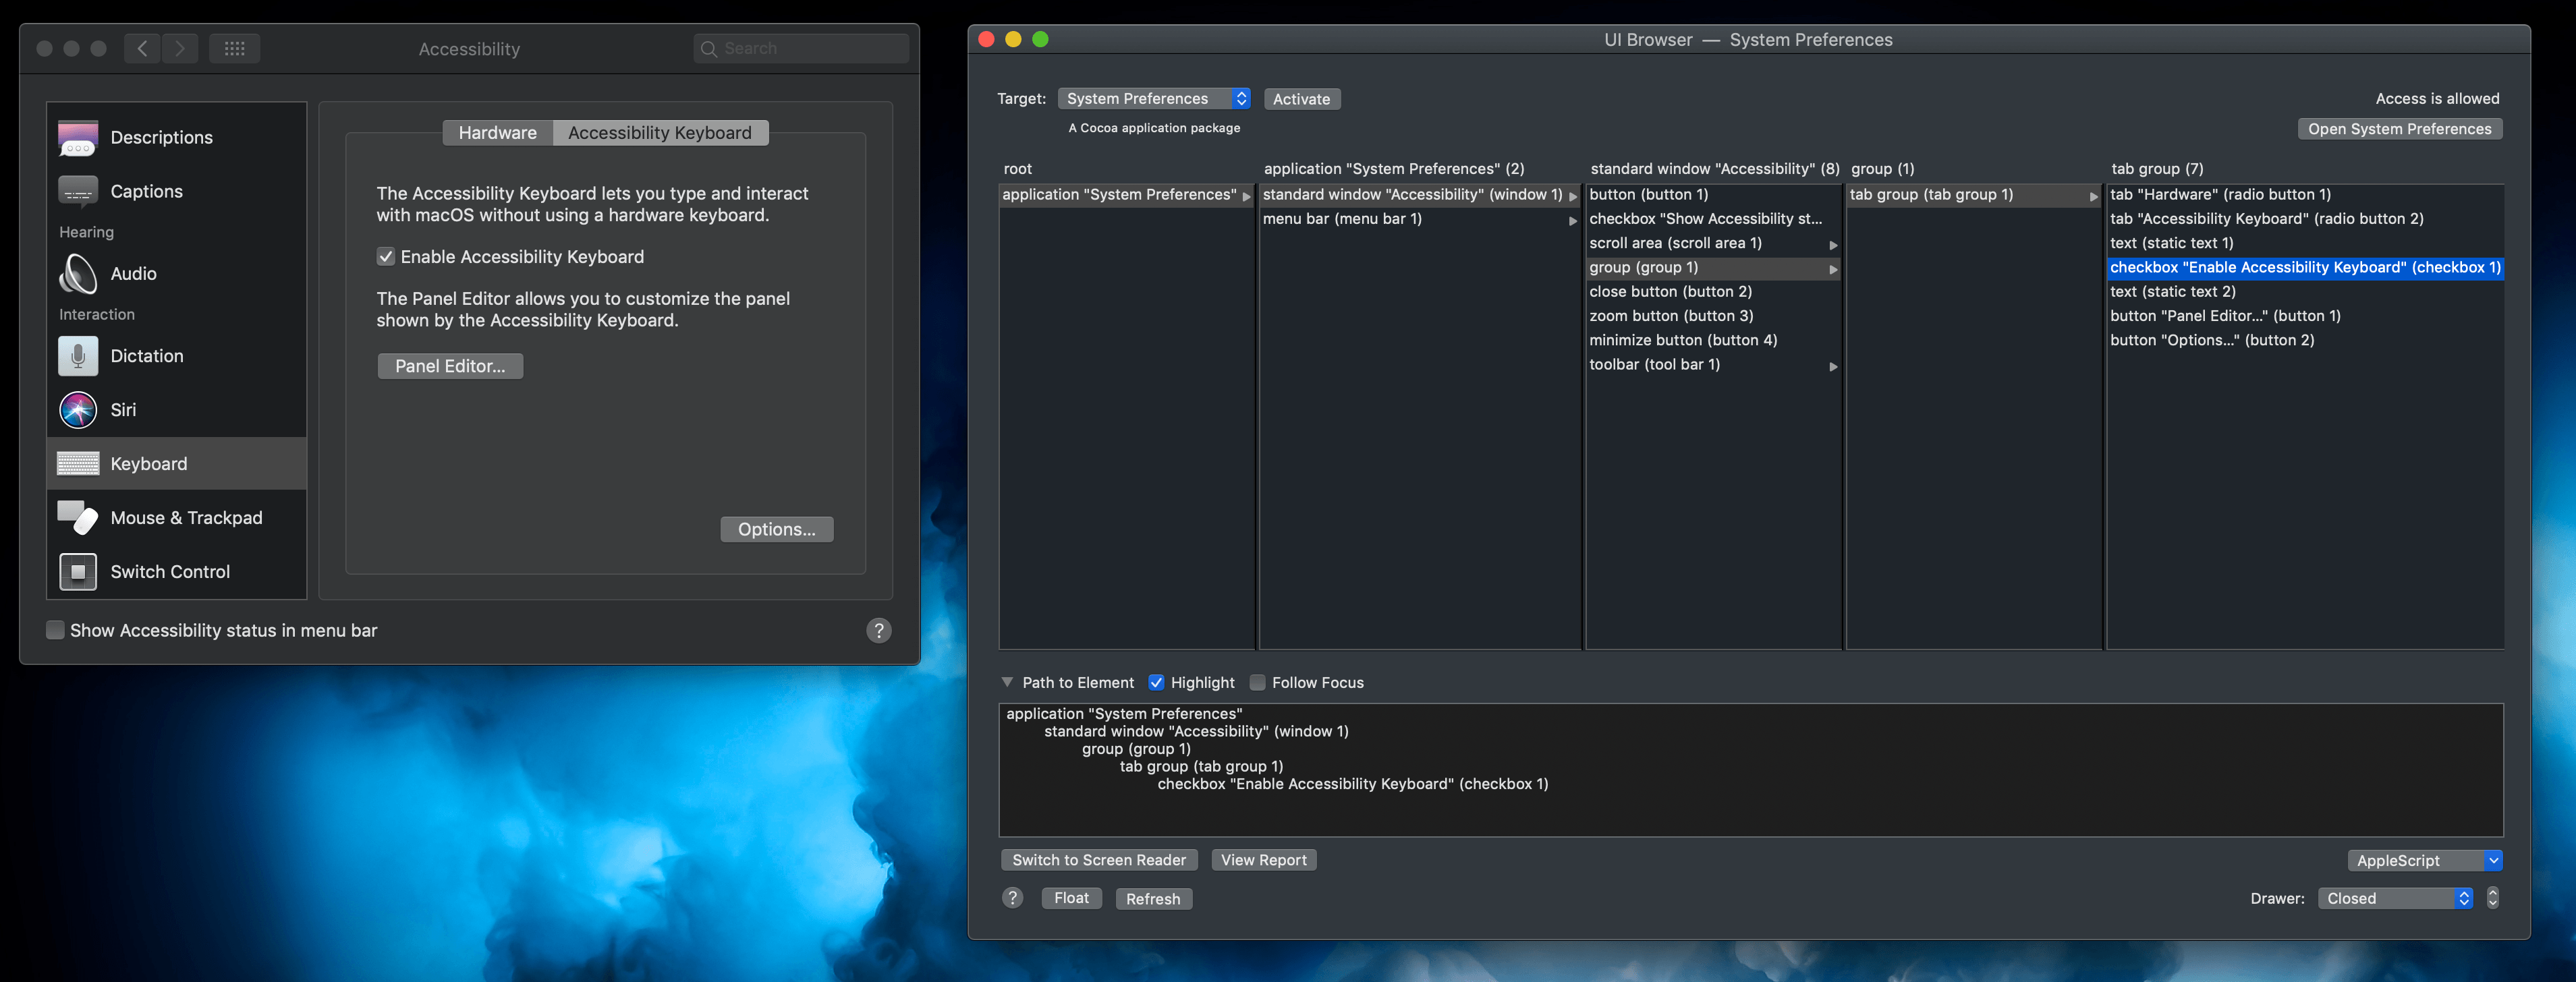
This is how I navigated the structure of System Preferences for GUI scripting. (Tap for full-size image.)
As you might imagine, I went down the rabbit hole with all of this for a few weeks, but I’m happy with the final result. The scripts to toggle the Accessibility Keyboard panel work great, and I’ve learned a few things about GUI scripting that might come in handy down the road. If you want to automate a Mac app that doesn’t natively support AppleScript, I highly recommend giving UI Browser a try to see what you can come up with.
The “shortcuts bar” that I created using the Accessibility Keyboard for macOS has quickly become one of my favorite enhancements to the everyday Mac experience whether I’m using macOS from the Mac mini or the iPad Pro via Luna Display. It’s a testament to Apple’s commitment to automation and the Mac’s greatest advantage over iOS – the complete freedom to personalize the operating system and truly make it your own.
Finally, here is a short video showing how I can use Luna Display as a secondary display for the Mac mini (which is in another room) while taking advantage of keyboard shortcuts and the Accessibility Keyboard panel:
Using Luna Display as a secondary display with the help of BetterTouchTool. (Tap volume icon for sounds.)Replay
Luna Display
The idea of using “macOS as an app” seemed ridiculous to me when I first heard of Luna Display years ago, but now that it’s become part of my workflow and daily routine, it feels obvious. Even though macOS was not designed for multitouch and using it from an iPad will never be a substitute for the real experience of using a Mac, Luna Display is the closest I was able to get to owning a hybrid Apple device that “runs” both iOS and macOS. Despite the occasional slowdowns or latency issues, the illusion created by Luna Display – this idea that you can have two OSes in one Apple device – is so strong, it feels like a natural complement to the iPad Pro.
Perhaps someday we’ll have an Apple laptop running a future operating system that blends the best of both worlds – the sheer ingenuity of iOS and its vibrant app ecosystem, and the wisdom, deep personalization, and technical prowess of macOS. I, for one, cannot wait for that future to become our new reality. But until that happens, Luna Display is the best workaround I’ve found to date, and it’s one of my favorite tech purchases of the past few years.
- When you switch between iOS apps with Luna Display running, the connection to the Mac is usually kept alive for a few minutes. I can switch back and forth between, say, Shortcuts and Luna Display without issues. ↩
- I adapted the iCloud Drive script from this one. ↩
- If you're on a Mac, you can also enable an Accessibility Keyboard setting that lets you "dwell" on a hot corner to toggle the visibility of a panel. I use this option when I'm at my Mac mini, but the Luna Display doesn't have a cursor, therefore I can't hover over a corner of the screen to quickly toggle the Accessibility Keyboard. ↩
- The basic template for these scripts was likely taken from StackOverflow, but I don't remember the original source, and I also ended up modifying them a lot for the latest release of Mojave. ↩