The Pixelmator team has released Pixelmator Photo, a pro-level photo editing tool that couples the core functionality of Pixelmator Pro for the Mac with the strengths of the iPad. The result, though not without a few caveats, is a sophisticated set of image editing tools wrapped in a straightforward UI that, with its support for RAW and other image formats, makes Pixelmator Photo my new favorite photo editor.
A New Way to Access Images
One of the features that sets Pixelmator Photo apart from most other image editing apps is the way you access images. Before iOS 11 introduced the Files app, file providers, and the document browser, photo editors could only access images stored in your iCloud Photo Library. Even today though, most photo editors, including many of my favorites such as Darkroom and Adobe’s Lightroom, still only access the iCloud Photo Library.

That’s in no small part because the Photos app is not a file provider. That limitation of iOS means Pixelmator Photo cannot access your iCloud Photo Library from within the document browser, which provides an interface for opening documents that’s similar to Apple’s Files app. Instead, the app does the next best thing. It launches into a document browser view where you can access and edit photos stored outside your iCloud Photo Library and has separate import buttons that access your iCloud Photo Library. It’s not ideal to have two different UIs for opening photos, but Pixelmator Photo has done about as good a job as can be expected given the current constraints of iOS.
Although I suspect most users edit photos in their photo library more often than not (myself included), I still appreciate having the document browser to access pictures that are stored elsewhere. For example, if a friend shares a folder of photos from an event with me, I often save it in Dropbox. Later, I’ll go through and pick my favorites and add only those to Photos. I also store Mac screenshots for reviews in Dropbox and Keep It. Because Pixelmator Photo provides access to those photos and screenshots in Dropbox, I can make any necessary edits and then save the final image to Photos or our CDN.
With the Files document browser inside Pixelmator Photo, I can also access images stored on my Western Digital My Passport Wireless Pro SSD using its My Cloud app or FE File Explorer Pro as a file provider. I use the My Passport SSD to offload images I take with my Sony a6500 camera. Paired with an iPad, I can quickly edit and share photos stored remotely without having to import them into Photos, where they’re interspersed with iPhone photos, and I avoid having to painstakingly pick through hundreds of photos using iOS’ very basic import UI.

Although importing from your iCloud Photo Library is a separate UI from Pixelmator Photo’s document browser, it’s just one tap away. Tapping either the plus button on the right side of the toolbar or the rectangular Import Photo button at the top of the document browser’s list of files switches to a view of your iCloud Photo Library. From this separate import view, you can also mark images as favorites, which you’ll see reflected the next time you open the Photos app.
I expect most people, myself included, will continue to import most of their photos from their iCloud Photo Library, but the option to access images stored elsewhere allows new flexibility not found in most other apps. Now, you can save images in a project folder on iCloud Drive or on any other online storage provider and edit them without using the iCloud Photo Library as an intermediary.
Pixelmator’s implementation is about as good as it could be under the circumstances, but it also highlights the awkwardness that results from Photos not being an iOS file provider. Either the Photos app should be a file provider or the app should have a dedicated iCloud Drive folder from which photos could be accessed from within the Files app. Until then, I can tolerate the somewhat inelegant way accessing photos is handled in return for the benefit of opening images from any iOS file provider.
Editing Images
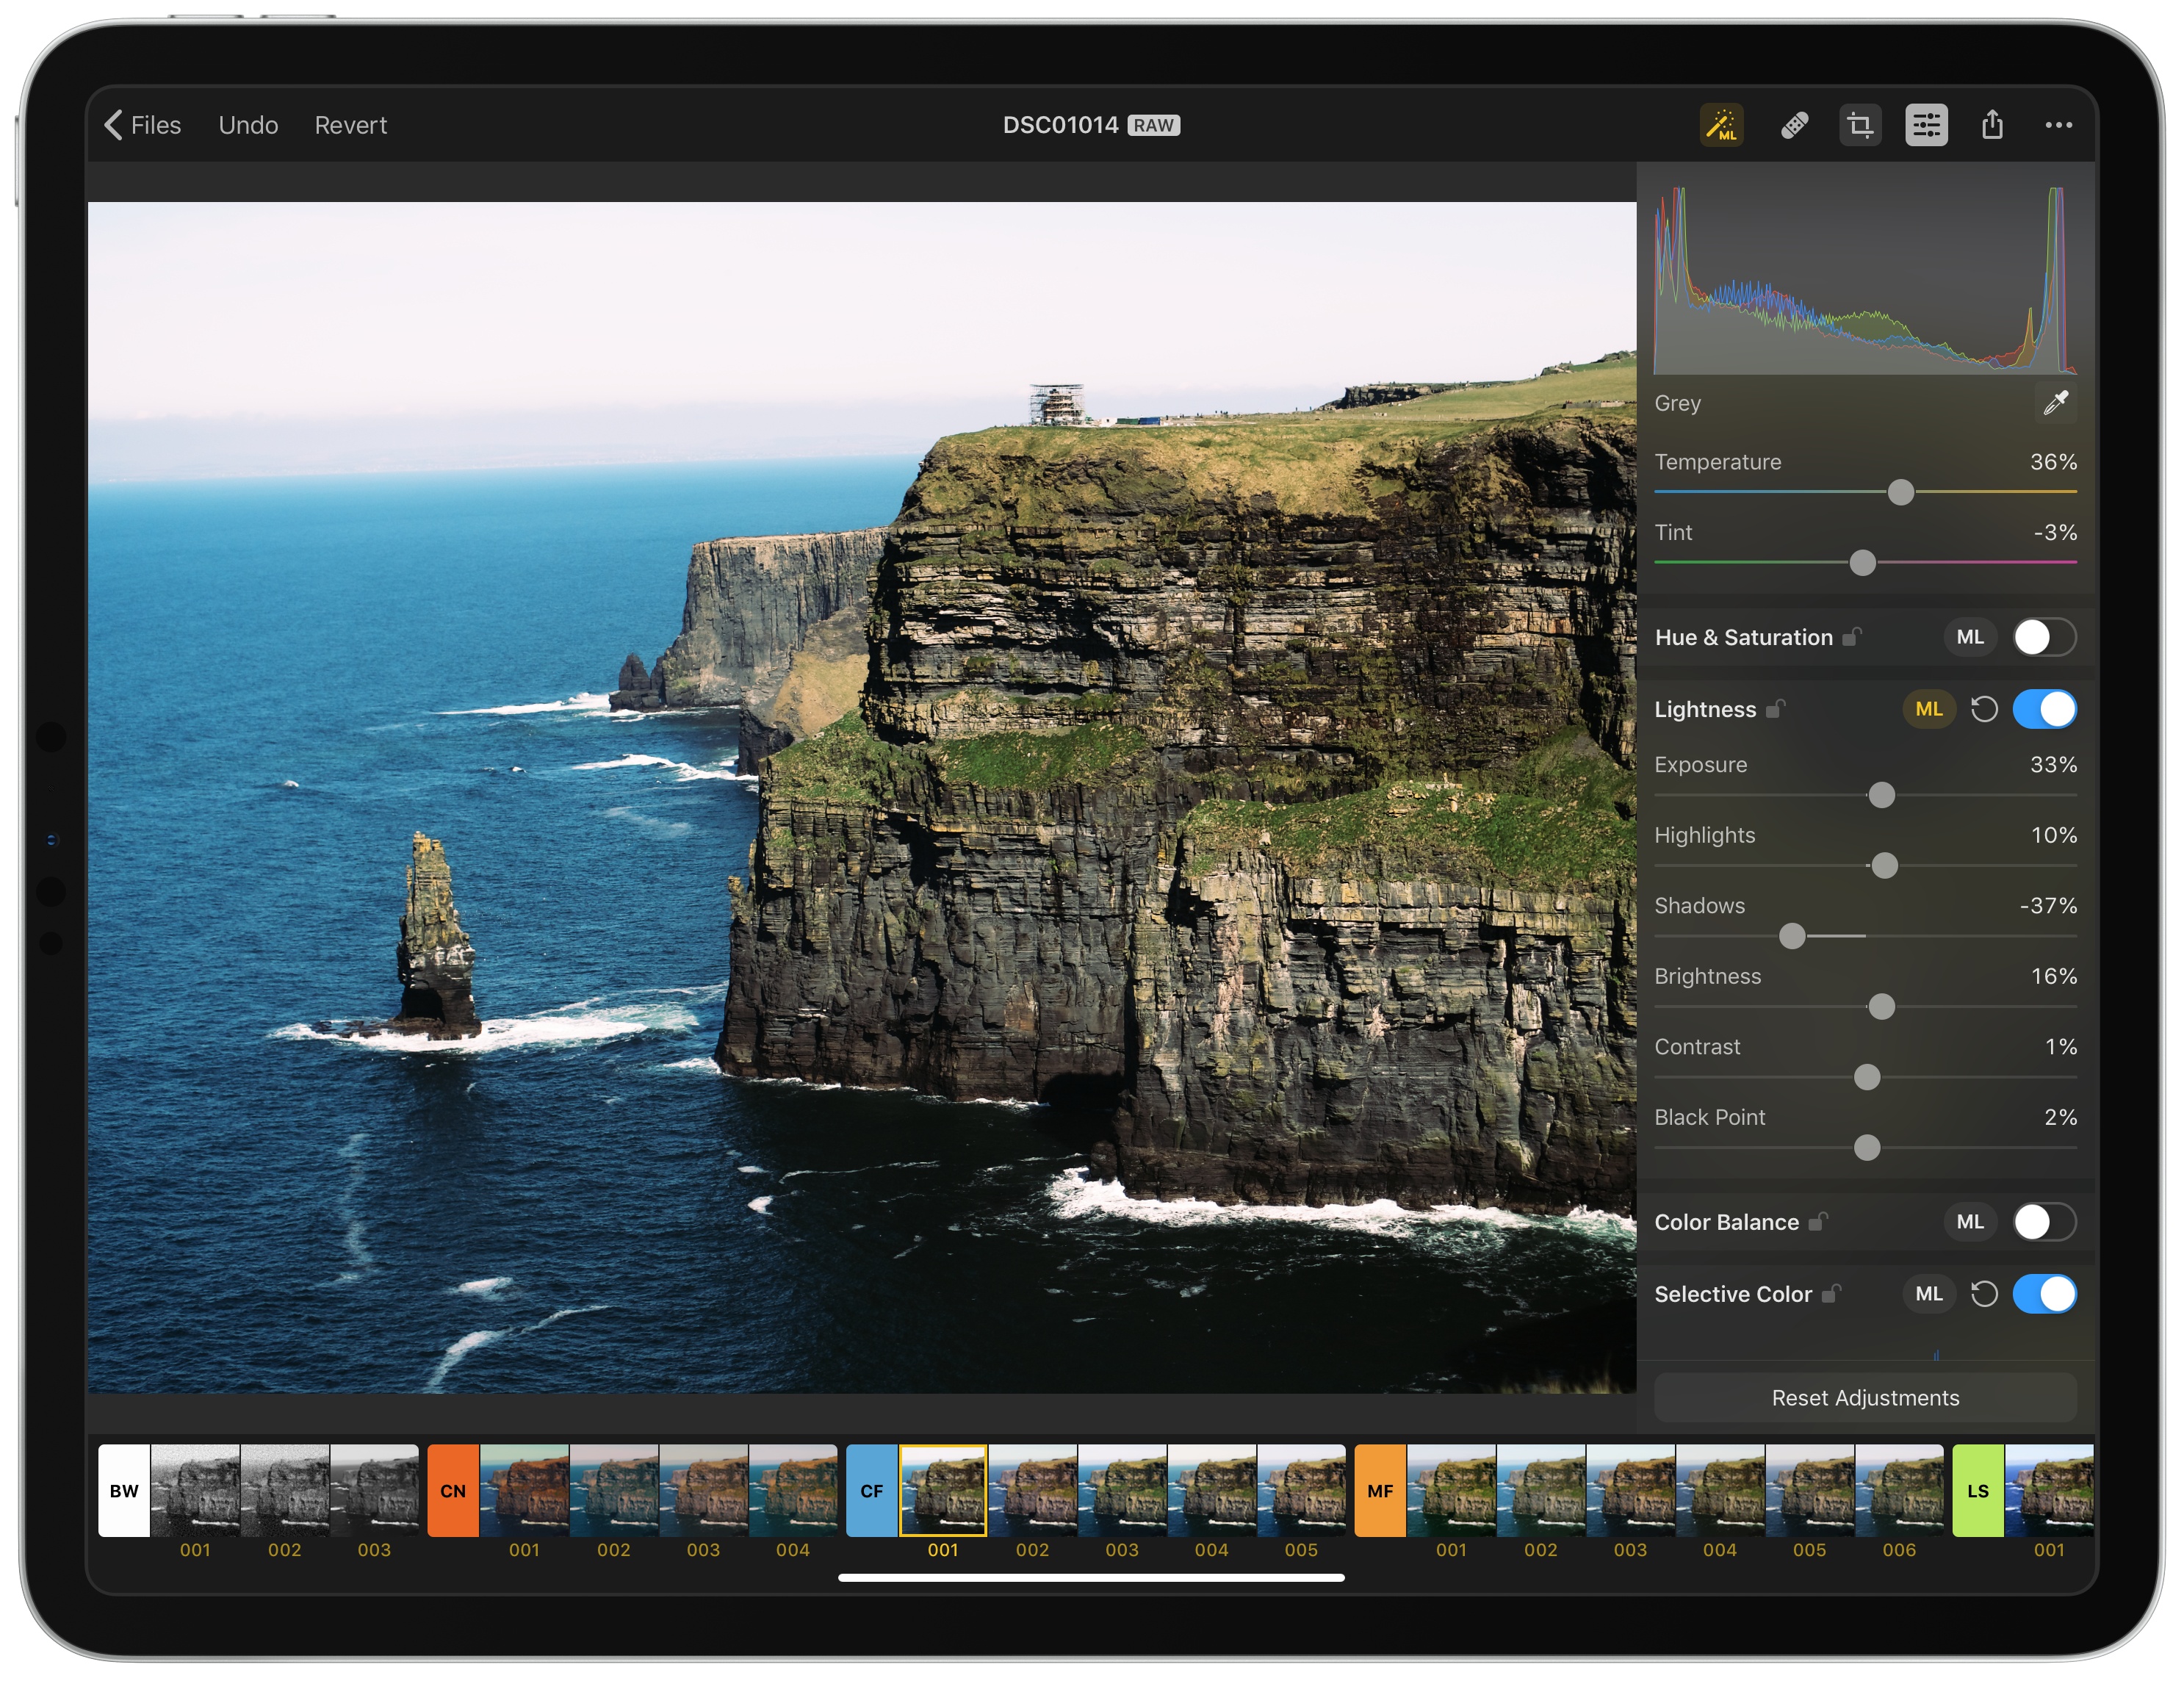
Pixelmator Photo’s UI is dominated by the image being edited. The app’s ML Enhance, healing, cropping, and editing tools, along with sharing functionality and settings are all accessed from the righthand side of the toolbar. The left side controls navigation back to the document browser and photo import UI and also includes undo1 and revert buttons. For a completely distraction-free view of an image, tapping on the toolbar causes it to slide up out of view. Tapping on the top edge of the screen again brings the toolbar back.
If you’ve used Pixelmator Pro on the Mac, you’ll already be familiar with the tools in Pixelmator Photo. For quick edits, ML Enhance has a dedicated button in the toolbar. With a single tap, ML Enhance uses its machine learning-tuned algorithm to apply a series of adjustments to an image. ML Enhance isn’t perfect, but I’ve found that often, I don’t have to make any additional edits to a photo, or I can use ML Enhance as a starting point from which I make further adjustments manually.

The healing tool does an excellent job removing small objects from a scene. In my experience, it works best when the contrast between what you are trying to remove and the background is high. For example, a telephone wire or airplane against a bright sky or a cigarette butt lying on the beach. The feature can’t perform magic, but in the right circumstances, it can remove something that would otherwise distract from the image you are editing.

The crop tool allows you to crop an image by dragging the sides or corners of an image as you’d expect, but there are some interesting advanced features as well. For instance, there’s an ML-crop tool that uses machine learning to suggest how to crop your image. Apps like Deep Crop do something similar, but it’s nice to have the functionality built in as a feature in Pixelmator Photo where it’s easy to use alongside the app’s other tools. The crop tool also includes options to crop according to common aspect ratios, rotate images 90 degrees at a time, flip images horizontally or vertically, straighten images automatically or with a dial, and adjust an image’s perspective horizontally or vertically.
Tapping the edit button reveals a panel of the same tools you’ll find in the Color Adjustments section of Pixelmator Pro. By default, the tools appear on the right side of the iPad’s screen, but they can be dragged to the left-hand side or off to the side and out of sight.

At the top of the editing panel is a histogram followed by:
- White Balance
- Hue & Saturation
- Lightness
- Color Balance
- Selective Color
- Levels
- Curves
- Replace Color
- Black & White
- Color Monochrome
- Sepia
- Fade
- Channel Mixer
- Invert
- Sharpen
- Grain
White Balance, Hue & Saturation, Lightness, Color Balance, and Selective Color all have machine learning buttons that you can tap to adjust them independently of the global ML Enhance tool.
Each tool can be turned on or off with a toggle next to its name. When turned on, the tool expands to reveal sliders and other controls related to the tool. Once you’re satisfied with changes you’ve made, you can lock any of the tools with a tap of the padlock button next to its name.

Sometimes precisely adjusting a slider is hard. To dial in a specific value for any slider, tapping the value you want to change opens a number pad for inputting the exact number you want, which is a nice touch. You can also double tap the slider drag handle to reset a value to zero.
Although Pixelmator has done an excellent job of ordering the tools so commonly used ones are at the top of the panel, I would like an edit button somewhere that would allow me to rearrange the tools to match my preferences and hide ones I don’t ever use. That said, I appreciate the power that Pixelmator has brought to the iPad. Whether you’re on your iPad or a Mac, the editing experience is the same, and arguably better on the iPad where you can directly manipulate images.

An additional tool that is unique to Pixelmator Photo is a strip of presets along the bottom edge of the screen when in editing mode. Pixelmator Photo includes nine sets with several filters in each that can be applied to images. I especially like that when you tap on the category’s name the app displays an explanation of the set. For example, the LS presets are designed with landscape photography in mind. In addition to the presets that come with Pixelmator Photo, you can save sets of image adjustments you make as your own presets by scrolling to the far right of the preset bar and tapping the plus button. Any preset can be shared using the share sheet and ones you save yourself can also be removed, redefined, or renamed.
Everything Else

When you’ve finished editing a photo, Pixelmator Photo’s share functionality gives you the option to modify the original image if it’s stored in your iCloud Photo Library, save a copy to the Photos app, or export an image to another app or cloud storage location in one of five formats. Pixelmator Photo also has a modest group of settings to show and hide the status bar, auto-center the canvas, enable extended adjustment value, and display basic EXIF data about an image.
What’s Missing
Pixelmator Photo is iPad only. Photo editors are best used on a large screen iPad, but the inability to make quick edits using Pixelmator Photo’s ML Enhance and other features on an iPhone as you take them is disappointing. Nor does Pixelmator Photo support Split View on the iPad. You can use Files or another app in Slide Over mode to drag images into Pixelmator Photo’s document browser, but the lack of Split View support severely limits the value of the app’s drag and drop support.
Finally, as the name suggests, Pixelmator Photo is all about photos. Unlike its predecessor, which is called simply Pixelmator, there is no support for layers or combining multiple images. That’s something I especially miss because I often use Pixelmator on iOS to combine multiple screenshots for articles on MacStories. Layers are supported by Pixelmator Pro on the Mac, so perhaps they’re a feature planned for the future, but for now, Pixelmator is limited to editing one image at a time on a single-layer canvas.
When I first tried Pixelmator Photo, I immediately missed the support for layers, but that was because I used it more for combining screenshots than editing photographs. I also thought the use of the document browser was odd, but as I’ve found myself editing images stored outside of Photos more often over the past few months, I’ve grown to appreciate the easy access to them that the document browser affords. The UI would be better if your iCloud Photo Library was a file provider. That way, there wouldn’t be a need for a similar but separate photo import UI in the app, but that’s a limitation of iOS that Pixelmator has done a good job working around under the circumstances.
Pixelmator Photo’s document browser was particularly handy on a recent family trip to Ireland. I brought my Sony a6500 camera and Western Digital My Passport Wireless SSD. Periodically I copied the images from the camera’s SD card to the SSD for safe keeping. With the SSD’s ability to connect to my iPad wirelessly over a 5GHz ad hoc WiFi connection, I could browse my photos at the end of the day and make edits without first batch importing them into Photos. It may not account for most of your photo editing, but anyone with photos stored on other cloud services should appreciate the availability of the document browser.
Aside from getting images into Pixelmator Photo, I’ve enjoyed having the same tools available on my Mac and iPad. Once you’ve learned the adjustments you like, they are equally simple to apply on either platform. I’m not thrilled that there isn’t an iPhone app or Split View support, both of which I hope to see in a future update to the app, but the reality is most of my photo editing happens on my iPad with its big, bright screen, so I can live with that limitation for now.
There are many excellent photo editors to choose from on iOS, but too few have a Mac version, and while you won’t find all of Pixelmator Pro’s tools in Pixelmator Photo, the most important photo adjustments are available, making the two apps excellent complements to each other.
Pixelmator Photo is available on the App Store for $4.99.
- The undo button can be long pressed to display a popover that explains what action will be undone and a separate button to redo the most recent undone action. ↩