One of the Todoist features I miss the most as a Things user is the service’s natural language parser. Available in the Quick Add field of Todoist for iOS, web, and macOS, this feature is, effectively, Fantastical for tasks. Instead of having to manually select task fields such as projects, tags, or dates, you can take advantage of an easy-to-remember syntax and quickly type them out. As you do that, Todoist will highlight the parts it understands in red, indicating that it knows how to parse them. I entered hundreds of tasks in Todoist using this system, and I think it’s an aspect of task creation that every other task manager should implement as well. It makes perfect sense, and it saves a lot of time.
Aside from a half-baked attempt at supporting natural language entry in its date assignment UI, Things doesn’t unfortunately offer a quick entry feature comparable to Todoist’s. So, of course, I set out to make my own using the app’s latest automation features.
Well, kind of. For starters, as much as I’d love to, automation doesn’t mean I can make my own interfaces in Things, supplementing the app with my custom UI to more easily create tasks. Things’ new URL scheme only lets us send data from other apps such as Workflow or Drafts. More importantly though, the workflow I’m sharing today isn’t based on a complex natural language engine such as the one used by Todoist or, say, the Chrono JS parser; I’m just using some special characters sprinkled with some delicious regex to make sure Workflow knows what constitutes a task title, a project, or a due date. Thus the quoted “natural language” in the headline of this story: it’s only natural as long as you don’t forego the special syntax required to make the workflow run.
That said, I’m quite happy with how this workflow lets me add multiple tasks to Things at once. I’ve been finding it especially useful at the end of the work day or during my weekly review, when I make a list of all the things I’m supposed to do next and want an easy way to add them all to Things. For this reason, rather than restricting this workflow to Club MacStories members, I thought every MacStories reader could benefit from it and modify it to their needs.
If you’re a Club member, you can still look forward to advanced Things workflows over the next few issues of MacStories Weekly; this one, however, has been too useful for me not to share with everyone.
The Syntax
Here’s the basic idea: I wanted to build a workflow that would take a sentence formatted in a special way and turn it into a todo object (with metadata) understood by Things. And I wanted to repeat this for multiple sentences in a row, so that instead of launching Things multiple times, Workflow would only open the app once, passing JSON data for all the sentences I had typed.
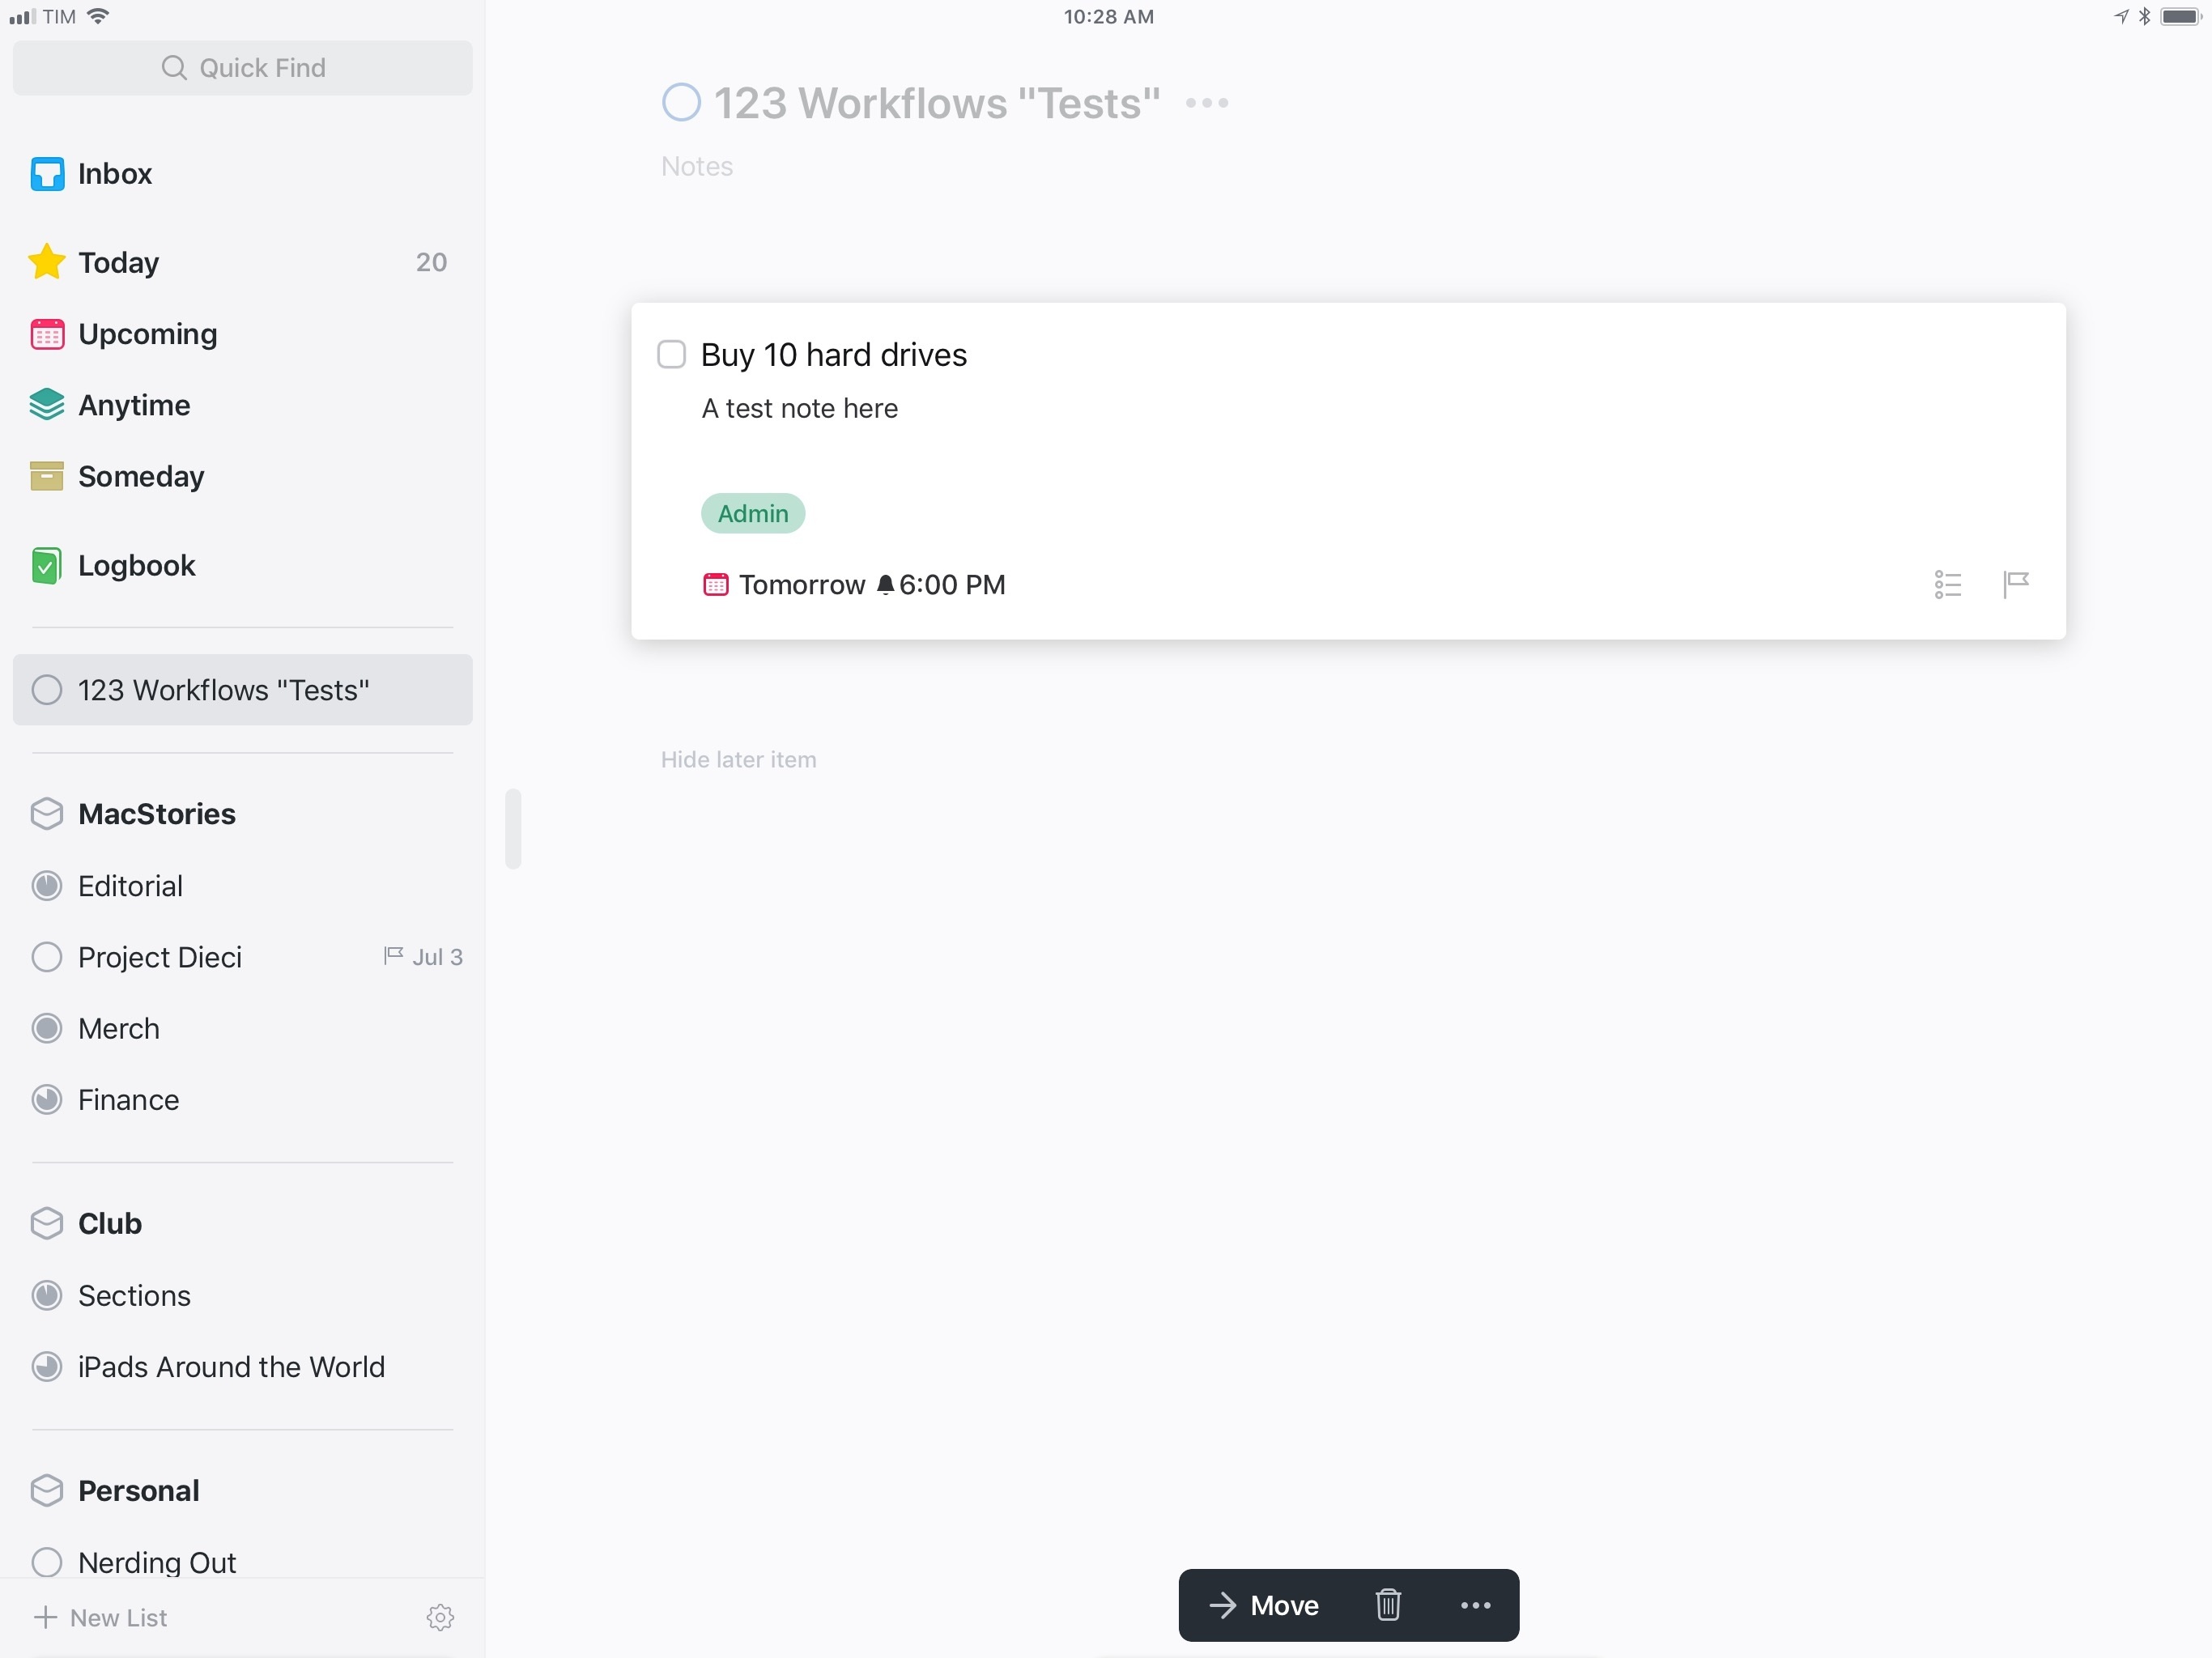
In simpler terms: I want a workflow that turns this sentence…
Buy 10 hard drives ++A test note here #123 Workflows "Tests" \\tomorrow at 6 pm @admin
…into this item in Things:
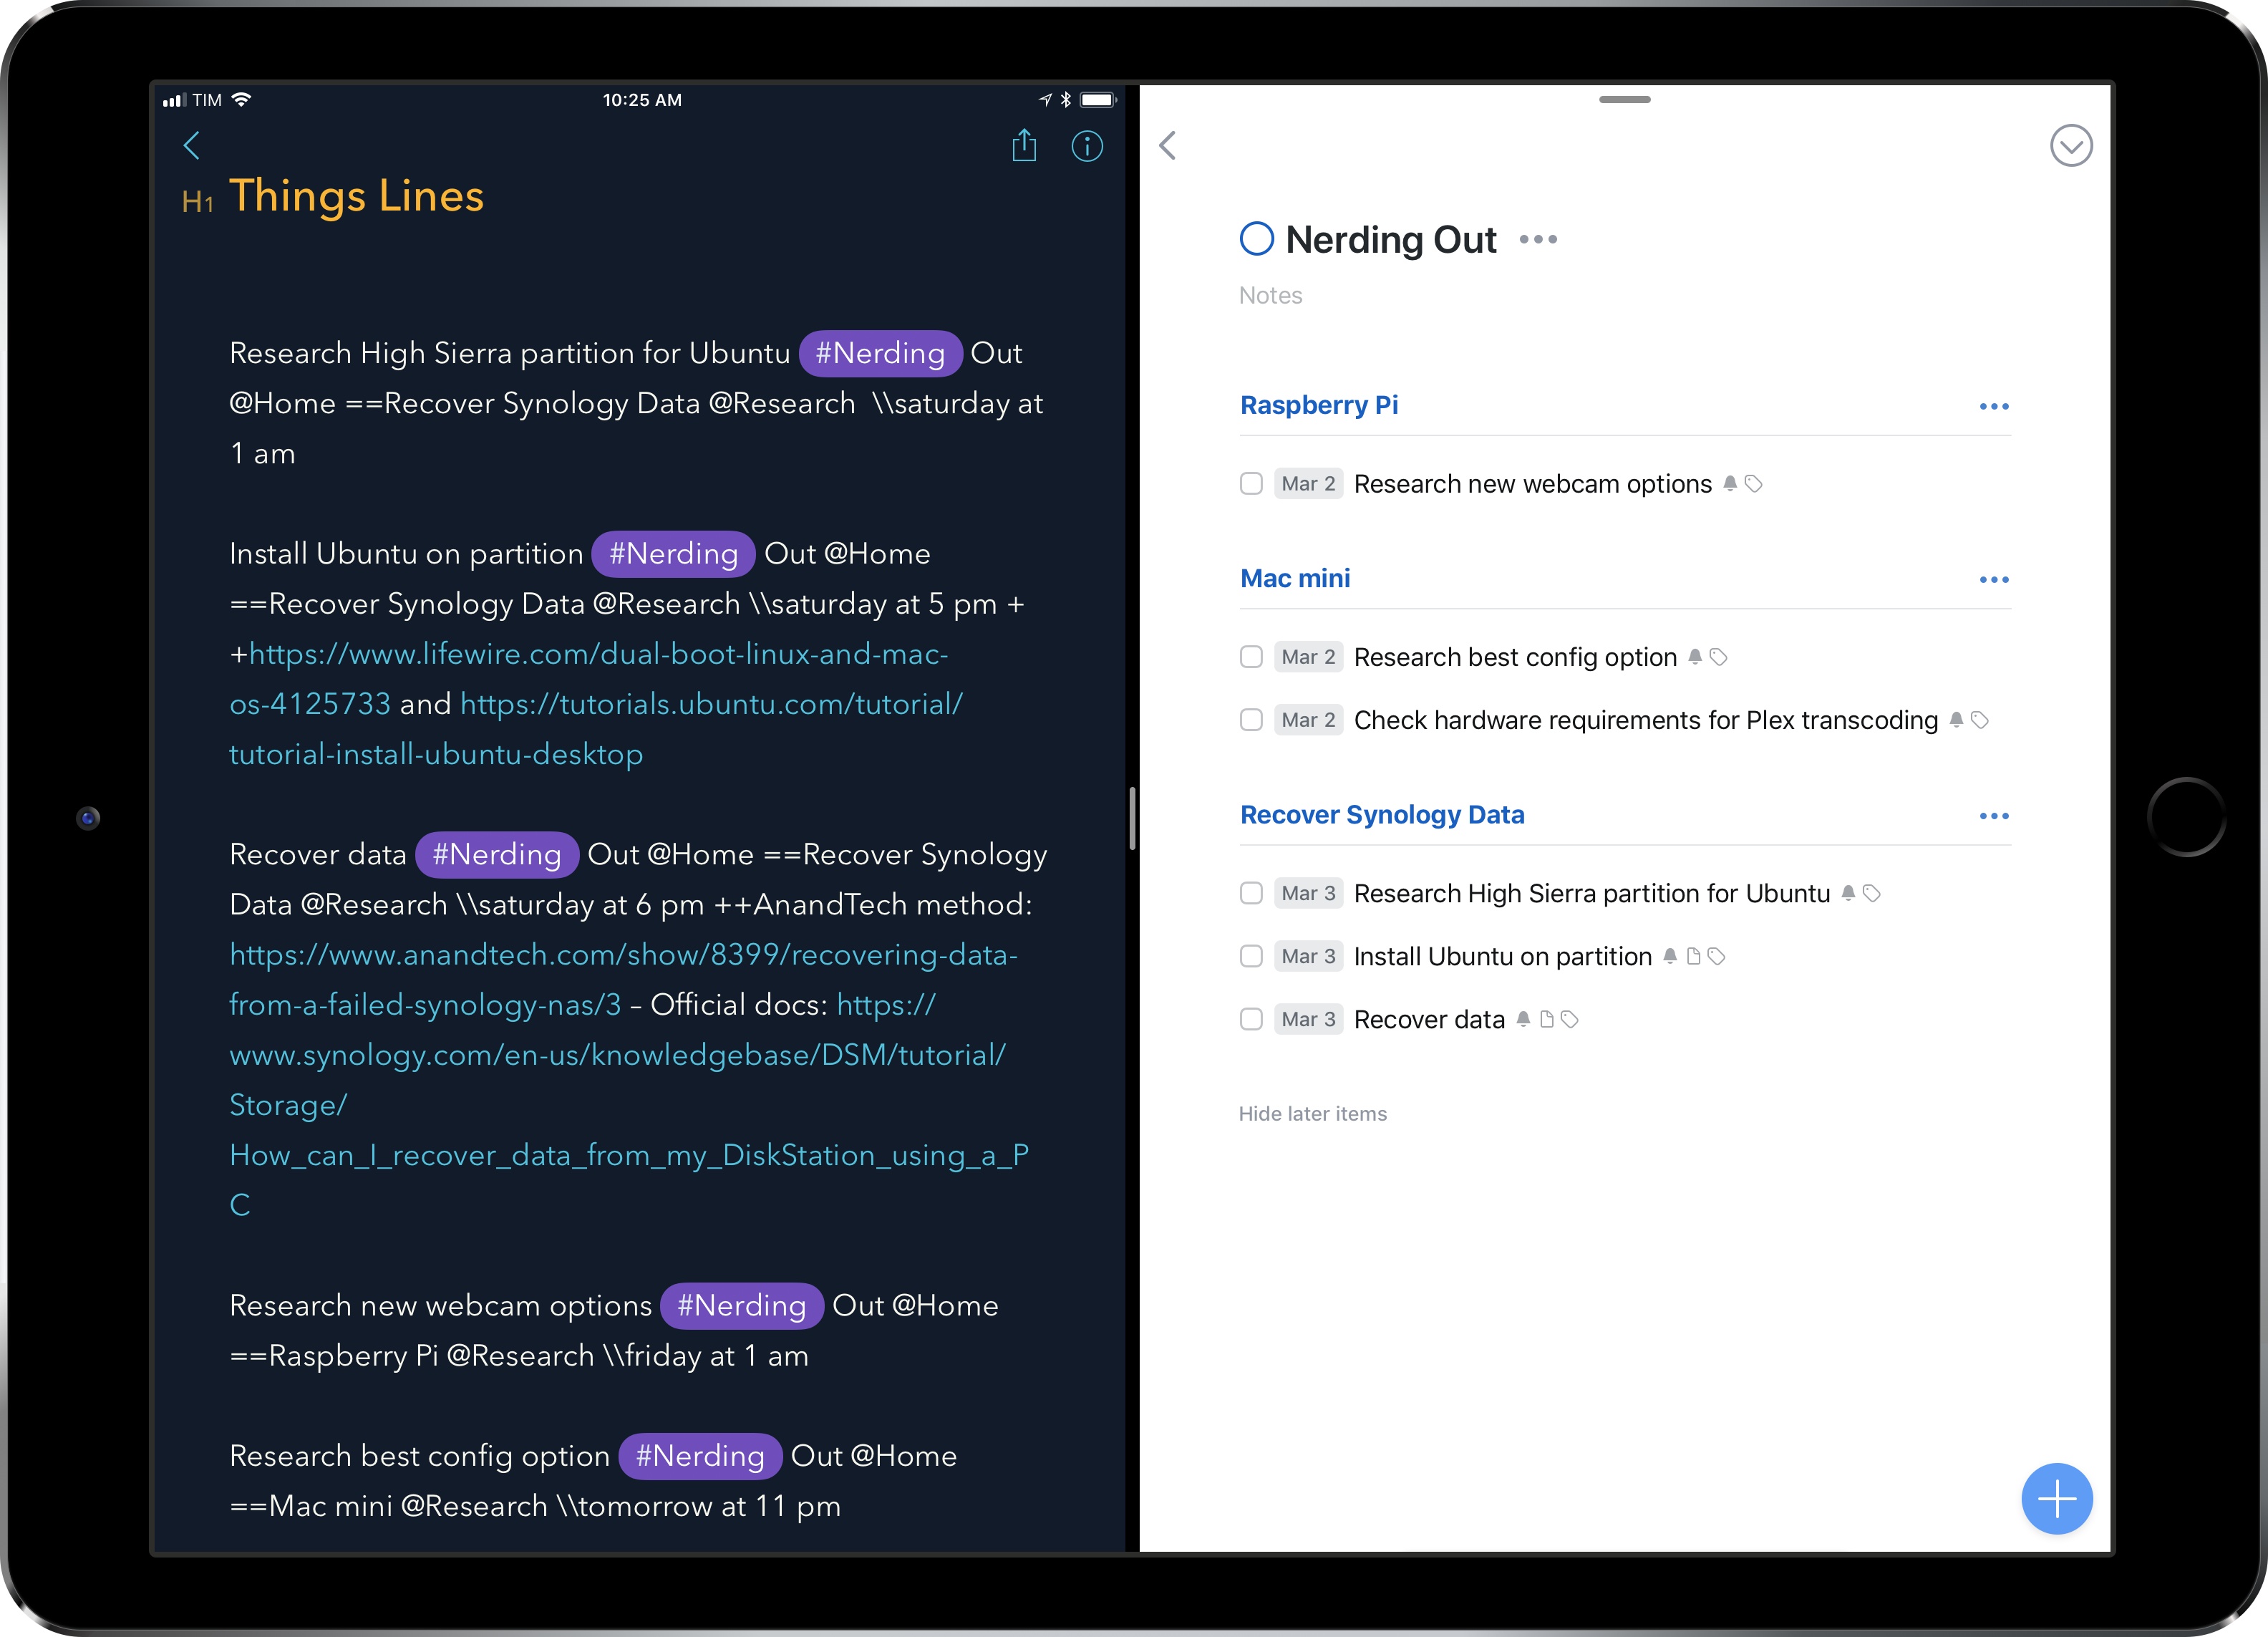
And not only that, but I also want this group of lines…
Test new workflow #123 Workflows "Tests" @Research \\today ++A link for reference: https://www.regular-expressions.info/lookaround.html

Send "video" to Myke ==Friends \\next Thursday at 1 am #123 Workflows "Tests" @research

Ping John via email @admin #123 Workflows "Tests" ==Friends ++I don't know why "lol" ????  \\tomorrow @Reading

WatchKit sweet solution post @Articles @Writing ++ https://marco.org/2018/02/26/watchkit-baby-apps Reference: https://www.macstories.net/linked/why-there-are-no-standalone-apple-watch-podcast-players/ \\today at 6 pm #123 Workflows "Tests" @"Test Tag" ==Articles
…to become all these tasks in Things:

And, I want this to happen by launching Things just once, not dozens of times with x-callback-url. The workflow should act as a template processing script that iterates over multiple lines of text in one go, avoiding the dance of opening apps back and forth typically involved with complex URL scheme automations.
Let’s start with the syntax. One of the limitations of this workflow is that the title of the task should always be at the very beginning of the line. While I can imagine that some may want to enter dates or tags first, it made more sense (and it was easier for me) to do it this way. In the examples I’ve included above, you can see how task titles are always the first items on each line; you should do the same when testing the workflow on your devices.
Individual pieces of metadata are then marked up using special characters that are somewhat related to their type. Here’s a list of all the supported fields:
- #Project Name
- @Tag Name
- ==Heading
- ++Task note
- \natural date and time string
There is one important rule that is fairly easy to memorize: special markup characters have to be placed exactly before their associated text without a space. That’s it. You can insert these variables anywhere in a line (but always after the task title), omit them, include spaces in the name of projects and tags, or write as much as you want in the note field. You can even include URLs and emoji in a task’s note with this system. You can enter multiple tags, but only one project and one heading per line.
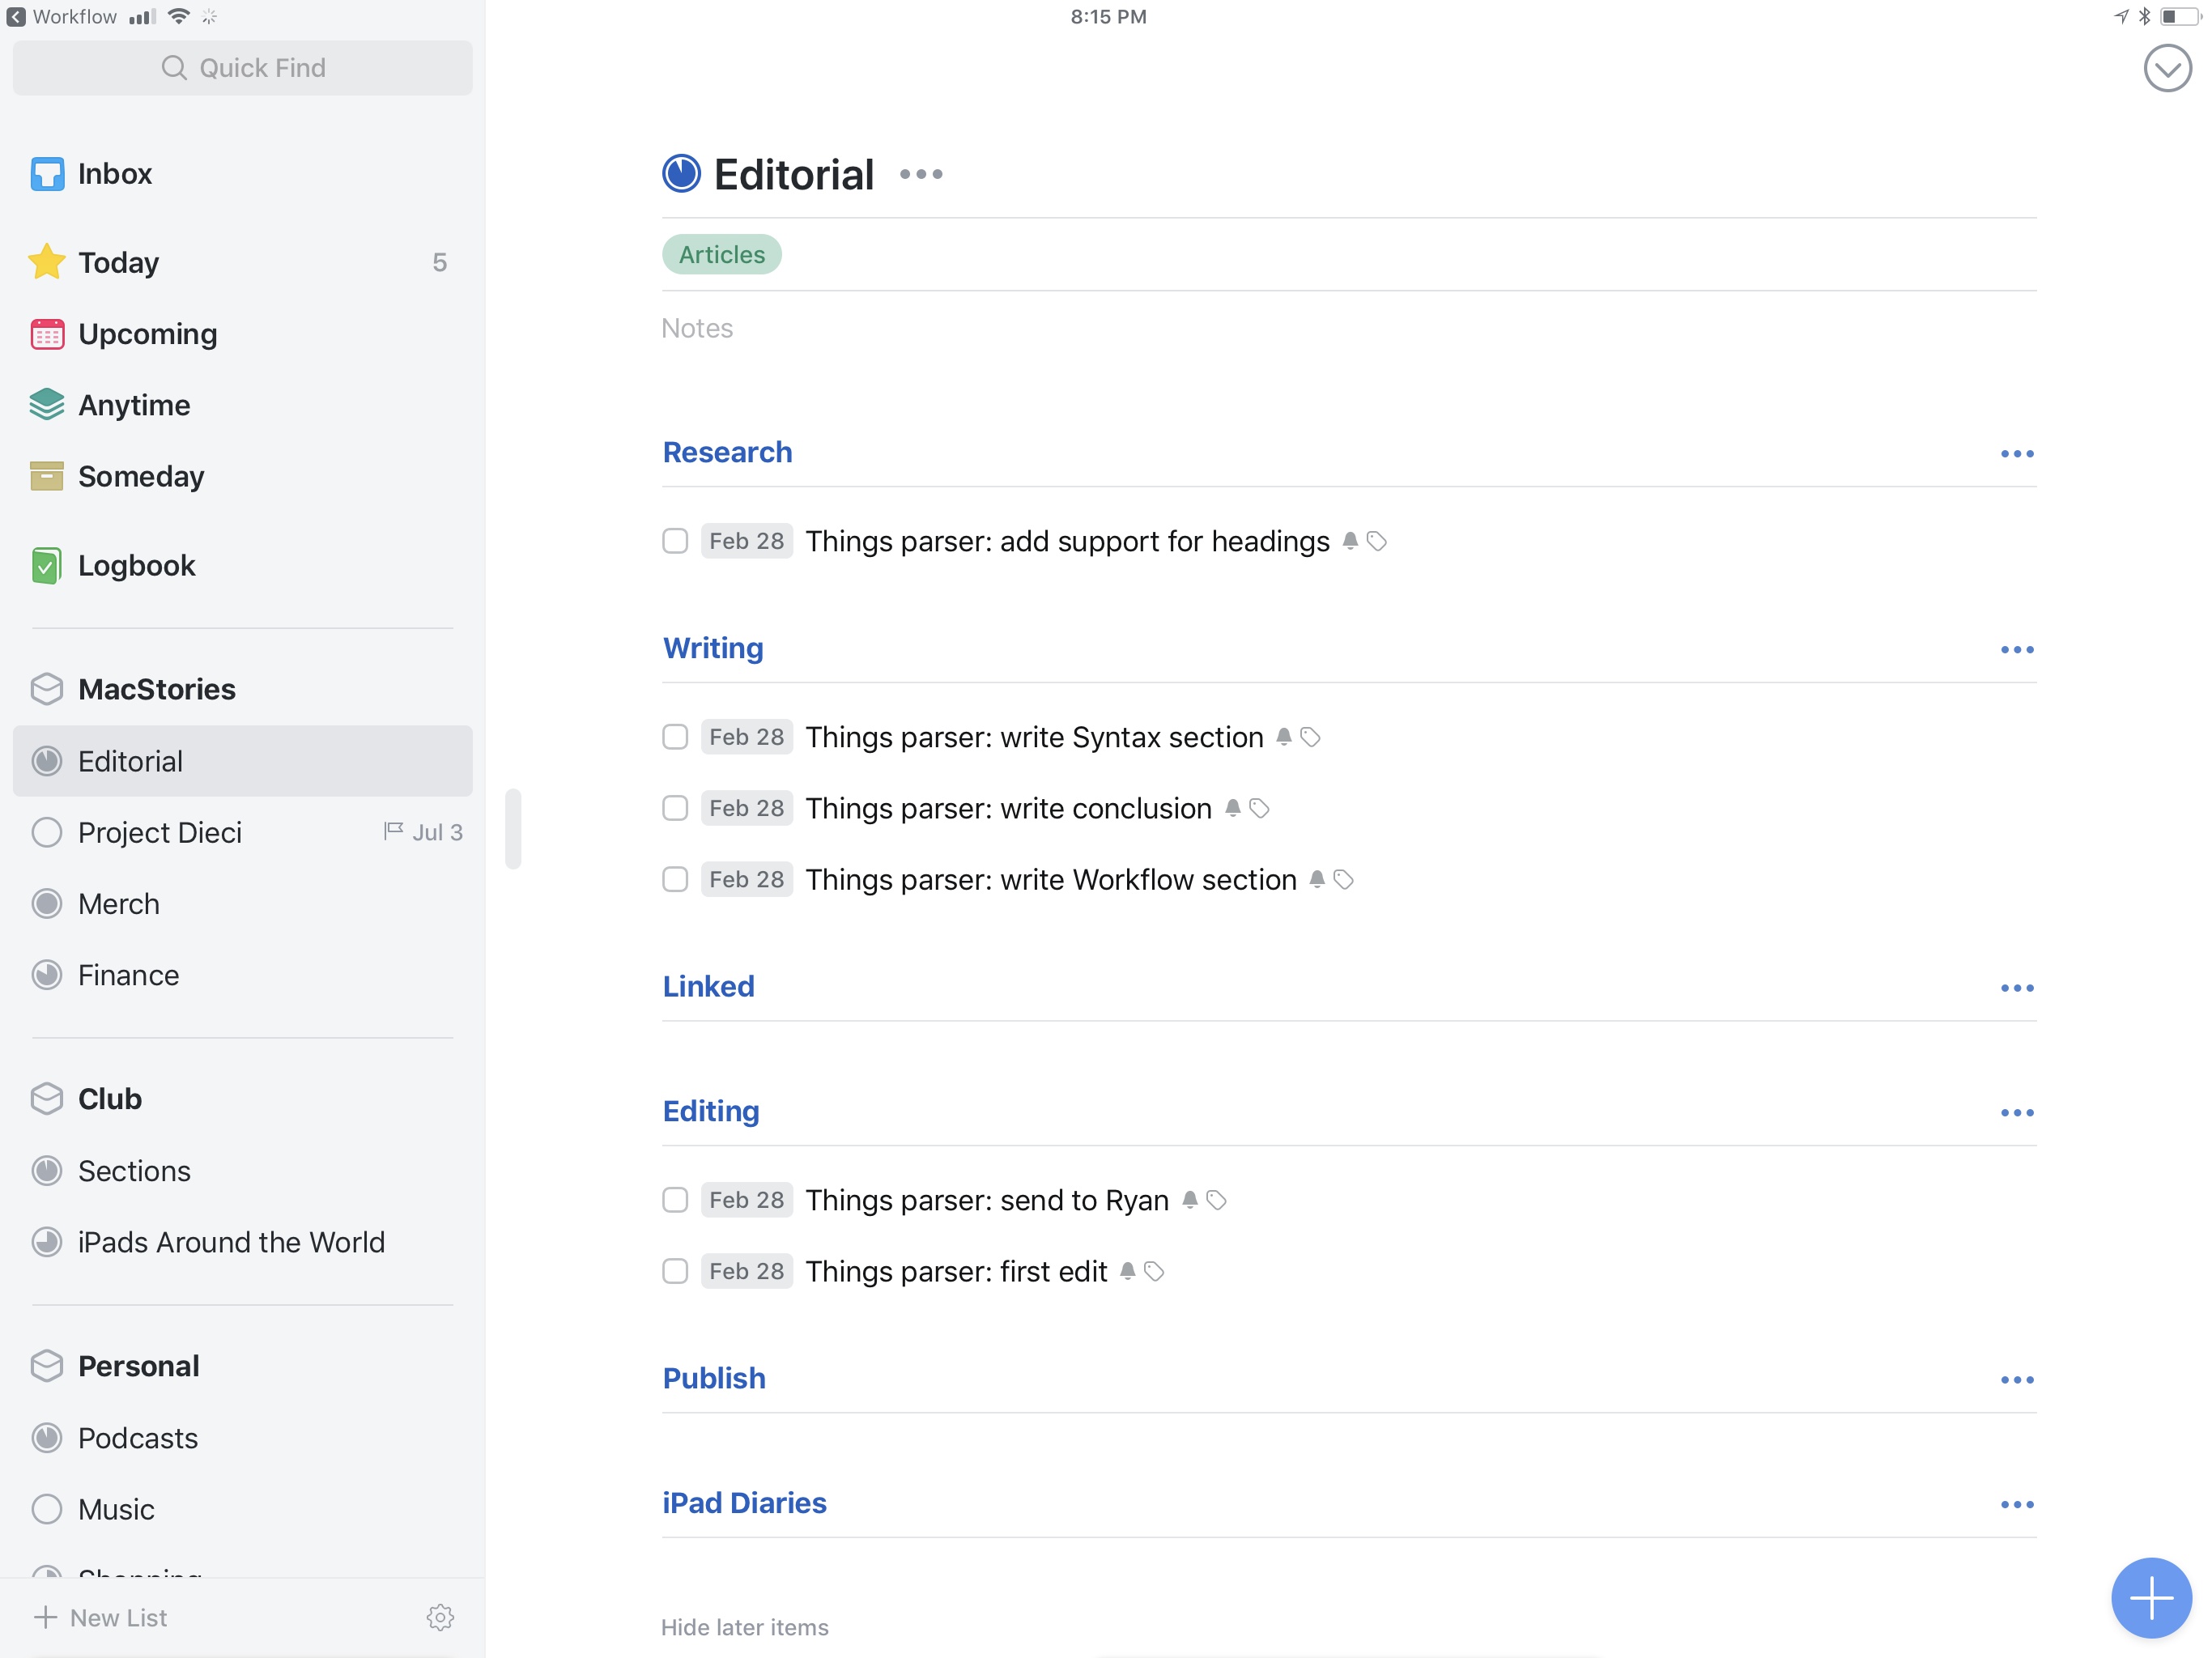
Again, for context, here’s what some actual lines of text I used for my Things setup look like:
Things parser: write Syntax section #Editorial @Writing \\tomorrow at 2 pm ==Writing
Things parser: write Workflow section #Editorial @Writing \\tomorrow at 3 pm ==Writing
Things parser: write conclusion #Editorial @Writing \\tomorrow at 4 pm ==Writing
Things parser: first edit @Editing \\tomorrow at 6 pm #Editorial ==Editing
Things parser: send to Ryan @Editing \\tomorrow at 10 pm #Editorial ==Editing
Things parser: publish to MS @Editing \\Thursday at 4 PM #Editorial ==Publish
And here’s the resulting set of tasks in Things:
There are three minor limitations I should point out. Projects or tags with emoji in their names are not supported because I couldn’t figure out a way to encode them reliably in JSON using Workflow. In addition, using special characters reserved for formatting of task metadata (@, #, , =, and +) elsewhere in a line may result in regex issues. Wherever possible, don’t use those in fields other than the ones they already mark up.
Perhaps more importantly, the natural language date parsing is subject to Workflow’s built-in date and time recognition feature. Generally speaking, the Workflow team has done an amazing job at recognizing a variety of English date strings such as “tomorrow at 1 PM”, “next Wednesday at noon”, or “in 2 days”. However, there may be edge cases when a complex date or a non-English sentence returns an error.
For instance, “tra 3 giorni” (which means “in 3 days” in Italian) throws up an error in Workflow: “in 3 giorni” (which is grammatically incorrect) does not, suggesting that support for non-English dates has only been implemented at a basic level in Workflow. I’ve had great results with all my typical dates in English, but your mileage may vary. I recommend using this workflow to test natural language dates and times in Workflow.
I tried to come up with a syntax that would feel familiar to TaskPaper users (who have been relying on similar workflows for years), while retaining the simplicity of Todoist’s Quick Add panel. I’ve been typing lists of tasks in Bear using this syntax for about a week now, and the system is pretty natural for me at this point. It’s not as clever as I’d like it to be, but I think it strikes a good balance of legibility and the customization granted by TaskPaper.
The Workflow
Now onto the good stuff. The underlying concept of my workflow is that, by the end of a repeat loop that iterates over multiple lines of text, we should end up with a JSON array containing tasks we can send to Things. This is largely made possible by Match Text actions that use regular expressions to isolate different parts of a line and assign them to different attributes of a task. At a high level, this is what the workflow does: it repeats a series of regular expressions for each line, generates JSON, and packages everything up to send data to Things in bulk.
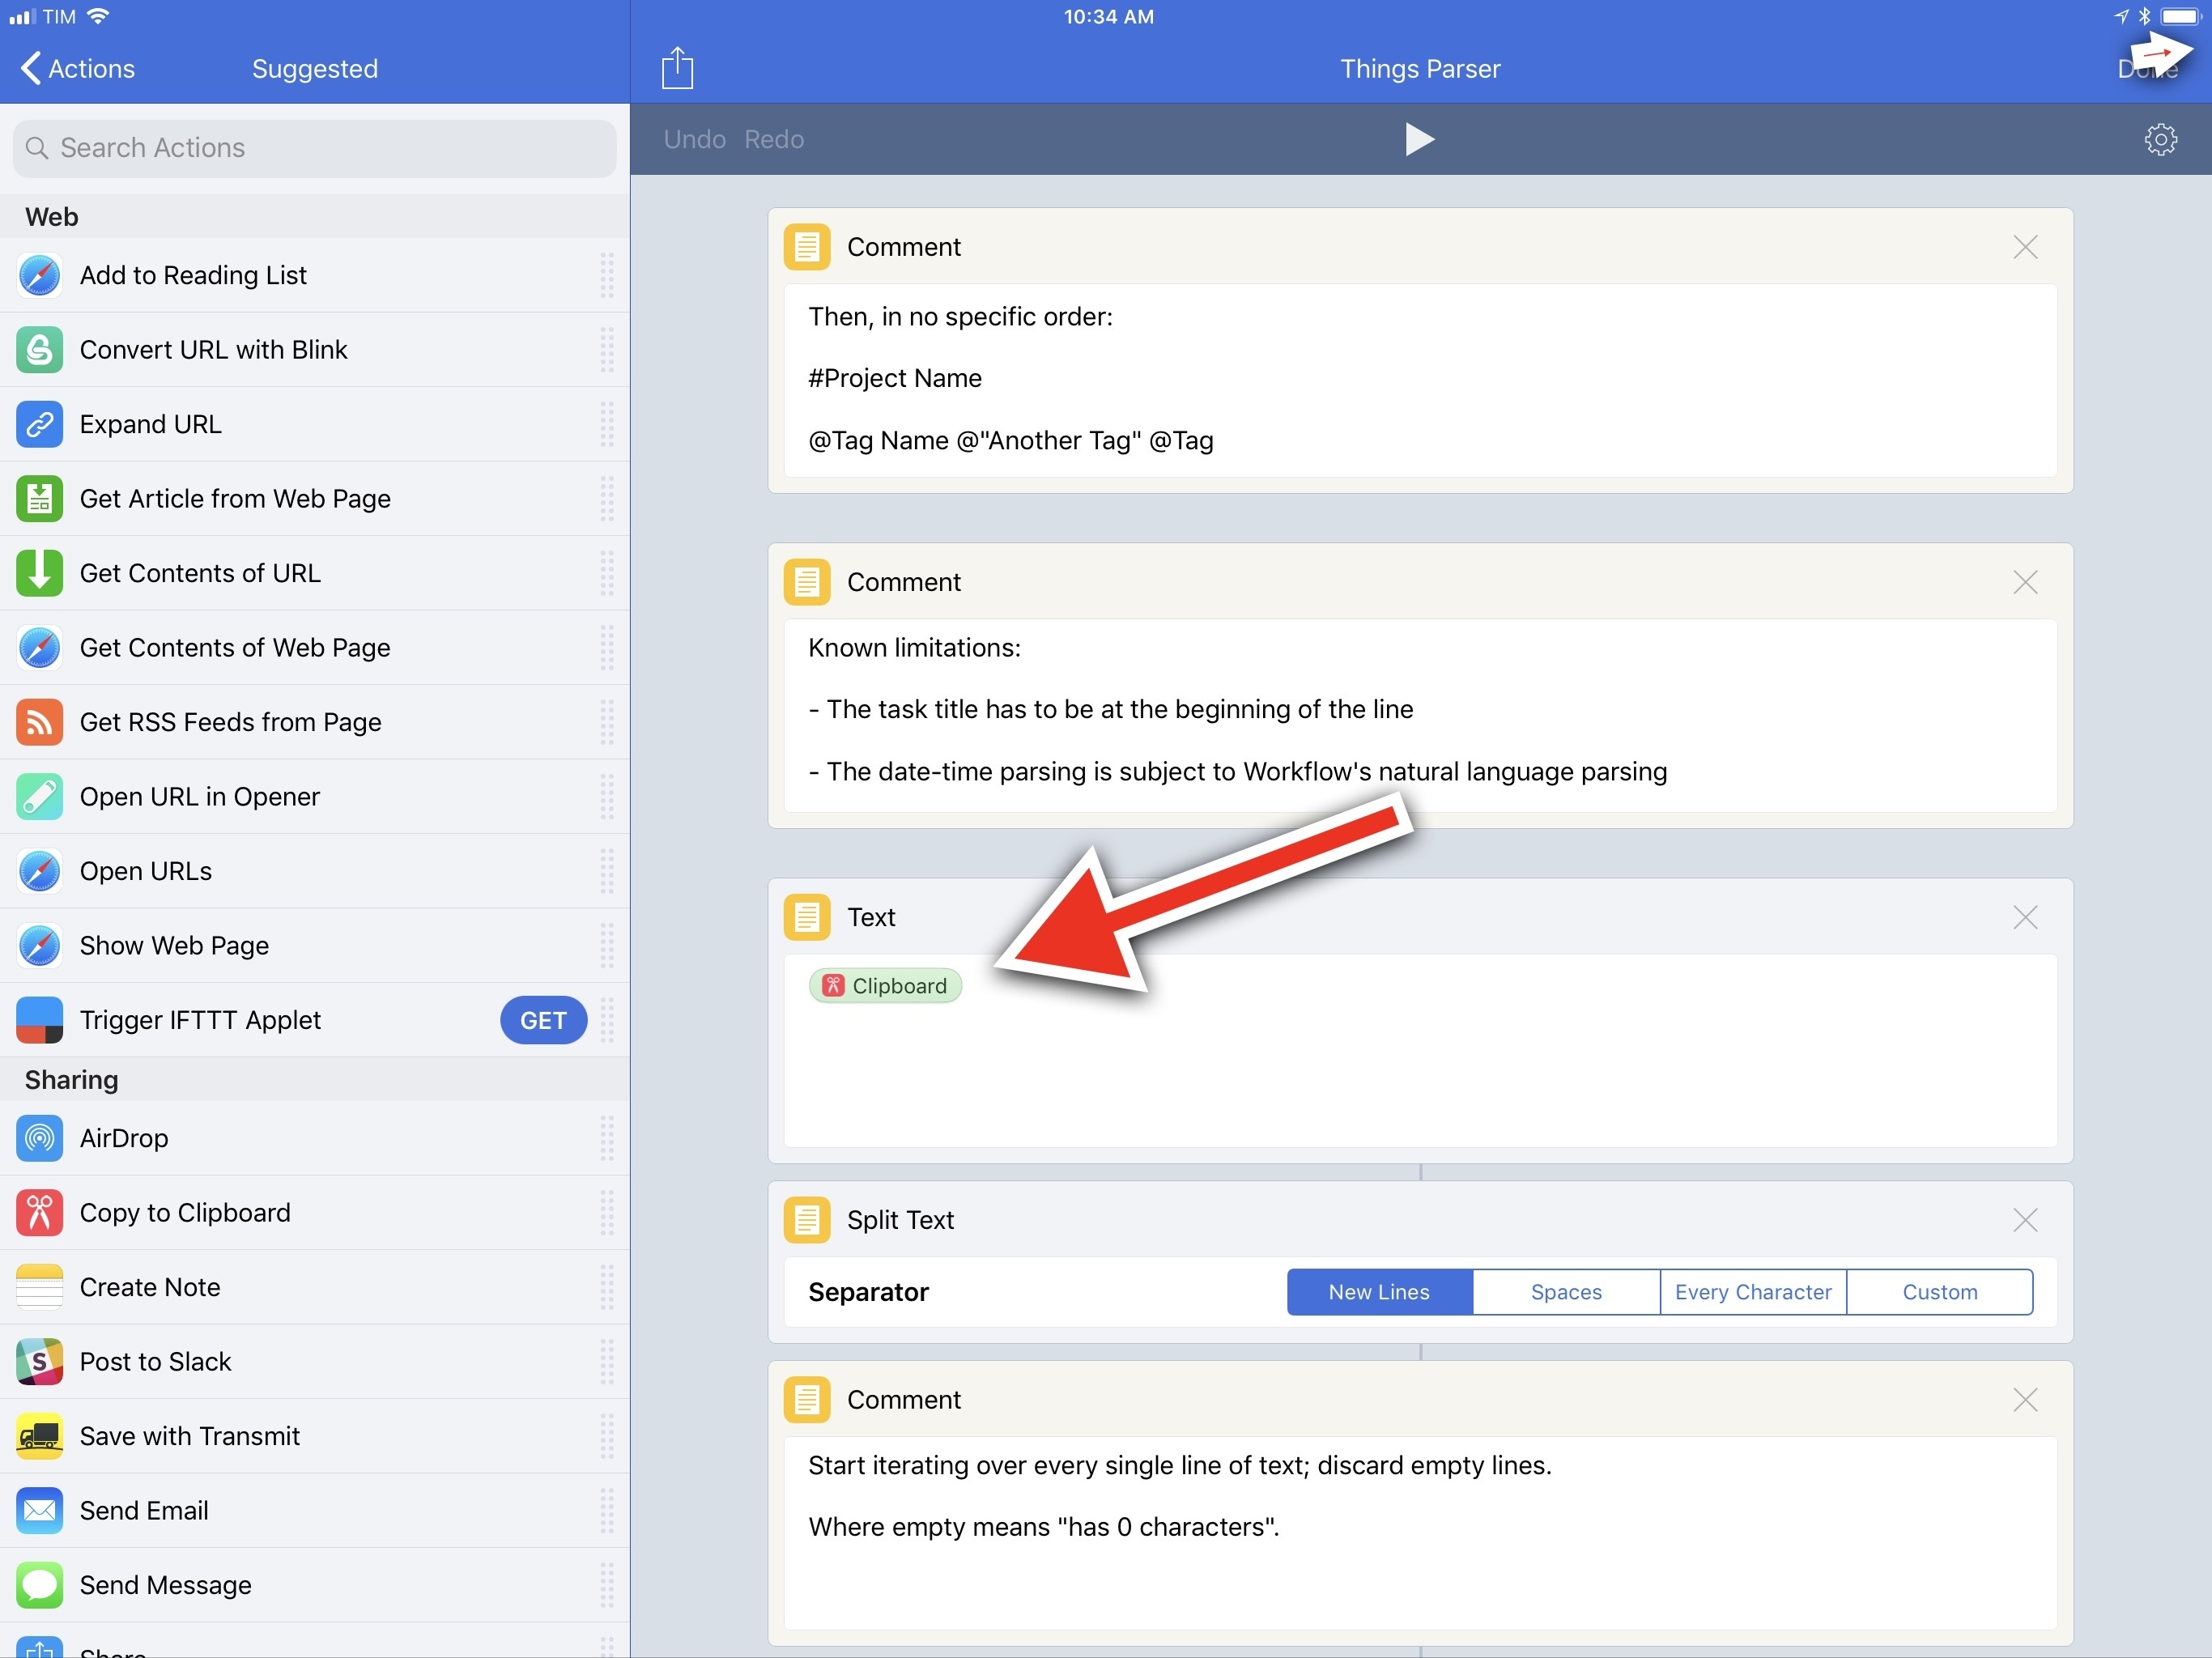
The workflow starts by splitting input text at new lines, creating a list of lines ready for a repeat loop. You’re free to choose the kind of input text you want to use: you may type lines of text directly in Workflow, get the contents of the clipboard, or use the workflow as an action extension, reading input from another app. Personally, I just copy lines of text from Drafts and use a Text action with a Clipboard variable to read whatever is in the system pasteboard. I usually run the workflow from a widget.
Once the workflow has split the text in multiple lines, it discards the empty ones with a conditional block. This is done by counting the characters contained on each line; if the count is 0, it means a line is empty and shouldn’t be parsed. Lines with text in them are saved to a Lines variable that the workflow then begins to process.
Once it has at least one line of text, the workflow starts using a variety of similarly constructed regular expressions to extract task attributes. Now, I know that my regex skills are merely average, and I’m open to suggestions for improvements, but here’s the general idea: using positive lookbehinds and negative lookaheads, Workflow’s regex engine matches text items that are preceded by a specific character but not followed by other characters. This enables us to match a multi-word @Tag Name until it is followed by a #Project Name, for example, or a ++Note that contains a URL as long as it’s not interrupted by a ==Heading. There’s probably a better, more elegant way to do this, but I haven’t been able to break my system yet, and it seems to get the job done.1
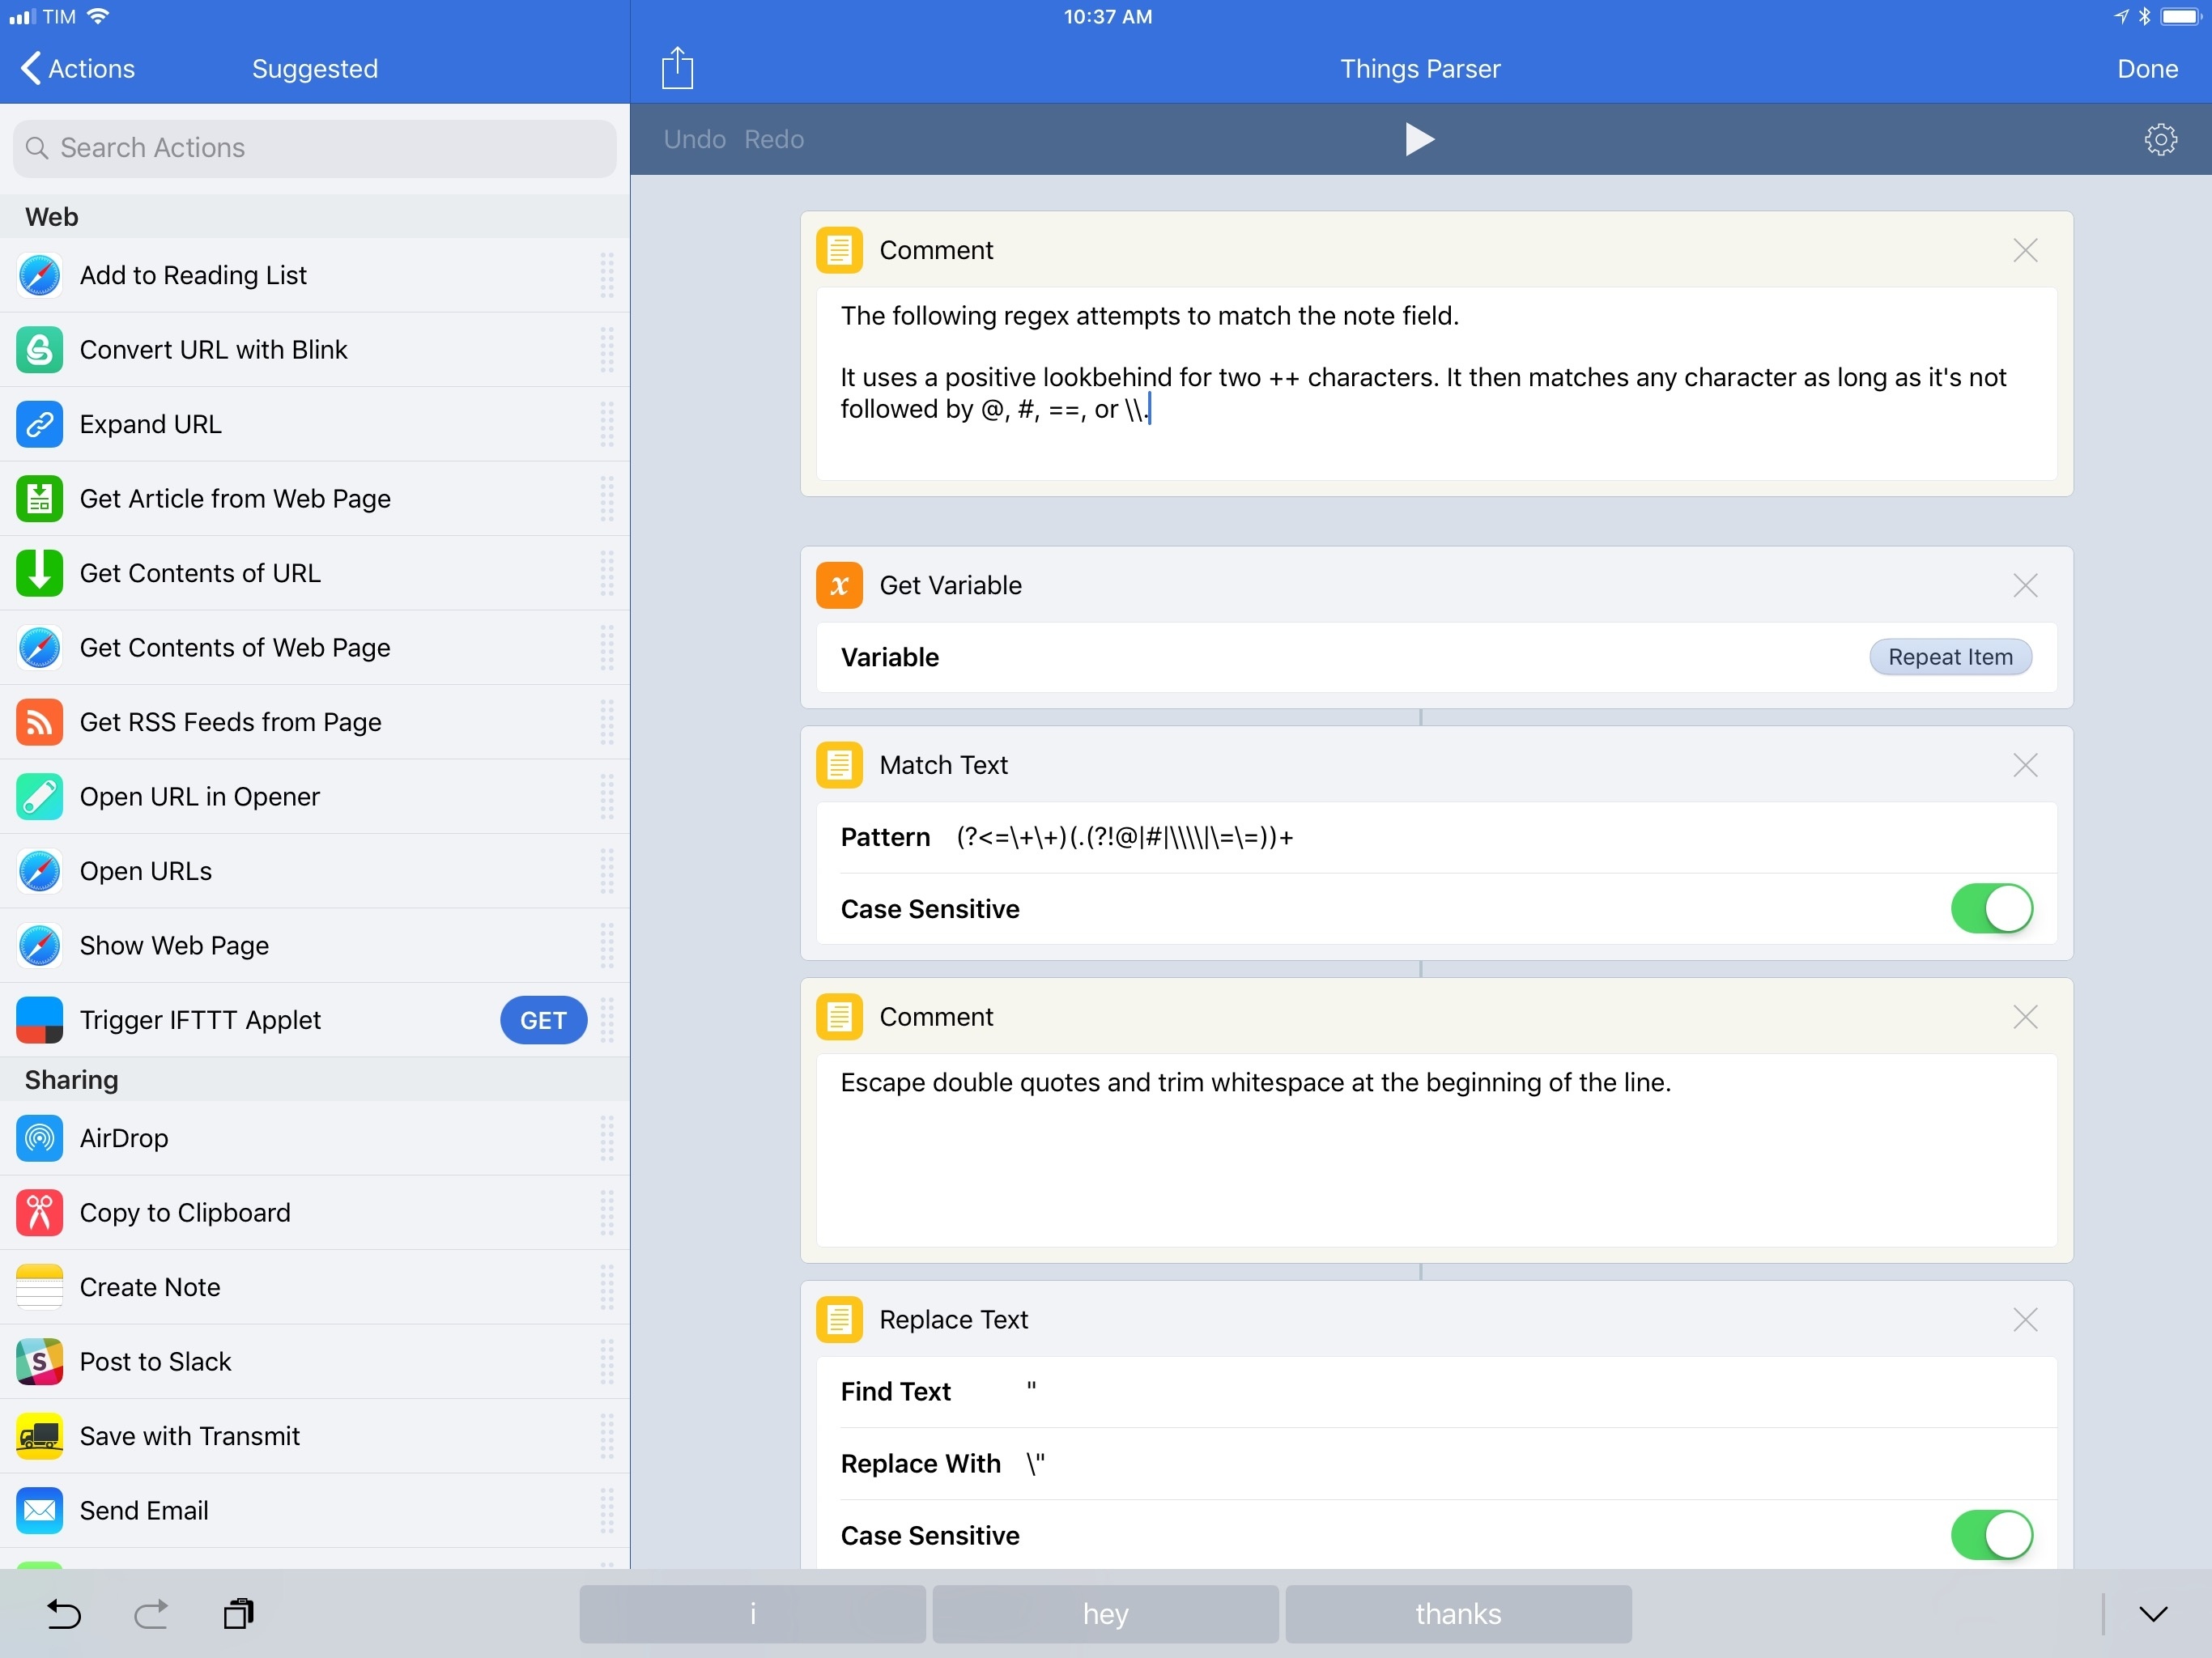
I want to call out a few things you’ll likely notice in scrolling through the Workflow. Double quotes are always escaped as \" to avoid JSON errors. The date is formatted using YYYY-MM-dd@h:mma, as required by the Things URL scheme spec. If you don’t enter a time, Workflow will add 12 PM as a default time string, thus setting a reminder in Things. If you prefer to create tasks in Things for specific days but without time-based reminders, I suggest removing the @h:mma bit from the Format Date action.
Under the hood, JSON is constructed using a simple Text action that contains plain text and variables previously generated by the workflow. At the end, before launching Things, the workflow generates a complete JSON object that looks something like this:
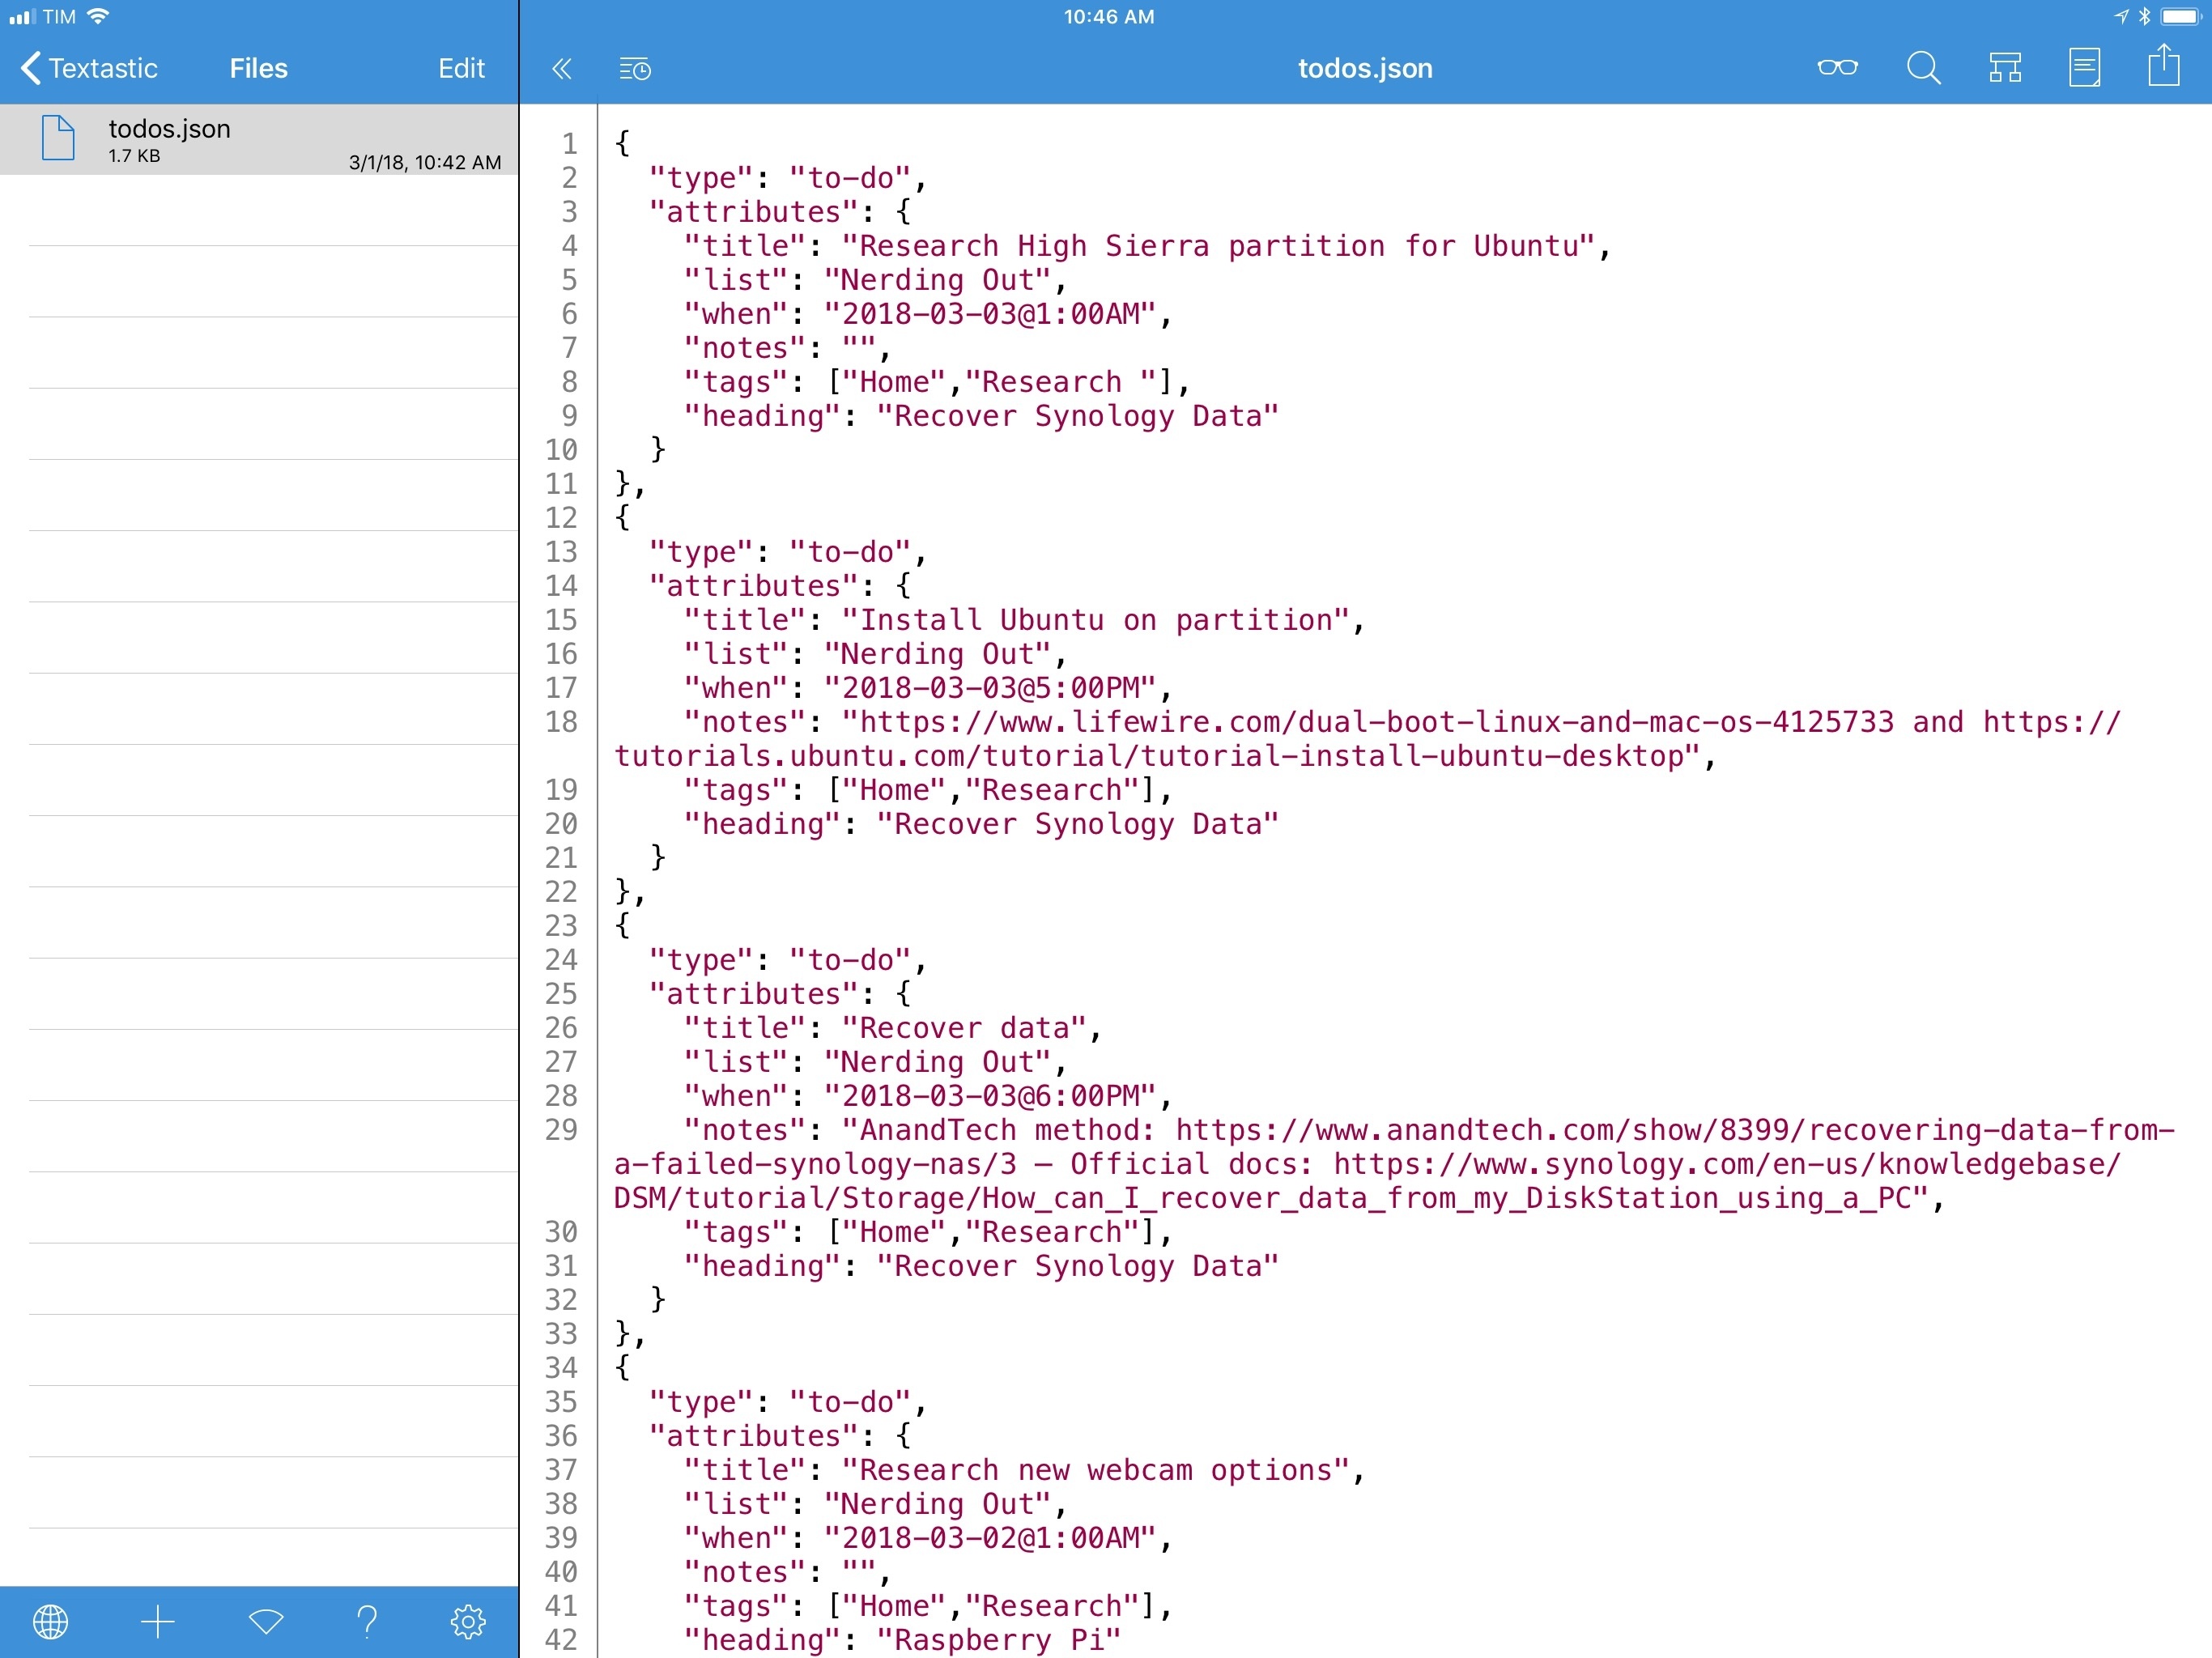
Scary-looking, but still legible. You won’t have to deal with any of this, but it’s what goes on behind the scenes.
Finally, after using the things:///add-json command, Things will launch, importing all the tasks you’ve passed to the app with the correct attributes and fields.
To give you an idea of how this complex automation results in just a few seconds of footage, here’s a video of the workflow in action:
You can download the workflow here.
I’m having fun with Things’ latest automation features. This workflow is helping me better plan the week ahead thanks to its support for batch processing tasks in the app: instead of creating one task after another in Things, slowly tapping around to select projects and dates, I can just prepare a list of formatted tasks in Drafts or Bear, hit a button, and import everything in Things. It takes two seconds to run and everything ends up in the right place.
I’m not done though. There’s more I want to build for Things, such as Markdown-based templates that generate entire projects in Things. As I argued last week, Cultured Code has created a versatile URL scheme that, in addition to developers, can be used by tinkerers and power users to extend Things in powerful, fun new ways.
If you have ideas on how to improve this workflow, let me know on Twitter. And in case you haven’t played with it yet, you can read more about Things automation here.