A few weeks ago, following a long research process, my girlfriend and I finally decided to buy a Dyson fan for our apartment – specifically, the Pure Hot + Cool model. We’ve been keeping an eye on this product for a while as a potential solution to purify air as well as heat our (small) apartment; unlike other Dyson fans, this one combines cooling and heating modes in a single compact, good-looking product that we’ve placed on top of an IKEA BESTÅ cabinet in our hallway. So far, we’re liking it a lot.
Whenever I buy a new appliance these days, one of my priorities is to ensure that it can become part of our HomeKit setup, either via native HomeKit support, custom integration via homebridge, or, if all else fails, a smart plug. As far as native HomeKit fans are concerned, I couldn’t find anything here in Italy that combined cooling and heating functions in a single product. Modern Dyson fans do not come with official HomeKit support either, but they can communicate over Wi-Fi using a proprietary service called Dyson Link. This service can be controlled via an iPhone app (which comes with a virtual remote and stats collected by the fan’s built-in sensors) or Amazon’s Alexa assistant. As I was researching the Pure Hot + Cool, I discovered a homebridge plugin that, with minimal configuration, allows you to add a Dyson fan along with its sensors and different modes to your Home setup as a series of accessories and sensors. And since I’m already using homebridge to bring HomeKit compatibility to various devices around the house (including two TVs), adding a new one wasn’t a hard decision at all.
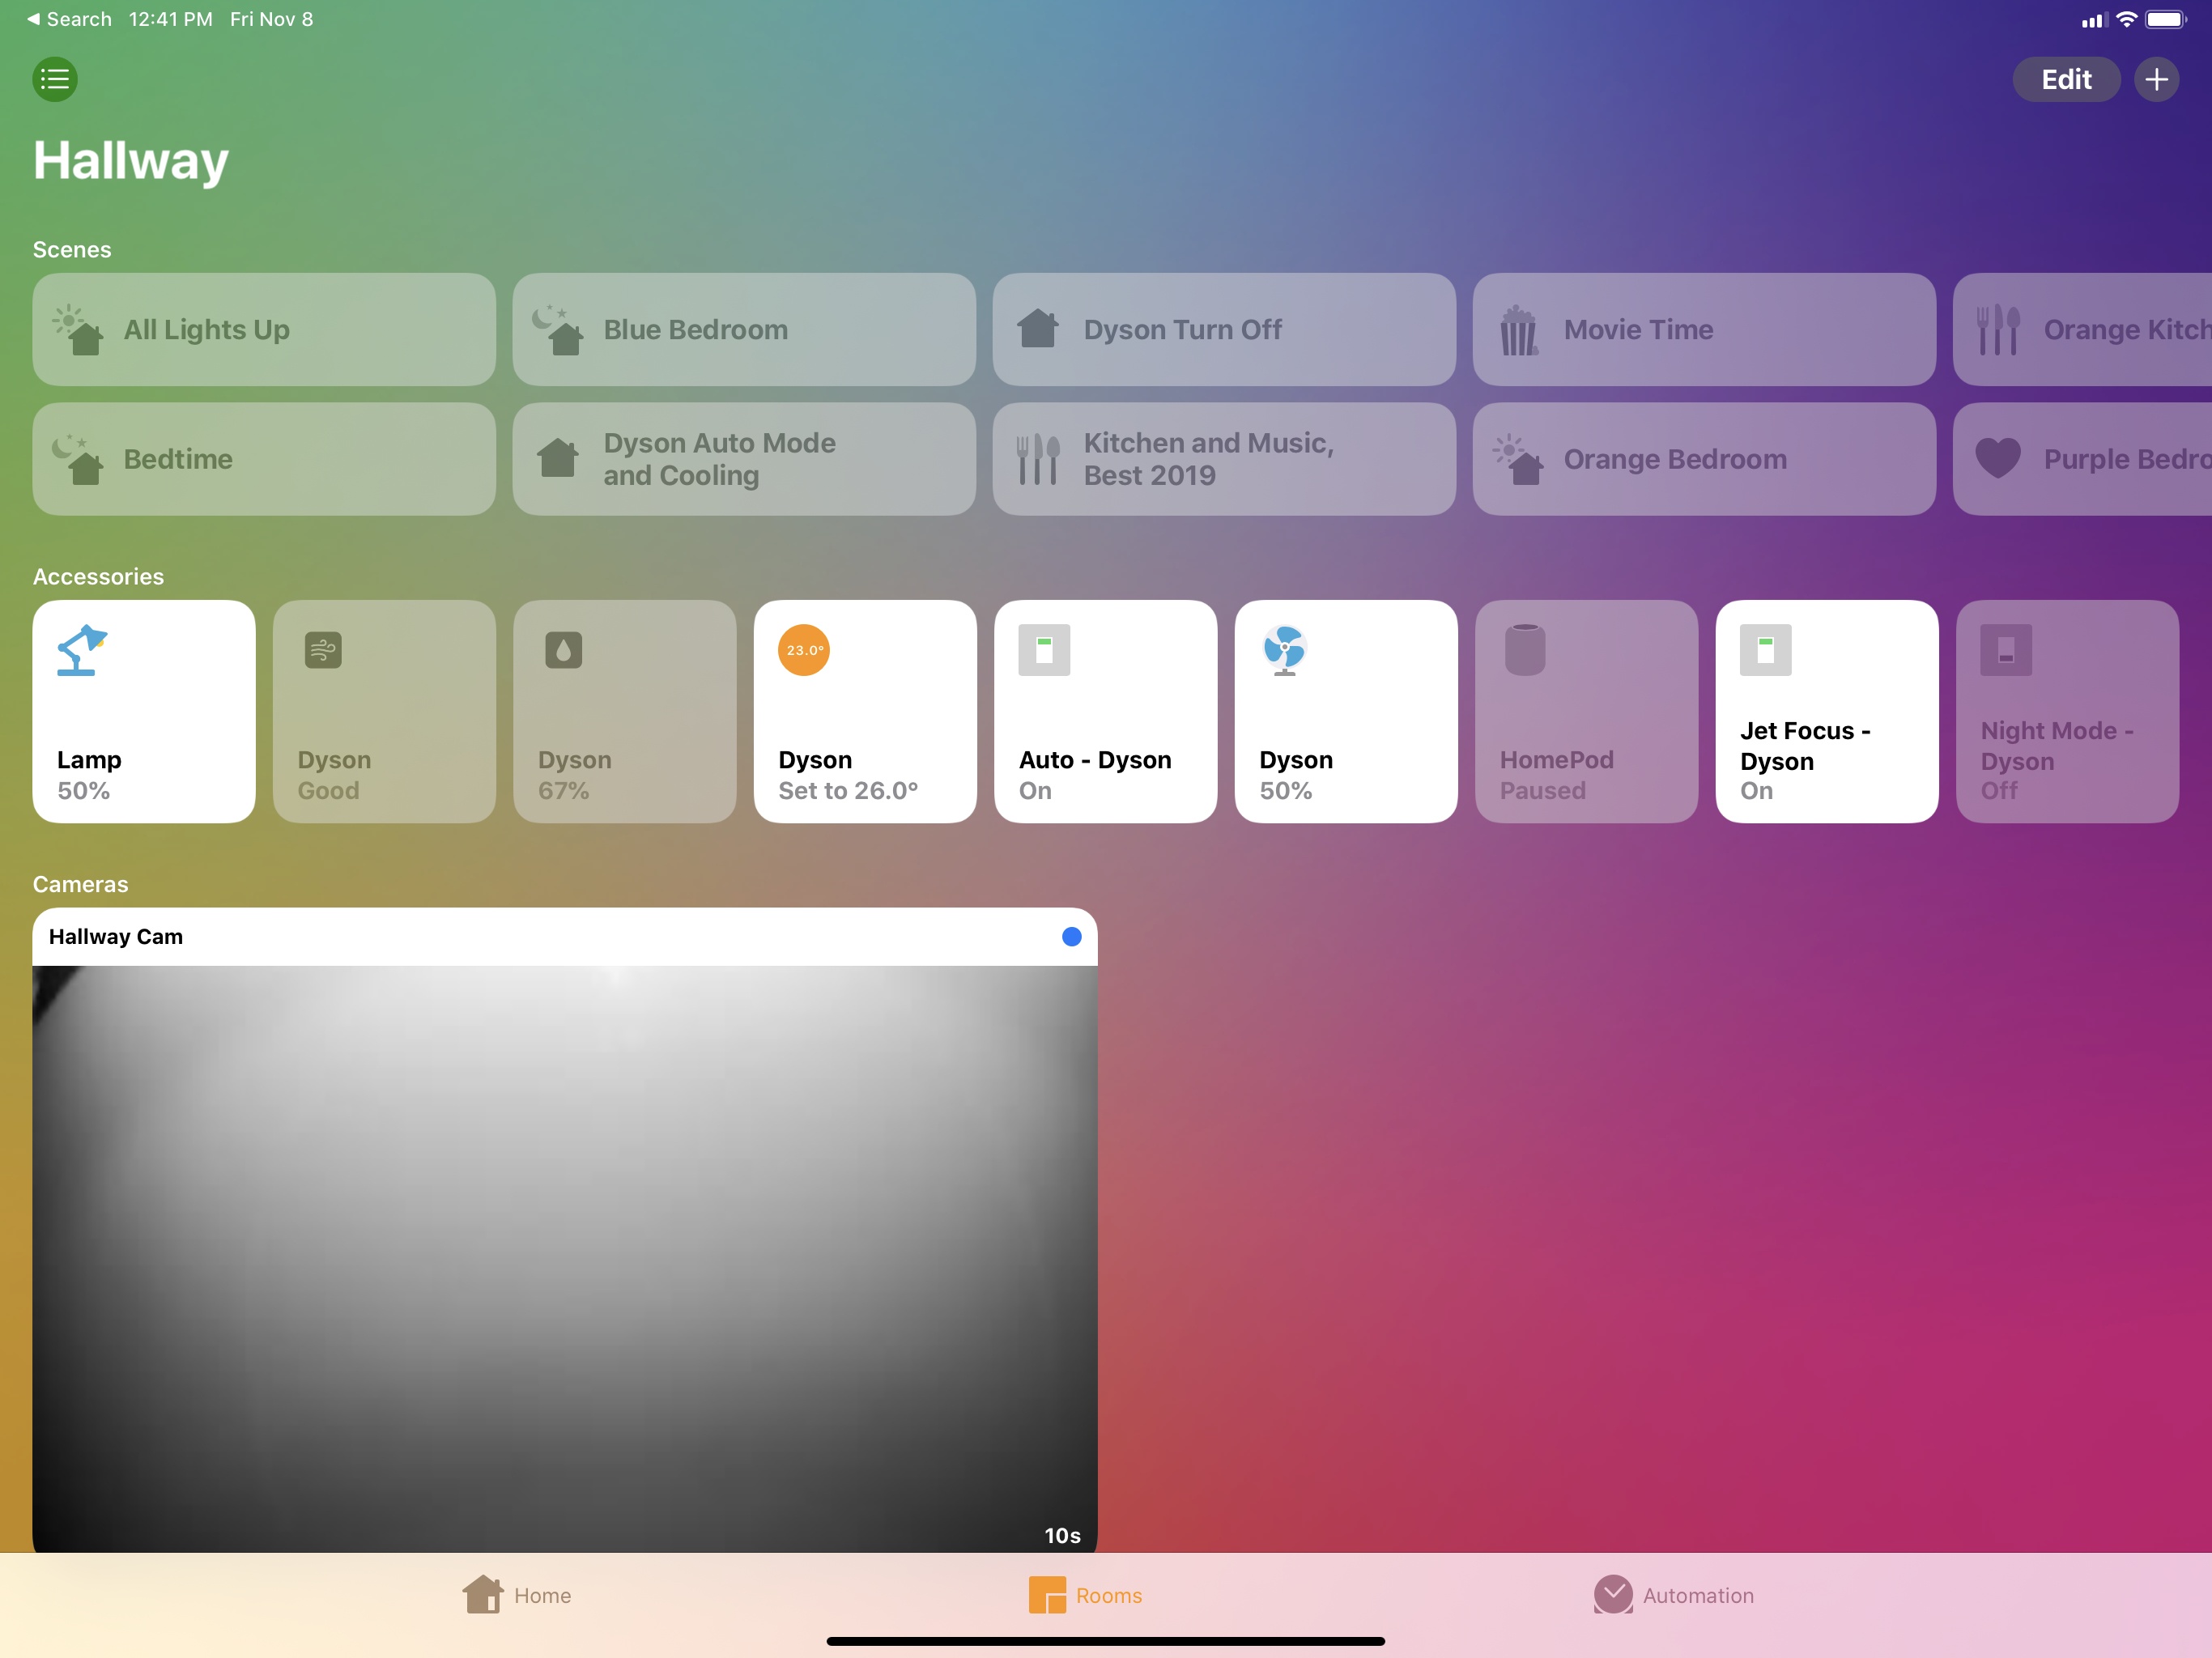
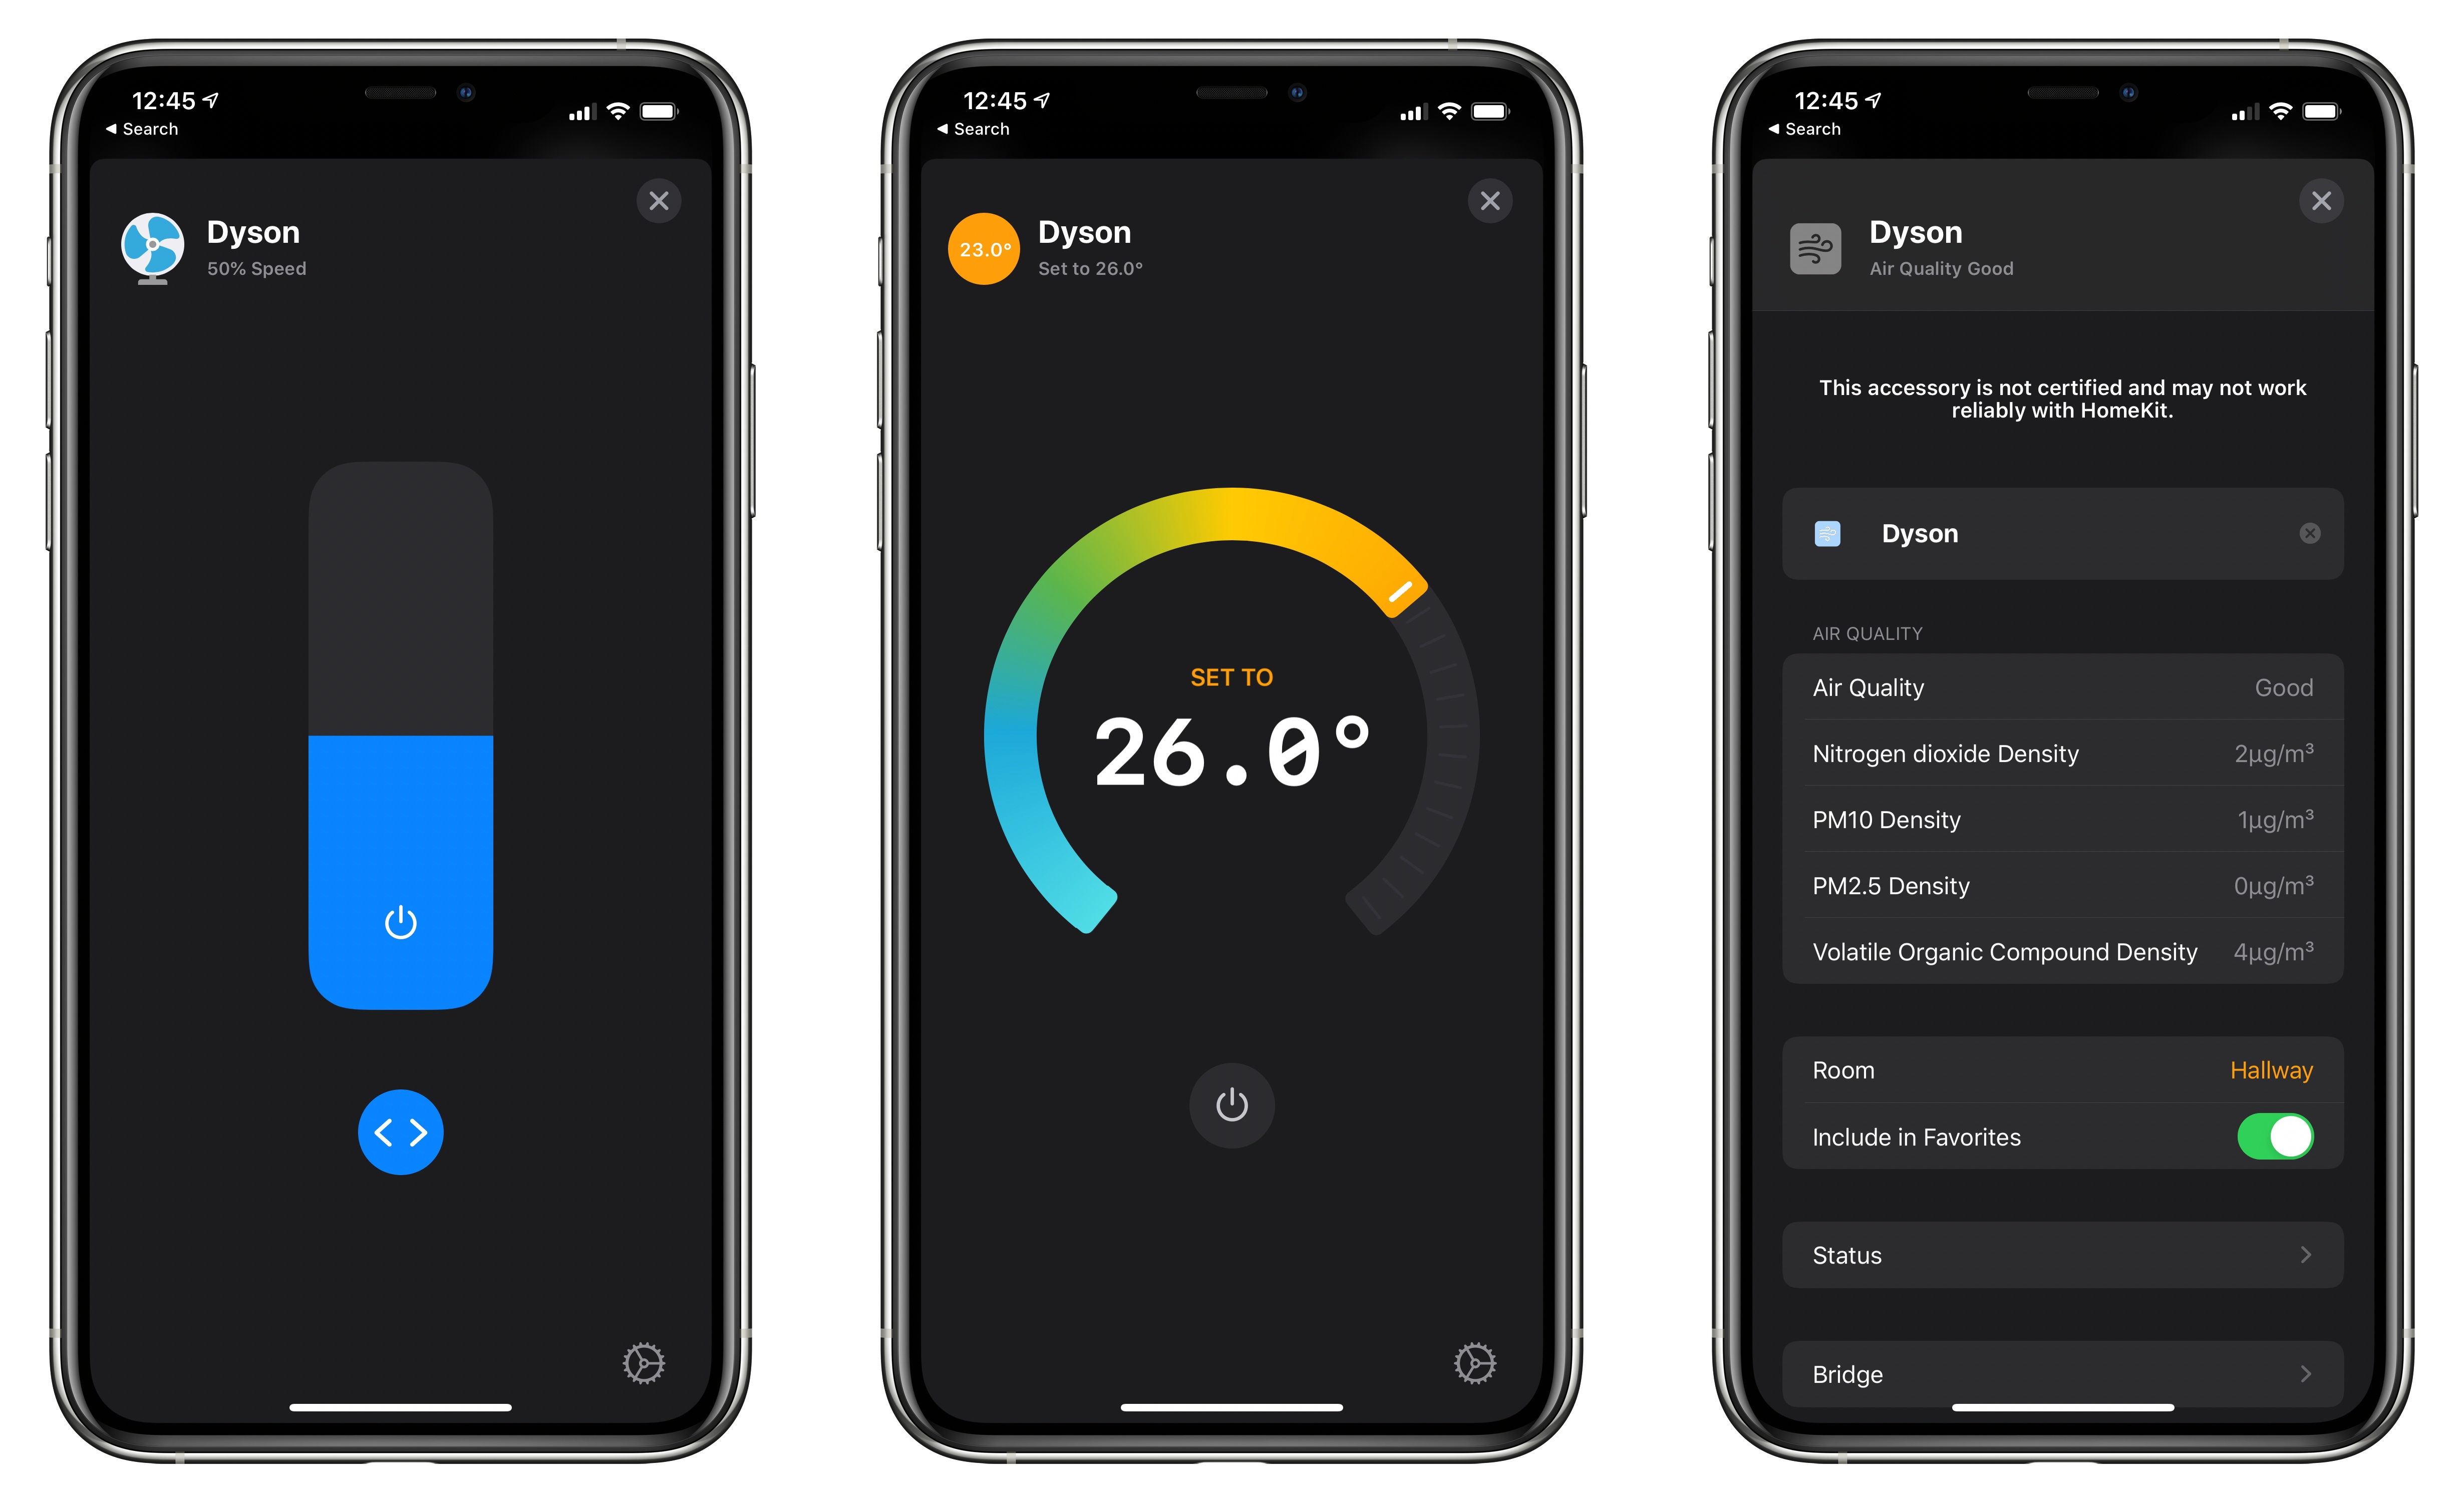
After following the plugin’s installation guide (for step-by-step instructions on how to get homebridge up and running, check out this other guide) and restarting homebridge, the Dyson fan and its related services showed up in the Home app. All I needed to do was ungroup them to show them as separate tiles (a new feature in iOS 13.2) and assign them to the correct room. The plugin I’m using exposes the following features and sensors for my Dyson fan:
- Humidity sensor
- Temperature sensor
- Air quality sensor
- Auto mode
- Night mode
- Jet focus
- Dyson heater accessory (with temperature control)
- Dyson fan accessory (with speed and oscillation control)
Now, all of this is great – I love that I can now choose to control my Dyson fan either with the native app or HomeKit. The advantage of HomeKit compatibility is that I can interact with the fan from any Apple device that supports Siri: I can set the heater’s temperature from the Apple Watch, switch on to auto mode using my HomePod, and even trigger a specific fan speed via Shortcuts on my iPad. The fact that all these features can be mapped to HomeKit with a third-party plugin demonstrates, once again, how it would be entirely feasible for the manufacturer to add official HomeKit support via a software update, but I digress. For now, homebridge is the only way to connect a Dyson Link-enabled fan to HomeKit, and it works well enough.
Controlling a fan manually via the Home app or Siri is fine, but, obviously, I wanted to set up some automations so I wouldn’t have to think about temperature and air quality every day. And this is where my problems started.
My idea was simple enough: I wanted to turn on the fan’s heating mode when indoor temperature dropped under 20 degrees Celsius, and switch back to auto cooling mode once it reached 23º. I have an Eve Room HomeKit temperature sensor in the bedroom (which tends to be the coldest room of the house) next to the hallway, which seemed like the perfect opportunity for automation. If the bedroom starts to get chilly, I want the Dyson’s heater to turn on and wait until it’s at a comfortable level again.
As it turns out, HomeKit makes this process oddly challenging. The HomeKit framework has support for triggers based on thresholds and value ranges – conditions such as “if the temperature changes” or “if humidity is between 50% and 70%”. At an API level, these features are part of the HomeKit framework and they’re natively understood by the Home app and Home hubs. But you can’t create these triggers in Apple’s Home app – you have to use a third-party app to create an automation with triggers that the Home app already understands.
Here’s what I wrote in my iOS 11 review back in 2017:
Furthermore, iOS 11 brings triggers based on accessory state with value ranges. Strangely though, this option is only exposed in the HomeKit API and Apple doesn’t use it in their Home app.
This new kind of trigger works with thresholds: for instance, if the living room’s temperature falls under 18˚, or if humidity in the bedroom is between 50% and 70%, some actions will execute. If you have sensors that monitor specific conditions, these triggers will grant you the flexibility to design powerful and intelligent automations; imagine the ability to turn on the AC only when a certain temperature threshold is met, or to run a sprinkler scene when the humidity outside is low.
Value-based triggers worked well in my tests with Hue lights and Elgato sensors, but the lack of native support for these rules in the Home app was an annoying limitation. I was able to test this feature using Matthias Hochgatterer’s Home app – both design and functionality-wise, a powerful and intuitive HomeKit dashboard superior to Apple’s.
Unfortunately, this is still very much the case in 2019: to create a HomeKit automation that triggers when the temperature drops below 20 degrees, I had to use a third-party app. Once the automation was created, it showed up in Apple’s Home app as a native automation. I might have understood this limitation as one of iOS 11’s early launch woes, but two years later…the lack of support for these triggers in Apple’s Home app boggles the mind. When you consider this and several other issues that affect HomeKit today, it’s no surprise Apple may be looking to reboot the entire initiative.
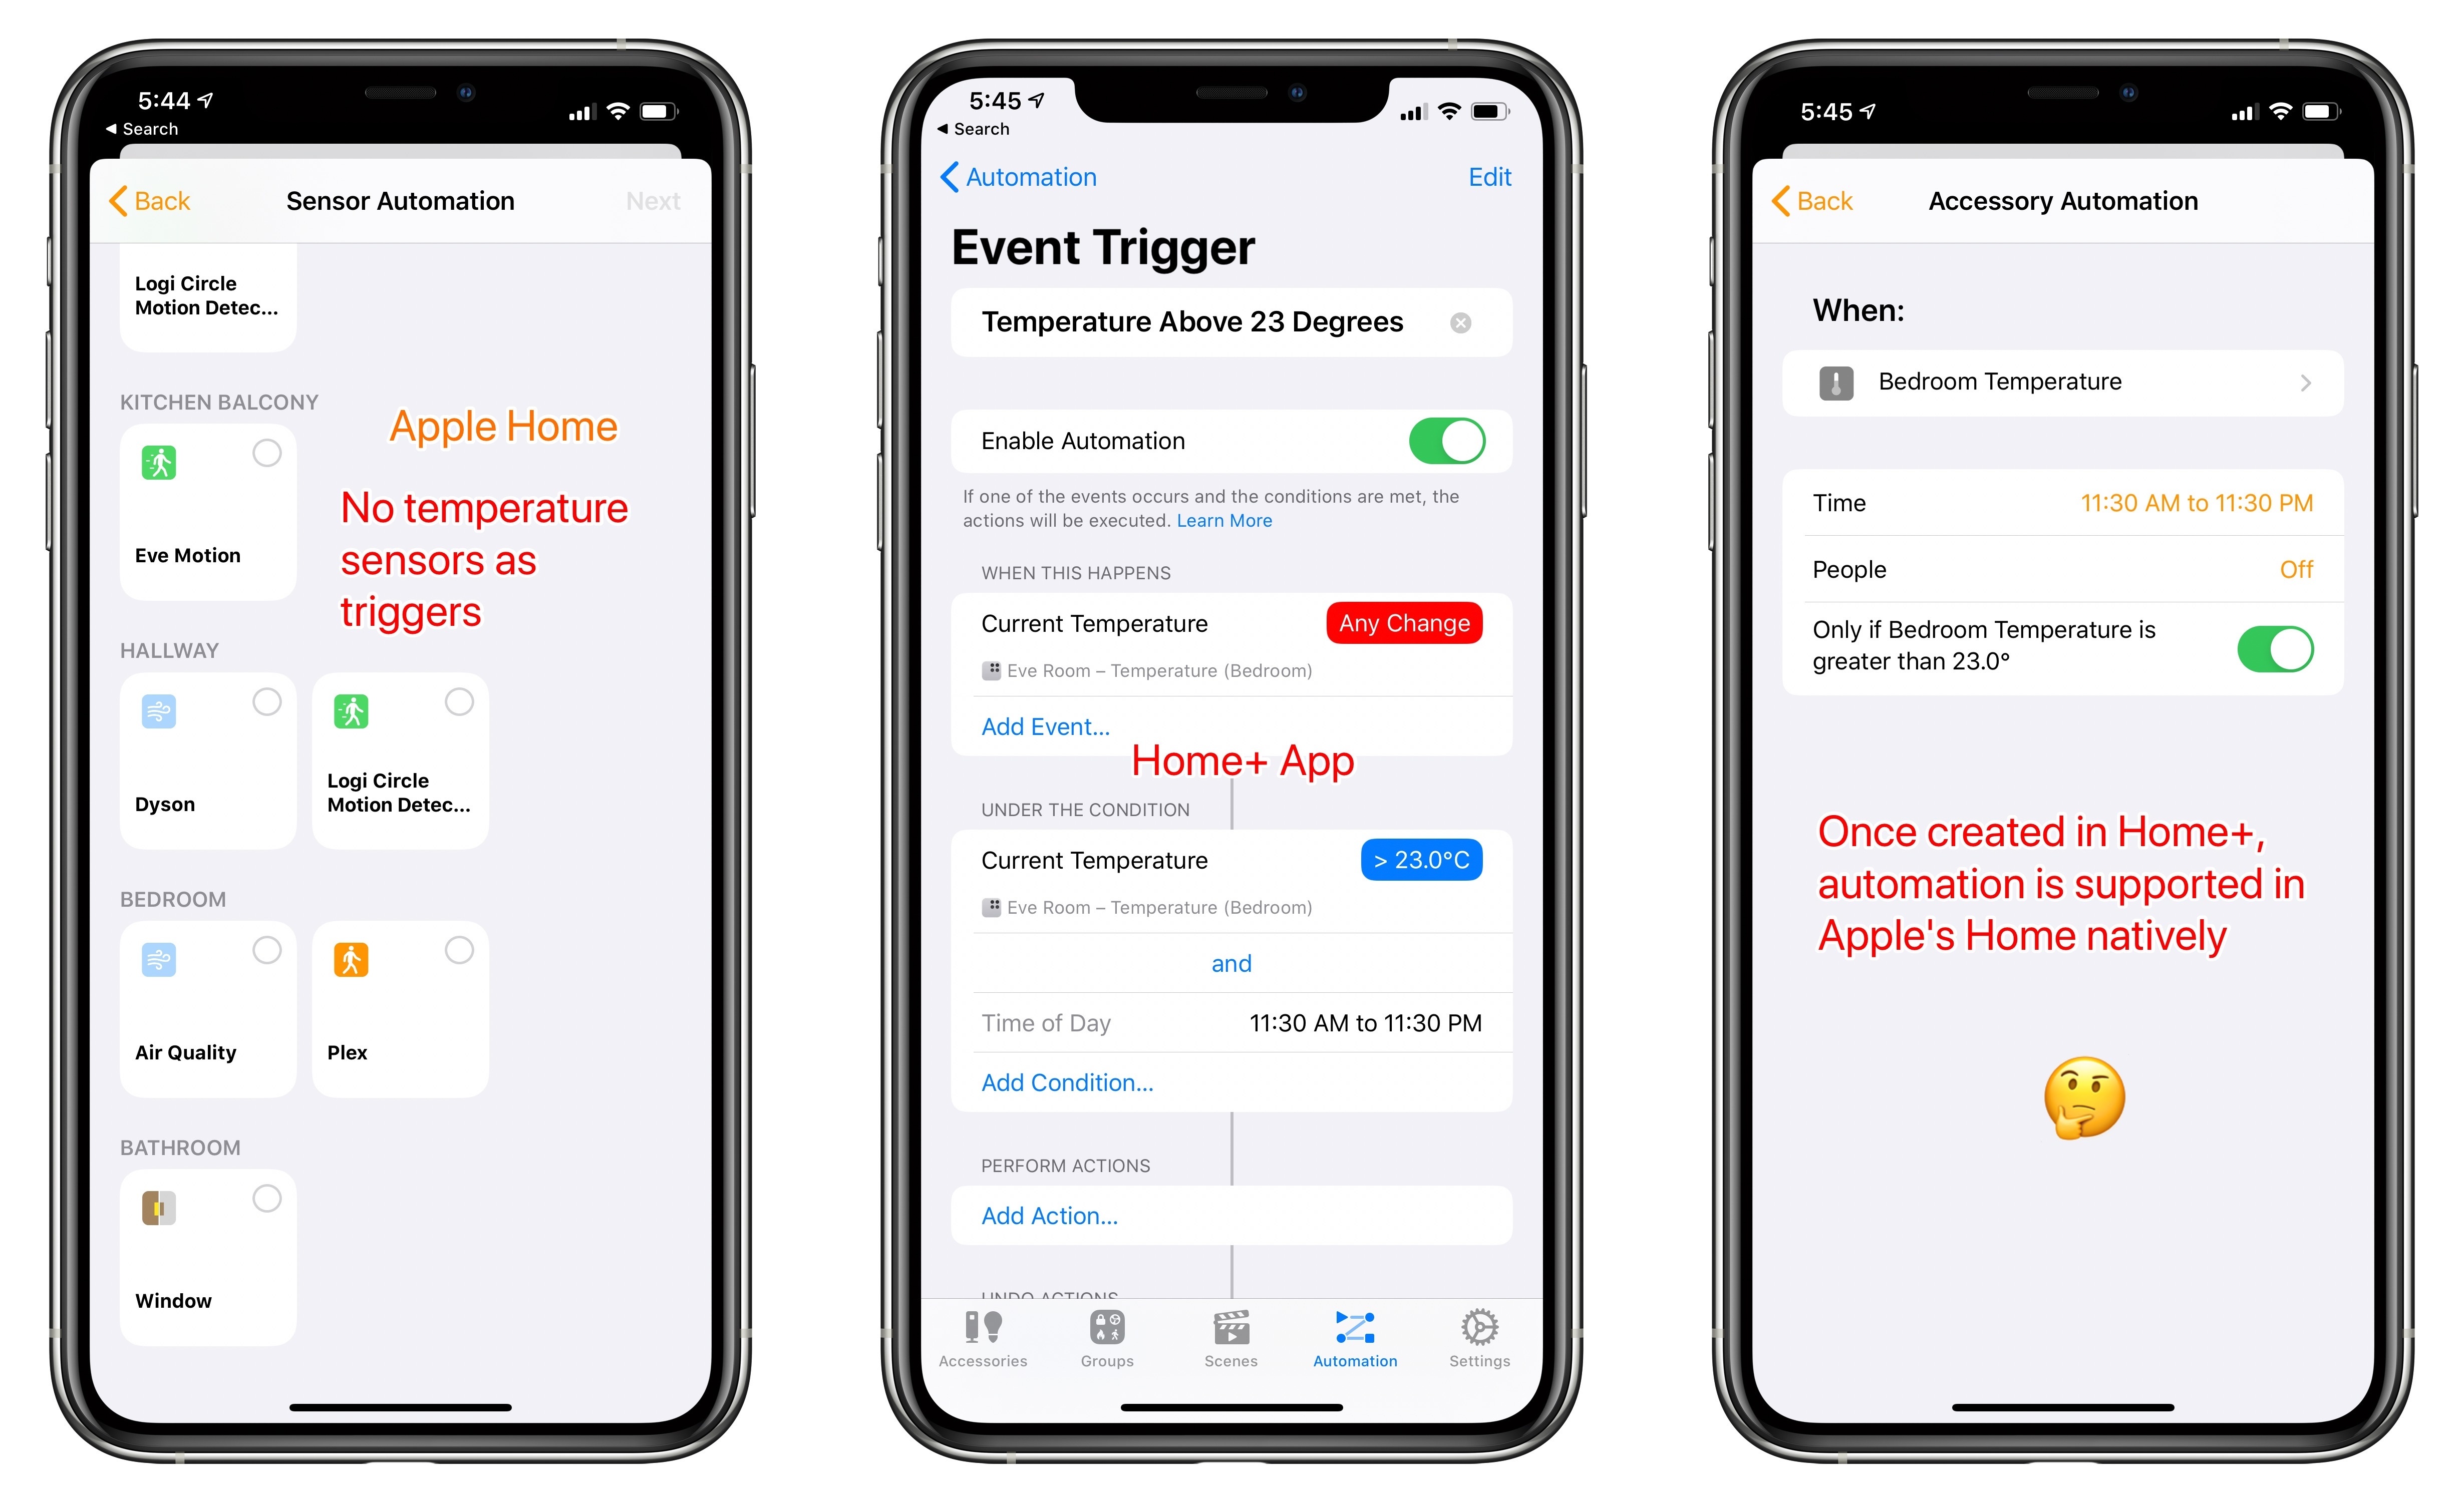
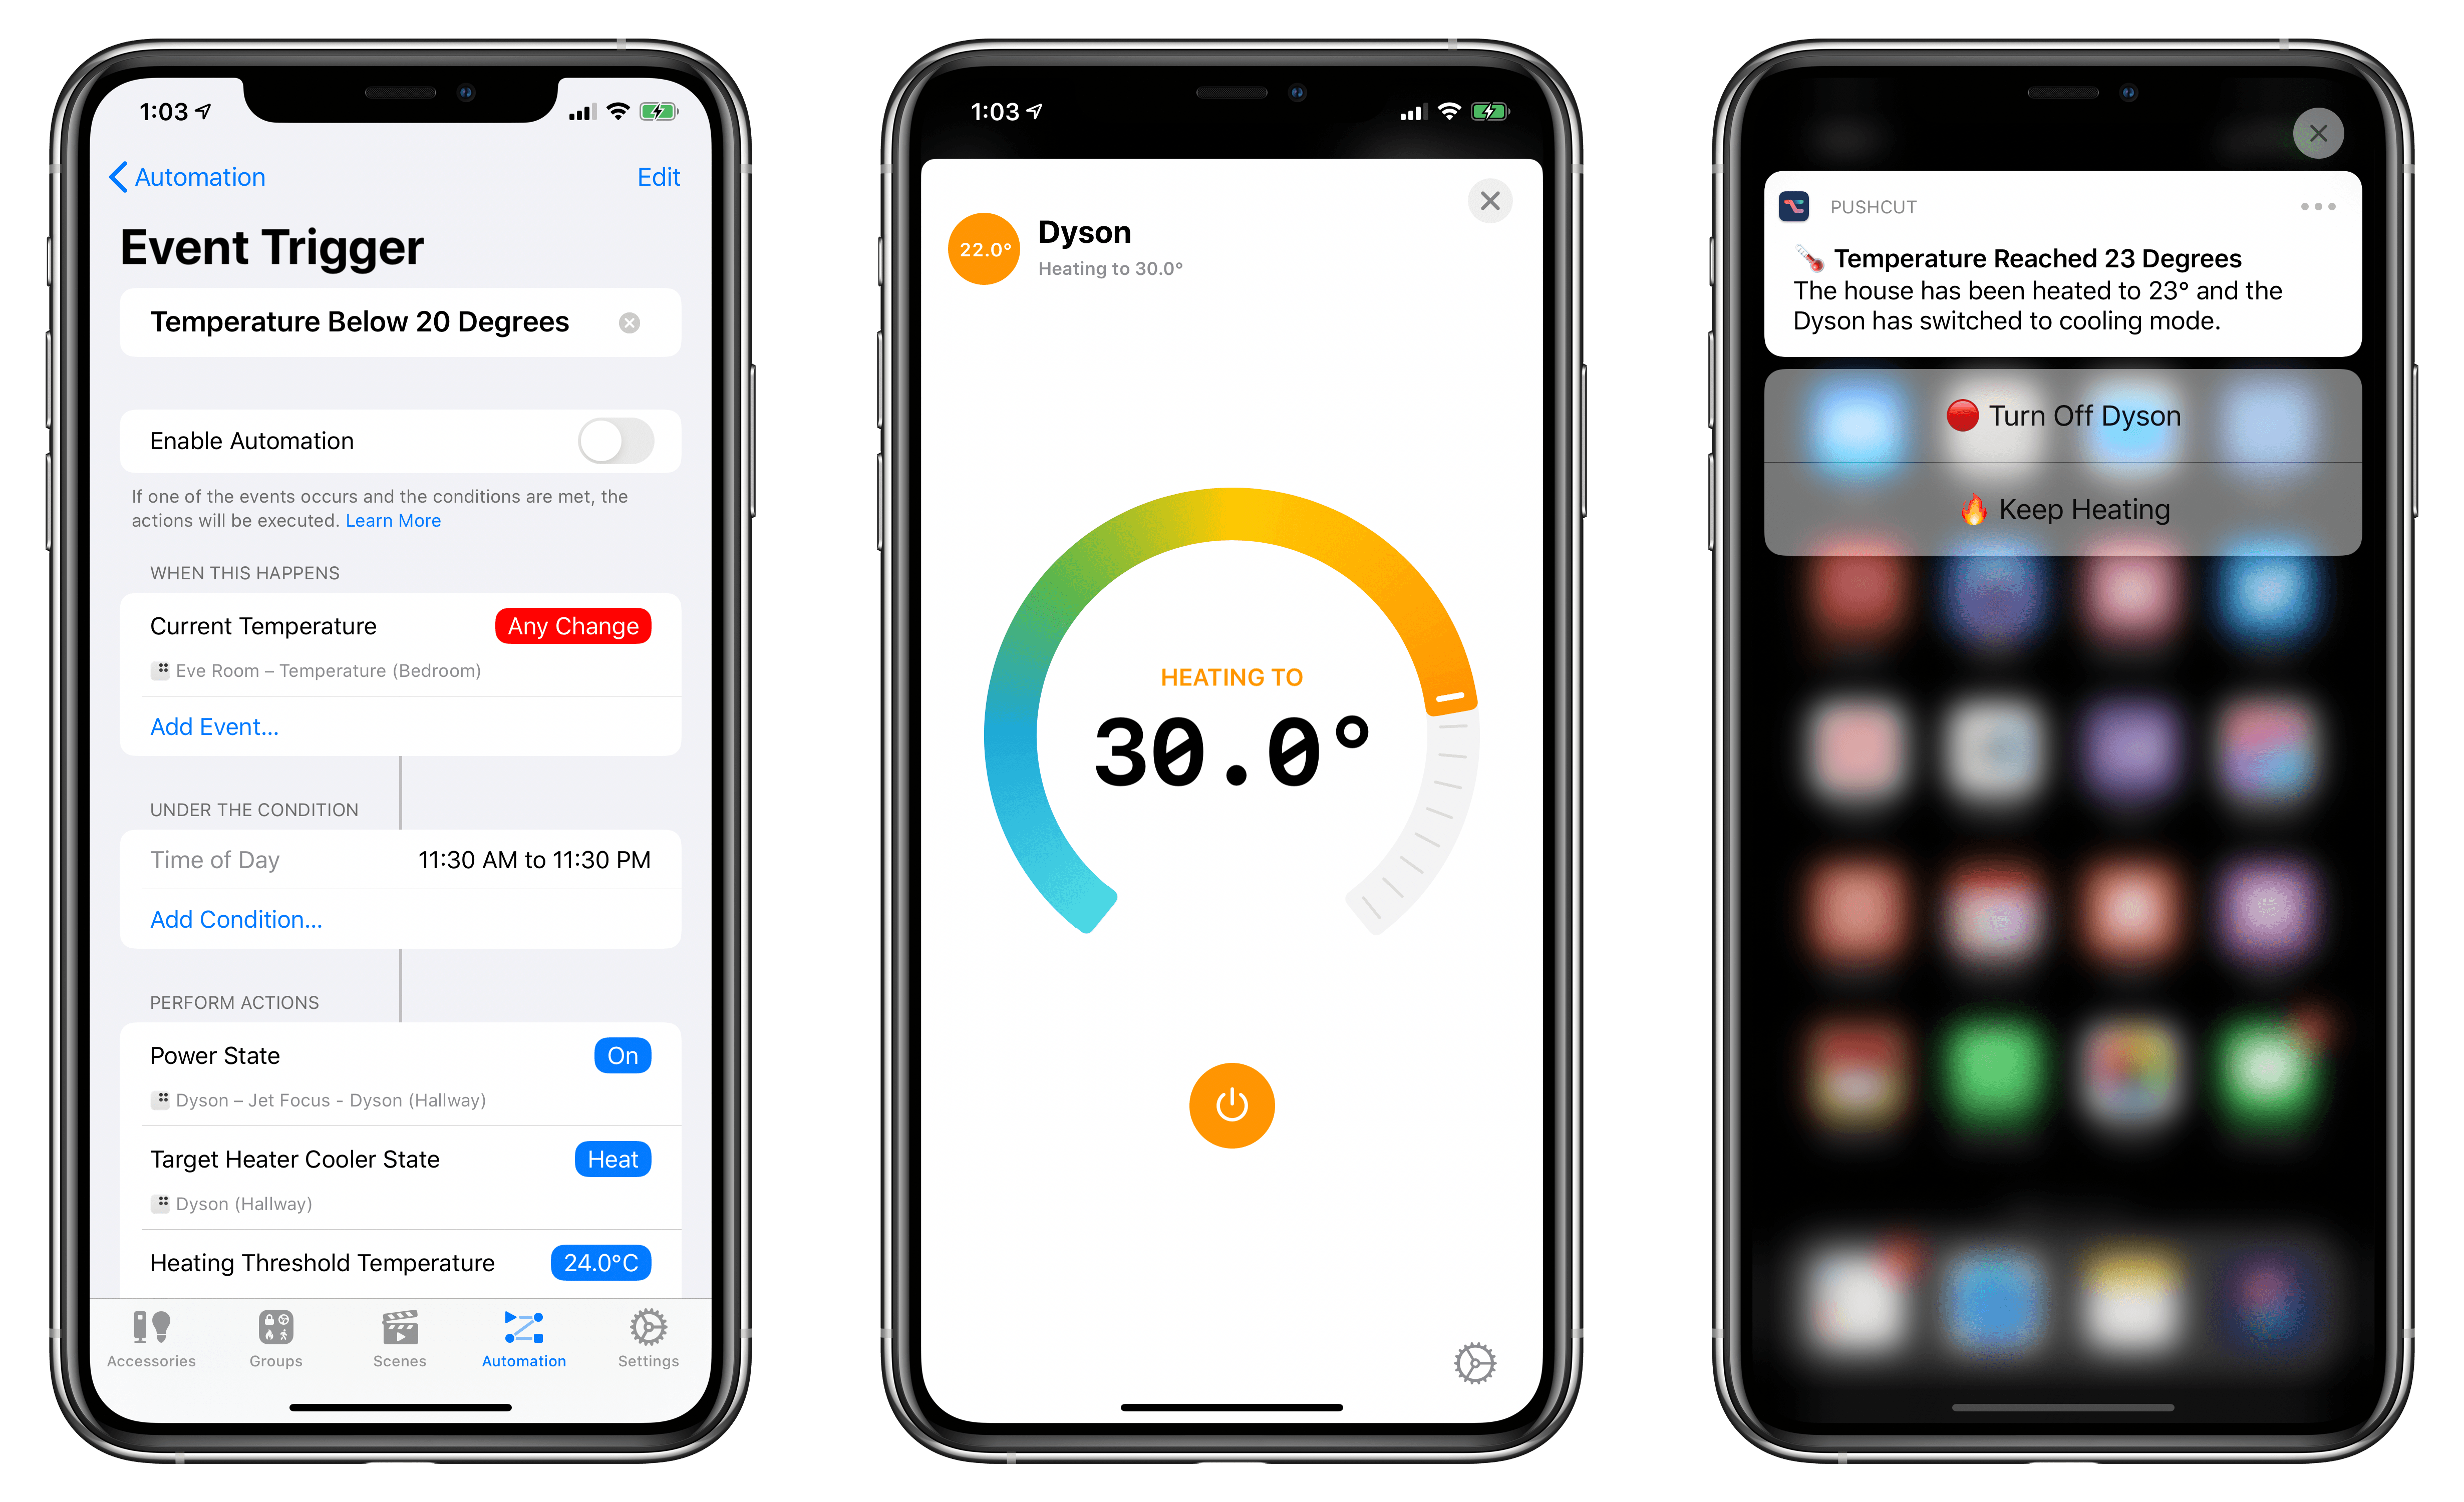
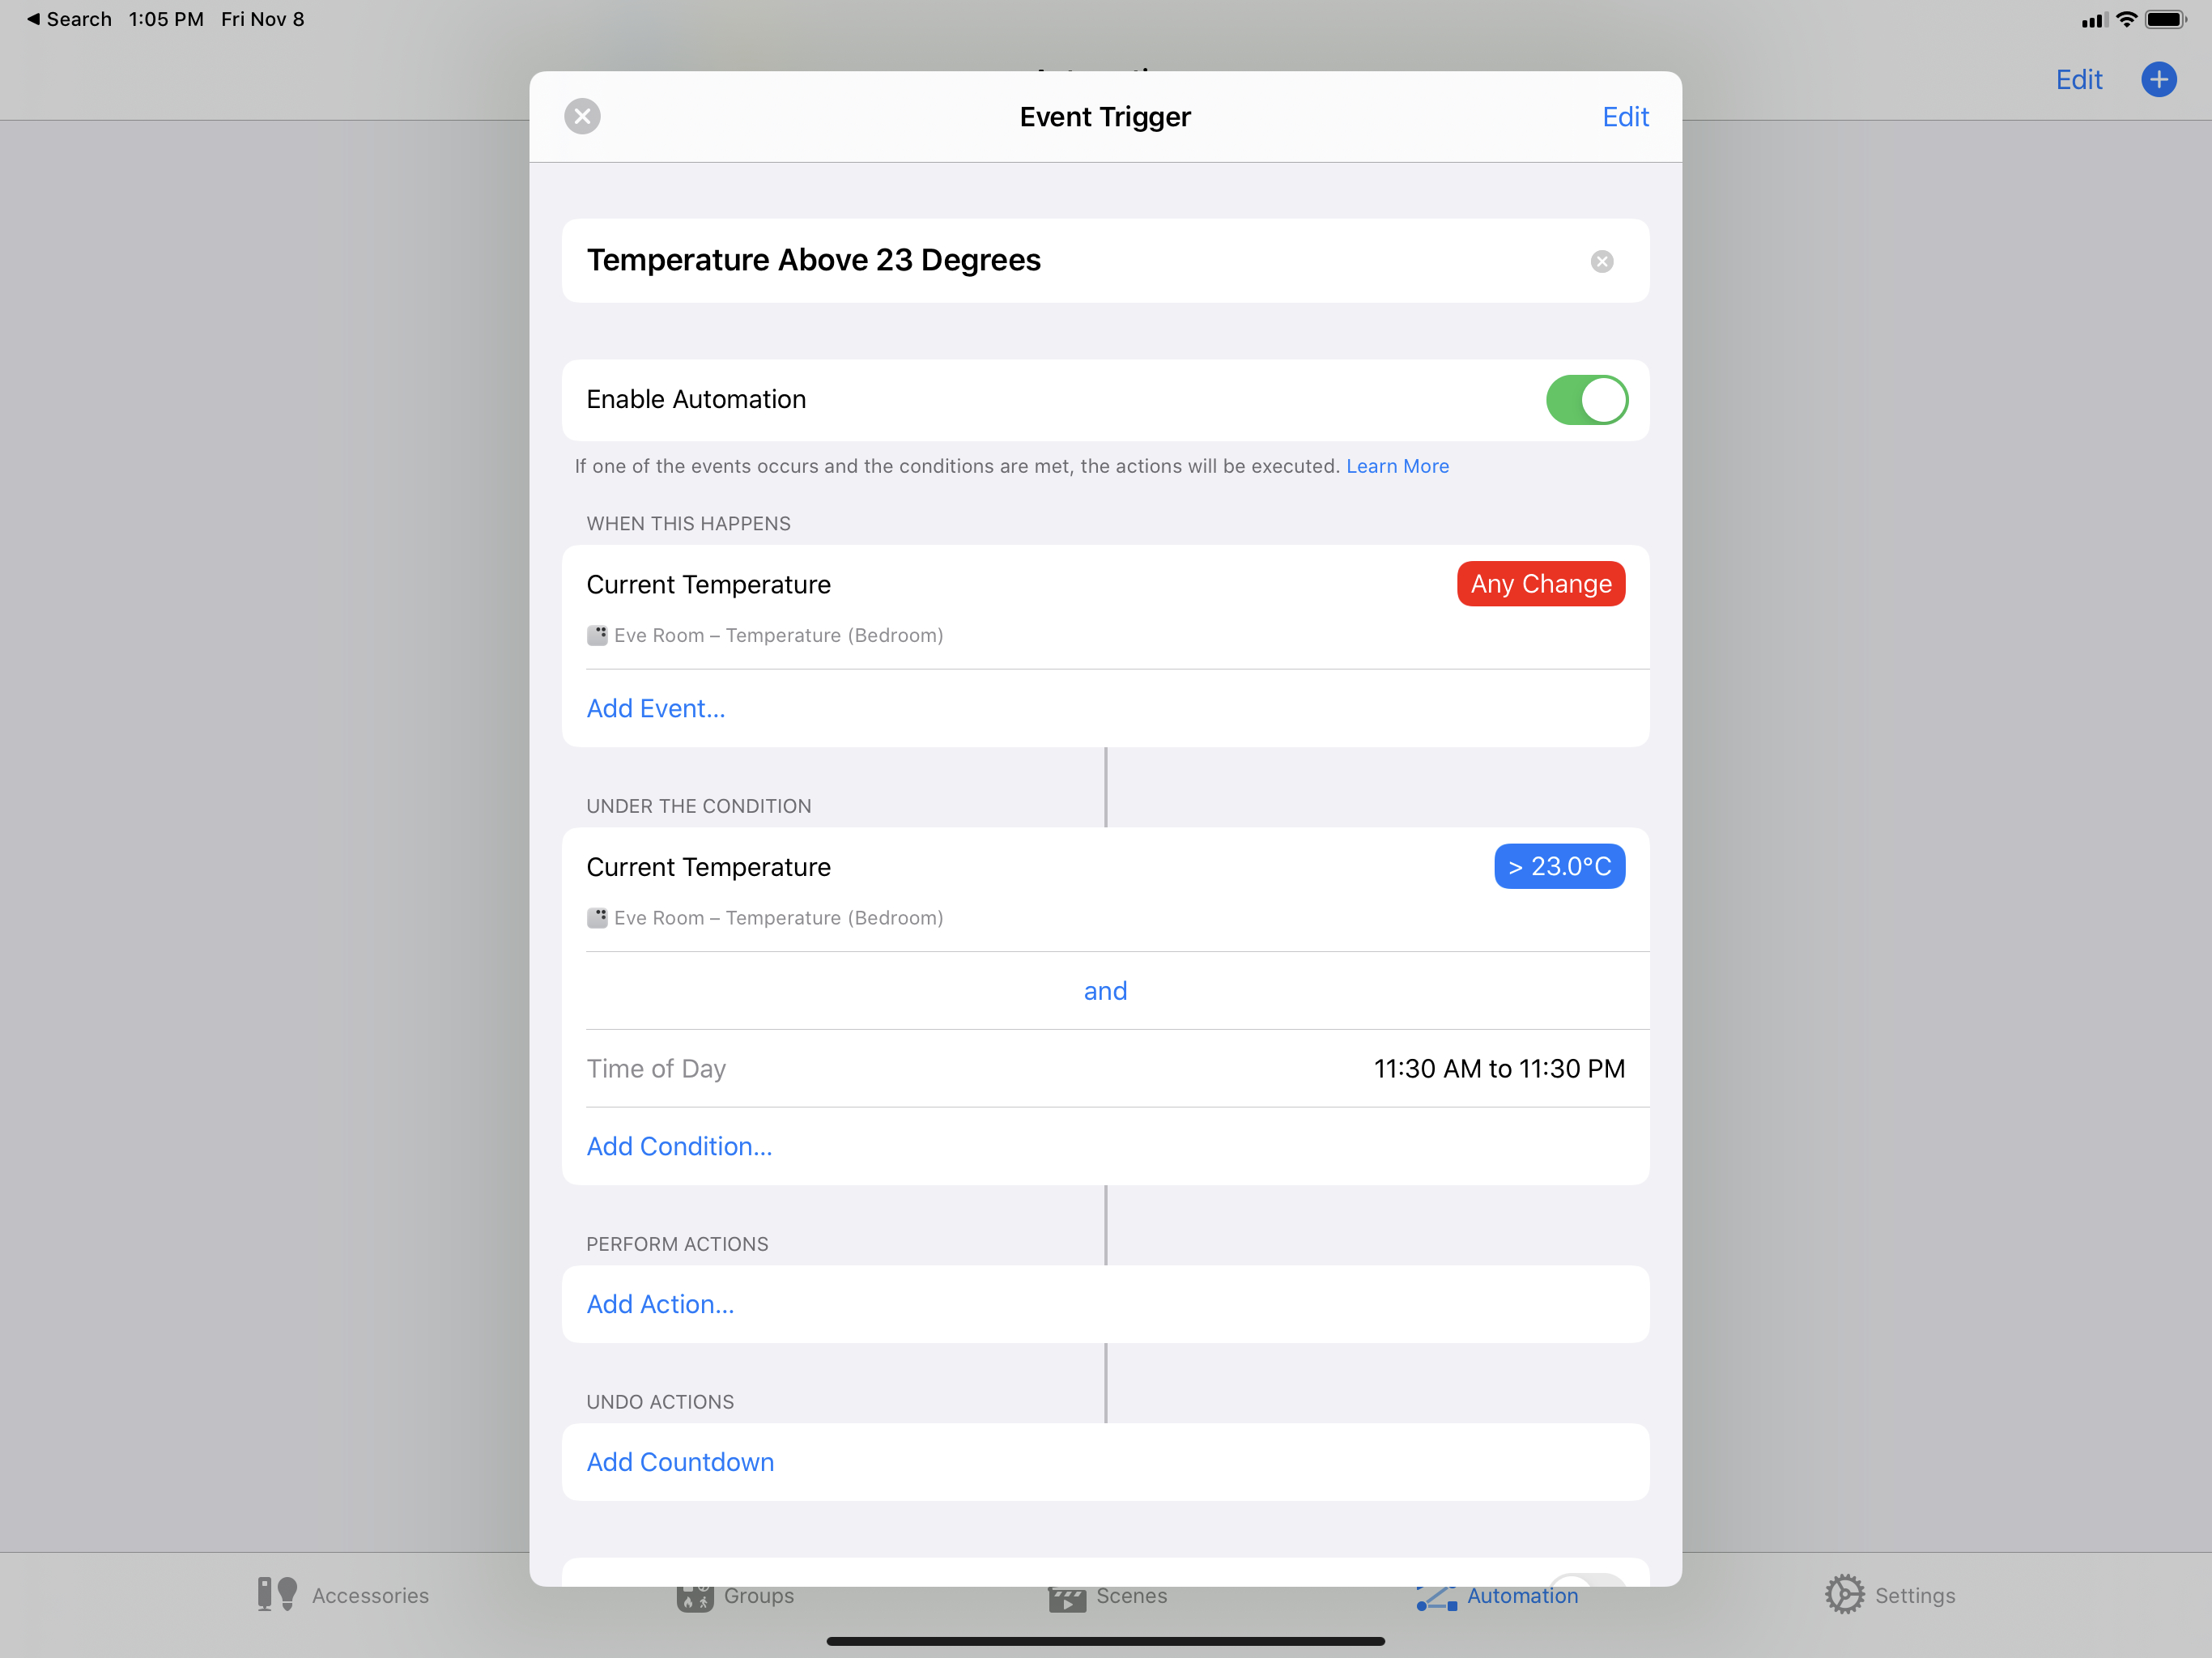
So, just like in 2017, I had to create automations based on temperature triggers in Matthias Hochgatterer’s (newly renamed) Home+ app. Fortunately, his app makes it easy to get started with value-based triggers: with an action editor reminiscent of Shortcuts, all I had to do was pick my temperature sensor, set conditions, and save the automation without enabling it (I’ll get to this in a minute). The rules are the following:
- When the Eve Room temperature changes to any value (trigger);
- If it’s between 11:30 AM and 11:30 PM (condition);
- And if the temperature is greater/lower than [value] (condition);
- Turn [on/off] the Dyson (action).
In the editor, here’s what the automation looks like:
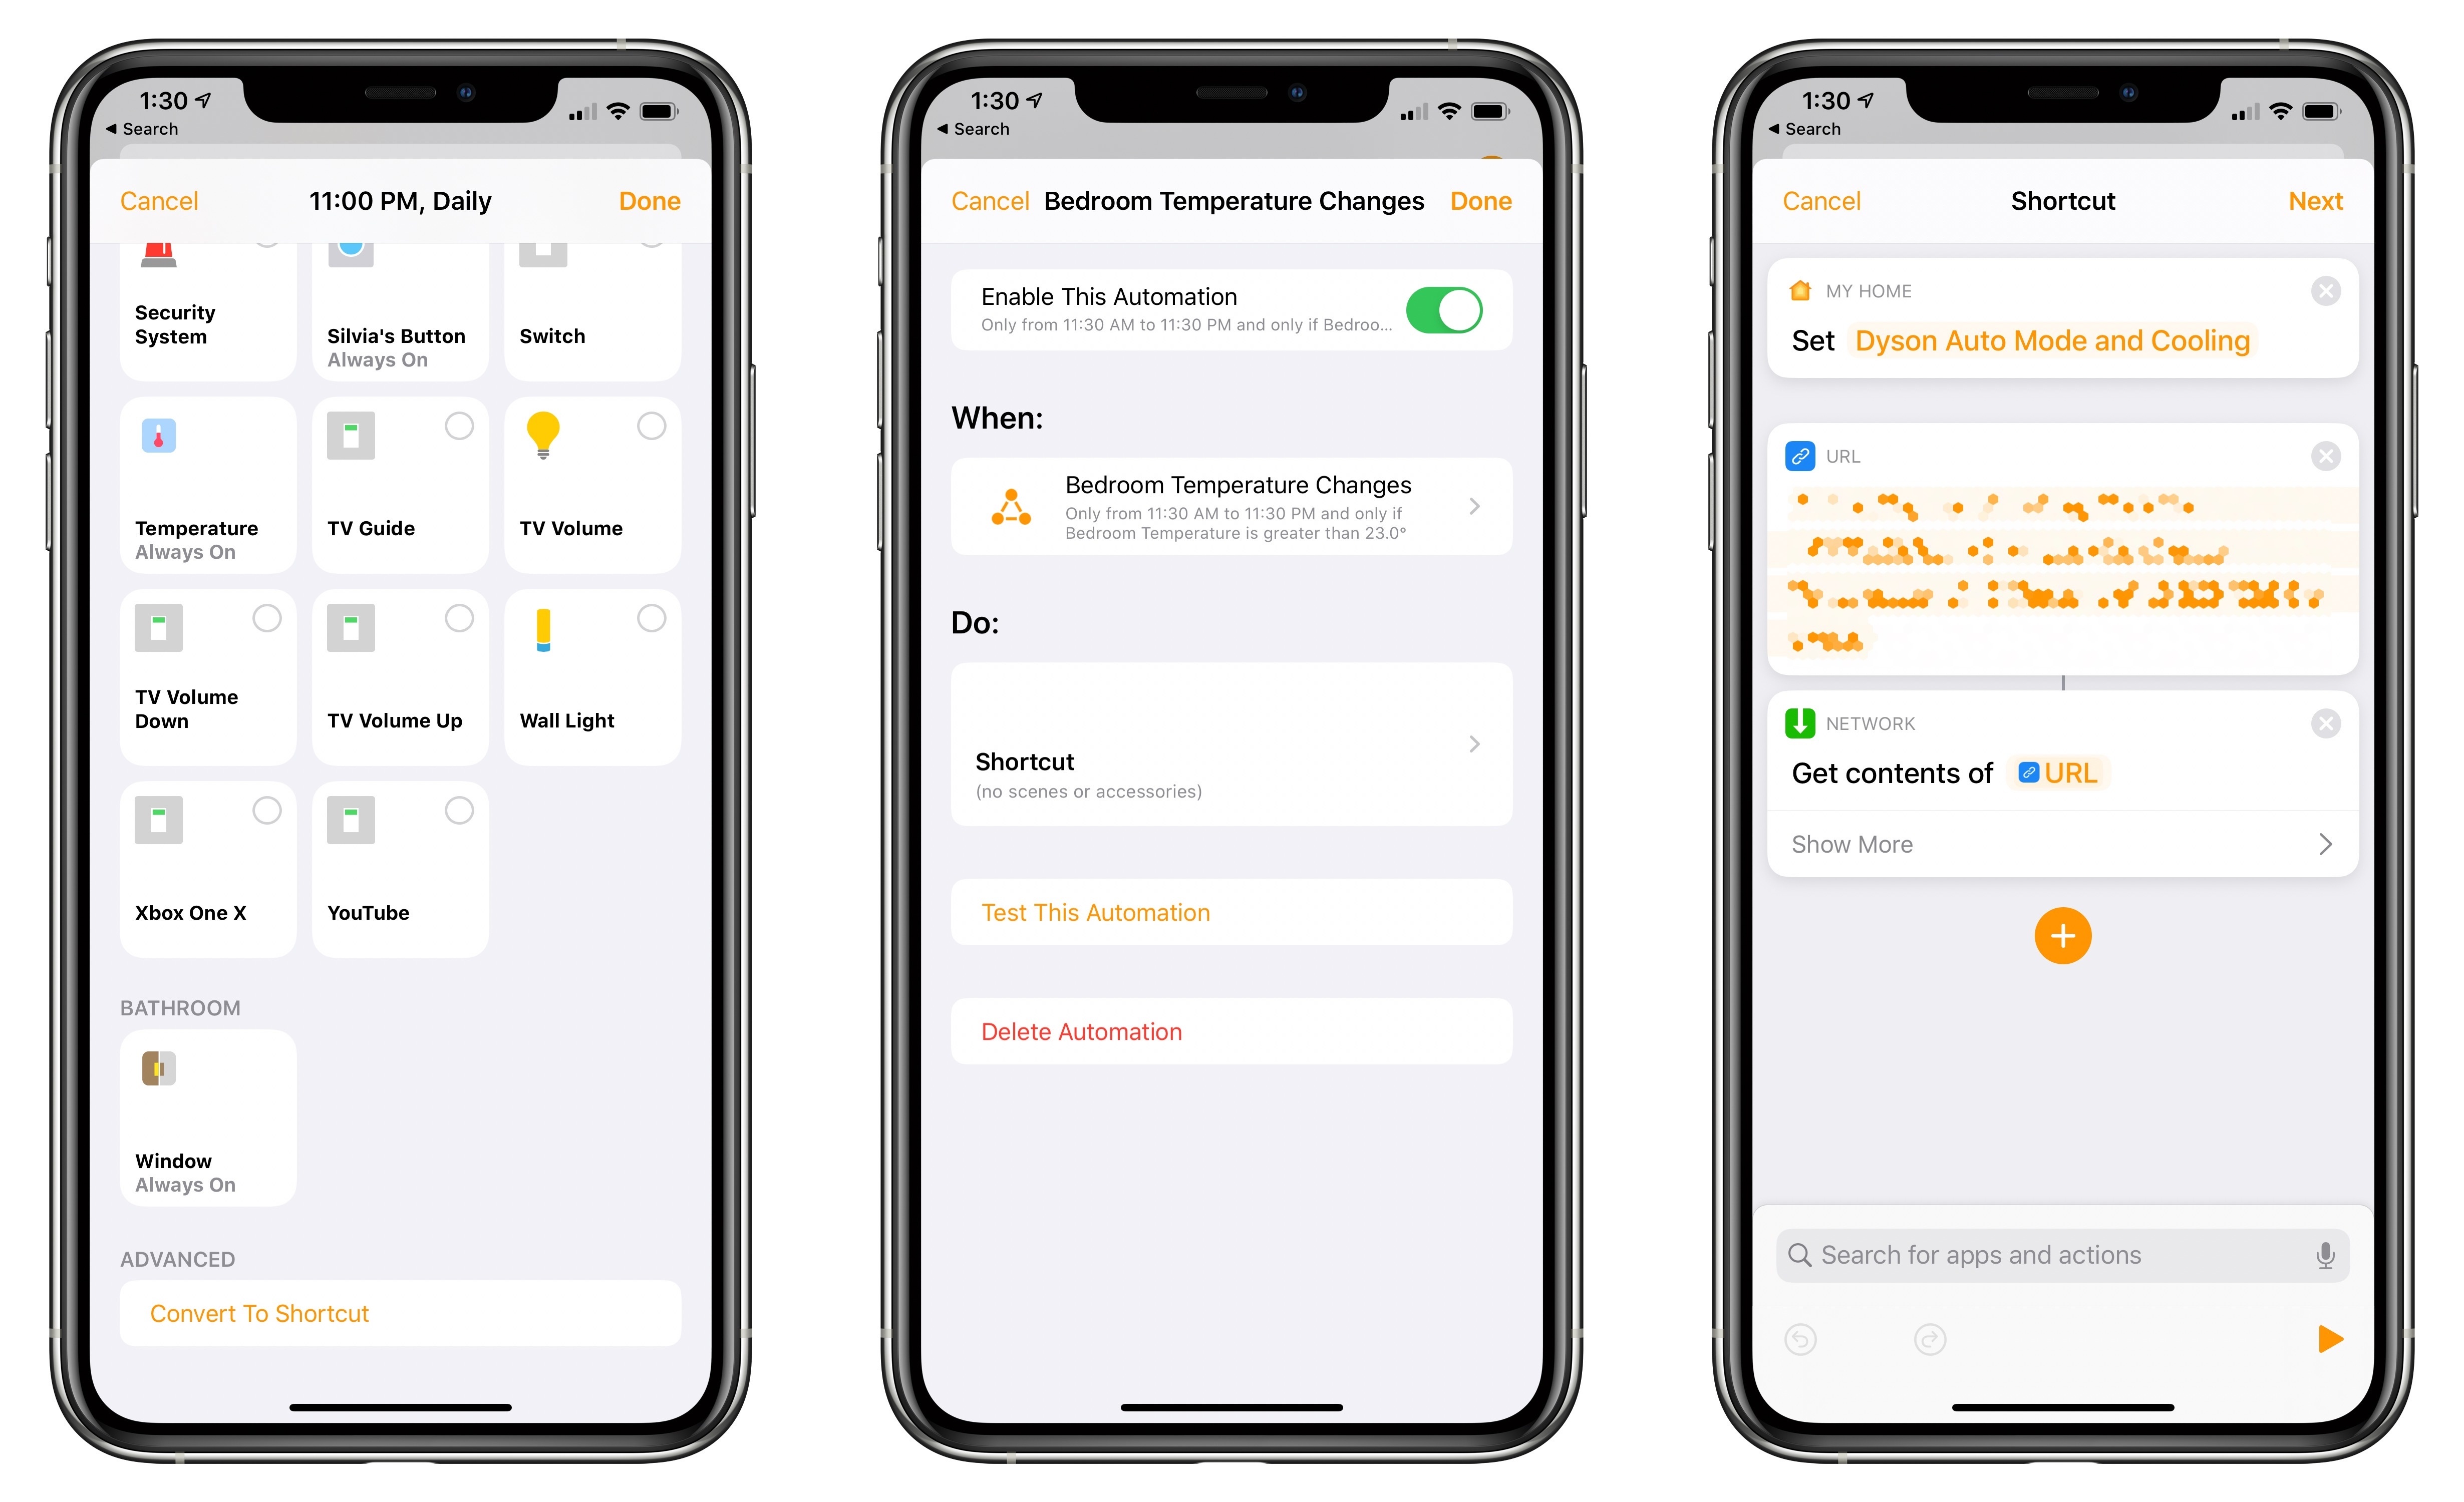
I saved the automation without actions because the feature I wanted to access can only be set up in Apple’s Home app for iOS 13. As I detailed in September, the Home app now offers the option of running a shortcut as part of an automation. I explained how all this works in this section of my iOS 13 review, but to recap: the Home app has access to a subset of Shortcuts actions, which you can mix and match with existing accessories and scenes using the Shortcuts editor inside the Home app. To run a shortcut when an automation triggers, you need to select ‘Convert To Shortcut’ at the bottom of the ‘Select Accessories and Scenes’ page, as pictured below:
In my case, I needed to convert the action to a shortcut because I didn’t just want to toggle the Dyson’s power or cooling state: I also wanted to be notified about it and, if necessary, take action on the Dyson’s new state immediately, right from the notification. Which brings me to Pushcut.
Pushcut is a utility that launched earlier this year, offering the ability to launch shortcuts from push notifications, which you can create by choosing from different types of triggers. I didn’t pay much attention to Pushcut when it first came out, then I started working on my iOS 13 review in the summer and forgot about it. A few weeks ago, I came across this review of the latest version of Pushcut and realized just how far this utility has come over the past few months. Now in addition to launching a shortcut from a push notification, Pushcut lets you run HomeKit scenes and perform requests to web APIs – in the background, with one tap, on any Apple device, including the Apple Watch. The app has a fair business model that includes subscriptions (to cover recurring server costs of the service that sends push notifications) with multiple tiers (for those who don’t need the extra advanced features), plus a one-time lifetime purchase option. Pushcut has grown into an incredibly powerful companion utility for Shortcuts and HomeKit on Apple platforms, and I’m excited to start digging into its more advanced functionalities.
Pushcut’s appeal over other push notification services such as Pushover is twofold: the app lets you design your own rich notifications with multiple buttons to run different actions in the background; and, Pushcut lets you trigger HomeKit scenes with a single tap on a notification’s action. I haven’t seen these features in any other push notification service with an iOS app, which makes Pushcut the premiere companion utility for Shortcuts and Home on iOS. I genuinely believe that if Apple ever plans to revamp Shortcuts’ ‘Send Notification’ action, they should take a look at what Pushcut lets you create.
But back to my Dyson automations. In Pushcut, I created two notifications (one for switching to heating mode, the other for cooling) and assigned HomeKit actions to them. This can be done with a couple taps in Pushcut’s notification editor, which also lets you customize the notification’s title, description, and action labels:
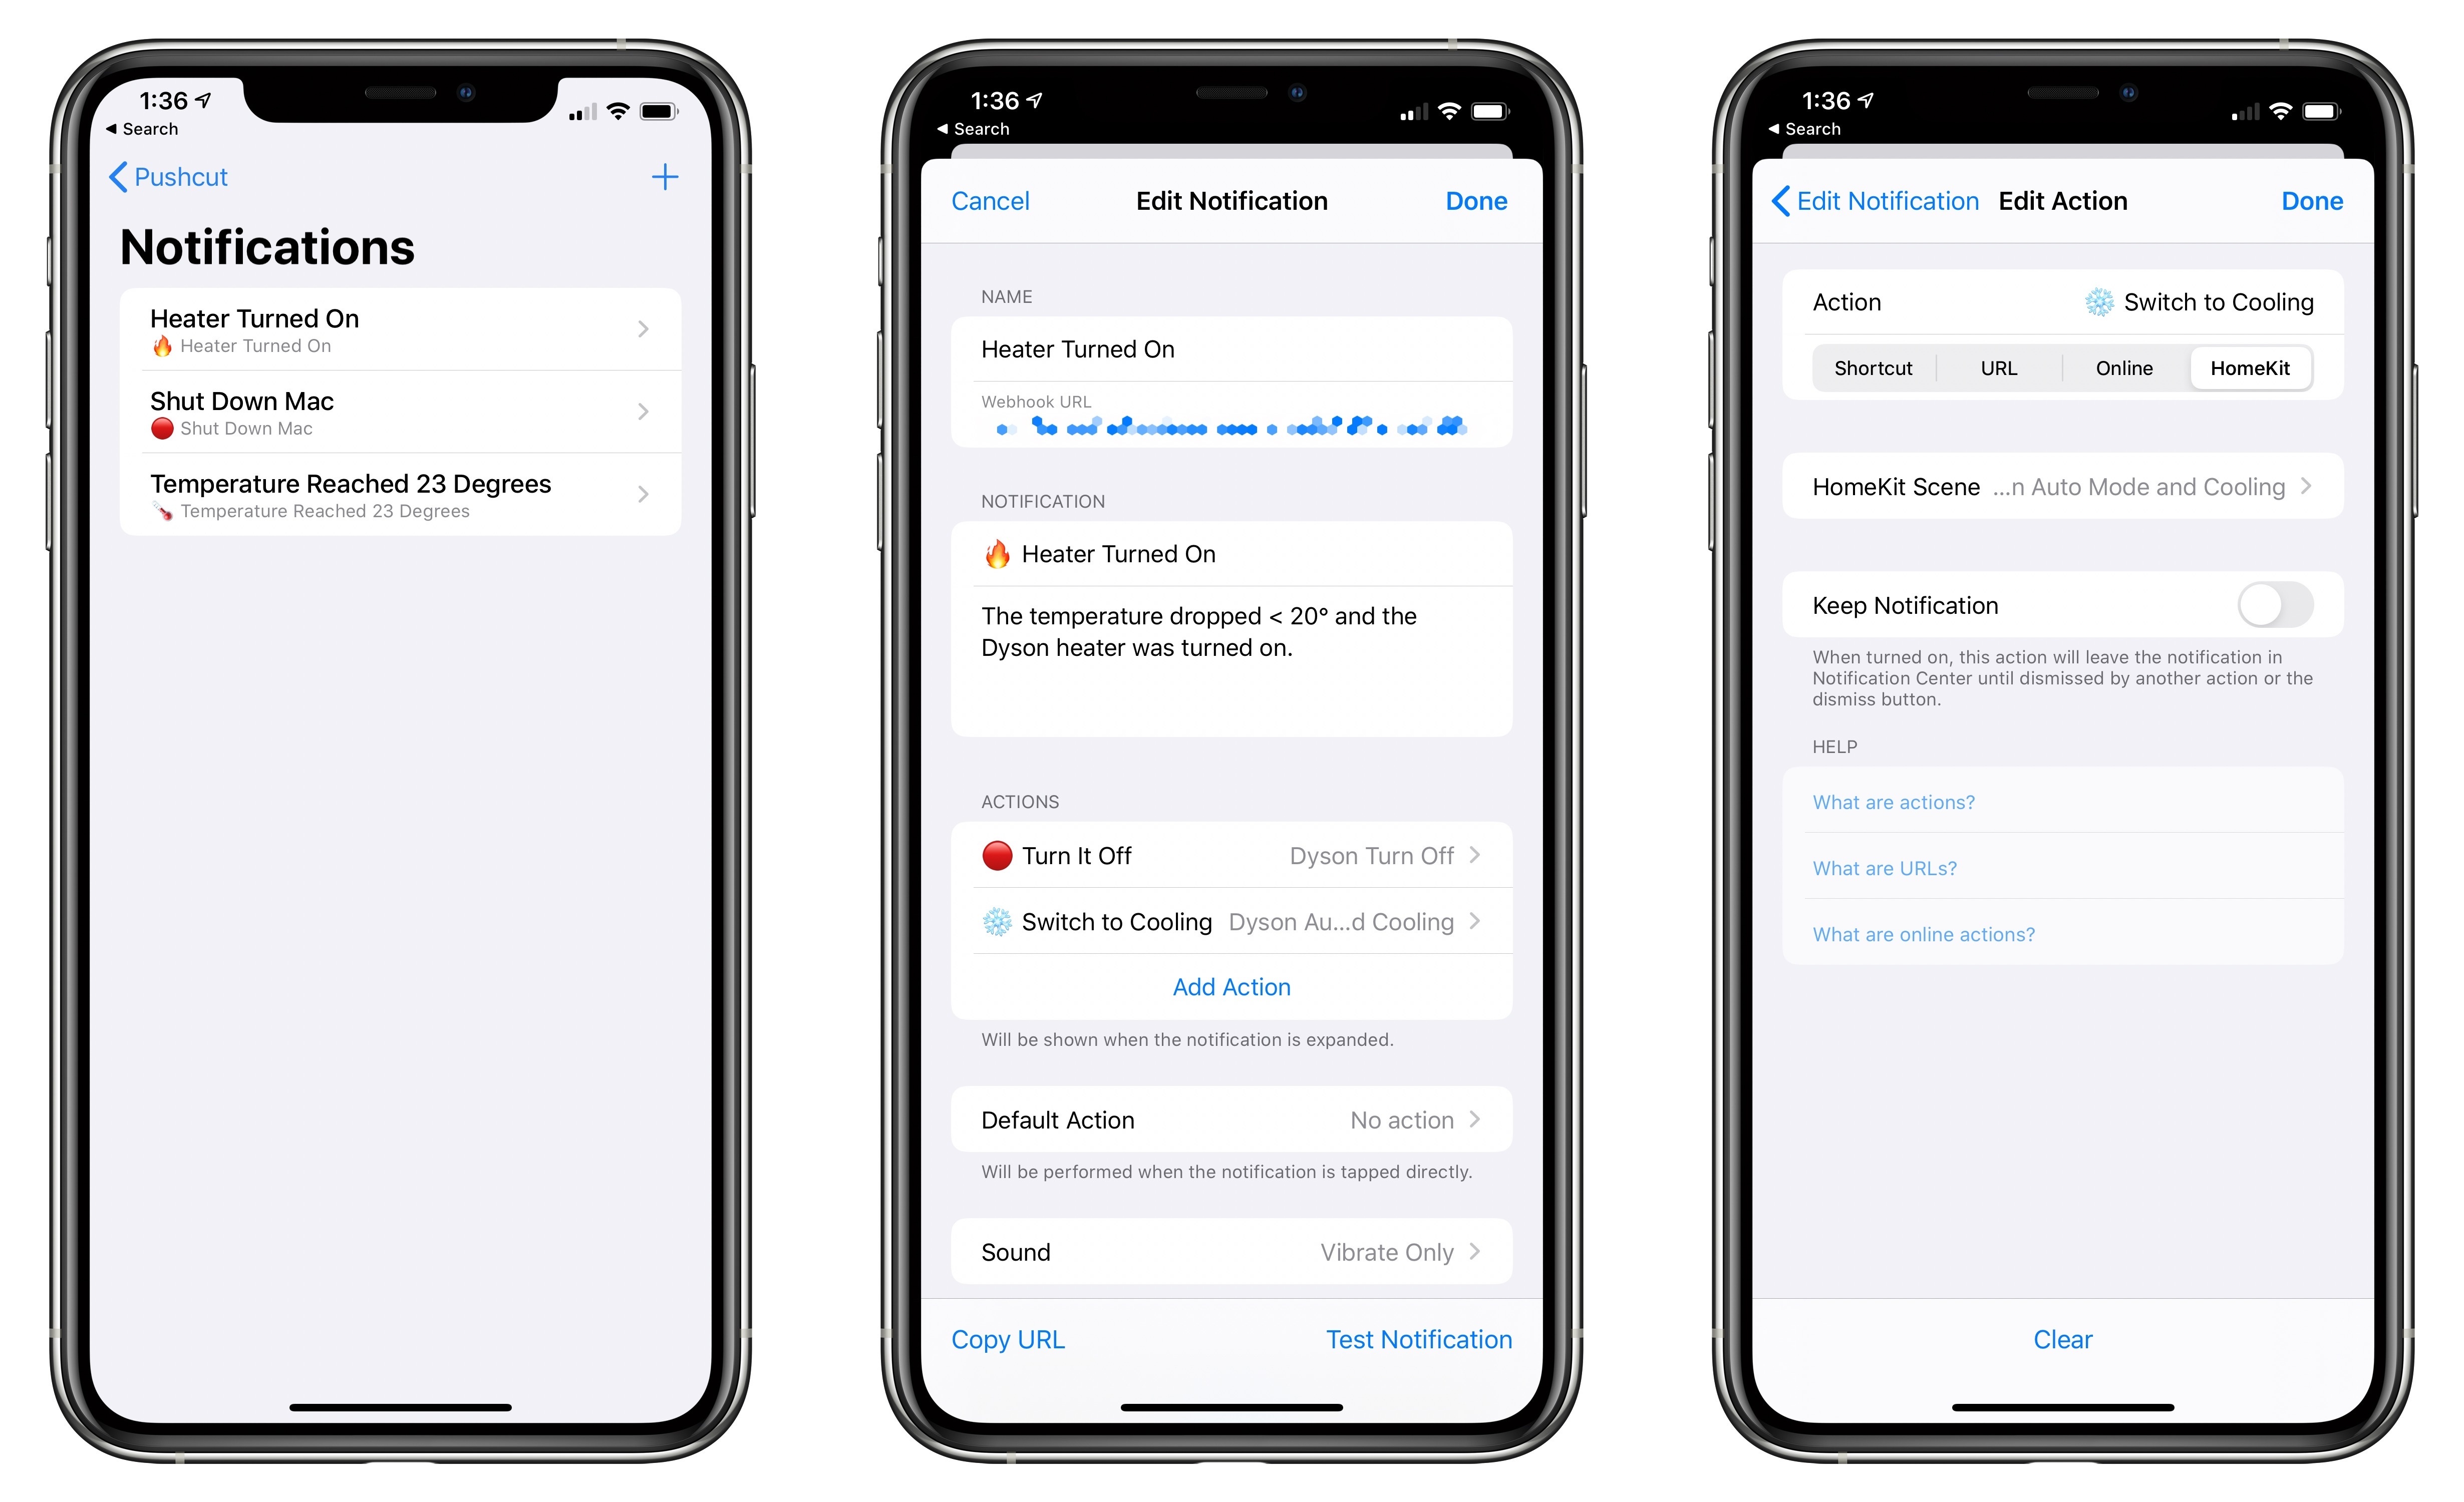
Each Pushcut notification has a unique webhook URL: by performing a GET request to this URL, the notification will trigger on every device where the Pushcut app is installed. You know where this is going: I copied each notification’s URL, switched back to the Home app, converted the automation to a shortcut, then inserted a ‘Get Contents of URL’ action to trigger the notification.
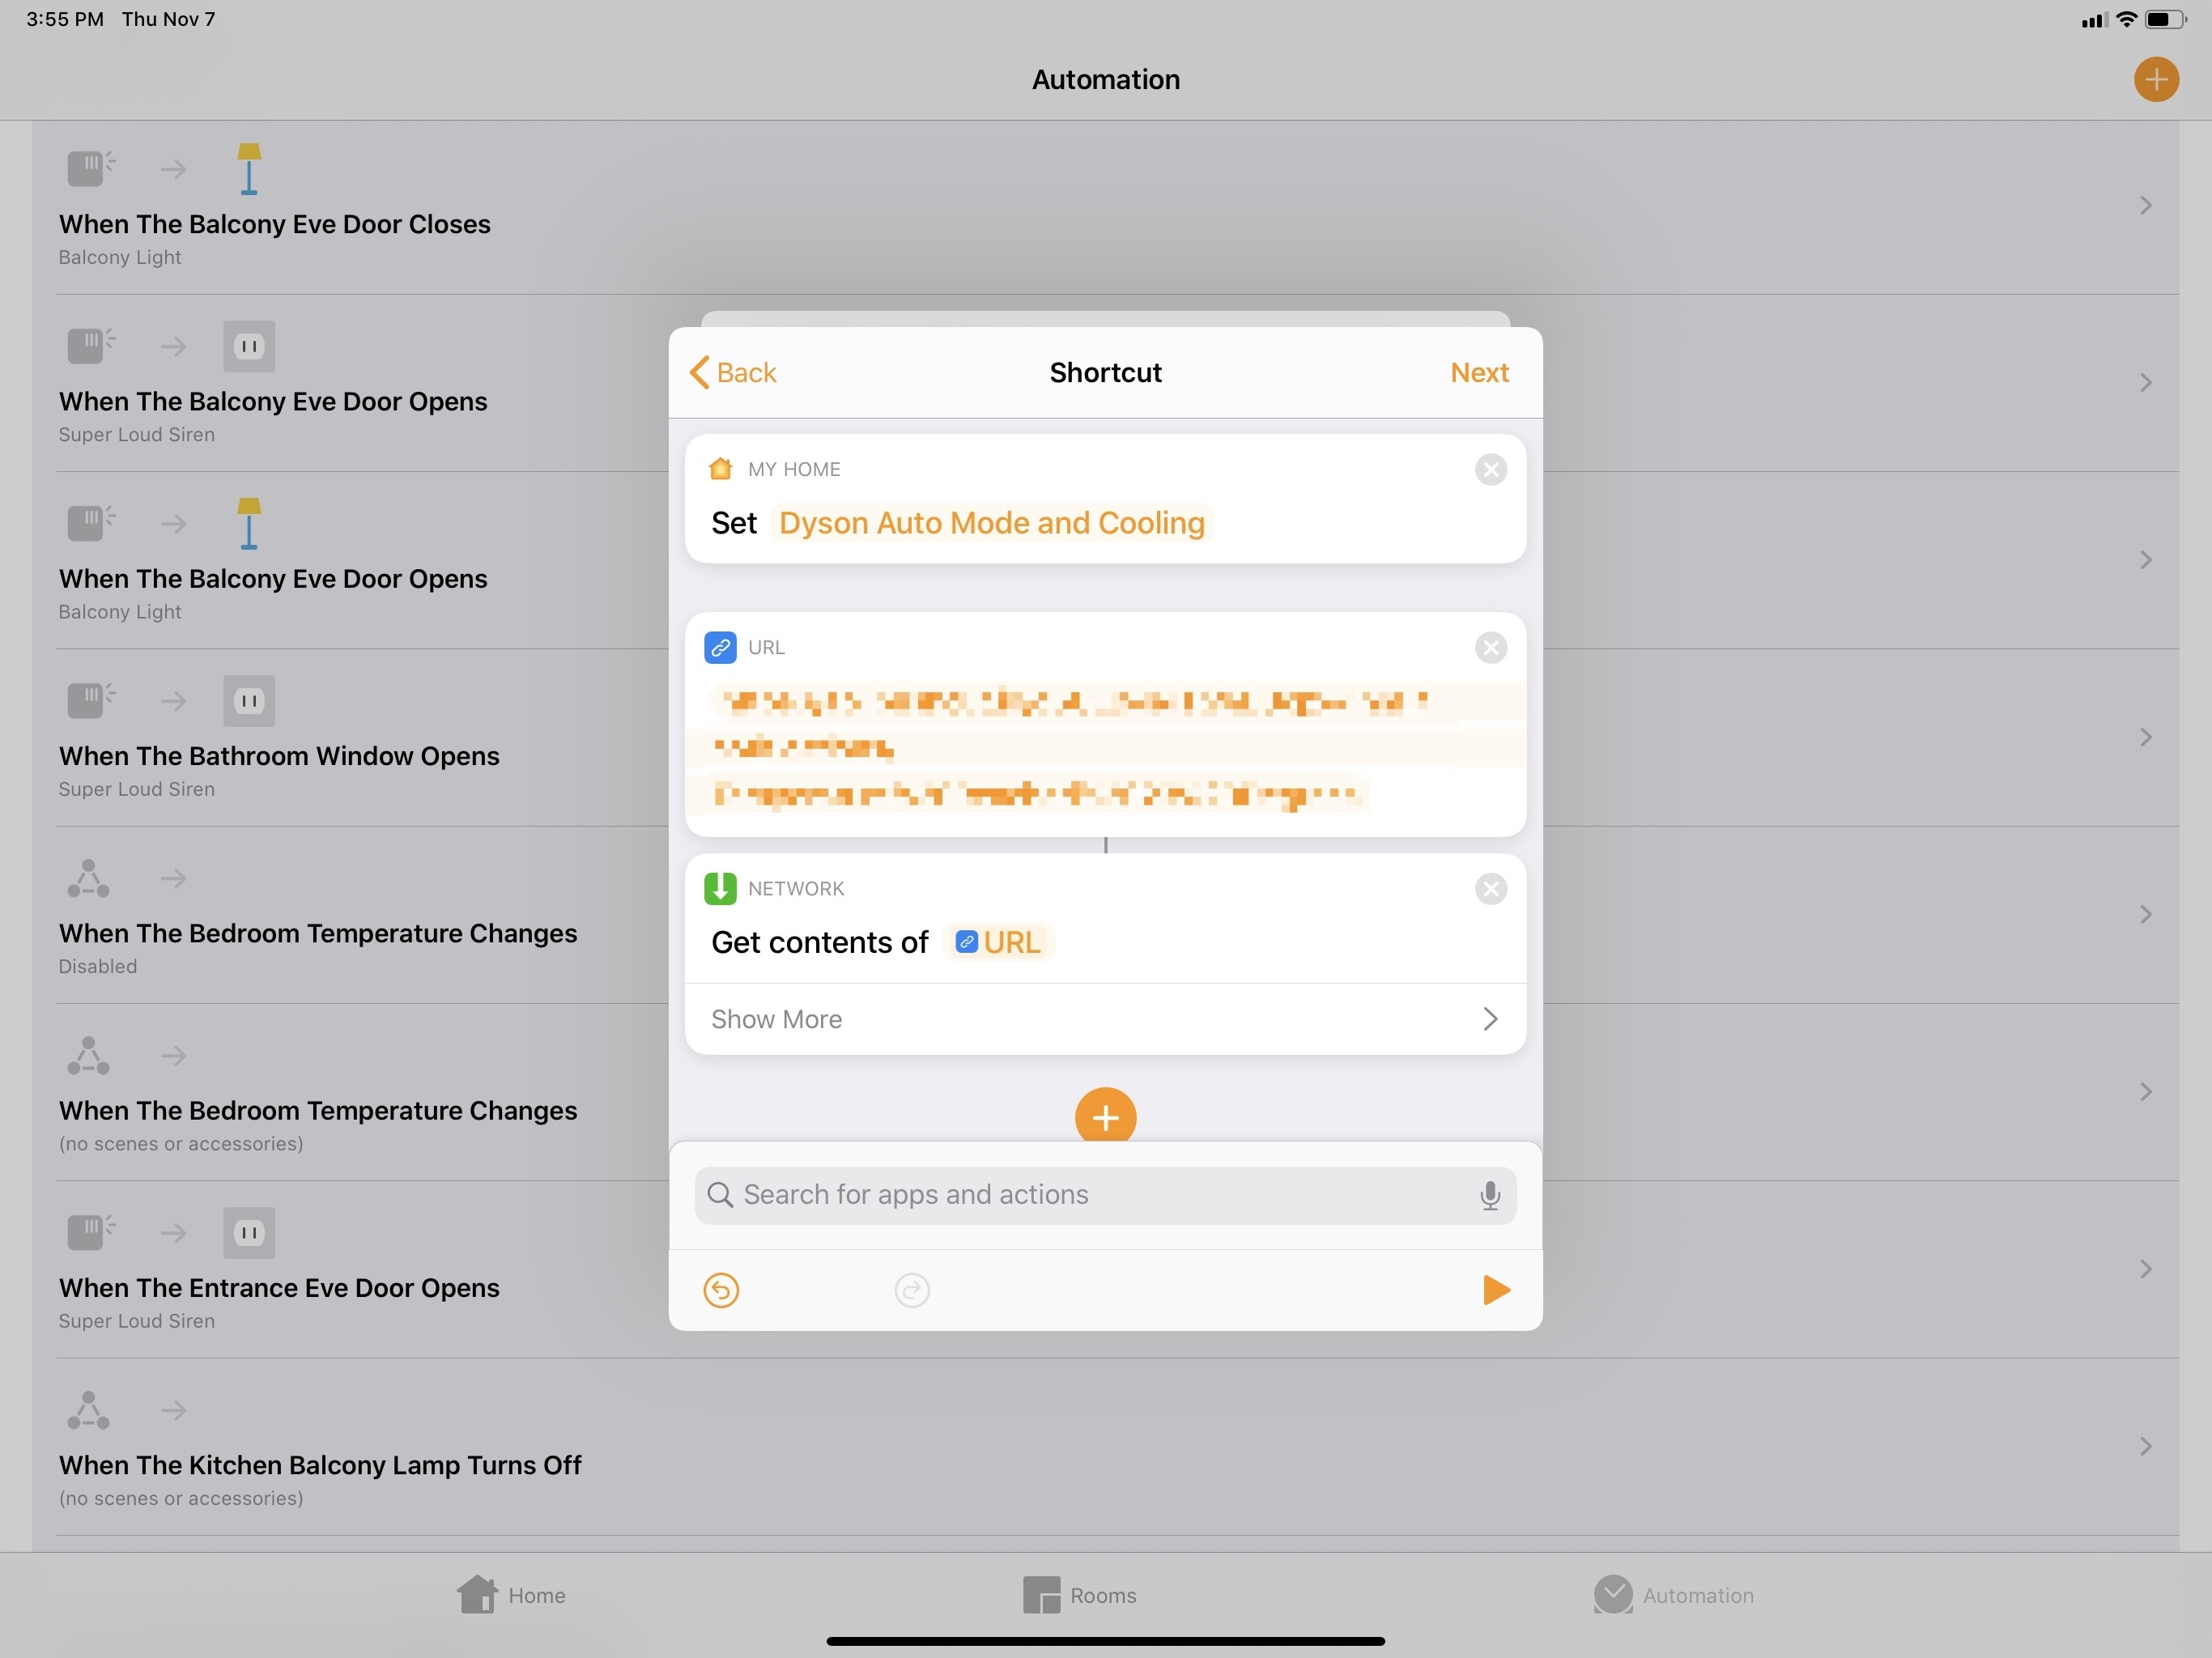
As you can see in the screenshot above, to control the Dyson’s heating and cooling modes, I used scenes, which I included in the custom shortcut triggered by HomeKit.

Now, whenever the Dyson fan thinks the apartment is warm enough, HomeKit turns off the heater, switches to auto cooling mode, and sends me a push notification to tell me about it. I can ignore the notification, or I can expand it to reveal an action that turns off the Dyson fan altogether. This action is based on a HomeKit scene that runs in the background from the notification itself.
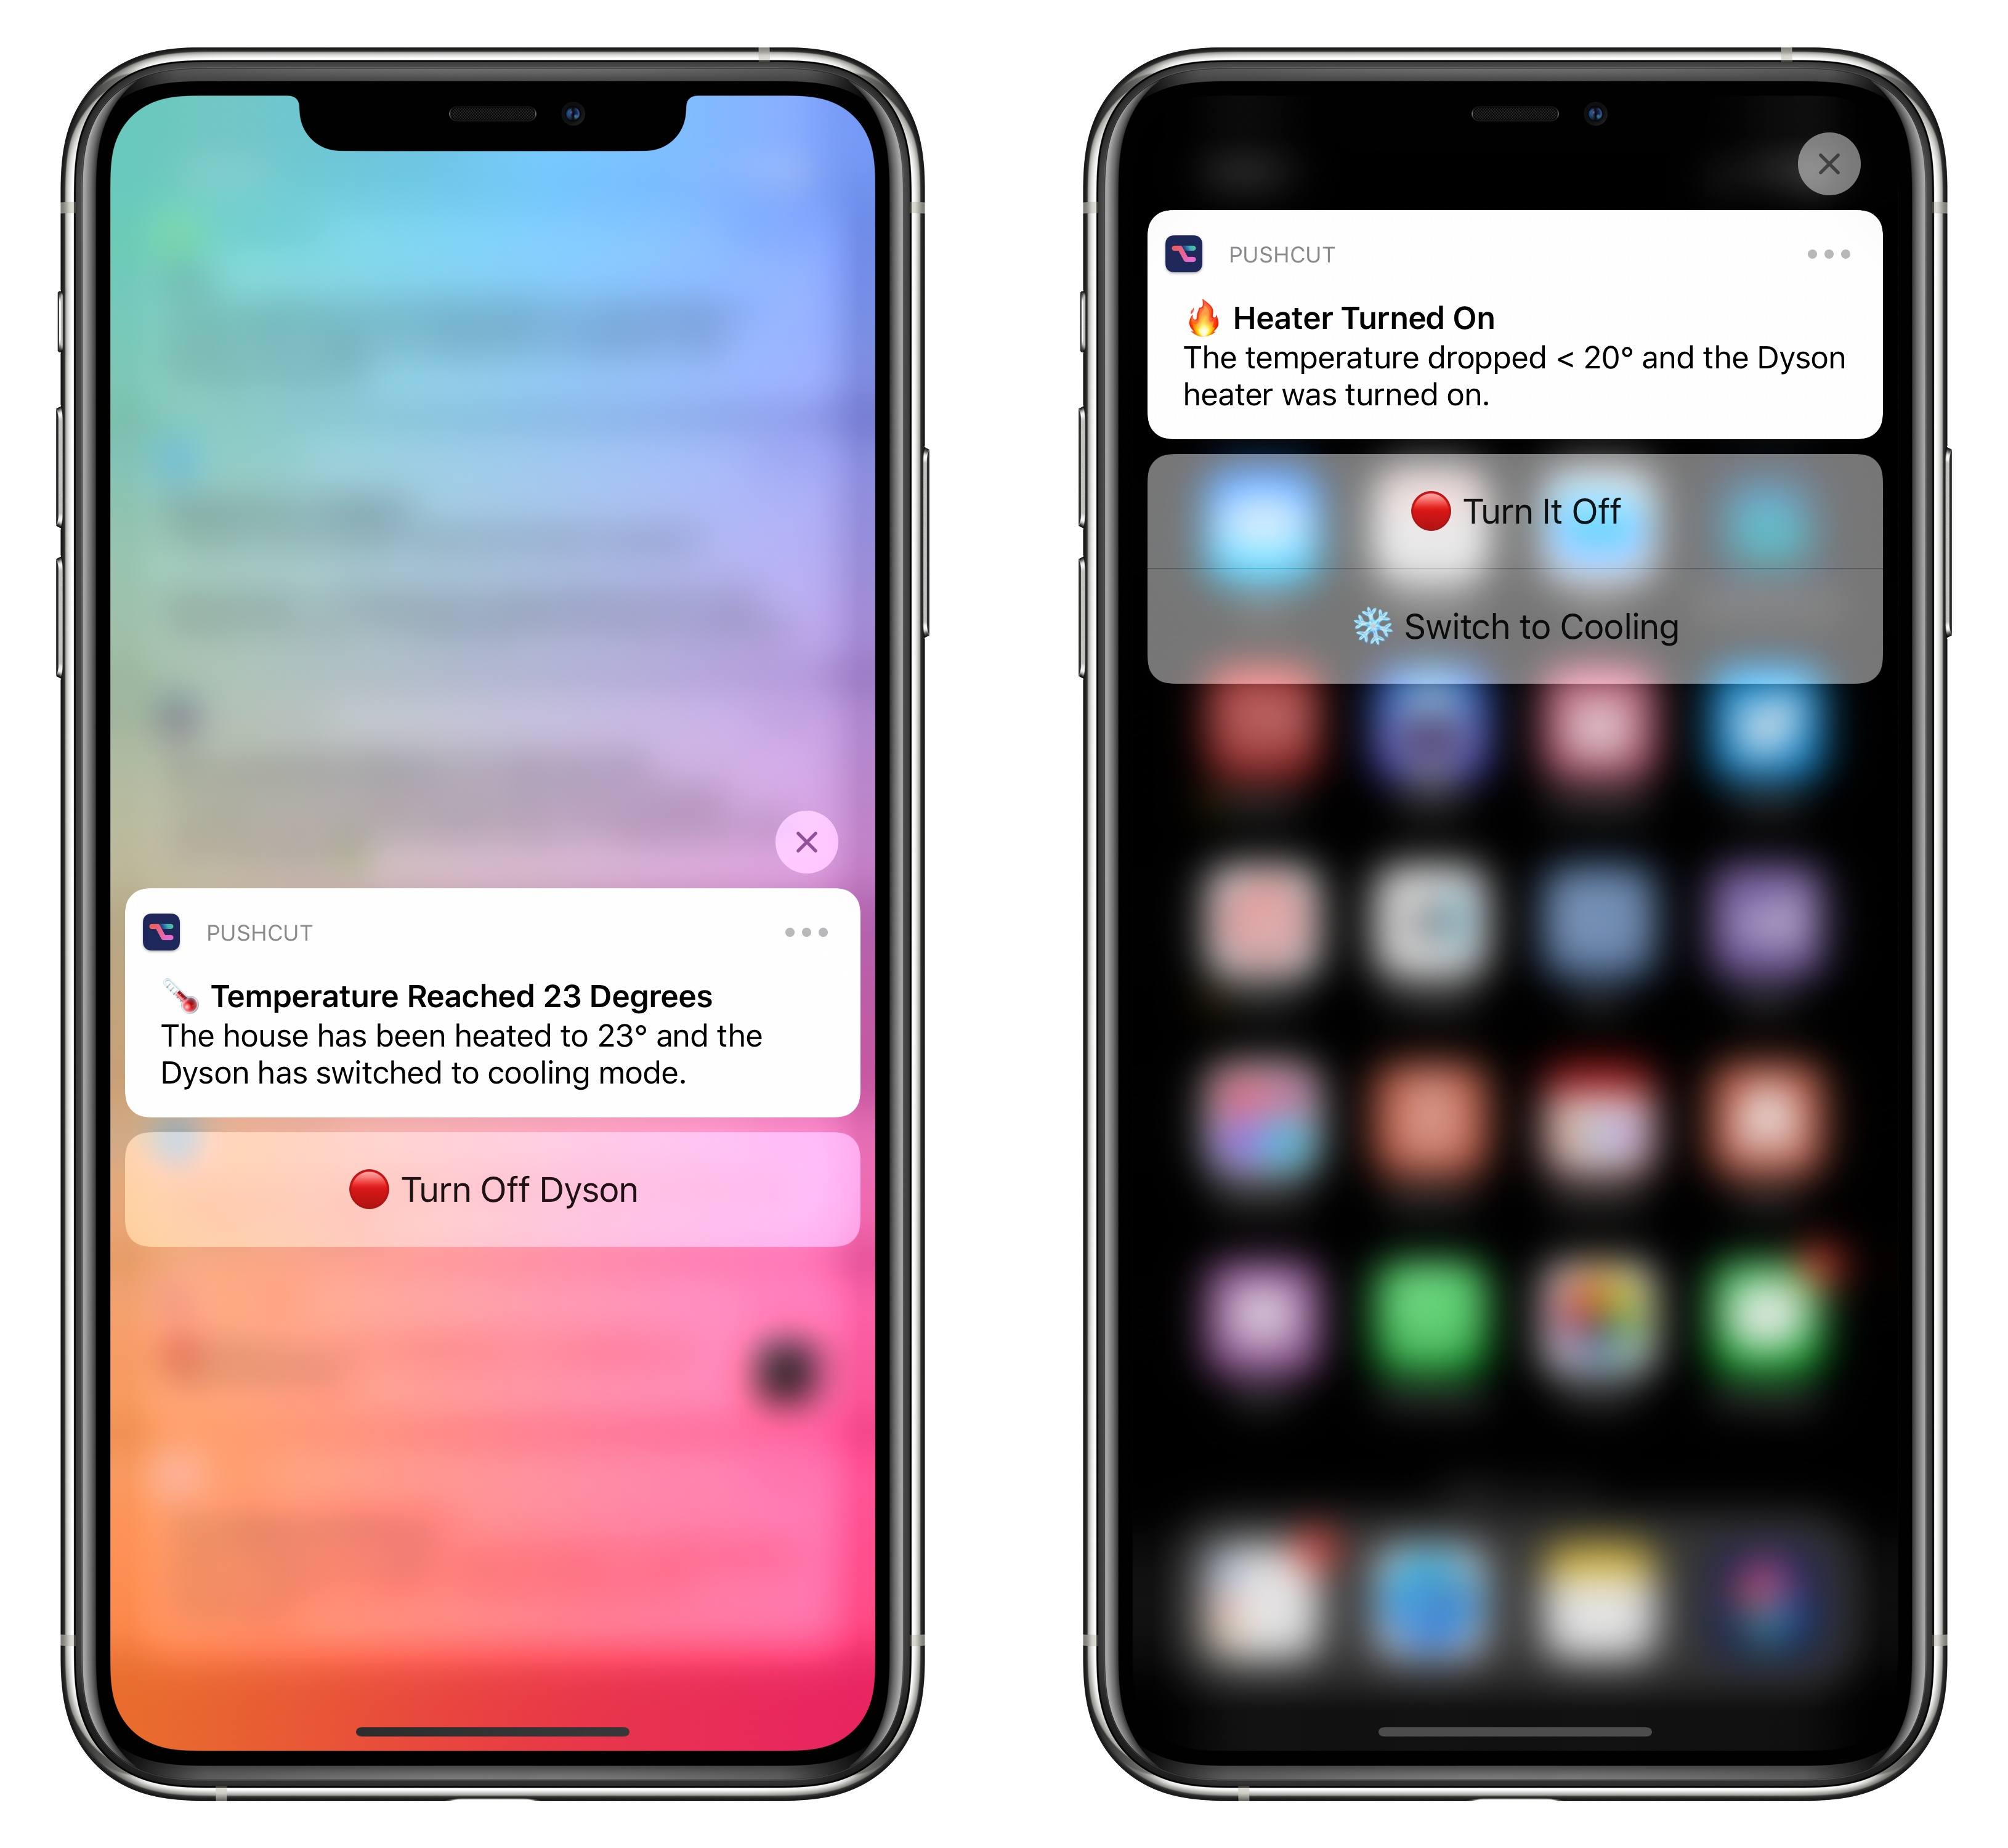
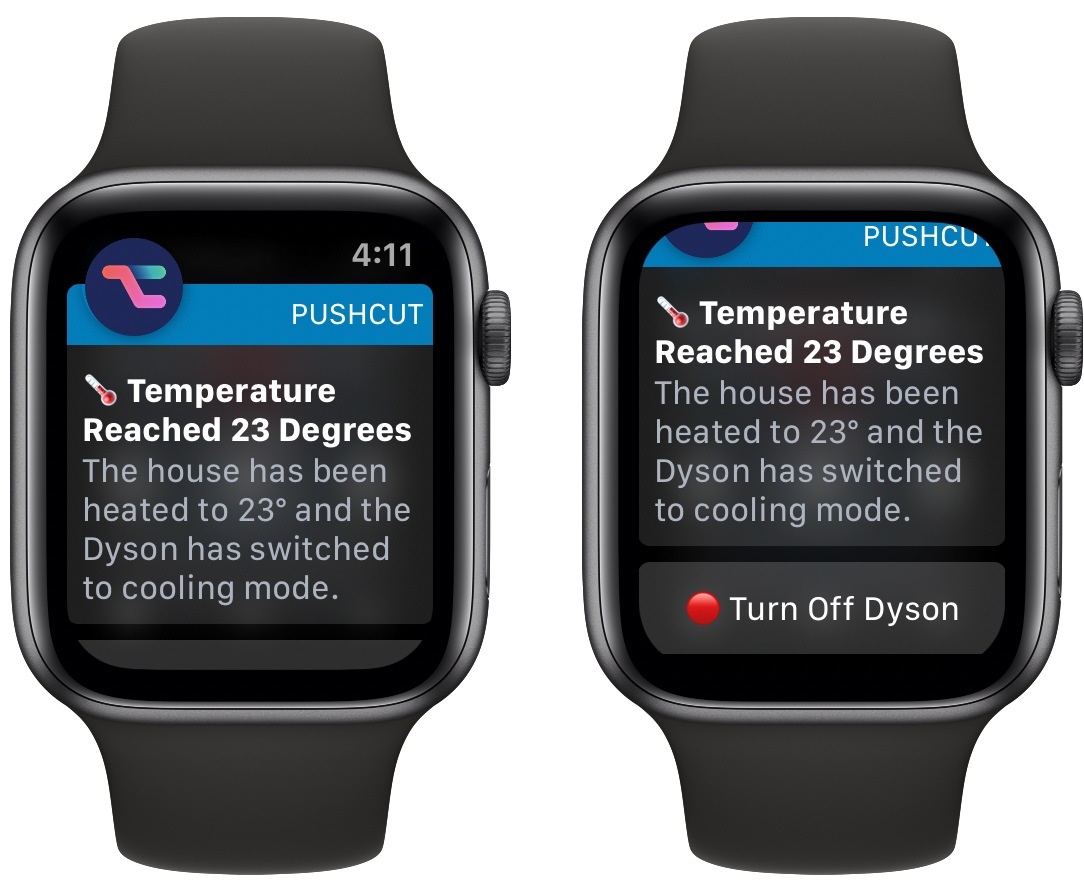
With Pushcut’s latest update, I can even receive and act upon these notifications on my Apple Watch.
I’ve been running this setup for the past couple of weeks, and it works great. Ideally, all these features should be natively supported in the Home app: I should be able to set up temperature-based triggers without a third-party app, and HomeKit’s Shortcuts-based automation should offer built-in support for secure push notifications without requiring me to set up a third-party web service such as Pushcut.
Hopefully, Apple is planning such options for a possible future revamp of HomeKit and the Home app. But until that happens, I’m glad I was able to connect my Dyson fan to HomeKit via homebridge, and Pushcut is serving my advanced needs well.