If you have been using Google Authenticator or Authy for two-step verification (“2FA” for short), you may have wondered whether you should switch to 1Password, now that it offers the same functionality. You may have wondered how much of a hassle it would be to change from one app to another, and if it would be worth it.
If that describes you, well, then you’re in luck, because I just completed the switch and I’m here to report my results. (Spoiler Alert: it was easier than I expected, and I already like it more than Authy, despite having really liked Authy.) There are a few “tips and tricks” which can makes the transition a little easier.
“What’s ‘Two-Factor Authentication’? Is it the same as ‘Two-Step Verification’? And are they the same as ‘Time-based One Time Passwords’?”
I won’t spend a lot of time on this, but just as a quick summary: for most people in most situations most of the time, the terms “Two-Factor Authentication”, “Two-Step Verification”, and “Time-based One Time Passwords” can be treated as being equivalent. What I mean is that while they are not technically identical they are functionally the same thing. If you want to understand more about the differences, read AgileBits’ article TOTP for 1Password users, specifically the section named “Second factor? No.”
For the purposes of this article, they are all going to huddle together under the umbrella of “2FA” with this as a functional definition: “You have a username plus a password plus a third thing. Someone might be able to get your username or password, but they should only be able to get that third thing if they have unfettered access to your Mac or iOS device right now.” That “third thing” is what is most people mean most of the time when they are talking about “Two-Factor Authentication”, “Two-Step Verification”, or “Time-based One Time Passwords”.
While it may be frustrating to people who are highly fluent in the various differences between those three things, my point is only to say that you can accomplish exactly the same thing using Google Authenticator or Authy or 1Password with a large and growing number of websites which all may use slightly different terminology to describe what is basically (for most people most of the time) the same thing. Ok? Good talk.
“Ok, but why do I want to use 2FA anyway?”
Assume your worst enemy managed to get ahold of the username and password that you use for email. They could get into your email, reset your passwords across the Internet, and generally make your life miserable. If your email account is protected by 2FA, having your username and password wouldn’t be enough, they would also need to get ahold of your iPhone (or iPad, or Mac, or whatever other device you use for 2FA). Without that, even having your password wouldn’t let them access your account.
Now substitute for “worst enemy”: former employer, former romantic partner who may be unhappy about the end of the relationship and want to mess with your life, secret government agent, rogue teenagers bored on Spring Break, malicious hacker group from across the globe which just managed to compromise a large website’s security. And so on.
2FA is like adding a dead-bolt to a door which already has a lock. It may not make it impossible to break in, but it will make it more difficult.
“Why should I switch to 1Password?
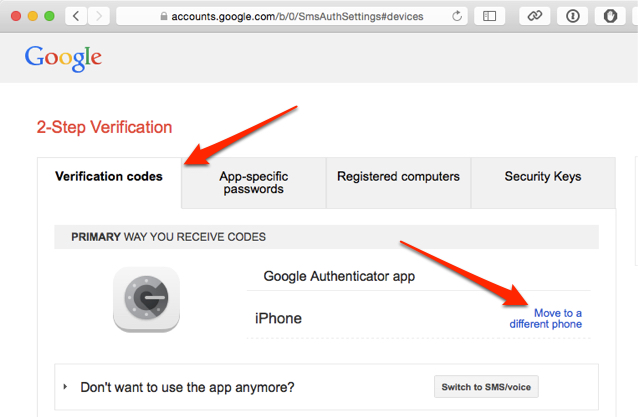
In the beginning there was Google Authenticator, and it was functional, but not pretty, nor did it offer much by the way of extra features. Then came “Better Two-Factor Authentication with Authy for iOS and OS X” which was prettier and had more functionality.
One of the main reasons that I switched to Authy was that it had a Mac app which connected to your iPhone via Bluetooth. The Mac app would receive the codes from your iPhone and make it so that you could easily copy and paste them into your web browser. Unfortunately, this feature didn’t work very reliably in real life. First you had to have a new Mac that had the lower energy Bluetooth 4.0. Then, the iOS app had to be active for the Mac app to connect. When the iOS app quit or the Bluetooth connection was lost, the Mac app would complain about not being able to connect.
What 1Password offers is greater convenience. Since 1Password already runs securely on Mac and iOS devices, you can have access to your 2FA codes on any of your Mac and iOS devices without having to mess around with Bluetooth (which means that it will work on any Mac, even ones without Bluetooth 4.0). You can copy/paste right from the app so you don’t have to manually type them (which was never particularly difficult, but was error-prone due to the time-limit factor of 2FA codes). For me, it also means that I can delete an entire app from my iOS device home screen, since I no longer need either Authy or Google Authenticator, I can just use 1Password.
(Oh, I guess I should explicitly say that I wrote this from the perspective of someone who is already using 1Password, writing to people who are already using 1Password. Because I think everyone should use 1Password. Don’t get me started on why you should be using 1Password.)
“Wait, isn’t it less secure to use one app for this instead of two?!?”
Maybe, but not really, at least, I don’t think so.
Previously, I was using two apps (1Password and Authy) and had separation between my passwords and my “second factor” device. It might appear that this new situation is less secure because the 2FA codes are available on more devices. However, in reality, the practical difference is nearly non-existent.
The reason is due to another part of any 2FA system: “What happens if I lose my iPhone, or it is damaged or stolen?” To prepare for such eventualities, all of the 2FA systems that I have used offered users special “Emergency Recovery Codes” (or another, similar name). If you had the username, password, and one of those emergency codes, you could access the account without the 2FA device.
Guess where I kept all of my Emergency Recovery Codes? If you said “Inside 1Password” you’re correct! So, if anyone had been able to compromise my 1Password database, they would have been able to defeat my 2FA protections. So, to me, it seems like I am not giving up any significant security advantage that the old system might have had, but I am getting more convenience from the new system.
“Security and convenience” has been a tricky balance since the dawn of security measures. Obviously you’ll have to decide for yourself if this system meets your needs and/or the I.T. department’s requirements. Personally, this feels sufficiently safe, given that both of my iOS devices (an iPhone 5s and an iPad Air 2) have Touch ID enabled and use a passphrase (not PIN). Both of Macs use File Vault 2. Those are additional layers of security on top of what I consider to be a very secure master passphrase for 1Password. I think I’ve done a reasonable job of protecting myself and my various accounts, especially since I consider myself fairly low-risk when it comes to the chances of me being specifically targeted (no one looking for nude pictures or government secrets or vast financial resources is going to come after my accounts).
“Get on with it already!”
Ok, here’s where we get to the nitty gritty details.
First, make sure that you are using 1Password for Mac version 5.3 or later since that was the first version which supported 2FA on the Mac. Make sure you are using version 5.2 or later of the iOS apps, which shouldn’t be a problem since they were released several months ago.[1]
Note: I refer to “Authy” in the rest of this article, but the steps are the same if you are switching from Google Authenticator or any other 2FA app. You will need to use your old app one last time, in order to log in to each one of your accounts, so you can switch that account over to 1Password. Once you are sure that you have switched all of your accounts over, you can – and should – delete the old app from your device so it doesn’t cause confusion in the future.
Step 1: Tag each 2FA account in 1Password
The most important step is to make sure that you know all of the accounts which are currently connected to your existing 2FA app (Authy, Google Authenticator, etc). If you miss any, you will have to rely on those Emergency Recovery Codes or risk losing access to your account entirely. An ounce of prevention is worth a pound of cure, so don’t skip something that could save you time and frustration later.
To start this process, I launched Authy and counted the number of accounts that I had configured in it (Answer: 16). Then I searched for each of those accounts in 1Password, and added a new tag to it. (I called my tag “2FA” because I am süper creative.)
Next, I counted the accounts in 1Password which were tagged “2FA” and made sure I had the same number as were in Authy (Answer: 16).
Once I had that tag created, I could use it in 1Password on my iPad and Mac to quickly find the accounts that I would be editing. When I was done, I could quickly check each one to make sure that it had the appropriate 2FA information in it before deleting Authy.
Step 2: Have multiple devices? Use them!
I am fortunate enough to have an iPhone, an iPad, and a Mac, so I put them all to use. I could have done this with any one of them, but using 3 separate devices allowed me to minimize switching between apps, and use each device for a specific task.
- On my left: my iPhone, running Authy
- On my right: my iPad, running 1Password
- In the middle: my MacBook Pro, running Safari and 1Password
Ready? Ok, here’s where there fun begins.
Step 3: Work your way through the 1Password tag group you created in Step 1.
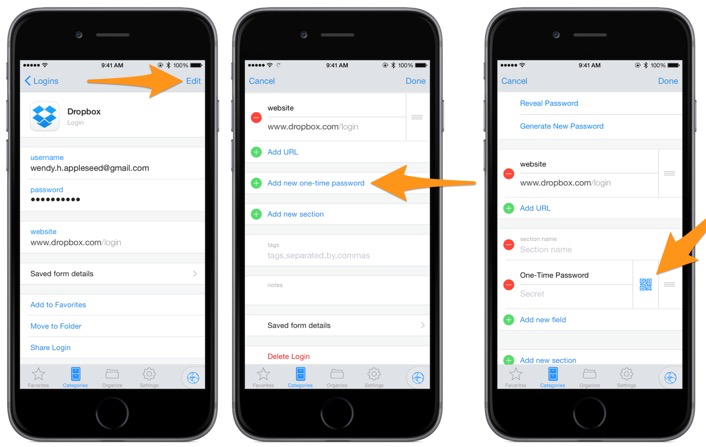
In 1Password on the iPad, I went to the “2FA” tag, and then tapped the first account which appeared alphabetically in that list, which happened to be Dropbox, so I will use that as my example.
On the iPhone, I tapped Authy and selected Dropbox.
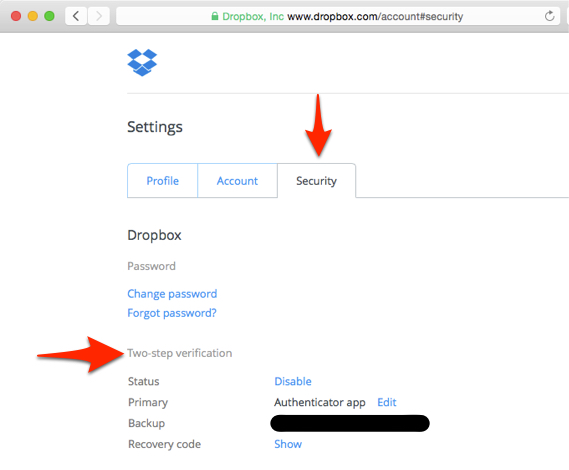
On my Mac, I went to Dropbox.com and logged in. I found the link which brought me to Dropbox’s 2FA settings.
The next step will vary, depending on each site’s implementation of setting up and/or modifying 2FA, so you will have to look around and see how they handle moving to a new phone or a new authentication device. Some sites will let you change your 2FA device. Those are the easiest sites to switch to a new device. Others require that you turn 2FA off and then turn it back on in order to enable a new device. That’s slightly less convenient, and usually requires that you re-enter your account password again, but still only takes a few moments.
Eventually, the site will display a QR code to scan. Here is where I used 1Password on the iPad. I tapped “Edit” to make changes to the appropriate account, then scrolled down until I saw the “One-Time Password” section, shown here:
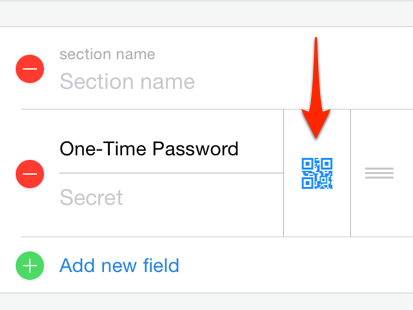
When I tapped on the QR code icon in 1Password, it launched a mini iPad camera app inside 1Password. I pointed the iPad at my MacBook’s screen until I could see the QR code inside the camera window in 1Password. This worked extremely well. As soon as the QR code visible in the window, 1Password recognized it right away, and then added the relevant information to the account. (Finding the right link on the site took seemed to take about 10 times longer than actually setting up 2FA!)
Then I tapped “Done” in 1Password on the iPad to finish editing the account information. Now I could see the 2FA code and the countdown timer (each code is only valid for about 30 seconds). I manually typed those into Dropbox.com (or whichever site I was updating) on my Mac.
Once 2FA is enabled on your account, there should be no question about it. Generally there was a banner or other text displayed on the site confirming that it had been successfully configured.
Don’t leave the site yet! This is a good time to make absolutely sure that you have your Emergency Recovery Code(s) from the sites where you enable 2FA. Some sites made me generate new codes after I switched from Authy to 1Password, and others did not. In each case I copied the code (or codes, some places just use one, some gave me as many as 10!) and added it/them to the “Notes” section in 1Password on my Mac.[2]
Last but not least: I also recommend adding the URL for 2FA settings to the 1Password entry for the website. 1Password can keep multiple URLs/websites per login item, so there’s no reason not to, and if you ever need to go back, it might come in handy to have them already stored in 1Password.
Step 4: Repeat Step 3 for each account in the “2FA” tag group in 1Password
I continued alphabetically through the 2FA tag group until I had updated all 16 accounts. With the “three device setup” I described above, I was able to finish in approximately 30–45 minutes. Most of that time was spent hunting for the right link to get to the 2FA settings for each account. (See below for some help with this.)
This is one of those tasks that you might want to do some afternoon when you aren’t feeling particularly “energized” after lunch, or any other time when you have more time than energy. Ideally you should switch them all of your 2FA accounts over at the same time, otherwise you will have to use your old authenticator app for some and 1Password for others, which seems like a recipe for confusion, frustration, and potential disaster.
“Remind me… Why am I doing this?”
Since my primary motivation for doing this was to make things easier, especially on the Mac, I thought I should describe the steps required before using Authy (“The Old Way”) versus using 1Password (“The New Way”).
The Old Way:
- Remove iPhone from pocket.
- Unlock.
- Launch Authy.
- Authenticate again (Touch ID or enter password).
- Search for correct account (which became a challenge once I had more than 12 because it meant that the account I wanted might be off-screen until I scrolled).
- Tap on correct account.
- Set iPhone down on desk so I can type in the 2FA digits.
- Press iPhone “off” button.
- Put iPhone back in pocket.
New Way:
- Click the 1Password icon on Safari’s toolbar.
- Hover over the account until the expanded information appears.
- Hover over “One-Time Password” field.
- Click “Copy”.
- Paste into Safari.
Here’s what it looks like in Safari:

Not only does the new way require fewer steps, but the steps are easier, requiring much less brain effort.[3]
“This still sounds like a lot of work, can’t you make it easier for me?”
There isn’t too much more that I can do from here, but I do have a reward for those of you who made it this far into the article.
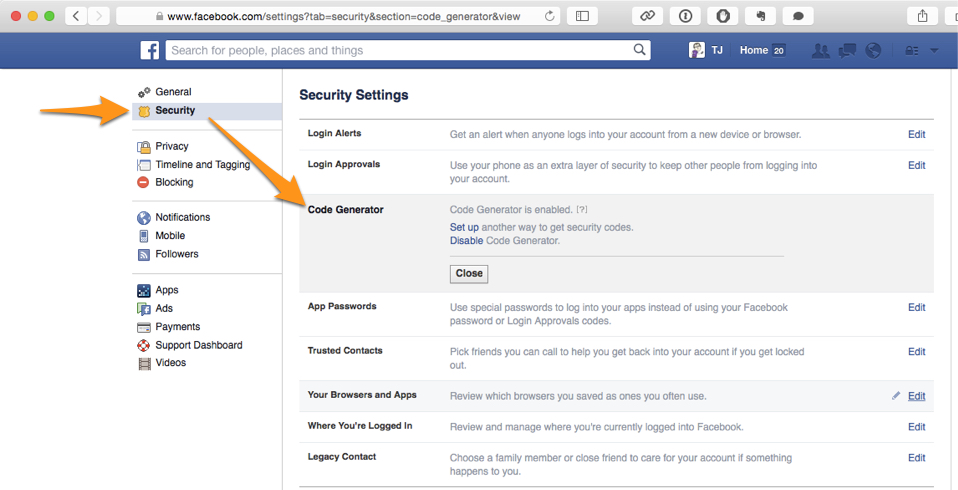
I went to some of the more popular[4] sites which use 2FA and provided a direct link to each site’s 2FA settings, as well as a screen shot to show you what to look for. Each one of the site names below is linked to the appropriate URL for 2FA, so you can click them and be taken directly to the page you need.
(Keep in mind: this article was written on April 8th, 2015, so the appearance and/or URLs might have changed, especially if you are reading this much later!)
Here’s my list:
Dropbox
Evernote

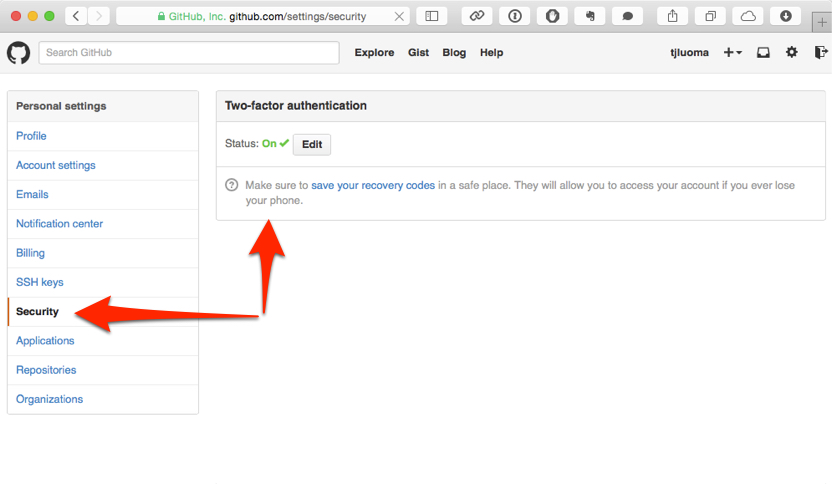
GitHub
Microsoft

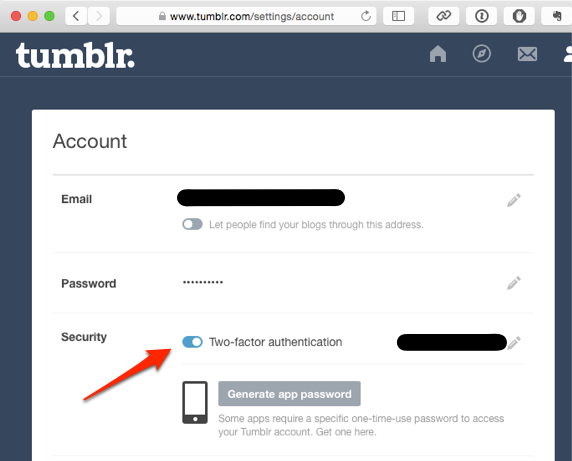
Tumblr[5]
Other Sites
If your site of choice isn’t listed here, the easiest way to find it is to log in and then look for links for things like “Account Settings” and then “Security” or something similar.
“How do I find out which sites support 2FA?”
I refer you to the excellent table at TwoFactorAuth.org.
- You’ll need the “pro” version of the 1Password iOS apps to use this feature. Authy and Google Authenticator are free, so that may be a consideration for some people. ↩
- 1Password syncs so fast using iCloud that by the time I switched from 1Password on my iPad to 1Password on my Mac, the 2FA information had already been sync’d over. However, if it hasn’t, you might want to wait until it updates before adding the codes. I suspect that 1Password is plenty smart to figure out any sync conflicts, but taking a few extra seconds to make sure it still a good idea. ↩
- I think the technical term is “cognitive load” but “brain effort” is more descriptive. ↩
- As determined by my powers of intuition and experience. YMMV. ↩
- Tumblr’s 2FA setup is weird. Tumblr requires that you first enter an SMS number for them to send you the initial verification information. Once you have done that, then you can add an authenticator app. Once you have added the authentication app, you can disable SMS if you wish, or use both. I don’t know why they won’t allow you to add an authentication app directly. “Because Tumblr” is the best answer I can suggest. ↩