New Health Features
Fitness and health are the two primary targets in any good watchOS update, and this year Apple has two new health-related features for us to enjoy. The brand-new Medications app turns the Apple Watch into a convenient tracker and reminder for medications, and the sleep tracking system has been upgraded to collect more in-depth metrics.
Medications
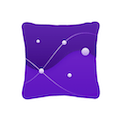
Medications is a new first-party app for Apple Watch, as well as a panel in the Health app on iOS. Before you can use the watchOS app you’ll need to set the feature up in Health on your iPhone.
The goal of this feature is to help you track any and all medications that you take. You enter your medications into the Health app, and configure time intervals at which you need to be taking them. You can also set up as-needed medications for those that you only take when you need them.
Since Medications is a subsection of Health, you’ll have to find it in the Health app in order to set it up. For me it was initially shown prominently in a recommended block under the ‘Get More From Health’ heading. However, after setting the feature up and then coming back to the Health app later, that block was no longer recommended, and it took me a minute to figure out how to find the feature again. Ultimately I needed to go to the ‘Browse’ tab in the bottom-right corner and find the ‘Medications’ category from there.
If you want to maintain easy access to the Medications interface, you’ll probably want to add it as a favorite by tapping the ‘Edit’ button next to the Favorites section of the Summary tab. From then on you’ll be able to find it in the list of favorited features.
At this point in time, I struggle to understand why Apple keeps stuffing significant new features into the Health app. Especially in the modern era of iOS where we can delete unused first-party apps, I wish Apple would be less afraid to just spin up new apps on iOS that match their watchOS counterparts. The Medications interface in Health is entirely different from the rest of the app, so it’s already like Apple is hiding an app inside of a different one. It would be far less confusing and more convenient for users if Medications was a first-party iOS app just like it is on the Watch. For now though, we’re stuck in Health.
Once you successfully find your way to the Medications interface on iOS, you can began adding your medications. Tap the ‘Add a Medication’ button and type a name into the search field to find it. Or better yet, just tap the camera icon and point your iPhone camera at your medication’s container.
The camera lookup feature is impressively accurate. I tried it against a variety of items that I found in my house, from pill bottles to spray bottles to ointments. Never once did the app fail to identify exactly what the medication was, as well as the strength and unit of measurement if defined on the container.
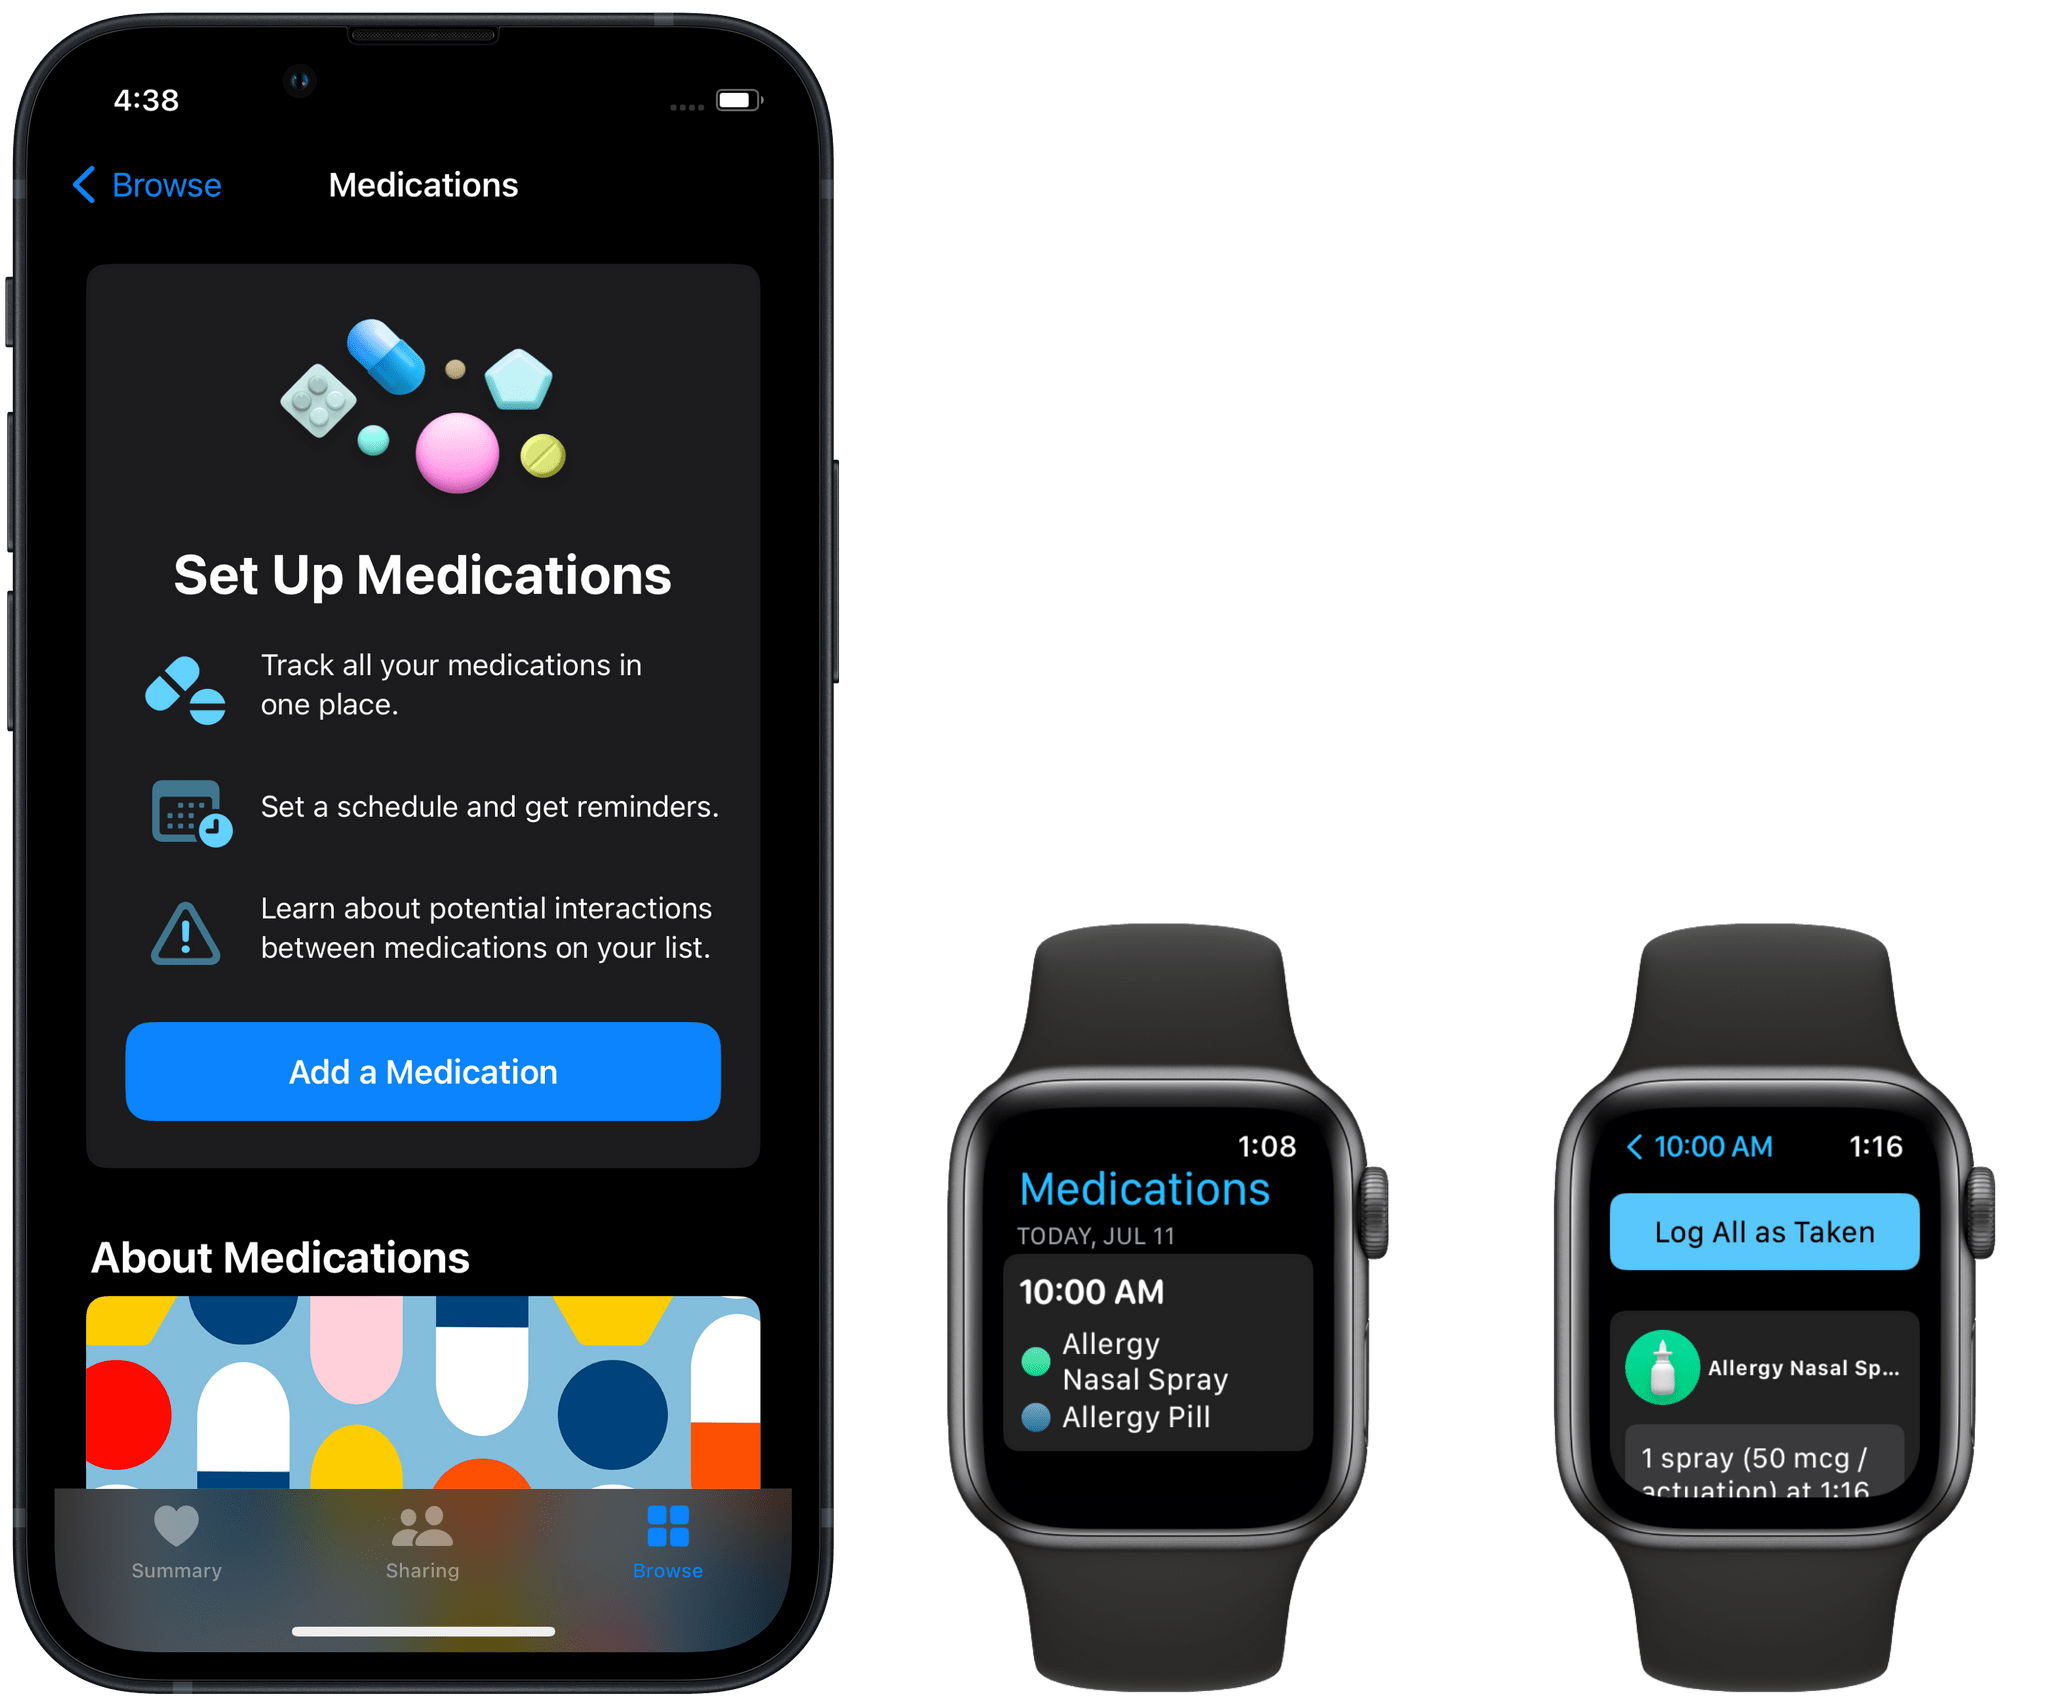
The reason that Apple wants to identify your exact medications from its data sources is for another feature: drug interactions. This information shows up beneath your list of configured medications, and will attempt to inform you if a combination of medications that you’re taking may react with each other in potentially harmful ways.
The drug interactions feature has three tiers of alerts: ‘Critical’, meaning you absolutely should not take these medications together unless explicitly told to by your doctor; ‘Serious’, meaning there may be significant side effects but they’re unlikely to be life-threatening; and ‘moderate’, meaning there may be mild side effects or the drugs might not work as well together. You can see more details about these tiers by tapping the ‘Drug Interactions’ header and then tapping the information icon.
The drug interactions feature can also optionally check for interactions with common lifestyle factors such as alcohol, cannabis, and tobacco consumption. These factors are disabled by default, likely because they seem to trigger the ‘Serious’ interaction type for many common non-prescription drugs. For instance, I added Ibuprofen and Tylenol to my list of as-needed medications, and both showed us under the category of serious interactions with alcohol.
While Apple is clearly being careful to not cause unnecessary alarm here, they’re also not wrong that even extremely common medications like Tylenol can have serious health effects when consumed alongside too much alcohol. When drilling down into the details view about these interactions, the descriptive text is a great explainer and didn’t read as scare-mongering to me at all. I think it would have benefited users more to leave these “life factor” interactions on by default. If you want to enable them yourself, you can do so by tapping into the ‘Drug Interactions’ panel in the Medications sections of the iOS Health app, then tapping the ‘Edit’ button in the ‘Interaction Factors’ block.
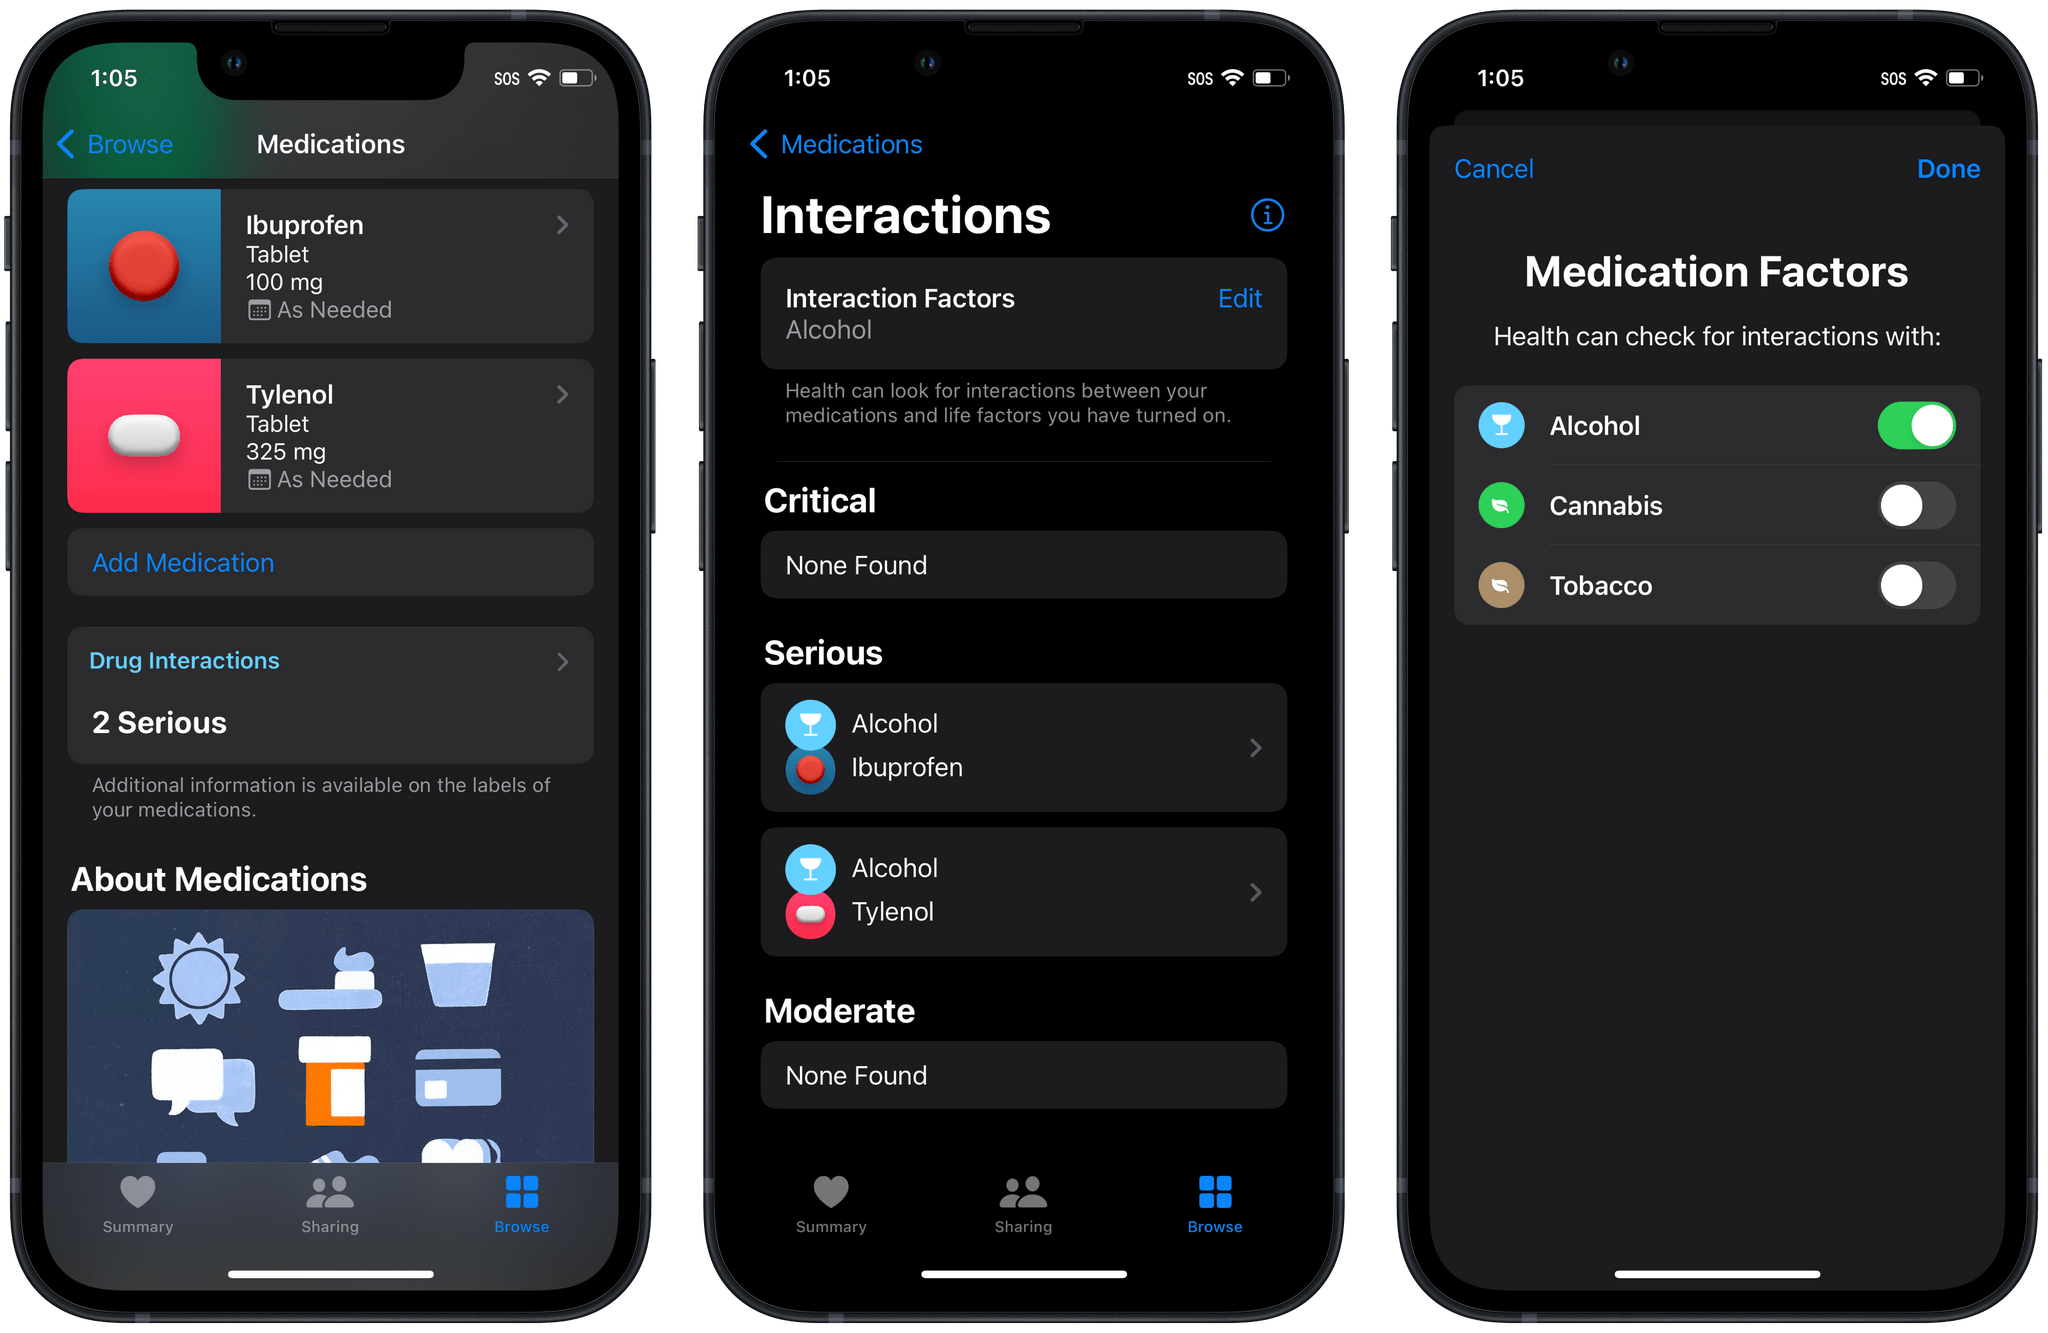
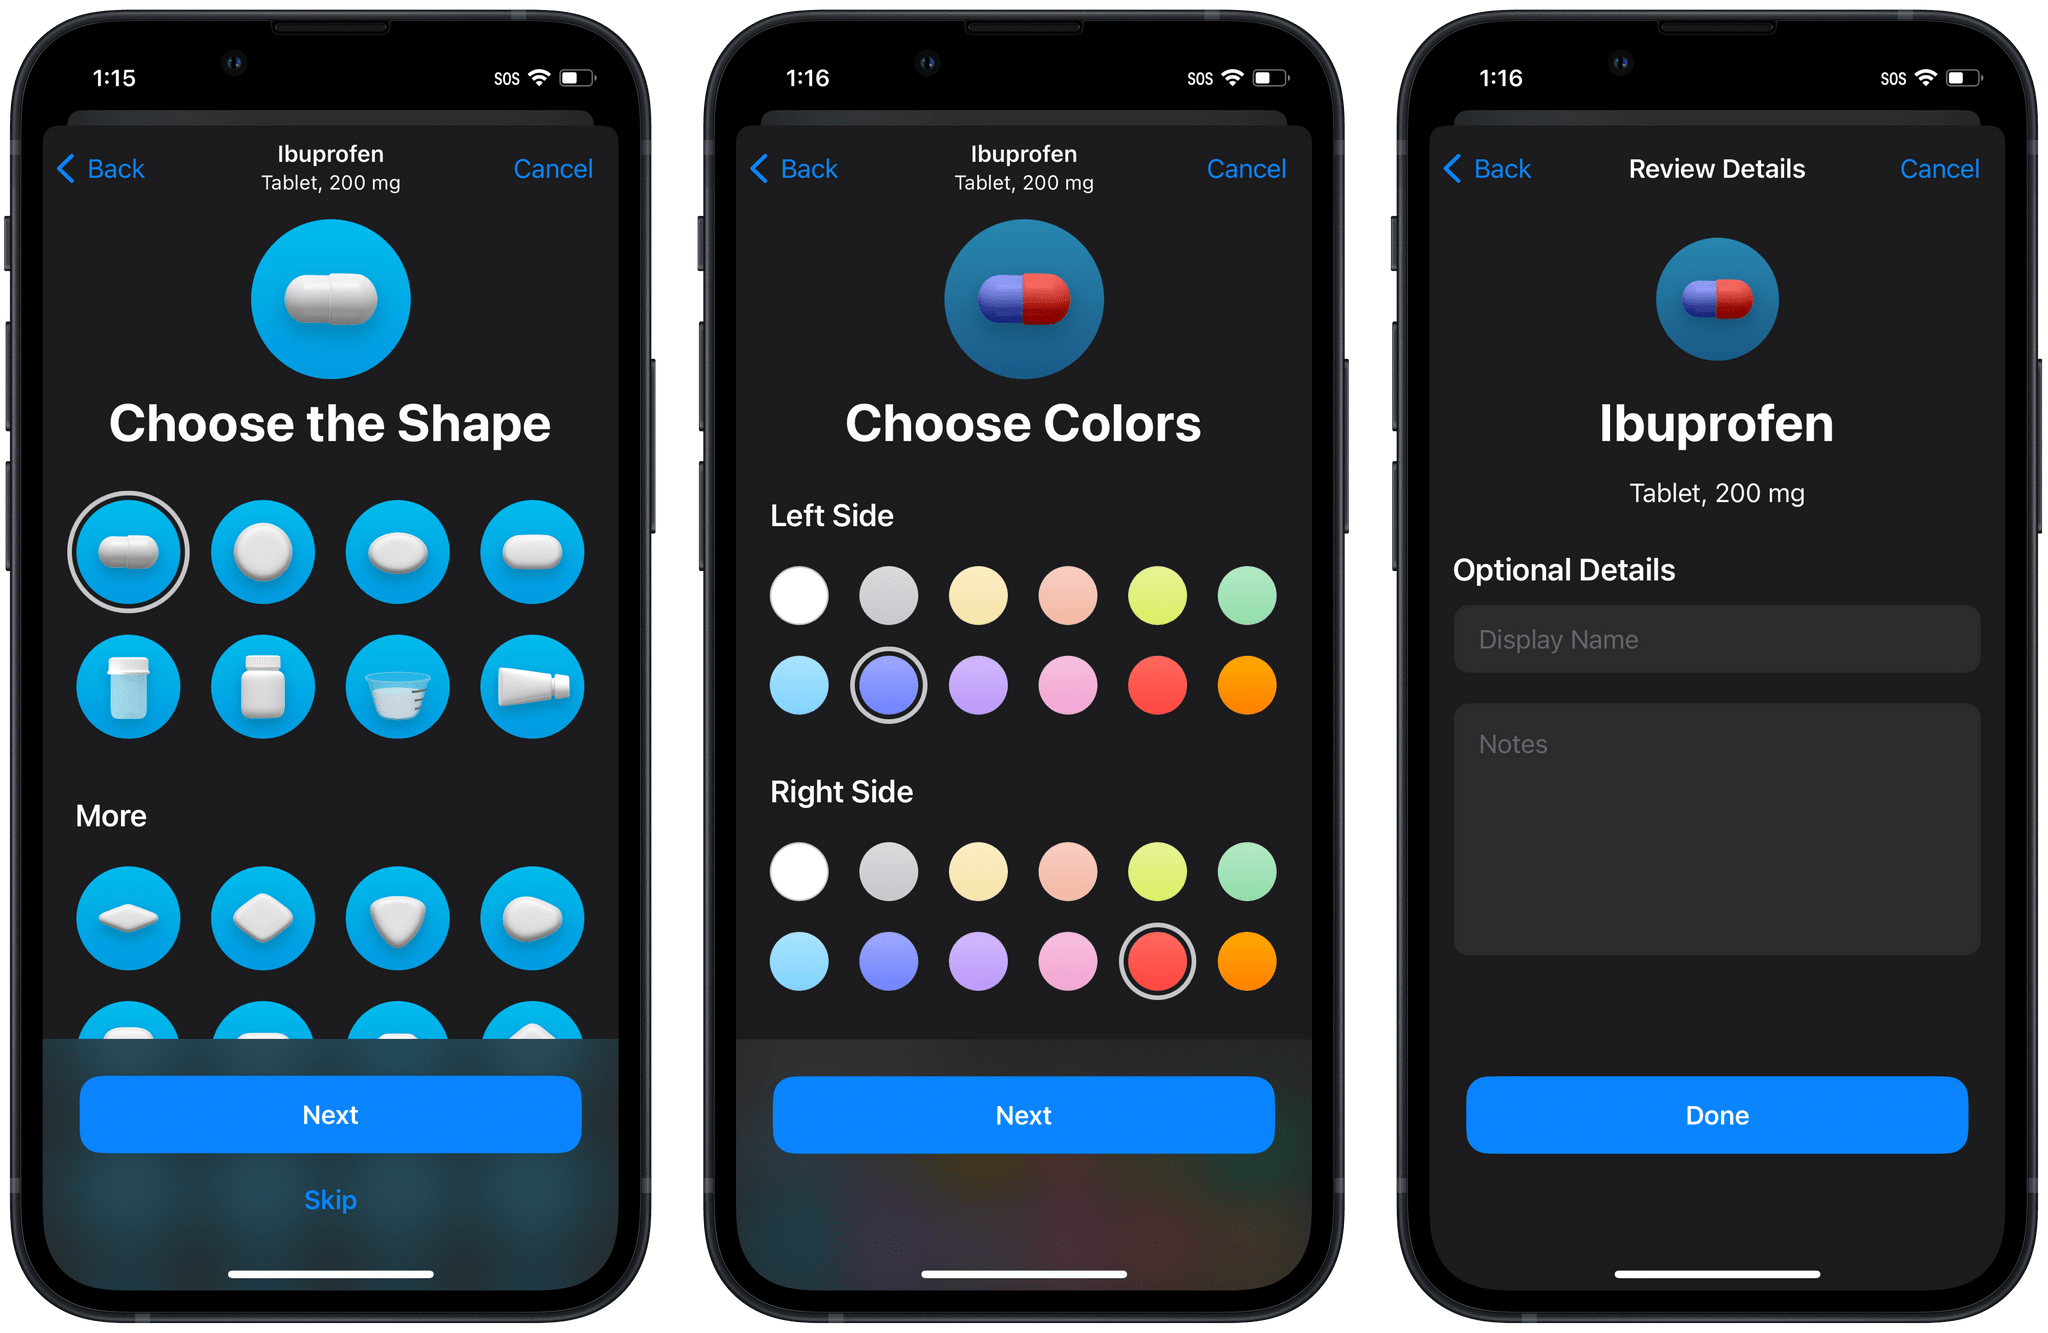
Okay, back to adding medications. Once the app has identified the medication that you’re trying to add, you get to configure the form in which you are taking it. Options are wide-ranging, from capsules to chewable tablets to creams to spray bottles and many more. Next up, you set the strength and unit type (such as a unit of milligrams and a strength of 200, if you’re taking a 200mg tablet). Then you set the frequency (with options ranging from daily to every other day to specific days of the week, and more), or select ‘As Needed’.
Finally, the fun part: you get to create a nice icon for your medication. Apple has designed an interface with all kinds of forms of medications, from various tablet shapes to pill bottles to ointment tubes. Select a shape, then set a color (or sometimes even multiple colors) for the shape, and another color for the background.
Finish things off by setting an optional display name (for example, I set my daily allergy medication to the display name “Allergy Pill” rather than the technical name “Loratadine”) and adding any notes about this medication which you may want for your own future reference.
Earlier in the beta cycle Apple was only allowing users to create medications that Apple could match via their data sources. Thankfully they have loosened that restriction up for the official release version. If you need to add a medication that doesn’t match Apple’s list, you can just tap the ‘Add’ button at the bottom of the screen to create a custom medication. Be wary, as doing this will result in the medication not being checked by the drug interactions feature, but it’s a good way to deal with Apple not having your particular medication in its list. You can also add custom medication strength values if the strength of your particular medication doesn’t show up in Apple’s default list of options.
Once you’ve finished setting up your medications, the watchOS 9 Medications app can actually be used. The app consists of a single list view, with the top of the list showing all of the medications that you are scheduled to take today. You can tap into any of these medications to log them as either taken or skipped.
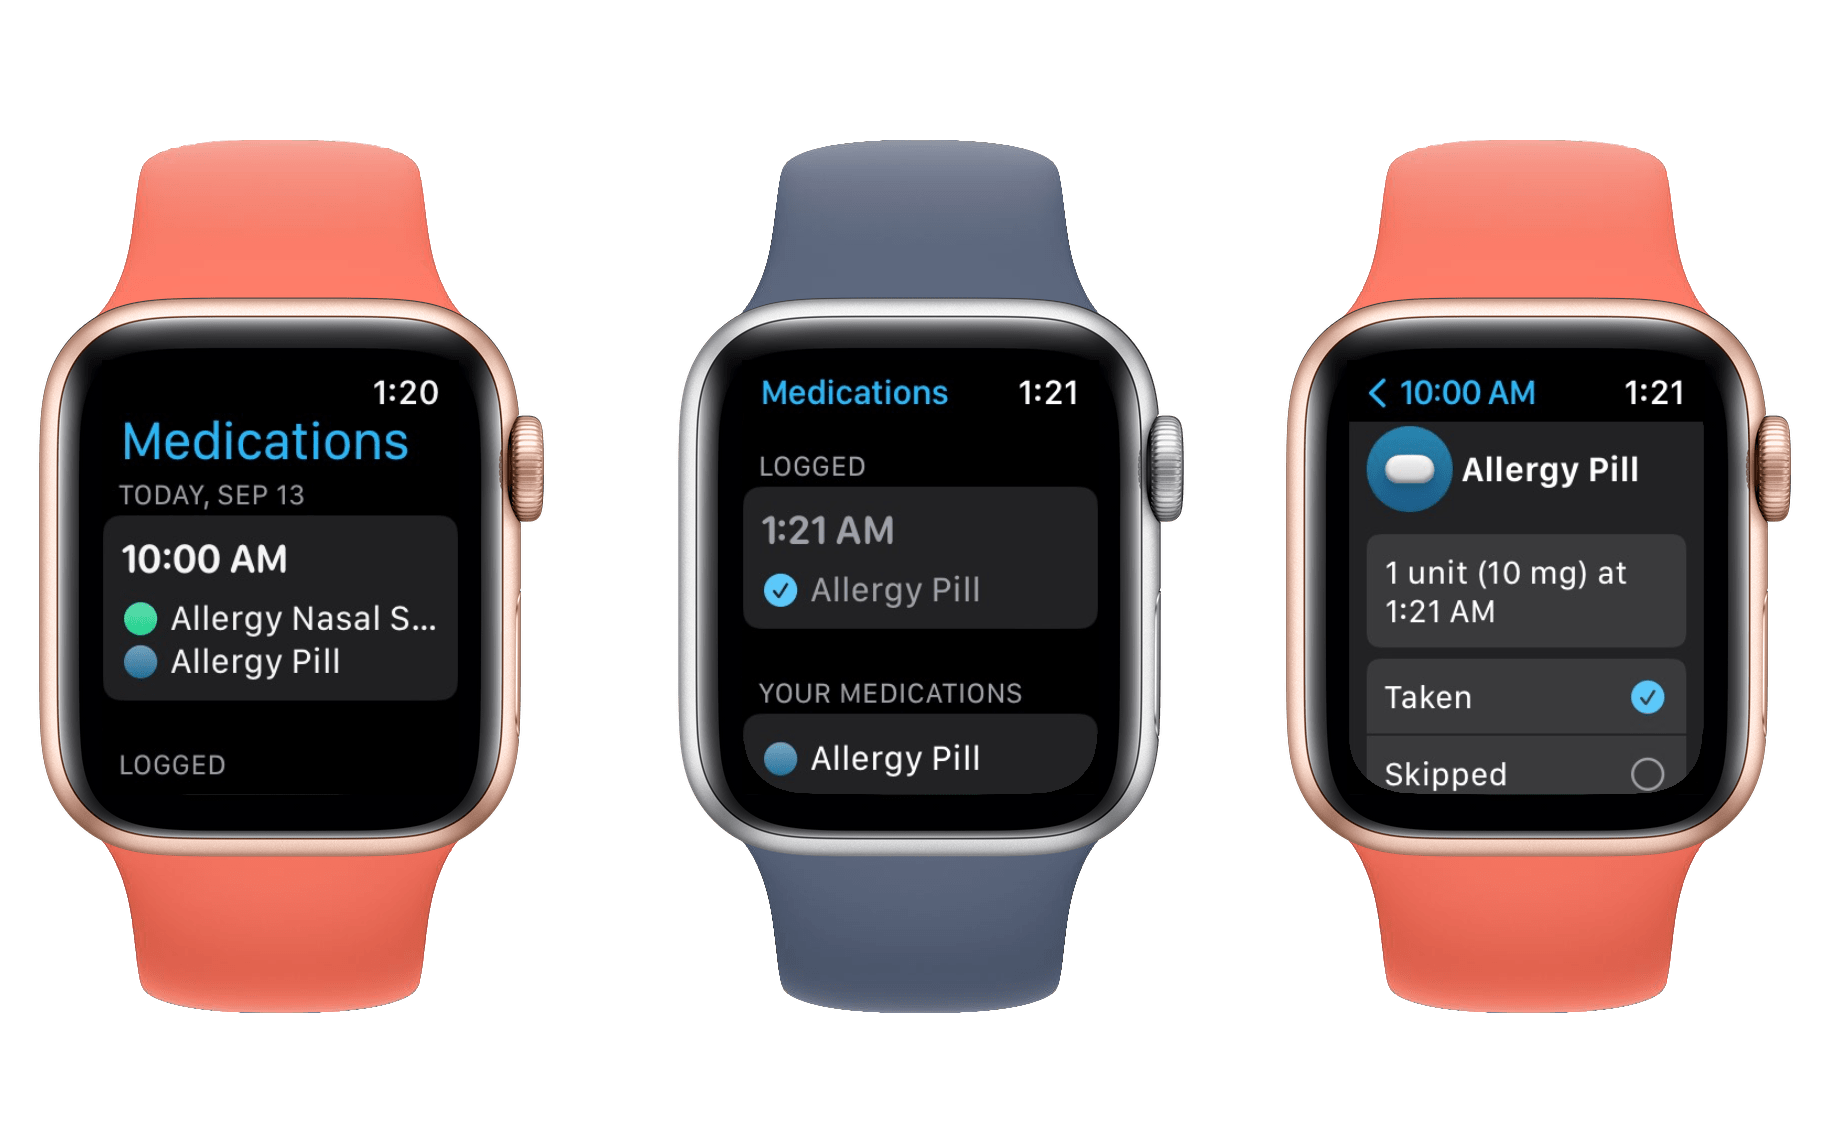
Any medications that you have logged today show up in the next section as you scroll down in the app. You can tap into these to undo logging them, or swap them from taken to skipped or vice-versa. If you forgot to log a medication at the right time of day, then from this interface you can also tap on the block with the logged time shown to open an editing interface. From there you can change the amount of the medication taken, or adjust the time at which you took it.
Finally, as you scroll to the bottom section of the app, you’ll find your full list of configured medications. This is the section you’ll go to when you wish to log an as-needed medication, since those will never show up in the top section. Just tap into the medication that you’re looking for and tap the ‘Log’ button and it will be logged as taken at that time.
The final aspect of the Medications feature is the notifications, and unfortunately I have a significant complaint about them. When you configure medications to be taken at a particular time and frequency, the app will dutifully send you a notification on both your Apple Watch and your iPhone. This notification includes three options: log the medication as taken, log it as skipped, or remind you again in 10 minutes. Those options are great, but the problem arises in the fact that these notifications aren’t sticky.
If you’ve ever set up a time-based reminder in the Reminders app, then you’ll know the kind of notifications that I’m talking about. Reminders notifications will always stay on your Lock Screen even if you tap on them to open the Reminders app. The only ways to make them go away are either to explicitly swipe them left and clear them, or to mark the corresponding reminder as done.
It’s kind of wild to me that timely Medications notifications don’t operate in this exact same way. If you receive a Medications notification and then accidentally tap into it before you’re actively on your way to take your med, then the notification will be dismissed. And since you didn’t explicitly choose the “remind me again in 10 minutes” option, you will never be reminded about it again. This is very much a recipe for forgetting to take important medications.
The notification issue is really my only complaint regarding an otherwise fantastic addition to watchOS and iOS. I’m really happy with how Apple built this feature, and I think it’s going to be huge for many users. That said, I do think that the notification issue is a significant setback. People can’t be moving their important medication reminders to this app and then missing the notifications to take their meds.
Notifications here should either be sticky like reminders, or should automatically repeat themselves when not interacted with like Due. I hope Apple changes this behavior sooner rather than later — preferably in a dot update so that we don’t have to wait a whole year.
Sleep Tracking
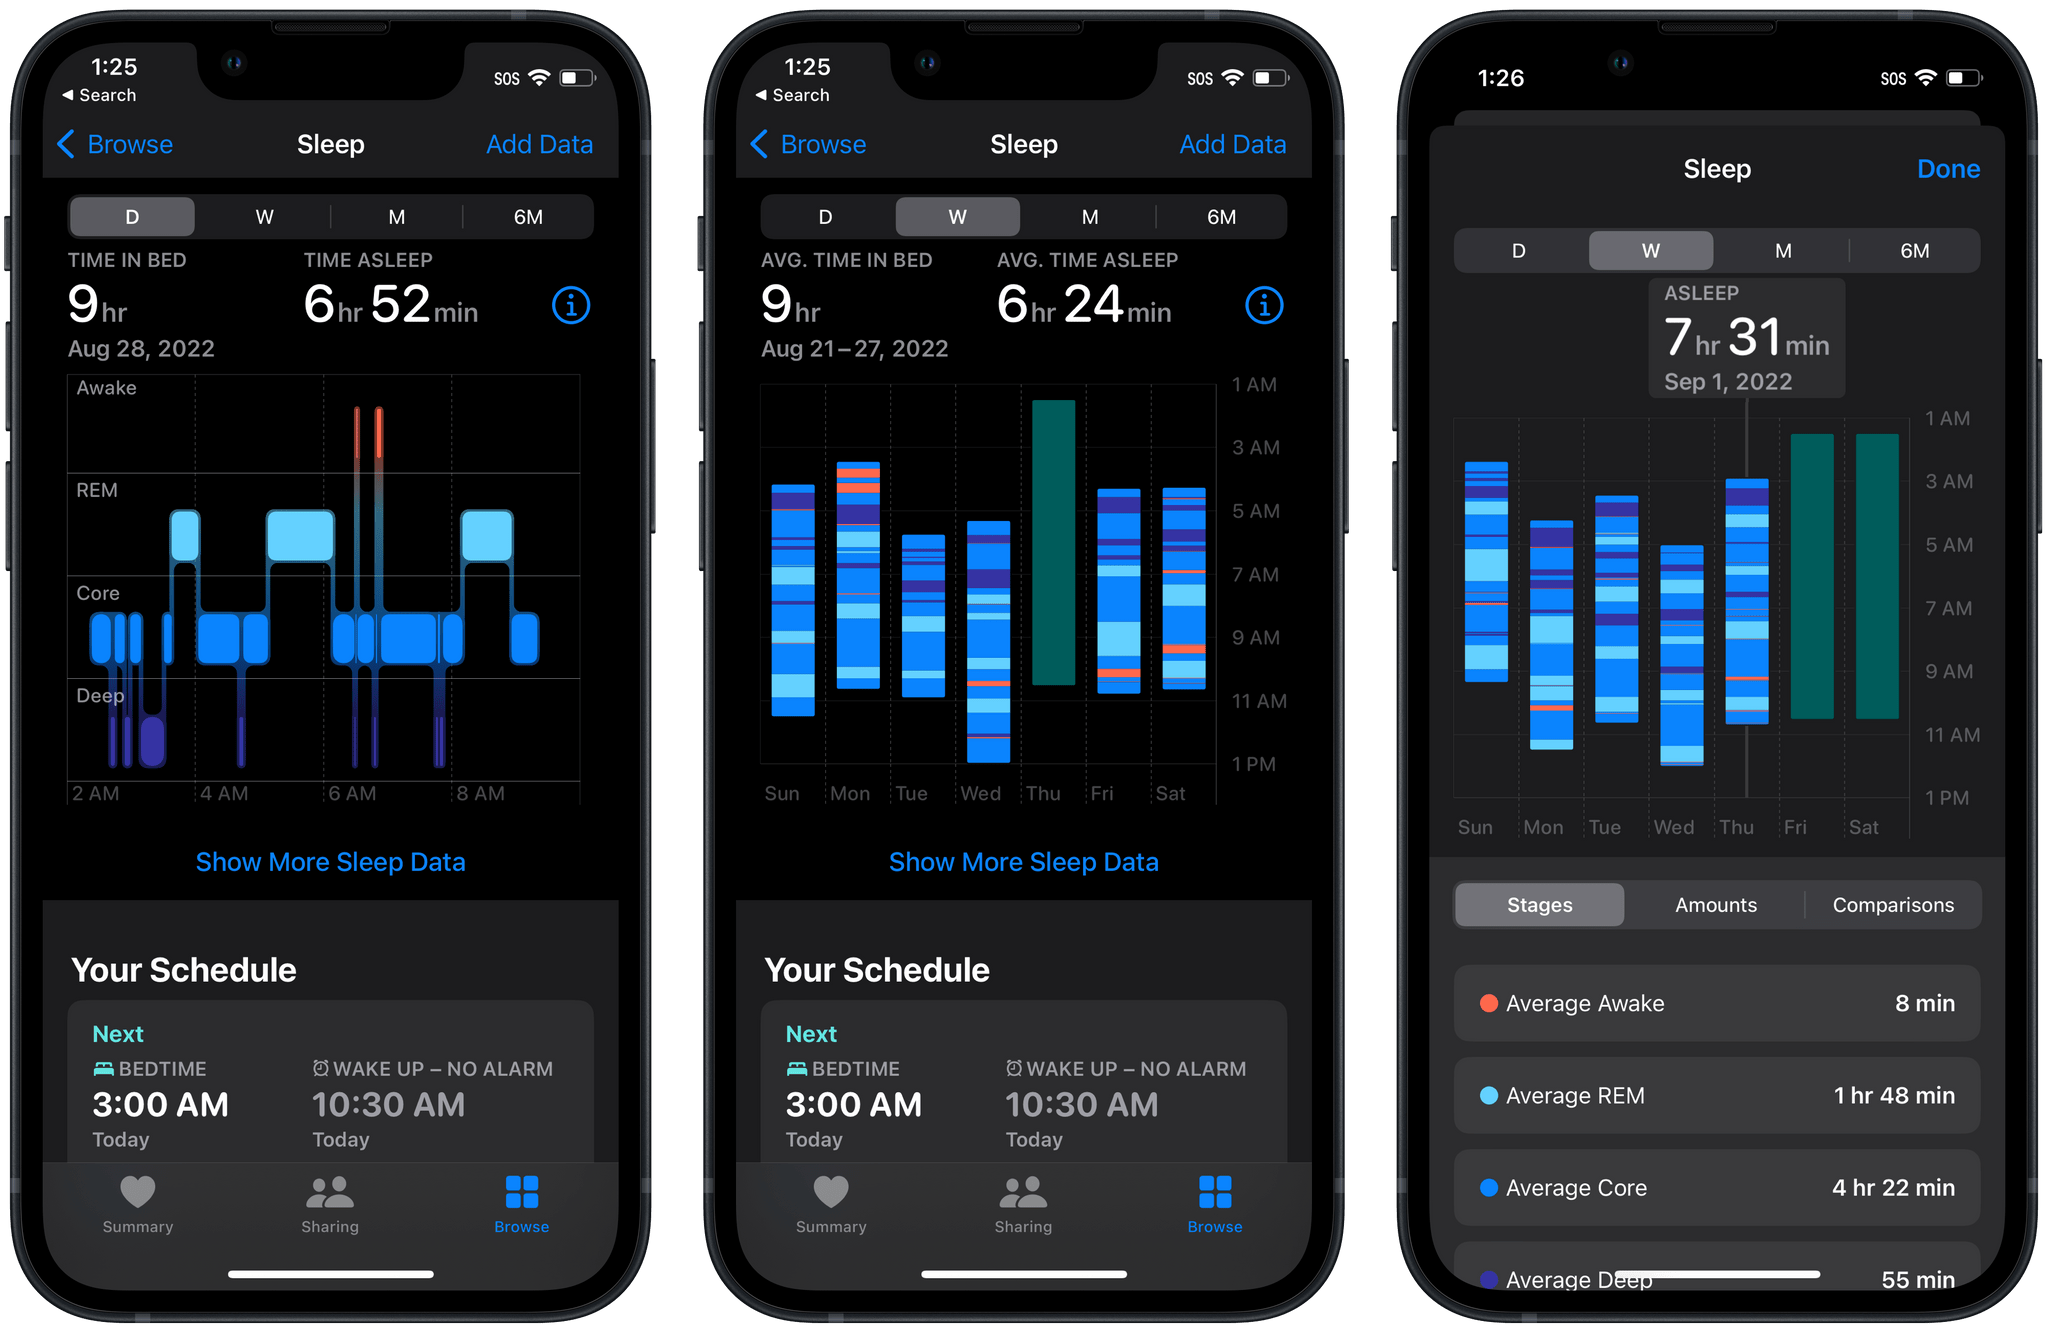
Sleep tracking has received a nice upgrade this year, adding the ability to track more granular levels of sleep. If you sleep with your Apple Watch on and Apple’s tracking system active, you’ll now see your sleeping patterns split up into four separate levels: Awake, REM, Core, and Deep.
The Sleep section of the Health app for iOS (another app inside of an app) will show you graphs of your sleep data, and these graphs are actually interactive. You can tap on any hour of data in the single-day view to see the exact period of time that you were in the corresponding level of sleep. In the week, month, and six month views (available from the tabs at the top of the graph), you can tap into any day to see the amount of time you spent “in bed” vs “asleep”. Tap on the ‘Show More Sleep Data’ button to access the single-day view for whatever day you are hovering on and get hour-by-hour data. You can also tap on the information icon in the top-right corner of the graph to read Apple’s in-depth explanation of what each stage of sleep means.
These new sleep features are excellent, and I appreciate that Apple is making the granular data readily available in every graph in the Sleep section of Health. Alas, as I must continue to complain each year, Apple’s Sleep feature only works if you set up a sleep schedule. That said, this year I dug into that requirement and mostly managed to circumvent it in a way that wasn’t too bothersome.
In the sleep schedule setup screen in the Health app for iOS, I disabled the ‘Use Schedule for Sleep Focus’ setting, which stops the schedule from automatically enabling a Focus mode. I also disabled the ‘Wind Down’ feature (by setting it to zero minutes) which tries to tell me that it’s time to go to sleep some amount of time before the schedule triggers. Finally, I disabled the Sleep Reminders settings. I then set up a schedule that is relatively close to the hours that I am often asleep.
Ultimately though, with all of the annoying reminder and Focus features disabled, the sleep schedule doesn’t really do much of anything — which is exactly what I want since I rarely sleep on a set schedule. With these settings, I get to control Sleep entirely. I just quickly enable the Sleep Focus from Control Center on my Apple Watch when I am actually going to sleep. This is never hard to remember, because the Sleep Focus also turns off the always-on watch face, which I definitely need to be off if I am sleeping with my Apple Watch on.
This combination of settings has removed my main gripes with Sleep requiring a schedule to be set up. That said, I’ve learned that I still just dislike sleeping with a watch on, so I only kept up with the sleep tracking for a few weeks while preparing this review.
One confusing thing I’ve noticed is that Apple’s ‘time in bed’ metric has some sort of very strange 9-hour default going on. Almost every night when I don’t wear my Apple Watch to sleep, the next day my Sleep recap shows me as having been “in bed” between exactly 1:30 AM and 10:30 AM. These time periods do not pertain to the sleep schedule that I have set up, as that schedule is set from 3:00 AM to 10:30 AM.
I’m not sure what’s going on here, but it may just be related to my strange setup. I’ve been running two iPhones during the beta process, with one on iOS 16 and another still on iOS 15. Still, the Sleep settings are identical for both, so I’m not sure why that would cause this strange in-bed data. It could always be a beta bug, but it has persisted intermittently all the way up to the final beta release. Hopefully this issue is only on my end, and most Sleep users won’t see similar bad data reflected in their results. (The actual sleep tracking metrics have always been accurate to my real-life sleeping hours, so the in-bed metric being off hasn’t felt like that big of a deal.)
AFib History
A new AFib history feature in watchOS 9 can estimate how frequently a heart is in AFib for users diagnosed with atrial fibrillation. It will also track lifestyle factors that may influence these users’ condition. This data is accessible via the Health app on iOS in yet another app-within-an-app interface. The data can also be surfaced by helpful notifications on the Apple Watch.
AFib history displays your heart data on a graph, and can export all data into PDF format for you to easily take for review by your doctor.