Improvements to Workout
Apple’s Workout app for Apple Watch is seeing its biggest update in years in watchOS 9. While the interface is remaining mostly the same, the active workout view has been packed full of brand-new metrics, and you can now create custom workout types.
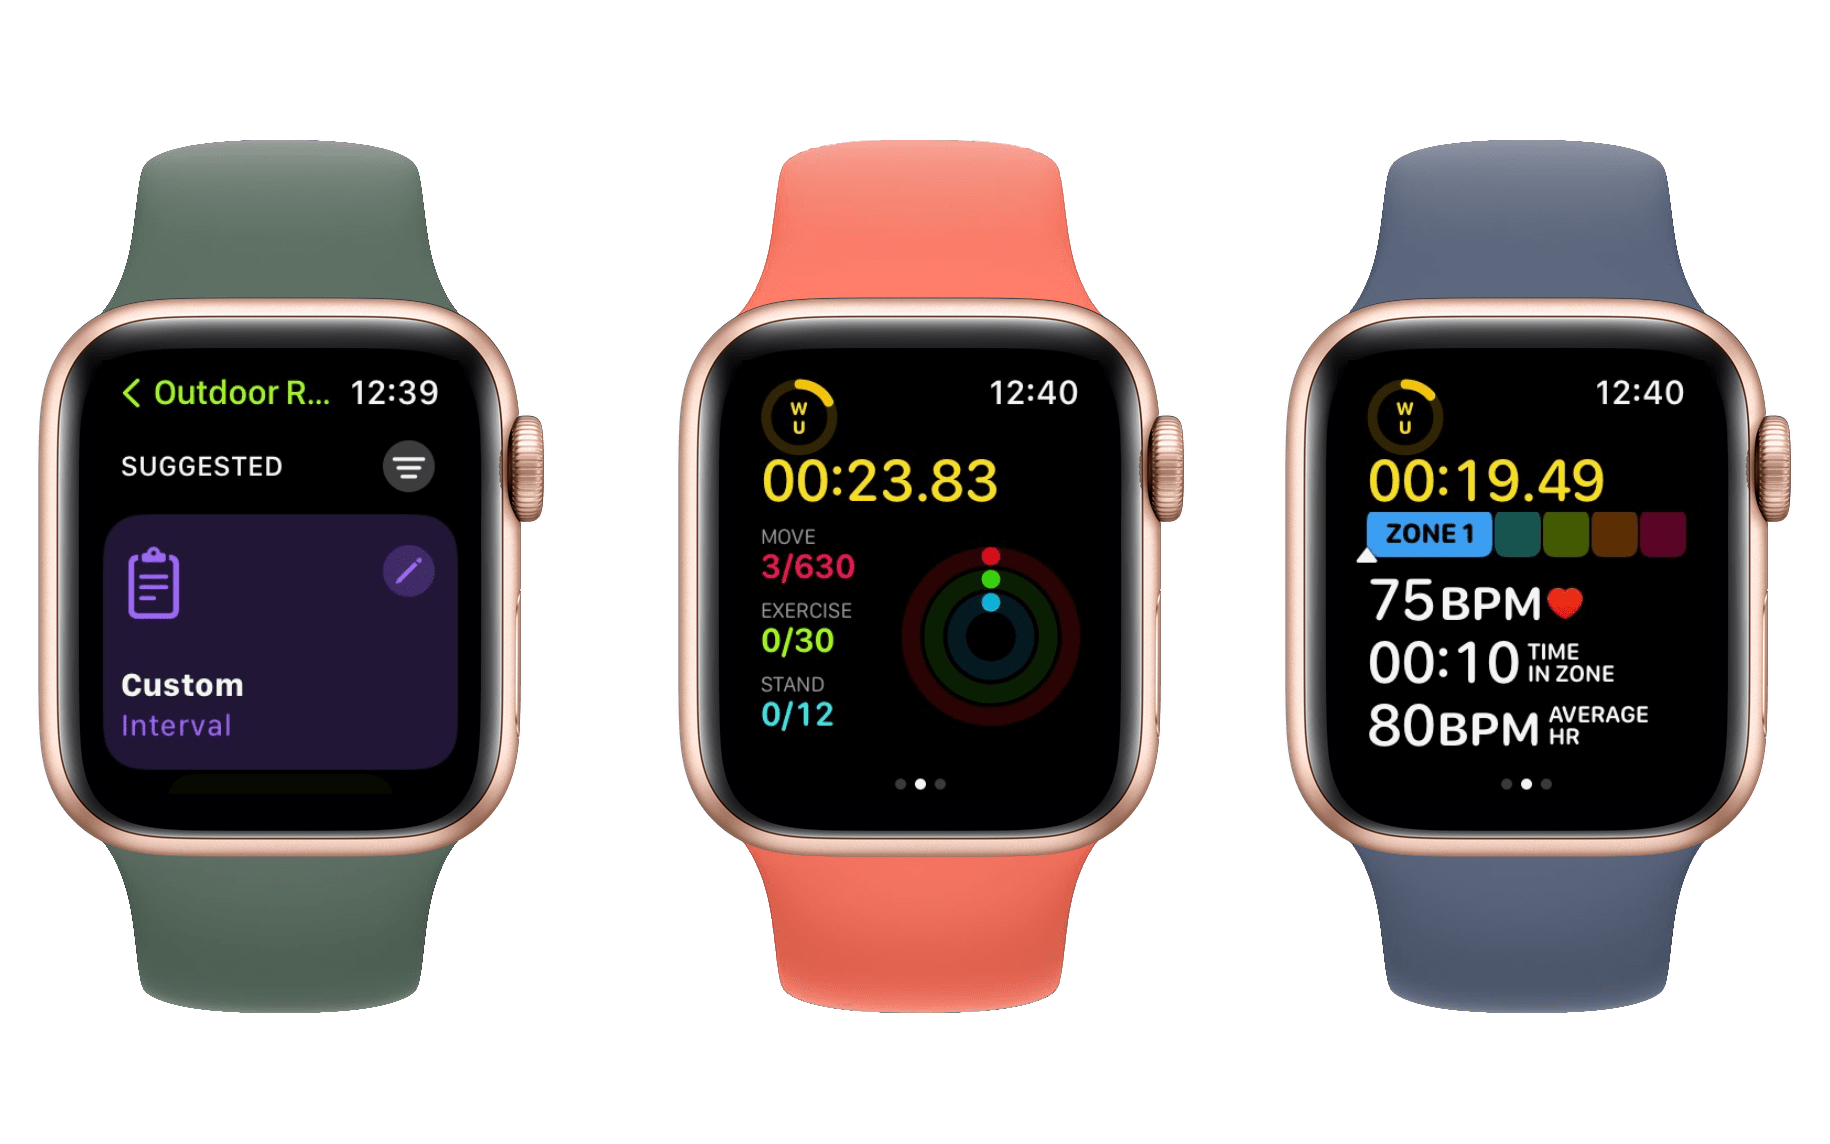
In all prior version of watchOS, the active workout interface in the Workout app has consisted of three horizontally-scrolling screens. On the left is a panel of buttons to control your workout, in the middle is the workout metrics screen, and on the right is the audio control screen. In watchOS 9, while the left and right screens have not been changed, the central workout metrics screen has far more going on.
The metrics screen can now be scrolled vertically as well as horizontally, with each new view in the stack consisting of even more metrics for you to look at during your workouts. Depending on the workout that you are undertaking, you get different options for these views. All options can be enabled or disabled by customizing the workout.
Customizing Workout Views
Workout views can be easily customized from the main workouts list on watchOS while you are not actively running a workout. Just tap the ‘…’ button that shows up in the top-right corner of each workout card. This will bring you to an all-new details interface for setting up your workout, with a list of goal cards that you can filter using the buttons in the top right.
“Goals” are the Apple Watch’s longstanding workout subtypes. Choosing between each goal sets up the main metrics that you wish to track during your workout. For instance, in an Outdoor Run workout you may wish to focus on your time, the distance that you are running, or the calories that you are burning. Each of these options, and several others, show up as goals in the Workout app, and can be selected when you begin a workout.
The most common type of goal is the generic “open” goal, which you’ve likely seen before since all of the app’s default workouts use it. If you aren’t specifically training a particular type of running or other workout metric, then the open goal is the one to use.
In watchOS 9, from each workout’s details interface, you can now tap the pencil button in the top-right corner to edit the goal. Editing allows you to set up alerts based on certain metrics, or to edit the metric views. Alerts are nice if you want to be made aware mid-workout when you are on/off your target for heart rate, pace, time, or other metric. Metric views make up the vertical stack that can be scrolled through during an active workout.
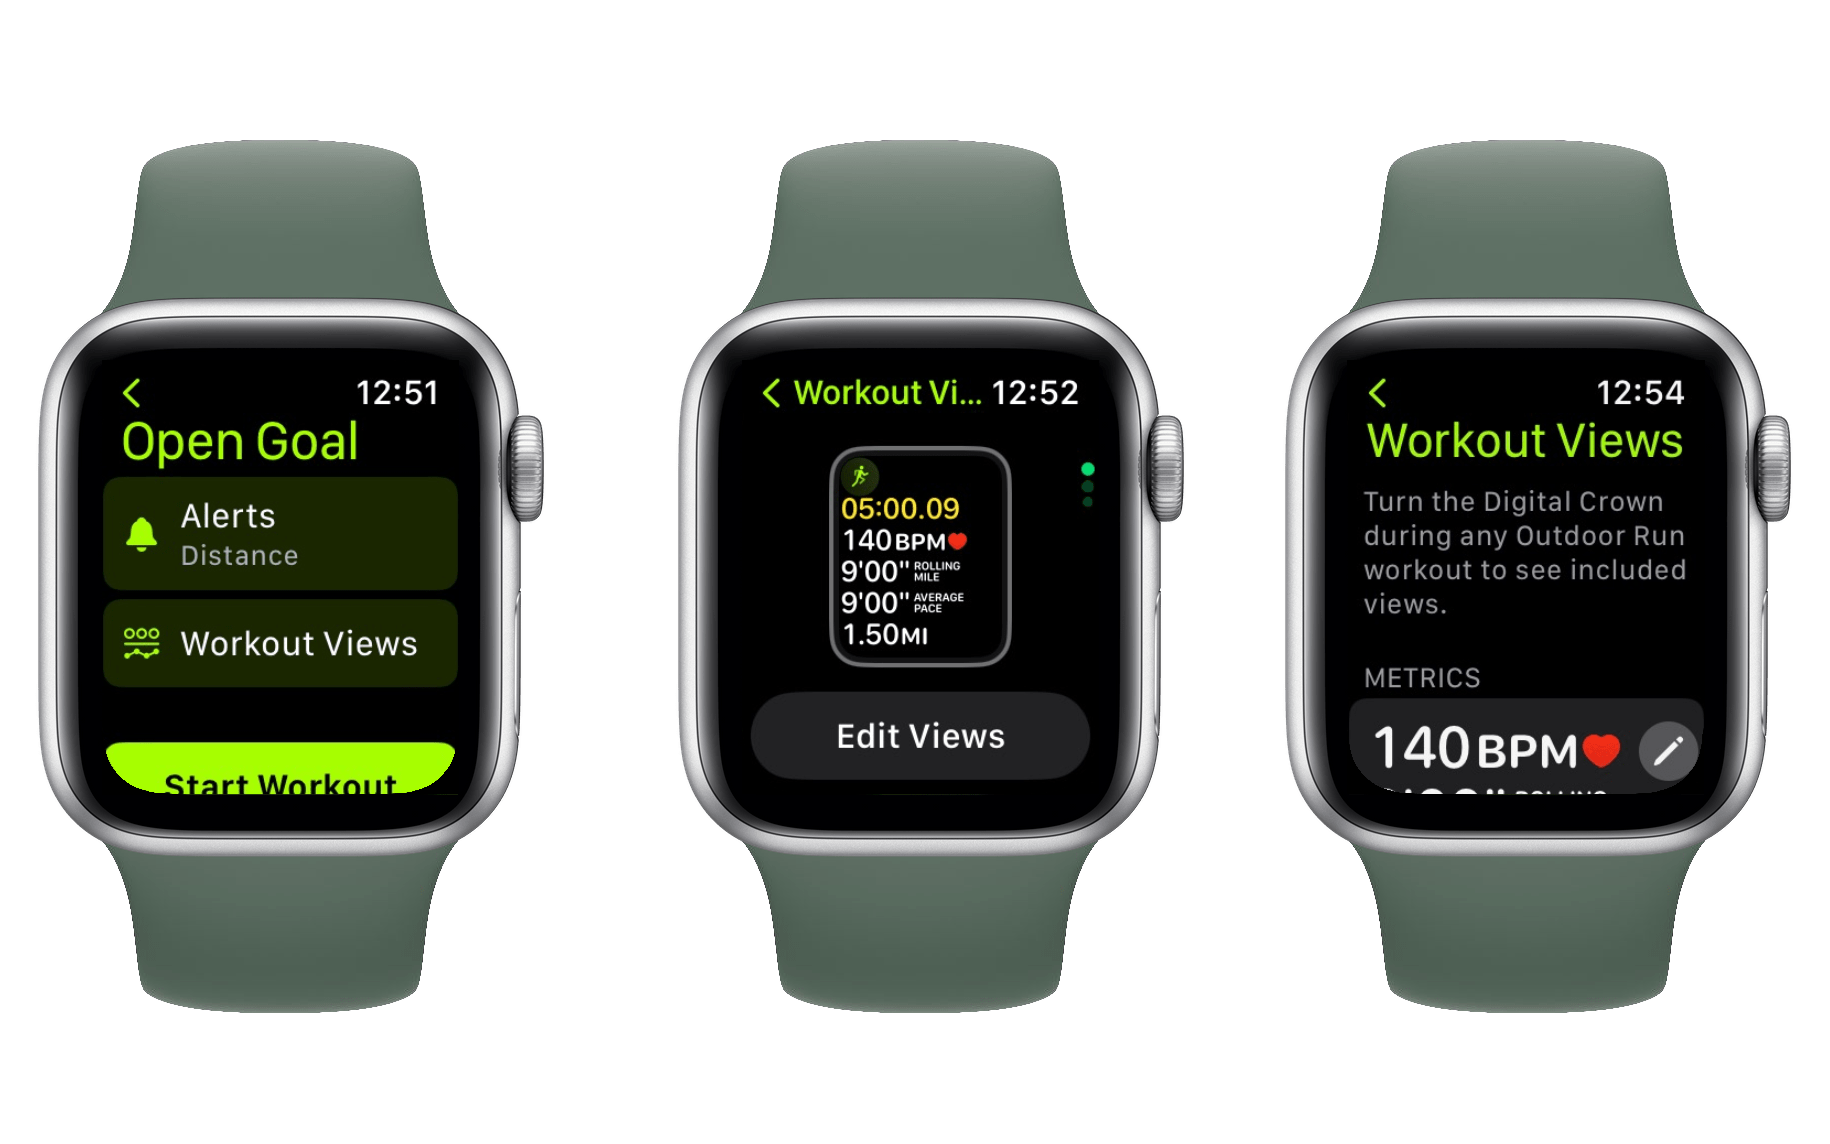
Tapping into the ‘Workout Views’ option gives you a preview of which views you have set up for this workout. If you wish to make changes, just tap the ‘Edit Views’ button to enter the editing interface. From here you can enable or disable any views to ensure that you are only seeing the metrics that interest you. You can also tap the edit buttons available on certain views to make changes to them.
Currently the only editable views are the ‘Metrics’ and ‘Metrics 2’ views. These will be familiar to Apple Watch users because they’re the same view that the workouts app has always had in its central screen. However, in watchOS 9, not only can you add a second metrics view, but you can also customize the exact metrics that show up in either one. You can add and remove metrics, or even reorder them using the editing interface.
The other metric views are Heart Rate Zones, Splits, Segments, Elevation, and Activity Rings. These cannot be edited granularly, but can be enabled or disabled so that unnecessary metrics don’t take up space in your stack.
If you wish to reorder the stack of metric views themselves, just scroll to the bottom of the view editing interface and tap the ‘Reorder’ button, then move them around to your heart’s content.
Once you have your workout views set up, you can navigate between them during an active workout either by scrolling with your finger or by spinning the Digital Crown. In previous iterations of watchOS, spinning the Digital Crown on the active workout view would cause the highlighted metric to change. As of watchOS 9, there’s no longer any way to change which metric is highlighted while working out. That said, if you only care about a specific metric, you can easily just customize the workout views so that the data you care about shows up at the top rather than being buried elsewhere.
Customizing Workouts
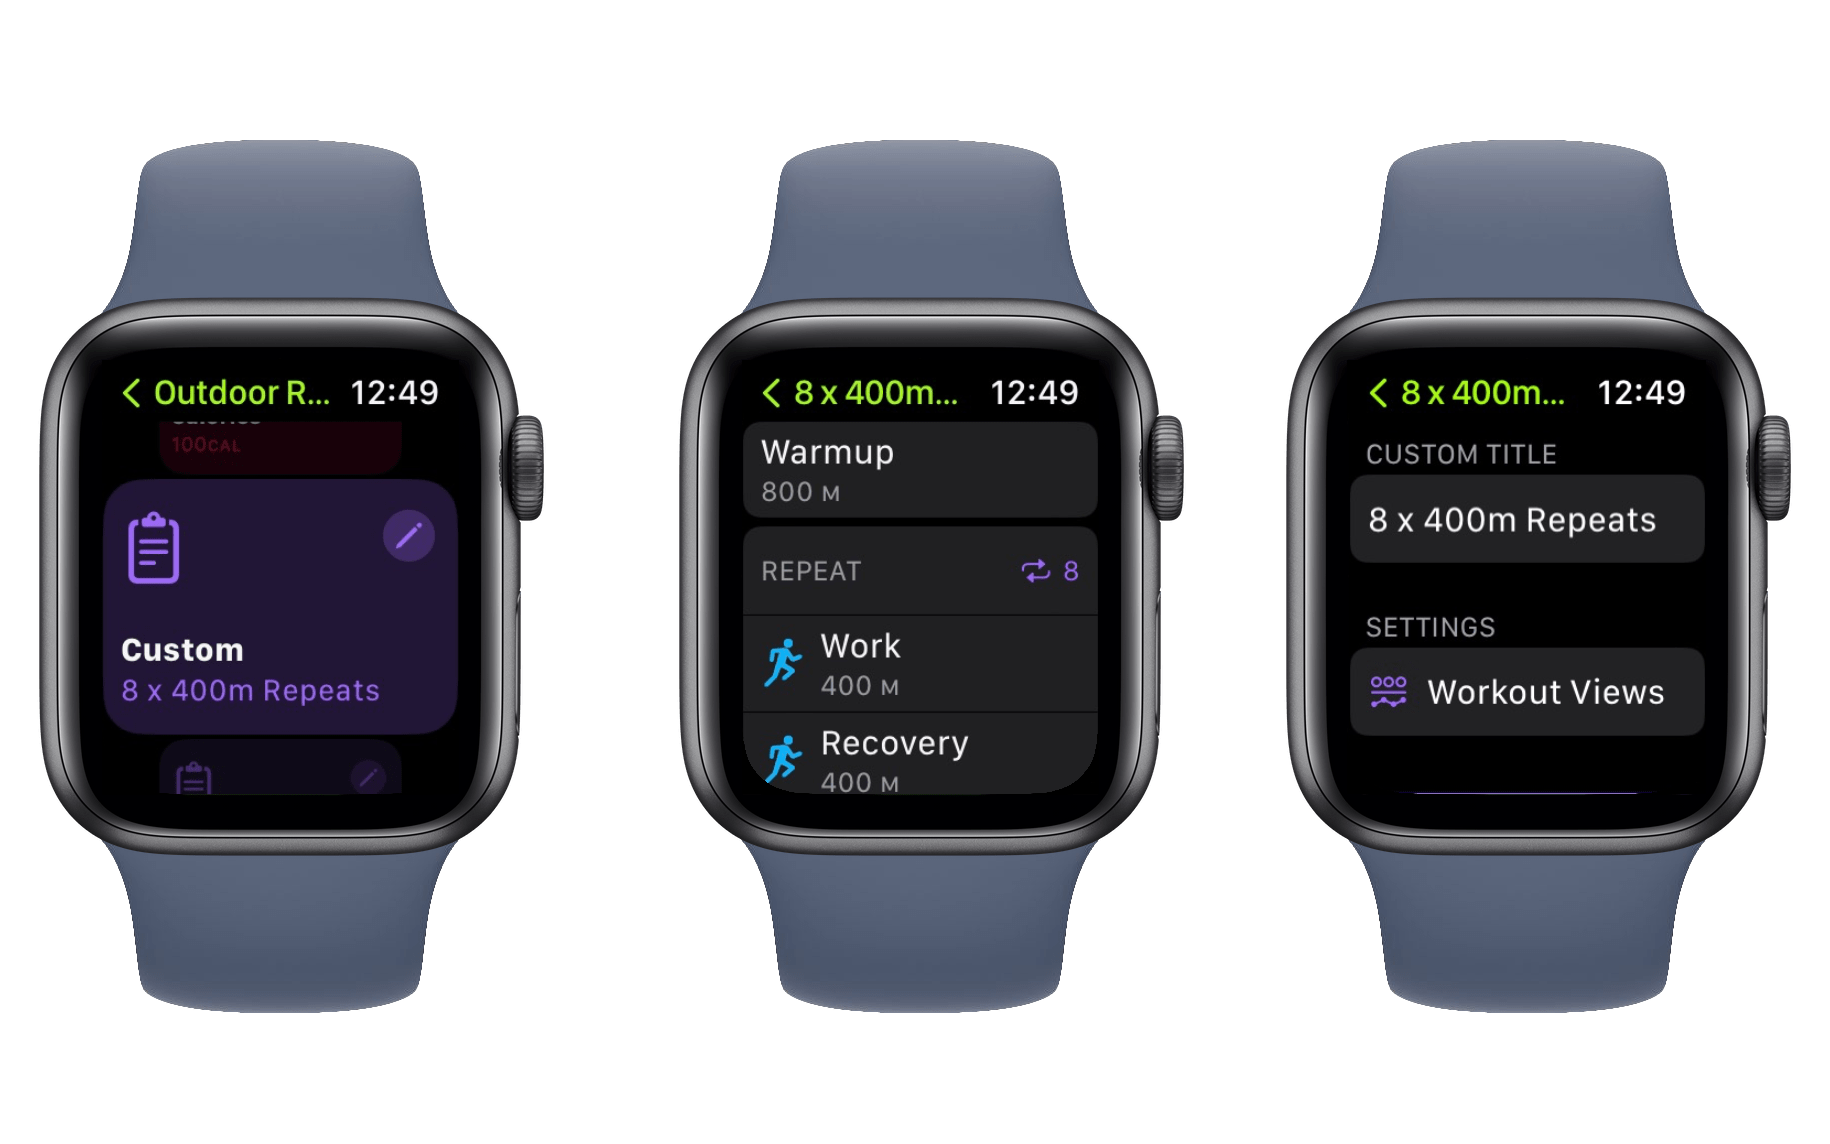
Apple didn’t finish there with its changes to the Workout app in watchOS 9. The company also added the ability to create entirely custom workouts by combining smaller segments.
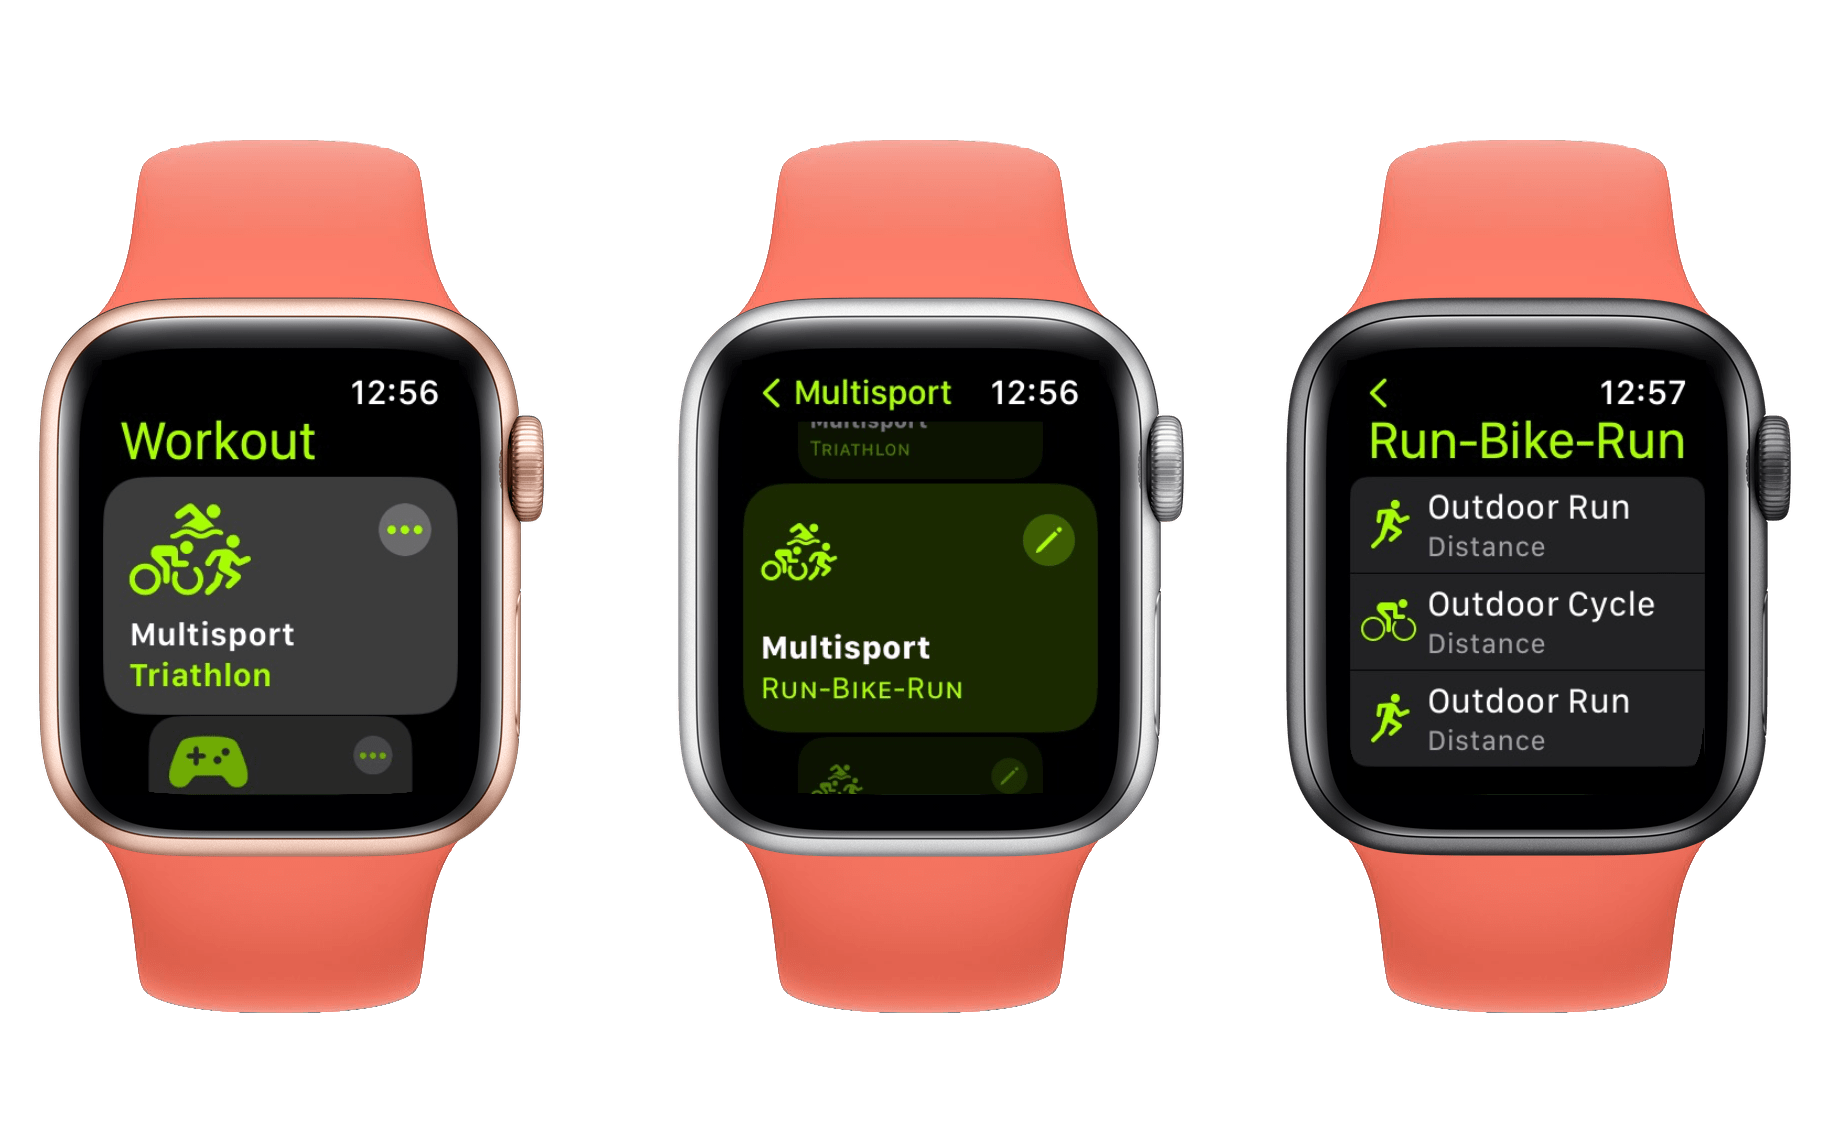
Specifically, these are custom workout goals, which means they take place within the confines of a particular type of workout. For instance, if you are creating a custom outdoor run workout, then you would first tap into the ‘Outdoor Run’ card’s details view via the ‘…’ button, then scroll to the very bottom and tap the ‘Create Workout’ button. Choose the ‘Custom’ option to begin setting up your workout. This works the same no matter which type of workout you are customizing, with the exception of the multisport workout type that we will get to momentarily.
Within the customization interface, you can choose to set up a warmup or a cooldown for your workout. Each of these can be configured as a particular type of goal, such as warming up for a run based on distance or time. You can also pick the “open” goal type for your warmup or cooldown.
Depending on the goal you pick, your warmup or cooldown will either end automatically (once the specified time has elapsed or distance has been traveled), or in the case of the open goal type, will end only when you manually double-tap your watch screen to end it.
Between the warmup and cooldown, you can add any number of ‘Work’ and ‘Recovery’ steps to your workout. You can also configure sets of these work/recovery steps to be repeated a number of times. Using these building blocks, you can design a workout to exactly match the training regimen that you are undertaking.
Once you’ve designed your custom workout, you can activate it by finding its overarching workout type in the main interface of the Workout app, tapping the ‘…’ button, and then selecting your custom workout from the list. This number of steps feels a bit clunky, but if you run the same workout type consistently enough then it will probably get elevated to the main interface so that you can activate it with one tap.
I say probably because there’s no manual way to control which workout goal shows up in the top-level interface of the Workout app. By default it is generally the ‘Open’ goal for each workout, but if you configure and run a custom workout then that one usually gets swapped into the top position. In my testing though, the custom workouts sometimes just don’t get pushed to the top.
The default workout goal is based on the ‘suggested’ filter when you tap into a workout’s details view. This filter is an Apple black-box, so when it doesn’t suggest the workout that you want at the top level, you’re just going to have to tap into the full list and find the right one. I wish Apple would just give us the option to configure this list ourselves and select whichever default we want.
If you do get stuck with a default workout goal that you never use, one option to fix the issue is to tap into the details view, swipe left on the offending goal, and delete it entirely. This triggers a reorder of Apple’s suggested list and in my testing often resulted in my most recently used workout (which will generally be the one I want) getting elevated to the top of the list. You can always add deleted goals back later with the ‘Create Workout’ button in the corresponding workout’s details view.
The Multisport Workout
The multisport workout is a brand new type this year. It combines swimming, cycling, and running workouts with interim transition periods to enable smoothly tracking triathlon metrics via the Apple Watch. This is sure to be a very useful advancement for triathletes, as the only way to make something like this happen previously was to waste time fiddling with the Apple Watch interface to switch workouts between each leg. Another option would have been to just track the entire exercise using a generic “open” goal, but then you would miss out on the valuable sport-specific metrics for swimming, cycling, and running.
By default, the multisport workout type tracks each leg automatically, including tracking the between-leg transitional periods as their own separate sections. As a nice touch, the Apple Watch automatically puts itself into Water Lock mode during the swimming leg, disabling the touch screen until you hold the Digital Crown down for a few seconds, at which point it plays noises to eject any water from the speaker holes.
I didn’t attempt a triathlon to test this, but I’ll admit that I did spend some time in my apartment waving my arms around in the attempt to trick my watch into thinking I was swimming. Unsurprisingly, I was unable to outsmart the device’s swim-stroke-attuned sensors, so it just immediately put me into a transitional period. Presumably this will work great if you actually undertake a triathlon.
If the real-world automatic tracking doesn’t work for you — or if you just don’t want to leave your metric tracking up to Apple’s attempts at guessing each leg — you can customize each multisport workout goal such that they only transition manually. In this case, you’ll need to swipe over to the leftmost screen and tap the ‘Next’ button each time you finish a leg to switch to the transition period, then tap ‘Next’ again to begin the next leg. Don’t forget that after the swimming leg you’ll need to spend a few seconds holding the Digital Crown in order to release the water lock.
The multisport workout is an outlier when it comes to customization. Rather than giving you the standard customization view that all other workout goals grant access to, multisport’s customization view only allows adding and reordering each leg. You can choose between indoor and outdoor run, swim, and cycle workouts.
The metric views for individual multisport workout types cannot be adjusted, which seems like an oversight to me. Hopefully Apple will allow further customization of each workout leg next year.
That said, you can use the multisport customization interface to set up any manner of run/bike/swim workout that you are planning to undertake. Duathlon athletes can use this to eliminate the swimming leg, and it may also be useful for training by switching legs to indoor, or eliminating legs entirely.
New Workout Metrics
In watchOS 9, the Workout app can now track vertical oscillation (how much you move vertically during each stride), stride length, ground contact time, and running power. These join the previous cadence and pace metrics to present an ambitious portfolio of metrics for runners. For most non-running workouts, these metrics won’t be available.
There is also a new “heart rate zone” metric, which shows up for most workout types, and is available as its own view in the new stack of workout views. Heart rate zones track your heart’s beats per minute over time throughout your workout, and can help present you with data regarding which zones of effort your heart is operating in as your workout progresses.
By default, heart rate zones are configured automatically by watchOS using your monthly average resting heart rate and your monthly maximum heart rate. These max and resting values are updated on the first day of every month, and can be found in the watchOS Settings app under Workout > Heart Rate Zones. If you’d rather set your heart rate zones up manually, you can do so from that settings panel as well.
Finally, the Fitness app for iOS 16 has been updated with a new details view to give better insights into your workout metrics over time. The Fitness app has long had a confounding lack of interactivity and information density, with graphs of heart rate data and route maps which cannot be drilled into at all to see exact metrics. In iOS 16, Apple is sort of fixing this.
The main screen of the Fitness app has had its design tweaked, but remains mostly the same overall. You will see a list of your workouts going back in time, and can tap into any of them to enter its details view. This main details view also remains mostly the same, other than some minor design changes. A graph of heart rate data is shown toward the bottom, and you can tap into it to expand it and also see your post-workout heart rate graph. Neither of these graphs show any granular data though, and neither of them are interactive in any way.
However, the updated Fitness app also includes a new ‘Workout Details’ header with a ‘Show More’ button next to it. If you tap that button, you’ll be taken to a brand-new details view inside of the main details view. This view shows a nearly identical heart rate graph, as well as a map of your route and graphs for other metrics such as pace, elevation, and cadence.
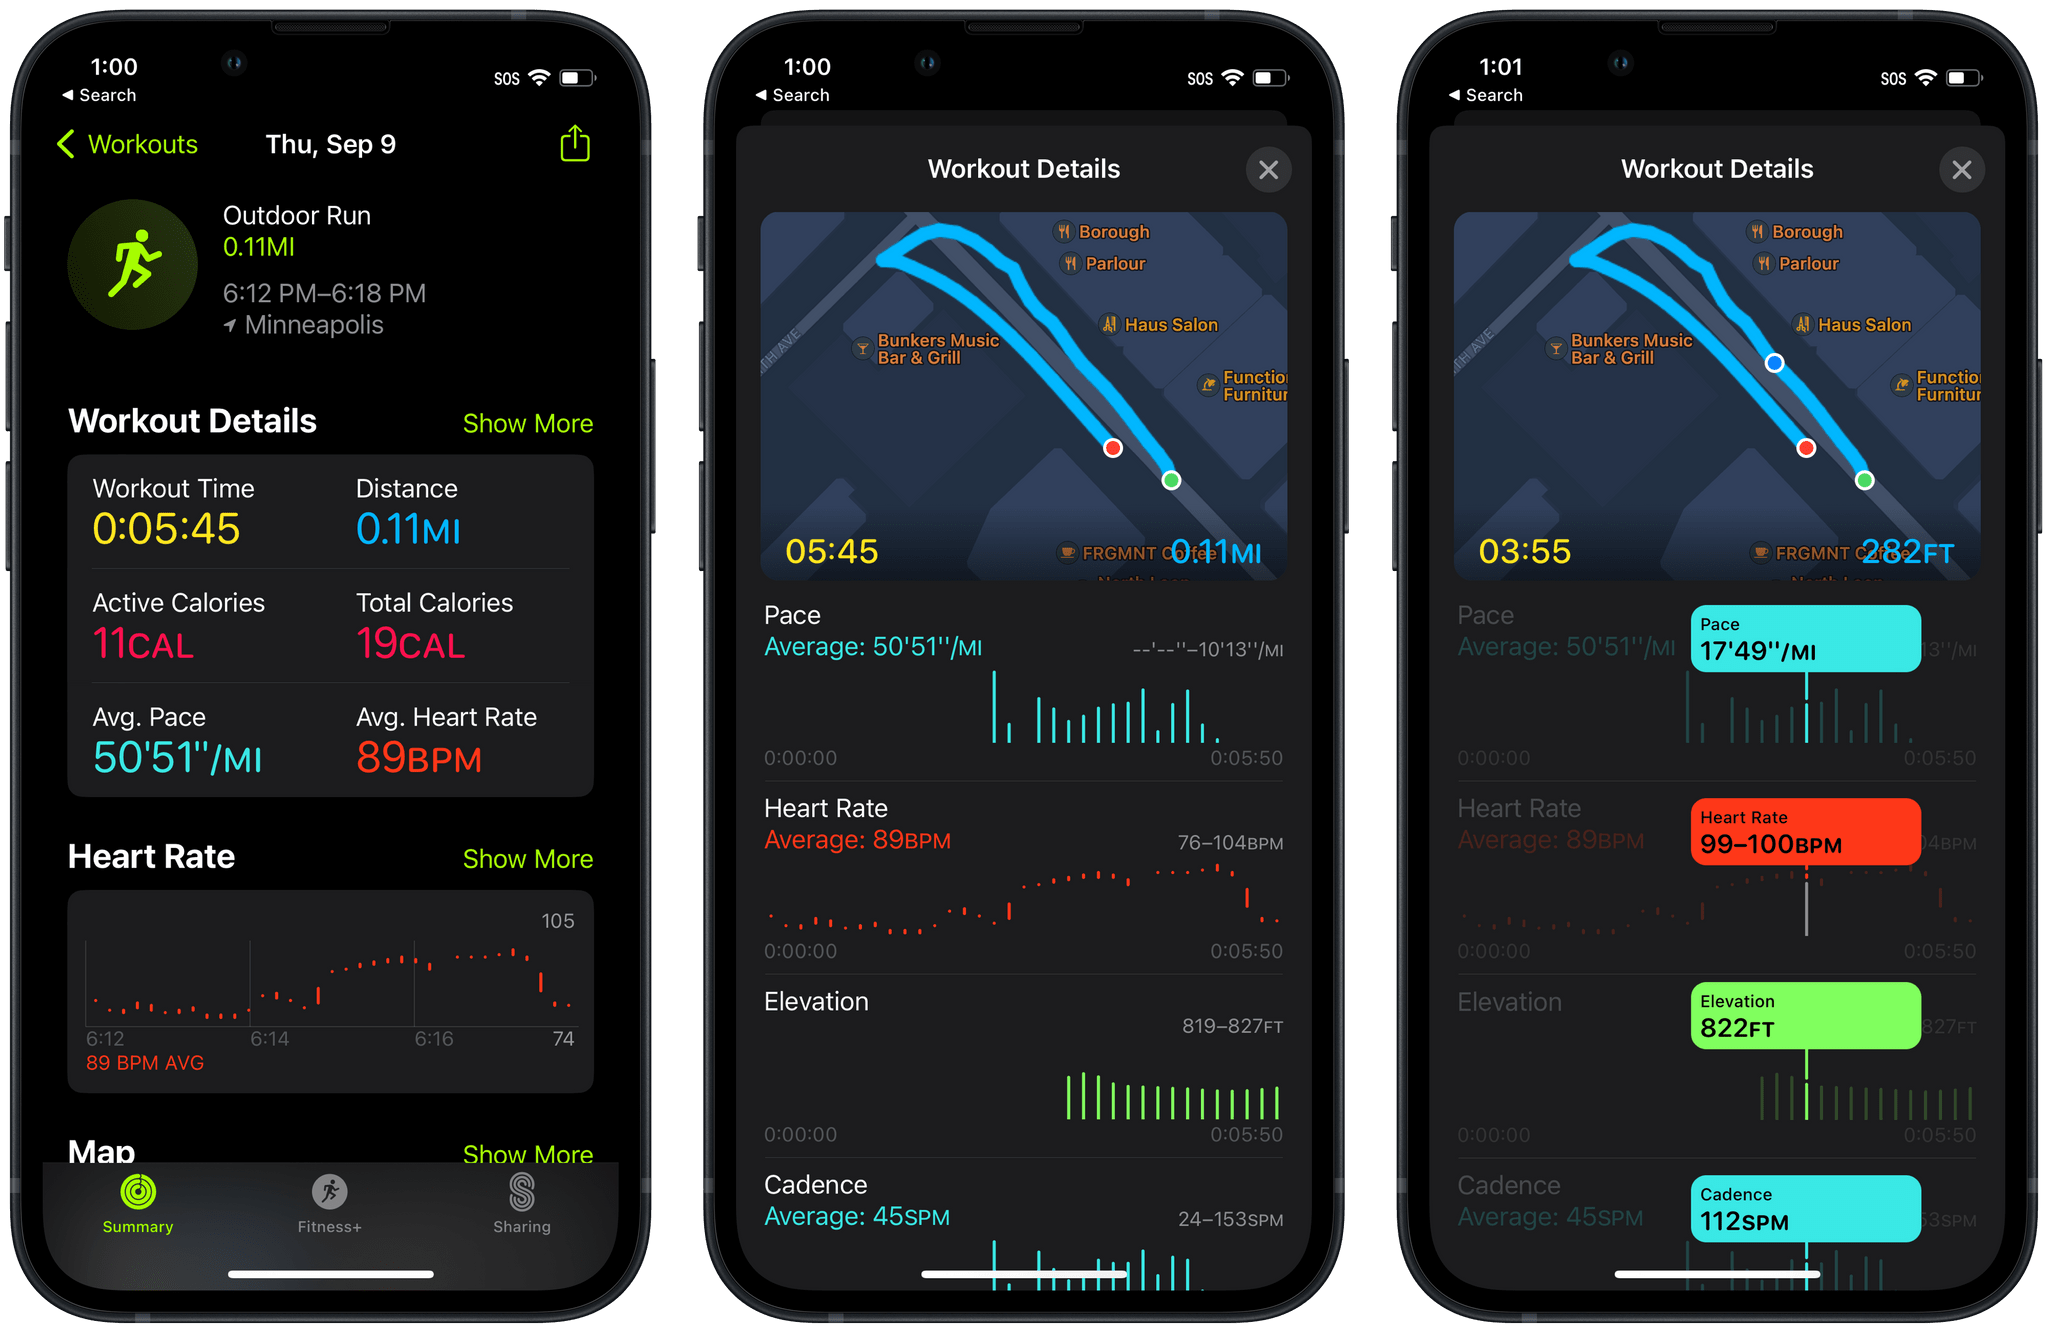
For some reason, these graphs have been deemed special enough to be interactive. You can tap and hold on them to see granular data from each graph show up, and even see an indication on the map of your exact location when the data points were being gathered. You can move your finger back and forth to see your exact route as you undertook it slide across the map.
The interfaces inside of the Fitness app are frustratingly inconsistent. I struggle to understand how Apple can’t make some simple and straightforward metric views even after years of this app existing. Every graph in this app should be interactive, and you should be able to zoom in and out of them to drill down to more granular levels. Instead, Apple remains committed to making the interface appear simple and attractive above all else, sacrificing usability in the process.
The new interactive graph view is of course a step in the right direction, but since the view is hidden so deeply in the app, and since every other similar interface trains users that these graphs are not interactive, I fear that few people are going to discover the availability of these new insights.