Whether you have hundreds of notes and are looking for a way to sift through them, or you want a quick way to create a note or add to an existing one, Shortcuts is a terrific solution. I have about 300 notes. That’s a lot, but I know people with many more. Between pinning and sorting by date modified, my notes are manageable, but often I find myself searching for a bit of information I stored away months ago. That’s why I want to kick off a pair of Shortcuts Rewind installments with two shortcuts to help you locate existing notes. In a future installment, I’ll tackle note creation.
Apple’s Notes app has built-in search, and its sorting is powerful, but with Find Notes (with Menu) and View Recent Notes, you can create a customized system that takes you to your most-used notes faster, regardless of whether you are working in the Notes app.
Aside from the utility of the shortcuts themselves, these two shortcuts are also an excellent way to dig into Shortcuts’ scripting actions. As I walk through each shortcut, you’ll see how picking from lists works and use a counting script action to tie a shortcut’s behavior to the number of items found. I’ll also briefly revisit If and Otherwise actions, a staple of many shortcuts.
Find Notes (with Menu)
I have a handful of notes that I access over and over throughout the week for things like lists of apps I want to check out, ideas for stories I want to write, media I want to try, and MacStories project plans I share with Federico. The list of notes I access changes frequently, but there is always a core of 5-10 notes I go back to over and over for months at a time, for which Find Notes (with Menu) is perfect.
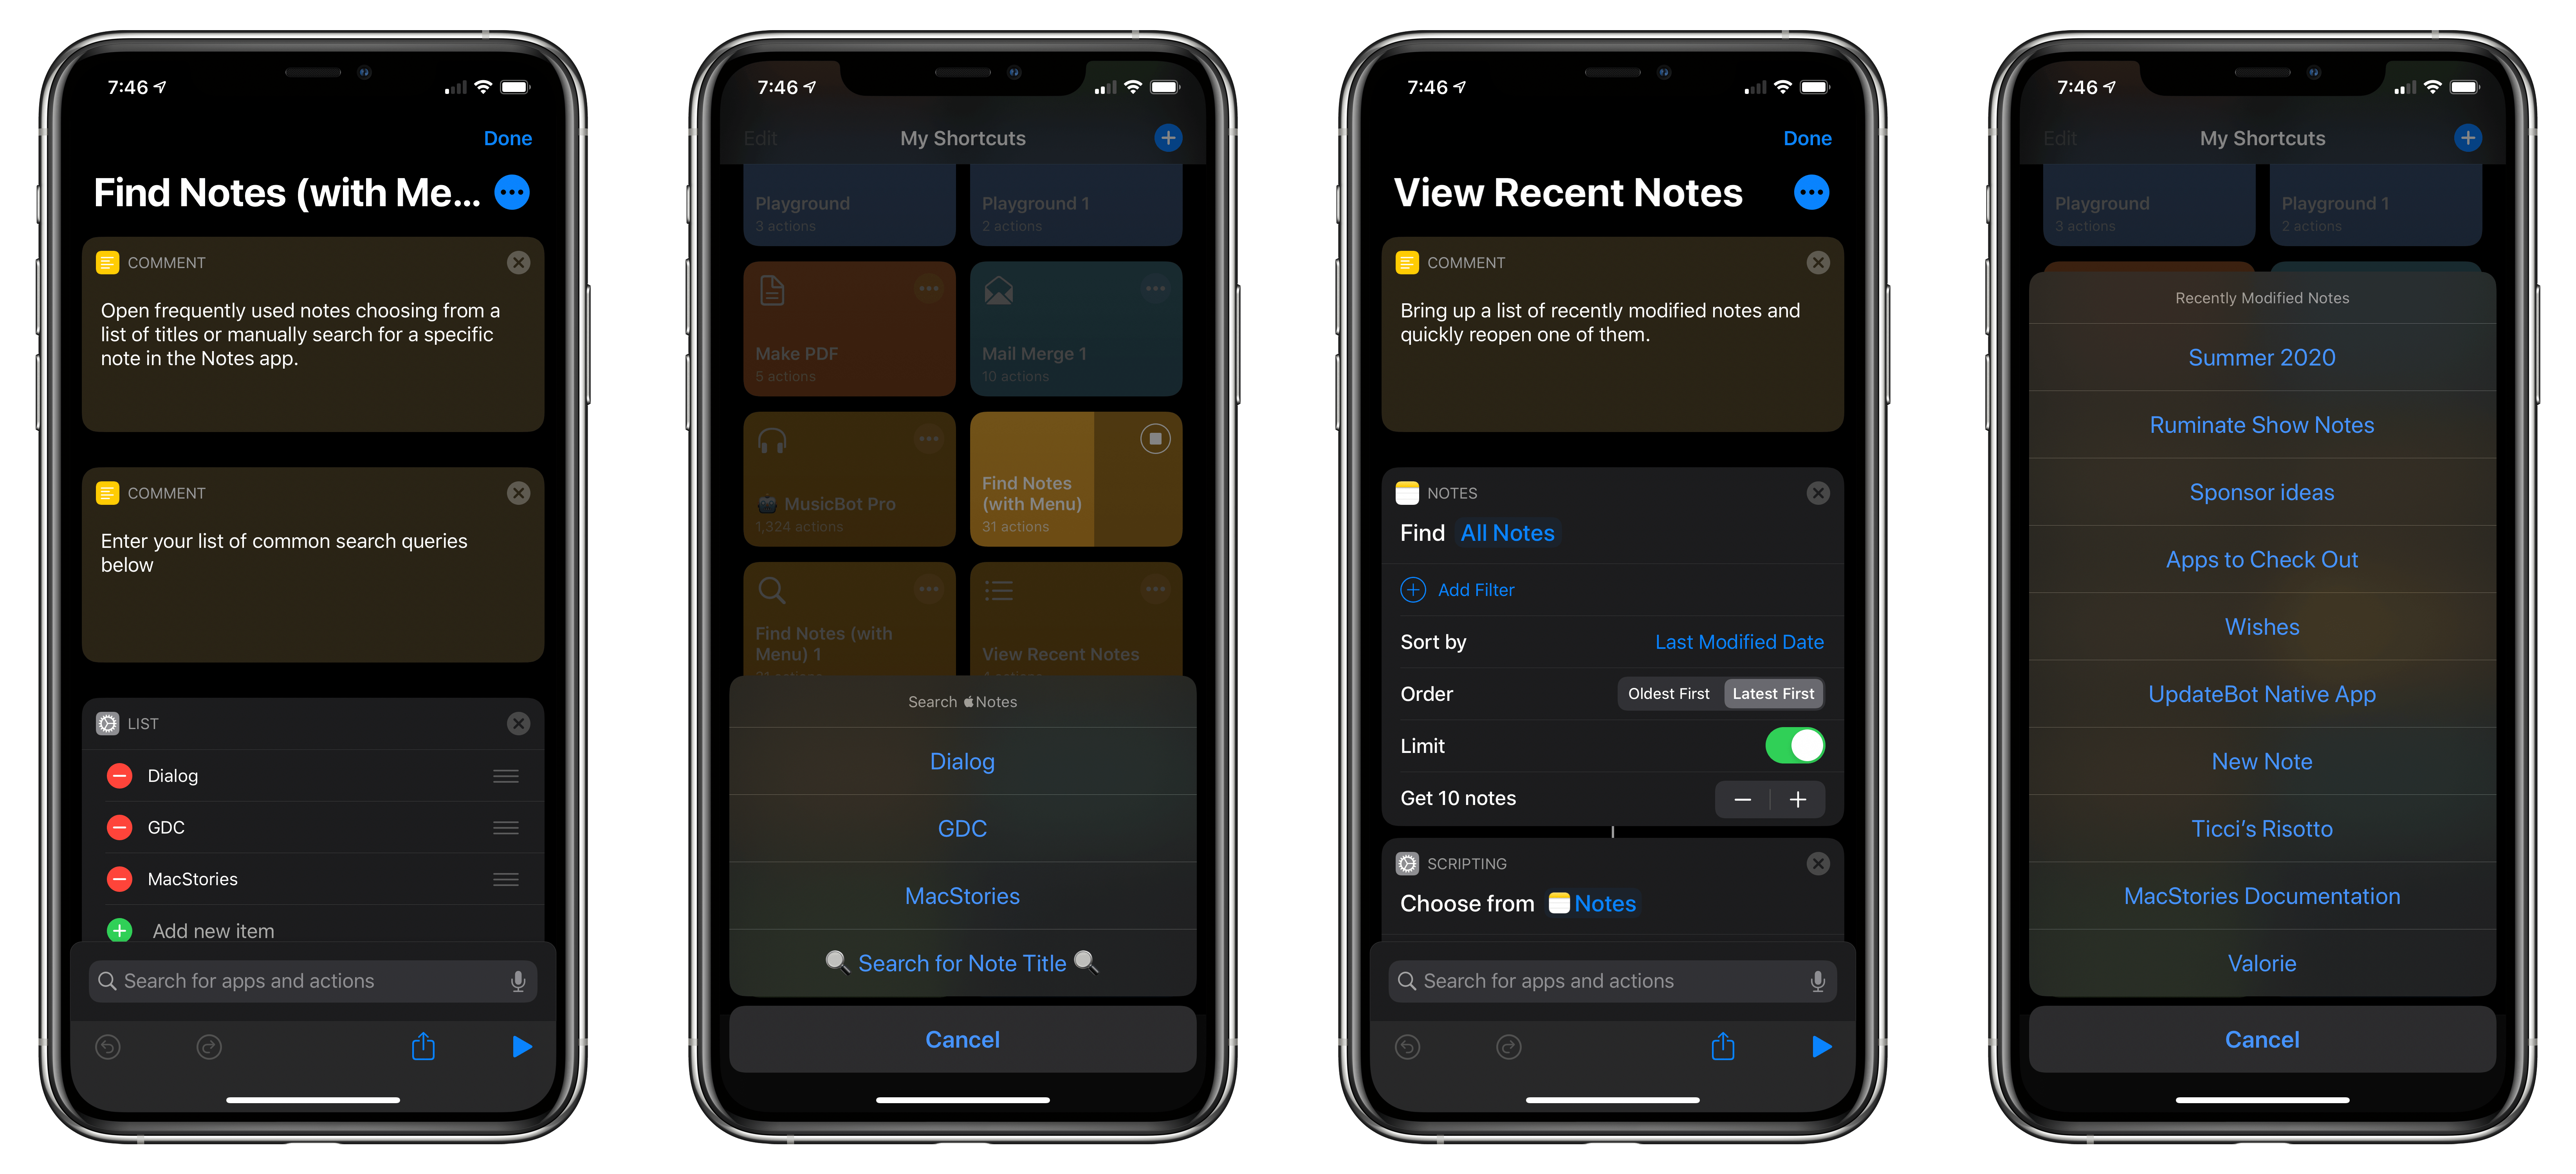
The shortcut, which can be run from the Shortcuts app, from Shortcuts’ widget, or from the Home screen, opens a popup menu of notes to pick from for quick access. There’s also a ‘Search for Note Title’ menu option to find a different note.
A nice touch of the predefined note choices in the menu is that they are searches too. That means you can be very specific, which will return one note or, if you have a series of notes that share common terms in the titles, you can use the term instead of a specific title to display a second menu containing notes with that term.
For example, I don’t have a note called ‘Try’ but I do have a series of notes with names like ‘Apps to Try’ and ‘Music to Try.’ By using ‘Try’ as a menu item in Find Notes (with Menu), I can pull up a secondary menu of notes with that term and pick from them.
Of course, there are other ways to quickly surface frequently-used notes in the Notes app, such as pinning them to the top of a folder of notes. I use that method too, but for my most commonly-used notes, I prefer Find Notes (with Menu) because it takes me straight to the note I want, side-stepping the possibility that I’ll get distracted by something else in my long list of notes along the way.
Find Notes (with Menu) originally appeared in Shortcuts 2.2 Brings New Apple Notes Actions, Travel Time Enhancements, where Federico covered it alongside the other shortcut I’ll outline in this installment of Rewind. The shortcut can also be found in the MacStories Shortcuts Archive.
Find Note (with Menu), Part 1
➊ Choosing From a List of Notes
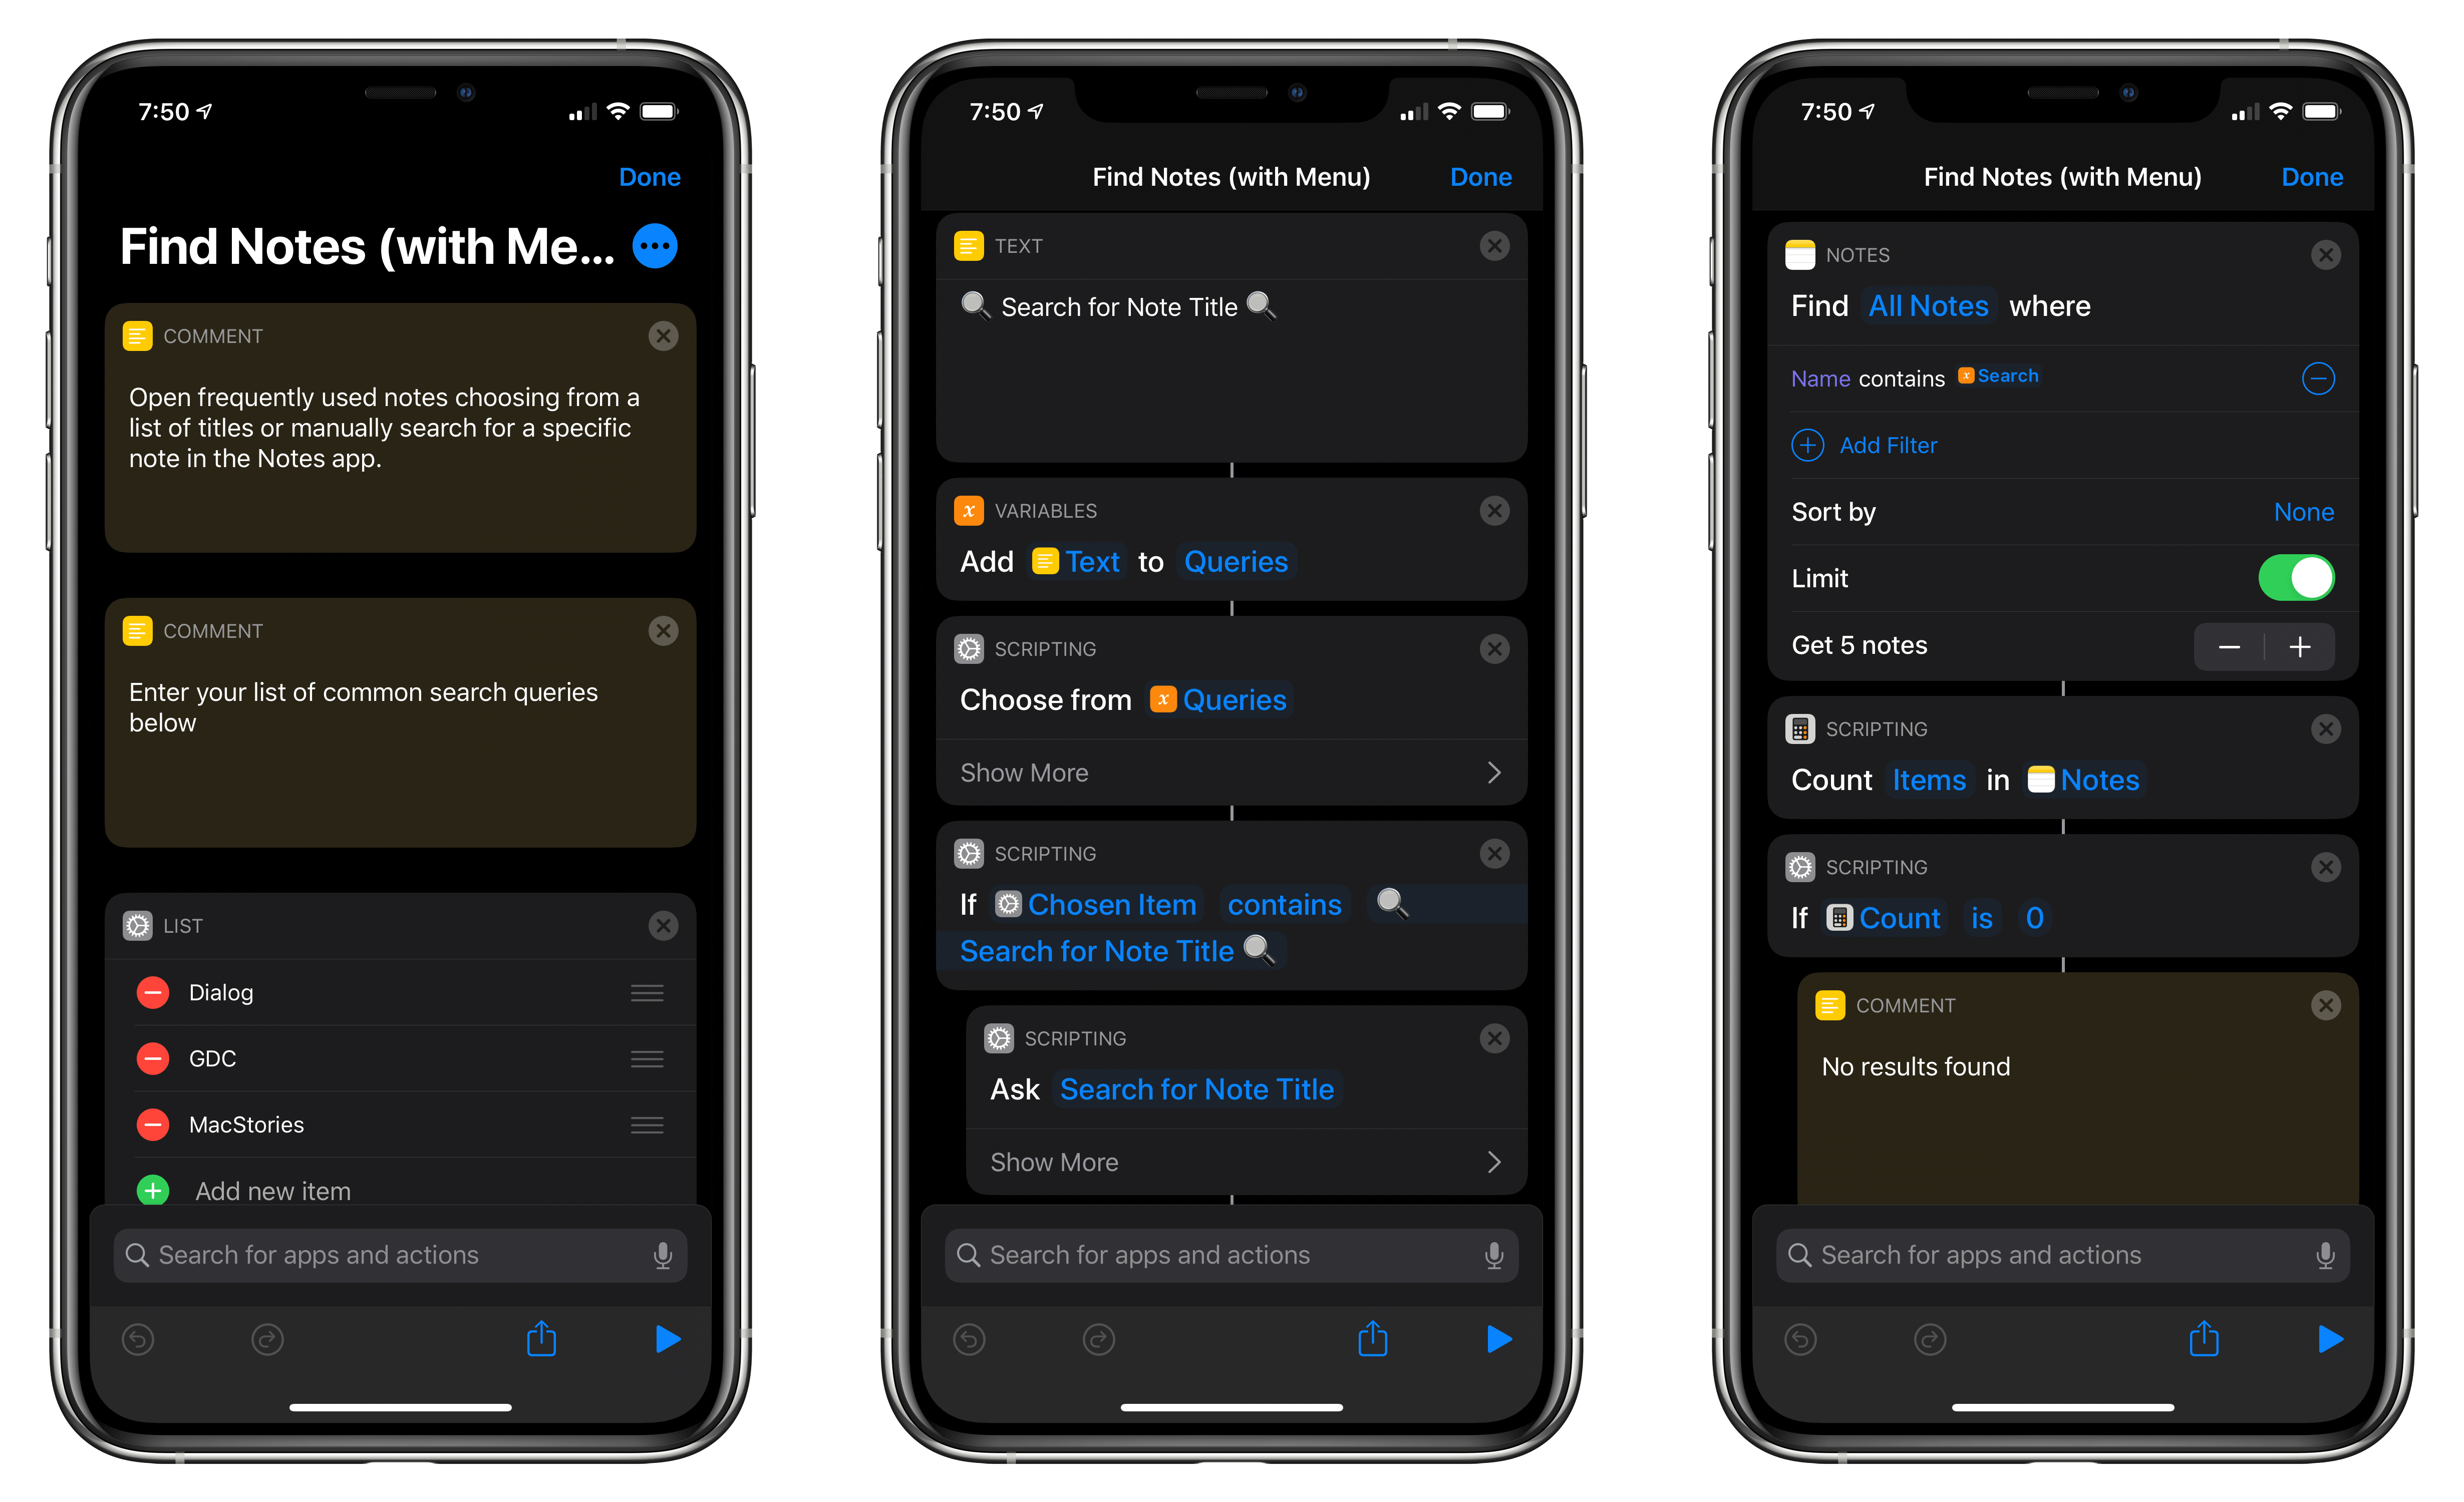
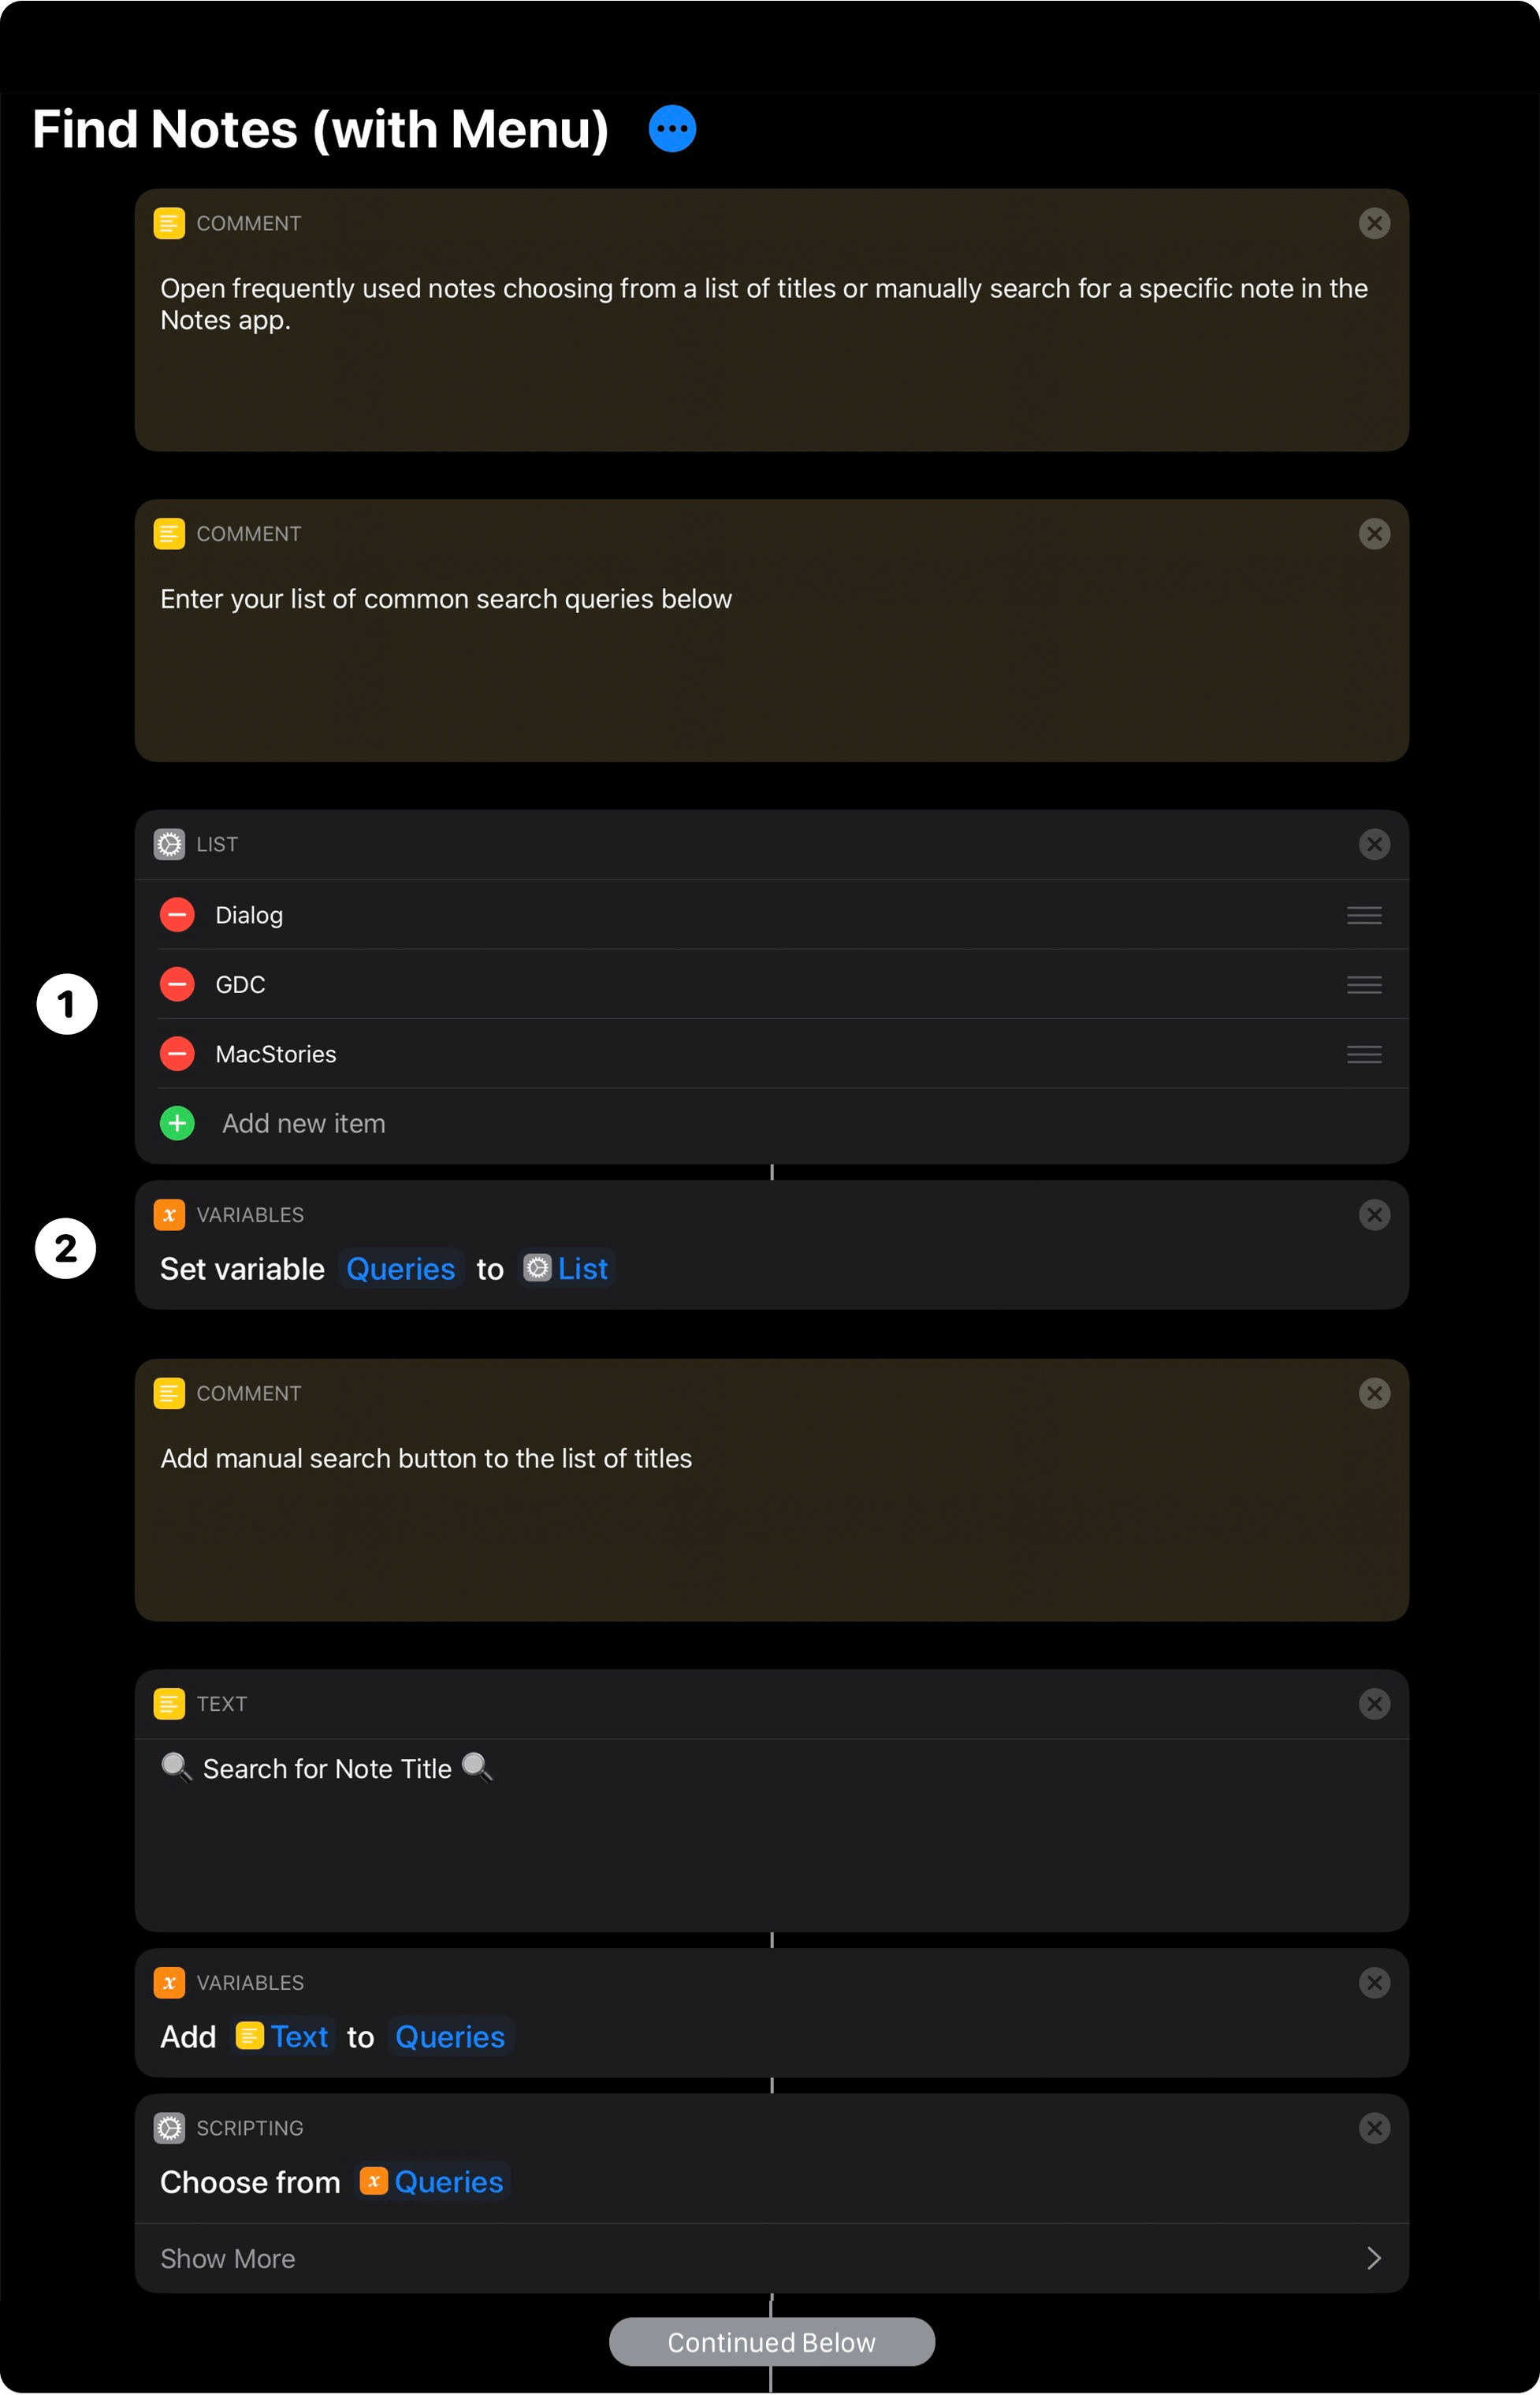
Find Note (with Menu) starts with a Scripting action called List, which as the name implies stores a list of items. For Find Notes (with Menu) there are two types of list items that need to be handled: the predefined note titles and the ‘????Search for Note Title????’ option. Because the actions that flow from each kind of menu option is different depending on which one the user picks, they are handled separately.
For the predefined note titles that will appear in a popup menu, all that’s needed is to add the exact note titles to the List action that you want to appear in the menu. The version in the MacStories Shortcuts Archive has three predefined notes (Dialog, GDC, and MacStories), which you can change to the titles of notes you’ve created.
❷ Adding List Items to the Queries Variable
The next step is to take a Set Variable action, which is named Queries, and add the items from the List action to it. The final menu item that will let users search for any note is found in the Text action that contains the text ‘????Search for Note Title????,’ which is added to the previously-defined Queries variable using an Add to Variable action. The last step is to use a Choose from List action to display everything that has been stored in the Queries variable.
Find Note (with Menu), Part 2
❸ Handling Search Terms
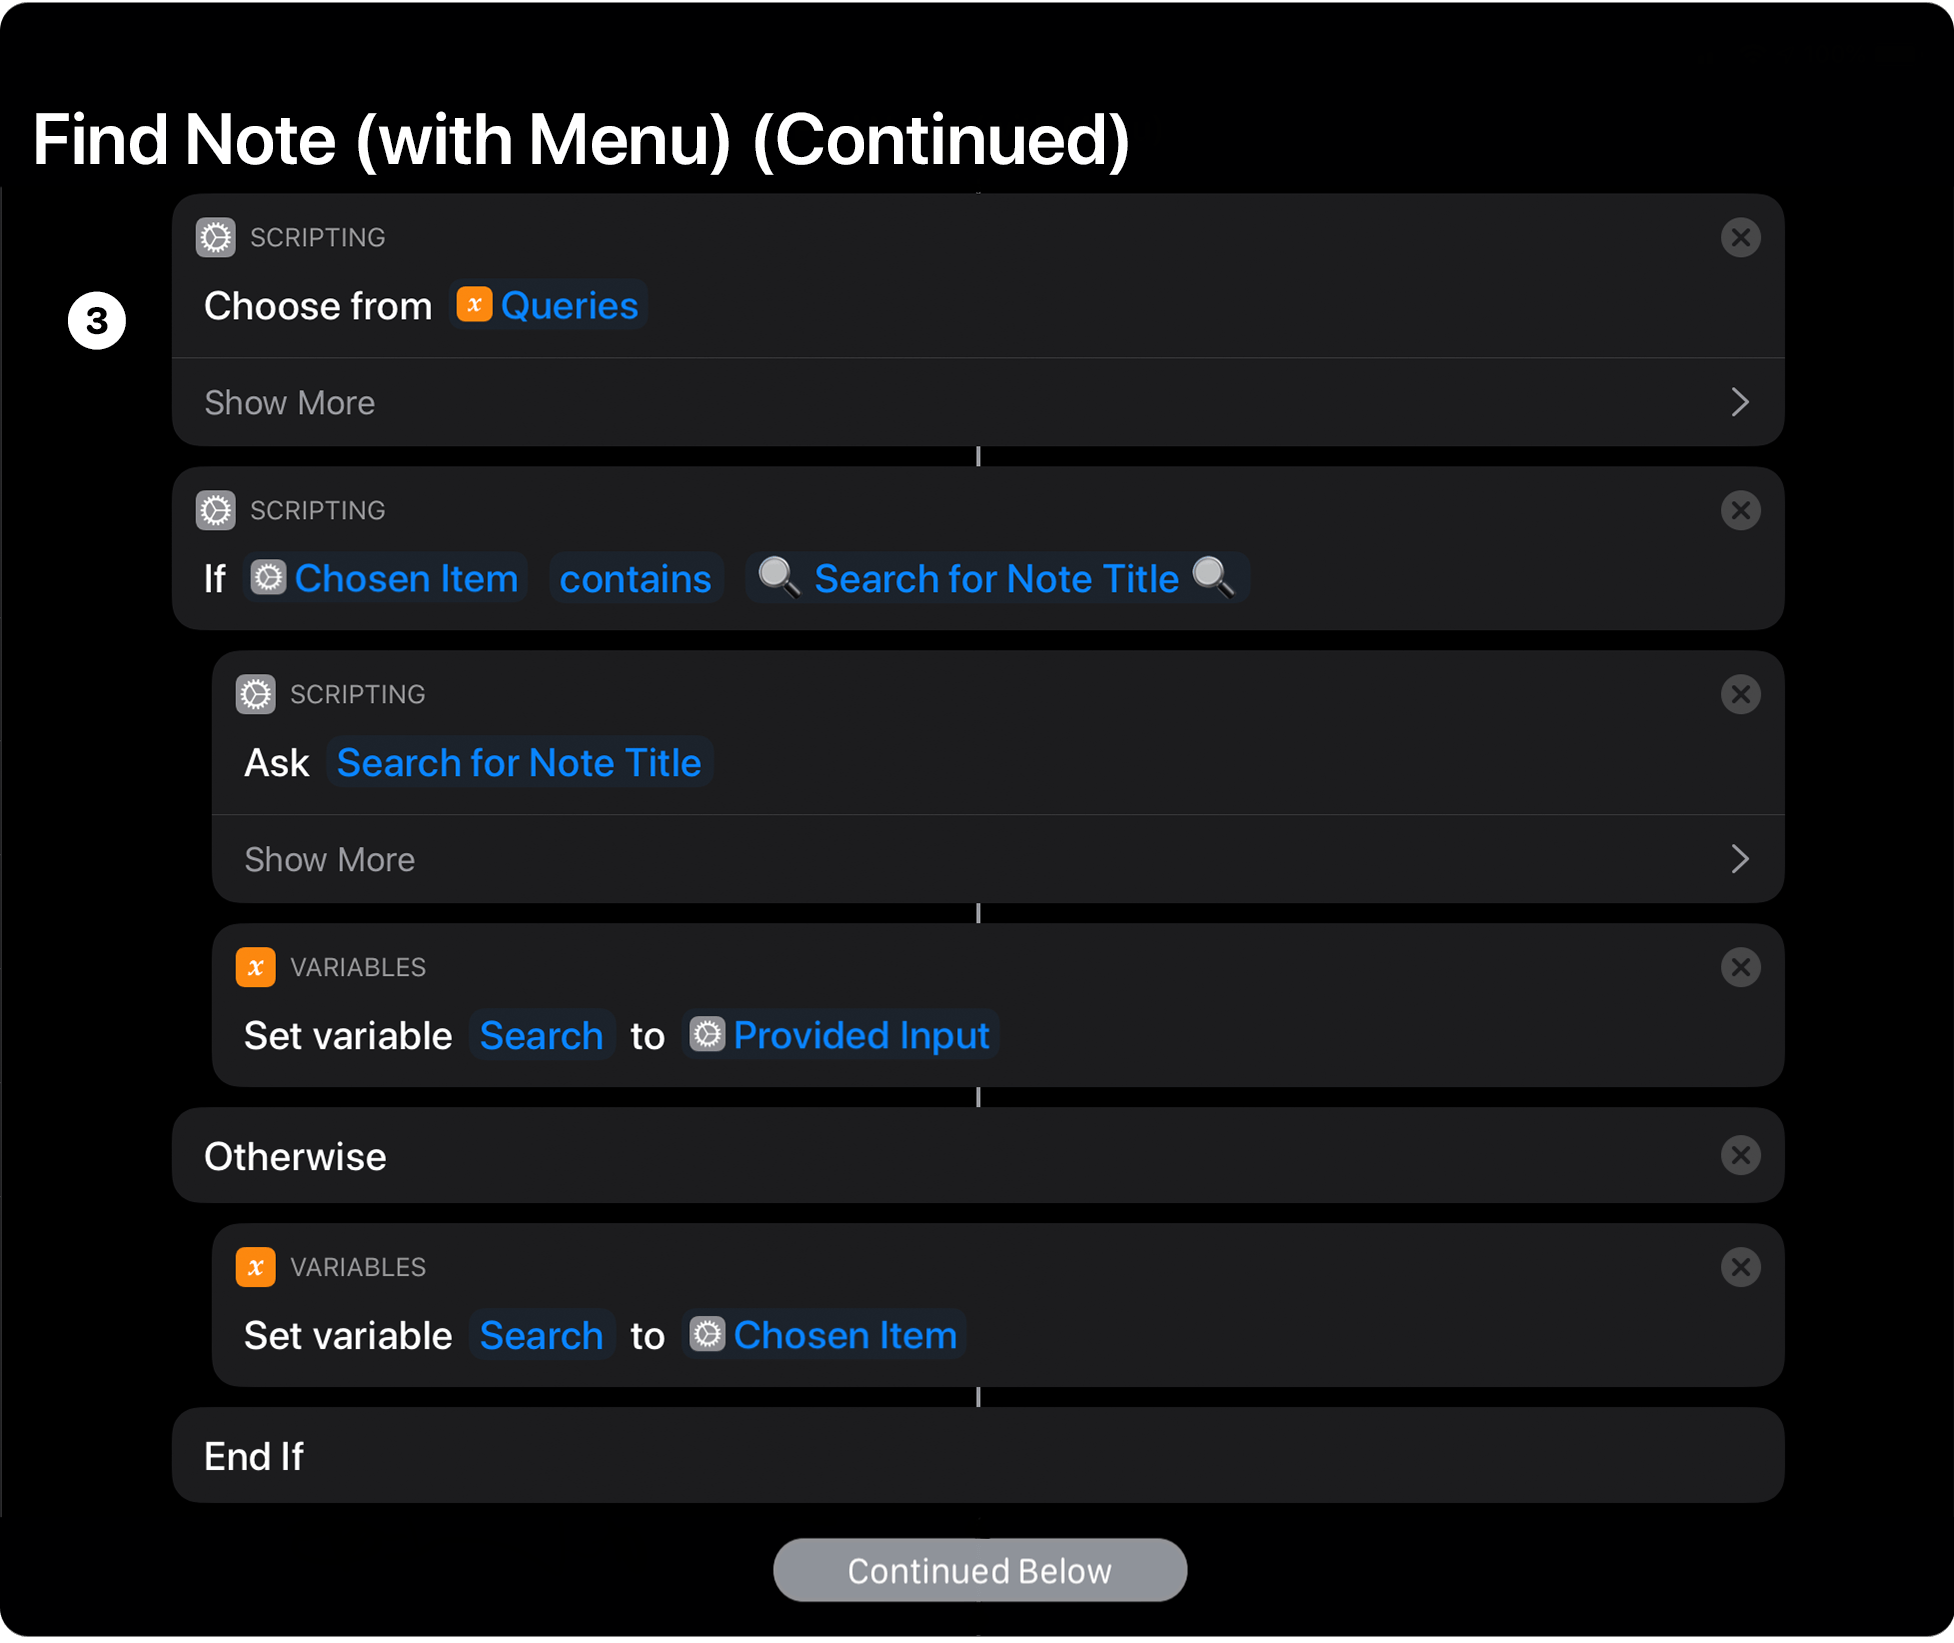
The remainder of the Find Notes (with Menu) shortcut locates the notes, displaying multiple options where necessary or taking the user straight to the Notes app. The shortcut manages each of the different possible options that a user can pick by using a series of If and Otherwise actions.
The first set of If and Otherwise actions checks if the menu item that is picked is the search option. If it is, the shortcut uses an Ask for Input action, which prompts the user for search terms that are saved to the Queries variable using a Set Variable action. If the menu item picked by the user isn’t the search option, the shortcut takes the name of the item chosen by the user and saves that to the Search variable using a Set Variable action.
❹ Showing an Alert When No Notes Are Found
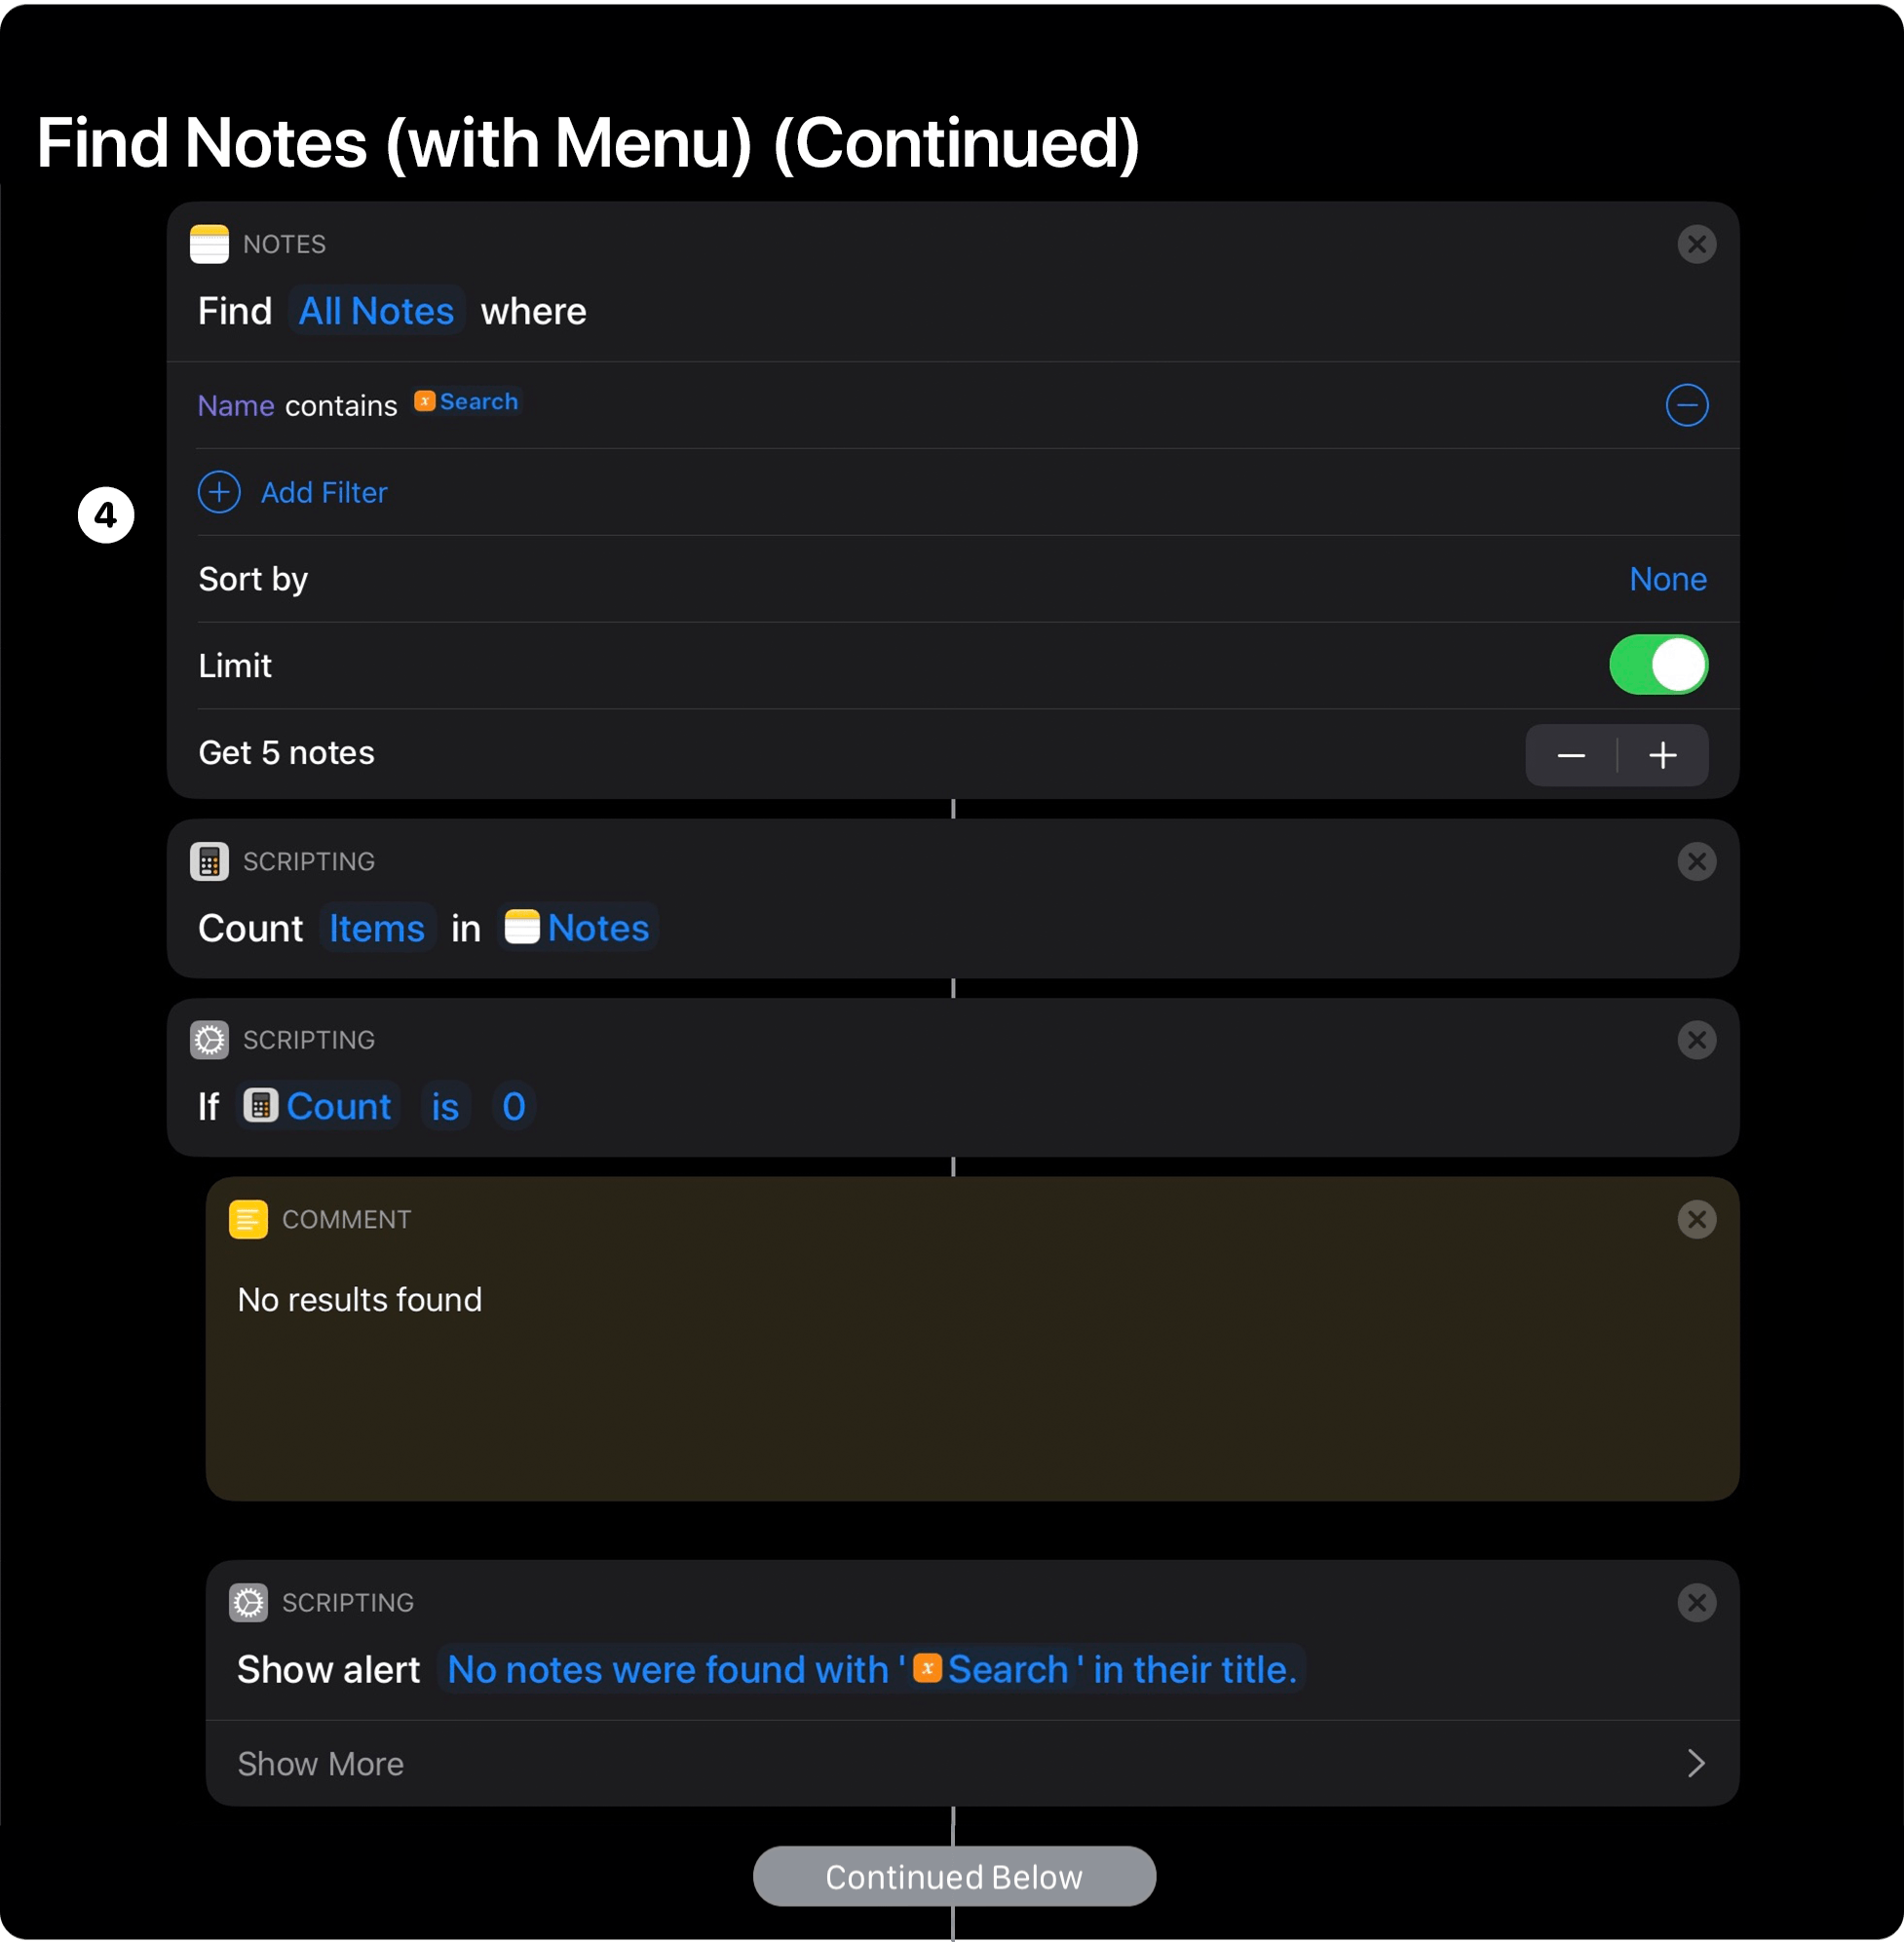
The next section of Find Notes (with Menu) feeds the user’s input into a Find Notes action. Not to be confused with the name of this shortcut, a Find Notes action allows you to find notes by applying filters. You can apply the filters based on the body text of your notes or their names, a folder, a creation date, or a last modified date. For this shortcut, the Find Notes action applies the contents of the Search variable to the names of your notes, which will return any notes with titles that match a predefined menu item, or that match a search term entered by the user if that option was selected.
The Find Notes action also includes options to sort the results based on several criteria and limit the number of notes returned. Here, Find Notes (with Menu) only limits the results to five notes, a number you can alter if you’d like.
❺ Handling When One or More Notes Are Found
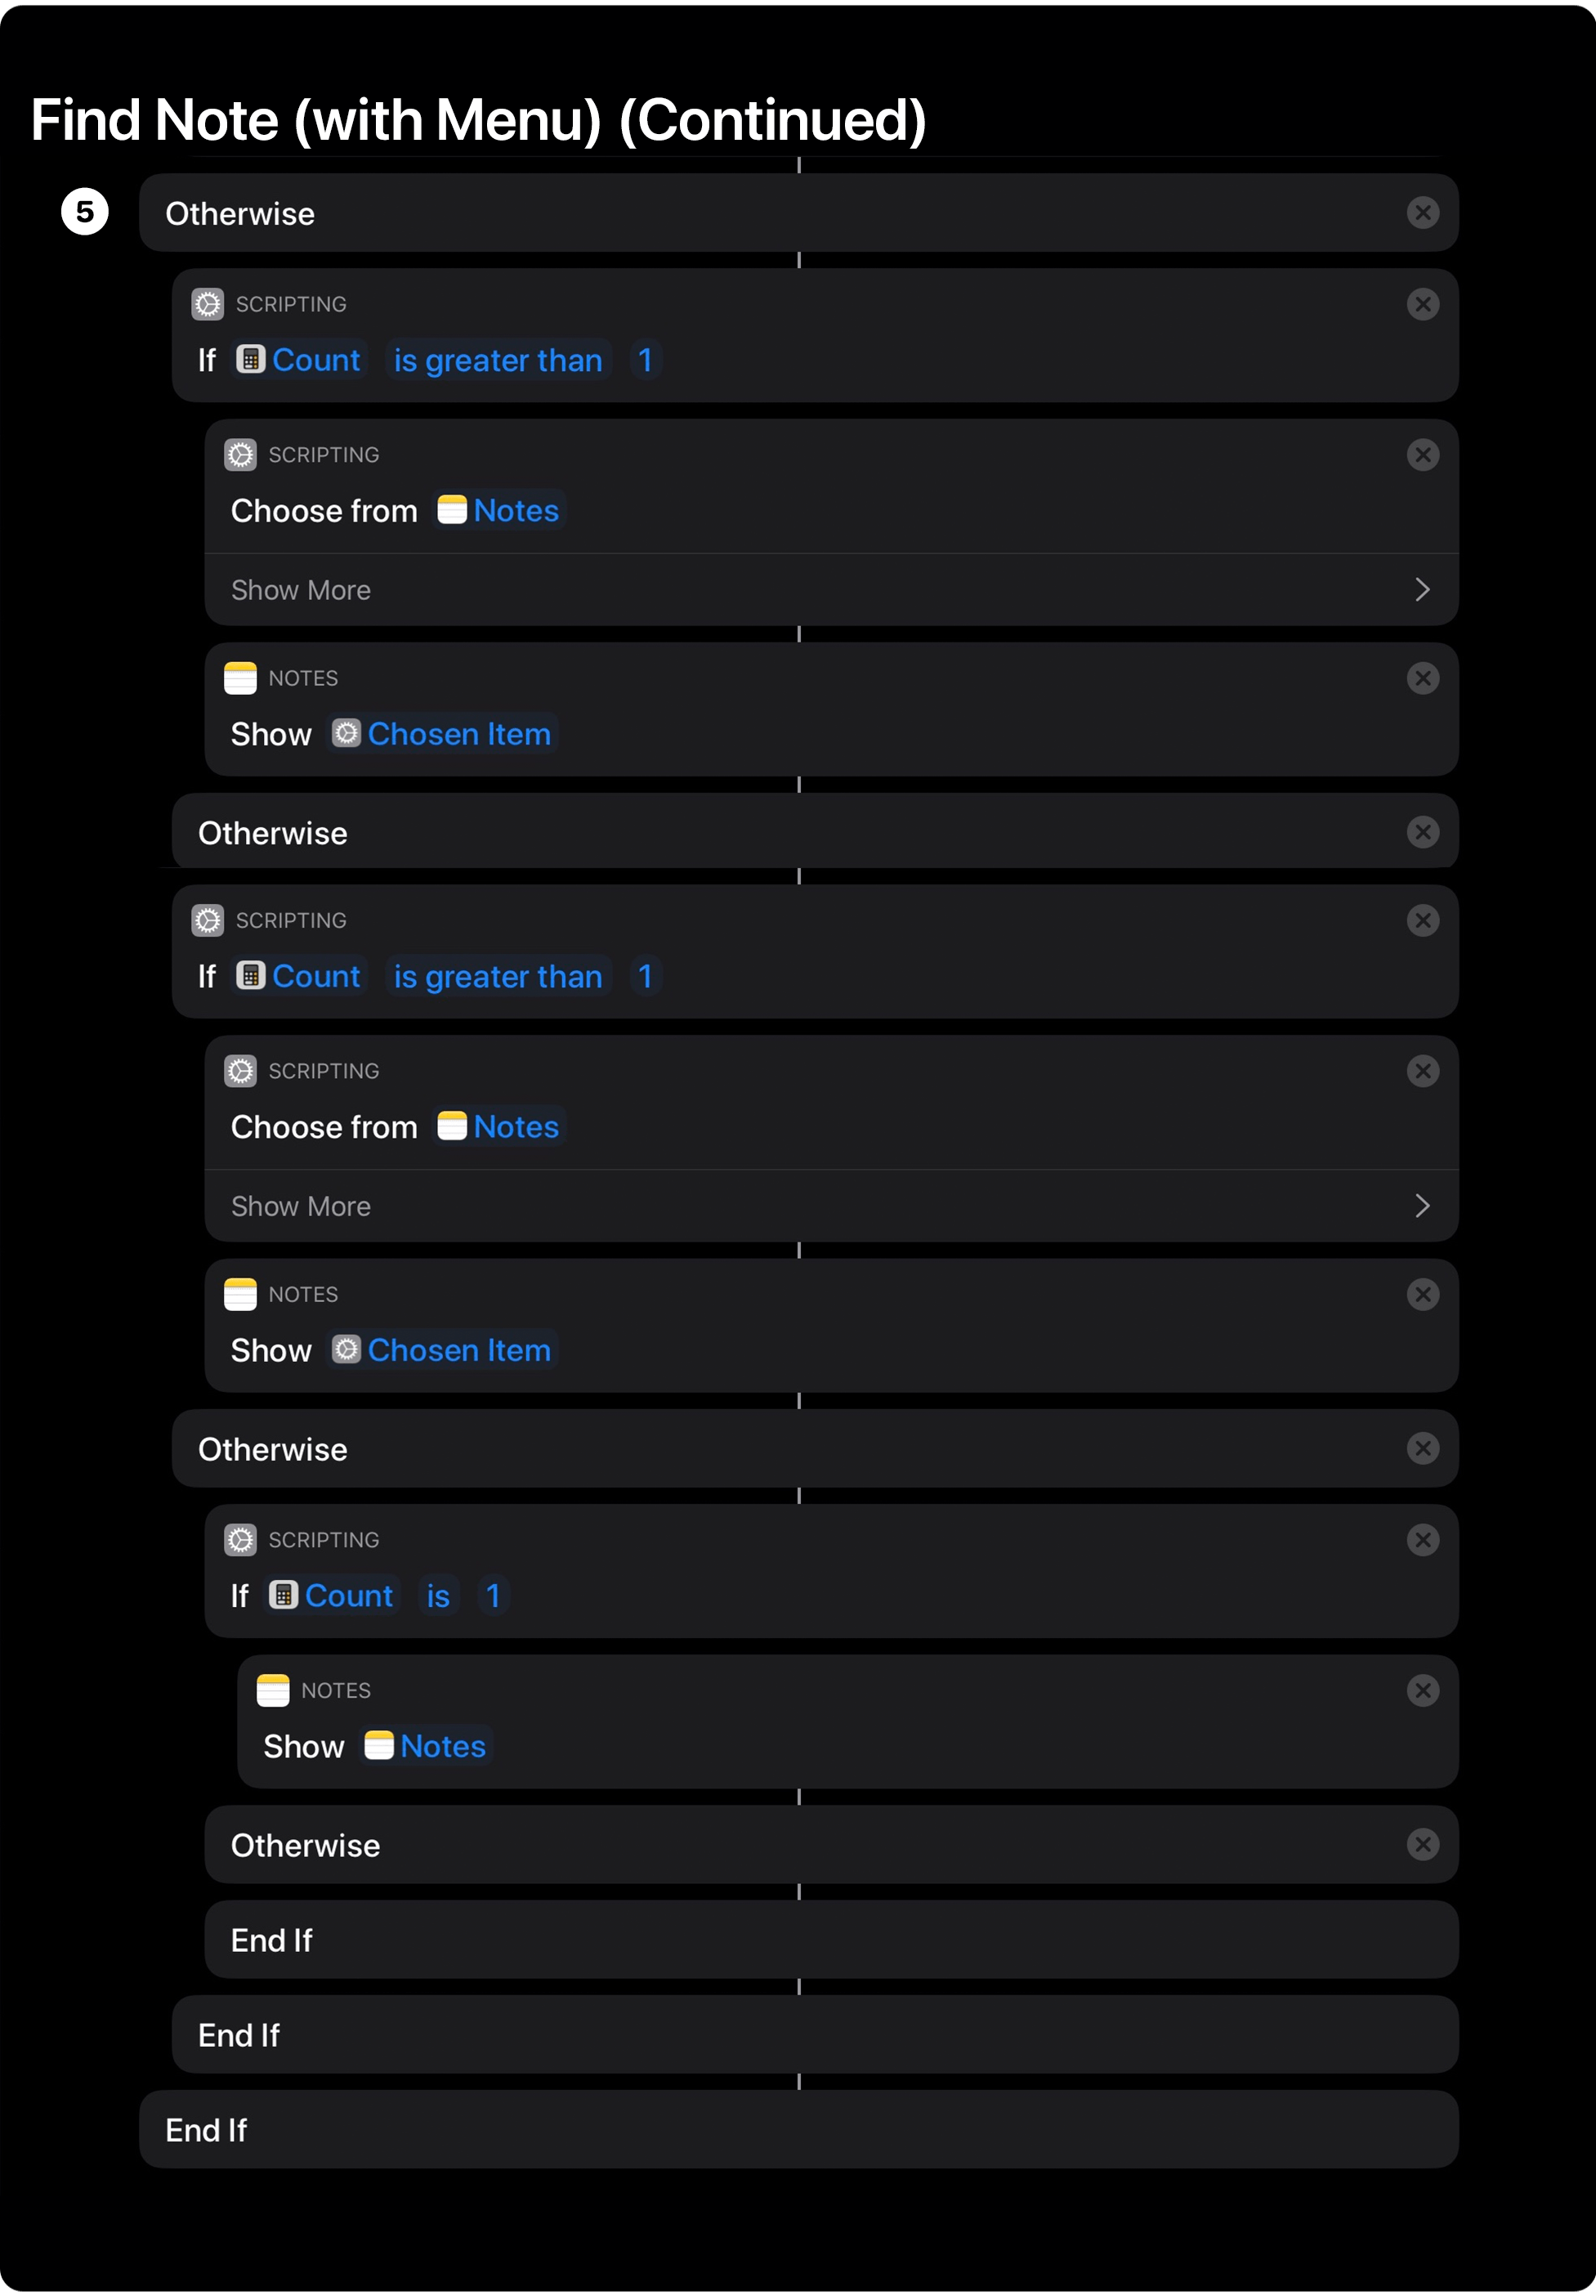
The remaining steps in Find Notes (with Menu) are blocks of If and Otherwise actions that handle the outcomes if the preceding step finds no matching notes, one matching note, or more than one matching note. If no notes are found, a Show Alert action is used to communicate that to the user. If multiple notes are found, a Choose from List action prompts the user to pick one, which is opened using a Show Result action that displays the note picked. Finally, if only one note is found, the shortcut simply uses a Show Note action to retrieve the note immediately.
If you’re an Apple Notes user, take a look at the notes you open over and over throughout your day and think about the contexts in which you need them. I’ve found that I access Find My (with Menu) most often from iPadOS’s Search feature. I keep Shortcuts in Slide Over on my iPad. That way, when I’m working with apps other than Notes, and I think of something I need to add to a note, I can run the shortcut from Search, which slides the Shortcuts app into view and prompts me to pick from its menu. Another option is to add the shortcut to your Home screen and then store it in the dock where it can be accessed quickly.
You can download Find Notes (with Menu) below or find it in the MacStories Shortcuts Archive.

Find Notes (with Menu)
Open frequently used notes choosing from a list of titles or manually search for a specific note in the Notes app.
View Recent Notes
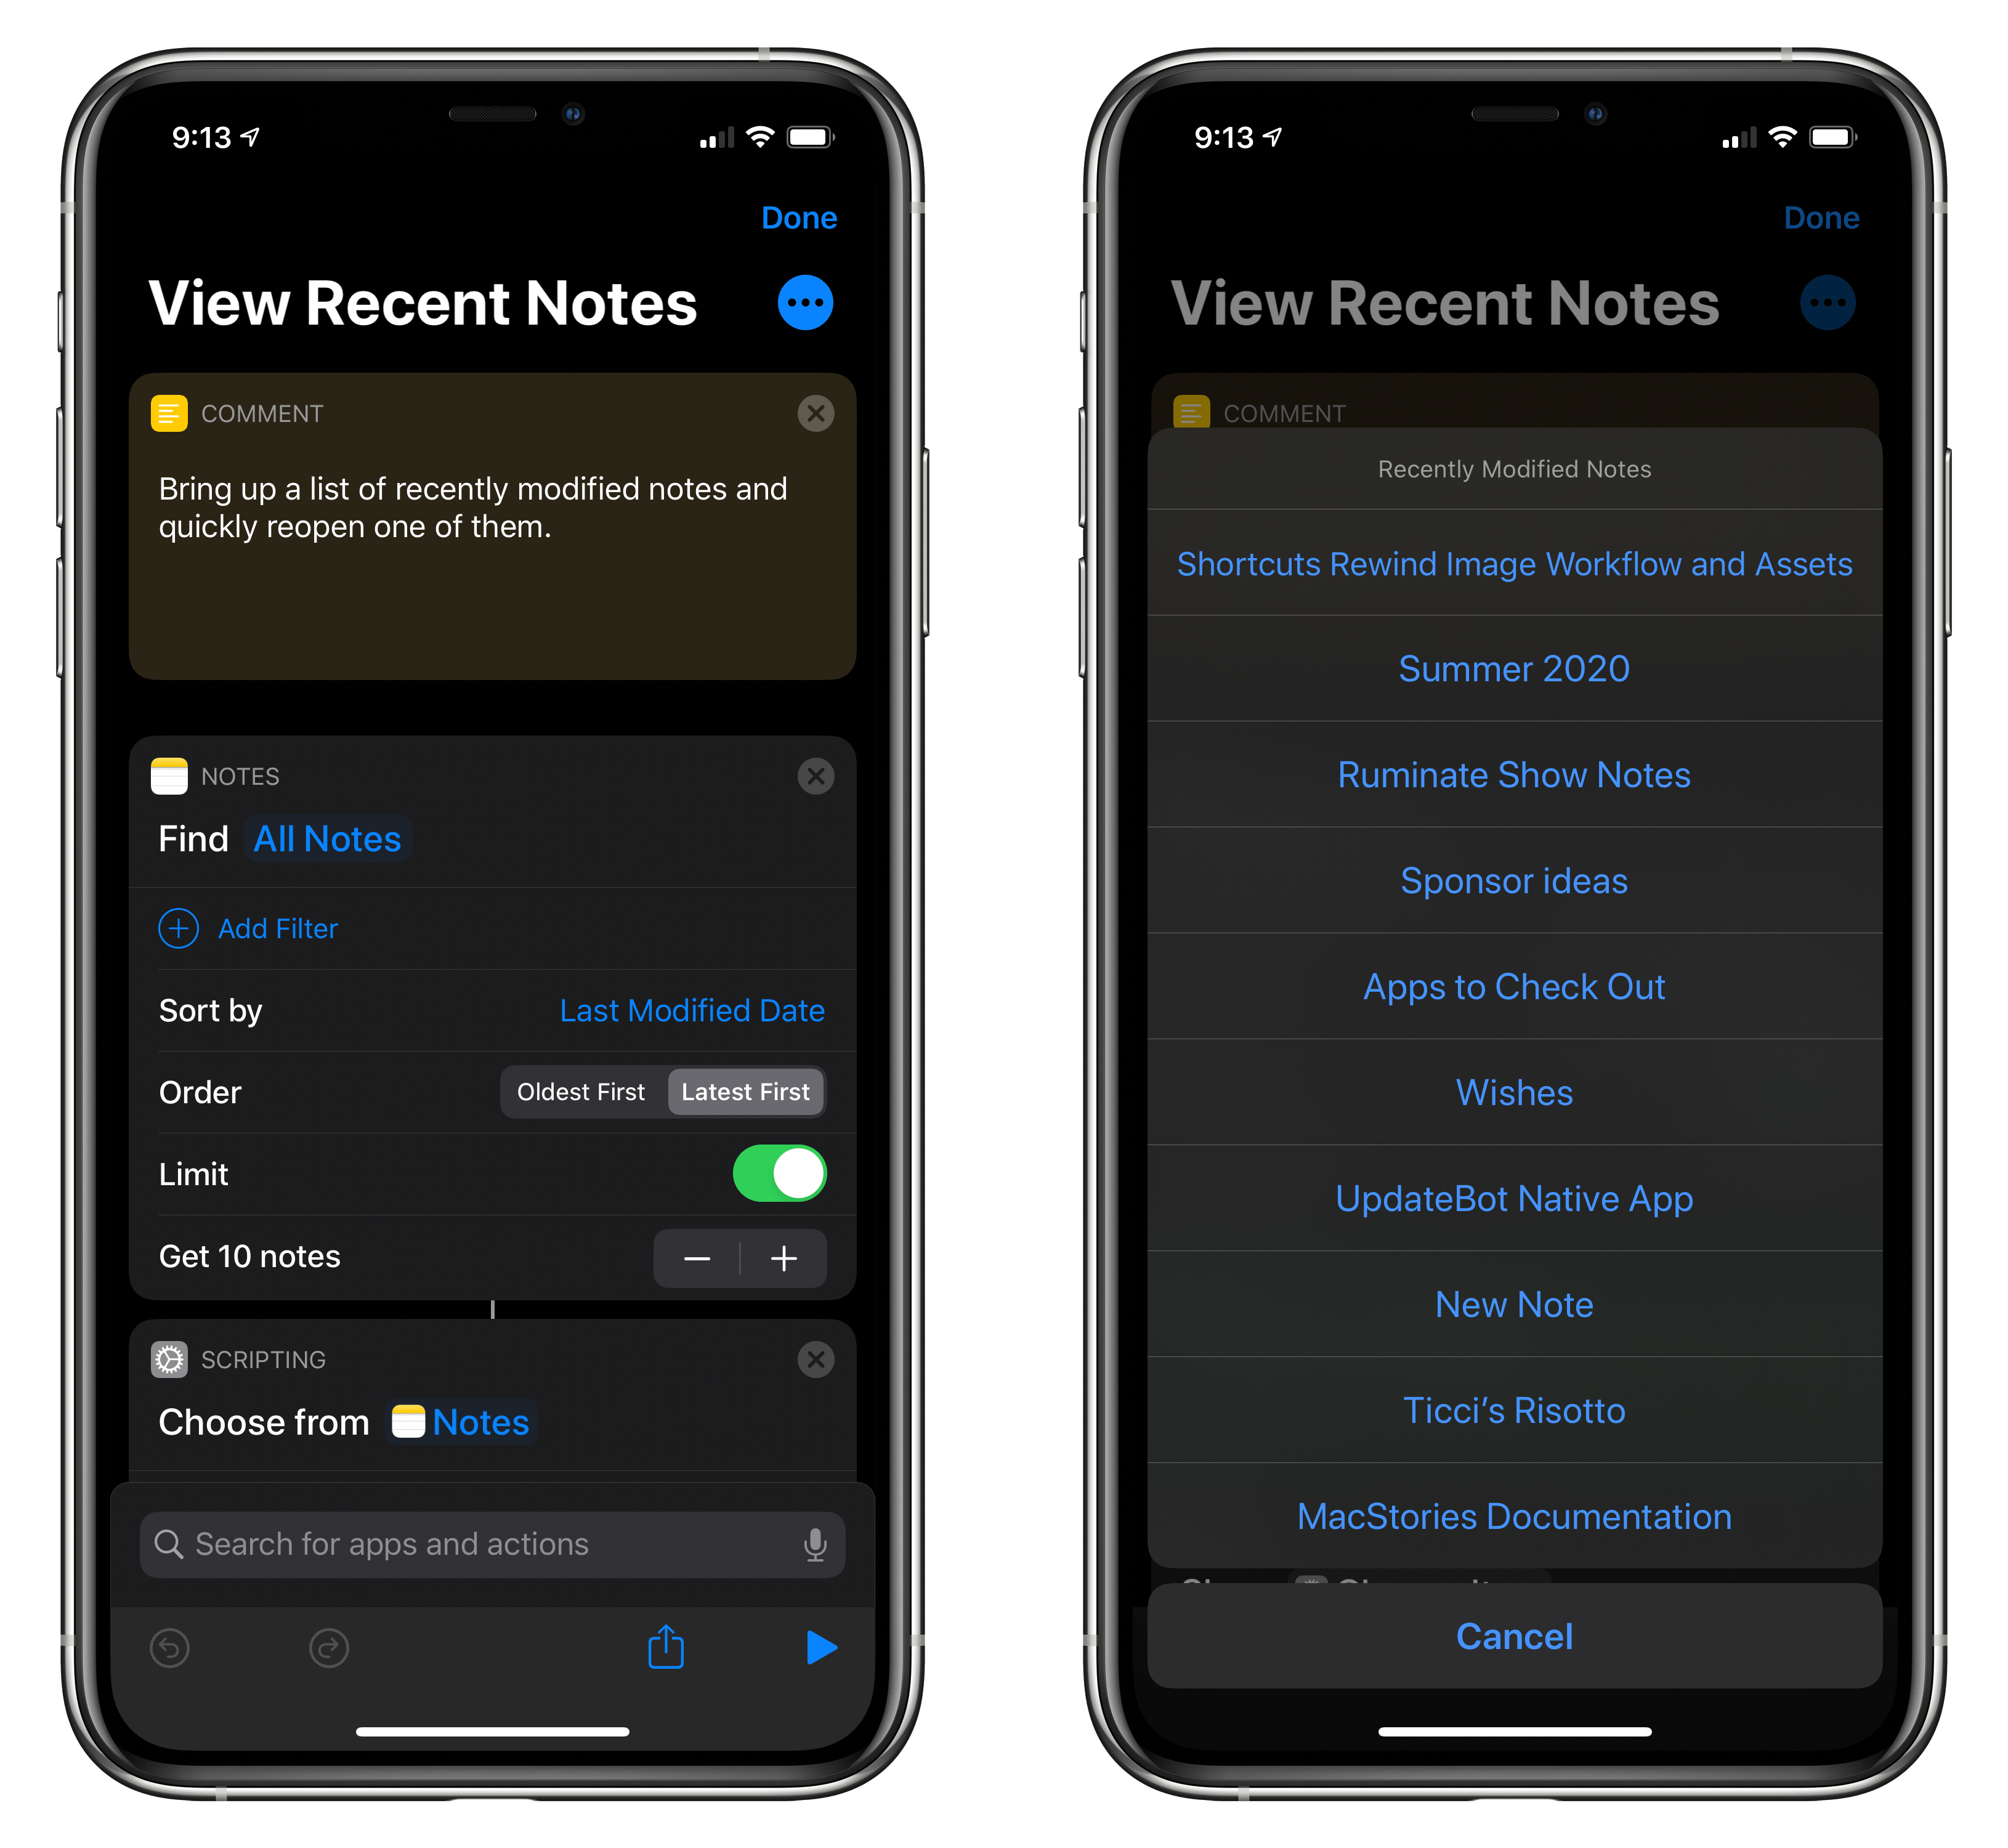
The majority of the actions in Find Notes (with Menu) handle generating the menu of notes from which the user picks and managing what happens depending on the number of notes found. The shortcut has the benefit of allowing you to designate the notes you frequently use in advance or searching for any others, but that’s more than some people need. If all you want to do is access a list of recent notes, Federico’s View Recent Notes shortcut is incredibly easy to set up and shows how sometimes the simplest shortcuts are among the most powerful.
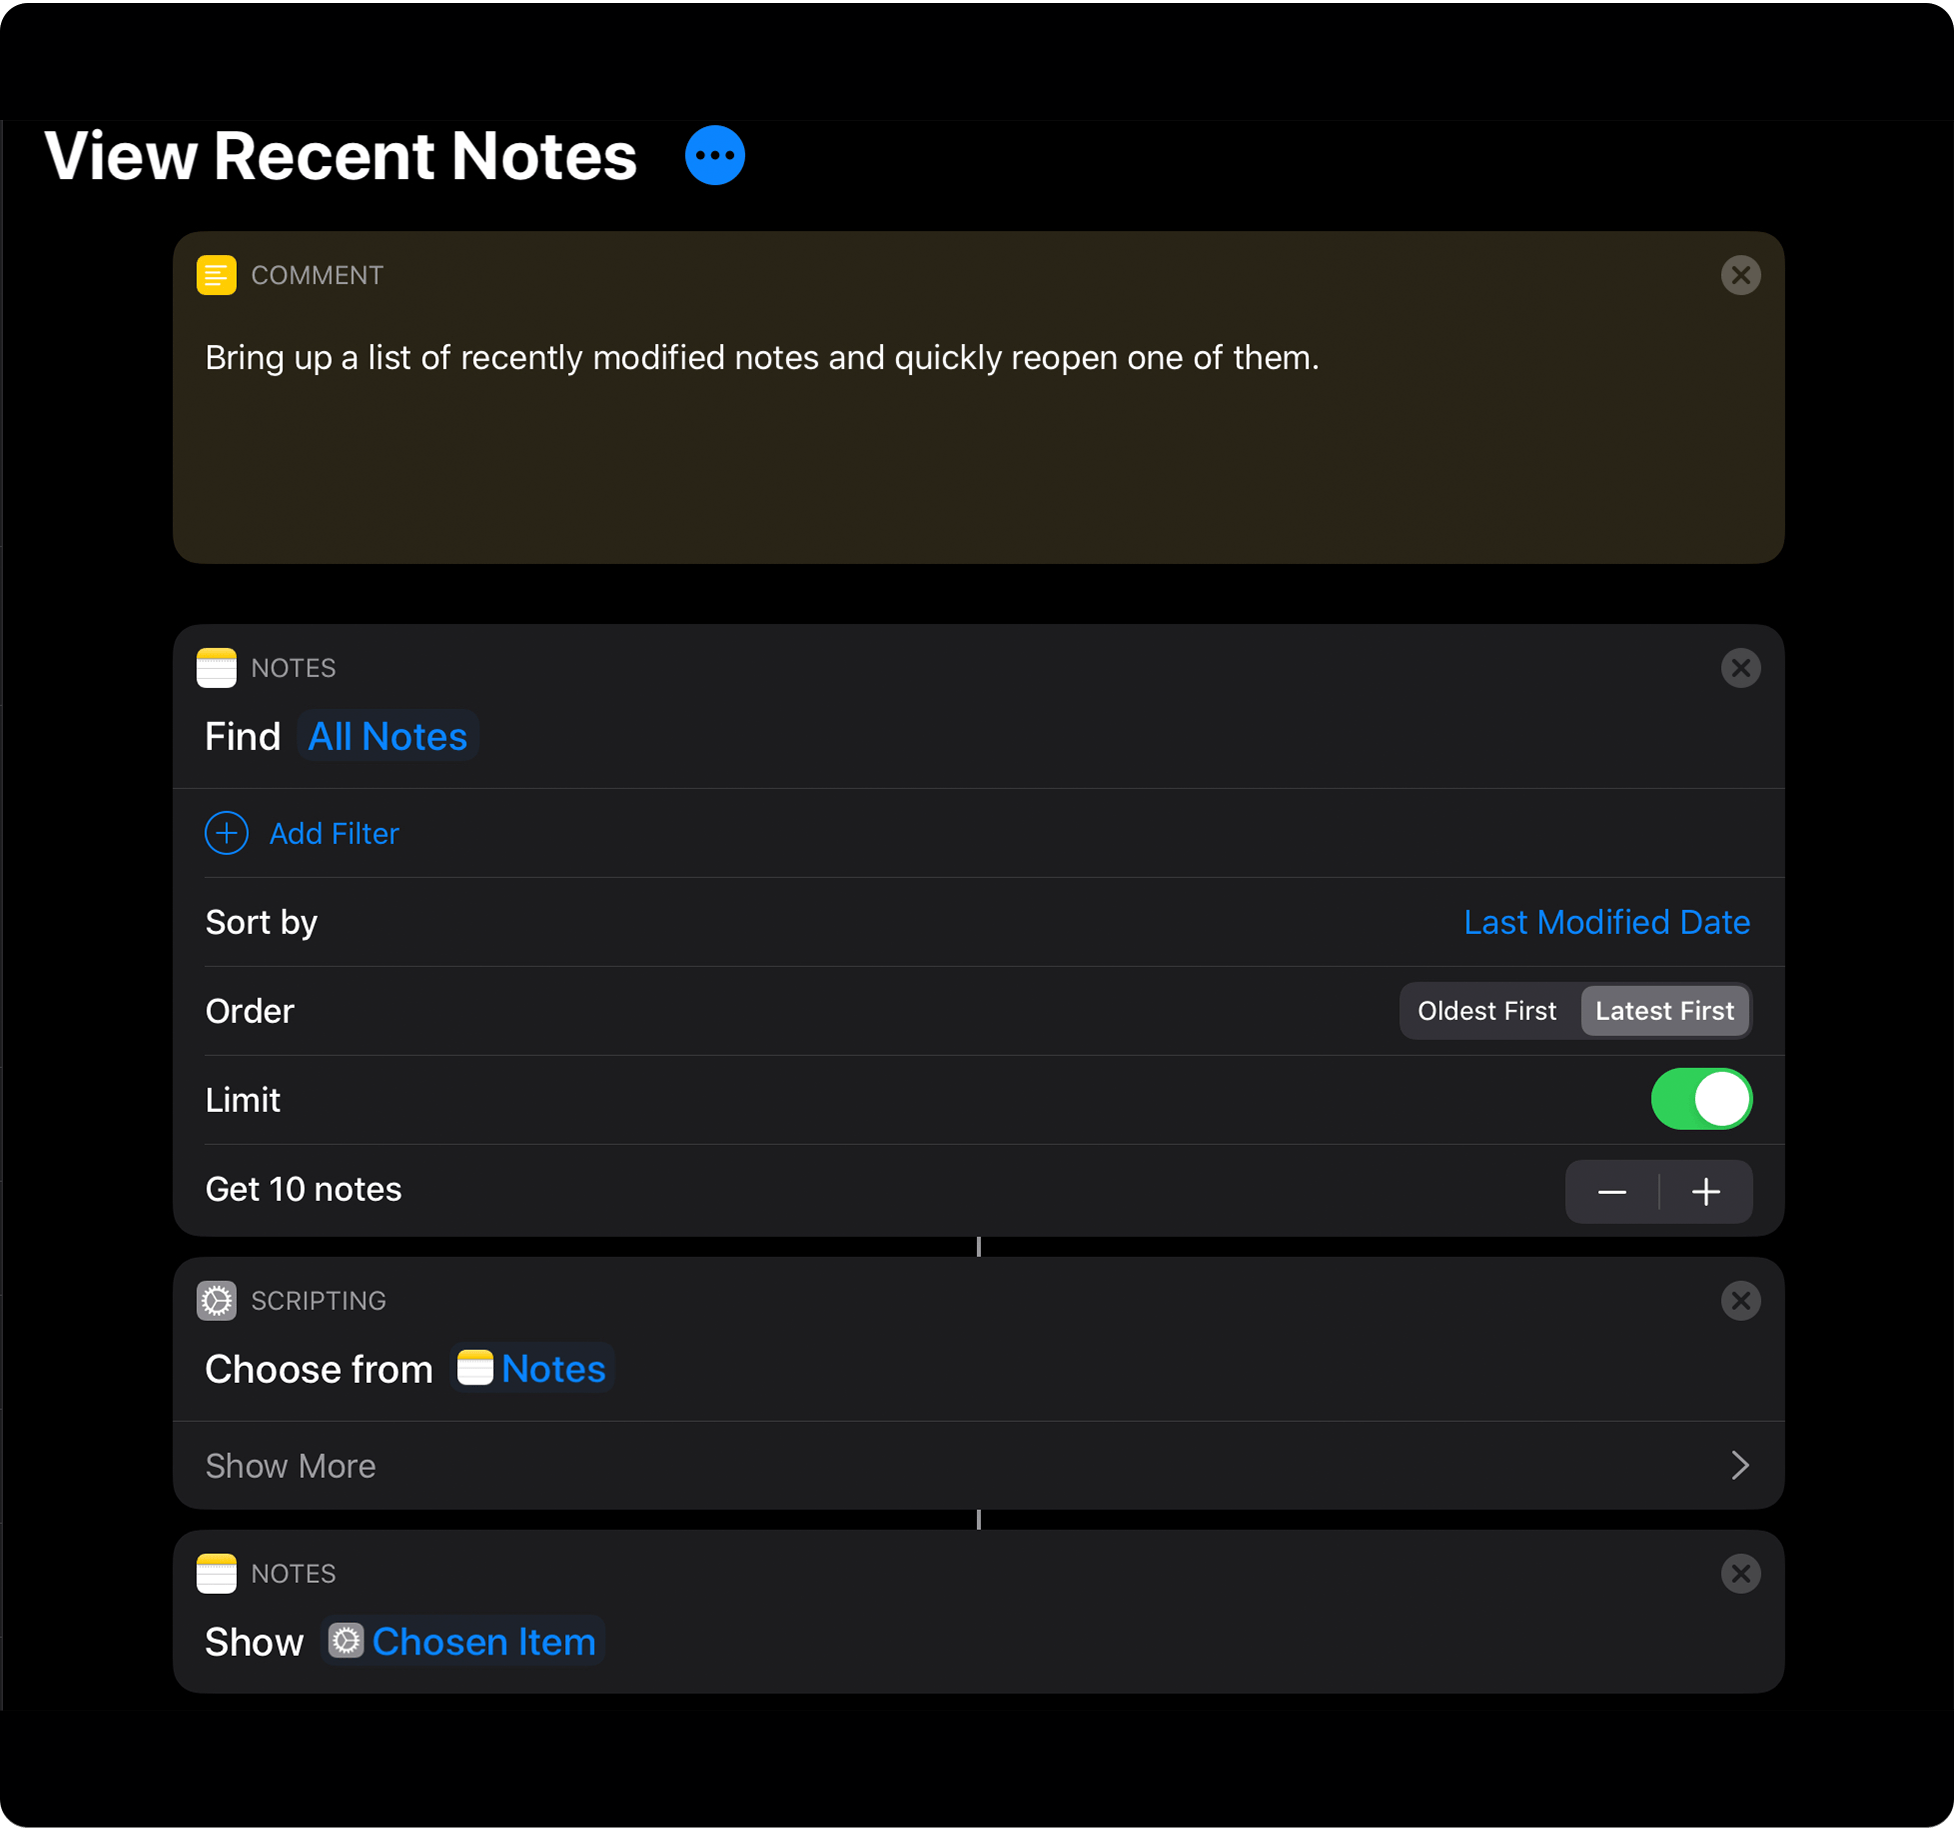
View Recent Notes uses just three actions: Find Notes, Choose from List, and Show Note, all of which were used in Find Notes (with Menu) too, though a little differently. Unlike the last shortcut, a Find Notes action is used without filters, sorts according to Last Modified Date, puts the most recently-changed note at the top of the list, and limits the list to ten notes. Depending on how many notes you regularly modify, you could change this to return a different number of them.
Choose from List takes the list of notes found by the last action and displays them in a popup list that shows their titles. When the user taps the name of a note, the final Show Note action opens it. There’s nothing fancy going on in this shortcut, but it’s the sort of useful automation that helps make Shortcuts more accessible by familiarizing new users with how parameters and other action settings work.
You can download View Recent Notes below or find it in the MacStories Shortcuts Archive.

View Recent Notes
Bring up a list of recently modified notes and quickly reopen one of them.
Notes has evolved into one of my favorite iOS and iPadOS system apps. Despite powerful built-in search and pinning, I’ve grown to prefer accessing my frequently-used notes with Shortcuts. It’s faster when I’m in the middle of something else, which is the whole point of automating repetitive tasks in the first place. Instead of tapping through the notes hierarchy, I’m taken directly to where I need to go with minimal effort.