For this installment of Shortcuts Rewind, I’m going to focus on date and calendar actions. I’ll also touch on some of the Shortcuts actions that Apple Maps offers and explain dictionaries.
I wanted to cover date and calendar actions early in the Shortcuts Rewind series because they’re the sort of actions that come in handy over and over in a wide variety of shortcuts. Plus, date-based shortcuts are useful to lots of people. After all, everyone deals with schedules and meetings to some degree.
With Shortcuts, dates become modifiable building blocks that go hand-in-hand with events that the app allows you to decouple from your calendar app and recombine in new ways. It’s a powerful pairing that, along with an understanding of dictionaries, can be extended to other contexts over and over.
You can download each of the three shortcuts I cover at the end of each section of this story or by visiting the MacStories Shortcuts Archive, where you’ll find these and over 200 other shortcuts. Once you download one of the shortcuts, opening it on an iPad side-by-side with this walkthrough is a terrific way to learn how each works. Another technique that is effective is to rebuild each shortcut from scratch yourself, as you follow along below.
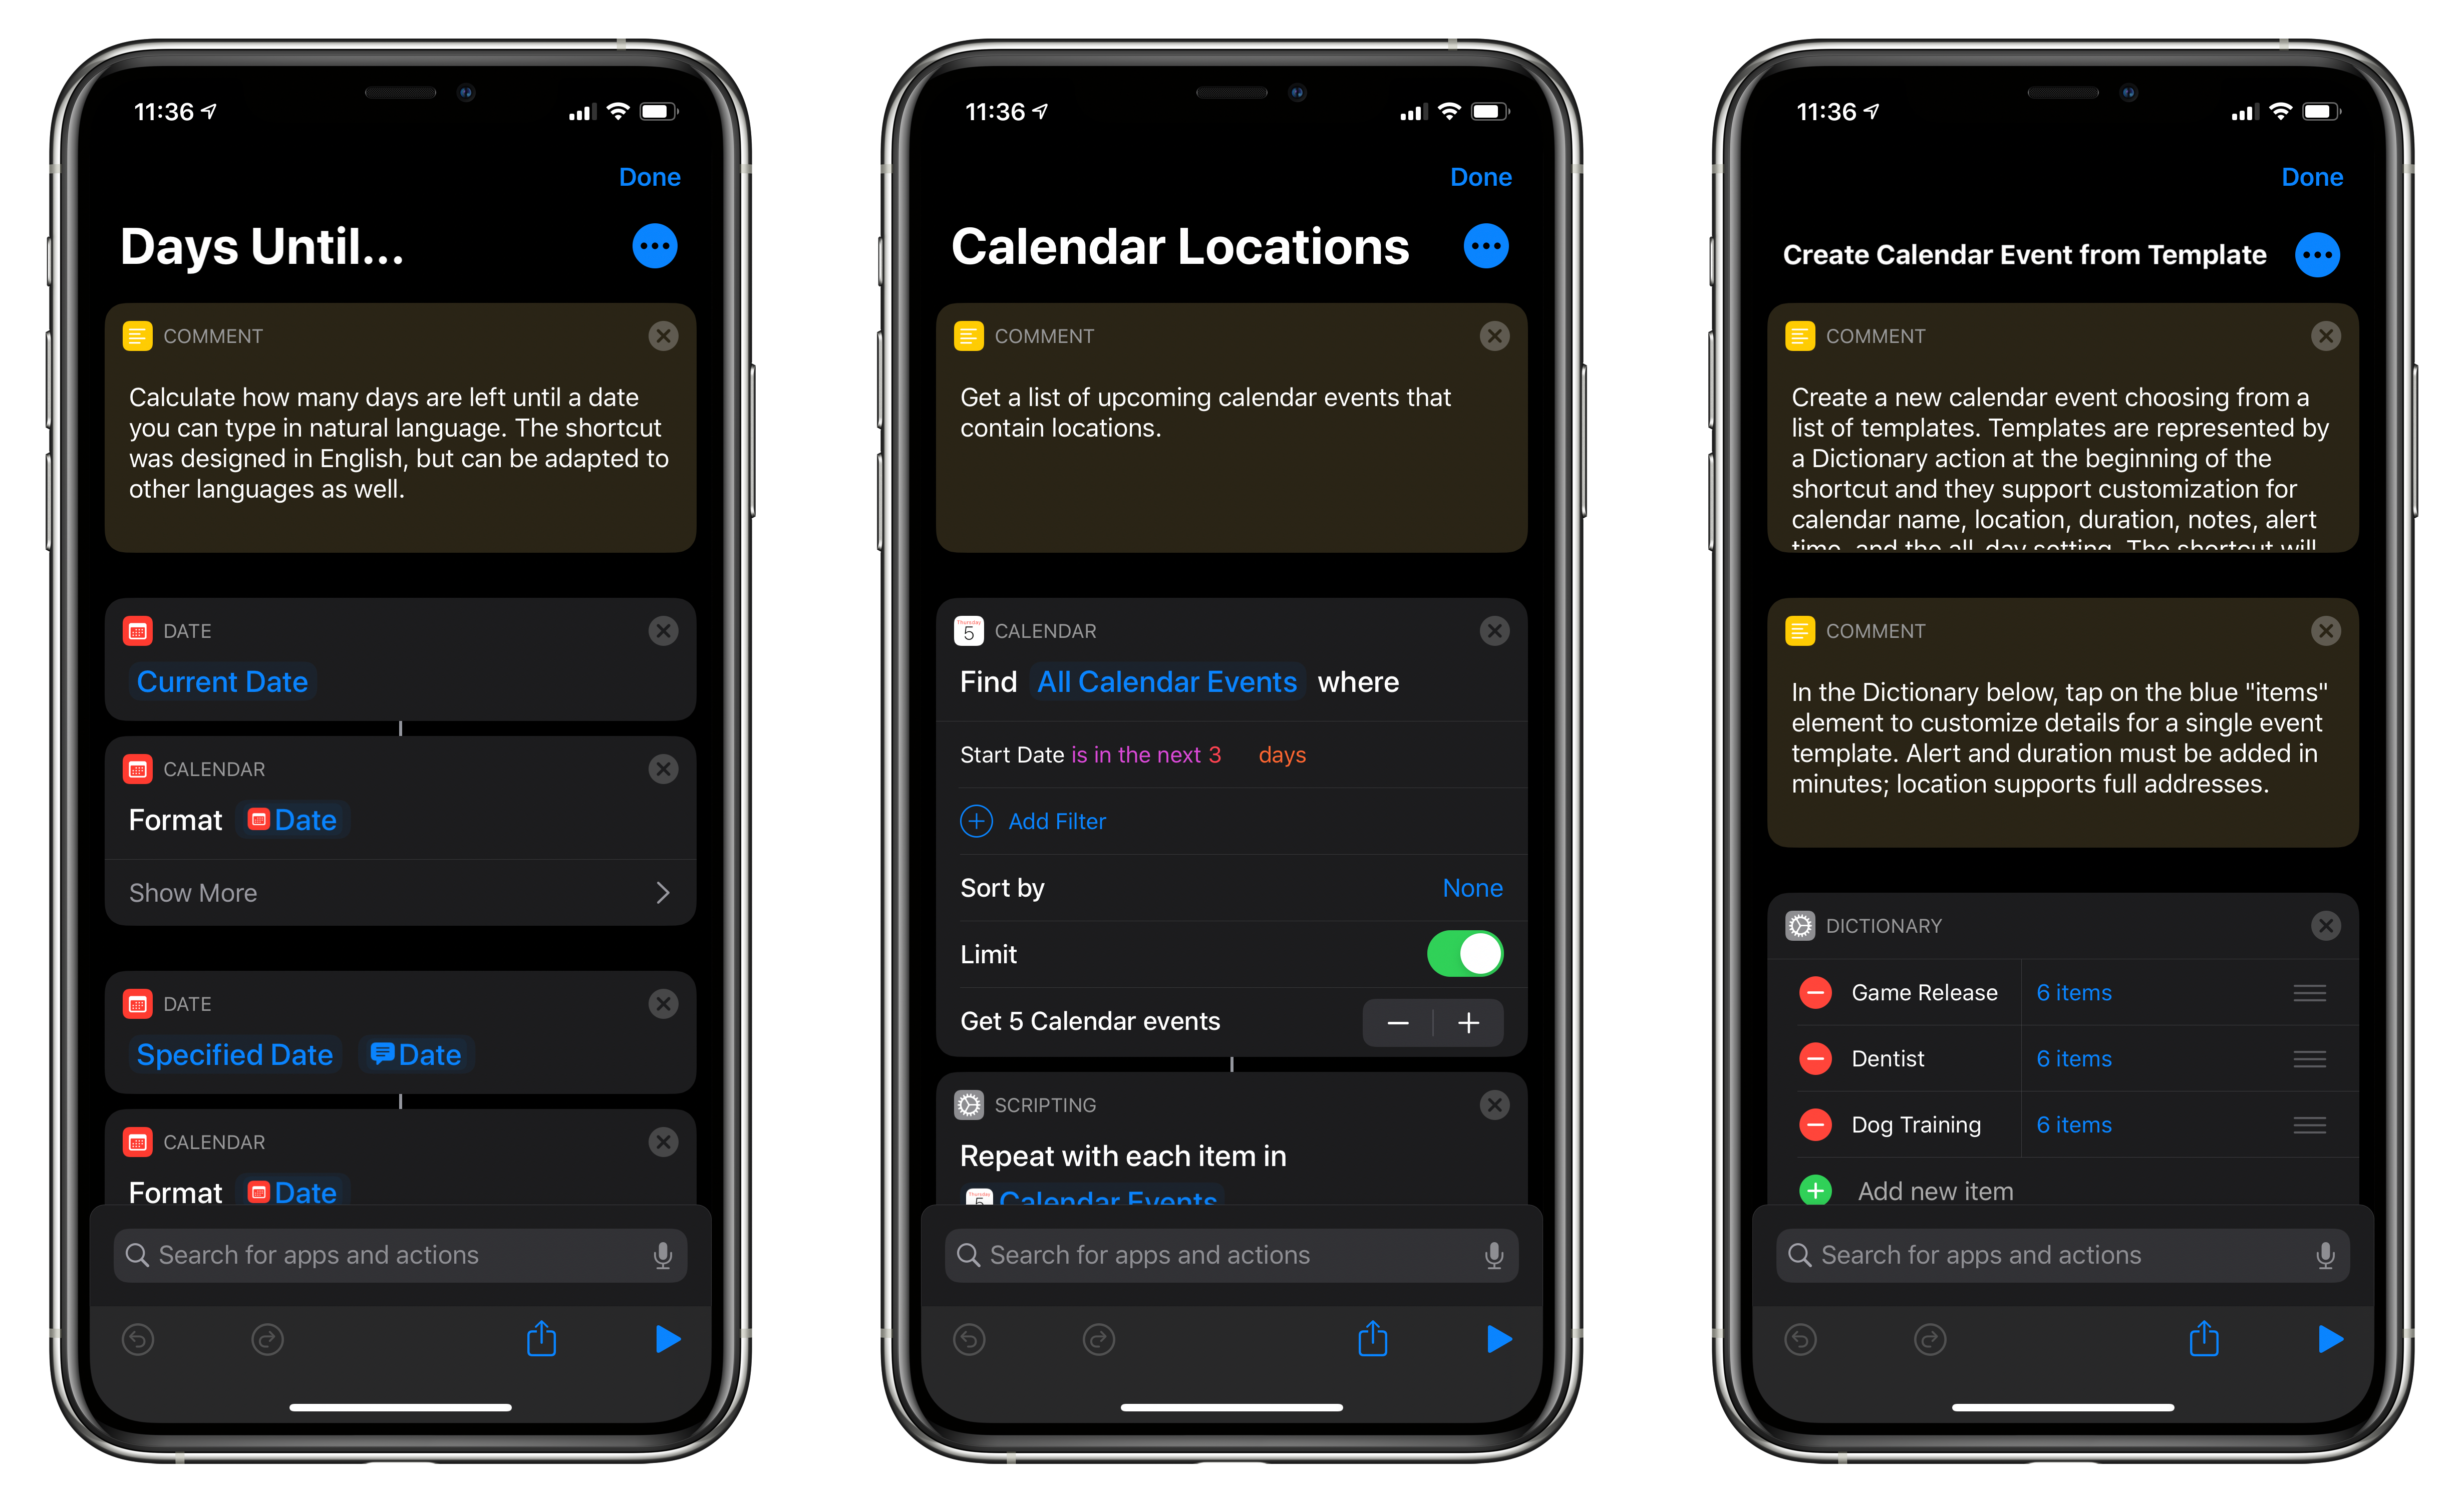
Days Until…
Days Until… is a terrific place to start with date actions. The shortcut prompts you for a date, which can be entered using natural language like ‘this Friday’ and calculates the number of days until then. It’s a simple shortcut that highlights some of the different ways the app can format dates, how it interprets date input by a user and date math. It’s also a nice refresher on If actions, which I covered in the last installment of Rewind.
Days Until…, Part 1
The first step is locating the date actions in Shortcuts. You won’t find them by tapping in the categories like Apps or Scripting at the top of the actions catalog. Instead, simply search for ‘date’ and the five available actions will appear at the top of the list.
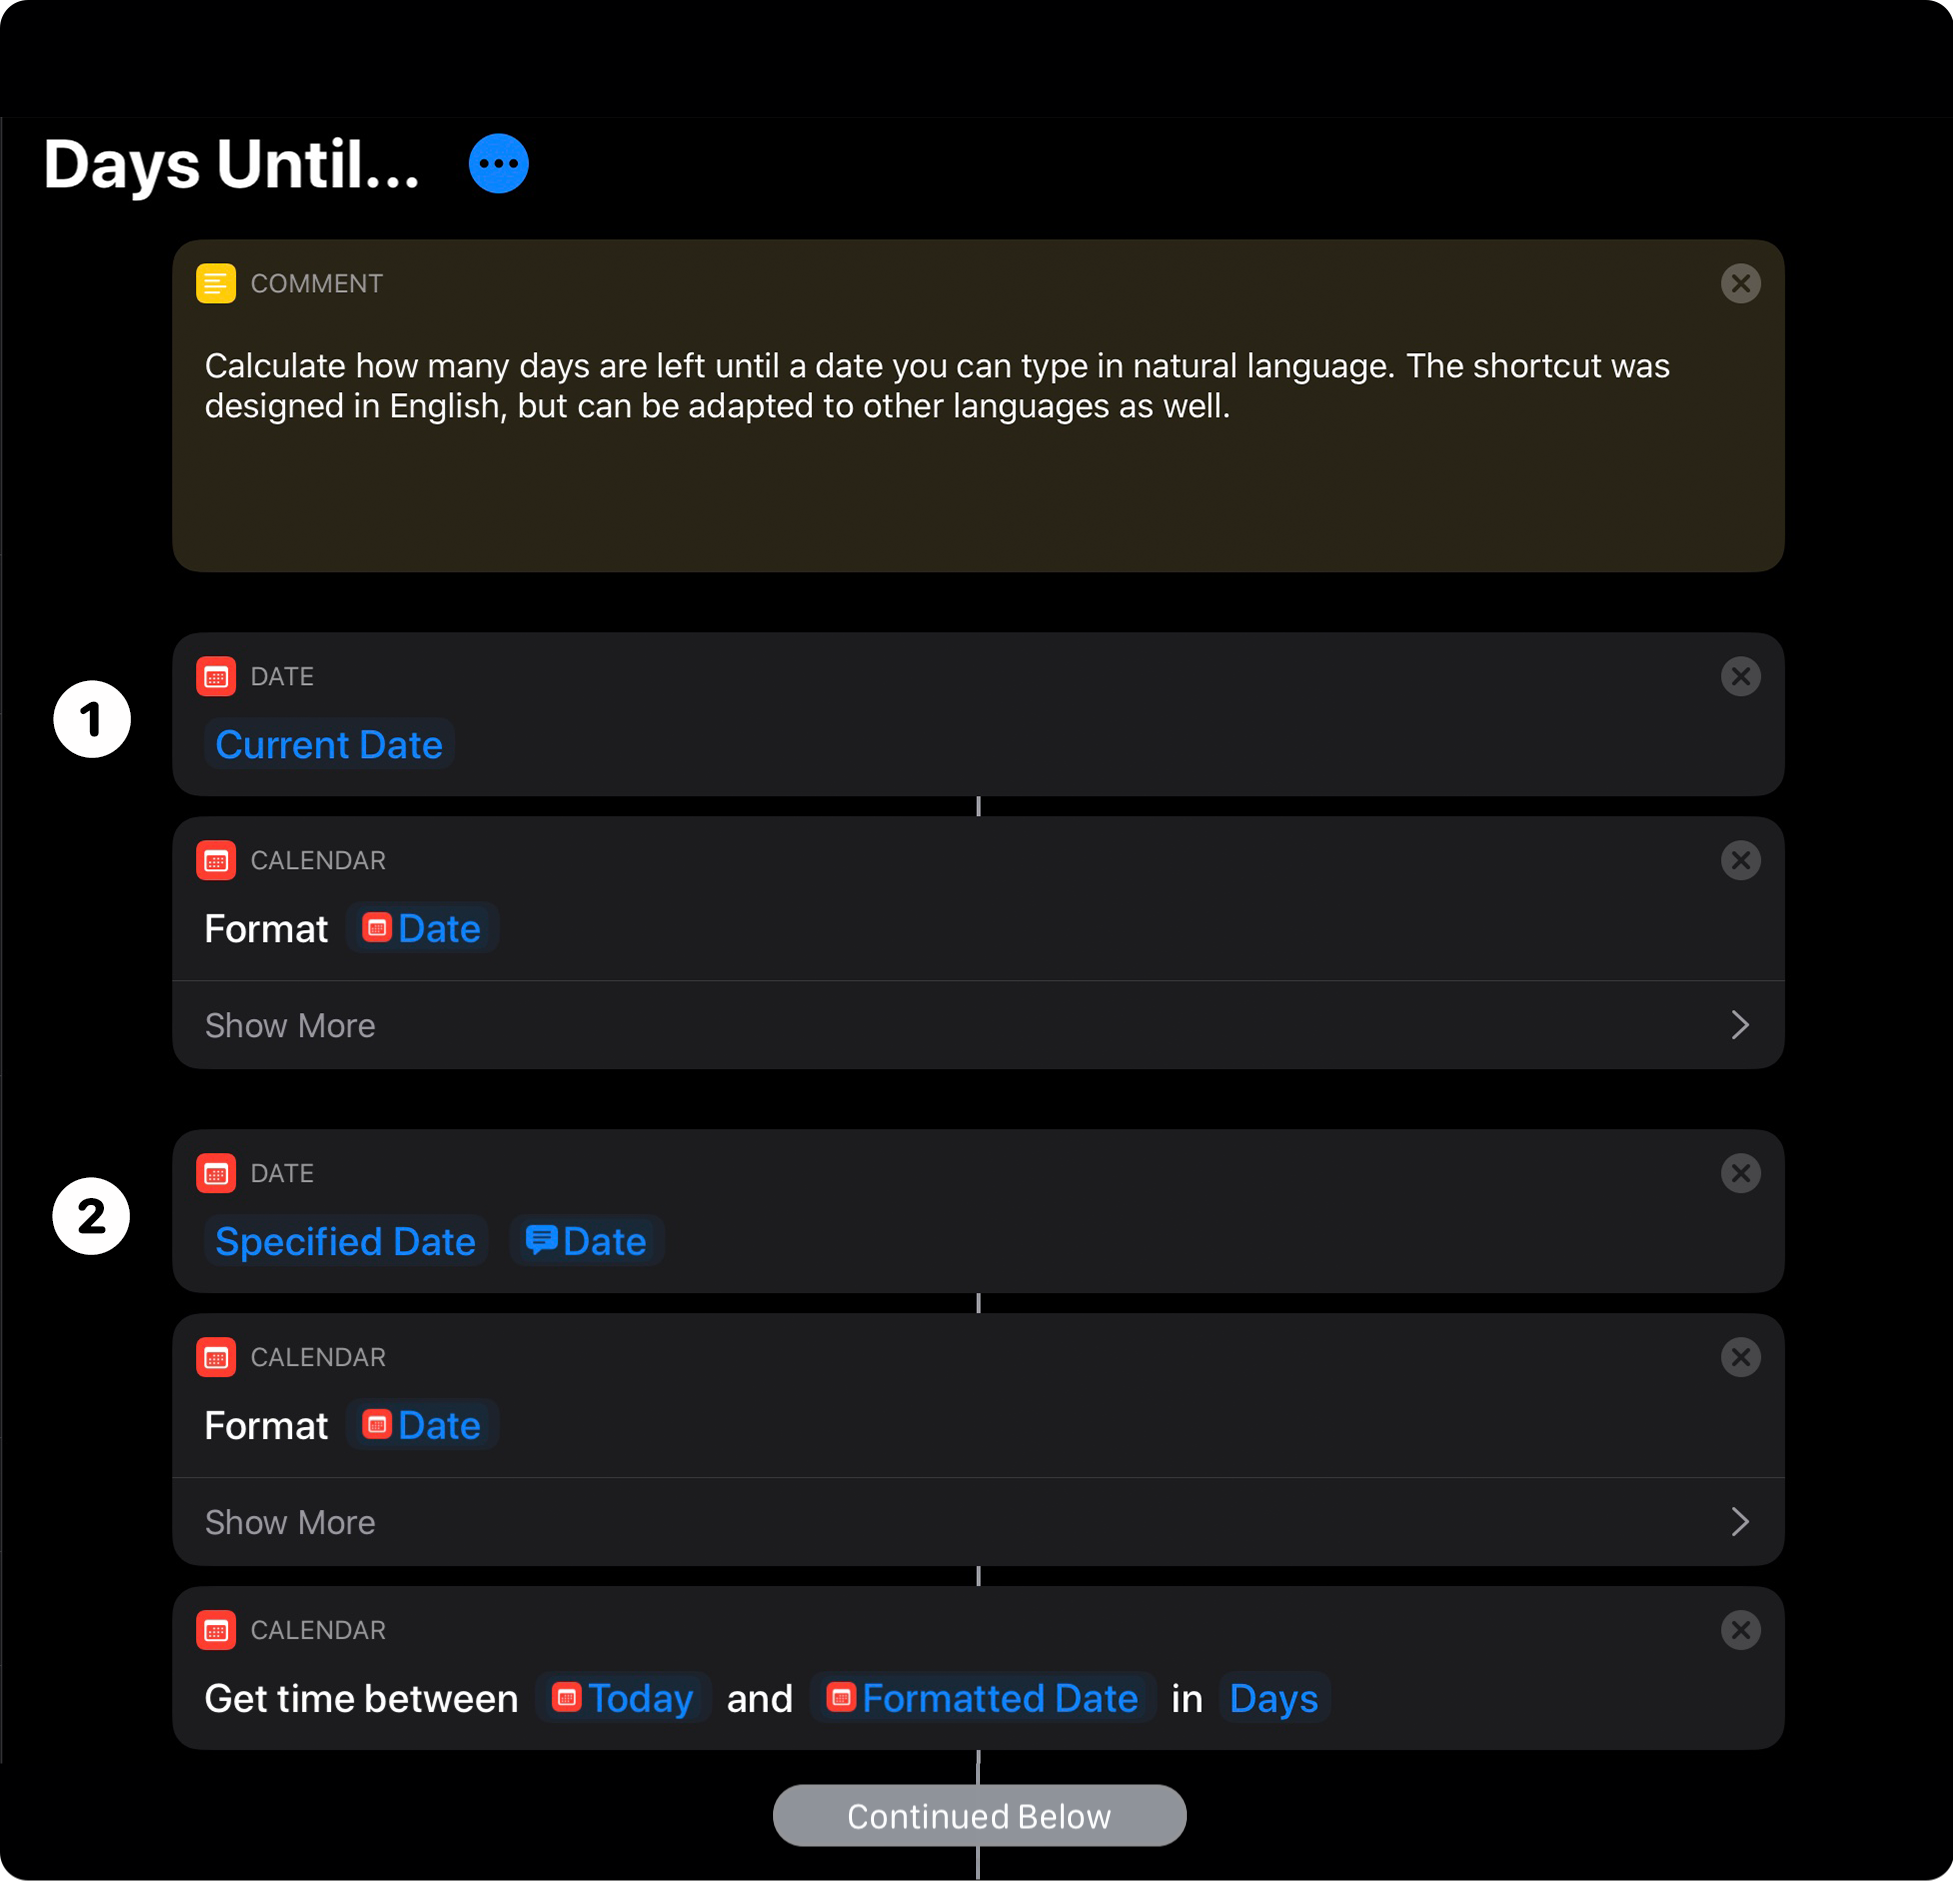
➊ Date and Format Date
Step 1 uses ‘Date’ and ‘Format Date’ actions. The Date action includes a single parameter that by default is set to the Current Date, which is what we want. The Format Date action includes a single parameter called ‘Date,’ which will take the Current Date passed from the first action. Expand the Format Date action by tapping the Show More button. By default, the Date Format and Time Format are both set to ‘Short.’ It’s worth tapping Date Format and Time Format to see the different options because there are a lot. It’s a shame there aren’t examples of what each of these date and time formats look like in Shortcuts, so I made a table with examples of each:
| Format | Example | Notes |
|---|---|---|
| None | ||
| Short | 3/2/20 | |
| Medium | Mar 2, 2020 | |
| Long | March 2, 2020 | |
| Relative | Today | Offers Short, Medium, and Long versions of relative dates. |
| RFC 2822 | Mon, 02 Mar 2020 12:00:00 -0600 | Has no Time Format option because it’s built into the date format. |
| ISO 8801 | 2020-03-02 | Provides option to include ISO 8601 time. |
| Custom | EEE, dd MMM yyyy HH:mm:ss Z | A syntax used in programming to create custom dates from strings of text. |
There are fewer time options, but here’s what each looks like:
| Format | Example |
|---|---|
| None | |
| Short | 12:00 PM |
| Medium | 12:00:00 PM |
| Long | 12:00:00 PM CST |
| Relative | 7 hours ago |
You can also require Shortcuts to ‘Ask Each Time’ for the date and time when you run your shortcut. When you do so, the shortcut pops up the Format Date action’s UI as soon as it reaches that step of your shortcut, giving you a chance to set the date and time to whatever format you’d like. However, for the purposes of Days Until…, set the Date Format to Short and the Time Format to None.
➋ Date, Format Date, and Get Time Between Dates
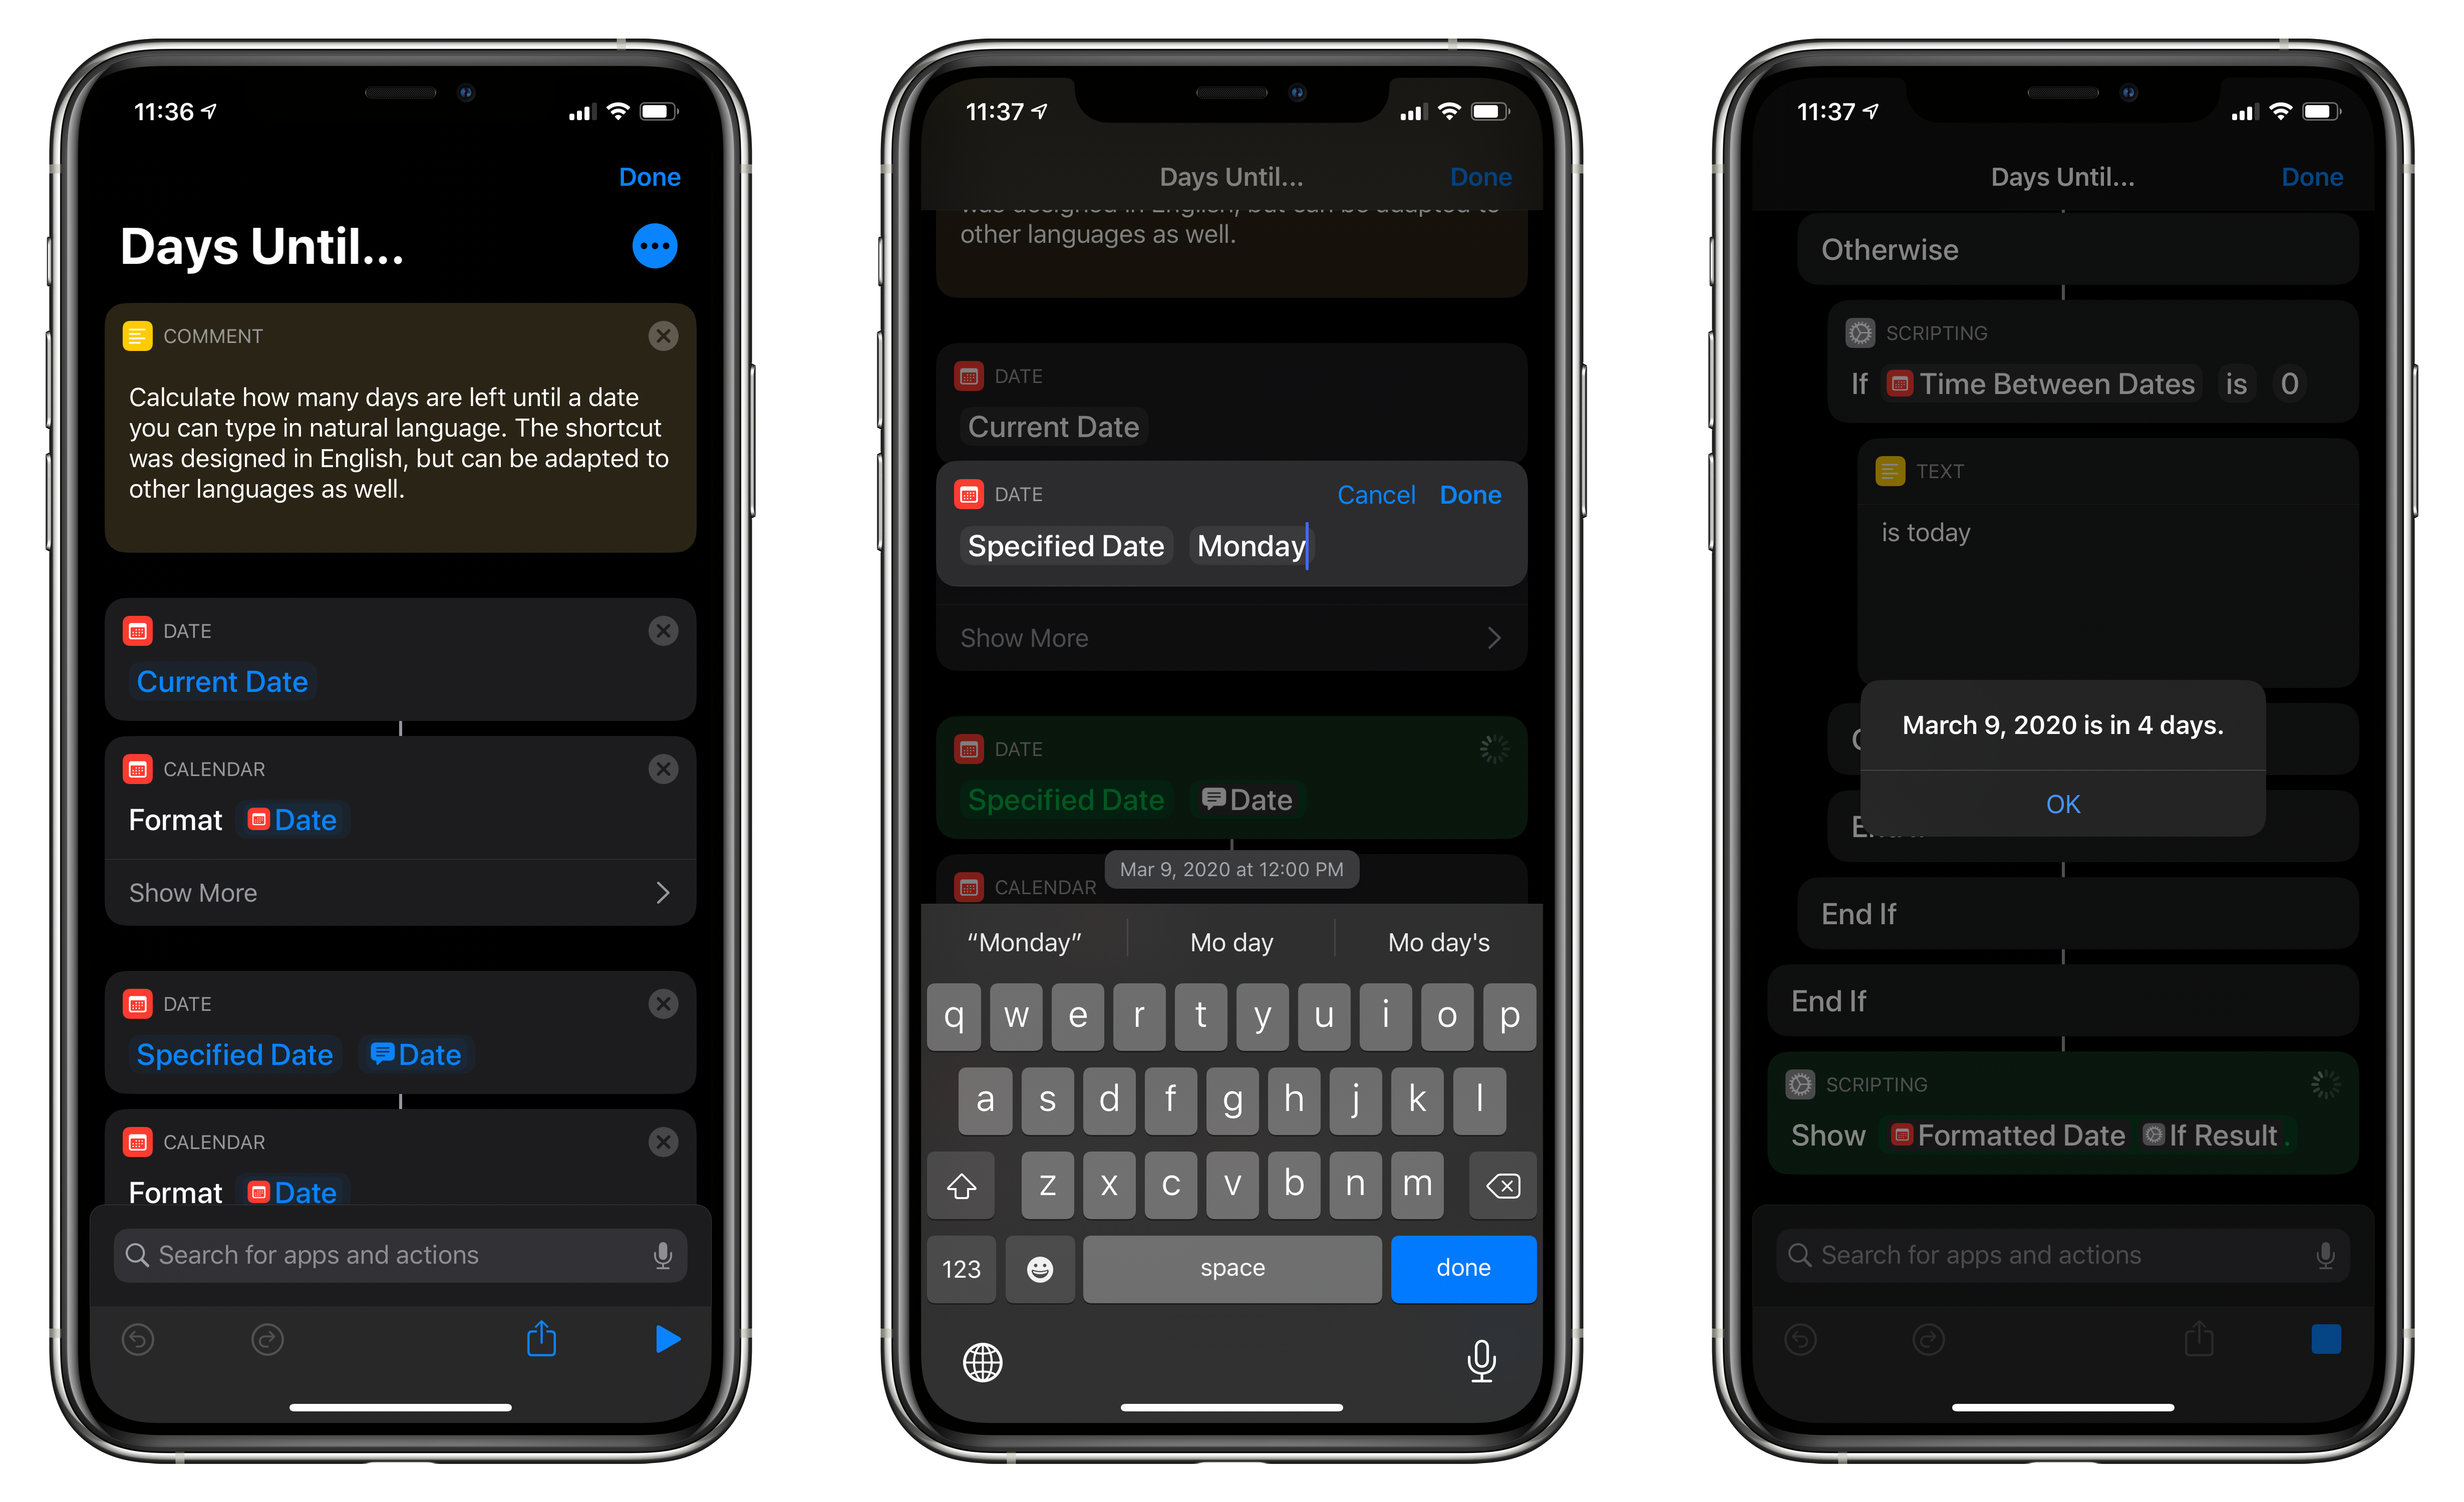
Now that we have today’s date, we need to ask for the date to which we’re going to compare it. Step 2 requires a ‘Date’ action. Date actions default to the ‘Current Date,’ which isn’t what we want. Tap Current Date and pick Specified Date because we want to use a single date the user will pick when the shortcut runs.
After adding Specified Date to the Date action, you’ll see a new lighter field added to the action that says ‘June 29, 2007.’1. Long-press the date and pick ‘Ask Each Time’ so the user is prompted to pick a date.
What’s really neat about Shortcuts is just how flexible it is in taking dates from the user. Specified Date can be in any of the formats listed in the table above. This provides latitude that reduces the possibility of user error, especially since it even works with relative dates like ‘next Tuesday.’
Next, add another Format Date action and set the Date Format to Long and the Time Format to None. We’re formatting this date a little different because we’re going to use it again as part of the alert we show users with the result of the shortcut.
The final step of this section of Days Until… is to use the current date and the one provided by the user to calculate the numbers of days between each. For this, grab a ‘Get Time Between Dates’ action and add it to the shortcut.
If you’ve already downloaded the Days Until… shortcut from the MacStories Shortcuts Archive, you’ll see that the action says ‘Get time between Today and Formatted Dates in Days.’ The first parameter called Today is the result of the formatted date from the shortcut’s first action.
If you’re setting up the shortcut from scratch, the result of that first action is called Formatted Date, but to distinguish it from the next date in the Get Time Between Dates action, it has been renamed. Start with the Get Time Between Dates action, and long-press the default ‘Current Date’ parameter. Next, pick Select Magic Variable. Choose the ‘Formatted Date’ result that appears beneath the first action. Next, tap ‘Formatted Date’ in the Get Time Between Dates action and rename it by selecting the Rename button in the toolbar just beneath the Shortcuts editor. In Days Until… it has been renamed ‘Today.’
Long-press the ‘Date’ parameter next, pick Select Magic Variable, and then the Formatted Date result from the immediately preceding action. Finally, tap the ‘Minutes’ parameter and change it to Days from the eight options available.
Days Until…, Part 2
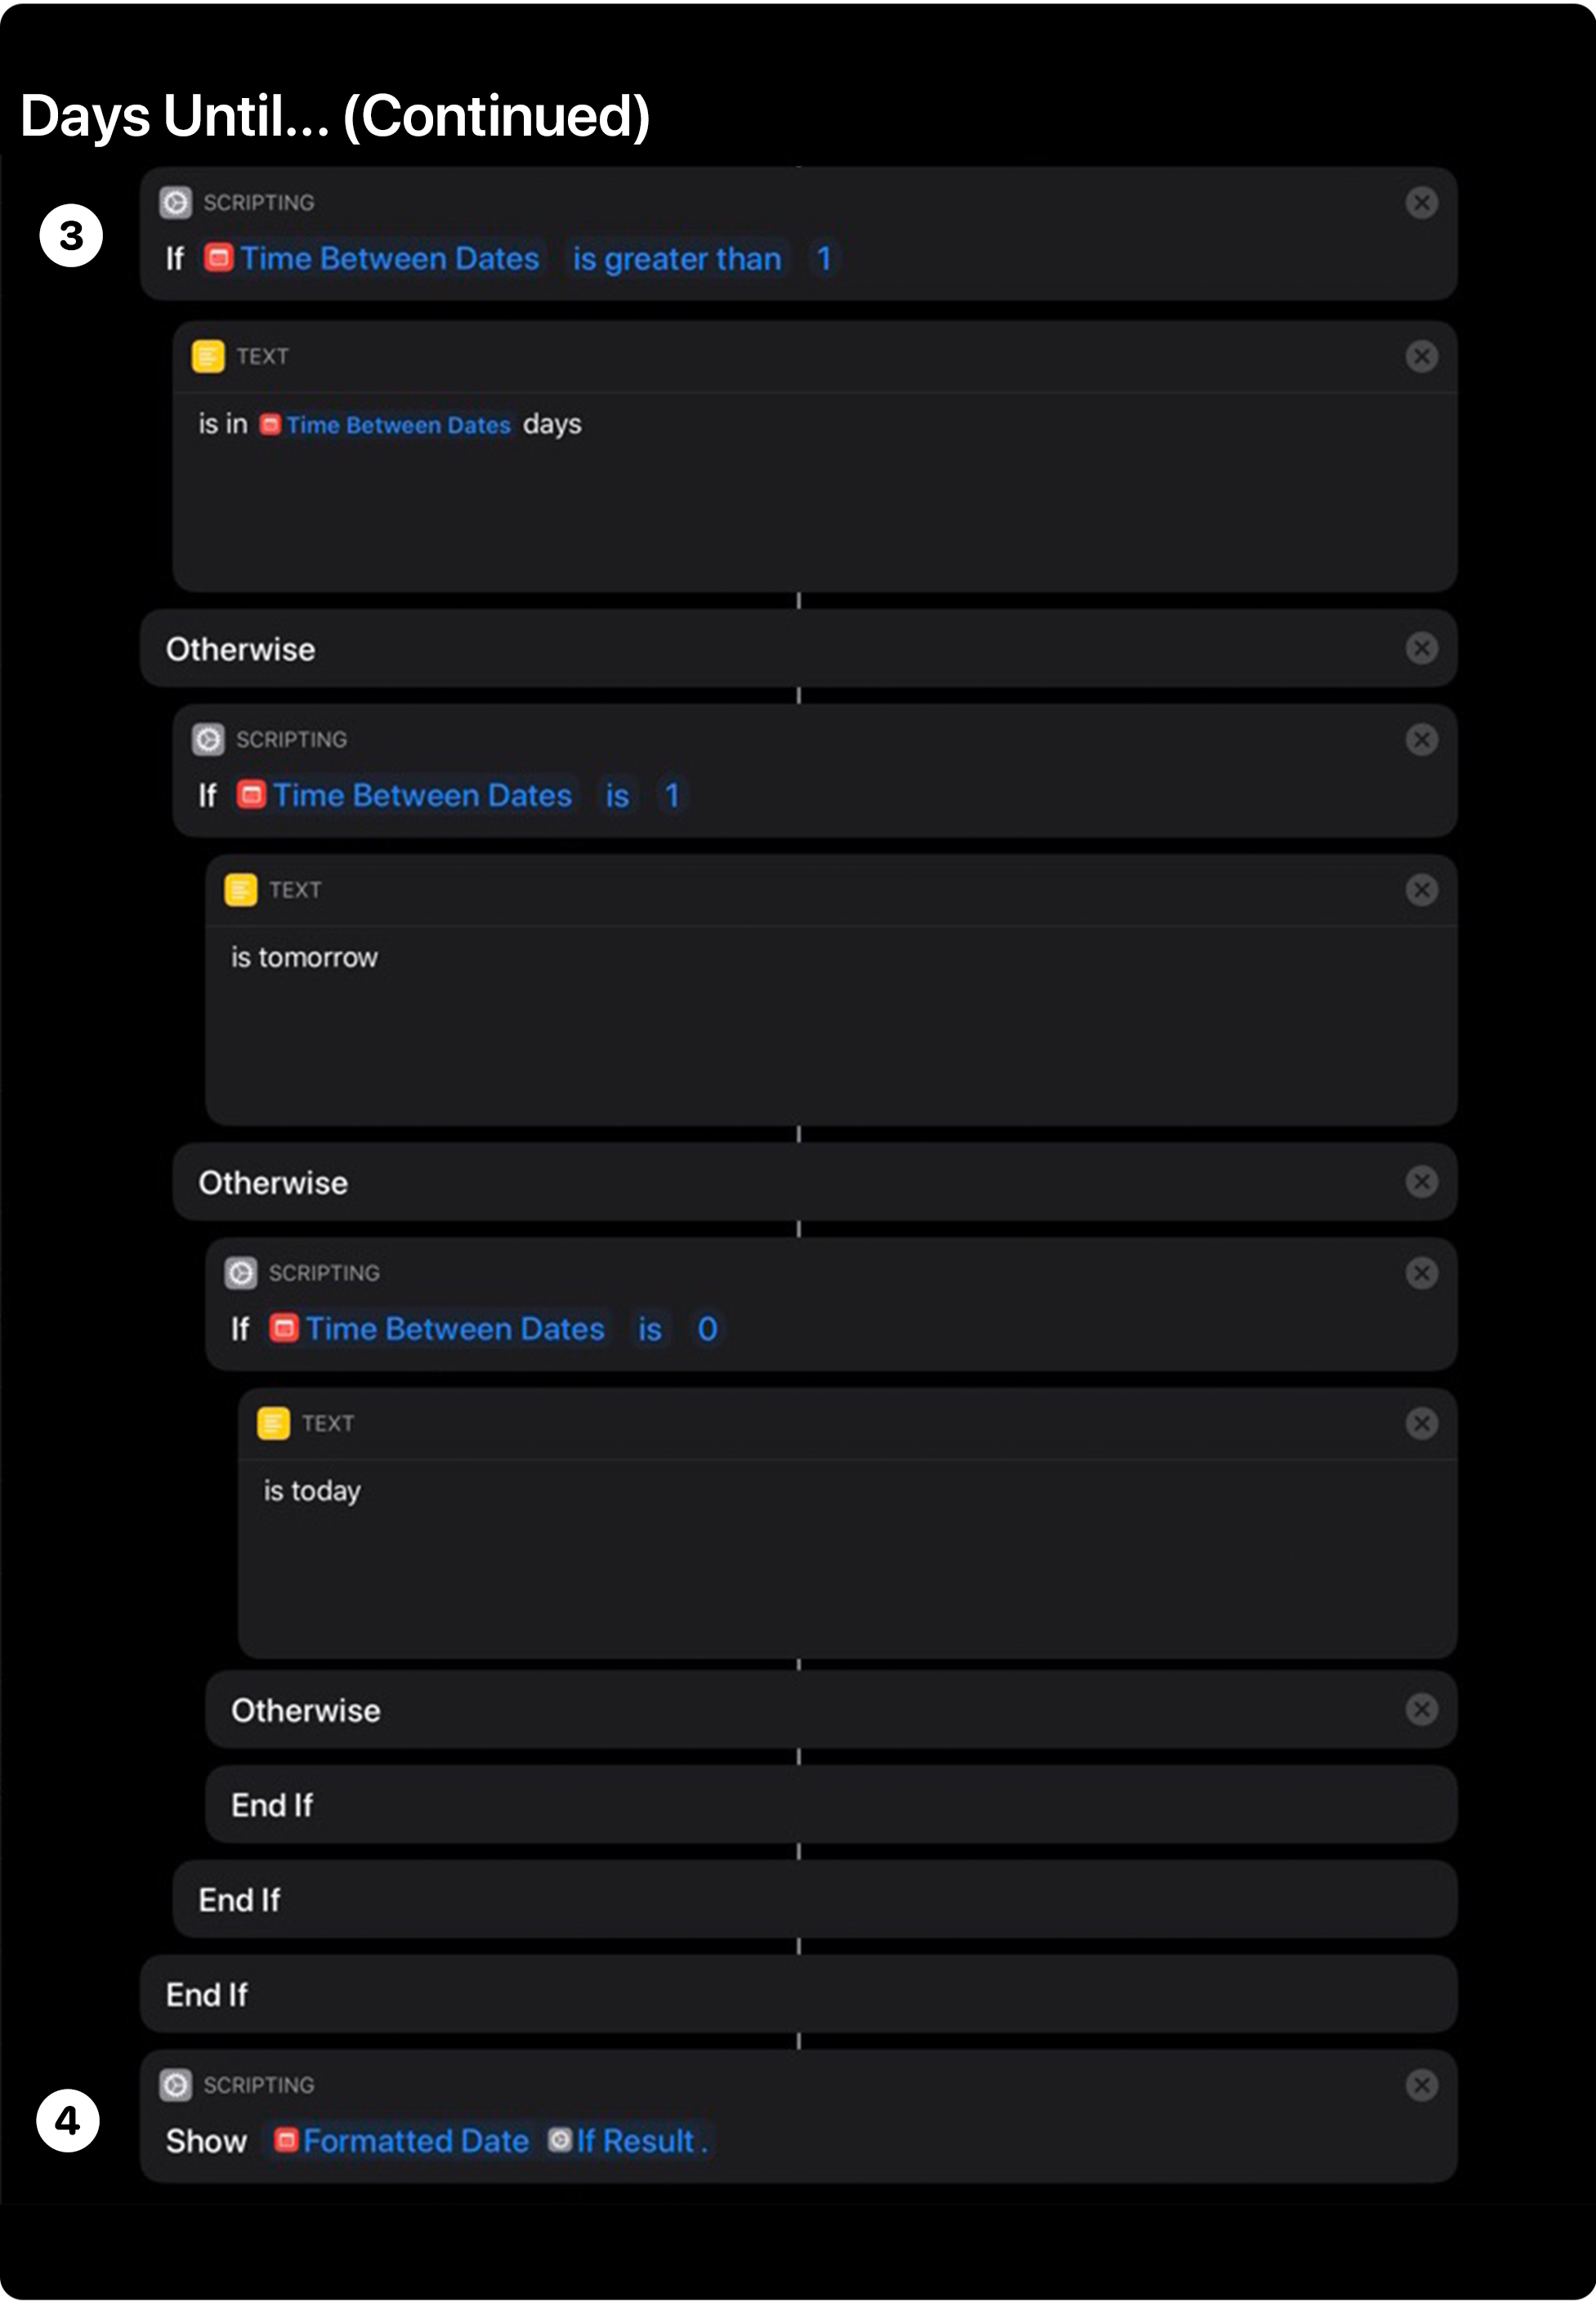
➌ Nested If Actions
Step 3 of Days Until… consists of three nested ‘If’ actions that account for the user picking a date more than one day in the future, tomorrow, and today. For more on If actions, be sure to check out the Create Hyperlink shortcut in the first installment of Shortcuts Rewind.
Each of the If actions start with the result of the Time Between Dates action, which Shortcuts will fill in automatically when you add an If action. Tap the Condition parameter and choose ‘is greater than’ and enter 1 for the Number parameter.
The next action is a ‘Text’ action that reads ‘is in Time Between Dates days.’ To include the results of Time Between Dates to the Text action, pick it in the horizontally-scrolling list of variables in the toolbar at the bottom of the editor. The other two pairs of If and Text actions are similar, addressing the situations where the time between days is 1 day and 0 days with custom text indicating the dates are tomorrow and today, respectively.
➍ Show Results
Step 4 uses a ‘Show Result’ action to display the Time Between Dates variable and If Results variables. When you add the action, it will only show one placeholder for a variable. Tap the Variables button to show the available variables and after picking the first one, make sure the insertion point is where you need it and pick the other. When the shortcut runs, the results will be displayed along with an ‘Ok’ button to dismiss the message.
That’s a fairly long explanation of a relatively simple shortcut, but as with any of these shortcuts, it pays to poke around at all the options for each action. When I do that, I inevitably find something that will come in handy for a future shortcut.
You can download Days Until… below or find it in the MacStories Shortcuts Archive.

Days Until…
Calculate how many days are left until a date you can type in natural language. The shortcut was designed in English, but can be adapted to other languages as well.
Calendar Locations
Shortcuts isn’t limited to dates, though. You can also build shortcuts based on events that you previously entered into your calendar.
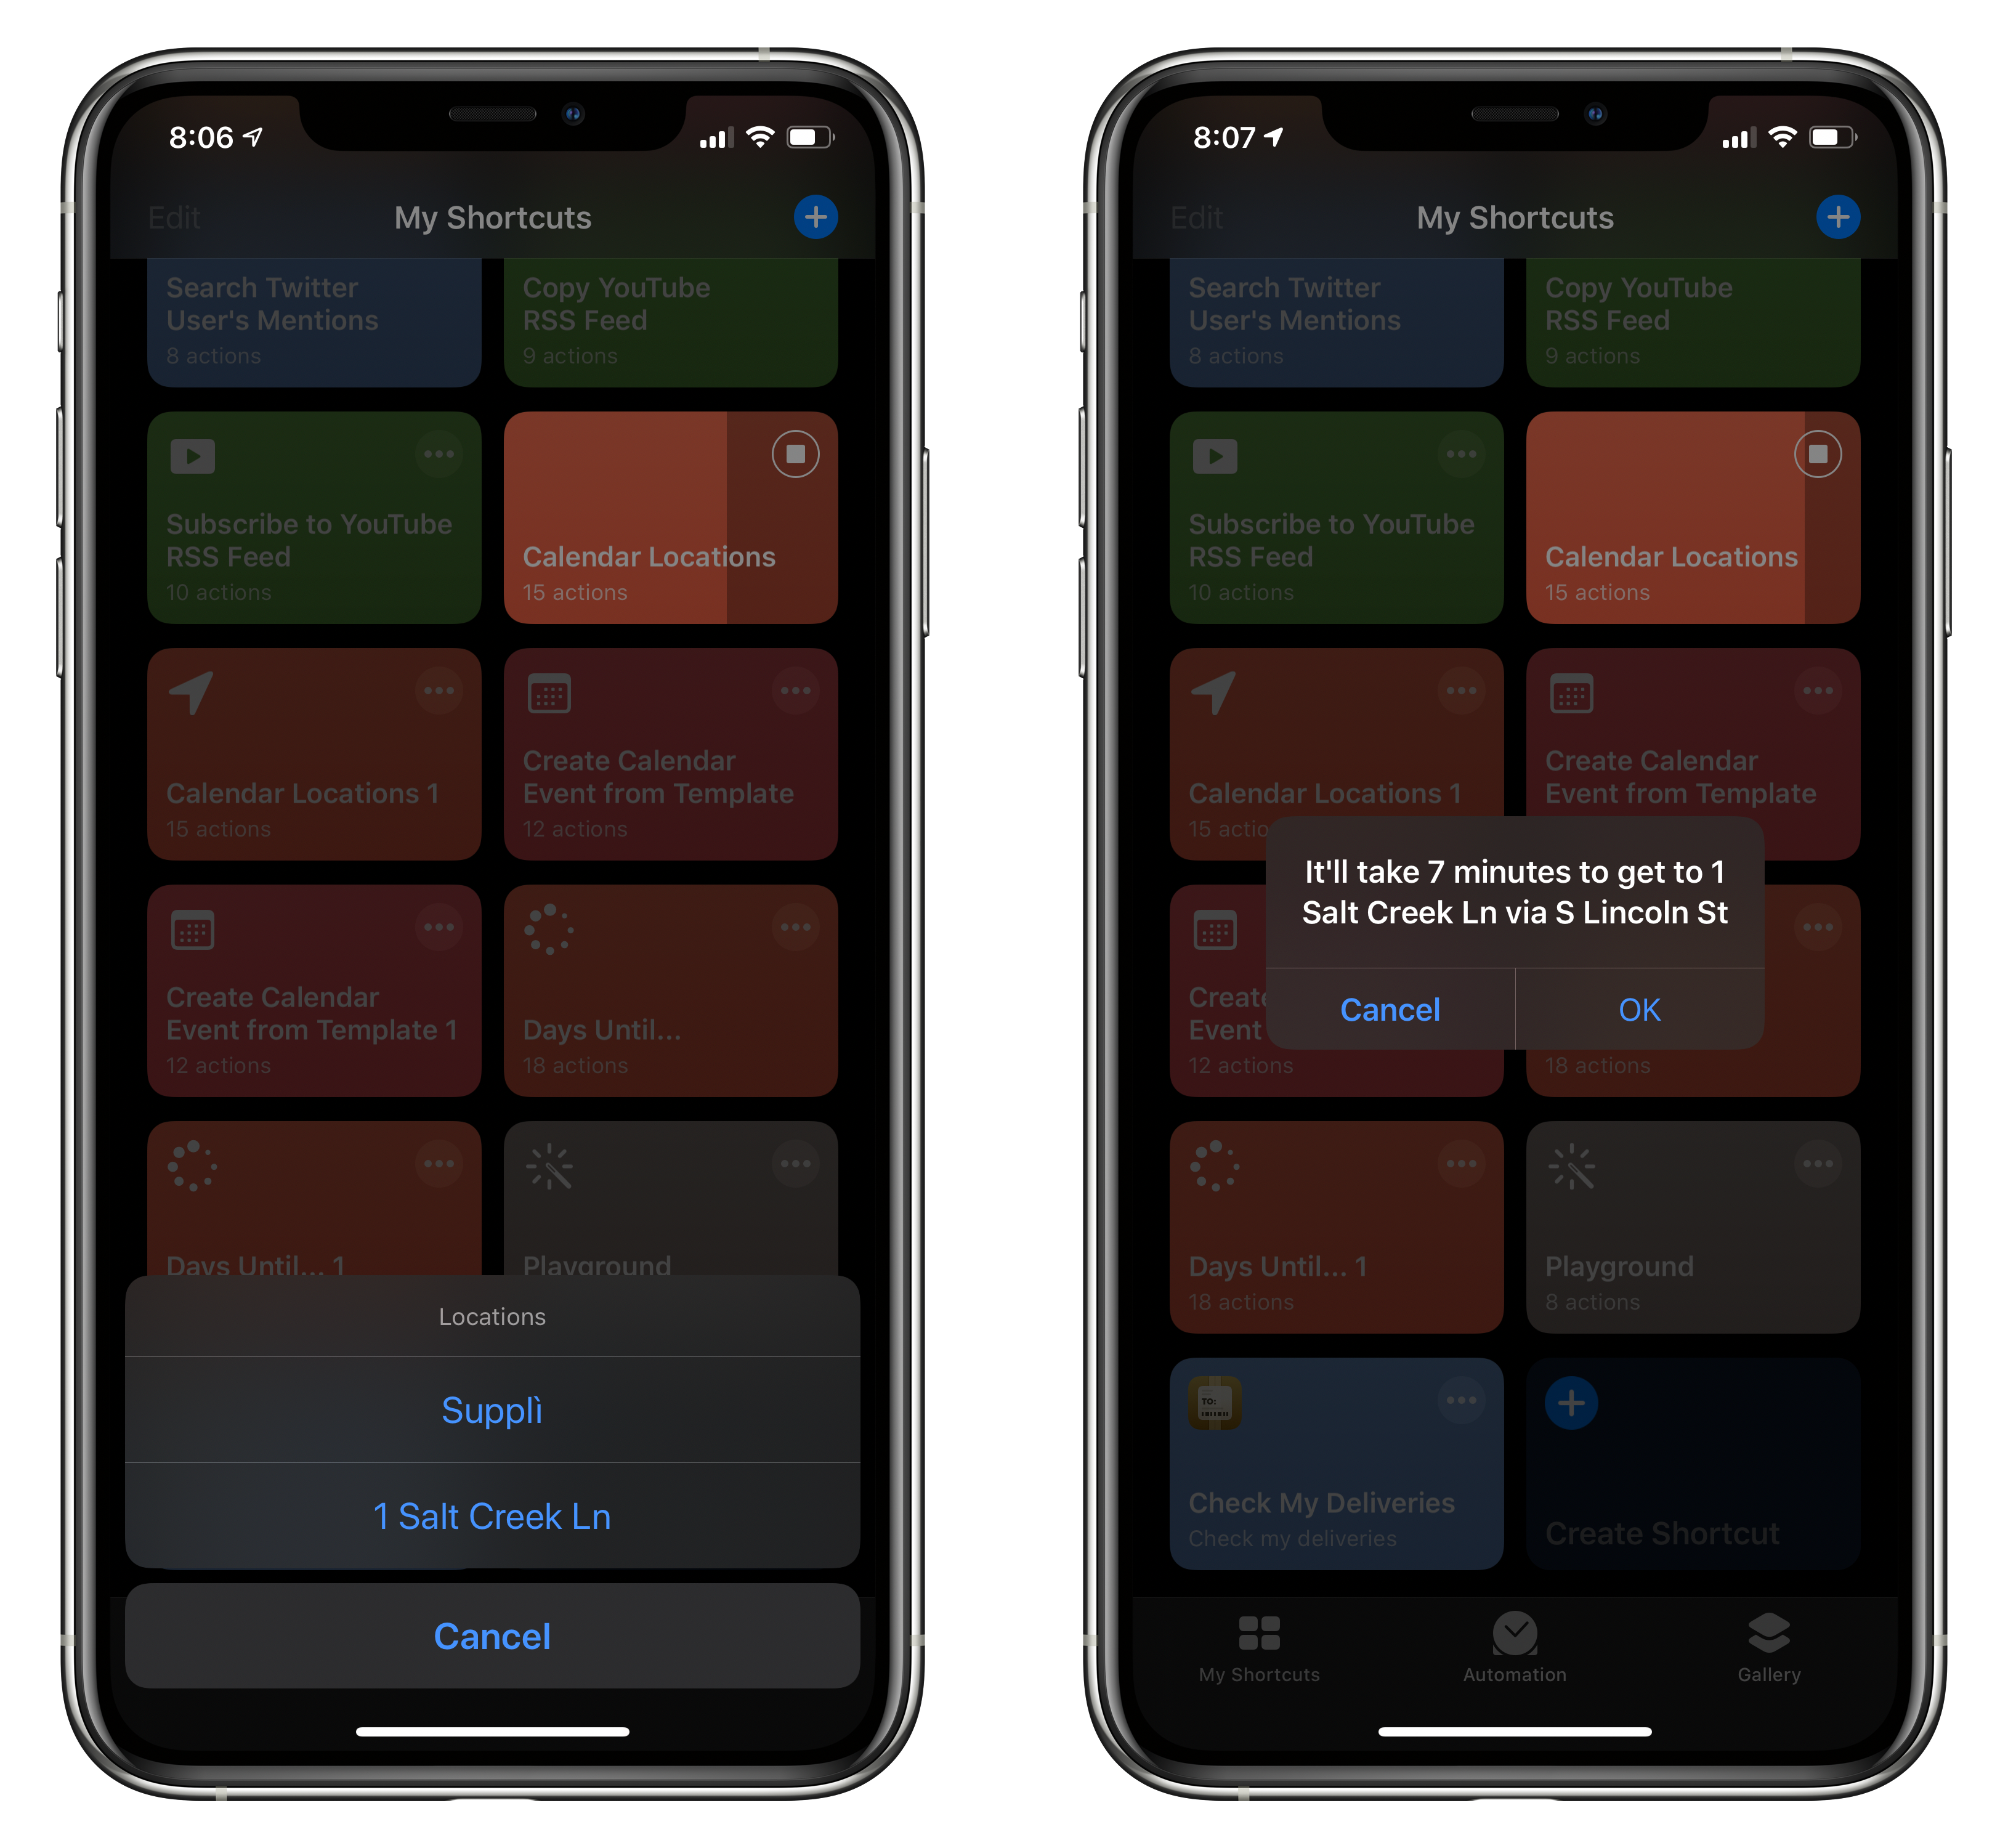
Calendar Locations looks forward to the next three days worth of events in your calendar, extracts location data included in them, and presents you with a list of locations. Tap on one and the shortcut will tell you how long it will take to get to the location. The shortcut is an excellent introduction to calendar actions, Apple Maps actions, and the ‘Repeat with each item in’ scripting action that we haven’t covered yet.
Calendar Locations, Part 1
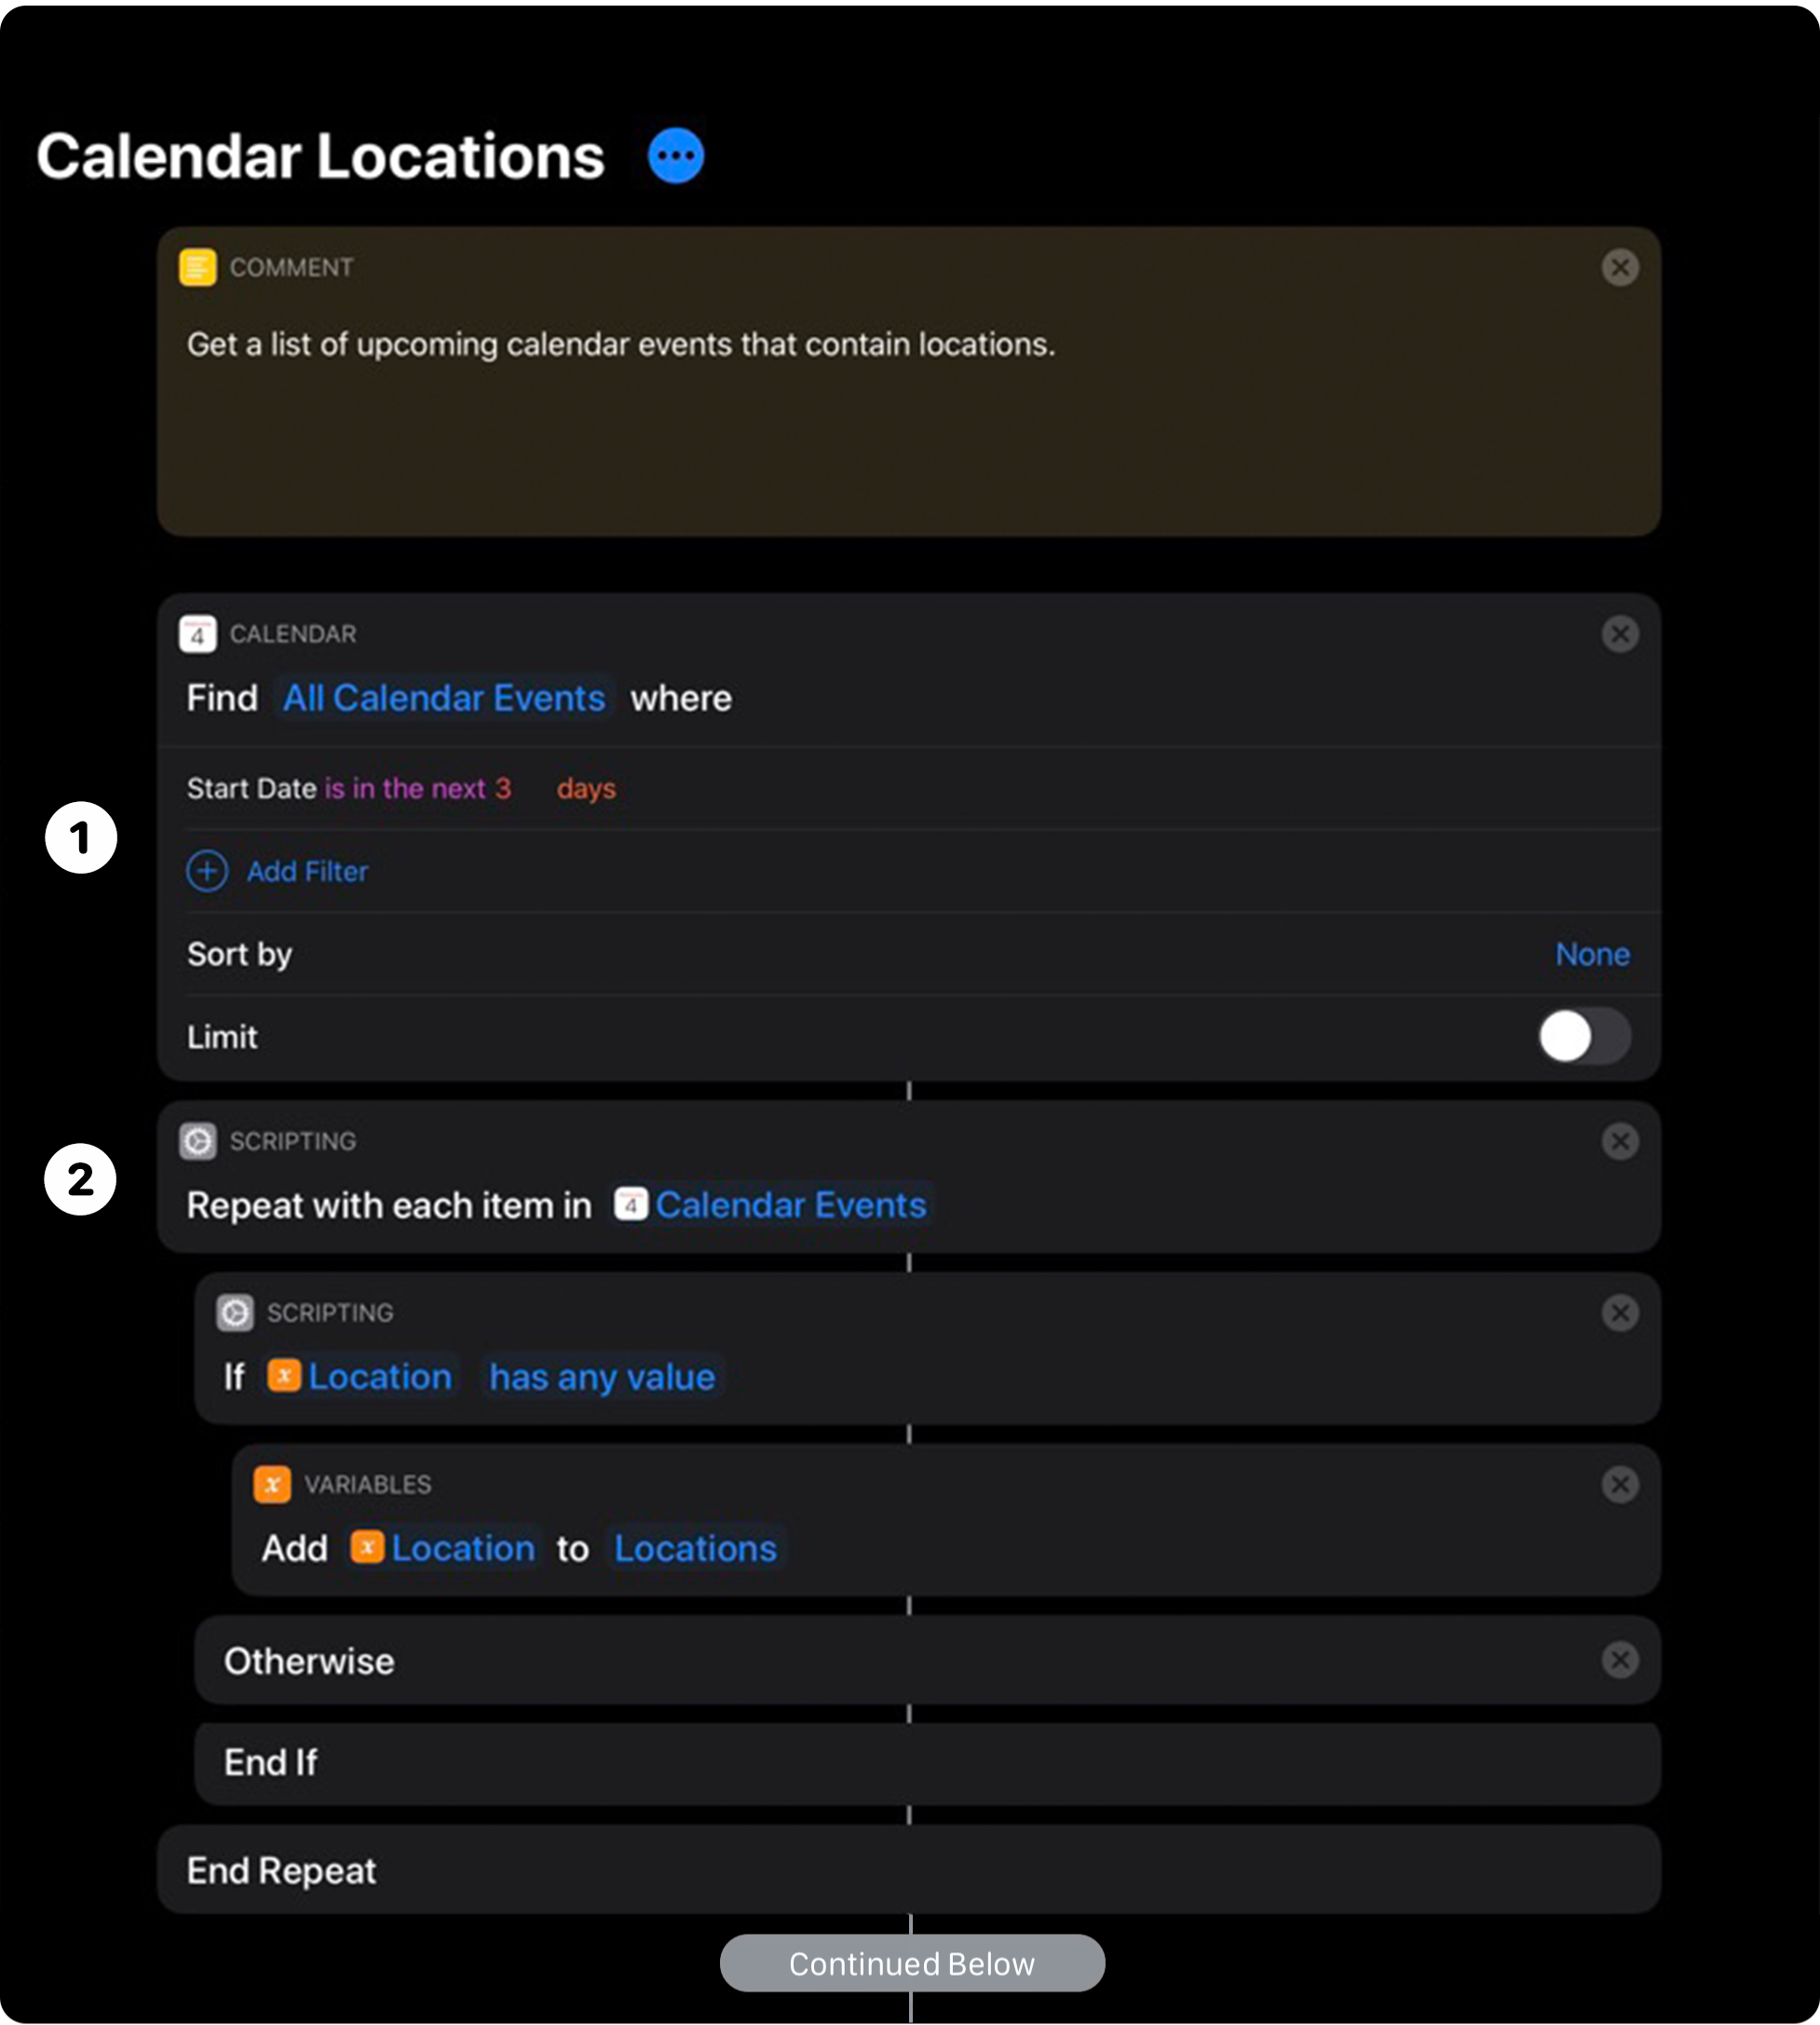
➊ Find Calendar Events
Step 1 of Calendar Locations is to find your calendar events. Shortcuts includes eight built-in calendar actions, but for this shortcut all we need is ‘Find Calendar Events.’ By default, the action finds all calendar events where the start date is in the next seven days. We only want the next three days, so if you’re building the shortcut from scratch, tap the text field in the action and replace ‘7’ with ‘3.’
It’s worth noting that in addition to looking forward for events ‘in the next’ number of days, you can tap on ‘is in the next’ and change it to an exact date, today, a range of days, or in the last number of days. You’re not limited to days as a measure of time periods either. You can also use seconds, minutes, hours, weeks, months, and years.
The Find Calendar Events action includes a filter option that lets you filter which calendars are included in the action and a sorting option for sorting the action’s results by ten different criteria. It’s worthwhile to poke around these options to see what’s possible, but this shortcut doesn’t use any of them.
➋ Repeat with Each
Step 2 uses a ‘Repeat with Each’ action to perform the same set of steps on each of the events passed to it from the last step. For each calendar event found in step 1, the repeat loop will look to see whether the event includes a location and if it does, add it to a list of locations that are stored in a variable.
First, add a Repeat with Each action and an If action. Next, drag the If action so it’s inside the Repeat with Each action, which will assume you want to use the Calendar Events magic variable that was output by the first action. That is correct, so no need to make changes there.
There are a couple of changes to make in the If action, however. First, tap on the ‘Repeat Item’ parameter. Shortcuts displays the different forms the item can take. By default, each Repeat Item will be a Calendar Event, but we want the event’s location, not the other included data, so scroll down and pick ‘Location,’ which changes the variable name in the If action to ‘Location’ too. Second, we need to fill in the Condition parameter. Tap the parameter and pick ‘has any value’ from the list because all we’re checking for here is whether the calendar event includes a location or not.
Next, drag an ‘Add Variable’ action between the If and Otherwise actions. Tap ‘Repeat Item’ and change the item from Calendar Event to Location, as we did above. Then, tap the Variable Parameter and name it Locations because this is where the list of locations collected from your next three days of calendar events will be stored. Every event the shortcut finds will be run through this Repeat with Each loop, adding the locations it finds to the Locations variable until all of the events are processed, at which point it will proceed to the next step.
Calendar Locations, Part 2
➌ Choose from Locations
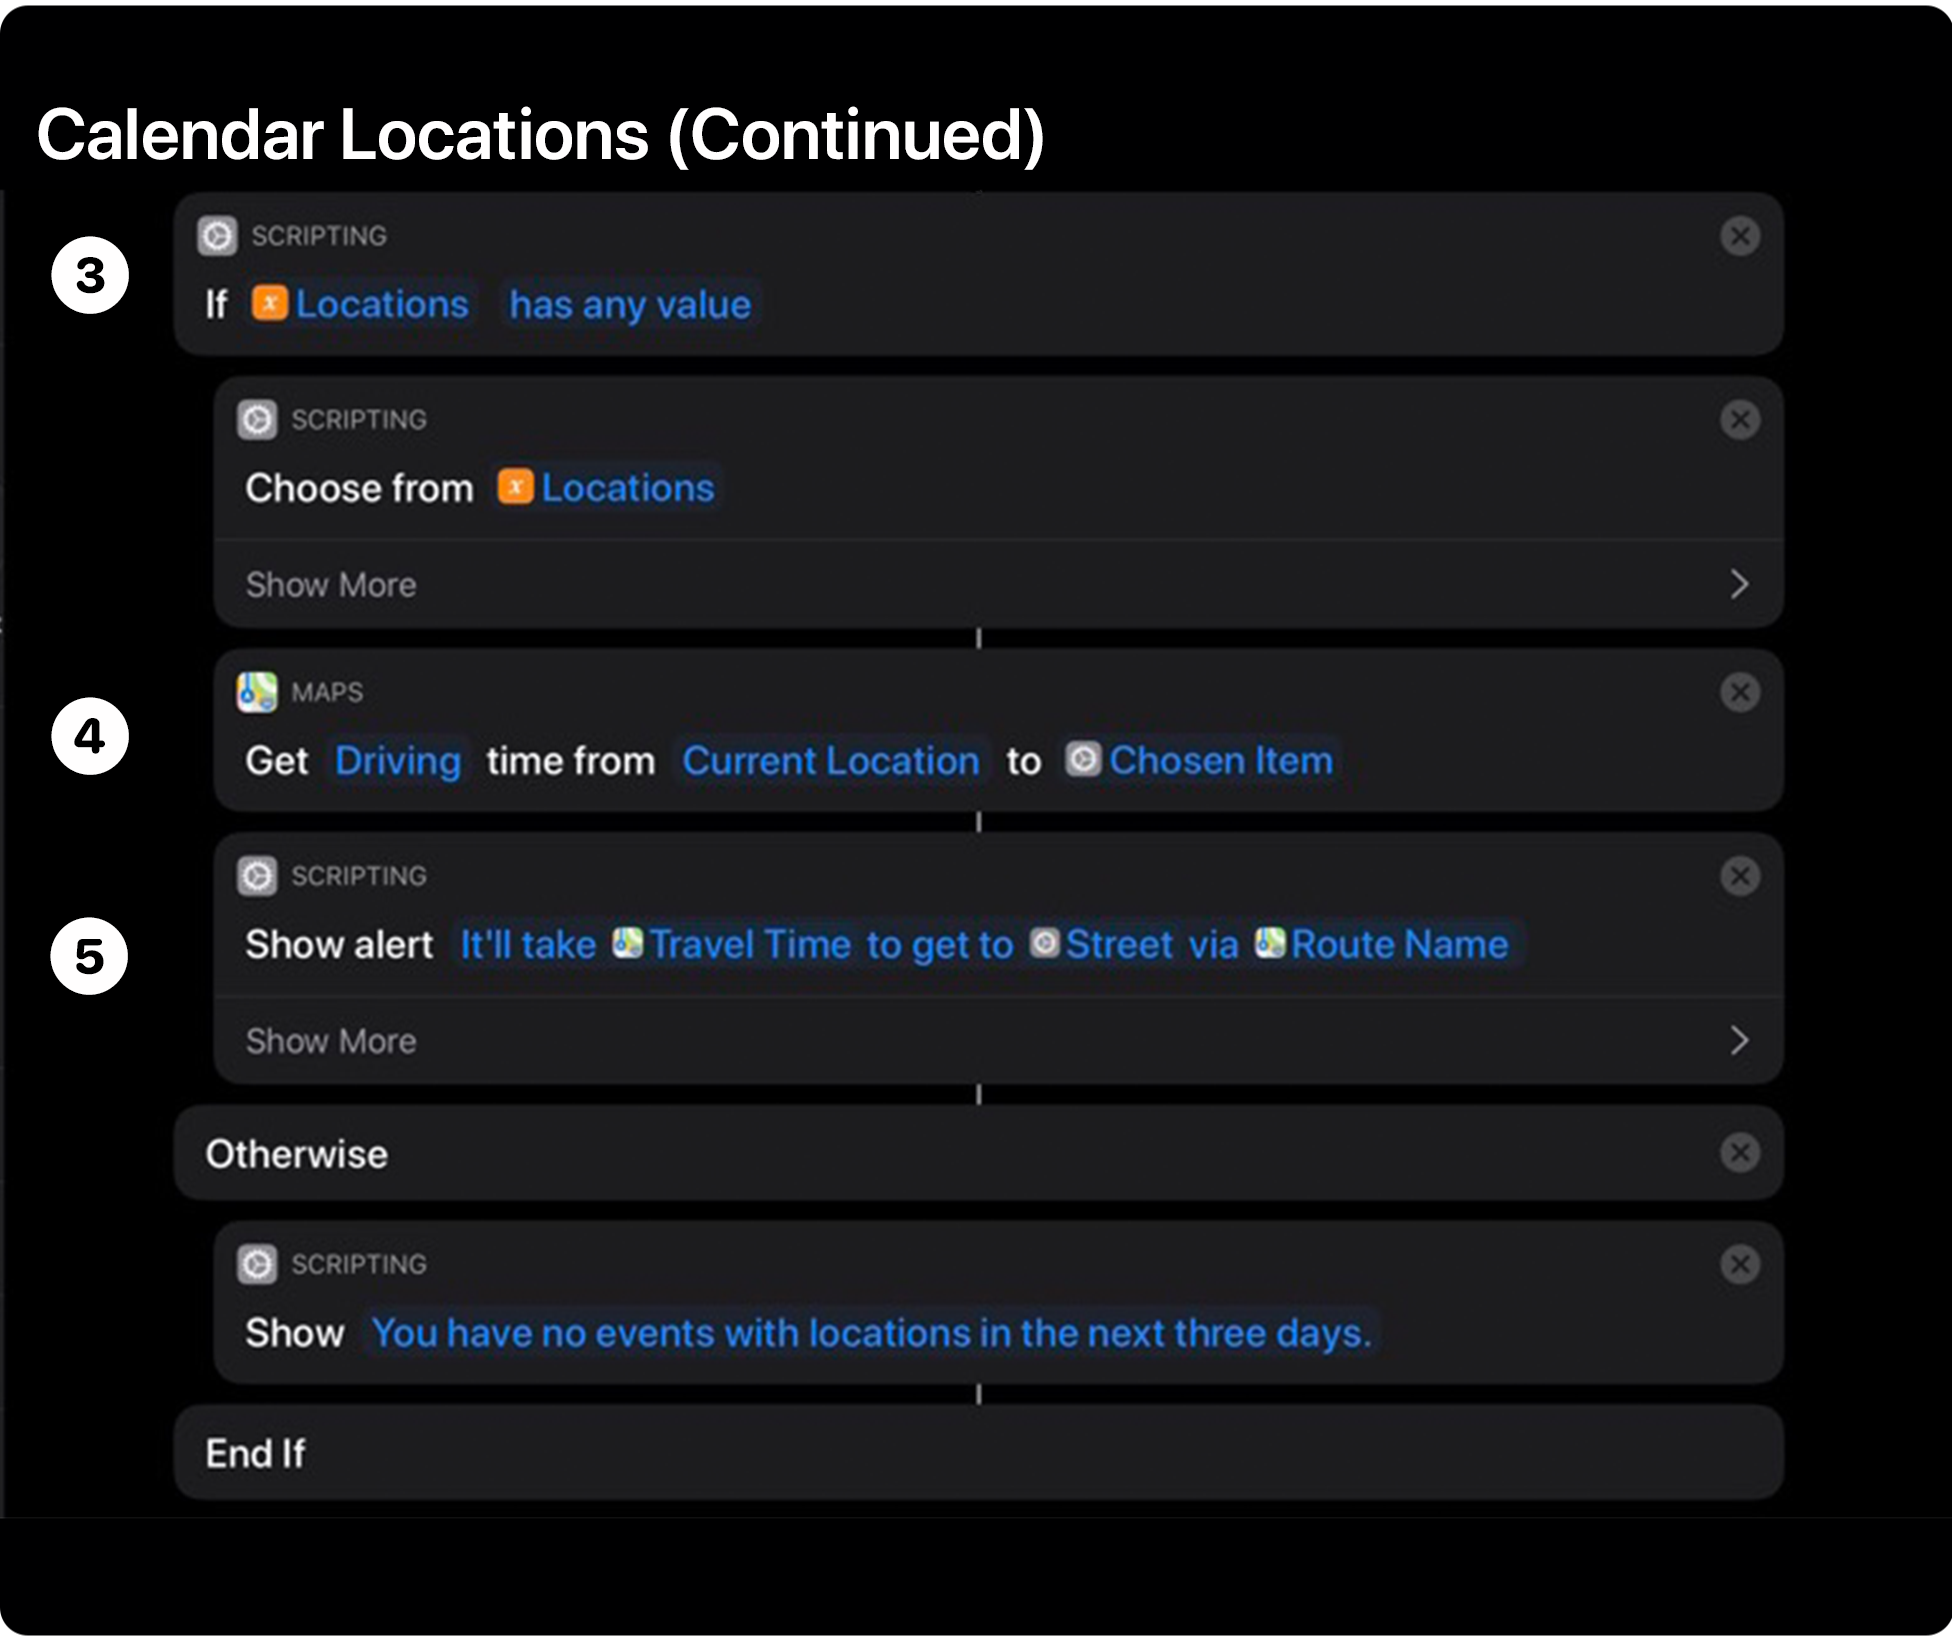
Step 3 checks if the Locations variable you created above has any value. If it does, the shortcut prompts you to pick a location and then calculates the travel time to your destination.
To check if the Locations variable has a value, add another If action to the shortcut. The If action defaults to checking the Repeat Results, but by long-pressing on it, the variable can be changed to Locations. The Condition parameter should be changed to ‘has any value’ as in the last If action above.
Nest a Choose from List action inside the If action and long-press on the parameter to change from the default ‘Repeat Results’ magic variable to the Locations variable you created. That will display a list of the locations found among your next three days of events. If you expand the ‘Show More’ button in the Choose from List action, you can fill in the optional Prompt field with ‘Locations’ to help the user understand the list they are viewing.
➍ Get Travel Time
The steps of the Calendar Locations shortcut calculate the travel time to your event’s destination and displays the results of the shortcut.
Apple Maps includes several actions. Step 4 uses ‘Get Travel Time,’ which needs to be dragged inside the If action after the Choose from List action from the last step. The default values don’t need to be changed for this action. The first parameter the action takes is the mode of transportation, which accepts Driving, Walking, and Transit. Calendar Locations is set up to provide drive times to locations, but can be changed to walking or transit times instead. The action also defaults to measuring the travel time between your current location and the event’s location, but you can set a different starting point if you’d like by tapping ‘Current Location.’ Finally, the action defaults to the Chosen Item magic variable for the destination, which is what we want since it’s the location picked in the preceding action.
Step 5 of the shortcut displays its results to the user. Drag a Show Alert action after the Get Travel Time action and replace its text with a combination of static text and three Magic Variables, so it reads ‘It’ll take Travel Time to get to Street via Route Name.’ It’s worth examining each of these magic variables because they demonstrate how magic variables can be adjusted to access the precise data needed for the displayed message.
The first magic variable hasn’t been modified at all. The Travel Time magic variable is automatically created by the Get Travel Time action and is available in the toolbar at the bottom of the shortcut editor. Just tap it will be added to the alert you’re building.
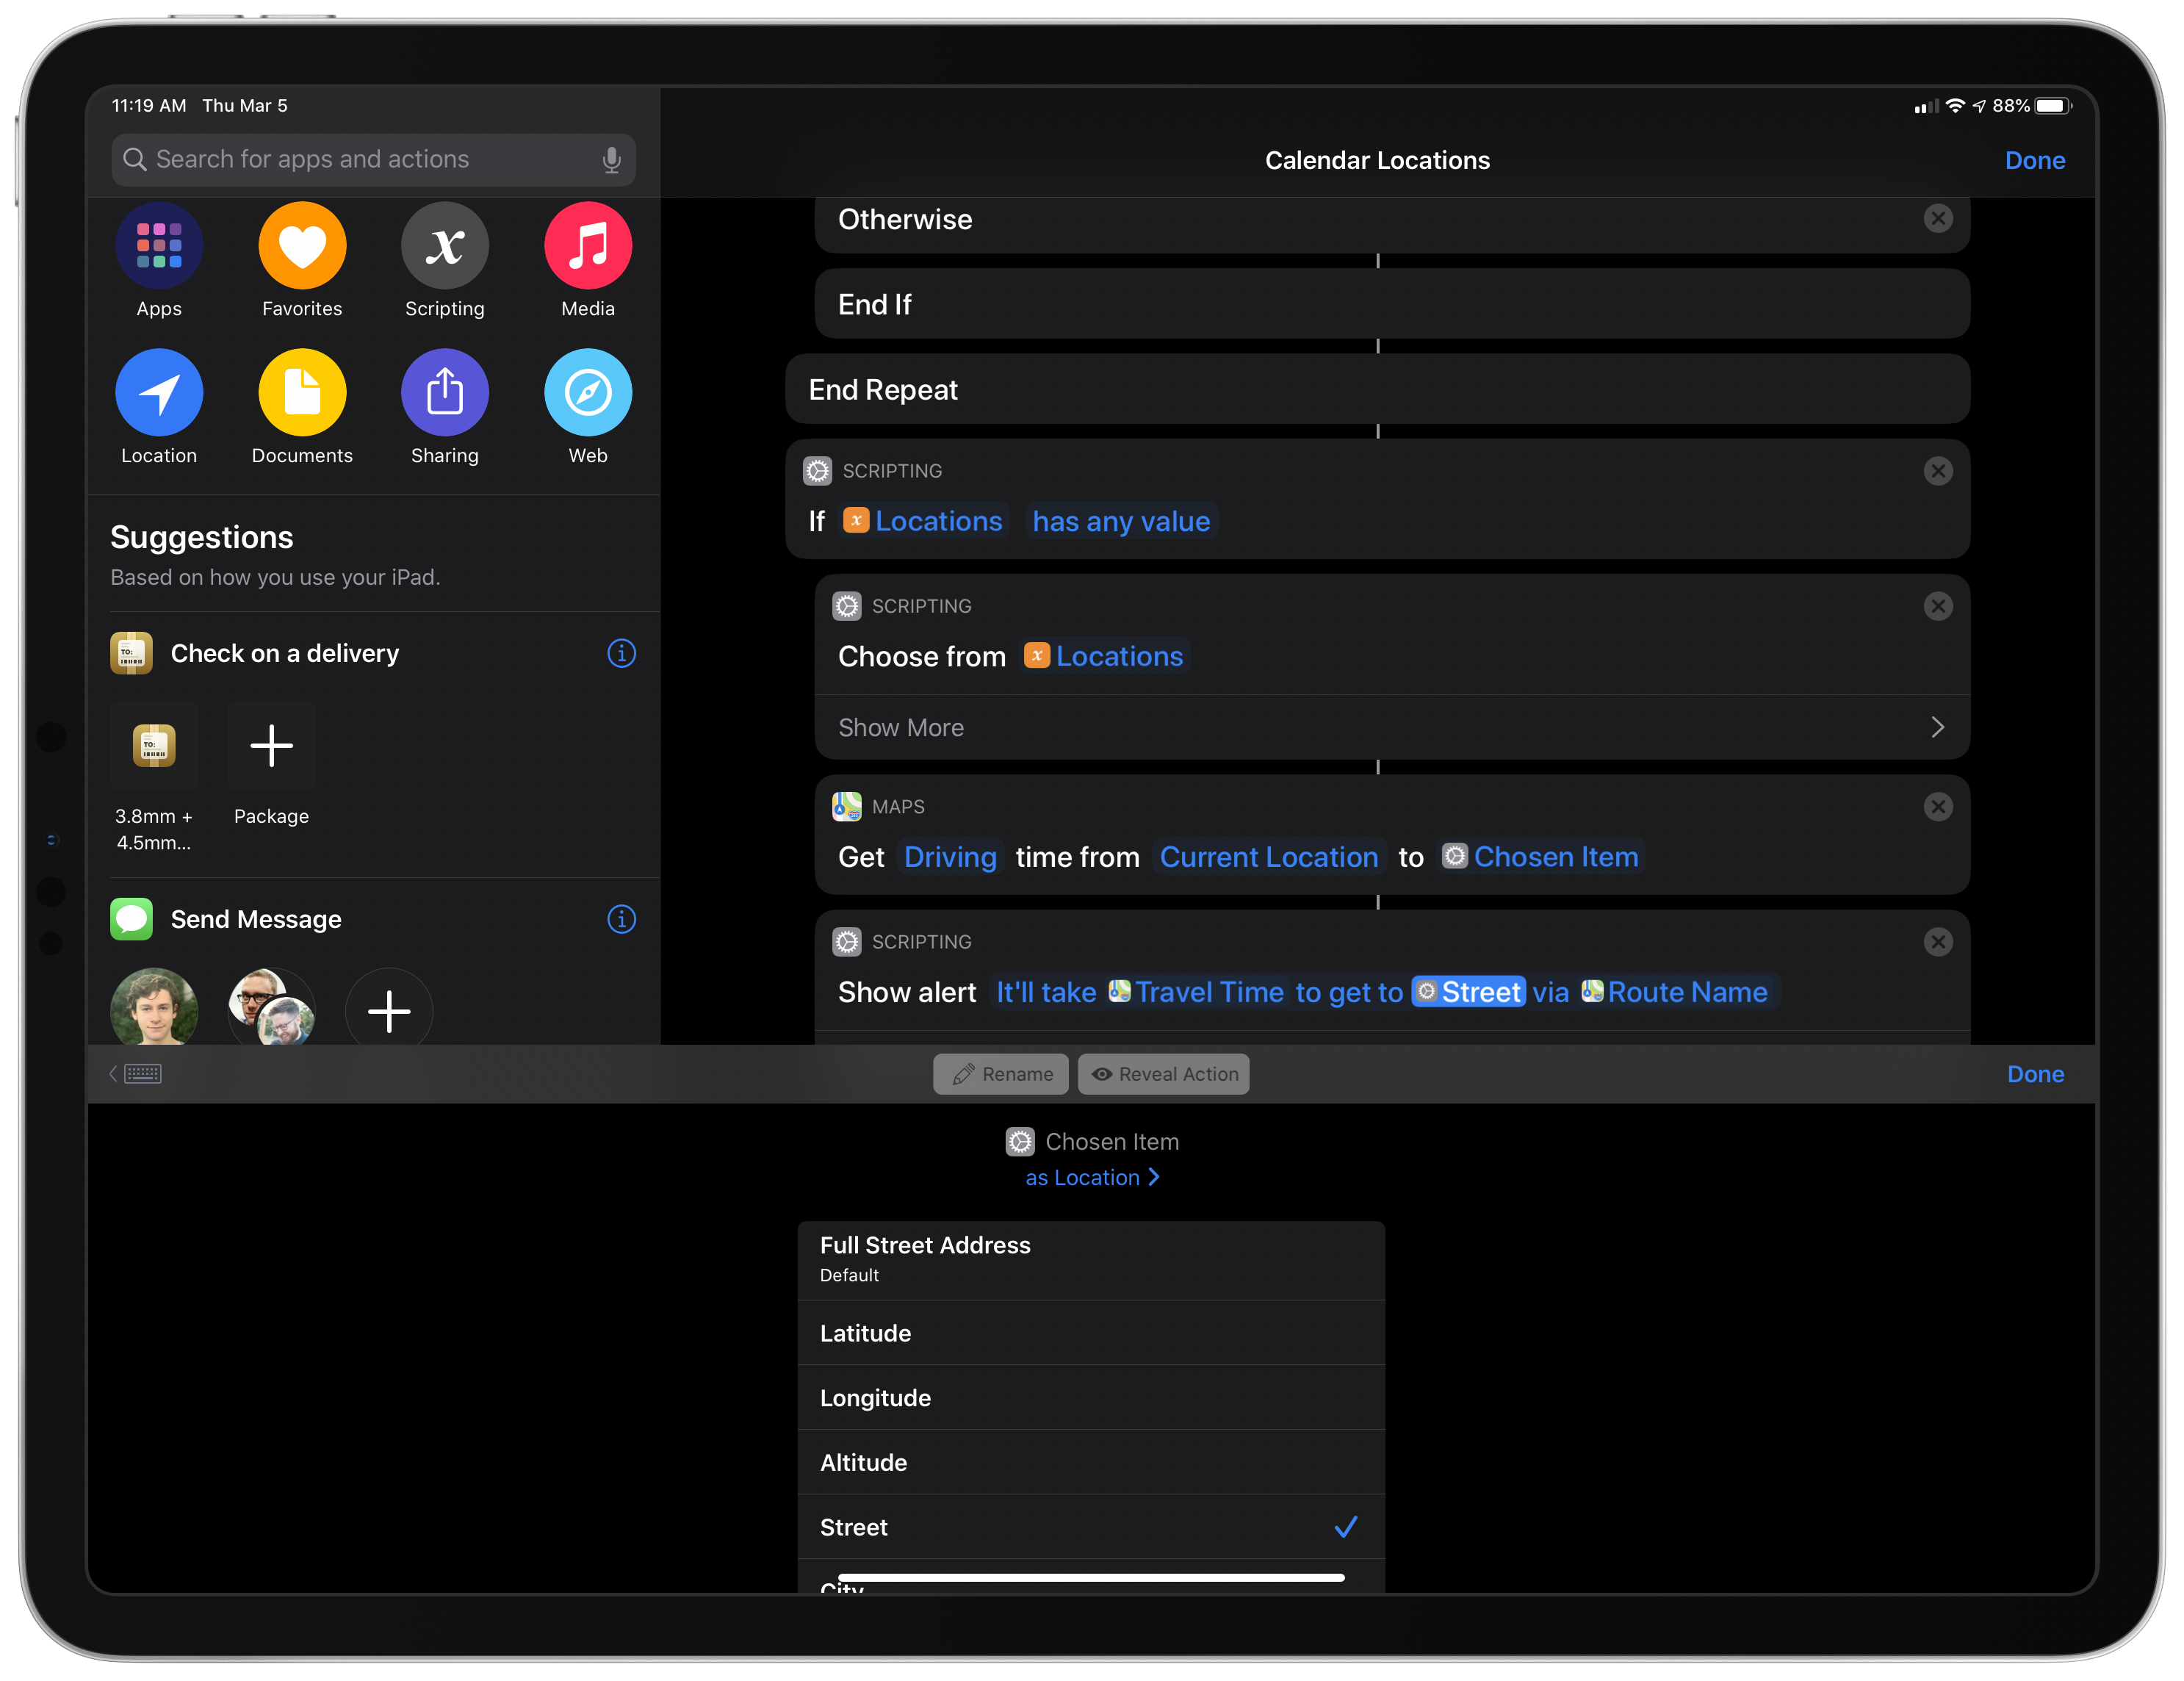
The ‘Street’ magic variable is a little tricky. What you want is the street for the location you picked earlier in the shortcut. That is the ‘Chosen Item’ in the immediately preceding action. However, when you add the Chosen Item magic variable to your Show Alert action and tap on it, you’ll see that it’s been added as a Calendar Event. To switch to the Location representation of the magic variable, tap ‘Calendar Event’ in the view that appears under the action editor when you tap the Chosen Item variable. A list appears with all the bits of data available for the Chosen Item, including the street address. Pick Street and the name of the magic variable changes to Street too.
I wish this magic variable functionality was surfaced better because I found it to be one of the hardest things to get used to as I was learning Shortcuts. Fortunately, after modifying the data you’re accessing from magic variables a few times, the process becomes easier. Like other parts of Shortcuts, this is another good place to poke around to see what’s possible because there are a lot of different options.
The final magic variable to add is the route. The first clue of what to do is that the icon next to ‘Route’ is the Apple Maps icon. Although Travel Time may seem a little counterintuitive, add it to the Show Alert action and tap it. Travel Time is the default value for the variable, but among the other options is Route. Pick that and the variable name changes to Route.
The only other thing to do is add a second Show Alert action after the Otherwise action to handle the case where the If action finds no locations in your Locations variable. In that case, the Calendar Locations shortcut displays a static alert that says there are no events with locations coming up in the next three days.
Apart from the inherent usefulness of Calendar Locations, what I like about this shortcut is how it highlights the versatility of Repeat with Each Item actions and exposes the different ways you can use magic variables to access different bits of data from calendar events and locations. Because of the flexibility of each action and magic variable, the same elements used in Calendar Locations can be incorporated into a wide variety of other shortcuts once you understand what each offers.
You can download Calendar Locations below or find it in the MacStories Shortcuts Archive.

Calendar Locations
Get a list of upcoming calendar events that contain locations.
Create Calendar Event from Template
Repetitive, template-based tasks are perfect for automation. Create Calendar Event from Template, which was originally created for Club MacStories members, presents a list of templates for calendar events. Pick one, fill in the details, and the shortcut adds an event to your calendar. The shortcut uses a dictionary action inside another dictionary action to store calendar templates and a combination of other scripting and calendar actions to add the necessary details.
Create Calendar Event from Template, Part 1
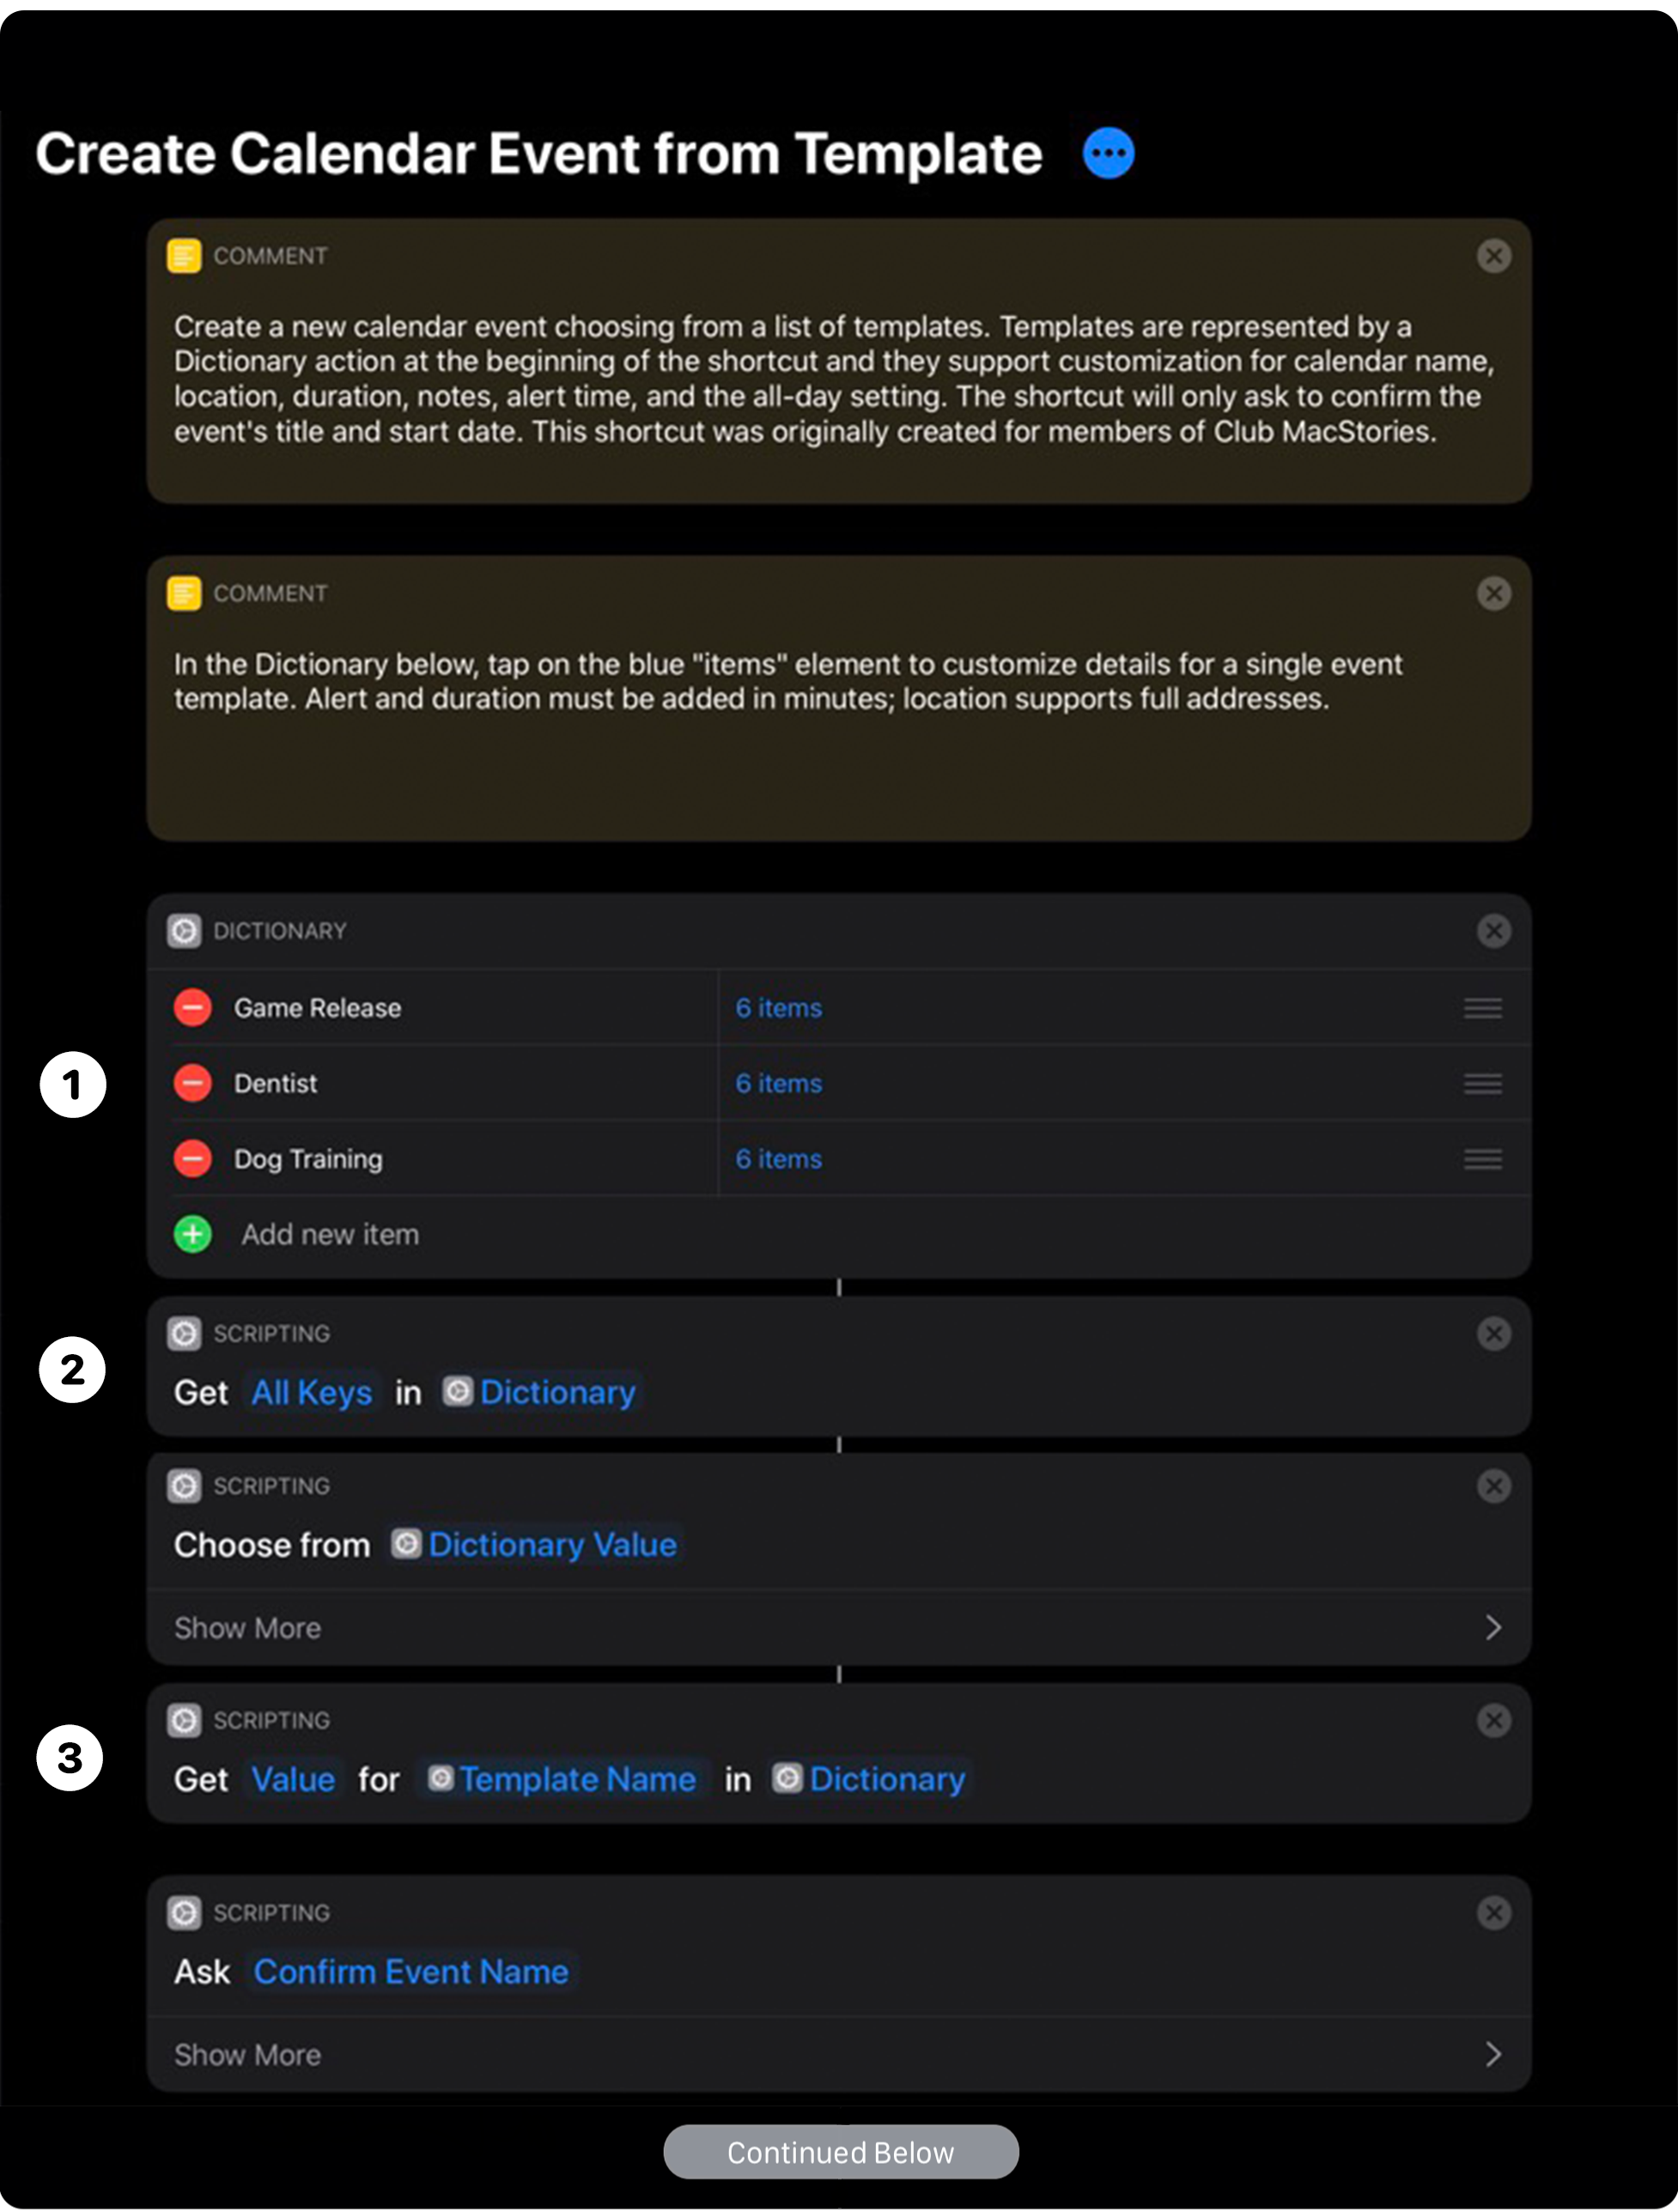
➊ Dictionary
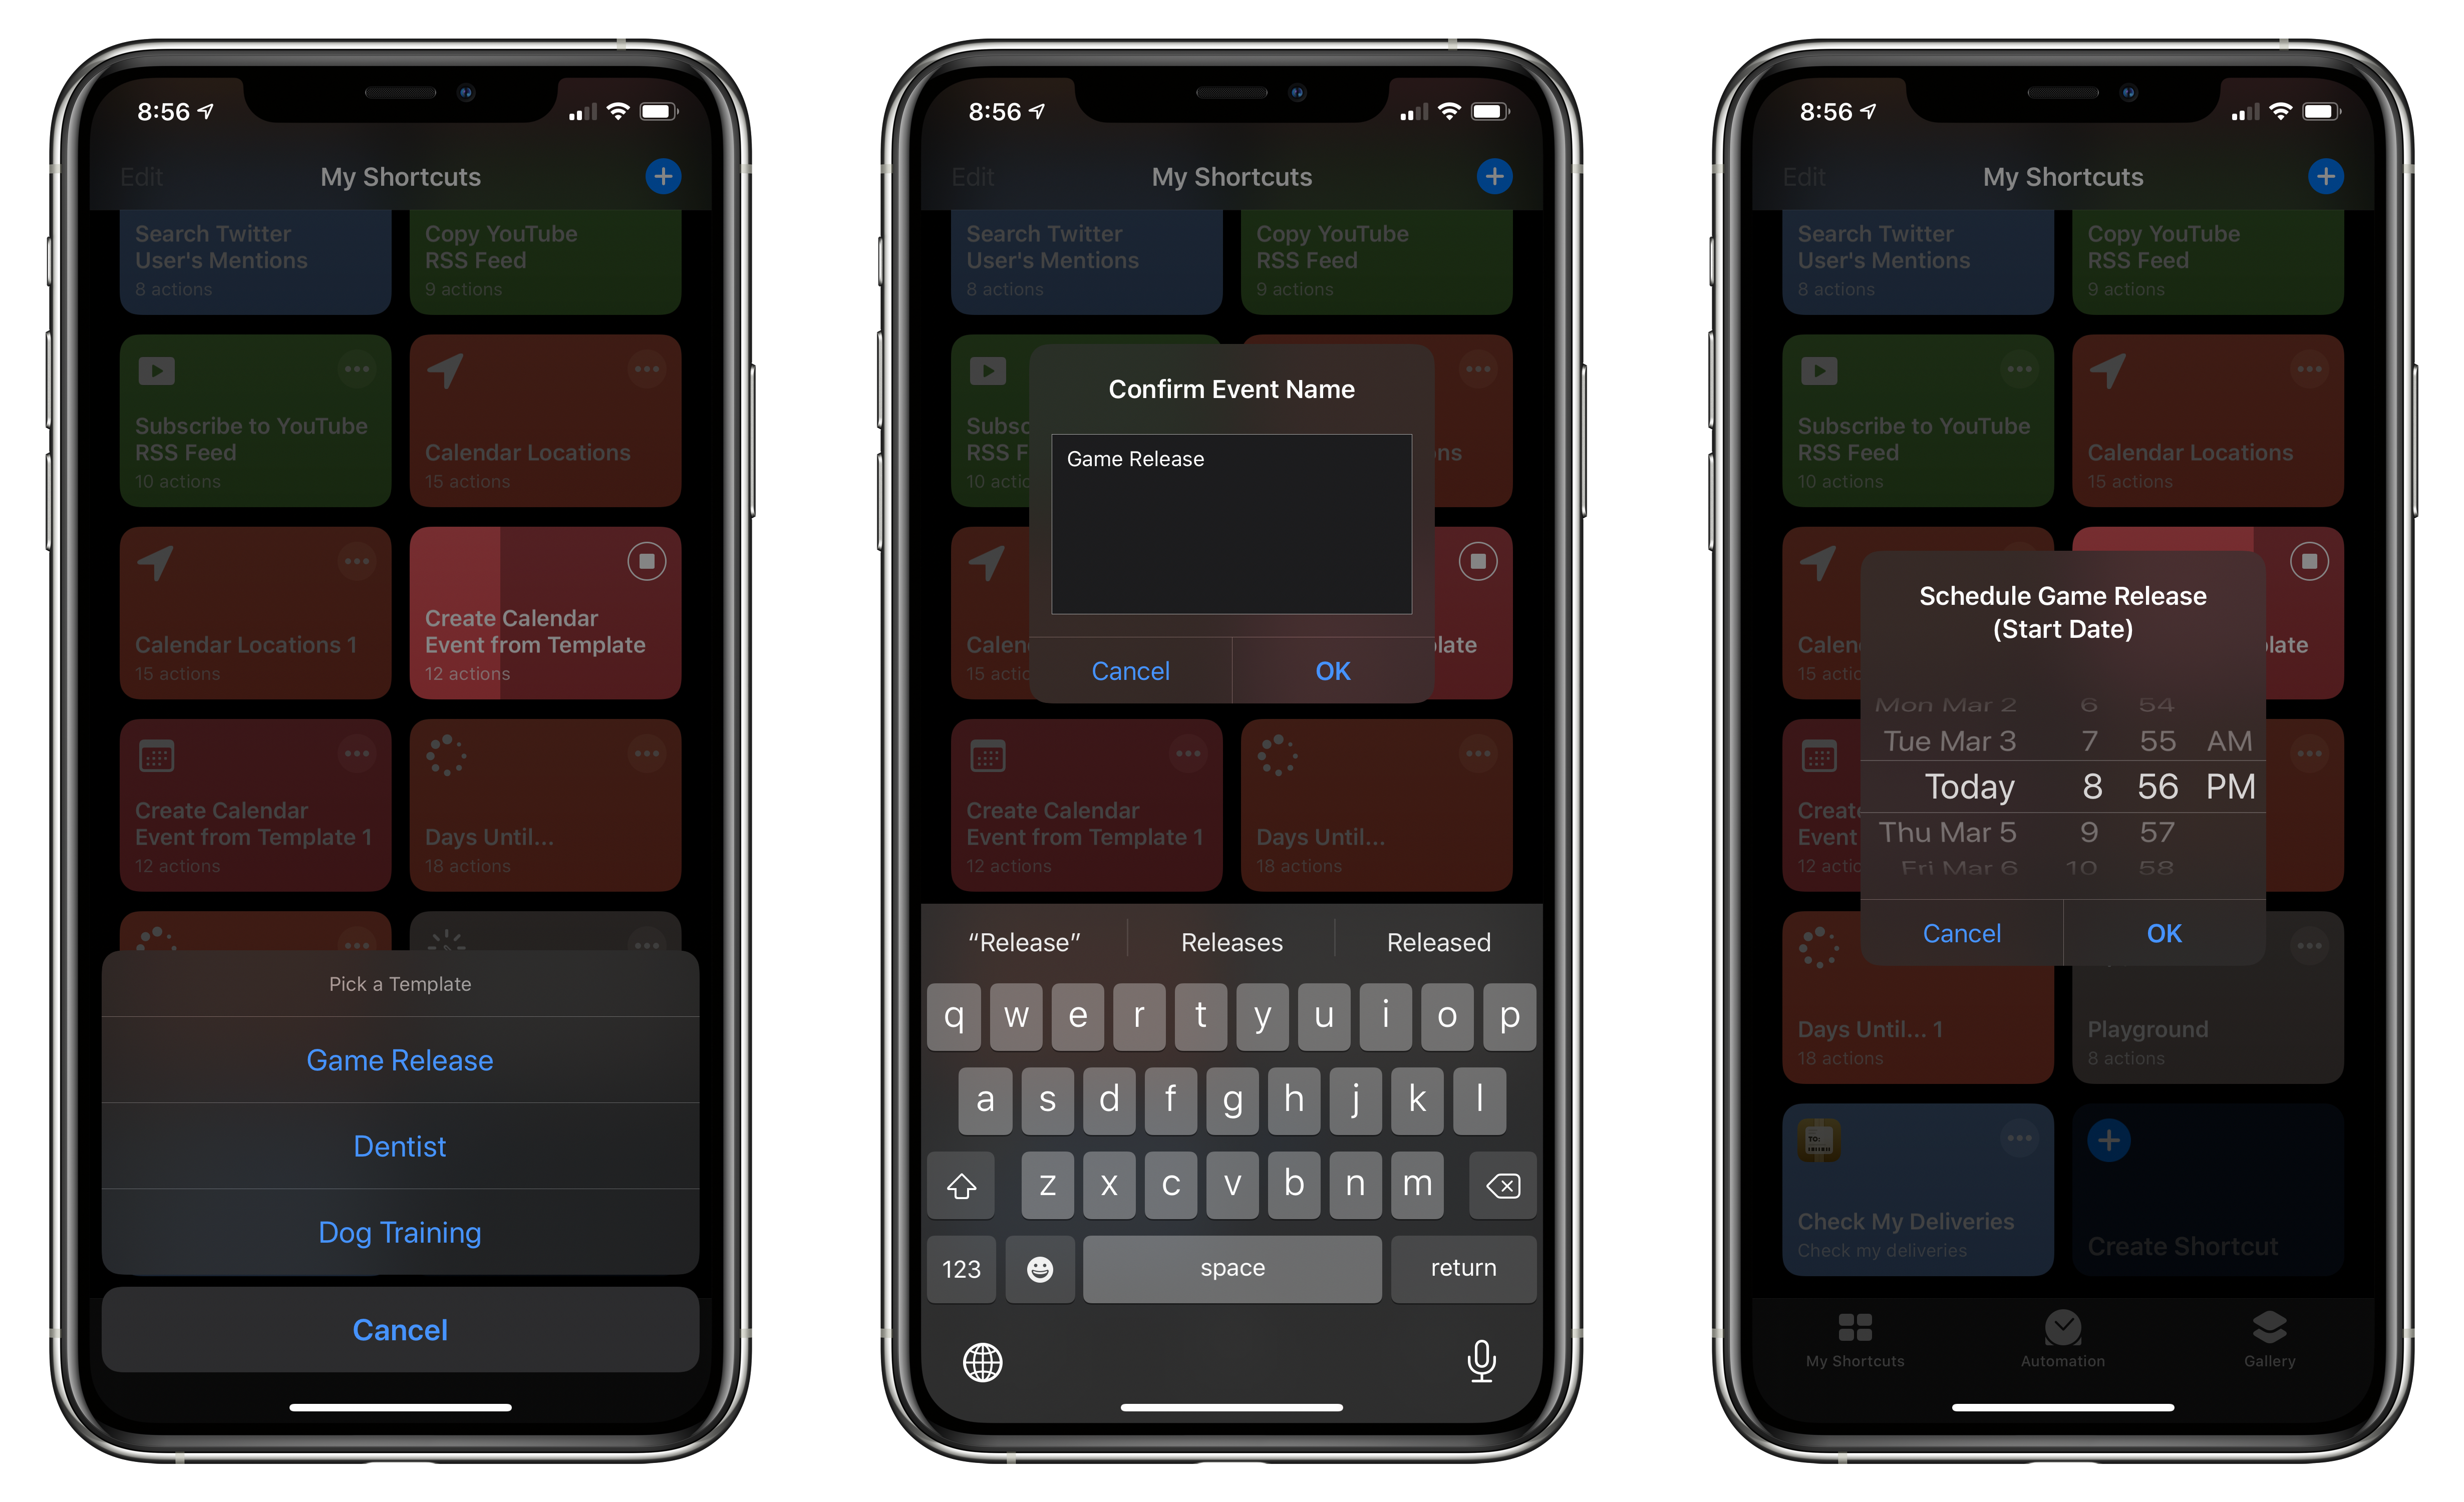
Step 1 is to set up the dictionary that will store the shortcut’s event templates. ‘Dictionary’ is one of the Scripting actions built into Shortcuts. In Create Calendar Event from Template, the dictionary includes three example templates (Game Release, Dentist, and Dog Training) that you can modify to match recurring events in your own schedule.
At their simplest level, dictionaries are pairs of data that are typically referred to as keys and values. In this shortcut, Game Release, Dentist, and Dog Training are the keys, and collections of details represented by ‘6 items’ in blue next to each key are the values. Dictionaries get their name from the fact that they work like a traditional dictionary for looking up definitions of words, but in programming, the key is the word, and the value is the definition. Keeping that in mind goes a long way toward understanding dictionaries.
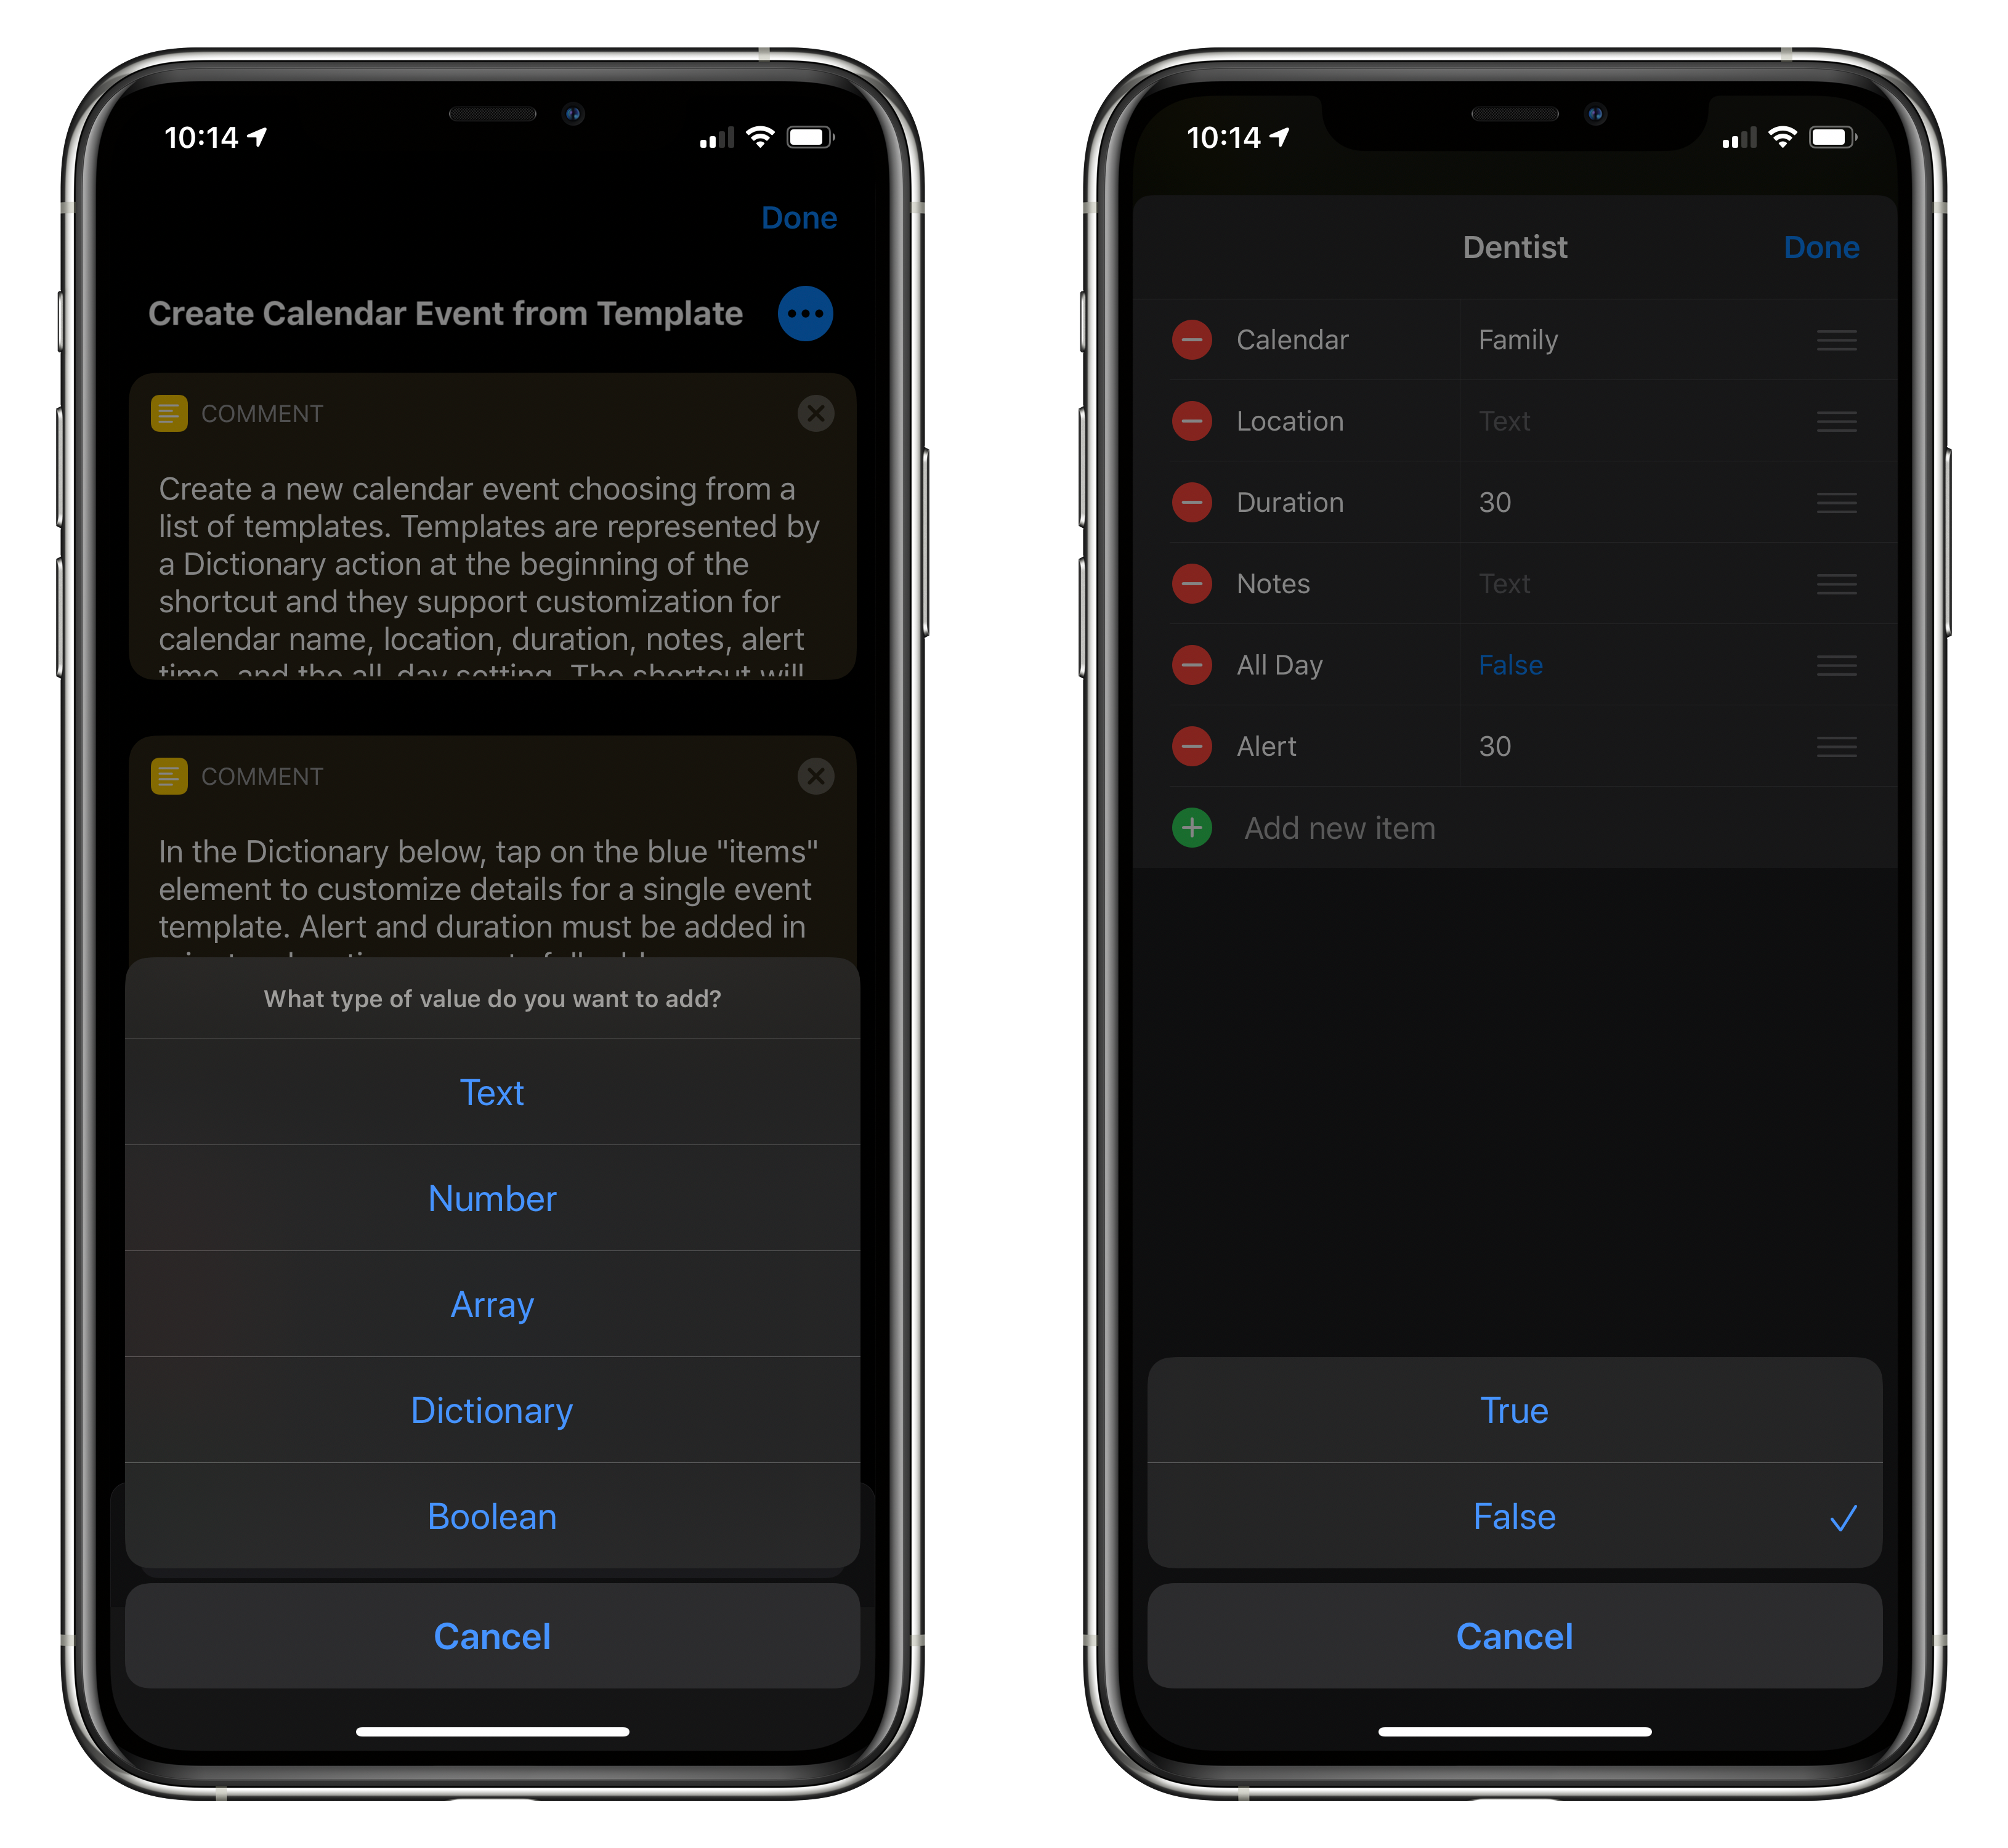
When you add a Dictionary action to a shortcut, it is empty and prompts you to ‘Add new item.’ If you tap the prompt, Shortcuts asks what type of value you want to add to the dictionary: text, a number, an array,2 another dictionary, or a Boolean.3
With Create Calendar Event from Template, we are diving right into the deep end by creating a dictionary of dictionaries. The reason for that is so the shortcut can access multiple templates. If we had only one event template, we could create a single dictionary with pairs of keys and values for each aspect of the event we want to automate. However, each template in this shortcut is a little different from the others, which you can see by tapping on ‘6 items’ next to each template name. The solution for handling the situation is to create a dictionary that has three entries – one for each template – where each value in the top-level dictionary is its own dictionary of keys and values that are unique to that template.
To make it a little more concrete, it helps to look at the Dictionary action in Create Calendar Event from Template. The top-level dictionary that you see in the Shortcuts editor has three keys: Game Releases, Dentist, and Dog Training. Next to those keys are their values, which are each represented by the link to ‘6 items’ in blue. Tap on the first one and you’ll see the dictionary of keys and values for Game Release.
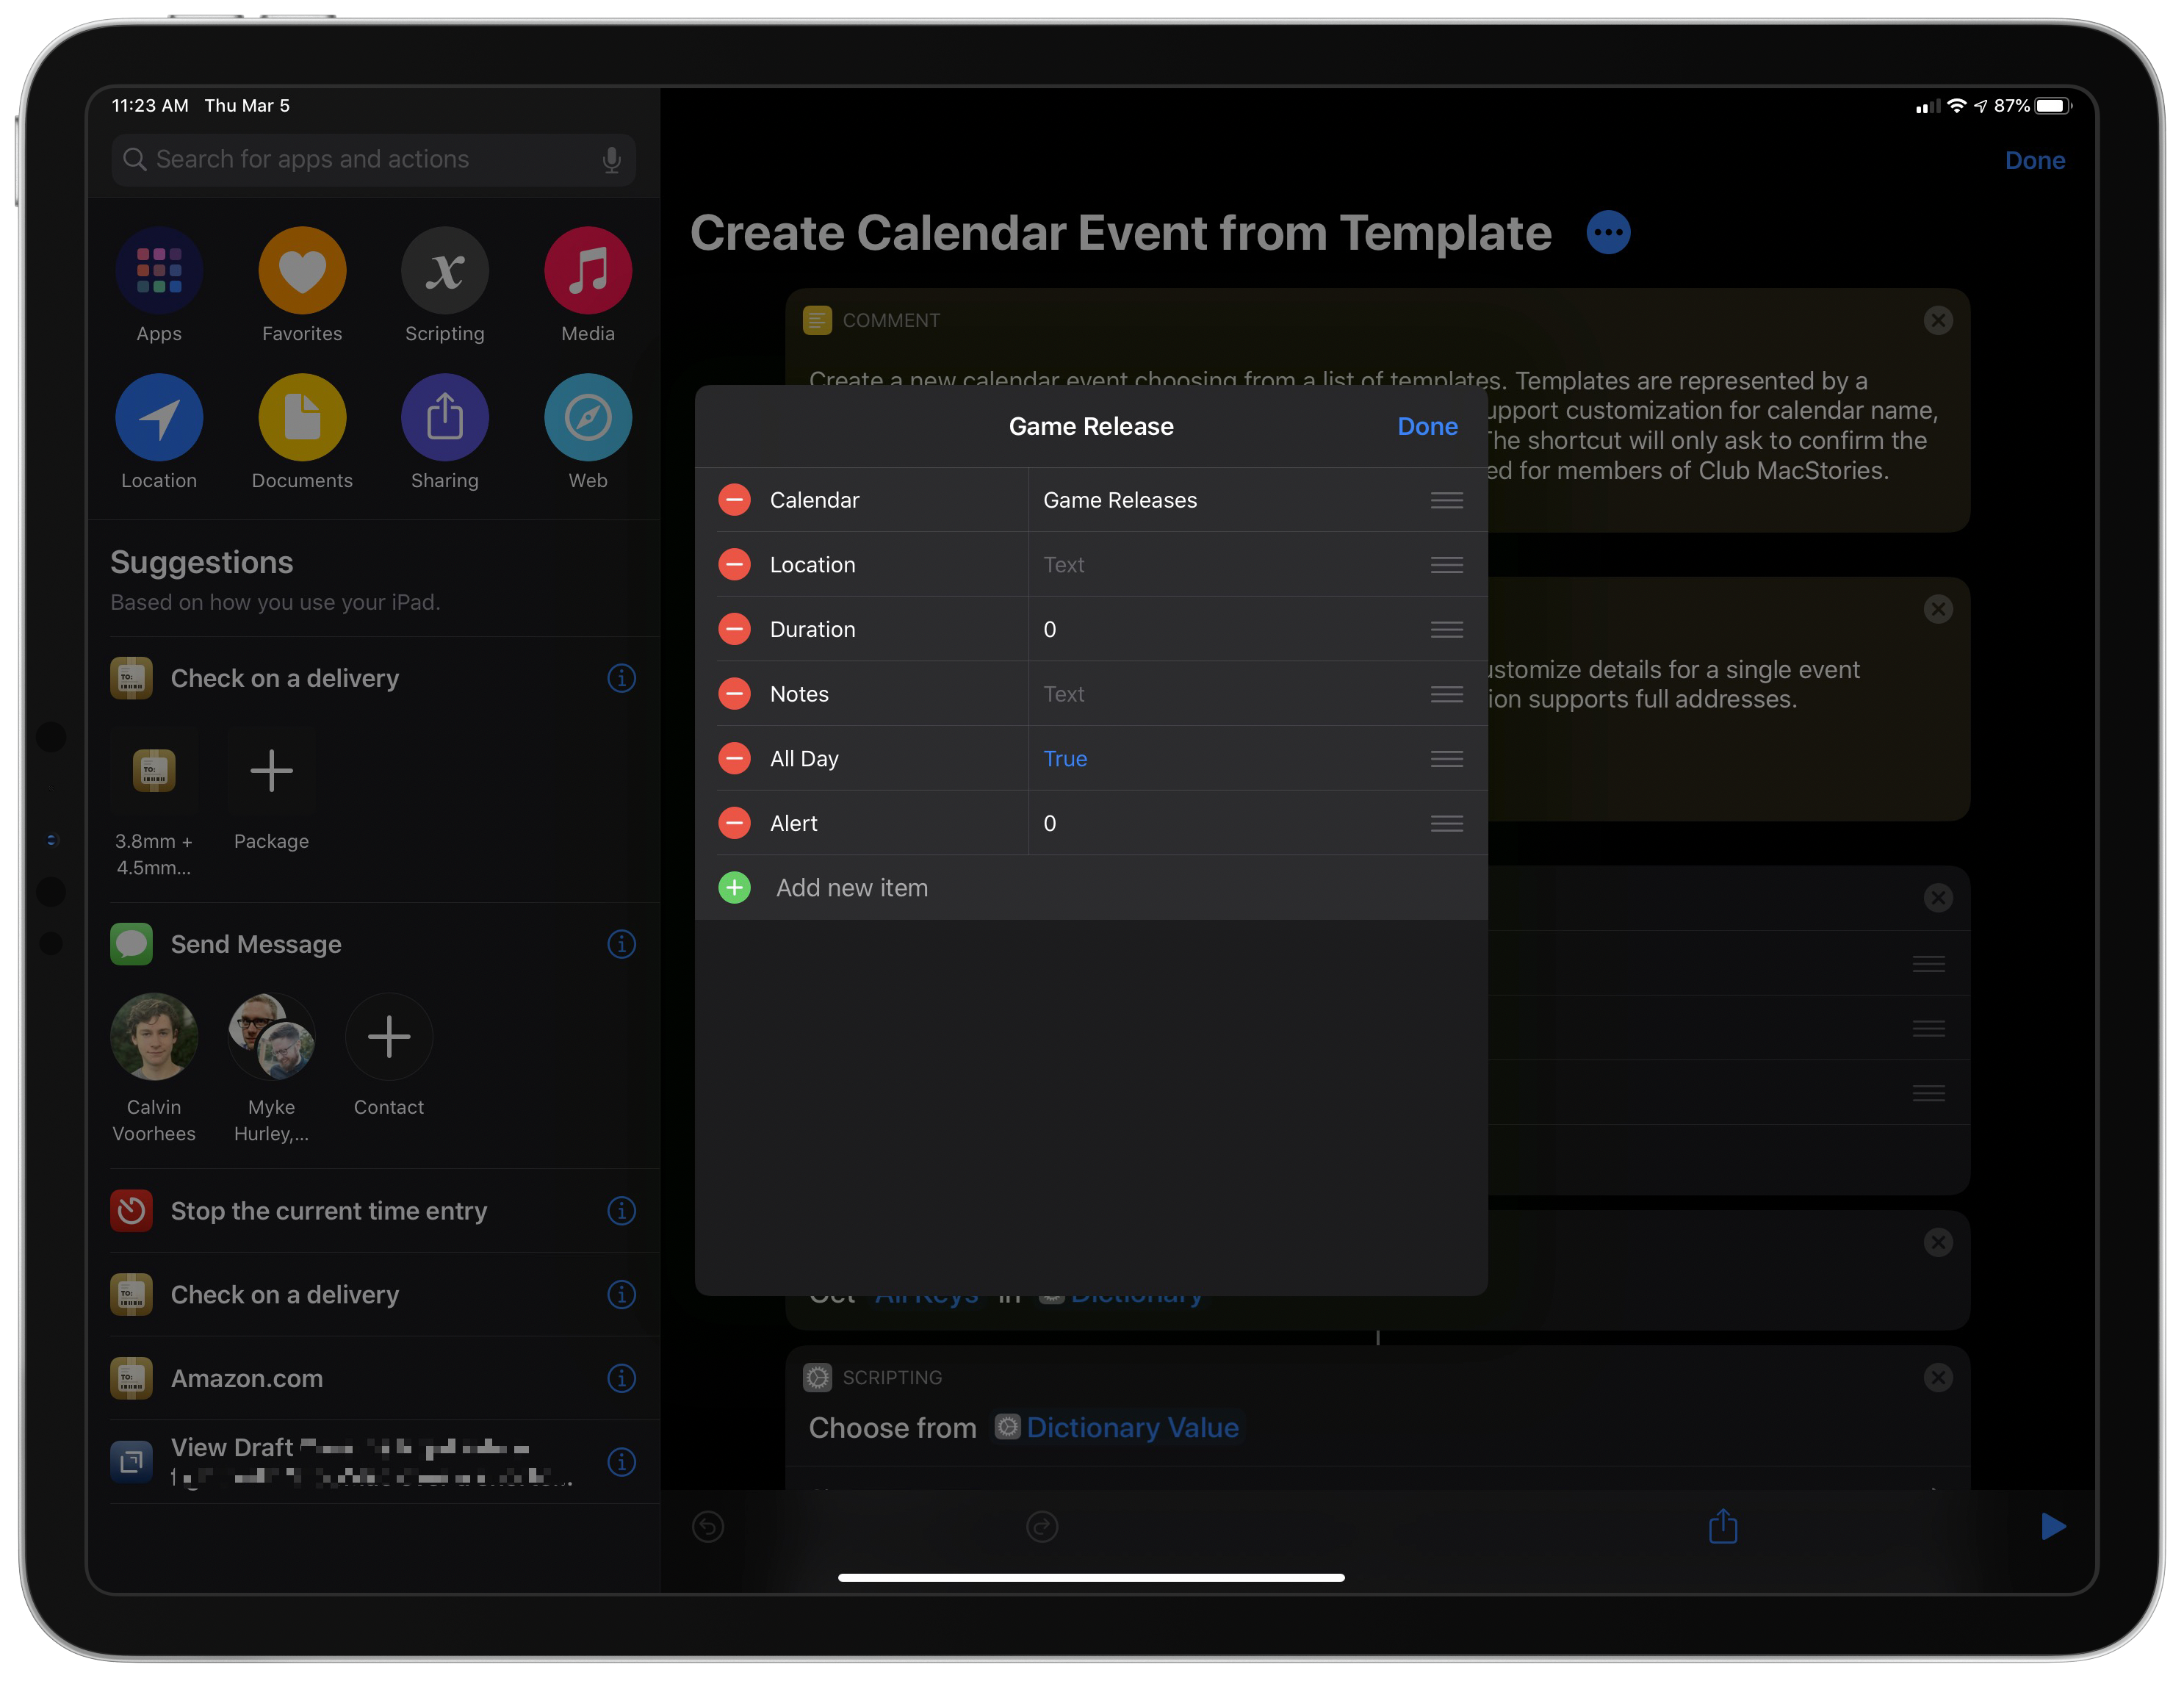
Inside this nested dictionary for Game Releases, you can see that there are six keys – Calendar, Location, Duration, Notes, All Day, and Alert – which are entirely user-defined. There are a couple of things worth noting about each of these nested dictionaries. First, you can add default values for each item in a dictionary. A good example is the Calendar key in the Game Releases template, which has been set to a calendar named ‘Game Releases.’ Tapping on any text field lets you add a default value. Alternatively, you can leave a field blank to be filled in later when the shortcut is run by the user. The same goes for numbers and Boolean fields. Tap one of their fields and Shortcuts offers appropriate options you can fill in.
With nested dictionaries, there’s a lot going on in our single Dictionary action, but it shows off one of the greatest strengths of Shortcuts. Once you’ve thought through the templates you need for any sort of data entry task that you repeatedly do, you can turn it into a shortcut to save time in the future. The same pattern can be used for all sorts of repetitive tasks, including creating tasks in a task manager or sending template-based email messages.
The remainder of Create Calendar Events from Template handles accessing the key-value pairs in the shortcut’s dictionary, prompting the user to fill in the necessary information, and then creating the event.
➋ Get Dictionary Value and Choose from List
Shortcuts includes four dictionary actions in its Scripting library. Step 2 uses a Get Dictionary Value action as the first step in asking the user to pick which calendar template they want to use. By default, the action will retrieve a single value for a key in a particular dictionary. However, to allow the user to pick from among each of the calendar templates in Create Calendar Event from Template, tap on the Value parameter and change it to ‘All Keys.’ That changes the language of the action to ‘Get All Keys in Dictionary,’ which will retrieve the keys in the top-level dictionary: Game Releases, Dentist, and Dog Training.
Next, the shortcut uses a Choose from List action to display the list of template choices to the user. Dictionary Value, which is the result of the last action, is automatically filled in, so no need to make any changes there. If you disclose full contents of the action, you’ll see that this action added a ‘Pick a Template’ prompt to help explain what the shortcut expects the user to do.
➌ Get Dictionary Value and Ask for Input
Step 3 uses the results of the choice made by the user above and presents the name of the template as a suggested event title, which the user can edit if they’d like. First up is another Get Dictionary Value action. Unlike the last one used, though, we only want the value for the calendar template chosen by the user.
There are three fields available to fill in. We want the value for the calendar template that was chosen, so long-press Key, tap Select Magic Variable, and then select ‘Chosen Item.’ In this shortcut, ‘Chosen Item’ has been renamed to ‘Template Name’ for clarity, using the rename button that appears at the bottom of the editor when you tap on ‘Chosen Item.’
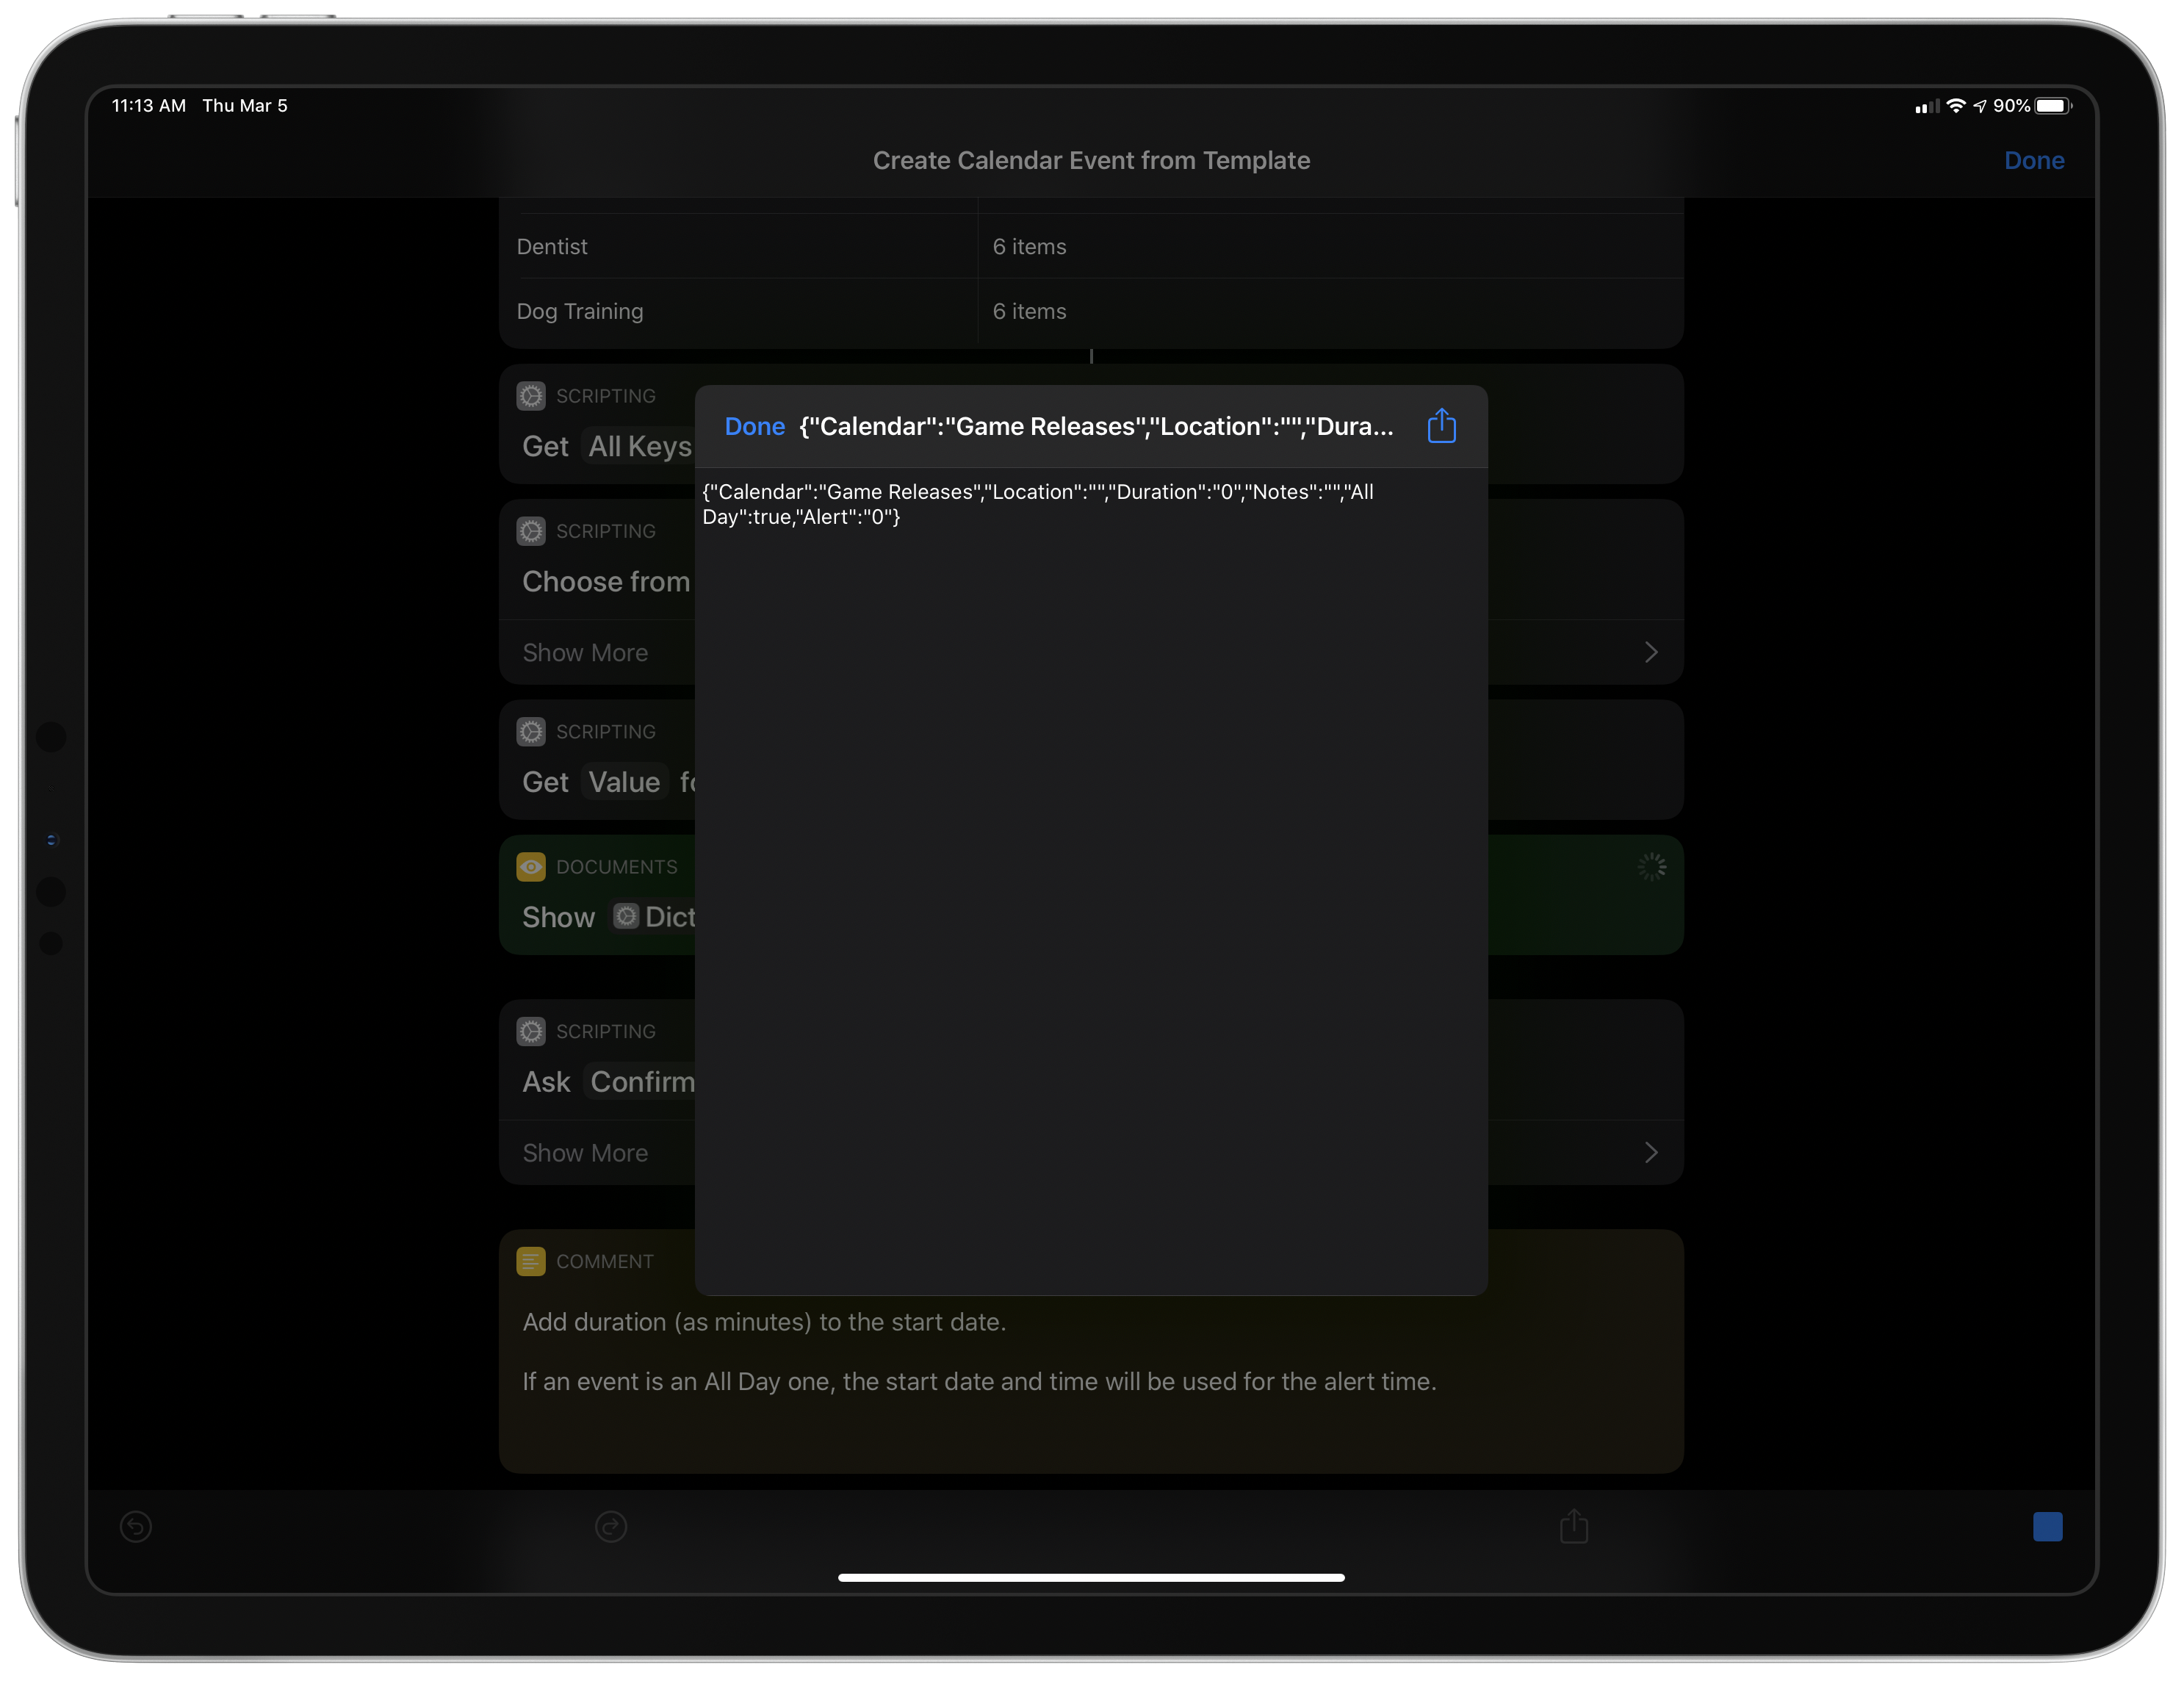
Also, long-press on the last parameter in the action and pick the Dictionary variable from the first action. The action now reads ‘Get Value for Template Name in Dictionary.’ If you drop a Quick Look action here, you’ll see that what this does is retrieve the nested dictionary for the calendar template value you picked, which includes six pairs of keys and values for that template.
This Get Dictionary Value action returns the contents of the dictionary for the template picked by the user.
The next action is an ‘Ask for Input’ action that asks the user to confirm the name of the event. Because the name of the event is text, the Input type is text. It replaces the default Question parameter with ‘Confirm Event Name.’ If you tap Show More, you’ll see that it uses the Template Name as the default event name, which the user can change when prompted.
Create Calendar Event from Template, Part 2
➍ Ask for Input
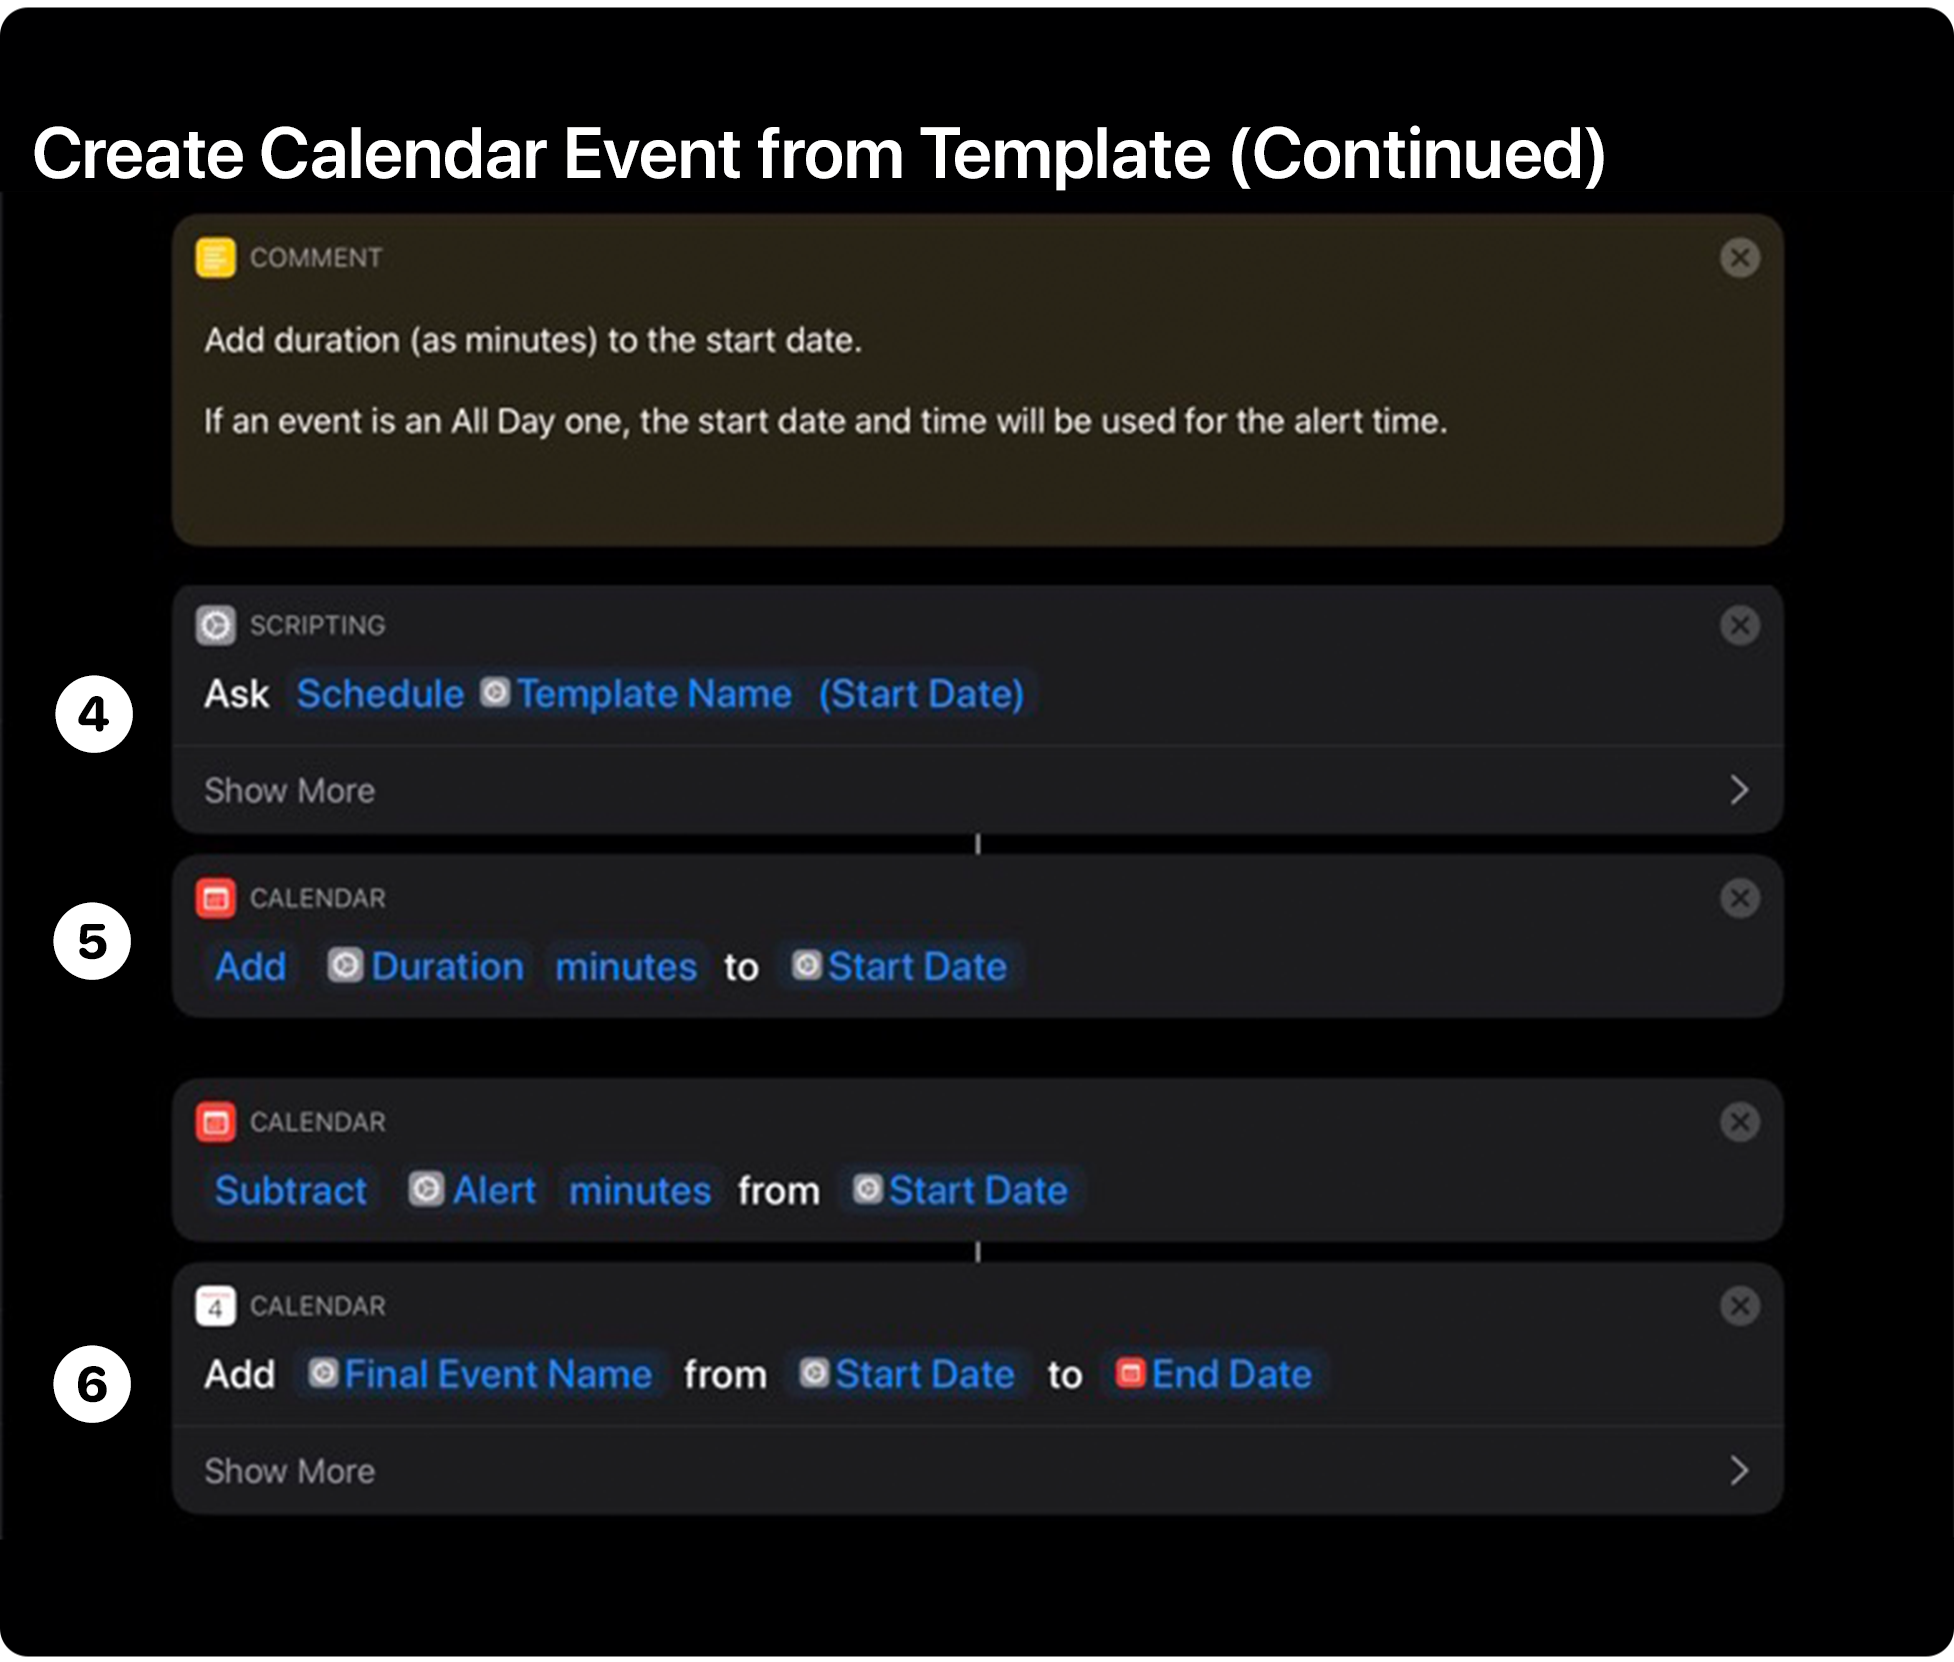
Step 4 lets the user change the duration of the event. The first action is another Ask for Input action with the input type changed to ‘Date and Time,’ so the system date and time picker appears when the shortcut reaches this step. The text of the picker has been customized to clarify what is being requested and includes the Template Name magic variable, reinforcing what is being requested.
➎ Adjust Date
Step 5 sets the duration of the event and adds an alert based on the values you included for those in your templates in the very first Dictionary action. As the comment in the shortcut explains, if a template event is set up as an all-day event, the start date requested in the previous action serves as the alert time. Otherwise, the duration is added to the start date and time from the last action, so it appears at the correct time in your calendar.
The first action is the ‘Adjust Date’ calendar action for setting up the duration of the event. To add a duration in minutes, the default Add parameter is left alone, but seconds needs to be changed to minutes by tapping on that parameter and picking minutes. Instead of a set number of minutes, long-press the 0 parameter and choose Select Magic Variable and pick the Dictionary created in the first action. We don’t want the whole dictionary though, just the duration value from the event template. To do that, tap ‘Get Value for Key’ and type in Duration. It’s important for the key name you enter here to match what is in your dictionary. Finally, long-press the last parameter and change the magic variable to the Provided Input from the last action. In Create Calendar Event from Template, the name of this magic variable has been changed to Start Date for clarity.
The next action is another Adjust Date action that shows that you can subtract time from a date, which is exactly what we want for an alert to go off before the event occurs. The setup process for this action is just like the last action except that the first parameter needs to be changed to Subtract, and the dictionary value for the number of minutes to subtract should be set to the Alert key from the dictionary in the first action.
➏ Add New Event
Step 6 is the final step, which adds the event created to your calendar using an ‘Add New Event’ action. There are three main parameters to fill in. The first is Event Title. Here, you want to use the Magic Variable that is the result of the action in Step 3, in which the event name was confirmed. In Create Calendar Event from Template, that variable’s name has been changed to ‘Final Event Name.’ The second parameter is the Start Date magic variable from the action where the start date and time were chosen. The third and final parameter is the End Date magic variable that is the renamed result of the calendar action above, in which the duration of the event was added to the start date.
When you step back, Create Calendar Event from Template involves a fair amount of setup for the templates and asks the user to input the things that change from event to event, but the result is a streamlined process for adding events in the future. Instead of setting up similar events over and over, filling out every relevant field, this shortcut cuts out the repetition and reduces the task to a couple of requests of the user. It’s the sort of shortcut that eliminates a bit of hassle and saves some time whenever it’s used, which piles up when used over and over.
What’s more, knowing how to create templates using dictionaries and combining them with user input is a pattern that can be used repeatedly with all sorts of shortcuts. Learning it once for a shortcut like this gives you the tools to roll it out in other shortcuts, which is the point at which you really start reaping the benefits of building shortcuts.
You can download Create Calendar Event from Template below or find it in the MacStories Shortcuts Archive.
Create Calendar Event from Template
Create a new calendar event choosing from a list of templates. Templates are represented by a Dictionary action at the beginning of the shortcut, and they support customization for calendar name, location, duration, notes, alert time, and the all-day setting. The shortcut will only ask to confirm the event’s title and start date. This shortcut was originally created for members of Club MacStories.
- Of course, we’re all aware of the significance of June 29, 2007, right? ↩
- Arrays are another data type you’ll find in any programming language that consist of a list of items. They share some similarities with dictionaries, but instead of being pairs of values, an array is a single list of ordered values. ↩
- Booleans are values that be either true or false. In this shortcut, a calendar event is an all-day event, or it isn’t, which is why that item uses a Boolean value. ↩