John: Part of the widget story for all of Apple’s OSes this fall is StandBy, an iPhone-only mode that displays widgets, a clock, or photos when your device is stationary and charging in landscape orientation. When StandBy was first rumored before WWDC, I was skeptical. It didn’t sound like something I needed or would find useful. Boy, was I wrong. I’ve been using StandBy daily since just after WWDC at my desk and on my nightstand, and I’ve enjoyed it so much that I’ve begun using it elsewhere, too. So, today, I thought I’d hit the highlights of what StandBy can do because it’s a lot and not immediately obvious and, along with Federico, recommend several chargers that we’ve been using to enable it.
To use your iPhone in StandBy, it must be charging and in landscape mode. Official MagSafe and MagSafe-compatible chargers work, as does charging via a Lightning cable. Oddly, though, Apple’s white MagSafe battery pack doesn’t work. Your iPhone also needs to be stationary as Federico discovered when he tried it in his car while driving.
Tapping on a a widget causes a button to appear in the corner that you can tap to open the related app.
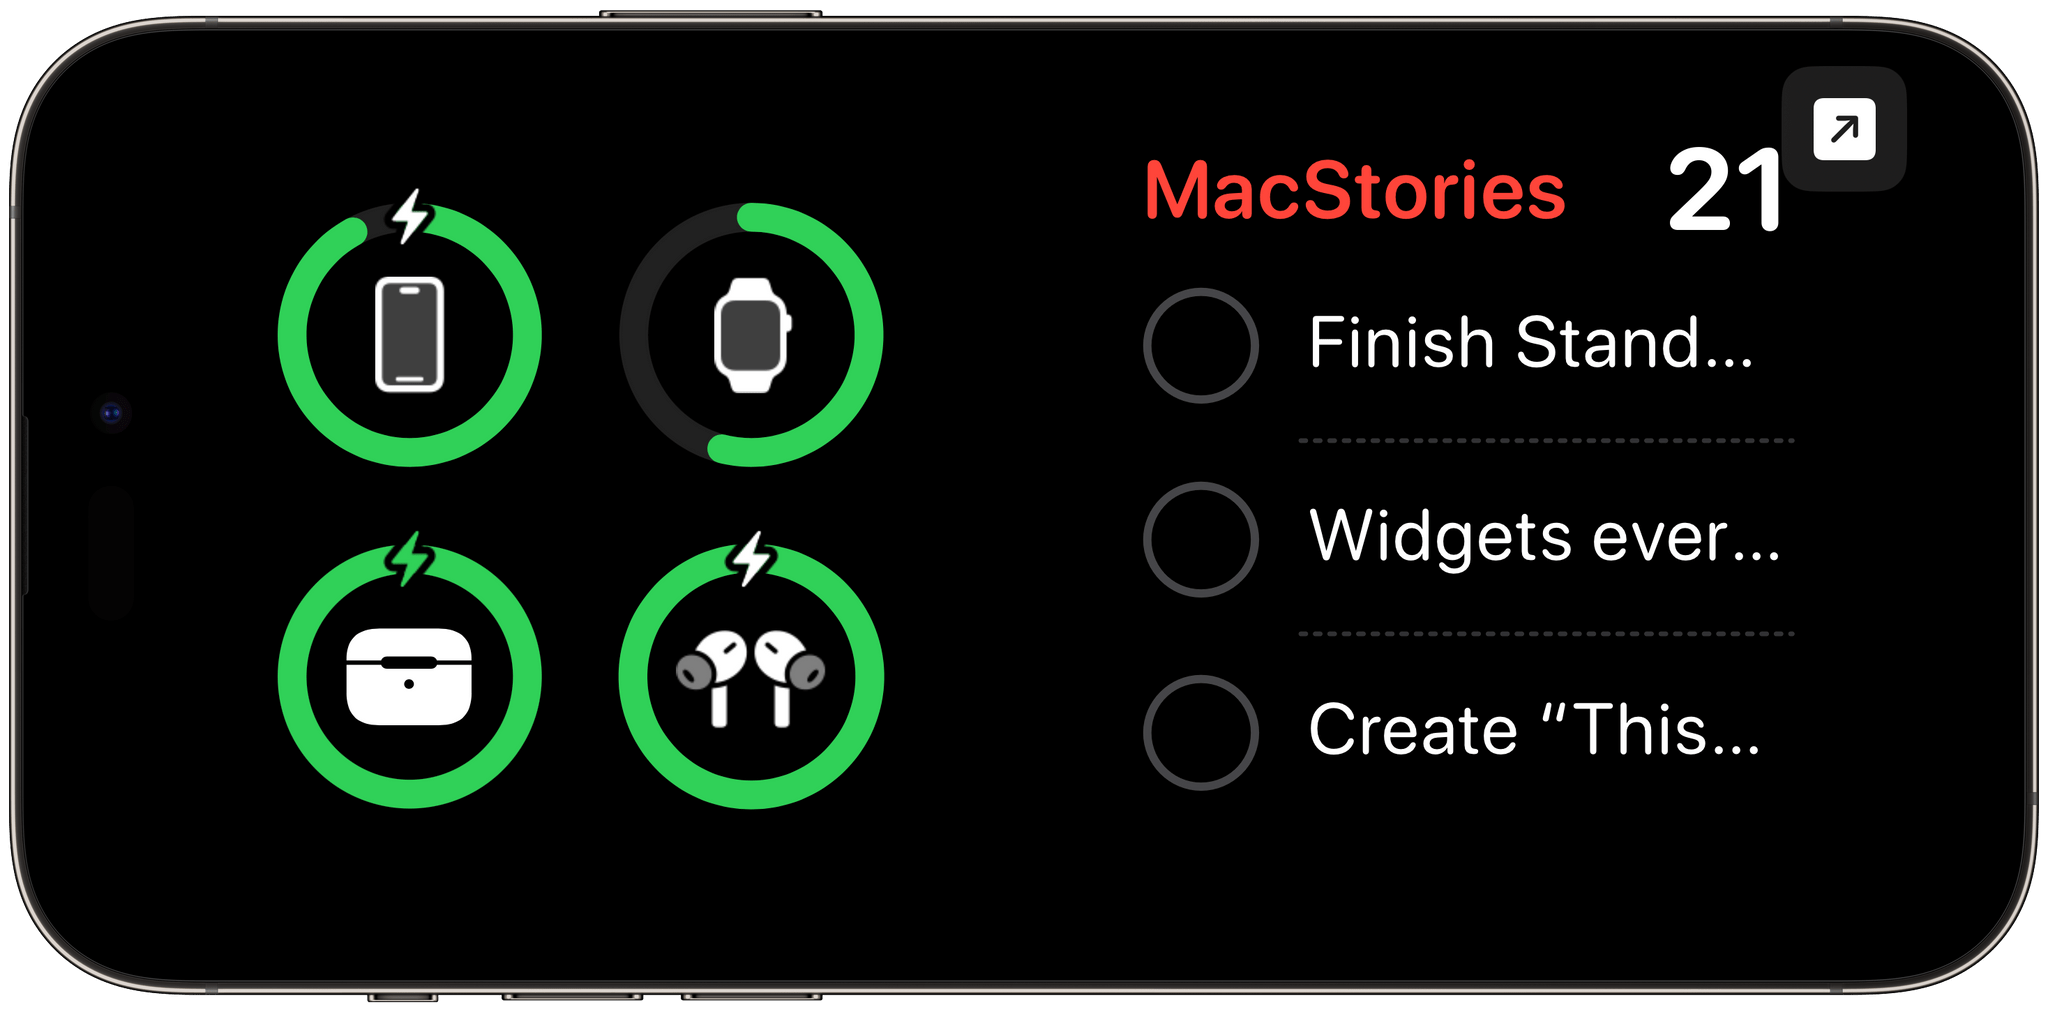
StandBy has three modes: dual widgets, a clock, and photos, all of which are customizable. Like Home Screen widgets, StandBy widgets can be stacked and swiped through vertically, and they’re interactive. Tapping on a widget causes an arrow to appear in the top right corner of the widget, which can then be tapped to open the associated app. It’s a nice touch that prevents accidentally opening apps when you don’t want to, which wasn’t part of the feature in the earliest betas.
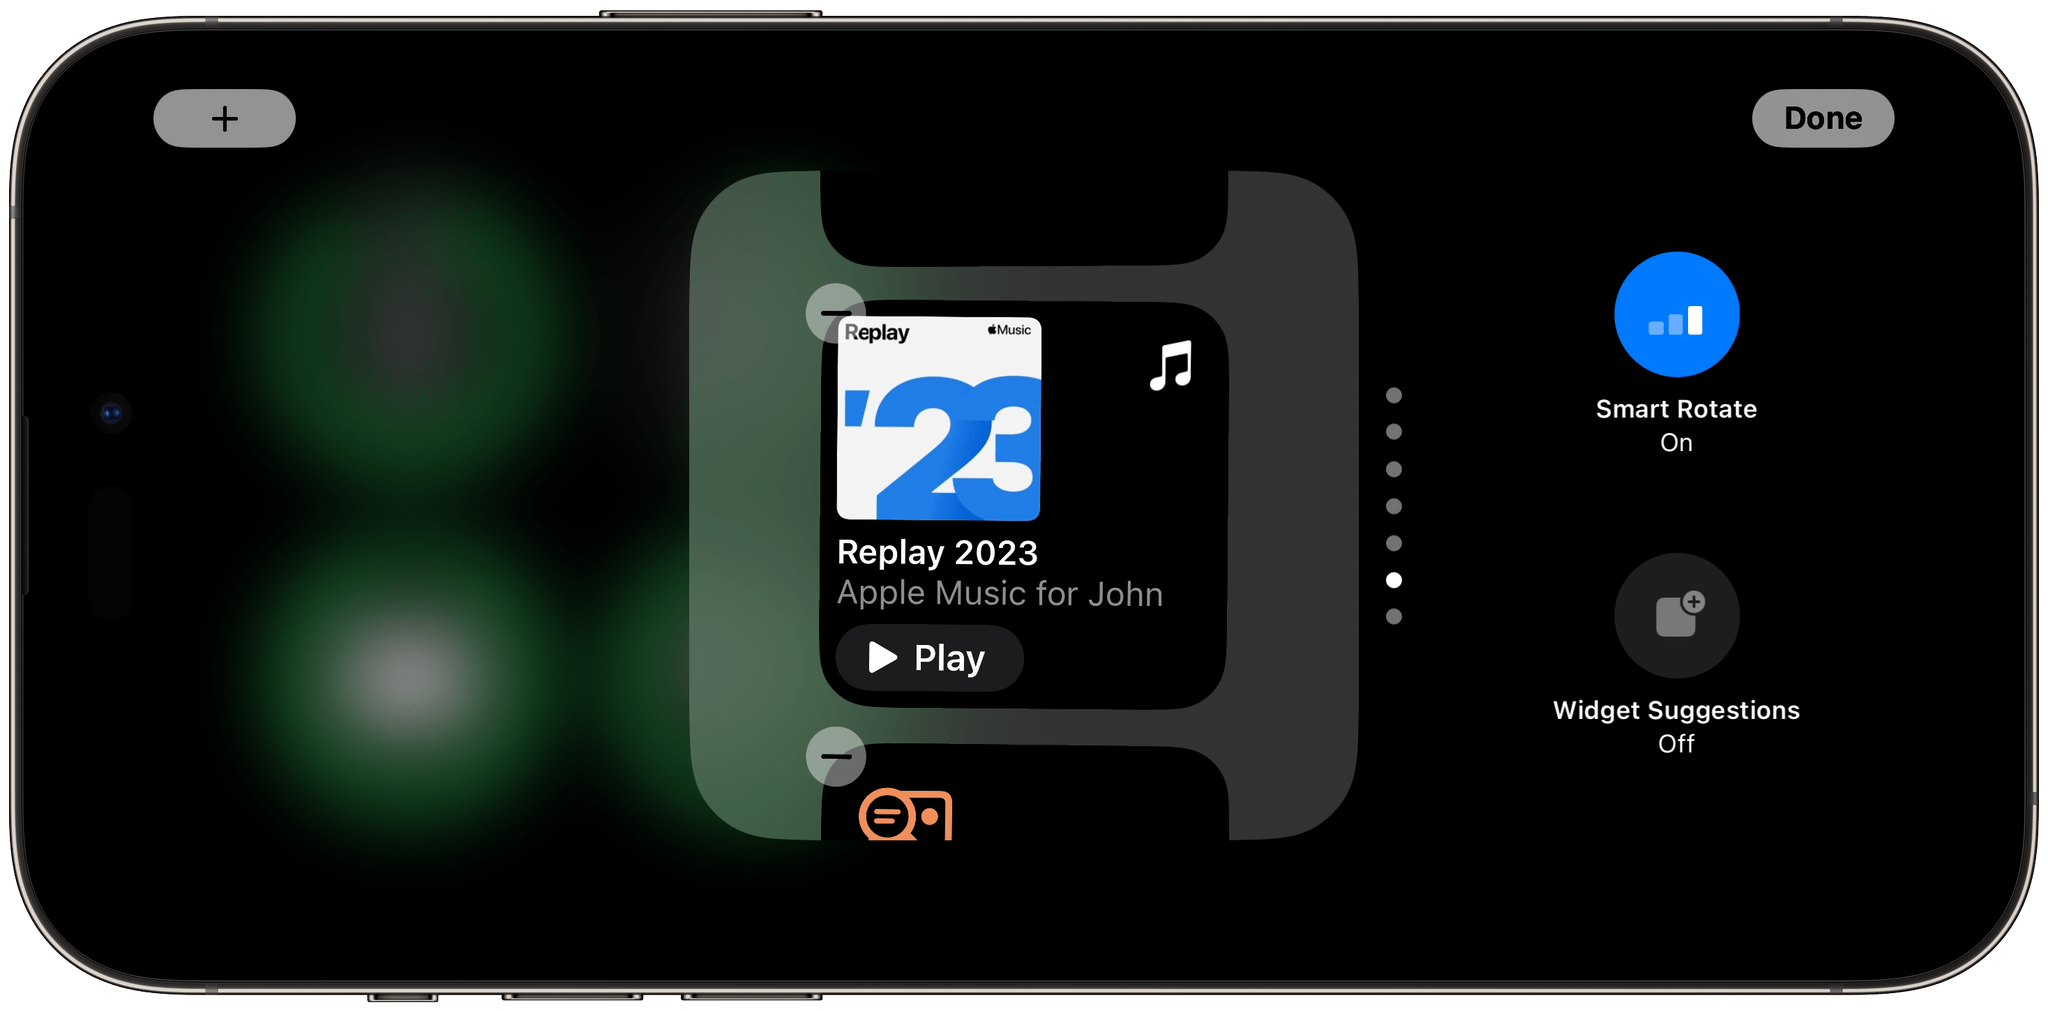
If you’re already using widgets on your iPhone, adding them in StandBy mode will be very familiar. Tapping and holding on a widget puts the selected widget or widget stack in a jiggle mode where it can be edited and where you can activate Smart Rotate or Widget Suggestions, similar to the way widget stacks work on the iPhone’s Home Screen. In jiggle mode, there’s also a plus button for adding a new widget to the selected stack.

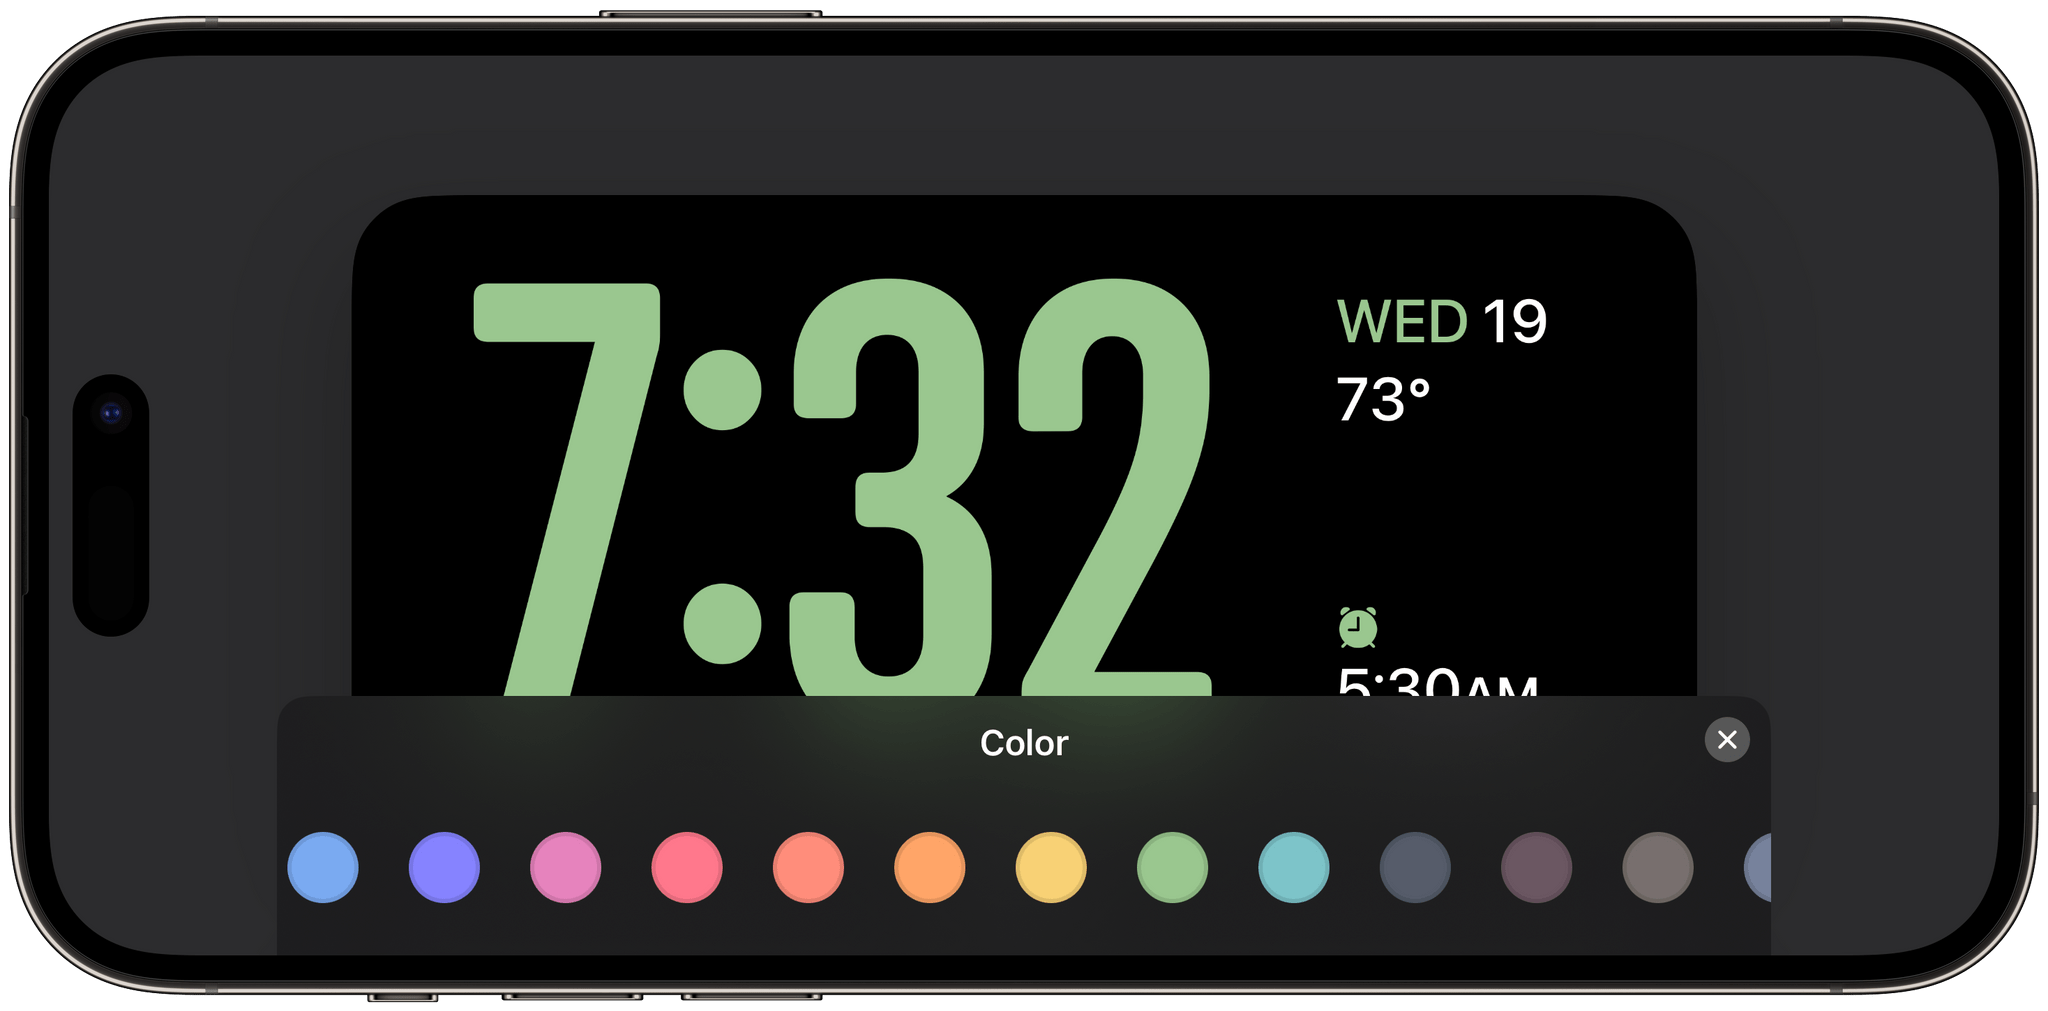
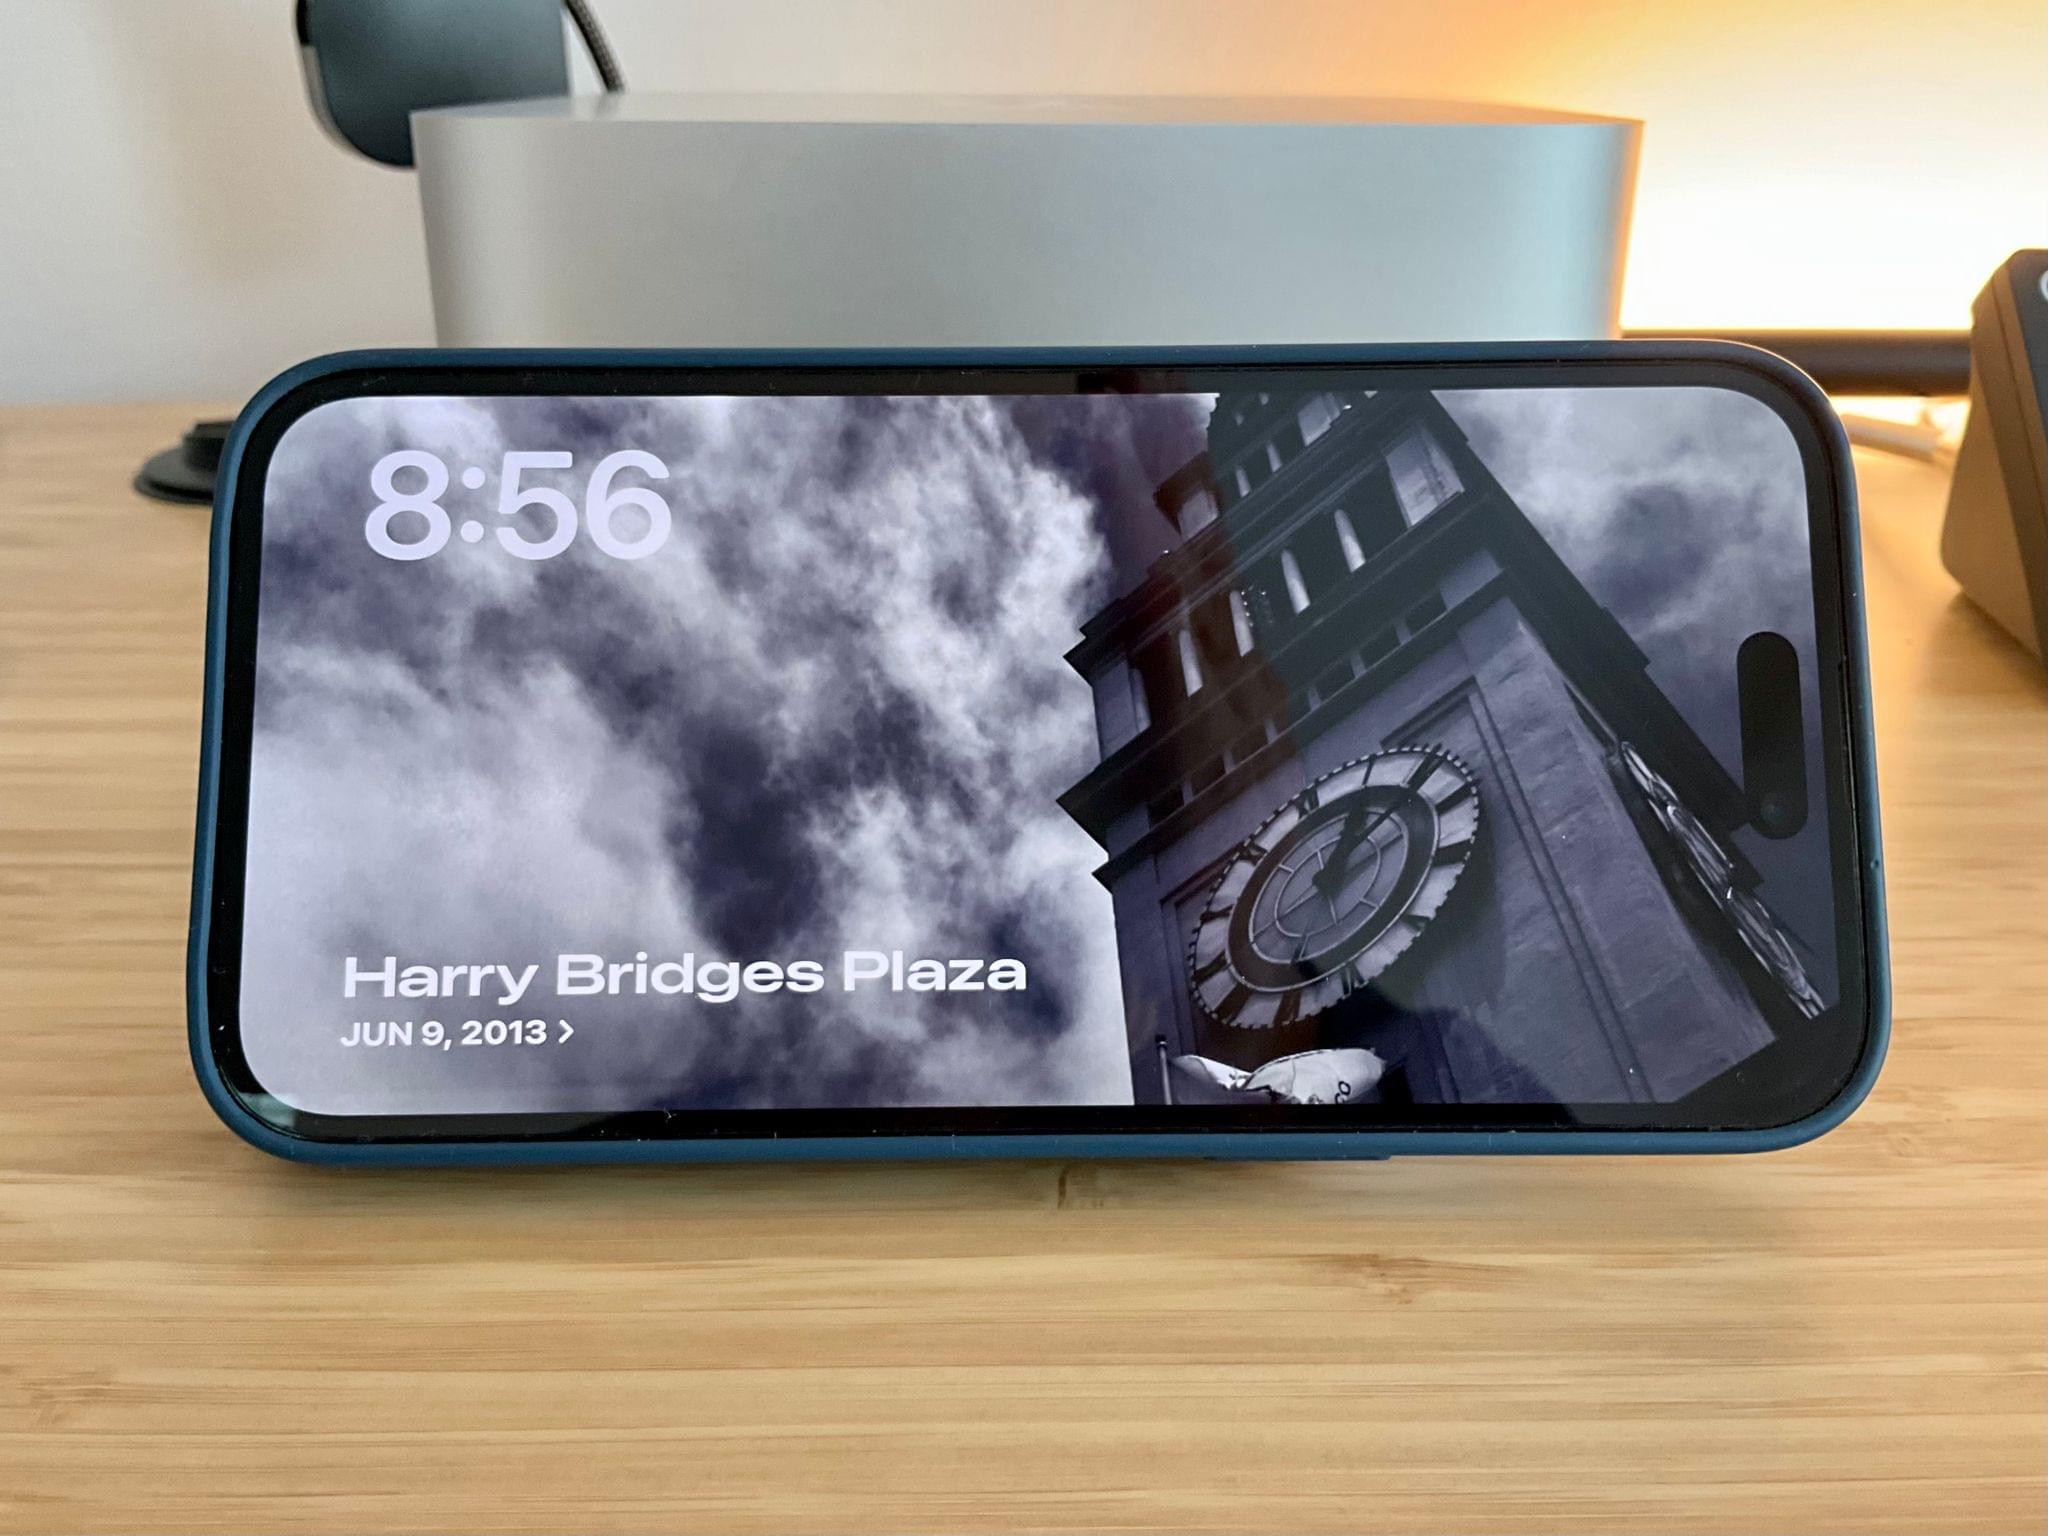
StandBy isn’t just about widgets, though. There’s a clock mode with five clock options. My favorite is a big digital clock that also shows the day, date, temperature, and the time of my next alarm. Long-pressing on the clock face lets you change the accent color, similar to the way you can change colors on a watch face in watchOS to a bunch of pre-defined colors or one you pick yourself.


There’s also a retro analog alarm clock option that includes your next alarm, the day, and the date. Its color accents can be updated, too. A world clock option displays a world map made up of dots highlighted to show any cities you’ve set up in the system Clock app. Tapping on any of the highlighted cities switches the digital time on the corner of the display to that city’s time.
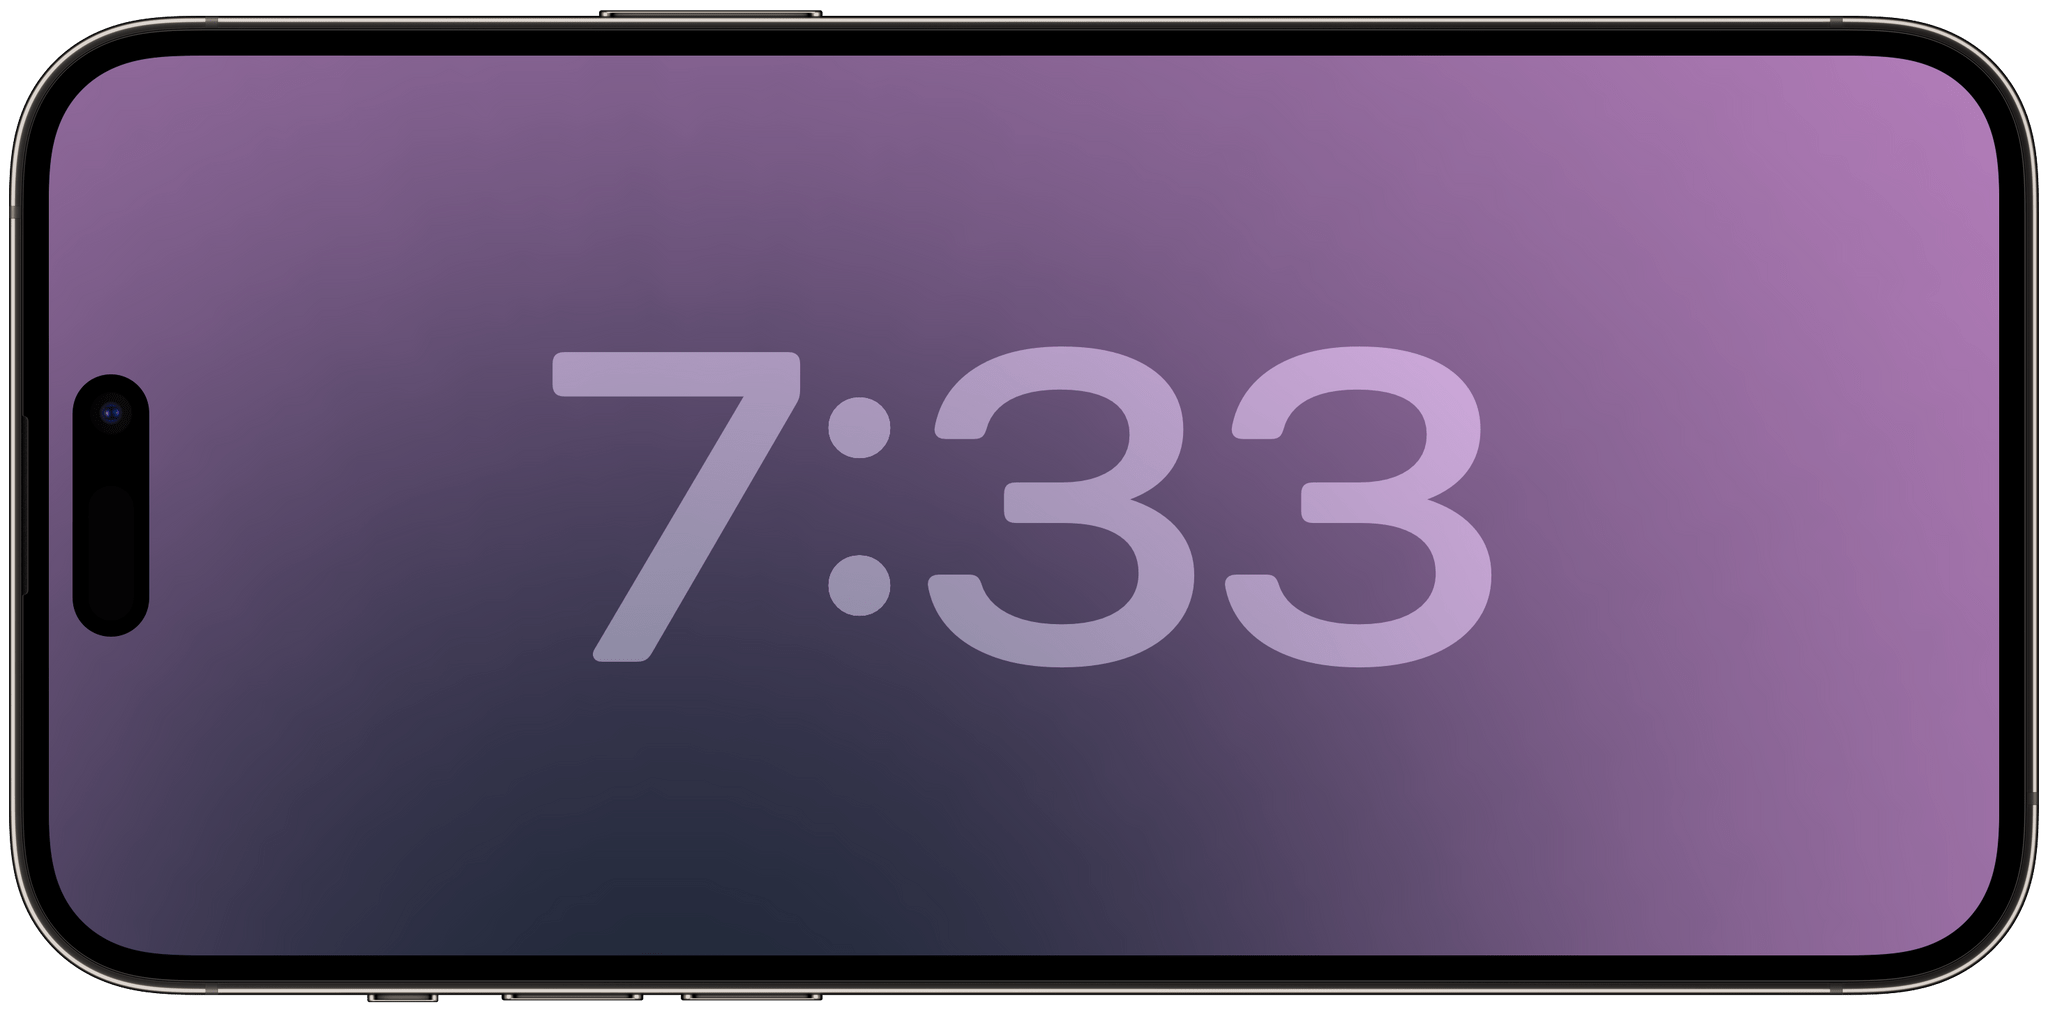

The simplest two clocks are another digital version called Solar with a background gradient that shifts throughout the day. Long-pressing on the face lets you change the color of the gradient. Finally, Float is a digital clock with big, rounded numerals that overlap, plus your next alarm. Like the other clocks, you can edit the colors used and even pick from multi-color options. When the time changes, the new digits animate into view, rotating up from the bottom of the screen.


The final StandBy option is the photo viewer, which can be set up to rotate among featured photos, nature shots, cities, and people by default. While each photo is onscreen, it slowly zooms in using a Ken Burns-like effect to add some motion. If you choose people, you can also set who should be included. The photo mode’s jiggle mode includes a plus button to allow you to pick any photo album from the Photos app to use in StandBy, too.

When a notification comes in, it’s initially dominated by the icon or profile picture of who sent it.

StandBy can also optionally display notifications. If you don’t manage your notifications carefully, this could be a distraction, but I find it less distracting than a notification on my Mac, so I’ve kept notifications turned on. For example, if a text message comes in, the text is big and legible, so I immediately know if it’s something I need to pay attention to or not. It’s a lot like managing notifications using the Apple Watch.
If you see a notification you want to act on or simply want to tap on a widget to access its app, StandBy is a bit of a mixed bag. Tapping on a notification or widget will open up the related app, but unless the app supports landscape mode, which many do not, you’ll probably find yourself grabbing your iPhone off of its charger instead of trying to use a portrait mode app that’s rotated 90 degrees.

Apple’s system apps are a good example of the difference. Tap on a calendar notification or its widget, and you’ll get a landscape view of your calendar that looks great. However, tap the weather widget to see a multi-day forecast, and it opens rotated 90 degrees, which isn’t a good experience. I’m not surprised that many of Apple apps don’t support landscape mode because there haven’t been many reasons to do so historically. However, I suspect we may see a trend toward landscape mode adoption if StandBy is as popular as I expect it will be.

On top of all of that, there’s also a Night Mode built into StandBy, which can be deactivated in Settings. When the lights are dimmed, the StandBy screen turns red, so it doesn’t shine brightly in your eyes as you try to sleep. A short time after entering Night Mode, StandBy turns off, so your screen is completely dark, but with a wave of your hand, it will light back up if you want to check the time, although this can be turned off in settings if you prefer.
So, as you can probably tell, what looks like a simple feature in the screenshots and demos shared at WWDC actually has a lot of depth. There are a bunch of ways for users to customize StandBy to their liking through the interface itself as well as Settings and plenty of room for developers to participate by offering widgets.
I’m a big fan of StandBy. I can monitor a couple of widgets plus notifications without picking up my iPhone, which makes it less likely that I’m going to get distracted by something else on my iPhone. The feature has also decluttered my Mac’s menu bar. I’ve moved calendar events and the weather out of the menu bar and onto my iPhone in StandBy mode, for instance.
I also prefer StandBy to the Apple Watch’s nightstand mode. The iPhone’s screen is easier to read in the dark without my glasses on when it’s in StandBy’s clock mode, and it frees up my Apple Watch for sleep tracking. Plus, the photos mode makes a surprisingly good photo viewer for other times I’m not using my iPhone. Perhaps most surprising of all is how useful StandBy has already been even before I’ve used many third-party widgets. That’s a good sign because it’s only going to get better when your favorite third-party apps join the StandBy party.
As I mentioned at the top, I got started with StandBy at my desk, quickly moved on to also using it on my bedside table at night, and most recently, I’ve been experimenting with mobile solutions so I can use the feature when I’m working on my balcony or away from home, or cooking in the kitchen. Federico’s been on a parallel journey with StandBy, which has led us both to try multiple charging solutions, which we thought we’d share for those who are interested in trying StandBy as part of the iOS 17 public beta.
Federico’s StandBy-Friendly Chargers
Federico: I’ve been taking advantage of StandBy in iOS 17 with two different types of MagSafe-certified chargers for my iPhone 14 Pro Max. One of them is a recent discovery, while the other is a product I’ve been using for months.
Anker Cube
Anker’s 3-in-1 MagSafe charging cube has to be one of my favorite tech accessories of all time. For those who may not know this about me, I love cubes and believe they’re the perfect shape. History doesn’t lie. So what better combo than having a tiny, cube-shaped charger that supports fast charging on iPhone and Apple Watch, has regular wireless charging, is MagSafe-certified, and is also extremely compact?
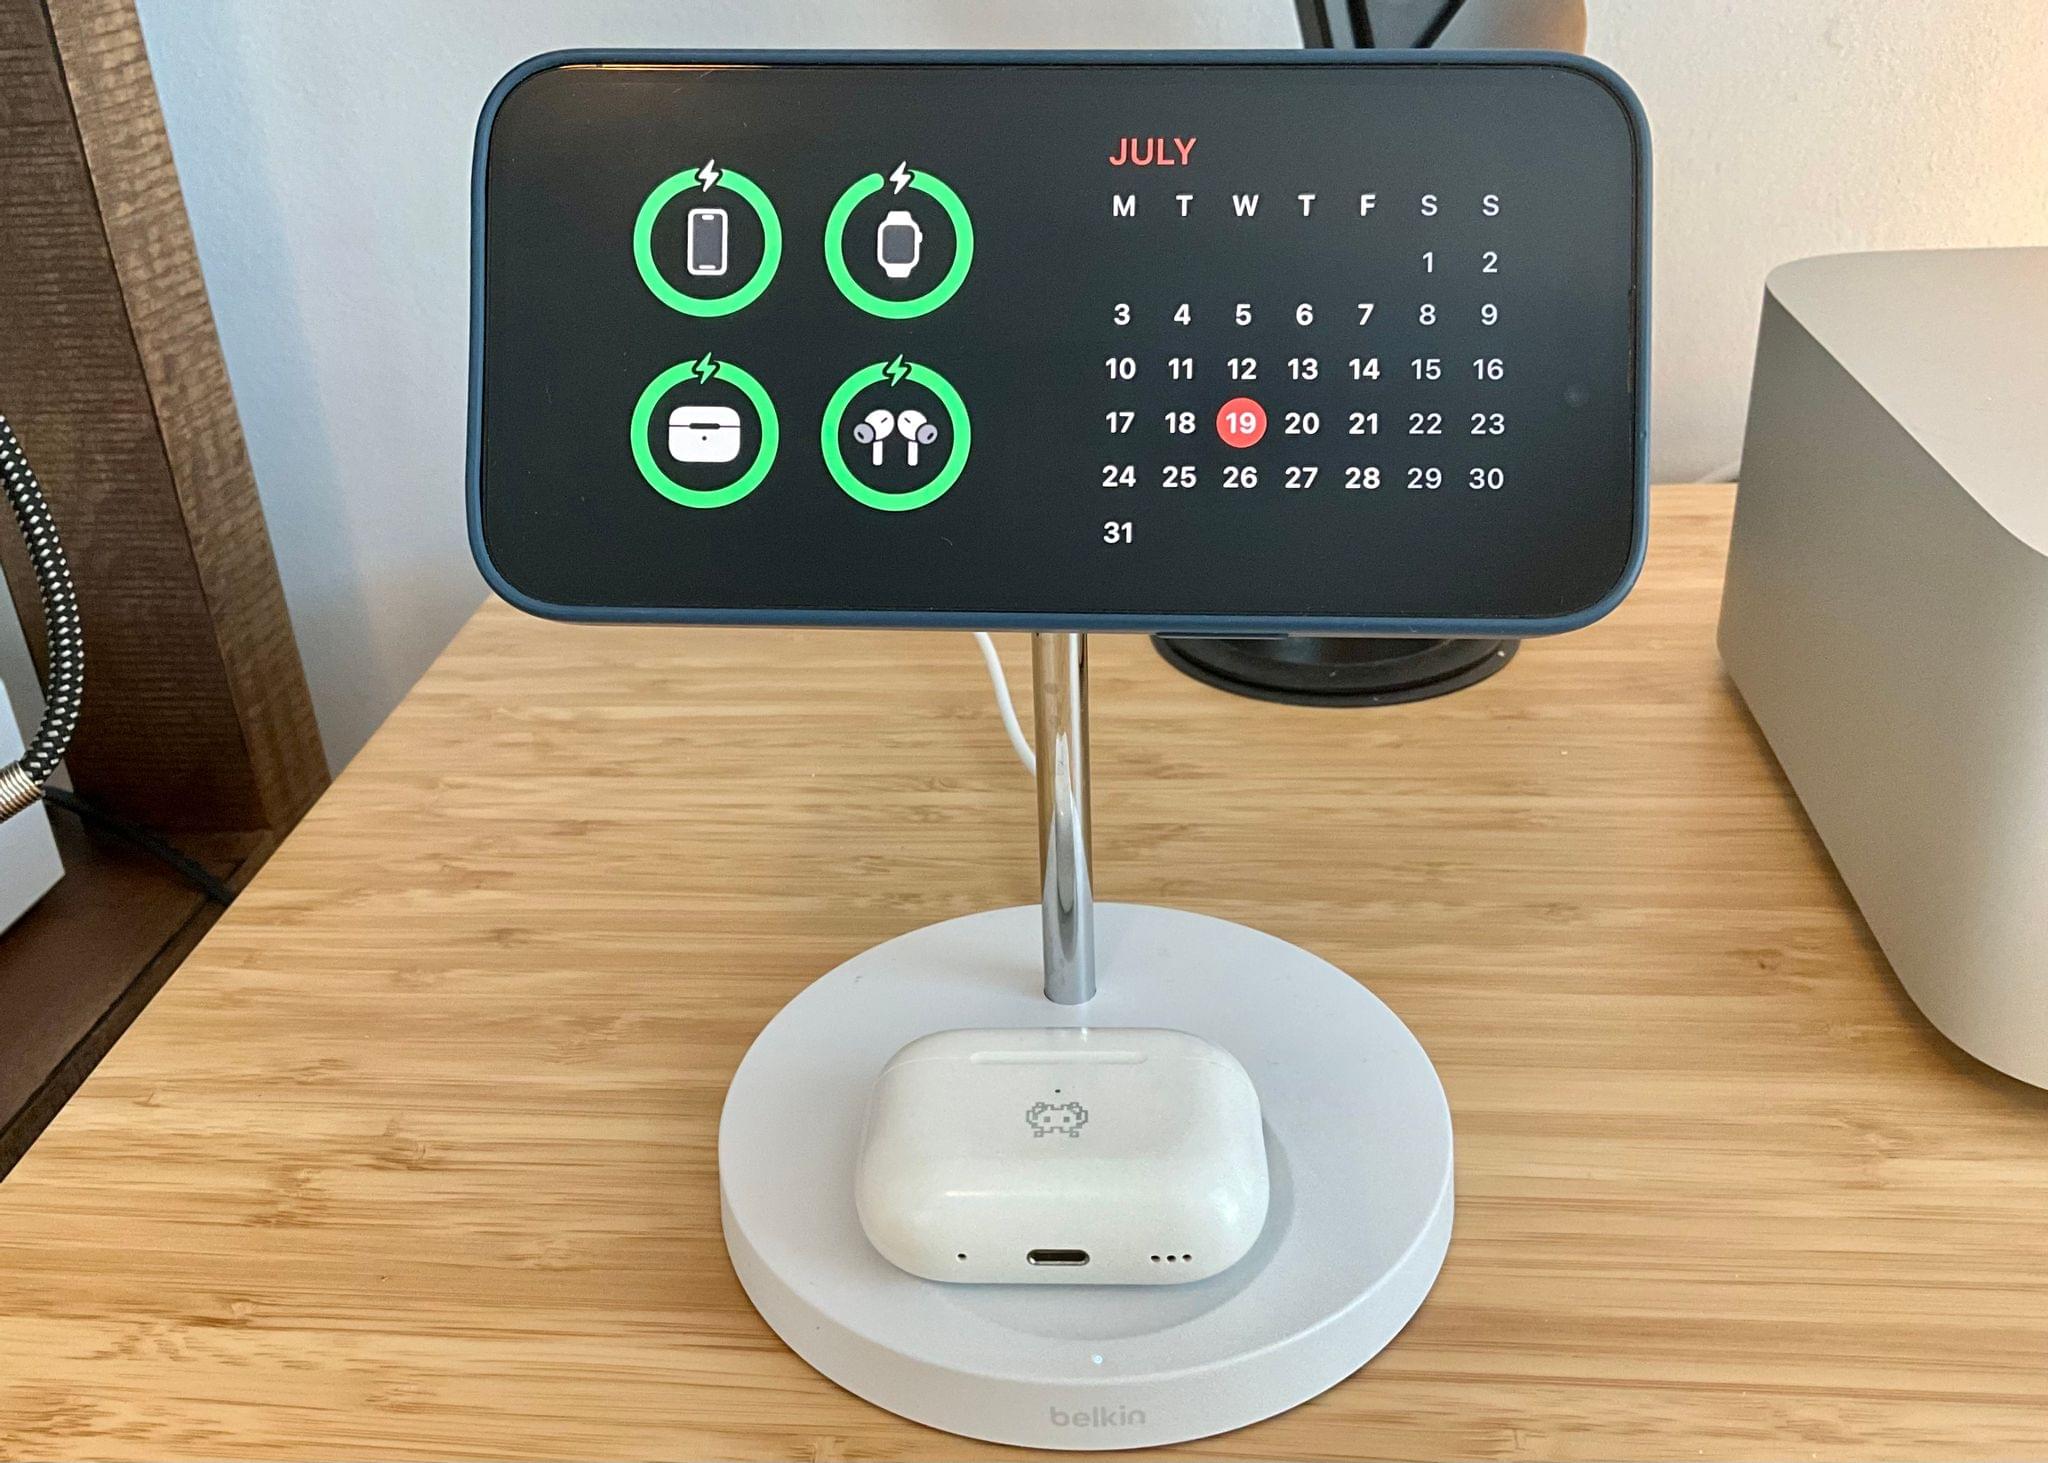
I started using Anker’s cube months ago and liked it so much, I purchased two more: one for my desk and another for Silvia’s nightstand. What I love most about the cube is that it’s comprised of different layers that you can adjust and reveal only when needed. The main MagSafe charger, for instance, is a square-shaped surface that supports angle adjustment or can be closed flat on top of the cube. When lifted, the charger lets me attach the iPhone both in portrait or landscape mode; with the latter option, I can use StandBy mode, which I’ve been doing a lot with the cube on my desk, so I can keep an eye on my calendar or the currently running timer in the Timery app for iOS 17 (currently in beta).
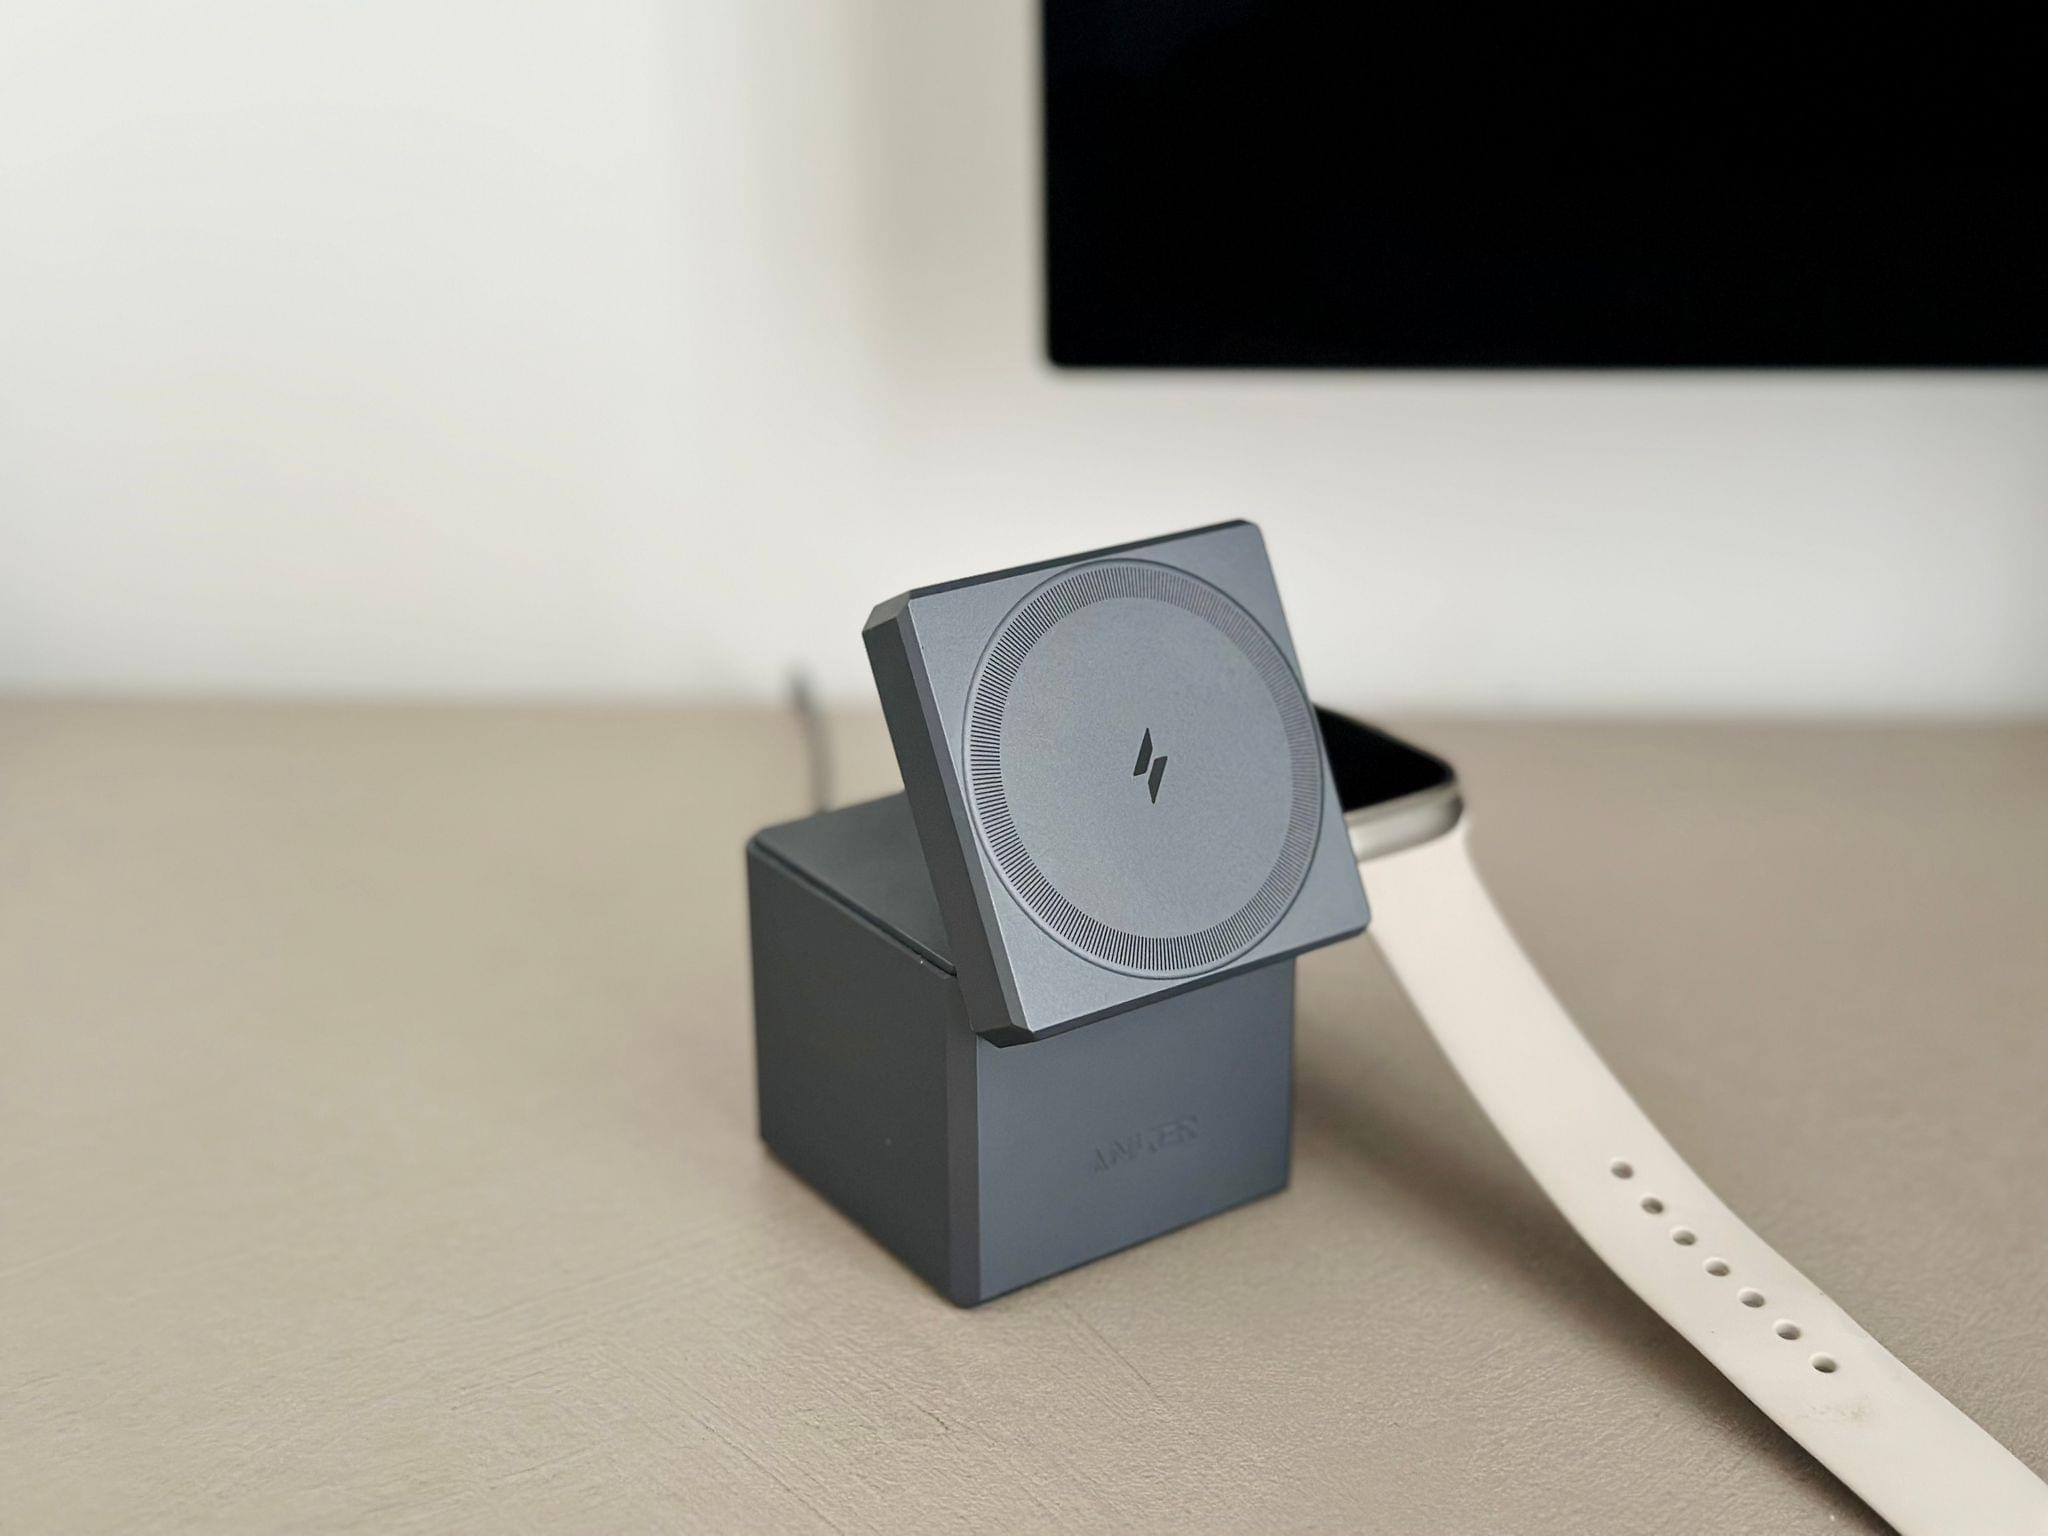
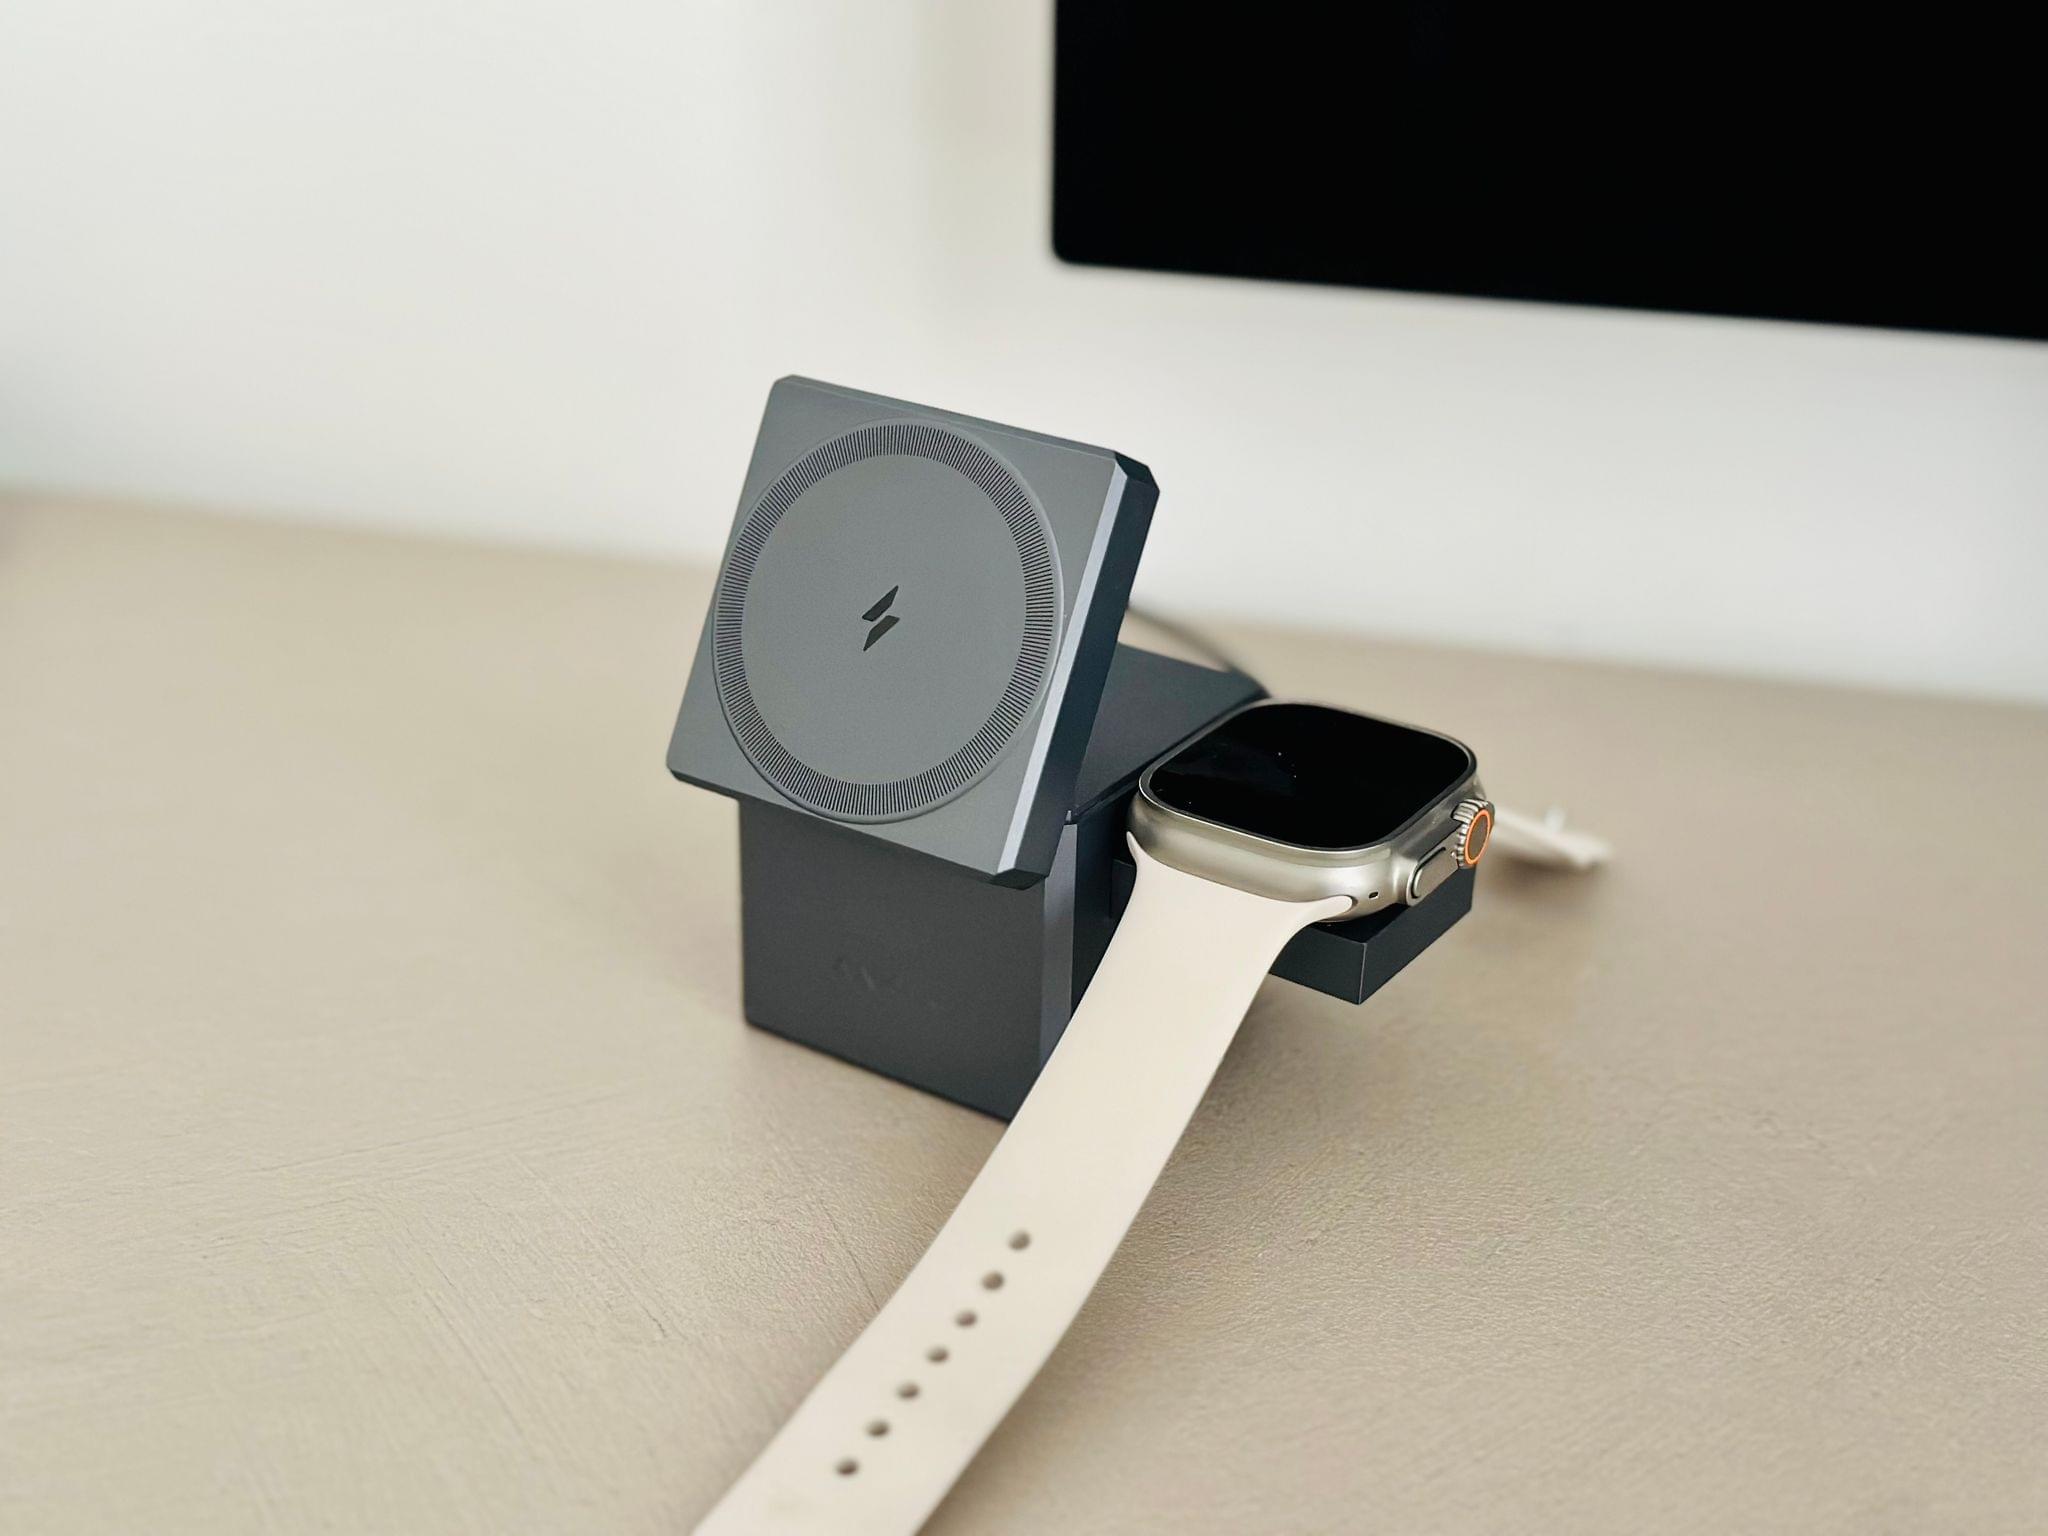
What’s also great about the cube is that it offers flexibility in a compact and elegant package. On the right side, there is a special compartment for an Apple Watch charging puck, which I can reveal when needed by pressing on the side of the unit. If I don’t need to charge my Watch, I can push the puck inside the cube, and it disappears from view. Similarly, if I want to charge my AirPods Pro wirelessly, I can place the case on the back of the MagSafe charger: the upper surface of the cube has a built-in Qi charger, which is just the right size for AirPods Pro.
Anker’s MagSafe cube is not a cheap accessory, but the build quality is terrific, and it has the sort of modular flexibility that I love to see in products I use every day without giving up on a minimalistic design that looks fantastic on a nightstand or desk. For these reasons, the cube is my favorite wired MagSafe charger that works with StandBy in iOS 17 out of the box.
OtterBox’s 2-in-1 MagSafe Battery
The other charger I’m using for StandBy is something I’ve been trying to find for a while: a portable battery with an official, MagSafe-certified charging puck that also doubles as a USB-C battery and Apple Watch charger.
The OtterBox charger is a USB-C battery about the size of two iPhone 14 Pro Max units stacked on top of each other. It is not, as you can guess, a lightweight battery you can easily fit in a pocket. However, it is the only way I’ve found to have a real MagSafe charger that I can move around the house without wires or take with me in a bag if I’m out of town.
The reason I wanted to find this kind of product is that, in iOS 17, StandBy mode will eventually support a special ‘MagSafe memory’ feature that takes advantage of the fact that each MagSafe charger has a unique ID to remember the StandBy page and widget configuration you want to use on a specific charger. As I wrote in my iOS 17 preview story, this feature isn’t working for me at the moment, but my understanding is that it will soon. And once that happens, I’ll be able to have a MagSafe-certified charger that lets me tilt the iPhone upright next to my iPad Pro, no matter where I am, without being connected to a power outlet – all while perfectly integrating with StandBy.

The OtterBox charger is a 10,000 mAh battery that, in addition to a MagSafe puck that supports iPhone fast charging up to 15W and wireless charging for AirPods, also has an integrated Apple Watch charging puck (for charging up to 5W) and a USB-C port to charge other devices at 20W. The port is also used for charging the battery itself, which I usually do at the end of the day when I’m finished working.
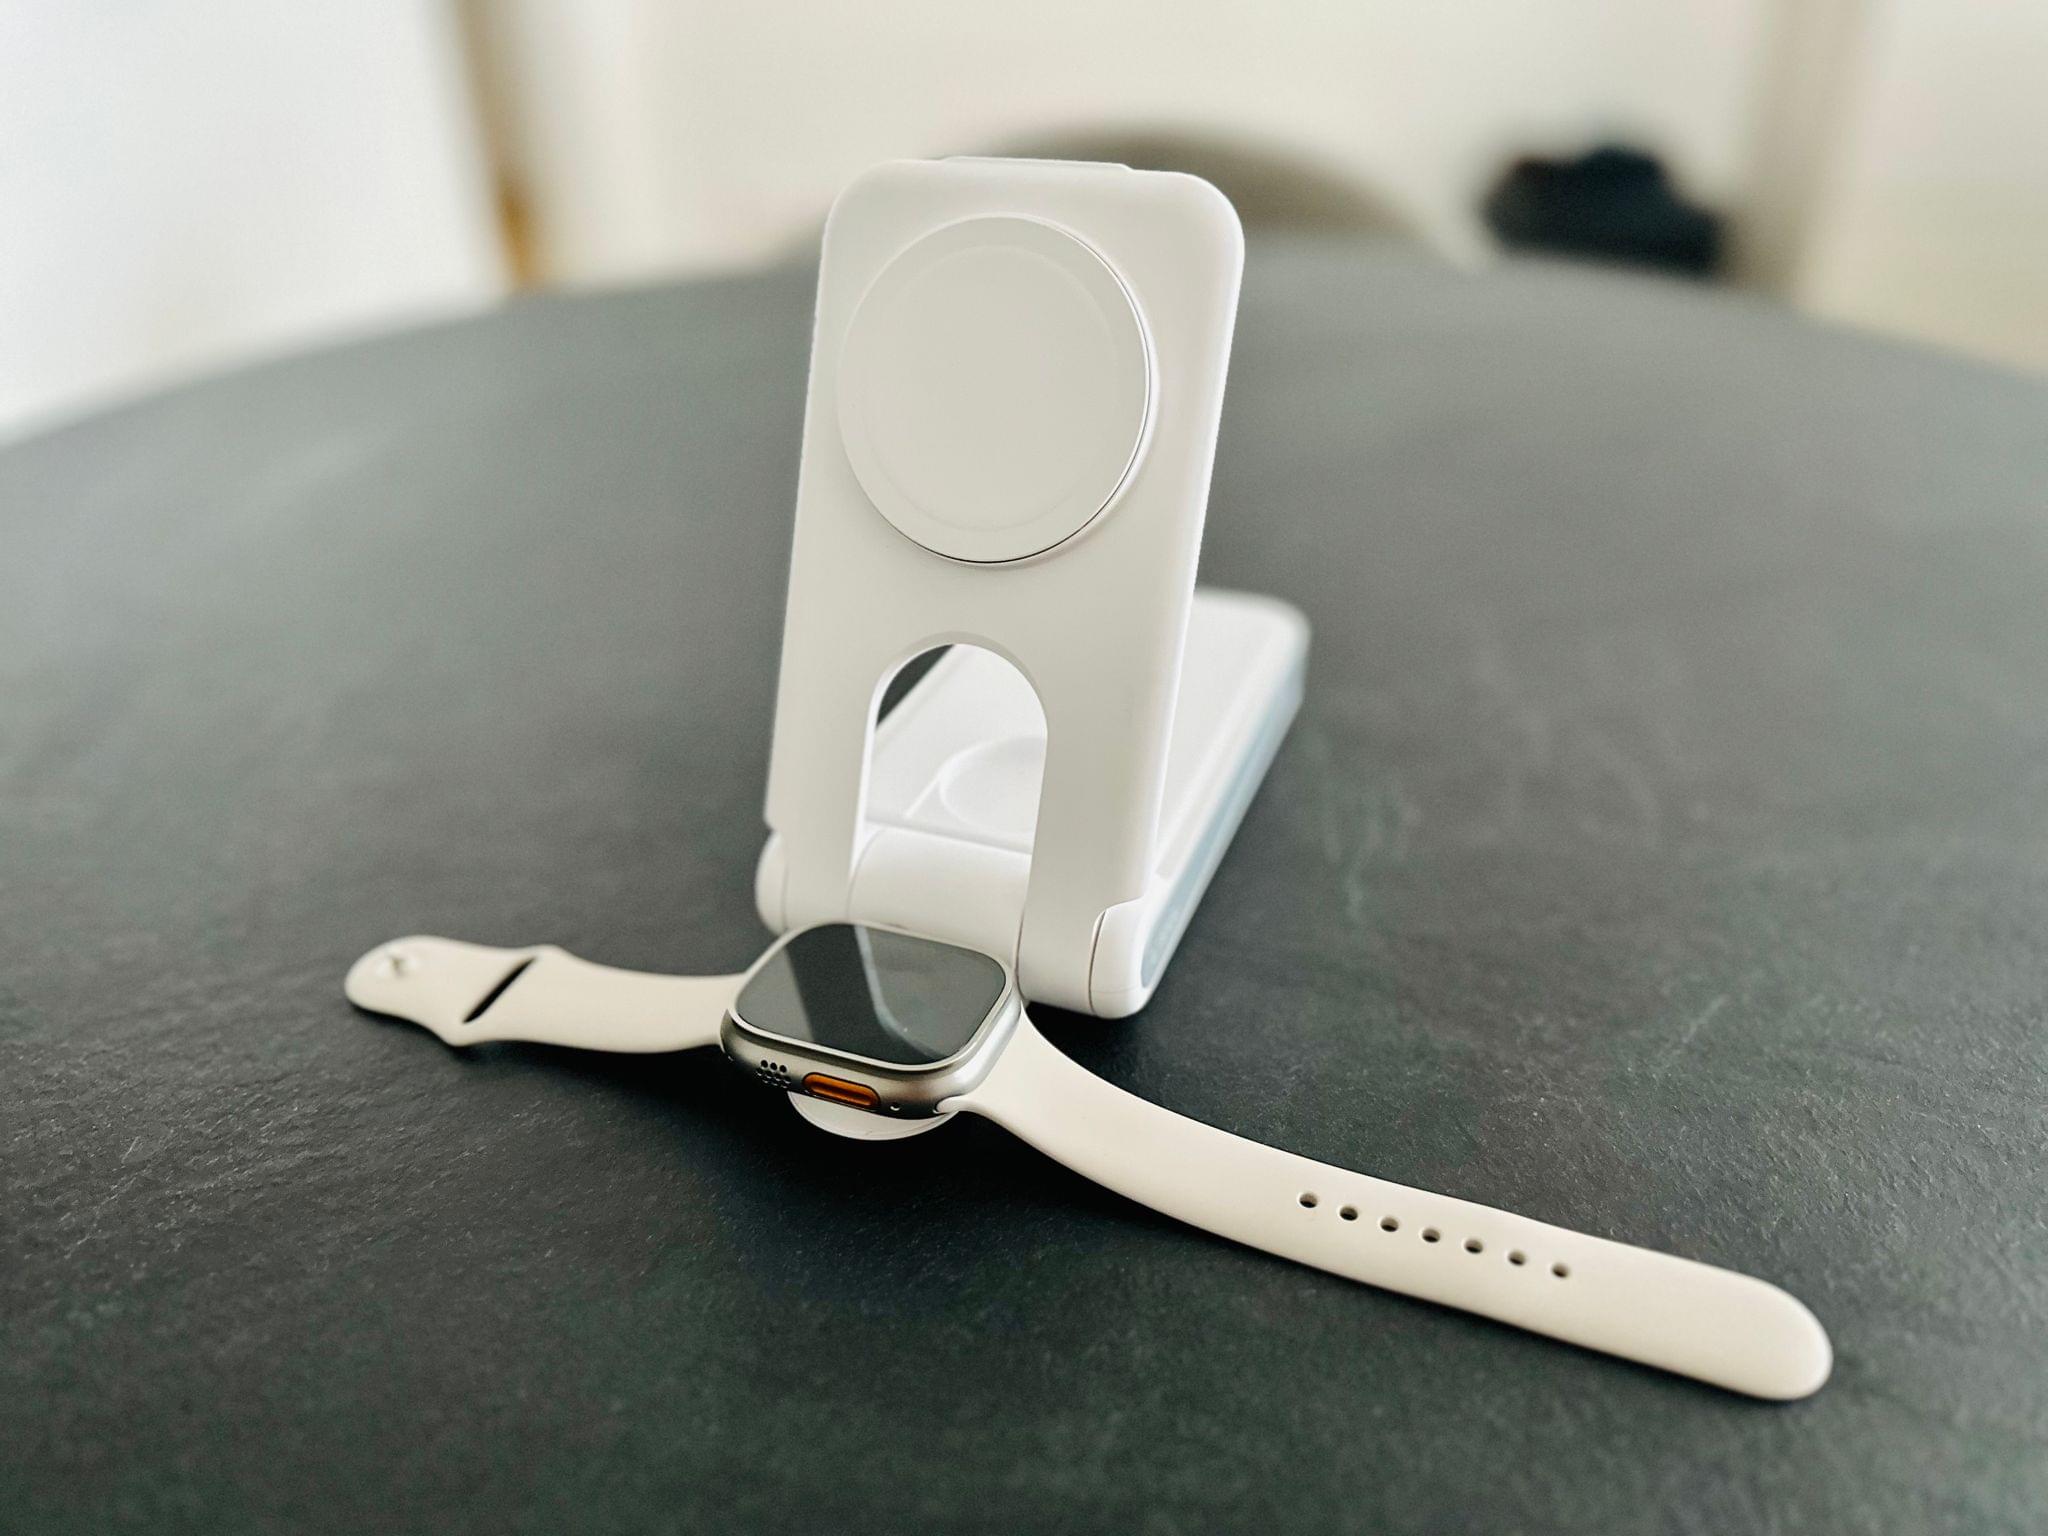
Based on what I’ve written so far, I think you can see why I’m falling in love with this product. Despite its shortcomings (the battery could be bigger, and the build quality of the plastic arm that contains the MagSafe puck could be better), it grants the kind of freedom and MagSafe certification that I haven’t been able to find in any other battery. There are many “MagSafe compatible” batteries out there, but they’re not MagSafe official; for that reason, their charger doesn’t have a MagSafe ID associated with them, and they won’t support the MagSafe memory feature of StandBy I mentioned above. The OtterBox battery is the only MagSafe-certified portable charger that exists at the moment, at least to my knowledge.
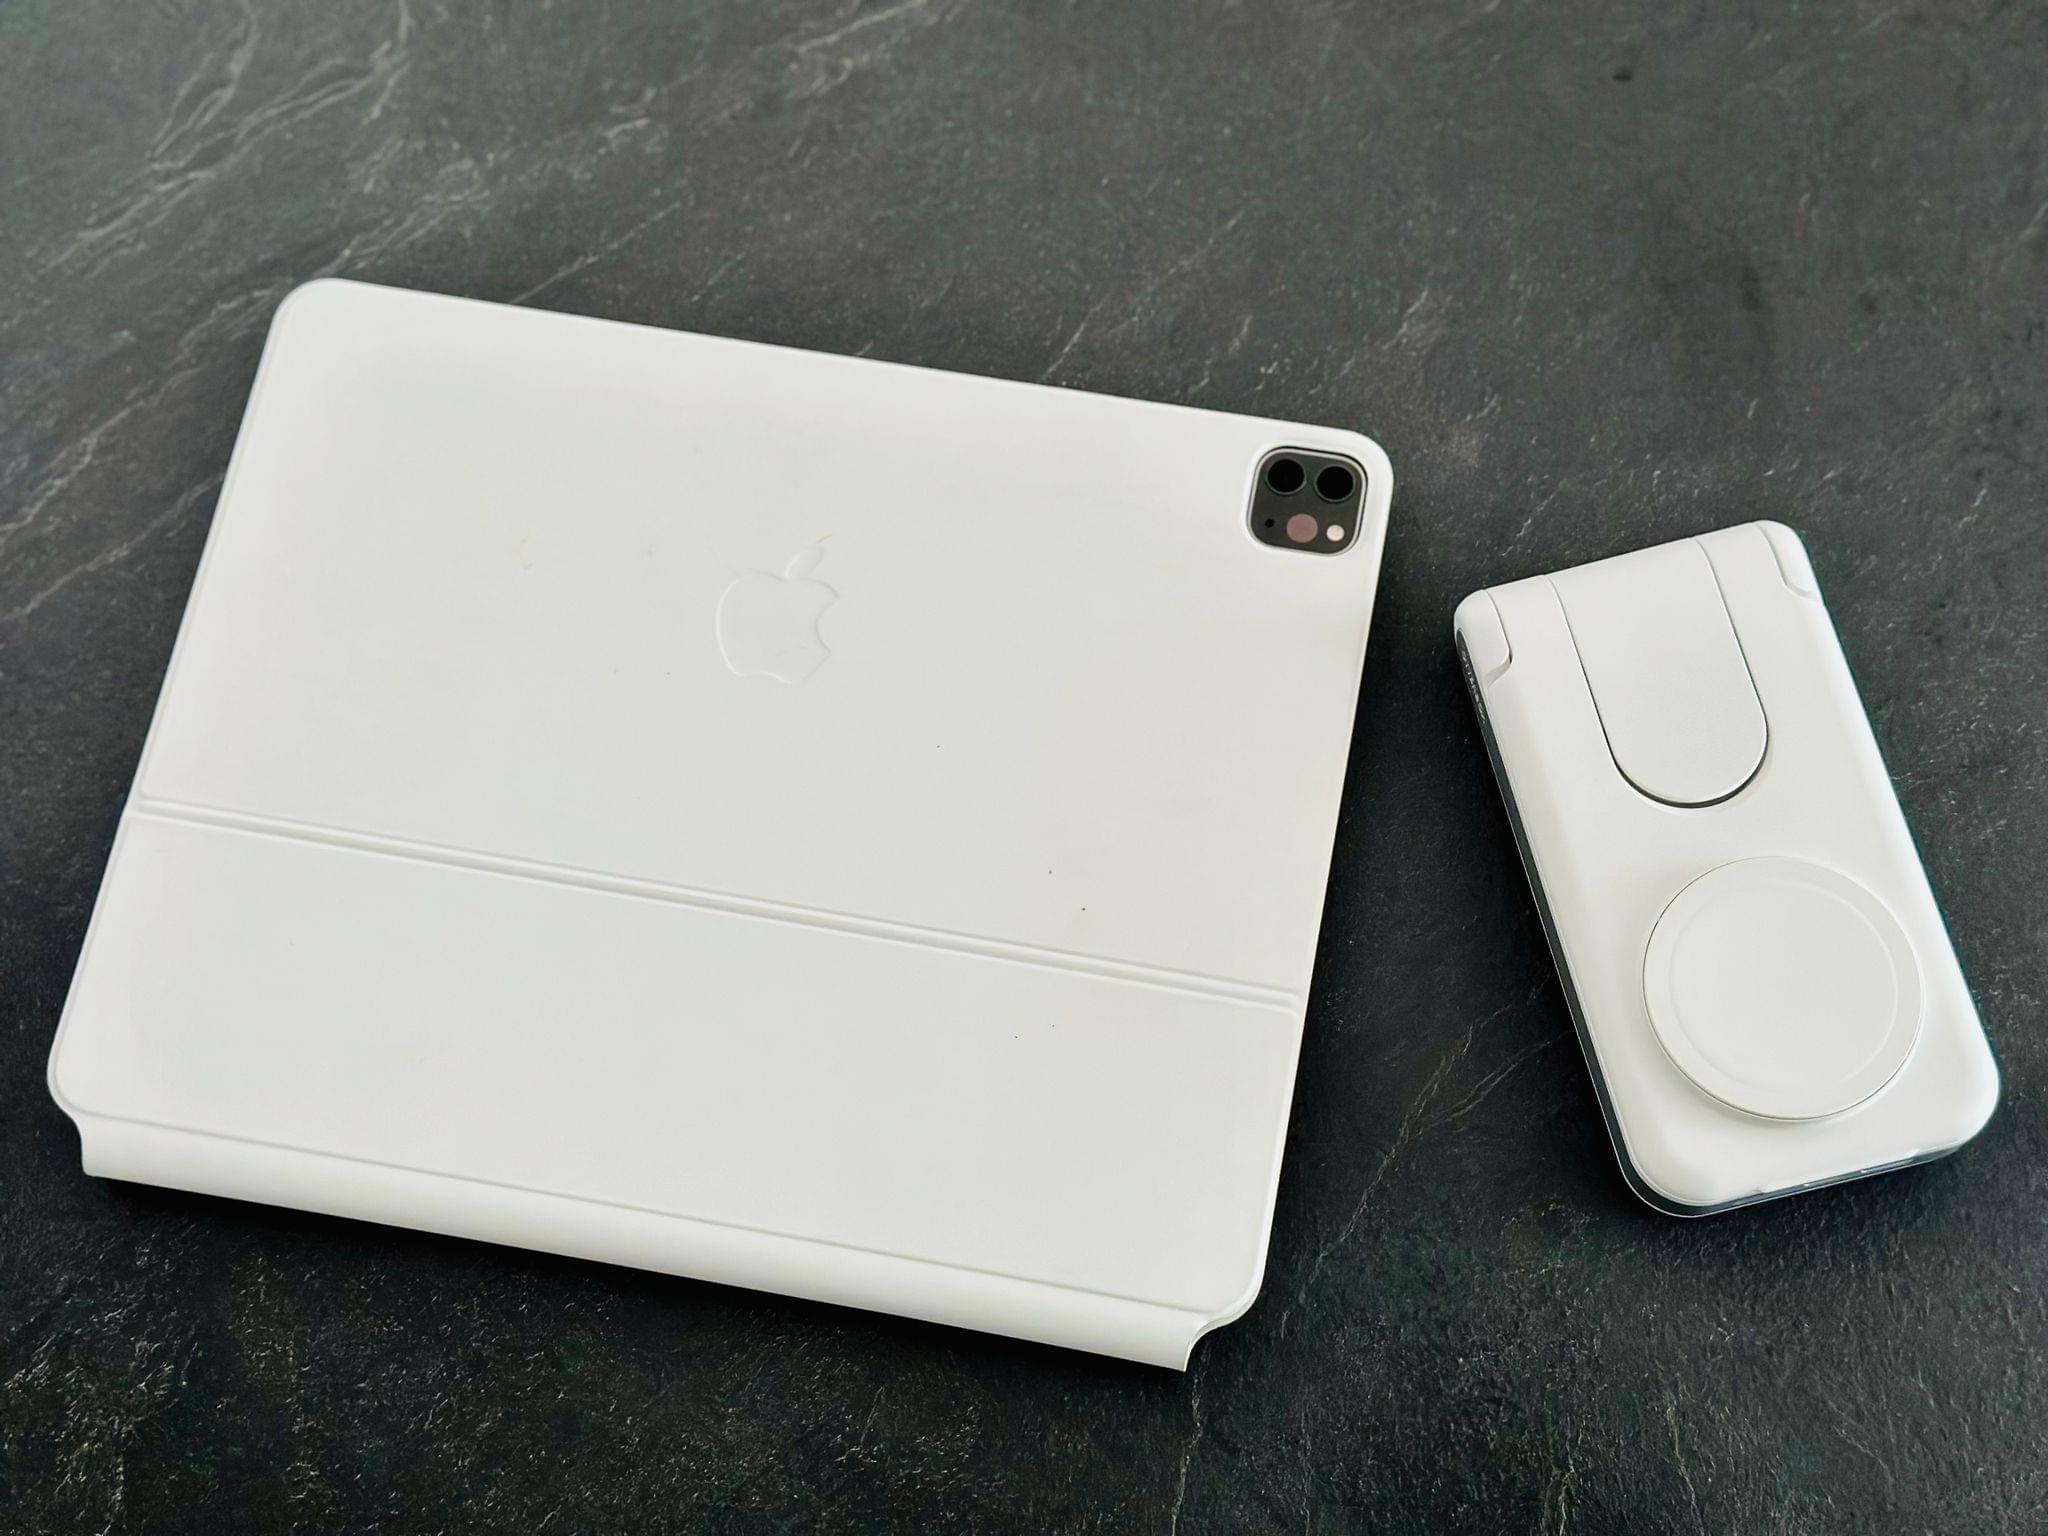
I plan to rely on the following setup for the rest of the summer: iPad Pro, iPhone, Apple Watch Ultra, and the OtterBox battery. If you’re willing to compromise on size and battery capacity to have real MagSafe and proper StandBy wherever you are, I can’t recommend the OtterBox 2-in-1 MagSafe battery enough.
John’s StandBy-Friendly Chargers
John: I’ve experimented with several different charging solutions for StandBy and settled on three: one for my desk, one for my nightstand, and a portable charger for everywhere else.
Belkin 2-in-1 BoostCharge Pro
Belkin’s 2-in-1 BoostCharge Pro is the charger I’m currently using at my desk. I used to use the Belkin BoostCharge Pro 3-in-1 charger, but it was an older model that didn’t charge an Apple Watch at maximum power. The BoostCharge Pro 3-in-1 was also bulky, so I switched to the smaller 2-in-1 model that can charge an iPhone and AirPods Pro but forgoes the Watch charger.
The iPhone also sits higher than the 3-in-1 model, which I prefer, and the build quality is excellent. The only thing I don’t like about Belkin’s 2-in-1 charger is the power brick, which is a little bigger than I’d prefer.
However, if you’re looking for a solution that also charges an Apple Watch, it’s worth noting that Belkin has updated the 3-in-1 BoostCharge Pro with more powerful Apple Watch charging. It appears from Belkin’s website that the design is exactly the same as the older model I have, which works perfectly well with Standby because the charging pads are far enough apart to accommodate an iPhone in landscape mode as well as an Apple Watch.
Twelve South HiRise 3
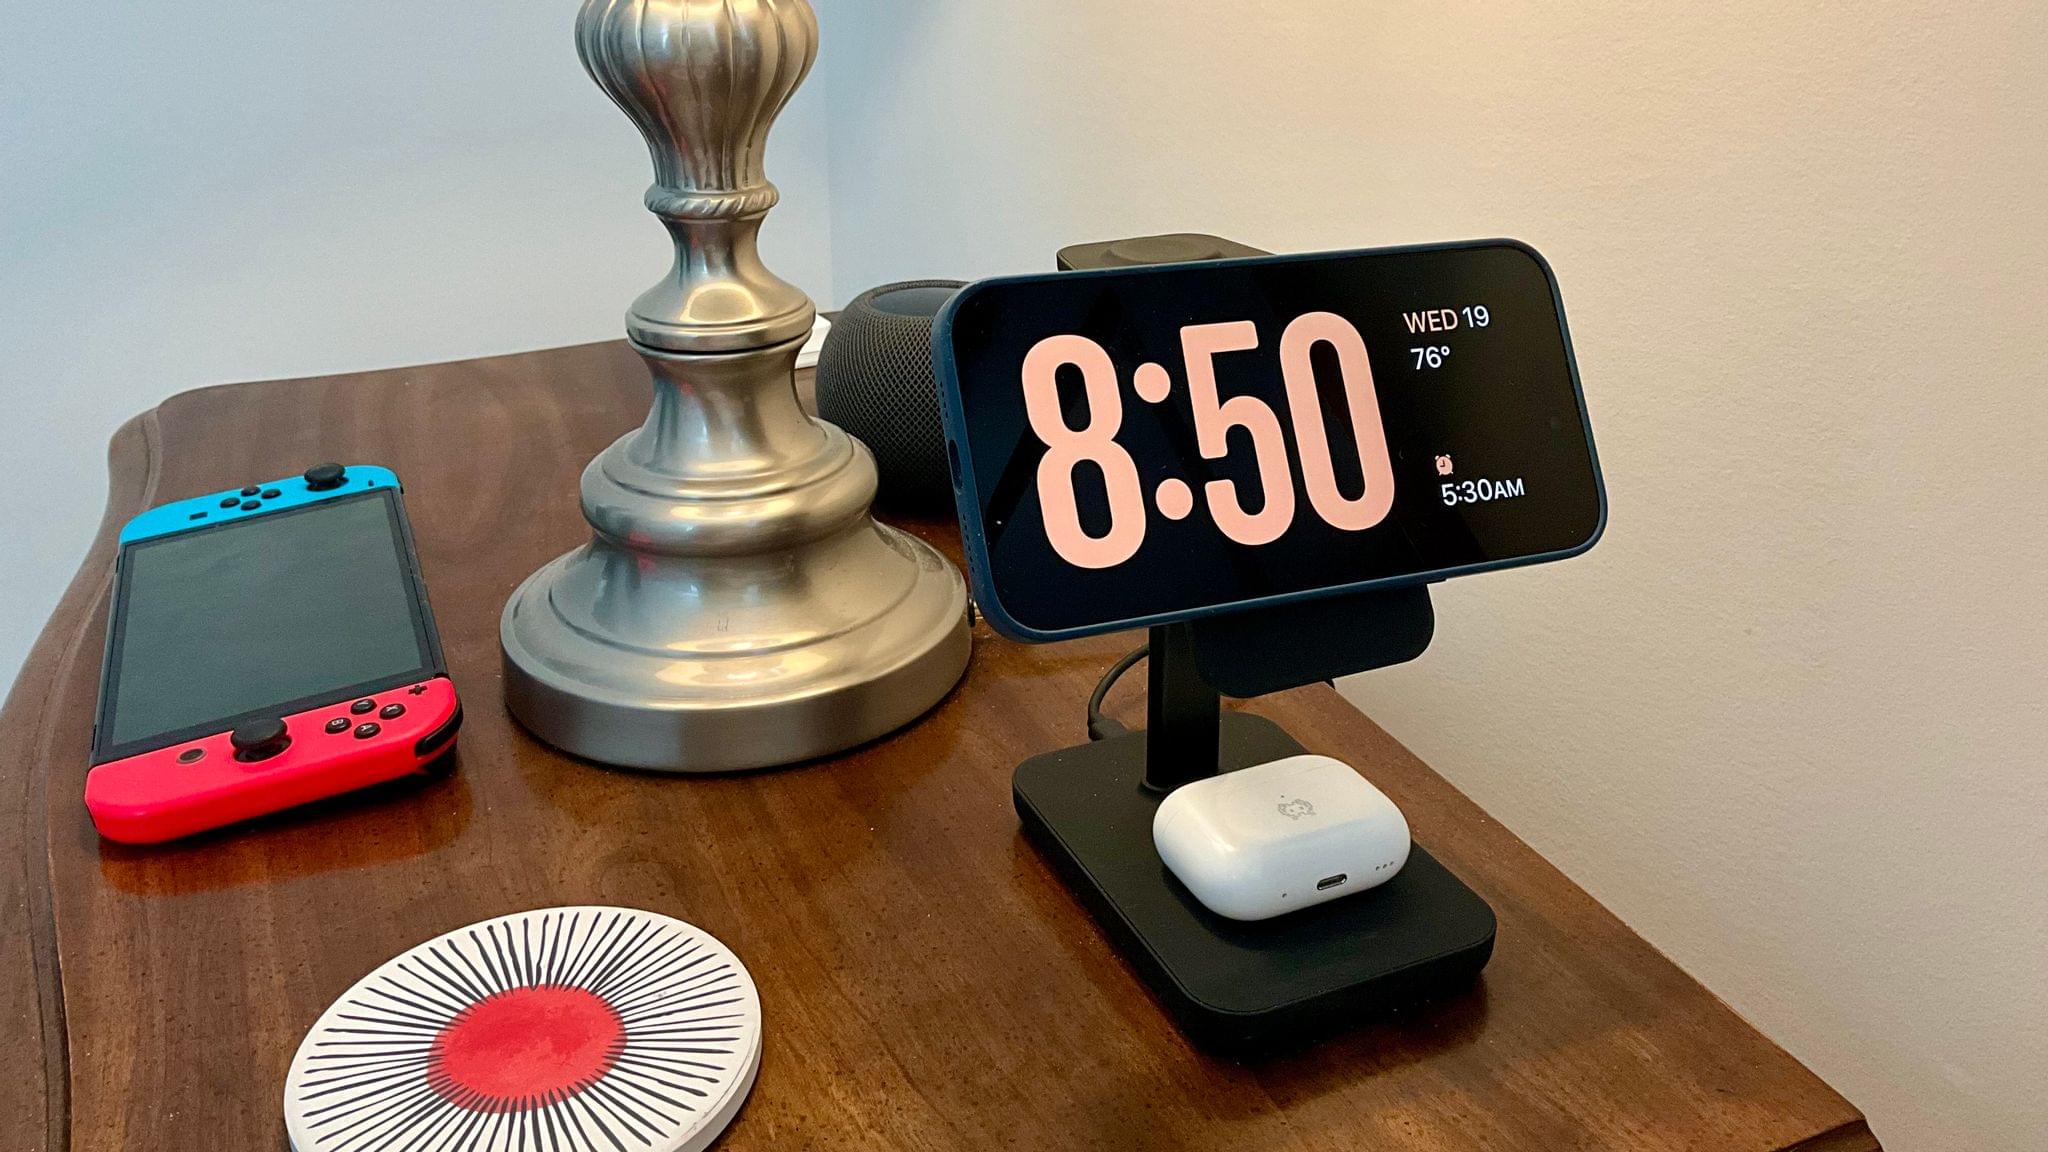
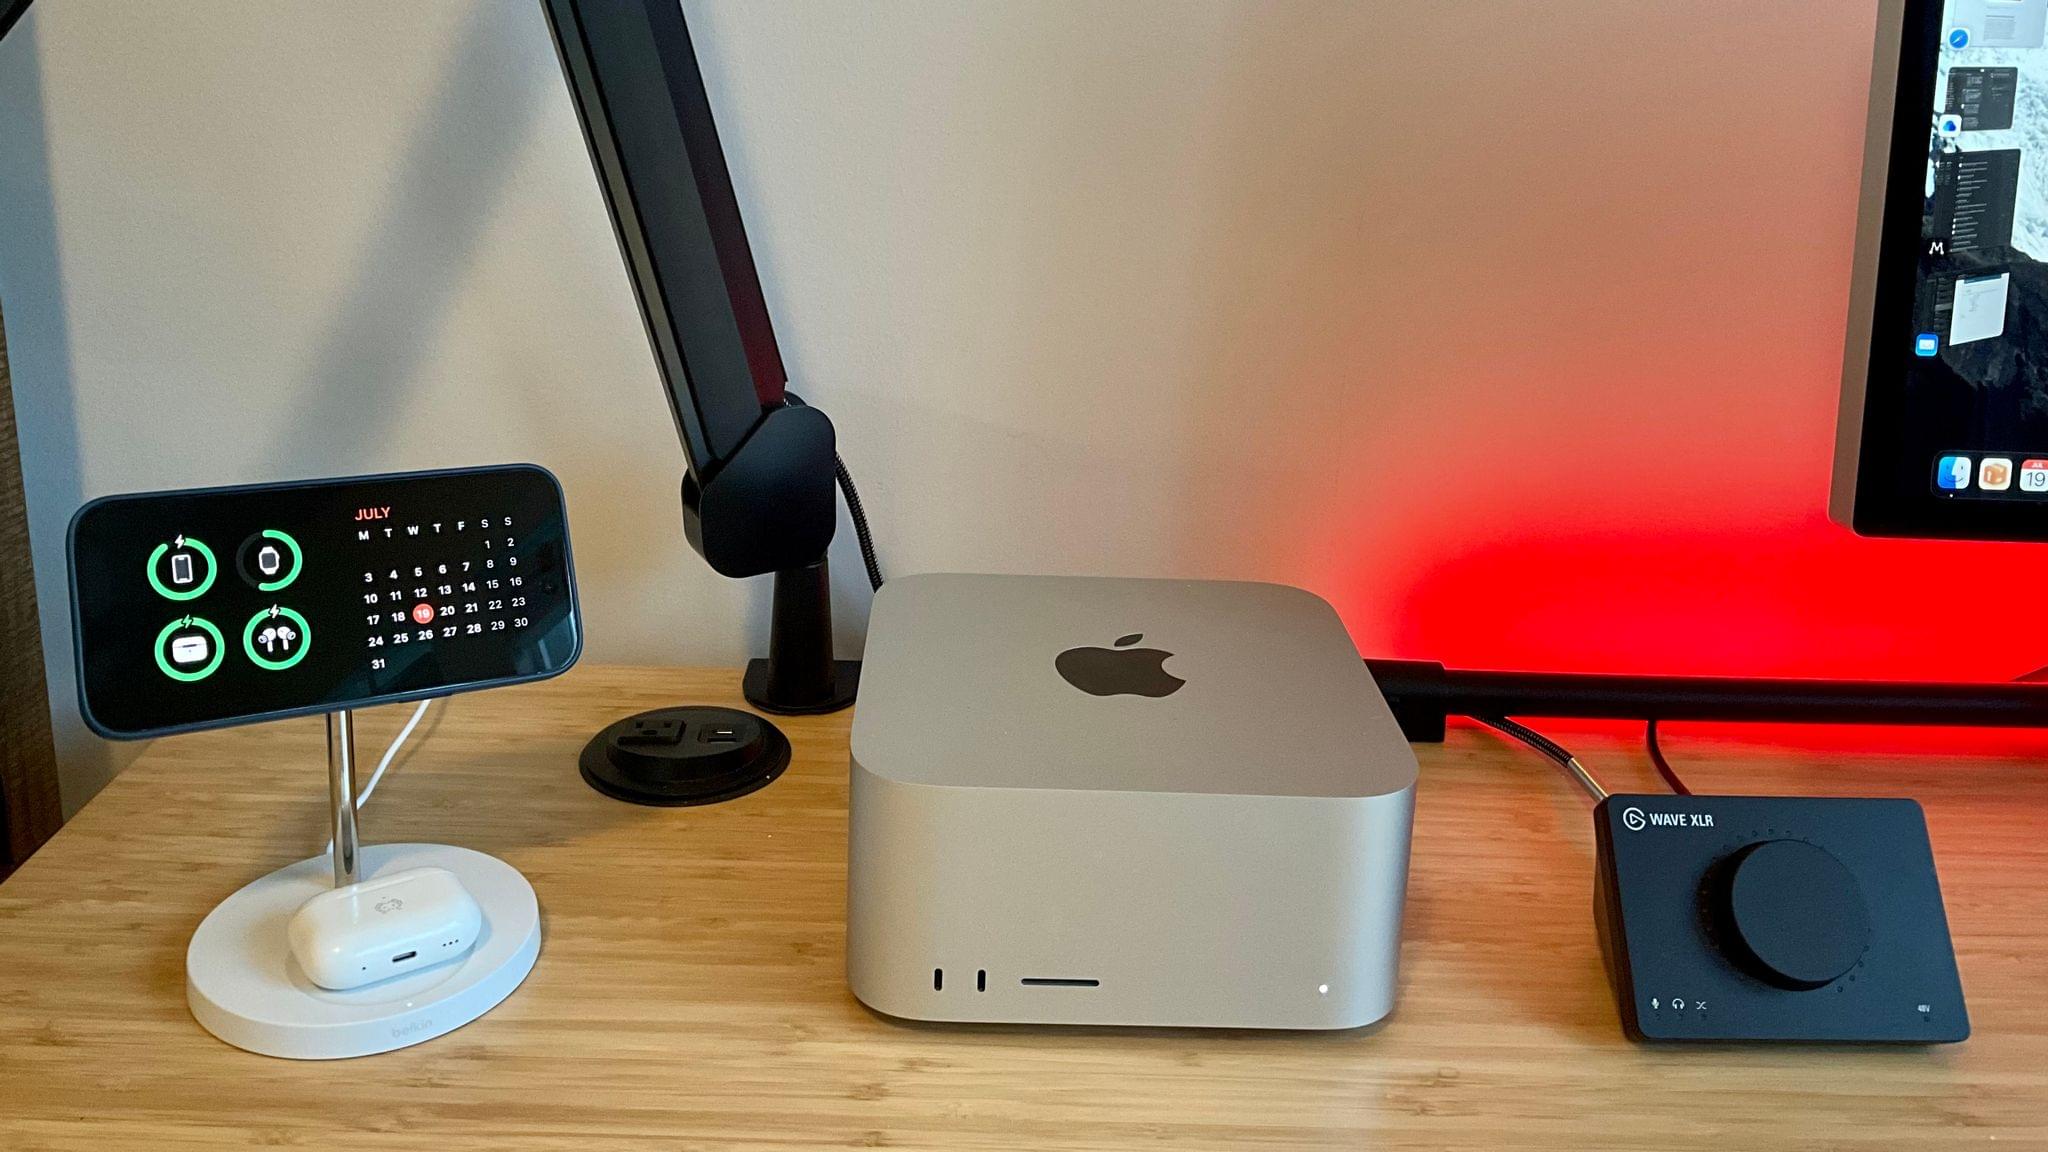
This is the charger that I’m using on my nightstand. What I like most about the HiRise 3 is its small footprint. The charger is heavy enough that it won’t tip over, and it has a tacky bottom that sticks it to my table, but it’s removable and hasn’t left any marks on the wood table. The HiRise can accommodate an Apple Watch, charging at 3W, an iPhone, and AirPods Pro. I don’t use the HiRise to charge my Apple Watch Ultra at night because I use it for sleep tracking, and the HiRise 3 charges too slowly for the Ultra, but I was using it for my iPhone before the iOS 17 beta and have continued to use it.
The charging pad of the HiRise 3, which I reviewed in more detail on MacStories last summer, is rectangular, which means that if you’re charging in landscape mode to take advantage of StandBy, you’re going to see a short ‘chin’ peeking out along the bottom edge of your iPhone, even if you’ve got an iPhone Pro Max. That doesn’t bother me because I’m using StandBy in my bedroom at night with the lights off, so it’s not usually visible, but I know from talking to a couple of people in the Club MacStories+ Discord, that not everyone likes that look, which is understandable. Another downside is that you need to supply your own USB-C charger to use with the HiRise 3. That said, as a space-saving nightstand charger, the HiRise 3 is excellent, and it’s worked well enough for me that I haven’t felt the need to replace it.
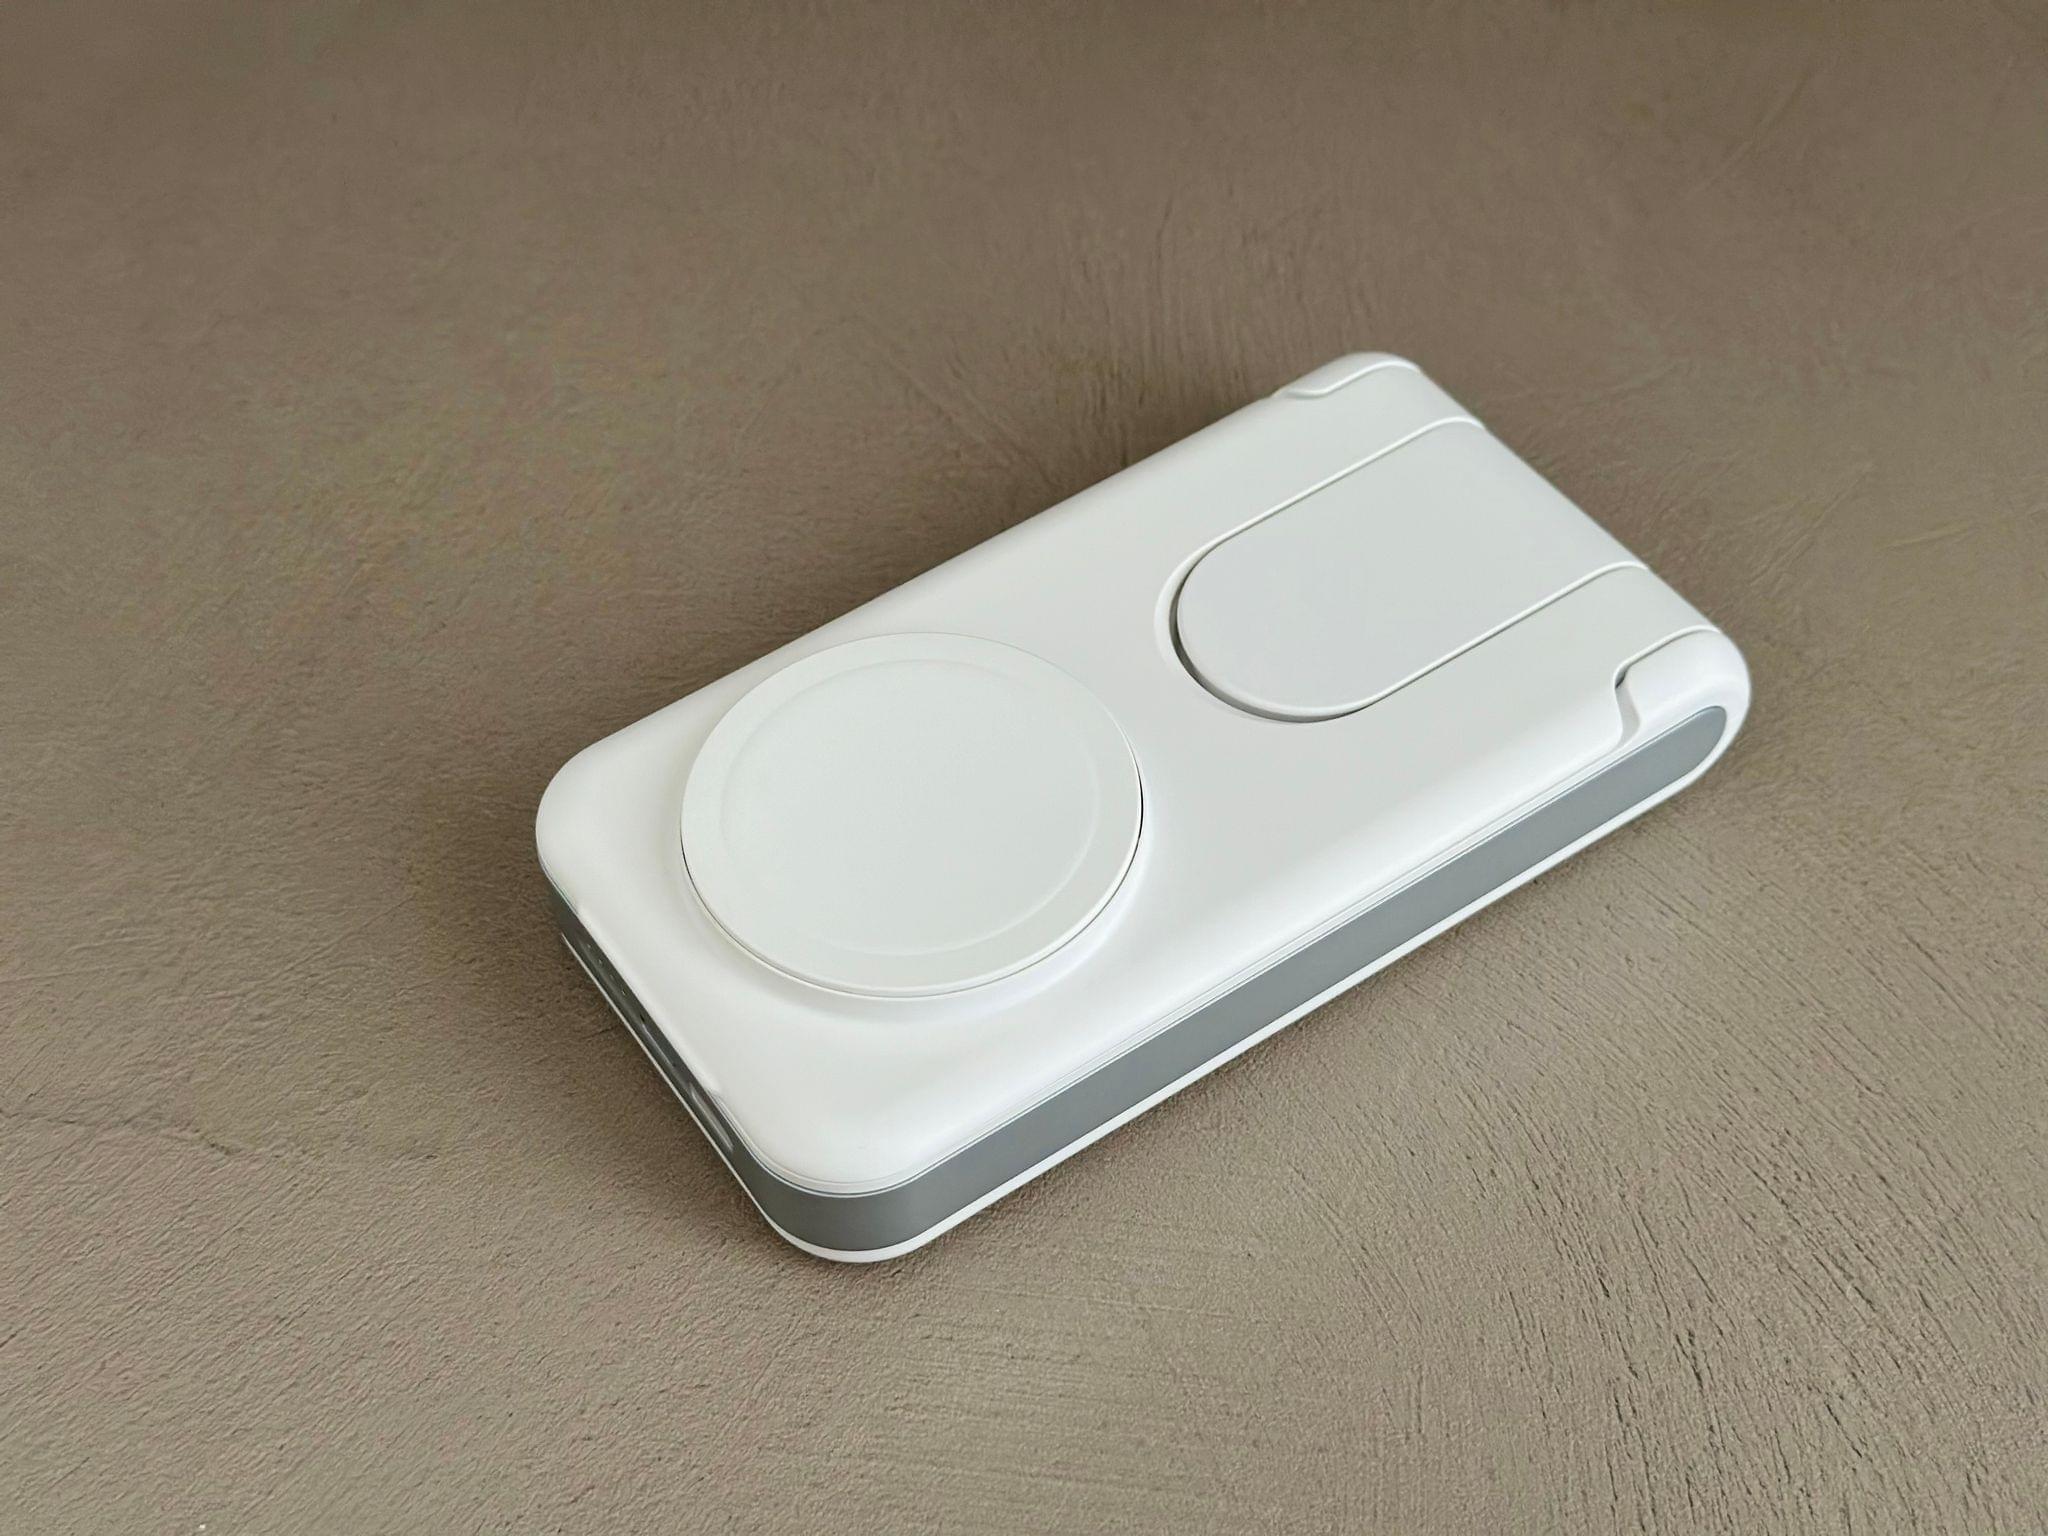
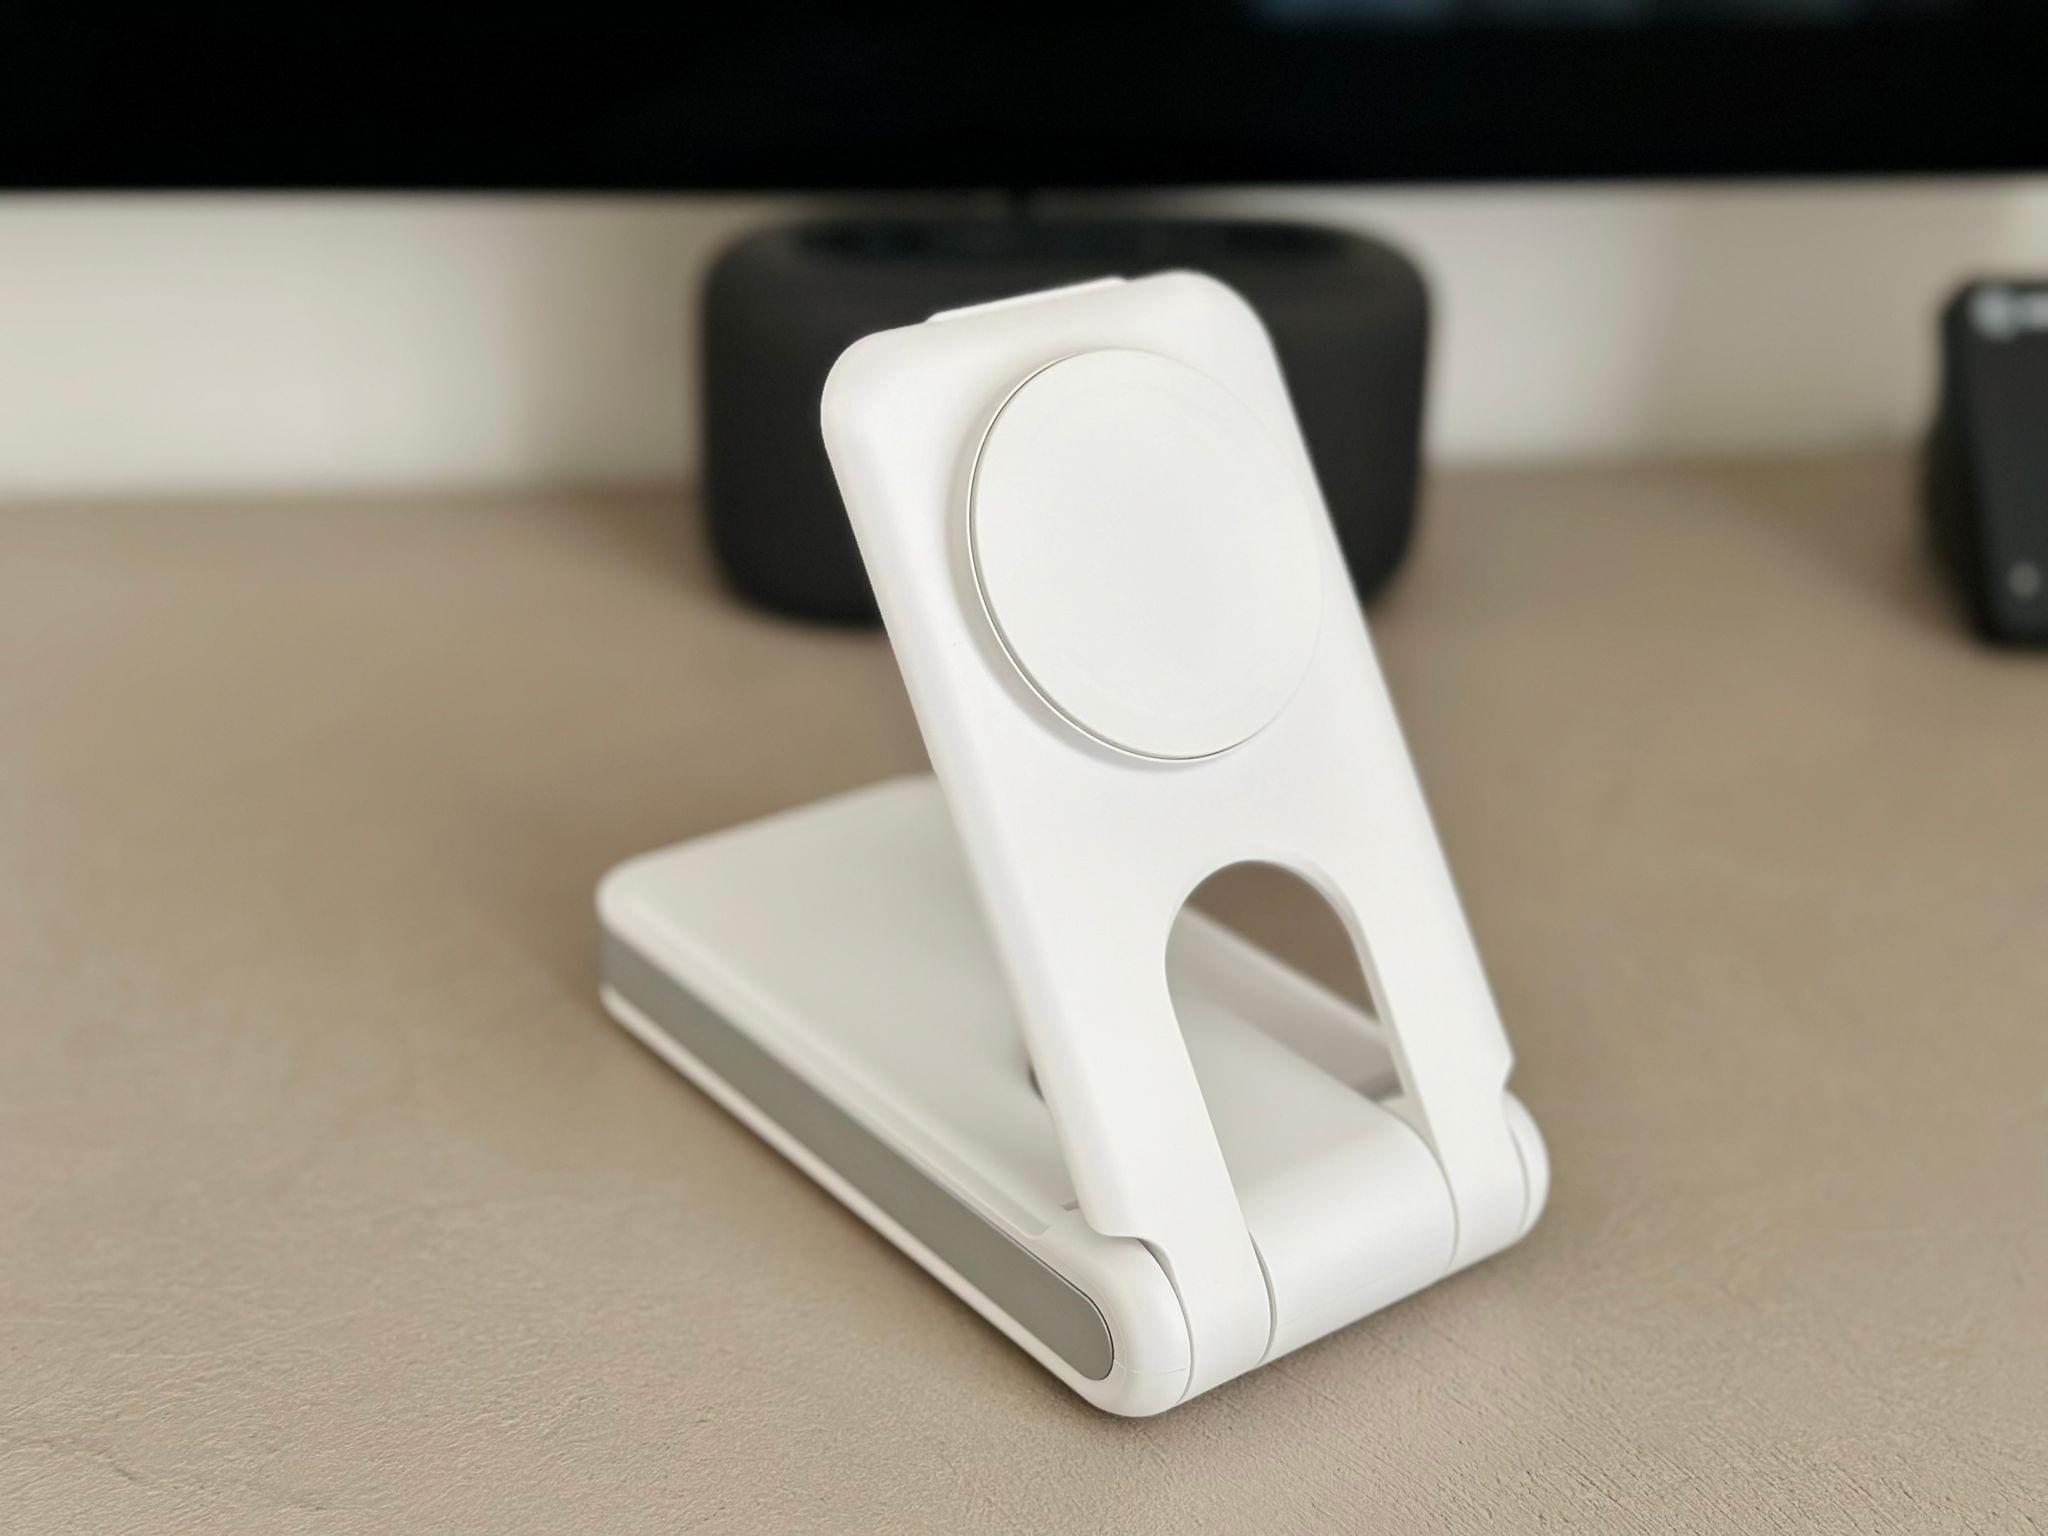
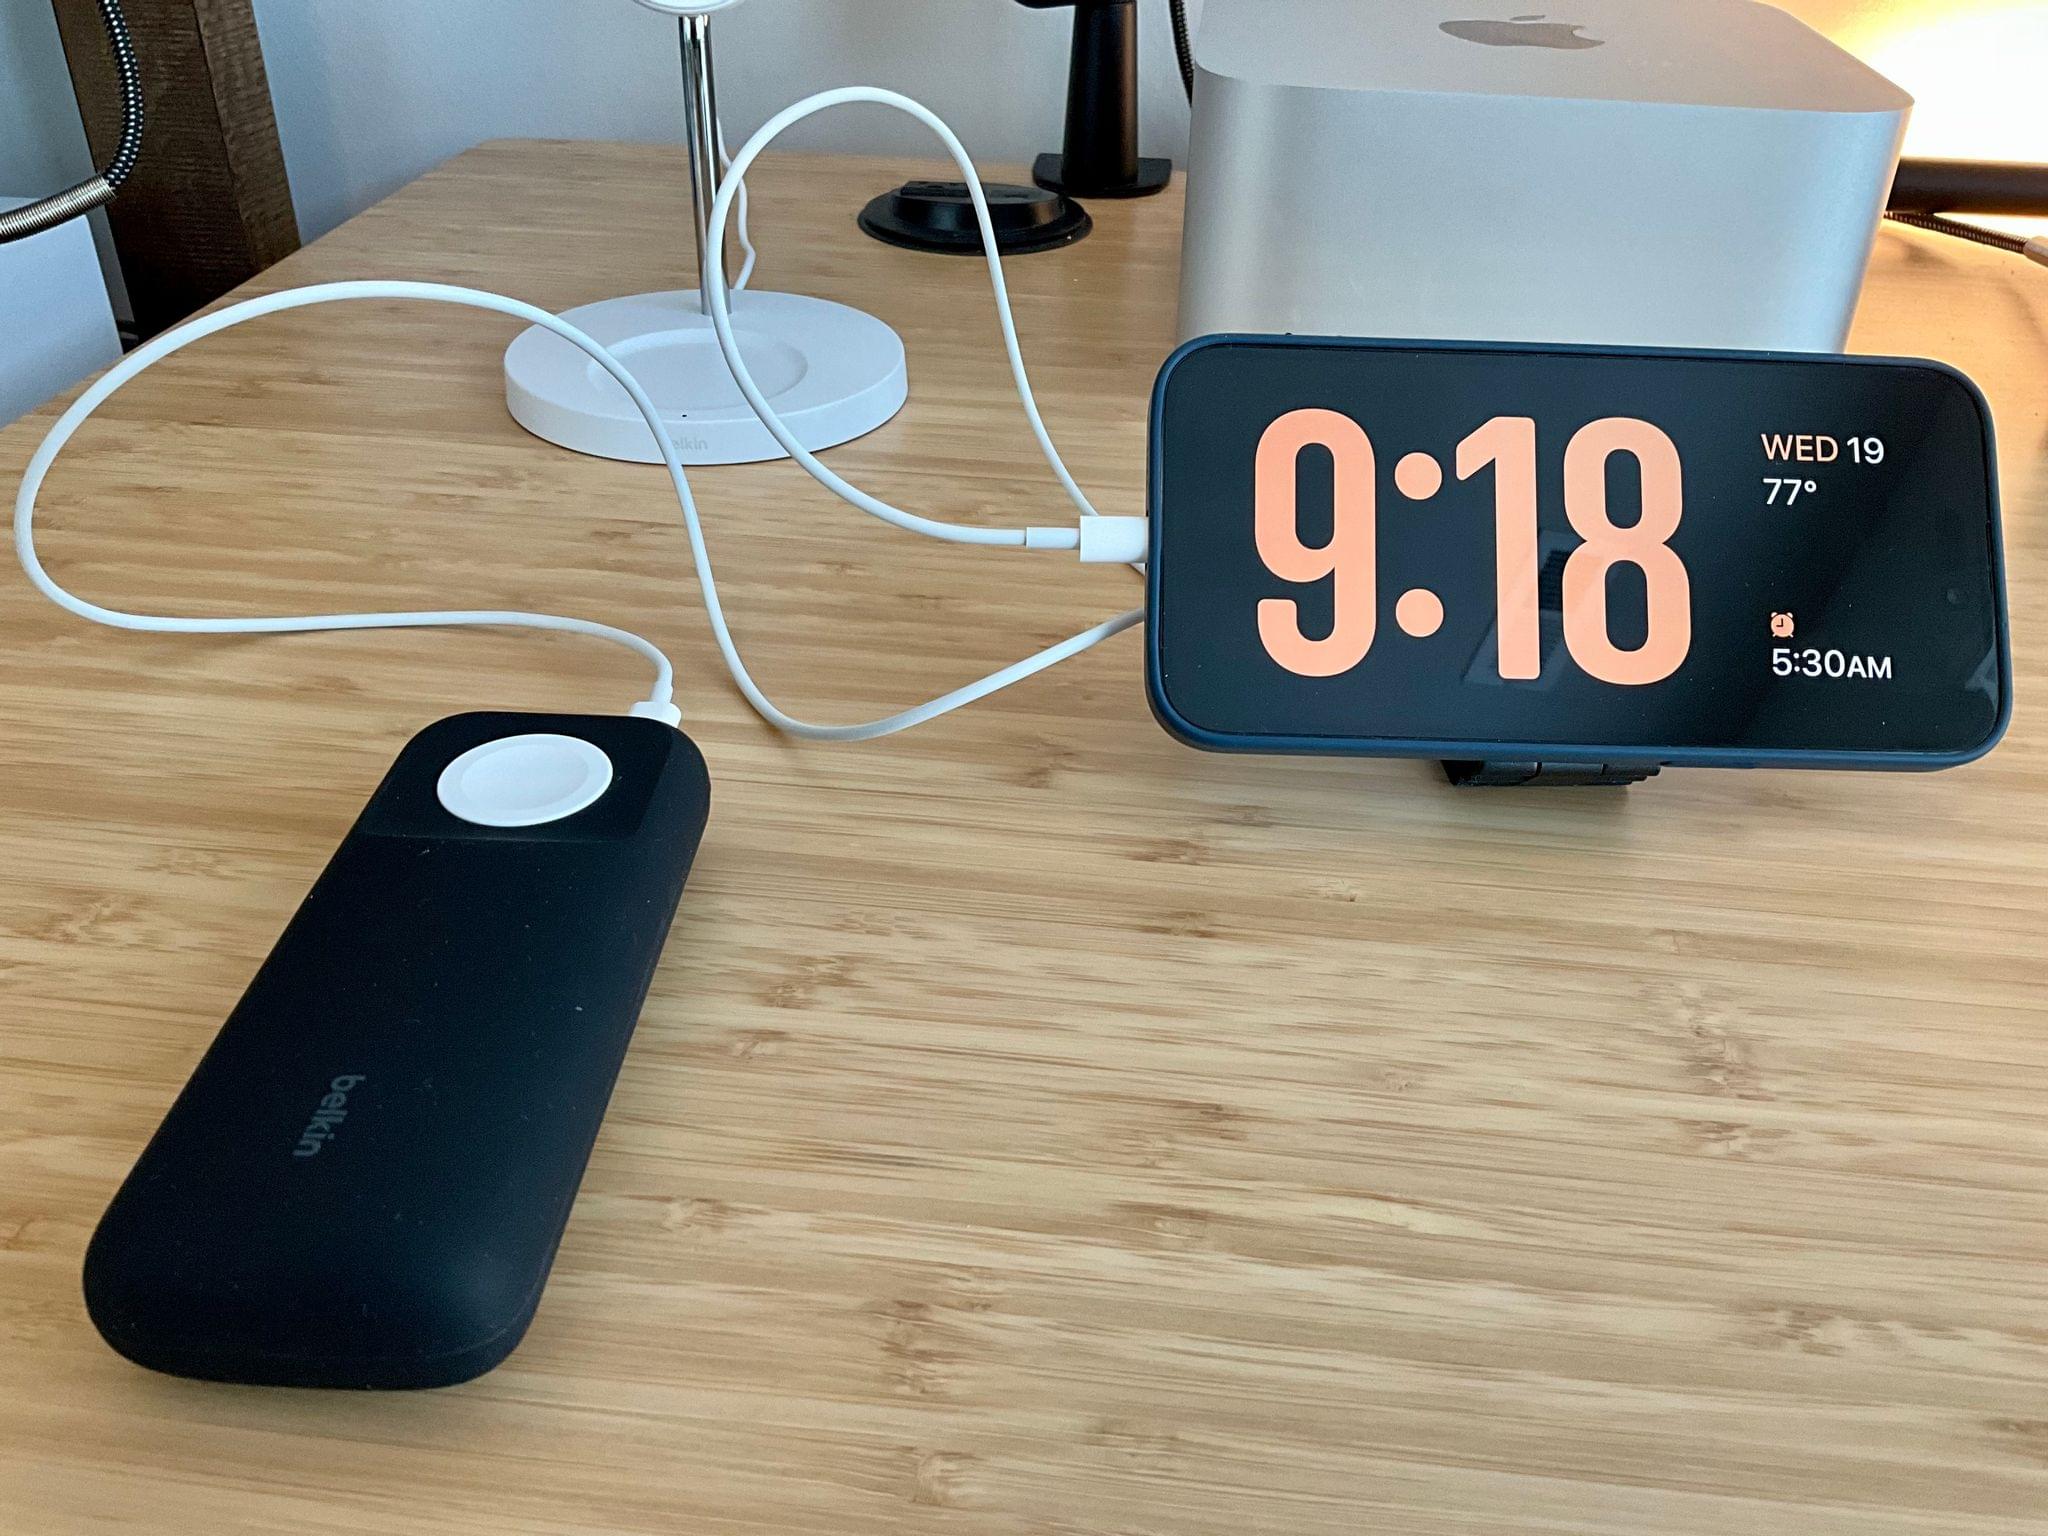
Ugreen 10,000mAh MagSafe Wireless Power Station
The best portable StandBy solution that I’ve found so far is the Ugreen 10,000mAh MagSafe Wireless Power Station. Unlike the Otterbox case Federico recommends, it’s not MagSafe-certified, which means it won’t be able to take advantage of the MagSafe memory feature Federico mentions. However, it’s also the same size battery and currently about one-third the price of the Otterbox battery pack on Amazon’s US store.
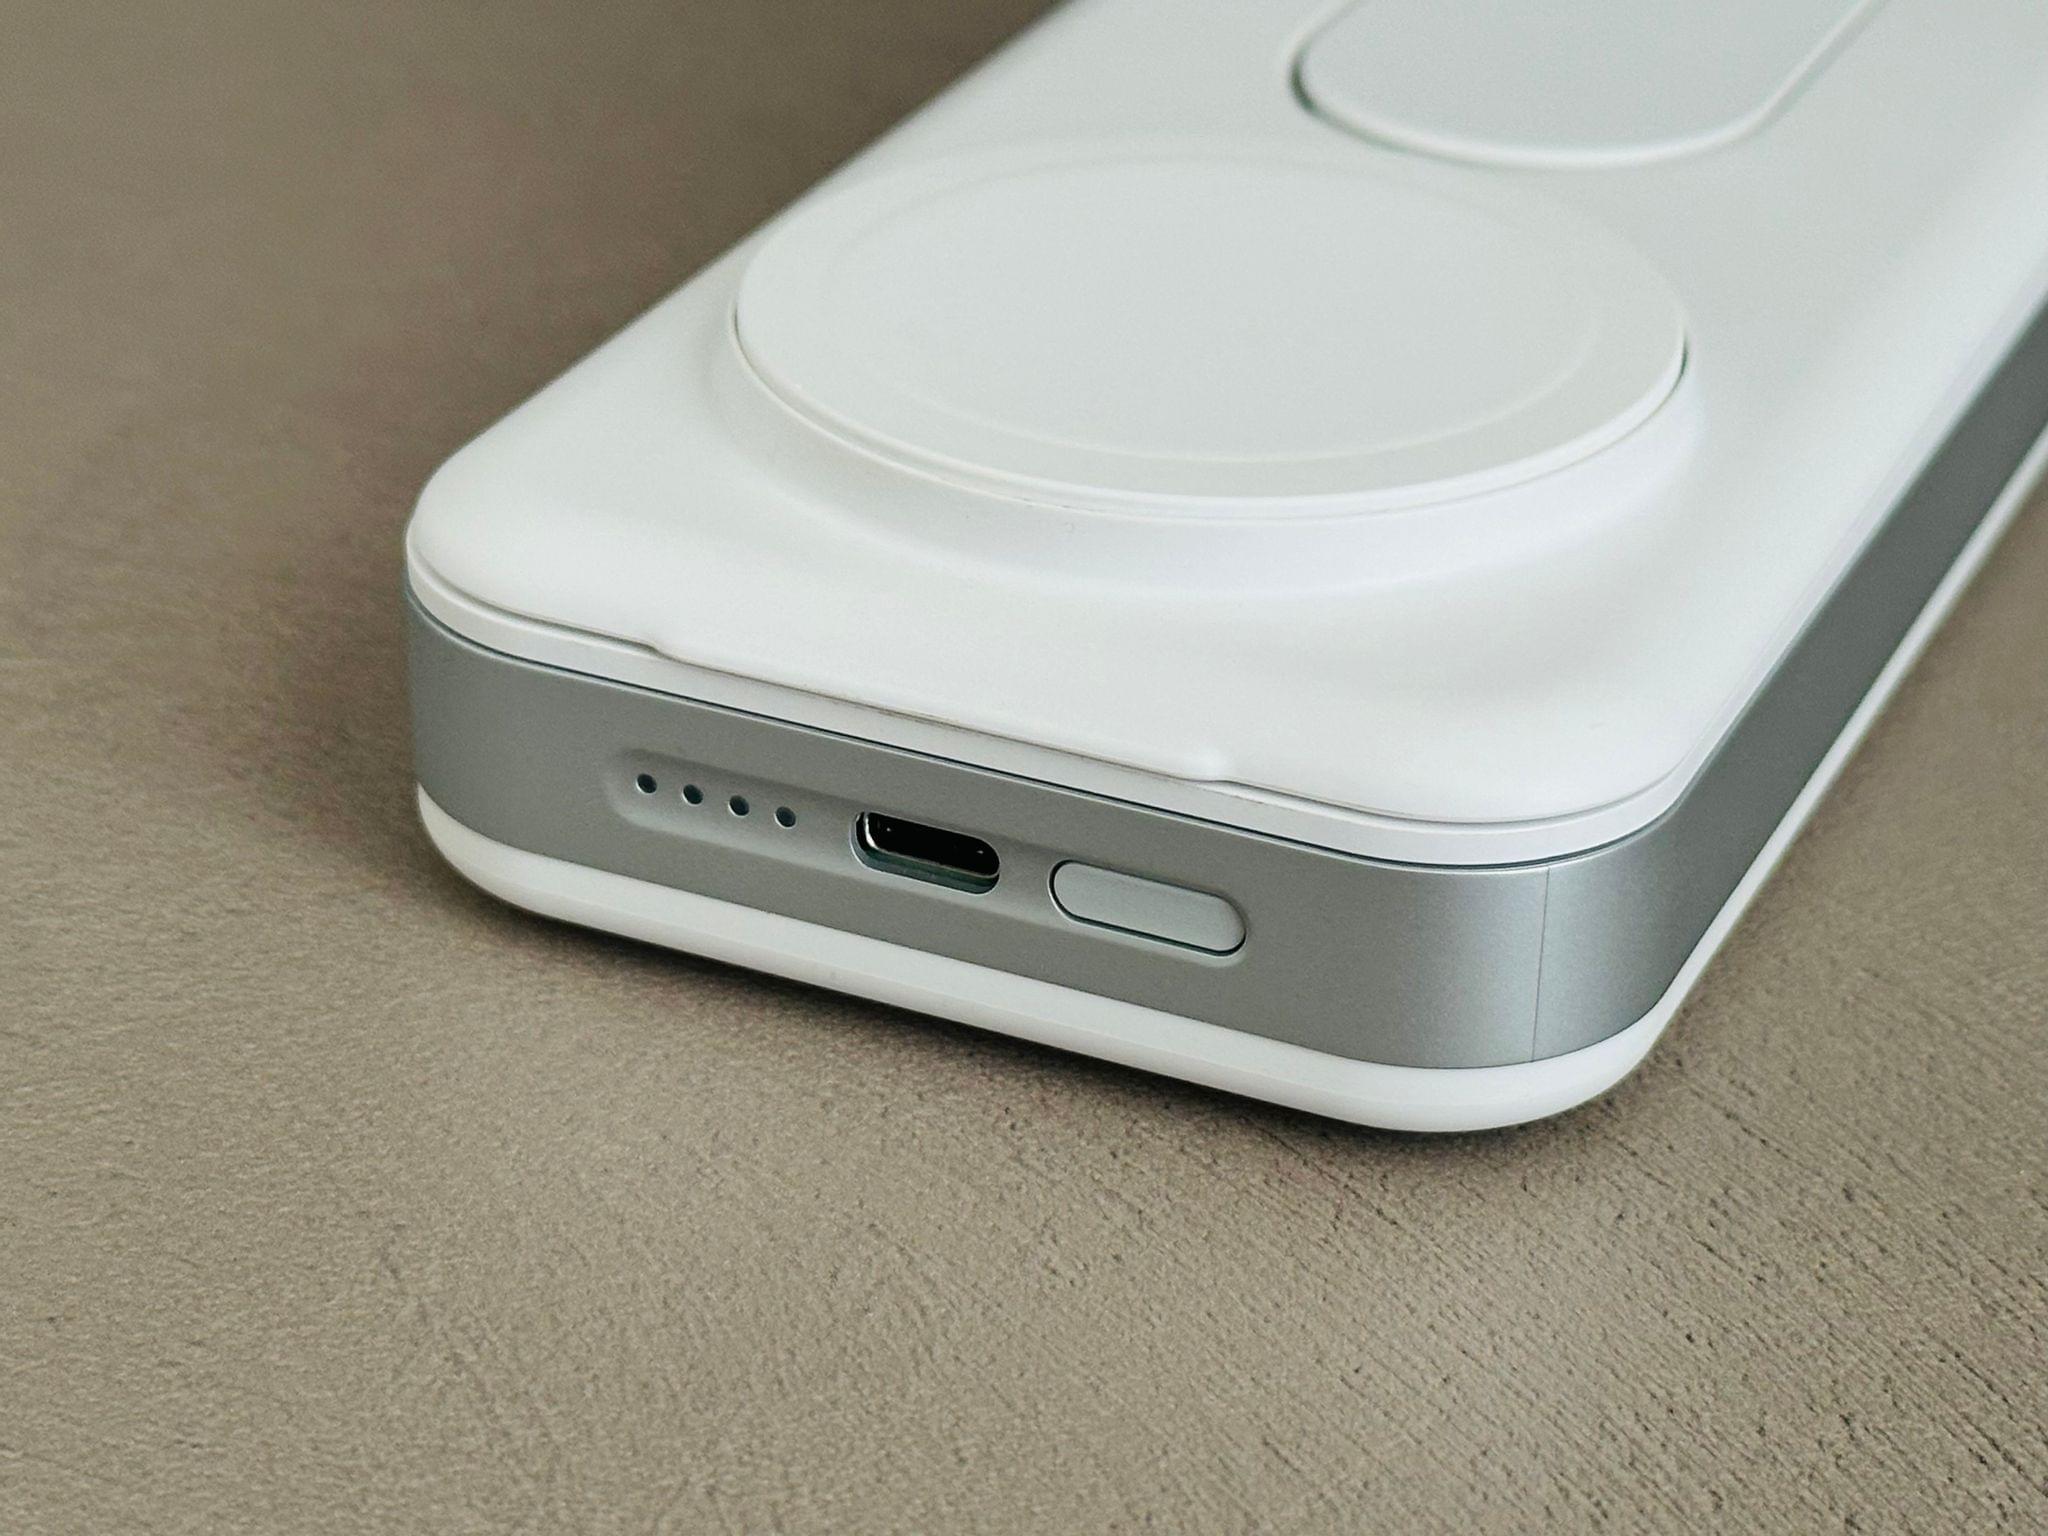
Ugreen’s battery pack is a 10,000mAh battery with one USB-A and one USB-C port, plus MagSafe. That’s a good-sized battery without being too heavy, making it one that I don’t mind carrying around in my backpack. In MagSafe mode, the battery works just like Apple’s battery pack, but it’s significantly thicker, making the combination with your iPhone heavy and awkward even in bigger pockets, so I don’t recommend using it that way.
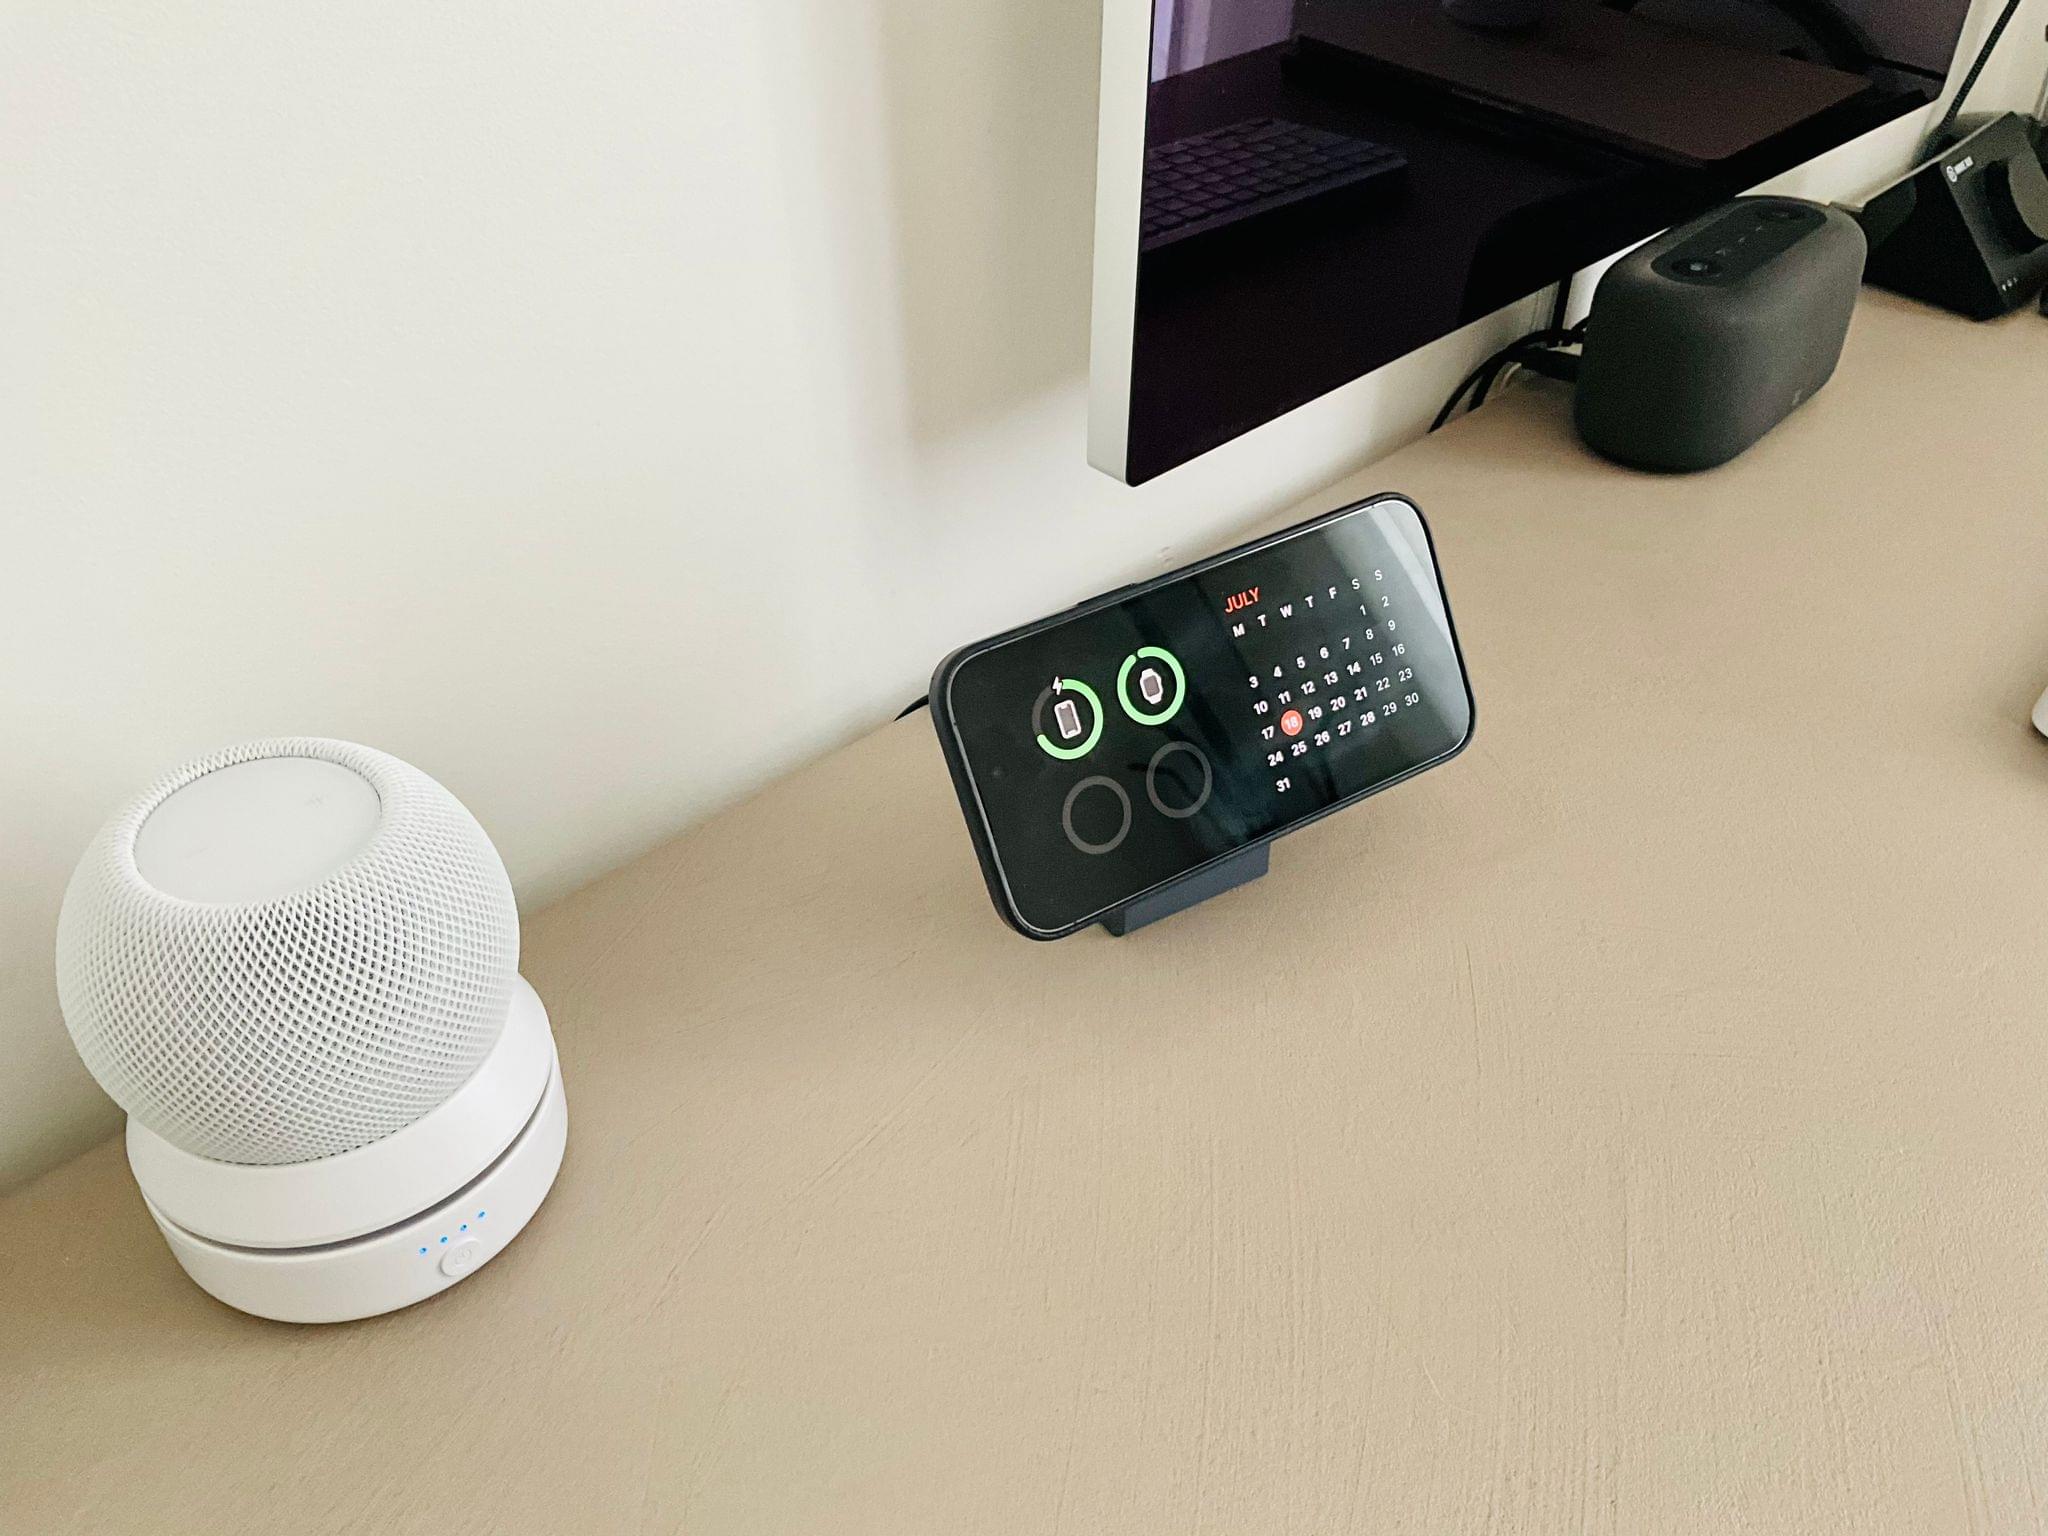
The secret sauce of this battery pack is a little kickstand on the back that lets you prop up your iPhone in landscape mode for StandBy. With no power cord or charging cable needed, the Ugreen battery is perfect for sitting anywhere that a wall outlet isn’t available or when you just don’t want to deal with the clutter of cables. I’ve been using this solution primarily for sitting outside, working on my balcony at home, and in the kitchen as I cook. I’ve also used it traveling as my travel alarm clock.
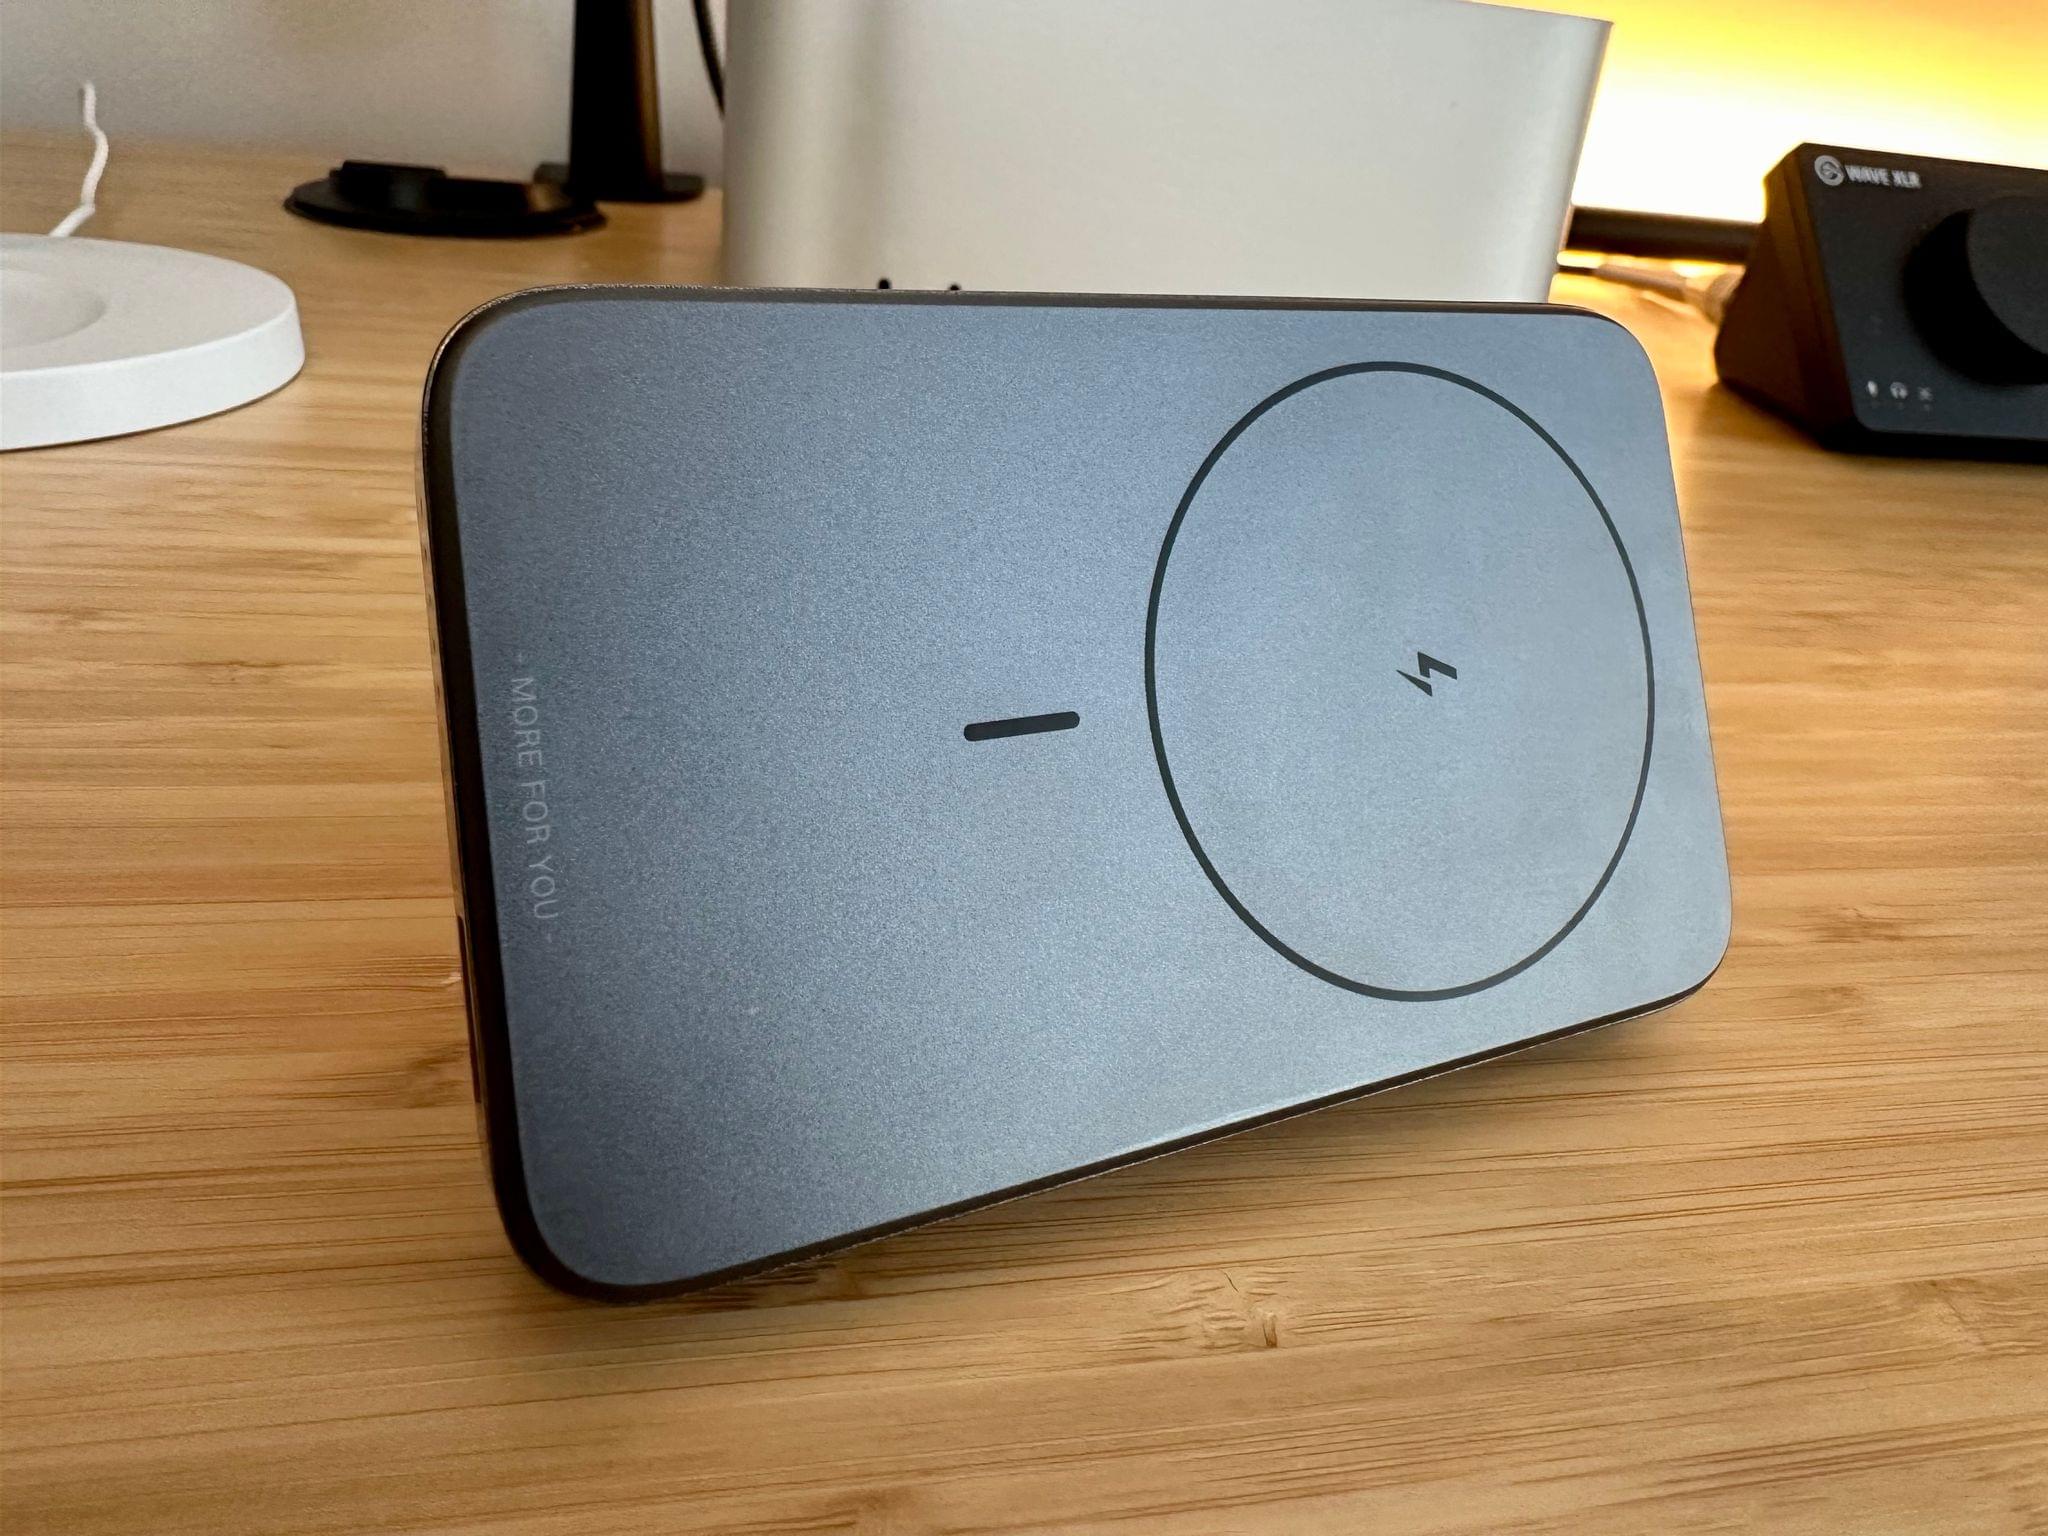
Honorable Mention: Belkin’s iPhone Mount with MagSafe for Mac Desktops and Displays
StandBy works whether your iPhone is charging via MagSafe or a Lightning cable. So, one of the first portable solutions I tried was Belkin’s Continuity Camera adapter, which works with external displays. I connected my iPhone to the adapter, which also works well as a horizontally oriented stand. That by itself doesn’t work to trigger StandBy, but once I started charging my iPhone with a Lightning cable, StandBy kicked in, and I was good to go. Pairing this setup with a Lightning cable and battery pack makes a nice portable setup on a nightstand because it doesn’t take up much space. It’s also a good solution for traveling because the Belkin adapter doesn’t take up much space, and you’re probably already going to be traveling with a Lightning cable and perhaps a battery pack, too.
One of the things I like most about StandBy is the way it takes inspiration from Home Screen widgets as well as watchOS. The combination provides an excellent passive experience at a distance that’s genuinely useful but not intrusive. I expect with the addition of third-party widgets, the experience will be even better, integrating the iPhone into more aspects of your day than ever.
You can also follow our 2023 Summer OS Preview Series through our dedicated hub or subscribe to its RSS feed.