Released by a small team of indies in December 2014, Workflow reinvented iOS automation. Combining an interface reminiscent of Apple’s Automator for OS X with easy access to native iOS features such as Safari, the photo library, and iOS 8 extensions, Workflow promised to make automating tasks on an iPhone and iPad a simple and pleasant affair. The results spoke for themselves: Apple selected Workflow as Editor’s Choice, the app trended for weeks in the App Store’s Top Charts, and thousands of users released interesting and useful workflows in various online communities. MacStories readers may remember that Workflow was my iPad app of the year.
Workflow is one of those few apps that have dramatically changed how I work on my iPad. For me, the point of using Workflow isn’t to put together chains of actions to show off the app’s power – I just want to save time I can spend doing something else. While I have fun experimenting with Workflow and understanding its capabilities, ultimately the app just sits there in the background, waiting for me to call a series of actions I need. I love Workflow the most when it’s summoned for those two seconds and it does something magic that would have normally required minutes of manual interaction. Things like appending links to Evernote, converting spreadsheets to Markdown tables, or adding text to the clipboard.
Workflow fits my routine like a glove. I’ve used it every day to automate aspects of my work that speed up how I write and communicate on my iOS devices. And with Workflow 1.1, released today on the App Store, its developers are further expanding the app’s capabilities with powerful new functionality that includes filtering, better conditionals and image manipulation, URL expansion and deeper calendar access, and even the ability to open multiple links at once in a web browser.
Version 1.1 of Workflow includes over 50 new actions and dozens of fixes, improvements, and changes to existing actions. Core parts of the app have been revised for a faster experience and the foundation laid with the Content Graph has started to pay off with the addition of metadata and filters. Because I’ve been playing around with Workflow 1.1 since the app’s original release two months ago, I’m going to offer some practical examples with a high-level overview of the changes.
UI Improvements
Workflow’s interface has largely stayed the same, but there are some refinements and additions worth noting:
- You can quickly run workflows by double-tapping them;
- You can duplicate workflows;
- There’s a confirmation dialog the first time your run a workflow downloaded from the web;
- Downloading a workflow with the same name of an existing one no longer overrides it;
- You can now use your own images for Home screen icons.
I particularly appreciate the quick-run shortcut as it means less tapping around the app, and I’m grateful for the ability to duplicate workflows. That comes in handy when I want to have similiar workflows but don’t want to bother recreating one from scratch or exporting it to reimport it later.
I still think that the developers should consider ways to run Workflows from the action extension without showing the flow of actions every time (double-tap or tap & hold in the share sheet maybe?), but, overall, the UI/UX fixes in this version are smart and they pave the way for the true core of version 1.1: new actions and filters.
Long URLs, Safari Selections, and Textshots
Safari is one of my most used apps on my iOS devices, and I also spend a good amount of time on Twitter, Pocket, and NewsBlur. I deal with a lot of URLs on a daily basis, which means I’m happy to see an Expand URL action in Workflow 1.1.
Before 1.1, I had created an action to turn shortened links into unfurled ones using LongURL. I don’t like it when I’m forced to share a shortened link to a webpage I want others to read and reference, which is why I setup the workflow to expand links for Pocket, Nuzzel, and other apps. With Expand URL, I can drop a single action into my workflows and throw away all the steps required to expand links manually. Expand URL can follow multiple redirects, and, in my tests, it worked perfectly for links shared from a variety of iOS apps.
In addition, Workflow 1.1 introduces the ability to pass selections from Safari to the app’s action extension. One of the most glaring omissions in version 1.0, the ability to select text from Safari and use it contextually to the native share sheet as text or HTML further increases the scope of the app and how it can be used to automate web tasks – and I’m taking advantage of it in a useful way.

I used to have a workflow to expand URLs and share real links from Pocket and Nuzzel. Thanks to Workflow 1.1, I have enhanced that workflow to:
- Use a selection from Safari if present, enclosing it in double quotes;
- Use a selection from Pocket/Instapaper if present;
- Always expand links thanks to Expand URL;
- Support textshots with built-in cropping.
This new workflow lets me always share expanded links and quotes no matter the app I’m using. I find it particularly handy in Pocket, as I can share a link or a link plus a quote if I trigger the workflow from the copy & paste menu (same for Instapaper).

Also, I realize that text is better shared as actual text, but I find the so-called textshots to be useful and informative. Twitter isn’t using Cards to provide summaries of web articles (they’re just snippet previews with no user control over what gets previewed) and the practice of using textshots leverages Twitter’s timeline design to fake rich text previews that you can create.
Following an exchange with MG Siegler a while back, I settled on a specific textshot style: sans-serif text with a sepia background pulled from Pocket. The idea of using the app’s sepia theme for these came from MG, who noticed that yellow screenshots had more contrast in Twitter’s native apps.

With Workflow 1.1, I can have a single workflow that unifies Safari selections, third-party apps, expanding URLs, and attaching screenshots to tweets. I don’t even have to leave the app I’m using: I can take a screenshot, pick it directly from the Workflow extension, edit it with the built-in crop tool, and send the resulting text, link, and picture to Twitter (and any other iOS app) via the share sheet. I use this workflow several times each day and I’ve reused many of its components elsewhere in my workflow library.
You can download it here.
Append Links to Evernote
Another existing workflow that benefited from the Expand URL action is my Append to Evernote one.
Every day, I add links to Evernote notes that I keep for Virtual and MacStories Weekly. Each week, I go through these notes, reopen all the links to double-check them, and I move them to other documents we keep for the podcast and our newsletter. Then, I wipe the notes and start over, saving new links in them.
As you can imagine, I don’t like it when Pocket or NewsBlur append shortened links to my notes. I want to see the full domains in there (useful to, say, know if I’m linking to the same source too much at a glance) and Expand URL lets me quickly resolve URLs and use them in Evernote (appending text to a note is also visibly faster in Workflow 1.1).
You can download the workflow here.
App Store Affiliate Links
Expand URL can also be used to obtain unfurled links from unusual suspects, such as the App Store.
I often want to share affiliate links on MacStories and Twitter and, ideally, I’d like to do so directly from the App Store app, which I already use to browse new releases and updates. While I have a solution in Python, getting links from an API isn’t the most convenient (or visual) way to browse results.
With Workflow 1.1, I can hit share from the App Store, choose my workflow, and let the app expand the appsto.re short link into a proper itunes.apple.com link for the selected item. Then, using a variable and a list (that you’ll have to modify to your needs), I can construct an affiliate link with my token and campaign parameter.

I could have used my Python script to grab results from the iTunes API and the output would have been impeccable. With Workflow, I can achieve the same results from the App Store, which lets me see screenshots, changelogs, and other app information.
You can download the workflow here.
Open Multiple Links at Once
Here’s where things start being amazing (and crazy): Workflow can open multiple links at once in Safari and Chrome – multiple tabs, all at once.
iOS apps can’t normally do this, and I was curious to know how the Workflow team managed to pull it off. With the same Open URL action that you’re already using to open links in Safari, you can pass a list of URLs to the browser and watch as multiple tabs will be opened in front of you. But how?
It turns out, there’s a trick involved. To open multiple links at once, you’ll have to tap a button in a middle step that will launch a special webpage in Safari/Chrome. This webpage (its address begins with ‘data:text’) contains the information of multiple URLs and you’ll have to confirm the action by tapping a large button in the middle of the screen.
This is a bit of a hack, but it works, and it’s faster than copying and pasting URLs, especially if you have a dozen of them. This works particularly well for my Append to Evernote workflow: when I need to recall all the links I’ve saved, I can launch a workflow and the app will scan the specific note for links and it’ll open them all in Safari.
The same concept can be applied to my workflow for appending text to the system clipboard. Want to copy a bunch of links and have them open in Safari all at once? All it takes is two actions in Workflow 1.1 (Get Clipboard > Open URLs) and perhaps a shortcut in Launch Center Pro to speed things up even more.
You can download Open Evernote Links here and Open Links here.
Images from Safari Selections
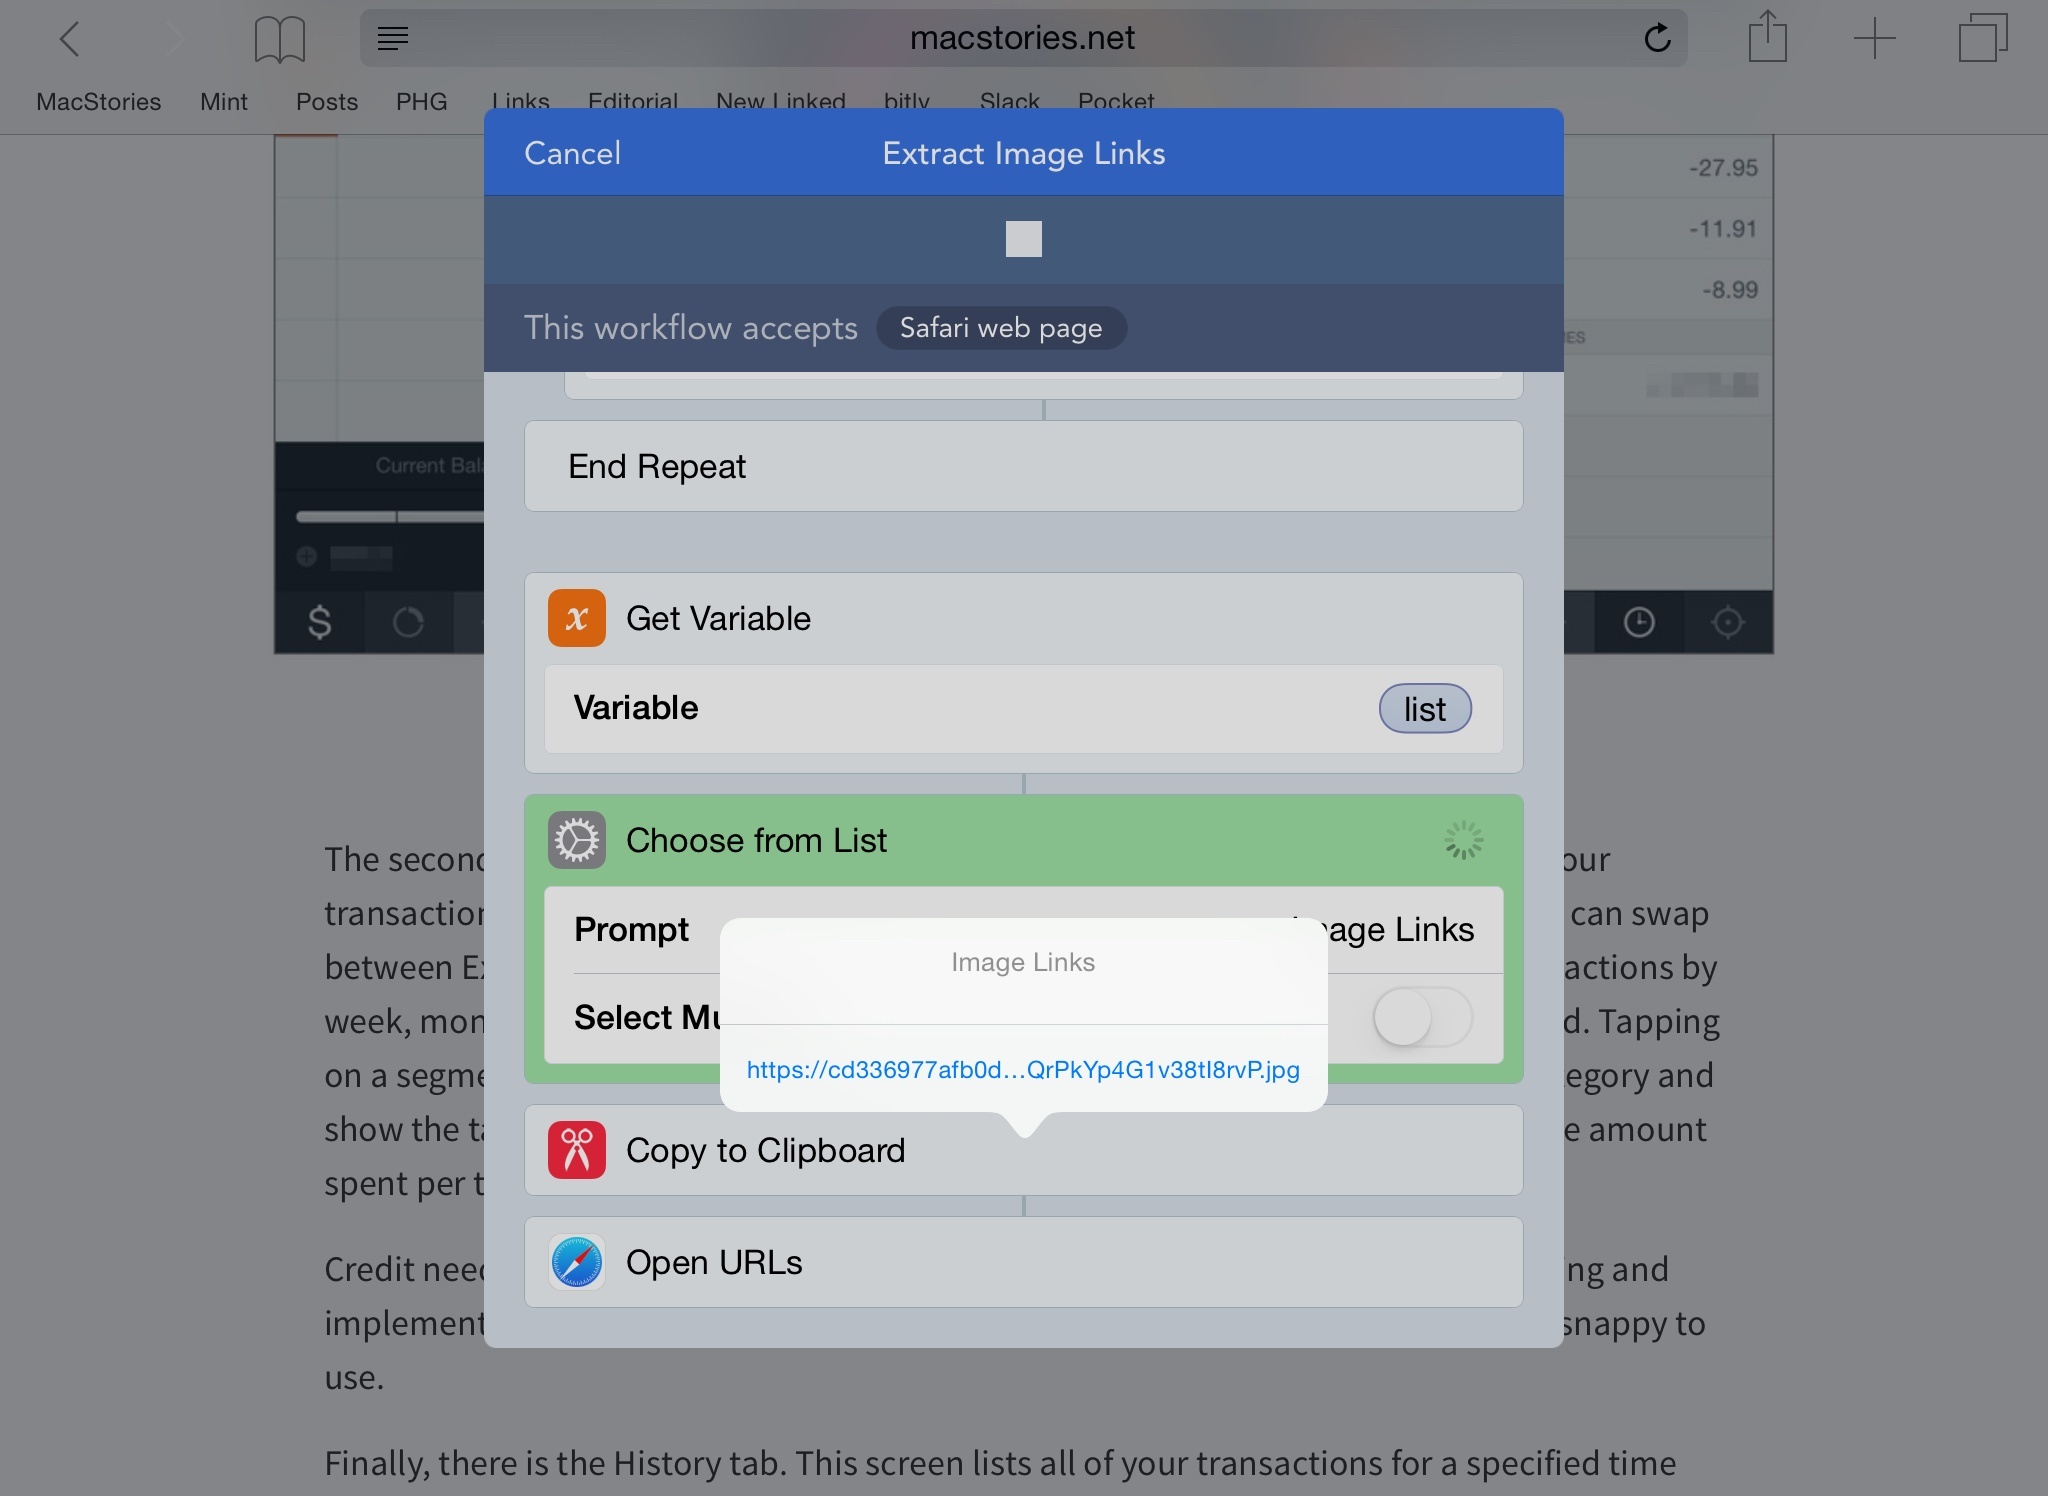
I often want to copy image URLs from a webpage in Safari, but sometimes the browser doesn’t let me get an image’s link. Given Workflow’s new Safari selection abilities, I created a workflow to get a selection from a webpage and find image URLs in it.
To parse Safari selections with Workflow, you’ll need to enable the action extension mode and make sure a workflow can accept Safari webpages as input. As I demonstrated with the Long URL workflow, you can also use the Get Type action on input passed to the extension and, if it’s returned as ‘Safari web page’, treat it accordingly. Workflow action extensions will interpret webpage selections as rich text, which you can convert to HTML for proper parsing with an action.
The workflow does exactly this: it gets a selection from Safari, turns it into HTML, then scans it for URLs that contain image extensions such as JPEG and PNG. The workflow removes duplicate links and then brings up a list where you can tap a link to copy it to the clipboard and open it in a new Safari tab for additional confirmation.
A similar take on this idea allows me to turn screenshots into smaller files I can use for featured posts (the ones you see at the top of this website). By accepting Safari selections as input, Workflow can perform a series of conversions through the Content Graph and use Get Images from Input to return image files from rich text.
At this point, I can use the updated Choose from List action to pick an image from multiple ones, resize it with a new Resize Image action, and preview it with Quick Look. From the preview window, I can upload it elsewhere with the built-in share sheet, which doesn’t require an action as it’s part of Quick Look itself. When I’m done uploading and I dismiss Quick Look, the workflow gets the newly created image link from the clipboard and opens it in a new tab.
You can download Extract Image Links here and Resize Safari Image here.
Search Pocket
Since I started using Pocket as my read-later app (again) late last year, I’ve enjoyed the ability to run full-text search queries with my Premium subscription. I often want to find articles I’ve read, and maybe I only remember a sentence or a name. Pocket search helps me find articles using what I remember from reading them rather than a specific set of parameters I may forget (such as title or author).
Workflow 1.1 has two new Pocket actions to add and retrieve articles. The latter has been useful in my case, as it contacts Pocket directly without forcing me to search in the Pocket app, which can be slow. Once authorized, Pocket will look for articles matching specific criteria in your account, and it’ll return results as article titles and URLs.

Combined with Launch Center Pro, I set up a workflow to search Pocket by typing a query, opening Workflow, and waiting for results to come back from my account. Workflow can look in your Archive and Unread lists as well as All articles; it can try to fetch a tag, run a text search, and you can also limit the number of results Workflow gets from Pocket. It would have been nice to sort results by parameters such as author name or publish date.
This workflow fits nicely with Launch Center Pro and it’s a good one to have if you’re a heavy Pocket user. Obviously, if multiple articles are returned by search, you’ll be able to select them and open them all in Safari or Chrome at once using the Open URL action. I often save multiple reviews for the same app or videogame in Pocket, and being able to retrieve them on the fly with Workflow and get all their real URLs in one place helps me reference them later in other places.
You can download the workflow here and associated Launch Center Pro action here.
Filtering: Crop and Combine iPhone Screenshots
One of the most powerful new features of Workflow 1.1 is filtering, which allows you to dive deep into the app’s Content Graph and access properties of files and other iOS features that weren’t previously exposed. If you’re making complex workflows that deal with a lot of variables and files, filtering alone opens hundreds of new possibilities for fine-tuned results and conditionals.
To properly understand filters (and searches, also based on the same system) let’s back up for a second and mention the Content Graph. From my original review:
For Workflow, Weinstein and team created ContentKit, a custom iOS framework that is capable of taking a collection of content items and intelligently coerce them into another format. The ContentKit framework powers the Content Graph, which is a “map” of how input from iOS features and apps is translated throughout workflow actions on the fly. The content transformations that Workflow does and that puts in the user’s control are based on a complex technology that allows Workflow to integrate apps and services that are seemingly unrelated, such as Maps and iBooks or Music and Twitter.
And:
Workflow’s Content Graph extends to every input type supported by the app – whether it’s a web link, plain text, a webpage, a song, a PDF, or a video. In theory, any action output can be turned into a compatible input for a subsequent action, creating combinations such as “turn webpage to PDF” or “choose photo, upload to Dropbox, get a public link, and share it”.
Workflow was already smarter than most iOS automation apps because it could understand file and data formats, coercing them to something different if necessary depending on actions used in a workflow. With filtering, the data types recognized by the app can now be refined according to specific properties, generating an output that matches criteria specified by the user.
Filtering photos is a good example of this, and I’m going to use it to illustrate the new workflow I made to crop, combine, and upload screenshots to MacStories.
For over a year now and for reasons that I’ve explained elsewhere, I’ve used a series of Python scripts to clean the status bars of my screenshots, combine multiple ones in a single image, and upload them to our CDN. The system is, I believe, as optimized as it could ever be, but results aren’t always perfect. With time, I’ve grown tired with the limitations caused by the status bar cleaning script (such as having to display an active WiFi connection) and I’ve considered whether simply cropping the status bar would put an end to my nitpicking. I’m still not completely sold on the idea of cutting the status bar from my screenshots, but my curiosity gave me a nice opportunity to test Workflow’s new filtering and editing tools.
Workflow has long been able to get screenshots from your photo library, outputting images that match the file format and size criteria of screenshots. With the new Filter Images action, however, you can go way beyond the simple “screenshot” type and make sure you get exactly the kind of screenshot you need. In my case, I want Workflow to only return iPhone 6 screenshots in portrait mode.
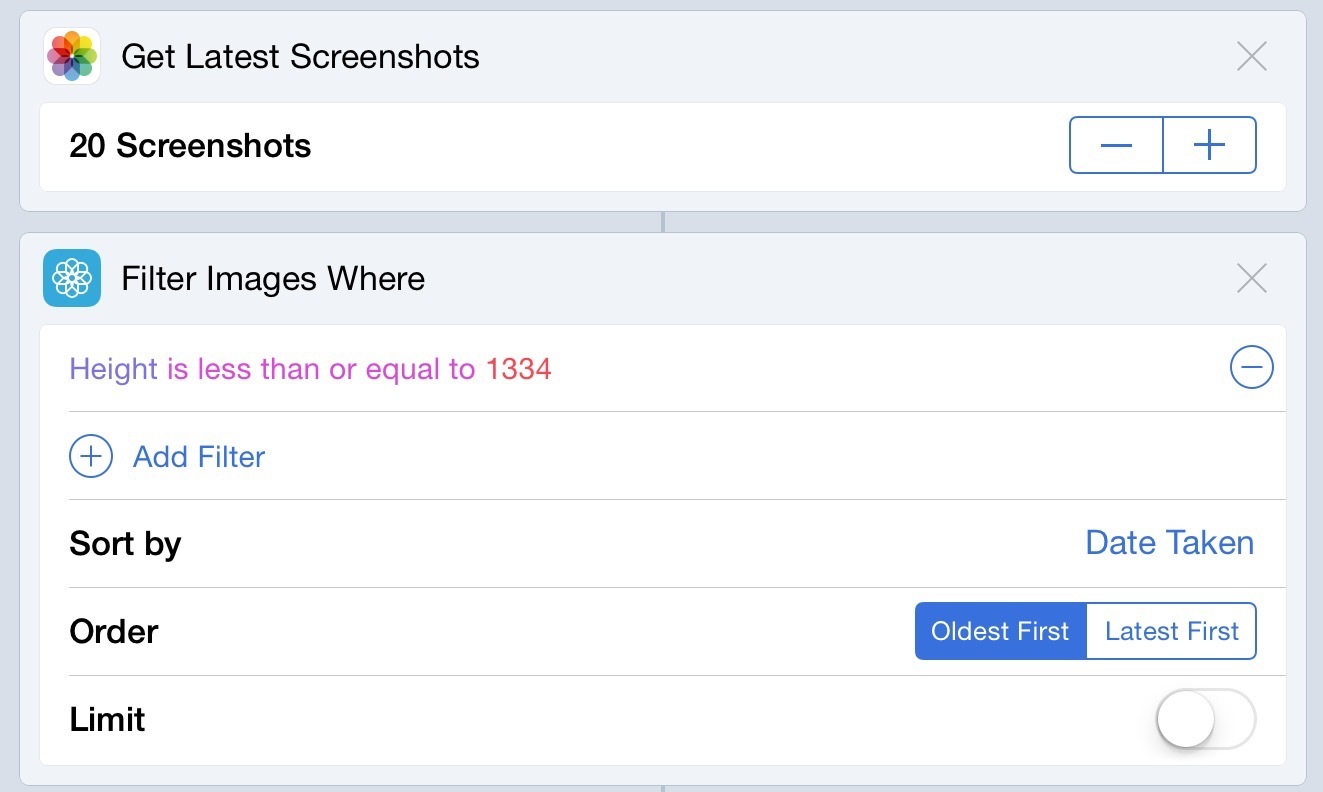
The Filter action places a series of optional conditions at your disposal that you can mix and match. You can ask Workflow to return images where height is greater than 1334 pixels, where orientation is up, where time taken is between 7 PM and 10 PM, and you can add as many filters as you want and say whether you want all or any of them to be true. There are dozens of filters available in Workflow 1.1 for a variety of data types, and the results they return can be sorted, ordered, and limited.
The customization enabled by filtering makes, in many ways, Workflow an entirely new app. What’s impressive isn’t necessarily what Workflow is able to natively retrieve on iOS – after all, the app could already access photos, music, etc. – but the depth and control in the user’s hands and how that can help people save time.
In version 1.0, for example, I could ask the app to show me screenshots, but I couldn’t specify “iPhone 6 screenshots”, so I was forced to pick them manually. Now, I can set up filters to find the kind of images I need, sort them, and even put them in a popover with useful thumbnails.
Because Workflow now understands metadata, you can also get details for individual files or data types after you’ve filtered them from a larger collection. In my workflow, I use a Get Details action, which lets me retrieve standalone bits of data such as location or time taken and that isn’t just available for images. Workflow can get details for locations (street, ZIP code, city, etc.), files, (file size, name, etc.), and even Music from a user’s library. The amount of metadata exposed by Workflow is huge and it’s no surprise that the developers took their time to bring it to the app in a way that made sense and was user-friendly.
In this case, I use Get Details to grab an image’s width and height values, which I then use to select a portion of an image I want to be cropped. This is another new action in the app: you can crop any image programmatically (that is, without interacting with an interface) by setting a position, coordinates, and width/height values. By using a custom position and removing 40 pixels from the top of an iPhone screenshot (where the status bar is), I can end up with a full-sized iPhone screenshot without a status bar. No scripting – just visual actions.
There’s more. For over two years, I used a script to combine images – i.e. putting two portrait screenshots side by side because I think they look better than a single screenshot in blog posts. Workflow 1.1 can do this with an action. Define a direction (vertical is also supported if you want to stitch multiple screens together), set a spacing, and multiple images will be combined into one. That’s another script replaced by a visual action that works the same way.

The rest of the workflow is unsurprising. After ending up with cropped and combined screenshots (both optional), I call the system share sheet to send the resulting image to Dropshare, which uploads it for me. Then, Workflow launches Pythonista, which sends my CDN URL to Kraken for further image optimization.
I won’t be deleting Python scripts from my iPad and iPhone any time soon, but Workflow is making a strong case for a new way to handle status bars and image combination. With filters and visual actions, I can enjoy more consistent output with less errors and faster results, which gives me time to do something else. But, even better, Workflow’s action extension allows me to edit and upload images directly from the Photos app, which I can’t do with Pythonista. The ability to select images from the app I always use to organize them is a huge plus, and I’ve been enjoying the integration of different parts that Workflow brings with the ease and convenience of visual actions.
You can download the workflow here.
Crop iPad Screenshots
This workflow is a modified version of the iPhone one. It looks for iPad screenshots in my photo library, crops them, and uploads them using the same system I described above.
Thanks to filtering, the workflow can look for images that are 2048 or 1536 pixels wide using the “any” parameter of the Filter Images action. This allows me to find screenshots taken both in portrait and landscape mode, even though the majority of screenshots on this site are in landscape. Once I’m done picking, I crop the status bar, upload, and watch as Workflow sends the output to Pythonista. Again, I can run this workflow from the Photos app through Workflow’s action extension.
You can download the workflow here.
Calendar Times and Location Filters
As I mentioned above, the ability to filter data types and files has been brought to several aspects of Workflow’s iOS integration, and that includes the Calendar. By accessing local calendars you’ve set up on your devices (such as iCloud and Google Calendar), Workflow will not only be able to return event information and lists of upcoming appointments, but also to filter Calendar data according to calendar-specific parameters.
So, I built a workflow to know when I’m supposed to leave home and pick up my girlfriend at class. Obviously.

Through an action called Find Calendar Events, you can return a list of events from any configured calendar and apply filters to return a subset of events that match criteria defined in the action. You can use dates, event titles, locations, alarms, and other typical event metadata as filters for events you want Workflow to retrieve.
In my case, I want events that:
- Begin in the next 12 hours;
- Have my girlfriend’s school as the location;
- Are from my Personal calendar.
Furthermore, I want to sort them by start date and show them in a list. From this list, I want to pick one and I want the app to tell me in how many hours it is. I can do all this with no scripting and just a bunch of premade actions in Workflow 1.1.
The core of the workflow is a series of calculations to get the current date, get the date and time for a selected event, and compare the two to find how many hours are in between them. Fortunately, Workflow ships with new Date actions that allow you to get the current date, get a specified date, and even convert a date to different time formats such as short, medium, and relative.
To display a message like “Three hours from now at 8 PM”, I use a relative time format, which doesn’t require any additional calculations to pinpoint an event x hours or minutes from the current date and time. I like how the Workflow team brought date and calendar actions to the app and, even if some parts could have been explained better1, the integration is top notch and I keep imagining new uses and ways to mix actions for my Calendar and more.
As for this workflow, I added it to the Home screeen with a nice heart icon, so now I can quickly know when I’m supposed to leave and how much time I’ve got left for writing or cooking my girlfriend a nice dinner. Not bad for an automation app.
You can download the workflow here.
Photo Flashbacks
The last workflow I created for this article is another demonstration of filtering and a riff on one of Everpix’s most beloved features: photo flashbacks.
The idea behind photographic flashbacks (also explored by Timehop, Dropbox Carousel, Picturelife, and, most recently, Photo Flashback for iPhone) is that people like to compare the current day to the same day in the past through photos. I like to see how my life has changed over time, and photo flashbacks provide a visual, natural, and intimate way to observe our lives through the iPhone’s lens. And all this can be replicated with Workflow 1.1 using filtering and metadata.
The underlying principle is that you can filter photos based on date taken. Combine that with the ability to subtract an arbitrary amount of hours/days/years/etc. from the current date, and you end up with a way to tell the app what “a year ago” means in two actions. Furthermore, because the Adjust Date action supports adding and subtracting whatever you want from a date, you can even manually enter the amount of days you want to go back in time – normally I’d guess 365, but you can enter any other number. Or, just remove the Ask When Run token, set the action to 1 Year, and forget about it.
At this point, you can easily imagine how filtering photos works: you can find all photos where Date Taken matches the date calculation you performed and also add a “Photo is a not a screenshot filter” to make sure you only get photos from your library.
The workflow shows multiple photos from the same day if present, allowing you to pick one to view it with Quick Look. Additionally, the workflow will also try to fetch the photo’s location from its metadata and turn it into a Maps tile thanks to the Content Graph. This will let you remember the photo as well as where it was taken on a particular day – all without leaving the app or sharing your personal data with a web service because it’s all contained in the photo metadata exposed to Workflow.

The problem with this workflow is that results can be hit-or-miss if you use iCloud Photo Library. In my tests with 9 years of photos available in the Photos app, Workflow often didn’t see photos that I had previously downloaded (i.e. cached offline) from iCloud. My understanding is that the app needs better support for photos stored in iCloud – I don’t know if it’s possible for developers to implement this, but it’d be nice to ask Workflow to show me photos that have been downloaded, as well as look for any photo and then download its full-res version when I need it.
What I put together is a basic structure – you could connect this workflow with a daily reminder in Due to check your photo flashbacks, make it email your relatives or friends every day, fetch photos from specific albums, and more.
You can download the workflow here.
1.1
Version 1.1 of Workflow further solidifies its originality. There’s nothing else like it on iOS. The deep integration with iOS envisioned by the Workflow team was already unique with the app’s debut last year. Filtering takes it to a new level, enabling tons of new ideas and use cases.
In a few months (I first started testing Workflow in August 2014), Workflow has become an essential component of how I get work done on iOS. The improvements and features launched today extend the app’s capabilities deeper into native iOS frameworks – whether you want to find photos, filter files and calendar events, or save selections from Safari, Workflow is becoming a command center for iOS that can do anything. It’s powerful, and there are still a few issues to fix, but it’s useful, and, even better, it’s fun.
Workflow is the most exciting app I have on my iPhone and iPad. Version 1.1 is available on the App Store. You can read my original review here.
- Did you know that you can parse natural language dates with iOS’ built-in data detectors and Workflow 1.1? Or that you can combine variables and the Ask When Run token in the same field, useful to confirm the creation of new calendar events (which Workflow can also do now)? Or that, if you choose to create a new event in Workflow, you can have instant date validation as you type? Yes, more about this in a separate article. ↩