I think in outlines. When I was in law school, that’s how I was taught to break down legal issues and structure the enormous amount of information I needed to know to pass exams. Outlines became second nature – something I still use today to organize research, write longer articles, and organize projects.
I wish I had OmniOutliner when I was in law school. Those outlines grew as the semester wore on, adding complexity that made them harder to edit. Although the word processor I used could handle outlining, it wasn’t optimized for huge outlines the way OmniOutliner is.
Today, my outlining needs are much simpler. I’m not creating 100-page outlines. If an outline is more than a few pages long, it’s only because it’s full of detailed notes. More often than not, all I need is a quick indented list, with simple formatting, and the ability to reorder sections easily.
Perhaps the greatest strength of OmniOutliner 3 for iOS is that it can handle both scenarios. That’s because OmniOutliner 3 isn’t one app, it’s two: OmniOutliner Essentials and OmniOutliner Pro. Essentials includes all the tools you need for basic outlining, and Pro adds extensive customization options, section navigation, automation, and other features.
Outline Creation and Editing

When I’m outlining, the last thing I want to do is fight the tool I’m using. I want to get the ideas out of my head quickly and get them organized with as little friction as possible. Omni understands this and makes creating an outline dead simple, especially with a keyboard connected to an iPad.
To start, just type. Each time you hit return, a new row is created. To indent a row, tap the tab key on your keyboard or the one on the toolbar at the bottom of the screen. Outdenting works using Shift+Tab or another onscreen button. Best of all, to indent a row, it doesn’t matter if your cursor is at the beginning of a line, the middle, or the end (please take note Google Docs).
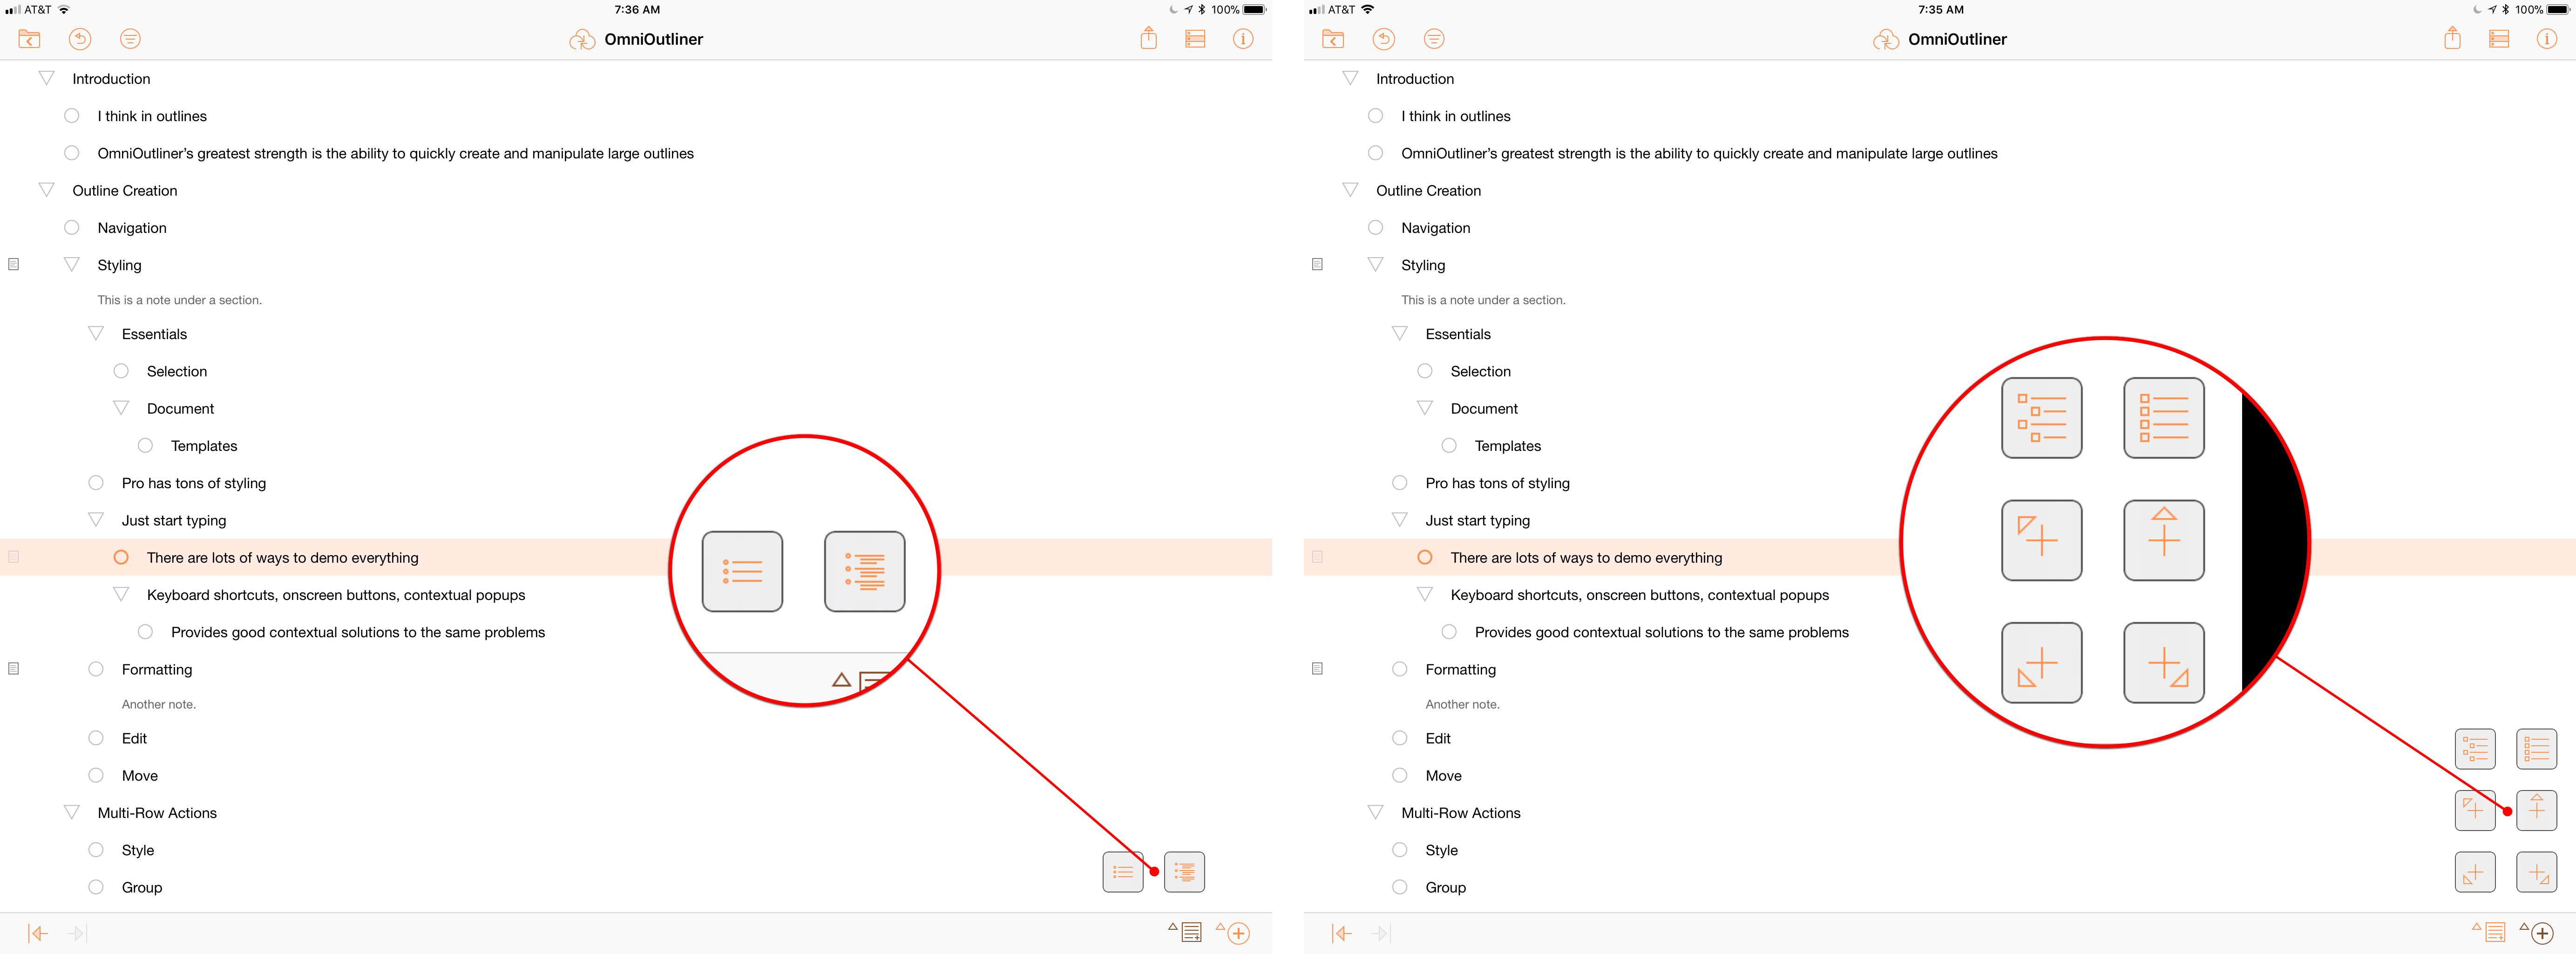
Showing and hiding outline notes with the Add Note button (left) and the six options available by long pressing the Add Row button (right).
Adding new rows can also be accomplished by tapping the plus button in the toolbar at the bottom of the screen to add rows above, below, indented, or outdented from the one that is currently selected. Next to the plus button is a button for adding notes to a section of your outline that doubles as a show/hide button for your notes when it’s long pressed.
Collapsing sections of an outline can be accomplished with the arrow keys on a keyboard or the disclosure triangles next to any line that has multiple sub-levels. There are also keyboard shortcuts for expanding or collapsing all sections of an outline at once.

Filtering is accessible from OmniOutliner’s toolbar or the Command+F keyboard shortcut. Unlike text editors that take you to the spot in a document where your search query occurs, OmniOutliner hides rows that don’t match your filter. It’s a fantastic way to view different sections of an outline simultaneously while editing.
As you can probably tell, Omni has put a real emphasis on keyboard shortcuts, which emphasizes that OmniOutliner is first and foremost an iPad app. There are around 90 keyboard shortcuts to accomplish nearly every task imaginable in the app from editing to navigation. Of course, there are also onscreen controls as well as contextual menus that appear when you select elements of an outline. That provides users with a lot of options to choose whatever works best depending on context and their preferences. However, it can also be a little intimidating at first, and discovering what works best for you takes a little patience and experimentation.

Styling
OmniOutliner Essentials includes a subset of the document and section-level styling found in the Pro version, which I cover below. Although modest in scope compared to the Pro version, I suspect there are more than enough formatting options in Essentials to cover the needs of most users.

The style inspector is accessible from the ‘i’ button in the top right-hand corner of the screen. At the document level Essentials includes controls for zooming in and out of your outline, which scales all of the text up or down at once. You can also toggle checkboxes on or off if you’d like to turn an outline into a checklist.

Essentials has 11 built-in themes, including three dark ones that also switch the app’s UI to a dark mode when applied. It’s easy to switch back and forth to try different themes, but I ran into a bug in the beta that displayed an alert that said ‘Recovery is disabled’ every time I switched themes on my iPad. The alert was easily dismissed by tapping cancel and didn’t seem to affect my outline in any way.
Individual rows can be styled with bold, italics, or underlined text. You can also pick from 6 heading styles and 3 text highlighting styles on a per-row basis.
Multi-Row Actions and Drag and Drop

OmniOutliner includes a multi-row selection mode that is toggled with a button on the right-hand side of the top toolbar. Selecting multiple items lets you style them all at once using the style inspector. You can also cut, copy, delete, group, and move multiple selections. Cut, copy, and delete do as you’d expect. Group takes each of the selected rows and moves them under a new blank row in your outline. The move command asks you to select the spot where you want to move the rows with the option of placing them above, below, or inside the row you pick.
OmniOutliner also support’s iOS 11’s drag and drop feature. You can drag and drop individual rows of an outline to reorder them or several rows. You can also drag and drop text between Essentials and other apps on an iPad or into other outlines. Pro adds the ability to drag and drop images and files into an outline.

Drag and drop works well in OmniOutliner overall. The only place I had an issue was sometimes it’s hard to drop a row at the end of an outline at the same level of indentation as the last row. When I tried, the row often ended up near the top of the outline instead.
OmniOutliner Pro-only Features
In addition to the features mentioned above, the Pro version offers several others that are unique to it.
Like OmniFocus and OmniGraffle, OmniOutliner now supports Omni Automation, Omni’s JavaScript-based scripting tool that works on iOS and macOS. OmniOutliner Pro includes a console for testing and running scripts as well as extensive documentation covering the dozens of classes available for scripting.

Navigation of long outlines is easier in Pro by virtue of a Section List that can be displayed on the left-hand side of the screen. You can pick one or more of the sections from the panel whether or not they are contiguous, and only those sections will be displayed in the main view in what Omni refers to as ‘focus mode.’ A status bar at the top of your outline serves as a reminder that only a portion of your outline is visible, which is nice because you can hide the Section List while focused on a subset of the sections of your outline. Tapping on the status notification gives you the option to exit focus mode.
The same left-hand panel also houses saved filters in OmniOutliner Pro. Filters are saved on a per-outline basis, which makes them useful for frequently run searches on a big outline, but it’s not a tool that can be used to find information in multiple outlines simultaneously.

Pro greatly expands styling choices too. You can add different lettering and numbering schemes to the levels of an outline, change the justification of each paragraph, pick from many different fonts, change the background color of an outline, and even create your own saved styles from combinations of the different formatting.
On a document level, there are more options too. Pro adds more themes, columns that make outlines feel more like spreadsheets,1 and the ability to tweak global formatting like the background color. Encryption can be added, and even the type of file can be adjusted so OmniOutliner works better with certain cloud services.
Document Management
OmniOutliner 3 uses a new file format. Older outlines can be converted to the new format, which has been in use on the Mac version of the app since OmniOutliner 5. The new file format works with both versions of the app, although in Essentials, Pro files are read-only unless you make a copy that strips out any Pro version features and formatting. There are no restrictions on using Essentials outlines in the Pro version.
Omni has its own sync service called OmniPresence that can sync outlines between iOS devices and the Mac. In my tests and based on my experience with other Omni apps, OmniPresence is fast and reliable. It does, however, complicate file navigation.
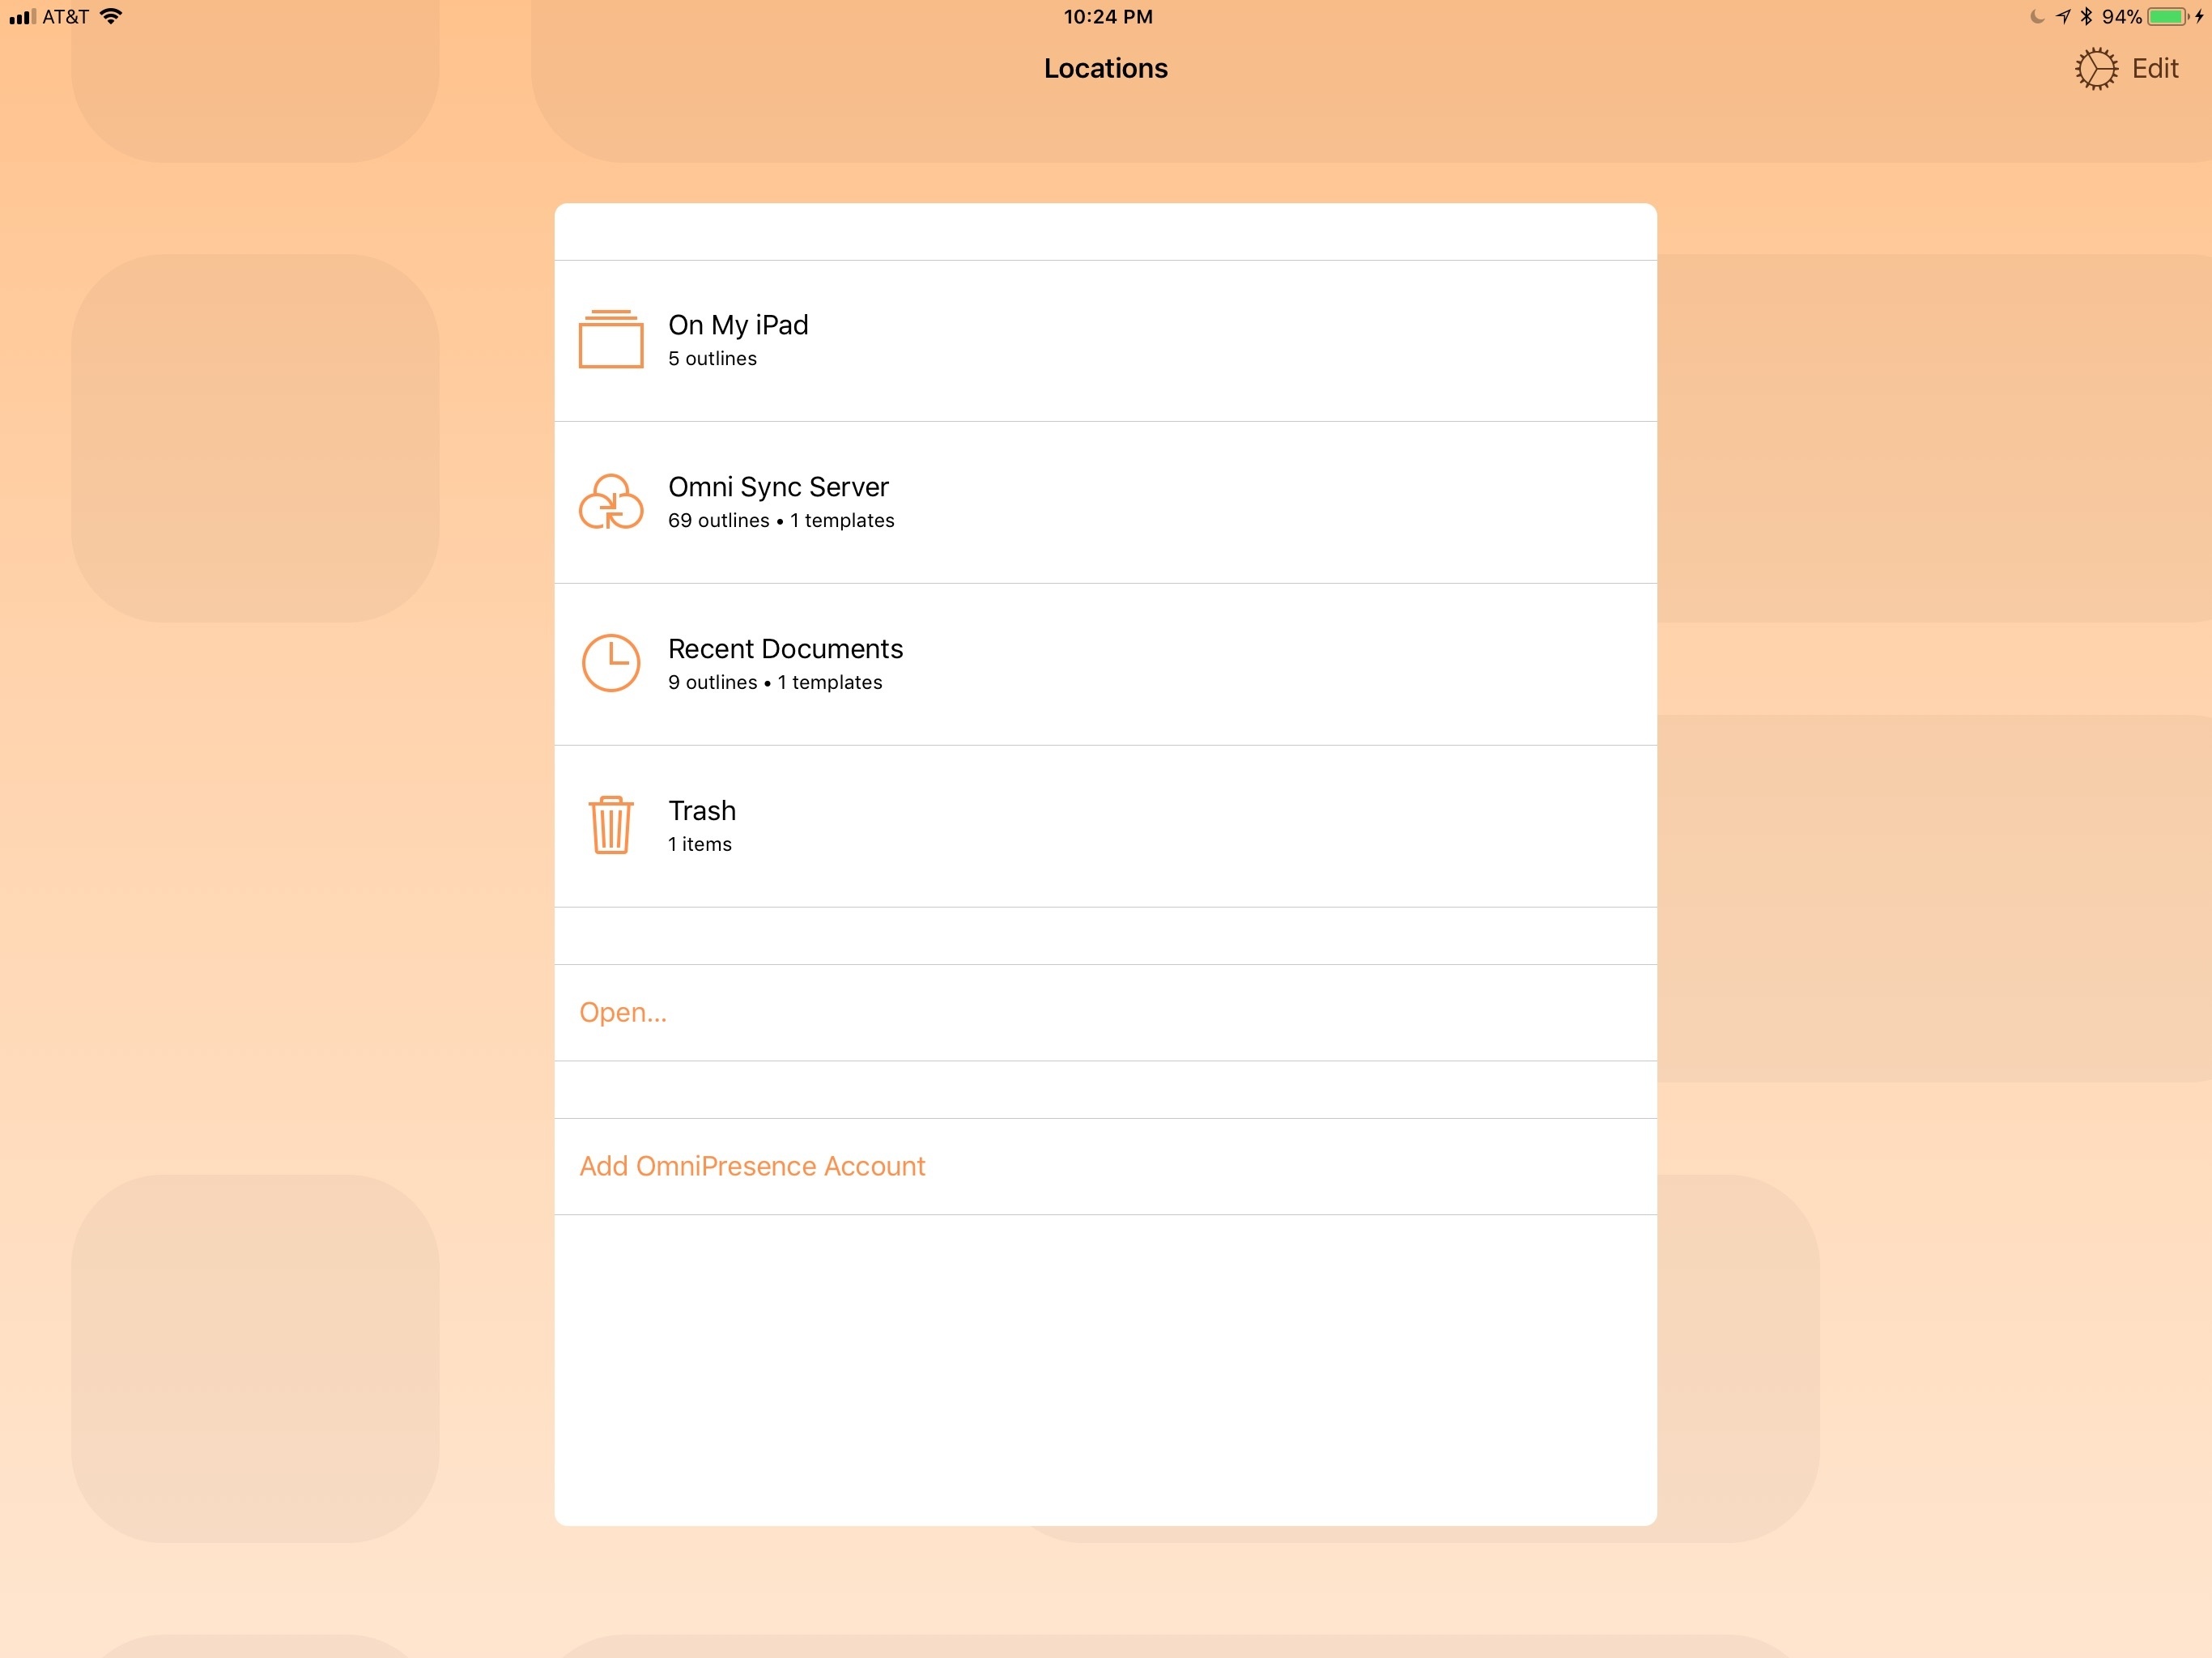
You can find your outlines in one of three places. ‘On My iPad/iPhone’ is local storage. Any outlines stored here won’t be available on other devices.
If you have an OmniPresence account, you can also save your outlines on the Omni Sync Server. Omni’s sync solution is not a file provider however, so documents stored on the Omni Sync Server cannot be accessed from Apple’s Files app.
To save to iCloud Drive or other locations that may be installed on your iOS device, you need to tap ‘Open…’ and navigate to where you want to store your outline. It’s an added layer of complexity that I’d rather not deal with but is probably necessary as long as Omni continues to offer its own sync option.
I ran into one bug moving outlines between iOS devices that I wasn’t able to reproduce consistently. After moving a file to iCloud Drive, I got an alert that told me it couldn’t be opened on another device because I didn’t have permission. The alert suggested that I choose File -> Get Info in Finder as though I was on a Mac.
OmniOutliner 3 on the iPhone

OmniOutliner includes all the same features on the iPhone but requires a popup menu for certain tools that don’t fit in the toolbar.
OmniOutliner started as an iPad-only app. In 2015, Omni made the app Universal, adding the iPhone version to the mix. The iPhone app includes all of the features as its iPad counterpart. If you need to work on an outline on an iPhone, OmniOutliner gets the job done, but it benefits greatly from the additional real estate of an iPad and the shortcuts that are available to keyboard users.
I ran into more bugs on the iPhone than I did on the iPad mostly revolving around the state of the UI after toggling filtering on and off. None of the bugs caused damage to my outlines and they were very hard to reproduce across different outlines, so your experience may differ. The bugs are worth mentioning though because if you run into them too, I was able to return the UI to the state I expected simply by closing and reopening the outline I was editing.
OmniOutliner is something more than just an outlining app. Calling it that is a little like calling a word processor a text editor. The difference lies in the extensive formatting and styling features that OmniOutliner offers. The Pro version is closer to a full-fledged word processor like Microsoft Word than it is to a text editor like Byword. That’s not an inherently good or bad thing, but it’s worth keeping in mind before you try OmniOutliner and instructive in deciding which version might fit your needs best.
I primarily use outlines as scratchpads. They’re a place to get ideas down and organized as I plan a project. I don’t often refer back to my outlines, and even when I do, I don’t mind if the outline is simple, unadorned text.
As a result, OmniOutliner Pro is not for me. Back when I was in school studying and revising outlines endlessly, I expect I would have chosen OmniOutliner Pro instead, but different jobs require different tools.
Today, I prefer Essentials. Even though it too has formatting and styling options that I rarely use, Essentials has all the outline creation and editing tools I need to effortlessly create an outline and move things around with little friction. The formatting options can be hidden away, which makes it the version I would recommend to anyone who’s primarily interested in using an outlining app to brainstorm and organize their thoughts.
For longer outlines where Pro’s section navigation panel would be handy or if you need to create polished outlines to share with others, Pro is a better option. It’s also the way to go if you know JavaScript and want to automate the outlining process.
Best of all though, you don’t need to choose either version in advance. You can download the 14-day free trial and switch between the two versions of OmniOutliner from the settings screen at will to decide for yourself which fits your needs best.
OmniOutliner is available on the App Store as a free download. After the 14-day free trial expires, Essentials is $9.99, and Pro is $39.99. Existing users of each version can get the same version for 50% off.
- In fact, Pro can export outlines to Excel. ↩