I’ve been using 1Password since January of 2008, which means that I have a lot of passwords and other bits of secure information stored in there.[1] Recently it started to feel like I had too much in there. Search results were cluttered with accounts that I no longer use, don’t use very often, or other information that I might need some day.
At first I went through and attempted to deactivate/delete accounts that I no longer use (i.e. the user forum for some piece of software that I used 3 years ago). Most often I found that the account could not be deleted unless I contacted someone, or the login information was no longer valid. The process was boring, time-consuming and frustrating. I found myself trying to guess if I might need something later. (Do I need to save the password for a friend’s WiFi login if I only see them once or twice a year? Couldn’t I just ask them for it again if I did need it? Do I need to keep a copy of my mother-in-law’s Gmail password in case she forgets it? Yes. Do I need to see it every time I search for “Google” in 1Password? No.) It is hard to know if I might ever need something again, and so I tended to err on the side of caution, meaning that I would keep things, even if I didn’t use them all that often. The end result was that I didn’t get rid of very much, and it still felt like I had more in my 1Password database than I really needed.
Archive Vault
That’s when I remembered 1Password’s “vaults” feature. This feature isn’t new (it has been around since version 4) but I had never used it. I had avoided it partially because I assumed it would be complicated to set up and a hassle to use; I was wrong on both counts. I read the Guide to Multiple Vaults support document from AgileBits and had a new vault working in a few seconds.
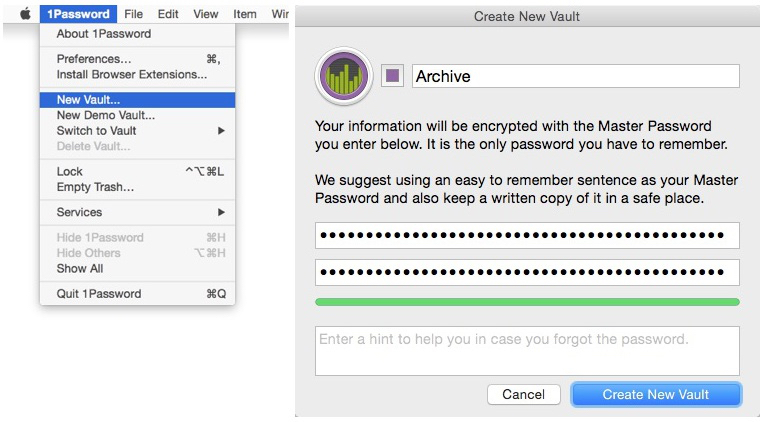
Once I had an archive vault (which I named “Archive” because I am süper creative), I could ask a completely different question. Instead of “Should I delete this and hope I never need it, or keep it and deal with it cluttering up my 1Password?” I only had to ask “Do I use this often?” That turned out to be a very easy question to answer, and since I was archiving instead of deleting, I knew that if I later realize that I guessed wrong, I can get it back very easily.
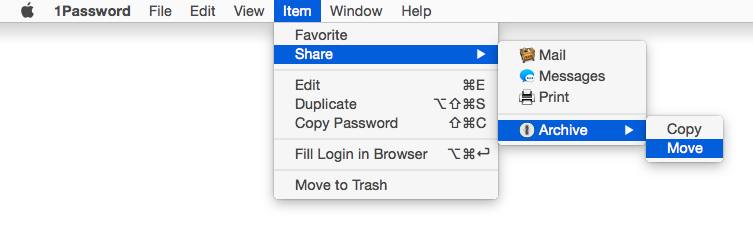
The only difficulty was that moving something to the archive required four mouse clicks: “Item” » “Share” » “Archive” » “Move” (see image at the top of this article), but that is a problem which I could solve one of two ways: either create an App Shortcut in OS X’s System Preferences, or use a Keyboard Maestro macro. There are advantages and disadvantages to both, as I’ll explain below.
Option 1: Making an App Shortcut
App Shortcuts (a.k.a “Keyboard Shortcuts”) can easily be added via the System Preferences » Keyboard » Shortcuts » App Shortcuts. The primary benefits to App Shortcuts are that they are quick, easy, show up in the app menu (so you can easily see which shortcut you have assigned to which menu item), and do not require any third-party software.
However, there are a few potential problems with App Shortcuts. If you use more than one Mac, you will have to add the App Shortcuts on each one, as they do not syncronize via iCloud. Secondly, if you get a new Mac or reinstall OS X for some reason, you will have to create them again. Also, Jamie Phelps, one of the 1Password developers, mentioned to me on Twitter that App Shortcuts might not work after you launch the app until you select the menu once with the mouse. (He’s looking for a solution.)
Also, it is important to make sure that you specify the exact menu path when creating the App Shortcut, because, if you use more than one vault, each one will have its own “Move” menu item. Fortunately you can do that by entering the path as shown here (change “Archive” to the name of your vault):[2]
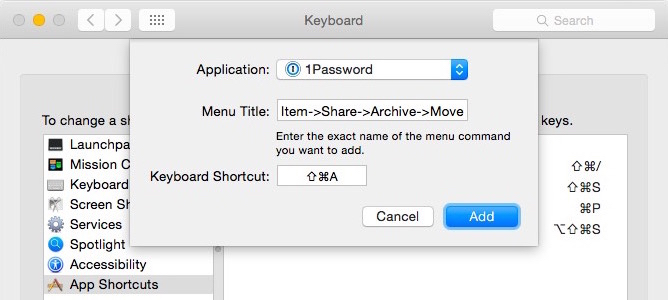
That will make sure that your keyboard shortcut triggers the correct menu item.
Option 2: Making a Keyboard Maestro macro
There are three advantages to using Keyboard Maestro macros instead of App Shortcuts:
- If you use more than one Mac, Keyboard Maestro macros can sync so you can always use the same keyboard shortcuts everywhere.
- Keyboard Maestro macros can easily be backed up and restored if you get a new Mac.
- Keyboard Maestro can select the menu item after you launch the app even if you have not opened the menu with the mouse first.
However, unlike App Shortcuts, the keyboard shortcuts used for Keyboard Maestro macros do not appear in the actual menus for the app.
Creating a Keyboard Maestro macro sounds a lot more complicated than making an App Shortcut, but I can go through the entire process of creating a special group for 1Password and the macro in 1 minute. I even made a screencast to show you how easy it is. Keep that in mind as I describe the process. Also, you can just download my Keyboard Maestro macro and import it into Keyboard Maestro, but I’ll explain how to make it so you’ll know how to make your own in the future.
The first step is to create a new group, then give it a name, then tell Keyboard Maestro which app (or apps) the group should be used for.
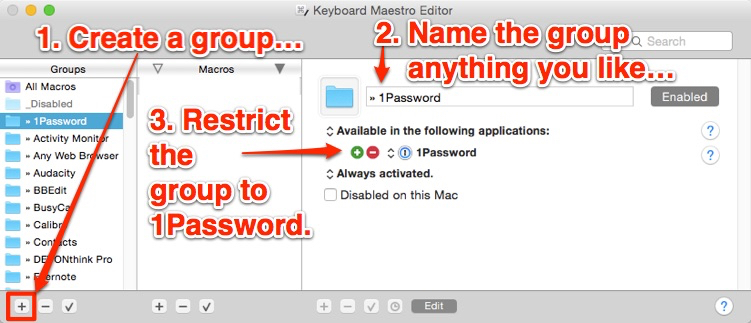
I like to keep my app-specific groups together in the “Groups” column, so I always start the group name with » followed by the name of the app, so for 1Password my group name is: » 1Password. Once I have the group, I create a new macro in that group by clicking the “+” in the “Macros” column.
I enter a name for the macro, choose what kind of “Trigger” I want to use (in this case I want a keyboard shortcut – which Keyboard Maestro calls a “hot key”). Then I tell Keyboard Maestro I want to select a menu item.
Now here’s where it gets really cool.
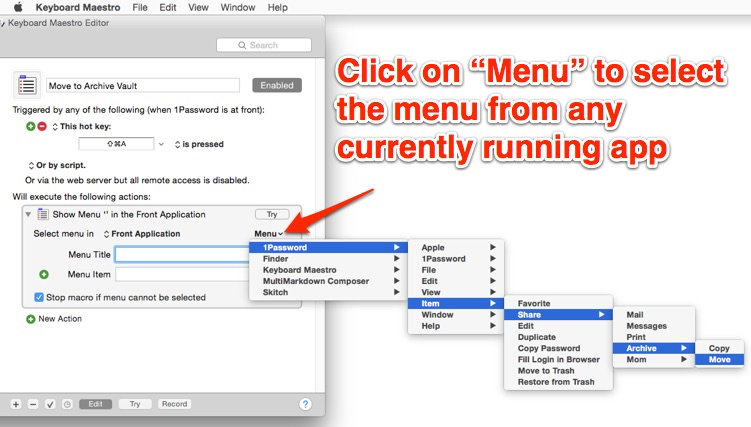
Rather than have to type in four layers of menu names, I only have to click the “Menu” button, and Keyboard Maestro will show me a list of all currently running applications. Click on an app and Keyboard Maestro displays the full set of menus for that app. Select the appropriate menu item and Keyboard Maestro will automatically fill in the appropriate menu items. Here’s what the end result looks like:
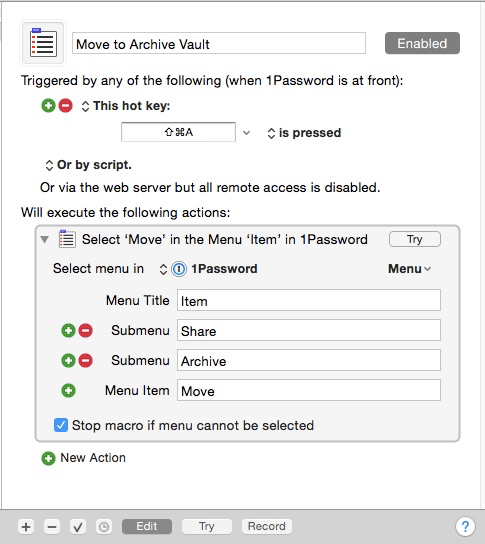
Now whenever I press ⌘+⇧+A, the currently selected item in 1Password gets sent to the archive. If the menu item can’t be selected for some reason, Keyboard Maestro will tell me.
If you have more than one vault, you can assign a different shortcut for each one, or you can use another cool feature of Keyboard Maestro. For example, I made four Keyboard Maestro macros (one for each of the alternate vaults I created), but I assigned the same keyboard shortcut (⌘+⇧+A) to each of them. Now when I press it, Keyboard Maestro shows me this:
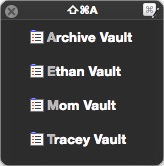
I can select which macro I want to use by typing the highlighted letter (A, E, M, or T). This is handy if you don’t want to have to remember separate keyboard shortcuts for each vault.
Using Alternate Vaults
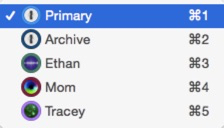
AgileBits has made using alternate vaults really, really easy. Each vault automatically gets a keyboard shortcut assigned to it. You can switch to the primary vault using ⌘+1, and then each subsequent vault gets a number attached to it, alphabetically. A dropdown menu appears at the top-left corner of the main 1Password window, showing you which vault you are using and the others which are available.
If you search for something in your primary vault and then press ⌘+2 to switch to your secondary vault, it will keep the search term active, so you can immediately see the results there. That’s a nice touch if you forget which vault something is stored in and need to switch between them. Have more than 2 vaults? Keep pressing the ⌘+number until you find it.
When you launch 1Password, it will show you which vault that you are logging in to, so you know which passphrase to use. You can use the same keyboard shortcut to change which one you will log in to, but it defaults to the primary vault, as you’d expect.
I wish I had started using vaults a long time ago, because now that I have all that extra information out of my main 1Password database it is no longer cluttering up search results, and when I go to login to websites that several family members use, I no longer have to choose between the various logins. If I only have one login in my primary vault, 1Password will automatically fill it in for me. If there are more than one, it has to show me a menu so I can choose which one to use.
Syncing Alternate Vaults
If you already use Dropbox to sync 1Password, you can keep using it to sync your alternate vaults as well.
Unfortunately iCloud sync does not support multiple vaults, but you can use it to sync your primary vault and use Dropbox to sync your secondary vault(s). Vaults synced via iCloud or Dropbox are also available to 1Password on iOS.
If you do not need to access your vaults on iOS, you can sync your secondary vaults via a folder, and (if you wish) sync that folder via BitTorrent Sync or some other method, but you will not be able to access those vaults via iOS.
Spring Clean Your 1Password
If you have been using 1Password for awhile, chances are good that you have accumulated information in there which might be better off in an archive vault. You may have stored some information in there for other family members just in case they lost or forgot it. Or maybe you have a habit of collecting Gmail or Twitter accounts that you want to keep, but don’t log into frequently. All of these are good candidates to be moved into an archive vault.
Do you share some login information with a spouse or partner? Create a shared vault so you both always have the most up-to-date information, and avoid the temptation to send login information in a potentially insecure manner when they need to log in and can’t remember your 50 character password for Amazon.com.
If you want to learn more about this vaults, checkout the Guide to Multiple Vaults from 1Password.
- About 650 items in my primary vault, and about 750 in my Archive. ↩
-
Make sure there are no spaces around the
->between each menu item. You can learn more about this in my article Make Keyboard Shortcuts for Two Menu Items with the Same Name. ↩