
Lion is a solid update to OS X and it comes with several new features as we’ve outlined in our review, however there are so many little touches and minor features it is possible some of them will go unnoticed, leaving a user wondering whether something he thought would be possible was removed by Apple. In this post, we’ve collected some of the best tips and tricks we’ve received from our readers and Twitter followers since Lion came out yesterday, as well as stuff that didn’t make it to the review. More will follow throughout the next days, but in the meantime check them after the break.
Note: Part 2 is now online.
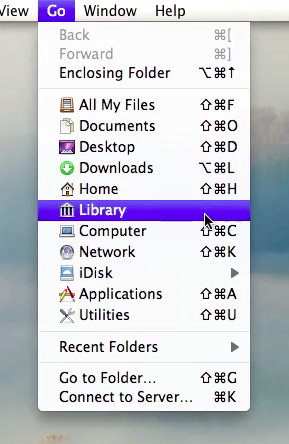
Enable the user Library folder
Lion hides the Library by default, but there’s an easy way to get it back. Open the Terminal and type “chflags nohidden ~/Library” (without quotes). Press Enter. The Library has been assigned a “not hidden” flag, meaning it’s now visible under your Home folder. One more thing: once your Library is back, head over the Finder’s Go menu in the menubar, click on it and press Option. The Library will be an extra option to quickly launch. [Update: the Library doesn’t need to be visible with the Terminal hack for the Option shortcut to work in the menubar.]
Get a 2D dock in Lion
Just like Snow Leopard, and in spite of the new “no indicator lights” option, Lion can get a 2D dock. To enable it, type the following in the Terminal: “”defaults write com.apple.dock no-glass -boolean YES” (without quotes) then “killall Dock” (again, no quotes) to immediately restart the dock and enjoy your new 2D effect. To change it back to 3D, replace YES in the first string with NO, and repeat the same procedure.
How much space left?
The Finder is great, but it doesn’t have a status bar by default. So how do I see how much space I’ve got left on my hard drive, you may ask? You’ve got two options: either you select the Mac HD (your hard drive, whatever you’ve called it) under the Devices tab in the Finder’s sidebar and hit spacebar to invoke Quick Look, or you re-enable the Finder’s status bar. The latter option requires a quick trip to the Finder’s menubar, then View -> Show Status Bar. This will bring back the bottom bar showing the space (and items) of a selected device and folder. Additionally, you can also enable the Path Bar (the one that will show the path of the currently opened Finder folder) from the same menu.

Customize the Finder’s sidebar
Whilst we’re still waiting for a way to get colored icons back and move the Devices tab back at the top of the sidebar, choosing which icons appear in the left side of the Finder is an easy trick. Once in the Finder, open the Preferences (CMD +, or Finder -> Preferences from the menubar) and click the Sidebar tab. Here, you can choose what Favorites, Shared and Devices icons should show up in the Finder. Yes, you can disable All My Files is you want, too. Keep in mind that you can add anything (a folder, a file) to the Finder’s sidebar with drag & drop, but removing an item will require you to keep CMD pressed while you drag it out. This change was first introduced on Snow Leopard.
Accented letters, iOS-style
Auto Correction aside, Lion borrows another element of the iOS’ soft keyboard: the way you type accented letters. If you’ve got a US keyboard, you don’t remember the shortcuts to type à or è, or you simply don’t want to use the dedicated keys on your International layout, Lion offers a way to get accented letters using standard keys: when you’re typing, keep a key pressed for a few seconds (say, the “a” key) and Lion will pop up an iOS-like menu to choose between variations of the same letters with different accents. You can select one with the cursor, or by hitting the number assigned to it (1,2,3,4,…) while keeping the key pressed.

Get three-swipe navigation back
Lion assigned three-finger swipes to moving between full-screen apps or the Launchpad. No problem. You can customize the system gestures by opening the Trackpad settings in System Preferences, and selecting the More Gestures tab. As you can see from the screenshot in this post, I’ve assigned three-finger swipes to moving between pages (meaning, navigation) and four-finger swipes to full-screen apps. This means I can navigate with three fingers in the Finder, or avoid Safari’s new “back and forward” animation altogether by using a regular three-finger swipe.

Can I move files with the keyboard in Lion?
Yes, you can. Finally, Apple implemented an option to move a file after the Copy shortcut has been pressed: instead of regular CMD + C and CMD + V to copy & paste, try CMD + C and CMD + Option + V to copy & move.

I want the old Dashboard back
Don’t like the fact that Dashboard has got its own dedicated space on Lion? You can disable this. Open the Mission Control panel in System Preferences, and uncheck “Show Dashboard as a space”. This will resume the old Dashboard behavior with widgets appearing on top of your desktop as an overlay.
Quickly add a webpage to the Reading List
The Reading List is a new feature in Lion’s Safari that allows you to save webpages for later. But is it necessary to keep the Reading List sidebar always visible, and click the Add Page button to save interesting links? No. With the sidebar either visible or hidden, you can shift-click any link to instantly send it to the Reading List. It’s also got a neat animation.
Can I set the Launchpad as my default desktop?
A way to do this hasn’t been discovered yet, but here’s a simple tip: add the Launchpad app to your login items (System Preferences -> Users & Groups -> Login Items) and make sure it’s the last one in the list. Every time you log in, your login items will load (hopefully quickly) and because the Launchpad is the last thing that loads, the desktop will stay with the Launchpad in the foreground, ready to launch your first app.
Emoji support
Lion comes with native Emoji support. Emoji are those illustrated characters that were introduced by Apple on iOS with international keyboards, and that are often used in online conversations instead of regular emoticons. Emoji characters belong to the new Apple Color Emoji font that can be viewed in the new Font Book, but to actually use these characters while you’re writing, you’ll have to open the Special Characters picker, which is usually assigned a CMD + Option + T keyboard shortcut. From there, move to the Emoji tab and you’ll be able to copy characters or drag them into your text field.

Manually delete “saved states”
One of the biggest features of Lion is the possibility of remembering exactly what you were doing inside an application after it closes, or the OS shuts down. Upon next boot or application launch, Lion will re-open the app with the same content, position and even text cursor status from when you last closed it. This happens thanks to Resume, a system-wide functionality that makes sure everything is always remember so you don’t have to. But if you’re a geek, you’ve enabled the hidden Library folder and you feel like tinkering with the OS a little, you can manually delete the saved states without having to disable Resume entirely.


Simply navigate to Library -> Saved Application State, and find the folder for the app you want to “reset”. As you delete it, Lion will erase its saved state kept on the local memory so that on the next application launch, you won’t have any “state” from the previous version. For example, Safari will forget the pages it had opened, or a text editor won’t remember what you were typing. This is obviously dangerous and you shouldn’t mess with these system functions at all, but we just want to outline that it’s possible, and this method can be combined with power-user tools like Hazel to set up a custom maintenance clean-up routine for saved state folders, without having to enable/disable Resume.
From around the web, TUAW details an interesting way to manually refresh the contents of the Launchpad, and Matt Legend Gemmell explains how to rename flags in Lion’s Mail. Check out additional tips in our “First Five Things I Do When I Set Up Lion” article and OS X Lion review. If you want to know what you can do with the Lion installer downloaded from the Mac App Store, see our Installation Guide and Q&A.
Bonus Tips
Here’s some other interesting things I’ve received after publishing this post. I’ll update with more tips as I get them.
Customize System Preferences
Lion lets you customize the icons that appear in System Preferences – this is a handy option if you only want System Preferences to show the panels that you use the most. To hide icons, open System Preferences, click View in the menubar and then Customize. The app will let you check and uncheck the icons you want to show or hide but pay attention, they won’t be deleted – they’ll just be hidden from your view. You can access the Customize menu also by clicking and holding the Show All button in the upper left corner of System Preferences.

Resize all corners
Lion lets you resize windows from anywhere, but it doesn’t resize all corners at once with the default command. To resize all corners at once, hold Option while resizing. Try it now with a Finder window.

Preview’s Magnifier tool
Preview in Lion comes with a new Magnifier tool that lets you see parts of an image in greater detail. To activate it, select Show Magnifier from Tools in the menubar. You can adjust the size of the magnifier with a pinch gesture.
