Last Updated: 05/20/2013
In 2010, Outlook poorly supported Gmail accounts, but today it’s a lot better. Most of the setup that was previously required is now automated. In this revised guide, you’ll now find two major sections. The first shows you where to plug in your account information, and I’ll also walk you through some extra steps to remove a couple unnecessary folders. The second details how you can make Outlook feel more like Mail, and includes some of what was previously covered in the 2010 tutorial. I’ve also removed the previous introduction — I’ll get straight to the point. I hope you find this guide more more relevant and useful than it was before.
Plugging Gmail into Outlook
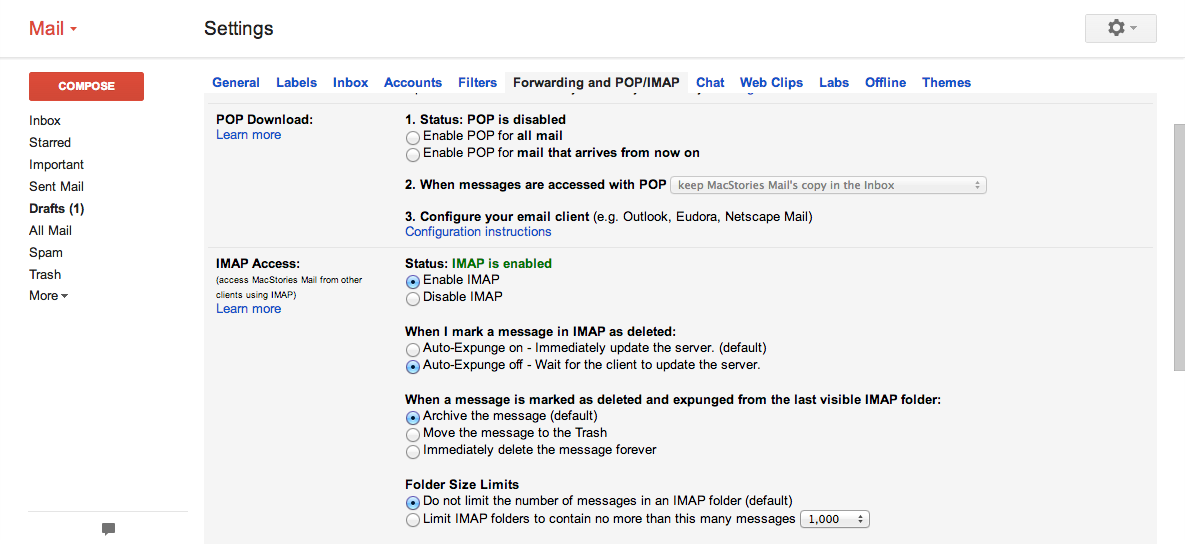
Before opening Outlook, we should double check some settings in Gmail so that you can properly sync your messages to the desktop. Log into Gmail and click the settings button — look for the gear on the right. From the drop down menu, click on Settings. Next, click on the Forwarding and POP/IMAP tab. Make sure POP is disabled and IMAP is enabled. I find the following settings as shown in the screenshot below work best for me.
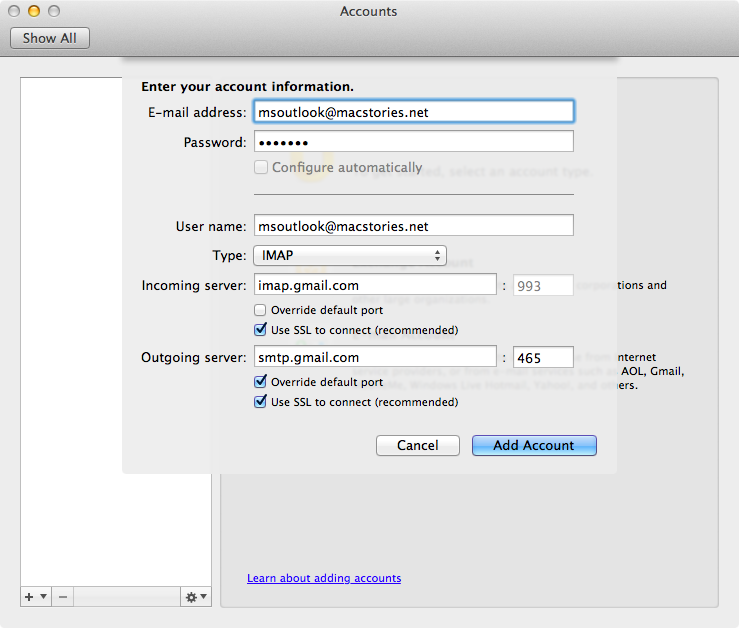
Open Outlook, then enter Preferences through the Outlook menu in the menu bar, click Accounts, and add an e-mail account through the + button at the bottom of the accounts panel. When prompted, simply enter your email address and password and configure automatically. Keep in mind that if you’re using 2-step verification, you’ll need to generate an app specific password for Outlook.
If you’re using a Google Apps for Business account, you’ll need to fill out a settings pane (be sure to check with your IT debt or company guidelines). You can use the screenshot below as a general guide.
When this tutorial was first introduced in 2010, the frustrating issue with Outlook was that it didn’t intuitively map its folders with Gmail’s. There were also naming conflicts which have since been resolved. Today, Gmail support is much better, although there are some interesting quirks which we can optionally iron out in the next section. Before you proceed, make sure Outlook is up to date by visiting About Outlook in the Outlook menu. Currently, it should be at least version 14.3.4 as of this guide.
In the sidebar, you’ll notice INBOX, Drafts, Sent Mail, and Trash mailboxes, with [Gmail] and Spam sitting underneath. If you expand the [Gmail] folder, you’ll notice some redundancy with the previously mentioned mailboxes, but it’s nothing you have to worry about. These folders are linked with what you already see in the sidebar. Unfortunately, Outlook takes some initiative and hides folders like All Mail, even if you’ve allowed it to sync on Gmail’s side. Close [Gmail] — we’ll be changing a couple of settings to finish up.
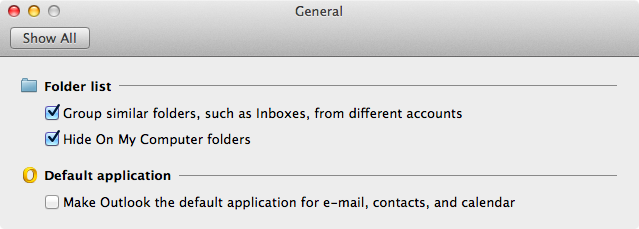
If you’re only using IMAP accounts with Outlook, we can turn off the On My Computer mailboxes. Go to the Preferences, select General, and check the box, “Hide On My Computer folders.” The other options here are simply personal preferences, and I’ll let you play with them.
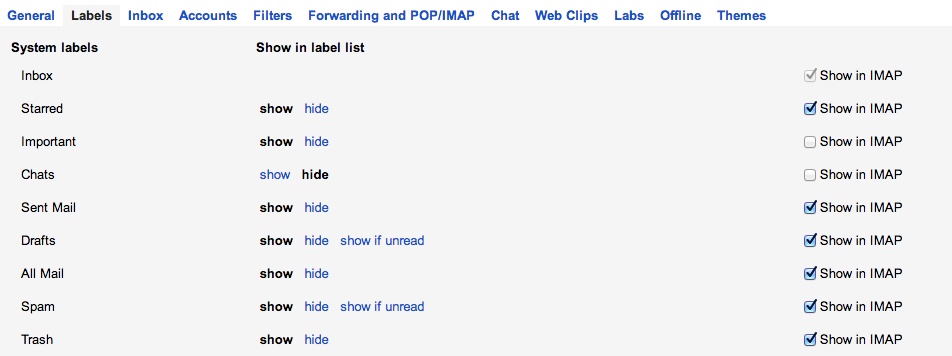
Lastly, go back to your Gmail account on the web and access the settings again. In the Labels tab, uncheck Important and Chats. If you uncheck All Mail, I’d recommend creating an Archive label in Gmail.
That’s it — you should be good to go.
Optional: advanced settings
If you want to clean up the sidebar and plan on only using Outlook to access your Gmail account, want to view All Mail, and want to resolve some of the weird quirks seen in Outlook, we can make a couple additional changes in the settings. This second section is basically for the picky among us, and can affect how Gmail labels appear in other email apps you might use. Again, this is completely optional, and I’ve sectioned off the various extra steps so you can pick and choose how to get the most out of Outlook.
Basic changes to folder syncing
The recommended syncing setup for Outlook can be found at following link: https://support.google.com/mail/answer/78892?hl=en&ref_topic=1668961
Save copies of messages in Sent Items folder > leave unchecked
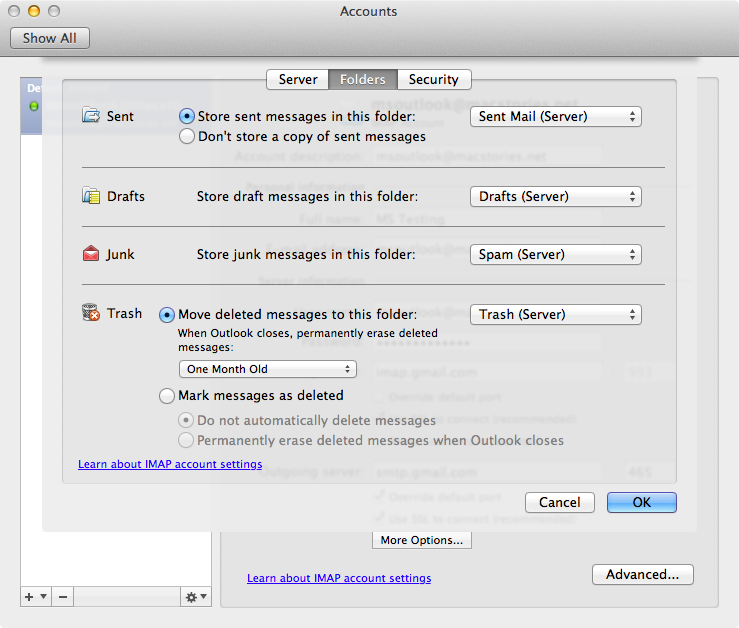
If you experience issues with your sent messages not showing up in Gmail on the web, I’d argue not to do this. You can change this setting by going to the Preferences, clicking on Accounts, then clicking on Advanced in the Folders tab. My settings are shown in the screenshot below.
Cleaning up the sidebar and custom labels
Be forewarned that the next steps will remove your custom labels from Outlook, which we’ll resolve shortly after.
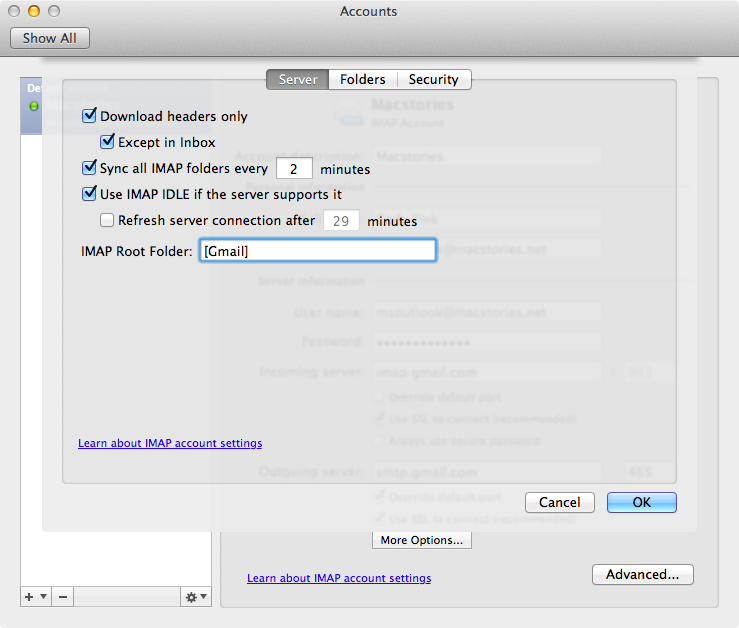
In Outlook, head back into the Preferences, click on Accounts, and highlight your account in the left pane. Below all of your server details, you should see an Advanced… button. Click it, and enter [Gmail] into IMAP Root Folder text box. When you exit the preferences, Outlook will take a moment to update itself.
What will happen is that Gmail’s default folders will now appear in the sidebar — the [Gmail] folder has now been removed, but you’ll be missing your custom labels. To resolve this, we’ll have to go back to Gmail.
In Gmail’s settings, navigate back to the Labels tab. You’ll want to edit the names of your custom labels, prefixing them with [Gmail]/ as shown in the screenshot below.
The tradeoff is that labels will look ugly in Gmail, but they’ll look like regular folders in Outlook. The next time Outlook syncs (which you can force by quitting and launching Outlook), your custom labels will appear in the sidebar.
Labels in subfolders
Let’s say you’re not a big fan of having [Gmail]/ in front of every label. Visually it’s irritating in Gmail, but I’ve found a way to make it less so. Entering your labels will still be annoying, but on the bright side, everything won’t look the same.
To create subfolders, create a new label called [Gmail]/My Labels. Next, you can edit your previous labels and nest them under [Gmail]/My Labels, or in Gmail’s side bar create new sub labels.
With this method, only one label in Gmail will be prefixed, and it’ll show up as a Folder called My Labels in Outlook. Again, you’ll have to sync Outlook to see the latest changes.
Custom rules
Back in Outlook, there isn’t a tremendously easy way to archive data instead of deleting it. If you want to send your messages to All Mail instead of the Trash, you could always go back into your account settings and point Trash to the All Mail folder. While All Mail will adopt the trash icon, it’s a simple way to archive data (but be sure that you don’t purge this All Mail folder since you’ll lose everything).
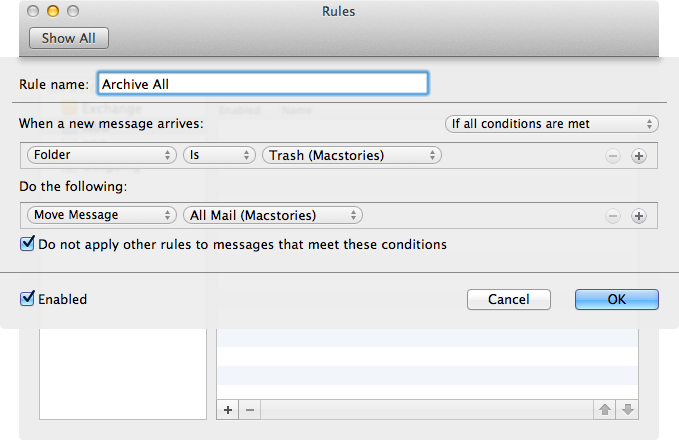
My suggestion is to create a rule. Click on the Rules button in the ribbon, and select Edit Rules…. Select IMAP in the sidebar, then click the add button at the bottom of the pane. Create a new rule that tells the Trash folder to move items to the All Mail folder as seen in the screenshot below.
The rule will be applied by either visiting the Trash folder, or by clicking on Rules in the ribbon, and selecting your rule from the menu.
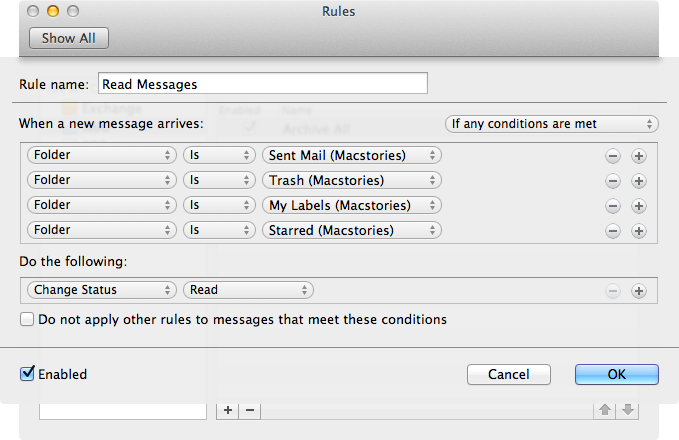
Lastly, every time you check your sent mail, visit your drafts folder, or otherwise navigate your account, Outlook considers these items to be unread until you view them. Again we can create a rule to solve this issue.
Your new rule should mark most folders (it’s up to you) as read as you view them. I personally don’t need to see an indicator telling me how many unread sent mails I have – it’s only useful for knowing how many unread items are in my Inbox (and maybe the Drafts folder). It’s super handy, and you can use the screenshot below as a reference.
In review
I hope you find this updated tutorial more relevant and much more useful than it was before. Please keep in mind that this a simple setup guide, stemming from my own interests, and that MacStories will not provide additional help or tech support. If you need help, you can contact Microsoft here: http://www.microsoft.com/mac/support


