Earlier this week, the founders of Dark Sky made their post-Apple debut with a new weather app for the iPhone and Apple Watch: Acme Weather. It’s a terrific 1.0 with all the details you’d expect, plus a few interesting features that set it apart from other apps in its category.
Posts tagged with "utility"
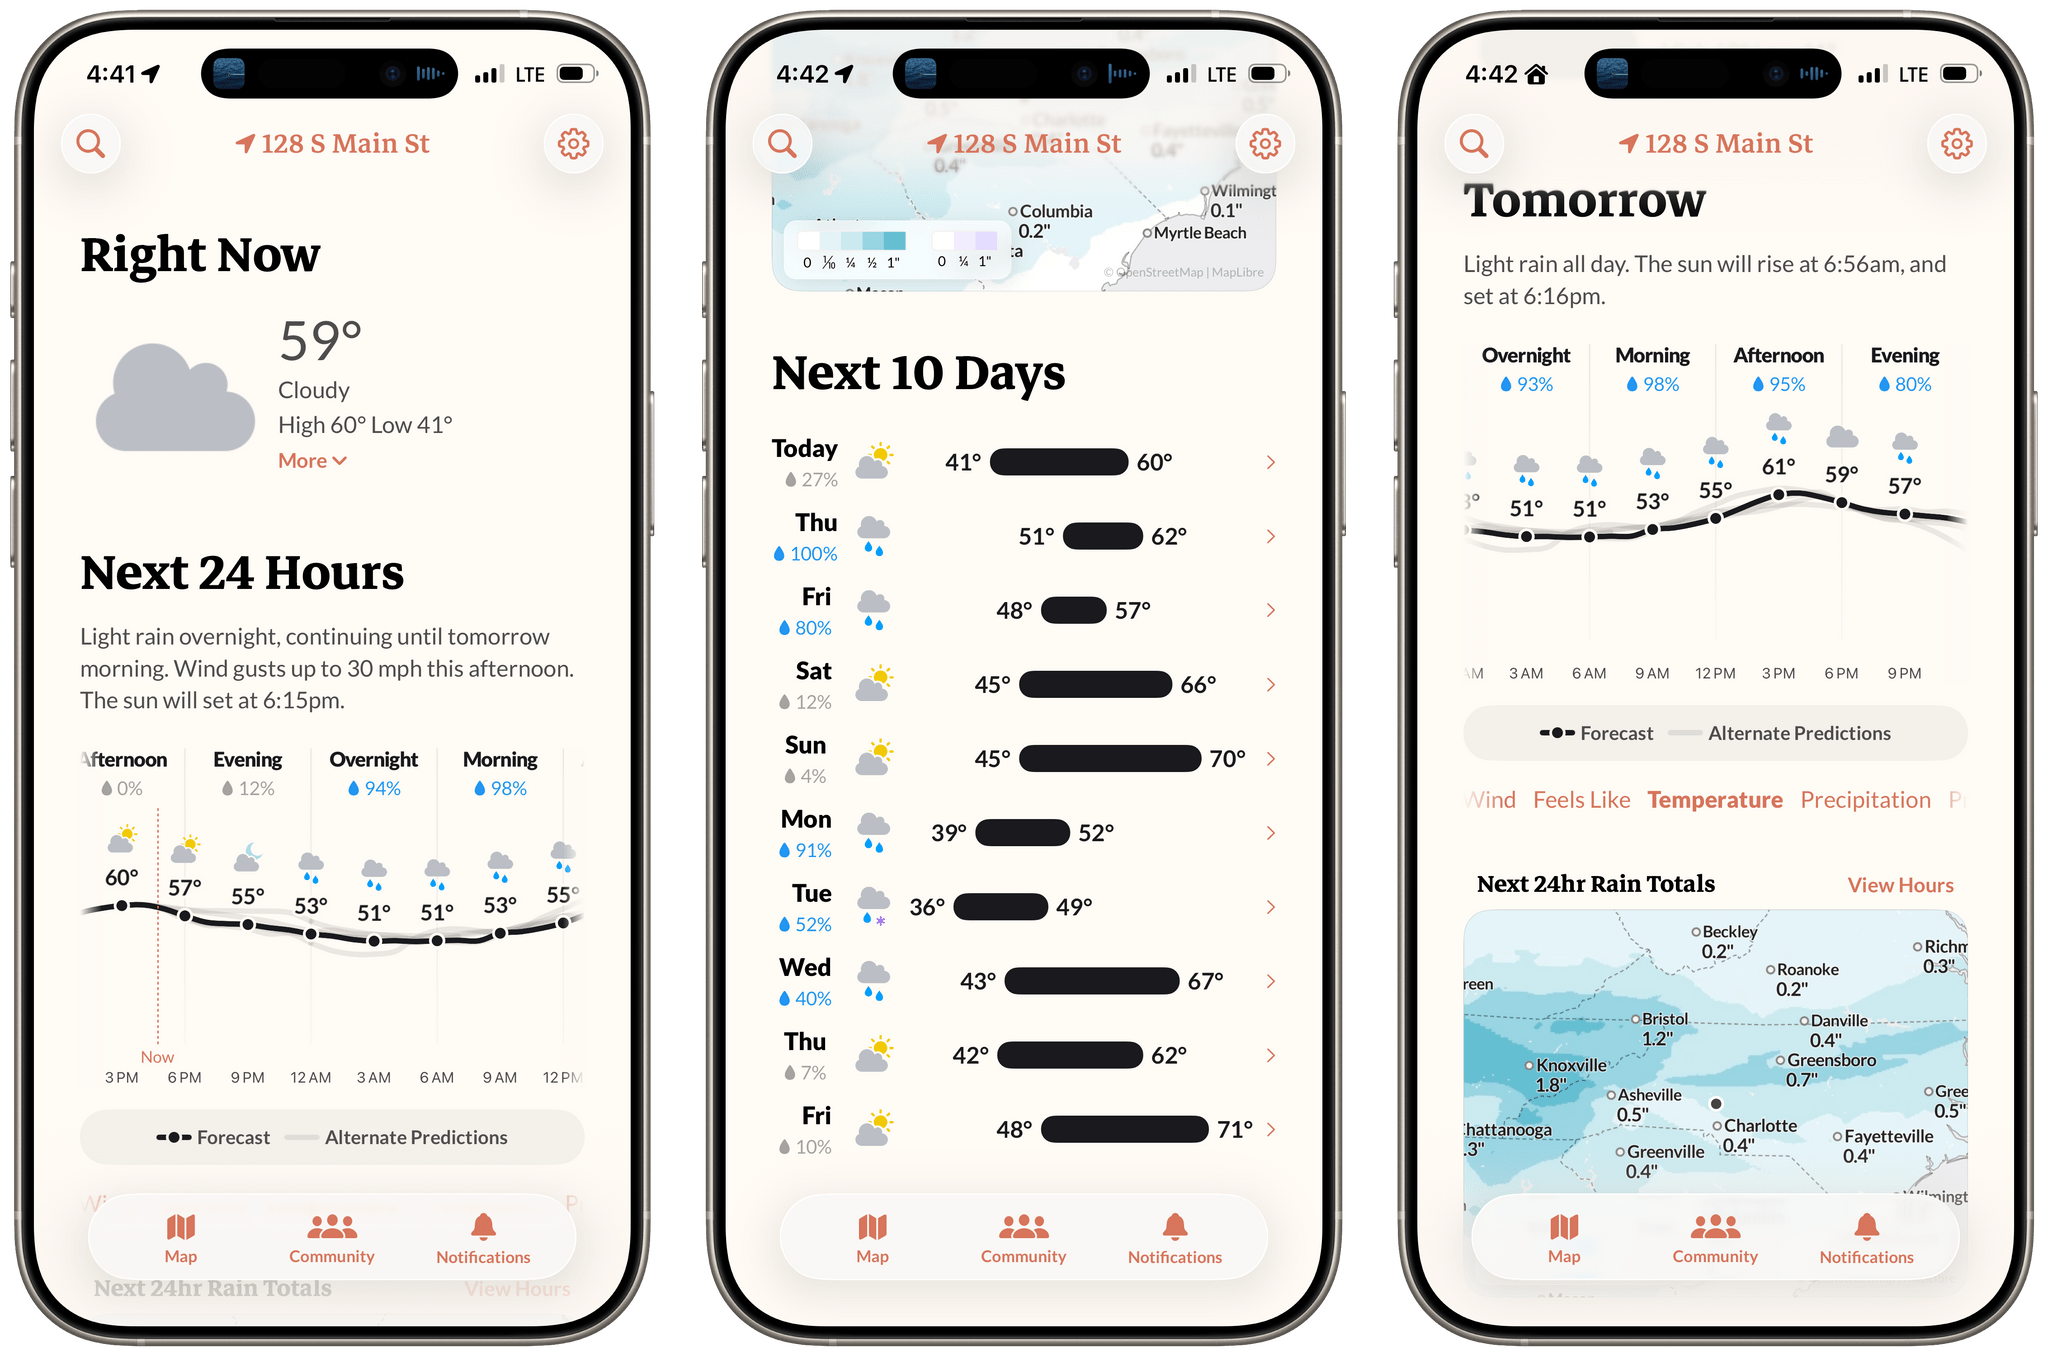
Acme Weather: A Fresh Take on Forecast Uncertainty
Access Extra Content and Perks
Founded in 2015, Club MacStories has delivered exclusive content every week for nearly a decade.
What started with weekly and monthly email newsletters has blossomed into a family of memberships designed for every MacStories fan.
Club MacStories: Weekly and monthly newsletters via email and the web that are brimming with apps, tips, automation workflows, longform writing, early access to the MacStories Unwind podcast, periodic giveaways, and more;
Club MacStories+: Everything that Club MacStories offers, plus an active Discord community, advanced search and custom RSS features for exploring the Club’s entire back catalog, bonus columns, and dozens of app discounts;
Club Premier: All of the above and AppStories+, an extended version of our flagship podcast that’s delivered early, ad-free, and in high-bitrate audio.
How I Used Claude to Build a Transcription Bot that Learns From Its Mistakes
[Update: Due to the way parakeet-mlx handles transcript timeline synchronization, which can result in caption timing issues, this workflow has been reverted to use the Apple Speech framework. Otherwise, the workflow remains the same as described below.]
When I started transcribing AppStories and MacStories Unwind three years ago, I had wanted to do so for years, but the tools at the time were either too inaccurate or too expensive. That turned a corner with OpenAI’s Whisper, an open-source speech-to-text model that blew away other readily available options.
Still, the results weren’t good enough to publish those transcripts anywhere. Instead, I kept them as text-searchable archives to make it easier to find and link to old episodes.
Since then, a cottage industry of apps has arisen around Whisper transcription. Some of those tools do a very good job with what is now an aging model, but I have never been satisfied with their accuracy or speed. However, when we began publishing our podcasts as videos, I knew it was finally time to start generating transcripts because as inaccurate as Whisper is, YouTube’s automatically generated transcripts are far worse.
My first stab at video transcription was to use apps like VidCap and MacWhisper. After a transcript was generated, I’d run it through MassReplaceIt, a Mac app that lets you create and apply a huge dictionary of spelling corrections using a bulk find-and-replace operation. As I found errors in AI transcriptions by manually skimming them, I’d add those corrections to my dictionary. As a result, the transcriptions improved over time, but it was a cumbersome process that relied on me spotting errors, and I didn’t have time to do more than scan through each transcript quickly.
That’s why I was so enthusiastic about the speech APIs that Apple introduced last year at WWDC. The accuracy wasn’t any better than Whisper, and in some circumstances it was worse, but it was fast, which I appreciate given the many steps needed to get a YouTube video published.
The process was sped up considerably when Claude Skills were released. A skill can combine a script with instructions to create a hybrid automation with both the deterministic outcome of scripting and the fuzzy analysis of LLMs.
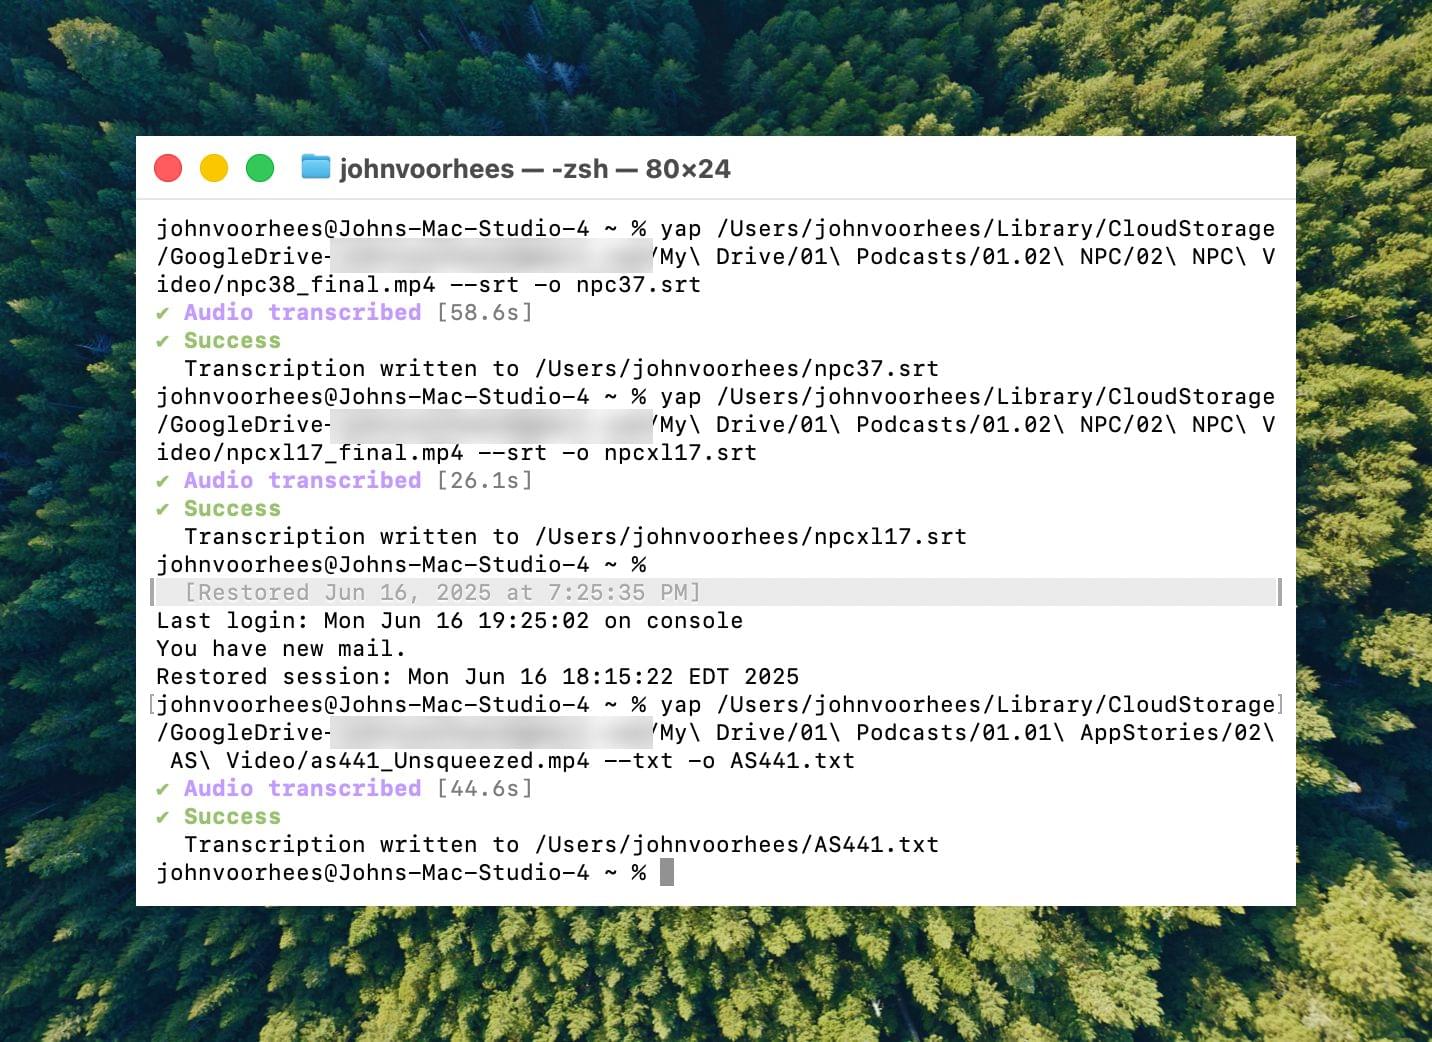
I’d run yap, a command line tool that I used to transcribe videos with Apple’s speech-to-text framework. Next, I’d open the Claude app, attach the resulting transcript, and run a skill that would run the script, replacing known spelling errors. Then, Claude would analyze the text against its knowledge base, looking for other likely misspellings. When it found one, Claude would reply with some textual context, asking if the proposed change should be made. After I responded, Claude would further improve my transcript, and I’d tell Claude which of its suggestions to add to the script’s dictionary, helping improve the results a little each time I used the skill.
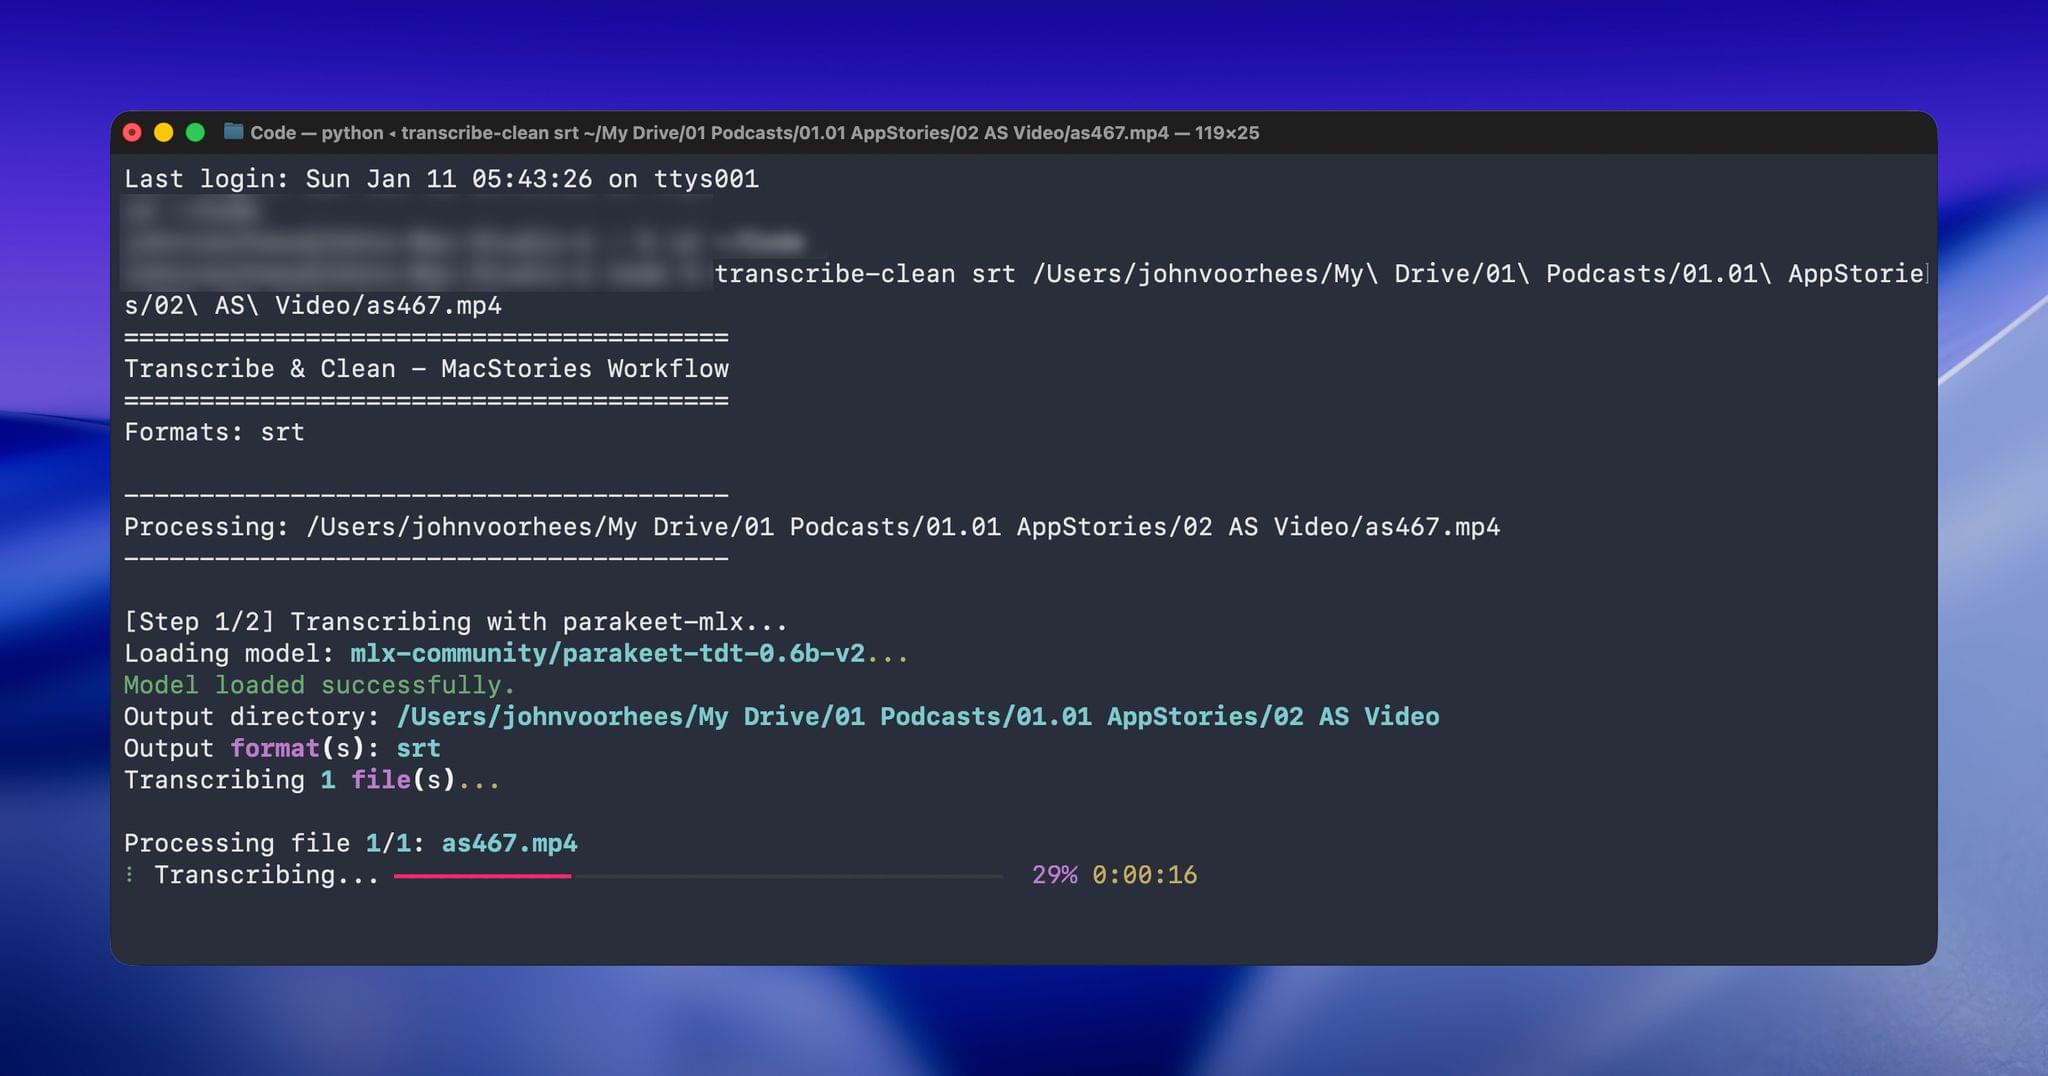
Over the holidays, I refined my skill further and moved it from the Claude app to the Terminal. The first change was to move to parakeet-mlx, an Apple silicon-optimized version of NVIDIA’s Parakeet model that was released last summer. Parakeet isn’t as fast as Apple’s speech APIs, but it’s more accurate, and crucially, its mistakes are closer to the right answers phonetically than the ones made by Apple’s tools. Consequently, Claude is more likely to find mistakes that aren’t in my dictionary of misspellings in its final review.
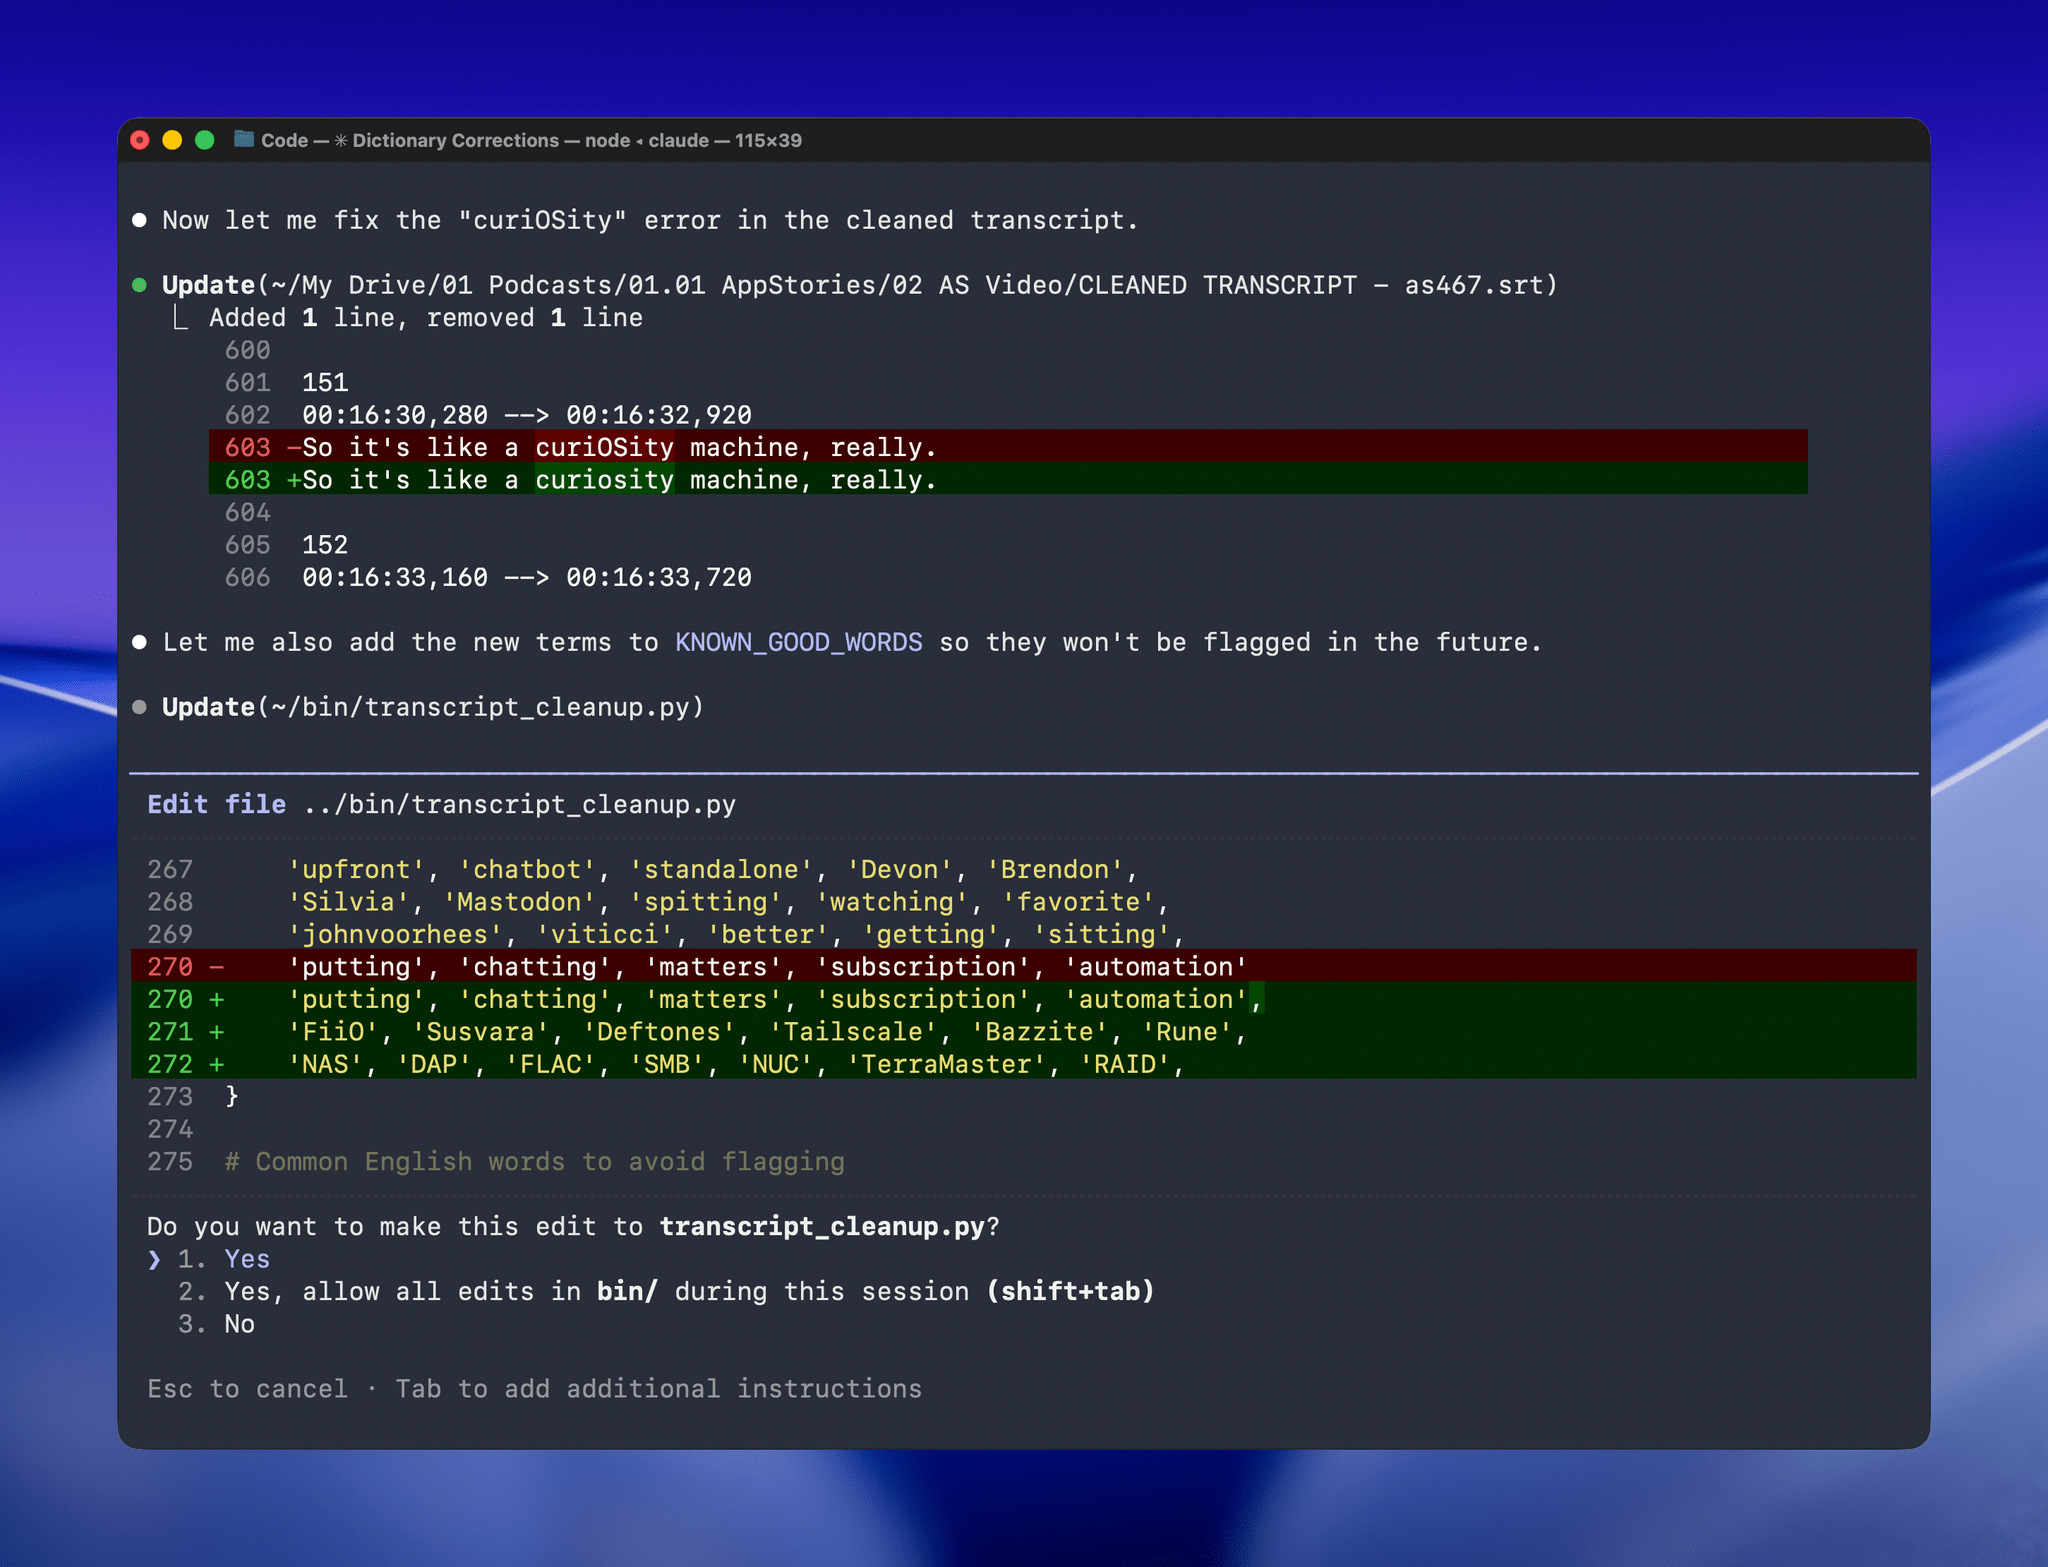
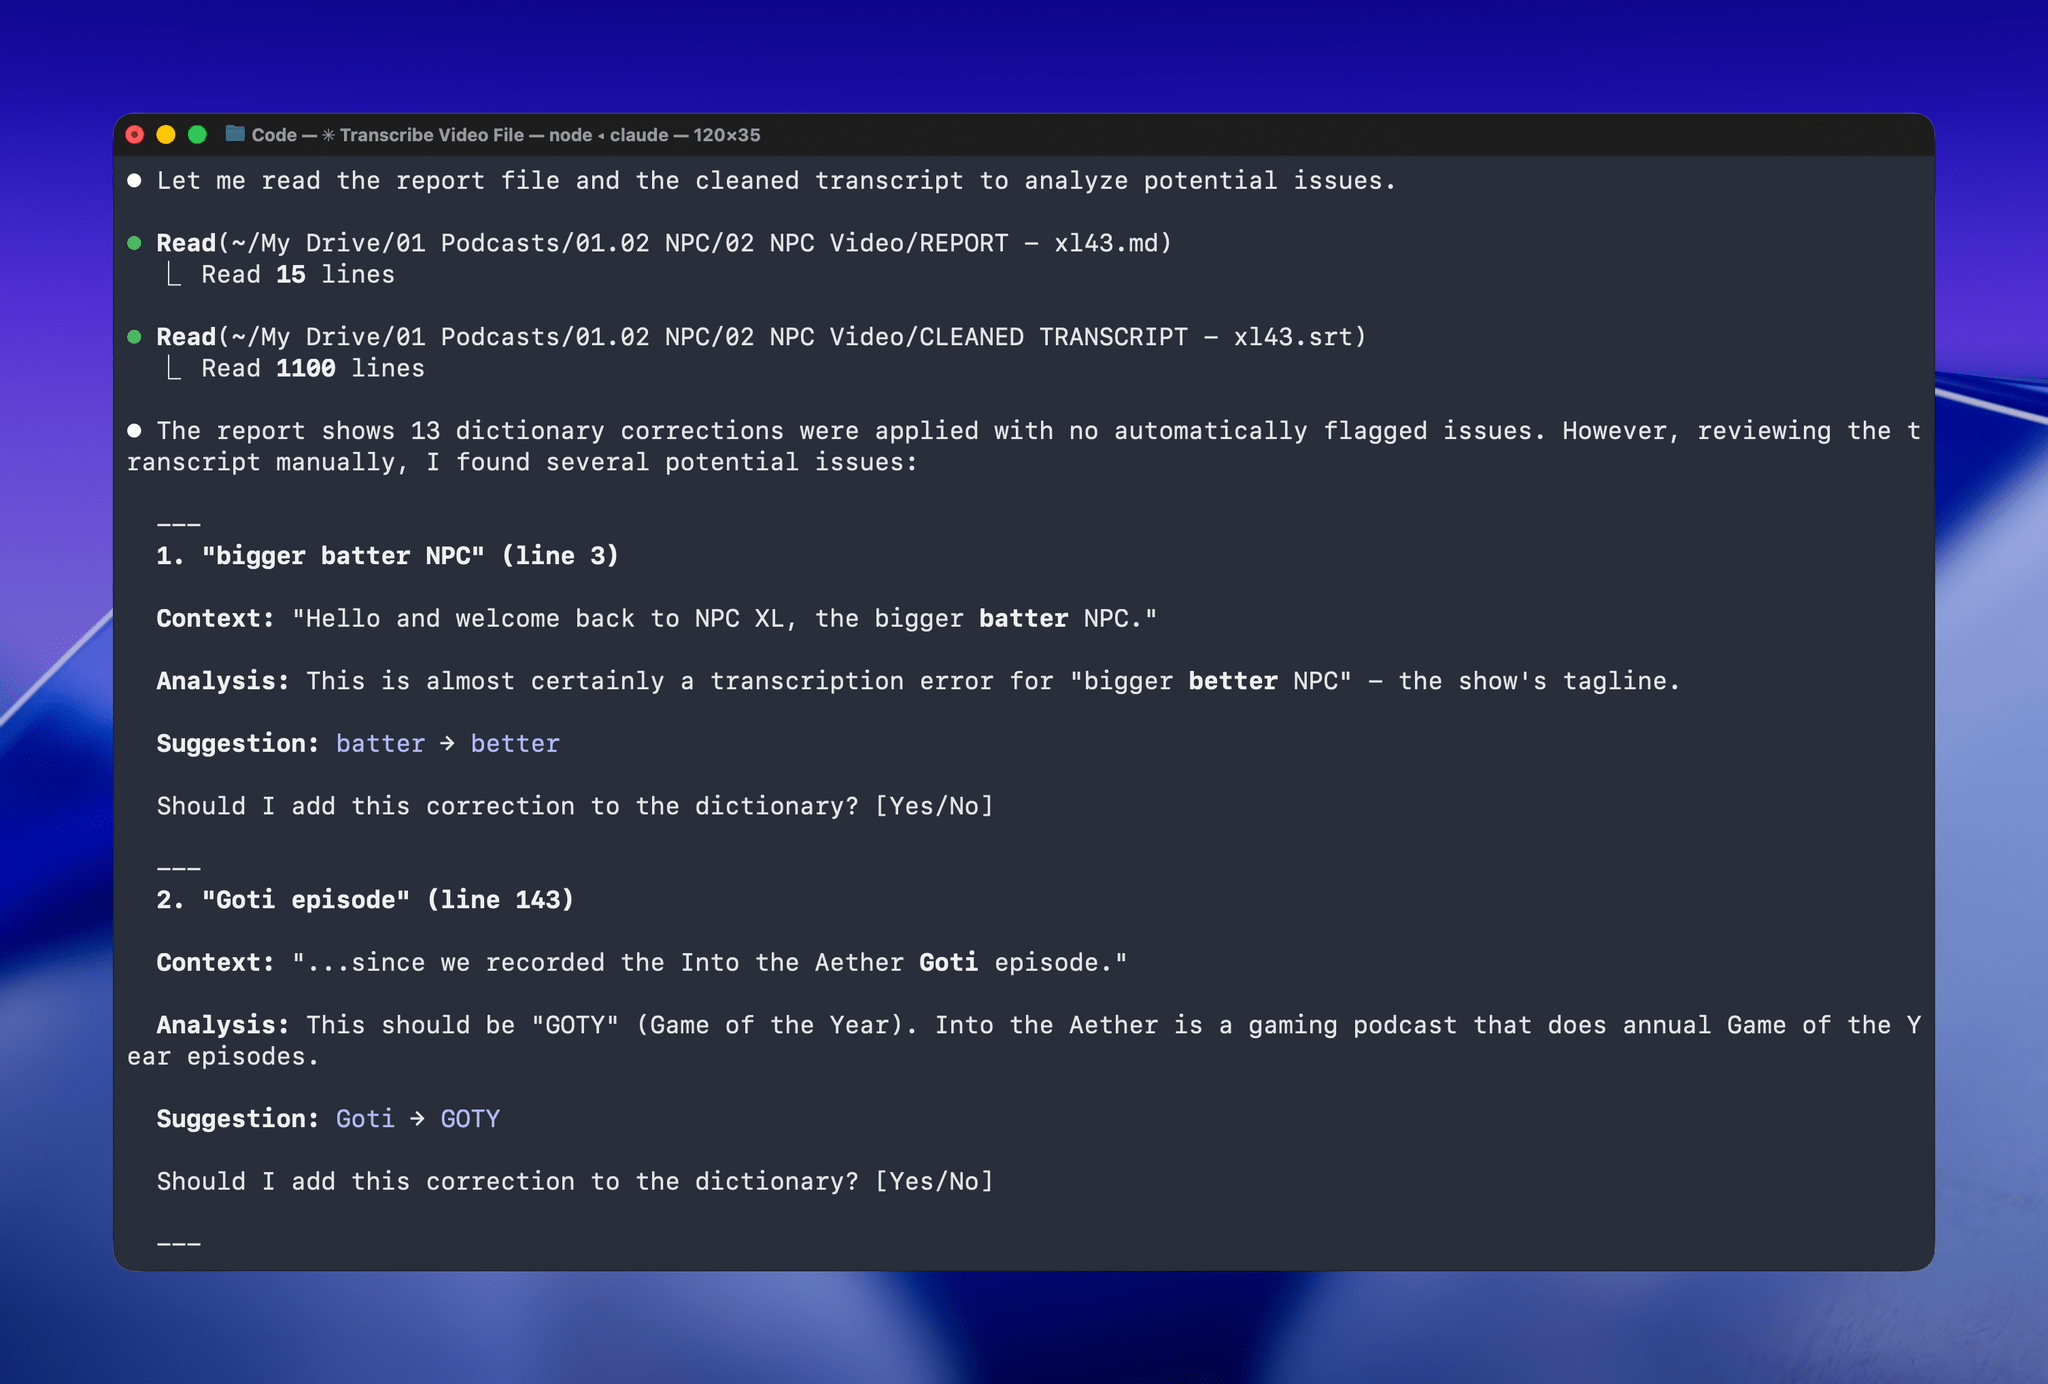
With Claude Opus 4.5’s assistance, I rebuilt the Python script at the heart of my Claude skill to run videos through parakeet-mlx, saving the results as either a .srt or .txt file (or both) in the same location as the original file but prepended with “CLEANED TRANSCRIPT.” Because Claude Code can run scripts and access local files from Terminal, the transition to the final fuzzy pass for errors is seamless. Claude asks permission to access the cleaned transcript file that the script creates and then generates a report with suggested changes.
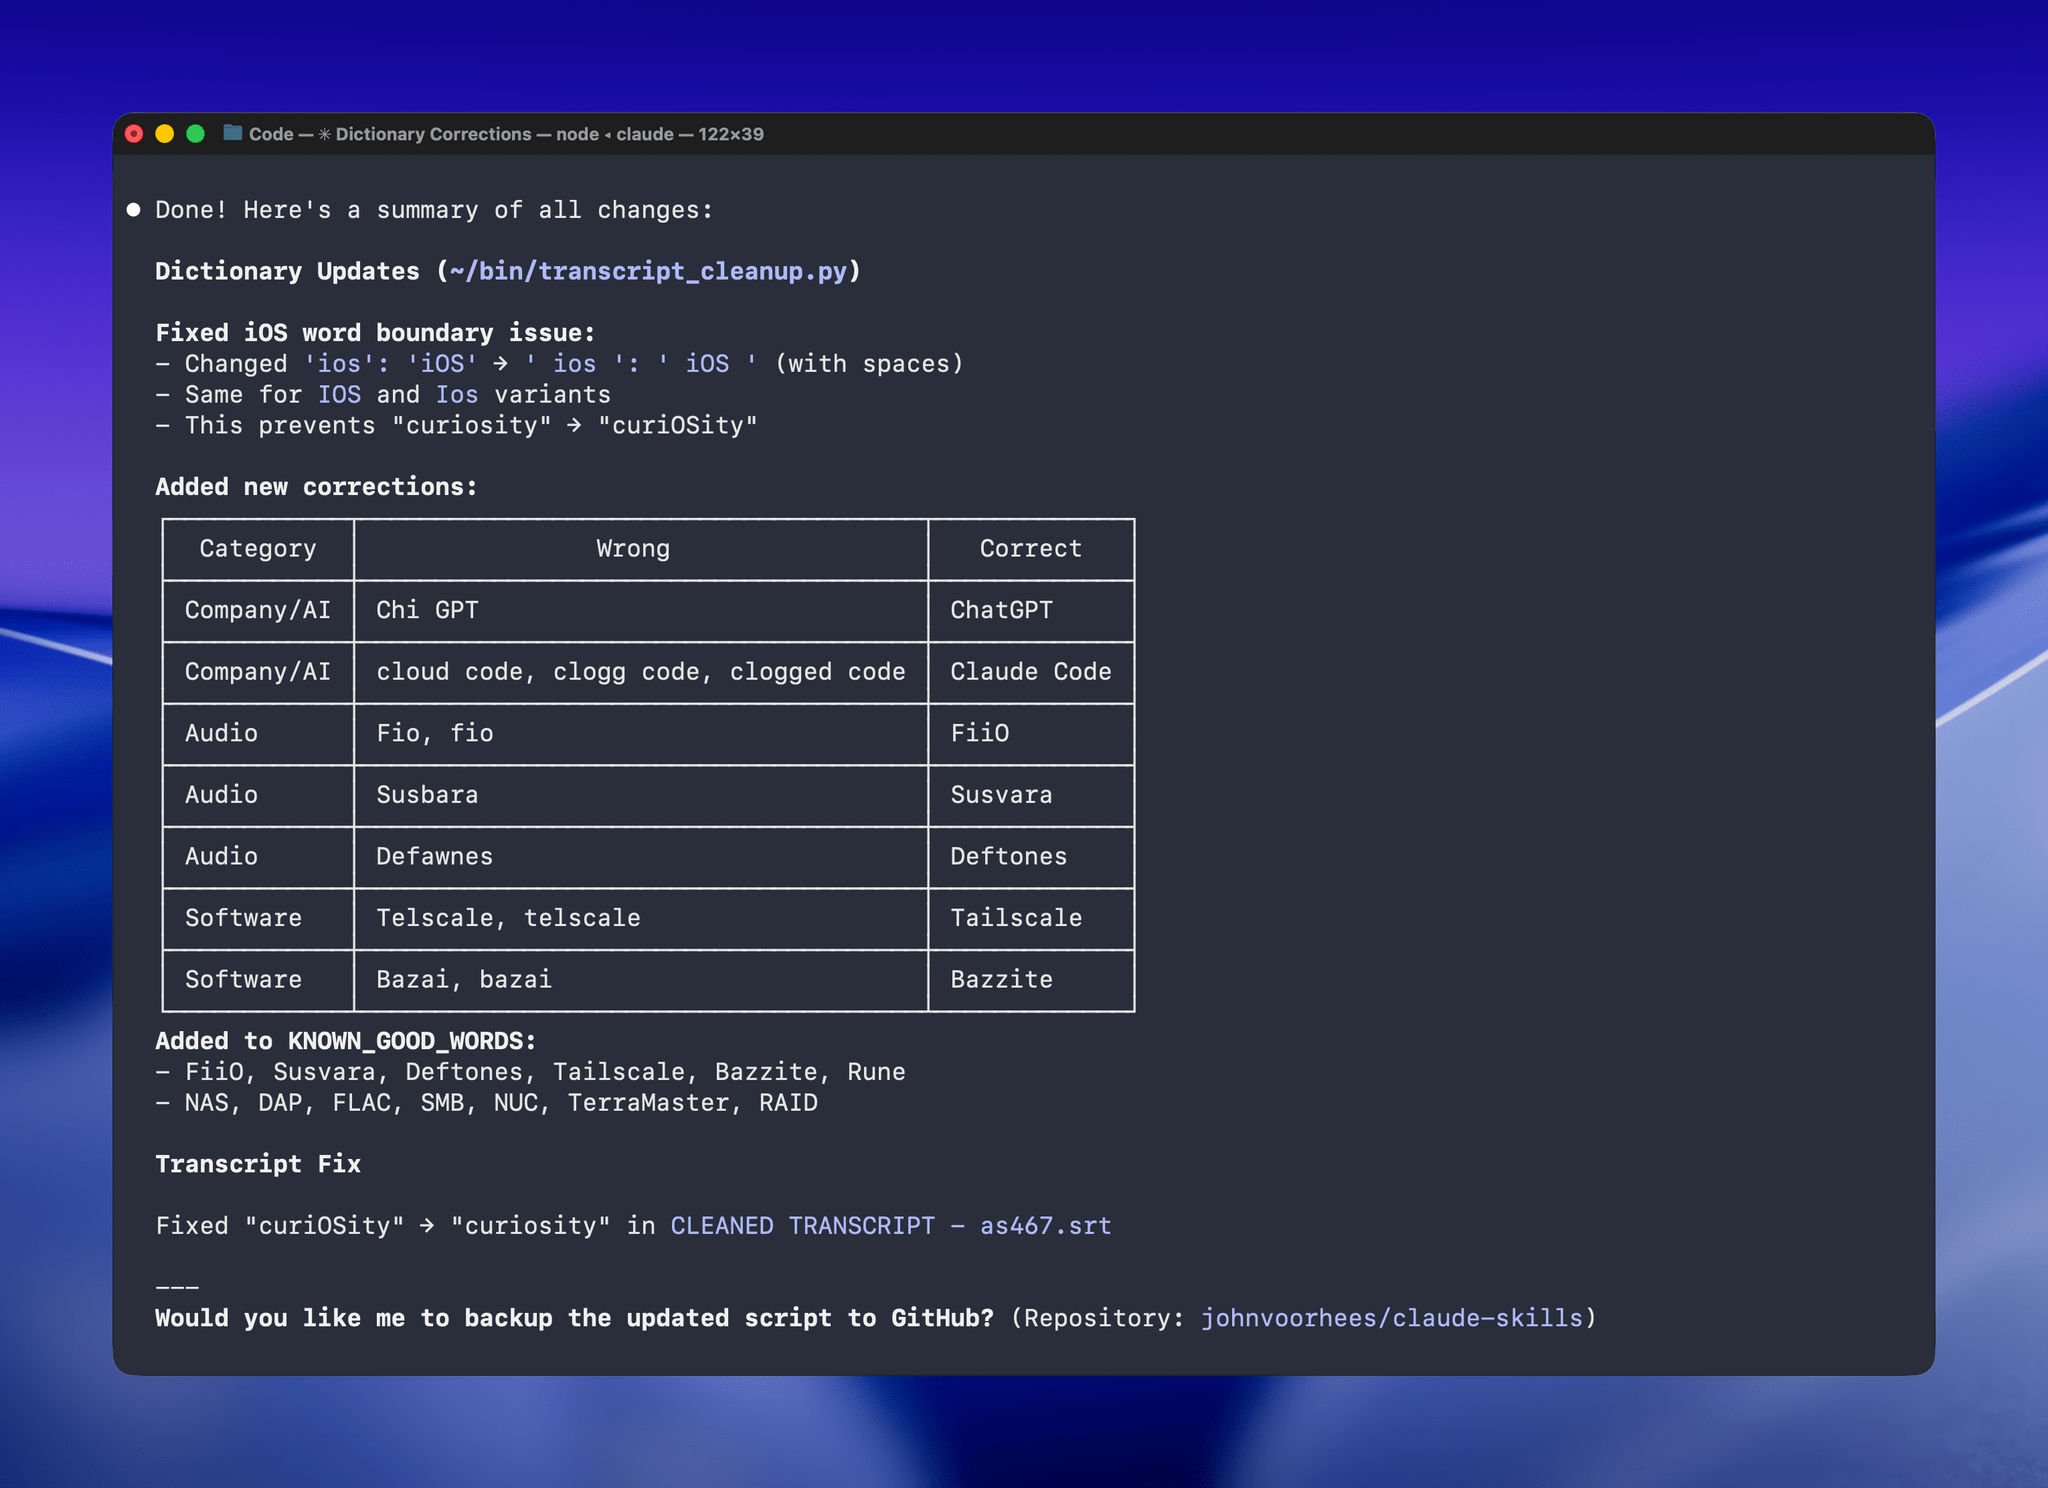
The last step is for me to confirm which suggested changes should be made and which should be added to the dictionary of corrections. The whole process takes just a couple of minutes, and it’s worth the effort. For the last episode of AppStories, the script found and corrected 27 errors, many of which were misspellings of our names, our podcasts, and MacStories. The final pass by Claude managed to catch seven more issues, including everything from a misspelling of the band name Deftones to Susvara, a model of headphones, and Bazzite, an open-source SteamOS project. Those are far from everyday words, but now, their misspellings are not only fixed in the latest episode of AppStories, they’re in the dictionary where those words will always be corrected whether Claude’s analysis catches them or not.
I’ve used this same pattern over and over again. I have Claude build me a reliable, deterministic script that helps me work more efficiently; then, I layer in a bit of generative analysis to improve the script in ways that would be impossible or incredibly complex to code deterministically. Here, that generative “extra” looks for spelling errors. Elsewhere, I use it to do things like rank items in a database based on a natural language prompt. It’s an additional pass that elevates the performance of the workflow beyond what was possible when I was using a find-and-replace app and later a simple dictionary check that I manually added items to. The idea behind my transcription cleanup workflow has been the same since the beginning, but boy, have the tools improved the results since I first used Whisper three years ago.
Access Extra Content and Perks
Founded in 2015, Club MacStories has delivered exclusive content every week for nearly a decade.
What started with weekly and monthly email newsletters has blossomed into a family of memberships designed for every MacStories fan.
Club MacStories: Weekly and monthly newsletters via email and the web that are brimming with apps, tips, automation workflows, longform writing, early access to the MacStories Unwind podcast, periodic giveaways, and more;
Club MacStories+: Everything that Club MacStories offers, plus an active Discord community, advanced search and custom RSS features for exploring the Club’s entire back catalog, bonus columns, and dozens of app discounts;
Club Premier: All of the above and AppStories+, an extended version of our flagship podcast that’s delivered early, ad-free, and in high-bitrate audio.
Awake: A Considered, Effective Alarm for Chronic Snoozers
Waking up on time is a quintessential human problem. Over the years, we’ve come up with all kinds of solutions, from ringing analog clocks to flashing lights to motorized digital clocks that roll away from our bedsides as they chime, forcing us to get up and find them to turn them off. But what if there was a way to use a device you already have – your phone – to help you break the habit of snoozing and actually get out of bed when you’re supposed to?
That’s what unorderly, the team behind the day planner app and App Store Awards 2025 finalist Structured, have set out to do with their new alarm app Awake. Built on the newly introduced AlarmKit API, which gives third-party alarm apps the same level of system access as Apple’s Clock app, Awake takes a comprehensive approach to setting alarms that’s meant not only to wake you up but to help you feel more alert and prepared for the day when you do.
If you’ve ever used Structured before, you’re aware of how deeply the unorderly team considers every element of their work, from the color scheme to the fine details of editing events, to make tools that are both elegant and powerful. I’m happy to report that the same level of care is reflected in Awake, both in its design and in the balance of simplicity and customization it offers.
Access Extra Content and Perks
Founded in 2015, Club MacStories has delivered exclusive content every week for nearly a decade.
What started with weekly and monthly email newsletters has blossomed into a family of memberships designed for every MacStories fan.
Club MacStories: Weekly and monthly newsletters via email and the web that are brimming with apps, tips, automation workflows, longform writing, early access to the MacStories Unwind podcast, periodic giveaways, and more;
Club MacStories+: Everything that Club MacStories offers, plus an active Discord community, advanced search and custom RSS features for exploring the Club’s entire back catalog, bonus columns, and dozens of app discounts;
Club Premier: All of the above and AppStories+, an extended version of our flagship podcast that’s delivered early, ad-free, and in high-bitrate audio.
Alyx: A Fun, Flexible Way to Track Caffeine Intake

Alyx is a new caffeine tracking app for the iPhone by Jordan Morgan that’s simple, fun, and flexible all at once. It’s a great example of marrying Apple’s latest design language with recent technologies in a way that serves its users incredibly well.
Access Extra Content and Perks
Founded in 2015, Club MacStories has delivered exclusive content every week for nearly a decade.
What started with weekly and monthly email newsletters has blossomed into a family of memberships designed for every MacStories fan.
Club MacStories: Weekly and monthly newsletters via email and the web that are brimming with apps, tips, automation workflows, longform writing, early access to the MacStories Unwind podcast, periodic giveaways, and more;
Club MacStories+: Everything that Club MacStories offers, plus an active Discord community, advanced search and custom RSS features for exploring the Club’s entire back catalog, bonus columns, and dozens of app discounts;
Club Premier: All of the above and AppStories+, an extended version of our flagship podcast that’s delivered early, ad-free, and in high-bitrate audio.
Festivitas Brings Fresh Whimsy to Your Mac, iPhone, and iPad for the Holiday Season
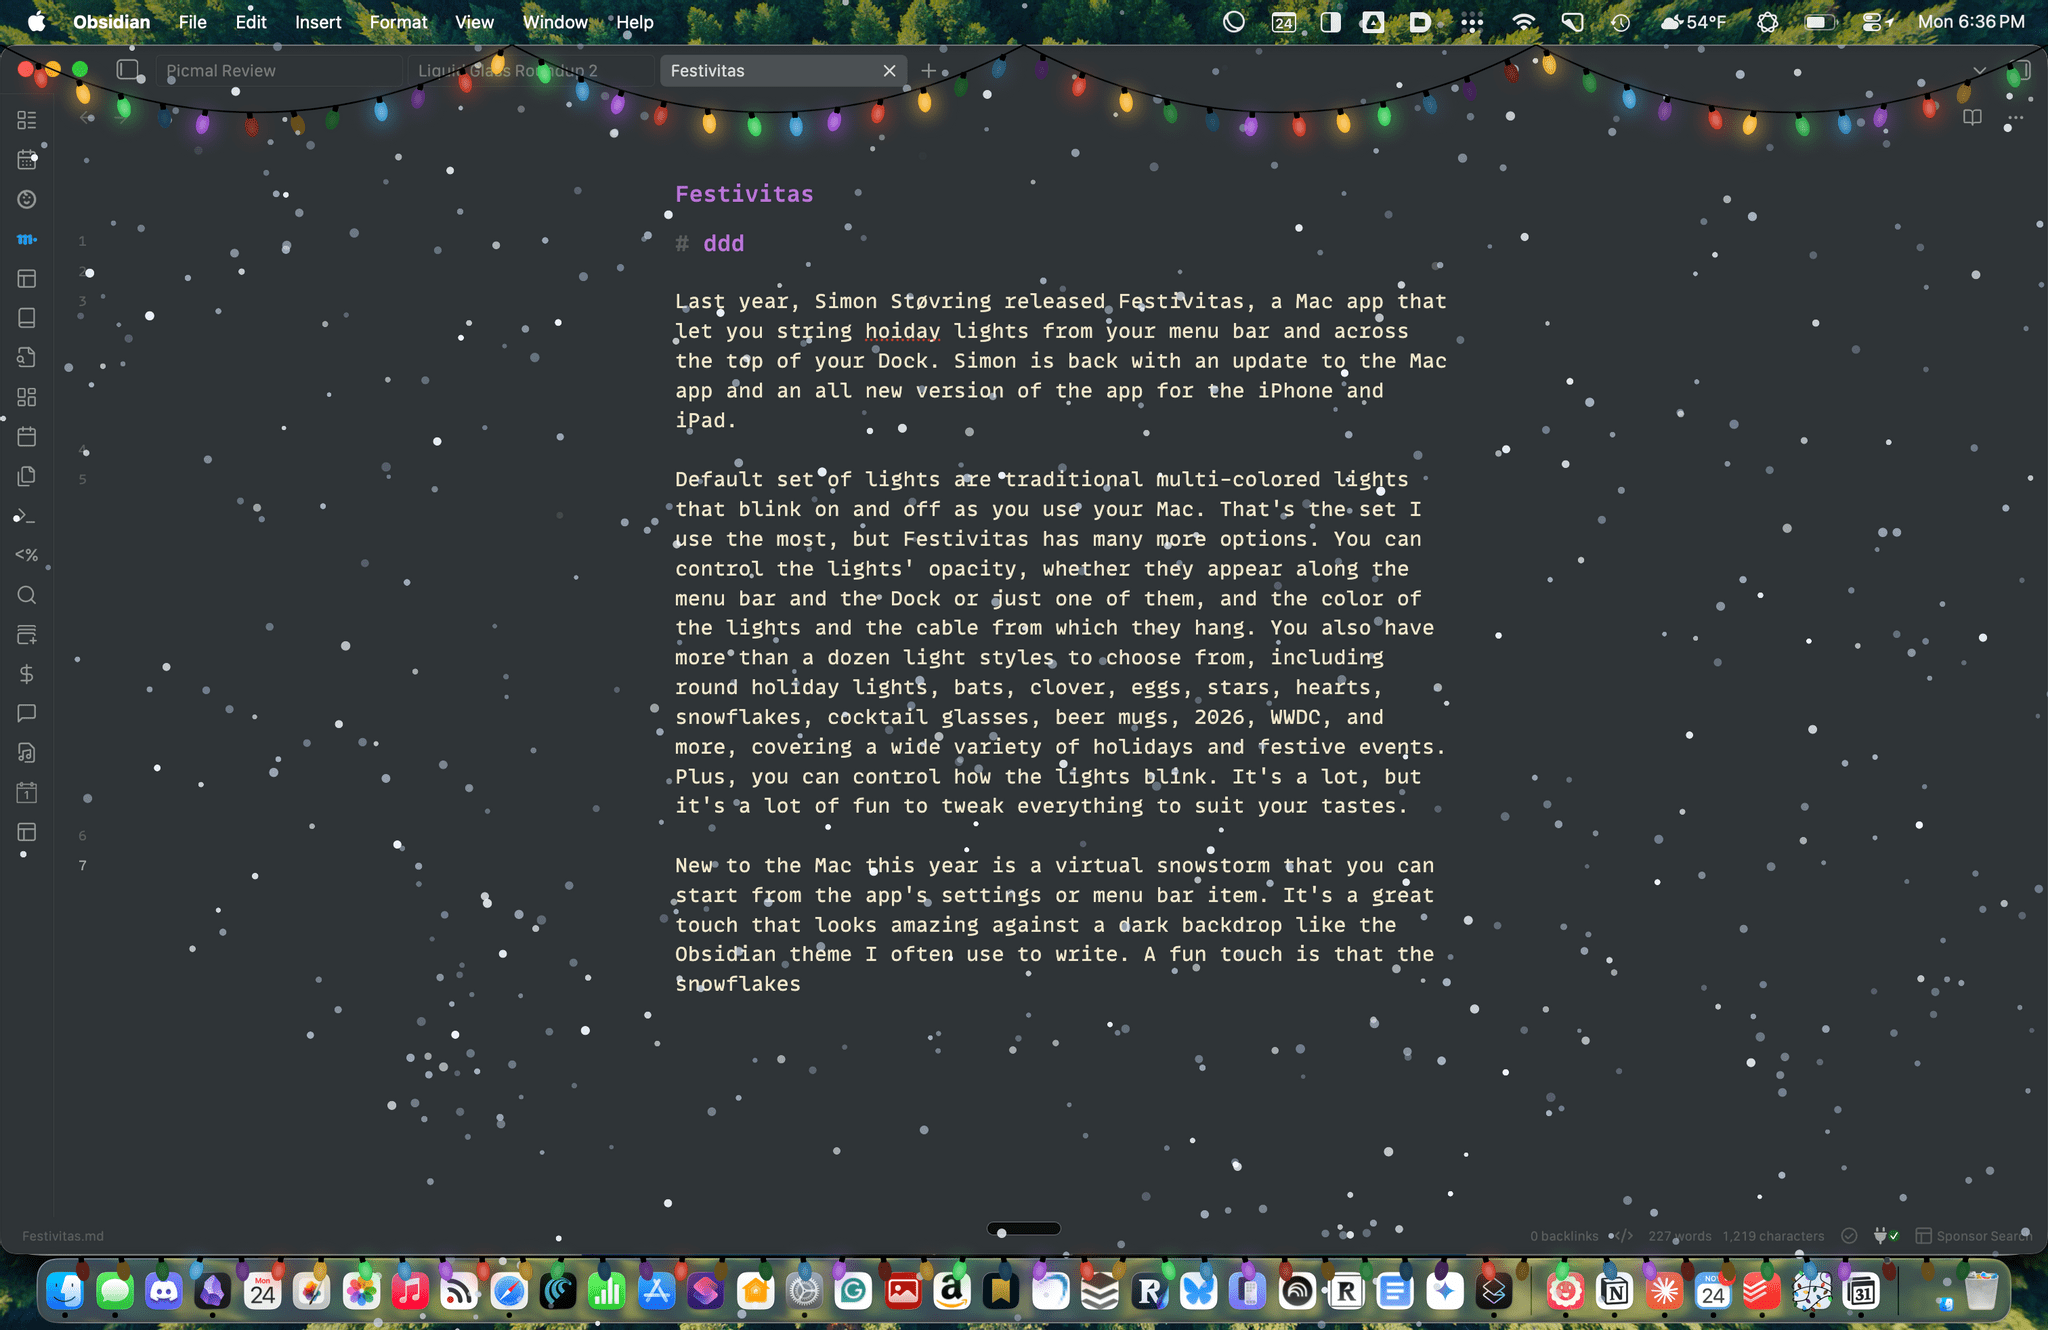
Last year, Simon Støvring released Festivitas, a Mac app that lets you string holiday lights from your menu bar and across the top of your Dock. This year, Simon is back with an update to the Mac app and a new version for the iPhone and iPad.
The default set of lights consists of traditional multi-colored bulbs that blink on and off as you use your Mac. That’s the set I use the most, but Festivitas offers many more options. You can control the lights’ opacity, whether they appear along both the menu bar and the Dock or just one of them, and the colors of the lights and the cable from which they hang. You also have more than a dozen light styles to choose from, including round holiday lights, bats, clovers, eggs, stars, hearts, snowflakes, cocktail glasses, beer mugs, “2026,” “WWDC,” and more, covering a wide variety of holidays and festive events. Plus, you can control how the lights blink. It’s a lot, but it’s also just plain fun to tweak everything to suit your tastes.
This year, the Mac app adds a virtual snowstorm that you can start from the app’s settings or menu bar item. It’s a great addition that looks amazing against a dark backdrop like the Obsidian theme I often use to write. A fun touch is that the snowflakes avoid your pointer, and you can adjust the sensitivity of this feature in settings. You can also use your pointer to push around the lights hanging from the menu bar, which is handy for those times when they obscure Safari’s menu bar or other content.
The snow is lovely. I highly recommend pairing it with the Animal Crossing Snowy Day soundtrack on Nintendo Music. It’s an incredibly peaceful and relaxing combination.
Festivitas supports Shortcuts, too. Simon has created some fun example automations that you’ll find in the app’s settings to do things like turning on the snowstorm when snow is forecast and activating your lights when you play music.

New this year is a Festivitas app for the iPhone and iPad. The app lets you build small, medium, and large widgets to place on your Home Screen. You can either frame a photo with twinkling lights or create a transparent-style widget so the lights frame an element of your Home Screen. I love that the lights framing the photos are animated, an effect I know isn’t easy to do with a widget. You can also add text and make other adjustments to each widget.
Festivitas isn’t going to help you get more done. In fact, it might even slow you down a little bit, and maybe that’s the point. Taking a moment to enjoy the app’s lights and be mesmerized by the falling snow is a good reminder to slow down a little and have some fun.
Festivitas for the Mac is available directly from the app’s website for any price you want to name between $3.99 and $9.99. The iPhone and iPad version is a free download on the App Store with a range of in-app purchases from $3.99 to $9.99 to create a similar name-your-price system.
Access Extra Content and Perks
Founded in 2015, Club MacStories has delivered exclusive content every week for nearly a decade.
What started with weekly and monthly email newsletters has blossomed into a family of memberships designed for every MacStories fan.
Club MacStories: Weekly and monthly newsletters via email and the web that are brimming with apps, tips, automation workflows, longform writing, early access to the MacStories Unwind podcast, periodic giveaways, and more;
Club MacStories+: Everything that Club MacStories offers, plus an active Discord community, advanced search and custom RSS features for exploring the Club’s entire back catalog, bonus columns, and dozens of app discounts;
Club Premier: All of the above and AppStories+, an extended version of our flagship podcast that’s delivered early, ad-free, and in high-bitrate audio.
Picmal Streamlines Batch Conversion and Compression on the Mac
One of my favorite aspects of macOS is the endless supply of great utilities for doing anything you can imagine. If there’s something you want to do on your Mac, the chances are that there isn’t just one good utility to accomplish your task; there are several.
My latest discovery is a file conversion and compression app called Picmal. The app has a wonderfully simple, modern interface that sits on top of a lot of complexity, enabling batch conversion and compression with minimal effort.
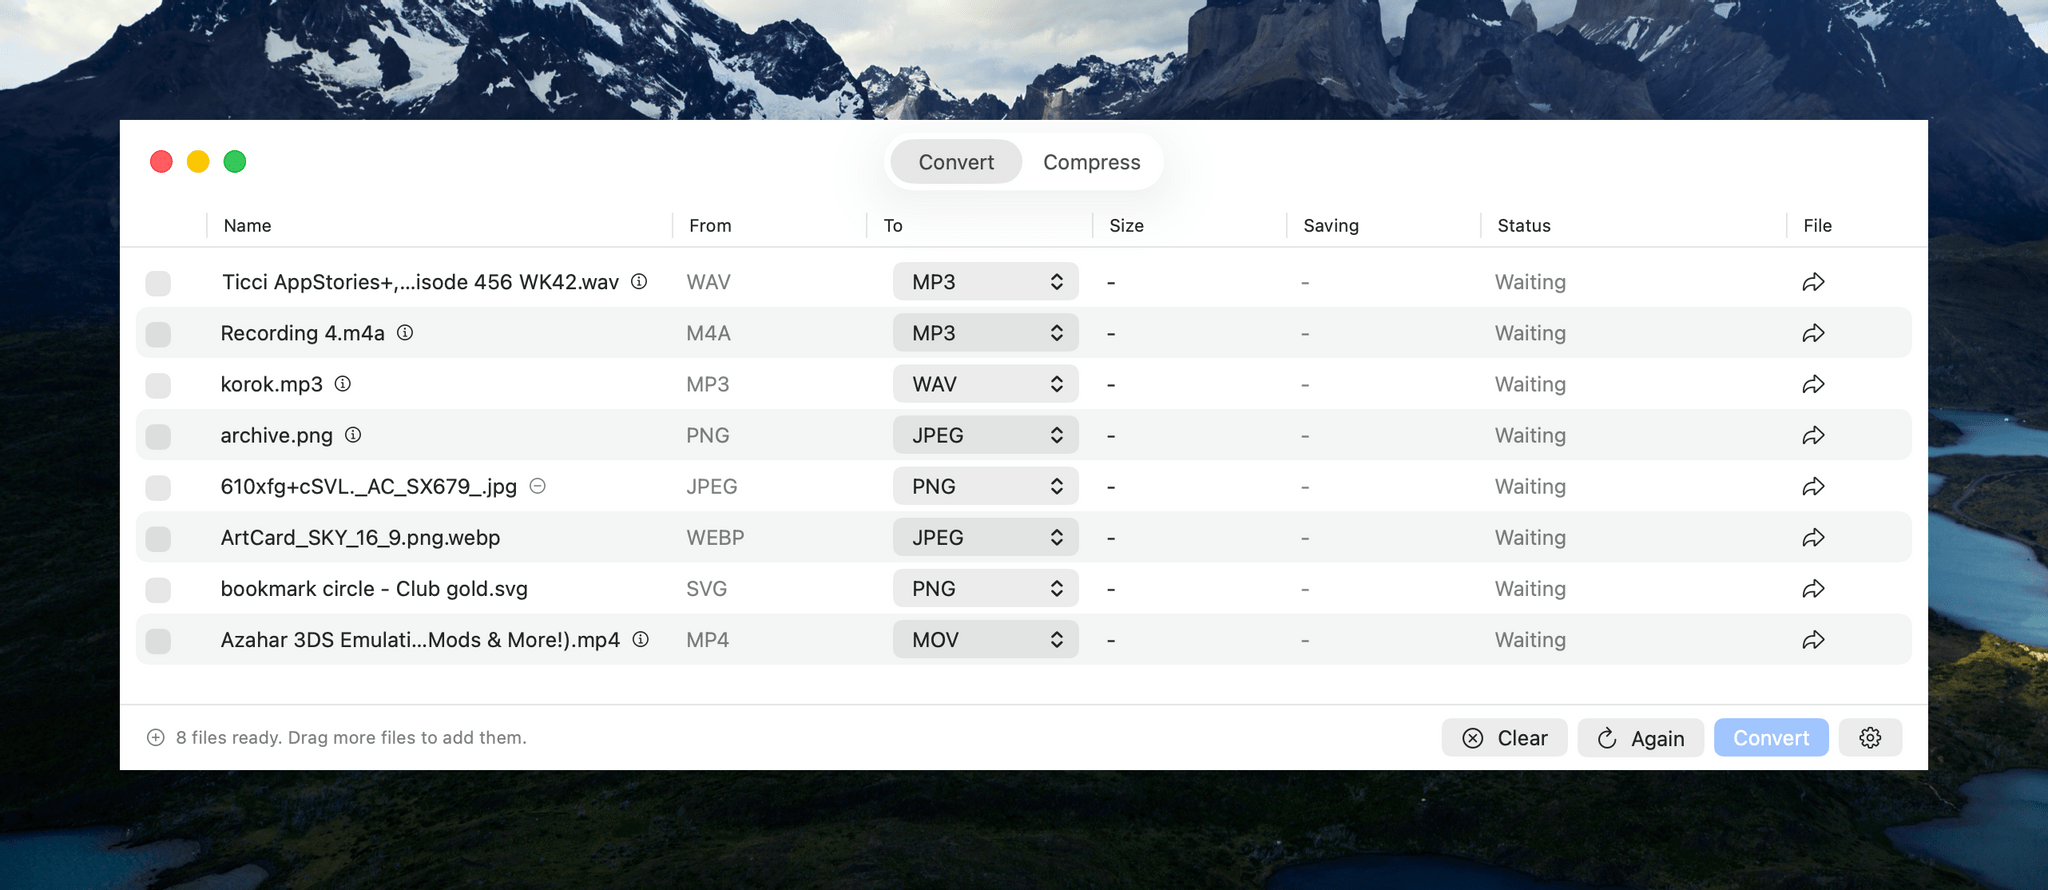
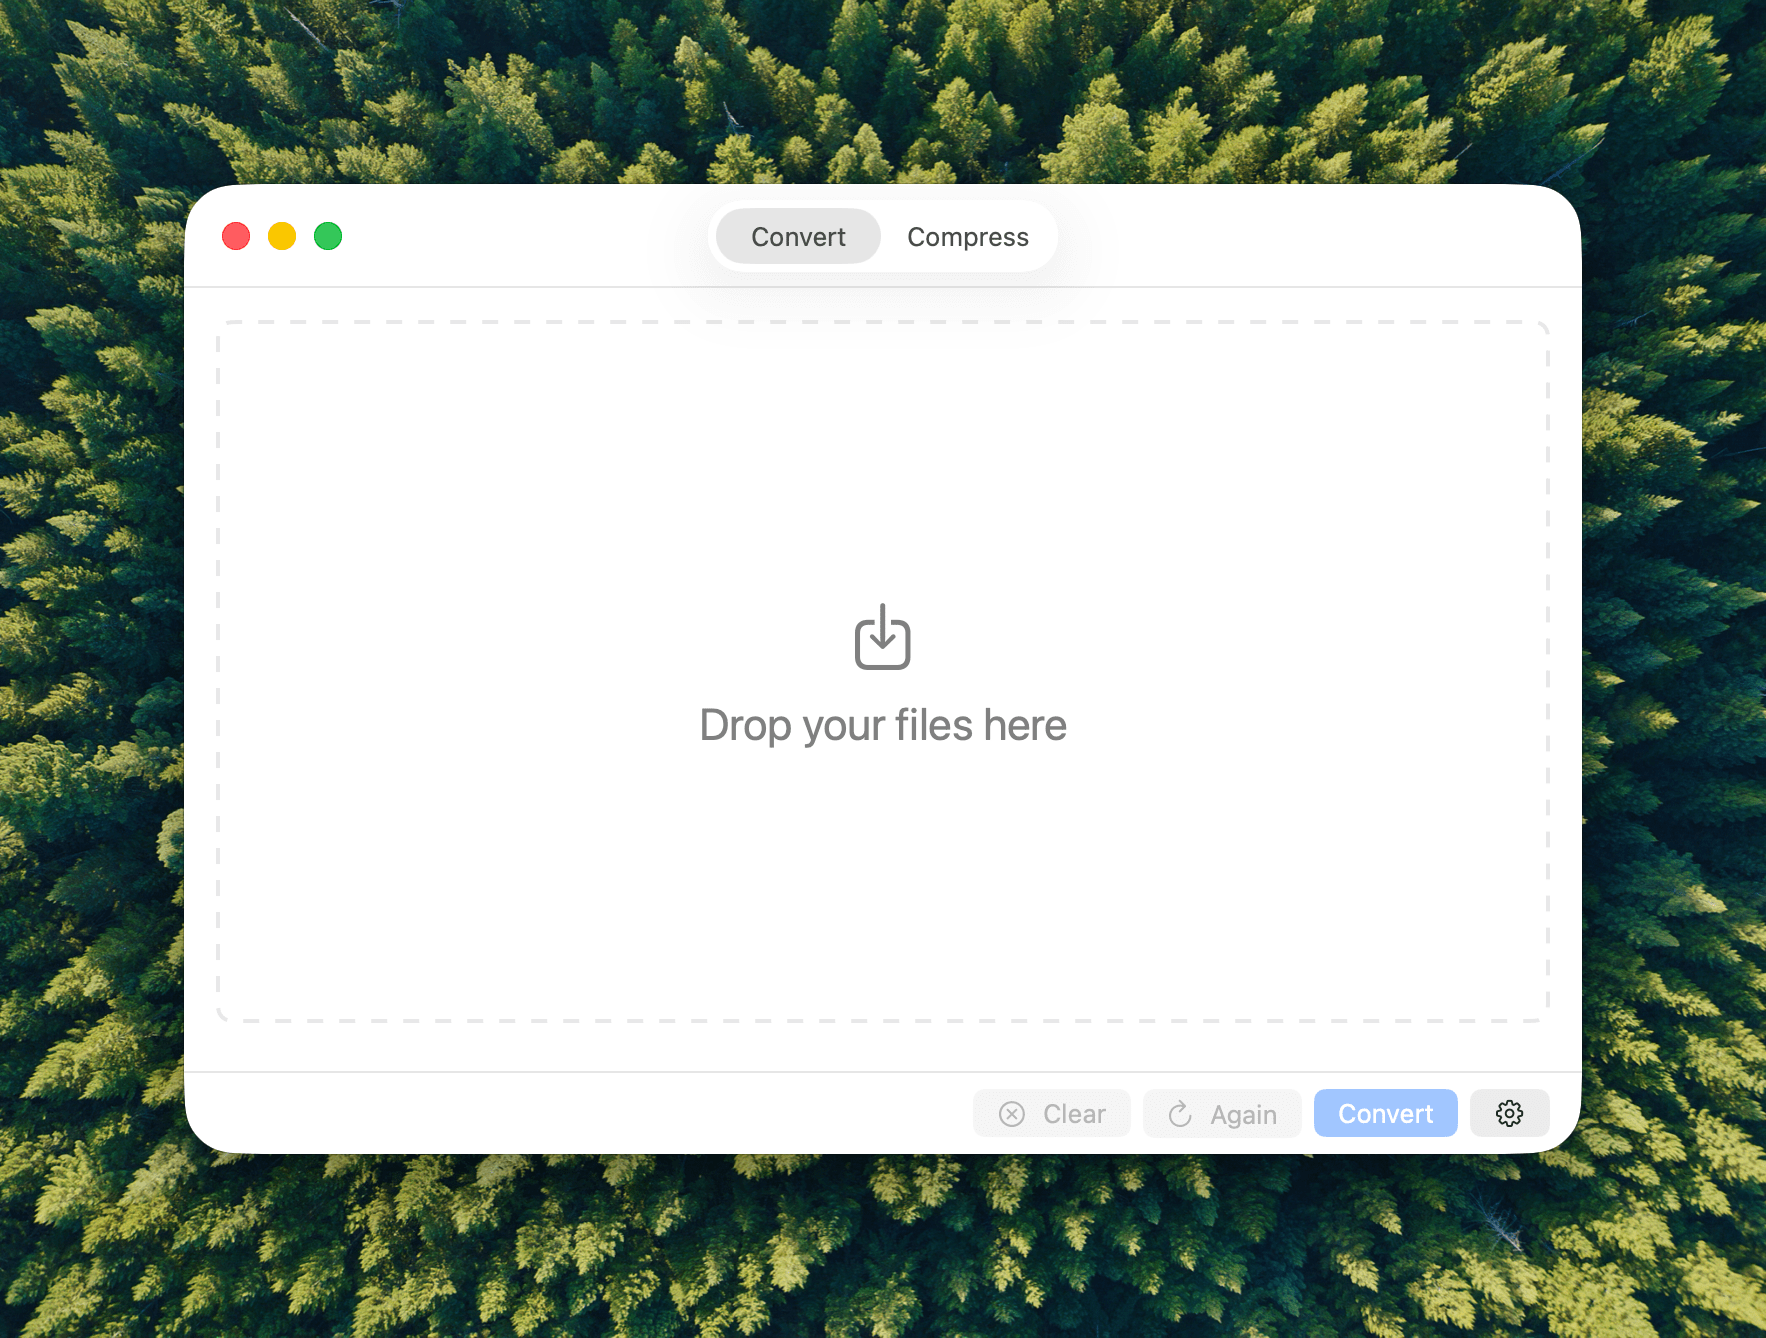
Picmal handles images, videos, and audio files in a single-window utility that features a Convert/Compress toggle at the top and a lot of empty space to start. The center of the window invites users to “Drop Your Files Here.” Once you do, the window animates into something a little closer to a Finder window with alternating white and light gray rows that make it simple to track metadata about each file.
Files can be dragged into Picmal from anywhere on your Mac, allowing for batch processing without moving your files to one location first, which I appreciate. Once converted, files are saved as new files in the folder they came from with a prefix or suffix that you can specify in the app’s Settings. You’re not limited by file type either. You can drag any combination of images, videos, and audio files into Picmal’s window, picking and choosing what to convert them into as you go.
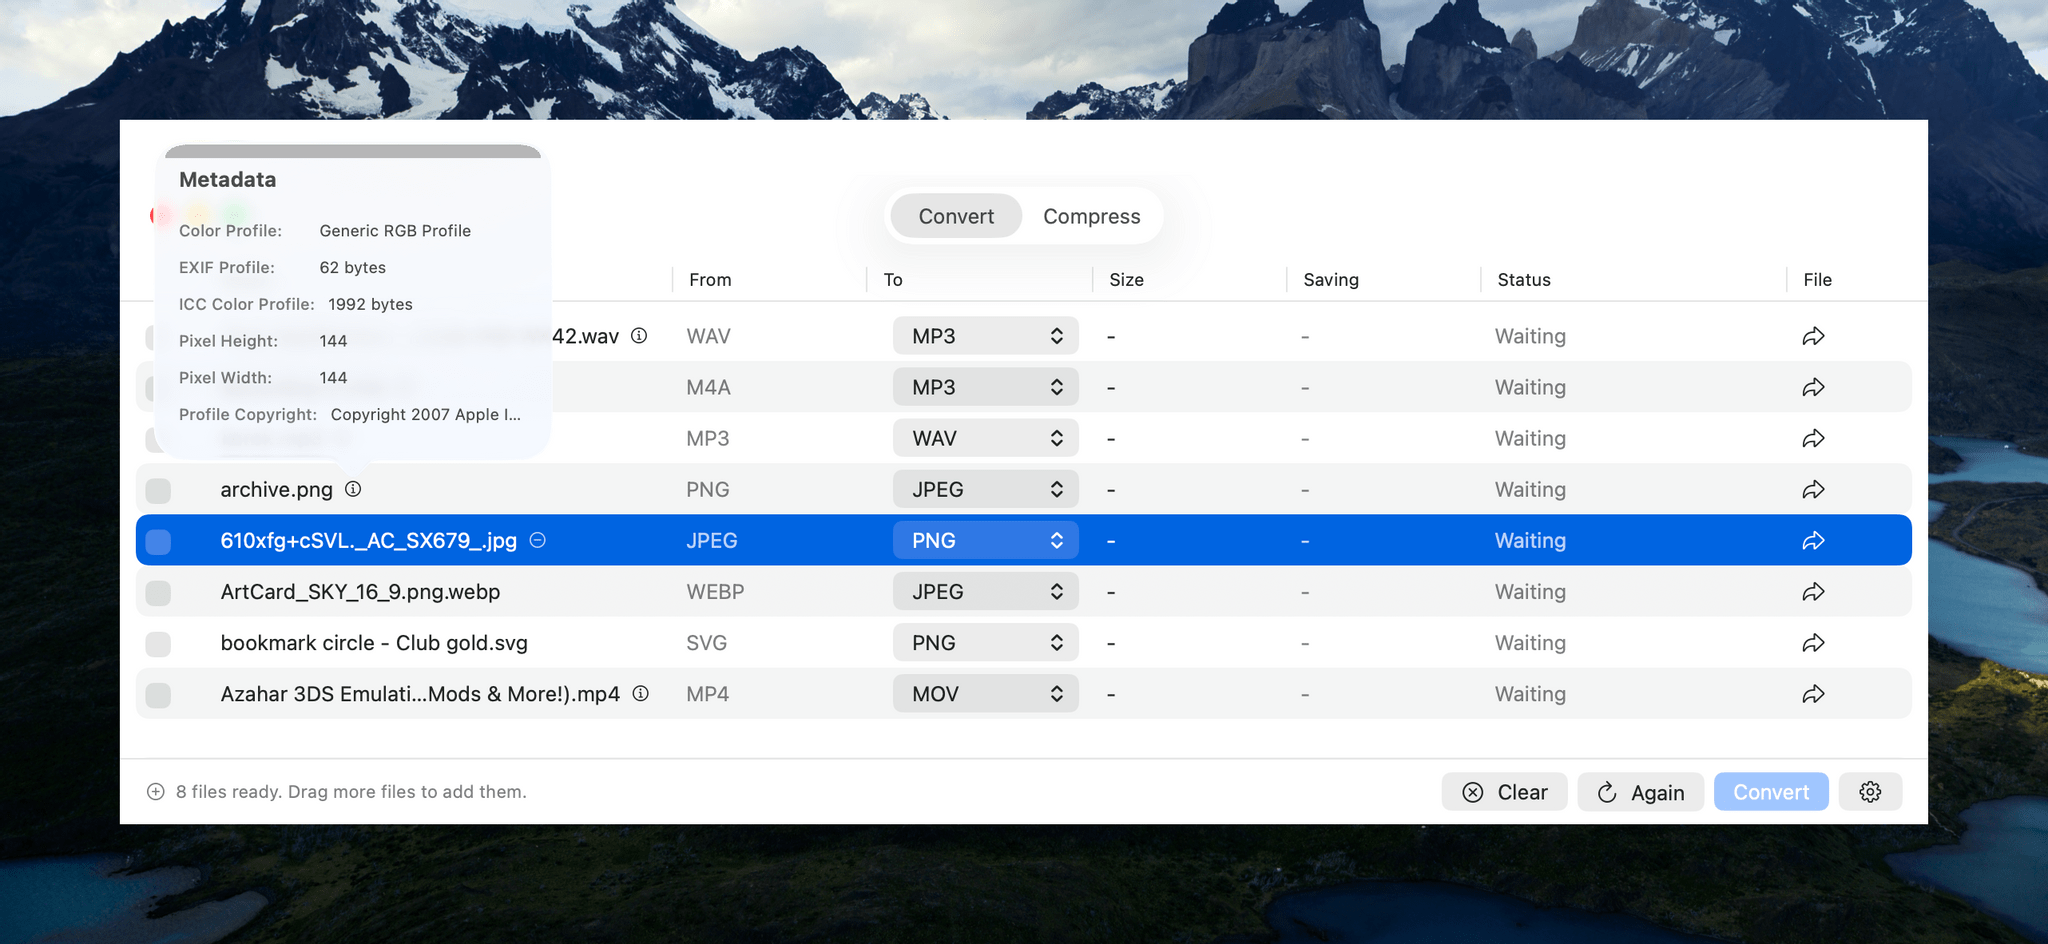
Next to some file types is a small info button that reports the sort of basic file metadata you find in the Finder’s info panel. That’s followed by a column that lists the file’s starting type, and a column with a dropdown menu for picking the destination file type. The list of supported file types is long, too, with the exact number of options dependent on the type you begin with.
If you want to check the file you’re about to convert before doing so, there’s also an arrow button on the far right of each file’s row that will take you to it in the Finder. The other columns report the output file’s size, any compression savings, and the status of each conversion. Whenever you want, you can add more files for conversion, kicking off a new batch once any ongoing conversions complete.
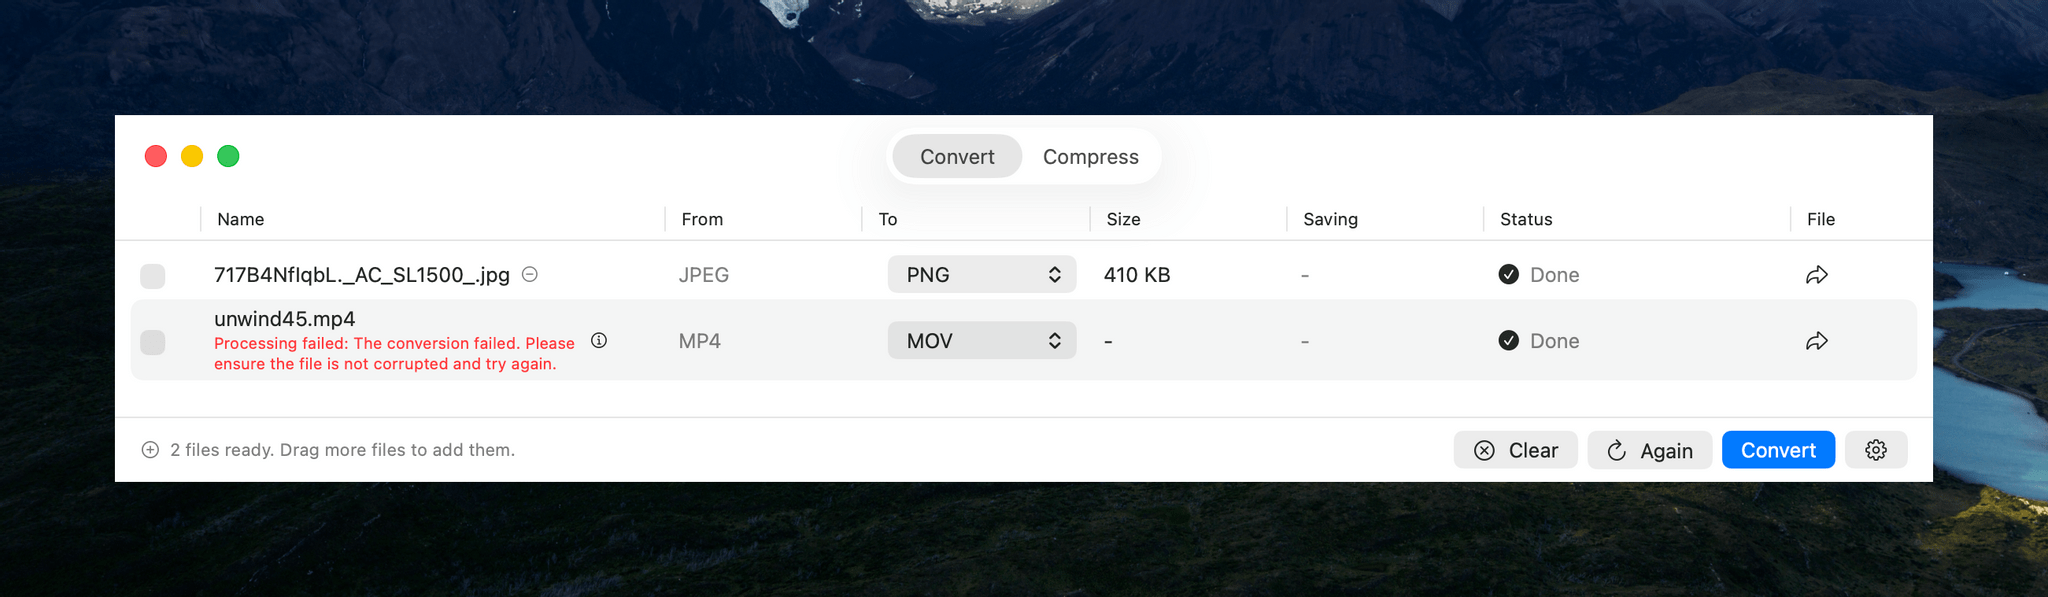
Most file conversions I tried went well, but I couldn’t manage to convert large MP4s to the MOV format.
In my testing, Picmal performed well overall. I converted images, audio, and videos to and from a variety of common formats such as PNG, JPEG, PDF, MP3, AAC, WAV, MP4, and MOV. However, I did run into trouble trying to convert a 1.55 GB MP4 of an episode of MacStories Unwind from MP4 to MOV. The conversion failed, even though much smaller files worked. Hopefully this is something that can be fixed in an upcoming update.
Another smaller issue I ran into is that there’s a checkbox next to each file in the Picmal file conversion interface that appears to be intended as a way to change the conversion file type for multiple files at once. However, the dropdown that appears when selecting multiple files of the same type didn’t give me an option to pick a new conversion type. The developer is aware of this and the large video file issue and is working to resolve both.
The other primary use for Picmal is file compression. The workflow is largely the same as converting files, with the size savings reported in a dedicated window column. By default, compressing files requires you to click on Picmal’s Compress button, but you can change the process so that it happens automatically instead. From Settings, you can also add compression to your file conversions, completing both steps together.
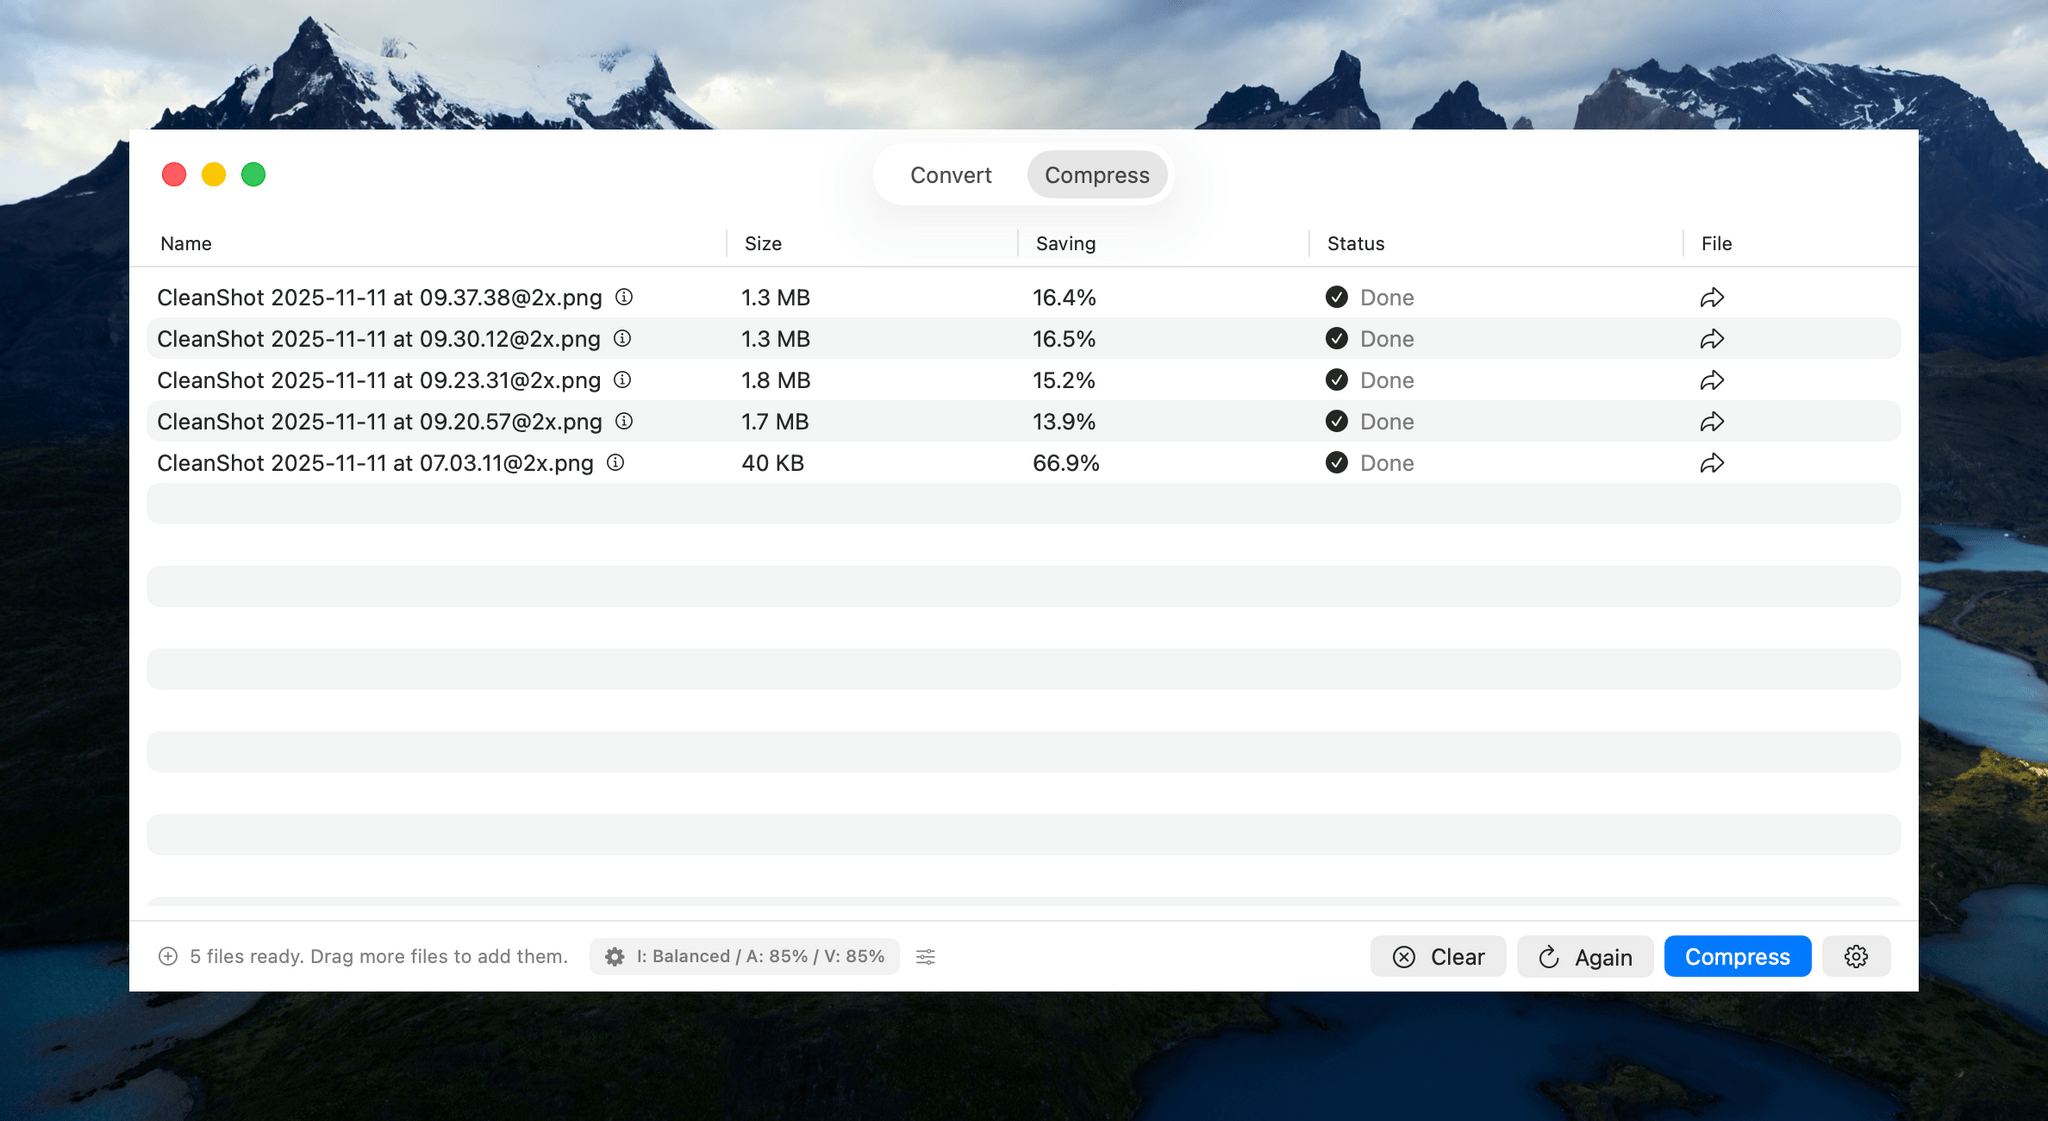
Audio and video compression quality are set to 85% by default, while image compression quality is set to ‘balanced.’ However, in each case, you can tweak the compression settings with more fine-grained controls. Another nice touch is that your compression selections and a link to Picmal’s Settings are both accessible from the bottom of the Picmal window, making your compression choices clear and simplifying the process of making any adjustments.
Aside from a couple of hiccups in my testing that the developer will likely have fixed soon, my experience with Picmal has been great. About the only thing I’d love to see added is support for Shortcuts. Otherwise, Picmal is an excellent way to manage file conversion and compression jobs of any size. There are other apps that accomplish something similar, but the simplicity and speed with which you can manage batch conversion and compression with Picmal sets it apart and makes it worth checking out.
Picmal is available directly from its developer for $9.99. That gets you the use of the app on one Mac at a time, which can be expanded to more Macs at an increasing per-Mac discount based on the number of licenses you purchase.
Access Extra Content and Perks
Founded in 2015, Club MacStories has delivered exclusive content every week for nearly a decade.
What started with weekly and monthly email newsletters has blossomed into a family of memberships designed for every MacStories fan.
Club MacStories: Weekly and monthly newsletters via email and the web that are brimming with apps, tips, automation workflows, longform writing, early access to the MacStories Unwind podcast, periodic giveaways, and more;
Club MacStories+: Everything that Club MacStories offers, plus an active Discord community, advanced search and custom RSS features for exploring the Club’s entire back catalog, bonus columns, and dozens of app discounts;
Club Premier: All of the above and AppStories+, an extended version of our flagship podcast that’s delivered early, ad-free, and in high-bitrate audio.
Tot 2.0: A Thoughtful Extension of an Already Elegant Note-Taking App
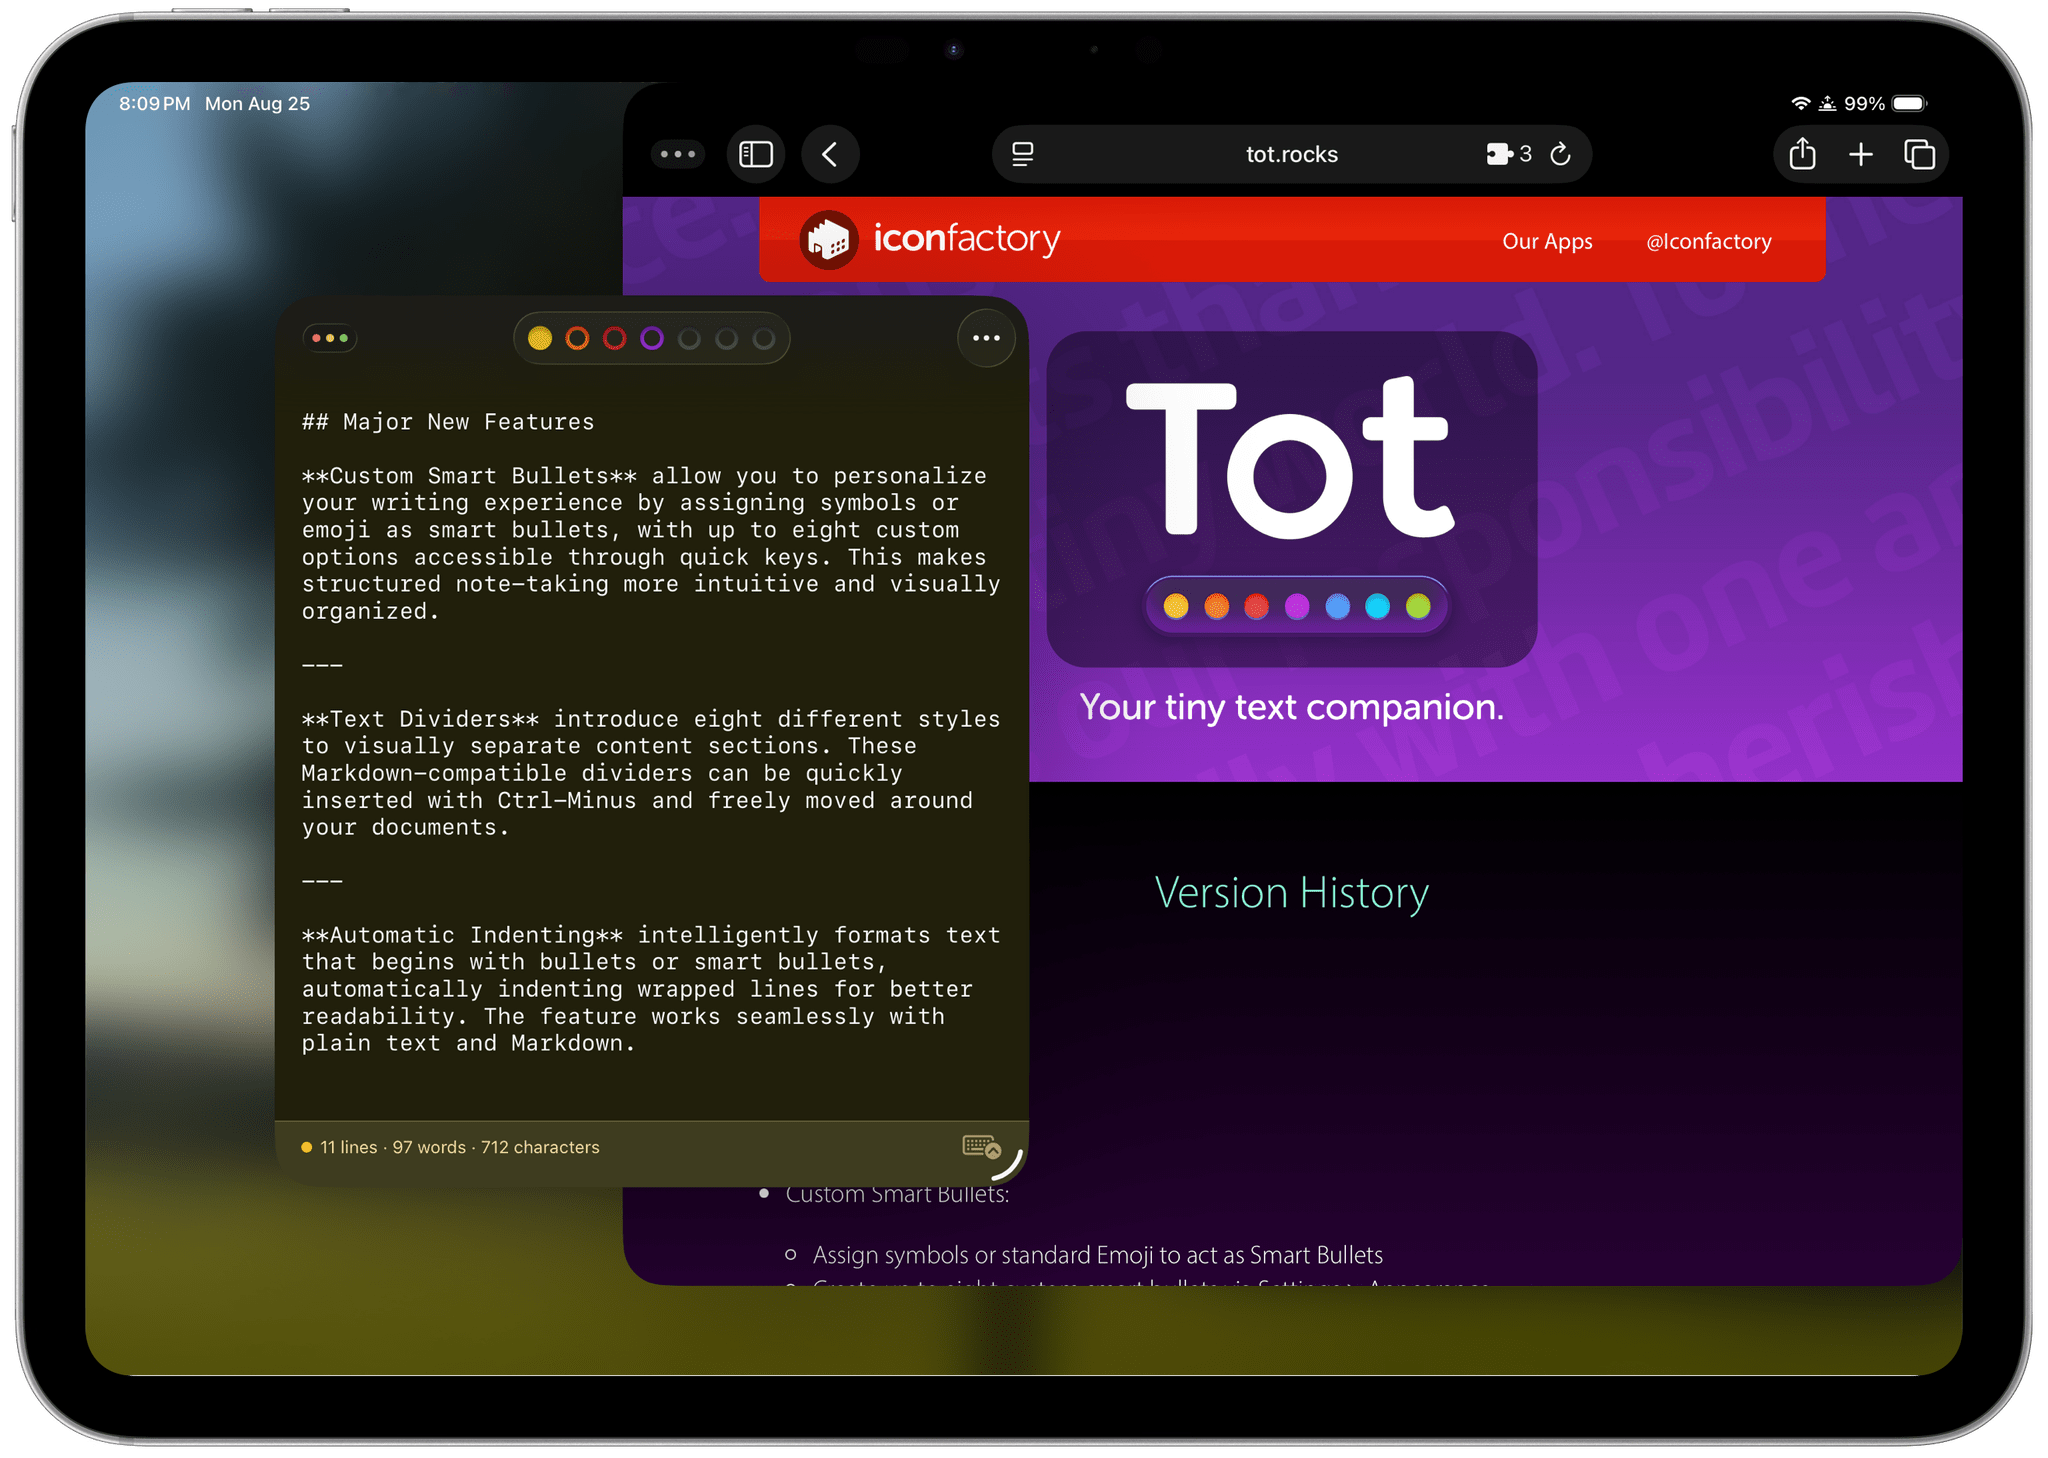
Late yesterday, The Iconfactory released 2.0 updates to Tot for macOS, Tot Pocket for iOS and iPadOS, and Tot Mini for watchOS. The apps, which The Iconfactory describes as tiny text companions, include a handful of big new features that span all three versions, along with other updates and fixes that are unique to each platform.
What hasn’t changed is Tot’s incredible design and reliable performance across all platforms. The app showcases some of The Iconfactory’s best app design work, which Federico described in his review of version 1.0:
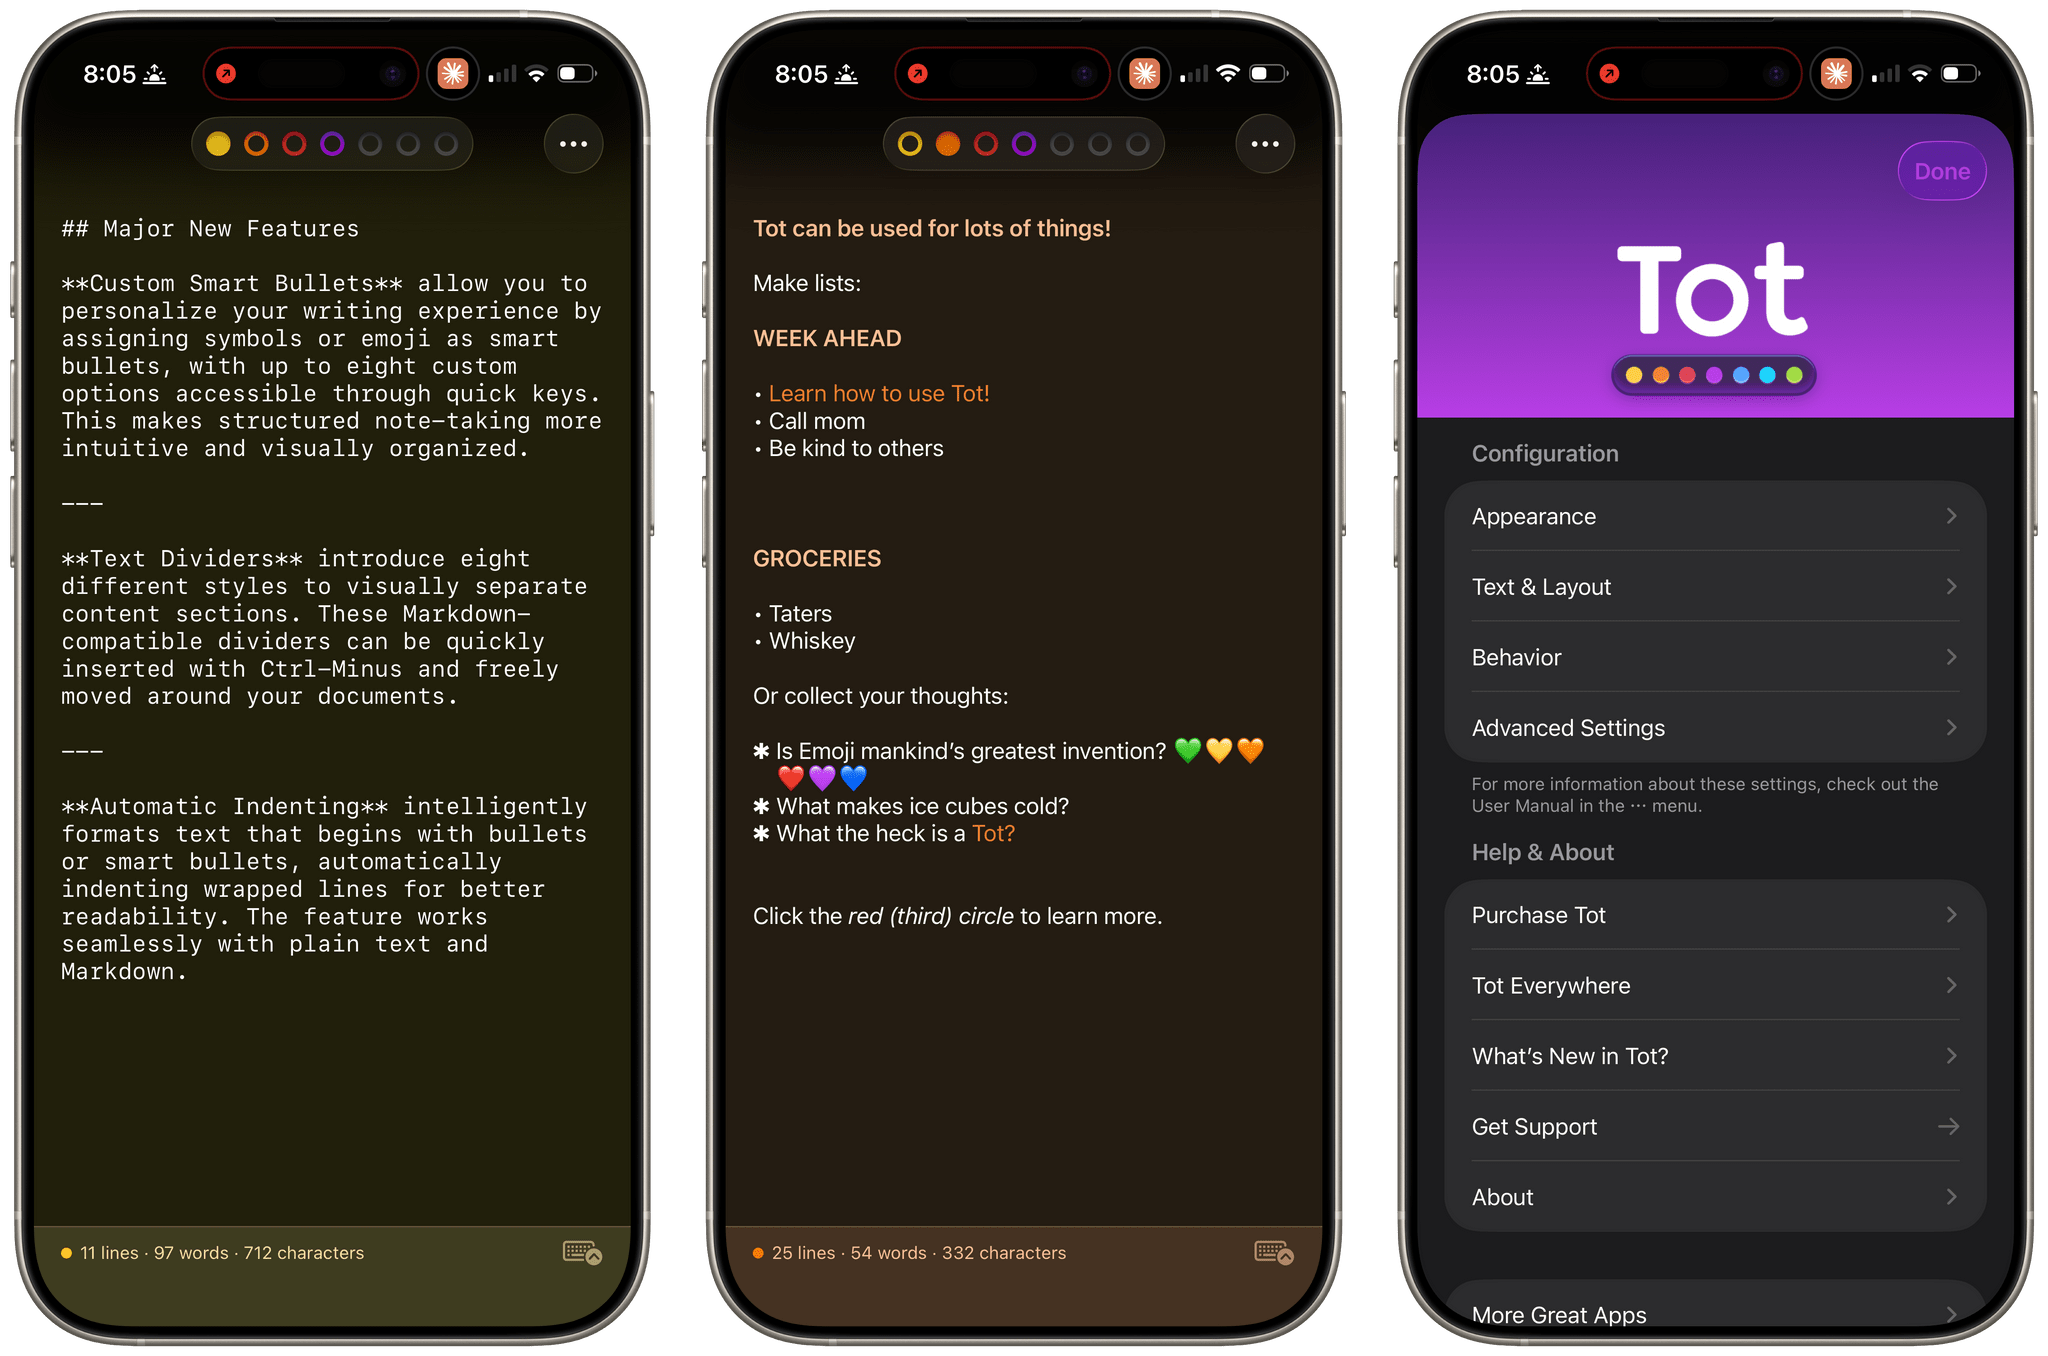
Tot’s colored dots serve the dual purpose of being spatial navigation tool and context indicators. You can navigate across documents in the app with a quick swipe, and in doing so on modern iPhones you’ll feel a delightful haptic tap; alternatively, you can tap the dots to switch documents. As I mentioned above, each dot carries a color, which becomes the background color of the selected document (vibrancy is also used to let the color shine through the software keyboard – a nice touch). The palette chosen by The Iconfactory for Tot’s seven documents is some of the finest selection of colors I’ve seen in a modern iOS app: it looks great in light mode, and it looks amazing in dark mode thanks to its combination of high contrast and translucency.
The combination of that elegant design with reliable sync across multiple OSes and thoughtful Shortcuts integration has understandably made the Tot family of apps integral to a lot of MacStories readers’ workflows. However, if you haven’t tried any of the Tot apps before, it’s worth checking out Federico’s review of version 1.0 for the fundamentals because they haven’t changed, and I’ll be focusing on what’s new.
My favorite 2.0 feature is that Tot now supports automatic indenting. If you indent a line using the Tab key, the next line will begin at the same indentation level when you hit Return. That makes creating hierarchical lists a lot faster than before. My only quibble with the feature is that if you’re making a bulleted list, to indent a line, you can’t indent using just the Tab key if the cursor appears anywhere in your line of text. However, you can use ⌘ + ] and ⌘ + ] to do the same thing. Regardless of how indenting is invoked, it’s an excellent addition to Tot that I was glad to see included in the update.
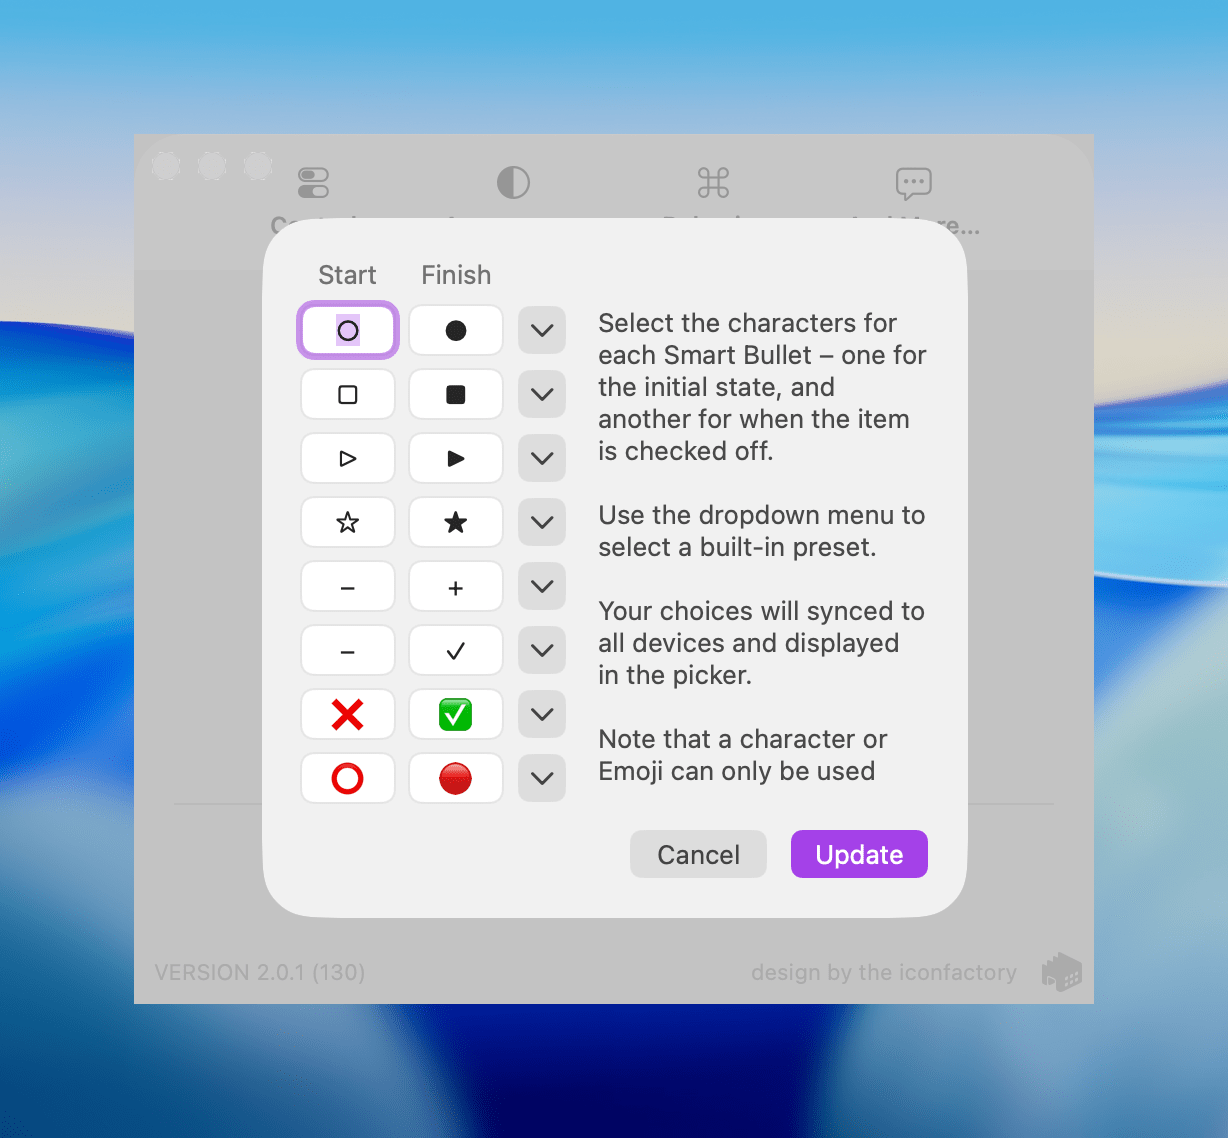
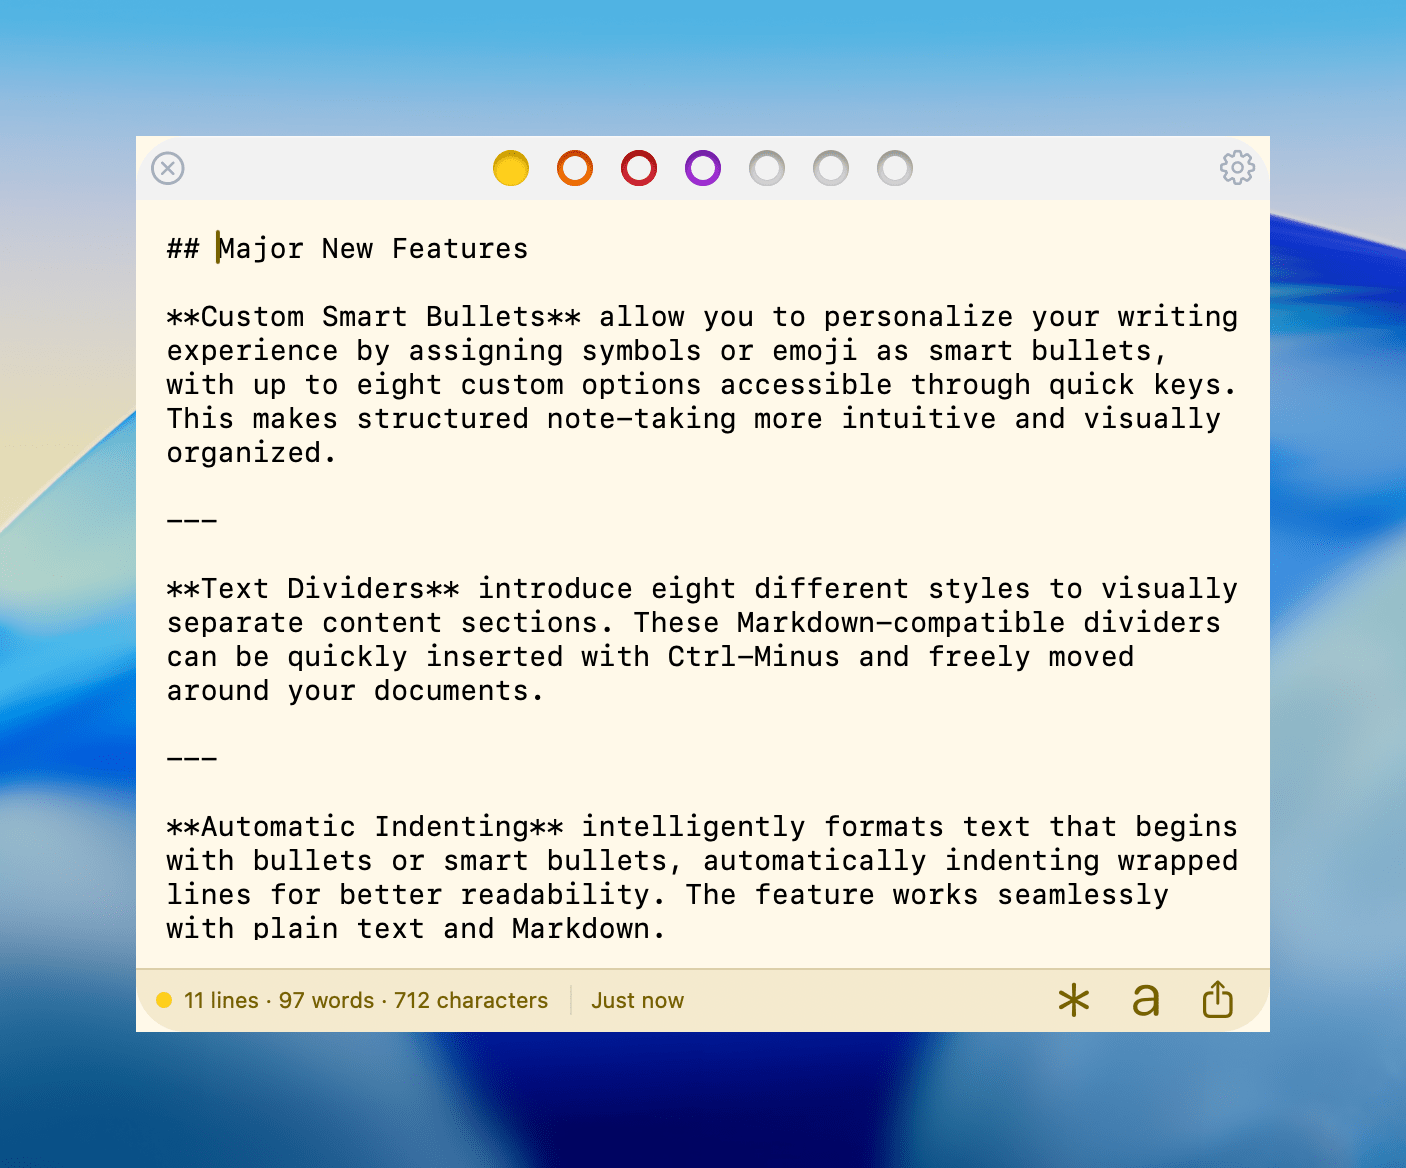
Speaking of bullets, Tot 2.0 also supports customizable smart bullets. From the app’s settings, you can choose from different pairs of symbols and emoji, like empty and filled circles or empty and filled stars. To toggle between the symbols in each pair, all you need to do is click or tap on them. If the eight default pairs aren’t to your taste, there are a bunch of alternatives you can use instead, such as the snowflake and flame emoji. It’s a clever twist on standard checkboxes and radio buttons that I’ve enjoyed because it adds some character and color to the app.
Tot adds eight new text dividers, too. From the classic three dashes used in Markdown to asterisks and more, there’s a nice variety of options. Plus, you can easily insert a divider with the keyboard shortcut Control + Minus.
The Iconfactory has made other platform-specific changes, too:
- Settings have been redesigned in the Mac version and include new options, such as floating the Tot window over other windows.
- The iOS and iPadOS versions include a menu button that offers access to the app’s settings along with a couple of bulk operations like saving, sharing, and exporting notes.
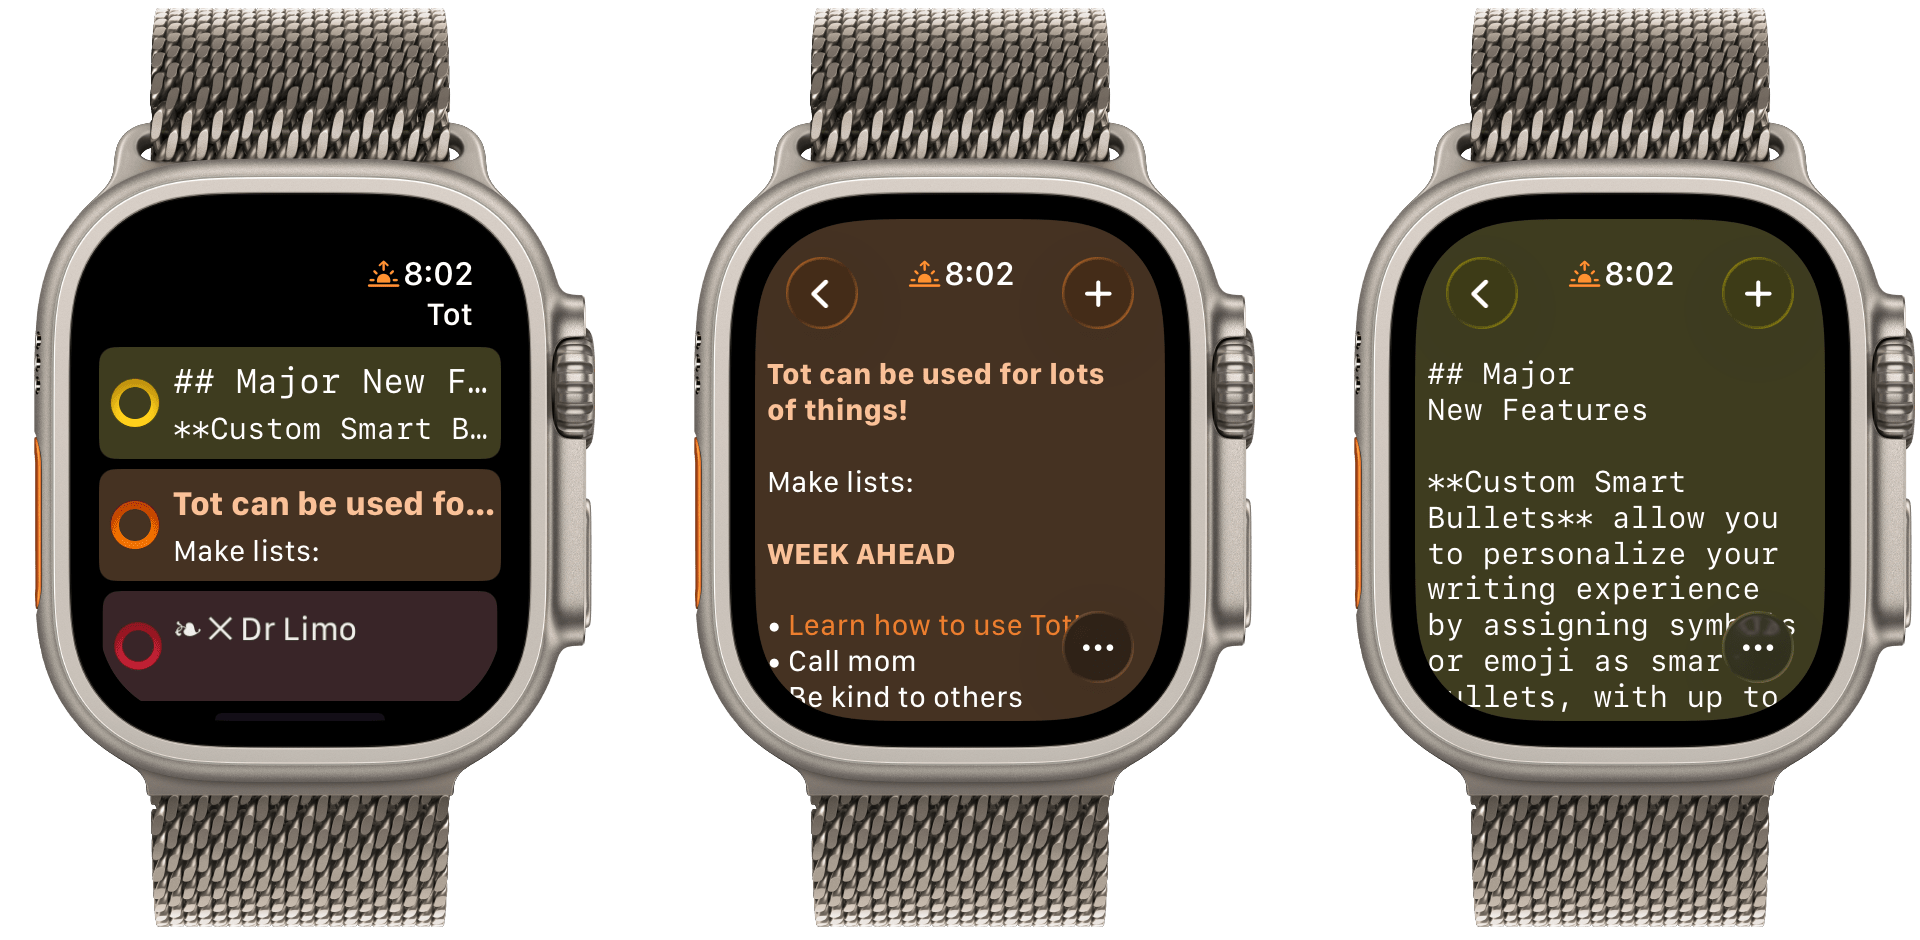
- The watch app’s design has been refreshed with simplified controls and colorful backgrounds.
It’s great to see the Tot apps reach version 2.0. The three tentpole features – automatic indenting, custom smart bullets, and text dividers – are all meaningful improvements that don’t compromise the apps’ simplicity. Those features, along with several quality of life improvements and other bug fixes that you can read about in Tot’s version history, add up to an excellent update that should serve users well for a long time.
Tot is available on the Mac App Store, and Tot Pocket is available on the iOS and iPadOS App Store. Each costs $19.99, though existing users can update to Tot Pocket at no extra cost. Tot Mini, the Apple Watch app, is available as a separate $1.99 purchase.
Access Extra Content and Perks
Founded in 2015, Club MacStories has delivered exclusive content every week for nearly a decade.
What started with weekly and monthly email newsletters has blossomed into a family of memberships designed for every MacStories fan.
Club MacStories: Weekly and monthly newsletters via email and the web that are brimming with apps, tips, automation workflows, longform writing, early access to the MacStories Unwind podcast, periodic giveaways, and more;
Club MacStories+: Everything that Club MacStories offers, plus an active Discord community, advanced search and custom RSS features for exploring the Club’s entire back catalog, bonus columns, and dozens of app discounts;
Club Premier: All of the above and AppStories+, an extended version of our flagship podcast that’s delivered early, ad-free, and in high-bitrate audio.
Shareshot 1.3: Greater Image Flexibility, New Backgrounds, and Extended Shortcuts Support
If you have a screenshot you need to frame, Shareshot is one of your best bets. That’s because it makes it so hard to create an image that looks bad. The app, which is available for the iPhone, iPad, Mac, and Vision Pro, has a lot of options for tweaking the appearance of your framed screenshot, so your final image won’t have a cookie-cutter look. However, there are also just enough constraints to prevent you from creating something truly awful.
You can check out my original review and coverage on Club MacStories for the details on version 1.0 and subsequent releases, but today’s focus is on version 1.3, which covers three areas:
- Increased image size flexibility
- New backgrounds
- Updated and extended Shortcuts actions
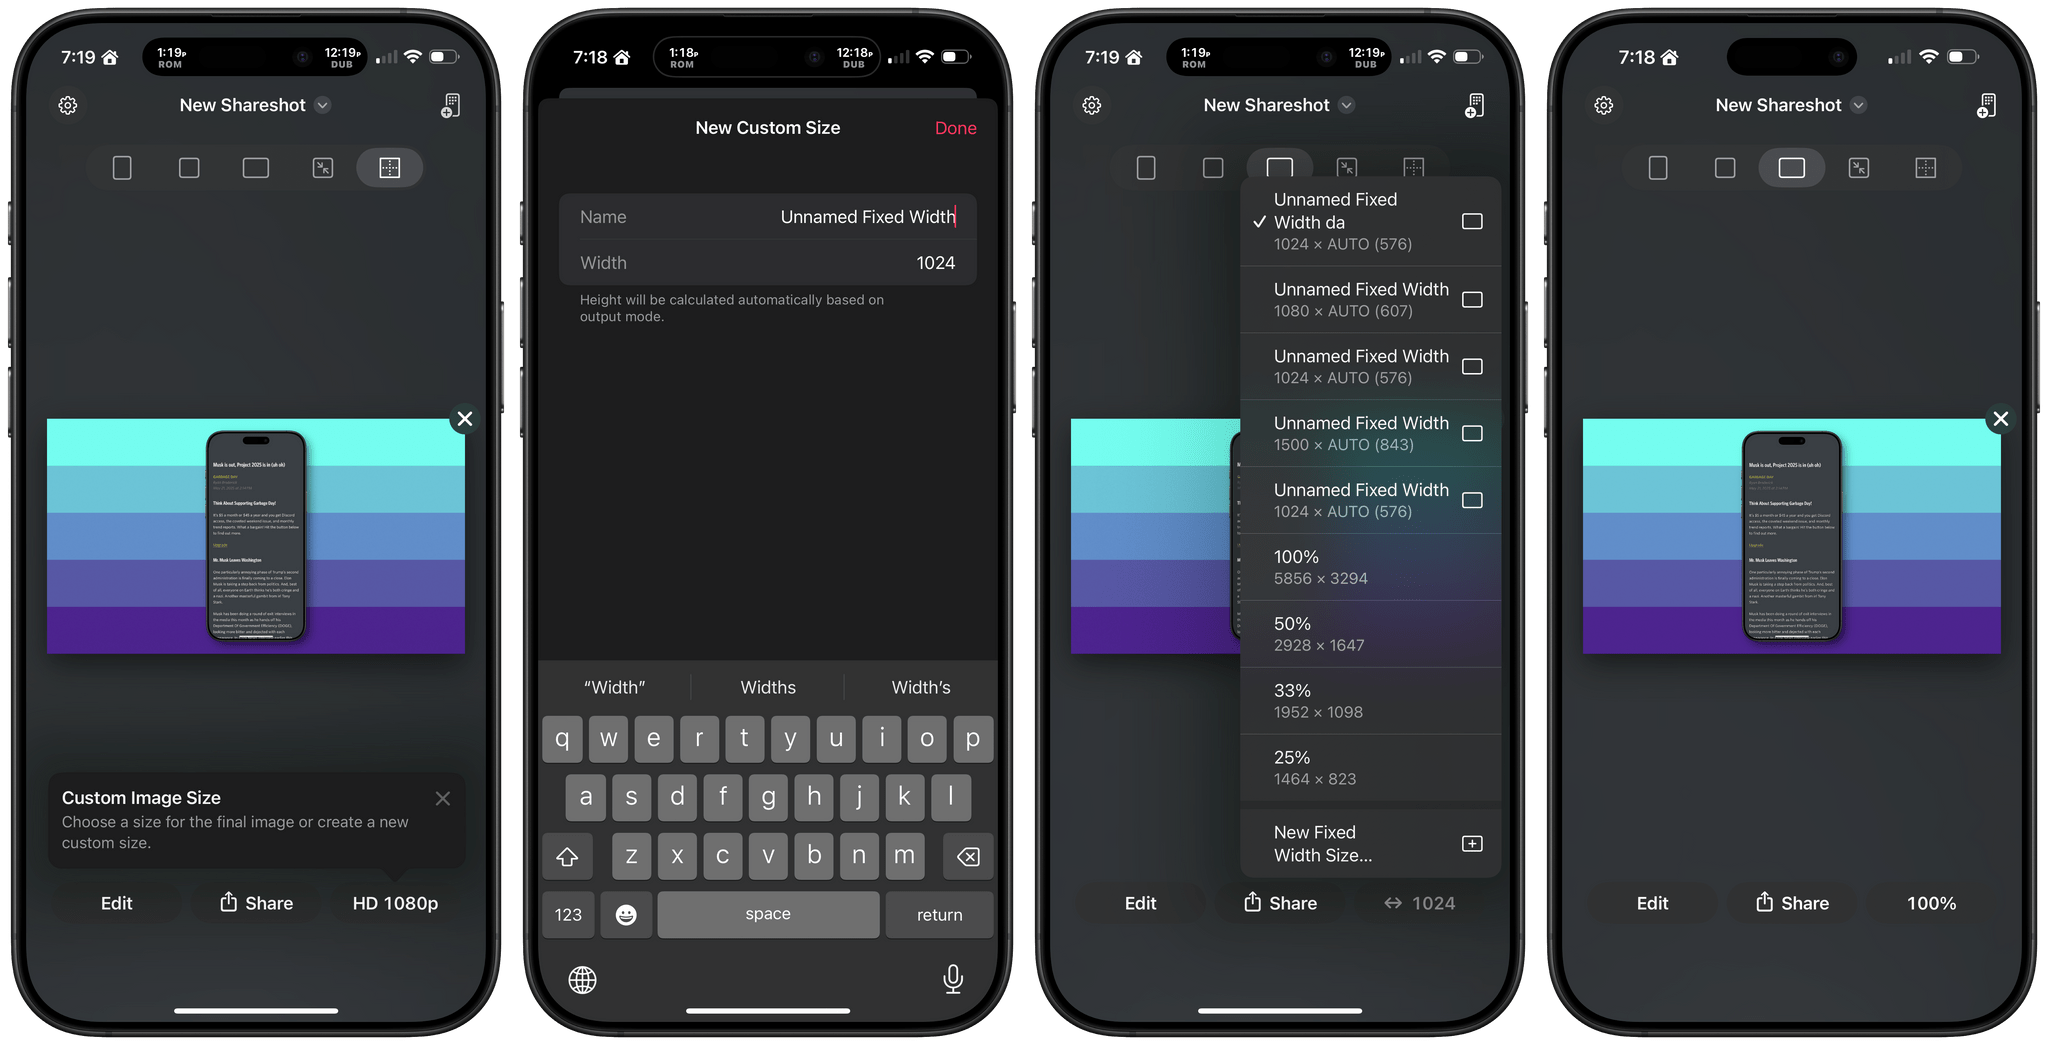
With version 1.3, Shareshot now lets you pick any output size you’d like. The app then frames your screenshot and fits it in the image size you specify. If you’re doing design work, getting the exact-size image you want out of the app is a big win because it means you won’t need to make adjustments later that could impair its fidelity.
A related change is the ability to specify a fixed width for the image that Shareshot outputs. That means you can pick the aspect ratio you want, such as square or 16:9, then specify a fixed width, and Shareshot will take care of automatically adjusting the height of the image to preserve the aspect ratio you chose. This feature is perfect if you publish to the web and the tools you use are optimized for a certain image width. Using anything wider just means you’re hosting a file that’s bigger than necessary, potentially slowing down your website and resulting in unnecessary bandwidth costs.
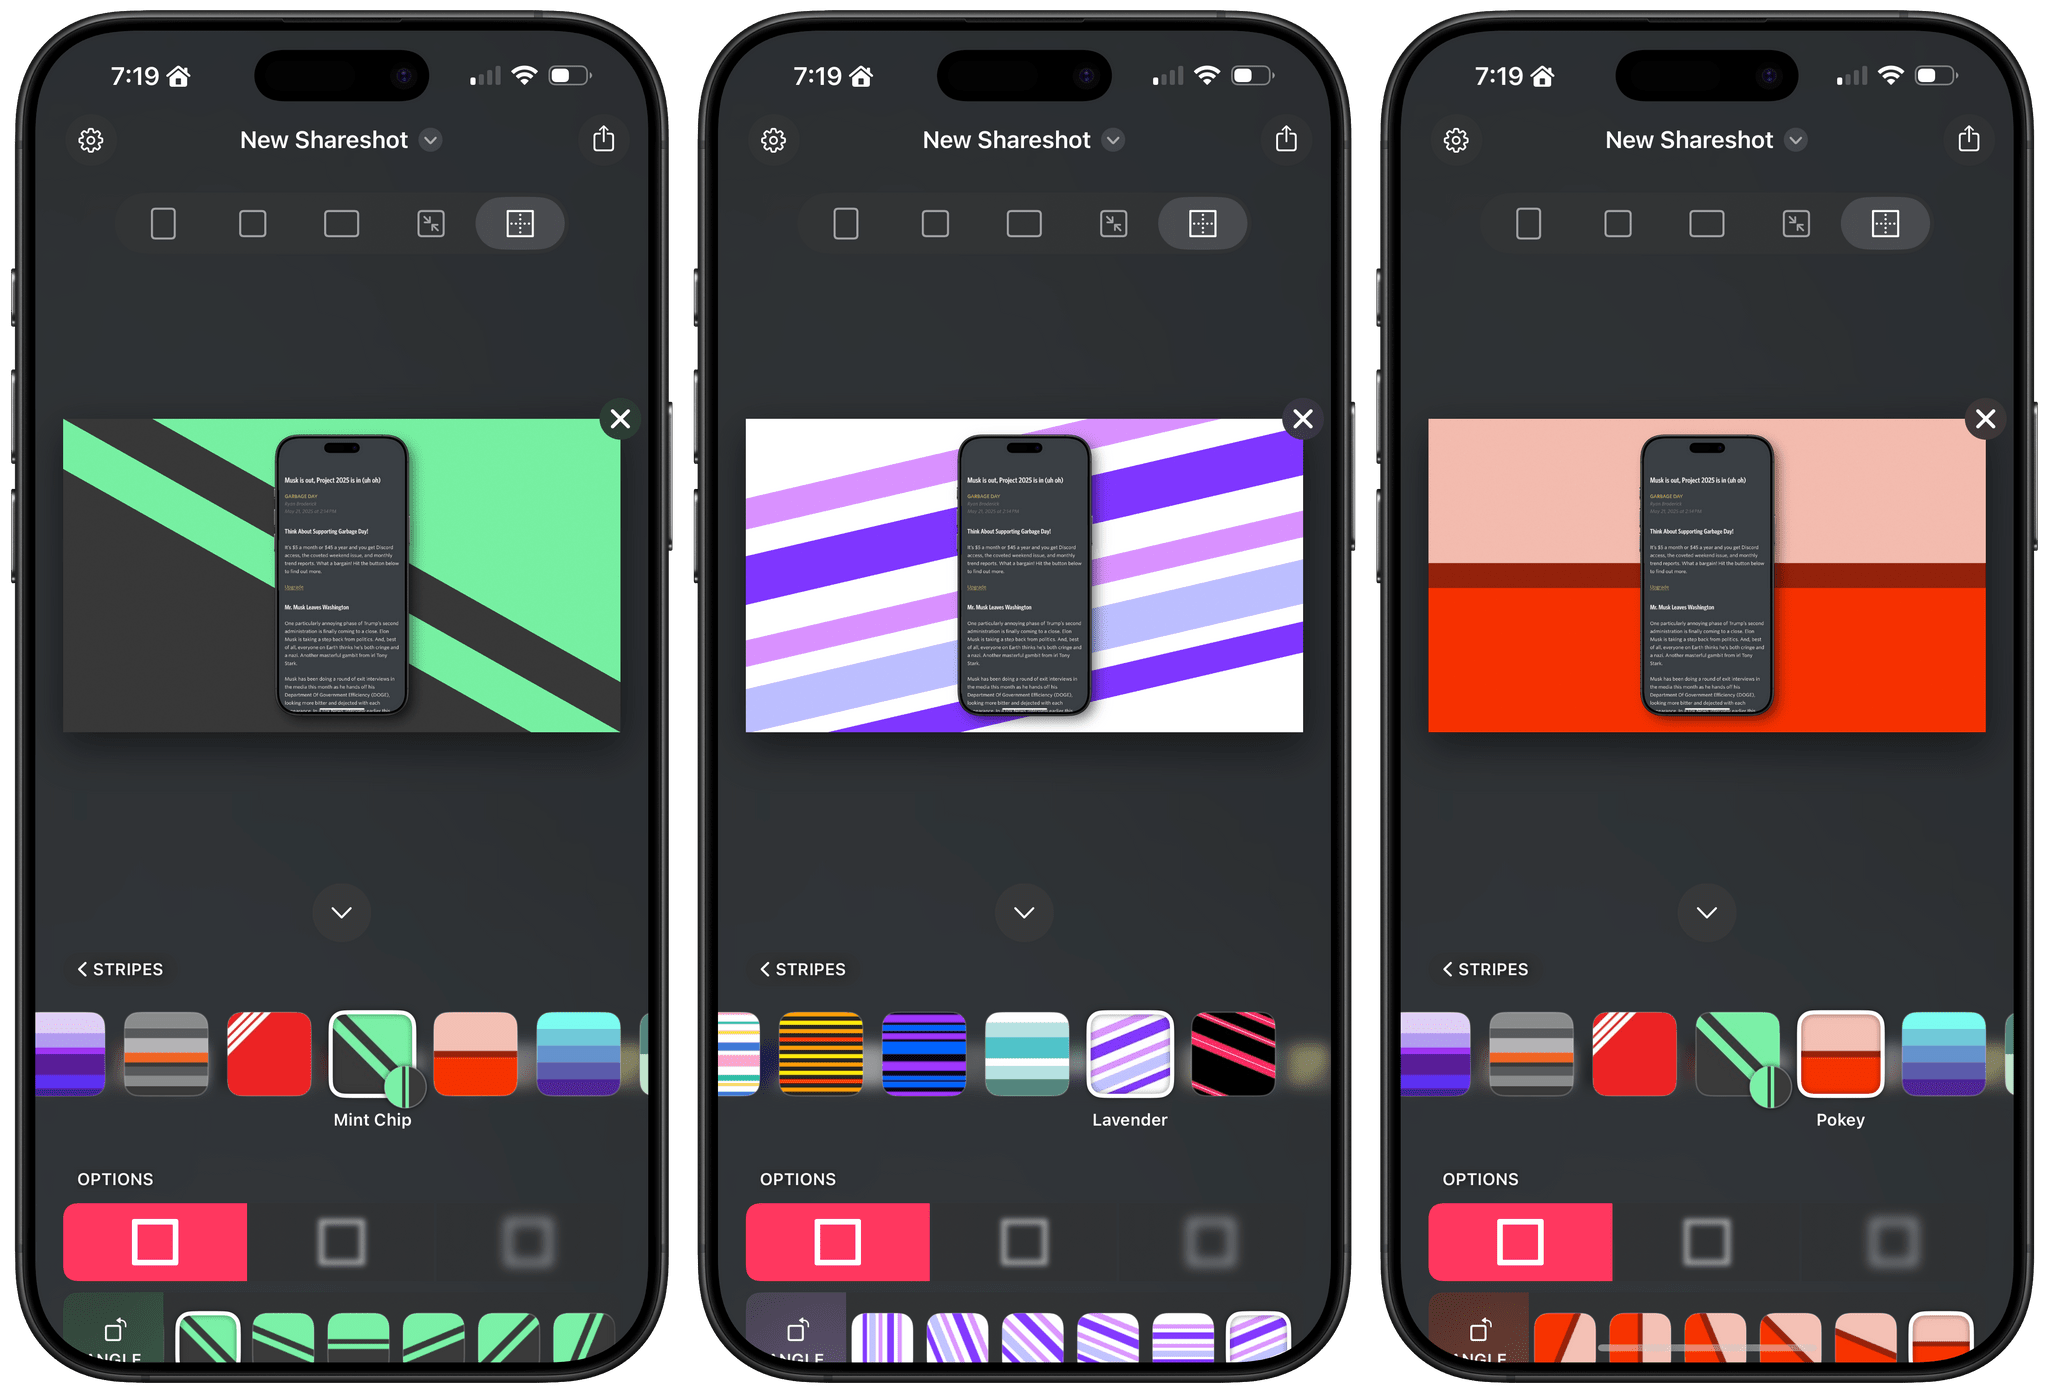
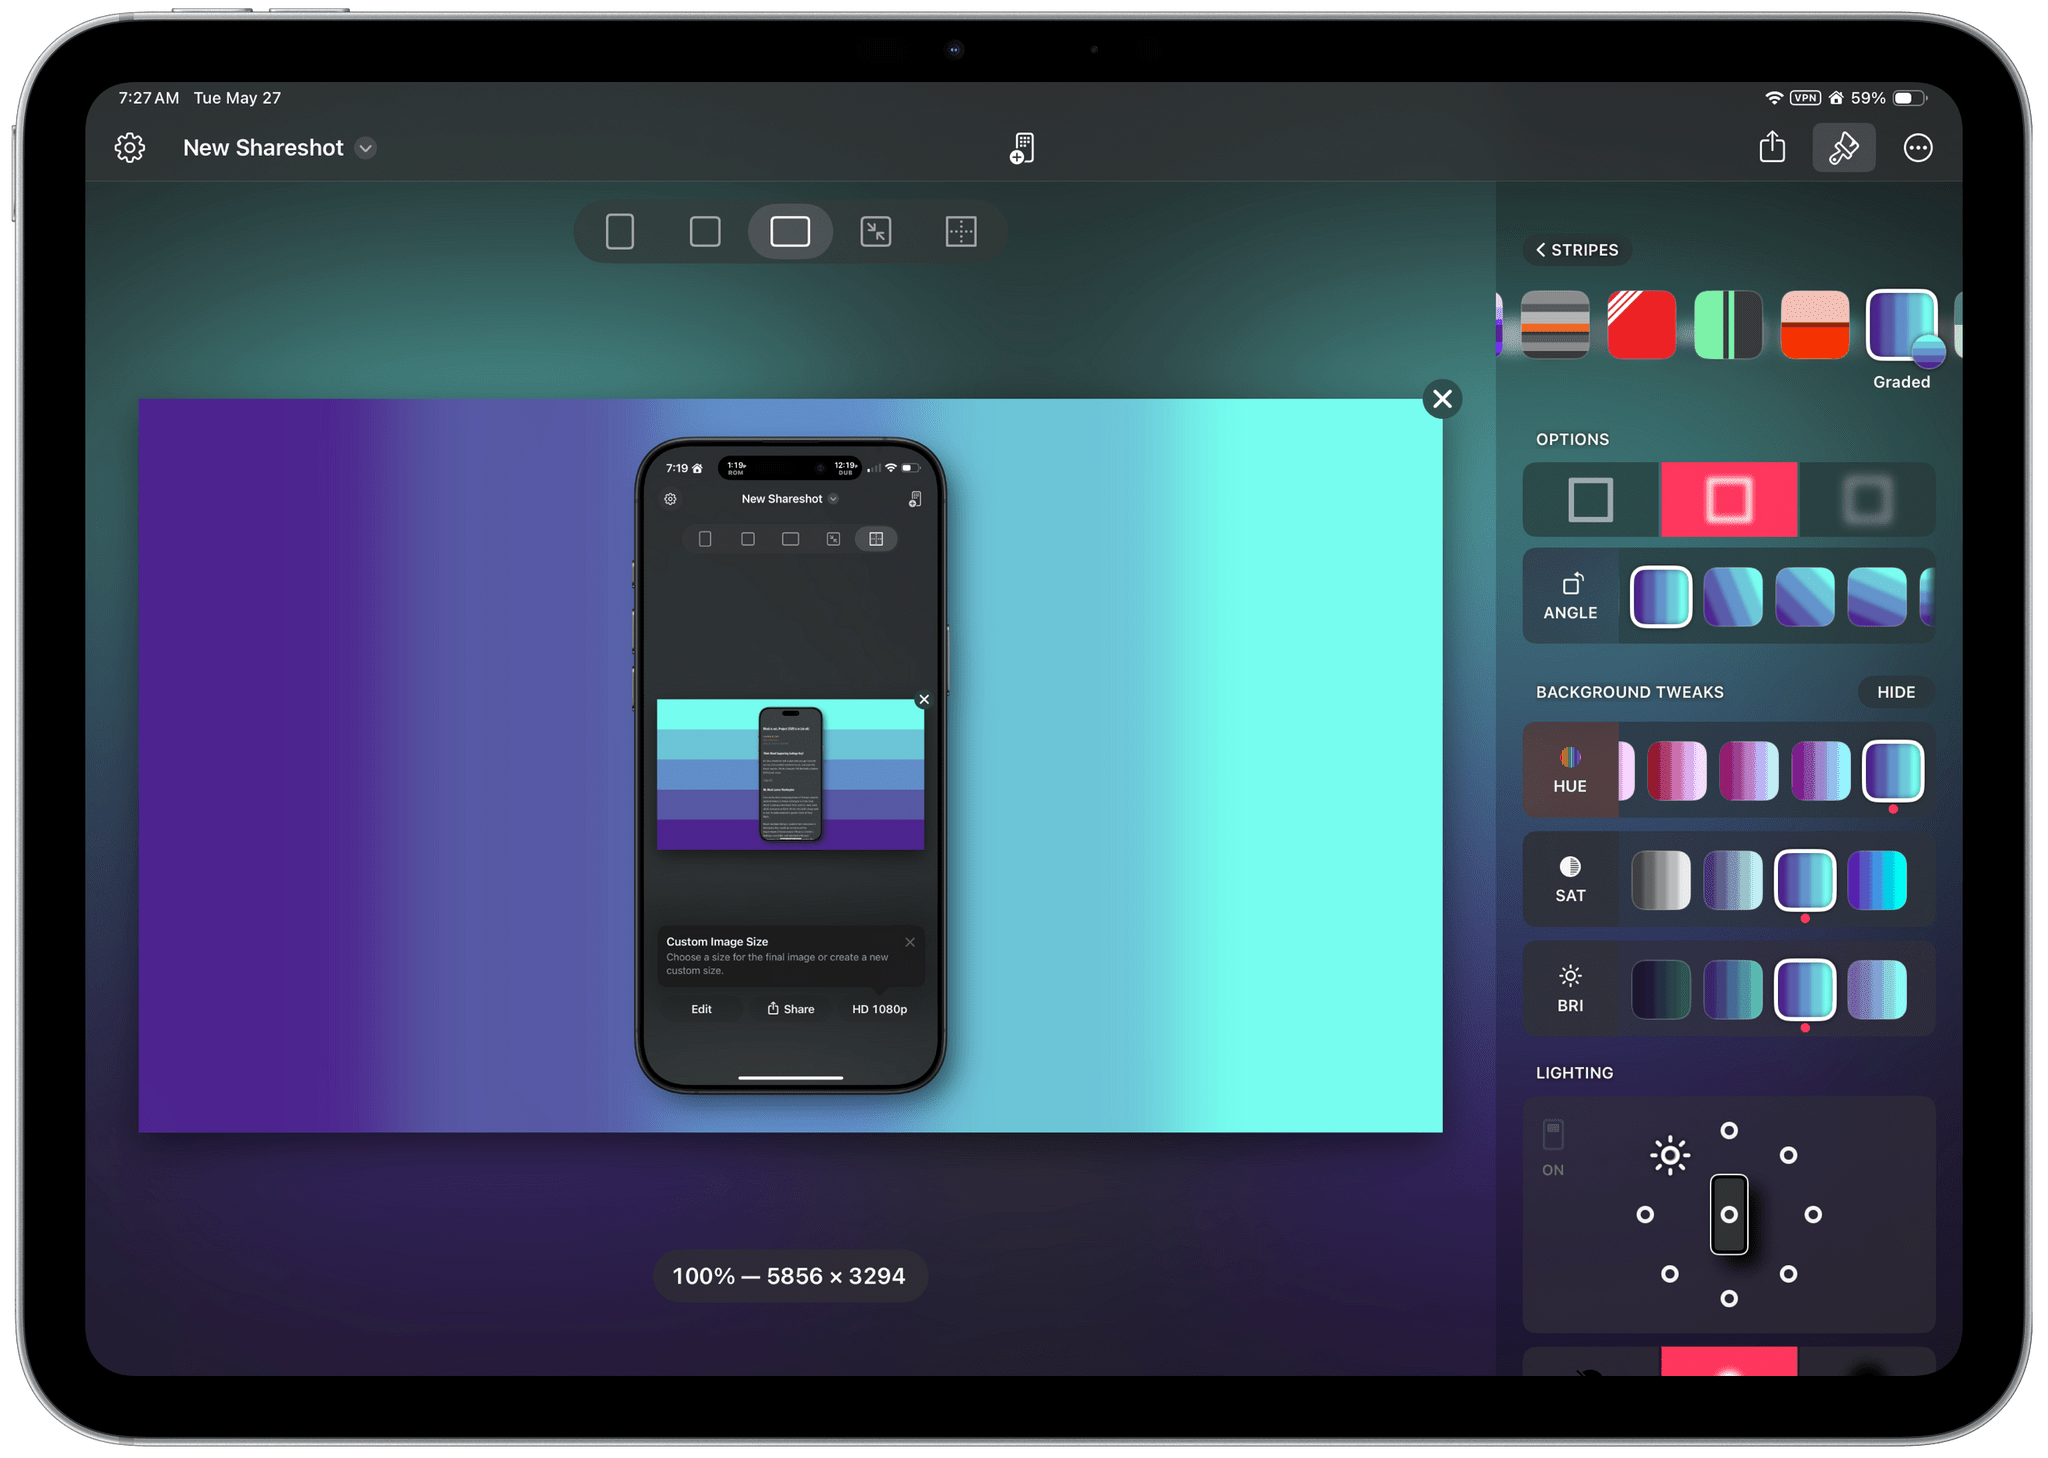
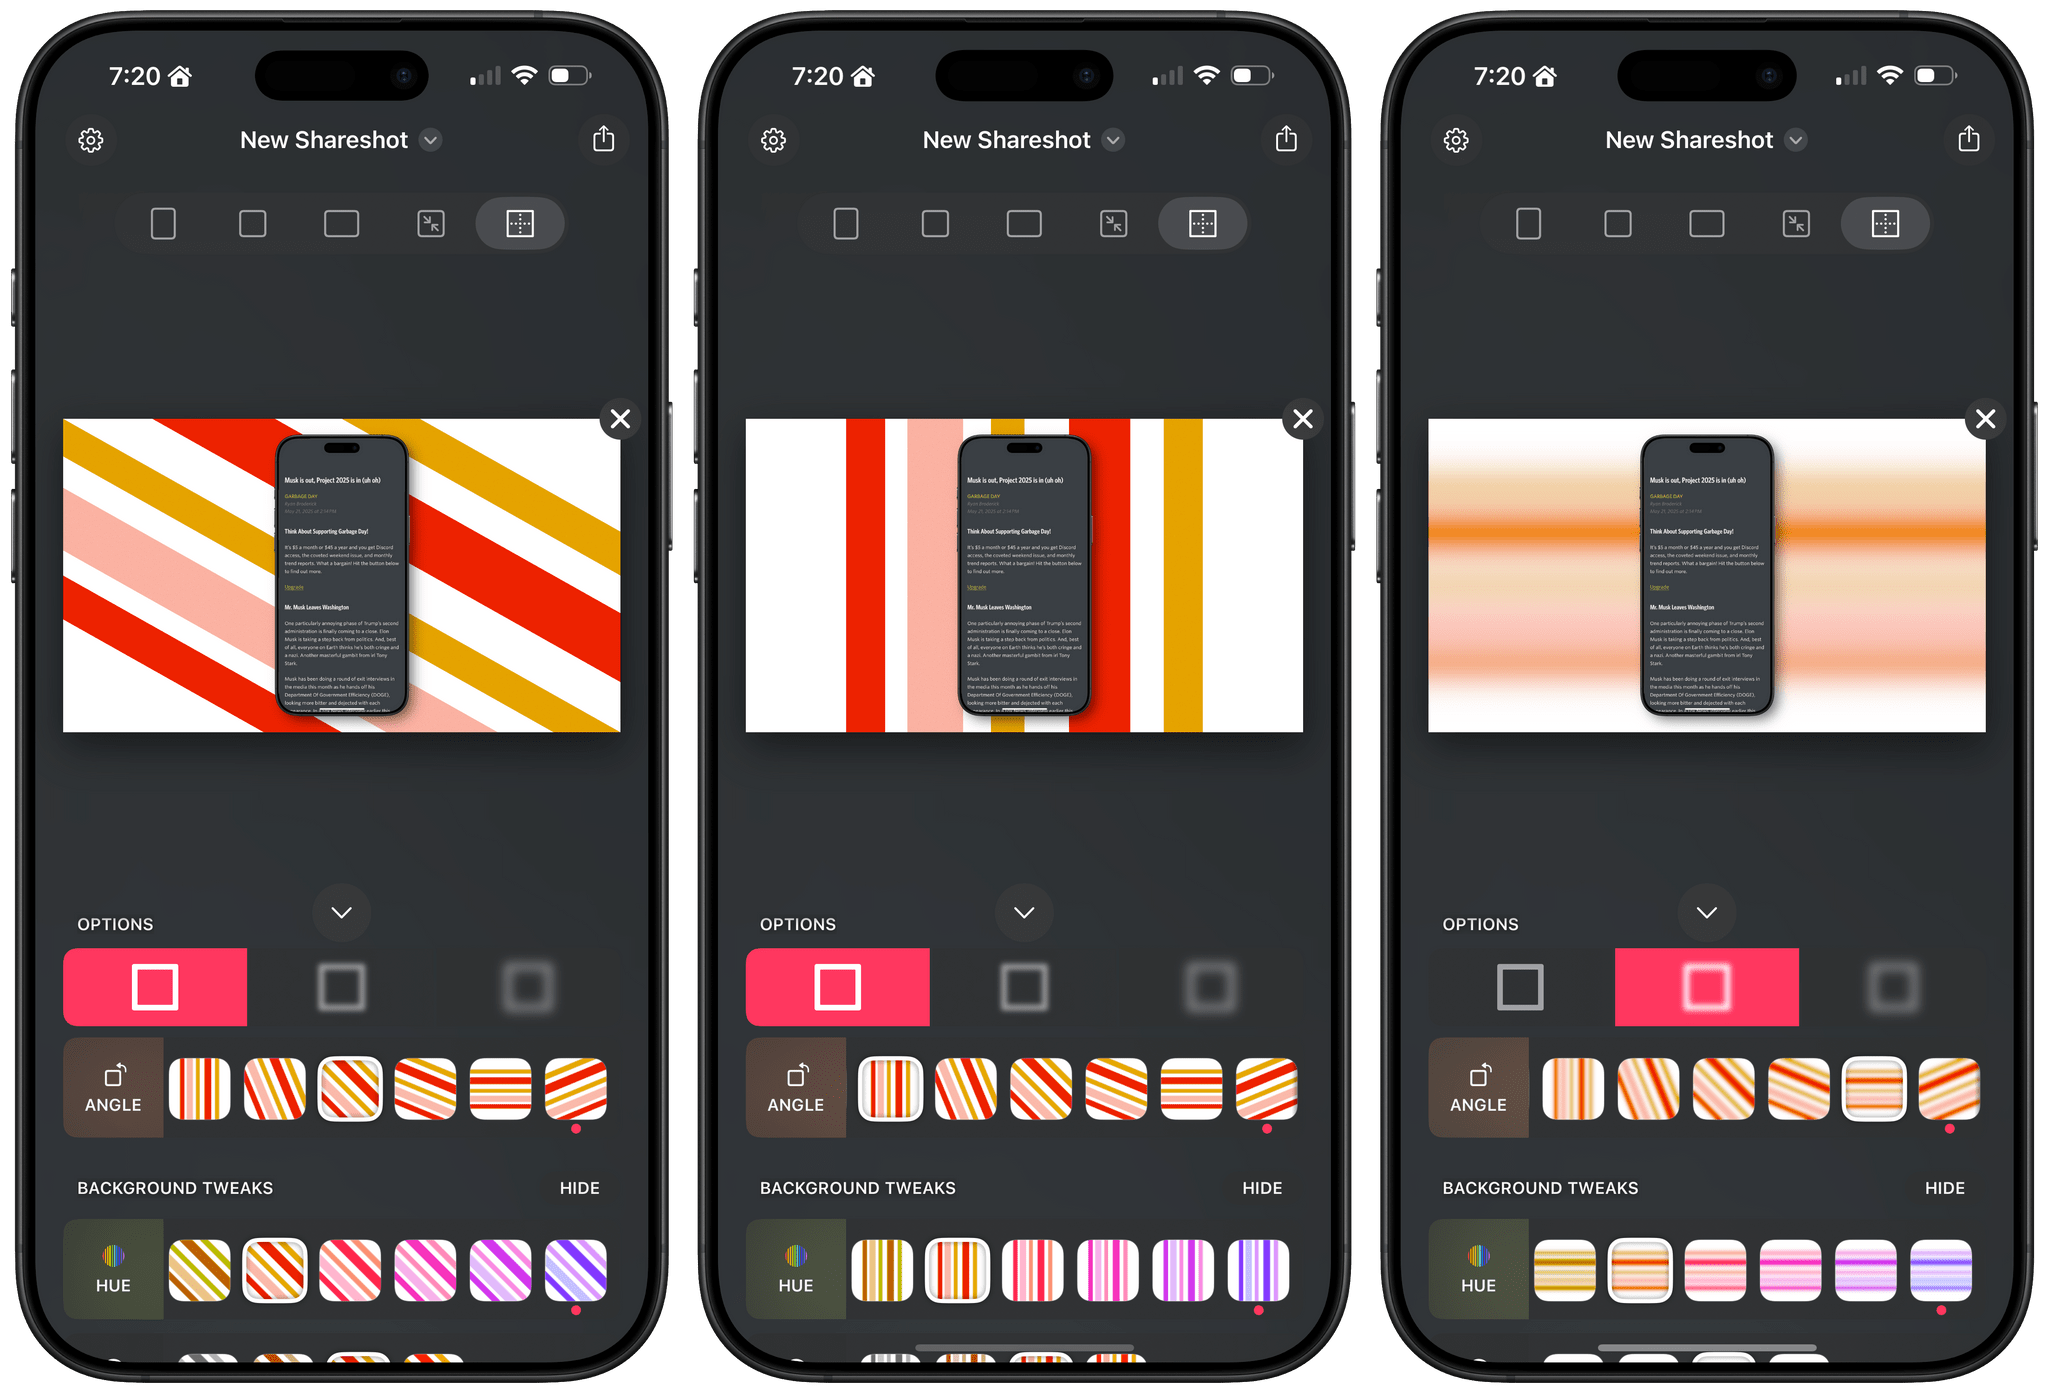
Shareshot has two new categories of backgrounds too: Solidarity and Stripes. Solidarity has two options styled after the Ukrainian and Palestinian flags, and Stripes includes designs based on LGBTQ+ colors and other color combinations in a variety of styles. All of the new categories allow you to adjust several parameters including the angle, color, saturation, brightness, and blur of the stripes.
Finally, Shareshot has revamped its Shortcuts actions to take advantage of App Intents, giving users control over more parameters of images generated using Shortcuts and preparing the app for Apple’s promised Smart Siri in the future. The changes add:
- Support for outputting custom-sized images,
- A scale option for fixed-width and custom-sized images, and
- New parameters for angling and blurring backgrounds.
The progress Shareshot has made since version 1.0 is impressive. The app has grown substantially to offer a much wider set of backgrounds, options, and flexibility without compromising its excellent design, which garnered it a MacStories Selects Award last year. I’m still eager to see multiple screenshot support added, a feature I know is on the roadmap, but that’s more a wish than a complaint; Shareshot is a fantastic app that just keeps getting better.
Shareshot 1.3 is free to download on the App Store. Some of its features require a $1.99/month or $14.99/year subscription.
Access Extra Content and Perks
Founded in 2015, Club MacStories has delivered exclusive content every week for nearly a decade.
What started with weekly and monthly email newsletters has blossomed into a family of memberships designed for every MacStories fan.
Club MacStories: Weekly and monthly newsletters via email and the web that are brimming with apps, tips, automation workflows, longform writing, early access to the MacStories Unwind podcast, periodic giveaways, and more;
Club MacStories+: Everything that Club MacStories offers, plus an active Discord community, advanced search and custom RSS features for exploring the Club’s entire back catalog, bonus columns, and dozens of app discounts;
Club Premier: All of the above and AppStories+, an extended version of our flagship podcast that’s delivered early, ad-free, and in high-bitrate audio.
AI Adds a New Dimension to DEVONthink 4
DEVONthink is a difficult app to review because its flexibility means it can serve a wide variety of purposes. I’ve been using it for the past few weeks as an archive and research companion that houses thousands of plain text files, but the app is capable of effectively replacing your Mac’s file system, storing and cataloging all sorts of files. With lightning-fast search, tagging, and a plethora of other organization methods, DEVONthink 3 has a well-earned reputation as a premier tool for researchers working with lots of files. However, DEVONthink’s capabilities are so varied that it can also serve as a text editor, an RSS reader, a read-later app, and a lot more.
Today, DEVONtechnologies is releasing a public beta of DEVONthink 4, a big update with a focus on AI, but with other new features and refinements to existing capabilities, too. Which of these features matters most to you will depend in large measure on how you use the app. I’m going to focus on the new AI tools because those are the additions that have had the greatest impact on the way I use DEVONthink, but it’s worth keeping in mind that the app offers many other tools that may suit your needs better.
Access Extra Content and Perks
Founded in 2015, Club MacStories has delivered exclusive content every week for nearly a decade.
What started with weekly and monthly email newsletters has blossomed into a family of memberships designed for every MacStories fan.
Club MacStories: Weekly and monthly newsletters via email and the web that are brimming with apps, tips, automation workflows, longform writing, early access to the MacStories Unwind podcast, periodic giveaways, and more;
Club MacStories+: Everything that Club MacStories offers, plus an active Discord community, advanced search and custom RSS features for exploring the Club’s entire back catalog, bonus columns, and dozens of app discounts;
Club Premier: All of the above and AppStories+, an extended version of our flagship podcast that’s delivered early, ad-free, and in high-bitrate audio.