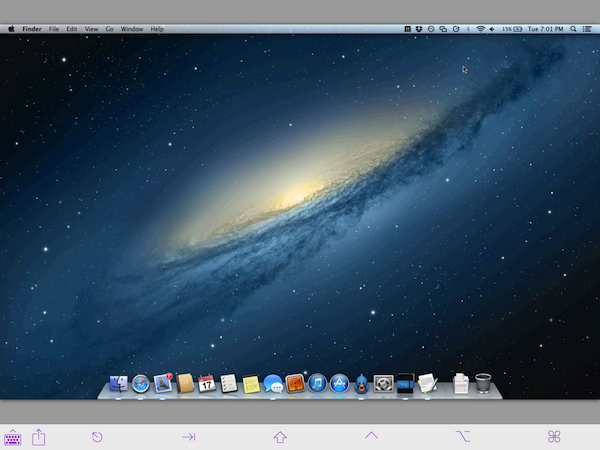
Edovia’s Screens is a MacStories favorite because it’s so ridiculously easy to use. In short, Screens lets you access your Mac or PC from your touchscreen iOS device. You can remotely connect to any of your computers, launch apps, and remotely control your personal computers at home or across the Internet. It’s great for troubleshooting a friend’s computer, accessing headless servers, or simply for moving important documents into Dropbox when you’ve forgotten to do so before heading to work.
For Screens 3, I tested the app with a desktop PC running Windows 8 and a MacBook Air running OS X Mountain Lion. Connecting to a Mac is pretty straightforward, but connecting to a PC can be tricky depending on its configuration.
Setup is a breeze
Screens 3 makes working with your remote Mac, PC, or Linux box even easier than before. For Macs, you gain access to the same gestures you’re used to with Lion and Mountain Lion. On Windows 8 PCs, you’ll find specific features like a Windows button for calling the Start Screen. And just like Macs, Linux boxes will broadcast their availability so you can quickly connect to them through the Nearby and Remote Computers list without having to setup a new screen.
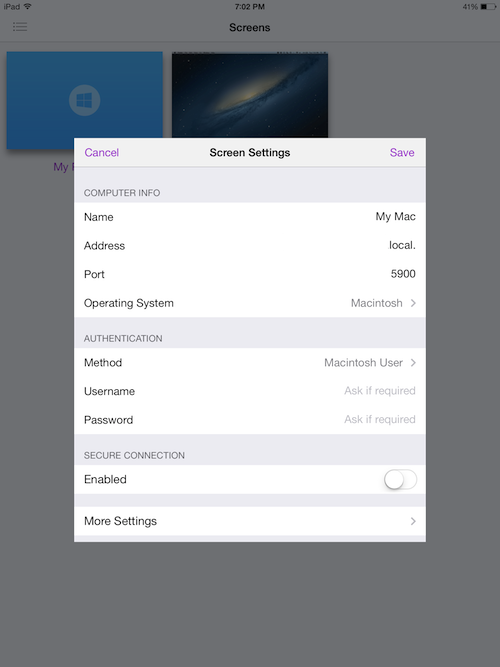
An example configuration for Screens. Easy as pie. (Address above left blank, but can be an IP address or a hostname.)
On Windows 8, I ended up downloading and installing UltraVNC, which is certainly not user friendly (many might find RealVNC or TightVNC easier to use) but can be downloaded and installed with very little initial configuration necessary. Screens offers a brief tutorial in their help documentation, so I won’t get into the geeky bits. Windows requirements are unique since you have to manually add the screen to your computer. To find your IP Address, you can type in ipconfig in the Command Prompt to get it. If you’re looking to connect to your Windows PC remotely, Edovia has published a tutorial to get you started.
On a local network, Screens can find Macs that are setup for screen sharing, letting you simply connect to an office computer without having to leave the couch. In fact, Macs work great with Screens since configuration is often limited or not necessary. And with Screens Connect, you can remotely connect to a Mac without having to configure much of anything.
On Macs, getting started is as simple as visiting the System Preferences, clicking Sharing, and turning on Screen Sharing and Remote Login. Then your Mac will magically appear Screens’ sidebar. Unlike the previous version of Screens, you can simply tap on the Mac to connect; No screen setup is required.
For remotely connecting to your Mac, you can download aforementioned the Screens Connect app. Screens Connect takes care of all the setup so that you can jump right into a desktop Mac or a Mac based server. By logging into your Screens Connect account, you can immediately view all of your active Macs running Screens Connect. If that wasn’t easy enough, saved screens can be shared between iOS devices via iCloud. You never had to setup the same configuration more than once.
The gestures couldn’t be better
The real accomplishment of Screens is that it has lots of gestures you don’t have to think about. Clicking, dragging windows, and even opening Charms on Windows 8 are all intuitive. Provided you don’t have multi-touch gestures turned on for your iPad (they’ll conflict with some desktop gestures), you can access Mission Control, Launchpad, hide desktop windows, and swipe between desktops just like you can on your Mac. Scrolling webpages and Finder windows are also as easy as two finger scrolling. Everything is intuitive, except maybe for moving the mouse cursor, which requires a two finger drag for activating hot corners or accessing administrative utilities on a PC. The best part is that you can zoom in and out of desktops at any time just by pinching.
I did get stuck figuring out how to hide and unhide the toolbar. It’s simple: just double tap with two fingers.
Unfortunately I couldn’t test a multi-monitor setup with Screens, but Edovia claims the app supports moving between multiple displays.
There’s the keyboard. And then there’s copy and paste.
There’s not much to write home about concerning the keyboard. Unlike iOS, you’ll have to manually call the keyboard each time you want to type into a field or use a keyboard shortcuts. While using keyboard shortcuts isn’t ideal, you can call up Spotlight for example by hitting the Command button, bringing up the keyboard, and hitting the spacebar.
Fortunately for Spotlight, however, there is a specific button for that. The toolbar can be swiped left and right to access a variety of shortcuts such cut, copy, paste, page up, page down, etc. These shortcuts can be customized in Screens’ settings, letting you choose only what you need in the toolbar.
One of Screens best features with Version 3 is the included pasteboard. If you ever need to copy text to and from your Mac or PC, Screens now lets you share the pasteboard. A limitation for PCs, however, is that you won’t be able to get and paste images.
Ready for iOS 7
Everything has been redesigned for iOS 7. In Screens’ case, the app looks much more professional than before, resembling something more along the lines of a big studio app from VMWare or Parallels. It looks great, with purple being the choice accent color for text and buttons. There’s a new icon portraying a cascade of flattened screens as well.
Screens 3 is sort of this magic teleportation device. You can instantly connect to any of your computers from your iOS device from your daily commute, the office, or the break room, and you don’t even have to break a sweat. Your computer will also be there no matter where you or, and no matter what device you use, thanks to iCloud sharing and saved screens.
Screens 3 is available (as a new app) for devices that can run iOS 7. You can download it for $19.99 from the App Store.


