Ole Zorn’s Pythonista is one of my favorite, most-used iOS apps to date. Combining a Python interpreter with scripting capabilities that take advantage of iOS through native interface elements and features like URL schemes, Pythonista has completely reinvented my iOS workflow. With Pythonista, I can work from the iPad without wishing I had a Mac.
Back in November, I wrote an extensive review of Pythonista 1.2, providing some sample scripts and an in-depth look at the app and its functionalities. I concluded my review saying:
I believe that, going forward, Pythonista and other similar apps will show a new kind of “scripting” and task automation built around the core strenghts of iOS.
Pythonista 1.3, released today, adds a number of features aimed at making the app more “connected” with the underpinnings of iOS, enabling users to create more complex workflows that go beyond running scripts inside Pythonista. I was able to use Pythonista 1.3 for the past weeks, and I believe it’s a very solid update.
Notifications and Photos
The big new feature is support for Notification Center and the iOS Camera Roll: with the addition of the notification and photos modules, Pythonista can now set and cancel native notifications, access existing photos from the Camera Roll and even save new ones directly into it.
Notification Center integration means the app can now schedule notifications to be displayed when a script (or even the entire) app is no longer running. Notifications can be displayed with Pythonista’s icon but they can have a custom message, sound, or URL to launch when tapped. An obvious implementation for this is using notification banners to display success messages after the app has completed a script and launched a URL (say, “Image Uploaded” while opening an image’s URL in a web browser); or, you can use the “action URL” attached to a notification to launch a specific app or website upon tapping the item in Notification Center.
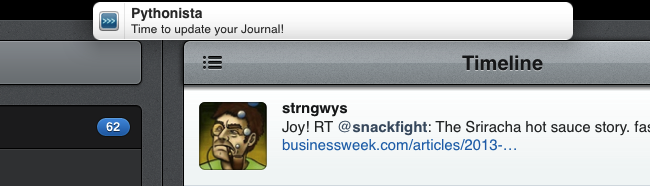
Notification Center support is a powerful addition that allows Pythonista to be more tightly integrated with iOS. Because notifications are scheduled by indicating a delay in seconds (a notification scheduled in 180 seconds will appear in 3 minutes), you can schedule several notifications at once and they will be triggered at different time intervals while always being displayed in Notification Center.
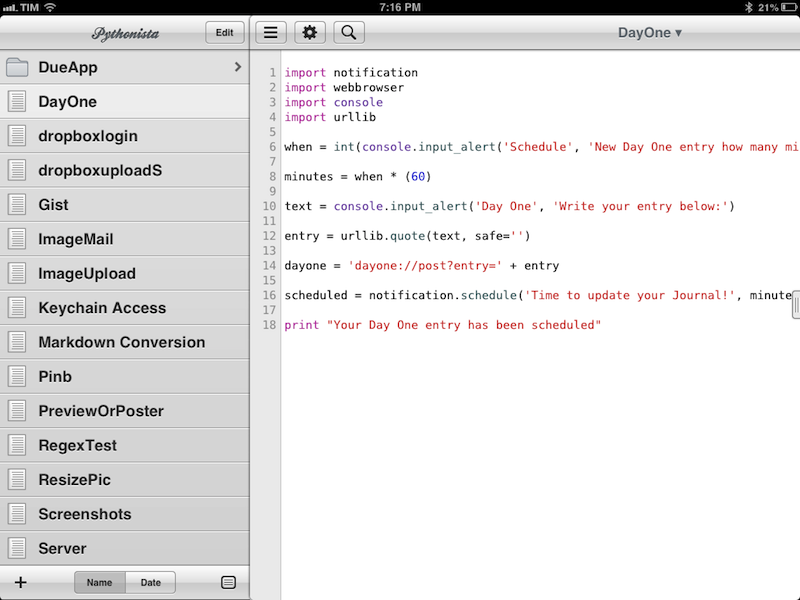
Below, a quick proof of concept to show how you can schedule a notification that will launch Day One in x minutes, adding a new entry with text previously entered in Pythonista. The script uses the new notification module to schedule a notification containing a URL to launch Day One in creation mode.
import notification
import webbrowser
import console
import urllib

when = int(console.input_alert('Schedule', 'New Day One entry how many minutes from now?'))

minutes = when * (60)

text = console.input_alert('Day One', 'Write your entry below:')

entry = urllib.quote(text, safe='')

dayone = 'dayone://post?entry=' + entry

scheduled = notification.schedule('Time to update your Journal!', minutes, 'default', dayone)

print "Your Day One entry has been scheduled"
Line 6 uses input_alert to request text that will be converted to an integer; as you can see, the request asks for “minutes”, so I can later multiply for 60 seconds to transform the value entered in minutes in a delay that Pythonista can parse. Ideally, I would like to specifically request a numeric pad instead of a regular keyboard (which would be a nice addition to always return integers through input alerts) or add a check to see if the value that has been entered is, in fact, a numeric value.
Line 10 requests text to add to Day One, and line 12 URL-encodes it. Line 14 constructs a Day One URL that incudes our previously entered text, and line 16 schedules a notification that has a custom message, the delay value expressed in seconds, a default alert sound, and the Day One URL we want to launch.[1] Once triggered, tapping the notification will quickly fire up Pythonista and then immediately launch Day One with our entry ready to be saved.
This is just a quick proof of concept, but it gives you an idea of the possibilities opened by Notification Center integration with action URLs.
The photos integration is equally powerful and, especially for my workflow, useful on a daily basis. Building upon the possibility of reading images from the iOS clipboard and handle them with the Python Imaging Library, Pythonista can now request access to the Camera Roll to get and save images – while still treating them as PIL objects in a script.[2]
Using capture_image Pythonista can show a standard camera interface to take a new photo directly into the app and pass it along as a PIL object; you can get specific images (or thumbnails) using an index parameter, or – my favorite – you can show a native iOS photo picker to manually select images from the Camera Roll. You can only select single images; while I’d like to see Photos.app-like multiple selections, I’m pretty sure that can be done with repeat blocks in a script. Ping me if you create scripts to handle multiple images with the photo picker.
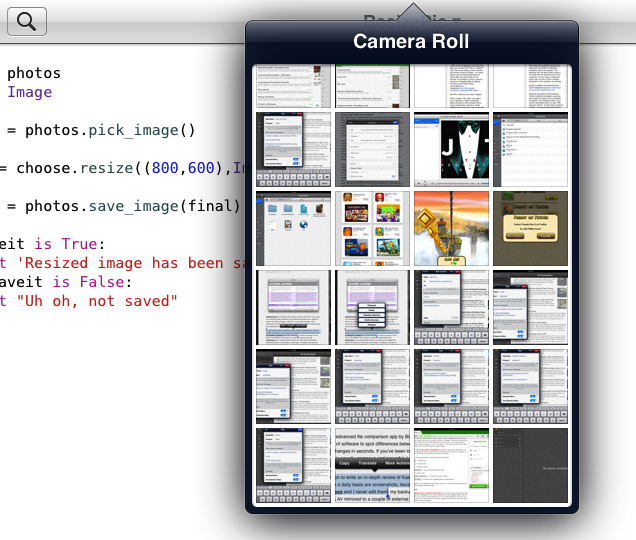
Here’s another super-simple demonstraton of how you can leverage the photos module to make working with the Camera Roll seamless inside Pythonista.
import photos
import Image

choose = photos.pick_image()

final = choose.resize((800,600),Image.ANTIALIAS)

saveit = photos.save_image(final)

if saveit is True:
	print 'Resized image has been saved'
elif saveit is False:
	print "Uh oh, not saved"
The script above simply requests an image with the photo picker, and uses Image to resize with an anti-alias filter, then save the same PIL object to the Camera Roll. If the image is successfully saved, a success message is printed in the console.[3]
Other Additions
Aside from the big additions, there are many other improvements in Pythonista 1.3 that are worth mentioning. In version 1.2, I lamented how the Library View could get out of hand with several scripts; in Pythonista 1.3, there’s a sidebar to view files as thumbnails or a list, sort them by name or modification date, and, more importantly, create folders and move scripts into them. This is a very welcome change that has allowed me to group scripts by purpose or app.[4]
The app can now explicitly launch Safari by prefixing standard http:// URLs with ‘safari-’: using ‘safari-http://apple.com’ in a script will launch Apple’s website directly in Safari rather than the built-in browser.[5] In the console, you can now create tappable links by using console.write_link().
Alongside other modules and tweaks, I want to point out the addition of the markdown2 module, which, unlike the previously supported markdown, has better support for extras like footnotes and header IDs (both of which I use extensively for MacStories).
Two More Scripts
As one last extra, I have modified two of my existing scripts to demonstrate the new features of Pythonista 1.3. For a more comprehensive overview of the scripts I use, you can refer to my Pythonista review and tag on the site.
The first script shows a camera interface to take a photo, upload it to my Dropbox Public folder, and open its public URL in Safari. It uses the Dropbox login methods and keychain access I described in November.
import photos
from dropboxlogin import get_client
dropbox_client = get_client()
import keychain
import console
import time
import httplib
from io import BytesIO
import datetime
import webbrowser
import urllib
import clipboard

today = datetime.datetime.now()

console.clear()

img = photos.capture_image()
titles = console.input_alert('Image Upload', 'Enter your image name below')
console.show_activity()
buffer = BytesIO()
img.save(buffer, 'JPEG')
buffer.seek(0)
imgname = today.strftime("%Y-%m-%d-at-%H-%M-%S") + '-' + titles + '.jpeg'
response = dropbox_client.put_file('/Public/' + imgname, buffer)

console.hide_activity()

encoded = urllib.quote(imgname, safe='')

final = 'http://dl.dropbox.com/u/YOURID/' + encoded
print "uploaded:", response, '\n'
console.write_link( titles, final)

clipboard.set(final)

browser = 'safari-' + final

webbrowser.open(browser)
Line 18 takes a new photo, and line 19 requests a title with an input alert. Line 22 saves the image in a buffer, and line 24 creates the name of the photo by using a strftime-based timestamp generated by the datetime module; line 25 uploads the photo (with the specified name) to my Dropbox Public folder.
Line 29 generates a URL-encoded version of the filename and line 31 combines that with a Dropbox URL of my Public folder. Note that this is done by using the old way of “guessing” public links by using your account’s ID: Dropbox appears to prefer the new “shareable” links now, but this trick still works (and looks cleaner to me, conceptually).
Line 32 prints the Dropbox response in the console and line 33 writes a link to the image.[6] Line 35 puts the same link in the clipboard, line 37 prepends ‘safari-’ to the link, and, last, line 39 launches the URL in your web browser.
The script gives you an idea of the power of Pythonista 1.3 with native Camera Roll access and better Safari integration. It’s highly customizable: you can change the format of the filename, remove the webbrowser module and just tap on the link written in the console (I left both), or perhaps launch another app and attach a custom message/URL to a notification.
The second script is a variation of the new Markdown conversion script already included by default in Pythonista 1.3. It allows you to preview Markdown-formatted text in a custom HTML page, or send it to Poster to publish it on your WordPress blog. I made it available in a GitHub Gist in order to avoid formatting issues with the HTML of this page.
Lines 10–46 set a custom HTML page to use for the preview of Markdown text. Line 49 gets Markdown text from the iOS clipboard and line 50 uses markdown2 with footnote and header IDs extras to convert it to valid HTML.
Lines 52–68 provide the two choices I want to have in this script: preview the HTML in Pythonista, or send it to Poster. The first block takes a look at an alert that was displayed on line 47 asking if I wanted to preview the text inside Pythonista or forward it to Poster. If the answer was “1” (Pythonista), the block uses the code provided by Ole to create a custom HTML file and view it using a file:// URL.
If the answer to the alert was “2”, the script asks for a title to use in Poster, then encodes everything in UTF–8 again and sends URL-encoded text and title to Poster’s creation screen through the webbrowser module and the Poster URL scheme. In this way, I converted Multi-Markdown text with footnotes and header IDs to HTML that has been sent to Poster in roughly 4 seconds.
Pythonista 1.3
Pythonista 1.3 is a great update that, once again, positions the app as a unique solution to write Python scripts that have direct access to several iOS features and UI elements. Like I said in my original review, Pythonista is not for everyone, but those willing to try it out will find an even more solid Python environment with native integration on the platform it runs on.
Pythonista 1.3 is available on the App Store.
- Note that
'default'isn’t really the name of a sound effect included in Pythonista; entering any name that is not recognized by the app will result in playing the default iOS alert sound. If you want, you can use'ticci'in the sound’s name. ↩︎ - In most cases: fetching an image’s EXIF metadata won’t obviously return a PIL object, but a dictionary instead. ↩︎
- I use the script above to resize landscape iPad screenshots to an absolute value of 800 x 600 (the size I use for MacStories). You can make image resizing smarter by resizing proportionally like my friend Gabe does. ↩︎
- Make sure to properly call modules if you move scripts that use them inside a sub-folder. ↩︎
- The same can be done with https:// URLs. ↩︎
- Line 33 is where you’ll want to add a check to see if the upload was successful. I just didn’t have time for it. ↩︎