I was never good at managing my expenses.
It’s not that I didn’t believe in the usefulness of logging how my money was spent – I just used to be lazy and disorganized. But I only blame myself partially: in Italy, cash is still widely used, and, occasionally, smaller stores don’t even give you a receipt, which makes it harder to remember an expense later. To make things worse, I was never able to find great expense tracking software that could work with my Italian bank and credit card – all the cool apps are limited to the US, Canada, Australia, or other European countries that aren’t Italy.
Still, I should have found a way to track my expenses earlier, because growing up it became harder to tell my accountant that “I couldn’t remember” how I spent my money. This is obvious, right? I reached the tipping point last year, when my girlfriend and I moved in together and, like tasks, I completely lost track of a side of my business and financials that was too important to ignore.
Earlier this year, I set out to find a good expense tracker that would work on all my devices (iPhone, iPad, MacBook) but that wouldn’t be a “companion app” on iOS. Too many finance apps are developed for Mac first and ported to iOS as an afterthought with limited functionality, and I’m not okay with that.1
In March, I started using Next, developed by indie studio noidentity and available on the iPhone, iPad, and Mac. I’ve refrained from writing about Next not only because I like to take my time with reviews (which is usually the case), but because I believe that an expense tracker needs to fit in your daily habits and prove itself in scenarios that can’t be tested in traditional ways. How can you tell if your expense tracker works while you’re on vacation? You need to go on vacation. Does it work at IKEA while you’re in a hurry at the checkout line and you want to save your expenses quickly? Well, you need to buy some furniture first (which I did).
So I began using Next and I didn’t write about it. I’ve been using the app religiously for the past eight months: this summer, my friends made fun of my obsession with saving expenses while we were on vacation in Sardinia, but I didn’t budge. If I wanted to truly test Next, I needed to stick to it and test its flexibility over time.
Next is on my Home screen on my iPhone and iPad. I use the app every day, and I log every expense (whether it’s cash or an expense from my bank account) as soon as I can. My perspective of my spending habits has considerably changed since I started using Next, and I’m making more informed decisions thanks to the overview that this app offers and its elegant design combined with astounding ease of use.
Note: There are hundreds of expense trackers on the App Store that also support direct connections with banks and credit cards. I am based in Italy, and I’ve never found a good app with support for Italian banks and institutions.
Adding Expenses
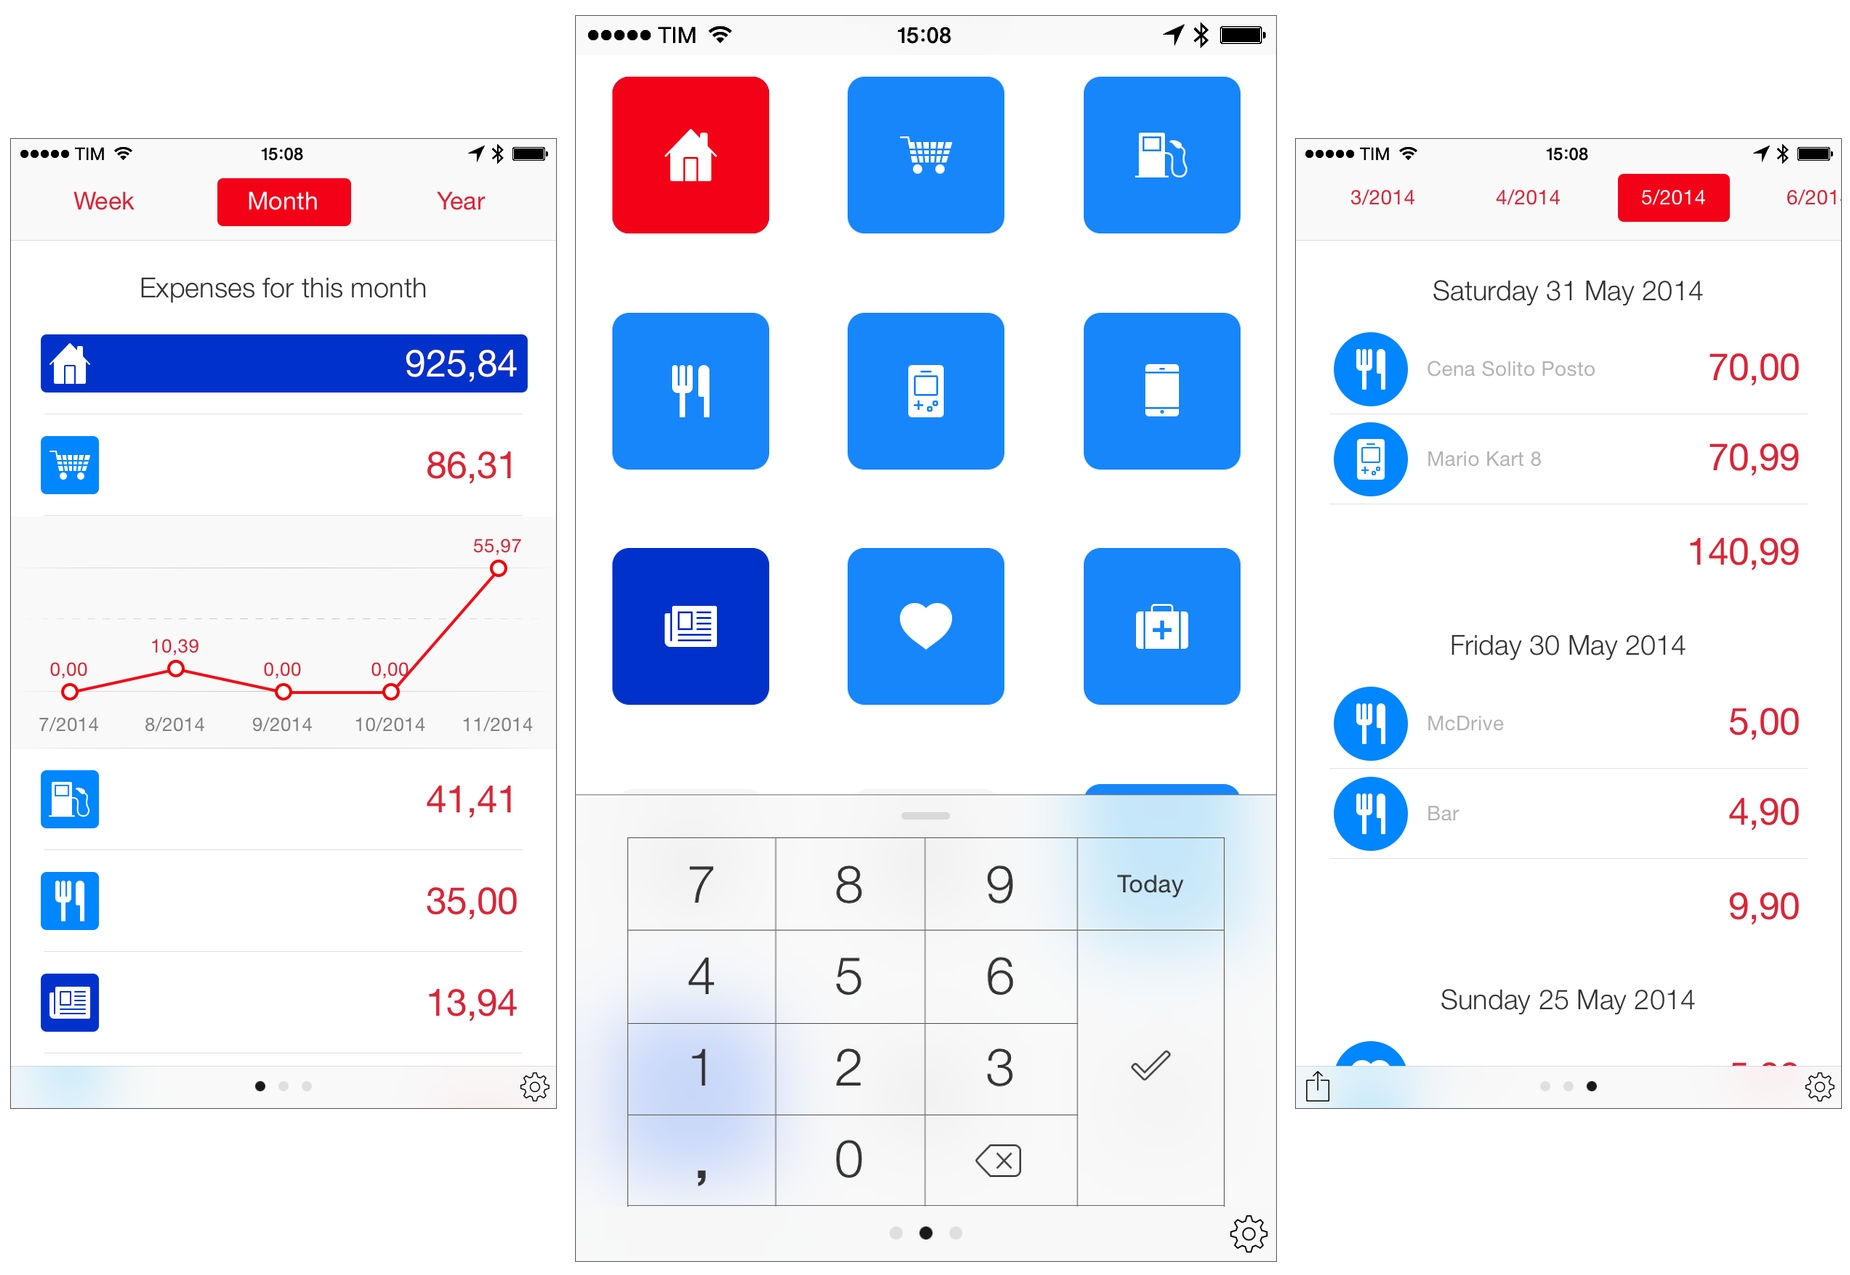
Next for iPhone launches to a screen that lets you add an expense by tapping a category and entering the amount in a keypad at the bottom. This, in its simplicity, is my favorite part of the app. You can tap & hold any category and choose from dozens of different icons, which have been designed specifically for Next and clarity – when you’re in a hurry and using your phone with one hand, you can always distinguish one category from another.
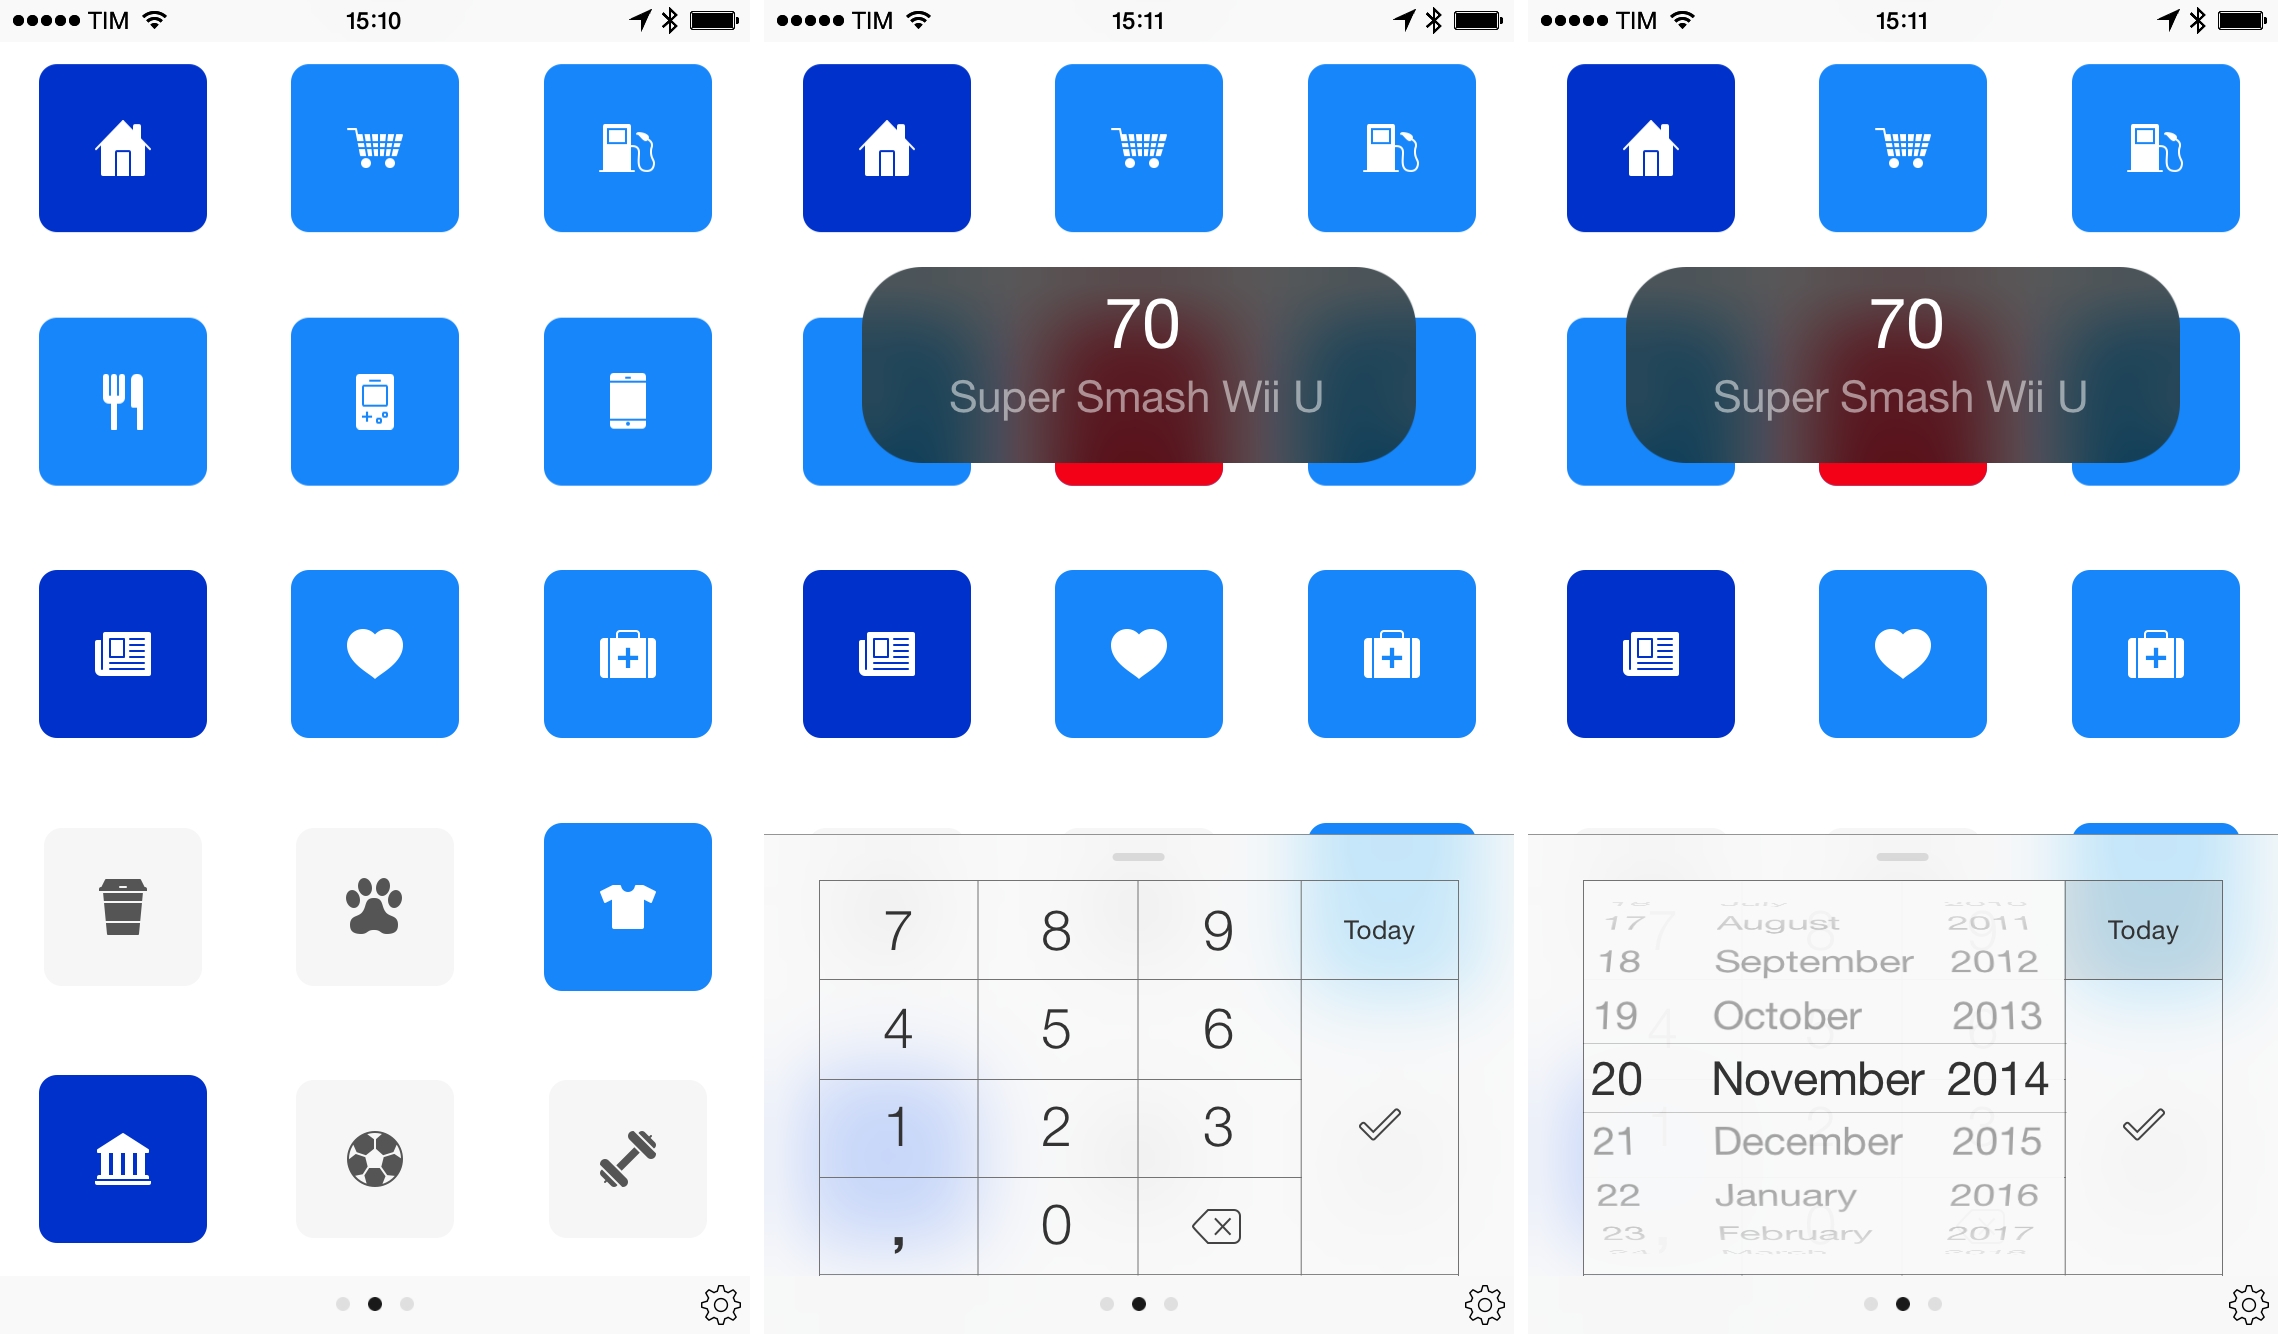
When you select a category, there’s a sound effect, the icon bounces, and the category turns red to indicate selection. You can then enter your amount, which will be displayed in the middle of the screen with a pencil icon next to it; at this point, you can either save the expense by tapping the large checkmark at the bottom, or you can add a description by tapping the pencil and typing a name. I always enter a description for my expenses so I can remember them in the future.
In the iPad app, adding expenses happens with the same mechanic, but the screen is larger and available by tapping a “+” button in the top right. Next is heavily based on the idea that larger screens are better suited for viewing expenses and smaller ones for creating on the go: Next for iPhone launches in expense creation mode; Next for iPad and Mac prioritize viewing over adding.
Besides the aforementioned nice touches of the expense creation experience, there are other thoughtful details that developer Sandro Pennisi crafted for the main screen of Next for iPhone. Categories where you’ve spent more money have a darker blue hue, so you can quickly differentiate them as the app assumes they’re your most used ones. Scrolling the category page has a spring effect attached to its icons, similar to the one found in the conversation bubbles of Apple’s Messages app. And, even if you’ve started typing an expense, you can still tap a category in the background to switch in medias res.
After eight months, I find adding expenses in Next so fast and intuitive, I struggle to use any other expense tracker.2 There’s a refreshing immediacy about Next’s main screen on the iPhone that is hard to top: while other expense trackers focus on cramming as much information as possible on the screen before letting you save an expense, Next is always ready to go by focusing on a fast, simple interaction. I’ve used Next while drinking coffee and carrying a bag full of groceries – I always use the app after paying for gas but before turning my car on again so I don’t forget the amount – and I’ve grown used to its intelligent use of color, sounds, and icons.
But the detail that perfectly encapsulates my appreciation for Next’s elegance is this: if you tap categories that contain more expenses than others (the dark blue ones), the associated sound effect has a higher pitch.
Viewing Expenses
Viewing expenses is where Next for iPhone and Next for iPad substantially differ.
On the iPhone, you can swipe left to view a reverse chronological list of all your saved expenses, grouped by day and organized by month; you can switch months at the top by tapping their tabs in the title bar, which is also scrollable if you need to view all the months you’ve been using Next.
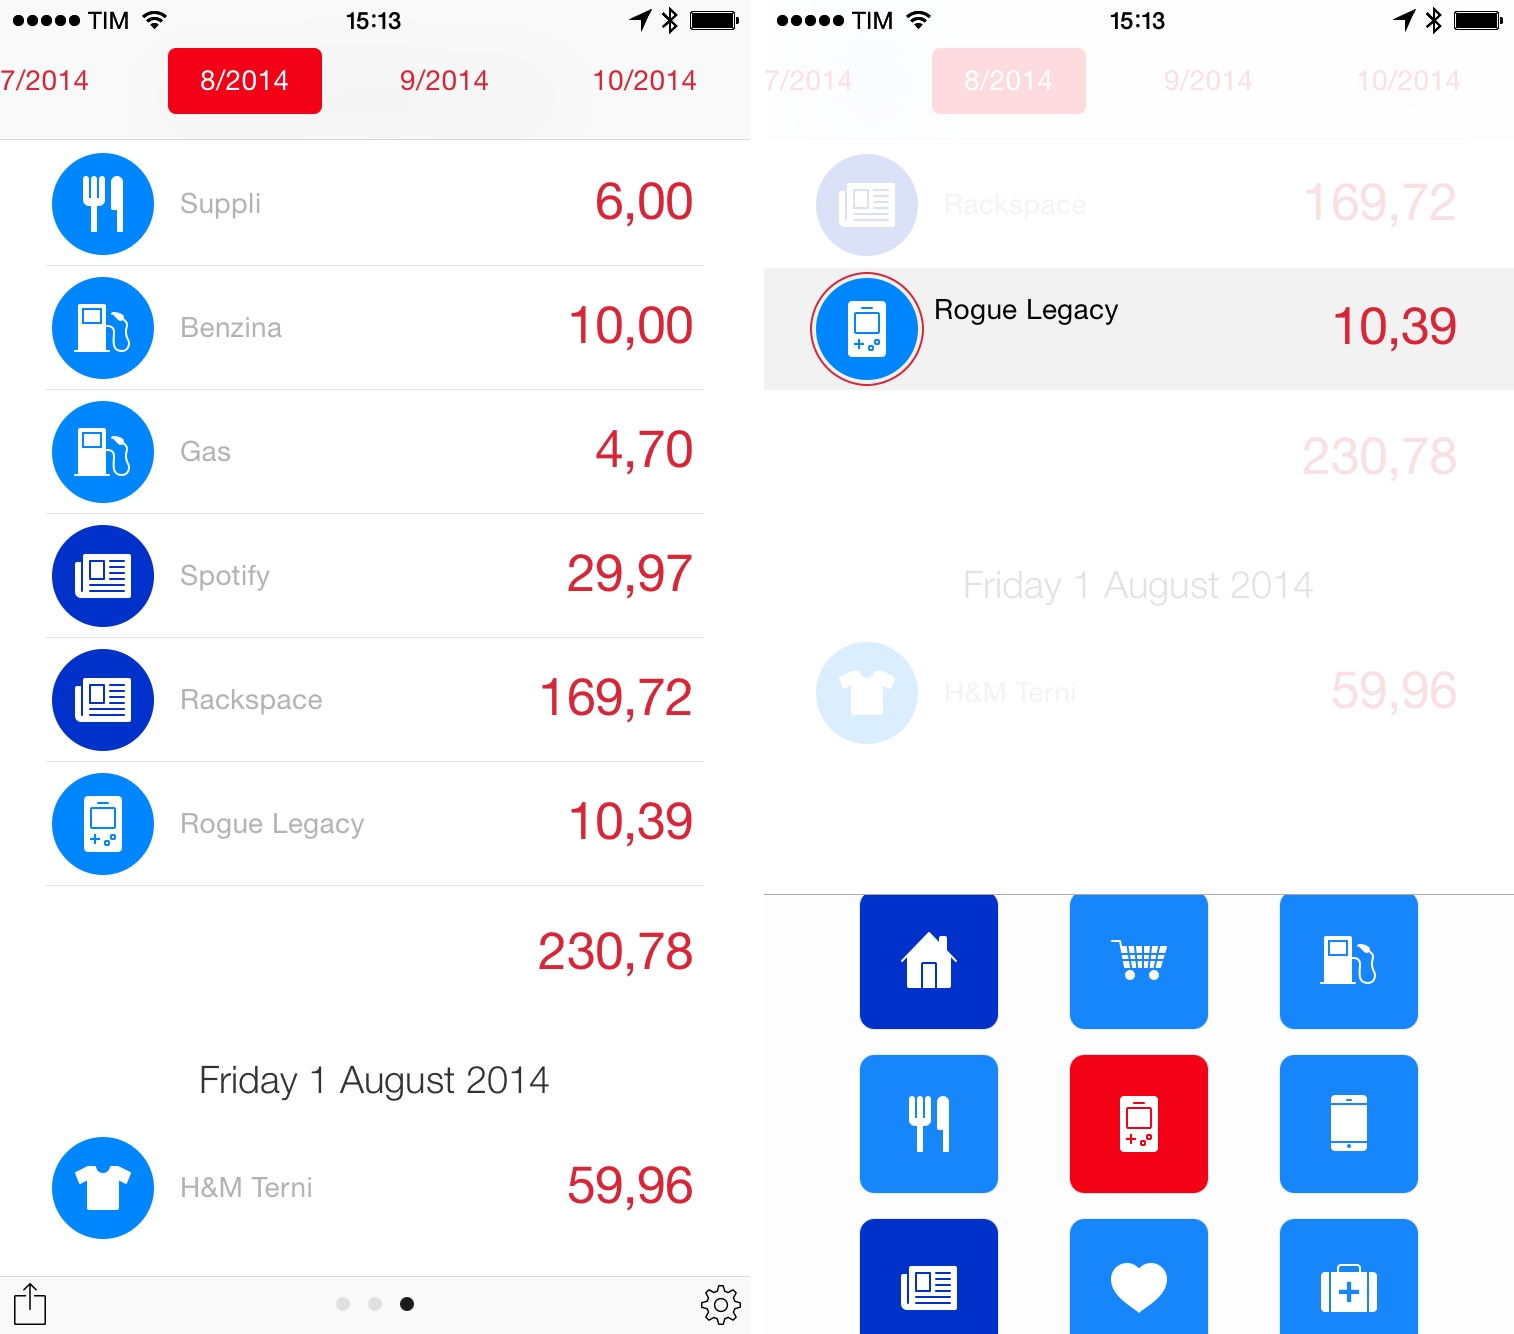
You can tap each individual entry in three areas: you can tap the icon to change it; you can tap the description to enter a new one; or, you can tap the amount to change the expense and date.
This screen is useful to get a complete overview of all your expenses, but it also shows off the limitations of the app and potential improvements that could be considered for future releases. Expenses are grouped by day, and each day shows the total at the bottom, which is handy to, say, know how much you spent yesterday while you were out shopping. However, expenses don’t carry the time of the day when they were saved, which makes it harder to remember what an entry is about if you don’t have a clear recollection of your day. For a future update, I wouldn’t mind being able to save the current time of an expense and, optionally, location information about where an expense was first created (Foursquare’s rich database could be used for this).
Another nice touch is that you can peek at the total for a month by swiping down on the expense list, but I also wish that search was in that screen so I could easily find an expense by name.
Overall, I use the expense list quite a bit, but I prefer the other screen – the one you access by swiping right in the main page – to get an overview of how my money has been spent over time.
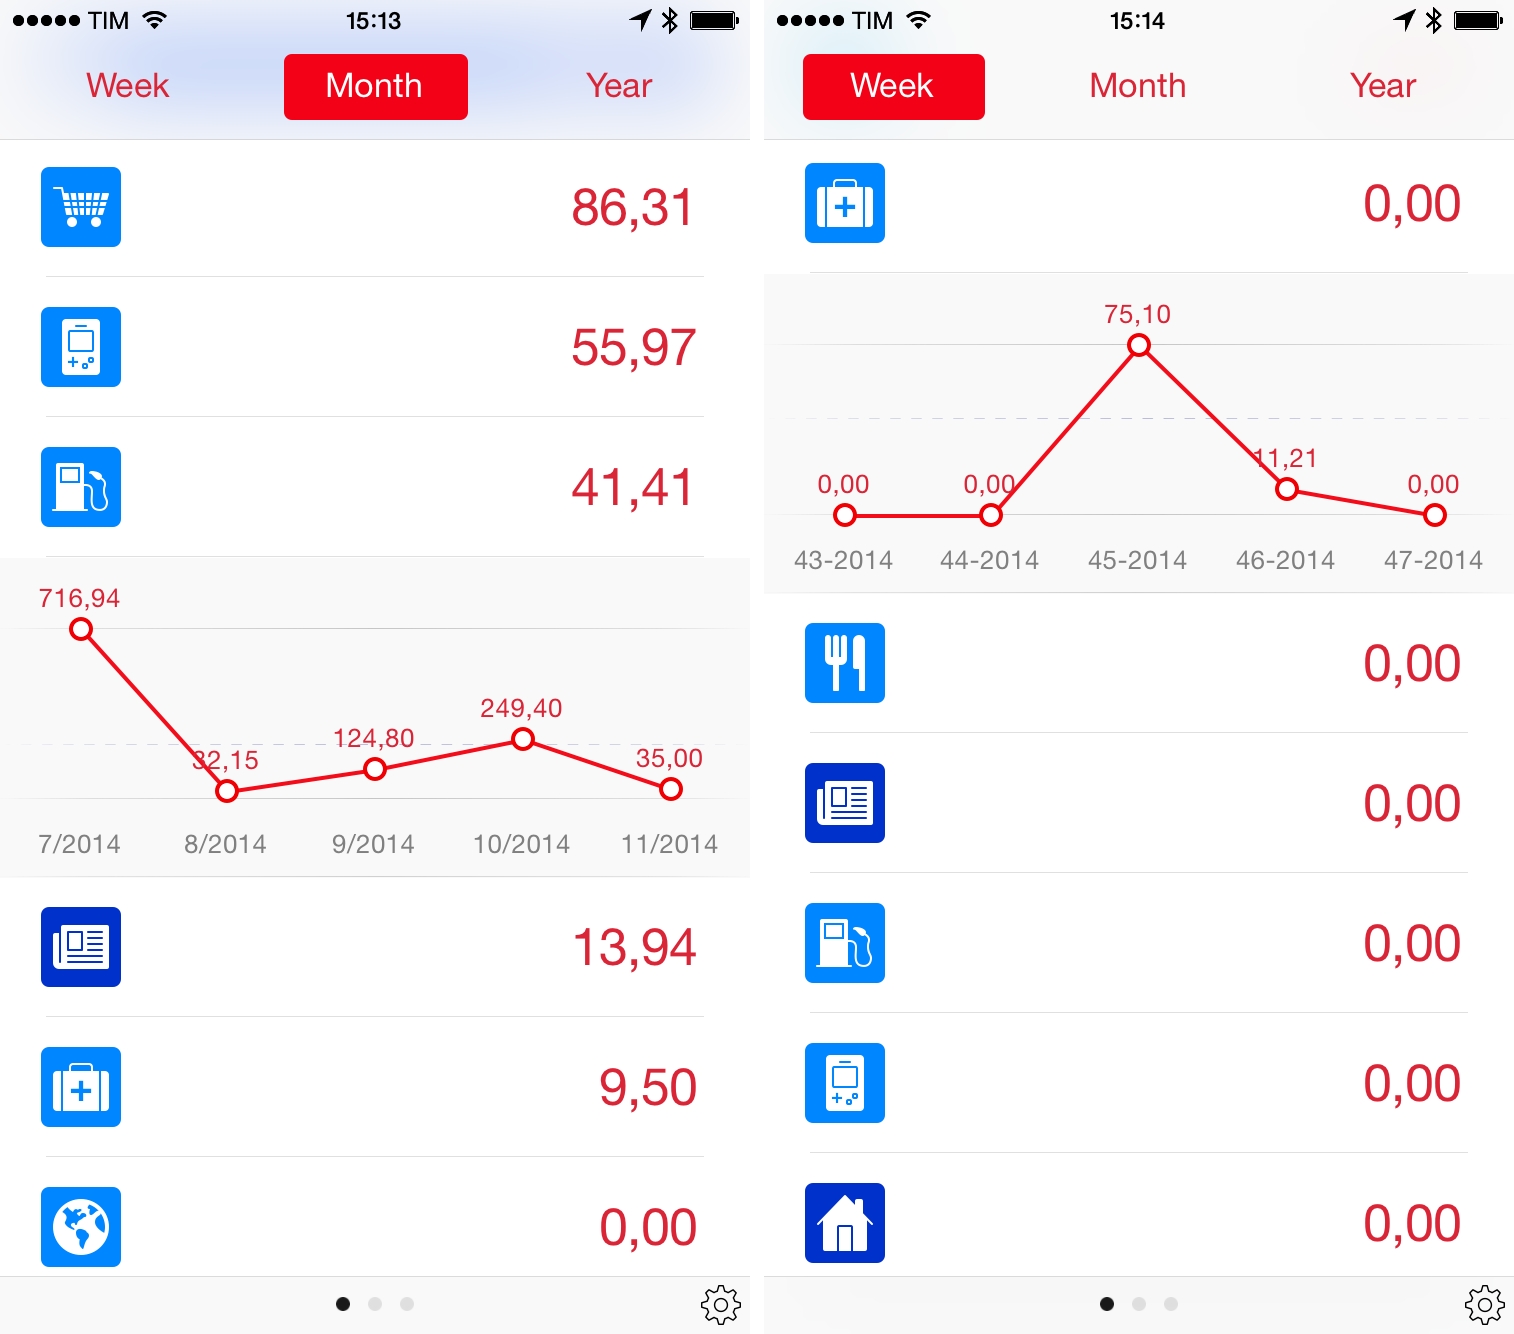
In this screen, you can view expenses by week, month, or year as categories displayed with bars from highest to lowest expense. In each timeframe, you can then tap on a category to view an overview graph with the latest five points, but you can’t scroll the graph to go back in the past and see the previous five weeks.
I love the overview screen because, in spite of the graph limitations, it gives me a clear and concise overview of spending over time organized by expense type. I can look at the MacStories expenses and see that the CDN costs were higher in September and October (busier months), but I can also see that I bought less games during the summer (fewer releases and more vacation time for me).
As someone who wasn’t into expense tracking before, Next has enabled a behavior that now allows me to break down my expenses, analyze patterns, and see if I need to optimize my spending habits more. It also helps predicting future expenses, as the graphs help me understand what my house bills or MacStories server costs will be like next Spring.
It is the iPad version of Next, however, that provides the best way to visualize expenses and navigate through past entries.
Unlike most iPhone apps that are brought to the iPad as enlarged versions that don’t take advantage of the device’s canvas, Next has been completely reimagined to offer a unique tablet experience tailored for gestures, animations, and displaying more content where it makes sense.
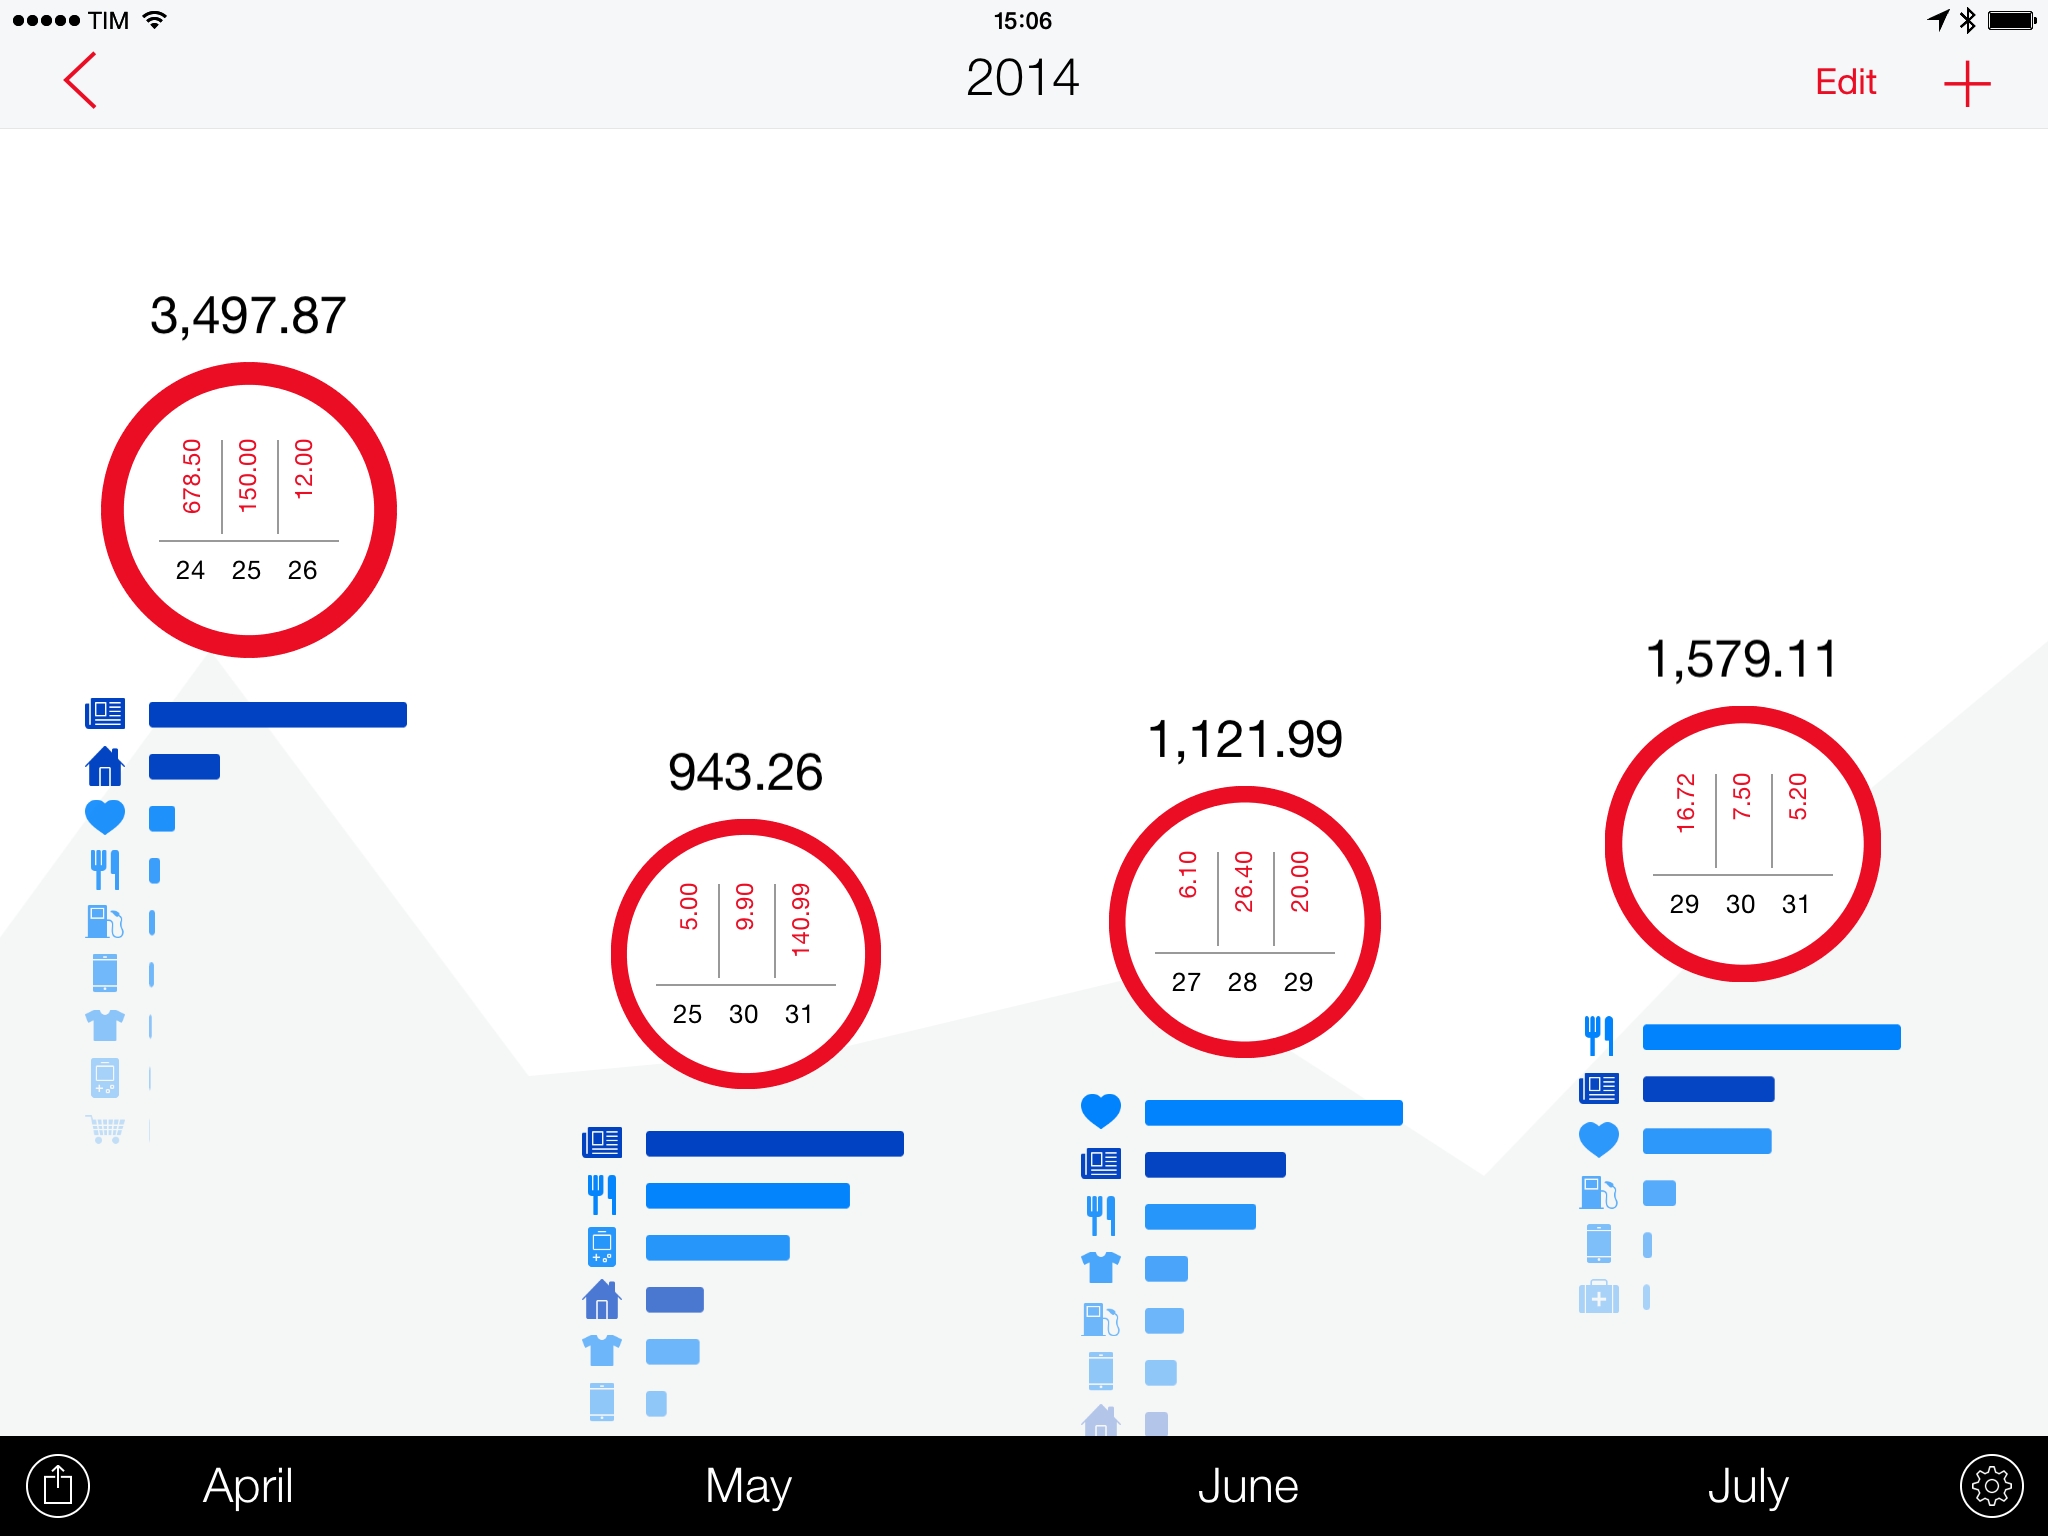
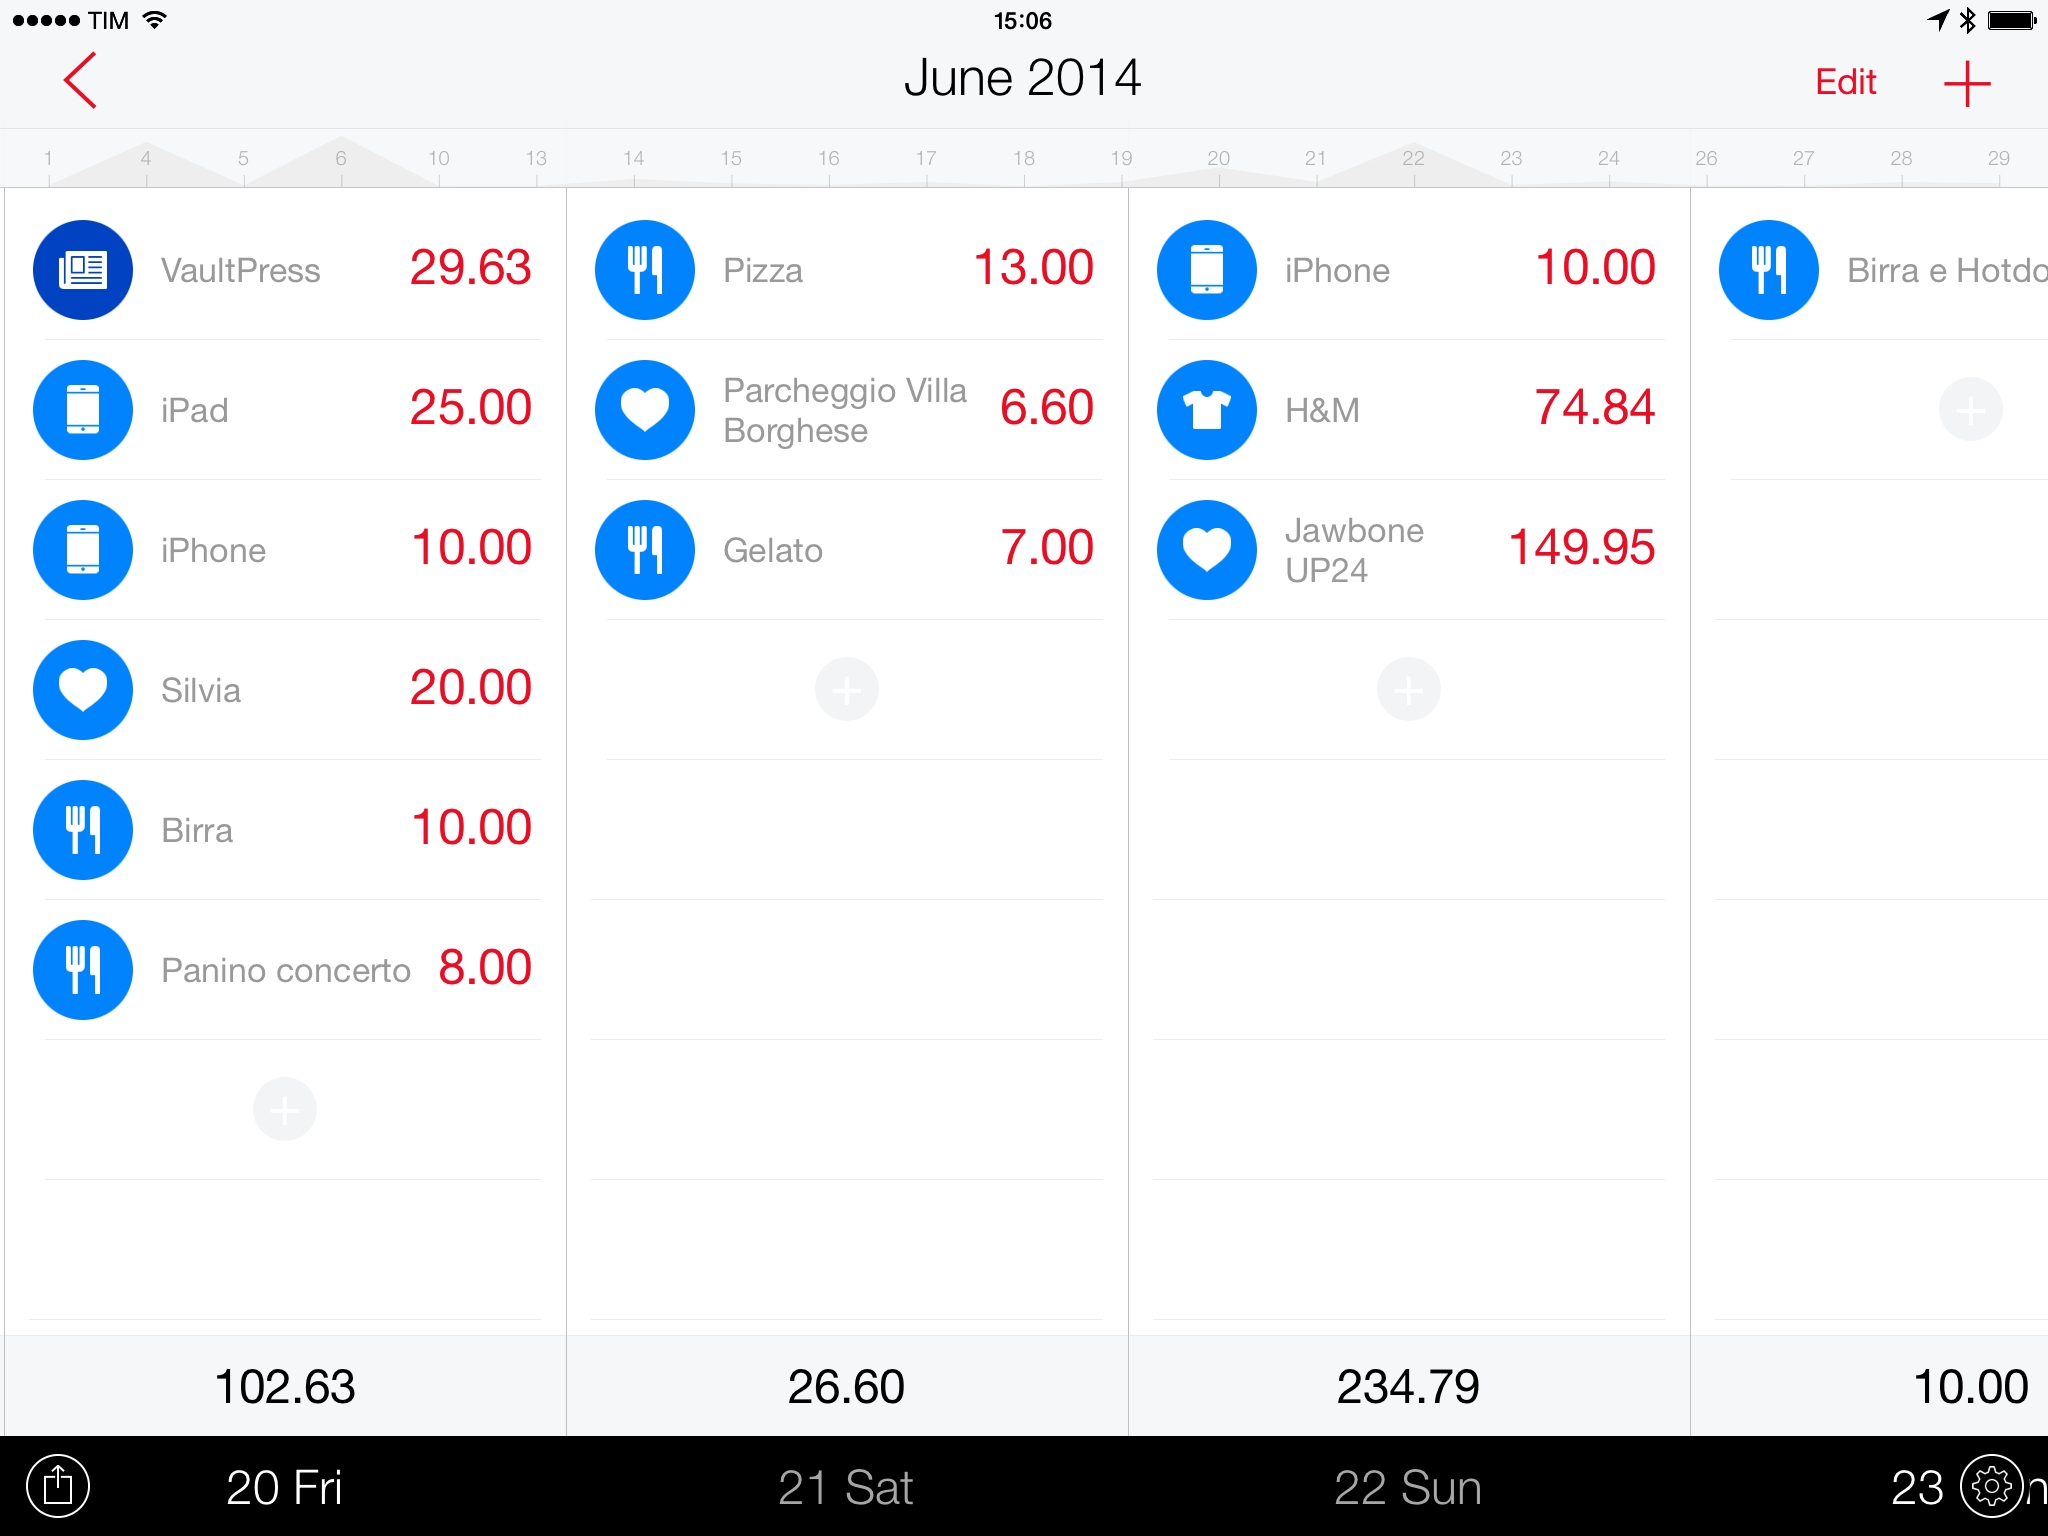
The app starts by displaying years inside circles with expense breakdowns for categories and monthly charts; tap the circle, and you zoom into months, which are laid out with the same structure. The zooming animation is associated with a sound effect and both provide context for the action of entering a specific time period. Tap a month, and the app zooms again into a scrollable gallery of all your expenses where you can then edit individual entries as you can on the iPhone.
I could look at the transitions of Next for iPad all day without getting tired of them: they’re contextual, they happen at the right speed, and they feel as part of the app rather than visual accessories. Next for iPad is the way you switch between months and days, and I struggle to come up with more examples of iPad apps that have been intelligently designed to use the iPad’s screen so well (Paper comes to mind).
And as the iPhone app, Next for iPad is full of little details that practically contribute to make finding expenses easier. The background of the monthly view, for example, is a graph of your monthly expenses; it subtly offers a hint to scroll towards months with higher or lower expenses, and its scrolling speed is different than the front pane (it’s tough to describe this textually, but it’s almost like a parallax effect). You can tap on the category bars under months to toggle amounts, and, when you’re in the day view, you can pinch your way out of the screen to return to the monthly page. If you hold the pinch-to-close gesture, you’ll return to the first screen of the app.
When you’re browsing days inside a month, the same gray graph that is used as background in the previous screen is applied to a horizontal calendar that shows all days for the current month. This is useful because you only see a few days at a time underneath the monthly bar, but the graph helps you navigate to days with high expenses – when you see a peak in the graph, you know that’s where you want to scroll (or tap), and this makes finding “big days” in your Next database intuitive and fun.
Next for iPad sounds like a great exercise of thoughtful design on paper, but this has real, practical consequences as well. While Next for iPhone is the app I use to quickly jot down an expense and forget about it, Next for iPad is the app I come back to view and understand my expenses (Next is powered by iCloud sync). The larger screen of the iPad and the fact that Next has been made for the iPad (not adapted to it) allow me to sit down, open Next, and scroll through months to see how much I spent on pizza and video games.3 The mix of icons, graphs, colors, and gestures turn the otherwise boring act of checking my expenses into a fresh visual experience that, for me, is way better than looking at a spreadsheet or bland list view. Next for iPad is informative without being garish or unnecessarily cartoonish, and it’s a great example of how good design can aid functionality.
Mac App
I haven’t used the Mac version of Next as much as the iOS apps. Shocking, I know.
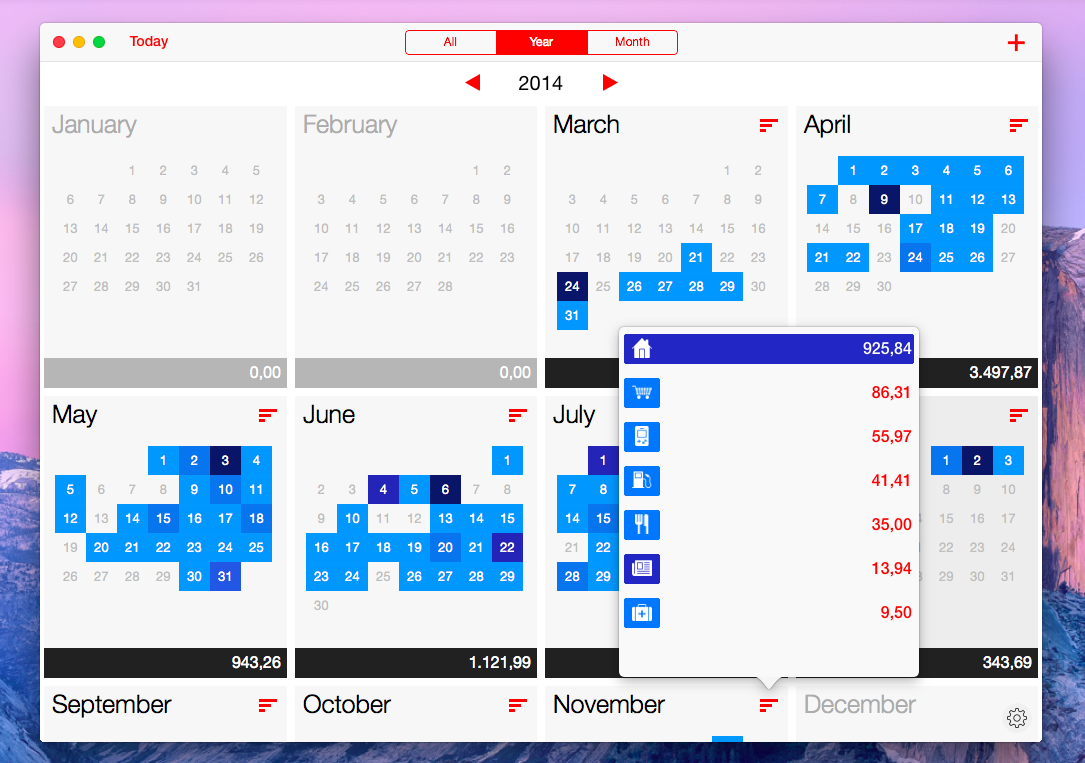
The Mac app is mostly reminiscent of the iPad counterpart, with less animations and a different monthly calendar visualization in the year view. The app uses popovers to add expenses and view monthly category breakdowns, and the various sections have been reorganized to make sense on OS X (such as tabs in the title bar).
What Next gets right on OS X is that being a Mac app means implementing features that aren’t meant for iOS, and one of them is keyboard shortcuts. Next for Mac has a good selection of those, but I wouldn’t know what else to say about the app. I don’t use it much.
Wrap-Up
Next got me into tracking my expenses, and my wallet is in better shape because of it. It’s been eight months now, and I feel I can safely say that Next fits in my lifestyle well because it’s designed for each platforms it runs on. The iPhone app is perfect for quickly saving expenses; the iPad app excels at viewing expenses and find patterns over time.
Next is an expense tracker that requires you to manually add expenses. It doesn’t have direct connections with your bank account or credit card – it’s an old fashioned tracker where you type numbers and text. And that works better for me because of the situation Italy is in: we still use cash a lot, sometimes we don’t get receipts for purchases, and therefore adding expenses to Next manually has become a habit for me.
I realize that this may sound odd to people who are used to powerful finance managers that connect directly to their bank accounts and come with budgeting features and other integrations, but a simple expense tracker has done wonders for me. I went from forgetting how I spend my money to being able to retrieve all my expenses in an app that makes it easy to do so, and I’ve benefitted from that. My main wish for the app would be a search feature to see similarly named entries side by side, but, in general, I want Next to keep its simplicity and elegance forever.
Next is a fantastic example of how iOS apps should be designed to take advantage of the platform they’re made for. I’m pretty good at managing my expenses now, and I owe that to Next.
Next is available on the App Store for iPhone, iPad, and Mac.