When I handed down my iPad to a loved one, they were given a device that would give them unlimited access to the Internet. For the first time, they could access the news and weather, research articles, and Google just about anything without having to rely on me or someone else to help them. iOS devices like the iPad are lauded because they make doing things like this ridiculously easy for someone who isn’t computer savvy, and I’m comforted in knowing that the iPad isn’t likely going to suddenly stop working or become infected by a virus. At the same time, I want to make sure their experience is pleasant, and that they don’t accidentally enter a password in a phishing site or stumble upon something that might be offensive to them. We either have parents or grandparents who’re just learning about what devices like the iPad can offer them, and it’s our job to make sure they stay safe.
Parents don’t want their young child stumbling upon anything they shouldn’t, and we certainly don’t want curious kids making accidental in-app purchases, rummaging through our email, or deleting personal apps. Parents want to create safe and fun environments for their children, especially if the intention is to use an iOS device as an educational tool.
In a family setting, it’s about striking a balance. How do you make it comfortable for the grownups in the house who want to use their devices as is, while keeping your child safe online?
Restrictions on iOS 7
One of the easiest things to do, especially with children, is to enable Restrictions on your iOS 7 device. Restrictions are the equivalent of Parental Controls, and can be used to determine what someone can or can’t do with their device without a password. If you’re afraid of a child installing an app without your permission, downloading a movie not appropriate for their age, or changing a setting, Restrictions is where you’ll want to look.
To find Restrictions, navigate to Settings, tap on General, then scroll down and tap on Restrictions.
Next, tap on Enable Restrictions. You’ll be prompted to enter and confirm a four digit code. Pick a good one, preferably nothing in this list or a guessable birth date.
Restrictions are split up into four groups: Allow, Allowed Content, Privacy, Allow Changes, and Game Center.

- Allow gives you an opportunity to disable various common functions, such as installing or deleting apps. These two are great ones to disable if you’re sharing your device with a child. (Heads up! Disabling access to certain apps like the Camera may rearrange app icons on your home screen.)
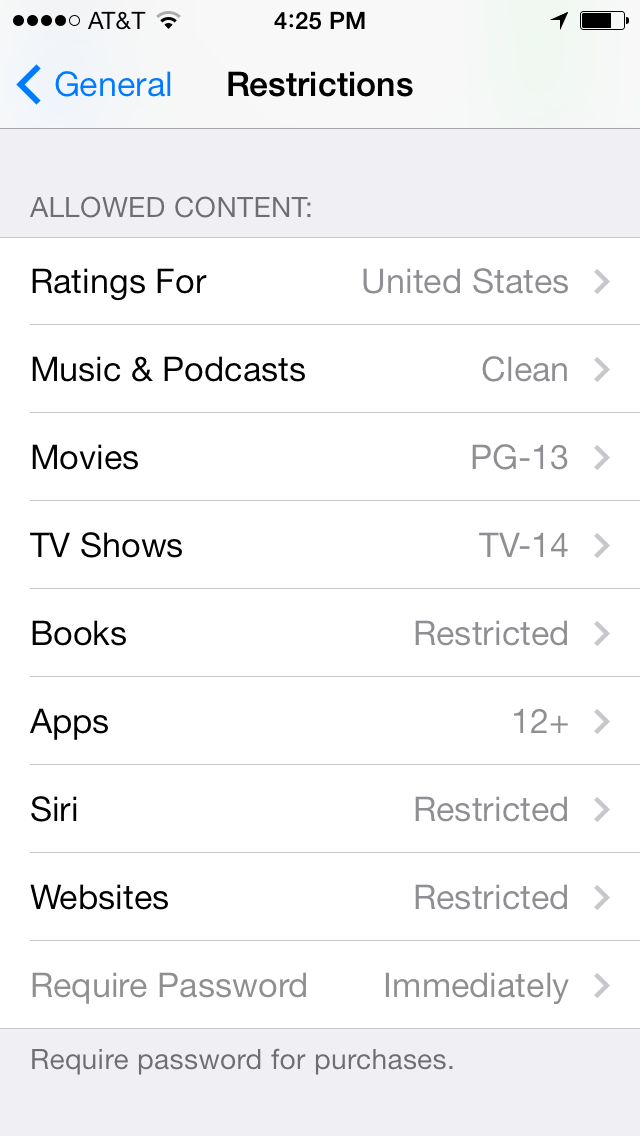
- Allowed Content lets you set what’s age appropriate. You can prevent playback of songs and podcasts marked as Explicit in iTunes (but only for iTunes purchases), set the age rating for movies and TV shows, and decide whether Siri pulls up web results if a query fails.
- Privacy overlaps with Privacy under Settings, locking these settings into place if you choose.
- Allow Changes lets you prevent things such as whether email accounts can be deleted and set the max volume limit. The latter is good for preventing damage to young ears, and for keeping friends from taking your iOS device and maxing out the volume while you’re listening (ow).
- Game Center toggles let you decide if you can play multiplayer games or add friends to your account.
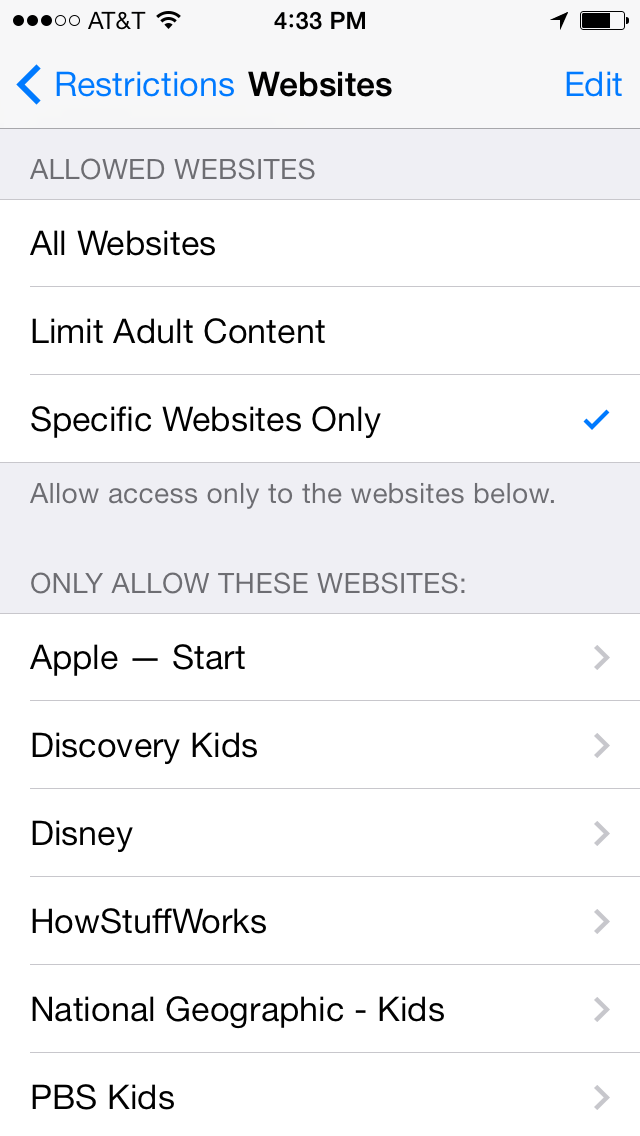
One particularly important section in Allowed Content is Websites. Tap Websites, and you’ll find that you can Limit Adult Content or allow access Specific Websites Only. The former is aggressive, and will prompt you for your PIN any time you remotely come across anything that could contain explicit language or show anything revealing. The latter lets you whitelist specific websites that you deem safe for your child, like Disney.
Guided Access
Introduced in iOS 6, Guided Access can lock you into an app and lock what buttons a person can or can’t press. It’s particularly useful if you want to limit a child’s session to a particular education program, game, or an app like Video if they’re watching a movie.
To turn on Guided Access, tap on the Settings icon from the home screen, General, then Accessibility, and finally Guided Access towards the bottom. Libraries and museums use it for public access computers or guided tours. Once it’s enabled, you’ll again be prompted for a separate four digit code that’s used to turn Guided Access on and off. In the app you want to lock down, simply press the home button three times.
Filtering websites on your home network with OpenDNS (Advanced)
OpenDNS, free for basic Home and Family use, lets you filter out categories of websites. In a few clicks, you can block websites that showcase sexual activities, sell firearms, are drug related, and are scam or phishing sites. The categories are broad and many, but selecting a few of the important ones continues to let the adults browse the sites they want to while the kids won’t wander onto anything parents would deem inappropriate. You can use OpenDNS without creating an account or choosing any filters if you desire, simply for the benefit of using private DNS servers.
OpenDNS is a three part solution that involves you having to change the DNS address in your router, download an updater to associate your home network’s IP address with your OpenDNS settings, and choose what you want to filter in an OpenDNS account.
If you’re wondering what DNS is, it’s the mechanism that lets you visit websites. It translates human readable addresses like www.macstories.net to its respective IP address. I like OpenDNS’s DNS servers since the company makes money by selling home, business, and enterprise solutions, not from tracking what you do online or selling advertisements.
OpenDNS isn’t difficult to set up, requiring about 15 minutes of your time (and some momentary downtime as your router is updated).
The aforementioned Home and Family plans fall under OpenDNS’ Home Internet Security plans. Click the link, choose Get Started under Parental Controls, and select OpenDNS Home on the next page. Click Sign Up Now and follow the prompts to create your account.
As an easier alternative, OpenDNS Family Shield sets up a lot of stuff for you. As Family Shield predefines its filters, you don’t get to choose what you want to block in a dashboard, but it does save you a lot of time. The following instructions still apply, but you’ll need to enter different DNS resolver addresses, which are noted at the end of the walkthrough.
The service offers plenty of instructions for establishing a connection on a variety of personal computers and home routers. I’ll walk you through setting it up on your AirPort Express, Extreme, or Time Capsule base station. These instructions are for AirPort Utility Version 6.
Launch AirPort Utility on your Mac or iOS device, then select the AirPort device that’s directly connected to the Internet.
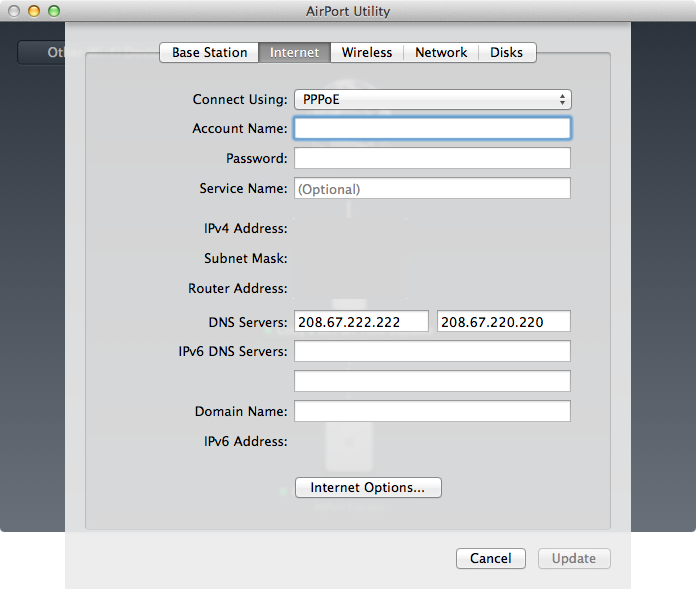
On your Mac, click Edit, enter your password if required, then click on the Internet tab. In the text fields next to DNS Servers, enter 208.67.222.222 in the first space, and 208.67.220.220 in the second. Click Update to apply the new settings to your router.
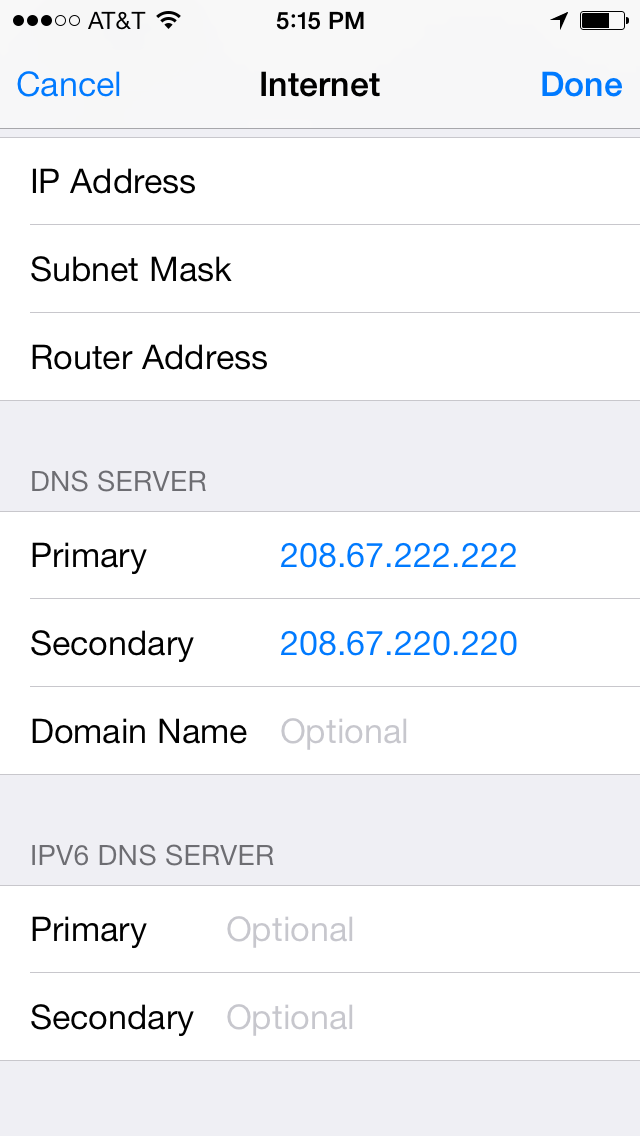
On your iOS device, enter your password if required, then tap on Edit in the top right. Tap on Internet Connection, scroll down, then enter 208.67.222.222 and 208.67.220.220 under DNS Server for the Primary and Secondary addresses. Lastly, tap on Done.
Note: The Family Shield plan automatically sets up OpenDNS with filtering for adult website using an alternate set of DNS resolver addresses: 208.67.222.123 & 208.67.220.123. You can stop here if you’ve chosen that plan.
Any time you visit a website on your home network, all DNS queries will now be made through OpenDNS.
A potential pitfall you can run into: Macs, PCs, and iOS devices can get their DNS queries elsewhere if they have DNS Server addresses individually set in their network settings. By default these fields are left blank, meaning they’ll use the same DNS server addresses as set on your AirPort router. If you want, you can also add the two addresses per device. This way, if your laptop or iOS device joins a public network, you’ll continue to send queries through OpenDNS.
Instructions for changing DNS settings on your personal devices can be found here.
For OpenDNS to apply custom filtering, they need to know your IP address. Many home networks have dynamic IP addresses, while high speed Internet and business customers have static IP addresses.
The former means your home IP address that your Internet service provider gives you can change. The latter means that address is always the same. Your ISP can tell you which one you have if you don’t know. If you have ADSL service, you’ll likely have a dynamic IP. It’s recommended that you download the OpenDNS Updater, and install it on a Mac or a PC that’s always at home. An iMac or desktop tower makes a good computer to use with this program. Personally, I wouldn’t install the updater on a MacBook or laptop unless it’s the only computer you have. Remember to turn off the updater before you leave the house.
To download the updater, this support thread contains links for Windows, Mac, and Linux desktops. The individual links are below:
Once downloaded, install it on your machine. When launched for the first time, you’ll be prompted for a username and password. Return to the OpenDNS website and open up your Dashboard.
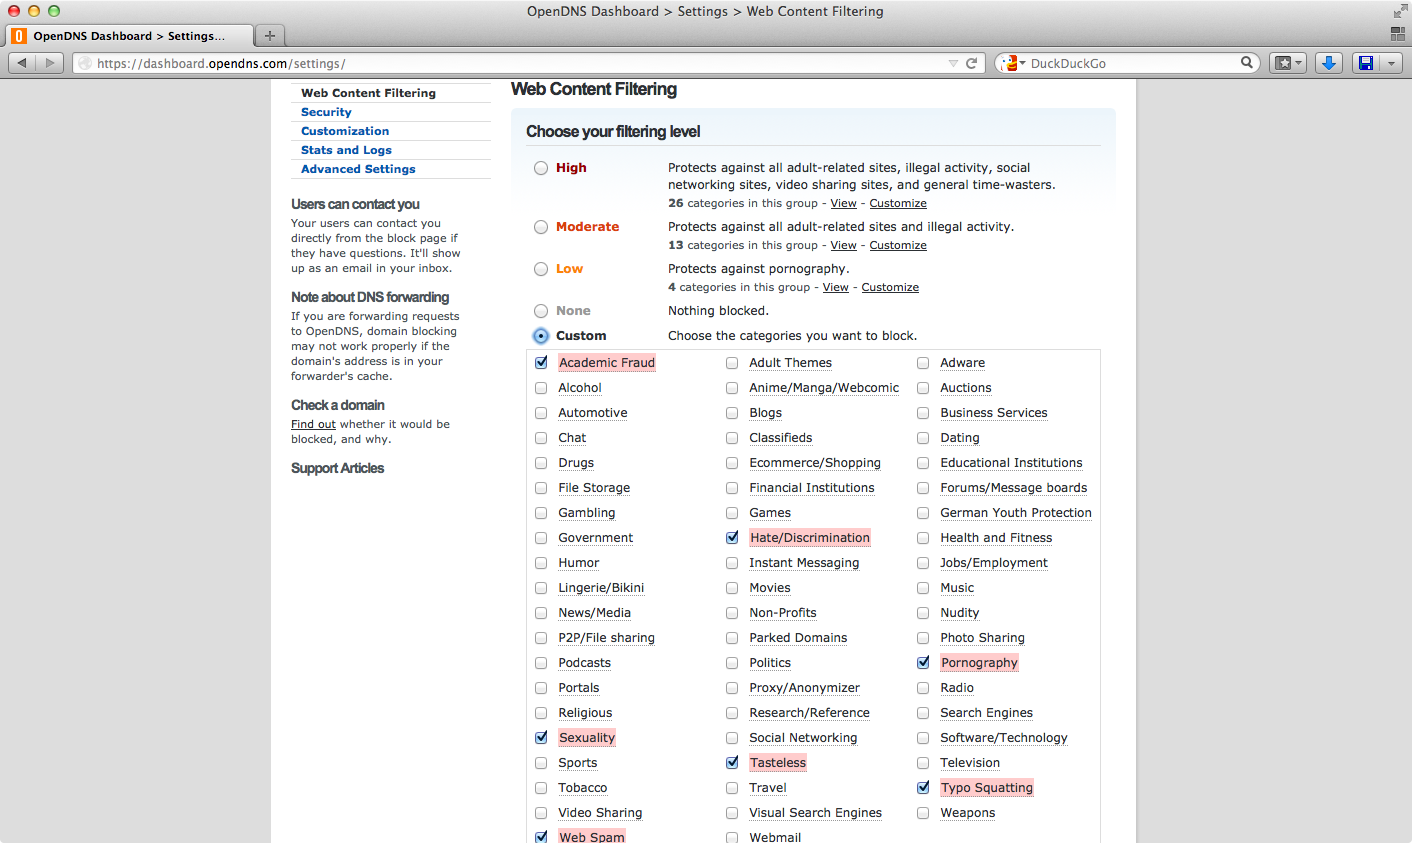
Click the image for a larger example of custom custom content filtering in OpenDNS.
In your account there’s going to be tabs for things like Stats, Settings, and My Account. The Settings tab is where you can select the IP Address associated with your home network, and customize filters. Various filters from High to Low can automatically set ground rules, but you’re free to check your own boxes with a custom filter. Remember to click Apply when you’re done. Remember, if OpenDNS isn’t pointed at your home IP address, your network won’t have any filtering applied.
Consider this
iOS 7 restrictions, paired with OpenDNS, can establish a family friend home environment for parents and loved ones alike. It isn’t a bulletproof solution however, and you should still keep an eye on what applications and websites your children are visiting if you want to keep them safe online. Apps like YouTube, or Alien Blue, can still display content that you might deem inappropriate for your child. Apps that make atypical requests for content or webpages can work around an OpenDNS filter or iOS restriction.
In summary
The advantage of restricting certain features on iOS can go a long way towards keeping family safe online. By restricting simple things, such as deleting apps, you can load up a grandparent’s iPad with apps and not have to worry about anything being deleted. By limiting what websites can be visited, either on iOS 7 or throughout your home network, you can prevent family from landing on well known phishing site, and save them from ending up on typo-squatted websites. For children, you can lock in video or educational apps with Guided Access so you can safely hand them your iOS device without worrying about them getting into your stuff. While iOS 7 doesn’t specifically included Parental Controls, or individual accounts, a variety of tools can help you set up a customized environment based on your family’s needs.