Say you take screenshots of your desktop or open applications now and then to show off via IM or Twitter. Sure, you know how to take that screenshot: Cmd-Shift-4 (for an area) or Cmd-Shift-3 (for the whole screen). But getting it out onto the web? What a hassle to fire up an FTP client or twitpic.com just to drop off one little picture!
Enter TinyGrab.
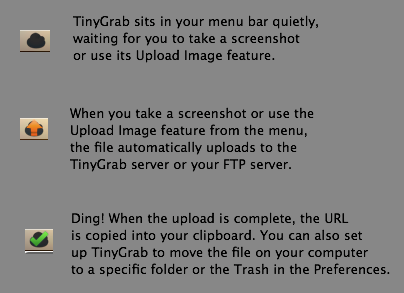
This tiny app waits around quietly for you to take a screengrab and automatically uploads it to the web, then copies a short link into your clipboard to paste wherever you like. It even goes ding! The best part? It’s available for free right now as part of MacHeist’s NanoBundle.

That’s all the news, folks. TinyGrab takes the labor out of uploading a screenshot (or picture) and lets you get on with sharing it across the web. Very lightweight, its icon (a camera in the clouds) sits in the menu bar in case you need to copy or open the link to a recent upload, to upload a new file, or to change your preferences. This ease of use paired with its simple setup – just sign up for the free service (or the 10-pound premium service) and put the program in your Applications folder– make this a great, simple, and tiny utility for picture uploading.
The online support for the application is pretty super and simple, too! Once your file is uploaded, you can log in at TinyGrab.com to manage your uploaded images. If you have any issues or ideas, the TinyGrab developers, Keyone Productions, keep close tabs on the GetSatisfaction page for TinyGrab and provide lots of feedback to your questions. If you want to use this under Windows if you’re using BootCamp or Parallels, you’re covered: a Windows version is available with the same functionality.
Here’s a more detailed look at TinyGrab’s features, since it does a few more things than just upload screenshots.
After uploading, it goes ding! (You can turn off or change that sound.)
There’s also a visual notification, if you take a peek at the icon in the menu bar. (During upload, it shows an amber arrow; when it’s done, a green checkmark shows up.) The URL for the newly uploaded picture is copied into the clipboard for you to paste wherever. There’s also an option in the Preferences to automatically move the file on your computer to the Trash or the folder of your choice. (You choose it once, that is; there’s no need to specify which folder every time!)
The last five uploads are listed by upload time in the menu if you click the icon.
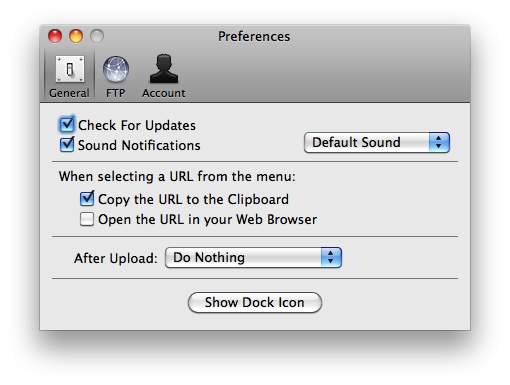
Select an upload time to copy the URL into the clipboard (default behavior) and/or open it in your web browser (which can be changed in the Preferences).

Your images are given a tiny URL that looks like http://grab.by/a920.png, perfect for Twitter, if you’re using the TinyGrab.com service - which you should, since they provide great image management on the website.
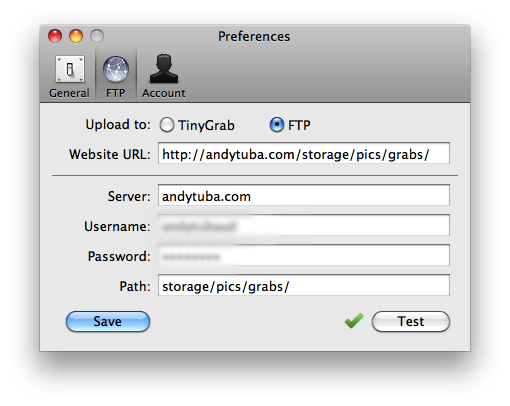
You can also upload to your own FTP server if you don’t want to use the TinyGrab service. (Pro tip: make sure the Website URL points you to the same place as the Path or your links won’t work!)
Automatic uploading can be disabled with just two clicks: click on the icon in the menu bar to pull down the menu, then select “Disable Uploading”. Just make sure to turn it back on later!
You can also upload other images that are already on your computer: click on the icon in the menu bar to pull down the menu, then select “Upload Image” and find the file. Incidentally, this file is treated the same as a screenshot: on the pull-down menu, the file is listed by what time you uploaded it and the uploaded file gets a new name.
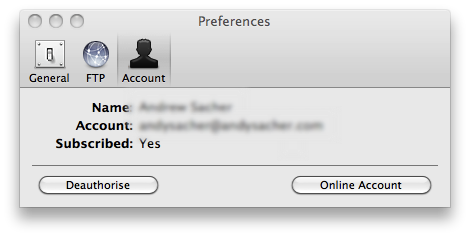
To easily access your online account on tinygrab.com, you can open up the Preferences and, under the Account tab, click the “Online Account” button to open it in your web browser.
The downside of all this simplicity is that a few things aren’t immediately obvious, so here’s some tips in case you get confused.
- TinyGrab doesn’t actually take screenshots itself. When you take a screenshot using Mac OS X’s built-in screenshot feature, TinyGrab automatically uploads that picture. The default keyboard shortcut for taking a screenshot is Cmd+Shift+3 for the whole window and Cmd+Shift+4 for a specific region; these keyboard shortcuts can easily be changed in the Keyboard preference pane in System Preferences, under the Keyboard Shortcuts tab in the Screen Shots category.
-
The URL for your uploaded file is copied into the clipboard after the upload is complete. To see if the upload is complete, check the cloud icon for a green checkmark or listen for the ding.the URL linking to your picture is copied into your clipboard and you can paste it wherever.
-
Make sure to check the Preferences after you install it, since a few great features aren’t turned on by default (like clicking a picture in the pull-down menu to open it in your web browser).
On an interesting postscript, it’s even possible to upload any kind of file quickly to your server. If you’ve set up TinyGrab to upload files to a specific FTP server rather than to TinyGrab.com grab.by service, you can use TinyGrab’s “Upload image” feature to upload any kind of file–not just pictures. Keep in mind that the file will be treated just like a screenshot: the uploaded file will have a new filename, but will retain the same extension. For example, I uploaded “International Characters.pdf” and ended up with “372cb35809dc73bfd041956a6ba66522.pdf” on my web server.
Nonetheless, this is a handy feature for easily sharing single files and obscuring the filename, too.
TinyGrab does quick and easy screenshot/image upload–and it does it well. Its automatic screenshot upload and streamlined image file upload make it perfect for someone who does a lot of one-off picture sharing (especially if that someone is tired of using the Twitpic interface). With a minimalist and beautiful design, this application is a paragon of both the Apple and Unix design ethics. The designer is providing plenty of support to current and new users (of which there are plenty, thanks to MacHeist).
Plenty more features are in the works, too, so even if this application doesn’t provide everything you need right now, such as posting to Twitter/Twitpic or Facebook, check back in a month for updates and new features.
This review was written by Andy Sacher. You can reach him on Twitter (@andytuba) or head over his website.