The framework AppleScriptObjC allows users to write scripts with an interesting fusion of the AppleScript and Objective-C languages. Specifically, Apple describes the framework as:
AppleScriptObjC lets AppleScript objects serve as Objective-C objects in the Cocoa runtime
Basically this means that you can use simplistic Objective-C code in an AppleScript with the seemingly easier to grasp syntax of AppleScript. If none of this makes any sense yet then just hang in there and I will explain in a very visual tutorial in which I will build a sample Cocoa-AppleScript app that simply sends a notification to the Notification Center and quits.
AppleScriptObjC is nothing new, in fact it was first introduced in Mac OS X 10.6 Snow Leopard. Apple published release notes on the topic but the possibilities are quite limitless when you start mixing the languages. In all honesty, I don’t particularly care for AppleScript but I was intrigued when I had the idea of using it to interact with the new Notification Center, a feature introduced in the recent OS X 10.8 Mountain Lion operating system. So what follows is an introduction not only in creating a AppleScript-Cocoa application, but also a great example of integrating the Notification Center in to your AppleScripts.
The main difference when writing an AppleScript-Cocoa application is that you will no longer be using the AppleScript Editor. You will have to download the Xcode application from the Mac App Store and use that to write your AppleScript code. Xcode is a free download and comes with some pretty amazing tools aside from just creating AppleScript applications that you may want to explore if you have an interest in app development.
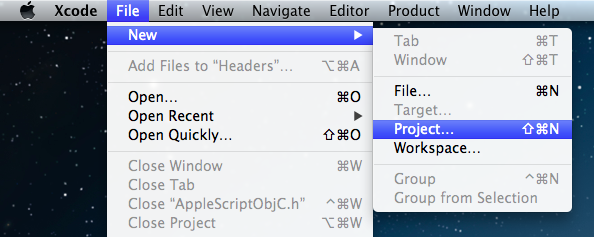
Once you have Xcode installed, open the application and start a new Project.
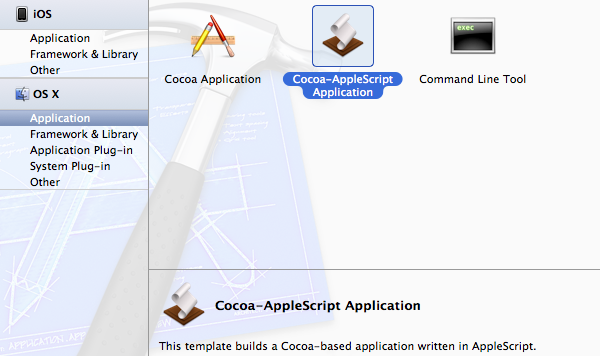
Xcode will provide you with many project templates but the only one you need at the moment is under OS X > Application > Cocoa-AppleScript Application. You will also be prompted to give your project a name and to choose a destination directory where the project will be saved.
Once your project loads up, Xcode will have pre-populated it with some default files including the main AppleScript file usually called “AppDelegate.applescript”. This is the AppleScript file where you will write your code.
So lets dive in to the the small amount of code required to write an AppleScript function that will send notifications from your script to the new Notification Center!
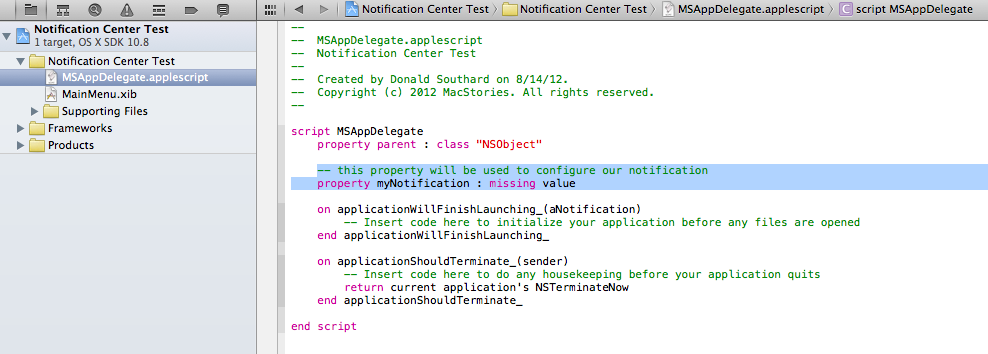
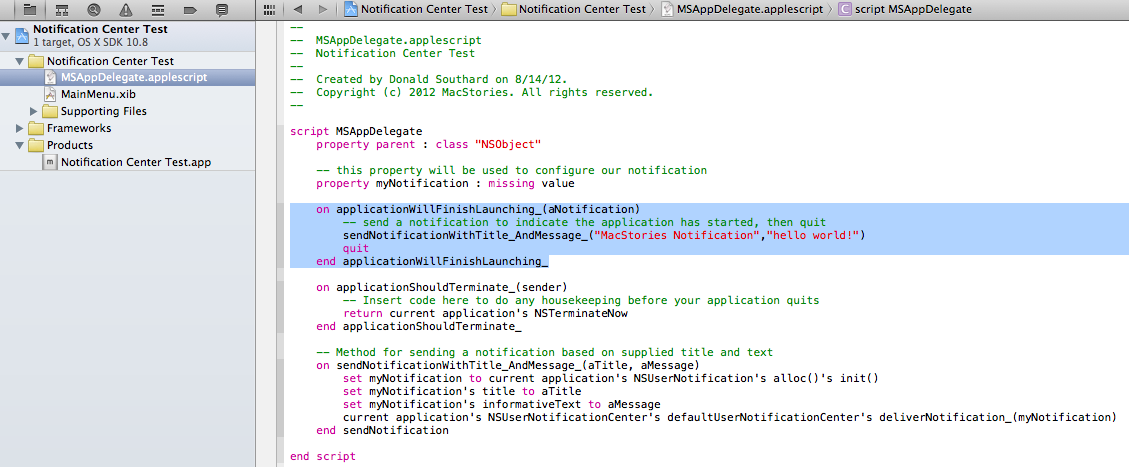
Start by adding a property to your AppleScript that will be used as a placeholder for the notification details. Properties are a common AppleScript functionality for defining constants so you may already be familiar with the syntax. However in this AppleScript-Cocoa app you are assigning the property a missing value, which is only temporary because we will allocate a notification in the next bit of code. As shown in the screenshot, this property is defined in the main script function.
property myNotification : missing value
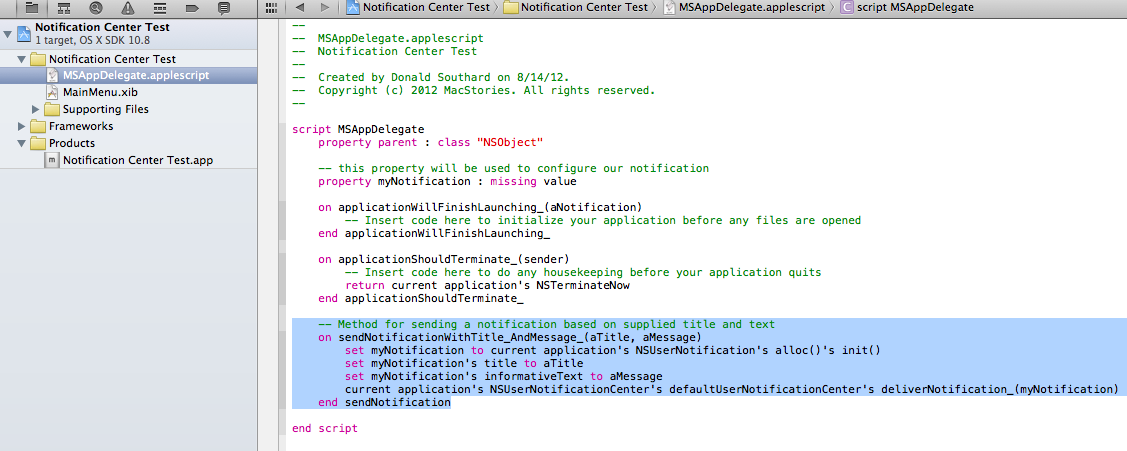
Now lets add in the function that we will call to create and send the actual notification. This function takes two parameters: a title and a message.
There is a lot going on in this chunk of code that even an avid AppleScript user may not be familiar with. This is where we start to see a bit of Objective-C however I don’t want to fall down the rabbit hole of explaining the Objective-C code but just how AppleScript is able to access it. A great example is the second line where a notification is allocated. In Objective C this would simply be written as
[[NSUserNotification alloc] init];
However as you can see, to use this in a Cocoa-AppleScript application you must write the code in one of the common AppleScript syntax’s as defined in Apple’s release notes on AppleScriptObjC. I chose the syntax Apple referred to as Object’s Method(). As a result, that same bit of code is written as so:
NSUserNotification's alloc()'s init()
This is the fundamental lesson to writing and utilizing Objective-C in your AppleScript. Apple gave additional syntax examples in their release notes and I urge you to read that document as well.
Once we have the code for our notification function in our AppDelegate.applescript it should look like this:
Now we simply need to add a line of code calling the function and passing it a title and message. In this test project I added a line in the applicationWillFinishLaunching_() function that way a notification will get sent as soon as the application launches, then the app simply quits. This should be enough to show you the basics of how to implement Notification Center in AppleScript.
The AppDelegate.applescript file should look like so:
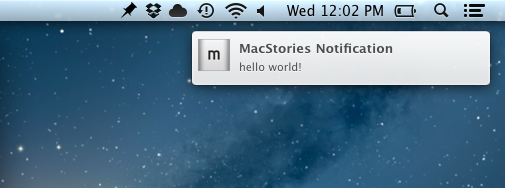
To run the program and test the notification simply click Xcode’s “play” button on the left side of the Toolbar. When the program runs you will see a notification display and it will also be logged in the Notification Center. In this example I have added a MacStories icon to the project to give the notification a personalized look. It is also important to mention that the end result of a Cocoa-AppleScript application is not a script but a bundle package which Xcode will build for you when you run the application. The .app file that is generated will be located in the Products folder in your Project directory tree which you will find at the bottom of Xcode’s left side bar.
I am also including this test project as a downloadable zip file so feel free to experiment with it! Hopefully this tutorial was simple enough for you to take this bit of code and really expand your scripts to more advanced AppleScript applications. The AppleScriptObjC framework has some really interesting uses beyond Notification Center when you consider adding features like interface elements with Xcode and the included tool Interface Builder. I will be excited to hear how you folks put this to use!


