Posts in links

Just How Fast is Fusion Drive? Macworld Benchmarks the Mac Mini

Just How Fast is Fusion Drive? Macworld Benchmarks the Mac Mini

Apple’s Fusion Drive isn’t a new idea — after all, Seagate sells their Momentus XT Solid State Hybrid Drive and Corsair promises that their Accelerator Series SSD cache drives will improve the performance of your PC by augmenting existing hard drives — but it is a new option available for Apple’s latest Mac minis and iMacs. (There are notable differences between how the aforementioned products work in comparison to Fusion Drive, but they all attempt to reach the same result.)

To quickly recap, Apple’s Fusion Drive was announced on October 23rd in San Jose, California, where Apple launched an updated Mac mini, a new iMac, the iPad 4, and the new iPad mini. The Fusion Drive pairs a mechanical hard drive with a solid state drive (SSD). Traditional hard drives, while available in large storage capacities from 1 to 2 terabytes, are slow to read and write data. Apple’s implementation uses the SSD as temporary storage, where the most recently and often used apps and documents can be stored so that they load and save faster. Things on your computer that are used the least often are placed in “long term storage,” or the slower mechanical hard drive. However, the two drives (combined) will appear as one drive in the Finder — OS X handles everything for you. So why not just use a SSD (which would be simpler in setup)? While they’re much faster and (arguably) less prone to failure than their mechanical counterparts, SSDs are still very expensive. A 500 GB SSD still costs around $400, while a 1 TB mechanical hard drive costs under $100. As Macworld puts it,

…in brief, Fusion Drive is Apple’s answer to the high-price-per-gigabyte problem of solid-state drives. SSDs are fast as all get out, but they have very limited capacity and they cost a lot more than traditional drives. Fusion Drive gives you the best of both worlds by bringing together a separate 120GB SSD and 1TB hard drive and presenting them to both the user and applications as a single drive.

The benefit is clear. Fusion Drive is less expensive and offers incredible performance. Just how fast is it?

The standard configuration $799 Mac mini with its 5400-rpm hard drive took more than three times as long to complete our copy file and uncompress file tests as the Fusion Drive did in the BTO Mac mini.

Macworld’s build-to-order Mac mini, with a Fusion Drive, scored comparatively to a 15” MacBook Pro with Retina display. Impressive. And they’ve ran a gamut of tests to show that a customized Mac mini is a really fast little machine. As a side note, I personally think if someone’s thinking about dropping $1499 on a Mac mini, most people should spend a few hundred dollars more and get a 21” iMac for the display, mouse (or trackpad) and keyboard.

As for the technical implementation of the Fusion Drive, several days ago, Ars Technica went in depth on how it works using a training document as a guide. There’s a lot going on behind the scenes, and Ars writes that what makes it newsworthy is that it just works. Sounds familiar right?

If you’re a casual user and don’t care about the internals, there is nothing that you need to do to make FD “work.” You power on the system, log on, and use it. A Fusion Drive-equipped Mac leaves the factory with the operating system and all of the pre-installed applications on the SSD side, so the system is just as snappy and responsive as if it were an SSD-only Mac.

I personally wouldn’t pass up the Fusion Drive (a $250 option) if I was configuring a higher end Mac mini or a new iMac. There’s no setup of the drives themselves, and as far as you or anyone else is concerned, you still save documents and install apps the same way you always have. In the background, Apple’s Fusion Drive manages what physically goes where, how it’s handled, and when it gets offloaded to the hard drive. Apple’s Fusion Drive isn’t geek friendly — Ars Technica notes that you won’t want to “poke at or prod” the Fusion drive. This comes with caveats, such as being forced to use Apple’s Boot Camp for creating a Windows partition. It is, however, very consumer friendly, and that’s all that relatively matters when you simply want the best possible performance for the most storage.

Permalink

Apple Airs New iPad mini Commercials

Apple Airs New iPad mini Commercials

Following the “Piano” ad launched after the announcement of the iPad mini, today Apple aired two new commercials for the device. Named “Books” and “Photos”, both commercials focus on showing the size difference between the regular iPad and the iPad mini. More importantly, both ads want to communicate the simple message that the iPad mini is smaller in size, but also just as capable in terms of functionality: the iPad mini runs the same apps of the bigger iPad, therefore making it a “real” iPad, only smaller (and thus more portable). This follows the tagline on the product page: There’s less of it, but no less to it.

As noted by Jordan Golson at MacRumors, the commercials rely on clever pairings of books and photos to compare the two iPad models. For books, Apple uses The Sun Also Rises and The Valley of the Moon; East of Eden and How the West Was Won; Moby Dick and Gone Fishing.

The new commercials aren’t available on Apple’s YouTube channel yet, but they have been uploaded to Apple’s website. You can watch them here.

Permalink

Micro Audio Converter

Micro Audio Converter

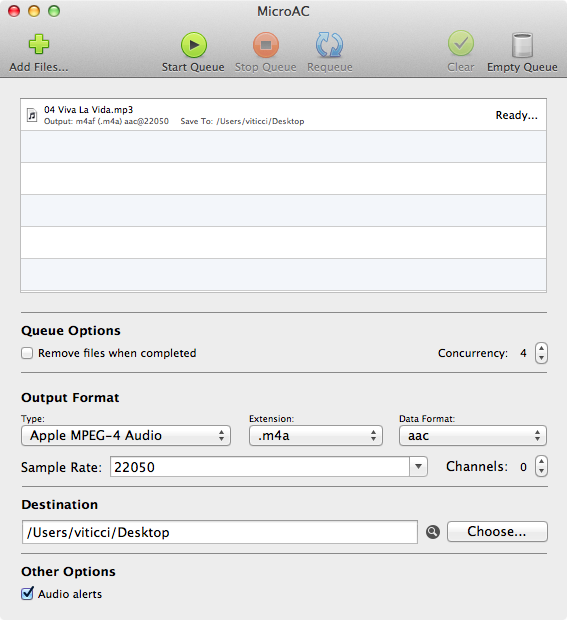
Developed by Aaron Smith, MicroAC is a nice GUI for afconvert. In case you’ve never heard of afconvert, it’s a command line tool that Apple describes as a utility to “convert a source audio file to a new audio file with the specified file and data types”. Rather than forcing you to set parameters by hand in Terminal, MicroAC provides an elegant and simple interface that makes it easy to convert audio files from one format to another.

MicroAC can convert “Core Audio compatible formats” such as 3GP Audio, 3GP-2 Audio, MPEG-4 (both for audio and Apple audiobooks), AIFF, WAVE and CAF. The app lets you drag & drop files to convert into the main window, and you can choose types, data formats, extensions, channels, rates, and destination in the lower section of the app. In actual usage, I was able to convert MP3 files to MP4 in less than 2 seconds.

If you’d like to rely on afconvert without going through Terminal, MicroAC is a nice option. $2.99 on the Mac App Store.

Permalink

PopClip Extensions

PopClip Extensions

I first wrote about PopClip last year. Developed by Pilotmoon, it is a simple utility that brings an iOS-like popup menu for text selected on OS X. From my original coverage:

PopClip, a $4.99 app from the Mac App Store, takes a page from iOS’ playbook and overhauls the Mac’s default copy and paste actions with an iOS-like popup menu.

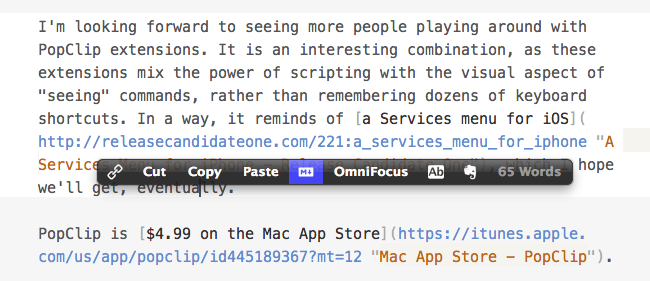
With PopClip, you can select text and a popup menu with options to copy, paste, cut and look up in Dictionary will appear, just like on your iPhone or iPad. PopClip is also capable of opening links contained in selected text, and it’s got support for spelling corrections.

I recently found out (thanks to a Systematic episode) that it’s possible to extend PopClip. Version 1.4, in fact, brought support for extensions. Pilotmoon has posted a dedicated page showcasing some examples of extensions already available. The best part? PopClip extensions can be made with AppleScript, shell scripts, system Services – it’s very easy to adapt existing scripts to PopClip’s syntax for selected text (literally one word). Extensions can have custom icons, names, and requirements, and to put one together you’ll need to create a .plist file for the extension’s settings. For developers, Pilotmoon has also posted instructions on how to create and package extensions.

Personally, I have already installed some of the extensions linked on PopClip’s page (such as Evernote, Title Case, and Paste and Match Style), as well as an OmniFocus one by Marc Abramowitz and a set by Andy Guzman. To prove it’s really simple to update existing scripts for PopClip, I’ve created a version of today’s Mail > Evernote AppleScript that works for text selected with PopClip in an email message; it’s very simple, but you can find it here.

I’m looking forward to seeing more people playing around with PopClip extensions. It is an interesting combination, as these extensions mix the power of scripting with the visual aspect of “seeing” commands, rather than remembering dozens of keyboard shortcuts. In a way, it reminds of a Services menu for iOS, which I hope we’ll get, eventually.

PopClip is $4.99 on the Mac App Store.

Permalink

Instagram Profiles Now Let You View and Share Your Photos On the Web

Instagram Profiles Now Let You View and Share Your Photos On the Web

Just announced on the Instagram blog, a long awaited feature is finally hitting the web. Instagram Profiles allow you to share your Instagram photographs online, allowing anyone to comment and like photos from their favorite web browser.

Instagram web profiles are a beautiful new way to view and share Instagram on the web! Your web profile features your photos along with your profile photo and bio, giving others a look at the content you share on Instagram.

You can share your own profile with anyone you want to see your Instagram photos. In addition, web profiles provide an easy way to follow other users, comment & like photos, and even edit your profile directly from the web.

The address for your Instrgram profile is ridiculously simple (For example, Federico’s profile would be instagram.com/viticci). You can make your photos public so that anyone can view your profile, or make them private so that only Instagram users you’ve allowed can see your photographs. However, not all profiles are available yet. According to Instagram, online profiles will be rolling out over the next couple of weeks.

Permalink

#MacStoriesDeals: 20% Off Hazel Screencast & Superstorm Sandy Donations

#MacStoriesDeals: 20% Off Hazel Screencast & Superstorm Sandy Donations

Last week, I linked to Mac OS X Screencasts’ Hazel tutorial, a 1-hour screencast detailing several Hazel features:

I have watched the entire video, and, indeed, I think it’s one of the best resources you can buy to get started with Hazel and understand all of the its potential. Screencast quality is good, with on-screen guides and labels, zoomed views on specific sections and menus, and clean transitions. The voiceover is concise and to-the-point. The video lasts an hour, but it passes quickly thanks to the provided examples and explanations – it’s definitely not boring, as most video tutorials can be nowadays.

Should you get it? Yes. If you’re new to Hazel, this will get you up to speed very quickly. And, even as a long-time Hazel user, the screencast refreshed my memory on several aspects of Noodlesoft’s app.

Thanks to Mac OS X Screencasts, we can offer a 20% discount off the Hazel screencast (regular price €10) with the coupon code MACSTORIES-IS-AWESOME. The coupon code is valid from November 1st - 18th. Simply head over to Mac OS X Screencasts’ website and paste our coupon code to receive a 20% discount.

But there’s more. For every screencast sold with our coupon code, Mac OS X Screencasts will donate €1.50 to American Red Cross to help people impacted by Hurricane Sandy in the United States. If you purchase the Hazel screencast without our coupon code, Mac OS X Screencasts will donate €3 to American Red Cross for every screencast sold.

The Hazel screencast offer is available here. If you’d like to donate to American Red Cross without having to buy the Hazel screencast, we recommend Apple’s own donation page available on iTunes.

UPDATE: Together with Mac OS X Screencasts we’re giving away 5 free screencasts for this Hazel tutorial. To enter, tweet to @macstoriesdeals with the hashtag #macstorieshazeltutorial and we’ll pick 5 winners later today! GOOD LUCK!

Permalink

The Future of iOS

The Future of iOS

Kyle Baxter writes about the future of iOS from a functionality standpoint. He uses his app Basil as an example for what better communication between installed apps could lead to:

For example, Basil could declare that it handles web URLs. Then, I could build the recipe saving feature of Basil as a mini application (stored in Basil) that users can use from any other application that deals with the web. If someone who uses Basil is browsing recipe websites in Safari, they could tap a “Basil” icon in the action sheet, and my mini application would pop up, save the recipe to Basil and get out of the way—all without the user ever leaving Safari. The same could be true for Reeder (save recipes from cooking websites you subscribe to while browsing your feeds), Twitter applications, or anything else—and those developers wouldn’t have to know that Basil even exists.

This is a shared sentiment among developers. In my interview with Loren Brichter, the man behind atebits said there will be an “explosion in innovation” when Apple will allow XPC (the technology Kyle refers to) to work with third-party apps – more specifically, he mentioned “faceless apps, doing neat things for you in the background without presenting any UI and using minimal hardware resources”.

This is a subject I’ve been writing about for the past two years as well. In using my iPad as my main “computer” regularly every week, I have come to the conclusion that what I’m missing from the Mac isn’t multiple windows – it’s the glue that allows apps to work together in harmony. Maybe it’s a service to send text from Safari to Evernote. Or perhaps a simple script that puts a Mail message into OmniFocus. This kind of trusted, efficient communication between apps is what I’m really looking forward to seeing on iOS. This is why we should be excited for the future: it feels like we’ve only scratched the surface with third-party software on iOS.

Read Kyle’s post here. See also: Ole Begemann’s series on Remote View Controllers.

Permalink

Automatic Screenshot Uploading with Dropbox and Automator

Automatic Screenshot Uploading with Dropbox and Automator

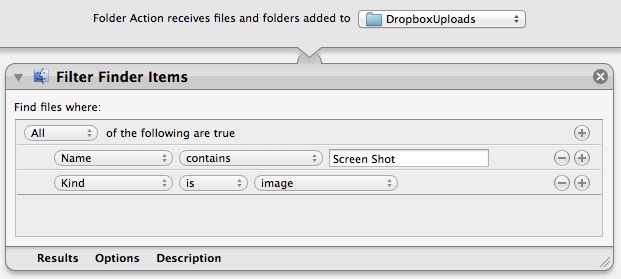
Matteo Agosti figured out a simple yet effective way to upload items to your Dropbox Public folder and automatically receive their URLs in the clipboard: Automator.

After long time using various utilities to automatically share my screen shots when I updated to Montain Lion I had to find another solution as many of them stopped working. It came to my mind that OS X is bundled with Automator, an extremely powerful utility that I always relegated to thumbnails generation. So I decided to give it a try and I eventually made it. That’s how I did.

His folder action is extremely simple: it monitors a folder, filters items that begin with “Screen Shot” and that are images, then moves them to your Dropbox Public folder. By using your unique Dropbox ID, it places a link in the clipboard guessing what the final URL will look like; the URL is made of the standard initial “dropbox.com/u/” portion combined with a URL-encoded version of the file’s name.

The obvious downside is that this workflow isn’t directly communicating (i.e. uploading) with Dropbox: it’s simply moving files and composing the link that you will get once the upload is finished. In my tests, for instance, the URL received by the workflow became available after 10-20 seconds – when the Dropbox app actually finished uploading the file. After that, the URL was indeed correct.

Still, if you’re looking for a simple way to upload public Dropbox files and get a link back, you should check out Matteo’s post.

Permalink

Automatically Convert .iconset to .icns with Drag & Drop

Automatically Convert .iconset to .icns with Drag & Drop

Earlier today I indirectly asked on App.net and Twitter if there was a way to automate the process of converting sets of icons for non-Retina and Retina devices. On its developer documentation, Apple recommends using iconutil and tiffutil to convert application icons and graphic resources, respectively. Once you’ve packaged, for instance, .png files inside an .iconset folder, you should fire up the Terminal, and run the command for the .iconset folder you want to convert. How about automating the process for batch conversion of multiple files?

As it often turns out, if you can think about it, then someone likely already blogged about it. Jono Hunt wrote a drag & drop utility earlier this year to do just that: select multiple .iconset folders, drop them onto the app, receive converted .icns files.

Apple have changed the way you should compile .icns files used for Mac application icons. Instead of using Icon Composer you should now use the “iconutil” Terminal command with .png images contained in folders with the .iconset extension. I created an AppleScript droplet to simplify the process. Just drag the .iconset folder containing your .png files on to the app to easily create a retina ready .icns icon.

Jono has also released versions of the script that work with Alfred and Automator. He also build a counterpart for tiffutil, available for download here.

Permalink