The barrier to entry onto the App Store was already quite low, but with the launch of sticker packs in iOS 10, that barrier was substantially lowered. Now you don’t even have to type a line of code in order to launch a product on the App Store. This has been an exciting development and has enabled a whole new wave of creators to make products and launch them on the App Store.
I was one of them. I don’t know how to code, but I do have some design skills, and I wanted to see what it was like to create something for iOS and launch it on the App Store. So a few months ago I decided that I would make some sticker packs for iOS 10 – and that’s what I did. I brainstormed possible ideas, started designing some stickers and ultimately ended up publishing Birthday Celebration Stickers and an app bundle which included World Flag Stickers and a few other country-specific flag stickers.
The process of making and publishing these sticker packs was fairly straightforward, but I also encountered some unexpected hurdles. To help others who are excited about making their own sticker packs, I’ve written this guide, which I hope can make the process a little smoother.
Table of Contents
- Sticker Pack Creation Basics
- Generating Ideas
- Design
- Xcode
- Preparing for Publication
- Publication
- Miscellaneous Tips
- TestFlight
- App Bundles
- Wishlist: Sticker Pack Improvements for Creators
- Conclusion
Sticker Pack Creation Basics
Things You’ll Need
- A Mac (to run Xcode).
- Xcode 8 – available for free.
- An image editor of some kind to create and save the images you’ll use as your stickers.
- A paid developer account if you want to publish your sticker pack on the App Store. The Apple developer program costs US$99 per year.
- iMovie, or another video editing app, if you want to make an App Preview video of your sticker pack for the App Store.
The Process, Simplified
This is a lengthy guide, so here’s the tl;dr version of what you’ll need to do:
- Come up with an idea for a sticker pack.
- Design your stickers.
- Assemble your sticker pack in Xcode.
- Prepare your app for testing and distribution in iTunes Connect.
Sticker Packs and iMessage Apps
There is an important, but subtle, distinction between sticker packs and iMessage apps that can also offer stickers. iMessage apps require you to code, but sticker packs do not. This guide will focus solely on sticker packs where coding is not required – though it will still be useful to those who decide to go the extra mile and code other features.
Essential Reading and Viewing
You’re already reading this article, which will be a good start, but you should also do the following:
- Read and bookmark Apple’s API Reference document for Messages. It has some key information that is useful to refer back to.
- Watch Apple’s iMessage Apps and Stickers WWDC 2016 videos – Part 1 and Part 2.
Note that some of the information in those resources relates to iMessage apps. Even if you’re just looking to create an iMessage Sticker Pack I’d recommend you still read/watch that, just so you have a better understanding of the limitations of iMessage Sticker Packs and the greater flexibility of an iMessage app.
Important Notes and Limitations
- iMessage Sticker Packs are distributed on the iOS App Store. This means that you will need to have a paid Apple Developer Account and your Sticker Pack will go through the standard App Review process before it can be distributed.
- iMessage Sticker Packs must either be free or paid upfront. There is no option to use In-App Purchases (unless you create an iMessage App).
- The design of the sticker browser is not customizable, unless you create an iMessage App. You cannot add a caption to your stickers, though you can add a VoiceOver description for Accessibility.
- There are size limitations for the stickers (for both dimensions and file size), described below in the Design section.
- Stickers can be static or animated, or a mix of both.
- You can only edit your published iMessage Sticker Pack by submitting an update to the App Store.
Generating Ideas
My Experience
The first step to making a sticker pack is to come up with some ideas. When I first decided to make some sticker packs, I started a note and just kept adding ideas to that note. At the moment there are around 22 ideas for sticker packs in there. Don’t expect your first idea to be the one you ultimately ship, because you may realise it is too difficult to create, doesn’t make commercial sense, or maybe you just think of a better idea.
My first idea was to make a sticker pack of comic book effects like the BOOM! Wham! and BAM! I knew that making a high quality sticker pack of these effects was a bit beyond my (limited) artistic talents so I had some preliminary discussions with a few artists. I ultimately decided it probably wasn’t worth investing too much time and money into it, and I could always come back to the idea later. I’m glad I made that decision because when the iMessage App Store opened, Cory Bohon also had the same idea and had created the fantastic Comic Talk sticker pack that was easily better than anything I could have done.
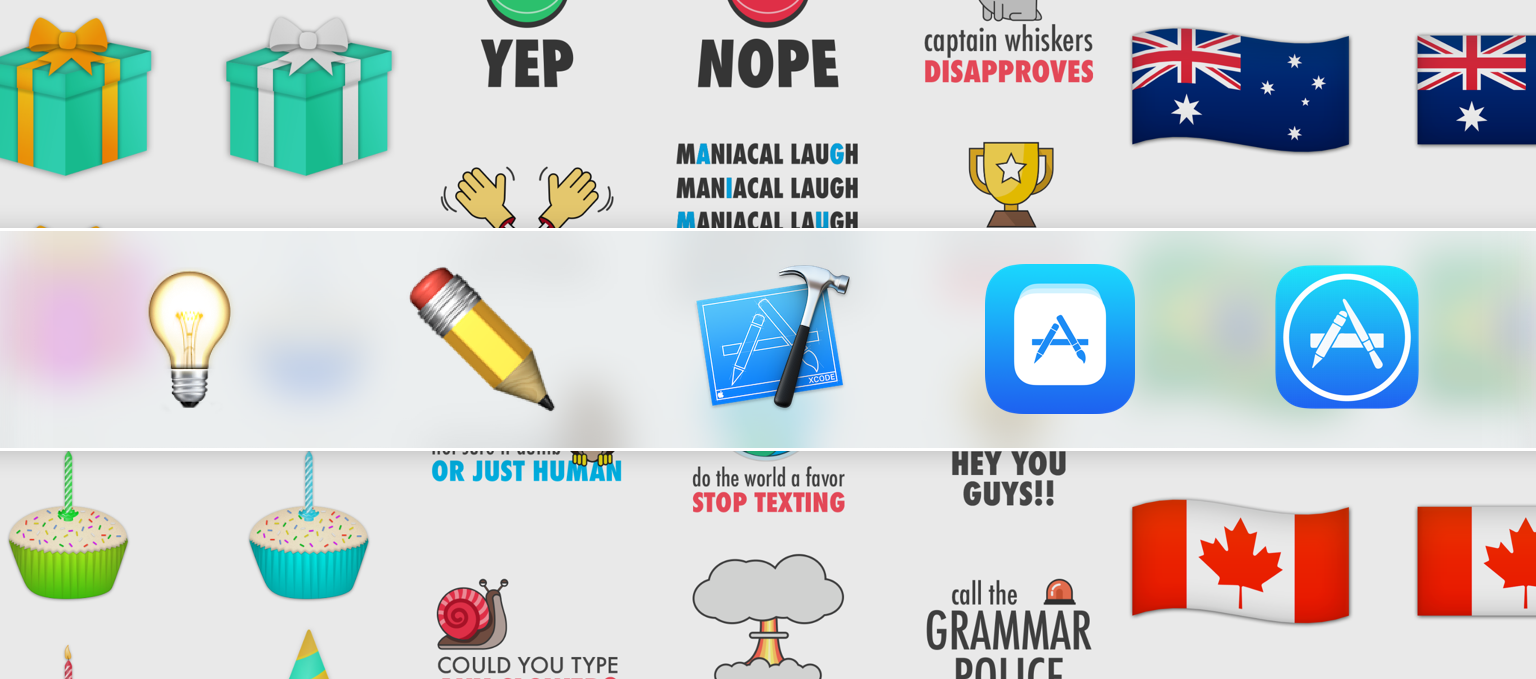
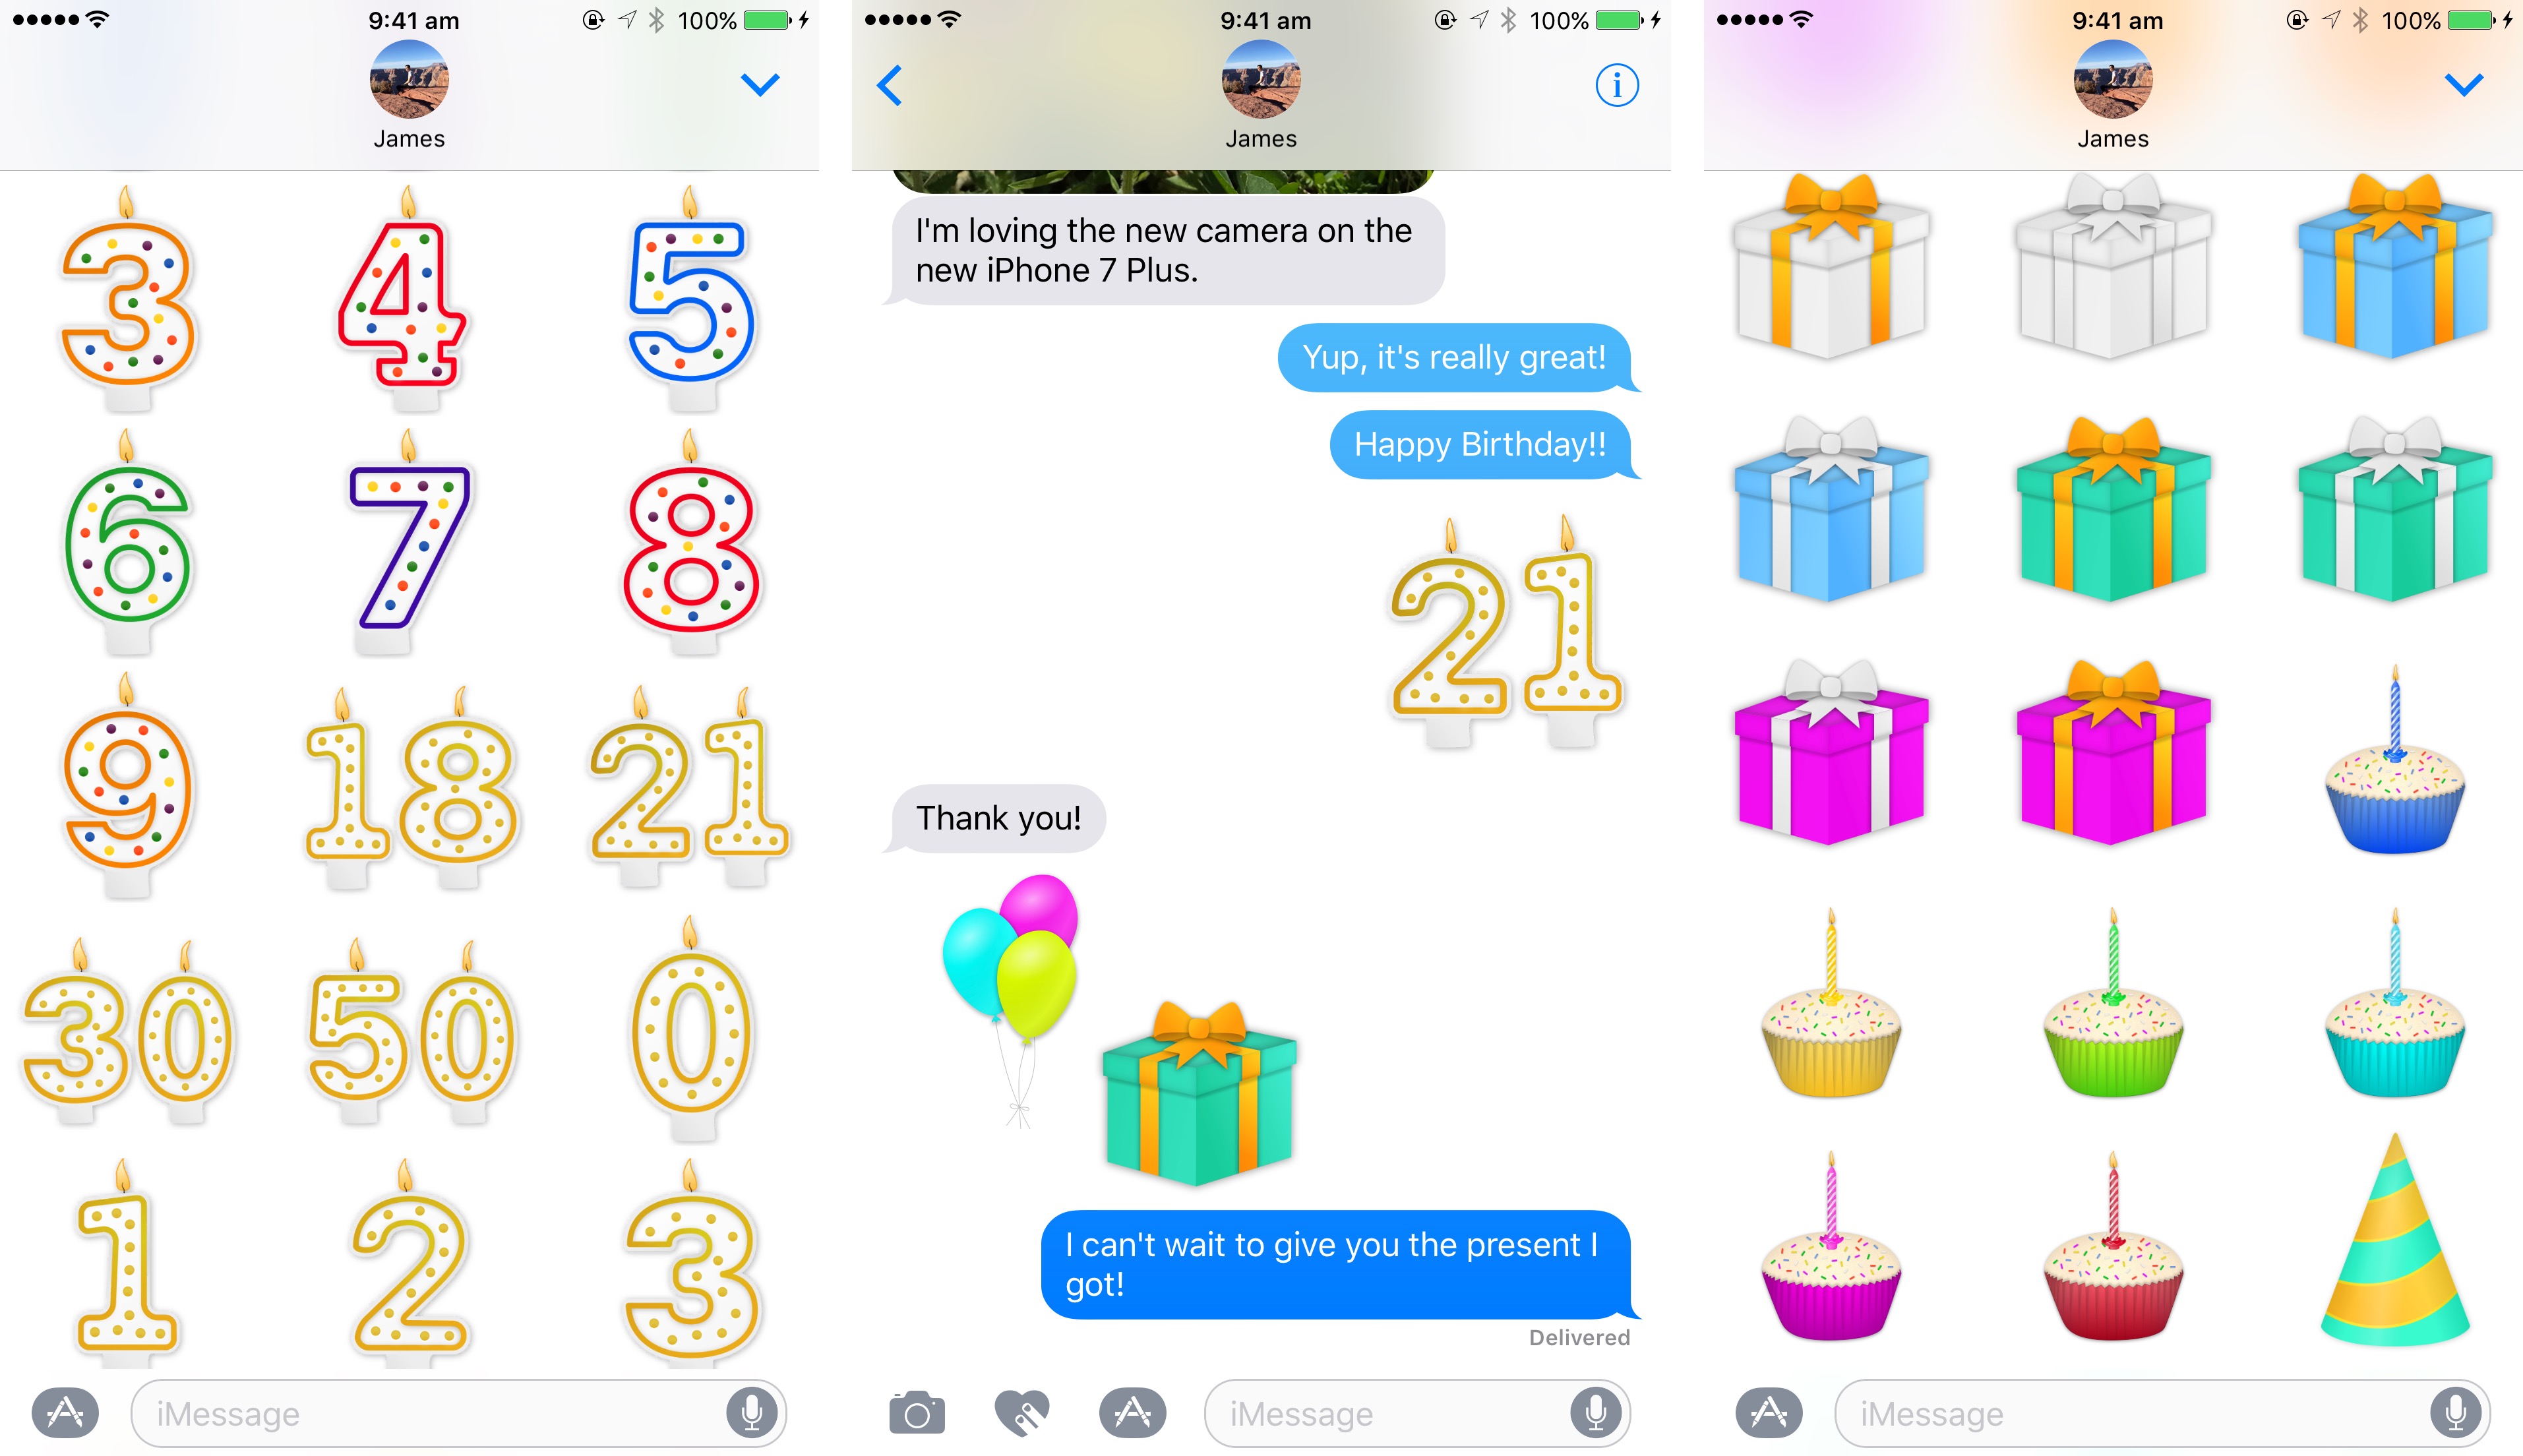
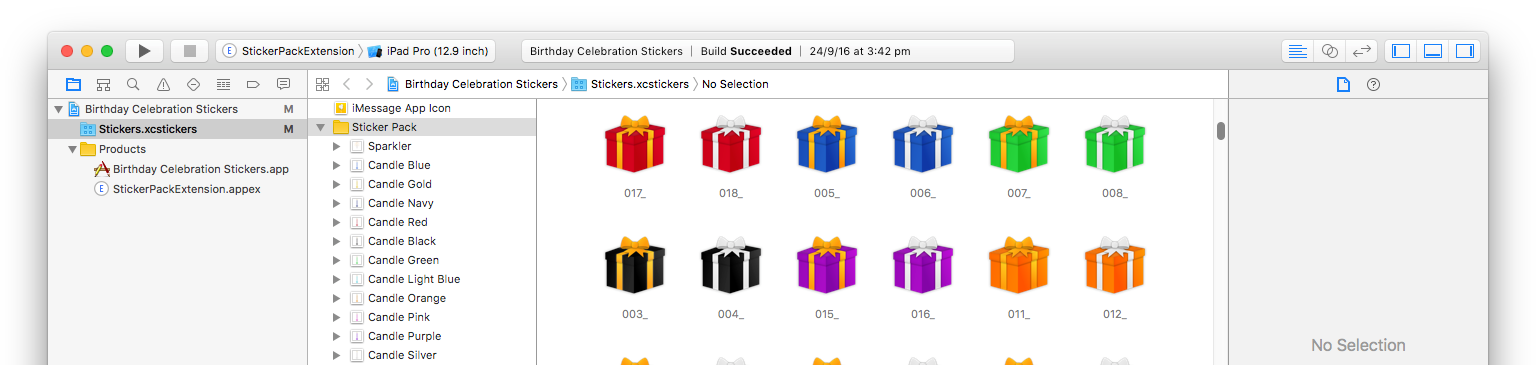
In the end, I focused primarily on two sticker packs; World Flag Stickers and Birthday Celebration Stickers. World Flag Stickers was not particularly complicated once I had the source files for every country flag and set up a Photoshop action that created the necessary style and effect that I wanted. Birthday Celebration Stickers was much more difficult because it required me to create original artwork for every sticker. But one important idea that I realised was that if I design the artwork as a template, I could easily create color and style variations that would make the sticker pack larger and a better deal for customers. So you’ll notice that I have 9 types of objects from candles to balloons and cupcakes, but because of all the variations I made, there are 151 stickers in total.
Suggestions for Generating Ideas
My sticker packs have not been a roaring commercial success, so take all of these suggestions with a grain of salt, but I think they offer a good starting point for you to generate ideas for what sticker packs you might want to create.
- Have a look at the iMessage App Store. See what’s already there and popular, but just as importantly, look to see what might be missing.
- Create a cute and charming character, and make it the focus. As an example, see The Little Fox stickers, Unicorn Stella, or Grumpy Spud.
- Make something whimsical and fun like the Pun Pals Sticker Pack or Comic Talk.
- Think outside of the box like Grammar Snob or Phoneys (even if it was ultimately pulled from sale).
Here on MacStories we’ve also published two roundups of our favorite sticker packs and iMessage apps. You can read the first roundup here, and the second here.
Design
Choose a Size
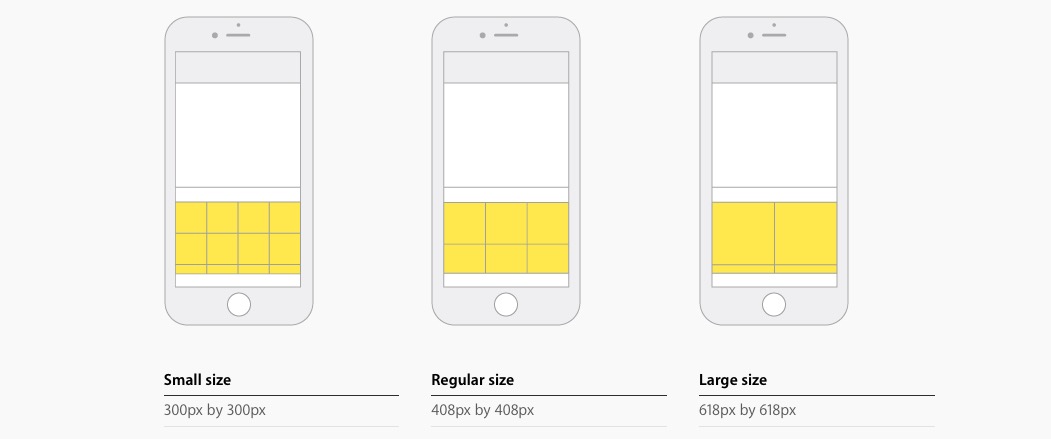
An important decision you need to make, preferably early on in the design process, is what size stickers to make. You have three choices:
- Small – 100 x 100 points @3x (300 x 300 pixels).
- Medium – 136 x 136 points @3x (408 x 408 pixels).
- Large – 206 x 206 points @3x (618 x 618 pixels).
Whichever size you choose, you must ensure that the image files you create are at @3x. So if you choose to make your stickers large, the image files need to be 618 x 618 pixels.
File Size Limitations
Keep in mind that the file size of an individual sticker must not exceed 500 KB. This may seem like a lot, even for a large sticker, but it can quickly become problematic if you’re making an animated sticker. For example, if your animation has 5 frames, then you only have 100 KB per frame.
Designing Stickers
I won’t spend too long talking about the design of your stickers because this is where you have a huge amount of freedom. You can create hyper-realistic images in Photoshop, or you could sketch them on your iPad or even hand-draw them and scan them into your computer. You could use Pixelmator, Sketch, Photoshop, Illustrator, heck, even Microsoft Paint if you like.
But here are some general tips:
- Remember the stickers will (most likely) be viewed on a small iPhone screen, so don’t spend all your time designing the stickers on your 27-inch iMac at 300% zoom.
- Nobody wants a sticker pack with just a handful of stickers, so if it makes sense, be sure to create variations of your stickers. This allows you to make lots of stickers at a more efficient pace.
- If you’re creating an animated sticker, do lots of tests to make sure the animation looks right.
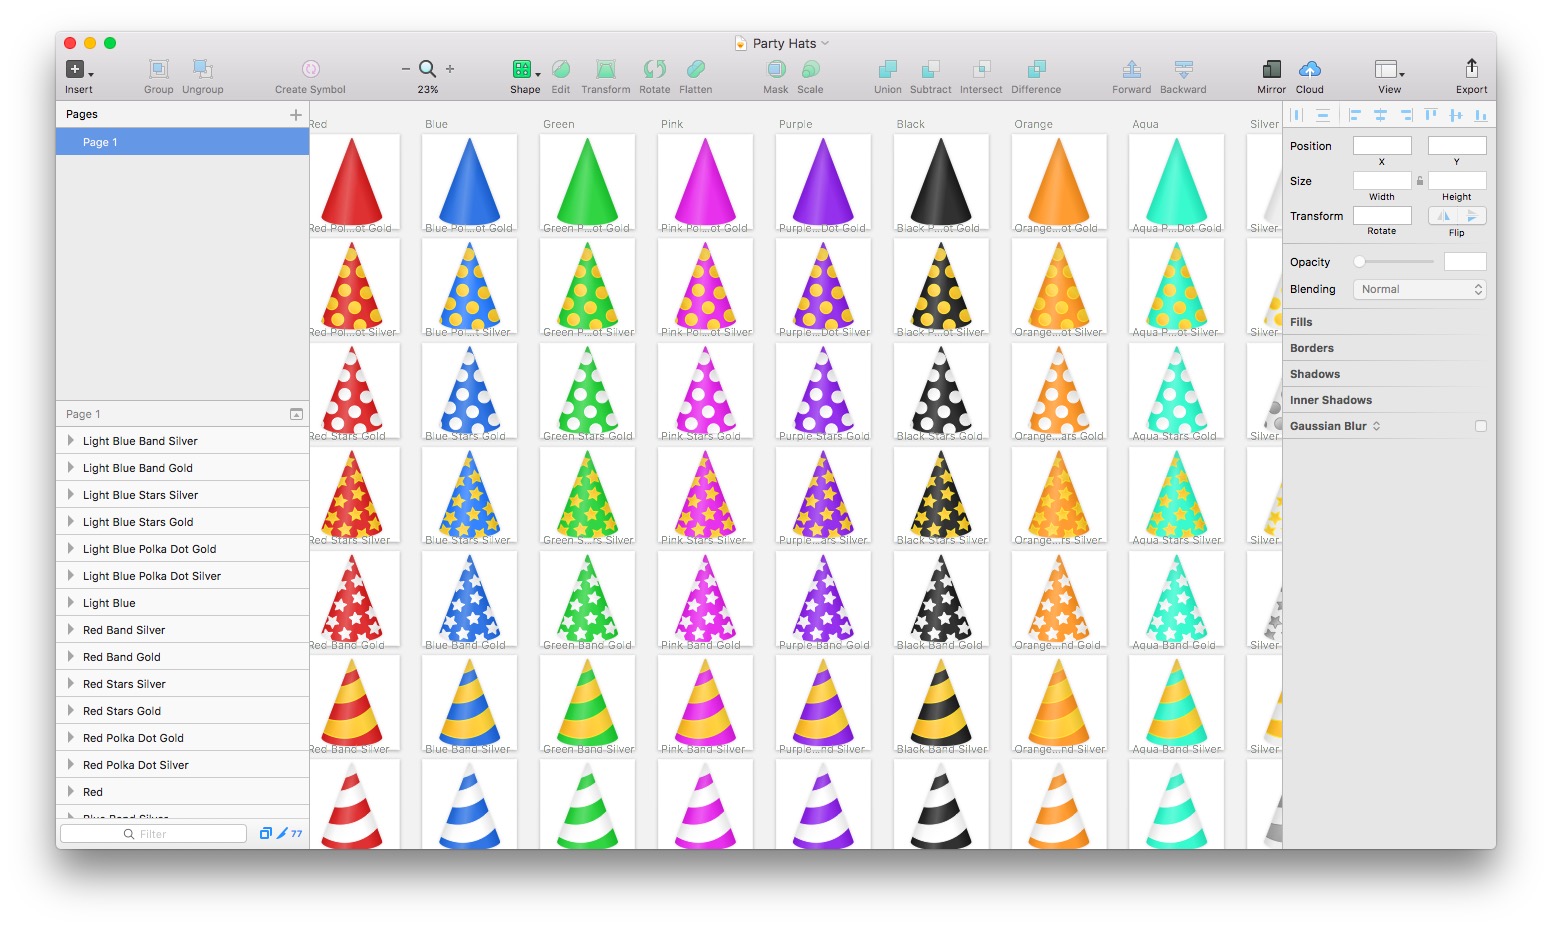
There are 151 stickers in my Birthday Celebration Stickers pack, and that’s largely because I made heavy use of creating a core template for the key stickers and then making lots of color and pattern variations.
Icons
A very important part of your sticker pack is its icon. This is the first thing that most of your customers will see, so it needs to be good.
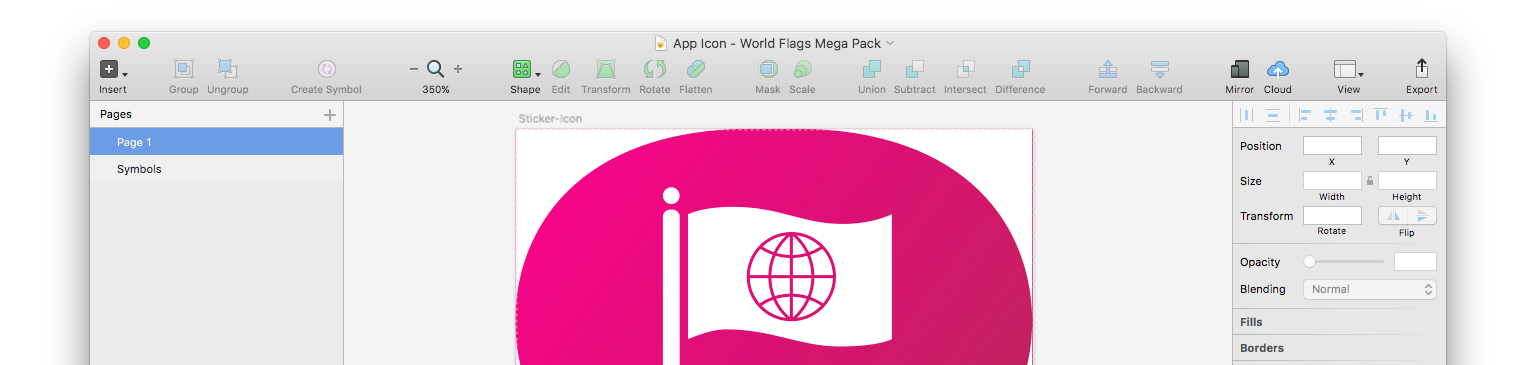
Unfortunately, this can also be a very tedious task, because you need to provide 13 differently sized icons to Xcode and iTunes Connect. They will range in size from 58 x 58 pixels (used in iPhone Settings) to 1024 x 768 pixels for the Messages App Store.
I use and highly recommend that you also use the fantastic Bjango App Icon Templates. This free resource contains templates for Photoshop, Illustrator, Sketch, and Affinity Designer which allow you to quickly create the different sizes of icons required.
I can create all the necessary app icons very quickly with my modified version of the Bjango App Icon Templates.
Xcode
Starting the Project
Starting your sticker pack in Xcode is fairly straightforward. When you open Xcode simply select “Create a new Xcode project” (if you don’t see the Xcode welcome window you can also do this by File > New > Project).
Xcode will then ask you to select a template for your new project. You should select ‘Sticker Pack Application’.
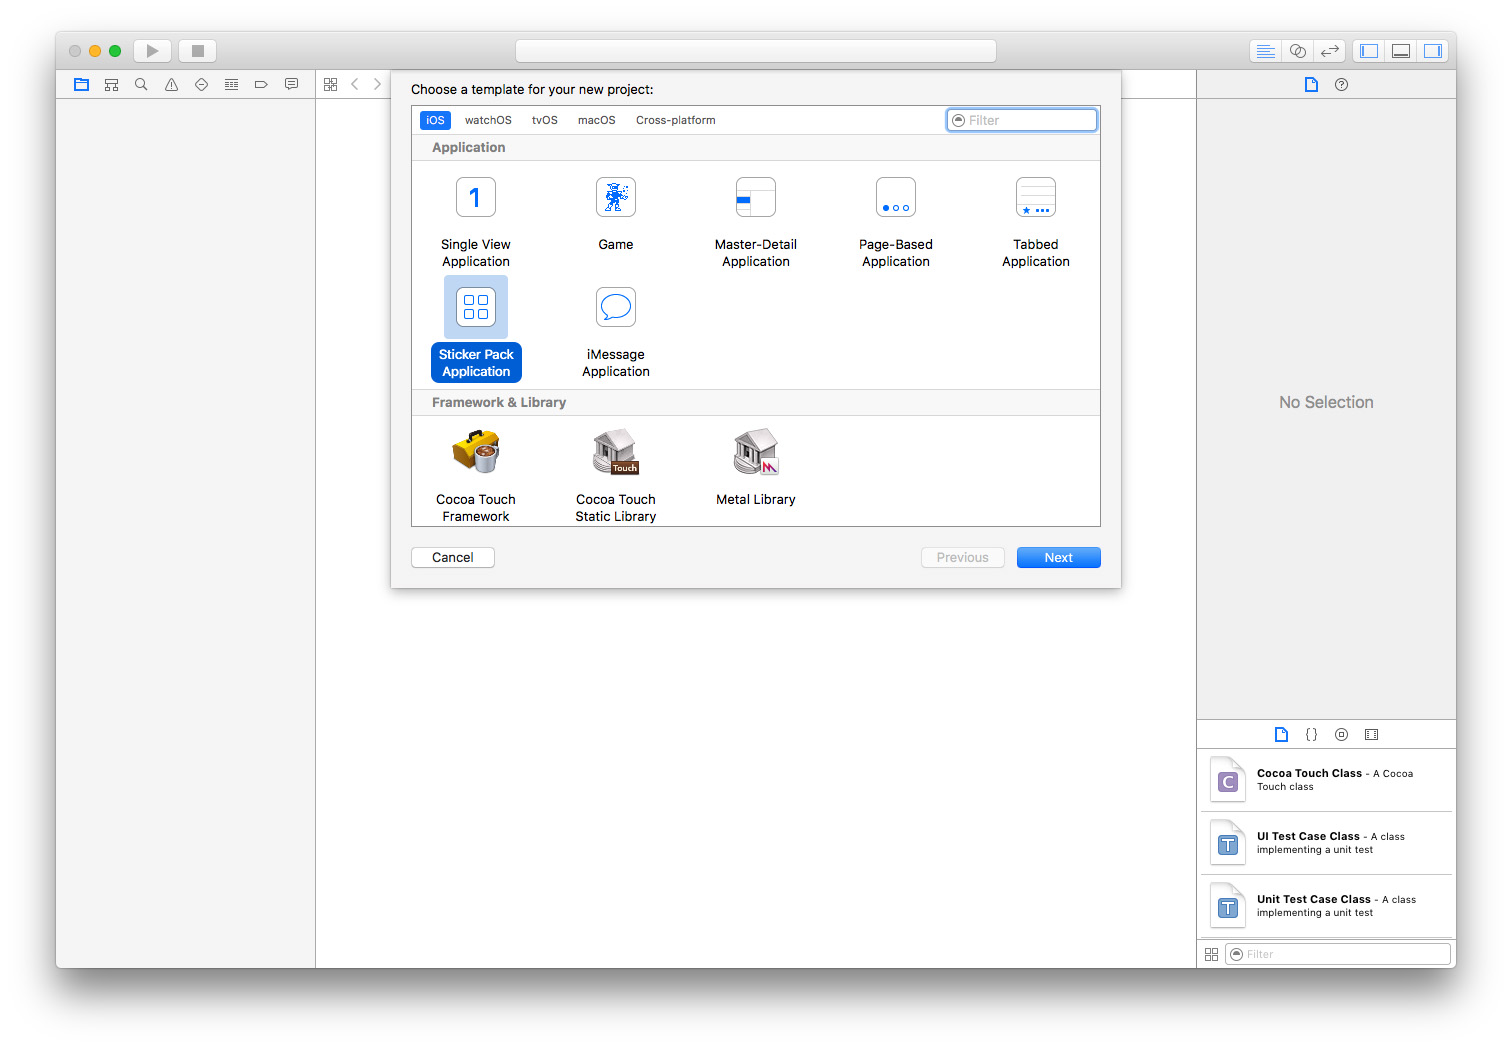
Then all you need to do is enter a product name for the project, select the relevant Apple Developer Account (if yours doesn’t show up, you can enter it into Xcode’s preferences) and provide an organization identifier (I just used my initials for this).
Add the iMessage App Icons
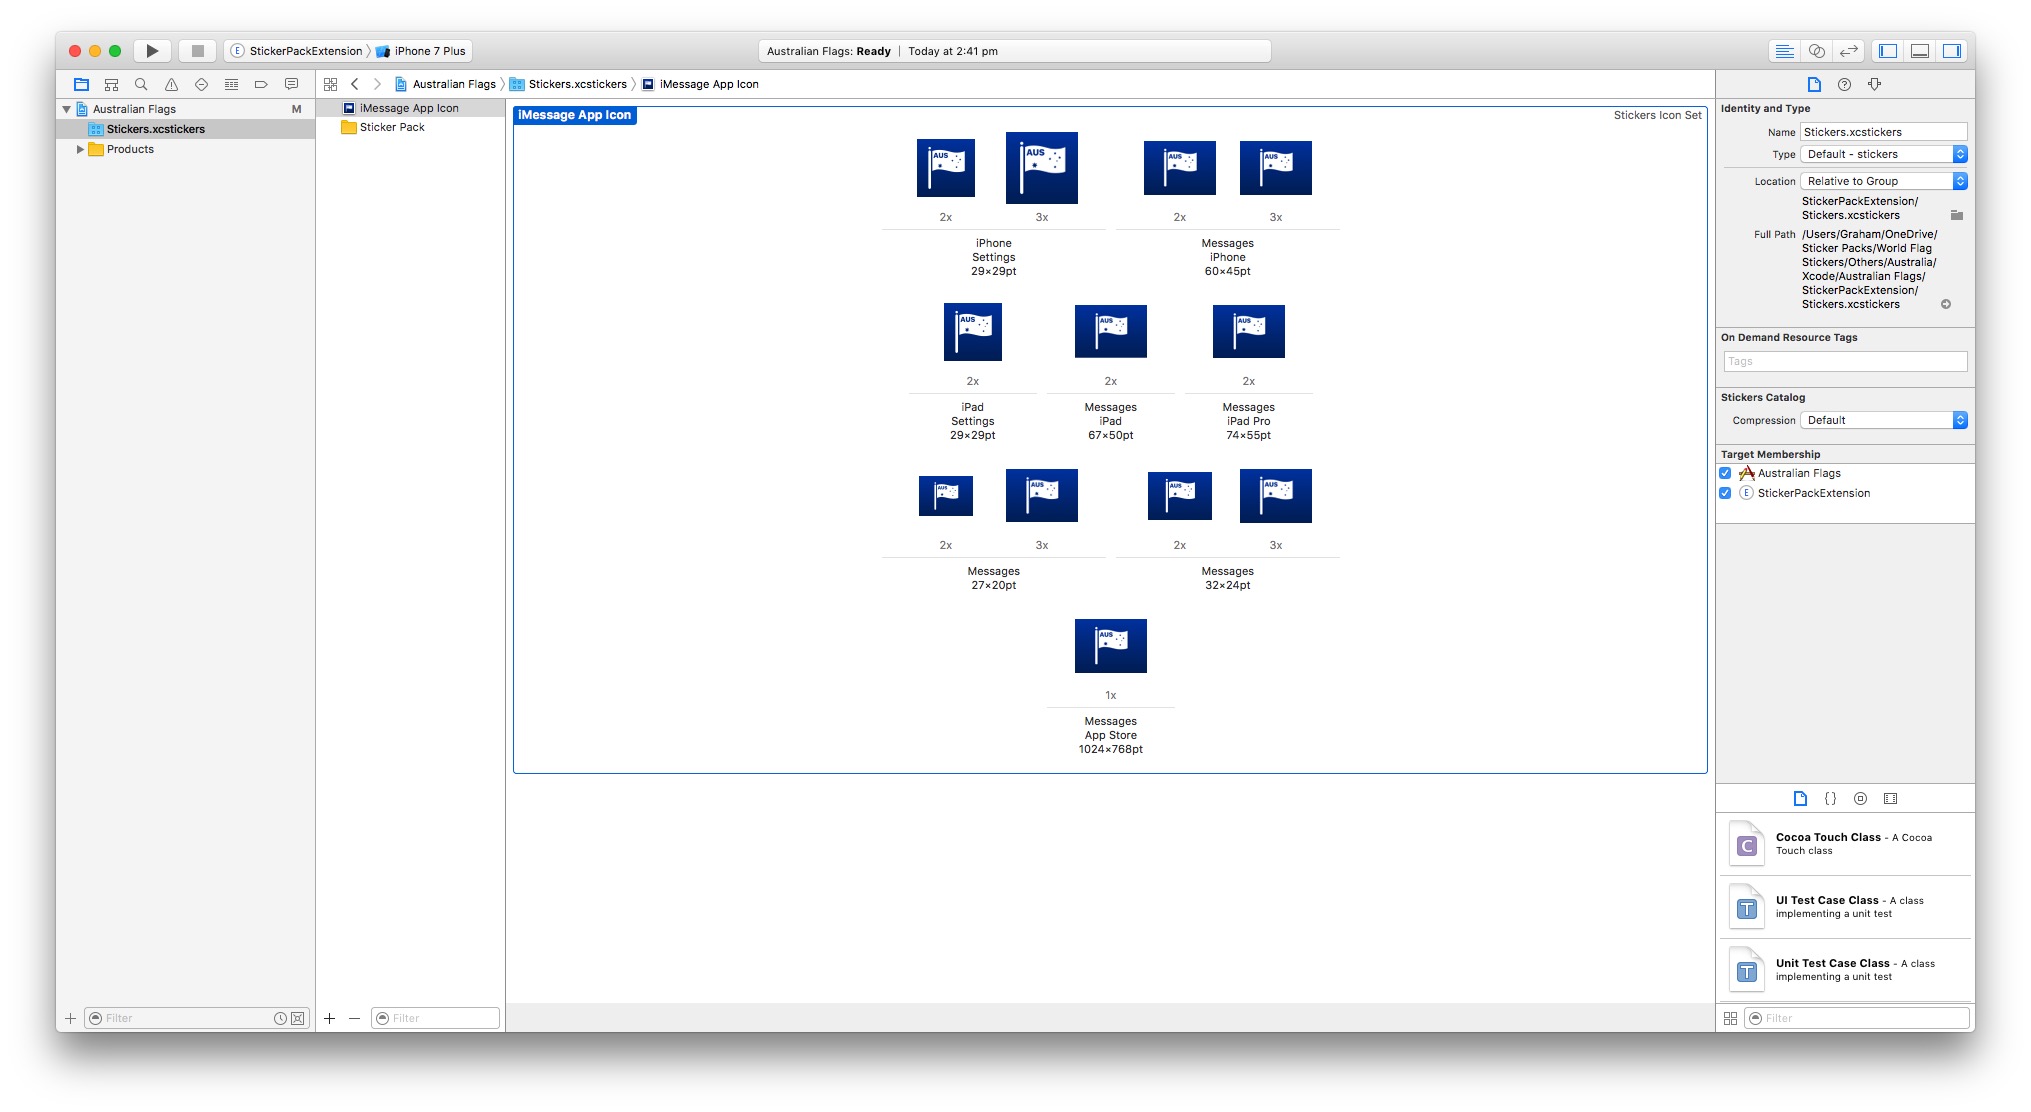
Now that we’ve created the Xcode project, its time to start adding our graphical assets, starting with the app icons.
To add your app icons, simply click on iMessage App Icon in the sidebar of Xcode and you’ll be faced with a screen that will have empty slots for all of the required app icons. If you’ve already created your app icons, you can simply drag and drop the entire set into the Xcode window and they will automatically be placed into the correct slot.
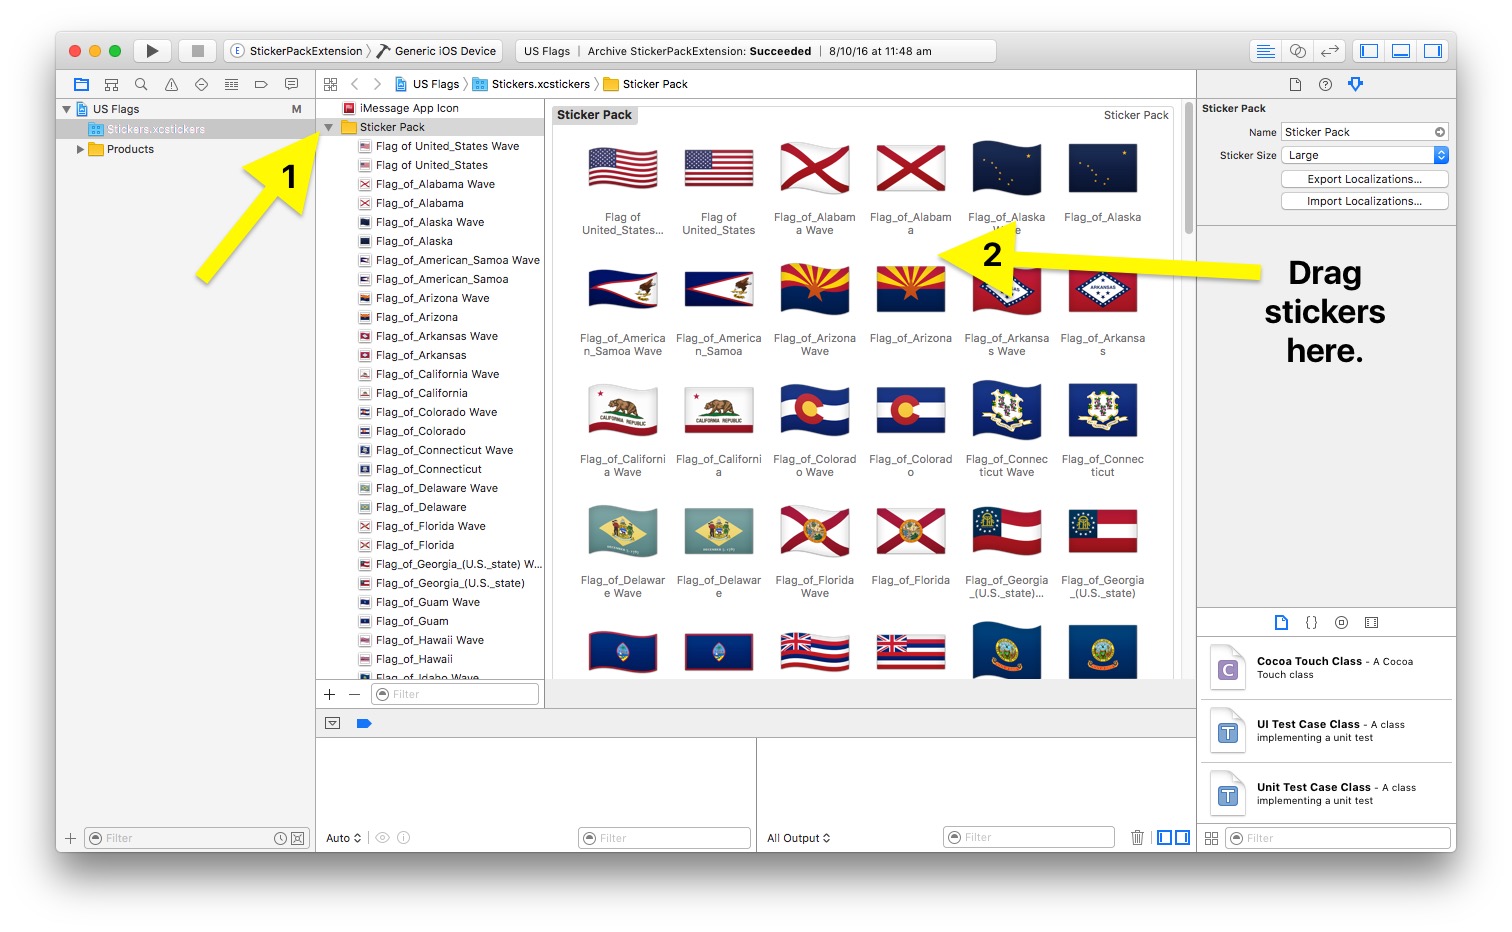
Add the Stickers
Adding your stickers is just as easy as adding the app icons – just drag and drop them into Xcode’s window when you have the ‘Sticker Pack’ folder selected.
Editing the VoiceOver Description for Accessibility
By default, the name of your sticker’s image asset will be used as the VoiceOver description. But you can override this in the Attributes Inspector which appears on the right hand side of Xcode. Just type your preferred description/name in the Accessibility field.
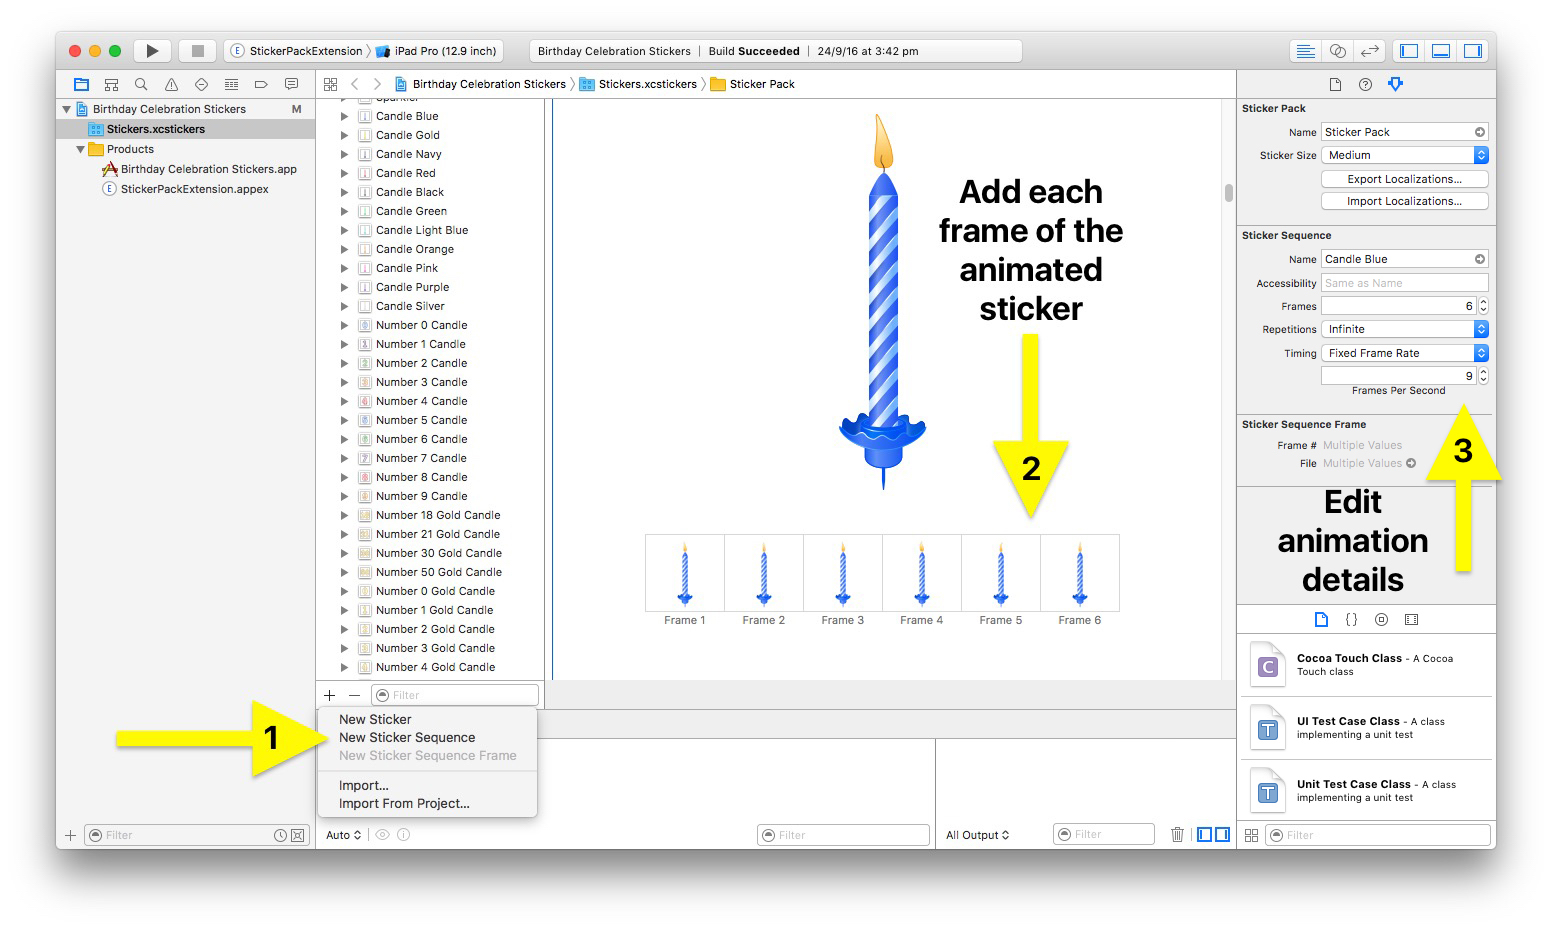
Animated Stickers
If you have created animated stickers by designing assets for each frame of the animation, you can also add these to Xcode. The only difference is that rather than just dragging them into Xcode, you’ll want to first instruct Xcode to create a ‘New Sticker Sequence’. Then you can add each frame to the sequence.
Testing Builds from Xcode
As you create your sticker pack in Xcode you’ll want to see it in action and test it. You can do this in two ways, either through the Xcode Simulator, which can emulate various iOS devices on your Mac, or on one of your own devices.
All you need to do is select the relevant device, whether it is a device in the Simulator or a real device connected to your Mac, and click the Run button.
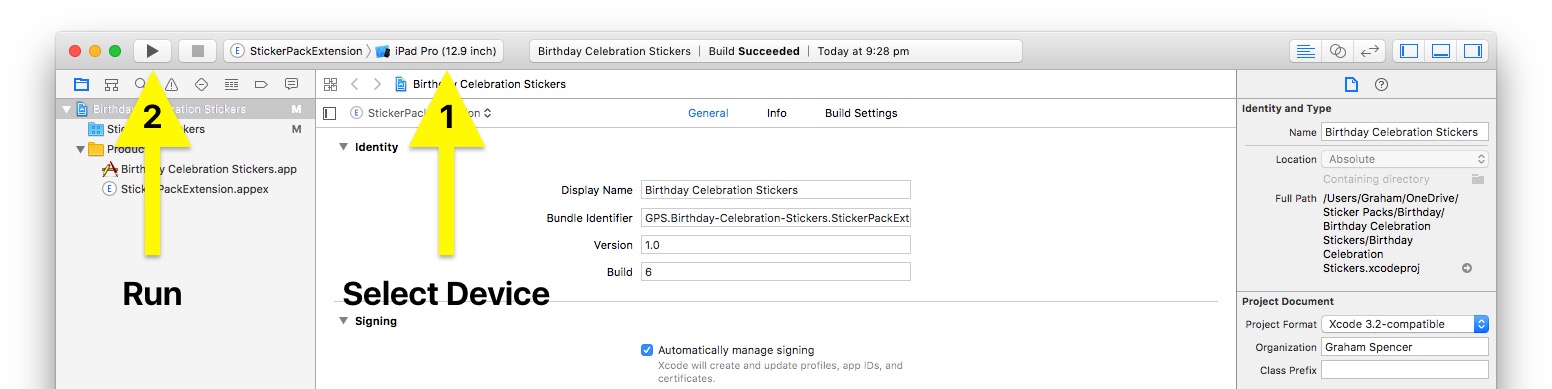
Note that if you want to run a build on your own device, you will have to go through some initial setup to add that device to your Apple Developer Account. Put simply, you need to register your device in the Certificates, Identifiers & Profiles page of your account. To do this you need to enter your device’s UDID (which you can get from iTunes when you plug your device into your Mac). For more information on this process, see this article from Apple.
Preparing for Publication
Creating App Screenshots
You can upload up to 5 screenshots for your app (for each device size), and in most cases you should be taking full advantage of this. The entire reason that people will download your sticker pack is based on what your stickers look like. Screenshots are the easiest way to sell your sticker packs to a potential customer. So take your time to get good screenshots that shows off your sticker pack.
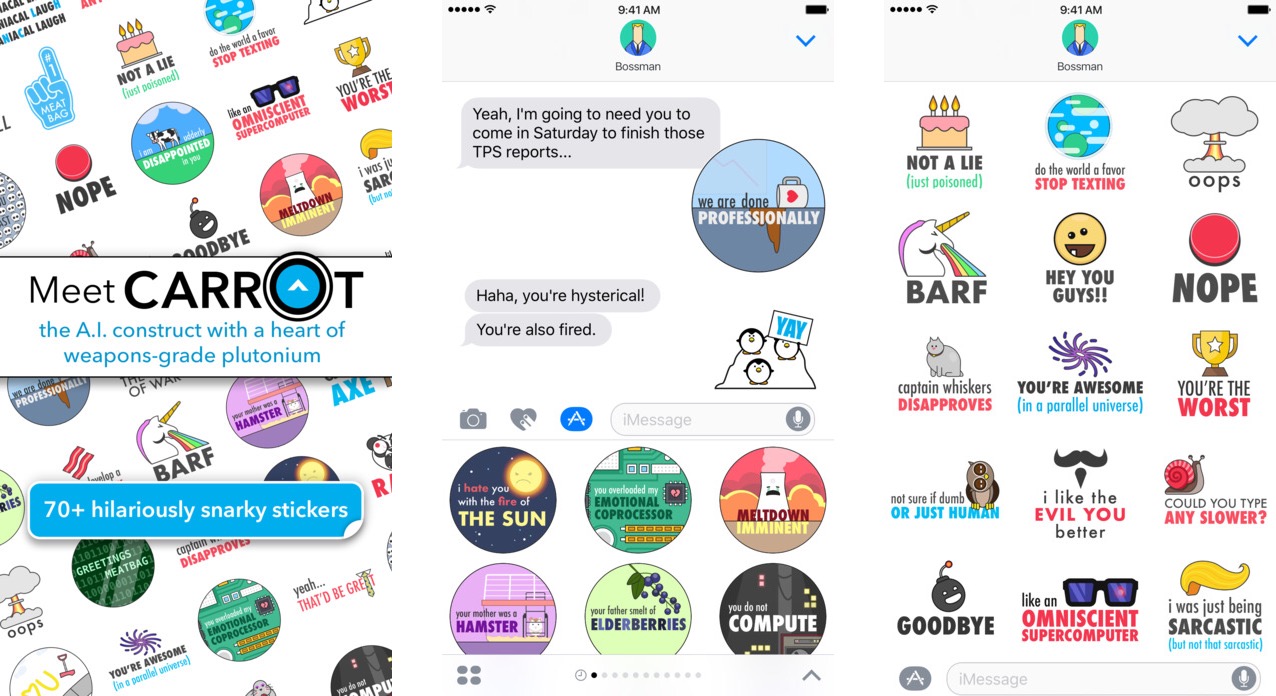
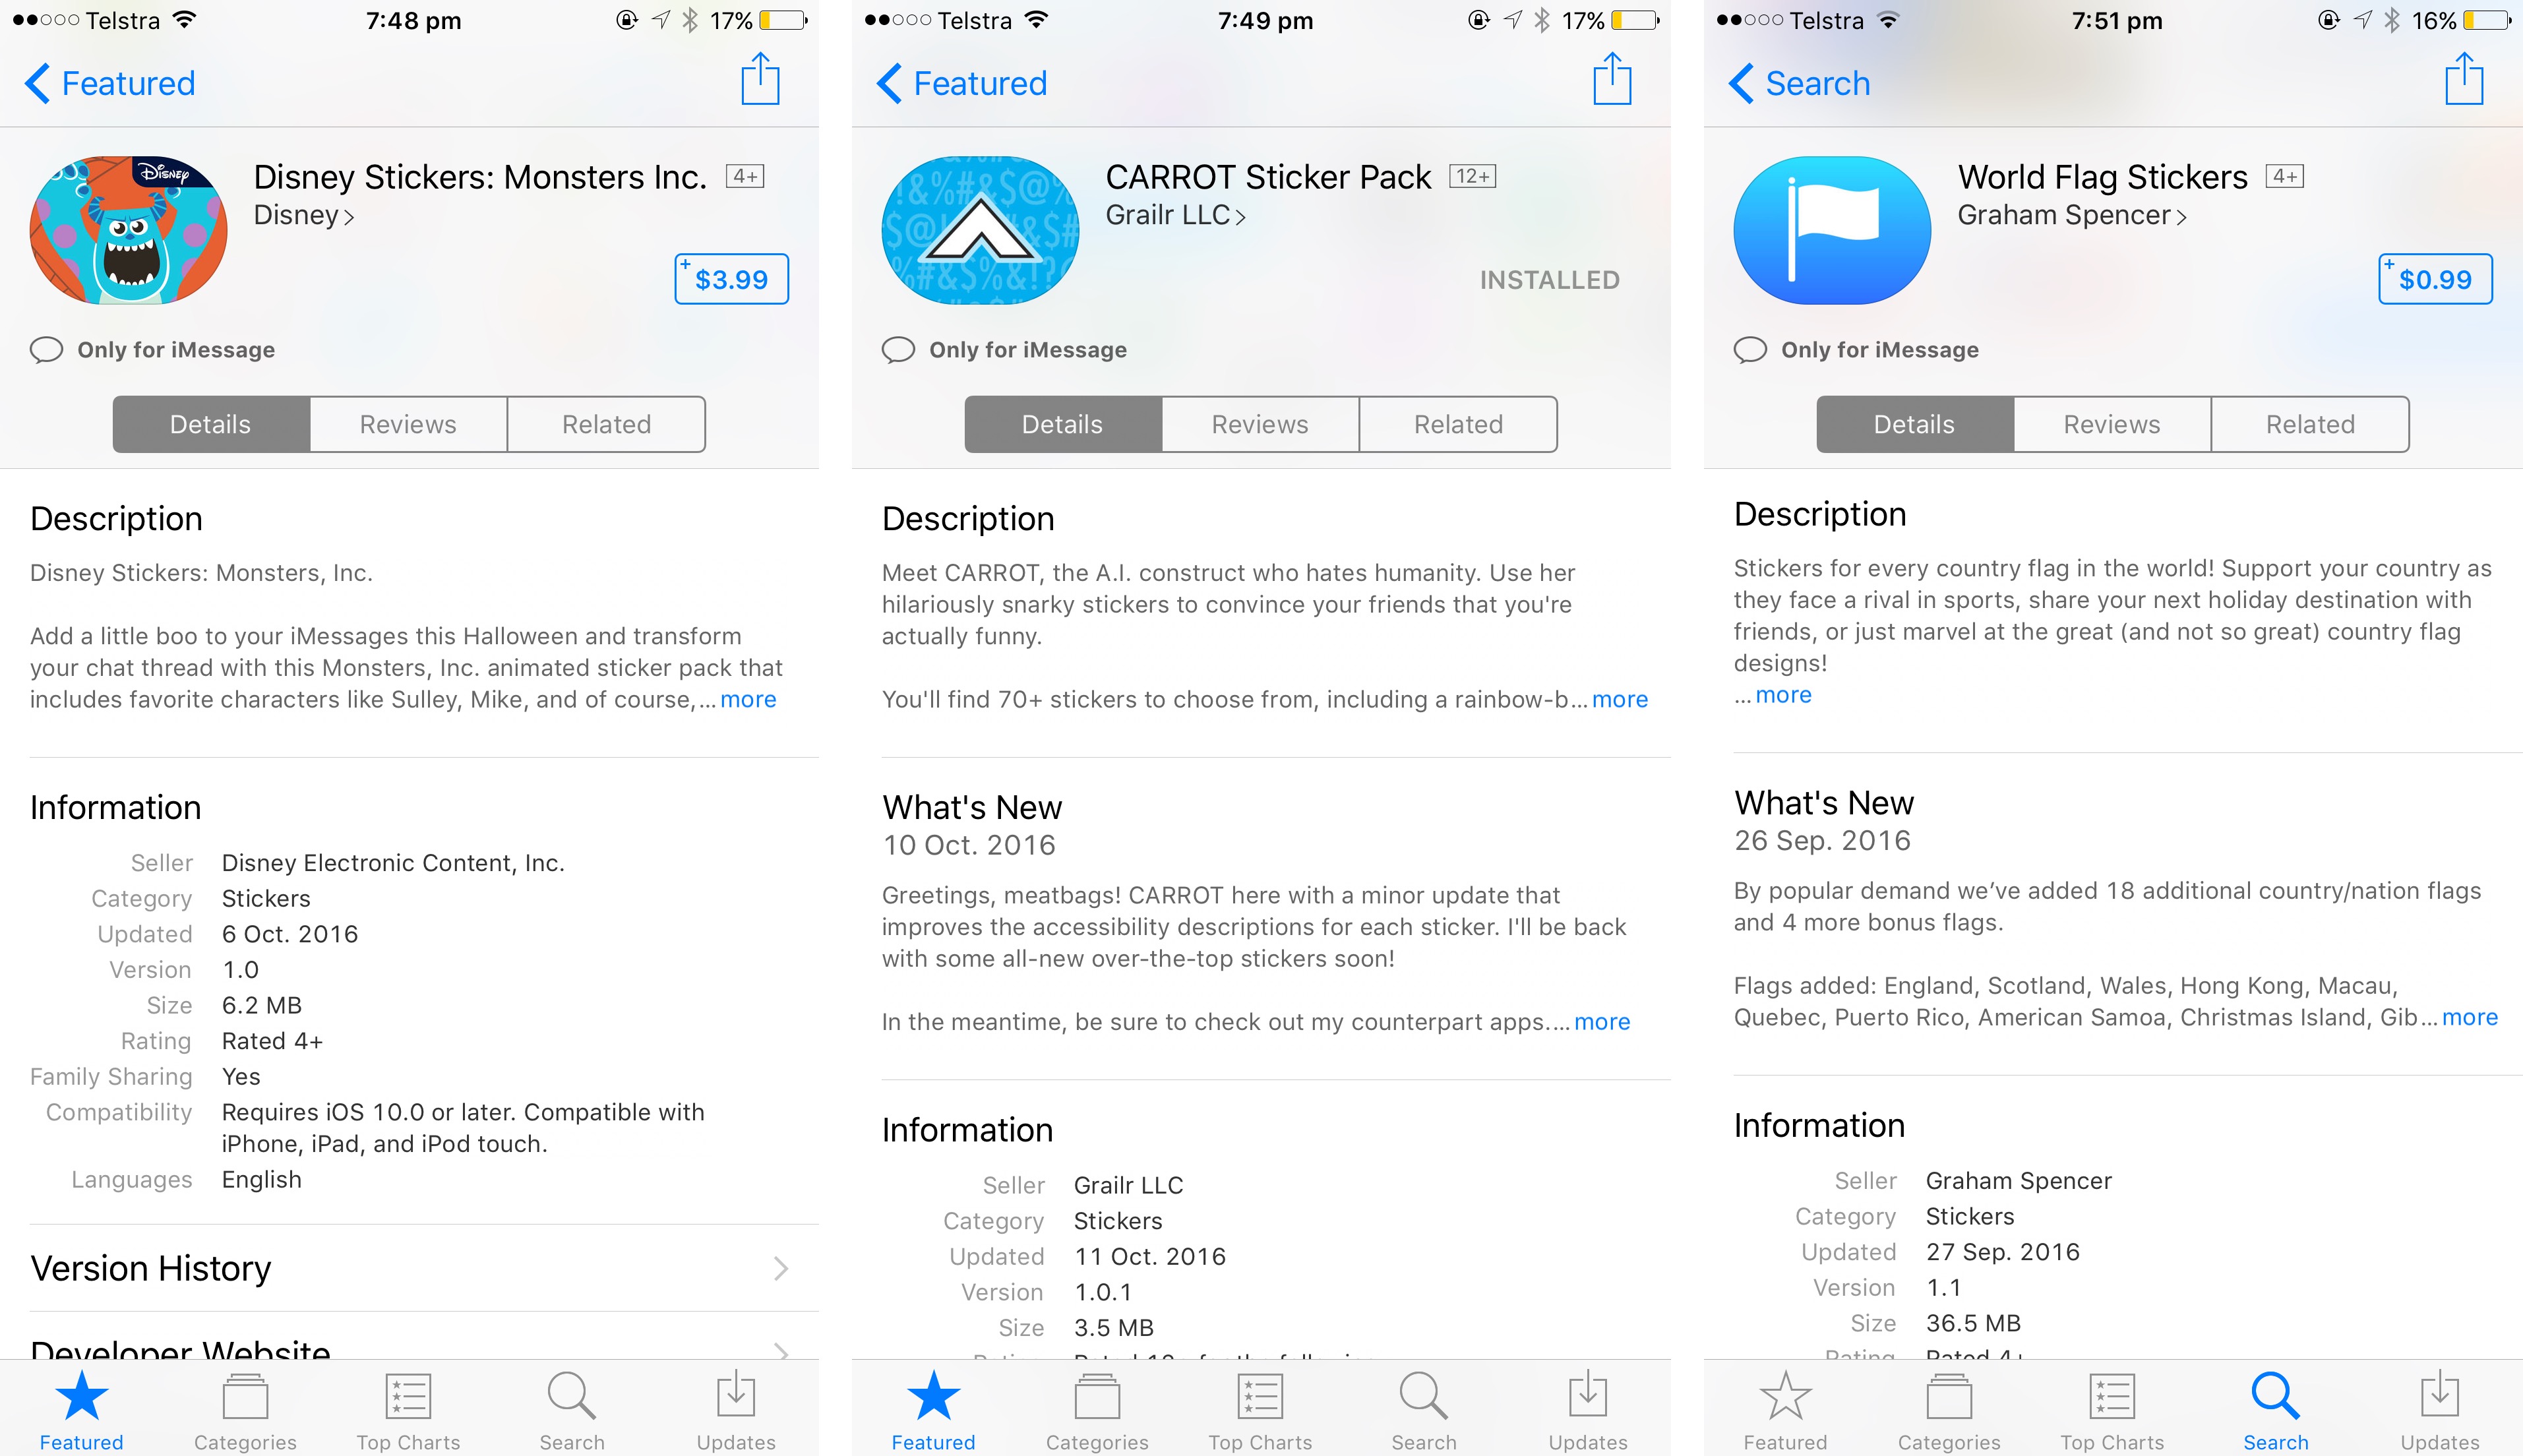
The CARROT Sticker Pack is a good example of what you can achieve if you invest some time in crafting your app screenshots. As you can see below, the first screenshot is more of a promotional image, but that’s fine – and it is probably more effective than a standard screenshot. In the second image we see the sticker browser, but also some of the stickers in the actual iMessage thread. Finally, in the third (and fourth) screenshot, we see the sticker browser in its full-screen view, which allows you to preview more of the stickers.
Tip: Clean Status Bar
If you’re taking screenshots on an actual iOS device, you should take the time to clean the status bar so that it isn’t a visual distraction.
Doing so is easy; just plug your device into a Mac, launch QuickTime, create a New Movie Recording, and change the camera input to the iOS device that is connected to your Mac. Now when you take a screenshot, your status bar will say 9:41 AM, have full battery and wireless indicators, with no carrier text.
Making an App Preview
App Previews are Optional
You do not need to create an App Preview, and particularly for stickers, the screenshots you upload will probably be a good enough preview for your potential customers. However, it certainly can’t hurt to create an App Preview, and it may be useful. Plus, if your sticker pack is animated, a video is the only way your potential customers can see what the animation looks like.
I created App Previews for some, but not all, of my sticker packs. They are extremely simple, but I think they give potential customers a decent preview of the stickers and how they might be used.
Here’s one of the App Previews I created:
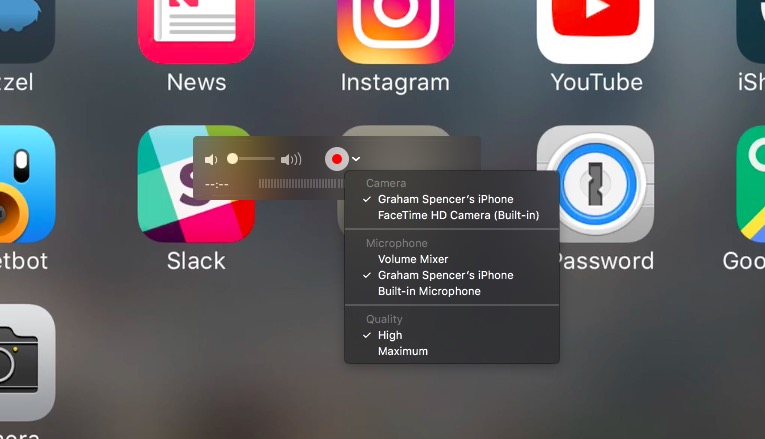
Recording your iOS Device’s Screen
We used QuickTime above to create a clean status bar, but this is also how you can create a screen recording of everything that happens on your iOS device. This is the easiest way to create a recording that we can use to make an App Preview for the App Store. Just make sure that you also change microphone input to your iOS device as well, as QuickTime does not automatically do this when you start recording an iOS device’s screen.
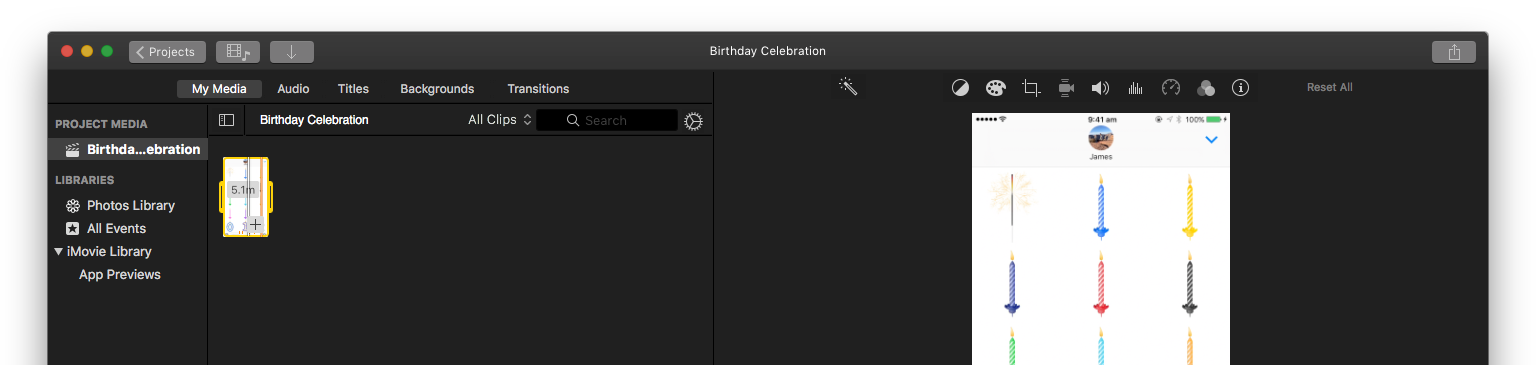
Creating the App Preview in iMovie
There are specific requirements for making an App Preview, detailed here. But iMovie makes it extremely easy. Simply launch iMovie and select File > New App Preview, this creates the project so that it will use the correct resolution and aspect ratio. Then it’s just a matter of editing the video to create something compelling.
Writing an App Description
Although I think screenshots and even app previews are more important, particularly for sticker packs, you shouldn’t ignore the app description. Don’t spend hours fretting on the perfect wording, but you should take some time to craft an app description that could help convince a potential buyer to download your sticker pack.
Most importantly, keep in mind that only a small amount of the app description will be shown. If you write a lengthy app description most of it will be hidden and require a further tap from the user, so convey the important information immediately and keep the less important items out of your opening paragraph.
Publication
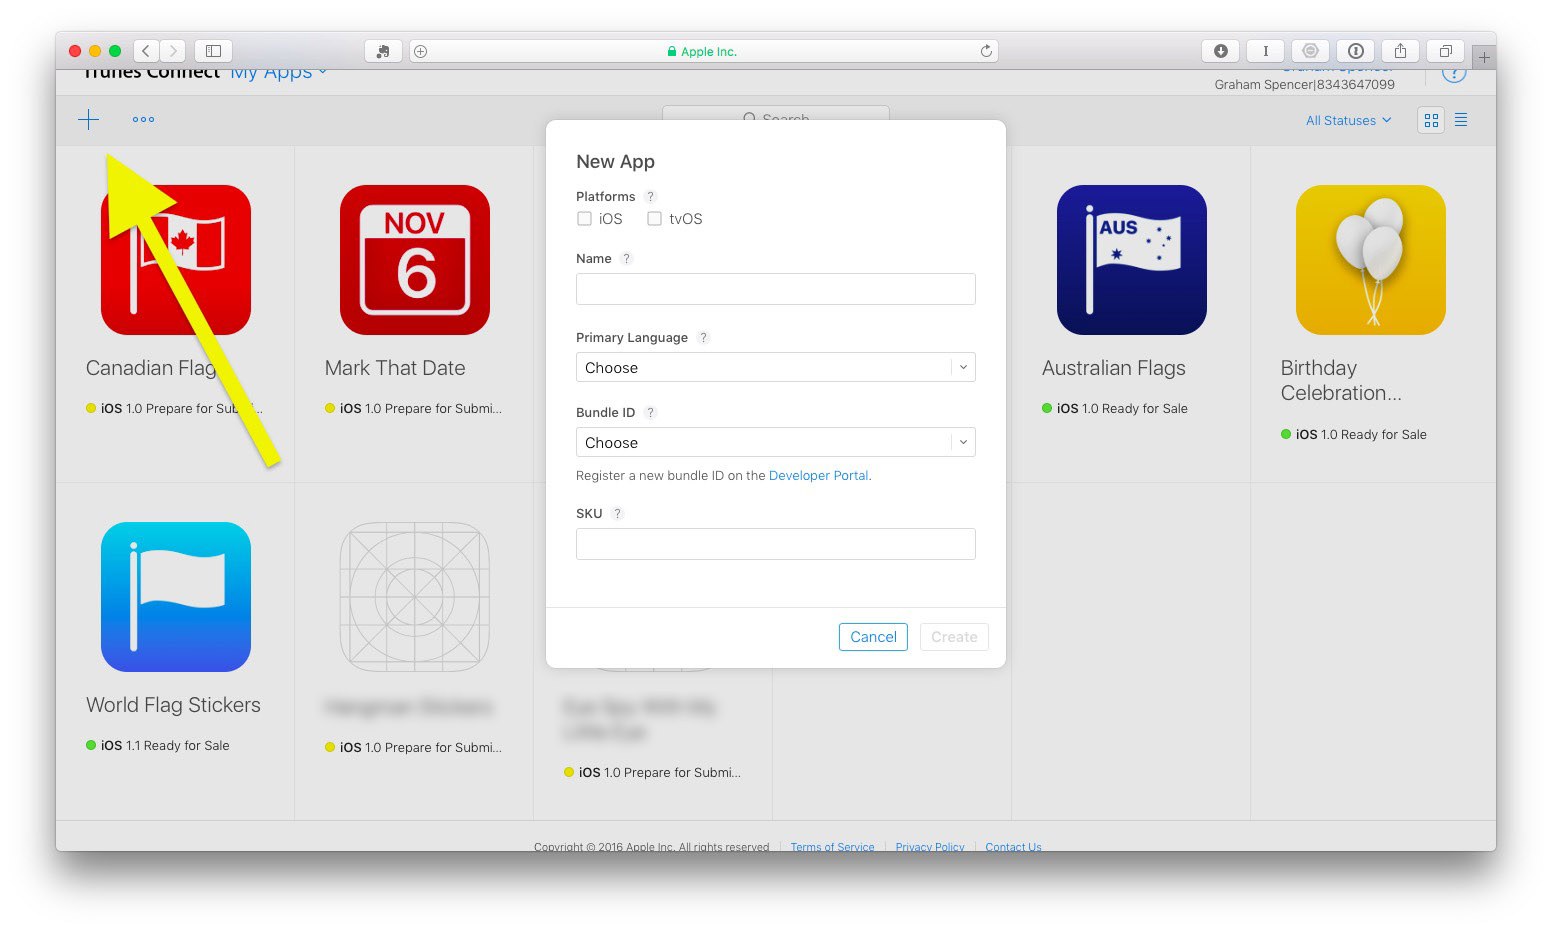
Create the App in iTunes Connect
Login to iTunes Connect and select ‘My Apps’. Then, using the + button in the top-left corner of the screen, create a ‘New App’. You’ll then be asked to complete a short form, which consists of the following questions:
- Platforms: Tick the iOS checkbox.
- Name: The name of your app, as it will appear on the App Store. It must be less than 50 characters and cannot be the same as another app on the App Store.
- Primary Language: Not particularly important for a sticker pack; just choose your primary language.
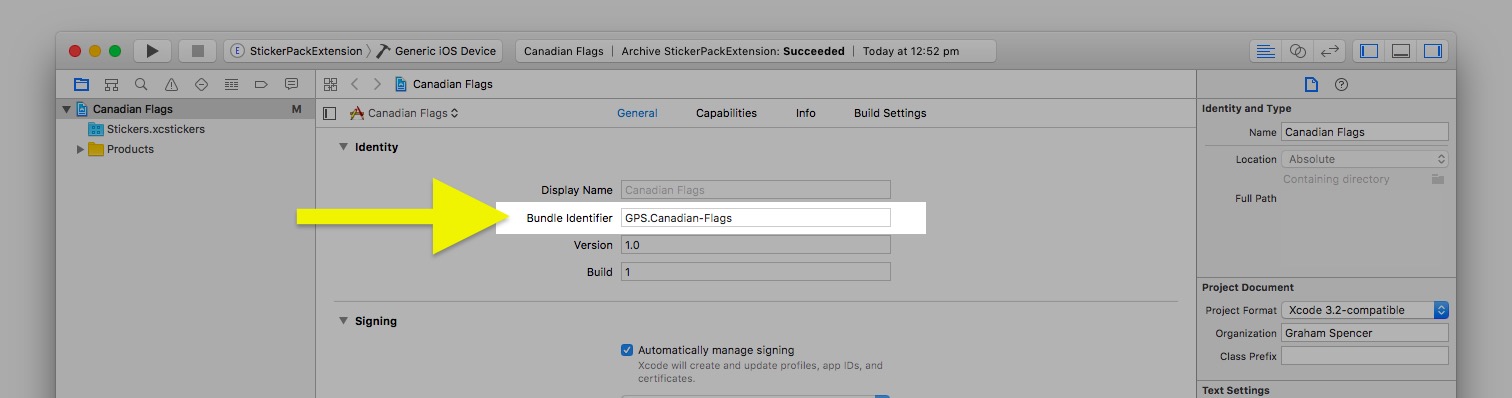
- Bundle ID: Using the dropdown menu, select ‘XC Wildcard - *’. That will show a new text field called ‘Bundle ID Suffix’. Go to your Xcode project and find the Bundle Identifier (see screenshot below), copy that and paste it into that ‘Bundle ID Suffix’ text field.
- SKU: This is just a unique alphanumeric ID that you need to provide to iTunes Connect. It is not shown on the App Store. For my apps, I have just used my initials followed by what number the app is.
Upload Build from Xcode
Important Note: You will not be able to upload your build from Xcode until you have created the app in iTunes Connect, as described above.
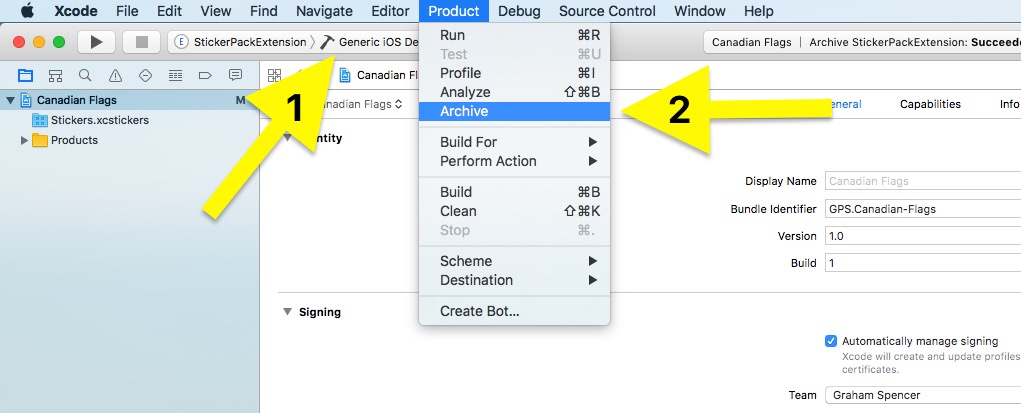
Once you have created the app in iTunes Connect, you need to build your sticker pack into an app using Xcode. This can be done by setting the active scheme to “Generic iOS Device”, and then selecting ‘Archive’ from the Product menu.
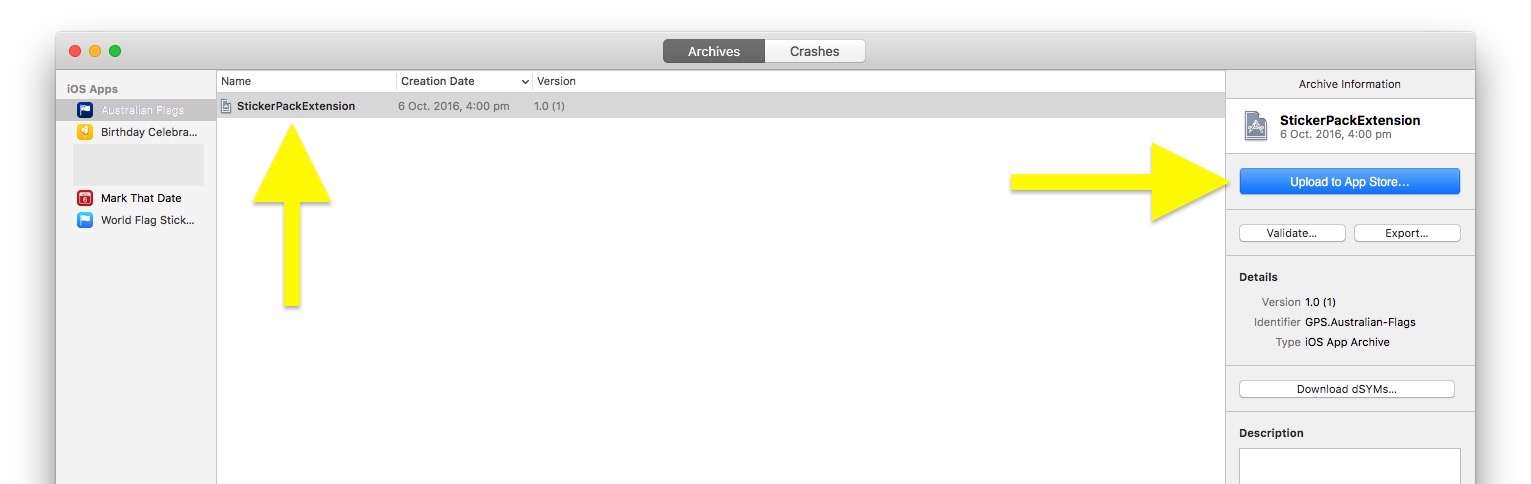
When Xcode has built the archive, it will open the Xcode organiser window. Select the build you just created and click the “Upload to App Store” button on the right. If you haven’t already logged into your Apple Developer Account in Xcode, you’ll need to do so before Xcode can upload the build.
Once you have uploaded the build to iTunes Connect, it may take a few minutes to show up, and a little bit more time for iTunes Connect to process it.
Completing the App Store Information
We’re almost there. Now we need to prepare our app for submission to the App Store. Go back to iTunes Connect, find the app you created above, and under the App Store tab you’ll notice a number of headers in the left sidebar. Below I’ve listed each of them, and the key information you’ll need to provide.
App Information
- The name of the app, as it will appear on the App Store.
- The category of the app. This should be Stickers, but you are free to choose the Subcategory.
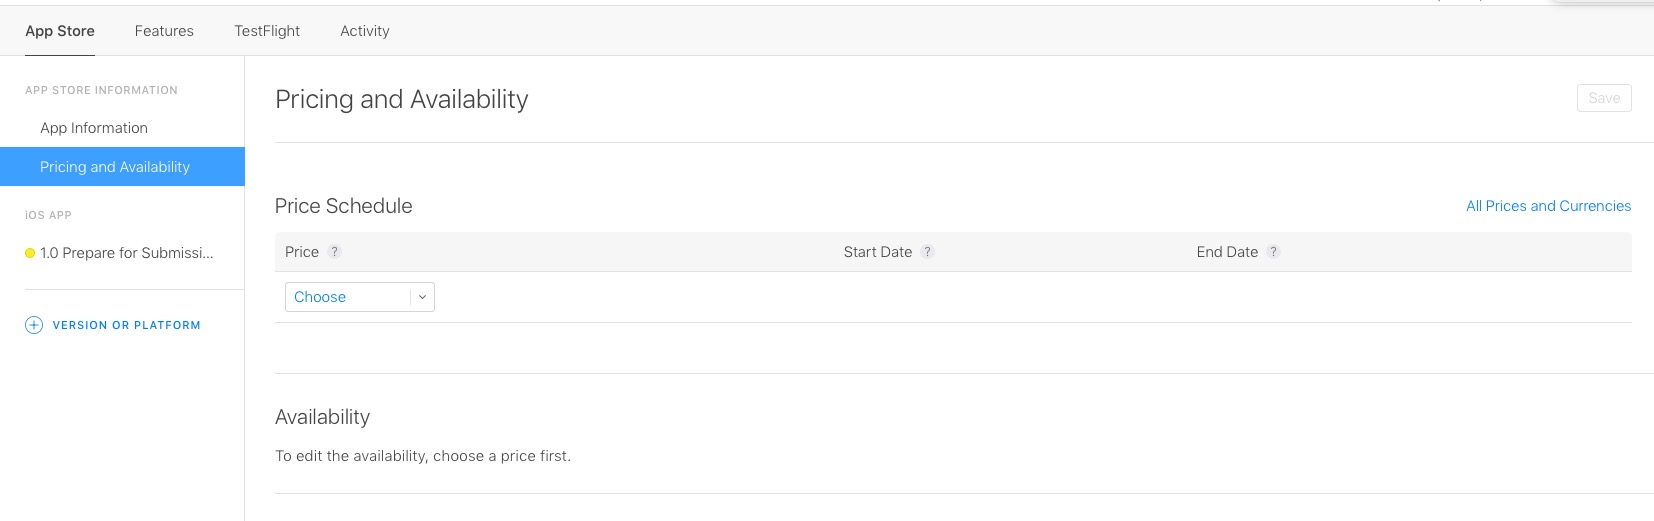
Pricing and Availability
- The price of the App. Technically, you’re actually just selecting the price tier, and each tier corresponds to a price in each country that is roughly the same after currency conversions. If you’d like a more detailed explanation, read this article I wrote which explains how the pricing tiers work in more detail.
- Availability (you can restrict the app to certain territories if you choose).
iOS App 1.0
- Screenshots and App Preview (see below).
- App Description (see above for some tips).
- App Build (which is what you just uploaded from Xcode).
- Another app icon (1024 pixels x 1024 pixels)
- Age Rating.
- App Review Information.
- Version Release (choosing when your app is released).
Uploading Screenshots and an App Preview
You need to upload at least one screenshot of the iPhone, and one of the iPad. You should absolutely try to include a few screenshots.
By default, you do not need to create screenshots for every device size. If you upload a screenshot from a 5.5-inch display (a Plus model of the iPhone), it can be used for every other smaller device. But you cannot use a smaller display screenshot on a larger display. The same is true for the iPad, which can use a 12.9-inch display screenshot for all smaller devices.
So if you’re looking to minimise the amount of work you need to do, take screenshots on an iPhone Plus and a 12.9-inch iPad Pro. If you don’t own an iPhone Plus or the 12.9-inch iPad Pro, use Xcode’s simulator to take screenshots of these devices.
App Review
Once you have completed everything in these 3 tabs, proofed it, and tested the latest build, you’re ready to submit it for review. Just click the Submit for Review button in the top right corner of iTunes Connect and follow the final few prompts.
App Review can be as quick as a few hours, to a week or more. But in recent weeks the average review time has been 1-2 days. You will be notified via email when the status of your app has changed from Waiting for Review to In Review and then Ready for Sale (approved).
Miscellaneous Tips
Screenshots in the Simulator
If you don’t have a Plus sized iPhone or a 12.9” iPad Pro, you might need to take your app screenshots in Xcode’s device simulator. Simply press ⌘+S at any time and it will save a screenshot. But just be aware that you must be at 100% scale in order to get a full resolution screenshot. You can quickly toggle between various viewing scales by using ⌘+1 (1 being 100%, 2 being 75% and so on).
Changing the Version & Build Numbers
This one stumped me for days. Let’s say you released your 1.0 sticker pack, but have since added more stickers and want to submit a 1.1 build. In Xcode you actually have to change this number in 2 places, because you have to change the app’s version number, as well as the app extension’s build number.
TestFlight
As discussed above, you can test your sticker packs using one of Xcode’s simulators, or even directly on your device via Xcode. But there’s another way, which is via TestFlight in iTunes Connect. Once you’ve uploaded a build to iTunes Connect, you can distribute it for internal or external testing.
Builds sent for internal or external testing are valid for 60 days.
Internal Testing
Internal testing is limited to those who have been added to your iTunes Connect account, whether they are have the Admin, App Manager, Developer, Marketer or Legal role. Distributing your app for internal testing does not require any app review process.
To start internal testing go to the TestFlight tab, select Internal Testing. Then you just need to select the build you want to test, and which internal testers should be given access to the build. Once you’ve done that, just click ‘Start Testing’ and the internal testers will be sent an email, inviting them to install the app for testing via the iOS TestFlight app.
External Testing
External testing is similar to internal testing, except that you can send an invite to any email, not just those associated with your iTunes Connect account.
However, another thing to keep in mind with external testing is that it is subject what Apple calls ‘Beta App Review’. This process is different to App Review, so do not rely on an approval from Beta App Review as any kind of guarantee that your app will be approved by App Review. Because Beta App Review serves a different purpose, it is typically a little more efficient than the main App Review process – all my Beta App Reviews took less than 24 hours.
You’ll also have to provide some additional information prior to submitting a build for external testing, specifically:
- What to Test
- Beta App Description
- Feedback Email
- Marketing URL
- Contact Information
- Demo Account: Not applicable for a sticker pack, uncheck this box.
- Review Notes: A message to the review team at Apple, I just wrote “This is an iMessage sticker pack”.
Take time to properly answer the open-ended questions, but it is okay to keep them brief. My answers were brief and I had no issue with Beta App Review.
App Bundles
Another option you may want to consider is creating an App Bundle. App Bundles enable you to offer multiple apps to customers at a discounted price. I think this makes a lot of sense for sticker creators, and you can already see some great examples such as the Iconfactory’s Emoji Pro Sticker Bundle.
After making my World Flag Stickers app I got a number of requests for more flags for the US, Canada, and Australia. I didn’t want to add them to the existing app, because that would make it more difficult to find country flags. So instead I decided to make seperate sticker packs for the US, UK, Canada, and Australia. I could then sell an app bundle which included all 5 of these sticker packs, at a good discount. So that’s what I did with the World Flag Mega Pack.
App Bundle Basics
- You can only create an App Bundle for your apps that have been approved and are ‘Ready for Sale’.
- Any App Bundle you create will also go through a review process.
- You can include up to 10 apps in an App Bundle
- The App Bundle must be sold at a reduced price to what it would cost customers to purchase the apps seperately.
- If a customer has already purchased an app included in an App Bundle they will be credited for that purchase and will be able to purchase the App Bundle at a reduced price that accounts for the existing purchase.
For more information this page on Apple’s website provides a good overview of App Bundles.
Creating an App Bundle in iTunes Connect
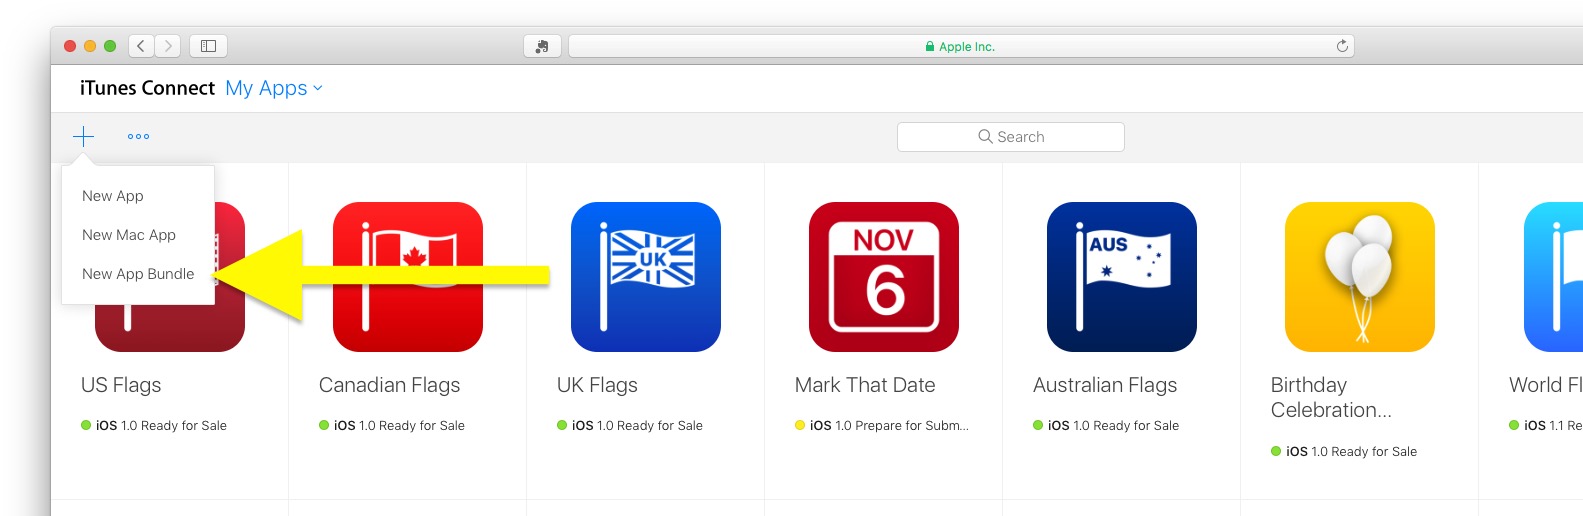
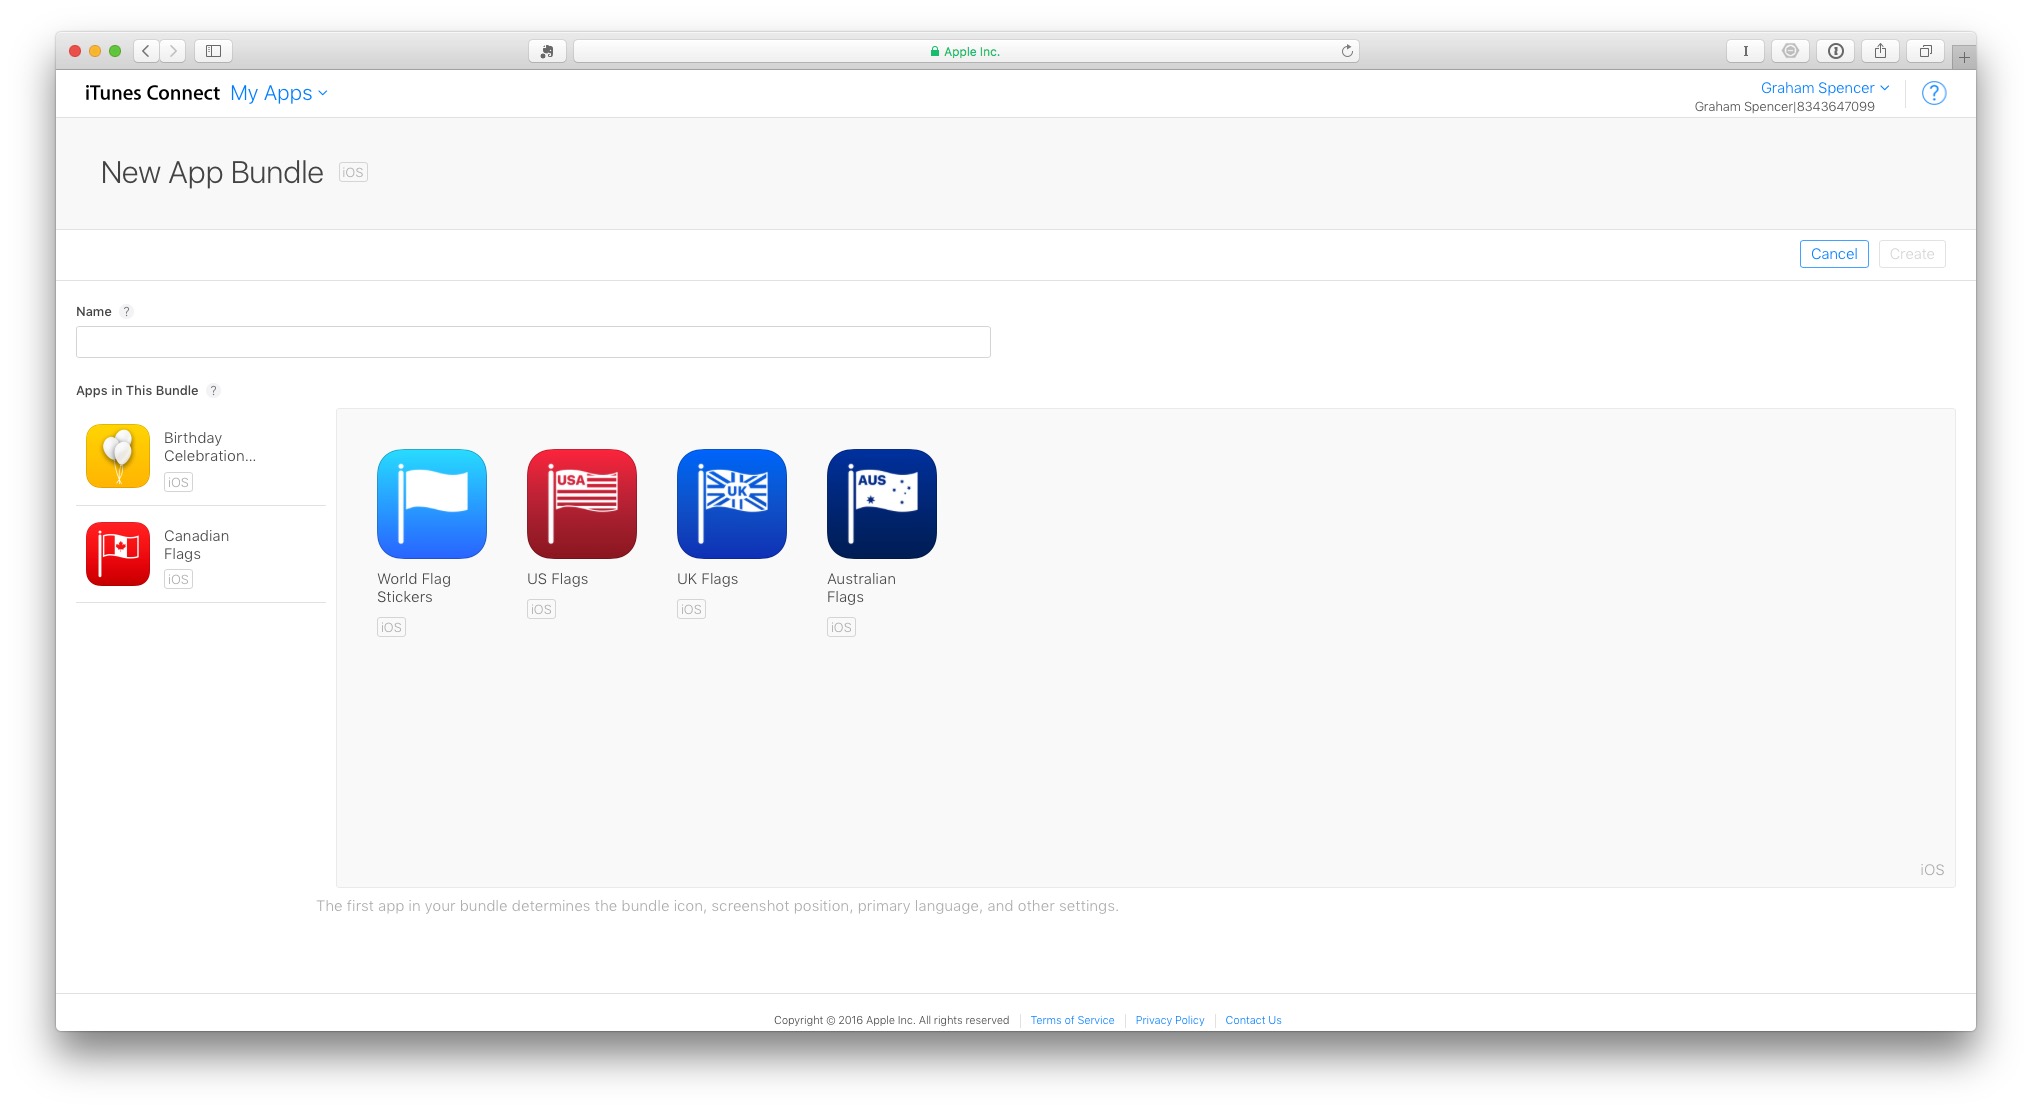
Creating an App Bundle is a fairly easy task. Just remember that you can’t add an app to an App Bundle until it has been approved and is ‘Ready for Sale’. To start, log into iTunes Connect, go to ‘My Apps’, click the + button in the top-left corner and select ‘New App Bundle’.
You will then be taken to a screen which asks you to create a name for the App Bundle, and select the apps which will be part of the App Bundle.
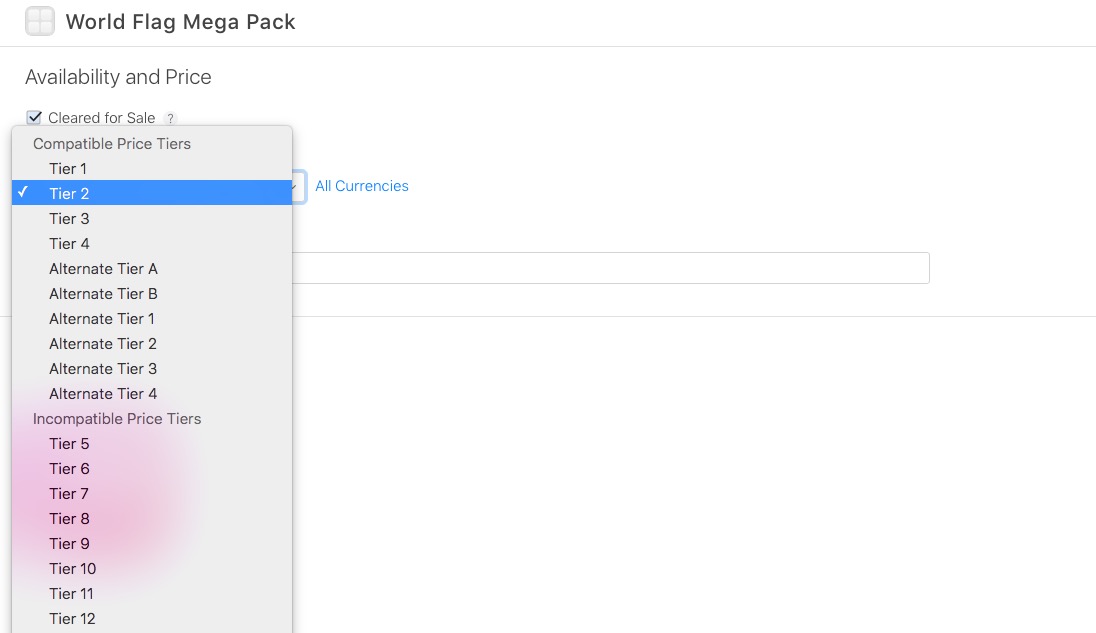
Then you’ll be taken to another screen which asks for more information about the App Bundle. This is where you’ll provide a description for the App Bundle, provide a marketing URL (optional) and select the price tier for the App Bundle. Remember that App Bundles must be sold at a discount compared to the collective price of the apps included in the bundle. Fortunately, iTunes Connect automatically calculates this and when you select a price tier it will indicate to you which price tiers are compatible and those which are incompatible. The ‘Cleared for Sale’ checkbox will mean your App Bundle goes live on the App Store when Apple approves it.
Once you’ve entered all the required information, you can save and submit the App Bundle for review. This process took a few days for me, and it appears to be managed by a different team to the one that deals with other app reviews.
Wishlist: Sticker Pack Improvements for Creators
I started off this post by noting that the barrier to entry onto the App Store has never been lower. There’s no doubt that’s true, but I also think that there’s a lot Apple can improve upon in iOS 11 that will make the process of creation, publication, and sale of sticker packs even easier and better for creators (and users).
Basic Design Customization Options
If you create a code-free sticker pack you only have one customization option for the sticker browser; whether your stickers are small, medium, or large. I’d like to see the ability for code-free sticker packs to also do things like:
- Add a search bar to easily find specific stickers;
- Change the background of the sticker browser;
- Add captions/names to stickers;
- Create folders or dividers to more easily separate different stickers within the same sticker pack.
All of this is currently possible if you also do some of your own coding. So you’ll notice that some sticker packs do, for example, have their own backgrounds for the sticker drawer. But it would be nice if some of these basic design customization options could be implemented without coding.
In-App Purchases
Also not possible with a code-free sticker pack are In-App Purchases. Your sticker pack has to be free or paid upfront. Whilst in some respects this is a nice return to the early days of the App Store, it also makes little sense when the rest of the App Store is today dominated by free apps that offer In-App Purchases.
I’d like to be able to offer free sticker packs which come with “expansion packs” that can be purchased via an In-App Purchase.
Not Xcode & Simplified Submission Process
I know this is a big ask, but I genuinely think that the hardest part of making a sticker pack is dealing with Xcode. Using Xcode to make sticker packs is like using a 200 tonne road train when you move apartments – complete overkill and it actually complicates the process. So why not create a dedicated app for creating sticker packs?
I’d also argue that the submission process for sticker packs in iTunes Connect could be simplified, but I think this is less of an issue.
Automatic Screenshot Generation
It would be truly fantastic if, at some point during the sticker pack creation process, Apple could automate the creation of screenshots for the App Store. Most sticker packs, mine included, take screenshots of the maximised sticker browser and use these as their App Store screenshots. Still give creators the option to create their own screenshots, but this would be a huge time saver and sufficient for 90% of sticker packs.
Automated Copyright Infringement Checker
It is an unfortunate reality that some people are stealing stickers created by others and packaging them in their own sticker packs for the App Store. Given that Apple has access to every sticker created, I’d imagine it should be possible to do an automatic image search during the app review process to see if any of the stickers are already included in another sticker pack. If the stickers do appear to be copied from another app, then it should be investigated by App Review.
Conclusion
Good luck creating your own sticker packs – it is a lot of fun and also quite rewarding to see your own work on the App Store when you’re done. I hope this guide has been of some help to you, and demystified some of the more complex steps involved.
Even at almost 6,000 words, there are still areas that I have glossed over or simplified by necessity. So if you have any questions, feel free to send me a tweet @greyham, and I’ll try my best to answer them.