Thanks to MacHeist, I had the chance to download and test Shovebox, a lightweight organizer for Mac OS X. Then, I found out that there was a Shovebox app for iPhone too, so I decided to give it a try. Expect a review soon.
Anyway, this is not a review of Shovebox mobile. In this tutorial I’ll show you how you can export items from Shovebox mobile and import them into Yojimbo on your Mac. As you can guess, Shovebox mobile + Yojimbo could become the ultimate data organizer setup: every data you shove on the go can be easily imported into Yojimbo on your desktop.
The process is a little bit complex and it’s based on an Automator workflow I created, but once you’ve set up everything it will take 2 seconds to export/import all the files.
Enjoy!
What you need:
Jailbroken iPhone
OpenSSH
Netatalk
Shovebox mobile
Yojimbo
Download: Automator Workflow (wrote on Snow Leopard)
First, you’ll need to have a jailbroken iPhone, otherwise the workflow won’t work as it needs to access the internal iPhone files. But don’t worry, it will only access to Shovebox database. Anyway, there are various tools to jailbreak the iPhone, I used Blackra1n from George Hotz to install Cydia on my 3GS. Just search Google for the better tool for your iDevice.
Once you’ve installed Cydia, fire it up and install OpenSSH: you’ll need this to set up SSH connections.
Then, search for Netatalk. Netatalk is an open source framework which brings the Apple Talk format to iPhone. Basically, it lets Mac OS recognize iPhone OS as a shared device: the iPhone will appear in the Finder’s sidebar under the Shared tab. This is necessary because the workflow needs to grab files from a Finder folder, and this is the only way to “mount” the iPhone as a shared volume. Obviously, your Mac and iPhone must be on the same wifi network.
After the installation of Netatalk reboot your device and try to log in: by default, the username is “root” and the password “alpine” (without quotes) but you may have changed the SSH credentials, so pay attention. If you successfully log in, don’t touch anything. At least not now.

Find Shovebox app into your iPhone. By default, everytime you install an app on your iPhone, iPhone OS creates a folder into var/mobile/Applications which isn’t called like the application but contains the app itself into the folder.
Like this: DD7DD0D0-801A-4C63-AA23-302B60CDC956
Inside this folder there’s the application, together with the app’s preferences, artwork and,usually, database. Pretty much like the Show Package Content menu on Mac OS, but with a slightly different approach. Here’s a screenshot to help you better understand the situation:
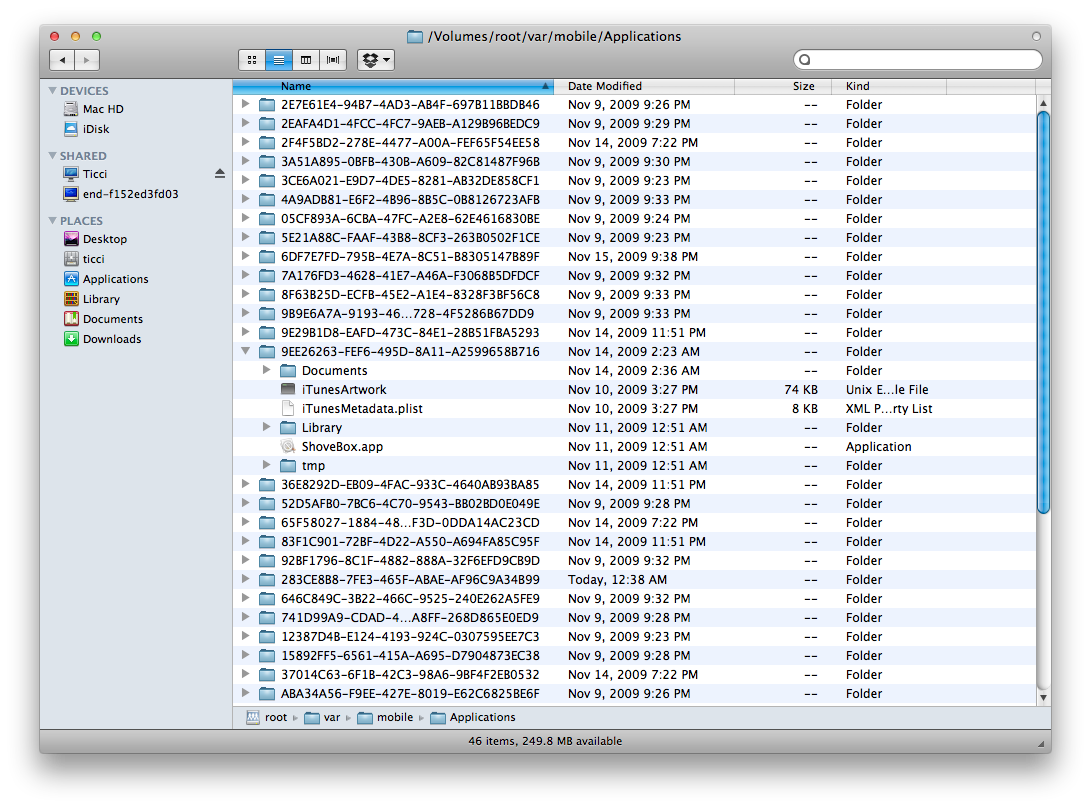
As you can see, there’s the “weird” folder, which contains Shovebox.app and other stuff related to the application. In this case, every note, snapshot you take with Shovebox goes into Documents/EntryData. This is the folder we’ll focus on.
Now, you have to find your Shovebox folder. Mine is called 9EE26263-FEF6-495D-8A11-A2599658B716 but it’s possible that yours has a different name. Remember: it’s located into var/mobile/Applications. Open every folder and look for Shovebox inside it. Though I use Cyberduck to browser my iPhone folders, you can do with the Finder (Remember? You installed Netatalk) and the list view. This is just your personal preference.
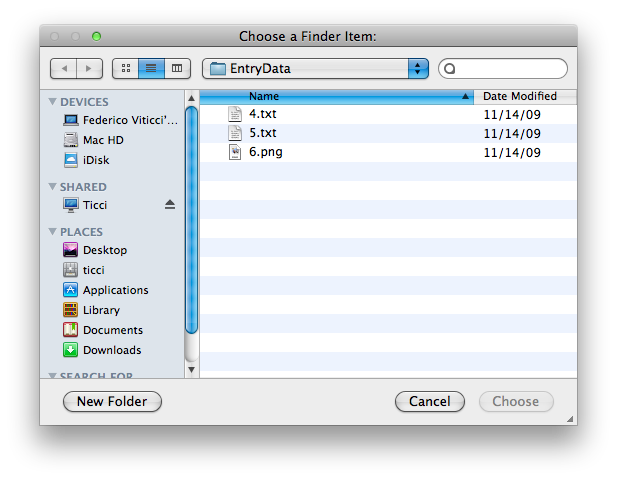
Once you’ve found your Shovebox folder, navigate to Documents/EntryData inside it: all your Shovebox entries are there.
Now, it’s time to open the Automator workflow. This workflow is made of 3 actions: it asks for Finder items located into the EntryData folder, copies them into a backup folder and then opens them with Yojimbo. Obviously, you can replace the backup folder with another folder you’d like, or even remove the action if you don’t want to backup the files before opening them with Yojimbo. Opening a file with Yojimbo means adding it to the Library. Remember to change the path of the Ask for Finder Items action and be sure that Yojimbo.app is in your Applications folder.
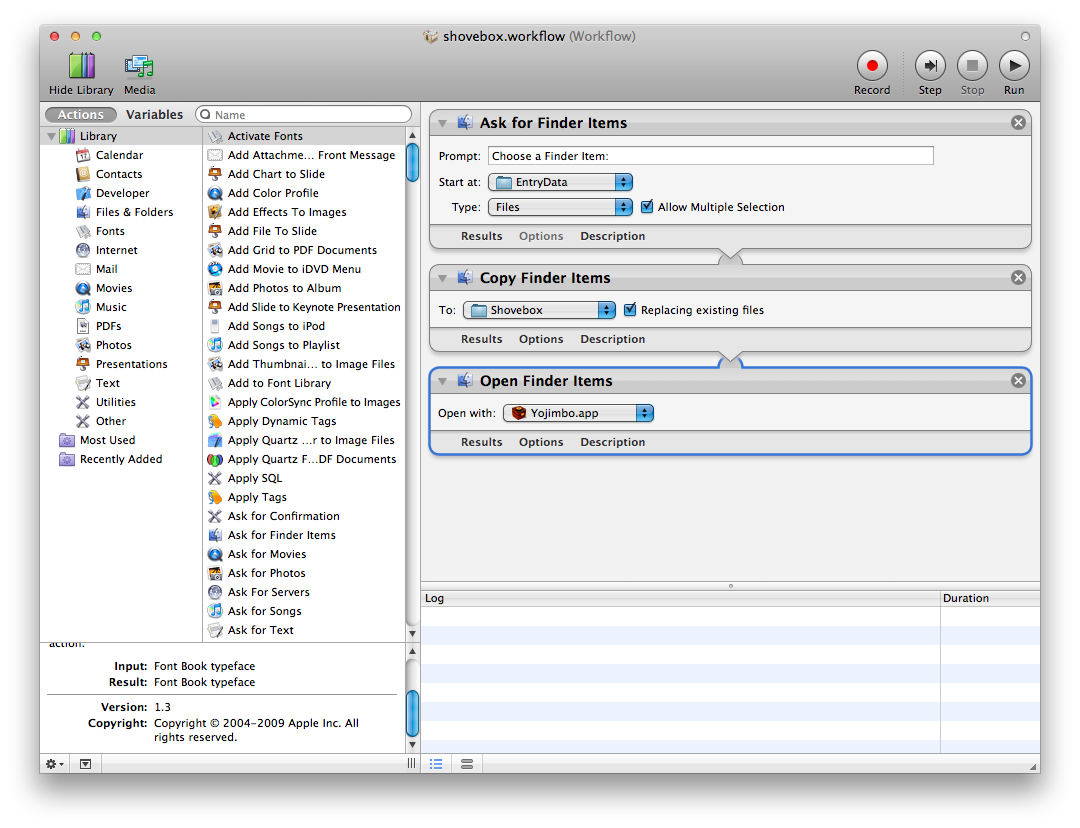
Save the workflow and place it whatever you like. Now, you should force Mac OS to open it with Automator Runner.app instead of Automator.app (enabled by default for .workflow files) in order to execute it everytime. If you don’t choose Automator Runner as the default app for this workflow, Mac OS will simply edit it. To do this, right click the workflow file, Open With, choose Other.. and select Automator Runner.app from System/Library/CoreServices.
And you’re set. Everytime you want to import Shovebox entries into Yojimbo, access the iPhone in the Finder sidebar, wait 20 seconds, then run the workflow. It will ask you for the files and then import them into Yojimbo. Remember that you’ll have to log into the iPhone or the Finder won’t recognize it as a mounted volume.
Now, a few considerations about this process.
First, Shovebox doesn’t save notes / images with their name: they’re given a number like 4 or 5 based on their order into the database. This pretty much sucks, because when you import stuff into Yojimbo you can’t see the “real” name of the note. You can always preview files with QuickLook though.
Then, there’s no way to actually sync Shovebox and Yojimbo. I’ve managed to locate Yojimbo’s library files and covert them to a native readable format, but still I can’t get Shovebox to open them. Besides, BareBones won’t implement an over-the-cloud sync soon, so things are really hard to achieve manually. Anyway, this could be an interesting way to backup Yojimbo into Dropbox.
I’ll keep you posted about it.