Brett Terpstra

22 posts on MacStories since May 2015

Brett is an independent Mac developer, author, podcaster, and blogger. He develops Marked 2, a Markdown preview app, and nvALT along with David Halter. You can find his podcasts (Systematic and Overtired) at ESN, and tales of mad code science at brettterpstra.com.

This Week's Sponsor:

Listen Later

Listen to Articles as Podcasts


AeroPress Timer for iPhone, Now with Custom Recipes

One of my favorite iOS kitchen utilities, AeroPress Timer ($4.99 US), has updated to version 3 with a complete rebuild and new functionality.

AeroPress Timer is an iPhone app that steps you through the stages of coffee making with an Aerobie AeroPress. Each step, Pour, Stir, Steep, and Plunge, has its own countdown timer. Once you get into the world of AeroPress, there are a hundred different variations and precise recipes for making different types of coffee, so it’s a handy guide.

The app has always had a great selection of AeroPress recipes, but the biggest, baddest new feature: you can now create and add your own recipes. You can also favorite recipes, add notes, and there’s a new visual grind size guide accessible from any recipe.

This update did lose Apple Watch functionality, which is a bummer, but the developer plan to have it back soon.

AeroPress Timer is available on the App Store.


Cardhop 1.1 Adds Smart Groups, Printing, and More

Cardhop from Flexibits got an update to version 1.1 today, and it packs in some pretty great improvements for an incremental update.

If you missed it before, Cardhop is the app from the makers of Fantastical that does for contacts what Fantastical did for calendars. All your contacts are managed from your menu bar, and you’re never more than a few keystrokes away from sending an email, making a call, sending a text, or anything else contact-related. Type “email elle” and it will find Elle’s card, pick the first email address, and hitting enter will fire up a new email in Mail (or your favorite mail app). Type “call mom home” and handoff a call to Mom’s home phone number. It’s far more powerful than that, but I’ll refer you to John Voorhees’ great writeup back in October for the overview.

Cardhop 1.1 comes with some fixes and improvements, not least of them being parsing and formatting support for French, German, Italian, Spanish, English, and Japanese. But the two updates that I personally find the most useful are Smart Groups and printing support.

Smart Groups are what you probably imagine – a group of contacts based on a set of criterion that automatically updates as contacts change to match (or fail to match) those criteria. It opens up a few interesting organization and productivity schemes, but my first interest is in pseudo-tagging. I can now add @tags in contact’s notes field and have them sorted into one or more smart folders, reducing my need for a large number of “actual” contact groups. And if I stop using Cardhop and need to access those groups in another app such as Apple’s Contacts, I can always just do a search for the @tag and drag them into a regular group.

The printing features are elegant. Much like those in Apple Contacts, but with a few extra touches in the print dialog, as well as the convenience of printing right from Cardhop. Being able to pull up a contact or an entire contact group and print envelopes with return addresses, or spit out address labels for the whole bunch with just a few keystrokes is a wonderful convenience. All you have to do is type “print [name]” or “print [group]” (or use a Quick Action).

Print from Cardhop

Print from Cardhop

When the print dialog comes up, make sure that you’ve clicked “Show Details.”

Show Details

Show Details

From there you can choose a list, envelopes, or labels, and define which fields to use and other particulars for each type. (You can also switch type with ⌘1-3.)

Envelope printing setup

Envelope printing setup

Other new features include template preferences to control which fields are shown when entering new contacts, an “Add Notes with Timestamp” option to add dated notes to a contact, and typing in the “related contact” field now autosuggests other names from your contacts.

I’ve been loving Cardhop, and I think it’s worth anyone’s time to grab the free trial and give it a go. Cardhop costs $19.99 US and is available on the App Store and direct from Flexibits.


Field Trips Just Got Cooler: Waypoint EDU

With the ubiquity of the smartphone in increasingly younger classrooms, integrating them into education is fast becoming a requirement for teachers. What better way to tame smartphones in the classroom than to make them part of the learning process?

Matthew Braun, developer of SketchParty TV (one of my favorite Apple TV games), released a new app to do just that. Waypoint EDU uses AR to make the phone not only a learning tool, but a truly interactive experience that can take place outdoors. Or anywhere.

From the student perspective, it works like this: students see a waypoint on a map of their current location and move around to find it. A la Pokemon Go, they search by looking through their phones, scanning for an out-of-place object such as a (miniature) colosseum sitting in a park. Once they’ve found the waypoint, they answer a quiz question to reveal the next waypoint. Think augmented reality geocaching.

From the teacher (or parent) side, creating a curriculum is pretty easy. I didn’t get into creating a fully customized one while I was trying it out, but editing the waypoints and related questions is simple. Once you have your curriculum set up, you just pull up the map and draw the playfield with your finger. The waypoints are automatically placed within the playfield, ready for the Hunt to be shared with the students via AirDrop. You can currently add artwork from a library, and the ability to add your own artwork will be a paid feature in a future update.

Waypoint EDU is a free app. Obviously, it has the requirement that everyone in the group has access to an iPhone. In situations where that’s possible, Waypoint EDU seems to me like the future of field trips. Below is a video of Waypoint EDU in action. You can find it on the App Store, and get more info at waypointedu.com.


NotePlan Calendar + Markdown + Notes Comes to iOS

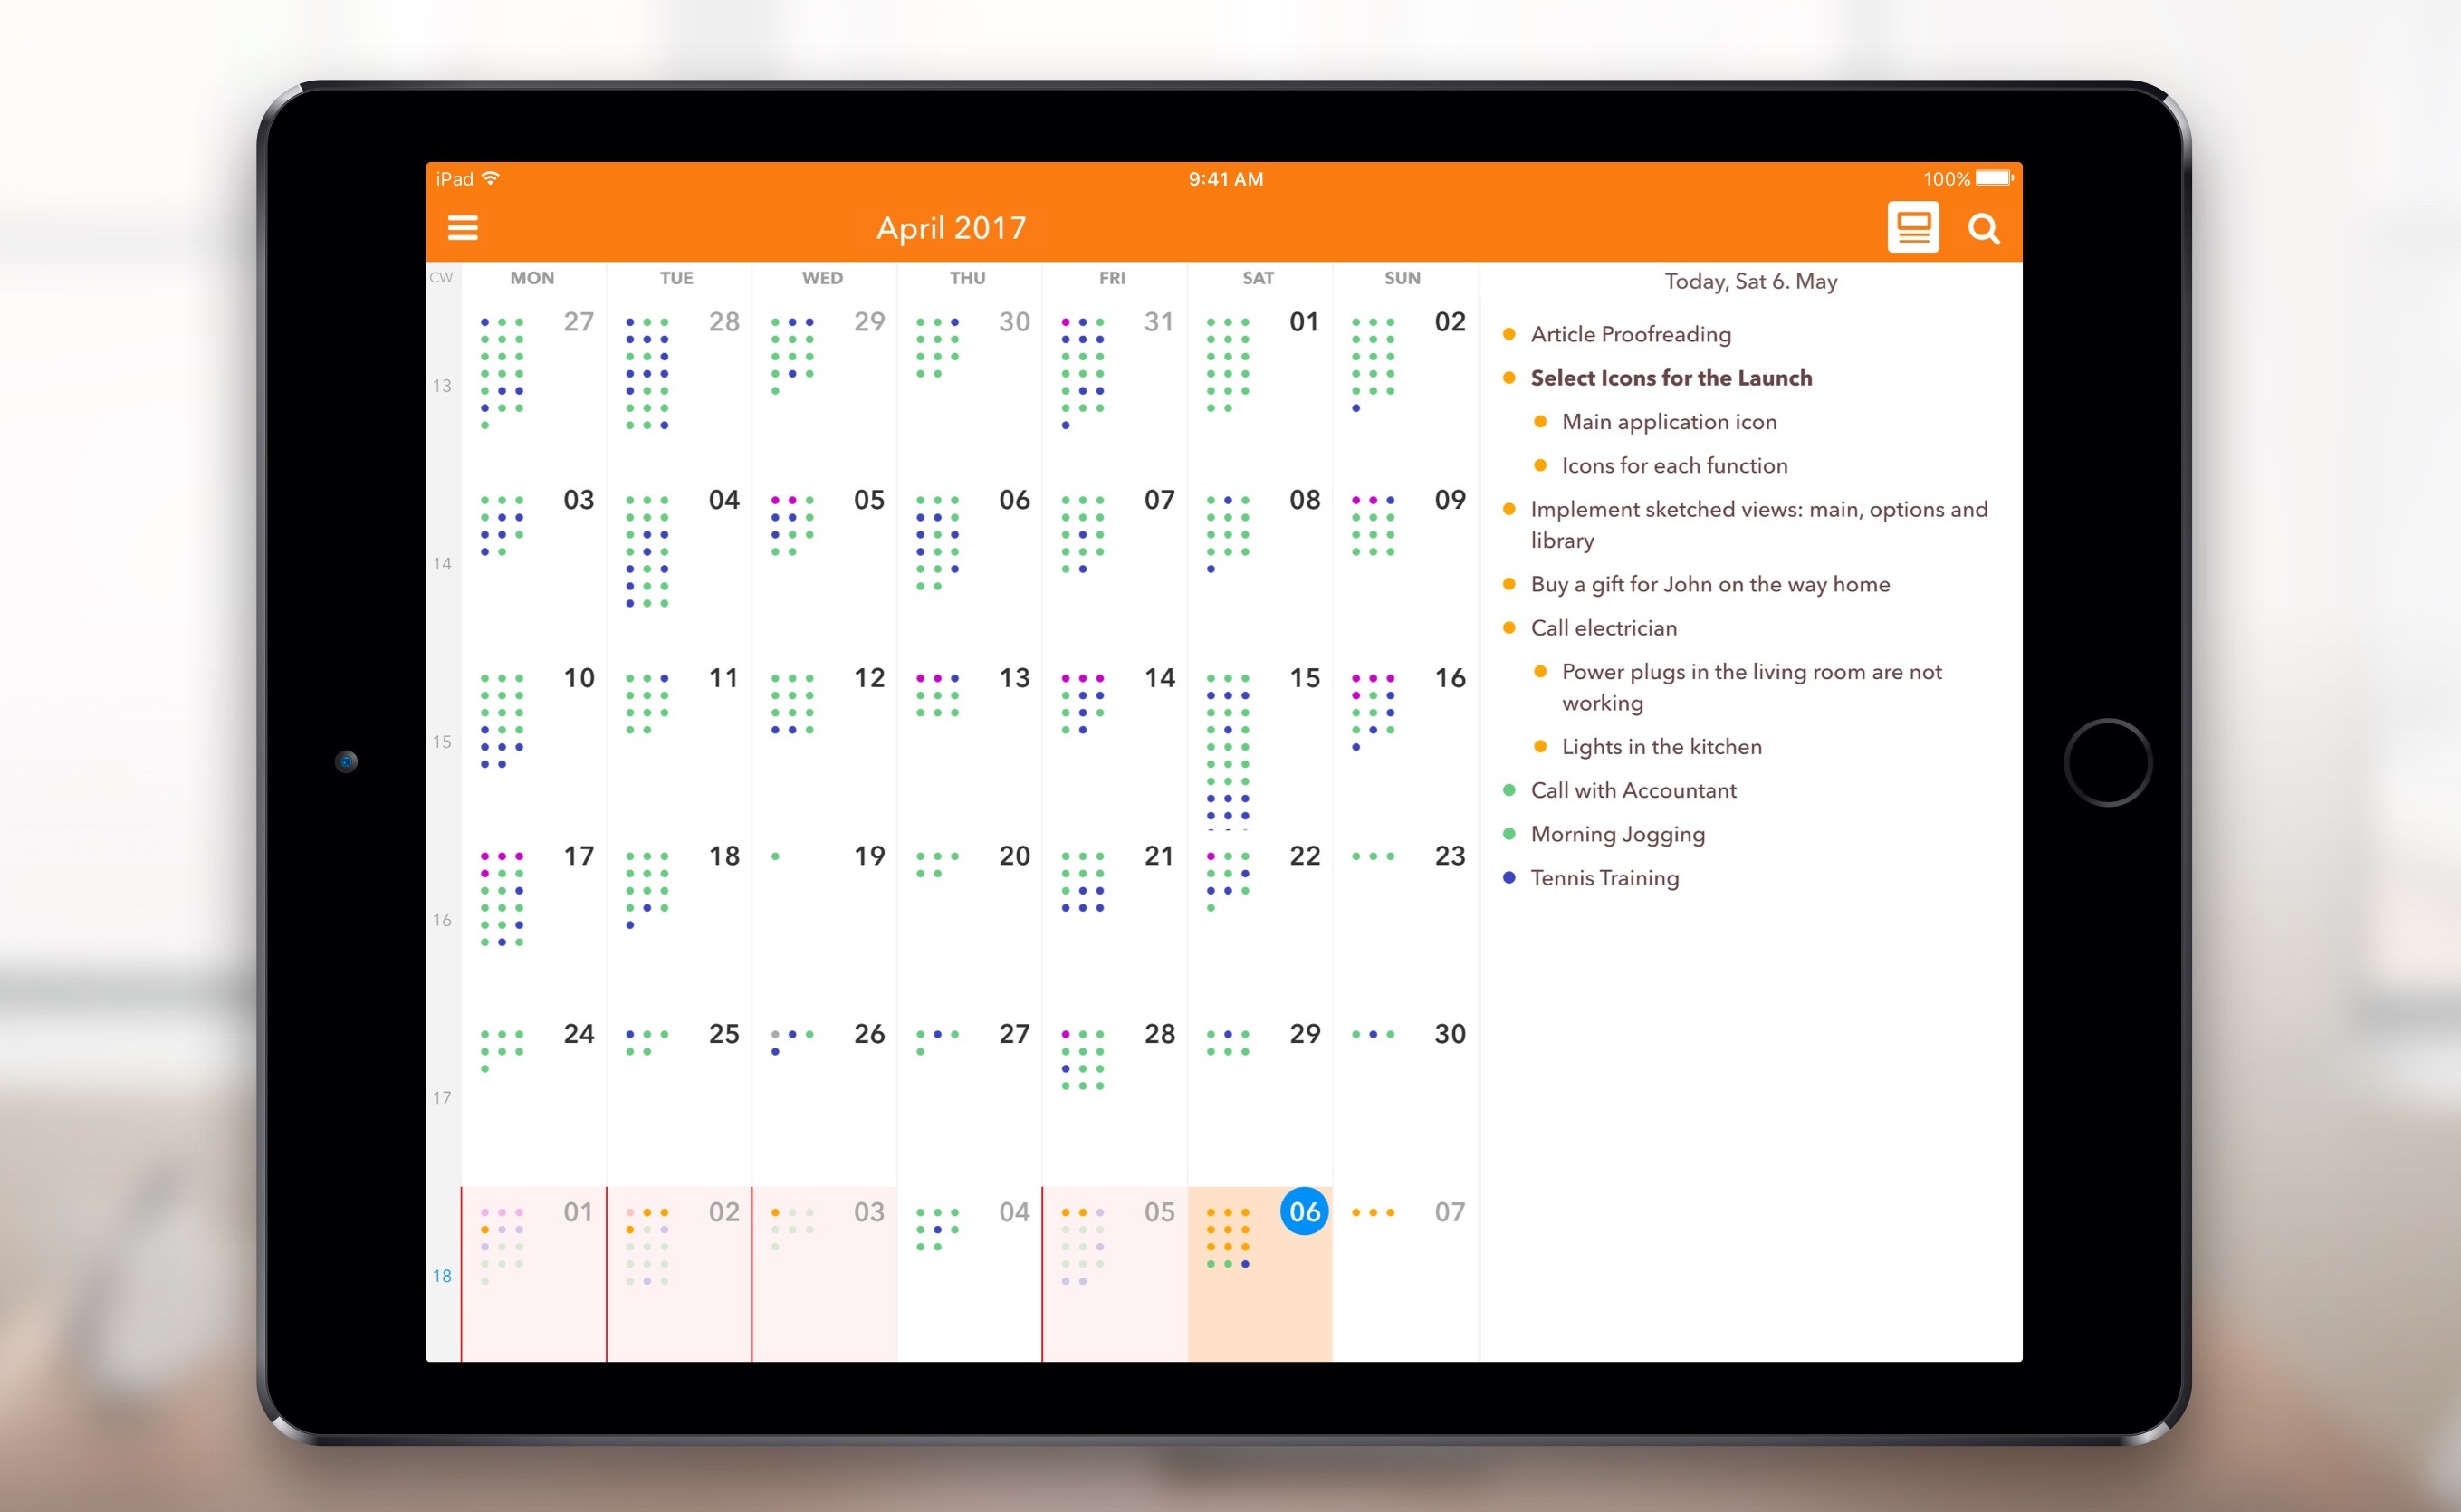
When I first heard about NotePlan, I was intrigued. It was a Mac app that used a text format (Markdown) as a calendar-based system, a note for each day, allowing you to easily create tasks and take notes, then see it all in an organized calendar. NotePlan for iOS was released today, and it’s enough to sell me on the idea.

I have a lot of side projects (I suppose my whole life is side projects these days), and organizing todo lists is vital. I love using the TaskPaper format, with TaskPaper on Mac and Taskmator on iOS, to track action items for individual projects. I also have a calendar, and a bucket of notes. Combining all of this in one place is appealing to me, and being able to use it on both Mac and iOS makes it truly useful.

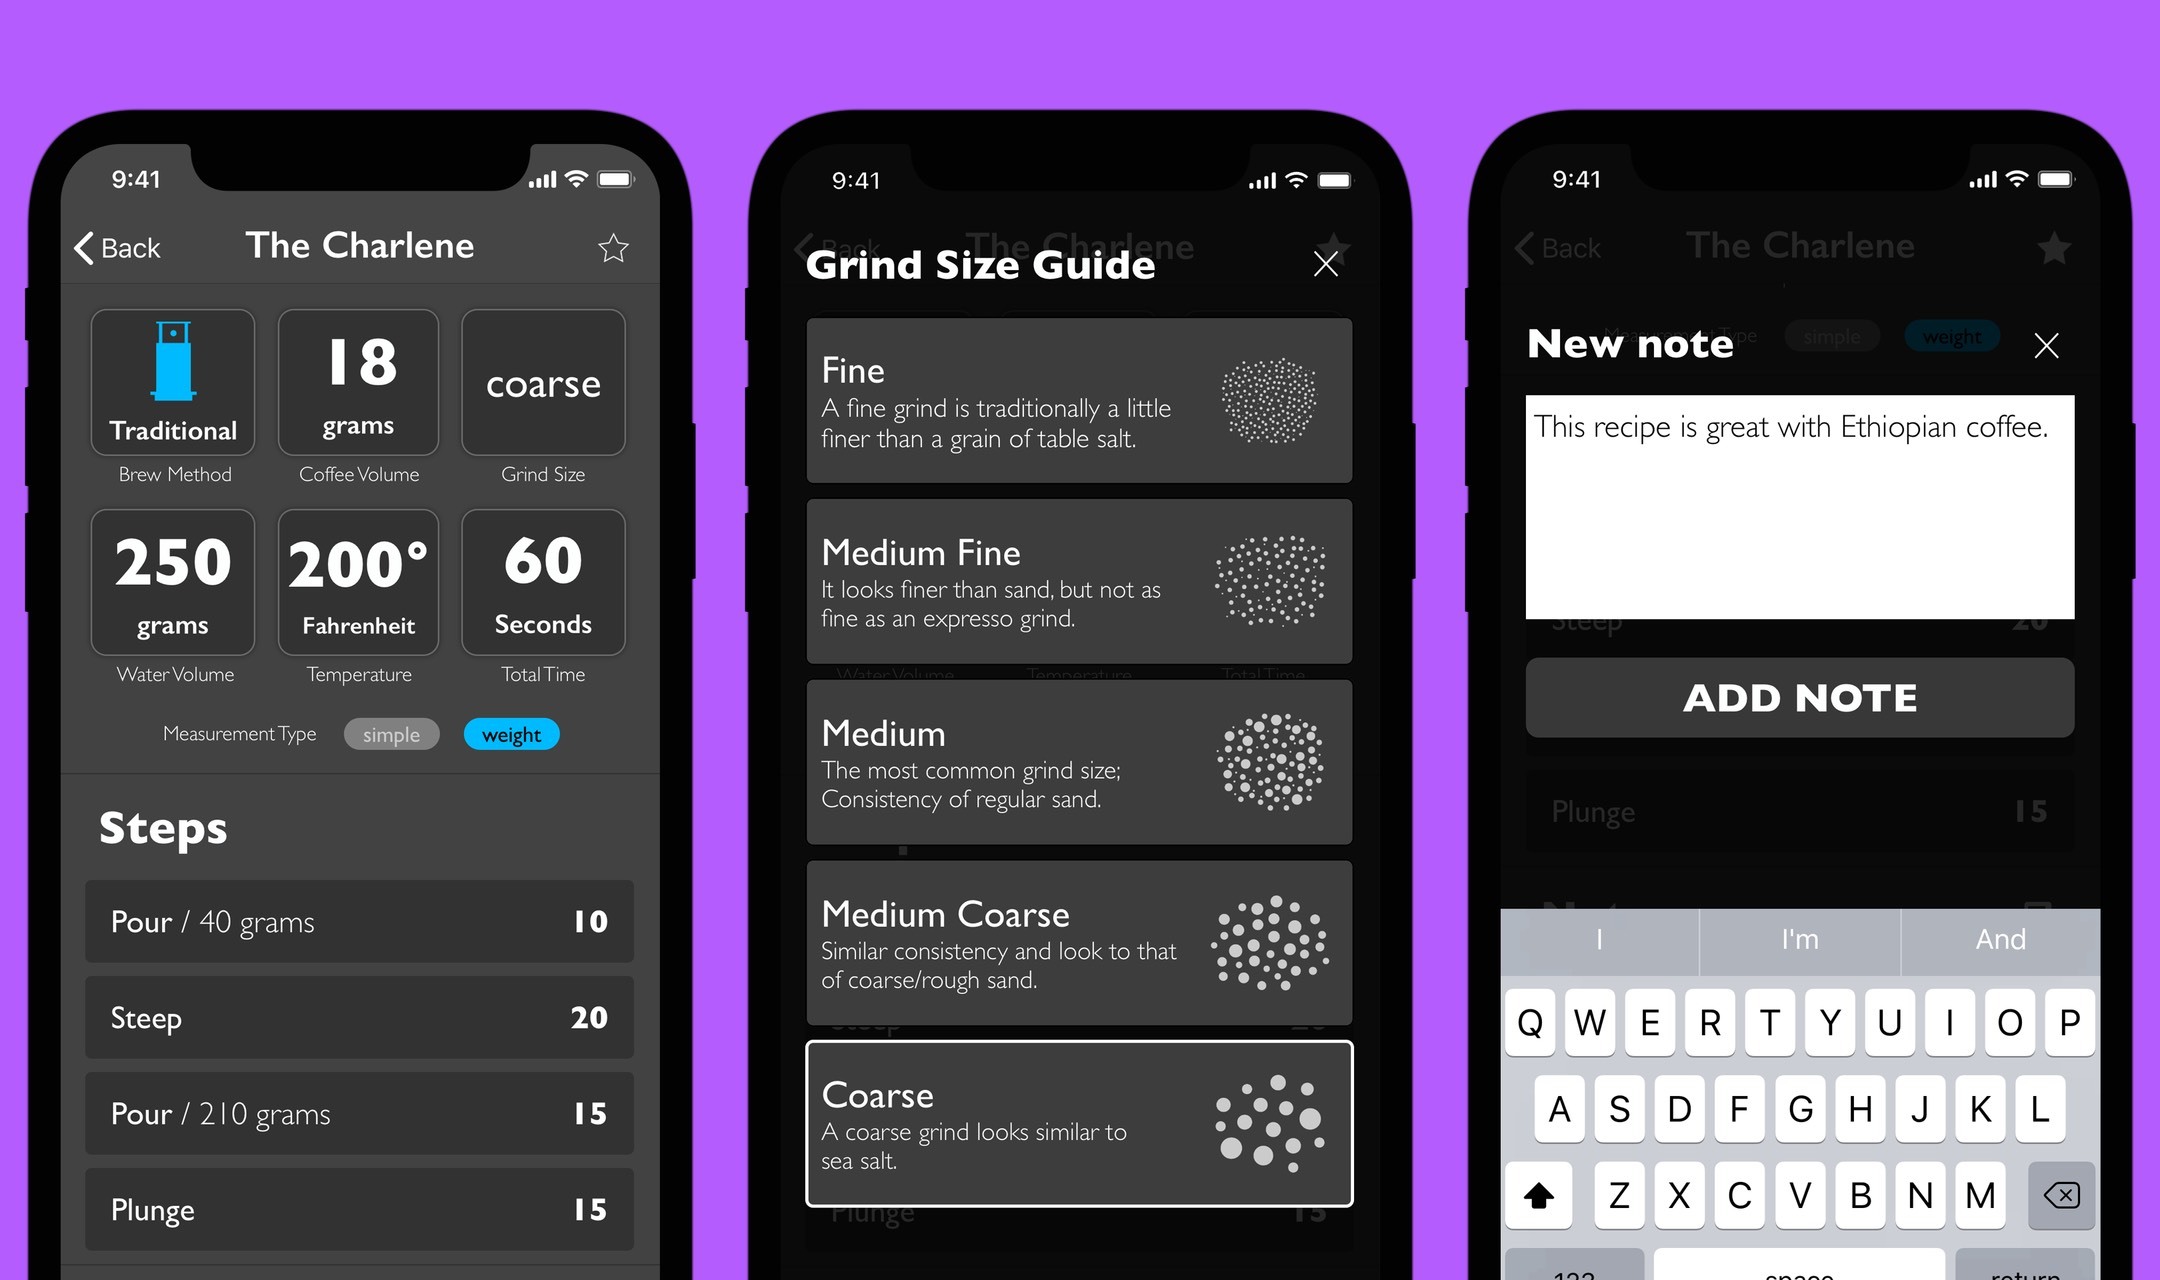
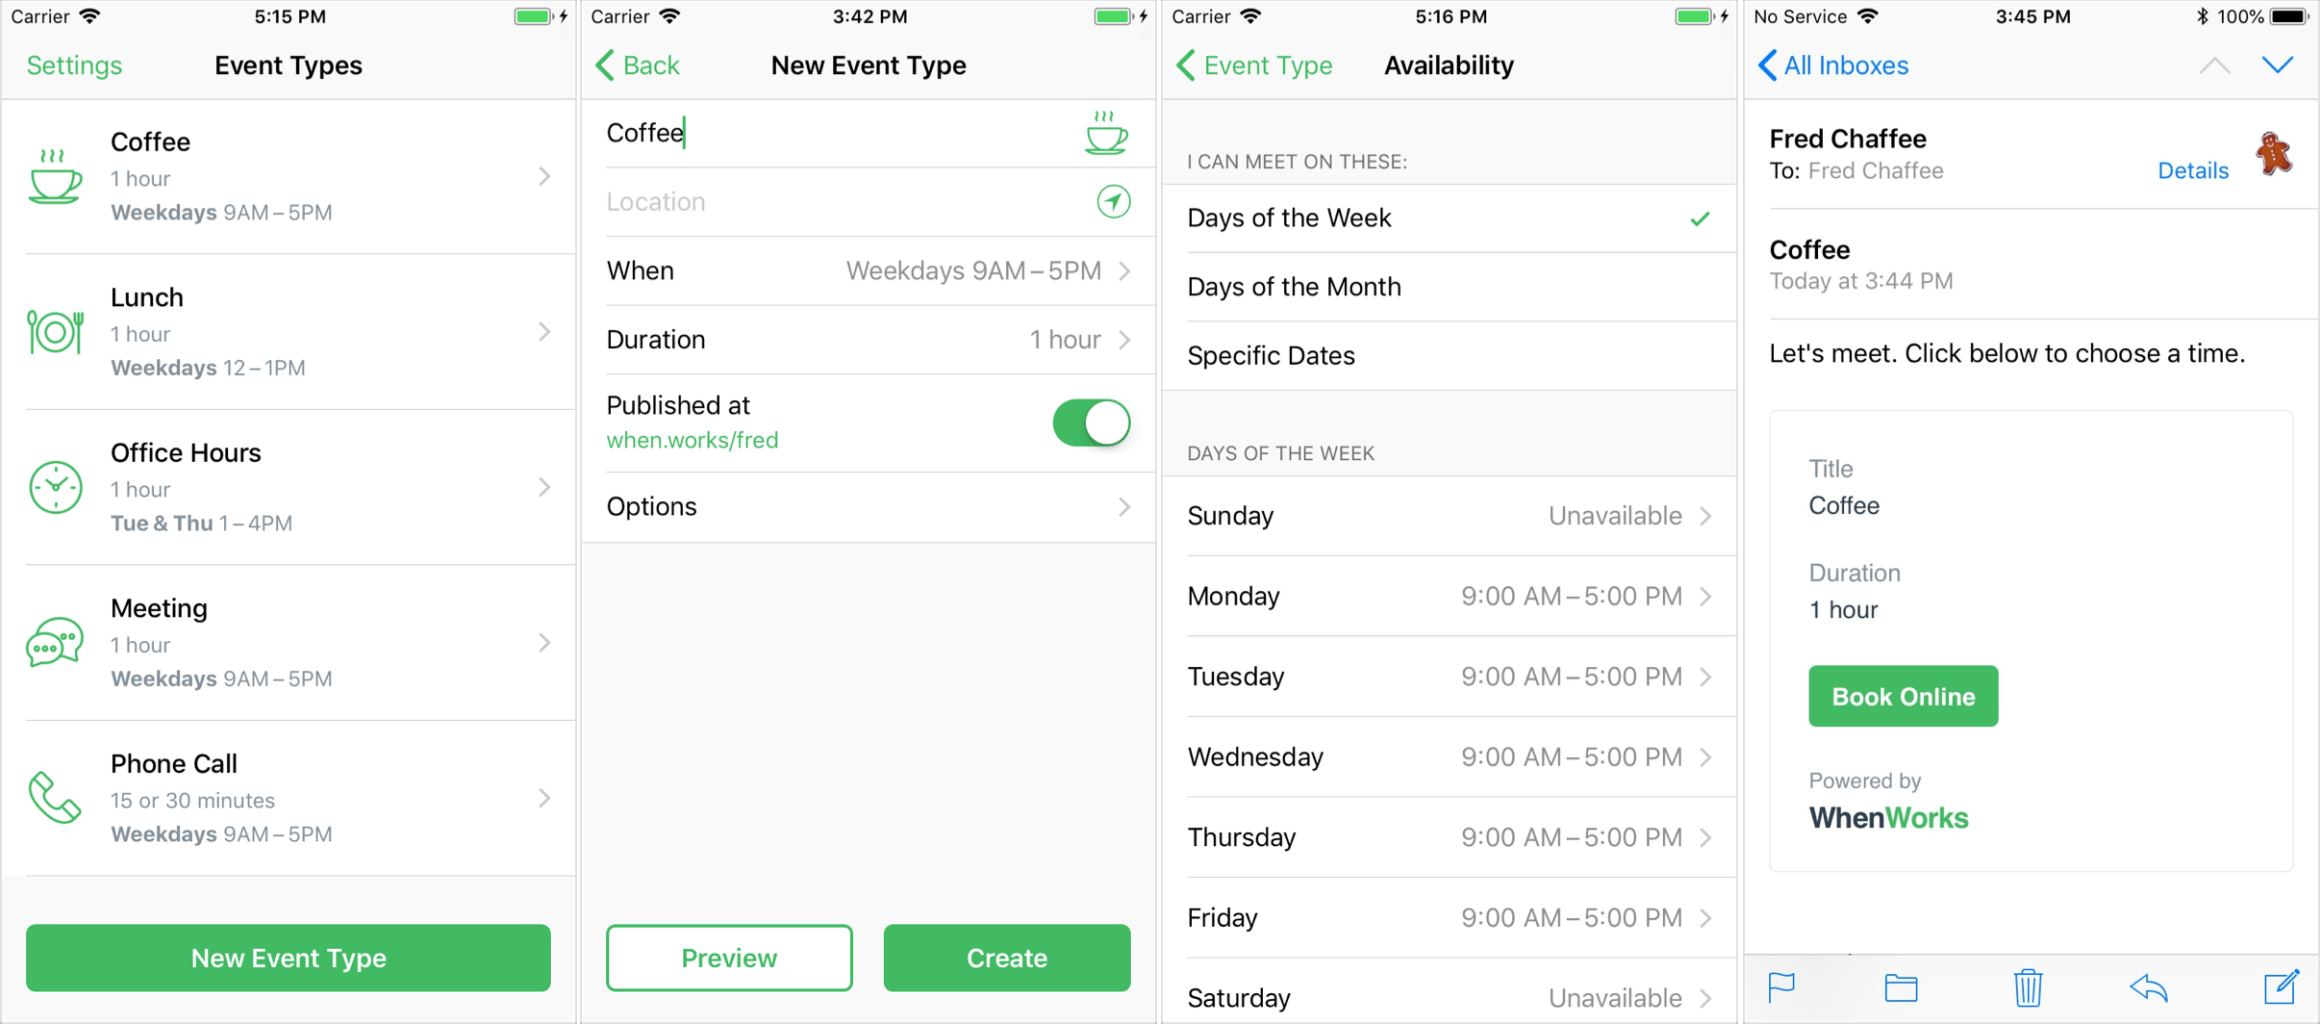
In NotePlan, tasks are created as Markdown lists. You can have it recognize any list item as a task, or tell it that only lines with a checkbox (- [ ] Thing to do) are action items. There’s an extra keyboard row available when editing that makes it easy to create items, complete or cancel them, or even schedule them for a future date.

Tasks can sync to Reminders lists as well, so it can incorporate into other workflows (and even shared lists). In the calendar view you can tap a day to see the note and associated task lists for that date.

Each day on the calendar gets a note, and you can add freeform notes in the All Notes area. A note can be bits of information, its own action list, or both. You can use #tags anywhere in the notes to organize, and wiki style links ([[title]] or [[YYYY-MM-DD]]) to reference other notes. Tasks added to freeform notes can be scheduled to the calendar with a tap, so you can use notes as a central project repository and schedule out the day’s (or week’s) tasks as you’re ready to tackle them.

NotePlan on iPhone

NotePlan on iPhone

On the new iOS version, you can drag and drop tasks around by pressing a text block until it turns blue and sliding it into place. You can also press and hold until it turns blue, then release and press another one to expand the selection between them, at which point NotePlan will offer you a toolbar to allow batch completion, rescheduling, etc.

I’d label NotePlan as a day planner, not a task manager like OmniFocus or Things. It’s ideal for planning out your day, Bullet Journal style. You won’t find extensive project management features or perspective overviews, but the combination of scheduling, tagging, and (plain text, portable) notes in one place makes it a true productivity tool.

If words like productivity, GTD, Markdown, TaskPaper and Bullet Journal cause a stirring within you, you’re probably the right audience for this one. Check out NotePlan for iOS, and then try out the Mac version for fully-synced productivity. Today and tomorrow, NotePlan for iOS is $11.99. After that, the price will be $14.99. NotePlan for Mac is $16.99.


Timing 2 Makes Time Tracking on Your Mac a Pleasure

Timing 2 for Mac is out today. I’ve been a long-time user of Timing, and have had the pleasure of beta testing the new version for a while now. It’s an excellent update to a great tool.

Timing is an app that runs on your Mac and tracks everything you do. Sounds creepy at first, but the data is completely safe, and the tracking is only for your own productivity purposes (never uploaded anywhere). By helping you see how you’re spending your time, you can start to change behaviors. Plus – because it can intelligently associate activities with actual projects – it serves as a detailed work timer for your paid projects.

Timing 2 comes in three versions: Productivity ($29), Professional ($49), and Expert ($79). No recurring payments needed, you own the app and you own your data. Some of the features I’ll be talking about are from the Expert version, so be sure to check the feature list before you purchase one of the other versions.

Timing tracks more than just what app you’re using. It will record what websites you visit, what documents you open, what folders you work in, and every way you spend time on your Mac. You can even add in notes about what you did while you were away from your Mac.

Timing 2 does a brilliant job of grouping tasks together and automatically assigning “keywords” to add new tasks to groups. You can also assign tracked tasks to projects, and do fine-grained editing on the criteria Timing uses to determine the purpose of the time it tracked.

Keywords and manual assignment of activities can be grouped into categories such as “Research” or “Podcasting.” As a result, you can easily see what activities you spent the most time on – and possibly realize that you’re not focusing on what you thought you were.

Timing also provides automatic suggestions for blocks of time that might belong together. It makes it easy to group activities and reap the benefits of manual time tracking with the ease of automation.

Timing 2 reports

Timing 2 reports

Then you get the reports. Timing 2 has truly upped its game in the data visualization section. Beautiful and useful graphs showing your most active times, most productive times, the type of work you spent your time on, and a pie chart of your most-used apps. Keep in mind that all of this is gathered automatically – you don’t have to configure anything to start getting detailed overviews.

When you edit a task, you can even assign a productivity rating to it. For me, an app like VLC gets a 25% productivity rating. A quarter of the time it’s active I’m watching something educational, but 75% of the time is probably less than productive. Now when I get reports, time tracked in VLC can automatically contribute to my overall productivity rating without unduly distorting it, and without me having to go in and manually mark each video as “productive” or “not.”

Timing 2 is the result of a solid year of development by Daniel Alm, who left his job at Google to work full time on it. In the process he’s turned a useful tool into an indispensable one for freelancers and productivity nerds. If that sounds interesting, go check it out!


Tomates Time Management: Elegant Pomodoro Timer for Mac

If you’re a fan of the Pomodoro Technique, you’ll be interested in Tomates Time Manager. Version 4 is a great-looking menu bar app with detailed reporting, Touch Bar support, and a handy Today Extension.

If you’re not familiar with it, the Pomodoro Technique is a timer-based way of getting work done in 25-minute sprints with short breaks between, and then a nice long break after a set of four. I first tried the Pomodoro Technique many years ago and it worked well for me, but I didn’t stick with it. Over the years I went back to it a few times, but it still didn’t stick. It was only last year when issues with my ADHD caused me to desperately need a system exactly like this.

There are a plethora of good timers available for Mac and iOS, including the elegant Zen Timer on Mac (which I’ve mentioned here before) and Focus Time on iOS. What sets Tomates apart is the combination of elegant design and powerful utility. It allows customizable work and break times, Work Series counts, alarm sounds, and handles task names and reporting.

Version 4 introduces a Today Extension, providing an overview of your progress right in the Today View of Notification Center, tracking your tasks and sessions along with trophies for reaching your goals.

Reporting is also enhanced, with both task and time-based reports. The time-based reports can show today, this week (or this workweek), this month, or a custom time period. The reports can also now be printed or saved as beautiful PDFs. I’ll admit those reports aren’t something I really need hard copies of, but they are nice looking.

Lastly, version 4 adds Touch Bar support so you can work with the timer from the Touch Bar on your MacBook Pro. Manage and reset timers, and reset the session and goal counters with a tap.

Head to the Mac App Store to check out Tomates Time Management. $2.99 US isn’t a bad price to pay for something that could change the way you work.


SketchParty TV 4.0 with New Look, Improved Gameplay

When my family gets together, we like to play games. One game has been a mainstay of our gatherings for the last four years: SketchParty TV.

SketchParty TV is a multiplayer game similar to Pictionary which uses an iOS device as the marker and your Apple TV-connected television as the drawing board. If you have a 2nd or 3rd-gen Apple TV, you can use the iOS version with AirPlay Mirroring. For 4th-gen Apple TV owners, there’s a native Apple TV app that connects to the iOS version.

The 4.0 update to SketchParty TV is a big one, with a visual overhaul for iOS 9+, a redesigned canvas, updated scoring system with speed-based rewards, and full support for the Apple Pencil on iPad Pro devices.

The Team Setup interface was always usable, but it got a lot of special attention in this update. In addition to improved word list settings, entry of team members is easier and now you can drag to reorder and even switch between teams.

If you own a compatible iOS device and a 2nd-gen or higher Apple TV, SketchParty is an excellent game for friends and family gatherings. Right now it’s on sale, too, for $5.99 (normally $9.99). Check it out in the iTunes App Store.


Make Money Outside the Mac App Store

Developer Christian Tietze has published an excellent book titled Make Money Outside the Mac App Store. It focuses on the FastSpring payment and storefront service. If you’re a developer looking at using FastSpring to avoid the hassles and 30% cut of selling through the MAS (or are already using FastSpring and want to implement more advanced features), this is a great guide covering implementation, piracy protection, and more.

Permalink